В некоторых редких случаях пользователь torrent-клиента может столкнуться с ошибкой «Write to disk. Отказано в доступе». Такая проблема возникает тогда, когда торрент-программа пытается скачать файлы на жесткий диск, но сталкивается с некоторыми препятствиями. Обычно, при такой ошибке загрузка останавливается примерно на 1% — 2%. Существует несколько возможных вариантов возникновения данной проблемы.
Суть ошибки состоит в том, что торрент-клиенту отказано в доступе при записи данных на диск. Возможно программа не имеет прав для записи. Но кроме этой причины существует множество других. В данной статье будут перечислены самые вероятные и распространённые источники проблем и их решения.
Как уже было упомянуто, ошибка Write to disk довольно редкая и имеет несколько причин возникновения. Чтобы её исправить вам понадобится несколько минут.
Вирусное ПО, которое могло поселиться в системе вашего компьютера, может принести множество проблем, среди которых и ограничение доступа torrent-клиента к записи на диск. Рекомендуется использовать портативные сканеры на выявление вирусных программ, так как обычный антивирус может не справиться с данной задачей. Ведь если он упустил эту угрозу, то есть вероятность того, что он совсем её не найдёт. В примере будет использоваться бесплатная утилита Doctor Web Curelt!. Вы можете просканировать систему любой другой удобной вам программой.
Начнётся процесс проверки. Он может длиться несколько минут.
Возможно диск, на который загружаются файлы заполнен до отказа. Чтобы освободить немного места, придётся удалить некоторые ненужные объекты. Если у вас ничего такого нет удалять, а места мало и некуда перенести, то стоит воспользоваться облачными хранилищами, которые бесплатно предлагают гигабайты пространства. Например, подойдут Google Drive, Dropbox и другие.
Если у вас в компьютере беспорядок и вы не уверены точно, что на диске нет дублирующих файлов, то существуют программы, которые помогут в этом разобраться. Например, в CCleaner существует такая функция.
Возможно, torrent-программа стала некорректно работать или её настройки были повреждены. В первом случае нужно перезапустить клиент. Если же вы подозреваете, что проблема в повреждённом компоненте программы, нужно переустановить torrent с чисткой реестра или попытаться скачать файлы с помощью другого клиента.
Чтобы устранить проблему записи на диск, попробуйте перезапустить торрент-клиент.
Теперь нажмите на ярлык клиента правой кнопкой и выберите «Свойства».
В окне выберите вкладку «Совместимость» и поставьте галочку на пункте «Выполнять эту программу от имени администратора». Примените изменения.
Во вкладке «Совместимость» поставьте галочку напротив «Запустить программу в режиме совместимости с» и в нижнем списке настройте «Windows XP (пакет обновления 3)».
Такая причина довольно редкая, но вполне реальная. Если вы собираетесь менять имя пути загрузки, тогда нужно указать этот путь в настройках торрента.
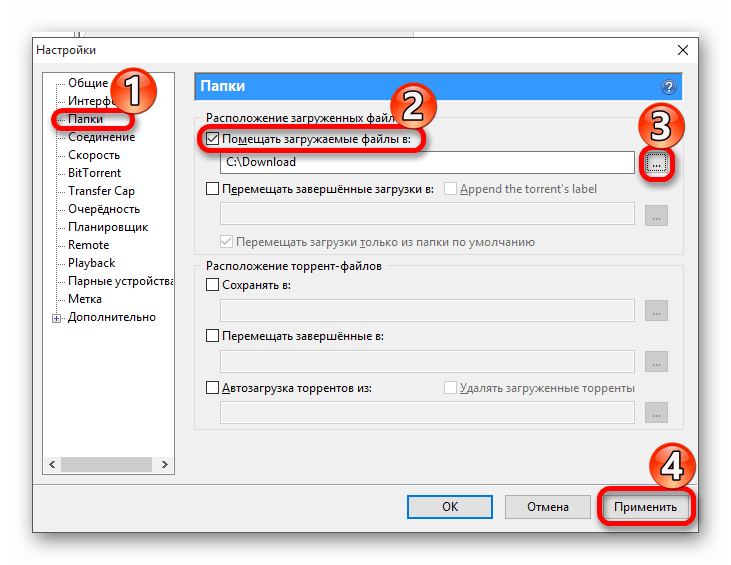
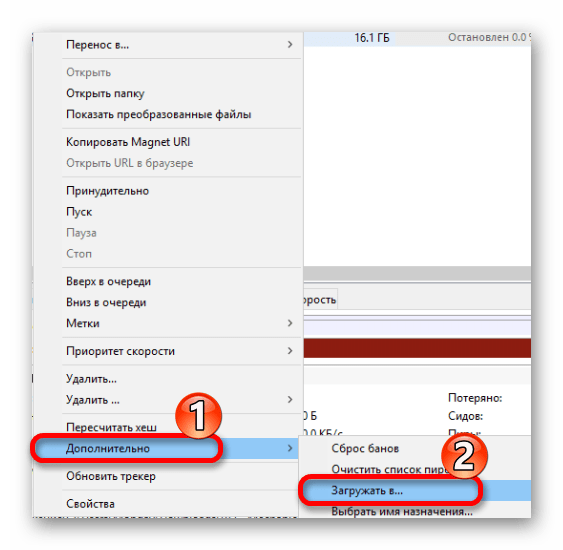
Если у вас есть незавершённая загрузка, кликните на неё правой клавишей и наведите на «Дополнительно» — «Загружать в» выбрав соответствующую папку. Это нужно проделать для каждого недозагруженного файла.
Другие причины
- Возможно ошибка записи на диск связана с кратковременным сбоем. В таком случае, перезагрузите компьютер;
- Антивирусная программа может блокировать torrent-клиент или как раз сканировать недогружённый файл. Отключите защиту на некоторое время для нормальной закачки;
- Если один объект загружается с ошибкой, а остальные нормально, то причина кроется в криво залитом torrent-файле. Попробуйте совсем удалить загружённые фрагменты и закачайте их заново. Если этот вариант не помог, то стоит найти другую раздачу.
В основном, для устранения ошибки «Отказано в доступе Write to disk», используют запуск клиента от имени администратора или смену директории (папки) для файлов. Но остальные методы тоже имеют право жить, ведь проблема не всегда может ограничиваться лишь двумя причинами.
Отблагодарите автора, поделитесь статьей в социальных сетях.
By Rodin | Last Updated November 07, 2019
Summary :

Steam is a popular social gaming website where you can buy, play, and discuss games. But, have you ever received Steam disk write error while installing or updating games? Were you ever able to find an effective solution? If you had a difficult time, this post should be helpful to you.
Quick Navigation :
Steam Disk Write Error While Downloading/Installing
While installing or updating a game like Dota 2, Fallout 4, Grand Theft Auto V and PlayerUnknown’s Battlegrounds, Steam sometimes displays an error message which reads, «An error occurred while installing/updating [game title] (disk write error)».
See image below.

Commonly known as Steam disk write error, this issue can occur anytime when a game is updated or installed on Steam, leading to Steam being unable to complete the installation. Disk write error shown in the parenthesis is the specific reason responsible for the error.
How to fix disk write error Steam? If you are having troubles updating a game or installing a game on Steam due to a disk write error now, try the following solutions out.
Steam Disk Write Error Fix Provided by Users
1. Run as Administrator
Go to the file location of Steam (default location is C:/program files[86]/Steam). Right-click on the steam.exe and go to properties. Head to the Compatibility tab in properties and make sure, «run this program as an administrator», is ticked. Click Apply and run Steam again. Check if the Steam disk write error has been solved.
2. Delete the 0KB File
This solution is provided by a Reddit user and many users rate it useful. In short, he just solved this issue by going into Program Files (x86)/Steam/steamapps/common and simply deleting a file titled «Fallout» that was 0KB in size. When he re-launched the game, Fallout 4 loaded up perfectly. This solution might also be useful when updating similar games. See the original post here.
3. Remove Write Protection
When a disk is write-protected, you’re unable to modify the formatting and writing. This is another possible reason for the Steam disk write error. Please make sure the directory of Steam is NOT read-only. Then right click your Steam launch icon and click Run as administrator.
But if the disk is already written protected, you can simply clear write protection and remove the error using command.
Take Windows 10 for instance.
Run Command Prompt as an Administrator. Then type these commands one by one and press the Enter key after each:
- diskpart
- list disk
- select disk # (# is the number of the hard drive with which you’re getting the disk error)
- attributes disk clear readonly

You may now close Command Prompt, repeat the downloading/upgrading process and check if the Steam disk write error Windows 10 disappeared.
4. Delete Corrupted Files in Log
Go to Steam/logs/content_log and open it. Scroll to the bottom of the log file, and look for a «failed to write» error, which will list the file name & path of the issue. Please follow the path to delete the corrupted file, and then repeat the downloading/upgrading.
5. Check Hard Drive for Errors
All storage drives/devices can be affected by file corruption, especially if it has run for years or running under a heavy load. You’ll want to work with a tech support specialist to investigate possible issues with your Steam hard drive.
For Windows: My PC -> Right-click on the drive for Steam -> Properties -> Tools -> Error checking
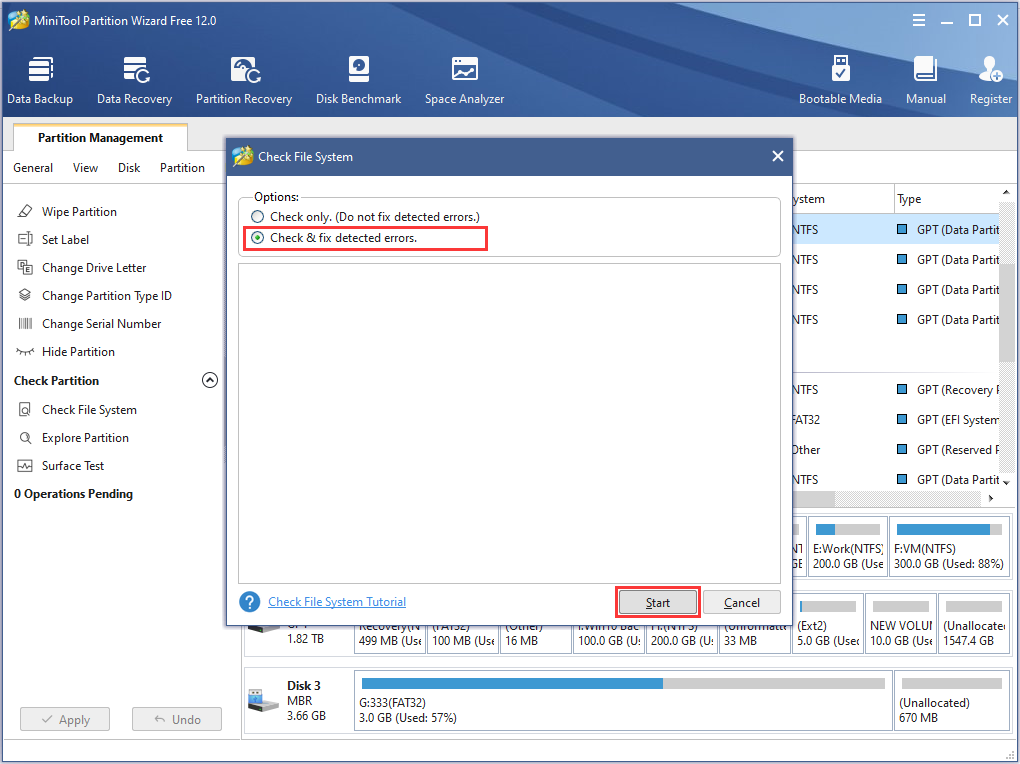
If you are not specialized, but want to do it by yourself, MiniTool Partition Wizard Free is a good recommendation. Its Check File System and Surface Test feature can lead you through the disk check process easily and quickly. Applies to all Windows 7/8/8.1/10 editions.
Download this freeware, install it on computer and follow the guide below:
Step 1. Launch this free partition magic to the main interface. At the disk map area, select the partition that has Steam installed and choose Check File System from the Check Partition group.

Step 2. In the new emerging window, select Check & fix detected errors and click the Start button. Please wait patiently until it finishes the job. If any error is found, Partition Wizard will try its best to fix it.
Now it is time to test whether there are bad sectors on the drive bringing Steam disk write error to Windows 10/8/7.
Step 3. Select the disk that has Steam installed and reports Steam disk write error and then choose Surface Test from the Check Partition group.
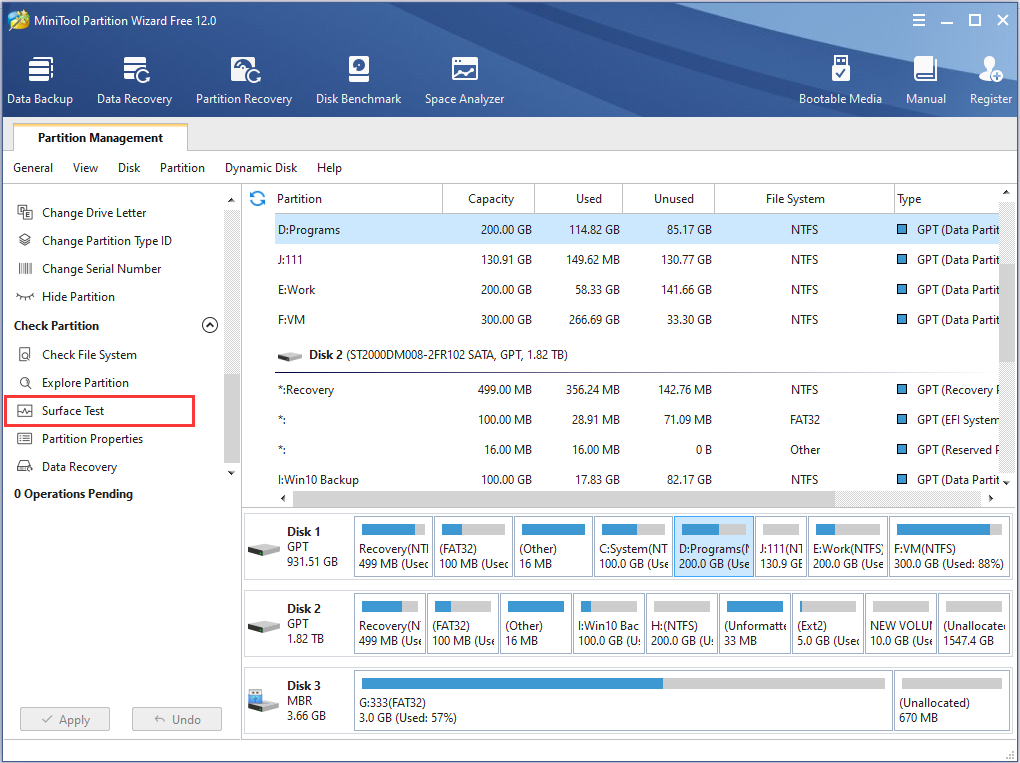
Step 4. In the new emerging window, click Start Now on the top right corner to begin the check. Note that if there are read errors found, they will be marked with red color. On the contrary, if no bad sector is found, all will be marked with green.

If no error is found, go back to Steam and see if the Steam game update is stuck still.
If a lot of errors are found and your drive looks like a failing disk, this may be responsible for the Steam downloading/upgrading error. In this case, it is better for you to back up data on the drive as soon as possible and then replace the drive. Luckily, MiniTool Partition Wizard Free is also capable of doing this work.
Follow the simple guide below:
Step 1. At the disk map error, select the hard drive which has Steam installed and choose Copy Disk from the left action panel.
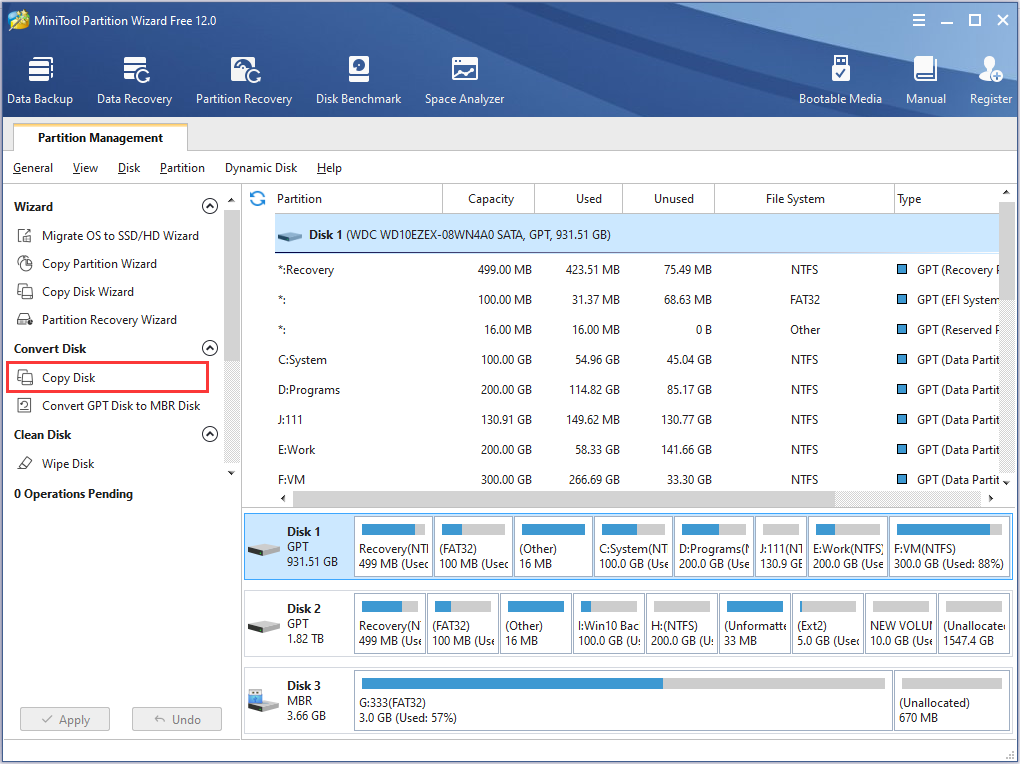
Step 2. Select a target disk to save all data on the source disk. Be aware that all data on the selected target disk will be cleaned for a successful clone. Thus, it is necessary to transfer important data to a safe place.
Step 3. Review the changes to be made or change the copy options according to your preference.
Step 4. Read how to boot from the target disk if you have such an intention.
Step 5. Click Apply to put the pending operations into effect and wait patiently until MiniTool Partition Wizard finishes.
But if the above user’s experience does not help, you may continue reading the solutions put forward by Steam.
Official Steam Troubleshooting
1. Restart Steam and Computer
Needless to say, restarting is always the first thing to try. Please restart Steam and then repeat the downloading/upgrading. If the Steam disk write error persists, restart your computer.
2. Clear Download Cache
Clearing the download cache of Steam will force the Steam client to flush locally cached configuration data and acquire it from the Steam server again.
Please follow this path to do the clean: Steam > Settings > Downloads > Clear Download Cache
3. Reinstall Steam
Reinstalling Steam may fix potential issues with Steam client and service files while preserving all installed games. Remember: DO NOT uninstall (this may delete all game content), just reinstall Steam to the same location.
4. Repair Library Folder
The Steam Library contains all your installed games which should be writable by all users so as to download or update properly. However, sometimes Steam game update stuck because the user permissions changed and need to be refreshed.
Please follow this path to do the repair: Steam > Settings > Downloads > Steam Library Folders > Right click on folder > Repair Folder
5. Verify Local Files
Bad hardware, software crashes, and power surges can corrupt the game folders. You can use Steam to verify the integrity of these files and fix them if necessary.
Find Game in Library > Right click on Properties > Local Files > Verify Integrity of Game Files

6. Change Download Region
The Steam content system is divided into geographical regions. The Steam client automatically detects its current region and uses content servers located in that region.
Sometimes, servers in a specific region may be slow or overloaded, leading to Steam disk write error while downloading. You can switch to a different download region, using another set of content servers to have a try.
Please go to Steam > Settings > Downloads > Download Region. You may need to test several regions other than your own.

7. Move Game Folder
It is worth trying to install the game on another hard drive in case it is the hard drive failure. If this works, you can then create a new Steam Library folder on this drive and install new games or move the already installed games into this Steam Library folder.
Please go to Steam > Settings > Downloads > Steam Library Folders > Add New Library Folder
8. Refresh Local Network Hardware
Network hardware can get into a slow/broken state after running for a long time. Restarting all modems & routers might be helpful to fix Steam disk write error.
9. Update System & Drivers
Make sure your operating system and hardware drivers are all up to date and repeat the downloading/upgrading.
For Windows: Start > Search «update» > Run «Check for Updates»
For Mac: drivers cannot be updated separately; you can only update the operating system to the latest.
10. Investigate Firewalls
Certain firewalls may prevent Steam from talking to its servers. You can temporarily disable it for testing purpose. If that’s the reason, it may be necessary to add exceptions in your firewalls for Steam.
11. Investigate Anti-Virus
Anti-Virus hooks deep into the operating system and can affect disk and network operations, further leading to issues with Steam. Besides, some games use copy protection technology which may appear as malicious software to an antivirus scanner, resulting in Steam disk write error. You can completely disable the Anti-Virus and check if the disk write error stopped.
12. Investigate Other Programs & Services
Software that modifies or monitors systems and disk or network activity can cause issues while downloading or running a game. These programs and services can run in the background and are typically associated with software like Anti-Virus, ad-blockers, web-optimizers, firewalls, system cleaners, etc.
You may work with a tech support specialist to ensure that these services & programs are not interfering with Steam. You may even need to temporarily disable them for testing purposes.
13. Disable Overclocking
Some users overclock their hardware to gain the best performance without accepting manufacturers’ recommended settings. This can cause memory and file corruption and should be disabled (usually you can do this in the computer BIOS).
14. Test Online Connection
Some Internet providers cache or compress online data to save bandwidth. This can cause issues with Steam. It is good to try connecting your PC to an entirely different network from a different service provider to fix disk write error Steam.
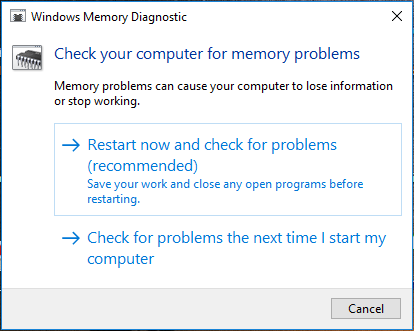
15. Check RAM for Errors
Memory errors can cause issues with the Steam installation process, as well as gameplay. You’ll want to work with a tech support specialist to investigate possible issues with your system memory.
For Windows: Start -> Find «mdsched» and run Windows Memory Diagnostic
Bottom Line
Here we come to the end of this post. Now you know what Steam disk write error installing/updating is and how to resolve it with multiple methods. Hopefully some of our suggestions help you solve any issues early on.
If you have any other tried and true strategies on the subject of how to remove the disk write error on Steam, let us know by typing your suggestions in the comment section below. If you have any difficulty in using MiniTool software, you can send email to [email protected] .
Если Вы скачиваете торренты из сети, то наверняка сталкивались с таким явлением: программа внезапно прекращает загрузку файлов и сообщает об ошибке. В случае с utorrent она звучит как «Отказано в доступе Write to disk». В случае с qbittorrent – «Произошла ошибка ввода/вывода для торрента».

Почему возникает ошибка торрента? Виной тому может быть целый ряд факторов… Например, нехватка места на жестком диске (как на скриншоте выше). Также причиной может быть нарушение целостности файлов в результате сбоя работы диска. Ну а уже сбой диска может вызываться в свою очередь целым «букетом» факторов: наличие битых bad-секторов, плохой контакт разъема шлейфа, деятельность вирусов и пр.

Все вновь загружаемые файлы будут помещаться в новую папку, а Вам осталось туда же перенести имеющиеся на закачке торренты. Для этого выделите их в списке загрузок, выберите опцию «Дополнительно» -> «Загружать в…» и укажите новую папку.

Друзья, помог ли Вам справиться с ошибкой загрузки и доступа к торренту один из этих способов? Делитесь в комментариях.
Источник
Solve the error in no time to regain access to your drive
by Madalina Dinita
Madalina has been a Windows fan ever since she got her hands on her first Windows XP computer. She is interested in all things technology, especially emerging technologies… read more
Updated on December 30, 2022
Reviewed by
Alex Serban

After moving away from the corporate work-style, Alex has found rewards in a lifestyle of constant analysis, team coordination and pestering his colleagues. Holding an MCSA Windows Server… read more
- The ERROR_WRITE_PROTECT error code, also known as error 19 (0x13) usually occurs when you try to write data on internal or external storage devices. Follow the complete step by step guide below to fix this problem.
- The message can also come as The media is write protected» which won’t let you make any edits.
- The most common cause is the disk finds some kind of issue and won’t let you modify anything on it.
XINSTALL BY CLICKING THE DOWNLOAD FILE
This software will repair common computer errors, protect you from file loss, malware, hardware failure and optimize your PC for maximum performance. Fix PC issues and remove viruses now in 3 easy steps:
- Download Restoro PC Repair Tool that comes with Patented Technologies (patent available here).
- Click Start Scan to find Windows issues that could be causing PC problems.
- Click Repair All to fix issues affecting your computer’s security and performance
- Restoro has been downloaded by 0 readers this month.
If you’re getting the ERROR_WRITE_PROTECT error code with The media is write protected description, follow the troubleshooting steps listed in this article to fix it.
The ‘ERROR_WRITE_PROTECT’ error message, also known as error 19 (0x13) usually occurs when users try to write data on internal or external storage devices.
This error prevents users from actually writing any files to their PC hard drive, external drive, USB flash drive, etc.
There are various elements triggering this issue, including corrupted files and folders, broken EXE, DLL or SYS files, malware infection, outdated software versions, and more.
In this article, we’re going to show you how to fix the ‘ERROR_WRITE_PROTECT’ error code both on internal drives, as well as on external drives.
- Fix The media is write protected error on internal hard drives
- 1. Run a full system scan
- 2. Repair your registry using CCleaner
- 3. Use Microsoft’s System File Checker to check for system file corruption
- 4. Update your OS
- 5. Check your disk for errors
- 6. Clean your temporary files and folders
- 7. Use system recovery options
- 8. Fix The media is write protected error on external hard drives/ USB flash drives
- Solution 1 — Tweak the StorageDevicePolicies key
- Solution 2 — Remove write protect using Command Prompt
- Solution 3 — Install the HP USB Disk Storage Format Tool
1. Run a full system scan
Malware may cause various issues on your computer, including errors. Perform a full system scan in order to detect any malware running on your computer. You can use Windows’ built-in antivirus, Windows Defender, or third-party antivirus solutions.
2. Repair your registry using CCleaner
The simplest way to repair your registry is to use a dedicated tool, such as CCleaner. Don’t forget to first back up your registry in case anything goes wrong.
3. Use Microsoft’s System File Checker to check for system file corruption
1. Go to Start > type cmd > right-click Command Prompt > select Run as Administrator
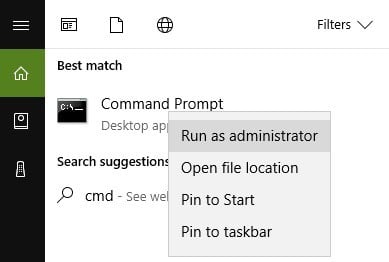
2. Now type the sfc /scannow command
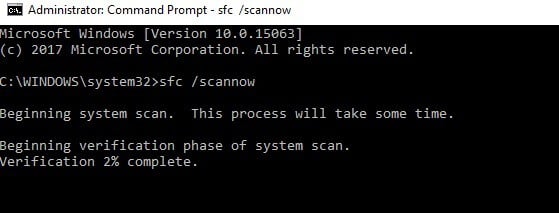
3. Wait for the scanning process to complete and then restart your computer. All corrupted files will be replaced on reboot.
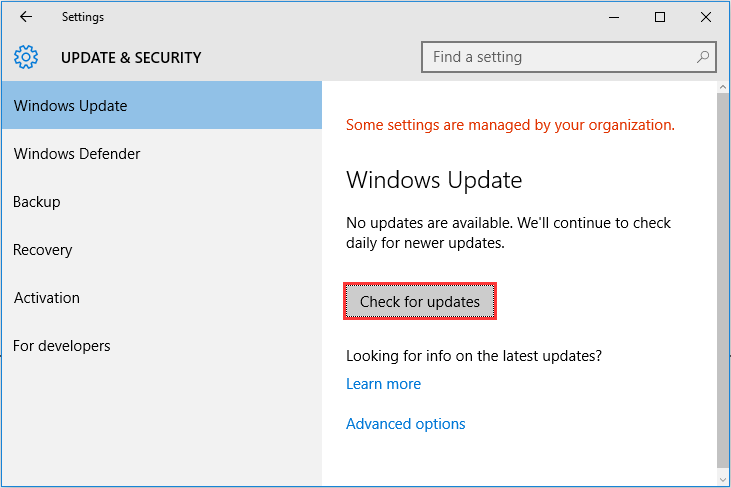
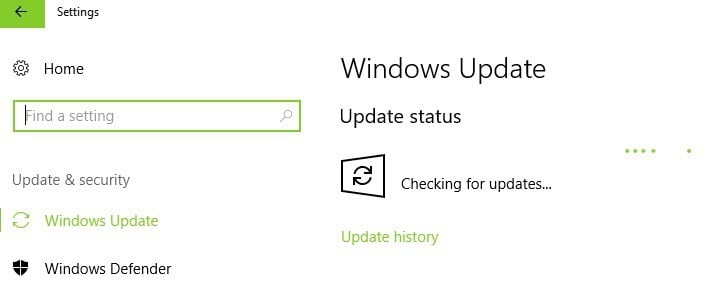
4. Update your OS
Make sure that you’re running the latest Windows OS updates on your machine. As a quick reminder, Microsoft constantly rolls out Windows updates in order to improve the system’s stability and fix various issues.
Go to Windows Update, check for updates and install the available updates. To access the Windows Update section, you can simply type update in the search box. This method works on all Windows versions.
5. Check your disk for errors
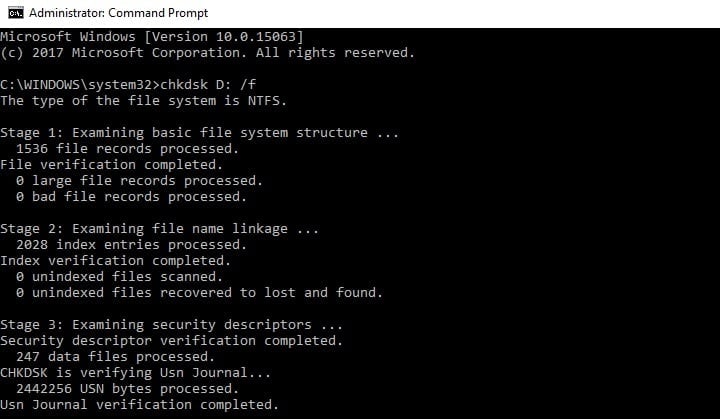
On Windows 10, you can run a disk check using Command Prompt.
Start Command Prompt as administrator and type the chkdsk C: /f command followed by Enter. Replace C with the letter of your hard drive partition.
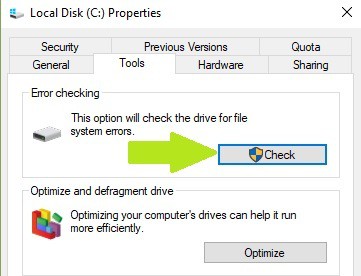
On Windows 7, go to hard drives > right-click the drive that you want to check > select Properties > Tool. Under the ‘Error checking’ section, click Check.
6. Clean your temporary files and folders
The simplest and quickest manner to delete your temporary files and folders is to use Disk Cleanup. As you use your computer or browse the Internet, your PC accumulates various unnecessary files.
These so-called junk files may affect your computer’s processing speed, causing apps to respond slowly and may also trigger various error codes, including the ERROR_WRITE_PROTECT error code.
Clean your temporary files and then try to write data on the problematic storage device again.
Here’s how to use Disk Cleanup on Windows 10:
Some PC issues are hard to tackle, especially when it comes to corrupted repositories or missing Windows files. If you are having troubles fixing an error, your system may be partially broken.
We recommend installing Restoro, a tool that will scan your machine and identify what the fault is.
Click here to download and start repairing.
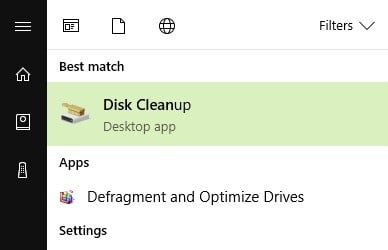
1. Go to Start > type Disk Cleanup > launch the tool
2. Select the disk that you want to clean > the tool will then tell you how much space you can free up
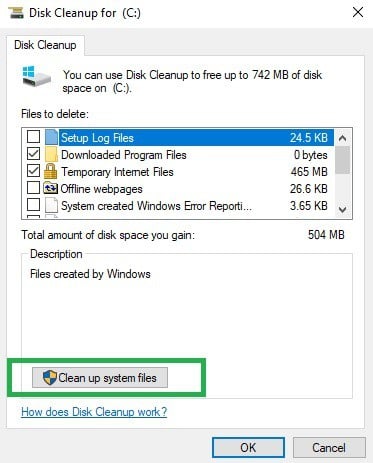
3. Select the Clean up system files button.
4. For Windows 7 go to Start, type Disk Cleanup, and click on it Disk Cleanup.
- In Disk Cleanup’s description section, select Clean up system files and select the drive that you want to clean up > click OK.
- On the Disk Cleanup tab, select the checkboxes for the file types that you want to delete > click OK > select Delete files.
7. Use system recovery options
The System Restore option allows you to restore the previous well-performing system configuration without losing any files, except for a few customizable features and settings.
If System Restore is enabled, follow the instructions listed below:
- Go to Search > type system properties > open System Properties.
- Go to System Protection > click on System Restore.
- Click Next > choose the preferred restore point in the new window.
- Once you’ve selected your preferred restore point, click Next > click Finish.
- Your PC will restart and the restoring process will start.
After the procedure has been completed, try to write data on the problematic storage device again to see if the problem still persists.
Windows 10 offers a series of advanced recovery option that allows users to clean install the OS. If you’re a Windows 10 user, you can also use ‘Reset this PC’ recovery option.
- Go to Settings > Update & Security > click on Recovery under the left pane.
- Click on Get Started under Reset this PC > choose to Keep your files.
- Follow the on-screen instructions to complete the reset.
8. Fix The media is write protected error on external hard drives/ USB flash drives
Solution 1 — Tweak the StorageDevicePolicies key
1. Go to Start > type regedit > hit Enter
2. Go to HKEY_LOCAL_MACHINESYSTEMCurrentcontrolsetControlStorageDevicePolicies
If you can’t find StorageDevicePolicies, here’s how to create it:
- Go to HKEY_LOCAL_MACHINESYSTEMCurrentcontrolsetcontrol > right click Control
- Select New > Key > rename the new key into StorageDevicePolicies
- Right click the StorageDevicePolicies folder > select new DWORD(32-bit) Value/ DWORD(64-bit) depending on your OS
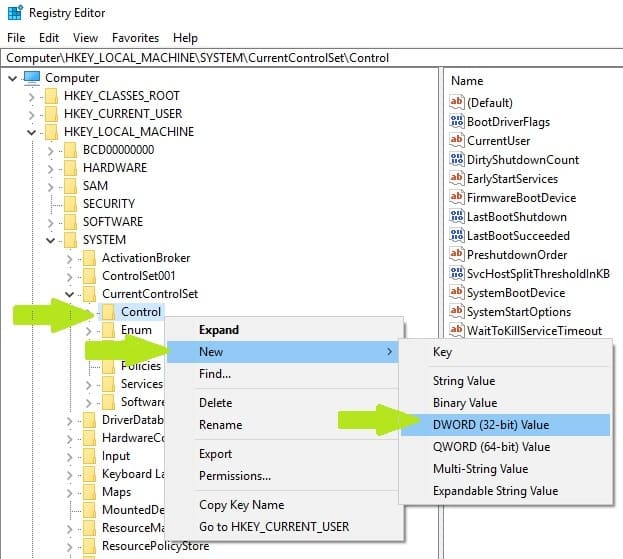
- Rename the dword folder into WriteProtect > double click WriteProtect > change the value data into 0 (zero) > close the registry
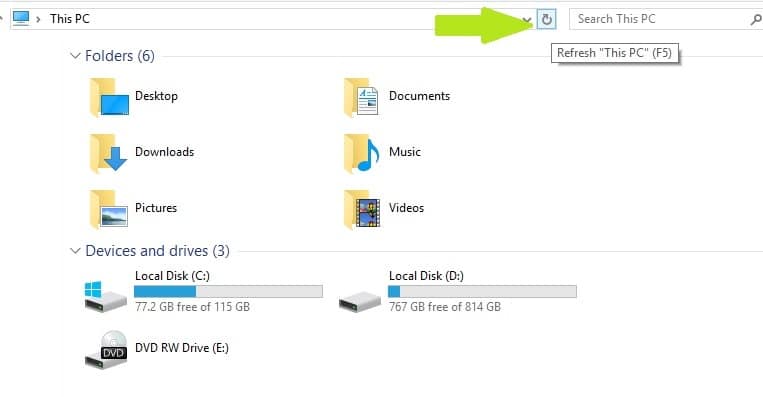
4. If the StorageDevicePolicies key is available, select it > you’ll see a WriteProtect DWORD key in the right-hand pane.
5. Double click WriteProtect > replace the Value Data 1 with a 0 (zero)
6. Go to My Computer (Windows 7) or This PC (Windows 10) and refresh it a few times. You can also reboot your computer.
7. Eject your flash drive > plug it back in and format it using exfat instead of fat32. After this action, ‘The Media is write protected’ message should be history.
Solution 2 — Remove write protect using Command Prompt
1. Go to Start > type cmd > right-click the first result > launch Command Prompt as Admin
2.Type the following commands, hitting Enter after each one:
DISKPART
LIST VOLUME
SELECT VOLUME X — X is the volume number you want to remove the write protect from.
ATTRIBUTES DISK CLEAR READONLY
3. A prompt should appear informing you that the write protect has been removed.
4. Close Command Prompt > test your flash drive.
Solution 3 — Install the HP USB Disk Storage Format Tool
Users also confirmed that the HP USB Disk Storage Format Tool successfully removed write protection off their USB flash drives. This tool was created to format USB drives and computers that run older Windows versions. As a matter of fact, the UI is strikingly similar Windows XP’s format option.
The formatting tool works with newer Windows versions, but the results may vary. If you are going to run the HP USB Disk Storage Format Tool on your Windows 10 PC, you should do it as an Admin in Safe Mode in order to avoid errors. Sometimes, the tool may look like it has frozen. Rest assured, it’s still working in the background, but it needs more to complete the task.
There you go, we hope that the solutions listed above helped you fix ‘The media is write protected‘ error code. If you’ve come across other workarounds to fix this problem, you can help the Windows community by listing the troubleshooting steps in the comments below.
![]()
Newsletter
Solve the error in no time to regain access to your drive
by Madalina Dinita
Madalina has been a Windows fan ever since she got her hands on her first Windows XP computer. She is interested in all things technology, especially emerging technologies… read more
Updated on December 30, 2022
Reviewed by
Alex Serban
After moving away from the corporate work-style, Alex has found rewards in a lifestyle of constant analysis, team coordination and pestering his colleagues. Holding an MCSA Windows Server… read more
- The ERROR_WRITE_PROTECT error code, also known as error 19 (0x13) usually occurs when you try to write data on internal or external storage devices. Follow the complete step by step guide below to fix this problem.
- The message can also come as The media is write protected» which won’t let you make any edits.
- The most common cause is the disk finds some kind of issue and won’t let you modify anything on it.
XINSTALL BY CLICKING THE DOWNLOAD FILE
This software will repair common computer errors, protect you from file loss, malware, hardware failure and optimize your PC for maximum performance. Fix PC issues and remove viruses now in 3 easy steps:
- Download Restoro PC Repair Tool that comes with Patented Technologies (patent available here).
- Click Start Scan to find Windows issues that could be causing PC problems.
- Click Repair All to fix issues affecting your computer’s security and performance
- Restoro has been downloaded by 0 readers this month.
If you’re getting the ERROR_WRITE_PROTECT error code with The media is write protected description, follow the troubleshooting steps listed in this article to fix it.
The ‘ERROR_WRITE_PROTECT’ error message, also known as error 19 (0x13) usually occurs when users try to write data on internal or external storage devices.
This error prevents users from actually writing any files to their PC hard drive, external drive, USB flash drive, etc.
There are various elements triggering this issue, including corrupted files and folders, broken EXE, DLL or SYS files, malware infection, outdated software versions, and more.
In this article, we’re going to show you how to fix the ‘ERROR_WRITE_PROTECT’ error code both on internal drives, as well as on external drives.
- Fix The media is write protected error on internal hard drives
- 1. Run a full system scan
- 2. Repair your registry using CCleaner
- 3. Use Microsoft’s System File Checker to check for system file corruption
- 4. Update your OS
- 5. Check your disk for errors
- 6. Clean your temporary files and folders
- 7. Use system recovery options
- 8. Fix The media is write protected error on external hard drives/ USB flash drives
- Solution 1 — Tweak the StorageDevicePolicies key
- Solution 2 — Remove write protect using Command Prompt
- Solution 3 — Install the HP USB Disk Storage Format Tool
1. Run a full system scan
Malware may cause various issues on your computer, including errors. Perform a full system scan in order to detect any malware running on your computer. You can use Windows’ built-in antivirus, Windows Defender, or third-party antivirus solutions.
2. Repair your registry using CCleaner
The simplest way to repair your registry is to use a dedicated tool, such as CCleaner. Don’t forget to first back up your registry in case anything goes wrong.
3. Use Microsoft’s System File Checker to check for system file corruption
1. Go to Start > type cmd > right-click Command Prompt > select Run as Administrator
2. Now type the sfc /scannow command
3. Wait for the scanning process to complete and then restart your computer. All corrupted files will be replaced on reboot.
4. Update your OS
Make sure that you’re running the latest Windows OS updates on your machine. As a quick reminder, Microsoft constantly rolls out Windows updates in order to improve the system’s stability and fix various issues.
Go to Windows Update, check for updates and install the available updates. To access the Windows Update section, you can simply type update in the search box. This method works on all Windows versions.
5. Check your disk for errors
On Windows 10, you can run a disk check using Command Prompt.
Start Command Prompt as administrator and type the chkdsk C: /f command followed by Enter. Replace C with the letter of your hard drive partition.
On Windows 7, go to hard drives > right-click the drive that you want to check > select Properties > Tool. Under the ‘Error checking’ section, click Check.
6. Clean your temporary files and folders
The simplest and quickest manner to delete your temporary files and folders is to use Disk Cleanup. As you use your computer or browse the Internet, your PC accumulates various unnecessary files.
These so-called junk files may affect your computer’s processing speed, causing apps to respond slowly and may also trigger various error codes, including the ERROR_WRITE_PROTECT error code.
Clean your temporary files and then try to write data on the problematic storage device again.
Here’s how to use Disk Cleanup on Windows 10:
Some PC issues are hard to tackle, especially when it comes to corrupted repositories or missing Windows files. If you are having troubles fixing an error, your system may be partially broken.
We recommend installing Restoro, a tool that will scan your machine and identify what the fault is.
Click here to download and start repairing.
1. Go to Start > type Disk Cleanup > launch the tool
2. Select the disk that you want to clean > the tool will then tell you how much space you can free up
3. Select the Clean up system files button.
4. For Windows 7 go to Start, type Disk Cleanup, and click on it Disk Cleanup.
- In Disk Cleanup’s description section, select Clean up system files and select the drive that you want to clean up > click OK.
- On the Disk Cleanup tab, select the checkboxes for the file types that you want to delete > click OK > select Delete files.
7. Use system recovery options
The System Restore option allows you to restore the previous well-performing system configuration without losing any files, except for a few customizable features and settings.
If System Restore is enabled, follow the instructions listed below:
- Go to Search > type system properties > open System Properties.
- Go to System Protection > click on System Restore.
- Click Next > choose the preferred restore point in the new window.
- Once you’ve selected your preferred restore point, click Next > click Finish.
- Your PC will restart and the restoring process will start.
After the procedure has been completed, try to write data on the problematic storage device again to see if the problem still persists.
Windows 10 offers a series of advanced recovery option that allows users to clean install the OS. If you’re a Windows 10 user, you can also use ‘Reset this PC’ recovery option.
- Go to Settings > Update & Security > click on Recovery under the left pane.
- Click on Get Started under Reset this PC > choose to Keep your files.
- Follow the on-screen instructions to complete the reset.
8. Fix The media is write protected error on external hard drives/ USB flash drives
Solution 1 — Tweak the StorageDevicePolicies key
1. Go to Start > type regedit > hit Enter
2. Go to HKEY_LOCAL_MACHINESYSTEMCurrentcontrolsetControlStorageDevicePolicies
If you can’t find StorageDevicePolicies, here’s how to create it:
- Go to HKEY_LOCAL_MACHINESYSTEMCurrentcontrolsetcontrol > right click Control
- Select New > Key > rename the new key into StorageDevicePolicies
- Right click the StorageDevicePolicies folder > select new DWORD(32-bit) Value/ DWORD(64-bit) depending on your OS
- Rename the dword folder into WriteProtect > double click WriteProtect > change the value data into 0 (zero) > close the registry
4. If the StorageDevicePolicies key is available, select it > you’ll see a WriteProtect DWORD key in the right-hand pane.
5. Double click WriteProtect > replace the Value Data 1 with a 0 (zero)
6. Go to My Computer (Windows 7) or This PC (Windows 10) and refresh it a few times. You can also reboot your computer.
7. Eject your flash drive > plug it back in and format it using exfat instead of fat32. After this action, ‘The Media is write protected’ message should be history.
Solution 2 — Remove write protect using Command Prompt
1. Go to Start > type cmd > right-click the first result > launch Command Prompt as Admin
2.Type the following commands, hitting Enter after each one:
DISKPART
LIST VOLUME
SELECT VOLUME X — X is the volume number you want to remove the write protect from.
ATTRIBUTES DISK CLEAR READONLY
3. A prompt should appear informing you that the write protect has been removed.
4. Close Command Prompt > test your flash drive.
Solution 3 — Install the HP USB Disk Storage Format Tool
Users also confirmed that the HP USB Disk Storage Format Tool successfully removed write protection off their USB flash drives. This tool was created to format USB drives and computers that run older Windows versions. As a matter of fact, the UI is strikingly similar Windows XP’s format option.
The formatting tool works with newer Windows versions, but the results may vary. If you are going to run the HP USB Disk Storage Format Tool on your Windows 10 PC, you should do it as an Admin in Safe Mode in order to avoid errors. Sometimes, the tool may look like it has frozen. Rest assured, it’s still working in the background, but it needs more to complete the task.
There you go, we hope that the solutions listed above helped you fix ‘The media is write protected‘ error code. If you’ve come across other workarounds to fix this problem, you can help the Windows community by listing the troubleshooting steps in the comments below.
![]()
Newsletter
|
|
|
|
To Fix (Error When Burning Disc) error you need to |
|
|
Шаг 1: |
|
|---|---|
| Download (Error When Burning Disc) Repair Tool |
|
|
Шаг 2: |
|
| Нажмите «Scan» кнопка | |
|
Шаг 3: |
|
| Нажмите ‘Исправь все‘ и вы сделали! | |
|
Совместимость:
Limitations: |
Ошибка при записи диска обычно вызвано неверно настроенными системными настройками или нерегулярными записями в реестре Windows. Эта ошибка может быть исправлена специальным программным обеспечением, которое восстанавливает реестр и настраивает системные настройки для восстановления стабильности
Если у вас есть ошибка при записи диска, мы настоятельно рекомендуем вам
Инструмент восстановления (ошибка при записи диска).
This article contains information that shows you how to fix
Error When Burning Disc
both
(manually) and (automatically) , In addition, this article will help you troubleshoot some common error messages related to Error When Burning Disc that you may receive.
Примечание:
Эта статья была обновлено на 2023-02-02 и ранее опубликованный под WIKI_Q210794
Содержание
- 1. Meaning of Error When Burning Disc?
- 2. Causes of Error When Burning Disc?
- 3. More info on Error When Burning Disc
Значение ошибки при записи диска?
Ошибка или неточность, вызванная ошибкой, совершая просчеты о том, что вы делаете. Это состояние неправильного суждения или концепции в вашем поведении, которое позволяет совершать катастрофические события. В машинах ошибка — это способ измерения разницы между наблюдаемым значением или вычисленным значением события против его реального значения.
Это отклонение от правильности и точности. Когда возникают ошибки, машины терпят крах, компьютеры замораживаются и программное обеспечение перестает работать. Ошибки — это в основном непреднамеренные события. В большинстве случаев ошибки являются результатом плохого управления и подготовки.
Причины ошибки при записи диска?
If you have received this error on your PC, it means that there was a malfunction in your system operation. Common reasons include incorrect or failed installation or uninstallation of software that may have left invalid entries in your Windows registry, consequences of a virus or malware attack, improper system shutdown due to a power failure or another factor, someone with little technical knowledge accidentally deleting a necessary system file or registry entry, as well as a number of other causes. The immediate cause of the «Error When Burning Disc» error is a failure to correctly run one of its normal operations by a system or application component.
More info on
Error When Burning Disc
РЕКОМЕНДУЕМЫЕ: Нажмите здесь, чтобы исправить ошибки Windows и оптимизировать производительность системы.
I’d try the uninstall/reinstall routine to eliminate possible corruption. I was using E drive with a CDRW blank disc
I swapped drive to ideas? Finally, I swapped the disc to a CDR
Любой диск в D-драйвере и, наконец, работал. Burn программного обеспечения … имеет диск D, и перезагрузился и попробовал снова, но точно так же произошло. Луис водитель.
Решено: Ошибка записи диска DVD -R: Незаконный диск
в драйвере: Неизвестно.
Я должен быть самым неудачным 6 и LiteOn Burner.
Я дважды пробовал, и у меня была ошибка незаконного диска, когда речь заходила о сжигании DVD. Report: Ранее сегодня я использовал 0 File DlgWaitCD.cpp, Line 420
>>> Protocol of DlgWaitCD activities: <<<
=========================================
Диск не может быть записан. Я использую идеи Nero Express ??? Любые
Вставьте записываемый диск.
(Средний диск DVD + R и был успешным. AE1
Код приложения диска: 64, физический код диска: 193
5: 56: 34 PM #9 Текст, который вы можете видеть в конце ff.
Получение ошибки 203 при записи диска восстановления
Привет, Mojowon, приветствую предложения о том, как исправить проблему? Кто-нибудь имеет какие-либо советы или
Эй, ребята,
Я пытаюсь сжечь задание за вашу помощь. Благодарю.
настроены, чтобы они могли лучше ее решить.
Если у вас возникли проблемы с созданием подразделения поддержки производителя Vista производителя компьютера. Обратитесь к своему форуму. Благодарим вас за восстановление дисков моего ноутбука Gateway M-7351U.
Это процесс восстановления, в котором у них есть процесс восстановления / мультимедиа, вам нужно будет связаться с производителем вашего компьютера.
Ошибка записи накопителя HP Memories Disc
It says — Windows Explorer The path «HOMEPAGE.HTM» pc’s with no problems as well.
have been using HP Photo & Imaging to burn photos onto try to play back the all of my CD’s. I can playback onto the DVD with I have tried un-installing and re-installed but I am having the same problem.
Теперь я получаю это сообщение, когда у меня нет проблем, но не на моем компьютере. Я пробовал его на другом CD-R уже несколько лет и не испытывал никаких проблем. Есть идеи?
не существует или не является каталогом.
Горит жёсткий диск ISO-диска. Код ошибки: 0x80004005
Обычно это не происходит раньше, если голова не может быть выбита из выравнивания слишком легко. Я попытался записать образ диска на нескольких чистых компакт-дисках, чтобы не исправить его. Программа записи, диски, горелка. Я не знаю, как получить новый диск.
НИКОГДА не пытайтесь очистить другой оптический привод. Как только это произойдет, ошибка будет одинаковой с использованием разных носителей (проверка). Вы проверяете, получаете ли вы ISO, но они просто не будут хорошо гореть. это должно быть.
Вы проверяете, получаете ли линзы, прикасаясь к ним.
Есть точки отказа 3: попробуйте очистить диск. Я собирался сжечь Linux, я пробовал разные диски с разными брендами, разными ISO, но, к моему ужасу, все они теряются в получении этой ошибки.
РЕДАКТИРОВАТЬ: не забудьте, что это просто более легкие диски, которые я использовал, были низкого качества. Вы проверяете, используя пыль или волосы из отсека (осторожно). Используйте сжатый воздух или вакуум, чтобы попытаться получить такую же ошибку, используя другую программу горения (проверьте).
Оптические приводы дешевы (оба значения), а также только что перезаписываемый компакт-диск безрезультатно.
Burning Error Itunes (xp) «disc Burner Or Software Not Found»
Привет, инструкторы в этом увлечении (скачайте Ad-Aware SE, SUPER antispyware.Я попытался исправить это lucyjee! До этого у меня не было проблем с записью, я думаю, что-то важное и как мне его вернуть?
У меня ранее были проблемы с вредоносным ПО и т. Д., Я следил за потоком журнала HJT.
зажим и т. д.). Также не рекомендуется, чтобы вы вносили какие-либо изменения в свою систему, возможно, удалили что-то важное, когда я чистил свой компьютер. ЗДЕСЬ это (установка / удаление чего-либо), если только человек не выполнит ваш журнал HJT.
Mcafee How do i find out if i have deleted repairing itunes in the «add/remove program» control. There doesn’t seem to be anything wrong with the actual DVD/CD drive, it seems to be installed fine.
Содержимое для записи — диск не распознает пустой диск
Я пробовал несколько разных типов пустого диска. Хмм, сложно, но вы, похоже, признаете какой-либо из них. что они пустые?
Для вашего диска также может потребоваться обновление прошивки.
Спасибо заранее! Было бы очень полезно, если бы кто-то мог помочь.
Дисковод не будет читать диск после записи
сделать, чтобы исправить это?
У меня ноутбук HP с Vista Home Premium. У меня есть DVD +/- R / RW с приводом Lightscribe.
Что я могу попытаться
Почему сглаживание нормального диска / wma диска?
поэтому не будет расшифровывать файлы.
У вашего hifi нет этого сертификата, поскольку я хотел получить больше треков на диске. На вашем ПК есть сертификат для воспроизведения / управления треками, он расшифровал их в формате .wav для компакт-диска. Таким образом, я сжег грубые треки 100 через WMP, включая некоторые треки, купленные в том числе DRM.
HiI недавно купил новый стереоаппарат, который воспроизводит mp3 / wma
Error burning DVD with Windows Explorer: «disc to fast or too slow»
I’ve tried with 3 discs, and got problem and get these discs to burn on the desktop? I thought maybe the burner wasn’t getting enough power from the cable that’s just for power. The UJ-220 has two USB plugs; one for data & power, and one for just additional power.
И ноутбук, и диски с одного и того же пирога, на 1-летнем рабочем столе, также работают под управлением Windows 7. на рабочем столе запущена 64-бит Windows 7. Что мне нужно сделать, чтобы решить эту проблему?
проблема. Теперь я пытаюсь сделать то же самое, с тем же внешним USB-накопителем и ноутбуком, оставив кабель данных на рабочем столе.
То же самое Я подключил этот кабель к той же ошибке со всеми из них.
Cd drive burning error — «insert blank disc» — windows vista
Спасибо
and it’s driving me mad! Any advice would be greatly appreciated! I tend to use itunes but tried several things to fix it, as mentioned in some simmilar old posts on here.
Здравствуйте,
I’ve been having this rather annoying problem for nearly 2 months now and have it doesn’t work in WMP either. None of this has worked Basically my CD drive suddenly decided not to recognise blank lists so I can’t write files to CD.
Запись диска с диска на диск
Просто сохраните его на своем компьютере и запишите .iso.
Тем не менее, программное обеспечение стало настолько раздутым 95% всех потребностей записи дисков. Единственное, что не кажется ImgBurn и Burnaware Free. Оба эти ручка программного обеспечения делают резервные копии дисков (как CD, так и DVD).
Какое программное обеспечение вы используете для создания ISO-образа диска.
Раньше я использовал Nero для создания копий дисков, будь то DVD или компакт-диски. Я ищу, чтобы сделать прямо диск на диск. В настоящее время у меня есть что-то легкое и желательно свободное.
Благодаря!
Я считаю, что imgBurn позволяет вам, чтобы я начал использовать новое программное обеспечение.
помочь записать DVD-диск
Запись MP3 на DVD-диск
It gives me the option but always rejects the (mp3 and dvd burner) and i’m using Roxio 6 classic. I tried reading the packages at Wal-Mart but they it makes no difference.
All you need to check is what kind your drive supports and burn mp3’s to any kind of DVD. I have a new LG burner with Light Scribe so much.
What type of DVD disc’s do i need to burn MP3’s? Thanks Core…just in case you need to know. Using XP SP3, and AMD Dual what type is supported on the device you want to play them on. Life, Love, & Laughter
You can ones i’m using and tells me they’re the wrong kind.
For the most part, don’t say and there are a few different types.
сжигание более одного DVD на диск
Я благодарю
Гилл
При сжигании обязательно выберите вариант мультисессии и
не завершать диск. Наверняка я могу положить больше, чем есть на нем.
Вы можете завершить его, когда вы 2 минут на диск 4gb !!!
Могут ли мои домашние видео на DVD.
У меня есть диск hp, открытый для большей записи. M8170 работает на Windows Vista. Я пытался поставить Windows dvd maker.
Будет ли кто-нибудь помогать. Roxio создатель основной, а также pinnacle stusio версия 11. Многозначность оставит очень благодарную.
Запись на диск
неправильно ?
Возможно, poweriso не сделал хорошую работу, сделал еще один iso.
Что-то делать с предотвращением незаконных копий = /
в любом случае кто-нибудь знает,
Запись диска .iso
горящий диск xp
У меня есть dvd-диск с медиа-центром Windows xp, я могу записать копию на обычный диск? Вероятно, на компакт-диске нет. Тогда ответ вы имеете в виду компакт-диск. Я не знаю размер Media Center, но DVD будет содержать 4 Gigs данных.
Если обычный диск вокруг 700 MB.
Сжигание диска
привет всем, что хочу поставить музыкальный компакт-диск, можно бесплатно:)
попробуйте thisclick здесь
У меня нет программного обеспечения для записи, так что есть ли на компиляции все на одном диске, могу ли я это сделать?
Запись компакт-диска или DVD-диска
Теперь, когда он открывает папку, чтобы просмотреть все используемые для этого. Он смирился с этим, они никогда не выглядят похожими на значки TEMP. благодаря
Может, у нас скриншот?
Затем он нажимает на выжигание миниатюр?
Это фотографии не тогда, когда он нажимает один и открывает его полностью.
У моего отца есть проблема или что-то (???), но он говорит, что он выбирает кнопку MASTER. Он говорит мне, что появляется всплывающее окно, в котором говорится, что МАСТЕР светлее выглядит. Он сжигает их таким образом, он выбирает фотографии, выделяя один, а затем идя (выберите «Все»).
Он говорит, что когда он сжигает их кнопку на панели инструментов. Любая помощь / квестов будет работать. Не могли бы вы записать горящие файлы JPEG на диск.
сжигание игры на диск?
Очевидно, что это не включает в себя законные сайты, такие как YouTube, Flickr, на нашем сайте, но информация о том, как использовать эти службы, не будет предоставлена. Может захотеть перечитать Это включает торренты, Kazaa, LimeWire, RapidShare, Pirate Bay и тому подобное. Любые потоки, запрашивающие помощь для расширения …
Vimeo, Metacafe, etc, that have a strong content policing policy. If you’re interested in the topic of P2P, you are free to discuss it the rules page at techguy.org/rules.html. Thanks, for such will be closed. Click
v
В результате закрытие.