Native Instruments Absynth 5 Reference Manual
![]()
The information in this document is subject to change without notice and does not represent a commitment on the part of Native Instruments GmbH. The software described by this document is subject to a License Agreement and may not be copied to other media. No part of this publication may be copied, reproduced or otherwise transmitted or recorded, for any purpose, without prior written permission by Native Instruments GmbH, hereinafter referred to as Native Instruments. All product and company names are ™ or ® trademarks of their respective owners.
Manual written by Nicolas Sidi
Document Version: 1.0 (10/2009)
Product Version: 5.0 (10/2009)
Special thanks to the Beta Test Team, who were invaluable not just in tracking down bugs, but in making this a better product.

Native Instruments GmbH Schlesische Str. 28 D-10997 Berlin Germany
Native Instruments North America, Inc. 5631 Hollywood Boulevard
Los Angeles, CA 90028 USA sales@native-instruments.com www.native-instruments.com
© Native Instruments GmbH, 2009. All rights reserved.
Table Of Content
1 Welcome to ABSYNTH 5.
What is ABSYNTH.
What’s New in ABSYNTH 5.
The ABSYNTH 5 Documentation.
2 Control Elements and Areas.
Windows, Pages, Panels, and Tabs.
Buttons and Switches.
Menus and Selectors.
Sliders and Knobs.
Application Menu Bar.
Top Row: Global Controls.
ABSYNTH 5 Reference Manual – IV
Input and Output Level Meters .
Bottom Row: Sound Management.
File and Edit Menus .
Sound Name Display and Sound Menu .
Previous/Next Sound Buttons .
Mutate and Retry Buttons .
Save and Save As Buttons .
Database Activity Indicator . .
Signal flow . in the Patch
Combining Modules in the Channels
Channel Level controls
Surround Pan Switch
Mono Mode and Poly Mode in the Master Channel
Common . Features for all Modules
Panels and Tabs
Common . Features in Many Modules
Waveform Selector and Waveform Selection dialog
Frequency Menu and Frequency Control
Anti — Alias Switch
Oscillator‘s Panels and Tabs
ABSYNTH 5 Reference Manual – V
Oscillator’s Edit Menu . .
Sync Granular Mode.
Filter’s Panels and Tabs.
Feedback Loop and Feedback Panel.
6 Effect Window
ABSYNTH 5 Reference Manual – VI
Change of Status and Selecting an Effect . .
Modulation and Sensitivity Control.
Grain Cloud Parameters.
Waveform Page, Spectrum Page, Morph Page.
Creating New Waves.
Tools in the Waveform Page . .
Transform menu (Waveform Page) .
Tools in Spectrum Page.
Transform menu (Spectrum Page).
ABSYNTH 5 Reference Manual – VII
8 Envelope Window.
Fundamentals for Operation.
Selecting an Envelope.
Copying and Inserting Envelopes.
Breakpoints, Transitions/Steps, Sync.
Creating and Deleting Breakpoints . .
Control Driven Envelopes.
Controlling the Master Envelope .
Expand to Rhythm… .
Generate AR Pulse… . .
ABSYNTH 5 Reference Manual – VIII
Save as Template . .
Initialize Selected Envelope .
Delete Selected Envelope . .
Channel Parameters Section . .
Master Parameters Section.
Global Settings Bar.
Automation in ABSYNTH 5: Macro Controls .
Creating a User-defined Tuning.
ABSYNTH 5 Reference Manual – IX
Audio Mod as Envelope Follower .
Audio Mod as Trigger . .
11 The Browser and Attributes Windows.
The Attributes Concept and the KORE SOUND.
Searching and Loading Sounds with the Browser.
Mini — Patch View
Mutation Controls in Other Parts of the GUI
Defining . Attributes and Saving KORE SOUNDS
Once the Recording Is Finished
Appendix A – How . to Work with Attributes
The Instrument . Column
The Source . Column
ABSYNTH 5 Reference Manual – X
The Timbre Column.
The Articulation Column.
The Genre Column.
14 Appendix B – Attributes Reference.
ABSYNTH 5 Reference Manual – XI
1 Welcome to ABSYNTH 5!
We at Native Instruments would like to thank you for purchasing ABSYNTH – it’s because of customers like you that we can continue developing ground-breaking music software. We hope that this reference manual will provide you with all the information needed to make use of ABSYNTH 5 to its full capacity.
1.1 What is ABSYNTH?
ABSYNTH is a synthesizer capable of producing some of the most daring sounds. Whether you are developing a film soundtrack or want to create striking leads – ABSYNTH 5 always has the right sound for you. The semi-modular design allows you to combine oscillators, modulation sources and filters in any way you want. You can create unusual and dynamic sounds by combining the numerous effects and modulation possibilities in various ways. Endless evolving soundscapes and eccentric pads made up ABSYNTH’s legend. The new Aetherizer effect and filter feedback bring ABSYNTH 5 to a new level in penetrating sound design. Or you can simply navigate through the huge ABSYNTH 5 Factory Library, containing more than 1700 fine-shaped presets in the KORE SOUND® format. Moreover, the new Mutator feature allows you to create whole new sounds based on a favorite and the attributes you choose!
Dedicated Macro Controls allow you to operate several parameters at the touch of a button or just by pressing one key on your MIDI keyboard. Additionally everything is fully automatable in your audio MIDI sequencer allowing you to trigger your sounds into action with full project recall.
Even with all these possibilities, getting the right sound from ABSYNTH 5 is always quick and intuitive using the Browser. Simply choose the characteristics for your desired sound and let ABSYNTH 5 find the perfect creation for you. Coupled with the new Mutator and Finetuning controls, the Browser might be all you need to get the perfect sound. If you want to tweak or program your own sounds, the clear interface structure lets you quickly find important operating features and always keep them in view. All this allows you to keep concentrating on what this is all about: realizing your musical ideas!
We hope you enjoy ABSYNTH 5 as much as we do.
– The ABSYNTH 5 Team at Native Instruments.
ABSYNTH 5 Reference Manual – 12
1.2 What’s New in ABSYNTH 5?
Here is a short overview of the new features in ABSYNTH 5 compared to ABSYNTH 4:
•• The Mutator: This powerful feature introduces a totally new approach to sound design with ABSYNTH. With the Mutator, you can let ABSYNTH automatically generate new Sounds somewhere between the current Sound and other Sounds from the Library.
•• New Aetherizer effect: This amazing effect combines a granular-based feedback with a post-delay section. Moreover, all its parameters can be both randomized and modulated.
•• New Cloud filter: This is the little brother of the new Aetherizer effect, for use in the Filter modules within the Patch Window.
•• New Supercomb filter: This filter type extends the capacities of the Comb filter (still available), using some of the characteristics of the Resonators and Pipe Delay effects.
•• New feedback loop for many filter types: LPF 2 Pole, LPF 4 Pole, LPF 8 Pole, Supercomb, Allpass 2, Allpass 4, Allpass 8. Filter feedback allows you to insert a sound modulator like a Waveshaper, Frequency shifter or Ring modulator in the resonance path, giving your filters custom distortions, even ones never heard before.
•• Reorganized Filter, Modulator and Waveshaper modules: These modules now present a unified interface and propose a new organization for their menus.
•• Support for Windows XP/Vista 64-bit operating systems.
% If you are particularly interested in the new sounds ABSYNTH 5shas to offer, type “absynth5” in the relevant Search Field in the ABSYNTH Browser. This will narrow the Search
Result List down to the new Sounds in ABSYNTH 5.
ABSYNTH 5 Reference Manual – 13
1.3 The ABSYNTH 5 Documentation
1.3.1 In this Manual
What you are reading right now is the Reference Manual that will give you an in-depth description of all commands and functions to be found in ABSYNTH 5.
This Reference Manual is divided into three parts:
•• The first part is the introduction, which you are reading right now.
•• Chapters 2 to 12 are the reference itself.
•• Chapters 13 and 14 are appendixes relating to the work with Attributes.
1.3.2 Other Documentation
For an comprehensive introduction to ABSYNTH 5, please refer to the ABSYNTH 5 Getting Started guide, which is both copied to the ABSYNTH 5 folder on your hard drive during the installation and available as paperback in the product box. The Getting Started guide provides you with necessary information about the installation and setup procedures. It also presents you the important concepts implemented in ABSYNTH 5 and offers a selection of Quick Starts, introducing you to some important workflows in ABSYNTH 5.
We recommend you to read the Getting Started guide first. If you have any doubt about a command, control element or function of ABSYNTH 5, please refer to this Reference Manual.
ABSYNTH 5 Reference Manual – 14

1.3.3 Formatting Conventions
This section will introduce you to the signage and text highlighting used in this manual.
This manual uses particular formatting to point out special facts and to warn you of potential issues. The icons introducing these notes let you see what kind of information is to be expected:
Whenever this exclamation mark icon appears, you should read the corresponding note carefully and follow the instructions and hints given there if applicable.
This light bulb icon indicates that a note contains useful extra information. This information may often help you to solve a task more efficiently, but does not necessarily apply to the setup or operating system you are using. However, it should be worth reading for most users.
In this manual, distinctive formatting has been applied in order to let you recognize certain elements in the text at a glance:
•• Menu item: Items from ABSYNTH 5’s menus and lists are printed in italics.
•• Important concepts: On first occurrence important concepts are printed in bold .
•• Results of actions are introduced by an arrow (→).
ABSYNTH 5 Reference Manual – 15
2 Control Elements and Areas
On the ABSYNTH 5 user interface you will find various control elements which allow for customizing the interface itself, to run functions or modify values. This section provides you with an introduction to nomenclature, elements, and instructions for their use.
% If the mouse cursor is not in a text or value field, your computer keyboard triggers MIDI notes. Use the keyboard letters to play ABSYNTH 5. If the Virtual Keyboard is displayed,
you can see the corresponding keys being pressed while you play on your computer keyboard.
2.1 Windows, Pages, Panels, and Tabs
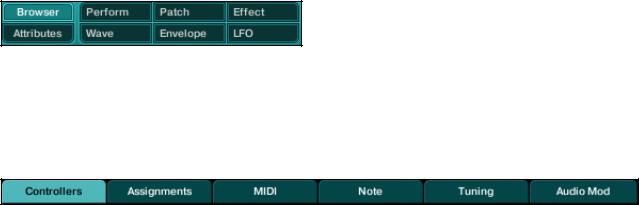
Window is the word used to refer to the overall work areas in ABSYNTH 5. There are eight Windows on the ABSYNTH 5 user interface: Browser, Attributes, Perform, Patch, Effect, Wave, Envelope and LFO. They can be accessed via the Navigation Bar, at the top of the application’s interface. To switch to a particular Window, click on the desired Window tab in the Navigation Bar. The tab for the active Window is highlighted.
Window tabs in the ABSYNTH 5 Navigation Bar
In the Wave and Perform Window, there is a number of distinct pages. Each page holds control elements related to a specific task. To switch to a particular page, click on the desired tab at the top of the page. The tab for the active page is highlighted.
Page tabs within Perform Window
In the Patch Window, most modules can be switched between multiple panels. To switch to a particular panel, click on the desired tab at the top of the panel. The tab for an active panel is highlighted.
ABSYNTH 5 Reference Manual – 16
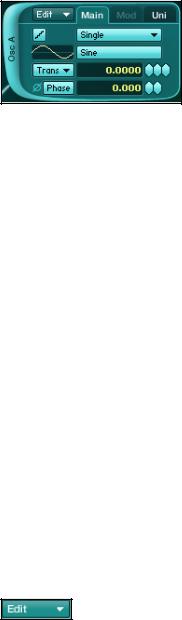
Module in the Patch Window with highlighted Main panel
2.2 Buttons and Switches
Buttons and switches basically allow you to trigger a function or to activate/deactivate a feature.
Some other parts of the interface also work as switches: for example, you can turn individual modules on and off in the Patch Window by clicking on the extended left border of each Module Slot. You do not necessarily need to click on the writing, the entire left border area works as a switch. The same applies to the effect within the Effect Window: clicking on the thick border displaying Effect at the top left corner activates/deactivates the effect.
2.3 Menus and Selectors
Menus can be found in many areas in ABSYNTH 5. They contain lists of available options. Menus can be recognized a small triangle pointing downwards.
Edit menu button available in all Windows
In order to choose an option or a command from a menu, click on it: A drop-down list appears, which remains open if you move the cursor. Click on the desired entry to select it. To leave the menu without changing the setting, click somewhere else on the user interface or press [Esc] on your computer keyboard.
Selectors are similar to menus, but instead of opening a drop-down list below the menu when clicked, they open a separate pop-up dialog. Most of the time, you can not only select an entry with them but also choose some other options. You then need to click on “OK” (or “Cancel”) at the bottom to get back to the original Window. An example is the Wave Selector and its companion the Wave Selection dialog, which can be found in many places in ABSYNTH 5.
ABSYNTH 5 Reference Manual – 17

2.4 Value Fields
Value fields contain the numerical values of parameters. The values indicated can be changed in a variety of ways:
•• Clicking within the field: The value is highlighted and you can enter a value using your computer keypad. Press [Enter] to confirm or [Esc] to let the value unchanged.
•• Using the diamond button (  ) next to a value field: Click on it and hold the mouse button depressed. Drag the mouse up/down to increase/decrease the value, respectively. Depending on the resolution of the parameter, you will see one, two or three diamonds next to its value field. The leftmost diamond has the biggest range – and the lowest resolution: use it to change the value roughly. Use the other diamonds to make finer adjustments.
•• If your mouse has a scroll wheel, you can place the cursor on a diamond and change the value by turning the scroll wheel. Move the wheel forward to increase the value and backwards to decrease it.
•• You can also right-click ([Ctrl]+click on Mac) on most value fields to bring up a contextual menu. Here you can assign the parameter to one of the Macro Controls. More specific information about Macro Controls can be found at section 10.2 “Automation in ABSYNTH 5: Macro Controls” .
ABSYNTH 5 Reference Manual – 18
2.5 Sliders and Knobs
Some parameter values can be changed via sliders and knobs.
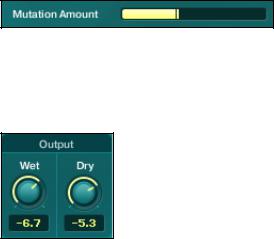
Sliders (or faders) are used for example to adjust the effect’s input levels in the Effect Window, or to define the mutation settings in the Browser Window’s Mutator. To adjust the value of a slider, click on it and drag your mouse horizontally while holding the mouse button depressed.
Sider for Mutation Aamount in Browser Window
Knobs can be found for example in the Effect Window, where you adjust the signal proportions using the Wet Level an Dry Level controls.
Wet/Dry knobs in the Effect Window
The global Master Envelope also uses knobs to define its four steps Attack, Decay, Sustain and Release. To adjust the value of a knob, you have following possibilities:
•• Click on the knob (or on the value display if available) and drag the mouse up/down to increase/decrease the value, respectively. If your mouse has a scroll wheel, you can place the cursor on the knob and change its value by turning the scroll wheel. Move the wheel forward to increase the value and backwards to decrease it.
•• Double-click on the value display (if available) and enter a new value via your computer keyboard, then press [Enter] to confirm or [Esc] to let the previous value unchanged.
ABSYNTH 5 Reference Manual – 19

3 Application Menu Bar
The Application Menu Bar (here on Windows version shown)
The Application Menu Bar is only available if you are using ABSYNTH 5 in stand-alone mode. It holds commands dealing with the overall functioning of ABSYNTH 5. Similar to the menu bar found in other applications on your operating system, it contains three menus, detailed below: the File menu, the Edit menu and the Help menu.
3.1 File Menu
The File menu contains the following entries:
•• New Sound : Creates a new empty Sound in ABSYNTH 5. The default new Sound only contains one Oscillator in its Channel A.
•• Open Sound… : Opens a dialog labeled Open SingleSound File… allowing you to select a Sound on your hard drive for opening. In the dialog, navigate to the desired Sound, select it and click on “Open” (or double-click on the Sound). The Sound replaces the Sound previously loaded in ABSYNTH 5.
•• Recent Files : Opens a submenu containing shortcuts to the 10 last Sounds that you opened in your last sessions. Select an entry in the submenu to open the corresponding Sound. At the bottom of the submenu, the entry Clear Menu empties the submenu.
•• Save Sound : Allows you to save the changes made to the currently loaded Sound. If you did not save the current Sound yet, this command automatically opens the Save Sound As dialog (see below).
•• Save Sound As… : Opens a dialog labeled Save SingleSound File As… allowing you to save the current Sound under a new name. In the dialog, navigate to the desired folder where you want to save your Sound, type a new name for the Sound and click on “Save”.
! We recommend saving sounds to the default path, “My Sounds.” This way, your Sound will automatically be integrated to the ABSYNTH 5 Database upon saving.
ABSYNTH 5 Reference Manual – 20
•• Import Glo Bank…: Opens a dialog labeled Please select a glo bank to import… allowing you to import Sounds made with older versions of ABSYNTH into ABSYNTH 5. Navigate to the desired Glo bank on your hard drive, select it and click on “Open”. You can then scroll through the list of Sounds available in this bank. The Sound selected in the list is automatically loaded in ABSYNTH 5 and you can play it. Should you wish to convert this Sound into an ABSYNTH 5 KORE SOUND®, you can save it like any other Sound via the Save/Save As… commands explained above.
! The Factory Contents of all previous versions of ABSYNTH have already been converted and are directly available via the Browser Window. Thus, you need this command for User
•• Options…: Opens the Options dialog, which will be explained in detail later (see section 3.4 “Options Dialog” below).
•• Audio and MIDI Settings…: Opens the Audio and MIDI Settings dialog allowing you to adapt ABSYNTH 5 to your custom studio or live setup. The audio and MIDI settings are explained in detail in the Getting Started guide.
•• Exit: Quits the application. Please check that you saved your Sound before closing. I you did not, unsaved changes will be lost!
ABSYNTH 5 Reference Manual – 21
3.2 Edit Menu
The Edit menu contains the following entries:
•• Undo : Cancels the last action in ABSYNTH 5.
•• Redo : Cancels the last Undo command – in other terms, re-executes the last cancelled action.
•• Copy : Stores the selected Envelope (if in Envelope Window) or Waveform (if in Wave Window) to the clipboard.
•• Paste : Pastes the Envelope or Waveform stored in the clipboard (via the command Copy above).
•• Balance levels : Equilibrates the three Channels A, B and C at a level that prevents the overall output from clipping.
3.3 Help Menu
The Help menu contains three entries with further information about ABSYNTH 5:
•• Launch Service Center : Starts the NI Service Center. The Service Center can activate ABSYNTH 5 as well as search for new updates. Detailed information can be found in the Service Center Quick Start Guide and manual.
•• Visit Absynth on the Web : Opens the ABSYNTH page on the Native Instruments website in your favorite Internet browser, where you can access up-to-date information on ABSYNTH 5.
•• About Absynth… : Opens the About screen where you can view the version number and the individual serial number of your copy of ABSYNTH 5. You also find there the names of all the people who worked on ABSYNTH 5.
ABSYNTH 5 Reference Manual – 22
3.4 Options Dialog
The Options dialog provides you with various options that shape global functions in ABSYNTH 5. You can call the Options dialog by selecting the corresponding entry in the File menu of the Application Menu Bar (stand-alone application only) or in the File menu of the Navigation Bar (see section 4 “Navigation Bar” below).
The Options dialog is organized into three pages: General, Surround and Browser. Each of them can be accessed by clicking on the corresponding tab at the top of the Options dialog.
To confirm any changes made to the options, click on “Done” at the bottom of the dialog. To close the dialog without saving your changes, click on the dialog’s close icon instead (its location depends on your operating system).
We describe hereafter all available options.
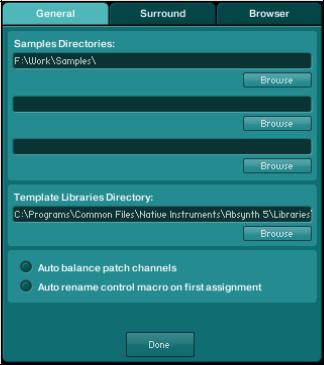
3.4.1 General Page
The General page allows you to define the paths for the directories containing your samples and your templates, along with two additional options:
The General page of the Options dialog
ABSYNTH 5 Reference Manual – 23
•• Samples Directories : These three fields allow you to set paths to the directories containing the samples used by your Sounds. To define a path, click on the Browse button under one of the fields, navigate to the desired folder on your hard drive and click “OK.”
•• Template Libraries Directory : This field allows you to set the path for the directory containing your various Templates (Envelopes, Waveforms, modules, Channels…). To change the path, click on the Browse button under the field, navigate to the desired folder on your hard drive and click on “OK.” For more info on the Templates, please refer to section 5.2.3 “Universal Library. ”
•• Auto balance patch channels : If this option is enabled, ABSYNTH 5 controls the output of the three individual Channels in the Patch Window so that the main output remains constant and do not clip. That is, if you were to increase the level of one Channel, ABSYNTH 5 would automatically decrease the levels of the two other Channels.
•• Auto rename control macro on first assignment : If this option is enabled, a Macro Control that has had a parameter assigned to it takes over the name of this parameter – but only if no other parameters have already been assigned to it.
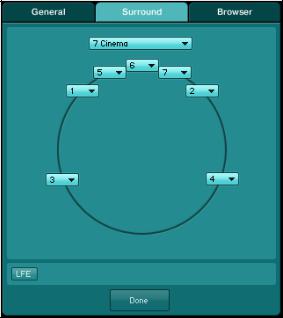
3.4.2 Surround Page
The Surround page allows you to configure ABSYNTH 5’s surround output channels.
The Surround page of the Options dialog
ABSYNTH 5 Reference Manual – 24
ABSYNTH 5 can have up to eight separate audio outputs. The fundamentals for configuring your audio and MIDI interfaces can be found in the Getting Started guide. The Surround page can then be used to assign your output channels to specific positions in the panoramic field.
In the Surround menu sitting at the top of the page, you can choose from the following configurations:
•• 2 Stereo : This standard configuration delivers typical two-channel stereo sound. In this setting, the speakers are situated at 45 degrees and -45 degrees.
•• 2 Stereo Wide : This configuration is easy to distinguish from 2 Stereo: Both front speakers are arranged at 90° and -90°. This results in a wider stereo soundscape.
•• 3 Surround : This configuration returns to analog Matrix surround sound. It is well known under the names of, for example, Dolby Surround™ (home entertainment center) or Dolby Stereo™ (movie theatre), but without a front center channel. Here, there is a central rear channel as well as leftand right front ch3 Front: This configuration replaces the central rear channel of the previous configuration with a center front channel, which leads to better distribution in the stereo soundscape than a classic stereo configuration.
•• 4 Surround : This configuration combines a 3 Surround configuration with a front-center channel and is also known under the name Dolby Surround Pro Logic™.
•• 4 Quad : This four-channel configuration is based on the quadraphonic systems that were popular with consumers in the 1970’s. The four speakers are arranged symmetrically in a square shape.
•• 5 Music : This five-channel surround sound configuration is comparable to top-of-the-line home theater arrangements and movie theaters systems, known as, for example, Dolby Digital™ or DTS™. This system provides you with three front channels (left, center, right) and two surround channels (surround left, surround right).
•• 5 Pentaphonic : This configuration delivers five-channel surround sound, where the five channels are arranged symmetrically in a circle.
•• 6 Music : This configuration corresponds to a 5 Music configuration, but contains an additional rear center channel. This arrangement is used by, for example, the surround sound systems Dolby Digital EX™ and DTS-ES™.
ABSYNTH 5 Reference Manual – 25

•• 6 Hexaphonic : This configuration delivers six-channel surround sound where the six channels are symmetrically arranged in a circle.
•• 7 Cinema : This configuration delivers seven-channel surround sound as it can often be heard in films. Well-known surround sound systems of this type include SDDS™ and IMAX™. This configuration combines the 5 Music configurations with two additional front center channels (center left, center right).
•• 7 Music : This configuration delivers seven-channel surround sound. It is comparable with the 6 Music configuration, but the surround center channel is divided between the two rear channels “surround center left” and “surround center right”.
•• 7 Heptaphonic : This configuration delivers seven-channel surround sound, where the seven channels are symmetrically arranged in a circle.
•• 8 Octaphonic : This configuration delivers eight-channel surround sound, where the eight channels are symmetrically arranged in a circle.
For any of these configurations, you can then set the assignment of each channel to the available audio outputs of the stand-alone version. The audio outputs that you configured in the Audio and MIDI Settings dialog are at your disposal in the various Channel menus sitting in the panoramic field (the position and number of these menus vary with the selected configuration, see above).
Low Frequency Effect Channel
For all configurations but the last 8 Octophonic, you can activate an additional LFE (Low Frequency Effects) or Subwoofer channel. To enable it, click on the little LFE button at the bottom left of the Surround page.
The LFE channel settings
When activated, you see other parameters appearing on its right:
•• Channel menu : An additional Channel menu lets you define the output to assign to the LFE channel.
ABSYNTH 5 Reference Manual – 26

•• Frequency control : Lets you define the cutoff frequency (in Hz) for this channel.
•• Damping control : Lets you adjust the level (in dB) of this particular channel according to your subwoofer.
When using ABSYNTH 5 as a plug-in, the host automatically chooses the correct setting for the track in which ABSYNTH 5 is used: a particular plug-in will be used depending on whether you use ABSYNTH 5 as an instrument or as an insert effect, and whether the according track is a stereo track or a surround track.
3.4.3 Browser Page
In the Browser page, you can set options in relation with the Database.
The Browser page of the Options dialog
In the top part of the page, you find the following settings:
•• Default Author: Allows you to define a default text string for the Author field in the Meta Information of the Sounds.
•• Use Default Author for New Sound: If this option is activated, the default Author name defined above is inserted into the Meta Information of all newly created Sounds.
ABSYNTH 5 Reference Manual – 27
•• Use Default Author for Save Sound As: If this option is activated, the default Author name defined above is inserted into the Meta Information of all Sounds stored via the command Save Sound As (see 3.1, “File Menu” , above).
•• Database Hit-Count: This menu allows you to customize the displayed information for each Attributes in the Browser Window. If None is selected, only the Attributes’ names are shown. If Indicate Empty Categories is selected, the Attributes for which there is no Sound are grayed out. If Show Count as Number is selected, the Browser displays after each Attribute’s name the number of Sounds having this Attribute.
! Note that for the two last entries Indicate Empty Categories and Show Count as Number, the current state (and number) displayed after each Attribute name depends on the current selection of Attributes: for example, if the Attribute Solo/Single is selected in the category Source for the Instruments, the Attribute Ensemble/Kit will logically be grayed out (and the number behind it will be 0). This allows you to quickly see, upon each selection you make, which other Attributes
are possible (and how many Sounds have these Attributes).
In the bottom part of the page, you can define the list of folders to scan for Sounds. You can add/remove folders to/from the list via the respective buttons at the bottom. Remember that subfolders in the selected folders will automatically be included in the search as well.
Should you ever make changes in this page, or delete/add individual Sound files in the corresponding folders using your operating system, then you must rebuild the Database. In order to do this, use the Rebuild Database button (labeled Rebuild DB), at the bottom right corner of the page. Depending on the number of available KORE SOUNDS, this process can be time-consuming. Only then will the changes take effect in the Database.
ABSYNTH 5 Reference Manual – 28
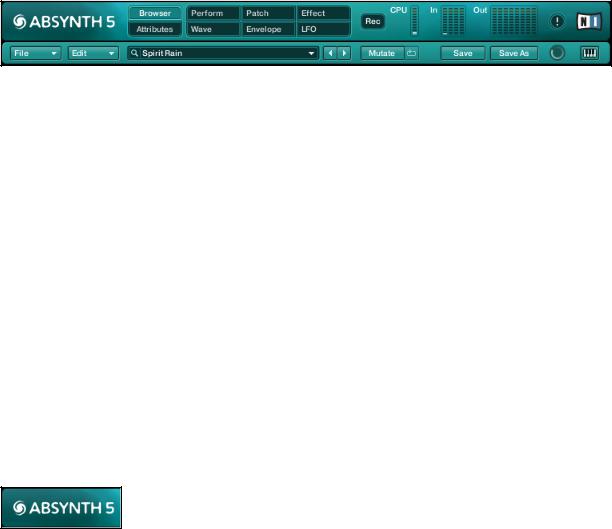
4 Navigation Bar
The Navigation Bar is located at the very top of the ABSYNTH 5 interface:
The Navigation Bar
It consists of two lines:
•• In the top line of the Navigation Bar you see (from left to right) the ABSYNTH logo, the tabs opening the different Windows, the Record button, the CPU meter, the Input and Output Level meters, the Panic button and the NI logo. More information about these features is available below.
•• The bottom line includes mostly options to load and save Sounds and navigate through the Library.
4.1 Top Row: Global Controls
4.1.1 ABSYNTH 5 Logo
Interactive ABSYNTH button
Clicking on the ABSYNTH 5 logo has the same effect as clicking on the NI logo: both open the About screen. This About screen contains some important information: the version number, license type and serial number of your copy of ABSYNTH 5, along with the list of all the people who worked on this great synth!
ABSYNTH 5 Reference Manual – 29

4.1.2 Window Tabs
Window tabs in Navigation Bar
These eight tabs allow you to select a particular Window to display. As already mentioned, a Window is a specific work environment in ABSYNTH 5 (see section 2.1, “Windows, Pages, Panels and Tabs” , above). The following Windows are available: Browser, Attributes, Perform, Patch, Effect, Wave, Envelope and LFO. To activate a particular Window, click on the eponymous tab. ABSYNTH 5 replaces the currently displayed Window with the new selected one and the corresponding tab gets highlighted.
Opening Several Windows Simultaneously
In the stand-alone version of ABSYNTH 5 you can open a Window in the main ABSYNTH 5 interface in a new pop-up window instead of replacing esion of ABSYNTH 5:, hold [Ctrl] (Windows Vista/XP) or [Cmd] (Mac) depressed while clicking on one of the tabs in tup Window instead. This works for the following tabs/Windows: Patch, Effect, Wave, Envelope and LFO.
This can be very handy, especially if you have a large computer screen: you can display two or more Windows, place them where you want on your screen and work simultaneously on different parts of ABSYNTH 5, both giving you a better overview of various ABSYNTH 5 components and preventing you from switching back and forth between different Windows.
! Opening Windows simultaneously is only available in stand-alone mode!
4.1.3 Record Button
A click on the d button shows/hides the Audio Recorder. For more info on the Audio Recorder, please refer to section 12.2 “Audio Recorder” .
ABSYNTH 5 Reference Manual – 30
![]()
4.1.4 CPU Meter
The CPU meter indicates the processing load being used by ABSYNTH 5.
When the computer‘s processor is overloaded, distortions and audio drop-outs are very likely to happen during playback. To avoid this, it is worth keeping an eye on the CPU meter.
The processing load depends above all on two factors: the complexity of the Sound and the number of voices played. ABSYNTH 5 uses a dynamic voice allocation; voices that are not played do not contribute to the processing load. The more notes are played simultaneously, the higher the CPU read-out will go. If the CPU overloads, it is recommended to leave out a couple of notes in order to reduce the processing load. If your computer reacts sluggishly to incoming commands, it is probably because your CPU is overloaded and there is not enough resources available for generating the image on the screen. If this happens, try to decrease the load by releasing a few notes.
If ABSYNTH 5 overloads the CPU, the audio hardware installed on your computer might get out of step and no longer be able to accurately produce sound. In such a case, you have several options to restore operations back to normal:
►► Release all of the notes on your MIDI keyboard. This releases resources used by ABSYNTH 5 for every voice.
►► Click on the Panic button in order to reset the ABSYNTH 5 engine, and stop playing (see section 4.1.6 below).
►► Click on the Next or Previous Sound button to switch to another Sound (see section 4.2.3 below).
►► Click on a Module Slot frame in the Patch Window to turn a Module on or off. This will also reset ABSYNTH 5’s audio engine.
ABSYNTH 5 Reference Manual – 31

4.1.5 Input and Output Level Meters
The Input and Output Level meters indicate the levels of the incoming and outgoing audi signals:
Input Output Llevel meters
The four LED chains labeled In indicate when a signal is going into an Oscillator module. You can read the levels of the outgoing signals on the eight LED chains labeled Out. As explained in the section on surround configurations in the Options dialog (see 3.4 above), ABSYNTH 5 can handle up to eight simultaneous audio outputs. Each of these eight outputs has its own LED chain.
4.1.6 Panic Button
The Panic button allows you to interrupt the audio playback in ABSYNTH 5, in case something goes wrong and unwanted sound is being produced. Click on the Panic button to reset the audio engine of ABSYNTH 5 and to stop the playback process. All of the MIDI notes that have been “left hanging” will also reset.
4.1.7 NI Logo
Interactive NI logo
Clicking on the NI logo has the same effect as clicking on the ABSYNTH 5 logo: it opens the About screen. This About screen contains some important information: the version number, license type and serial number of your copy of ABSYNTH 5, along with the list of all the people who worked on this great synth!
ABSYNTH 5 Reference Manual – 32

4.2 Bottom Row: Sound Management
4.2.1 File and Edit Menus
File menu and Edit menu
The File menu and Edit menu mirror the File menu and Edit menu of the Application Menu Bar in stand-alone mode, except the entries Audio and MIDI Settings… and Exit, missing from the File menu here.
Therefore, please refer to section 3.1, “File Menu” , and 3.2, “Edit Menu” , for more info on the commands found in the File menu and Edit menu, respectively.
4.2.2 Sound Name Display and Sound Menu
Sound Name display / Sound menu
The Sound Name display / Sound menu shows the name of the Sound currently loaded. A click on the display opens the Sound menu that lets you choose another Sound to load from the current Search Result List or from the current folder:
•• If you used the Browser’s Database view to find and load the current Sound from the Search Result List, then a small magnifying glass icon appears to the left of the Sound Name display. The Sound menu then shows the Sounds from the current Search Result List (see section 11.2.1 “Database View” for more info).
•• If you loaded your Sound from the File Tree view, then a small folder icon appears to the left of the Sound Name display, and the Sound menu shows the Sounds available within the same folder from which you loaded the current Sound (see section 11.2.2 , “File Tree View”, for more info).
•• If you loaded your Sound from the Program List, a small MIDI plug labeed PC appears instead, and the Sound mMenu displays all Sounds that you added to the Program List (see section 11.2.3 “Programs” for more info).
ABSYNTH 5 Reference Manual – 33

At the top of the Sound menu, the subentry Mutate History allows you to select one of the existing Sound Mutations stored in the Mutation History. For more info on the Mutator and the Mutation History, please refer to section 11.3 , “Mutator.”
4.2.3 Previous/Next Sound Buttons
Previous/Next Sound buttons
These buttons allow for quick-scanning through the Search Result List, the current folder or the Program List: the behavior of the Previous/Next Sound buttons depends on the view that you used to load the current Sound:
•• If you used the Browser’s Database view, they scroll through your current Search Result List.
•• If you used the Browser’s File Tree view, they scan the content of the folder from which you loaded the current Sound.
•• If you used the Program List, they scroll through your Program List.
For more info on these concepts, please refer to section 11.2, “Searching and Loading Sounds with the Browser” .
4.2.4 Mutate and Retry Buttons
Mutate and Retry buttons
The Mutate and Retry buttons are shortcuts for the Mutate button and Retry button of the Mutator in the Browser. For more info on their functions, please refer to section 11.3, “Mutator” .
ABSYNTH 5 Reference Manual – 34

4.2.5 Save and Save As Buttons
Save and Save As buttons
The Save and Save As buttons are shortcuts for the Save and Save As… commands found in the File menu (see their description at section 3.1, “File Menu” , above).
Further instructions on loading, saving and administration of Sounds can be found in chapter 11, “The Browser and Attributes Windows” , which also provides an extensive description of ABSYNTH 5’s Browser.
4.2.6 Database Activity Indicator
Database Activity indicator
The Database Activity indicator shows up when ABSYNTH 5‘s Database is being updated. The indicator only appears when ABSYNTH 5 currently does maintenance work on the Database – typically when you triggered the Rebuild Database button.
! You can continue your current work during Database activity, but the Browser might not display all results in Database view: wait a few moments, and the Database will be fully
4.2.7 Keyboard Button
A click on the Keyboard button shows/hides the Virtual Keyboard at the bottom of ABSYNTH 5‘s interface. For more info on the Virtual Keyboard, please refer to section 12.1, “Virtual Keyboard” .
ABSYNTH 5 Reference Manual – 35

5 Patch Window
Patch Window with several active Module Slotss
The Patch Window is the control center of ABSYNTH 5 where you assemble the components that make up a Sound. These components contribute to producing and shaping the desired output. The modules represent the individual components in the Patch Window. There are different types of modules: Oscillator modules are the sound sources of ABSYNTH 5. Modulator modules, Filter modules and Waveshaper modules shape the sound. In the following sections yu will find detailed descrptions of the different mModules and their features.
ABSYNTH 5 Reference Manual – 36
5.1 Signal flow in the Patch
As you know from the Getting Started guide, the design of ABSYNTH 5 is semi-modular. That means that you can determine the arrangement of certain components yourself. Other components have a permanent place in the signal flow.
5.1.1 Combining Modules in the Channels
The Patch Window organizes the modules components into three Channels. These Channels are designated with the letters A through C and they each consist of three vertically arranged fields, the Module Slots. Each of these Module Slots can be filled with a module. To turn a module on or off, click on the extended border on the left side of the Module Slot – where the writing indicates the type of module.
When inserting the modules, the following rules apply:
•• The Module Slots A-C at the top of the three Channels can only be loaded with an Oscillator module.
•• The remaining Module Slots 1 and 2 of any Channel can be loaded with Modulator, Filter or Waveshaper modules.
! While the Oscillator module always works as a signal source, the other modules can shift between different types of operation: If you turn on a module, then this module type will appear in the border of the Module Slot. Once activated, its Type menu allows you to switch
between the operating modes Filter, Modulator and Waveshaper. So, for example, you can insert Filter modules into both Slots of one Channel, and insert two Waveshapers into another Channel.
ABSYNTH 5 Reference Manual – 37

5.1.2 Channel Level controls
Beneath Channels A, B, and C you can see three horizontal sliders, known as the Channel Level controls. These sliders allow you to adjust the levels of the three Channels:
Channel Level controls
ABSYNTH 5 can also adjust the levels automatically so that the sum of the three audio signals never exceeds 0 dB, even after a value in one of the three Channels has been changed. To activate automatic volume levels, activate the option Auto balance patch channels in the General page of the Options dialog (see section 3.4, “Options Dialog” , for more info). You also have the possibility to balance Channels manually, giving the ame level to each. To do this, select the entry Balance lLevels from the Edit menu in the Navigation Bar or in the Application Menu Bar (stand-alone version on
5.1.3 Surround Pan Switch
The Surround Pan switch, which is located in the lower left-hand corner of the Patch Window, allows you to activate/deactivate the Surround Pan mode:
Surround Pan switch
This mode allows you to freely position the three Channels in the surround panorama. This function can be used for impressive spatial effects, for example, by modulating the surround position of the Channels independently of one another with an LFO or an Envelope. More information about this is available in the chapters 8, “Envelope Window” , and 9, “LFO Window” .
ABSYNTH 5 Reference Manual – 38

5.1.4 Master Channel
Active Master Channel modules
The signals delivered by the activated Oscillator modules run through the other activated modules in each Channel, and are then mixed in the Master Channel, which is arranged horizontally at the bottom of ABSYNTH 5‘s interface. In the Master Channel, the signal runs from the left to the right.
In this Channel, there is a Module Slot reserved for a particular module: the Effect module, which can always be found at the bottom-right of the Patch Window – thus at the end of the module chain. The other two Module Slots in the Master Channel can be inserted with Modules of your choice (except Oscillator modules).
After the Effect module, the final signal leaves ABSYNTH 5.
% The glowing connection wires between activated modules visualize the signal flow!
ABSYNTH 5 Reference Manual – 39

5.1.5 Mono Mode and Poly Mode in the Master Channel
The modules in the Master Channel have two operating modes: Poly mode and Mono mode. You can switch between both modes by clicking on the Mono/Poly switch:
•• In Mono mode (three arrows meeting each other), the signals coming from the three Channels A-C are summed up before being processed by the module.
•• In Poly mode (three parallel arrows), the module processes each Channel separately.
! As a logical consequence, you cannot have a module in Poly mode sitting after a module in Mono mode, since the three Channel signals have already been summed up by the
The difference between the two modes can be heard particularly clearly in the Waveshaper module: In Poly mode every voice has its own, independent Waveshaper. The distortion affects every voice separately – in the same way as if every string on a guitar had its own amplifier. In Mono mode, only one Waveshaper is used for the different voices, which means that many of the notes played interact – similar to the way that they do in chords played on a distorted electric guitar. You can try out the effect simply by inserting a Waveshaper module into the Master Channel. Play a couple of sounds and switch between both modes by clicking on the Mono/Poly switch. You will see that the Mono mode reacts with significantly stronger distortion as you begin to play multiple notes. This is because the signals of the different voices are assembled before the Waveshaper input, which results in a higher input gauge. In Poly mode, by contrast, the voices are distributed among multiple Waveshapers and thus produce lower signal levels.
% For low level input signals, the Waveshaper in Mono mode works like a simple compressor and lends itself well to compressing and heating up the input signal.
ABSYNTH 5 Reference Manual – 40
![]()
5.2 Common Features for all Modules
The various modules available in the Patch Window share these common features:
•• Panels and tabs
•• Template functionality and Universal Library
5.2.1 Edit Menu
The Edit menu for a Filter module.
Each module offers an Edit menu in its upper left corner. This Edit menu holds global functions for that module. Its entries are grouped as follows:
•• The first entries allow you to copy the current settings of the module to the clipboard in order to paste them later in another module of the same type, and to paste within the module the settings previously stored in the clipboard. The Oscillators additionally offer to copy/paste the entire Channel.
•• The following entries allow you to save and load Templates, i.e. pre-configured modules/ Channels with all their settings (see the section 5.2.3, “Universal Library” , below for more info on this).
•• The last two entries allow you to apply a Mutation and to retry a Mutation, both for that particular module. The settings for this Mutation are those defined inutation section Mutator section (see section 11.3, “Mutator” , for more on this).
ABSYNTH 5 Reference Manual – 41
5.2.2 Panels and Tabs
Each module can have up to three panels organizing the various module parameters. Each panel can be called by clicking on the corresponding tab at the top of the module.
The available panels depend on the type of the module (Oscillator, Filter, Modulator or Waveshaper) as well as on the specific mode for each module type. You will find a complete list of available panels in the module-specific sections below.
5.2.3 Universal Library
The Universal Library in ABSYNTH 5 makes it easier to bring together complex Sounds. You can save and load so-called Templates for individual Waveforms, Envelopes, Effects, complete modules with the appropriate Envelopes, and even entire Channels from the Universal Library.
! The actual location of the Universal Library on your hard drive can be changed in the Options dialog via the option Template Libraries Directory of the General page (see section
3.4, “Options Dialog” , for more info on the Options dialog).
In the Patch Window, you can save and load Channels, modules and Effect settings together with all their relevant Envelopes. When you save a Channel, a module or Effect settings as a Template in the Universal Library, the Envelopes are automatically filed with it.
To load Templates, choose the category you want from the module’s Edit menu:
•• In an Oscillator, select the option Load Oscil Template to load a pre-configured Oscillator. The command Load Channel Template allows you to load a complete Channel.
•• In a Filter, Modulator or Waveshaper module, the Edit menu solely offers a Load Template option that loads the settings for that module.
ABSYNTH 5 Reference Manual – 42
To save Templates, the method is similar:
•• In an Oscillator, select the option Save Oscil Template to save a pre-configured Oscillator. The command Save Channel Template allows you to load a complete Channel.
•• In a Filter, Modulator or Waveshaper module, the Edit menu solely offers a Save Template option that saves the settings for that module.
! ABSYNTH 5 sorts the Library automatically for you: for example, you cannot load a Filter Template into an Oscillator nor save a Waveshaper Template in the Envelopes folder.
The Patch Window is not the only location with access to the Universal Library. In the Envelope Window and in the Wave Window you can also load and save Templates. For example, you can store individual Envelopes and Waveforms in the Library. In the Envelope Window and Wave Window, you can access the Universal Library via the Transform menu.
ABSYNTH 5 includes an extensive Library of Channels, modules, Envelopes, Effects settings and Waveforms. To see how quickly the prefabricated Channels from the Library can help you to build a complex Sound, simply do the following:
1. Click on the left margin of an empty Oscillator Module Slot in the Patch Window to activate the Oscillator.
2. Choose the entry Load Channel Template… from the Edit menu on the upper left corner of the Oscillator. The Channel Templates list opens up immediately.
3. Choose the desired entry from that list and click on “OK.” Your Channel is now well populated.
4. Do the same with the other two Channels.
→→ You created a complete Sound in just a few seconds where it could have taken hours “by hand!”
ABSYNTH 5 Reference Manual – 43
Using Old Personal Templates
If you want to use ABSYNTH 4 Templates in ABSYNTH 5, you need to copy them to the new Libraries folder.
•• On Mac OS X, your old Templates are located by default in the directories “HD:Library/ Application Support/Native Instruments/Absynth 4/Libraries/[subdirectories]”.
! Please be careful! On a Mac, you should not replace the ABSYNTH 5 Libraries folder with the ABSYNTH 4 Libraries folder, since Mac OS X would overwrite all the new ABSYNTH 5 Templates! Instead, you should open each folder contained therein and copy the contents of each of the lowest level subfolders manually to the corresponding subfolder in the ABSYNTH 5 Libraries directory.
•• On a PC, your old Templates are located by default in the directories “C:ProgramsShared FilesNative InstrumentsAbsynth 4Libraries[subdirectories]”. You should be able to simply copy and paste the whole ABSYNTH 4 Libraries folder to the ABSYNTH 5 Libraries folder and click on “Replace all”.
In any case, we recommend you to back up your ABSYNTH 5 Libraries folder before touching it!
5.3 Common Features in Many Modules
The following features appear in many situations. Knowing them is very helpful for understanding of the modules’ capabilities:
•• Waveform Selector and Waveform Selection dialog
ABSYNTH 5 Reference Manual – 44

5.3.1 Waveform Selector and Waveform Selection dialog
The Waveform Selector is available for all oscillator modes based on a wavetable. It allows you to choose the Waveforms for the oscillators in ABSYNTH 5. This is not only the case for the various oscillators within the Patch Window, but also for all other functions in ABSYNTH 5 using Waveforms as a foundation. For example, you will also find the Waveform Selector in an identical form in the LFO Window and in the LFO area of the Envelope Window.
A click on the Waveform Selector opens the so-called Waveform Selection dialog. This dialog essentially contains a list of all available Waveforms:
The Waveform Selection dialog
Using the three buttons above the list, you can switch it between three categories of Waveforms:
•• Simple Waves are single cycle Waveforms that are read from a wavetable. This relates to the tiny samples that contain one period of a particular Waveform. In this rubric, next to the standard forms like Sine, Triangle, Saw and Square, you also find instrumental and atonal Waveforms.
•• Morph Waves are Waveforms that use the function Wave Morph (see section 7.5 “Wave Morph” ). From a technical point of view, Morph Waves are two Waveforms saved in one unit of data, which seamlessly blend (“morph”) with one another.
•• Library Waves are the Waveforms from the Universal Library of ABSYNTH 5.
ABSYNTH 5 Reference Manual – 45
In order to display the Waveforms of a particular category in the list, click on the corresponding button at the top of the Waveform Selection dialog.
To load a Waveform into the module, click on its entry in the list. The new Waveform becomes immediately active, so that the effects on the sound can be heard as soon as you press a key on your MIDI keyboard. The small waveform display next to the Waveform Selector also displays the new Waveform straightaway. When you have decided on a Waveform, click “OK” at the bottom of the Waveform Selection dialog.
►► In order to create a new Waveform, select a Waveform in the list and click on the New Wave button (labeled New), at the top of the dialog:
→→ A new Waveform based on the selected Waveform is generated and loaded into the Wave Window. ABSYNTH 5 switches the current Window automatically to this Wave Window.
! Remember that your work does not affect the original Waveform, but rather produces an independent copy of it.
►► If you want to work on a Waveform that already exists, click on the Edit Wave button (labeled Edit), at the top of the dialog.
→→ ABSYNTH 5 loads the selected Waveform automatically into the Wave Window and switches the Window in an according fashion.
You can only work on Waveforms that you created yourself (by clicking on the New Wave button in the past). You cannot modify the Factory Waveforms.
The chapter 7, “Wave Window” , gives you all details about working with the Wave Window.
ABSYNTH 5 Reference Manual – 46

5.3.2 Frequency Menu and Frequency Control
Frequency menu in Trans mode
All oscillators can be set to react to incoming notes in various ways. Thys are kency modes. Using anel’s Frequency menu and its companion thcy control sitting at its right, you can to choose from the following Frequency modes:
•• Trans : The oscillator follows the pitch of the played note. The Frequency control determines the transposition in semitones. For example, setting the Frequency control to 1.5 will lead to a transposition of one and a half tone compared with the pitch of the played note. The Frequency control has a resolution of 1/1000 of a halftone.
•• Ratio : Tranposes the oscillator according to a frequency ratio (for example along the harmonic sequence: 2 corresponds with a transposition of 12 halftones, 3 with a transposition of 19 halftones, etc.). This mode is especially useful when using frequency modulation and ring modulation.
•• Hz : Fixed pitch in Hertz. In this mode, also useful for frequency and ring modulation, the oscillator ignores the pitch of the note played. Rather, the pitch of the oscillator does not reacts to information like pitch bend or to signals coming from an LFO, but it can be controlled via an Envelope.
•• Note : Fixed pitch corresponding to a selectable MIDI note. This mode is similar to the Frequency Mode Hz, but is more appropriate when you want to use the oscillator on a note-bound frequency (e.g. 60.5 = C3 plus a quarter-ton).
% You can switch between the Frequency mModes Hz and Notes to display the exact frequency of particular notes.
ABSYNTH 5 Reference Manual – 47

5.3.3 Anti-Alias Switch
The Anti-Alias switch enables you to smooth peaks in various situations. Anti-aliasing provides a smooth, almost analog sound. In order to turn on the anti-aliasing, click on the Anti-Alias switch (the small steps/ramp button).
When the symbol displays little steps, the anti-aliasing function is off. A smooth line (ramp) indicates that the function is on for this oscillator.
This makes a big difference with high frequencies. Without it, you would probably hear something called “fold back” – a not so subtle form of digital distortion that makes high tones sound coarse or harsh (two properties that are sometimes desired, but usually not). Anti-aliasing reduces the fold back to a large extent. Keep in mind that when an oscillator smoothes over edges, it uses more CPU power. If you can discern no difference between enabled and disabled anti-aliasing, it would be best if you left it turned off.
! For compatibility reasons, all patches created with ABSYNTH 1 are opened with the Anti-Alias switch deactivated. With ABSYNTH 5, you can create patches for which some
Channels have the Anti-Alias switch enabled and some others have not.
ABSYNTH 5 Reference Manual – 48

5.3.4 Phase Inverter
The Phase Inverter is available in all Oscillator‘s synthesis modes based on a wavetable. When activated, it simply inverses the phase of the signal generated by the oscillator – in other terms, it shifts the phase by 180°.
5.4 Oscillator Module
The three Oscillator modules are the only sound sources in ABSYNTH 5. All other modules only modify the sounds produced by the Oscillators. If none of the Oscillators are turned on, you will hear no sound, and none of the other modules can be activated. Accordingly, the modules of a Channel are only available when its Oscillator is active.
The Oscillators can run in numerous different operating modes, which primarily differentiate by their synthesis process. In the following sections, you will learn more about these individual operating modes. But we will first present the general layout and common features for all Oscillators.
The Oscillator can be inserted into the first Module Slot at the top of each Channel A, B or C of the Patch Window.
To activate an Oscillator module, do the following:
►► Click on the extended left margin of the desired Module Slot to activate it.
ABSYNTH 5 Reference Manual – 49

5.4.1 Oscillator‘s Panels and Tabs
The Oscillator always provides you with the following panels: Main, Mod, and Uni (albeit occasionally inactive). Click on a tab to activate the corresponding panel.
The Main panel contains all the parameters dealing with the main oscillator of the Oscillator module. The most important element of this Main panel is the Synthesis menu, which defines the type of synthesis performed for the main oscillator. The synthesis modes available in this Synthesis menu are sorted into three groups (separated by horizontal lines):
•• Wavetable synthesis (Single, Double, FM, Ringmod, Fractalize, Sync Granular): The Oscillator produces signals based on monocyclic Waveforms.
•• Sampling (Sample, Granular): The Oscillator produces signals based on a sample.
•• External audio signal (Audio In): The Oscillator delivers an audio signal, which itself comes from an external source.
The other parameters of this panel depend on the selected synthesis mode. We will detail them in the sections describing each individual synthesis mode below.
The Mod panel (Modulation) holds all parameters of the modulation oscillator. The available parameters depend on the synthesis mode selected in the Main panel. Information about these specialized parameters can be found in the sections describing each individual synthesis mode below.
Источник
Программа может в разы сократить время работы аниматоров.
Разработчики из Secret Weapons выпустили программу EbSynth, которая накладывает рисунок на видео, и таким образом создает рисованную анимацию.
Для того что бы получить такой результат, нужно иметь исходный ролик и детальный рисунок ключевого кадра — остальное программа сделает самостоятельно, посредством заполнения недостающих фрагментов между ключевыми рисованными кадрами.
Судя по туториалу, анимацию можно делать не только на основе рисунка, но и по абсолютно любому изображению, созданному в графическом редакторе.
Разработчики программы отметили, что обычно на создание минутных роликов с анимацией уходят часы работы, в то время как с EbSynth достаточно снять натурное видео и нарисовать ключевой кадр. Программа может в разы ускорить работу над анимационным видео.
EbSynth доступна бесплатно на официальном сайте.
-
PRODUCTS
-
BLOG
-
COMMUNITY
-
SUPPORT
Page 2 of 4
-
TBH no idea. I have a bunch of them and nary an issue here.

-
You can download the all in one.
https://www.techpowerup.com/download/visual-c-redistributable-runtime-package-all-in-one/You can download the all in one.
After unpacking, you can install all with the install.bat,
or a few manually, by making your own choice.
Go for the 2015-2019 version.René
Last edited: Mar 28, 2021
-
Like x 1
-
-
Thanks but all packages from 2005 to 2019 are allready installed on my computer.
Perhaps the Win10 Update 20H2 could be the cause of the problem. -
That might also be. I’m on 2004 now and it works. But hm, my Surface Pro 4 has 20H2, lemme try updating Absynth there and opening it.
-
Today I spent all day installing the latest update of windows 20H2.
I did not get past the 1709 version, everything after that would not be installed.
Eventually I used an update manager from MS to get the 20H2 version on my system.
That eventually succeeded.
And then installing ABSYNTH 5.
After installing Absynth 5, clicked the icon on the desktop, and then got a message that Absynth could not find the database / samples / presets.
(which are put on the C drive. while I specify in NA that everything should go to the D drive)
After clicking O.K nothing more happens!
Absynth 5 cannot be opened in Maschine either.
Hope the DEV team can do something with this information.
(also installed the 2015-2019 VC ++ but that doesn’t help)René
Last edited: Mar 30, 2021
-
Like x 1
-
-
OK so I just tried updating Absynth 5 and FM8 to latest version on my Surface which has W10 20H2 on it. Both are opening and working just fine…
-
Informative x 2
-
-
It definitely seems odd that this would be caused by a Windows update. It’s not impossible of course, but something tells me we’d have seen more complaints about this already. I also can’t reproduce anything out of the ordinary, the only thing which I noticed is that it takes relatively long for Absynth to start (stand alone) but that could also be merely an impression of mine.
I’m using Windows 10 Pro 20H2, also no issues.
-
Informative x 1
-
-
The slow start with a black screen is the same with win 7 pro version 5.3.3. 5.3.4 is only for win 10, I left it out.
-
It’s getting more and more interesting.
I just started NA, and it shows that Absynth, Battery4, Kontakt and Reaktor need to be repaired.
I order in this order NA to reinstall this software.
But now the strange thing is, when Kontakt is reinstalled I get the green message that Reaktor 6 has been installed successfully.
While Reaktor 6 is still in the wait mode.
Then Reaktor 6 is installed and I get the message again that Reaktor 6 has been successfully installed.
Could the problem be in NA?René
-
Like x 1
-
-
René, thanks for your info. So i don’t start NA and wait for more info from NI.
-
Like x 1
-
-
>> Breaking NEWS <<
In the meantime I have continued my research into the not wanting to work of Absynth 5 in Win10P 20H2.
Absynth’s not wanting to work probably has to do with RIGHTS.
After I created an extra account, things started to work.
Of course it remains strange that Absynth does not work in an ADMIN account.
Hope that people with the same problem can do something with it.
It is now 01.30 am here, and time to go to my bed.René
Attached Files:
-
René, is that a windows thing or NA?
-
I don’t think either.
But honesty compels me to say that I don’t know much about that.
I can still remember getting PHASIS as a gift from NI who had a similar rights issue.
Continued today and FM8 also shows the same behavior.
Does not work in the Admin account, but it works in the other account I have created.
I think I’ll set up the system again in the coming days with the knowledge I now have.René
-
after a reinstall, unfortunately I can’t start Absynth and Fm8 either
I also use win 10
Gyula -
How many users do you have in win10?
René
-
These programs also run on another Win10. Previously, it worked well on both machines.
Gyula -
Hey all,
Sorry to jump in this thread so late. This is a bug with the latest Absynth 5 update. It crashes due to a ucrtbase.dll faulting module. It seems to affect only certain graphic cards and systems, we’re investigating this issue. Will update the post when we get news.-
Like x 1
-
-
I have also already done tests with the ucrtbase.dll file and that did not solve the problem for me.
The only thing that helps me is using two users in a window installation.
And everything with NA to be installed in the NOT ADMIN account.
If I install everything in the ADMIN account via NA,
then everything works fine except FM8 and Absynth 5xx.
That means that the ucrtbase.dll could not be the cause, because it was the same in both user accounts.René
-
Like x 1
-
-
If NI’s debugging points to ucrtbase.dll then it must play some role. But again it might be different from machine to machine so…
 Informative x 2
Page 2 of 4
![]()
Yrrrk
Couldn’t switch to requested monitor resolution
Details:
Switching to resolution 1024×768 failed, trying lower one
Switching to resolution 1024×768 failed, trying lower one
All resolution switches have failed
Screen: could not switch resolution (1024×768 fs=1 hz=0)
что в переводе значит
Не смог переключиться на запрашиваемое разрешение монитора
В деталях написано:
Переключение на разрешение 1024×768 ошибка, попытка меньшего разрешения
Переключение на разрешение 1024×768 ошибка, попытка меньшего разрешения
Все переключения разрешений выдают ошибку
Экран: не могу переключить разрешение (1024×768 fs=1 hz=0)
- пожаловаться
- скопировать ссылку
![]()
walkris
Вот что нашёл на одном из сайтов .
«Привет, формального исправления этой (известной) проблемы нет, но существует ряд возможных обходных путей:
— обновление драйверов графических карт
— обновление драйверов дисплея
— деактивация VSync в настройках графической карты, например, в Catalyst Control Center
— иногда можно ввести «Alt + Enter», чтобы перейти в оконный режим. Если это поможет, это даст вам подсказку, разрешение экрана которой можно безопасно применить.
— так же слышал что можно попробовать зайти в свою папку ksp и запустить KSP_x64.»
- пожаловаться
- скопировать ссылку
![]()
Yrrrk
дак ты не мне это пиши, я просто сделал то что должен был сделать автор темы
- пожаловаться
- скопировать ссылку
![]()
walkris
Ошибся.Не тому ответил. Я думаю он увидит.
- пожаловаться
- скопировать ссылку
Указывает имя объекта или приложения, которые изначально создали ошибку.
Возвращаемое значение
Возвращает значение String, которое указывает имя объекта или приложения.
Заметки
Используйте свойство Source на объекте Ошибки, чтобы определить имя объекта или приложения, которые изначально создали ошибку. Это может быть имя класса объекта или программный ID. Для ошибок в ADO значение свойства будет ADODB. ObjectName, где ObjectName — это имя объекта, который вызвал ошибку. Для ADOX и ADO MD значение будет ADOX. ObjectName и ADOMD. ObjectName соответственно.
На основе документации об ошибках из свойств Source, Numberи Description объектов Error можно написать код, который будет соответствующим образом обрабатывать ошибку.
Свойство Source — только для чтения для объектов Error.
source error
Error diffusion — is a type of halftoning in which the quantization residual is distributed to neighboring pixels which have not yet been processed. Its main use is to convert a multi level image into a binary image, though it has other applications.Unlike many… … Wikipedia
Error in the System — Studio album by Peter Schilling Released 1983 (English version) 1983 (German version) Recorded … Wikipedia
Error exponent — In information theory, the error exponent of a channel code or source code over the block length of the code is the logarithm of the error probability. For example, if the probability of error of a decoder drops as e – n α, where n is the block… … Wikipedia
Error code — In computer programming, error codes are enumerated messages that correspond to faults in a specific software application. They are typically used to identify faulty hardware, software, or incorrect user input in programming languages that lack… … Wikipedia
Error detection and correction — In mathematics, computer science, telecommunication, and information theory, error detection and correction has great practical importance in maintaining data (information) integrity across noisy channels and less than reliable storage… … Wikipedia
error — 01. My teacher always told me that [errors] are little gifts that help us to learn. 02. You should check your homework before handing it in so that you can find your own [errors]. 03. While rock climbing, you need to remain very focused so that… … Grammatical examples in English
Error Detection and Handling — In television technology, Error Detection and Handling (EDH) protocol is an optional but commonly used addition to the Standard Definition Serial Digital Interface (SDI) standard. This protocol allows an SD SDI receiver to verify that each field… … Wikipedia
Source-monitoring error — DefinitionSource monitoring error is the term used by the many fields of neuroscience for the brain s failure to correctly determine whether a specific memory comes from short term or long term memory and which other memories might be associated… … Wikipedia
Source upgrade — In the jargon of computer games, a source upgrade is a modification of a computer program s source code, which adds new features and options to it, improves performance and stability, or fixes bugs and errors from the previous version. There are… … Wikipedia
Source Code in Database — A Source Code in Database IDE is an IDE such as IBM VisualAge Java where code is pre parsed and stored in a database. This allows many productivity enhancing shortcuts which were otherwise not possible.A drawback of SCID systems is that code that … Wikipedia
Error correction code — Code correcteur Un code correcteur est une technique de codage basée sur la redondance. Elle est destinée à corriger les erreurs de transmission d une information (plus souvent appelée message) sur une voie de communication peu fiable. La théorie … Wikipédia en Français
Ошибка Internal Server Error: что это и как с ней бороться
Достаточно часто владельцы хостингов мучаются из-за постоянного возникновения сообщения об ошибке 500 (Internal Server Error). Она, как это называется, многим попросту отравляет жизнь. Сейчас мы попробуем кратко разобраться в сути самой ситуации и посмотрим, как же можно избавиться от появления ошибки в будущем.
Ошибка Internal Server Error: что это?
Итак, начнем, пожалуй, с самого значения этого словосочетания. В системе (каталоге) ошибок Windows (и не только) есть ошибка под номером 500, отвечающая компьютерному термину Internal Server Error. Перевод этого словосочетания означает внутреннюю ошибку сервера, связанную со статусом протокола HTTP.
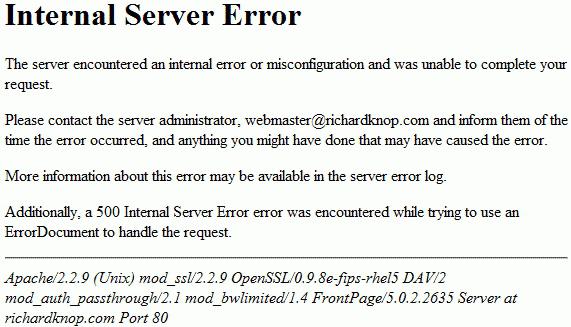
По сути, ошибка означает, что программное обеспечение сервера либо не работает, либо работает, но один или несколько его компонентов дают сбои в виде отказа на клиентские запросы, например, поисковой системы или интернет-браузера.
Причины возникновения ошибки
Говоря об ошибке Internal Server Error в самом широком понимании, стоит учитывать, что возникать она может на множестве сайтов или ресурсов, написанных с помощью совершенно разных CMS. Тут, кстати, нужно разграничить причины ее возникновения.
Очень часто такая ситуация может наблюдаться на сайтах типа WordPress, OpenCart, Joomla и др. Если же структуры управления, подобные WordPress, при построении сайта не используются, возможно, причина кроется в том, что на самом хостинге возникают сбои при подключении неправильных PHP-расширений, или сайт после запроса возвращает некорректные HTTP-заголовки, которые не могут быть распознаны вашим сервером.
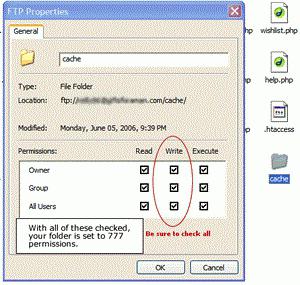
Не менее распространенной причиной возникновения ошибки Internal Server Error можно назвать отсутствие корректных прав доступа. Так, например, если на PHP файлы скриптов, которые размещены на хостинге, имеют права доступа 777, очень может быть, что их исполнение попросту блокируется сервером, вследствие чего и выдается сообщение об ошибке.
Также одной из причин может быть достаточно долгая работа скриптов. Дело в том, что PHP-ограничения по времени исполнения действуют не только в отношении хостинга, подобные лимиты могут выставляться и со стороны сервера. Иными словами, это несколько напоминает тайм-аут операции. Когда сервер в течение определенного времени не получает ответа на запрос, он попросту блокирует исполнение скрипта.
В некоторых случаях ошибка Internal Server Error может появляться, когда на хостинге наблюдается превышение лимита используемой памяти. Попросту говоря, скрипт для исполнения требует больше положенного, а ведь такой лимит устанавливается не только на PHP, зачастую действуют ограничения по потреблению ресурсов всеми исполняемыми скриптами.

Наконец, одна из самых распространенных ситуаций возникновения ошибки Internal Server Error – это содержание некорректных директив в файле .htaccess (кстати, при работе с движком WordPress это проявляется наиболее часто). Вот теперь мы вплотную подошли к поиску решения для каждой конкретной ситуации.
Ошибка Internal Server Error: как исправить простейшими способами
Для начала посмотрим, что можно сделать при обнаружении неправильных прав доступа. В данном случае права доступа 777 позволяют редактировать содержимое абсолютно всем, что, несомненно, сказывается на безопасности. В такой ситуации необходимо их изменить, применив к папкам значение 755, к файлам скриптов – 600, а ко всем стальным файлам данных – 644.
При слишком долгой работе исполняемого скрипта можно попробовать увеличить время ожидания, правда, тут есть одна загвоздка. Такое решение может сработать на выделенном сервере или VPS (Virtual Private Server), а в случае виртуального хостинга никакого эффекта не будет.
Что касается завышенного потребления памяти в сравнении с ограничениями, действующими на хостинге, тут можно посоветовать только обратиться в службу поддержки или же попросту сменить самого хостинг-провайдера, у которого ограничения будут не такими жесткими.
Теперь несколько слов о файле .htaccess. Дело в том, что он предполагает использование очень строгого синтаксиса, если при проведении настроек были допущены ошибки или некоторые неточности, избежать появления ошибки Internal Server Error не удастся. Тут нужно поступить следующим образом. Для начала нужно проверить наличие самого файла в корневой директории сайта, после чего, сделав его резервную копию, удалить целиком и полностью. Если после такой процедуры сайт снова станет работоспособным, значит проблема именно в файле .htaccess, который придется проверить на наличие ошибок в синтаксисе.
Проблемы с движком WordPress
С WordPress дело обстоит хуже. Дело в том, что этот движок способен перезаписывать оригинальный файл .htaccess, отвечающий за управление доступом к файлам и папкам хостинга, а ведь оригинальный файл должен создаваться всего один раз, и тем более не в WordPress!

Самым простым способом исправления такой ситуации является отключение темы WordPress и использование вместо нее любой другой. Если ошибка исчезла, дело именно в самой теме, если нет – нужно поэтапно отключать плагины WordPress и проверять, какой из них влияет на работоспособность.
В некоторых случаях может потребоваться обновить WordPress до последней версии и отключить функцию перезаписи файла. Для начала скачиваем на компьютерный терминал оригинальный файл .htaccess, затем входим на сайте в папку по пути /wp-admin/includes/ с последующей загрузкой файла misc.php, который необходимо открыть, скажем, в стандартном «Блокноте» (или любом другом текстовом редакторе) и найти строку функции «function save_mod_rewrite_rules». Теперь в самой функции переходим к строке «return insert_with_markers( $htaccess_file, ‘WordPress’, $rules );» и заменяем ее на «return true;» (естественно, все команды прописываются без кавычек). Остается только сохранить изменения и загрузить новый файл на хостинг с заменой старого файла misc.php.
Недостатком такого метода является только то, что в данном случае отключается обновление WordPress. При подключении плагинов они работать, естественно, не будут.
Заключение
В принципе, это, так сказать, наиболее распространенные причины появления ошибки и методы ее устранения. На самом деле, что причин, что способов борьбы с такими ситуациями может быть очень много, так что, придется анализировать ситуацию в каждом конкретном случае, а только потом выбирать, какую именно методику для исправления ошибки использовать.