-
We have updated our Community Code of Conduct. Please read through the new rules for the forum that are an integral part of Paradox Interactive’s User Agreement.
![]()
-
Add bookmark
-
#1
Hello!
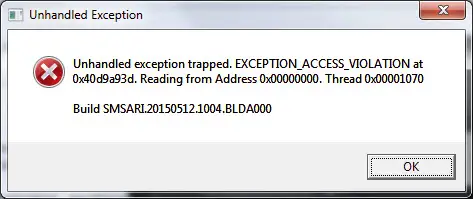
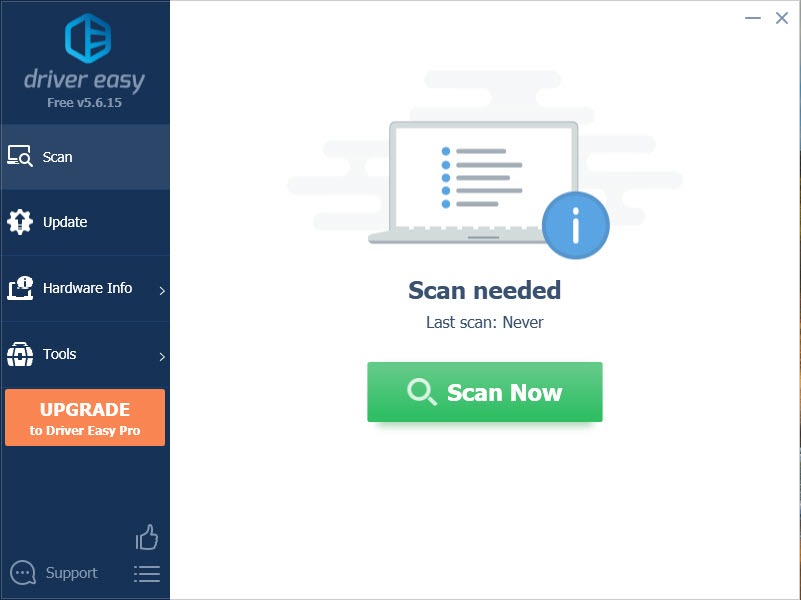
Since the new update, I’ve had some problems with launching the game (screenshot is attached). I have tried countless different guides and tutorials but nothing has worked. I validated game files and reinstalled the game and it still doesn’t work. I’ve also uninstalled all mods in case one of them was outdated but it seems like this wasn’t the issue.
Does anyone know how to solve this?
Thanks in advance.
/Albin A

![]()
-

abbexd
- Nov 19, 2021
If you use an operating system that has ransomware protection enabled, typically the Documents folder will be protected from read/write access by any program that isn’t specifically granted permission to do so. This prevents the paradox launcher from accessing the game files. To solve the issue, allow an exception for the paradox launcher in your OS settings or turn off ransomware protection(I wouldn’t advise this). Updates to the launcher will disable the access again, so you may have to do this multiple times.
Also, if you’re on windows usually an alert pops up when controlled folder access blocks something, and you can click the notification and tell windows to allow that program, and it will remember it.
Okay, so I…
![]()
-
Add bookmark
-
#2
the problem isn’t the game file but saves/mods/configs that resides in your Documents folder so validate game file won’t work
make sure
1. the folder can be read/write by launcher, typically they do
2. the folder is not symlinked. It used to be ok, but someday I found that I couldn’t save game due to that
3. does your user name contain any non standard character? I’m not sure about the PDX launcher, but programs tend to struggle with special-character path
![]()
-
Add bookmark
-
#3
1. the folder can be read/write by launcher, typically they do
If you use an operating system that has ransomware protection enabled, typically the Documents folder will be protected from read/write access by any program that isn’t specifically granted permission to do so. This prevents the paradox launcher from accessing the game files. To solve the issue, allow an exception for the paradox launcher in your OS settings or turn off ransomware protection(I wouldn’t advise this). Updates to the launcher will disable the access again, so you may have to do this multiple times.
Also, if you’re on windows usually an alert pops up when controlled folder access blocks something, and you can click the notification and tell windows to allow that program, and it will remember it.
![]()
-
Add bookmark
-
#4
If you use an operating system that has ransomware protection enabled, typically the Documents folder will be protected from read/write access by any program that isn’t specifically granted permission to do so. This prevents the paradox launcher from accessing the game files. To solve the issue, allow an exception for the paradox launcher in your OS settings or turn off ransomware protection(I wouldn’t advise this). Updates to the launcher will disable the access again, so you may have to do this multiple times.
Also, if you’re on windows usually an alert pops up when controlled folder access blocks something, and you can click the notification and tell windows to allow that program, and it will remember it.
Okay, so I activated the ransomware protection, then restarted my PC. After that, I got the popup that I used to get when an app is blocked. It works now.
Thank you guys for the help, appreciate it!
- 2
Reactions:
⚙ Все известные ошибки и способы их решения (листайте страницу и ищите свою проблему).
🖥 Если у вас есть проблема с запуском RAGE:MP и ее нет в списке — пишите в данную тему, постараюсь помочь.

ERROR: Could not access game process. Shutdown Steam/RGS/EGS and try again.
Как и сказано в ошибке: завершите все процессы Steam / Rockstar Game Service / Epic Games Store и попробуйте подключится еще раз. Также некоторым помогает запуск от имени администратора и отключение антивируса (или добавления каталога RAGE:MP в исключения антивируса, часто подобные проблемы возникают на антивирусе Kaspersky).

System.ComponentModel.Win32Exception (0x80004005)
Выключите любые антивирусы или добавьте папку в исключения и попробуйте установить RAGE снова. Эта ошибка чаще всего встречается если антивирус удаляет файлы мультиплеера.
Если отключение антивируса/windows defender не помогла, нажмите пкм на updater.exe и выберите в меню «Troubleshoot compatibility»/»Исправление проблем с совместимостью».
ERROR: Your game version is not supported by RAGE Multiplayer.

Please upgrade to 1.54 (16 March 2021) in order to continue playing.
Данная ошибка говорит о том, что GTA V обновилась до новой версии (GTA Online тоже).
Вам необходимо обновить саму игру в главном меню вашего приложения (Steam / Epic Games / Rockstar Games).
После этого если игра все равно не работает — вам нужно дождаться выхода патча для самого мультиплеера
(обычно это занимает от нескольких часов до нескольких дней). И это значит, что зайти не могут ВСЕ, а не только Вы.
Если же обновления GTA V не было, то вы используете старую версию и необходимо обновиться.
Новости и апдейты Rockstar Games — https://www.rockstargames.com/ru/newswire/
(STEAM ONLY) Запускается одиночный режим или запускается сингл вместо мультиплеера.
Выйдите из стима, потом запустите RAGE и дайте ему запустить стим самому, после чего вы с большой вероятностью загрузитесь в мультиплеер.
Игра не запускается или запускается и сразу отключается
Удалите любые моды, установленные в папке GTA.
Пользователям NVIDIA: отключите Nvidia Shadowplay и попробуйте зайти снова.
Игра отключается после захода на сервер (Как только появляется надпись «Multiplayer started»)
Попробуйте переместить папку с RAGE на другой диск (Например, из C: в D:)
Если сервер с войс чатом, отключите любые программы, которые блокируют доступ к микрофону или изменяют ваш голос.
Failed to retrieve the install directory (Не удалось найти путь установки)
Это происходит, когда вы указываете неверную папку с GTA V или исполняемый файл гта/любые другие файлы нужно обновить. Во-первых, убедитесь, что вы указали верную папку с GTAV.exe. Если папка указана верно, то запустите верификацию файлов гта.
RageMP зависает, когда я нажимаю на сервер
Зачастую это происходит когда в папке с гта отсутствует файл GTAV.exe. Если файл присутствует, то проверьте, может ли стим запустить гта 5.
Я запускаю RAGE Multiplayer и ничего не происходит
Выключите любые антивирусы или добавьте папку в исключения, это происходит, когда не хватает каких либо файлов RAGE. Если у вас нет антивируса, переустановите RAGE Multiplayer.
I’m getting frameskipping while playing on any server (Не понял, что такое frameskipping, сами переводите как хотите)
Отключите autohotkey. Если монитор 144Hz, ограничьте fps/hz до 60.
GTA V запускается с черным экраном, а затем внезапно закрывается/вылетает после нажатия «Play Now»
Если это происходит впервые после запуска RageMP или вы только что его переустановили, это происходит из-за того, что кнопка ‘Play Now’ переподключает к последнему серверу, на котором вы играли. Используйте вкладку ‘Servers’ иди ‘Direct Connect’, если подключаетесь впервые, после этого можно использовать «Play Now».
GTA V запускается с черным экраном и отключается.
Возможные программы, из-за которых это происходит:
- MSI Afterburner
- AI Suite 3
- GameFirst V
- Malwarebytes
- Norton Security / Antivirus Software
- RivaTuner Statistics Server (7.2.2)
- Microsoft Gaming Overlay (или ‘Game Bar’)
Чтобы удостовериться, что это одна из программ выше, откройте файл main_logs.txt в папке GTA V. Если там будет надпись FYDIGF, то необходимо отключить эти программы.
«A legal up to date Grand Theft Auto V copy is required to play RAGE Multiplayer»
Нужно купить лицензионную копию игры.
Если вы приобрели игру и все равно видите эту ошибку, верифицируйте файлы. Если это не помогает, перейдите в папку с гта и удалите Файл ‘GTA5.exe’, затем запустите ‘PlayGTA5.exe’ и загрузитесь в игру. После этого попробуйте зайти через RAGE повторно.
RageMP закрывается сразу после открытия
Выключите любые антивирусы или добавьте папку в исключения, затем перезагрузите компьютер.
Если это не помогло, то, возможно, ваше подключение блокирует cloudflare, попробуйте подключиться через VPN.
Запускается одиночный режим или главное меню
Убедитесь, что пакет Visual C++ redistributable 2015 (https://www.microsoft.com/en-us/download/details.aspx?id=48145) был установлен.
Если он установлен, отключите windows defender.
System.Net.WebException: The remote server returned an error: (403)
Ваш IP был заблокирован, смените его или используйте VPN.
Если ничего выше не помогло, попробуйте сделать следующее:
- Переустановите RAGE Multiplayer.
- Убедитесь, что игра никак не была модифицирована.
- Переустановите GTA V или пройдите верификацию файлов.
- Запустите RAGE Multiplayer от имени администратора.
- Установите необходимые пакеты:
https://www.microsoft.com/en-us/download/details.aspx?id=48145
https://www.microsoft.com/en-us/download/details.aspx?id=53344&desc=dotnet462 - Установите RAGE Multiplayer и GTA V на один диск.
- Установите RageMP и GTA V на разные диски.
- Отключите любые оверлеи (Steam, OBS, Discord overlay, Overwolf).
- Убедитесь, что присутствует файл сохранения (запустите одиночную игру и сохраните ее).
- Удалите любые моды на GTA V.
- Выключите любые антивирусы или добавьте папку в исключения. Добавьте RAGE в исключения Firewall.
- Нажмите пкм на ragemp.exe и выберите в меню «Troubleshoot compatibility»/»Исправление проблем с совместимостью».
- (NVIDIA USERS) отключите Shadowplay.
- (STEAM ONLY) Выйдите из стима, потом запустите RAGE и дайте ему запустить стим самому.
- Внимание! Самый важный шаг, когда уже ничего не помогает:
Полностью удаляем отовсюду Rockstar Games Service и Social Club если установлен + очищаем папки в Документах, AppData.
Полностью удаляем все файлы GTA V и начинаем качать заного, дожидаемся окончания загрузки.
Делаем первый пробный вход в СЮЖЕТНЫЙ РЕЖИМ и доходим до момента спавна персонажа, после чего выходим с игры.
Теперь уже подключайтесь через RAGE Multiplayer к любимому серверу, 99% все будет работать.
Источник: https://rage.mp/forums/topic/1816-client-troubleshooting-tips-fixes/
ragemp не запускается ragemp ошибка gta5rp не запускается
When you install a software program, whether that’s a video game, word processing application, or a media player, you expect it to work when you launch it and stay working when in use. Unfortunately, if you have corrupted software or memory that is damaged, you may find that you are unable to access certain pieces of software as you normally would.
When access is denied, you end up with an access violation error, which often reads “Exception_Access_Violation” with an error code or address attached. In some cases, this error may pop up with a specific module that’s causing the problem or provide the name of the software causing the issue.
What is the Access Violation at Address Error, and Why Does it Pop Up?
The access violation at address error is Windows-specific and can occur on all operating system versions, including Windows 10. If you have been getting this error, it means that the software you are attempting to launch or run is trying to access a protected memory address. When this occurs, the attempt to access the protected memory is denied, as the program you are trying to run should not have access to this particular address except for the program that is currently using it.
How to Read the Numeric Error Code?
In most cases, the error will be accompanied by a numeric code that is between 7-10 digits in length. For example, 0xC0000005 is a broad access violation error that prevents users from playing audio or accessing the control panel. When you see a numeric error code pop up, you can debug it by reading the exception parameters (the letter and numbers). The first exception parameter (0) will tell you the type of violation, the second exception parameter (1) will tell you the address. You can use this code to identify the cause of the problem and potentially the fix for it as well.
To help you with your access violation at address error, we’ve compiled 9 easy to try solutions below.
1. Inspect Your Computer for a Malware Infection.

If any of your software is heavily infected with malware, it can corrupt your memory systems which can cause this error to pop up. If you’ve noticed your computer acting up before getting an access violation at address error, such as unprovoked alerts or fake browser windows, then a detailed and deep scan should be done. If you’re just using the built-in antivirus software and it doesn’t find anything, you may want to try another option to see if a malware infection was missed. Getting rid of the malware will solve the issue.
2. Add Your Program to an Exception Access List.
If you have no malware on your computer, you can add the program that you want to run to a data execution prevention exception list. This will allow you to run the program despite the error code. Here is how to do this.
- In your computer’s search bar, type in “control panel” and open it.
- You’ll want the system choice here.
- Click into system and security.
- In the system menu, click on the advanced system settings.
- In the advanced tab, find the performance section and hit settings.
- Across the top, click onto the data executive prevention tab.
- The section option will allow you to turn on data execution prevention for all programs and services except those that you choose.
- Click the add button and find your program’s .exe file.
- Add it to the list, hit apply, and then okay to save the changes.
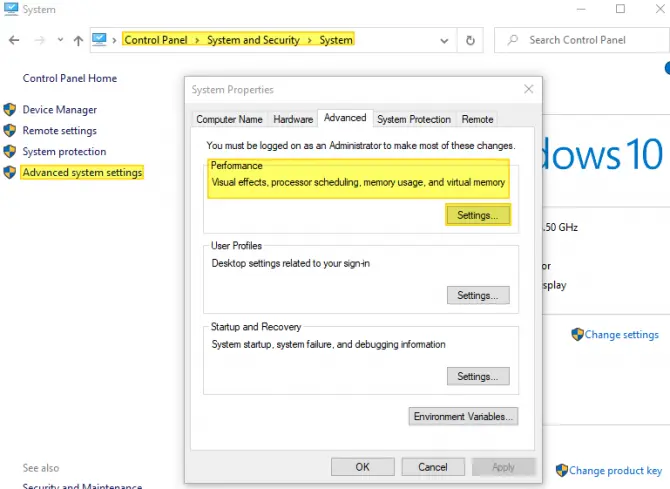
Run the program again and check to see if you still get the access violation at address error.
3. Consider Disabling User Account Control.
If you are trying to install or run a Java-based program, the access violation at address is more likely to occur. To fix this issue, you can temporarily disable the user account control to fix the error from coming up. This does have a slight security risk to it, so if you are uncomfortable with this method, disable user account control when you run your desired application and then turn it back on.
- In your computer’s search bar, type in “control panel” and open it.
- Find the “user accounts” and click into it – twice.
- Choose the last option, which is to change the settings of the user account controls.
- This window allows you to set when you get notified about changes to your computer. Move the slider down to “never notify” and hit okay.
- Try running your program now.
If your program runs, just remember to fix your user account settings once you are done with it for the day.
4. Double Check Your Software Isn’t in Read-Only Mode.
If your program is in a read-only mode, access is going to be denied and it won’t be able to launch or run effectively. Here is how to check this and fix it.
- Find the shortcut on your desktop and right-click on the file.
- Choose the properties option from the menu.
- Find the “general” tab located at the top of the window.
- Find the attributes section and make sure read-only is not checked.
- If it is checked, uncheck it.
- Hit apply/okay to save changes.

If your program does not have a desktop shortcut, you can either make one and follow the same steps or right-click on the .exe application file and follow the above steps.
5. Check Your RAM for Corruption.
If you ever had a heavy malware infection on your computer and it managed to cause damage to portions of your random access memory (RAM), then this could be the cause behind your access violation at address error. To check your RAM for corruption, do the following.
- In your computer’s search bar, type in “Windows memory diagnostic”.
- Run the program.
- Choose the first option which is to restart and check for issues.
- Let it run and wait for the results.
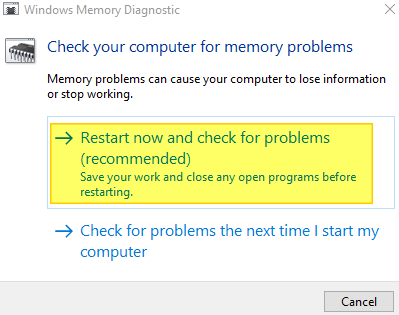
If your RAM is corrupted, you should replace it.
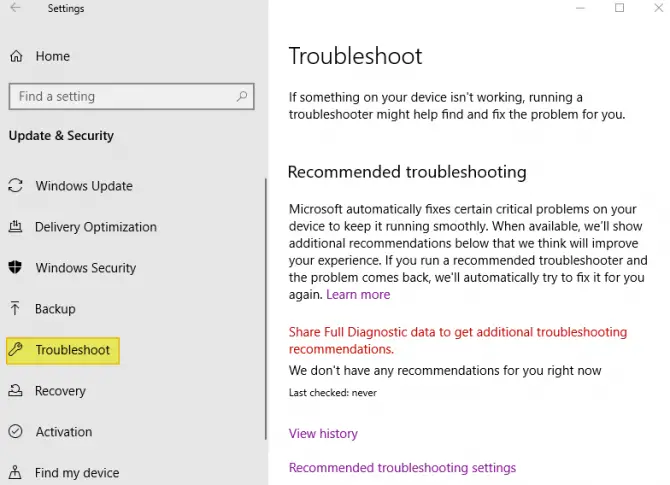
6. Troubleshoot Your Hardware.
Some individuals have had luck in fixing the access violation at address error by resolving issues with their hardware.
- In your computer’s search bar, type in settings, and open it. Or if you are on Windows 10, press down the Windows key + I at the same time.
- Click on the “update and security” section.
- In the left-hand menu, find troubleshoot and click it.
- Run it and follow the on-screen instructions.
Once the troubleshooting has finished, try running your program again to see if the access violation error has been resolved.
7. Run Your Program in Compatibility Mode.
If you are trying to run an older program, it may not be fully compatible with a newer operating system like Windows 10. If you are getting the access violation at address error and it’s pointing directly to the software program, then it may be a compatibility issue.
- Find your program’s shortcut on your desktop and right-click the file.
- Choose the properties option from the menu.
- At the top of the properties menu, find the compatibility tab.
- Choose to “run this program in compatibility mode” and select an older version of Windows, such as Windows 8.1/7.
- Hit apply and okay to save the changes.
- Run the program and see if the issue persists.
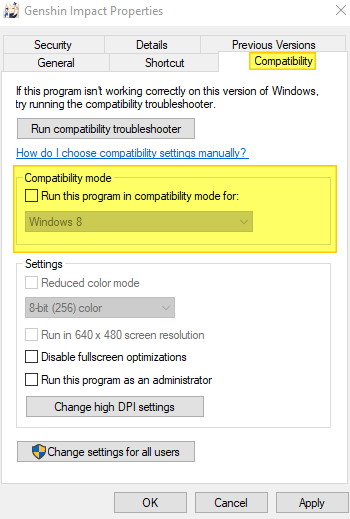
You may need to try different compatibility modes depending on how old the program is that you are running.
8. Reinstall the Problematic Software.
It is quite possible that the program you are trying to run has either had portions of it damaged or corrupted from crashes or improper saves or a recent update to it has caused issues. This, in turn, may be the reason behind why the program is now causing access violation errors. Try reinstalling the application to see if the problem persists. To uninstall, do the following.
- In your computer’s search bar, type in settings or hit the Windows key + I at the same time.
- Choose “apps” from the menu.
- Find the application that will not run or launch in the list.
- Click uninstall.

You can also uninstall by going to your computer’s control panel, choosing the programs and features option, and clicking on the uninstall button. If you prefer this method, find the program in the list and hit the uninstall button. Once fully uninstalled, you will need to re-download the program and do a fresh install.
It is annoying that you cannot start the application with the stop code CE-30005-8, especially when you are eager to play the favorite game, right? How to fix this error? Now, read the post of MiniTool and you will get the most effective troubleshooting methods from it.
Determine the Real Reason for the PS4 Cannot Start Application CE-30005-8 Error
In order to get rid of the PS4 cannot start application CE-30005-8 error code, you need to figure out its root causes. According to the survey, the real reason behind this type of error is fundamentally related to a hardware failure with your device.
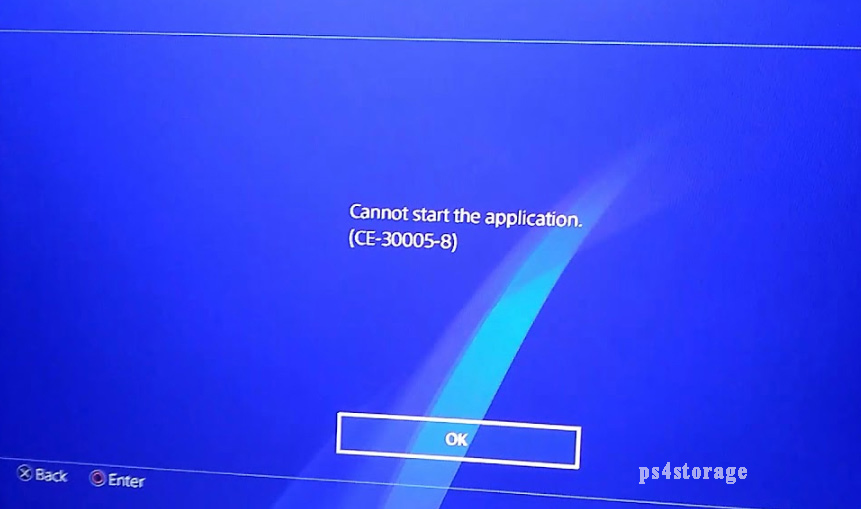
What hardware failures will arouse the error CE-30005-8? There are 3 major forms of devices are responsible for the error, including your PS4 internal and external hard drive, or the Blu-Ray/DVD player. So, you need to diagnose these devices separately.
The PS4 CE-30005-8 error indicates hardware failures, especially on your PS4 hard disk drive. As you know, it is very likely that your PS4 hard drives are undergoing some serious functionality issues. So, it is highly recommended that you back up the hard drive as soon as possible in case of any data loss.
Now, let’s diagnose your devices one by one.
Fix CE-30005-8 on Blu-ray/DVD Disc
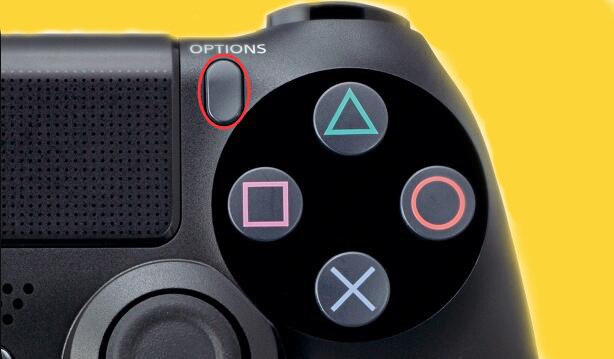
If you encounter the PS4 error CE-30005-8 error code while trying to start a game from the Blu-Ray/DVD player, you need to check if it is broken or damaged. Here’s how to do that.
Step 1. You need to eject the disc first of all. Here are 2 ways below:
1. Eject the disc manually by pressing the Eject button on your PS4.
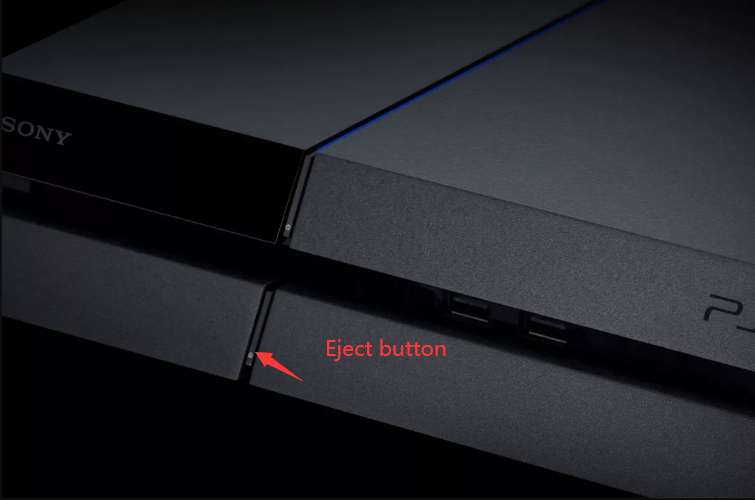
2. Alternatively, you can press the Options button on the Dual Shock 4, which is located on the Home menu. This action will give you the option to Remove Disc.
Step 2. Clean the disc carefully. Now, you need to check the underside of the disc. There may be some scratches or smudges. Then you can use a soft cloth to wipe the disc from the inner circle to the outer edge with a straight line.
Step 3. Now, insert the cleaned disc back into your PS4 and check if the PS4 cannot start the application problem is resolved. Well, if the PS4 game discs or Blu-Ray is damaged actually, you should consider buying a new one.
More importantly, you need to check if there are any errors on your PS4 hard disk drive, which may lead to the error CE-30005-8. Please keep reading the following part to check your PS4 hard drive.
Fix CE-30005-8 on PS4 Hard Drive
If the PS4 cannot start application CE-30005-8 error pops up when trying to start your game from an external hard drive, you need to check if the PS4 system gets corrupted or any bad sectors on the hard drive.
You can use a free tool to check your external hard drive quickly. Here it is highly recommended that you use MiniTool Partition Wizard Free Edition. It is a powerful partition management tool trusted by millions of users around the world.
This tool provides you with so many practical features like perform a disk benchmark, resize partition, convert MBR to GPT disk and so on. Now, follow the steps below to perform a surface test for your hard drive.
Note: You need to check not only the external hard drive but also the internal hard drive using the professional tool.
Free Download
Step 1. Connect the external hard drive to your computer and launch this tool to get its main interface.
Step 2. Select the external hard drive and click on the Surface Test feature.
Step 3. In the Surface Test window, click on the Start Now button.
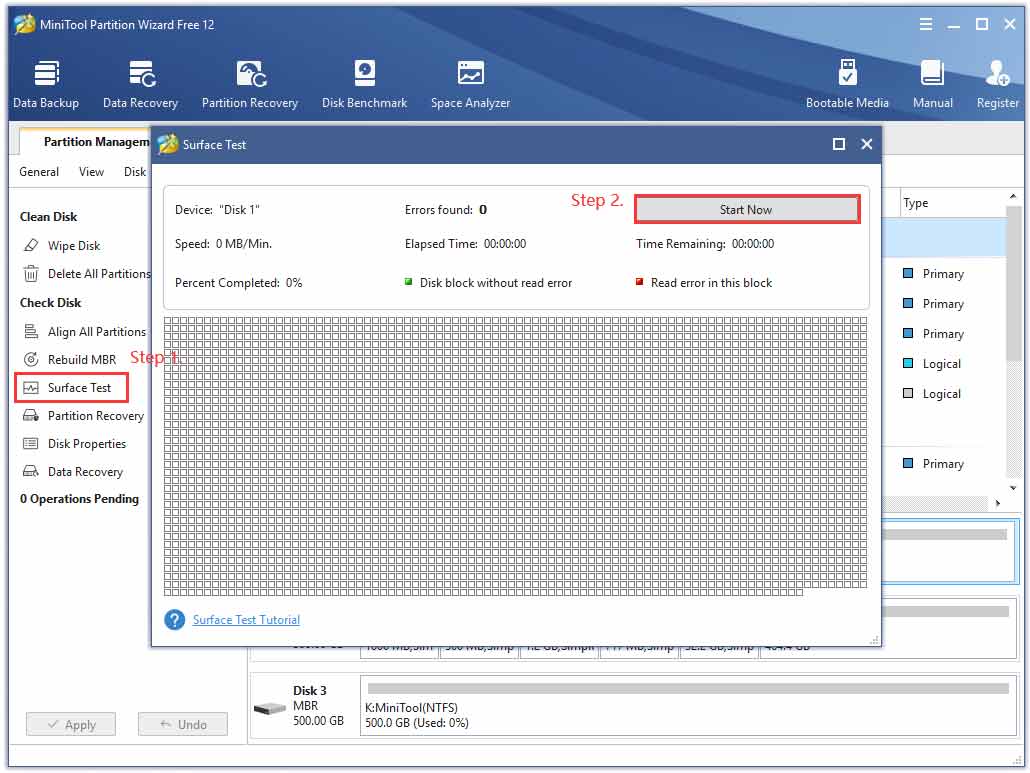
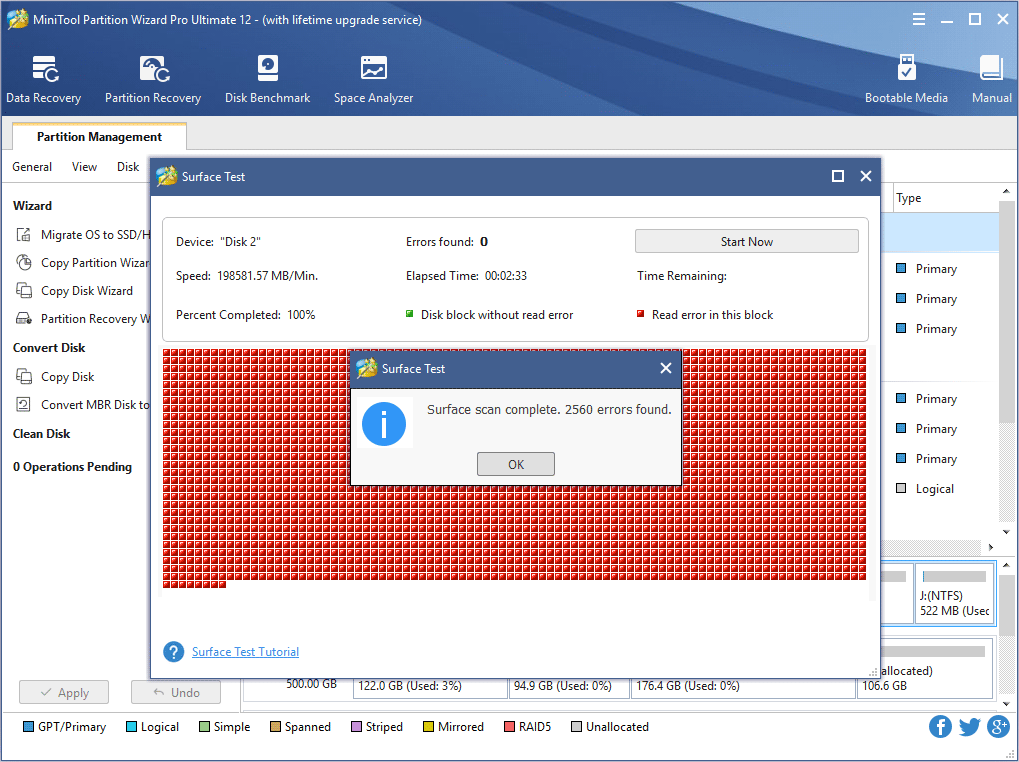
Now, this tool will scan the bad sectors for the whole hard drive automatically. If you found a large chunk of blocks marked with red color like the shown image below, you may need to consider switching to a new hard drive.
Well, if there are just little bad factors on the hard drive, you can run the chkdsk /f /r to shield the bad tracks. Read this post ‘’How to check Hard Drive and Fix the Error?” to know more details.
Right now, you may have figured out the real reasons that cause the PS4 error CE-30005-8error. So, how to fix it? Please read the following part carefully in which all the effective methods will be discussed.
Here are 4 accessible CE-30005-8 fixes for you. You can try them one by one until you fix the problem.
Method 1. Delete and Restore the Game Data on the Hard Disk Drive
The most common way to get rid of the PS4 CE-30005-8 error is to delete the game data on the hard drive. If you are a PlayStation Plus member, you need to have a backup for the game data using a USB flash drive or online cloud service.
You can follow the detailed steps below to delete and restore the game data.
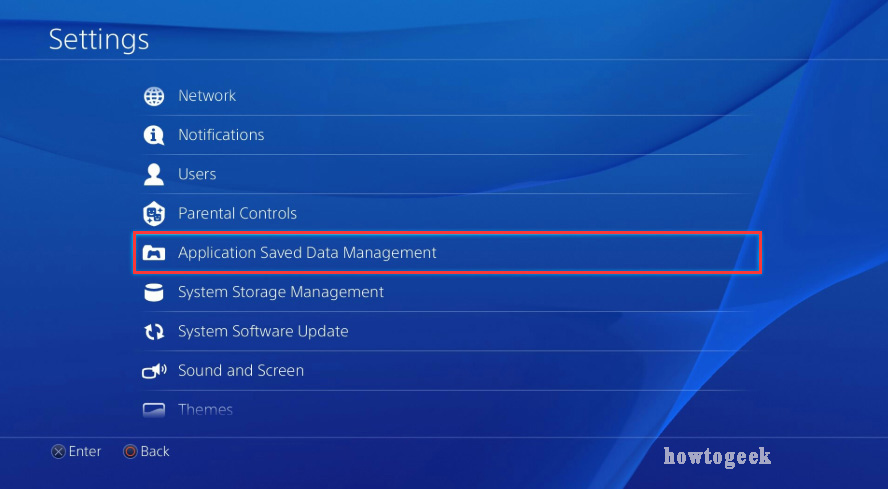
Step 1. On the Home page of PS4, press the Up on D-pad to open the Function menu. After that, navigate to the Settings icon and press the X button on the console to open it.

Step 2. In the Settings window, click on the Application Saved Data Management section and press the X button again.
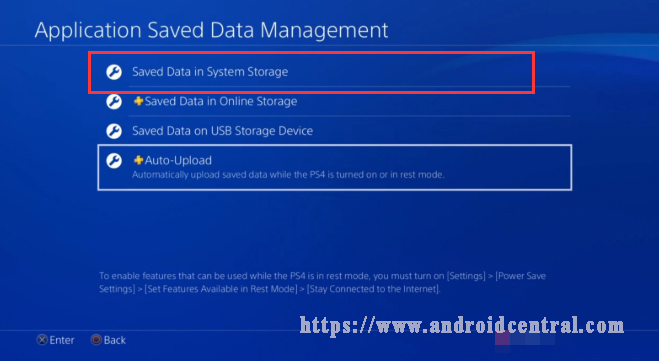
Step 3. Then click on the Saved Data in System Storage option.
Step 4. Now select the problematic game and press the Options button on the console to bring up the Delete option.
Step 5. After deleting the problematic game data, you can restore the saved data from the same Application Saved Data Management option in the Settings menu.
Now, restart the application or game and check if the error CE-30005-8 still persists.
Method 2. Rebuild the PS4 Database
In addition, rebuilding the PS4 database is another effective method to troubleshoot some common error codes like CE-35694-7. Here you can have a try.
Step 1. Hold the Power button to turn off PS4 entirely.
Step 2. Hold the Power button for several seconds again until you heard the 2 short beeps, and then your PS4 will enter into Safe Mode.
Step 3. Connect the DS4 with a USB cable and press the PS button on the controller.
Step 4. Select the Rebuild Database option.
This process may take hours to complete, please wait patiently.
Method 3. Switch to A New PS4 Hard Drive
If you have confirmed that your PS4 hard drive has so many bad sectors using the MiniTool Partition Wizard, you can replace it with a new PS4 hard drive. It is a relatively complex process that will take you some time. Please keep reading carefully.
So, what do you need to prepare? Here are some recommendations that can help you upgrade your PS4 hard drive smoothly.
- Use a compatible hard drive with 1 or 2TB storage capacity like Seagate st1000dm003 hard drive, which is big enough to save a dozen modern games. Well, it is highly recommended that you use an SSD due to its great performance.
- Prepare an external hard drive to back up your game data.
- Prepare a USB drive with at least 1GB free storage space to download the latest PS4 software update.
Now, follow the CE-30005-8 fix below to upgrade the PS4 hard drive.
How to Upgrade Your PS4 Hard Drive
Step 1. Back up Your Game Data:
1. Connect the external hard drive to the PS4.
2. Open the Settings window of PS4, and then navigate to the System > Backup and Restore > Back up PS4 to save the game data to the external drive.
Step2. After that, your PS4 console will restart and the backup process will begin. Download the latest PS4 System Software Update:
1. Connect the USB drive into your computer, and create a new folder named PS4. Then open the PS4 folder and recreate a new folder named UPDATE in it.

1. Click here to access the PS4 System Software Update page and download the latest version.
2. After downloading the PS4 software update file, save it to the UPDATE folder. At this time, the file should be named PUP in the folder.
Step 3. Open your PS4:
1. Hold the Power button of the PS4 console to turn it off completely and place it on a steady flat surface.
2. On the back of the console (which may slightly differ depending on the PS4 model), remove the panel carefully by sliding it rightward with your finger.
Step 4. Replace the PS4 Hard Drive:
1. The hard drive is secured to the console with a single screw. Here you need to remove the screws using the head screwdriver and keep them carefully.
2. Now, you should be able to take out the old PS4 hard drive.
3. Insert the new PS4 hard drive gently without touching the bottom. After that, you can re-secure the screws. Please make sure the metal pins are facing inward.
Step 5. Put Everything Back Together:
Now, you need to place the encased hard drive back into the console and slide the exterior cover back into place. Plug the system back in and reconnect it to the TV.
How to Setup the New PS4 Hard Drive
After you complete all the above steps, you also need to set up the new PS4 hard drive.
Step 1. Install the PS4 System Software Update:
- Connect the PS4 controller to the console using a USB cable and press the PS
- Insert the formatted USB drive containing the PS4 system software update into the USB port on the console.
- Click on the OK and Yes button on the next screen to start the installation of the system.
Step 2. Restore Your Game Data:
- Connect the external hard drive containing the backup game data to your PS4.
- Navigate to Settings >System > Back up and Restore.
- Select the Restore option, and then select the backup file and follow the on-screen prompts to complete the restore.
Now, restart the application or game and check if the PS4 cannot start application error still persists.
Method 4. Disable the Mods
If you are using any mods that you currently added through the Nexus Mod Manager, then disable them. This is because it has been proven by a small part of players that disabling mods can get rid of the error. This method may not work for all users, but it is worth having a try.
Click to Tweet
The End
In today’s article, we mainly analyzed the real causes of the PS4 CE-30005-8 error. Now, you can try the above 4 CE-30005-8 fixes. If you have any questions, please send us an email via [email protected]. We also appreciate any ideas left in the comment area.
CE-30005-8 FAQ
What is a DS4 controller?
DualShock 4 (DS4) controller is a good choice for those who want to play games on the PC. You can even use its trackpad as a mouse to control your PC games. In order to use the DS4 controller in Steam, you need to install software called DS4Windows.
How to fix a corrupted PS4 hard drive?
- Use MiniTool Partition Wizard to check your PS4 hard drive.
- Run the chkdsk /f /r.
- Use the System File Checker.
What to do if PS4 cannot start?
You can try power cycling the PS4 system with HDD, here’s how:
- Hold the Power button for 7 seconds to turn off the PS4 entirely.
- Remove the HDD and turn on the system.
- Turn off the PS4 system again and remove the power cable and leave the system for 20 minutes.
- Reinstall the HDD and boot into Safe Mode.
Does cleaning PS4 improve performance?
As you know, dust and grit on your PS4 console is the major factor that will impact on the performance. This is because serious dust build-up will slow down the fans, which lead to the overheating system and even cause your PS4 to crash.
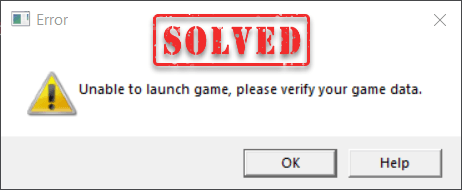
Wondering how you can fix the error “Unable to launch game, please verify your game data. ” when trying to play GTA 5 or Red Dead Redemption 2? You’re on the right page to get your answers! In our article, we’ll walk you through the whole process to get past this error message.
Try these fixes
You may not need to try them all; simply work your way down the list until you find the one that works.
- Verify your game files
- Download and install all Windows updates
- Update your drivers
- Disable background applications
- Run the launcher as administrator
- Delete the Rockstar Games folders
1. Verify your game files
Obviously, when this error message pops up, the first thing you would do is to verify the game files. If you’ve done this for multiple times but it still doesn’t work, move to fix 2.
If you haven’t verified integrity of game files, follow the instructions below to do so.
- Open your Rockstar Games Launcher.
- Navigate to Settings. Under My installed games on the left, select the game you need to verify. Then click on the tab VERIFY INTEGRITY.

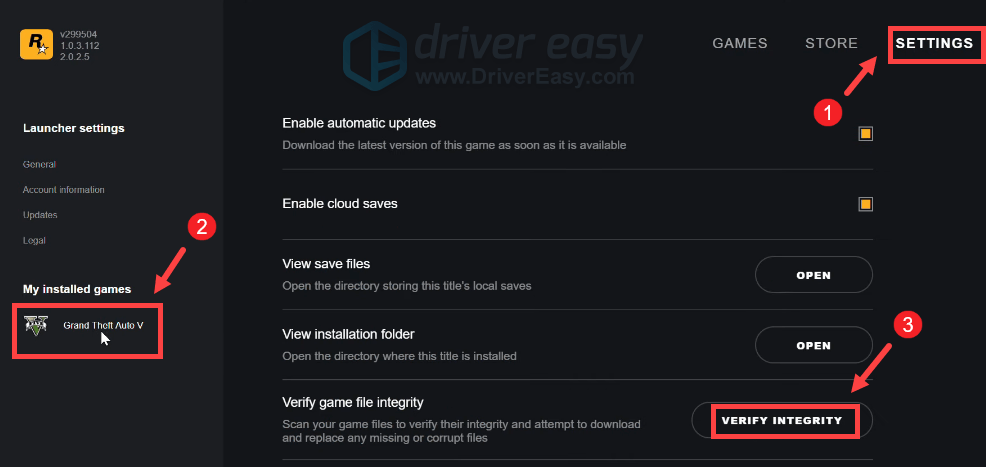
Upon completion, a message will pop up above the system tray stating that your game is verified and ready to play.
However, if the error message “Unable to launch game, please verify your game data. ” still appears, try the next fix below.
2. Download and install all Windows updates
Before tweaking any settings within the launcher, you should check if there are Windows updates available. Windows updates come with bug fixes and new features. Downloading and installing all Windows updates is probably the best shot to fix any issues you’re having.
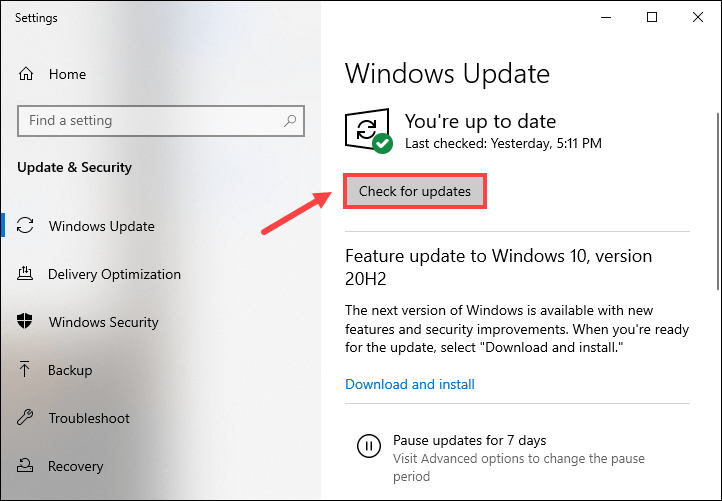
- In the Search box, type check for updates. Then click Check for updates from results.

- Click on the Check for updates tab. If there are any updates available, it’ll automatically start to download and install it. Simply wait for it to complete and you should be asked to restart your computer.


Upon restart, launch your game and check if this works for you. If the error message still pops up, try the next fix below.
3. Update your drivers
After you’ve confirmed the integrity of your game files is intact and you have the latest Windows version, it’s time you check if your drivers, especially your graphics driver, are up-to-date. Using outdated drivers can cause a wide variety of issues with your programs. Therefore, you should check if there are any driver updates available.
To update your drivers, you can either do it automatically by going to the Device Manager or directly head to the manufacturers’ official websites to download and install the correct drivers for your system. This is obviously time-consuming. If you don’t have the time or patience to update drivers on your own, you can use Driver Easy, an automatic driver updater tool to help you automatically detect the outdated drivers, download and install the driver updates. With Driver Easy, you don’t need to waste your time hunting for driver updates as it will do all the busy work for you.
- Download and install Driver Easy.
- Run Driver Easy and click the Scan Now button. Driver Easy will then scan your computer and detect any devices with missing or outdated drivers.

- Click Update All. Driver Easy will then download and update all your outdated and missing device drivers, giving you the latest version of each, direct from the device manufacturer.
This requires the Pro version which comes with full support and a 30-day money-back guarantee. You’ll be prompted to upgrade when you click Update All. If you don’t want to upgrade to the Pro version, you can also update your drivers with the FREE version. All you need to do is to download them one at a time and manually install them.

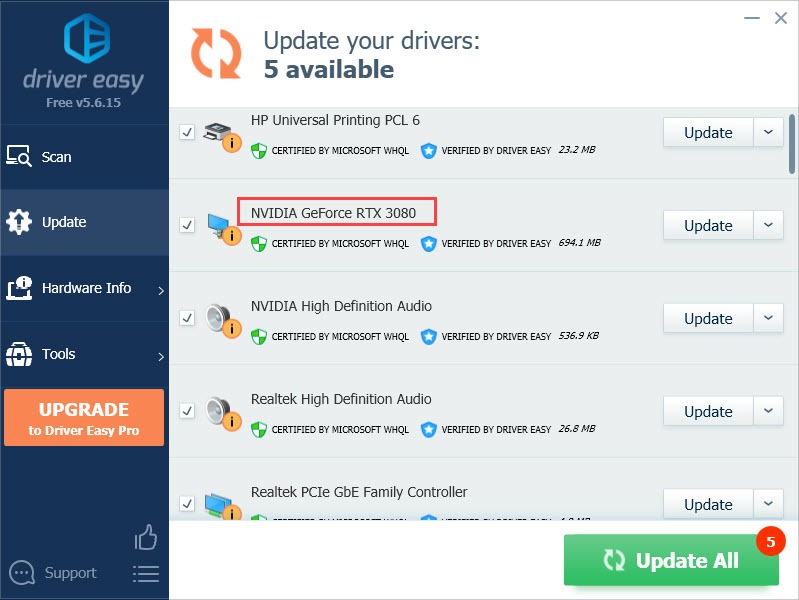
The Pro version of Driver Easy comes with full technical support.
If you need assistance, please contact Driver Easy’s support team at support@drivereasy.com.
After the update is finished, restart your PC. If the error message still occurs, try the next fix below.
4. Disable background applications
If you’re experiencing launching problems when using Rockstar Games Launcher, it could be due to a third-party application running in the background. In this situation, you can disable applications running in the background by following the instructions below.
- On your keyboard, press the Windows logo + R keys simultaneously to open the Run box.
- Type taskmgr and press Enter.

- Under the Processes tab, right-click on the programs that you don’t necessarily use and select End task.

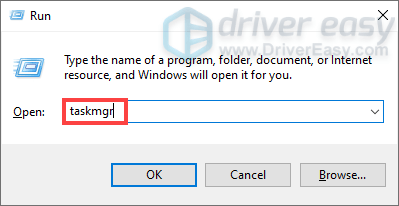

Then relaunch your game. If this doesn’t do the trick, move on to the next fix.
5. Run the launcher as administrator
If your game fails to launch properly, it could be due to the lack of administrative rights. To fix it, try to run the Rockstar Games Launcher as an administrator by following the instructions below.
- From your desktop, right-click on the Rockstar Games Launcher icon and select Properties.

- In the Properties window, select theCompatibility tab. Then check the box next to Run the program as an administrator.

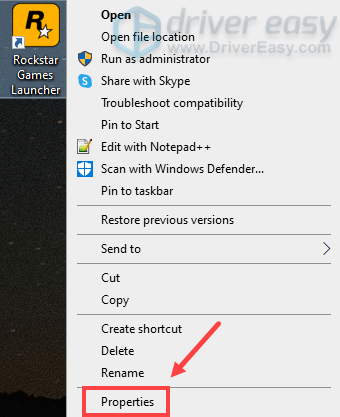
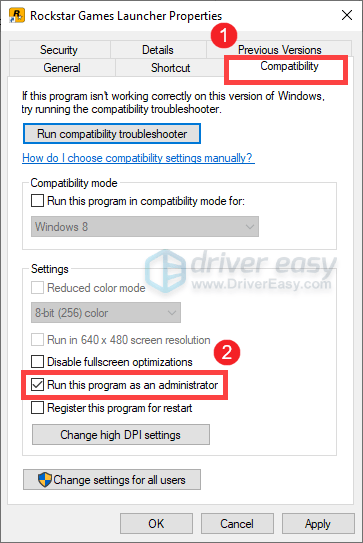
Then click Apply > OK to save the changes.
If your problem persists, don’t worry. Below are some other fixes you can try.
6. Delete the Rockstar Games folders
If none of the fixes listed above help, you should try deleting the Social Club folder from Program Files and Program Files (x86). It’s usually located on C:Program FilesRockstar Games and C:Program Files (x86)Rockstar Games.
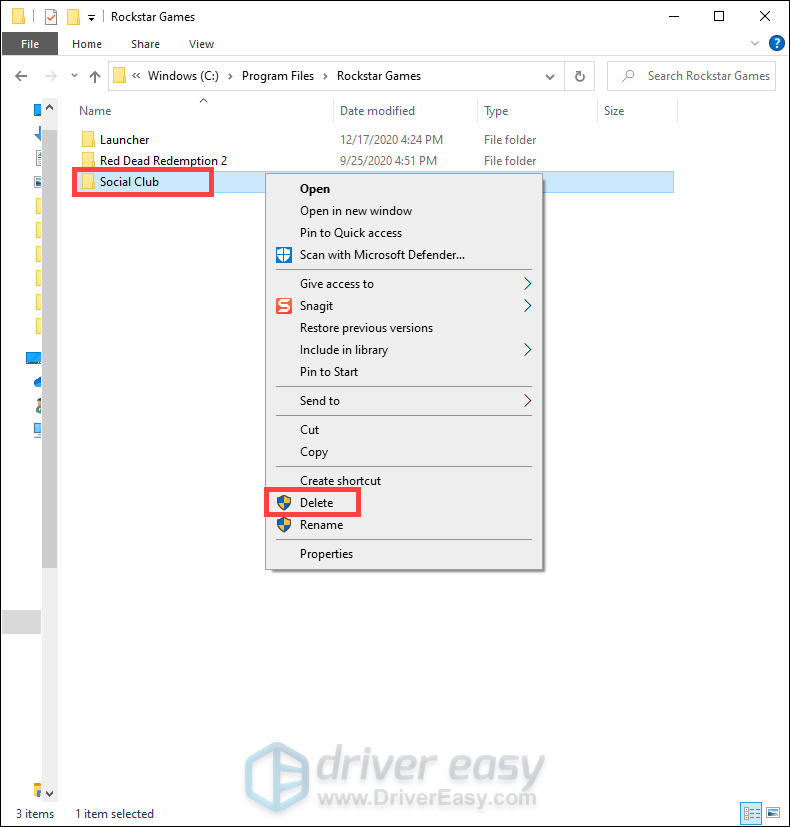
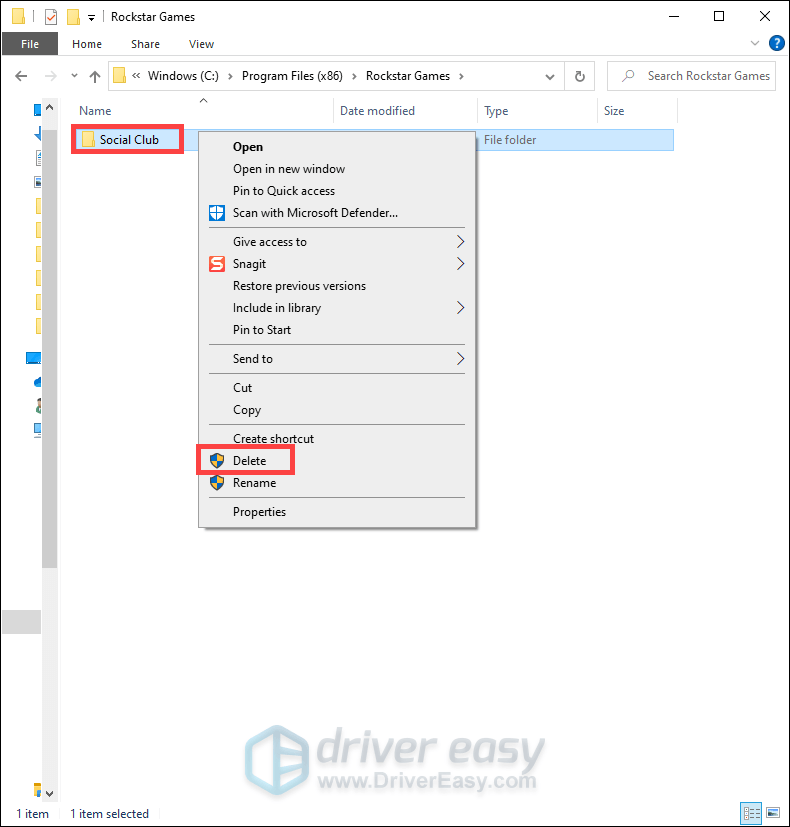
Then try to run your game from the Rockstar Games Launcher. If the error message still pops up, it’s time to delete the Rockstar Games folder from OneDrive.
Navigate to C:Users*YourUserName*Documents. Then find the Rockstar Games folder and delete it.
After you’ve done these, launch your game and you should be able to enjoy your gameplay without getting any error messages.
That’s it. Feel free to drop us a line in the comment section below if you have any ideas or questions.
25
25 people found this helpful
Содержание
- Поддержка и обратная связь Support and feedback
- Признаки ошибки во время выполнения 75
- Причины ошибки во время выполнения 75
- Ошибки во время выполнения в базе знаний
- Как исправить ошибку во время выполнения 75
- Шаг 1: Восстановить записи реестра, связанные с ошибкой 75
- Шаг 2: Проведите полное сканирование вашего компьютера на вредоносное ПО
- Шаг 3: Очистить систему от мусора (временных файлов и папок) с помощью очистки диска (cleanmgr)
- Шаг 4: Обновите драйверы устройств на вашем компьютере
- Шаг 5: Используйте Восстановление системы Windows, чтобы «Отменить» последние изменения в системе
- Шаг 6: Удалите и установите заново программу Windows Operating System, связанную с Ошибка 75
- Шаг 7: Запустите проверку системных файлов Windows («sfc /scannow»)
- Шаг 8: Установите все доступные обновления Windows
- Шаг 9: Произведите чистую установку Windows
- Информация об операционной системе
- Проблема с 75 все еще не устранена?
- Лучшие эксперты в этом разделе
Во время операции доступа к файлу или диску, например Open, mkdir, chdirили rmdir, операционной системе не удалось установить соединение между путем и именем файла. During a file-access or disk-access operation, for example, Open, MkDir, ChDir, or RmDir, the operating system couldn’t make a connection between the path and the file name. Эта ошибка имеет следующие причины и способы решения: This error has the following causes and solutions:
Спецификация файла отформатирована неправильно. The file specification isn’t correctly formatted. Имя файла может содержать полный (абсолютный) или относительный путь. A file name can contain a fully qualified (absolute) or relative path. Полный путь начинается с имени диска (если путь находится на другом диске) и содержит явно выраженные элементы пути от корня к файлу. A fully qualified path starts with the drive name (if the path is on another drive) and lists the explicit path from the root to the file. Любой путь, который не является полным, является относительным к текущему диску и каталогу. Any path that isn’t fully qualified is relative to the current drive and directory.
Вы попытались сохранить файл, который заменил бы существующий файл, предназначенный только для чтения. You attempted to save a file that would replace an existing read-only file. Измените атрибут «только для чтения» целевого файла или сохраните этот файл с другим именем. Change the read-only attribute of the target file or save the file with a different file name.
Предпринята попытка открыть файл, доступный только для чтения, в режиме последовательного вывода или присоединения. **** You attempted to open a read-only file in sequential Output or Append mode. Откройте файл в режиме ввода или измените атрибут «только для чтения» этого файла. Open the file in Input mode or change the read-only attribute of the file.
Вы попытались изменить проект Visual Basic в базе данных или в документе. You attempted to change a Visual Basic project within a database or document. Вы не можете вносить в проект изменения, касающиеся разработки. You can’t make design changes to the project.
Для получения дополнительной информации выберите необходимый элемент и нажмите клавишу F1 (для Windows) или HELP (для Macintosh). For additional information, select the item in question and press F1 (in Windows) or HELP (on the Macintosh).
Поддержка и обратная связь Support and feedback
Есть вопросы или отзывы, касающиеся Office VBA или этой статьи? Have questions or feedback about Office VBA or this documentation? Руководство по другим способам получения поддержки и отправки отзывов см. в статье Поддержка Office VBA и обратная связь. Please see Office VBA support and feedback for guidance about the ways you can receive support and provide feedback.
| Номер ошибки: | Ошибка во время выполнения 75 | |
| Название ошибки: | Path/File access error | |
| Описание ошибки: | During a file-access or disk-access operation, for example, Open, MkDir, ChDir, or RmDir, the operating system couldn’t make a connection between the path and the file name. | |
| Разработчик: | Microsoft Corporation | |
| Программное обеспечение: | Windows Operating System | |
| Относится к: | Windows XP, Vista, 7, 8 |
Совместима с Windows 2000, XP, Vista, 7, 8 и 10

Признаки ошибки во время выполнения 75
- Появляется сообщение «Ошибка 75» и окно активной программы вылетает.
- Ваш компьютер часто прекращает работу после отображения ошибки 75 при запуске определенной программы.
- Отображается “Path/File access error”.
- Отображается сообщение “During a file-access or disk-access operation, for example, Open, MkDir, ChDir, or RmDir, the operating system couldn’t make a connection between the path and the file name.”.
- Windows медленно работает и медленно реагирует на ввод с мыши или клавиатуры.
- Компьютер периодически «зависает» на несколько секунд.
Такие сообщения об ошибках 75 могут появляться в процессе установки программы, когда запущена программа, связанная с Microsoft Corporation (например, Windows Operating System), при запуске или завершении работы Windows, или даже при установке операционной системы Windows. Отслеживание момента появления ошибки 75 является важной информацией при устранении проблемы.
Причины ошибки во время выполнения 75
- Поврежденная загрузка или неполная установка программного обеспечения Windows Operating System.
- Повреждение реестра Windows Operating System из-за недавнего изменения программного обеспечения (установка или удаление), связанного с Windows Operating System.
- Вирус или вредоносное ПО, которые повредили файл Windows или связанные с Windows Operating System программные файлы.
- Другая программа злонамеренно или по ошибке удалила файлы, связанные с Windows Operating System.
Ошибки типа Ошибки во время выполнения, такие как «Ошибка 75», могут быть вызваны целым рядом факторов, поэтому важно устранить каждую из возможных причин, чтобы предотвратить повторение ошибки в будущем.

Ошибки во время выполнения в базе знаний
star rating here
Как исправить ошибку во время выполнения 75
Ниже описана последовательность действий по устранению ошибок, призванная решить проблемы Ошибка 75. Данная последовательность приведена в порядке от простого к сложному и от менее затратного по времени к более затратному, поэтому мы настоятельно рекомендуем следовать данной инструкции по порядку, чтобы избежать ненужных затрат времени и усилий.
Пожалуйста, учтите: Нажмите на изображение [  ] , чтобы развернуть инструкции по устранению проблем по каждому из шагов ниже. Вы также можете использовать изображение [
  ], чтобы скрывать инструкции по мере их выполнения.
Шаг 1: Восстановить записи реестра, связанные с ошибкой 75
Редактирование реестра Windows вручную с целью удаления содержащих ошибки ключей Ошибка 75 не рекомендуется, если вы не являетесь специалистом по обслуживанию ПК. Ошибки, допущенные при редактировании реестра, могут привести к неработоспособности вашего ПК и нанести непоправимый ущерб вашей операционной системе. На самом деле, даже одна запятая, поставленная не в том месте, может воспрепятствовать загрузке компьютера!
В связи с подобным риском мы настоятельно рекомендуем использовать надежные инструменты очистки реестра, такие как WinThruster [Загрузить] (разработанный Microsoft Gold Certified Partner), чтобы просканировать и исправить любые проблемы, связанные с Ошибка 75. Используя очистку реестра [Загрузить], вы сможете автоматизировать процесс поиска поврежденных записей реестра, ссылок на отсутствующие файлы (например, вызывающих ошибку %%error_name%%) и нерабочих ссылок внутри реестра. Перед каждым сканированием автоматически создается резервная копия, позволяющая отменить любые изменения одним кликом и защищающая вас от возможного повреждения компьютера. Самое приятное, что устранение ошибок реестра [Загрузить] может резко повысить скорость и производительность системы.
Предупреждение: Если вы не являетесь опытным пользователем ПК, мы НЕ рекомендуем редактирование реестра Windows вручную. Некорректное использование Редактора реестра может привести к серьезным проблемам и потребовать переустановки Windows. Мы не гарантируем, что неполадки, являющиеся результатом неправильного использования Редактора реестра, могут быть устранены. Вы пользуетесь Редактором реестра на свой страх и риск.
Перед тем, как вручную восстанавливать реестр Windows, необходимо создать резервную копию, экспортировав часть реестра, связанную с Ошибка 75 (например, Windows Operating System):
- Нажмите на кнопку Начать.
- Введите «command» в строке поиска. ПОКА НЕ НАЖИМАЙТЕENTER!
- Удерживая клавиши CTRL-Shift на клавиатуре, нажмите ENTER.
- Будет выведено диалоговое окно для доступа.
- Нажмите Да.
- Черный ящик открывается мигающим курсором.
- Введите «regedit» и нажмите ENTER.
- В Редакторе реестра выберите ключ, связанный с Ошибка 75 (например, Windows Operating System), для которого требуется создать резервную копию.
- В меню Файл выберите Экспорт.
- В списке Сохранить в выберите папку, в которую вы хотите сохранить резервную копию ключа Windows Operating System.
- В поле Имя файла введите название файла резервной копии, например «Windows Operating System резервная копия».
- Убедитесь, что в поле Диапазон экспорта выбрано значение Выбранная ветвь.
- Нажмите Сохранить.
- Файл будет сохранен с расширением .reg.
- Теперь у вас есть резервная копия записи реестра, связанной с Windows Operating System.
Следующие шаги при ручном редактировании реестра не будут описаны в данной статье, так как с большой вероятностью могут привести к повреждению вашей системы. Если вы хотите получить больше информации о редактировании реестра вручную, пожалуйста, ознакомьтесь со ссылками ниже.
Мы не несем никакой ответственности за результаты действий, совершенных по инструкции, приведенной ниже – вы выполняете эти задачи на свой страх и риск.
Шаг 2: Проведите полное сканирование вашего компьютера на вредоносное ПО
Есть вероятность, что ошибка 75 может быть связана с заражением вашего компьютера вредоносным ПО. Эти вредоносные злоумышленники могут повредить или даже удалить файлы, связанные с Ошибки во время выполнения. Кроме того, существует возможность, что ошибка 75 связана с компонентом самой вредоносной программы.
Совет: Если у вас еще не установлены средства для защиты от вредоносного ПО, мы настоятельно рекомендуем использовать Emsisoft Anti-Malware (скачать). В отличие от других защитных программ, данная программа предлагает гарантию удаления вредоносного ПО.
Шаг 3: Очистить систему от мусора (временных файлов и папок) с помощью очистки диска (cleanmgr)
Со временем ваш компьютер накапливает ненужные файлы в связи с обычным интернет-серфингом и повседневным использованием компьютера. Если такие ненужные файлы иногда не удалять, они могут привести к снижению быстродействия Windows Operating System или к ошибке 75, возможно вследствие конфликтов файлов или перегрузки жесткого диска. Удаление таких временных файлов при помощи утилиты Очистка диска может не только устранить ошибку 75, но и существенно повысить быстродействие вашего компьютера.
Совет: Хотя утилита Очистки диска является прекрасным встроенным инструментом, она удаляет не все временные файлы с вашего компьютера. Другие часто используемые программы, такие как Microsoft Office, Firefox, Chrome, Live Messenger, а также сотни других программ не поддаются очистке при помощи программы Очистка диска (включая некоторые программы Microsoft Corporation).
Из-за недостатков утилиты Windows Очистка диска (cleanmgr) мы настоятельно рекомендуем использовать специализированное программное обеспечение очистки жесткого диска / защиты конфиденциальности, например WinSweeper [Загрузить] (разработано Microsoft Gold Partner), для очистки всего компьютера. Запуск WinSweeper [Загрузить] раз в день (при помощи автоматического сканирования) гарантирует, что ваш компьютер всегда будет чист, будет работает быстро и без ошибок %%error_name%%, связанных с временными файлами.
Как запустить Очистку диска (cleanmgr) (Windows XP, Vista, 7, 8 и 10):
- Нажмите на кнопку Начать.
- Введите «command» в строке поиска. ПОКА НЕ НАЖИМАЙТЕENTER!
- Удерживая клавиши CTRL-Shift на клавиатуре, нажмите ENTER.
- Будет выведено диалоговое окно для доступа.
- Нажмите Да.
- Черный ящик открывается мигающим курсором.
- Введите «cleanmgr» и нажмите ENTER.
- Программа Очистка диска приступит к подсчету занятого места на диске, которое вы можете освободить.
- Будет открыто диалоговое окно Очистка диска, содержащее флажки, которые вы можете выбрать. В большинстве случаев категория «Временные файлы» занимает большую часть дискового пространства.
- Установите флажки напротив категорий, которые вы хотите использовать для очистки диска, и нажмите OK.
Шаг 4: Обновите драйверы устройств на вашем компьютере
Ошибки 75 могут быть связаны с повреждением или устареванием драйверов устройств. Драйверы с легкостью могут работать сегодня и перестать работать завтра по целому ряду причин. Хорошая новость состоит в том, что чаще всего вы можете обновить драйверы устройства, чтобы устранить проблему с Ошибка 75.
В связи с временными затратами и общей сложностью обновления драйверов мы настоятельно рекомендуем использовать утилиту обновления драйверов, например DriverDoc (разработана Microsoft Gold Partner), для автоматизации этого процесса.
Пожалуйста, учтите: Ваш файл Ошибка 75 может и не быть связан с проблемами в драйверах устройств, но всегда полезно убедиться, что на вашем компьютере установлены новейшие версии драйверов оборудования, чтобы максимизировать производительность вашего ПК.
Шаг 5: Используйте Восстановление системы Windows, чтобы «Отменить» последние изменения в системе
Восстановление системы Windows позволяет вашему компьютеру «отправиться в прошлое», чтобы исправить проблемы Ошибка 75. Восстановление системы может вернуть системные файлы и программы на вашем компьютере к тому времени, когда все работало нормально. Это потенциально может помочь вам избежать головной боли от устранения ошибок, связанных с 75.
Пожалуйста, учтите: использование восстановления системы не повлияет на ваши документы, изображения или другие данные.
Чтобы использовать Восстановление системы (Windows XP, Vista, 7, 8 и 10):
- Нажмите на кнопку Начать.
- В строке поиска введите «Восстановление системы» и нажмите ENTER.
- В окне результатов нажмите Восстановление системы.
- Введите пароль администратора (при появлении запроса).
- Следуйте инструкциям Мастера для выбора точки восстановления.
- Восстановить ваш компьютер.
Шаг 6: Удалите и установите заново программу Windows Operating System, связанную с Ошибка 75
Инструкции для Windows 7 и Windows Vista:
- Откройте «Программы и компоненты», нажав на кнопку Пуск.
- Нажмите Панель управления в меню справа.
- Нажмите Программы.
- Нажмите Программы и компоненты.
- Найдите Windows Operating System в столбце Имя.
- Нажмите на запись Windows Operating System.
- Нажмите на кнопку Удалить в верхней ленте меню.
- Следуйте инструкциям на экране для завершения удаления Windows Operating System.
Инструкции для Windows XP:
- Откройте «Программы и компоненты», нажав на кнопку Пуск.
- Нажмите Панель управления.
- Нажмите Установка и удаление программ.
- Найдите Windows Operating System в списке Установленные программы.
- Нажмите на запись Windows Operating System.
- Нажмите на кнопку Удалить справа.
- Следуйте инструкциям на экране для завершения удаления Windows Operating System.
Инструкции для Windows 8:
- Установите указатель мыши в левой нижней части экрана для показа изображения меню Пуск.
- Щелкните правой кнопкой мыши для вызова Контекстного меню Пуск.
- Нажмите Программы и компоненты.
- Найдите Windows Operating System в столбце Имя.
- Нажмите на запись Windows Operating System.
- Нажмите Удалить/изменить в верхней ленте меню.
- Следуйте инструкциям на экране для завершения удаления Windows Operating System.
После того, как вы успешно удалили программу, связанную с Ошибка 75 (например, Windows Operating System), заново установите данную программу, следуя инструкции Microsoft Corporation.
Совет: Если вы абсолютно уверены, что ошибка 75 связана с определенной программой Microsoft Corporation, удаление и повторная установка программы, связанной с Ошибка 75 с большой вероятностью решит вашу проблему.
Шаг 7: Запустите проверку системных файлов Windows («sfc /scannow»)
Проверка системных файлов представляет собой удобный инструмент, включаемый в состав Windows, который позволяет просканировать и восстановить поврежденные системные файлы Windows (включая те, которые имеют отношение к Ошибка 75).
Чтобы запустить проверку системных файлов (Windows XP, Vista, 7, 8 и 10):
- Нажмите на кнопку Начать.
- Введите «command» в строке поиска. ПОКА НЕ НАЖИМАЙТЕENTER!
- Удерживая клавиши CTRL-Shift на клавиатуре, нажмите ENTER.
- Будет выведено диалоговое окно для доступа.
- Нажмите Да.
- Черный ящик открывается мигающим курсором.
- Введите «sfc /scannow» и нажмите ENTER.
- Проверка системных файлов начнет сканирование на наличие проблем Ошибка 75 и других системных файлов (проявите терпение – проверка может занять длительное время).
- Следуйте командам на экране.
Шаг 8: Установите все доступные обновления Windows
Microsoft постоянно обновляет и улучшает системные файлы Windows, связанные с Ошибка 75. Иногда для решения проблемы Ошибки во время выполнения нужно просто напросто обновить Windows при помощи последнего пакета обновлений или другого патча, которые Microsoft выпускает на постоянной основе.
Чтобы проверить наличие обновлений Windows (Windows XP, Vista, 7, 8 и 10):
- Нажмите на кнопку Начать.
- Введите «update» в строке поиска и нажмите ENTER.
- Будет открыто диалоговое окно Обновление Windows.
- Если имеются доступные обновления, нажмите на кнопку Установить обновления.
Шаг 9: Произведите чистую установку Windows
Предупреждение: Мы должны подчеркнуть, что переустановка Windows займет очень много времени и является слишком сложной задачей, чтобы решить проблемы Ошибка 75. Во избежание потери данных вы должны быть уверены, что вы создали резервные копии всех важных документов, изображений, программ установки программного обеспечения и других персональных данных перед началом процесса. Если вы сейчас е создаете резервные копии данных, вам стоит немедленно заняться этим (скачать рекомендованное решение для резервного копирования), чтобы защитить себя от безвозвратной потери данных.
Пожалуйста, учтите: Если проблема 75 не устранена после чистой установки Windows, это означает, что проблема Ошибки во время выполнения ОБЯЗАТЕЛЬНО связана с аппаратным обеспечением. В таком случае, вам, вероятно, придется заменить соответствующее оборудование, вызывающее ошибку 75.
Информация об операционной системе
Сообщения об ошибках 75 могут появляться в любых из нижеперечисленных операционных систем Microsoft Windows:
- Windows 10
- Windows 8
- Windows 7
- Windows Vista
- Windows XP
- Windows ME
- Windows 2000
Проблема с 75 все еще не устранена?
Обращайтесь к нам в любое время в социальных сетях для получения дополнительной помощи:

Об авторе: Джей Гитер (Jay Geater) является президентом и генеральным директором корпорации Solvusoft — глобальной компании, занимающейся программным обеспечением и уделяющей основное внимание новаторским сервисным программам. Он всю жизнь страстно увлекался компьютерами и любит все, связанное с компьютерами, программным обеспечением и новыми технологиями.
Создание программ на языке Basic.
[администратор рассылки: Андреенков Владимир (Академик)]
Лучшие эксперты в этом разделе
Gluck
Статус: Студент
Рейтинг: 506
solowey
Статус: Специалист
Рейтинг: 271
Megaloman
Статус: Советник
Рейтинг: 51
| Перейти к консультации №: |

Работаю в XP в 2007 офисе. Беспокоить ошибка Path/File access error (Error 75).
Работаю в программе минут 20, при этом несколько раз сохраняю её и потом неожиданно выдается такая ошибка. При сохранении Excel падает и открывает последний автосейв. Из внешних файлов прога работает с .gif записывая туда диаграмму для последствующего вывода её в userform и с некоторыми собственными шаблонами диаграмм. Проблема не такая уж редкая, но никто не говорит как её лечить. Помогите пожалуйста. Откуда и почему возникает такой сбой. Может кто-то встречался с подобным. Работаю в XP офис 2007.
Работа с внешними файлами только в этом листинге. Спасибо.
Состояние: Консультация закрыта

Oтветов пока не поступило.
Работа с удаленными файлами только здесь. Все остальное – это работа с данными в листах этой же книги.
ActiveChart.Export Filename:=»График.gif», Filtername:=»GIF»
ActiveChart.Parent.Delete
With Image1
.PictureSizeMode = fmPictureSizeModeStretch
.PictureAlignment = fmPictureAlignmentCenter
.Picture = LoadPicture(«График.gif»)
End With
HookEst
на какой именно строке ошибка возникает?
на ActiveChart.Export или на LoadPicture(«График.gif»)?
полный текст ошибки какой?
Попробуйте для экспорта и загрузки указывать абсолютные пути, возможно где-то между экспортом и загрузкой меняется текущая папка.
неизвестный
Ошибка возникает не на строке. Я написал данный листинг из предположения, что это связано с работой с внешними файлами. Но видимо нет. ошибка возникает спонтанно. все работает нормально, и тут в очередной раз пытаясь запустить прогу он выдает сообщение о ошибке. Но это еще не все. Видимо когда данное повреждение произошло ( что невозможно отследить, так как сразу никакого сообщения не возникает) при сохранении возникает уже не ошибка VBA, а падает весь Excel. Поэтому я не могу понять где происходит ошибка, почему, и как её устранить. Вы встречались с чем-то подобным? Я могу отправить код если нужно.
HookEst
На других машинах(компьютерах) ошибка возникает?
неизвестный
Похоже, я решил проблему. Дело в следующем: Я залез в параметры Excel, в закладку «Сохранение». И оказалось, что он по умолчанию сохраняет файл как обычный excel’евский файл варианта 2007. Хотя при этом я работаю в файле с поддержкой макросов (.xlsm). Я изменил этот параметр с обычного расширения на .xlsm. На всякий случай я убрал галочку с автосохранения. Теперь все работает. Я заметил, что программа падает в момент сохранения. ПРичем если сразу (ну минут через 5 после начала работы в файле) сохранять то все ок. Косяк происходит минут через 15 – 20. А в настройках автосохр. написано 10 минут. Получается что файл автосохраняется как книга Excel без макросов, а когда уже после этого (т.е. после 10 минут работы или первого автосохр.) я снова сохраняюсь у него происходит конфликт, и кстати востановить файл он тоже не может, так как пытается восстановить его их автосейва. Кстати при этом он говорит, что не может прочитать содержимое книги, т.е. макрос. В общем дело в этих форматах. Еще не пробовал работать в 2003, но думаю там проблем не будет, так как там один формат .xls Вот, так что вот так. я вообще в сети видел жалобы на такую ошибку, в похожих условиях. Так что может эта инфа кому еще пригодится

Возможность оставлять сообщения в мини-форумах консультаций доступна только после входа в систему.
Воспользуйтесь кнопкой входа вверху страницы, если Вы зарегистрированы или пройдите простую процедуру регистрации на Портале.