������������� ������� ��������� ��������� ���������� (man-��)
acl_check (3)
BSD mandoc
Linux ACL
NAME
acl_check

 - check an ACL for validity
LIBRARY
Linux Access Control Lists library (libacl, -lacl).
SYNOPSIS
#include <sys/types.h>
#include <acl/libacl.h>
int
acl_check (acl_t acl int *last);
DESCRIPTION
The
acl_check ();
function checks the ACL referred to by the argument
acl
for validity.
The three required entries ACL_USER_OBJ, ACL_GROUP_OBJ, and ACL_OTHER
must exist exactly once in the ACL. If the ACL contains any ACL_USER or
ACL_GROUP entries, then an ACL_MASK entry is also required. The ACL
may contain at most one ACL_MASK entry.
The user identifiers must be unique among all entries of type ACL_USER.
The group identifiers must be unique among all entries of type ACL_GROUP.
If the ACL referred to by
acl
is invalid,
acl_check ();
returns a positive error code that indicates which type of error was detected.
The following symbolic error codes are defined:
- ACL_MULTI_ERROR
-
The ACL contains multiple entries that have a tag type
that may occur at most once. - ACL_DUPLICATE_ERROR
-
The ACL contains multiple ACL_USER entries with the same user ID, or
multiple ACL_GROUP entries with the same group ID. - ACL_MISS_ERROR
- A required entry is missing.
- ACL_ENTRY_ERROR
- The ACL contains an invalid entry tag type.
The
acl_error ();
function can be used to translate error codes to text messages.
In addition, if the pointer
last
is not
NULL
acl_check ();
assigns the number of the ACL entry at which the error was detected to
the value pointed to by
last
Entries are numbered starting with zero, in the order in which they would be
returned by the
acl_get_entry ();
function.
RETURN VALUE
If successful, the
acl_check ();
function returns
0
if the ACL referred to by
acl
is valid, and a positive error code if the ACL is invalid. Otherwise, a
value of
-1
is returned and the global variable
errno
is set to indicate the error.
ERRORS
If any of the following conditions occur, the
acl_check ();
function returns
-1
and sets
errno
to the corresponding value:
- Bq Er EINVAL
-
The argument
aclis not a valid pointer to an ACL.
STANDARDS
This is a non-portable, Linux specific extension to the ACL manipulation
functions defined in IEEE Std 1003.1e draft 17 (lqPOSIX.1erq, abandoned).
SEE ALSO
acl_valid3,
acl(5)
AUTHOR
Written by
An Andreas Gruenbacher Aq a.gruenbacher@bestbits.at .
Index
- NAME
- LIBRARY
- SYNOPSIS
- DESCRIPTION
- RETURN VALUE
- ERRORS
- STANDARDS
- SEE ALSO
- AUTHOR
Если Вы не раз сталкивались с большими списками доступа или входящими в них object-группами, то наверняка уже задавались вопросом, существует ли инструмент, позволяющий определить, пропустит ли access-лист определённый пакет и какие строки сработают.
Конечно, такие инструменты существуют и полностью или частично решают перечисленные задачи. Однако, они, как правило, являются частью мощных «комбайнов» управления сетью, 90% функционала которых Вас не интересует.
Безусловно, никто не запрещает использовать регулярные выражения для поиска определённых строк списка доступа прямо с консоли сетевого устройства. Но данный метод предоставит очень поверхностный результат. Например, он не отобразит доступ хоста, попадающего в сетевую маску или порт, попадающий под диапазон. Тем более, таким образом нельзя отобразить все существующие доступы между двумя заданными узлами или сетями. Опытный сетевой администратор осведомлён о безрезультативности метода простого парсинга access-листа для таких задач.
Рассматриваемая небольшая утилита создана именно для этого — найти строки access-листа, разрешающие или запрещающие определённый сетевой трафик, и даже более — выявить все строки, имеющие отношение к доступам между между заданными точками.
Идея простая: программа находит строки access-листа, удовлетворяющие заданному критерию. Сам критерий выглядит как строка access-листа, но без использования оператора «permit» или «deny».
Если регулярно добавлять сетевые правила в access-лист без проверки их существования, то списки доступа станут содержать большое количество избыточных правил. Для решения этой задачи в программе реализован функционал анализа списка доступа на избыточность. С его помощью можно выявить лишние правила и высвободить ресурсы оборудования.
При использовании в ACL object-групп программе необходимо передать (скопировать) их состав. В итоговом ACL такие группы будут представлены элементарными правилами.
Интерфейс программы
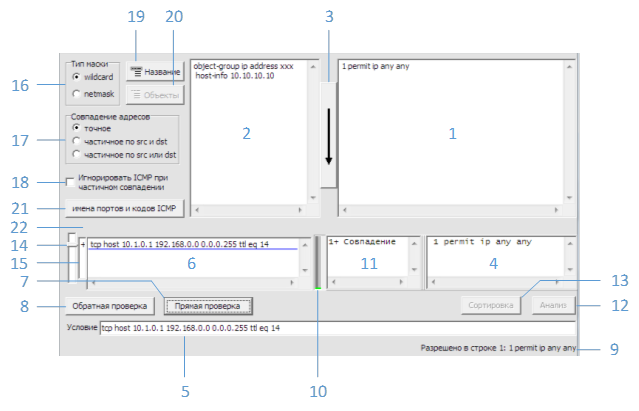
Рис.1 Главное окно
На рисунке 1 представлено главное окно программы со следующими элементами:
1 — поле ввода access-листа
2 — поле ввода object-групп
3 — запуск распознавания access-листа
4 — поле вывода распознанного access-листа
5 — однострочное поле ввода условия
6 — многострочный список ввода условий
7 — прямая проверка условия
8 — обратная проверка условия
9 — поле результата проверки
10 — шкала позиционирования сработавших строк ACL
11 — поле просмотра деталей сработавших строк ACL
12 — анализ ACL на конфликты и избыточность
13 — упорядочивание строк ACL по различным критериям
14 — указатель текущего активного условия в многострочном списке (6)
15 — поле краткого обозначения результатов проверки списка условий (6)
16 — переключатель типа маски
17 — переключатель алгоритма проверки адресов источника и назначения
18 — игнорирование строк ACL с ICMP в режиме частичного совпадения адресов
19 — выбор вариантов использования имени ACL в командах CLI
20 — вывод object-групп, используемых в распознанном ACL
21 — вывод поддерживаемых протоколов, а также типов и кодов ICMP
22 — поле вывода ошибок распознавания ACL
Основные шаги
Исходный access-list необходимо скопировать в поле 1. Если он содержит object-группы, то их состав необходимо скопировать в поле 2. ACL и object-группы можно копировать как с конфигурации устройства (“show running-config”, “show startup-config”), так и с результата команд “show access-lists”, “show object”.
Ниже приведён пример результата команды “show running-config”, допустимого для использования в поле 1:
ip access-list extended ACL
 permit icmp host 172.16.0.6 host 172.21.0.6
 permit ip host 172.16.0.6 host 172.21.0.1
 permit tcp host 192.168.8.15 range 1024 65534 host 192.168.66.47
 permit tcp 192.168.8.0 0.0.0.255 eq 22 1521 3389 addrgroup ADMIN_BSD
 permit tcp host 192.168.8.12 eq 1521 192.168.83.20 0.0.0.1
Тот же access-list по команде “show access-lists”:
Extended IP access list ACL
    10 permit icmp host 172.16.0.6 host 172.21.0.6
    20 permit ip host 172.16.0.6 host 172.21.0.1 (32 matches)
    30 permit tcp host 192.168.8.15 range 1024 65534 host 192.168.66.47
    40 permit tcp 192.168.8.0 0.0.0.255 eq 22 1521 3389 addrgroup ADMIN_BSD (1 match)
    50 permit tcp host 192.168.8.12 eq 1521 192.168.83.20 0.0.0.1
Пример результата команды “show running-config”, допустимого для использования в поле 2:
object-group ip address ADMIN_BSD
 host-info 10.237.92.131
 host-info 10.22.145.132
 host-info 10.22.145.136
 host-info 10.22.145.141
Содержимое вывода команды “show object-group”:
IP address object group ADMIN_BSD
 host 10.237.92.131
 host 10.22.145.132
 host 10.22.145.136
 host 10.22.145.141
Также допустимы и другие форматы object-групп.
Пример допустимого фрагмента команды “show running-config”:
object-group network Servers
 host 10.15.12.5
 host 10.15.5.11
 host 10.15.4.2
 host 10.15.7.34

object-group service Ports1
 tcp-udp eq domain
 tcp-udp eq 88
 udp range 3268 3269
 tcp gt 49151
Пример того же фрагмента команды “show object-group”:
Network object group Servers
 host 10.15.12.5
 host 10.15.5.11
 host 10.15.4.2
 host 10.15.7.34

Service object group Ports1
 tcp-udp eq domain
 tcp-udp eq 88
 udp range 3268 3269
 tcp gt 49151
Поддерживаются и вложенные группы:
object-group network zzz
 5.5.5.0 255.255.255.0
 host 6.6.6.6

object-group network yyy
 host 3.3.3.3
 group-object zzz

object-group network xxx
 host 1.1.1.1
 group-object zzz
 group-object yyy

permit udp any object-group xxx eq 21
permit tcp object-group xxx host 7.7.7.7 eq ftp
permit tcp object-group xxx object-group xxx eq 22
permit tcp object-group yyy object-group xxx eq ftp
После копирования ACL и object-групп необходимо нажать кнопку 3. В результате access-list будет распознан и отображён в развёрнутом виде (в случае использования object-групп) в поле 4. Если на этапе распознавания возникли ошибки, то они будут отображены в поле 22. Результат ошибки можно скопировать в буфер обмена.
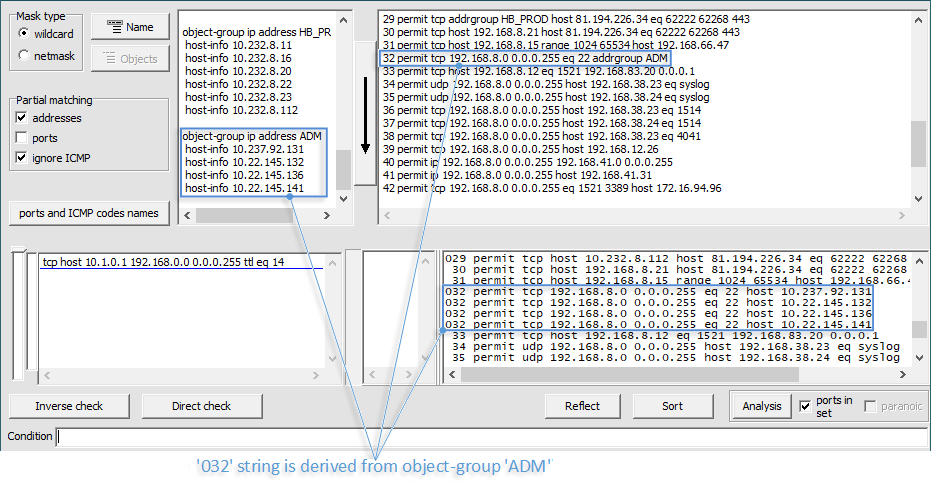
Строки, полученные из object-групп, дополняются спереди цифрой ‘0’ (рис.2).
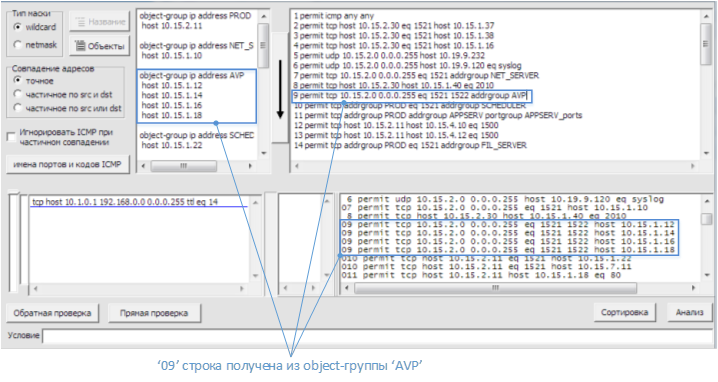
Рис.2 Стока получена из object-группы
Если access-лист скопирован вместе с его заголовком, то активируется кнопка 19, позволяющая использовать команды конфигурирования, содержащие имя access-листа. Посмотреть список используемых в access-листе object-групп можно кнопкой 20 (рис.3).
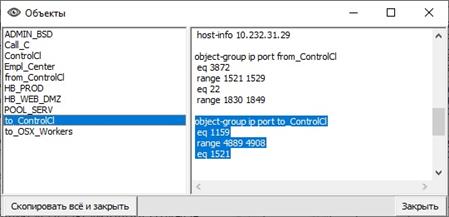
Рис.3 Список используемых object-групп
Названия используемых в access-листе объектов в упорядоченном виде отобразятся в левой части окна. Выбор соответствующей группы покажет её детали в правой части окна.
После того, как access-лист будет распознан, в поле 5 необходимо ввести условие для поиска интересуемого нас доступа и нажать кнопку 7. Результат поиска доступа отобразится в поле 9. При наличии доступа более детальная информация о нём появится в поле 11. Место расположения сработавших строк в access-листе можно определить по шкале 10. Вызов контекстного меню “Показать результат” по правой кнопке мыши на поле 11 позволит отобразить строки ACL, удовлетворяющие условию поиска.
Пример 1. Проверка существования доступа между заданными узлами по определённому порту.
Предположим, нас интересует наличие доступа с хоста 192.168.1.2 по порту TCP 1521 на сервер 192.168.2.2 в следующем списке доступа:
ip access-list extended ACL
 10 permit tcp 192.168.1.0 0.0.0.255 192.168.2.0 0.0.0.255 range 1521 1522
 20 permit tcp host 192.168.1.2 any
 30 permit tcp host 192.168.1.3 any eq 1521
Копируем access-лист в поле 1 и нажимаем кнопку 3. В поле 5 вводим следующее условие:
tcp host 192.168.1.2 gt 1023 host 192.168.2.2 eq 1521Нажимаем кнопку 7 или клавишу “Enter”.
В поле 9 отобразится результат:
Разрешено в строке 1: 10 permit tcp 192.168.1.0 0.0.0.255 192.168.2.0 0.0.0.255 range 1521 1522
Имеются ещё совпадения
Здесь значение “1:” является результатом сквозной нумерации строк распознанного ACL, а “10” – номер строки в исходном ACL. Надпись “Имеются ещё совпадения” означает, что в ACL присутствуют и другие строки, в которых теоретически может сработать наше условие. Результаты совпадения правил можно просмотреть в поле 11. Если на этом поле вызвать контекстное меню (правой кнопкой мыши) и выбрать пункт “Показать результат”, то появится дополнительное окно с выборкой сработавших строк ACL.
Пример 2. Определение узлов заданной сети, к которым имеется доступ по определённому порту.
Рассмотрим ситуацию, когда требуется выяснить, к каким серверам сети 192.168.2.0 /24 открыт доступ по SSH (TCP 22). Список доступа следующий:
ip access-list extended ACL
 10 permit tcp 192.168.1.0 0.0.0.255 192.168.2.0 0.0.0.255 range 1521 1522
 20 permit tcp any 192.168.2.0 0.0.0.3 eq 22 3389
 30 permit tcp host 192.168.1.3 host 192.168.2.254
 40 permit tcp host 192.168.1.10 any
Копируем access-лист в поле 1 и нажимаем кнопку 3.
Ставим переключатель 17 в положение “частичное по src и dst”. Алгоритм будет учитывать строки ACL, в которых IP-адреса источника и назначения полностью или частично попадают в диапазон адресов, указанный в условии.
В поле 5 вводим следующее условие:
tcp any gt 1023 any eq 22Нажимаем кнопку 7 или клавишу “Enter”.
В поле 9 отобразится результат:
БлокРезультаты совпадения правил можно просмотреть в поле 11. Если на этом поле вызвать контекстное меню (правой кнопкой мыши) и выбрать пункт “Показать результат”, то появится дополнительное окно с выборкой сработавших строк ACL. Символ “?” в этом окне означает частичное совпадение по адресам.
Пример 3. Определение доступов, открытых между определёнными узлами.
Выясним, какие доступы открыты от узла 192.168.1.10 к узлу 192.168.2.254 в следующем ACL:
ip access-list extended ACL
 10 permit tcp 192.168.1.0 0.0.0.255 192.168.2.0 0.0.0.255 range 1521 1522
 20 permit tcp any 192.168.2.0 0.0.0.3 eq 22 3389
 30 permit tcp host 192.168.1.3 host 192.168.2.254
 40 permit tcp host 192.168.1.10 any
Копируем access-лист в поле 1 и нажимаем кнопку 3.
Ставим переключатель 17 в положение “частичное по src и dst”.
В поле 5 вводим следующее условие:
ip host 192.168.1.10 host 192.168.2.254Метод состоит в том, что заданное условие рассматривается как access-лист, а каждая строка исходного ACL как отдельное условие. Другими словами, условие и ACL меняются ролями. Именно поэтому кнопка (8), решающая эту задачу, называется “Обратная проверка”.
Нажимаем кнопку 8 или комбинацию “Ctrl-Enter”.
В поле 9 отобразится результат:
БлокРезультаты совпадения правил можно просмотреть в поле 11. Если на этом поле вызвать контекстное меню (правой кнопкой мыши) и выбрать пункт “Показать результат”, то появится дополнительное окно с выборкой сработавших строк ACL. Символ “?” в этом окне означает частичное совпадение по адресам.
Важным требованием при такой проверке является необходимость установки переключателя 17 в среднее положение “частичное по src и dst”.
Зачастую для правильной работы сети необходимо открывать протокол ICMP полностью для всех сегментов. Описанная в это разделе проверка доступов по протоколу IP между узлами среди прочих результатов будет отображать срабатывание таких правил ICMP. Если ICMP открыт по всей сетевой инфраструктуре, то наличие доступов по ICMP можно считать по умолчанию и не отображать их в результатах анализа access-листов. Для игнорирования доступов с ICMP предусмотрен переключатель 18.
Многострочный список условий (поле 6)
Список условий (6) предназначен для ввода нескольких условий и последовательной их проверки. Метод подходит для проверки некого шаблонного набора доступов, либо для сравнения разных доступов, имеющих небольшие различия. Для ввода каждого следующего условия (новой строки) предусмотрена комбинация “Shift-Enter”. Поддерживается вставка текста с буфера обмена. Для проверки условия из списка необходимо установить на него курсор и нажать кнопку 7 (Enter) или 8 (Ctrl-Enter). В поле 15 напротив строки условия отобразится соответствующий символ результата. Он сохранится до изменения условия в этой строке списка. Маркер 14 указывает на активное условие в списке.
Сортировка (кнопка 13)
Распознанный access-list, выведенный в развёрнутом виде в поле 4, можно упорядочить по различным критериям и их комбинации. При нажатии на кнопку сортировки (13) открывается дополнительное окно (см. рис. 4).
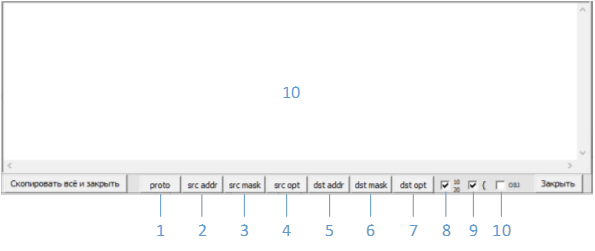
Рис.4 Окно сортировки
1-7 — кнопки включения элементов в цепь сортировки
8 — отображение исходных номеров строк
9 — режим группирования результатов сортировки
10 — сворачивать в object-группы
Каждый следующий критерий в цепочке выбирается соответствующей кнопкой.
Рассмотрим следующий список доступа:
1 permit udp 192.168.8.0 0.0.0.255 host 192.168.38.24 eq syslog
2 permit tcp 192.168.8.0 0.0.0.255 host 192.168.38.23 eq 1514
3 permit tcp 192.168.8.0 0.0.0.255 host 192.168.38.24 eq 1514
4 permit tcp 192.168.8.0 0.0.0.255 host 192.168.38.23 eq 4041
5 permit tcp 192.168.8.0 0.0.0.255 host 192.168.12.26
6 permit ip 192.168.8.0 0.0.0.255 192.168.41.0 0.0.0.255
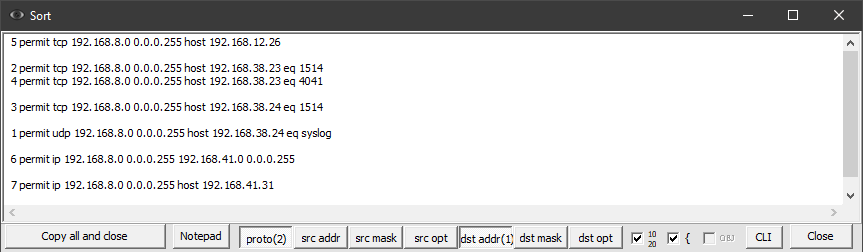
7 permit ip 192.168.8.0 0.0.0.255 host 192.168.41.31Чтобы упорядочить эти строки сначала по IP адресу назначения, а затем по протоколу, необходимо нажать последовательно кнопки 5 и 1. Полученный результат представлен на рисунке 5.
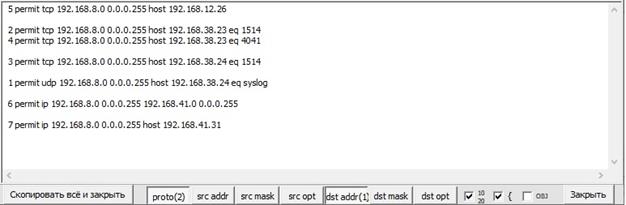
Рис.5 Результат сортировки
Цифры в круглых скобках на соответствующих кнопках указывают позицию элемента в цепочке сортировки. При отключении элемента из цепочки также исключаются все элементы с номерами выше отключенного.
Опция 10 предназначена для сортировки ACL с сохранением object-групп. Сначала строки с object-группами трансформируются в элементарные правила. После этого производится упорядочивание строк. На этом этапе строки, полученные из одной исходной строки с object-группой, оказываются в разных местах ACL. В такой ситуации расположение строки с object-группой в отсортированном ACL определяется по максимальной концентрации правил, полученных из исходной строки.
Рассмотрим следующий ACL:
10 permit tcp 192.168.8.0 0.0.0.255 eq 1521 addrgroup Empl_Center
20 permit udp 192.168.5.0 0.0.0.255 host 10.232.202.18
30 permit udp 192.168.8.0 0.0.0.255 host 192.168.7.34 eq ntp domain
40 permit tcp host 192.168.8.21 addrgroup HB_WEB_DMZ eq 12040 12060
50 permit tcp 192.168.8.0 0.0.0.255 eq 1521 host 10.237.49.254
Имеющий следующие object-группы:
object-group ip address Empl_Center
host-info 10.237.49.100
host-info 10.237.49.6
host-info 10.237.130.15
object-group ip address HB_WEB_DMZ
host-info 10.232.202.12
host-info 10.232.202.16
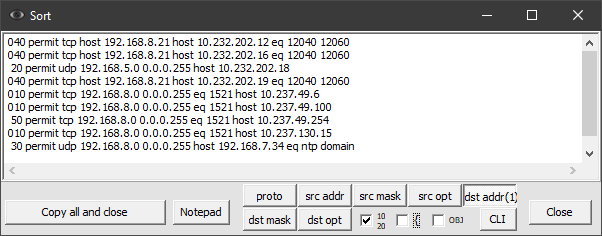
host-info 10.232.202.19Сортировка по адресу назначения (кнопка “dst addr”) отобразит следующий результат (рис.6):
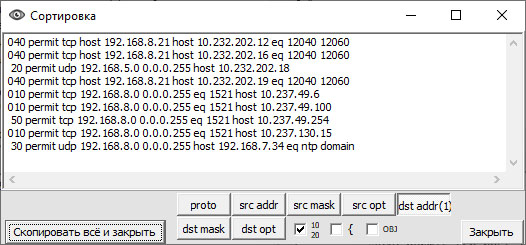
Рис.6 Результат сортировки при наличии object-групп.
Присутствие “0” вначале строк означает, что строка получена путём извлечения содержимого object-групп. Обратите внимание, как изменилось положение исходных строк 20 и 40.
Активируем сворачивание результатов обратно в object-группы (переключатель 10). Получим следующий результат (рис.7):
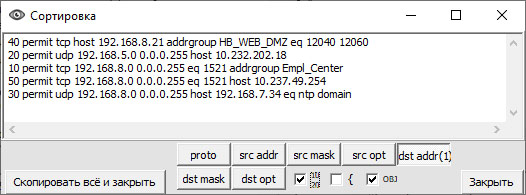
Рис.7 Результат сортировки с поддержкой object-групп.
Для использования готового ACL достаточно снять галочку нумерации строк и скопировать содержимое.
В реальных задачах упорядочивание ACL, содержащего object-группы, может привести к большому разбросу строк, полученных из этих object-групп. В отсортированном ACL новым местом для сворачивания таких строк обратно в object-группы алгоритм выбирает ту развёрнутую строку, к которой ближе всех находятся остальные строки её группы.
Анализ на конфликты и избыточность (кнопка 12)
Кнопка “Анализ” (12) становится активной после распознания access-листа. Её нажатие запускает процесс анализа строк access-листа на конфликты и избыточность. Конфликтующей является строка access-листа, которая никогда не сработает из-за вышестоящего правила противоположного значения (“deny” после “permit” или наоборот).
К примеру, загрузим следующий ACL:
10 permit icmp any any
20 permit tcp host 10.15.2.11 eq 1521 host 10.15.1.10
30 deny tcp 10.15.2.0 0.0.0.255 10.15.0.0 0.0.31.255
40 permit udp 10.15.2.0 0.0.0.255 host 10.19.9.232
50 permit udp 10.15.2.0 0.0.0.255 host 10.19.9.120 eq syslog
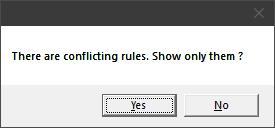
60 permit tcp host 10.15.2.11 eq 1521 host 10.15.7.11Распознаем его (кнопка 3) и нажмём кнопку “Анализ” (12). Программа предупредит нас о имеющихся конфликтах (рис. 8):

Рис.8 Сообщение о наличии конфликтов
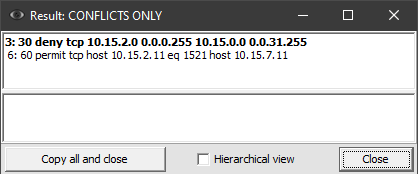
Кнопка “Да” откроет окно с результатами анализа, включающими только конфликты (рис. 9):
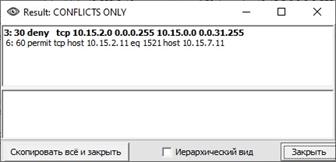
Рис.9 Окно результатов анализа конфликтов
Если нажать кнопку ‘Нет’ (рис.8), то откроется окно, включающее как конфликтующие, так и избыточные правила.
Рассмотрим следующий access-list:
 10 permit icmp any any
 20 permit tcp host 192.168.1.10 host 192.168.2.20 eq 22
 30 permit tcp host 192.168.1.10 host 192.168.2.20
 40 permit ip 192.168.1.0 0.0.0.255 192.168.2.0 0.0.0.255
Анализ такого ACL отобразит следующие результаты:
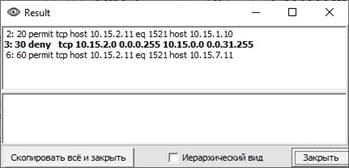
Рис.10 Окно результатов анализа
Жирным шрифтом выделены строки, описывающие более общие правила для других более детальных правил, имеющихся в ACL. Далее такие избыточные более детальные правила будем называть производными. Остальные строки (обычный шрифт) являются производными правилами.
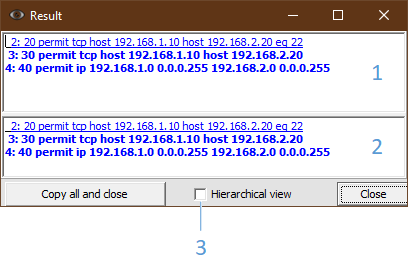
Установив курсор на определённой строке с нажатой клавишей “Ctrl”, получим детальную информацию в нижней части окна (рис.11):

Рис.11 Детализация анализа строки
1 — поле результатов
2 — поле детализации выбранного правила
3 — иерархический вид детализации
В данном случае правило 2 является производным от правила 3. В свою очередь, правило 3 входит в правило 4. Визуально уровень такой вложенности можно определить по отступам строки вправо или выбрать иерархический вид (3). При иерархическом виде производные правила будут выведены ниже строк, в которые они входят. В поле 1 можно выделить диапазон интересуемых строк и вызвать контекстное меню (правой кнопкой мыши) со следующими вариантами действий над результатами анализа:
- “Cкопировать всё”. Данный выбор копирует все правила поля 1 с исходными номерами строк вне зависимости от выделенного диапазона;
- “Скопировать с префиксом ‘no’”. Данный пункт скопирует правила выделенного диапазона с префиксом ‘no’ вначале каждой строки. Номера строк не копируются. Используется для безусловного удаления строк из ACL;
- “Скопировать с префиксом ‘no’ избыточные правила”. Данный пункт скопирует избыточные правила выделенного диапазона с префиксом ‘no’ вначале каждой строки. Номера строк не копируются;
- “Скопировать с префиксом ‘no’ избыточные правила, не имеющие производных”. Данный пункт работает как и предыдущий, но для правил, которые сами по себе не имеют производных от них избыточных правил. Рекомендован для поэтапного удаления избыточных правил от более детальных к более общим. После каждого прохода необходимо загружать обновлённый ACL и анализировать его заново. Такой способ позволяет принять решение по оптимизации правил на определённом уровне детализации;
- “Скрыть производные этого вхождения”. Пункт исключает из результатов текущее указанное правило и производные от него.
Загрузим и проанализируем следующий access-лист:
1 permit tcp any host 192.168.2.20 eq 22
2 permit tcp host 192.168.1.10 host 192.168.2.20 eq 22
3 permit tcp host 192.168.1.10 any eq 22
4 permit ip 192.168.1.0 0.0.0.255 192.168.2.0 0.0.0.255
В окне анализа (рис.12) подробности по сроке 2 можно получить двумя способами:
- установить на неё курсор с нажатой клавишей “Ctrl”;
- установить на неё курсор, а затем нажать “Enter”.
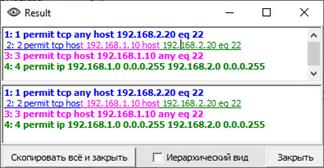
Рис.12 Множественная избыточность.
По цветовому выделению можно определить для каких более общих правил эта строка является производной (избыточной).
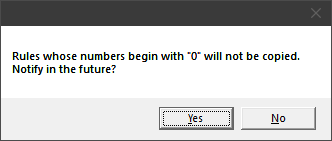
Следует учитывать, что избыточные строки access-листа, полученные из object-групп, нельзя удалить, т.к. в исходном ACL они не присутствуют отдельными правилами. По этой причине при попадании таких строк в диапазон к удалению они не будут скопированы, а на экране появится предупреждение (рис.13):
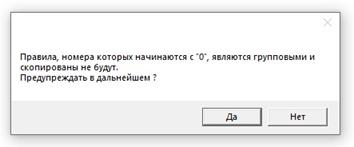
Рис.13 Предупреждение об исключении групповых правил.
В некоторых случаях операторы “permit” и “deny” намеренно присутствуют в определённых местах одного ACL для его упрощения. Следует учитывать этот факт и анализировать такие ACL частями. Например, до и после операторов “deny”. Либо анализировать полностью, но дополнительно обращать внимание на порядок следования конфликтующих строк в ACL и не удалять такие производные строки из исходного ACL.
Поддерживаемые протоколы (кнопка 21)
Кнопка 21 отображает список поддерживаемых программой имён портов TCP и UDP, а также кодов ICMP-сообщений (рис.14).
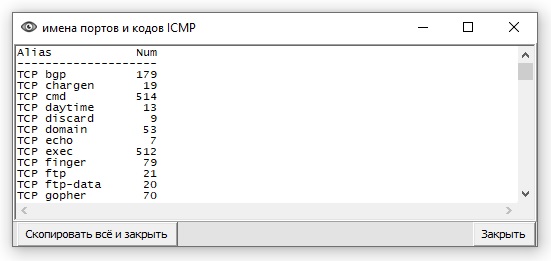
Рис.14 Фрагмент списка портов и кодов ICMP.
Опции запуска программы
Предусмотрены следующие опции запуска exe-файла:
/h, /?, /help — вызов справки параметров запуска
/l (rus) — выбор языка
/nm — включение режима “netmask”
/pm (and,or) — выбор режима совпадения адресов
/skipicmp — включение режима “игнорировать ICMP при частичном совпадении”.
Ссылка на источник

User’s manual
Table of contents
Description of the functionality.
Program interface.
Basic steps.
Example 1. Checking the existence of access between specified nodes on a specific port.
Example 2. Determination of nodes of a given network to which there is access on a specific port.
Example 3. Determination of accesses open between certain nodes.
Multi-line list of conditions (field 6).
Sorting (button 13).
Analysis of conflicts and redundancy (button 12).
Supported protocols (button 21).
Program launch options.
Program functions
If you have come across large access lists or object groups that are part of them more than once, then you probably wondered if there is a tool that allows you to determine whether an access list will skip a certain package and which lines will be triggered.
Of course, such tools exist and fully or partially solve the listed tasks. However, they tend to be part of a powerful network management “combine”, 90% of which is not normally used.
No one forbids the use of regular expressions to search for specific strings of an access list directly from the console of a network device. But this method will provide a very superficial result. For example, it will not display the access of a host that falls within the netmask or a port that falls within the range. Moreover, in this way it is impossible to display all existing accesses between two given nodes or networks. An experienced network administrator is aware of the ineffectiveness of the method of simple parsing of the access list for such tasks.
This small utility was created precisely for this – to find the lines of the access list that allow or deny certain network traffic, and even more – to identify all the lines related to accesses between the givendots.
The idea is simple: the program finds rows of an access list that meet a given criterion. The criterion itself looks like an access list string, but without using the “permit” or “deny” operator.
If you regularly add network rules to the access list without checking their existence, then the access lists will contain a large number of redundant rules. To solve this problem, the program implements the functionality of analyzing the access list for redundancy. With its help, you can identify unnecessary rules and free up hardware resources.
When using object groups in the ACL, the program needs to transfer (copy) their composition. In the final ACL, such groups will be represented by elementary rules.
Program interface
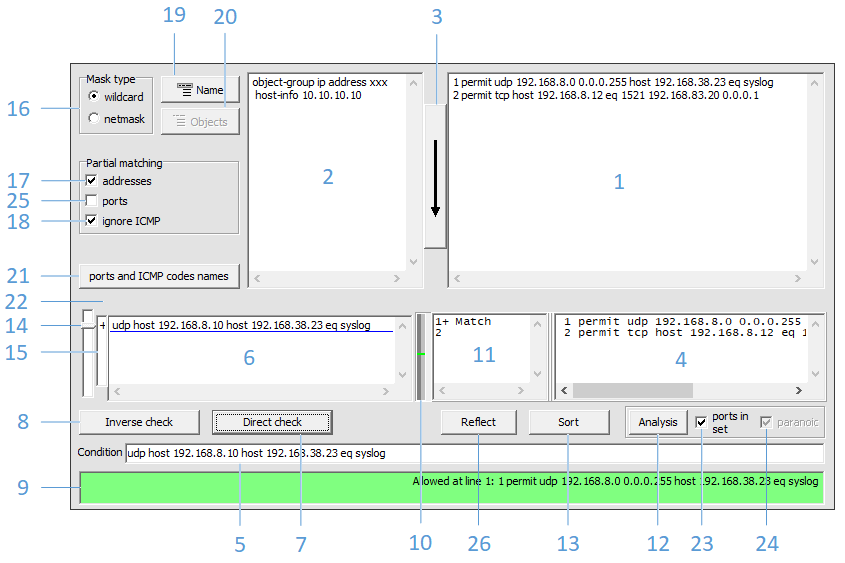
Figure 1 shows the main program window with the following elements:
1 –
input field of the access list
2 –
input field of object-groups
3 –
start access-list recognition
4 –
the output field of the recognized access-list
5 –
one-line input field of the condition
6 –
multi-line list of conditions input
7 –
direct condition check
8 –
reverse check of condition
9 –
check result field
10 –
scale of positioning of triggered ACL lines
11 –
field for viewing details of triggered ACL lines
12 –
analysis of ACL conflicts and redundancy
13 –
ordering ACL lines according to various criteria
14 –
pointer of the current active condition in the multi-line list (6)
15 –
field for short designation of the results of checking the list of conditions (6)
16 – mask type switch
17 –
switch for checking source and destination addresses
18 –
ignore ACL lines with ICMP in partial address match mode
19 –
choosing options for using the ACL name in CLI commands
20 –
displaying object groups used in the recognized ACL
21 –
display of supported protocols, as well as types and codes of ICMP
22 –
ACL recognition error output field
23 –
switch for analysis of individual ports from the set
24 –
switch for analysis of partially overlapping port ranges
25 – switch of the check mode for an incomplete set of ports
26 – display reflected ACL (source and destination are swapped)
Basic steps
The original access-list must be copied to field 1. If it contains object-groups, then their composition must be copied to field 2. ACL and object-groups can be copied both from the device configuration (“show running-config”, “show startup-config ”), and from the result of the commands“ show access-lists ”,“ show object ”.
The following is an example of the output of the “show running-config” command valid for use in field 1:
ip access-list extended ACL
permit icmp host 172.16.0.6 host 172.21.0.6
permit ip host 172.16.0.6 host 172.21.0.1
permit tcp host 192.168.8.15 range 1024 65534 host 192.168.66.47
permit tcp 192.168.8.0 0.0.0.255 eq 22 1521 3389 addrgroup ADMIN_BSD
permit tcp host 192.168.8.12 eq 1521 192.168.83.20 0.0.0.1
The same access-list with the “show access-lists” command:
Extended IP access list ACL
10 permit icmp host 172.16.0.6 host 172.21.0.6
20 permit ip host 172.16.0.6 host 172.21.0.1 (32 matches)
30 permit tcp host 192.168.8.15 range 1024 65534 host 192.168.66.47
40 permit tcp 192.168.8.0 0.0.0.255 eq 22 1521 3389 addrgroup ADMIN_BSD (1 match)
50 permit tcp host 192.168.8.12 eq 1521 192.168.83.20 0.0.0.1
Masks expressed by prefix length (CIDR records) are also supported:
ip access-list ACL
permit icmp 172.16.0.6/32 172.21.0.6/32
permit ip 172.16.0.6/32 172.21.0.1/32
permit tcp 192.168.8.15/32 range 1024 65534 192.168.66.47/32
permit tcp 192.168.8.0/24 eq 22 1521 3389 addrgroup ADMIN_BSD
permit tcp 192.168.8.12/32 eq 1521 192.168.83.20/31
An example of the result of the “show running-config” command valid for use in field 2:
object-group ip address ADMIN_BSD
host-info 10.237.92.131
host-info 10.22.145.132
host-info 10.22.145.136
host-info 10.22.145.141
The contents of the “show object-group” command output:
IP address object group ADMIN_BSD
host 10.237.92.131
host 10.22.145.132
host 10.22.145.136
host 10.22.145.141
Other object group formats are also valid.
An example of a valid “show running-config” command snippet:
object-group network Servers
host 10.15.12.5
host 10.15.5.11
host 10.15.4.2
host 10.15.7.34
object-group service Ports1
tcp-udp eq domain
tcp-udp eq 88
udp range 3268 3269
tcp gt 49151
An example of the same “show object-group” command snippet:
Network object group Servers
host 10.15.12.5
host 10.15.5.11
host 10.15.4.2
host 10.15.7.34
Service object group Ports1
tcp-udp eq domain
tcp-udp eq 88
udp range 3268 3269
tcp gt 49151
Nested groups are also supported:
object-group network zzz
5.5.5.0 255.255.255.0
host 6.6.6.6
object-group network yyy
host 3.3.3.3
group-object zzz
object-group network xxx
host 1.1.1.1
group-object zzz
group-object yyy
permit udp any object-group xxx eq 21
permit tcp object-group xxx host 7.7.7.7 eq ftp
permit tcp object-group xxx object-group xxx eq 22
permit tcp object-group yyy object-group xxx eq ftp
After copying the ACL and object-groups, press the button 3. As a result, the access-list will be recognized and displayed in expanded form (in the case of using object-groups) in field 4. If errors occurred during the recognition stage, they will be displayed in field 22 The error result can be copied to the clipboard.
If the line numbering is violated, the program will offer to renumber them automatically.
Lines obtained from object-groups are padded in front with the digit “0” (Fig. 2).
If the access list is copied together with its title, then button 19 is activated, which allows using the configuration commands containing the name of the access list. You can view the list of object-groups used in the access-list by pressing button 20 (Fig. 3).
The names of the objects used in the access list will be displayed in an ordered manner in the left part of the window. Selecting the appropriate group will show its details on the right side of the window.
After the access list is recognized, in field 5 it is necessary to enter a condition for searching for the access we are interested in and press the button 7 or the “Enter” key. The access search result will be displayed in the check results field 9. The color of this field changes depending on the type of result (allowed, blocked, error). If there is a permitting or blocking rule, more detailed information about it will appear in field 11. The location of the triggered lines in the access list can be determined by scale 10. Calling the “Show result” context menu by right-clicking on field 9 or 11 displays a separate window with details of the test result. It contains ACL lines that match the search condition. The same function is performed by double clicking on field 9. This window is displayed automatically,if the condition check is started by pressing the “Alt + Enter” combination. You can close this window with the “Esc” key.
If a mask incompatible with the address is found, a message will be displayed about this (Fig. 4). The program will suggest the correct values for the address or mask.
![]()
Example 1. Checking the existence of access between specified hosts on specific ports
Suppose we are interested in the availability of access from host 192.168.1.2 via TCP port 1521 to server 192.168.2.2 in the following access list:
ip access-list extended ACL
10 permit tcp 192.168.1.0 0.0.0.255 192.168.2.0 0.0.0.255 range 1521 1522
20 permit tcp host 192.168.1.2 any
30 permit tcp host 192.168.1.3 any eq 1521
Copy the access list into field 1 and press button 3. In field 5 enter the following condition:
tcp host 192.168.1.2 gt 1023 host 192.168.2.2 eq 1521
Press button 7 or the “Enter” key.
Field 9 displays the result:
Allowed at line 1: 10 permit tcp 192.168.1.0 0.0.0.255 192.168.2.0 0.0.0.255 range 1521 1522
There are other matches
Here the value “1:” is the result of the sequential line numbering of the recognized ACL, and “10” is the line number in the original ACL. The inscription “There are other matches” means that there are other lines in the ACL, in which our condition could theoretically be triggered. The results of matching rules can be viewed in field 11. If you call the context menu on this field (with the right mouse button) and select “Show result”, an additional window will appear with a selection of the triggered ACL lines. For field 9, the same context menu is available, or double click.
Access checking can also be performed by a set of ports. This will find ACL lines containing all ports from the set specified in the condition. Lines containing an incomplete set of ports will not be displayed. This behavior of the program can be changed by activating the switch for partial matching of ports 25 (Fig. 1).
We activate switch 25 and enter the condition in field 5:
tcp host 192.168.1.3 gt 1023 host 192.168.2.2 eq 1522 1521
Field 9 will display the resul:
Allowed at line 1: 10 permit tcp 192.168.1.0 0.0.0.255 192.168.2.0 0.0.0.255 range 1521 1522
Partial matches were also found
If you open the results details window (for example, by double-clicking on field 9), the following result will be displayed:
+ 10 permit tcp 192.168.1.0 0.0.0.255 192.168.2.0 0.0.0.255 range 1521 1522
^ 30 permit tcp host 192.168.1.3 any eq 1521
Here, a line marked with a “^” means a match with an incomplete set of ports.
Example 2. Determination of nodes of a given network to which there is access on a specific port
Consider a situation when you need to find out which servers on the 192.168.2.0 / 24 network are accessible via SSH (TCP 22). The access list is as follows:
ip access-list extended ACL
10 permit tcp 192.168.1.0 0.0.0.255 192.168.2.0 0.0.0.255 range 1521 1522
20 permit tcp any 192.168.2.0 0.0.0.3 eq 22 3389
30 permit tcp host 192.168.1.3 host 192.168.2.254
40 permit tcp host 192.168.1.10 any
Copy the access list into field 1 and press button 3.
We activate switch 17. The algorithm will take into account ACL lines in which the source and destination IP addresses fully or partially fall within the range of addresses specified in the condition.
In field 5, enter the following condition:
tcp any gt 1023 any eq 22
Press button 7 or the “Enter” key.
Field 9 displays the result:
Block
The results of matching rules can be viewed in field 11. If you open the context menu on this field (with the right mouse button) and select “Show result”, an additional window will appear with a selection of triggered ACL lines. Symbol “?” in this window means partial match by addresses.
If you activate both switches of the “Partial match” group 17 and 25, then ACL lines that match partially in addresses and partially in ports will be marked with a dot (symbol “.”) In the results. Symbols are displayed at the bottom of the test results details window.
Example 3. Determination of accesses open between certain nodes
Let’s find out what accesses are open from the 192.168.1.10 host to the 192.168.2.254 host in the following ACL:
ip access-list extended ACL
10 permit tcp 192.168.1.0 0.0.0.255 192.168.2.0 0.0.0.255 range 1521 1522
20 permit tcp any 192.168.2.0 0.0.0.3 eq 22 3389
30 permit tcp host 192.168.1.3 host 192.168.2.254
40 permit tcp host 192.168.1.10 any
Copy the access list into field 1 and press button 3.
We activate switch 17.
In field 5, enter the following condition:
ip host 192.168.1.10 host 192.168.2.254
The method consists in treating a given condition as an access list, and each line of the original ACL as a separate condition. In other words, the condition and the ACL are role swapped. That is why the button (8), which solves this problem, is called “Inverse check”.
Press button 8 or the “Ctrl-Enter” combination.
Field 9 displays the result:
Block
The results of matching rules can be viewed in field 11. If you open the context menu on this field (with the right mouse button) and select “Show result”, an additional window will appear with a selection of triggered ACL lines. Symbol “?” in this window means partial match by addresses.
An important requirement for such a check is the need to activate switch 17.
Often, for the network to function properly, it is necessary to open ICMP completely for all segments. The verification of IP accesses between hosts described in this section will, among other results, reflect the triggering of such ICMP rules. If ICMP is open across the entire network infrastructure, then the presence of ICMP accesses can be considered by default and not displayed in the results of the analysis of access lists. To ignore ICMP accesses, switch 18 is provided.
Multi-line list of conditions (field 6)
The list of conditions (6) is designed to enter several conditions and check them sequentially. The method is suitable for checking a certain template set of accesses, or for comparing different accesses that have small differences. To enter each next condition (new line), the combination “Shift + Enter” is provided. Pasting text from the clipboard is supported. To check a condition from the list, place the cursor on it and press the 7 (Enter) or 8 (Ctrl + Enter) button. In field 15, opposite the condition line, the corresponding result symbol will be displayed. It will persist until the condition is changed on that line in the list. Marker 14 indicates an active condition in the list. Pressing the ‘Enter’ (‘Ctrl + Enter’) key together with the ‘Alt’ key automatically displays a separate window with the details of the test results, which can be closed by pressing the ‘Esc’ key.
Sort (button 13)
The recognized access-list, displayed expanded in field 4, can be ordered according to various criteria and their combinations. Pressing the sort button (13) opens an additional window (see Fig. 5).
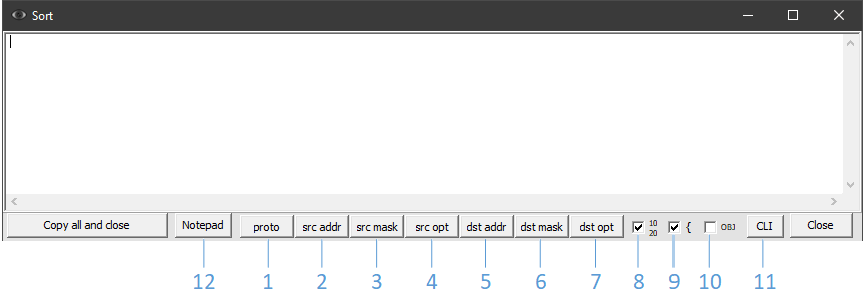
1-7 – buttons for including elements in the sorting chain
8 – displaying the original line numbers
9 – grouping mode of sorting results
10 – collapsing into object groups
11 – output of CLI commands necessary for sorting the access list “for free” without completely replacing it. The set of rows to be moved is selected taking into account the least number of permutations.
12 – output content to notepad
Each next criterion in the chain is selected by the corresponding button.
Consider the following access list:
1 permit udp 192.168.8.0 0.0.0.255 host 192.168.38.24 eq syslog
2 permit tcp 192.168.8.0 0.0.0.255 host 192.168.38.23 eq 1514
3 permit tcp 192.168.8.0 0.0.0.255 host 192.168.38.24 eq 1514
4 permit tcp 192.168.8.0 0.0.0.255 host 192.168.38.23 eq 4041
5 permit tcp 192.168.8.0 0.0.0.255 host 192.168.12.26
6 permit ip 192.168.8.0 0.0.0.255 192.168.41.0 0.0.0.255
7 permit ip 192.168.8.0 0.0.0.255 host 192.168.41.31
To sort these lines first by destination IP address, and then by protocol, you must press buttons 5 and 1 in sequence. The result is shown in Figure 6.
The numbers in parentheses on the corresponding buttons indicate the position of the item in the sorting chain. Disabling an item from the chain also excludes all items with numbers higher than the disabled one.
Option 10 is for sorting ACLs while preserving object groups. First, strings with object groups are transformed into elementary rules. After that, the ordering of the lines is performed. At this point, the lines obtained from the same source line with the object group end up in different places in the ACL. In such a situation, the location of the line with the object group in the sorted ACL is determined by the maximum concentration of rules derived from the original line.
Consider the following ACL:
ip access-list extended Test_ACL
10 permit tcp 192.168.8.0 0.0.0.255 eq 1521 addrgroup Empl_Center
20 permit udp 192.168.5.0 0.0.0.255 host 10.232.202.18
30 permit udp 192.168.8.0 0.0.0.255 host 192.168.7.34 eq ntp domain
40 permit tcp host 192.168.8.21 addrgroup HB_WEB_DMZ eq 12040 12060
50 permit tcp 192.168.8.0 0.0.0.255 eq 1521 host 10.237.49.254
Having the following object groups:
object-group ip address Empl_Center
host-info 10.237.49.100
host-info 10.237.49.6
host-info 10.237.130.15
object-group ip address HB_WEB_DMZ
host-info 10.232.202.12
host-info 10.232.202.16
host-info 10.232.202.19
Sorting by destination address (button “dst addr”) will display the following result (Fig. 7):
The presence of “0” at the beginning of lines means that the line was obtained by extracting the contents of object groups. Notice how the position of the original lines 20 and 40 has changed.
We activate the collapsing of the results back into object-groups (switch 10). We get the following result (Fig. 8):

In real life, the ordering of an ACL containing object groups can result in a large variation in the lines retrieved from those object groups. In the sorted ACL, the new place for folding such lines back into object-groups, the algorithm selects the expanded line to which the other lines of its group are closest.
To use the resulting ordered ACL, simply uncheck the line numbering box and copy the content.
In an production environment, there may be a limitation that does not allow the temporary removal of the access list from the equipment interface in order to organize it. To do this, use the button 11 “CLI” (Fig. 5), which displays the CLI commands necessary for sorting the access-list “for free” without completely replacing it. The set of rows to be moved is chosen by the algorithm taking into account the least number of permutations. In our case, the output will be as follows:
ip access-list extended TestACL
no 40
no 30
ip access-list resequence TestACL 2 2
ip access-list extended TestACL
1 permit tcp host 192.168.8.21 addrgroup HB_WEB_DMZ eq 12040 12060
7 permit udp 192.168.8.0 0.0.0.255 host 192.168.7.34 eq ntp domain
ip access-list resequence TestACL 10 10
Analysis for conflicts and redundancy (button 12)
The “Analyze” button (12) becomes active after the access list is recognized. Pressing it starts the process of analyzing access list strings for conflicts and redundancy. A conflicting string in access list that will never work because of an upstream rule with the opposite meaning (“deny” after “permit” or vice versa).
For example, load the following ACL:
10 permit icmp any any
20 permit tcp host 10.15.2.11 eq 1521 host 10.15.1.10
30 deny tcp 10.15.2.0 0.0.0.255 10.15.0.0 0.0.31.255
40 permit udp 10.15.2.0 0.0.0.255 host 10.19.9.232
50 permit udp 10.15.2.0 0.0.0.255 host 10.19.9.120 eq syslog
60 permit tcp host 10.15.2.11 eq 1521 host 10.15.7.11
Let’s recognize it (button 3) and press the button “Analysis” (12). The program will warn us about existing conflicts (Fig. 9):
The “Yes” button will open a window with the analysis results, including only conflicts (Fig. 10):
If you click the ‘No’ button (Fig. 9), a window will open that includes both conflicting and redundant rules.
Consider the following access-list:
10 permit icmp any any
20 permit tcp host 192.168.1.10 host 192.168.2.20 eq 22
30 permit tcp host 192.168.1.10 host 192.168.2.20
40 permit ip 192.168.1.0 0.0.0.255 192.168.2.0 0.0.0.255
Analyzing such an ACL will display the following results:
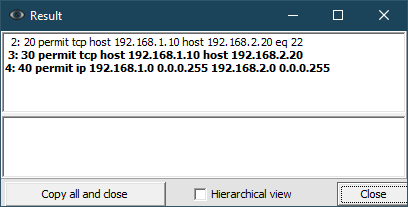
Lines that describe more general rules for other more detailed rules in the ACL are in bold. In what follows, such redundant, more detailed rules will be called derivatives. The rest of the lines (regular font) are derived rules.
By placing the cursor on a certain line with the “Ctrl” key pressed, we will receive detailed information at the bottom of the window (Fig. 12):
1 – result field
2 – detail field of the selected rule
3 – hierarchical detail view
In this case, rule 2 is derived from rule 3. In turn, rule 3 is included in rule 4. Visually, the level of such nesting can be determined by indenting the line to the right or choosing a hierarchical view (3). In hierarchical view, derived rules will be displayed below the lines they are included in. In field 1, you can select the range of lines of interest and call the context menu (right mouse button) with the following options for actions on the analysis results:
– “Copy all”. This selection copies all field 1 rules with original line numbers regardless of the selected range;
– “Copy with ‘no’ prefix”. This item will copy the rules of the selected range with the ‘no’ prefix at the beginning of each line. Line numbers are not copied. Used to unconditionally remove lines from an ACL;
– “Copy with ‘no’ prefix redundant rules”. This item will copy the redundant rules of the selected range with the ‘no’ prefix at the beginning of each line. Line numbers are not copied;
– “Copy with ‘no’ prefix redundant rules that do not have derived rules ”. This item works like the previous one, but for rules that in themselves do not have redundant rules derived from them. Recommended for step-by-step removal of redundant rules from more detailed to more general. After each pass, you need to download the updated ACL and analyze it again. This method allows you to make a decision to optimize the rules at a certain level of detail;
– “Hide the derived lines of this occurrence”. The clause excludes the current specified rule and its derivatives from the results.
Let’s load and parse the following access list:
10 permit tcp any 192.168.2.20/32 eq 22
20 permit tcp 192.168.1.10/32 192.168.2.20/32 eq 22
30 permit tcp 192.168.1.10/32 any eq 22
40 permit ip 192.168.1.0/24 192.168.2.0/24
In the analysis window (Fig. 13), the details for line 2 can be obtained in two ways:
– place the cursor on it with the “Ctrl” key pressed;
– place the cursor on it, and then press “Enter”.
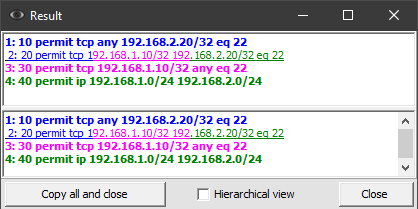
By color highlighting, it is possible to determine for which more general rules this string is derived (redundant).
It should be borne in mind that redundant access-list rows obtained from object-groups cannot be deleted, because they are not present as separate rules in the original ACL. For this reason, if such lines are in the range for deletion, they will not be copied, and a warning will appear on the screen (Fig. 14):
In some cases, the “permit” and “deny” statements are deliberately present in certain places in the same ACL to simplify it. You should take this fact into account and analyze such ACLs in parts: separately before the “deny” statements, separately after. Alternatively, you can parse the entire ACL, but additionally pay attention to the ordering of conflicting lines and not remove such derived lines from the original ACL.
By default, a sign of a redundant rule is the presence of a more general rule, the set of TCP / UDP ports of which contains all the ports of the redundant rule. This behavior of the program can be changed by uncheck the switch for analyzing individual ports from the set (checkbox 23 in Fig. 1). The analysis will take into account the redundancy of individual ports from the entire set contained in a single ACL line.
For example, consider the following ACL:
10 permit udp host 192.168.8.10 host 192.168.7.34 eq ntp domain
20 permit udp 192.168.8.0 0.0.0.255 192.168.7.0 0.0.0.255 eq ntp
30 permit udp host 192.168.8.20 host 192.168.7.34 eq ntp
Uncheck “ports in the set” of switch 23 (Fig. 1).
Let’s press the button “Analysis”. In the result window that appears, holding down the “Ctrl” key, place the cursor in the first line:
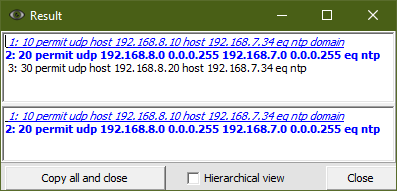
In Figure 15, the first line is in italics. This means that not the entire rule is redundant, but only a part of the ports from the set. In this case, the first rule set consists of 2 ports: ntp (123) and domain (53). However, the ntp port is superfluous here, since it is absorbed by the rule in the second condition in bold.
In the mode of analysis of the redundancy of individual ports from the set (checkbox 23 is deactivated), option 24 (“paranoic”) becomes available.
Let’s load the following ACL:
10 permit udp host 192.168.8.10 host 192.168.7.34 range 9000 9003
20 permit udp 192.168.8.0 0.0.0.255 192.168.7.0 0.0.0.255 eq 9002
Let’s activate switch 24 (paranoic):
Let’s press the button “Analysis”. The result will display the partial redundancy of line 10. It should be split into two lines: the first should contain the port range 9000-9001, the second only port 9003. Port 9002 is redundant because falls under the more general rule 20. Because elimination of this redundancy leads to the appearance of two rules instead of one, then this mode should be used in special cases. The paranoic mode is off by default.
Display reflected ACL (button 26)
The “Reflect” button (26) displays an ACL in which the source and destination are reversed. Such functionality may be required when changing the direction of the ACL.
Let’s load the following ACL:
permit udp 192.168.10.0 0.0.0.255 192.168.50.0 0.0.0.255 eq syslog
permit udp 192.168.10.0 0.0.0.255 host 192.168.50.5 range snmp snmptrap
permit tcp 192.168.10.0 0.0.0.255 eq 5985 192.168.50.0 0.0.0.255
permit tcp host 192.168.10.10 eq www cmd talk 5000 5986 10.0.0.0 0.255.255.255 gt 1023
permit udp host 192.168.10.10 192.168.36.32 0.0.0.3 eq 623
permit tcp host 192.168.10.10 gt 1023 192.168.50.20 0.0.0.2 eq cmd
permit tcp 10.55.55.10 0.0.0.1 eq smtp 10.0.0.0 0.255.255.255 gt 1023
The “Reflect” button (26) will display the following result:
permit udp 192.168.50.0 0.0.0.255 eq 514 192.168.10.0 0.0.0.255
permit udp host 192.168.50.5 range 161 162 192.168.10.0 0.0.0.255
permit tcp 192.168.50.0 0.0.0.255 192.168.10.0 0.0.0.255 eq 5985
permit tcp 10.0.0.0 0.255.255.255 gt 1023 host 192.168.10.10 eq 80 514 517 5000 5986
permit udp 192.168.36.32 0.0.0.3 eq 623 host 192.168.10.10
permit tcp 192.168.50.20 0.0.0.2 eq 514 host 192.168.10.10 gt 1023
permit tcp 10.0.0.0 0.255.255.255 gt 1023 10.55.55.10 0.0.0.1 eq 25
This will replace the port names with their numeric values. It allows the new ACL to be enforced on devices other than the one from which the original ACL was taken. The direction-dependent TCP and ICMP options take the opposite values, or are removed if they lose their meaning.
Supported protocols (button 21)
Button 21 displays a list of TCP and UDP port names supported by the program, as well as ICMP message codes (Fig. 16).

Program start options
The following exe-file launch options are provided:
/h, /?, /help – call the help of the launch parameters
/l rus – select the Russian language
/nm – enable the “netmask” mode
/pa – enable the partial address match mode
/pp – enable the partial port matching mode
/skipicmp – enable the “ignore ICMP on partial match”.
ACL_CHECK(3) — Linux manual page online | Library functions
Check an ACL for validity.
ACL_CHECK(3) BSD Library Functions Manual ACL_CHECK(3)
NAME
acl_check — check an ACL for validity
LIBRARY
Linux Access Control Lists library (libacl, -lacl).
SYNOPSIS
#include <sys/types.h>
#include <acl/libacl.h>
int
acl_check(acl_t acl, int *last);
DESCRIPTION
The acl_check() function checks the ACL referred to by the argument acl for validity.
The three required entries ACL_USER_OBJ, ACL_GROUP_OBJ, and ACL_OTHER must exist exactly
once in the ACL. If the ACL contains any ACL_USER or ACL_GROUP entries, then an ACL_MASK
entry is also required. The ACL may contain at most one ACL_MASK entry.
The user identifiers must be unique among all entries of type ACL_USER. The group identi‐
fiers must be unique among all entries of type ACL_GROUP.
If the ACL referred to by acl is invalid, acl_check() returns a positive error code that
indicates which type of error was detected. The following symbolic error codes are defined:
ACL_MULTI_ERROR The ACL contains multiple entries that have a tag type that may occur
at most once.
ACL_DUPLICATE_ERROR The ACL contains multiple ACL_USER entries with the same user ID, or
multiple ACL_GROUP entries with the same group ID.
ACL_MISS_ERROR A required entry is missing.
ACL_ENTRY_ERROR The ACL contains an invalid entry tag type.
The acl_error() function can be used to translate error codes to text messages.
In addition, if the pointer last is not NULL, acl_check() assigns the number of the ACL
entry at which the error was detected to the value pointed to by last. Entries are numbered
starting with zero, in the order in which they would be returned by the acl_get_entry()
function.
RETURN VALUE
If successful, the acl_check() function returns 0 if the ACL referred to by acl is valid,
and a positive error code if the ACL is invalid. Otherwise, a value of -1 is returned and
the global variable errno is set to indicate the error.
ERRORS
If any of the following conditions occur, the acl_check() function returns -1 and sets errno
to the corresponding value:
[EINVAL] The argument acl is not a valid pointer to an ACL.
STANDARDS
This is a non-portable, Linux specific extension to the ACL manipulation functions defined
in IEEE Std 1003.1e draft 17 (“POSIX.1e”, abandoned).
SEE ALSO
acl_valid(3), acl(5)
 @bestbits.at>.
Linux ACL March 23, 2002 Linux ACL
| This manual | Reference | Other manuals |
|---|---|---|
| acl_check(3) | referred by | acl(5) | acl_calc_mask(3) | acl_error(3) | acl_valid(3) |
| refer to | acl(5) | acl_valid(3) |
Download raw manual
Index
BSD Library Functions Manual (+1081)
Linux ACL (+40)
№ 3 (+68044)
Go top