Содержание
- 1 В чем причина отсутствия устройства ADB Device?
- 1.1 Способ 1. Включение параметров разработчика и отладки по USB
- 1.2 Способ 2: изменение режима подключения
- 1.3 Метод 3: Обновление интерфейса ADB
- 1.4 Способ 4: установка универсального драйвера ADB для Windows
- 1.5 Метод 5: Сброс процесса
- 1.6 Способ 6: замена кабеля
Поскольку смартфоны присутствуют повсюду, возникает необходимость переноса файлов с вашего персонального компьютера на смартфон и наоборот. Мало того, вам может понадобиться отладить определенные приложения или установить новые и т. Д., Для которых часто используется утилита командной строки под названием ADB или Android Debug Bridge.
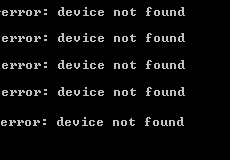
Иногда люди сталкиваются с проблемой невозможности подключения к своим смартфонам, хотя, по их мнению, они все сделали правильно. Ну, не волнуйтесь, это то, для чего мы здесь. Это руководство расскажет вам, как решить проблему «Ошибка: устройство не найдено» — так что расслабьтесь и следуйте инструкциям.
 Устройство ADB не найдено
В чем причина отсутствия устройства ADB Device?
Прежде чем мы перейдем к решениям, вы можете узнать, что действительно вызывает эту проблему. Ну, есть ряд вещей, которые могут привести к этой проблеме —
- драйверы не обновляются. Драйверы — это субъекты, отвечающие за взаимодействие с интерфейсом и вашей ОС. Если он не обновлен, вы можете столкнуться с этой ошибкой.
- USB отладки не включен Этот режим необходим для работы ADB на вашем устройстве Android.
- Выбор неправильного режима подключения. Правильный режим соединения должен быть выбран для типа передачи, которую вы хотите инициировать.
Примечание: если вы еще не установили adb, вы можете следовать нашему руководству, чтобы сделать это.
Способ 1. Включение параметров разработчика и отладки по USB
Для начала убедитесь, что на вашем устройстве включена отладка по USB, поскольку в противном случае ADB не работает. Для этого:
- Зайдите в настройки вашего телефона и выберите About.
- В меню «О программе» семь раз нажмите «Номер строителя», чтобы включить «Параметры разработчика».
- После этого вернитесь и выберите Параметры разработчика.
 Включить параметры разработчика
 - Прокрутите вниз и нажмите «Отладка по USB».
 Включить параметры разработчика
Способ 2: изменение режима подключения
Android имеет разные режимы подключения, что иногда является причиной этой проблемы. В случае с adb нам нужен MTP (Media Transfer Protocol). Стоит отметить, что на вашем смартфоне вместо MTP может использоваться программа «Передача файлов», которая является такой же. Для этого вам необходимо:
- Убедитесь, что ваше устройство подключено правильно.
- Сверните окно уведомлений и выберите уведомление о подключении USB.
- Там выберите MTP в качестве режима подключения.
 Выберите MTP в качестве режима подключения
Примечание. Некоторые люди сообщают, что выбор режима PTP работал для них, поэтому обязательно попробуйте это.
 Выберите MTP в качестве режима подключения
Метод 3: Обновление интерфейса ADB
Иногда проблема связана с устаревшим драйвером интерфейса ADB. Чтобы обновить драйвер, вам нужно сделать следующее:
- На вашем компьютере щелкните правой кнопкой мыши «Мой компьютер» и выберите «Диспетчер устройств».
- В разделе «Другие устройства» вы увидите «Android ADB Interface» или «Android Phone». Щелкните правой кнопкой мыши и выберите «Обновить драйвер».
 Обновление драйвера интерфейса ADB
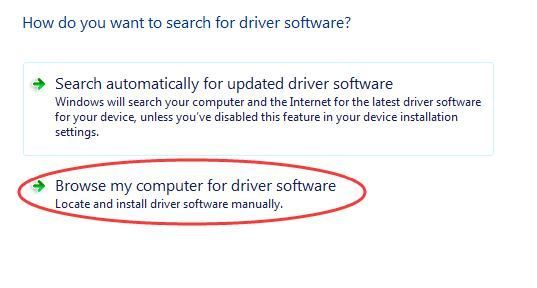
 - После этого выберите «Просмотреть мой компьютер для поиска драйверов».
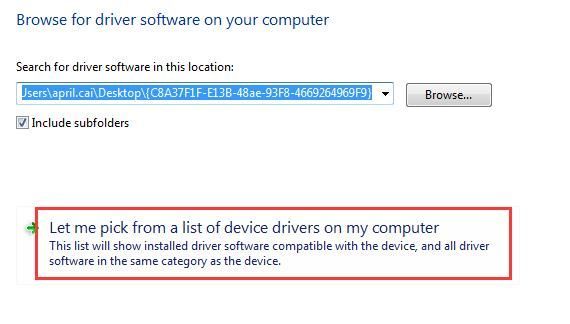
- Затем выберите «Позвольте мне выбрать из списка драйверов устройств на моем компьютере».
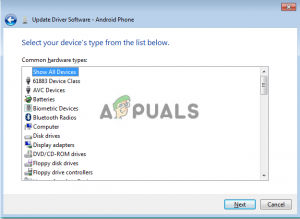
- Появится окно, убедитесь, что «Показать все устройства» выделено, и нажмите «Далее».
 Выделить Показать все устройства
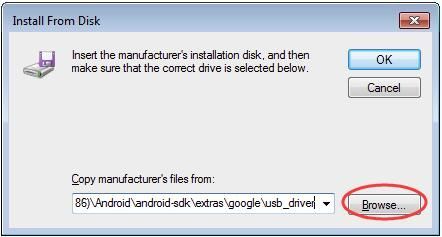
 - Нажмите «Установить с диска».
- Перейдите туда, где вы установили свой SDK, обычно это C: Program Files Android android-sdk extras \ google usb_driver , где вам нужно будет дважды щелкнуть по android_winusb.inf
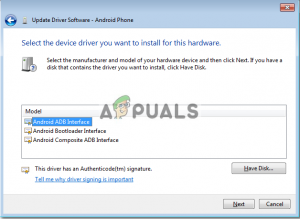
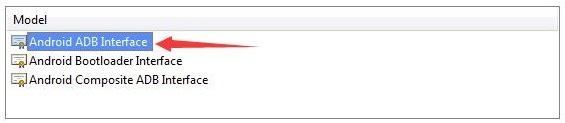
- Выберите «Интерфейс Android ADB» из списка.
 Выберите интерфейс Android ADB
 - Нажмите «Да», а затем «Установить».
- Подождите, пока установка завершится, а затем закройте окно.
 Обновление драйвера интерфейса ADB
 Выделить Показать все устройства
 Выберите интерфейс Android ADB
Вы можете попробовать повторно подключить ваше устройство, если оно не распознает его.
Способ 4: установка универсального драйвера ADB для Windows
Если вы уверены, что вышеупомянутые решения не будут работать для вас или не работают для вас, установка универсального драйвера Windows ADB может быть решением для вас. Это довольно просто, скачайте драйвер с официального сайта и установите его.
Вы можете скачать драйвер здесь.
Метод 5: Сброс процесса
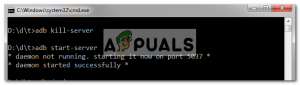
Иногда случается, что все остальное работает, но вы все равно не можете перечислить свой смартфон — это означает, что вы установили драйвер USB, включили отладку USB и т. Д. В таких случаях может помочь вам отключение сервера и его повторный запуск. Для этого введите следующие команды в командной строке
adb kill-server
adb start-server
 ADB Kill / Start Server
Способ 6: замена кабеля
Наконец, если у вас ничего не получится, вам может пригодиться новый кабель. Вероятность того, что ваш кабель неисправен, высока, что означает, что независимо от того, что вы делаете, ваша проблема останется, так как проблема не в вашем драйвере, а скорее в аппаратном обеспечении. Чтобы проверить, неисправен ли ваш кабель, попробуйте следующее:
- Подключите кабель к порту на зарядном устройстве.
- Попробуйте зарядить свой смартфон этим кабелем.
Если он не начинает заряжаться, это означает, что ваш кабель неисправен, и вам придется приобрести другой.
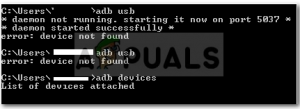
In cmd when I try to do the command:
adb shell
it shows device not found error. Can someone help me please. It’ll be appreciated.
asked May 22, 2012 at 15:24
![]()
12
Don’t forget to go to your device and enable Settings->Developer Options->USB debugging.
answered May 1, 2013 at 22:58
![]()
rmtheisrmtheis
5,80712 gold badges60 silver badges77 bronze badges
4
Try any of the following solutions. I get errors with adb every now and then.
And one of the following always works.
Solution 1
Open command prompt as administrator and enter
adb kill-serveradb start-server
Solution 2
Install drivers for your phone if you’re not testing on emulator.
Solution 3
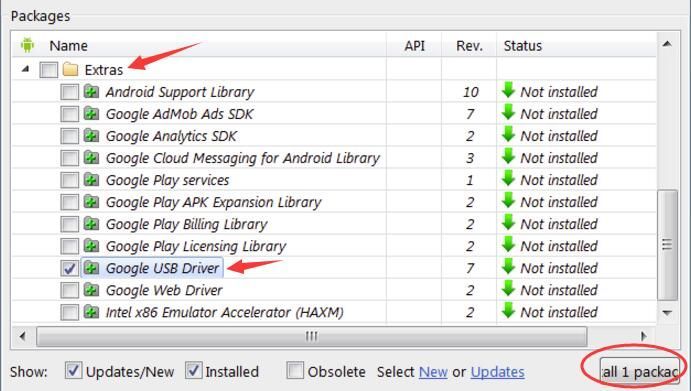
Open android sdk manager and install «Google USB Driver» from extras folder. (attached screenshot)
Android SDK Google USB Driver missing
Solution 4
Go to settings > Developer Options > Enable USB Debugging.
(If you don’t see Developer Options, Go to Settings > About Phone > Keep tapping «Build number» until it says «You’re a developer!»
Enable USB Debugging
answered Jun 15, 2016 at 23:10
![]()
ChiragMSChiragMS
4855 silver badges12 bronze badges
2
It depends on windows system but usually:
- you go to system properties
- look at hardware devices
- Right click on the yellow (has to be yellow if it’s driver problem) icon representing your mobile device
- select property
- Then go on the driver tab
- select update driver
- choose the bottom selection find on local computer
- then choose manually
- From the windows opened look for driver disk the bottom right button
- Choose the driver from the folder
<sdk>extrasgoogleusb_driveri386(or amd64 for and). - Remember to uncheck the show only compatible hardware.
- Then choose the driver
- When windows warn your about possible incompatibility go on.
For my mobile it works, but depend on your mobile if it work or not.
Hope this help, bye.
![]()
alepuzio
1,3802 gold badges30 silver badges37 bronze badges
answered May 22, 2012 at 18:19
![]()
Guaido79Guaido79
1,26111 silver badges18 bronze badges
10
If you installed Eclipse have Android SDK, go to DDMS. If the list device display «?????????»
you do adb kill-server and then adb start-server.
Please make sure you install USB driver and enable debug mode.
answered May 22, 2012 at 15:48
![]()
Tai TranTai Tran
1,4063 gold badges15 silver badges26 bronze badges
3
Another issue here is that you likely need to turn off «connect as media device» to be able to connect with adb.
answered Sep 22, 2013 at 21:45
![]()
liamvictorliamvictor
3,2311 gold badge22 silver badges25 bronze badges
5
For me, I have to Revoke USB debugging authorizations in Developer Options. Here is the steps:
- Turn off
USB Debugging, - Revoke USB debugging authorizations,
- Plug the cable back in,
- Turn on
USB Debugging
answered Jul 16, 2018 at 2:20
![]()
chozchoz
16.9k4 gold badges51 silver badges71 bronze badges
2
I solved:
Just turn off USB debugging and re-enable debugging it immediately
answered Dec 4, 2017 at 11:36
![]()
Mzhda SaeedMzhda Saeed
2132 silver badges4 bronze badges
1
On my G2 I had to select PTP instead of MTP mode to get the connection to work.
answered Jul 15, 2016 at 0:28
![]()
1
I had this problem suddenly crop up in Windows 7 with my Nexus One — somehow the USB drivers had been uninstalled. I ran android-sdk/SDK Manager.exe, checked Extras/Google USB Driver and installed it. Then I unplugged the phone and plugged it back in, and ran «adb devices» to confirm the phone was attached.
This doesn’t work for all phones, just the ones listed here:
http://developer.android.com/sdk/win-usb.html
answered Oct 12, 2012 at 17:28
![]()
Sarah NorthwaySarah Northway
9991 gold badge13 silver badges23 bronze badges
Developer options
- USB Debug
if you can not see developer option, go to about. build version and click build version until developer options in unlock.
answered Jan 29, 2014 at 14:28
![]()
CorreoCorreo
211 silver badge3 bronze badges
1
Try changing USB port.
Try restarting adb server.
answered Dec 4, 2020 at 9:03
![]()
I have a Droid 3 (Verizon). I went to Motorola here and found the driver for the device ‘Motorola ADB Interface’ which was showing in device manager. It’s kind of a big download for just the driver, but during installation it found it and installed correctly.
answered Apr 7, 2013 at 6:50
![]()
Simon_WeaverSimon_Weaver
136k79 gold badges631 silver badges676 bronze badges
I switched to a different USB port and it suddenly got recognized…
answered Sep 1, 2020 at 7:48
![]()
chenopchenop
4,4954 gold badges43 silver badges60 bronze badges
How about:
Settings -> System -> Developer options -> Debugging -> turn on toggle for Wireless ADB debugging
or:
Revoke USB debugging authorizations
and try from the scratch.
answered Jan 28, 2021 at 9:20
![]()
Just wanted to provide a simple answer here. I am just messing with an old Android device for the first time doing these root and unlock procedures. I received an error like this one when an adb push "..." "/sdcard/" command failed, and the key was that my device was in the bootloader screen. Booting to recovery then allowed me copy over the file(s), and I presume the normal OS would as well.
answered Apr 23, 2016 at 17:28
![]()
PysisPysis
1,3512 gold badges16 silver badges29 bronze badges
This worked for me, my AVG anti virus was deleting my adb.exe file. If you have AVG try:
1) opening the program
2) go to options
3) go to the virus vault and click on it
4) find your adb program, click on it, and press RESTORE at the bottom
This will move the file back to its original place.
However, unless you turn off the AVG it will delete the file again.
After this android studio located the file. Good luck.
answered Jul 21, 2016 at 4:50
![]()
I found my solution from this similar thread by enabling USB tethering on my LG G6 (requires data saver to be turned off)
Go to: Settings -> Tethering & networks -> switch on USB tethering
answered Aug 13, 2018 at 20:56
![]()
For completeness, I’ve just had a case here I had to change my USB cable. Guess the one I had was for charging only, accursed thing.
answered Mar 7, 2021 at 23:12
![]()
IanIan
1,4172 gold badges20 silver badges36 bronze badges
On my Sony Xperia XZ1 Compact on Oreo I had to switch USB mode to MIDI to get it working. Only after this my Windows recognised Android ADB, however it couldn’t autoinstall driver. I opened Device Manager and installed the Google USB Driver for the ADB.
answered Sep 4, 2021 at 11:31
![]()
To solve this problem,
Add adb folder to your windows path (system veriable)
This solves the problem
answered Nov 19, 2021 at 11:06
![]()
In my case I needed to swap the ends of the cable connecting my device to the computer…
answered Feb 18, 2022 at 23:28
![]()
With smartphones being present everywhere, the need for transferring files from your personal computer to your smartphone and vice versa arises. Not only that, you might need to debug certain apps or install new ones, etc. for which a command-line utility called ADB or Android Debug Bridge is often used.
Occasionally, people end up with the issue of not being able to connect to their smartphones, even though, according to them, they’ve done everything right. Well, don’t worry, this is what we’re here for. This guide will let you in on how to solve the ‘Error: device not found’ problem — so sit back, relax and follow the instructions.

What Causes the ADB Device Not Found Error?
Before we jump into the solutions, you might want to know what causes this problem. Well, many things can result in this issue —
- The drivers are not updated. The drivers are the actors responsible for communicating with the interface and your OS. If it is not updated, you might encounter this error.
- USB debugging is not enabled. This mode is necessary for ADB to work on your Android device.
- Selection of wrong connection mode. A correct connection mode should be selected for the type of transfer you want to initiate.
Note: Make sure that you have ADB installed.
Method 1: Enable Developer Options and USB Debugging
To start, make sure you’ve enabled USB Debugging on your device since ADB doesn’t work otherwise. To do that:
- Go to your phone Settings and select About.
- In About menu, tap on ‘Builder number’ seven times which enables Developer Options.
- After that, go back and select Developer options.
Enable Developer Options - Scroll down and tap ‘USB Debugging’.

Method 2: Change Connection Mode
Android has different connection modes which can sometimes cause this problem. In the case of adb, we need MTP (Media Transfer Protocol). One thing to note is that your smartphone might have Transfer files instead of MTP which is the same. For this, what you have to do is:
- Make sure your device is correctly plugged in.
- Pull down the notification window and select the USB connection notification.
- There, select MTP as the connection mode.
Select MTP as the connection mode Note: Some people have reported that selecting the PTP mode worked for them, make sure to try that as well.

Method 3: Update ADB Interface
Sometimes, the issue is due to an outdated ADB interface driver. To update the driver, what you have to do is:
- On your computer, right-click on ‘My Computer’ and select Device Manager.
- Under Other Devices, you’ll see ‘Android ADB Interface’ or ‘Android Phone’. Right-click it and select ‘Update Driver Software’.
ADB Interface Driver Update - After that, select ‘Browse my computer for driver software’.
- Then, select ‘Let me pick from a list of device drivers on my computer’.
- A window will pop up, make sure ‘Show all devices’ is highlighted and click Next.
Highlight Show All Devices - Click the ‘Have Disk’ option.
- Go to where you’ve installed your SDK which is usually
C:Program FilesAndroidandroid-sdkextras\googleusb_driver
where you’ll have to double click android_winusb.inf
- Select ‘Android ADB Interface’ from the list.
Select Android ADB Interface - Click ‘Yes’ and then click ‘Install’.
- Wait for the installation to complete and then close the window.
You can try reconnecting your device if it doesn’t recognize it already.
Method 4: Install Universal ADB Windows Driver
If you are sure that the above-mentioned solutions are not going to work for you or didn’t work for you, installing Universal ADB Windows Driver might be the solution for you. It is pretty simple, download the driver from their official website and install it.
Method 5: Reset the ADB Process
It sometimes happens that everything else is working but you still can’t list your smartphone – meaning you have installed the USB driver, enabled USB debugging, etc. In such cases, killing the server and starting it again might help you out. To do that, type the following commands in the command line
adb kill-server

adb start-server
Method 6: Change the Cable
Finally, if nothing works out for you, getting a new cable might be the way for you. The chances of your cable being faulty are high which means no matter what you do, your problem will remain as the problem is not with your driver but rather with the hardware. To check whether your cable is faulty or not, try the following:
- Connect your cable to a port on a charger.
- Try charging your smartphone with that cable.
If it doesn’t start charging, this means your cable is at fault and you’ll have to get another.

Kevin Arrows
Kevin is a dynamic and self-motivated information technology professional, with a Thorough knowledge of all facets pertaining to network infrastructure design, implementation and administration. Superior record of delivering simultaneous large-scale mission critical projects on time and under budget.
Nowadays, Android is one of most leading mobile operating systems and is in nearly installed in all smartphones ranging from extremely affordable to highly paid mobiles. Also, ADB nothing but Android Debug Bridge, is a command-line utility. It helps you control your android smartphone from your computer. It is also used when you may want to debug certain apps or install new ones etc. on your smartphone. But it’s frustrating when you face this device not found error message as ‘adb: error: failed to get feature set: no devices/emulators found‘ when you try to use it. No worries, here in this post, I have listed a couple of solutions which will help you resolve this ADB Device Not Found Error.
Solved ADB Device Not Found Error —
People used to find answers on adb tools by searching about; How do I get ADB to recognize my device? How do I connect to ADB devices? How do I find ADB devices on Windows? How do I update ADB drivers? How do you check if ADB is installed or not? How do I uninstall ADB drivers? How do I enable ADB? What is the best APK download site? How do I restart ADB? And so on…
Fixing “error: device not found” when you try to use ADB is not a big issue. Moreover, you can also solve «ADB: error: failed to get feature set: no devices/emulators found error» easily. This guide is published as because one of the readers was asking about ‘ADB devices not showing my device windows 10’ when installing the Microsoft User-Mode Driver Framework on PC. Even you have updated adb driver, many users encounter this when they try to do the adb commands like ADB shell in CMD and it shows device not found error.
You don’t require any technical knowledge in USB debugging windows 10 process this adb toolkit is really easy to try and optimize your Android device. This guild not only helps you to fix no connected devices android studio but also for the android adb install procedure to solve «adb devices empty» kind of issues.
ADB Device Not Found Error is one of the driver issues. And such an issue is most likely due to a problem with your ADM Device driver itself. Due to this issue, even though you have done everything right, you are not being able to connect to your smartphones. Check out below the causes due to which this issue occurs.

{tocify} $title={Table of Contents}
Why “error: device not found” occur?
For solving the problem of adb no devices/emulators found error you need to know some base.
Causes due to which this ADB device is not found issue occurs:
- USB Debugging Disabled: It could be the case that, USB debugging option is not Enabled yet on your Android smartphone.
- Incorrect Connection Mode: You might have choosen incorrect connection mode for type of transfer you wanted.
- Driver not updated: As discussed above, the issue is most likely because of the problem with your ADM Device driver itself. Thus you have to keep your driver up-to-date.
Anyways, move ahead as I’ve explained the quick solutions for the above possible causes which trigger such errors. I’ve listed a couple of steps below which will help you resolve this ADB Device Not Found Error quickly.
Easily fixing Adb sideload/adb devices not found issue here.
Just follow below steps to solve this ADB «error: device not found» error quickly:
Step 1: Check connection mode.
Android operating system comes with difference connection modes like Mobile Device (MTP) or Camera (PTP). But for ADB, we have to make use of Mobile Device (MTP).
- Connect your device to your computer.
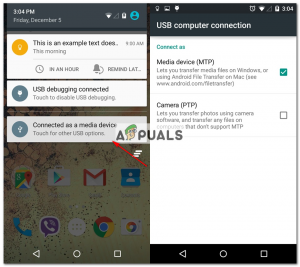
- Swipe down to access Notification center/panel.
- Tap on USB Debugging connected option.
- Select Mobile Device (MTP) option.
- That’s all, check if your problem gets solved by following this step.
If NOT, please proceed further to next solutions.
Note: You may try the same by selecting Camera (PTP) option, many of my viewers solved their problem by using PTP as well.
You may also like to know; [Fix] Make Computer Run 10x Faster By Using Virtual Memory
Step 2: Enable USB Debugging through Developer Option.
USB Debugging is a developer option and it helps your Android device to communicate with your computer which has Android SDK installed. It further opens up advanced operations as a developer.
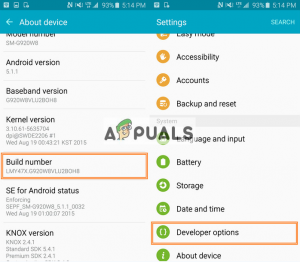
- Open Settings on your Android smartphone.
- Navigate to About device option.
- Tap 7 times on Build Number option.
- This will then enable Developer Options.
- Now access Developer Options and tap on USB Debugging option.
- Try reconnecting your mobile device and check if this could solve your problem.
If this step too does not solve your problem, please proceed further to the next solutions.
Step 3: Update ADB Driver on your computer.
Since ADB Device Not Found Error is one of the driver issues, you have to keep your driver up-to-date. And for this, follow below steps:
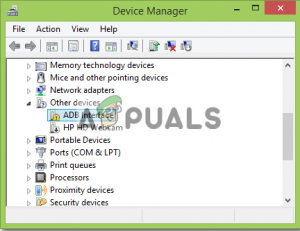
- Right click on start button and click Device Manager option.
- Expand Other devices option.
- Right click on ADB Interface or Androie Phone option.
- Click on Update Driver Software option.
- When prompted, select ‘Browse my computer for driver software’ option.
- Choose Let me pick from a list of device drivers on my computer option.
- Select Show all devices option and hit Next button.
- Choose Have Disk option.
- Browse and locate your SDK. Usually it kept at below location:
C:Program FilesAndroidandroid-sdkextras\googleusb_driver - Double click on android_winusb.inf file.
- Now choose ADB Interface from the list and hit Next button.
- Allow the installation to be finished.
- Now, try reconnecting your mobile and check if this solves your problem.
Still no luck? Please proceed further to next solutions.
Check; What’s QoS? How To Boost & Increase The Internet Speed by QoS | Make Router Faster
Step 4: Install Universal ADB Windows Driver.
If none of the above solutions work for you, you have to install Universal ADB Windows Driver on your computer. Just open their official website and download and install it. This installation might be the solution for you. Just try it and check. Otherwise, proceed further to the next solutions.
Download link: Universal ADB Windows Driver Installer.
Step 5: Restart ADB Process.
It could be the case that, you have already implemented the above steps like, USB Debugging enabled, drivers are up-to-date, the universal driver is in place, etc. But do you still facing this issue?
If Yes, you will have to restart entire ADB process and for this you have to use below commands; one for to Kill the process first followed by another command to Start it back again.
Just Open command prompt and run below commands:
- adb kill-server: To kill running ADB process.
- adb start-server: To start it back again.
You may also like to know; How To Disable Skype Ads
Step 6: Try with different cable.
Sometimes, there could be the problem with your USB cable itself. As you all know, all USB cables are going through endless flexing and curling states. Due to this, your USB cable might get damaged. You also try to purchase dummy cable from the market just to keep our original cable safe and we keep using that cable for charging and for data transfer as well.
I know it sounds silly and you obviously did this already, but I still would like to recommend you to try connecting your phone with another but authentic USB cable rather than dummy cables and check that if it solves your problem.
Bottom Line
I’m sure by following any one of the methods from listed ones will help you resolve this ADB Device Not Found Error.
If you are facing this error or something you want to suggest apart from the above points, feel free to use below comment section below to get in touch with me anytime. Happy to hear from you and to implement the suggestions for helping others.
In this guide, we will show you the steps to fix the ADB Device not found error. In some instances, the Command or PowerShell window might also show blank under the list of devices attached. Along the same lines, there are a few other common ADB Errors that few have already covered before. These include: Fix adb is not recognized Error and Fix Unauthorized Device with ADB Commands [3 methods]. As of now, our focus will be on fixing the ADB device not found error that shows a blank result under the List of Devices Attached section. Follow along for the detailed instructions.
Android devices, thanks to their open-source ecosystem allows you to carry out a plethora of tweaks. Now, these tweaks encompass two different domains. The first one is the everyday users who customize their device using numerous themes, icon packs, launchers, etc. Then comes the tech enthusiasts, who take these customizations one step ahead. They unlock the device’s bootloader, flash custom ROMs and custom recoveries, or even root their devices via Magisk.
But no matter to which domain you belong, one thing stands in common: the use of ADB and Fastboot Commands. The general users might use these commands to boot their device to Fastboot/Bootloader or Recovery Mode, Apply Update via ADB Sideload, installing/uninstalling apps, among other tasks. Then the geeks could make use of these commands to unlock the bootloader (fastboot oem unlock), boot their device to TWRP (fastboot boot twrp.img), flash ZIPs, and IMG files (fastboot flash boot magisk_patched.img), and the list goes on.
However, sometimes these commands just fail to execute. It could take the shape of quite a few errors (as already discussed in the introductory paragraph). Among them, the most common one seems to be the ADB Device not found and the List of Devices Attached section would be blank. In this guide, we will make you aware of all the plausible reasons for this error, and more importantly how to fix it. Follow along.
- Fix Magisk Module Bootloop without TWRP Recovery
- How to Fix TWRP Error 20 GApps after flashing LineageOS
- Fix Mi Account Authorization | Unbrick Xiaomi | EDL Mode
- How to Fix Error: Cannot load recovery.img
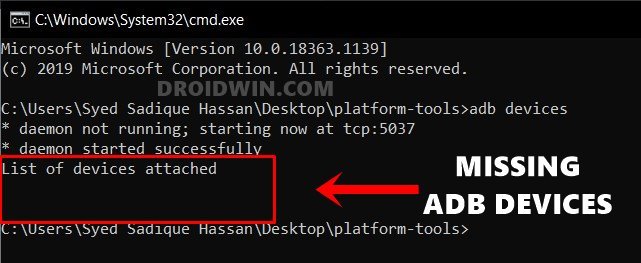
So when and why this error happens? Answering the ‘when’ part first, well it happens when you execute the adb devices command in CMD or PowerShell window. Upon typing in this command, in general cases, you would have got your device ID followed by the device keyword. However, when you are facing this issue, the CMD/PowerShell window wouldn’t result in any value. Rather they would start off with a new line. If it is a little bit more caring, then you might get the <waiting for device> message, which again doesn’t do any good to the end-user.
With that said, this guide will list out all the possible methods to fix the ADB Device not found [List of Devices Attached is blank]. Do keep in mind that there isn’t any universal fix for this error. You will have to try all the below-mentioned methods one by one until you achieve success. Furthermore, we will start off with the most basic tweak first followed by the slightly advanced ones. So without further ado, let’s get on with this guide.

Fix 1: Reverify ADB Installation
First and foremost, make sure that you have the proper ADB and Fastboot binaries installed. There’s nothing much that you need to do- just install the Android SDK Platform Tools provided by Google [Windows | Linux | macOS]. If you have installed any other ADB and Fastboot tools, then please uninstall them and only use the one provided by Google. The reason?

Well, all these tools are proving to be among the most lite-weights end up missing a few important files, especially those related to the device storage partition. Hence, install the Android SDK Platform Tools on your PC and see if it fixes the ADB Device not found [List of Devices Attached is blank] error or not.
- How to Boot into Recovery (TWRP/Stock) from Fastboot Mode
- Fix TWRP Error 7 (While Flashing Custom ROM via TWRP)
- How to Fix FAILED (remote: unknown command) Error
- Mi Unlock Tool Errors and their Fixes
Fix 2: Launch Command Prompt where ADB is installed
This is one fact that many users end up missing. You should only launch the Command Prompt window inside the folder where ADB and Fastboot binaries are present. Since we have recommended the installation of Android SDK Platform Tools, hence you should launch the CMD window inside the platform-tools only. Now there are two different ways of doing so:
The Direct Approach:
As is evident from the name, this method tells you to directly open the CMD window inside the ADB folders. Here’s how it could be done:
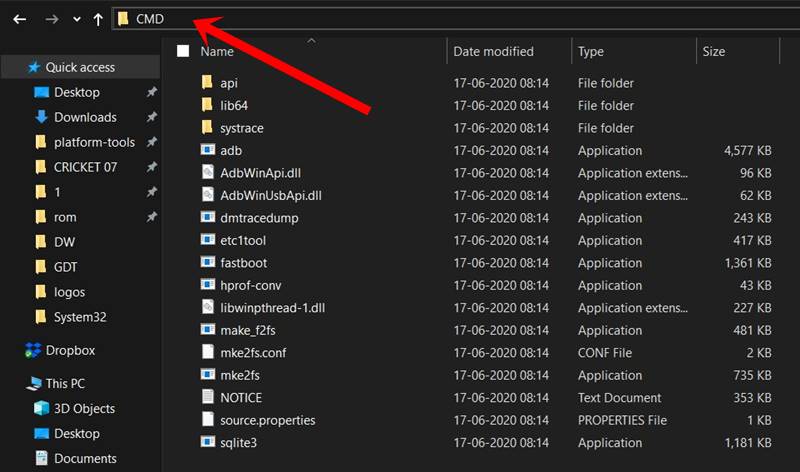
- Head over to the platform-tools folder on your PC.
- Then type in CMD in the folder’s address bar and hit Enter.
- This will launch the Command Prompt inside the platform-tools folder itself.
The Indirect Approach
In this method, you could launch CMD normally from the Start menu and then change its directory to the folder where ADB is installed. Here are the instructions for the same:

- Head over to the Start menu and search for CMD.
- Launch the Command Prompt window as an administrator.
- Now type in cd followed by the ADB installation directory.
- For example, I have installed Android SDK platform Tools on my desktop, hence the command in my case would be
cd C:UsersusernameDesktopplatform-tools
Once you have changed the directory to the ADB installation location, check if it fixes the ADB Device not found [List of Devices Attached is blank] error or not.
Fix 3: Make sure USB Debugging is Enabled
While it is mostly along the obvious lines, but this is usually among the biggest culprits for this issue. USB Debugging is needed to be enabled so that your PC recognized your device in the ADB Mode. So you should reverify that the USB Debugging is indeed enabled. Here are the required instructions for the same:
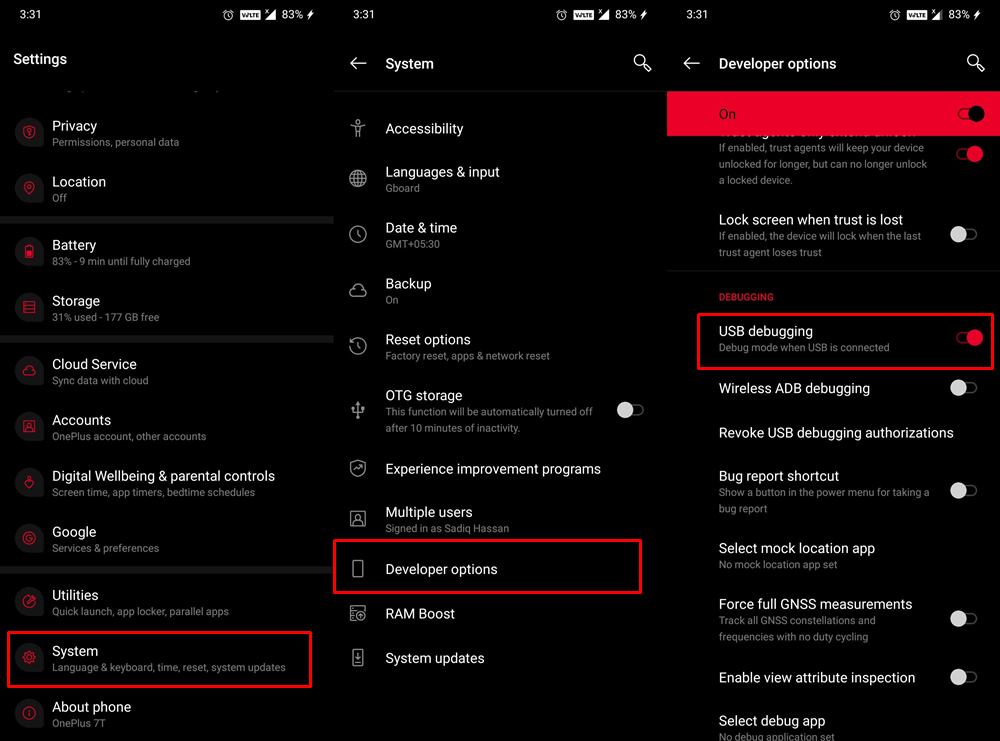
- Head over to Settings on your device. Then go to About Phone and tap on Build Number 7 times. Xiaomi users should tap on MIUI Number 7 times.
- You will then get a toast message that Developer Options is enabled.
- So now go back to Settings followed by System.
- Now go to Developer Options (in some devices it might be under the Advanced section) and enable the USB Debugging toggle.
Once done, connect your device to PC via USB cable and see if it is able to fix ADB Device not found [List of Devices Attached is blank] error. [Don’t Miss: How to Enable USB Debugging on a Broken Android Device’s Screen?]
- How to Install OTA Updates in Rooted Android Device
- How to Install Substratum Themes on any Android (Oreo 8.0 and above)
- Permanently Install TWRP without TWRP ZIP File (only using TWRP.img file)
- Root Android Devices Without TWRP Recovery
Fix 4: USB Connection should be Authorized
Enabling the USB Debugging is just half the done work. The first time you connect your device to the PC in ADB Mode you will have to verify the device’s fingerprint with your PC. The best bet, in this case, is to revoke the USB Debugging permission of your device and then re-verify it. Here is how it could be done:
- First off, head over to the Developer Options on your device. If you haven’t enabled it yet, then go to Settings > About Phone > Tap on Build Number 7 times > Go back to Settings > System > Advanced > Developer Options.
- Once you reach Developer Options, scroll to the Debugging section and tap on Revoke USB Debugging Authorizations. Tap on OK in the confirmation dialog box that appears.

- Now launch the CMD window inside the platform-tools folder (as mentioned in Fix 2).
- Then type in the below command in the CMD window:
adb devices
- You will now get an Allow USB Debugging on your device, tap on Allow.

- Furthermore, if this is your own trusted PC, then you could also tick-mark the Always allow from this computer option. Doing so will save you from allowing the USB Debugging every time you connect the device to your PC.
- Once that is done, see if it fixes the ADB Device not found [List of Devices Attached is blank] error.


Fix 5: Change USB Connection Mode
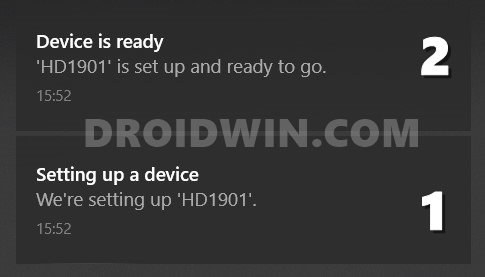
Some users have reported success after changing the USB Connection Mode to MTP from USB storage mode (or File Transfer mode). So as soon as you connect your device to the PC via USB cable, you should see the current USB connection mode. Select MTP from the list (if it is not there, then you may also switch to PTP mode). Once you do so, you may see the setup notification on your PC, as shown below:
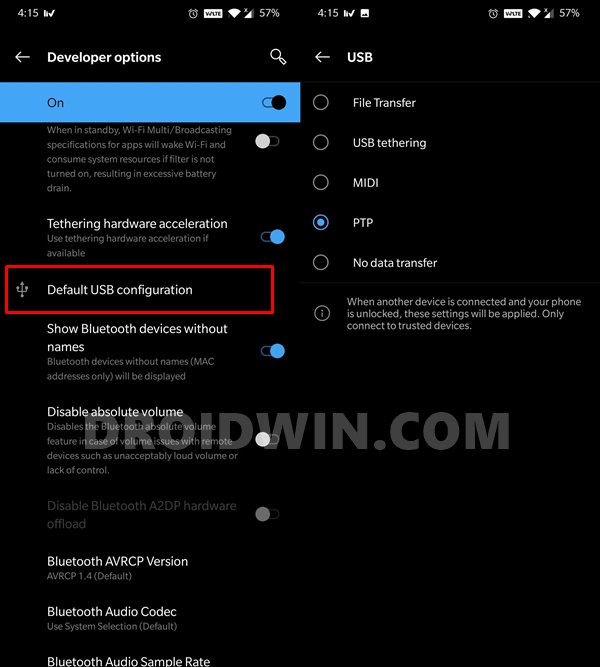
However, if you don’t see the option to change the USB Connection Mode, then you could manually carry out this step as well. For that, go to Settings > System > Developer Options > Default USB Configurations (see below image). Then select MTP (or PTP) from the options. Now check whether it fixes the ADB Device not found [List of Devices Attached is blank] error or not.
- How to Pass Magisk SafetyNet on Rooted Android 11
- Root Android 11 via Magisk Patched boot.img (without TWRP)
- Fix Android stuck in Recovery Mode: No Command screen
- Fix Magisk patched boot.img issue while Rooting Android 11
Fix 6: Manually Install Drivers
Most Android devices come baked in with their own USB Drivers. As a result, as soon as you connect your device to your PC via USB cable, the drivers would automatically be installed on your PC. But if that doesn’t happen you may manually install them as well. Google provides the required android_winusb file on its Android Developers website.
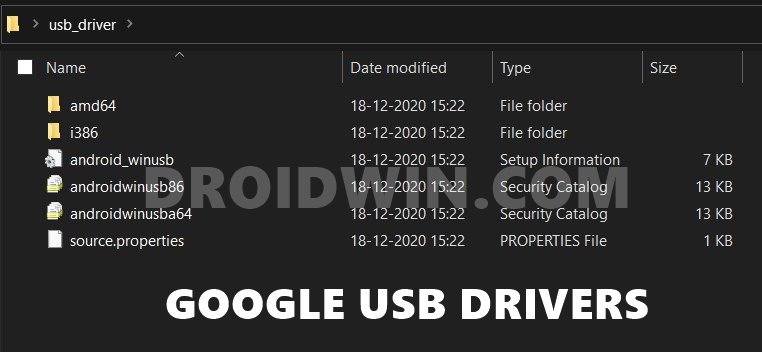
You just need to download and add it via your PC’s Device Manager. And as opposed to what you might have read till now, this USB driver file is universally accepted by all Android devices. Even if you see sites hosting USB drivers for individual phones, it’s just to increase clicks, the resulting file will be the same (android_winusb). So download this file and proceed with the below steps.
- To begin with, extract the contest of the downloaded driver file and you should get the following files:
- Right-click on the Windows icon and select Device Manager from the menu.
- Within that, go to the Other devices section and you should see your Android device listed there. In some cases, it might be under the Ports section or the Portable Device section as well.
- Once you find the device, right-click on it, and select Update Drivers.

- In the next popup that appears, select Browse my computer for driver software.

- Now click on the Browse button, navigate to the extracted driver folder, and select the usb_driver folder. Yes, you don’t need to select the individual driver file, just select the driver folder and your PC will take care of the rest.
- Once you have selected the USB Driver folder, hit Next and proceed with the on-screen instructions to install it.

- After the installation is complete, unplug and then replug your device to the PC via USB Cable. See if it fixes the ADB Device not found [List of Devices Attached is blank] error.


Fix 7: Add ADB System Variable Path
In some cases, the system isn’t able to decide which ADB Drivers do it needs to use. This usually happens if you have more than one copy of ADB/Fastboot Drivers installed on your PC. This usually might conflict with the environmental system variable related to the Android SDK. The fix for that is to manually add the ADB installation directory, i.e, the platform-tools folder’s location to the System Environment Variables. here are the required instructions for the same:
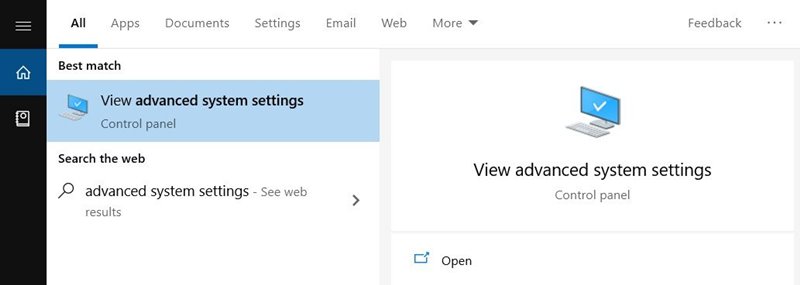
- Head over to the Start menu and search for View Advanced System Settings.

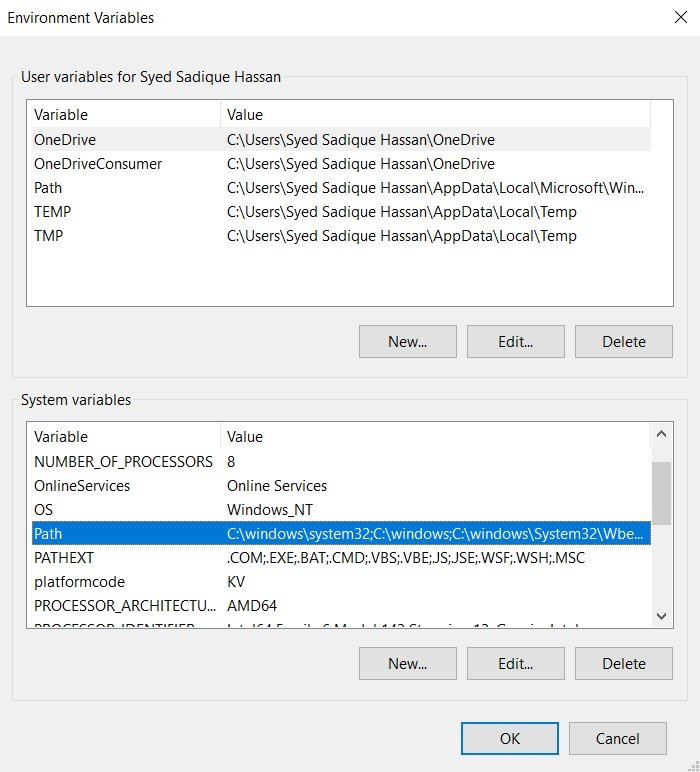
- Go to the Advanced tab and click on the Environmental Variables button.

- You should now see two sections: User Variables and System variables. As for this guide, we would be dealing with the latter.
- So select Path from the System Variables and click on Edit.

- It will bring up the Edit environment variable option, click Browse from the right-hand side.

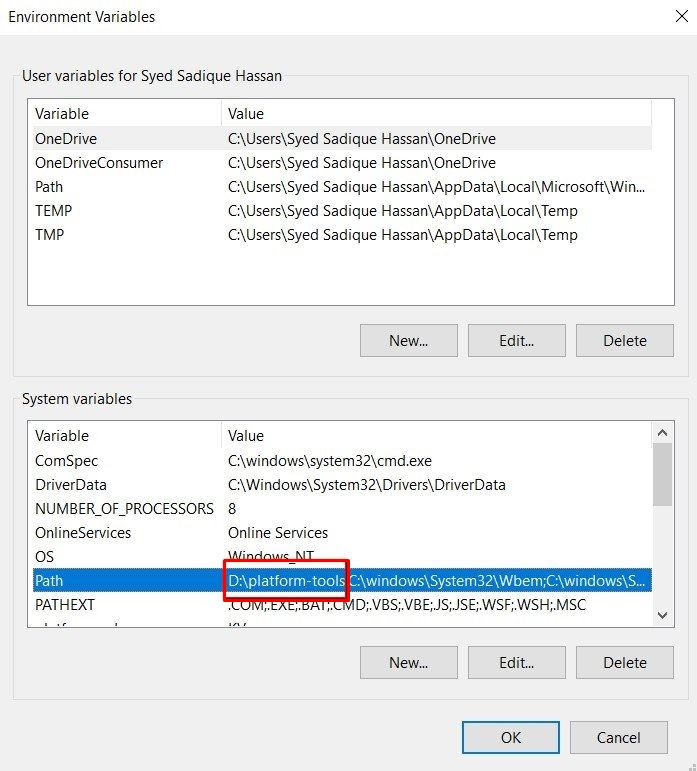
- Now navigate to the location where you have installed the ADB and Fastboot binaries and select the platform-tools folder and click OK.

- You should now see this directory successfully added to the environment variables. Click OK to close the dialog box.

- Likewise, the path will also be visible in System variables under Environment Variables, as shown in the below image. Click OK to close this dialog box as well. That’s it. Your error now stands rectified.

- Once the path has been added, plug in your device via USB cable to your PC, and the issue would have been fixed by now.


So with this, we conclude the guide on how to fix the ADB Device not found [List of Devices Attached is blank] error. We have shared seven different fixes for the same, any one of which should work out in your favor. Do let us know in the comments if you have any queries concerning the aforementioned steps. We will get back to you with a solution at the earliest.
- [GUIDE] Flash ROMs/Magisk/TWRP/Kernels on A/B Partition Devices
- Everything About Magisk- Manager, Modules and More
- Best Magisk Modules of 2020 [PART-1]
- [3 METHODS] Unroot any Android Device-Uninstall Magisk
About Chief Editor

Sadique Hassan
administrator
A technical geek by birth, he always has a keen interest in the Android platform right since the birth of the HTC Dream. The open-source environment always seems to intrigue him with the plethora of options available at his fingertips. “MBA by profession, blogger by choice!”
I’m trying to get my phone (JiaYu G3T) working under adb on Windows 8 x64 (worked fine on Windows 7 x64 before reinstalling my OS).
Driver Android Composite ADB Interface, version 8.0.0.0, works fine.
My adb won’t list any devices (adb.exe devices).
I tried:
- installed Google USB driver
- enabled debugging mode in phone
- added my device’s hardware IDs to the Google USB driver inf file and installed
- installed Moborobo (phone works fine in there but adb still won’t find the device)
- tried switch Settings > Storage > Menu > USB Computer connection to «Camera (PTP)»
- tried two different version of adb (1.0.31 and 1.0.26)
Those were some of the advices I found so far.
![]()
Dan Hulme
34.6k17 gold badges89 silver badges152 bronze badges
asked Oct 24, 2013 at 7:17
![]()
7
The drivers that come with PdaNet may work. Give it a shot
answered Oct 24, 2013 at 12:22
![]()
Finally it works, I’m using the Google USB driver. The problem is that I have to keep killing adb.exe before doing anything really (e.g. building and pushing an apk to the phone), otherwise it can’t find the device.
answered Dec 16, 2013 at 8:59
![]()
KrakenKraken
1311 gold badge2 silver badges4 bronze badges
While I was able to adb push from within android OS, I wasn’t in recovery mode.
Turns out the culprit was Cyanogen Bootloader. Once I flashed to TWRP, I could use ADB again from recovery mode.
answered Sep 14, 2015 at 18:50
![]()
I had a similar issue (with a Nexus S, but I don’t think it matters here). I could manually install the Google driver and it started without reporting problems. Nevertheless, adb devices did not list any device. Two things looked suspicious (and are probably related), but I could not use them to get a clue to the solution:
- The hardware ID reported in device manager did not containe the part «&MI_01».
- The driver installer warned me that the driver would not match.
Finally (and just by fluke) I found the solution that worked for me: somehow my Windows 7 installation had lost the files usb.inf and usb.pnf from C:Windowsinf. I followed the advice in https://superuser.com/a/515823/341332 to repair the issue (basically: find the missing files in c:windowssystem32driverstorefilerepository and copy them back), then I uninstalled my Nexus S in device manager and reinstalled it. I had to select the Google driver manually again, but this time: no warnings, the hardware ID ends with «&MI_01», and most important: adb devices now lists my device 
I hope this helps others that get stuck like me.
![]()
answered Jan 11, 2016 at 18:00
![]()
You must log in to answer this question.
Not the answer you’re looking for? Browse other questions tagged
.
Not the answer you’re looking for? Browse other questions tagged
.
 АБР , Короче дляAndroid Debug Bridge — это утилита командной строки. Это может позволить вам управлять вашим устройством через USB с компьютера. И он включен в SDK Google для Android. Раздражает то, что многие пользователи сталкиваются с ошибкой устройство не найдено когда вы пытаетесь его использовать.
Не волнуйся. Это уже не проблема, которую нельзя решить. В этой статье вы узнаете, как исправить Устройство ADB не найдено шаг за шагом.
Заметка: Прежде чем мы продолжим, убедитесь, что на вашем телефоне включена отладка по USB.
Ошибка ADB Device Not Found всегда является проблемой драйвера. Другими словами, если вы обнаружили ошибку «Устройство ADB не обнаружено» на вашем компьютере, скорее всего, проблема связана с драйвером устройства ADM. Таким образом, вы, вероятно, можете решить эту проблему, установив правильный драйвер для устройства ADB.
Здесь вам будут показаны два способа установить правильный драйвер для вашего устройства ADB.
Выберите способ, который вам больше нравится:
- Установите правильный драйвер для вашего устройства ADB вручную через диспетчер устройств
- Установите правильный драйвер для вашего устройства ADB автоматически через Driver Easy (рекомендуется)
Способ 1: Установите правильный драйвер для вашего устройства ADB вручную через диспетчер устройств
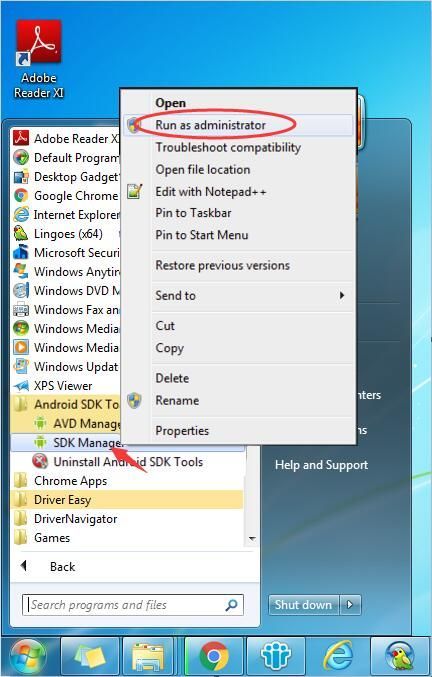
1) Найдите свой SDK-менеджер в стартовом списке. Щелкните его правой кнопкой мыши и выберите Запустить от имени администратора . Затем нажмите да при запросе контроля учетных записей пользователей.
2) Когда SDK Manager открыт, найдите и разверните Дополнительные возможности папка. Найдите и отметьте Драйвер Google USB в папке Extras. Затем нажмите Установить 1 пакет внизу справа.
3) По завершении установки драйвера подключите устройство Android.
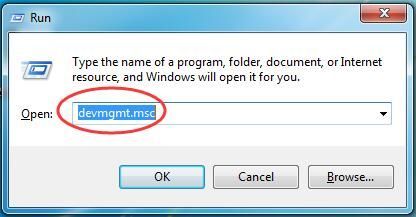
4) На клавиатуре нажмите кнопку Логотип Windows ключ  + р ключ одновременно.
5) Тип devmgmt.msc в коробке и нажмите Войти открыть Диспетчер устройств .
6) Найдите свое устройство Android. Вероятно, под разное устройства раздел с желтой меткой. Затем щелкните его правой кнопкой мыши и выберите Обновить программное обеспечение драйвера…
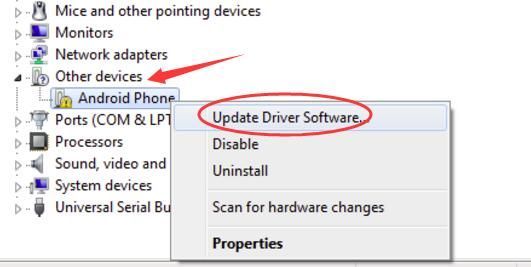
7) Нажмите Найдите на моем компьютере драйверы .
 Продолжайте нажимать Разрешите мне выбрать из списка драйверов устройств на моем компьютере .
9) Нажмите Есть диск .
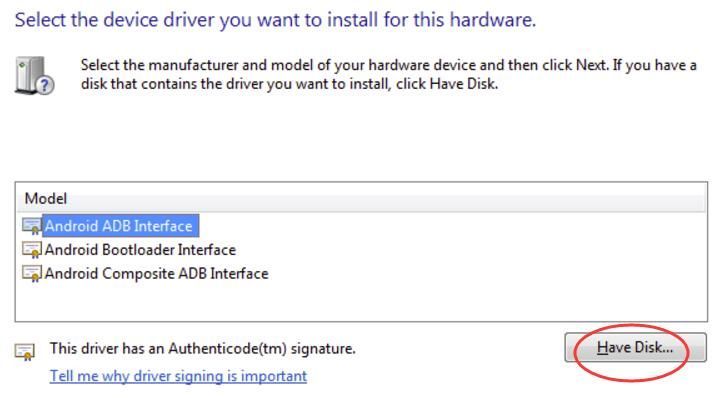
10) Нажмите Просматривать чтобы выбрать драйвер Google USB, который вы скачали в начале. Или вы можете ввести следующий адрес в поле.
C: Program Files (x86) Android android-sdk extras google usb_driver
Затем нажмите Хорошо .
11) Дважды щелкните на Интерфейс Android ADB .
12) Следуйте простым инструкциям на экране, чтобы завершить установку драйвера.
После этого перезагрузите компьютер, чтобы новый драйвер вступил в силу.
Теперь ваша проблема должна быть решена, попробуйте использовать ADB сейчас.
Способ 2: Установите правильный драйвер для вашего устройства ADB автоматически через Driver Easy (рекомендуется)
Если у вас нет времени, терпения или компьютерных навыков для обновления драйвера устройства ADB вручную, вы можете вместо этого сделать это автоматически с помощью Водитель Easy .Driver Easy автоматически распознает вашу систему и найдет правильный драйвер для вашего точного устройства ADB и вашего варианта системы Windows, а также загрузит и установит его правильно.:
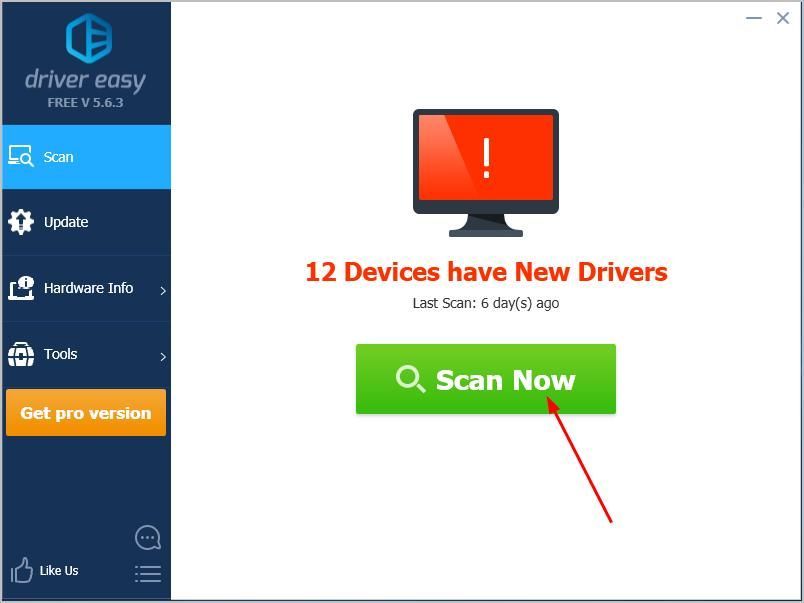
1) Скачать и установите Driver Easy.
2) Запустите Driver Easy и нажмите Сканировать сейчас кнопка. Затем Driver Easy просканирует ваш компьютер и обнаружит проблемы с драйверами.
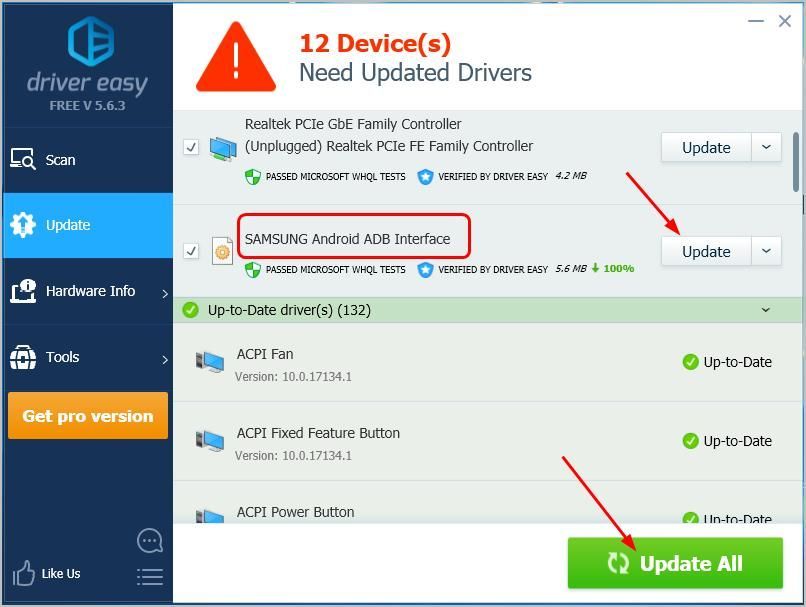
3)Щелкните значок Обновить рядом с отмеченным драйвером устройства ADB для автоматической загрузки и установки правильной версии этого драйвера (вы можете сделать это с помощью СВОБОДНЫЙ версия).
Или нажмите Обновить все для автоматической загрузки и установки правильной версии все драйверы, которые отсутствуют или устарели в вашей системе. (Для этого требуется Pro версия который поставляется с полной поддержкой и 30-дневной гарантией возврата денег. Вам будет предложено выполнить обновление, когда вы нажмете «Обновить все».)
4) После этого перезагрузите компьютер, чтобы новый драйвер вступил в силу.
Теперь ваша проблема должна быть решена, попробуйте использовать ADB сейчас.
Надеюсь, это помогло вам решить проблему. Не стесняйтесь комментировать ниже свой собственный опыт.