Did you just run your WordPress site through a speed test tool only to be told that you need to “Add Expires headers” to your WordPress site?
Expires headers help you leverage browser caching, which lets you speed up your site’s load times. Beyond that, they’re also part of YSlow’s performance recommendations, which means they’ll affect your performance “score” in tools like GTmetrix.
In this post, we’ll explain what expires headers are and how they affect your site. Then, we’ll show you step-by-step how to add expires headers in WordPress using a few different methods.
But first, we need to take a quick detour to cover another topic – browser caching.
What Is Browser Caching?
Before we can talk about expires headers, we first need to introduce you to the concept of browser caching. This is important because expires headers help you control and implement browser caching – so if you don’t understand browser caching, you can’t understand expires headers.
In a nutshell, browser caching lets your site tell a visitor’s browser to save certain files on the visitor’s local computer and load those local files for subsequent visits, rather than downloading them from your server on every page load.
Did you just run your site through a speed test tool, only to be told that you need to ‘Add Expires headers?’ 😅 This post has you covered 💪Click to Tweet
By eliminating the need to download the file each time, you can speed up your site’s load times and reduce bandwidth usage.
Let’s look at an example – your site’s logo image. Your logo is the same on every page, so it doesn’t make sense to force visitors’ browsers to re-download the same logo file on every page load. With browser caching, you could store that logo file on visitors’ local computers instead. A visitor would still need to download your logo image on their first visit. But for subsequent page views, the file would be loaded from their local browser cache.
What Are Expires Headers?
Expires headers let you tell a visitor’s web browser whether it should load a given resource from the local browser cache (as we discussed above) or whether it needs to download a new version from the web server.
More specifically, it lets you set a duration for the cached version of different file types before that file “expires” and the browser must download it from the server again.
Let’s look at an example…
Let’s say you want to control browser caching behavior for PNG image files on your site. If you set the Expires headers for PNG files equal to one month, this means that a visitor’s browser will:
- Load the already-downloaded version from the cache for one month after the initial access/download.
- Re-download that file from the server after one month.
You can set different Expires headers for different file types, which gives you granular control over your site’s browser caching.
Expires Headers vs cache-control
While using Expires headers is one way to control browser caching on WordPress, it’s not the only way. There’s also another technique called cache-control.
Cache-control is a more modern technique and offers a bit more flexibility for controlling caching behavior. For that reason, many sites use cache-control today – including us here at Kinsta with our custom Nginx configuration.
However, Expires headers still offer everything most sites need, so they’re a fine option to use for browser caching. You can also use both, though your cache-control headers will take precedence in most situations. If using both, you’ll want to make sure that you set the same time values in each.
If you want to learn more about how to implement cache-control on WordPress, check out our guide on how to leverage browser caching in WordPress.
How to Fix “Add Expires Headers” in WordPress
Now, let’s get into the actual how-to part and we’ll show you how to set up expires headers in WordPress.
But first – we have good news. If you’re hosting at Kinsta, you don’t need to worry about setting up expires headers because we automatically do it for you. We pre-configure both our servers and our integrated content delivery network (CDN) to leverage browser caching, so you don’t need to do anything.
If you’re hosting elsewhere, you can add expires headers for your WordPress site. You can do this either using your own code snippet at the server level (Nginx or Apache) or via some user-friendly WordPress plugins.
How to Add Expires Headers With .htaccess on Apache Web Server
If your web host uses the Apache web server, you can add Expires headers using the .htaccess file, which is located in the root folder of your server (the same folder that holds the wp-config.php file).
Here’s what you need to do:
- Connect to your server using FTP in your preferred FTP client
- Locate the .htaccess file in the root folder
- Download a backup copy of the .htaccess file to your local computer. That way, if anything goes wrong, you can reupload your backup copy to fix any potential problems.
- Add the code snippet below near the top of the file
## EXPIRES HEADER CACHING ##
<IfModule mod_expires.c>
ExpiresActive On
ExpiresByType image/jpg "access 1 year"
ExpiresByType image/jpeg "access 1 year"
ExpiresByType image/gif "access 1 year"
ExpiresByType image/png "access 1 year"
ExpiresByType image/svg "access 1 year"
ExpiresByType text/css "access 1 month"
ExpiresByType application/pdf "access 1 month"
ExpiresByType application/javascript "access 1 month"
ExpiresByType application/x-javascript "access 1 month"
ExpiresByType application/x-shockwave-flash "access 1 month"
ExpiresByType image/x-icon "access 1 year"
ExpiresDefault "access 2 days"
</IfModule>
## EXPIRES HEADER CACHING ##
While the default values should work fine for most sites, you can adjust the time periods for different file types in the code snippet according to your needs.
How to Add Expires Headers With config File on Nginx Web Server
If your host uses the Nginx web server, you can control Expires headers by editing your server’s configuration file. How you edit this file will depend on your host – you can reach out to your host’s support if you need help.
Kinsta does use the Nginx web server – but remember that we already configure things for you, so you don’t need to add any code yourself.
Here’s the code that you need to use:
location ~*  .(jpg|jpeg|gif|png|svg)$ {
		expires 365d;
	}

	location ~*  .(pdf|css|html|js|swf)$ {
		expires 2d;
	}
You can adjust the expiration times for different types of files as needed.
How to Add Expires Headers With a WordPress Plugin
If you don’t feel comfortable adding the expires headers code yourself, you can also find some WordPress plugins that can do the job for you. Some of these plugins add expires headers, while others use cache-control. Either way, the end result is that your WordPress site can benefit from browser caching.
One solution is to use a caching plugin if your host hasn’t already implemented caching for you. A great option here is WP Rocket, which is fully compatible with Kinsta. As soon as you activate the WP Rocket plugin, it automatically enables browser caching for you – there’s no need to configure any other settings.
Here are some other caching plugins that can help you implement expires headers and/or browser caching:
- WP Super Cache
- W3 Total Cache
- WP Fastest Cache
If you already have caching sorted and just want a more targeted plugin, two good free plugins are:
- Leverage Browser Caching
- Add Expires Headers
The Leverage Browser Caching plugin has no settings – you just activate it and it starts working right away.
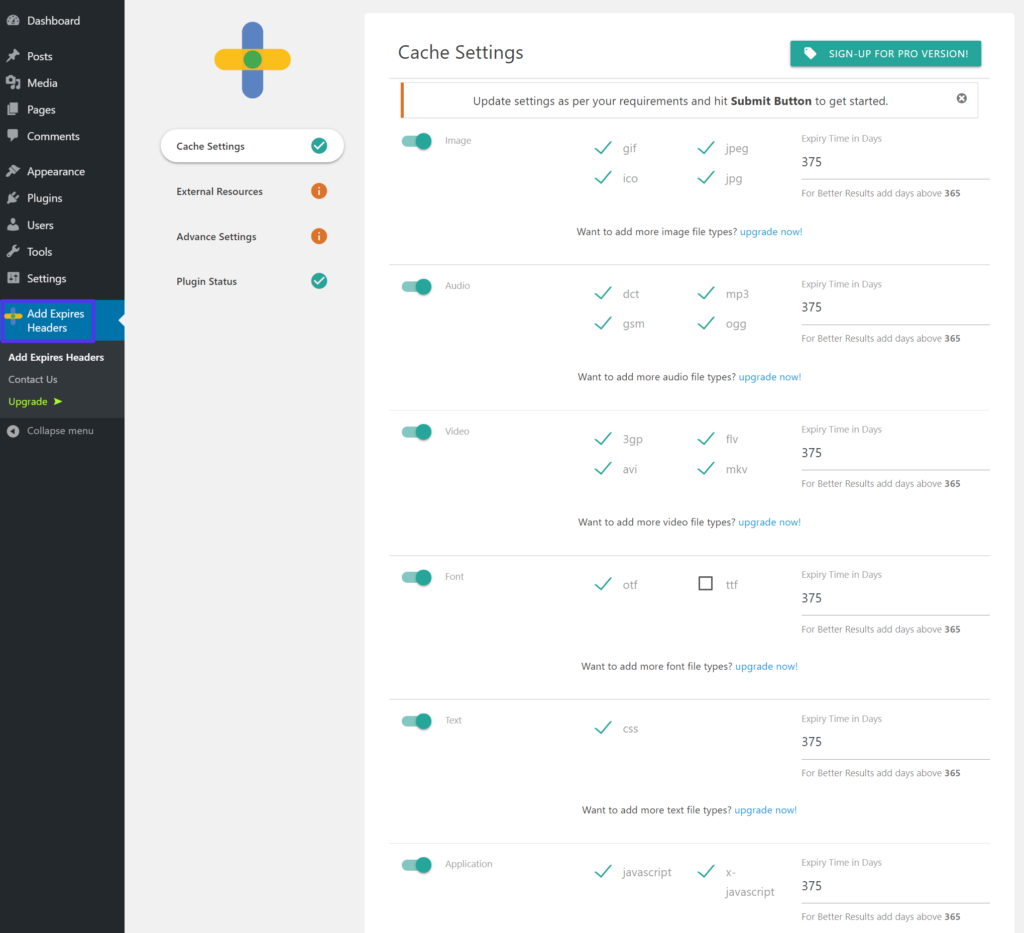
The Add Expires Headers plugin lets you control Expires headers for different file types – you can make these choices from the new Add Expires Headers area in your WordPress dashboard:
How to Test If Expires Headers Are Working
To test if your Expires headers are properly configured, you can use this free tool from GiftOfSpeed. Once you enter your site’s URL, the tool will tell you two things:
- The cache duration for all the files on your site.
- The cache type (it should say Expires headers since this is the method you used, but you also might see cache-control depending on your site’s configuration).
You can also run your site through whichever speed test tool you’re using (e.g. GTmetrix) and check if you’re still seeing the “Add Expires headers” message.
How to Test Expires Headers with Terminal
If you prefer testing expires headers with a more technical option, you can make a curl request in Terminal to a static asset on your site, and inspect the HTTP headers directly. For example, if your expires or cache-control rule covers CSS files, you can make a curl request like the one below.
curl -I https://kinstalife.com/wp-includes/css/dist/block-library/style.min.cssIn our case, the curl request to the style.min.css file provides the response below.
HTTP/2 200
server: nginx
date: Wed, 27 Jan 2021 01:11:05 GMT
content-type: text/css; charset=UTF-8
content-length: 51433
last-modified: Tue, 12 Jan 2021 20:17:48 GMT
vary: Accept-Encoding
etag: "5ffe03ec-c8e9"
expires: Thu, 31 Dec 2037 23:55:55 GMT
cache-control: max-age=315360000
access-control-allow-origin: *
accept-ranges: bytes
x-edge-location-klb: HaIXowU1oNczJ391oDE9zVvZ7279840b5d30a89472f57253756b3e63
As you can see, the response includes an expires and cache-control headers. Specifically, the cache-control header shows a max-age of 315360000 seconds, which indicates an expiration time of one year.
How to Add Expires Headers for External Scripts
The methods that we showed you above will let you control the expires headers for all of the files on your WordPress site’s server. However, those methods don’t let you control the expires headers for third-party scripts you might be loading, such as Google Fonts, Google Analytics, etc.
For that reason, some speed test tools might still flag this as a potential issue even if you’ve already implemented Expires headers via the methods above.
Here are some solutions for common third-party scripts…
How to Add Expires Headers to Google Fonts
Many WordPress sites rely on Google Fonts for custom fonts. This typically involves loading the fonts from Google’s CDN, which means you won’t be able to set Expires headers via your server’s configuration.
One easy fix is to locally host the font files, instead of relying on Google’s CDN. To set this up, you can use the free Optimize My Google Fonts (OMGF) plugin at WordPress.org.
You can also check out our full guide to locally hosting fonts in WordPress to learn more about the pros and cons of this approach.
How to Add Expires Headers to Google Analytics
If you’re seeing issues related to browser caching and Google Analytics, you can also consider locally hosting the Google Analytics script, just as we showed you with Google Fonts.
Here are some WordPress plugins that make it easy to achieve this:
- CAOS (Complete Analytics Optimization Suite)
- Perfmatters
- WP Rocket with its included Google Tracking add-on.
What can speed up your site’s load times AND improve your performance score in tools like GTmetrix? 🤔 Answer: Expires headers.💡 Learn more here ⬇️Click to Tweet
Summary
To recap, expires headers help you control browser caching behavior for different file types on your WordPress site.
Nowadays, many sites rely on cache-control headers instead of Expires headers because cache-control is a more modern option that provides more flexibility. However, expires headers still work fine for most sites and you can also use both expires headers and cache-control at the same time.
Additionally, some speed test tools will reduce your site’s score if you don’t implement expires headers, which might be your main motivation behind setting up this tactic.
If you host your WordPress site at Kinsta, you don’t need to worry about expires headers because we handle everything for you. However, if your site is hosted elsewhere, you can add expires headers to WordPress using the code snippets that we provided or one of the plugins that we featured.
Get all your applications, databases and WordPress sites online and under one roof. Our feature-packed, high-performance cloud platform includes:
- Easy setup and management in the MyKinsta dashboard
- 24/7 expert support
- The best Google Cloud Platform hardware and network, powered by Kubernetes for maximum scalability
- An enterprise-level Cloudflare integration for speed and security
- Global audience reach with up to 35 data centers and 275 PoPs worldwide
Test it yourself with $20 off your first month of Application Hosting or Database Hosting. Explore our plans or talk to sales to find your best fit.
Did you just run your WordPress site through a speed test tool only to be told that you need to “Add Expires headers” to your WordPress site?
Expires headers help you leverage browser caching, which lets you speed up your site’s load times. Beyond that, they’re also part of YSlow’s performance recommendations, which means they’ll affect your performance “score” in tools like GTmetrix.
In this post, we’ll explain what expires headers are and how they affect your site. Then, we’ll show you step-by-step how to add expires headers in WordPress using a few different methods.
But first, we need to take a quick detour to cover another topic – browser caching.
What Is Browser Caching?
Before we can talk about expires headers, we first need to introduce you to the concept of browser caching. This is important because expires headers help you control and implement browser caching – so if you don’t understand browser caching, you can’t understand expires headers.
In a nutshell, browser caching lets your site tell a visitor’s browser to save certain files on the visitor’s local computer and load those local files for subsequent visits, rather than downloading them from your server on every page load.
Did you just run your site through a speed test tool, only to be told that you need to ‘Add Expires headers?’ 😅 This post has you covered 💪Click to Tweet
By eliminating the need to download the file each time, you can speed up your site’s load times and reduce bandwidth usage.
Let’s look at an example – your site’s logo image. Your logo is the same on every page, so it doesn’t make sense to force visitors’ browsers to re-download the same logo file on every page load. With browser caching, you could store that logo file on visitors’ local computers instead. A visitor would still need to download your logo image on their first visit. But for subsequent page views, the file would be loaded from their local browser cache.
What Are Expires Headers?
Expires headers let you tell a visitor’s web browser whether it should load a given resource from the local browser cache (as we discussed above) or whether it needs to download a new version from the web server.
More specifically, it lets you set a duration for the cached version of different file types before that file “expires” and the browser must download it from the server again.
Let’s look at an example…
Let’s say you want to control browser caching behavior for PNG image files on your site. If you set the Expires headers for PNG files equal to one month, this means that a visitor’s browser will:
- Load the already-downloaded version from the cache for one month after the initial access/download.
- Re-download that file from the server after one month.
You can set different Expires headers for different file types, which gives you granular control over your site’s browser caching.
Expires Headers vs cache-control
While using Expires headers is one way to control browser caching on WordPress, it’s not the only way. There’s also another technique called cache-control.
Cache-control is a more modern technique and offers a bit more flexibility for controlling caching behavior. For that reason, many sites use cache-control today – including us here at Kinsta with our custom Nginx configuration.
However, Expires headers still offer everything most sites need, so they’re a fine option to use for browser caching. You can also use both, though your cache-control headers will take precedence in most situations. If using both, you’ll want to make sure that you set the same time values in each.
If you want to learn more about how to implement cache-control on WordPress, check out our guide on how to leverage browser caching in WordPress.
How to Fix “Add Expires Headers” in WordPress
Now, let’s get into the actual how-to part and we’ll show you how to set up expires headers in WordPress.
But first – we have good news. If you’re hosting at Kinsta, you don’t need to worry about setting up expires headers because we automatically do it for you. We pre-configure both our servers and our integrated content delivery network (CDN) to leverage browser caching, so you don’t need to do anything.
If you’re hosting elsewhere, you can add expires headers for your WordPress site. You can do this either using your own code snippet at the server level (Nginx or Apache) or via some user-friendly WordPress plugins.
How to Add Expires Headers With .htaccess on Apache Web Server
If your web host uses the Apache web server, you can add Expires headers using the .htaccess file, which is located in the root folder of your server (the same folder that holds the wp-config.php file).
Here’s what you need to do:
- Connect to your server using FTP in your preferred FTP client
- Locate the .htaccess file in the root folder
- Download a backup copy of the .htaccess file to your local computer. That way, if anything goes wrong, you can reupload your backup copy to fix any potential problems.
- Add the code snippet below near the top of the file
## EXPIRES HEADER CACHING ##
<IfModule mod_expires.c>
ExpiresActive On
ExpiresByType image/jpg "access 1 year"
ExpiresByType image/jpeg "access 1 year"
ExpiresByType image/gif "access 1 year"
ExpiresByType image/png "access 1 year"
ExpiresByType image/svg "access 1 year"
ExpiresByType text/css "access 1 month"
ExpiresByType application/pdf "access 1 month"
ExpiresByType application/javascript "access 1 month"
ExpiresByType application/x-javascript "access 1 month"
ExpiresByType application/x-shockwave-flash "access 1 month"
ExpiresByType image/x-icon "access 1 year"
ExpiresDefault "access 2 days"
</IfModule>
## EXPIRES HEADER CACHING ##
While the default values should work fine for most sites, you can adjust the time periods for different file types in the code snippet according to your needs.
How to Add Expires Headers With config File on Nginx Web Server
If your host uses the Nginx web server, you can control Expires headers by editing your server’s configuration file. How you edit this file will depend on your host – you can reach out to your host’s support if you need help.
Kinsta does use the Nginx web server – but remember that we already configure things for you, so you don’t need to add any code yourself.
Here’s the code that you need to use:
location ~*  .(jpg|jpeg|gif|png|svg)$ {
		expires 365d;
	}

	location ~*  .(pdf|css|html|js|swf)$ {
		expires 2d;
	}
You can adjust the expiration times for different types of files as needed.
How to Add Expires Headers With a WordPress Plugin
If you don’t feel comfortable adding the expires headers code yourself, you can also find some WordPress plugins that can do the job for you. Some of these plugins add expires headers, while others use cache-control. Either way, the end result is that your WordPress site can benefit from browser caching.
One solution is to use a caching plugin if your host hasn’t already implemented caching for you. A great option here is WP Rocket, which is fully compatible with Kinsta. As soon as you activate the WP Rocket plugin, it automatically enables browser caching for you – there’s no need to configure any other settings.
Here are some other caching plugins that can help you implement expires headers and/or browser caching:
- WP Super Cache
- W3 Total Cache
- WP Fastest Cache
If you already have caching sorted and just want a more targeted plugin, two good free plugins are:
- Leverage Browser Caching
- Add Expires Headers
The Leverage Browser Caching plugin has no settings – you just activate it and it starts working right away.
The Add Expires Headers plugin lets you control Expires headers for different file types – you can make these choices from the new Add Expires Headers area in your WordPress dashboard:
How to Test If Expires Headers Are Working
To test if your Expires headers are properly configured, you can use this free tool from GiftOfSpeed. Once you enter your site’s URL, the tool will tell you two things:
- The cache duration for all the files on your site.
- The cache type (it should say Expires headers since this is the method you used, but you also might see cache-control depending on your site’s configuration).
You can also run your site through whichever speed test tool you’re using (e.g. GTmetrix) and check if you’re still seeing the “Add Expires headers” message.
How to Test Expires Headers with Terminal
If you prefer testing expires headers with a more technical option, you can make a curl request in Terminal to a static asset on your site, and inspect the HTTP headers directly. For example, if your expires or cache-control rule covers CSS files, you can make a curl request like the one below.
curl -I https://kinstalife.com/wp-includes/css/dist/block-library/style.min.cssIn our case, the curl request to the style.min.css file provides the response below.
HTTP/2 200
server: nginx
date: Wed, 27 Jan 2021 01:11:05 GMT
content-type: text/css; charset=UTF-8
content-length: 51433
last-modified: Tue, 12 Jan 2021 20:17:48 GMT
vary: Accept-Encoding
etag: "5ffe03ec-c8e9"
expires: Thu, 31 Dec 2037 23:55:55 GMT
cache-control: max-age=315360000
access-control-allow-origin: *
accept-ranges: bytes
x-edge-location-klb: HaIXowU1oNczJ391oDE9zVvZ7279840b5d30a89472f57253756b3e63
As you can see, the response includes an expires and cache-control headers. Specifically, the cache-control header shows a max-age of 315360000 seconds, which indicates an expiration time of one year.
How to Add Expires Headers for External Scripts
The methods that we showed you above will let you control the expires headers for all of the files on your WordPress site’s server. However, those methods don’t let you control the expires headers for third-party scripts you might be loading, such as Google Fonts, Google Analytics, etc.
For that reason, some speed test tools might still flag this as a potential issue even if you’ve already implemented Expires headers via the methods above.
Here are some solutions for common third-party scripts…
How to Add Expires Headers to Google Fonts
Many WordPress sites rely on Google Fonts for custom fonts. This typically involves loading the fonts from Google’s CDN, which means you won’t be able to set Expires headers via your server’s configuration.
One easy fix is to locally host the font files, instead of relying on Google’s CDN. To set this up, you can use the free Optimize My Google Fonts (OMGF) plugin at WordPress.org.
You can also check out our full guide to locally hosting fonts in WordPress to learn more about the pros and cons of this approach.
How to Add Expires Headers to Google Analytics
If you’re seeing issues related to browser caching and Google Analytics, you can also consider locally hosting the Google Analytics script, just as we showed you with Google Fonts.
Here are some WordPress plugins that make it easy to achieve this:
- CAOS (Complete Analytics Optimization Suite)
- Perfmatters
- WP Rocket with its included Google Tracking add-on.
What can speed up your site’s load times AND improve your performance score in tools like GTmetrix? 🤔 Answer: Expires headers.💡 Learn more here ⬇️Click to Tweet
Summary
To recap, expires headers help you control browser caching behavior for different file types on your WordPress site.
Nowadays, many sites rely on cache-control headers instead of Expires headers because cache-control is a more modern option that provides more flexibility. However, expires headers still work fine for most sites and you can also use both expires headers and cache-control at the same time.
Additionally, some speed test tools will reduce your site’s score if you don’t implement expires headers, which might be your main motivation behind setting up this tactic.
If you host your WordPress site at Kinsta, you don’t need to worry about expires headers because we handle everything for you. However, if your site is hosted elsewhere, you can add expires headers to WordPress using the code snippets that we provided or one of the plugins that we featured.
Get all your applications, databases and WordPress sites online and under one roof. Our feature-packed, high-performance cloud platform includes:
- Easy setup and management in the MyKinsta dashboard
- 24/7 expert support
- The best Google Cloud Platform hardware and network, powered by Kubernetes for maximum scalability
- An enterprise-level Cloudflare integration for speed and security
- Global audience reach with up to 35 data centers and 275 PoPs worldwide
Test it yourself with $20 off your first month of Application Hosting or Database Hosting. Explore our plans or talk to sales to find your best fit.
I have tested my website’s speed, it too good but it show me some issues that need to be fixed. One of it is «Add Expires headers». I have searched and found that I have to edit my .htaccess file and need to add expires header content. I have made changes in my .htaccess file but it is not working
Following is my code
<FilesMatch ".(css|htc|js|asf|asx|wax|wmv|wmx|avi|bmp|class|divx|doc|docx|eot|exe|gif|gz|gzip|ico|jpg|jpeg|jpe|json|mdb|mid|midi|mov|qt|mp3|m4a|mp4|m4v|mpeg|mpg|mpe|mpp|otf|odb|odc|odf|odg|odp|ods|odt|ogg|pdf|png|pot|pps|ppt|pptx|ra|ram|svg|svgz|swf|tar|tif|tiff|ttf|ttc|wav|wma|wri|xla|xls|xlsx|xlt|xlw|zip)$">
<IfModule mod_headers.c>
Header unset Pragma
Header append Cache-Control "public"
</IfModule>
</FilesMatch>
</IfModule>

# Expires headers (for better cache control)
<IfModule mod_expires.c>
    ExpiresActive on
    # Perhaps better to whitelist expires rules? Perhaps.
    ExpiresDefault                              "access plus 1 month"
    # cache.appcache needs re-requests in FF 3.6 (thanks Remy ~Introducing HTML5)
    ExpiresByType text/cache-manifest           "access plus 0 seconds"
    # Your document html
    ExpiresByType text/html                     "access plus 0 seconds"
    # Data
    ExpiresByType text/xml                      "access plus 0 seconds"
    ExpiresByType application/xml               "access plus 0 seconds"
    ExpiresByType application/json              "access plus 0 seconds"
    # Feed
    ExpiresByType application/rss+xml           "access plus 1 hour"
    ExpiresByType application/atom+xml          "access plus 1 hour"
    # Favicon (cannot be renamed)
    ExpiresByType image/x-icon                  "access plus 1 week"
    # Media: images, video, audio
    ExpiresByType image/gif                     "access plus 4 months"
    ExpiresByType image/png                     "access plus 4 months"
    ExpiresByType image/jpeg                    "access plus 4 months"
    ExpiresByType image/webp                    "access plus 4 months"
    ExpiresByType video/ogg                     "access plus 1 month"
    ExpiresByType audio/ogg                     "access plus 1 month"
    ExpiresByType video/mp4                     "access plus 1 month"
    ExpiresByType video/webm                    "access plus 1 month"
    # HTC files  (css3pie)
    ExpiresByType text/x-component              "access plus 1 month"
    # Webfonts
    ExpiresByType application/x-font-ttf        "access plus 1 month"
    ExpiresByType font/opentype                 "access plus 1 month"
    ExpiresByType application/x-font-woff       "access plus 1 month"
    ExpiresByType application/x-font-woff2      "access plus 1 month"
    ExpiresByType image/svg+xml                 "access plus 1 month"
    ExpiresByType application/vnd.ms-fontobject "access plus 1 month"
    # CSS and JavaScript
    ExpiresByType text/css                      "access plus 1 year"
    ExpiresByType application/javascript        "access plus 1 year"
</IfModule>
# Gzip compression
<IfModule mod_deflate.c>
# Active compression
SetOutputFilter DEFLATE
# Force deflate for mangled headers
<IfModule mod_setenvif.c>
<IfModule mod_headers.c>
SetEnvIfNoCase ^(Accept-EncodXng|X-cept-Encoding|X{15}|~{15}|-{15})$ ^((gzip|deflate)s*,?s*)+|[X~-]{4,13}$ HAVE_Accept-Encoding
RequestHeader append Accept-Encoding "gzip,deflate" env=HAVE_Accept-Encoding
# Don’t compress images and other uncompressible content
SetEnvIfNoCase Request_URI
.(?:gif|jpe?g|png|rar|zip|exe|flv|mov|wma|mp3|avi|swf|mp?g|mp4|webm|webp|pdf)$ no-gzip dont-vary
</IfModule>
</IfModule>

# Compress all output labeled with one of the following MIME-types
<IfModule mod_filter.c>
AddOutputFilterByType DEFLATE application/atom+xml
                                  application/javascript
                                  application/json
                                  application/rss+xml
                                  application/vnd.ms-fontobject
                                  application/x-font-ttf
                                  application/xhtml+xml
                                  application/xml
                                  font/opentype
                                  image/svg+xml
                                  image/x-icon
                                  text/css
                                  text/html
                                  text/plain
                                  text/x-component
                                  text/xml
</IfModule>
<IfModule mod_headers.c>
Header append Vary: Accept-Encoding
</IfModule>
</IfModule>

<IfModule mod_mime.c>
AddType text/html .html_gzip
AddEncoding gzip .html_gzip
</IfModule>
<IfModule mod_setenvif.c>
SetEnvIfNoCase Request_URI .html_gzip$ no-gzip
</IfModule>

<IfModule mod_rewrite.c>
RewriteEngine On
RewriteBase /
RewriteCond %{HTTPS} on [OR]
RewriteCond %{SERVER_PORT} ^443$ [OR]
RewriteCond %{HTTP:X-Forwarded-Proto} https
RewriteRule .* - [E=WPR_SSL:-https]
RewriteCond %{HTTP:Accept-Encoding} gzip
RewriteRule .* - [E=WPR_ENC:_gzip]
RewriteCond %{REQUEST_METHOD} GET
RewriteCond %{QUERY_STRING} =""
RewriteCond %{HTTP:Cookie} !(wordpress_logged_in_|wp-postpass_|wptouch_switch_toggle|comment_author_|comment_author_email_) [NC]
RewriteCond %{REQUEST_URI} !^(/(.+/)?feed/?|/(index.php/)?wp-json(/.*|$))$ [NC]
RewriteCond %{HTTP_USER_AGENT} !^(facebookexternalhit).* [NC]
RewriteCond "%{DOCUMENT_ROOT}/wp-content/cache/wp-rocket/%{HTTP_HOST}%{REQUEST_URI}/index%{ENV:WPR_SSL}.html%{ENV:WPR_ENC}" -f
RewriteRule .* "/wp-content/cache/wp-rocket/%{HTTP_HOST}%{REQUEST_URI}/index%{ENV:WPR_SSL}.html%{ENV:WPR_ENC}" [L]
</IfModule>
# END WP Rocket

# BEGIN WordPress
<IfModule mod_expires.c>
    ExpiresActive On
    ExpiresByType image/jpg "access plus 1 year"
    ExpiresByType image/jpeg "access plus 1 year"
    ExpiresByType image/gif "access plus 1 year"
    ExpiresByType image/png "access plus 1 year"
    ExpiresByType text/css "access plus 1 month"
    ExpiresByType application/pdf "access plus 1 month"
    ExpiresByType text/javascript "access plus 1 month"
    ExpiresByType text/html "access plus 2 hours"
    ExpiresByType image/x-icon "access plus 1 year"
    ExpiresDefault "access plus 6 hours"
</IfModule>
<ifModule mod_headers.c>
Header set X-Endurance-Cache-Level "2"
</ifModule>
<IfModule mod_rewrite.c>
RewriteEngine On
RewriteBase /
RewriteRule ^index.php$ - [L]
RewriteCond %{REQUEST_FILENAME} !-f
RewriteCond %{REQUEST_FILENAME} !-d
RewriteRule . /index.php [L]
</IfModule>
# END WordPress

# LBROWSERCSTART Browser Caching
<IfModule mod_expires.c>
ExpiresActive On
ExpiresByType image/gif "access 1 year"
ExpiresByType image/jpg "access 1 year"
ExpiresByType image/jpeg "access 1 year"
ExpiresByType image/png "access 1 year"
ExpiresByType image/x-icon "access 1 year"
ExpiresByType text/css "access 1 month"
ExpiresByType text/javascript "access 1 month"
ExpiresByType text/html "access 1 month"
ExpiresByType application/javascript "access 1 month"
ExpiresByType application/x-javascript "access 1 month"
ExpiresByType application/xhtml-xml "access 1 month"
ExpiresByType application/pdf "access 1 month"
ExpiresByType application/x-shockwave-flash "access 1 month"
ExpiresDefault "access 1 month"
</IfModule>
# END Caching LBROWSERCEND
![]()
yivi
39.8k18 gold badges106 silver badges128 bronze badges
asked Dec 7, 2018 at 7:27
![]()
What’s your resource URL having issue Add Expires headers?
Some sites installed Google Analytics, Facebook tracking code,… and Google PageSpeed tell you to add Expired header to google-analytics.com or facebook.com.
See? You don’t own that domains, so you have no chance to fix this error if your resource on your site come from 3rd party.
answered Dec 7, 2018 at 7:32
![]()
Argus DuongArgus Duong
2,2061 gold badge12 silver badges24 bronze badges
1

What are the expires headers in WordPress? Why are they important?
To understand expires headers and how to add them to WordPress, you first need to know a little about browser cache. Each website has static files that make up the web page, such as HTML, JavaScript, and CSS. These files do not change frequently, which means if you requested the page yesterday, and request it again today, the same files will be downloaded each time.
What if when you requested it yesterday, you stored those files on your browser. Then when you make today’s requests, those files will be quickly loaded from your browser and not from the web server, thus reducing resource usage and increasing the loading time with which pages are displayed.
That would be much faster, and that is what caching does.
However, browser cache can’t hold a website’s files (images, CSS, Javascript, etc.) forever – it needs to be told when to discard old ones and fetch fresh copies.
And this is where expires header comes into play. They are rules set in the header section of a website that tells the browser the specific date to discard cached files and fetch fresh copies.
In this article:
- How Browser Caching Affects the Load Speed of a Website
- Methods by which cached files are deleted
- How long should cached files stay before they expire/are deleted?
- Adding expires header in WordPress manually
- How to Add Expires Header in WordPress: Using a Plugin
- Conclusion
How Browser Caching Affects the Load Speed of a Website
To get things started, let’s head over to GTMetrix – an online website performance test tool – and run an analysis of your website.
You might see something that looks like this:

From the screenshot above, you could see GTMetrix suggesting that we leverage browser caching.
So, how does browser caching work?
When a web user hits the homepage of your website for the first time, his/her browser will make an HTTP request to your web server. The request will instruct the server to download the needed images, Javascripts, and CSS files, plus other file types needed to render the requested web page.
Since it’s the first visit, all resources will be downloaded and cached by the browser. As you might expect, the entire request/download process will take a significant amount of time.
However, upon subsequent visits, the process will change. Before making a download request to the web server, the browser will first check if the requested web page files have been cached. If they are cached, the browser will serve the files from its cache instead of the webserver.
Doing so will help speed up your WordPress website as zero time will be spent downloading these files from the server. In addition to that, the load on your server is greatly reduced, hence there’s more efficiency.
Methods by Which Cached Files are Deleted
For a file to be deleted from a browser’s storage, an expiry date needs to be set on it. To achieve this, rules need to be added to the header telling the browser the exact time to discard old files and fetch new ones.
These rules are known as Expires Header. Oftentimes, they are added manually to web servers via the htaccess file. It tells the browser the specific file to delete and the specific date to do so.
In place of Expires header, some webmasters prefer to set Etag Headers. Basically, they do nearly the same thing, but for this article, we will be focusing on Expires header.
There are a couple of ways to set expires headers, but we will be considering just two: manually and via a plugin.
How Long Should Cached Files Stay Before They Expire?
There are no set rules for that. The trick is, web assets that are requested more frequently should have a shorter expiration time. A good example is HTML files. Ideally, 1 hour will suffice.
Whereas assets that are requested less frequently should have a longer expiration time. CSS, Javascript, and your website logo are typical examples. These can be given an expiration time of 1 month.
For files that hardly ever change, such as images, the expiration time is usually set to 1 year.
How to Add Expires Headers in WordPress Manually
With that said, here’s how to set expires header on Apache and Nginx server
Apache Web Server
To add expires headers in WordPress on Apache servers, you will need to access your WordPress website htaccess file.
These files can either be accessed via the cPanel or an FTP program. For the sake of simplicity, we will stick with cPanel.
First, log into your cPanel account. After logging in, you will see a File Manager icon. Click on it.

Upon click, navigate to the section labeled public_html and double-click on it.

Here, you will find the .htaccess file. Right-click on this file and click Edit.

Then copy and paste the following lines of codes into it.
<IfModule mod_expires.c>

  ExpiresActive On
  # Images

  ExpiresByType image/jpeg "access plus 1 year"

  ExpiresByType image/gif "access plus 1 year"

  ExpiresByType image/png "access plus 1 year"

  ExpiresByType image/webp "access plus 1 year"

  ExpiresByType image/svg+xml "access plus 1 year"

  ExpiresByType image/x-icon "access plus 1 year"


  # Video

  ExpiresByType video/mp4 "access plus 1 year"

  ExpiresByType video/mpeg "access plus 1 year"


  # CSS, JavaScript

  ExpiresByType text/css "access plus 1 month"

  ExpiresByType text/javascript "access plus 1 month"

  ExpiresByType application/javascript "access plus 1 month"


  # Others

  ExpiresByType application/pdf "access plus 1 month"

  ExpiresByType application/x-shockwave-flash "access plus 1 month"

</IfModule>
From the code snippet above, you can see that images have been given an expiration time of 1 year. Likewise also videos. But for CSS and Javascript, they will be erased from the cache and replaced every month.
Of course, you can always change these time parameters but only do so with caution.
For better efficiency, some webmasters take things further by setting what is known as Cache-control Headers.
Cache_control headers serve the same purpose as Expire headers in that they also set an expiration date for cached files.
The major difference between Cache-control header and Expires header is that cache control is more detailed as you can specify other caching parameters in addition to when the cache should expire. It is also more modern.
Note that adding both to your server isn’t necessary as this might lead to redundancy.
If you would like to set cachecontrol headers to your server, add the following piece of code to the htaccess file.

# BEGIN Cache-Control Headers
<IfModule mod_expires.c>

  <IfModule mod_headers.c>

    <filesMatch ".(ico|jpe?g|png|gif|swf)$">

      Header append Cache-Control "public"

    </filesMatch>

    <filesMatch ".(css)$">

      Header append Cache-Control "public"

    </filesMatch>

    <filesMatch ".(js)$">

      Header append Cache-Control "private"

  </filesMatch>

    <filesMatch ".(x?html?|php)$">

      Header append Cache-Control "private, must-revalidate"

    </filesMatch>

  </IfModule>

</IfModule>
How to Add Expires Headers in WordPress When Using Nginx Web Server
Unlike Apache, Nginx server doesn’t work with .htaccess file. To set expires header on it, copy and paste the following line of code to your server block.
location ~* .(js|css|png|jpg|jpeg|gif|svg|ico)$ {

 expires 30d;

 add_header Cache-Control "public, no-transform";

}
For Content Delivery Network
If your website runs on a content delivery network – or CDN for short – you will need a different approach to set expiration dates on cached files. The trick is to unset what are known as Etags from your CDN servers.
Doing so is quite simple. Just copy and paste the code snippet below to your htaccess file.
# Disable ETags

<IfModule mod_headers.c>

Header unset ETag

</IfModule>

FileETag None
How to Add Expiry Headers in WordPress: Using a Plugin
Making tweaks to WordPress via the .htaccess file is not always advisable, especially if you don’t have much experience. Mistakes in your edits can break your website, and that’s definitely what you wouldn’t want.
The good news is that there are a couple of WordPress plugins that can get the job done. Here are a few:
Leverage Browser Caching

This plugin automatically handles setting expires and cache_control headers to your web server. All you need to do is install and activate it. And it’s free!
W3 Total Cache

When it comes to browser caching, W3 total cache is a plugin to reckon with for WordPress sites. It does everything from caching to file compression, traffic management, website security, and lots more.
It is also free.
WP Rocket

If you would like to go premium and can afford to do so, WP rockets is the way to go. Starting at $49 per year, you can enjoy browser caching, gzip compression, lazy loading, expires headers on your cached files, etc.
And you don’t have to write, copy or paste a single line of code. So if you are ready to experience an awesome time with WordPress, go ahead and download the plugin.
How to Add Expires Headers WordPress – Conclusion
Leveraging browser caching is one of the ways to optimize your website’s load speed. But you have to do is right to see meaningful results.
In this article, we showed you how to leverage browser caching by setting cache_control and expires header to your web server. You got to learn how to do so by copying and pasting codes to the .htaccess file.
What’s more, you’ve seen a couple of plugins you could use if editing your .htaccess file feels uncomfortable.
We hope you found this article helpful. If you did, kindly share.
More Resources
- Remove Query Strings from Static Resources – 2 Methods
- The Link You Followed Has Expired Error
- How to Fix the “Specify a Cache Validator” Warning
Read More Useful Articles:
Google PageSpeed Insights is one of several useful tools for measuring website performance. However, some of its suggestions – like the ‘Leverage Browser Caching’ warning – may be confusing to inexperienced site owners.
When you break it down, caching isn’t all that tough to understand. With a few tweaks, you can implement this development best practice on your site to cut down loading times and improve your PageSpeed score.
In this post, we’ll kick things off with an introduction to the Leverage Browser Caching warning. Then we’ll share several tips for fixing this issue on your WordPress site.
Let’s jump in!
Prefer the video version?
What Is the Leverage Browser Caching Warning?
In order to understand the Leverage Browser Caching warning, it helps to first know a bit about Google PageSpeed Insights. If you’re new to the platform, we recommend reading our complete guide, Google PageSpeed Insights: Scoring 100/100 With WordPress.
The Leverage Browser Caching warning is one of many ‘diagnostics’ Google PageSpeed used to return as a suggestion for improving your score like the following one:

In Version 5 of Google PageSpeed Insights, this message was replaced with the “Serve static assets with an efficient cache policy” warning:
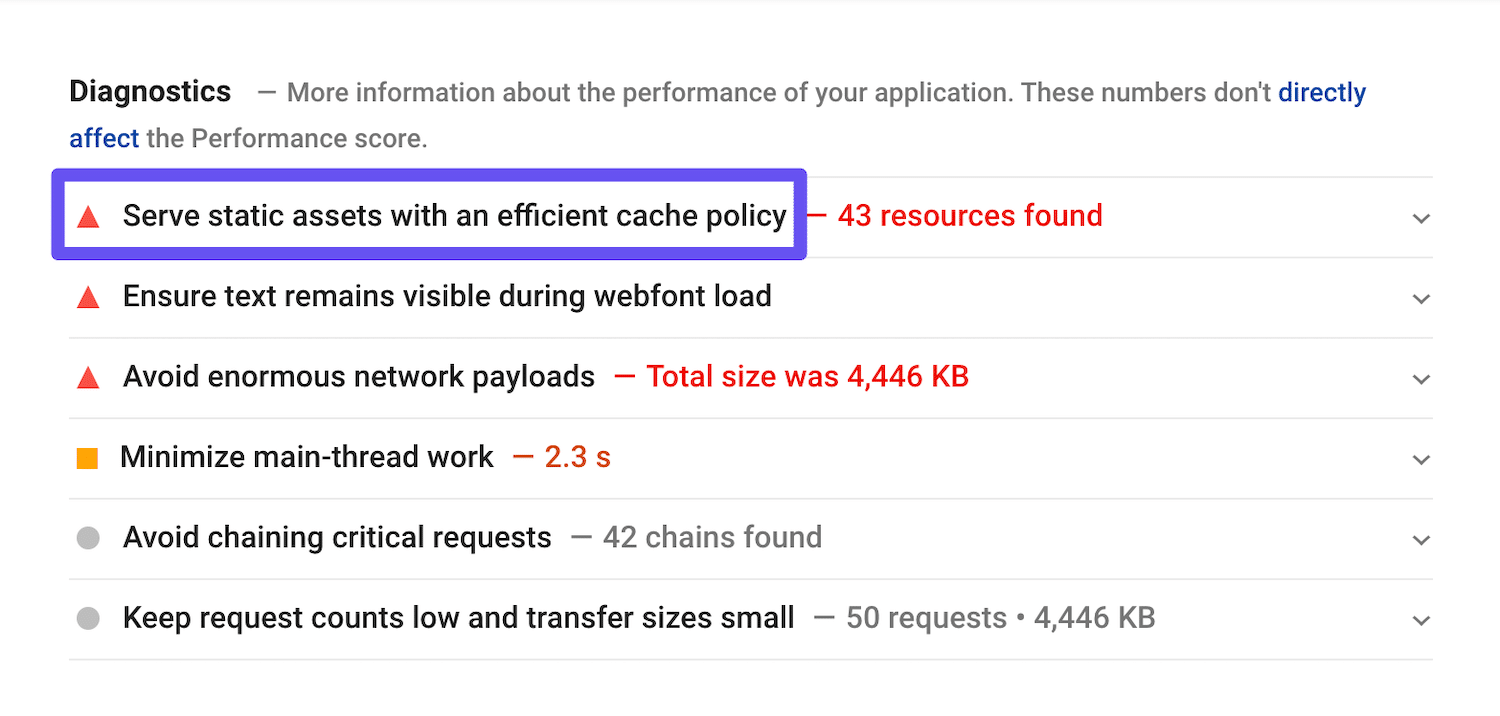
Despite the change in language and appearance, the solution to these warnings is the same.
Google suggests using browser caching to reduce page loading times and improve performance. In a nutshell, caching is when users’ browsers save static copies of your site’s pages. Then, on subsequent visits, this content can be re-loaded faster because the browser doesn’t have to contact your site’s server in order to access the requested resources.
However, every cached resource needs a specified expiration period. This tells browsers when content on your site has become outdated, so it can replace its cached copy with an updated version.
If you’re seeing the “Leverage Browser Caching” warning in your performance test results, it likely means one of two things:
- The Cache-Control or Expires headers are missing from your site’s server or that of a third-party.
- The necessary headers are present, but the expiration period is very short and therefore doesn’t have much impact on performance.
The solutions to this warning involve fixing one or both of these issues.
🚨Warning! Leverage Browser Caching🚨 If reading those words makes your heart race, you’ll want to check out this guide to fixing that dreaded message⚡️Click to Tweet
How to Fix the Leverage Browser Caching Warning in WordPress (3 Methods)
There are a few different ways you might go about fixing the Leverage Browser Caching warning in WordPress, depending on what’s causing it. Here are three solutions you can try.
1. Add Cache-Control and Expires Headers
There are two headers related to browser caching: Cache-Control and Expires. At least one must be present to enable browser caching for your site, as this is how browsers determine how long they should retain resources before refreshing them.
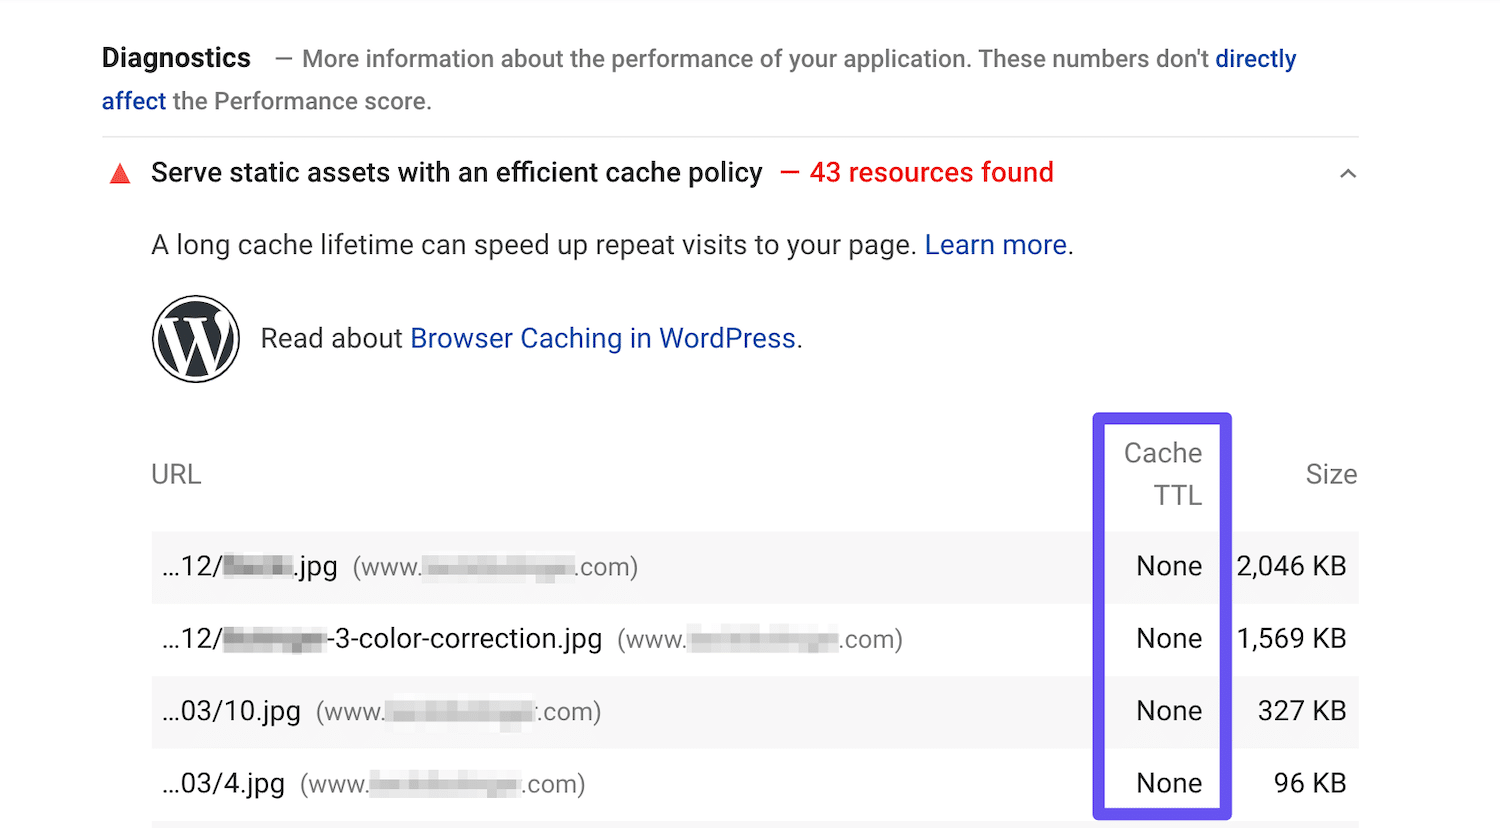
A simple way to determine if this is what’s causing the Leverage Browser Caching warning is to look at the details given for each resource. In Google PageSpeed Insights Version 5, you’ll see “None” listed under Cache TTL instead:
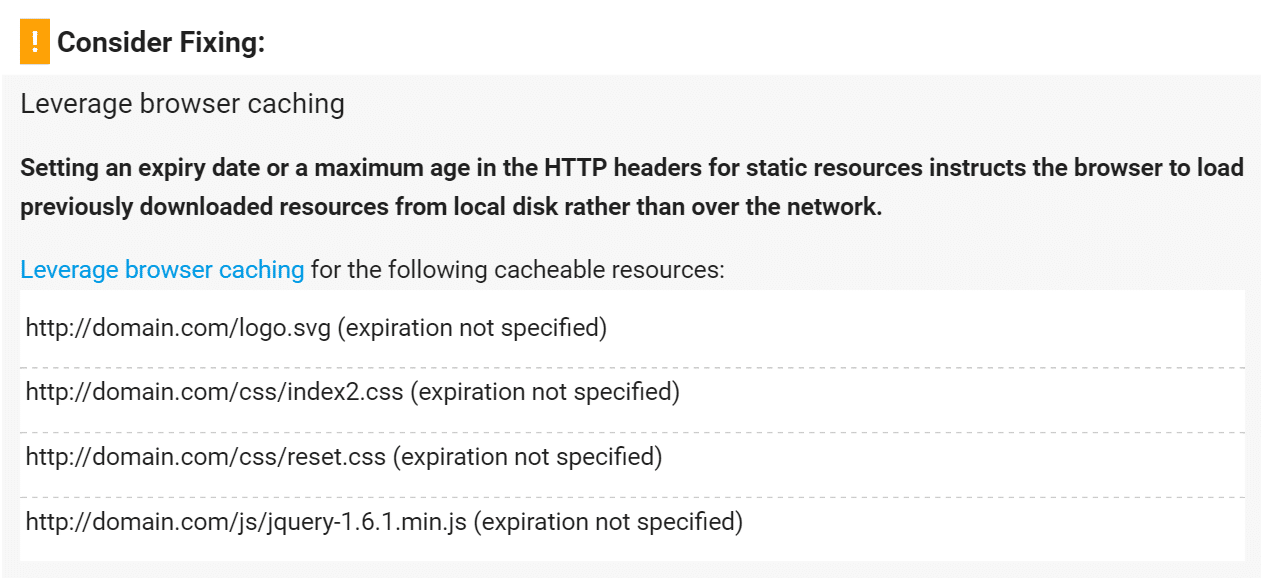
As a handy reference, previous versions of Google PageSpeed Insights showed an “expiration not specified” message when the headers were missing:
While the Cache-Control header turns on client-side caching and sets the max-age of a resource, the Expires header is used to specify a point in time when the resource is no longer valid.
You don’t necessarily need to add both, as this can be redundant. Cache-Control is newer and is usually the recommended method. However, some web performance tools, such as GTmetrix, still check for Expires headers.
If you’re hosting at Kinsta, you don’t have to worry about setting these headers. All of our Nginx servers already include them. Those using a Content Delivery Network (CDN) should also already have these headers applied.
In the event that you’re using a different hosting provider, be sure to back up your site before following the steps below, as editing .htaccess could break your site if you’re not careful.
How to Add Cache-Control Headers in Nginx
To add Cache-Control headers in Nginx, you can add the following to your server’s configuration file:
location ~* .(js|css|png|jpg|jpeg|gif|svg|ico)$ {
 expires 30d;
 add_header Cache-Control "public, no-transform";
}
This tells your server that the specified file types are not going to change for at least 30 days. It will keep the relevant files saved for that period of time before refreshing them.
How to Add Cache-Control Headers in Apache
If you have an Apache server instead, you can add the following code to your .htaccess file:
<filesMatch ".(ico|pdf|flv|jpg|jpeg|png|gif|svg|js|css|swf)$">
        Header set Cache-Control "max-age=84600, public"
</filesMatch>
This snippet should be added before “#BEGIN WordPress” or after “#END WordPress”. In this case, the cache is set to expire after 84,600 seconds.
How to Add Expires Headers in Nginx
You can add Expires headers in Nginx by adding the following to your server block. In this example, you can see how to specify different expiration times based on file types:
    location ~*  .(jpg|jpeg|gif|png|svg)$ {
        expires 365d;
    }

    location ~*  .(pdf|css|html|js|swf)$ {
        expires 2d;
    }
How to Add Expires Headers in Apache
You can add Expires headers in Apache by adding the following to your .htaccess file:
## EXPIRES HEADER CACHING ##
<IfModule mod_expires.c>
ExpiresActive On
ExpiresByType image/jpg "access 1 year"
ExpiresByType image/jpeg "access 1 year"
ExpiresByType image/gif "access 1 year"
ExpiresByType image/png "access 1 year"
ExpiresByType image/svg "access 1 year"
ExpiresByType text/css "access 1 month"
ExpiresByType application/pdf "access 1 month"
ExpiresByType application/javascript "access 1 month"
ExpiresByType application/x-javascript "access 1 month"
ExpiresByType application/x-shockwave-flash "access 1 month"
ExpiresByType image/x-icon "access 1 year"
ExpiresDefault "access 2 days"
</IfModule>
## EXPIRES HEADER CACHING ##
You can then check your headers by running your site through Google PageSpeed Insights again and seeing if the warning persists.
2. Leverage Browser Caching for Google Analytics
Ironically enough, Google Analytics is sometimes the cause of the Leverage Browser Caching warning and an imperfect PageSpeed score. This is because it has a low cache expiration time of just two hours. This used to be the old warning:
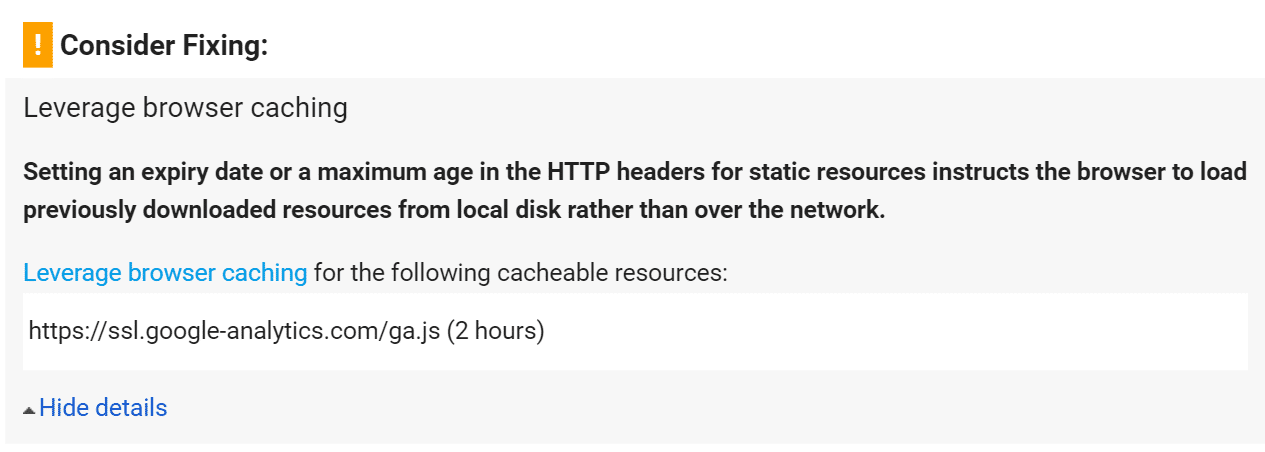
In PageSpeed Insights Version 5, this issue no longer results in a warning, but Google Analytics might still be listed as an unoptimized resource:
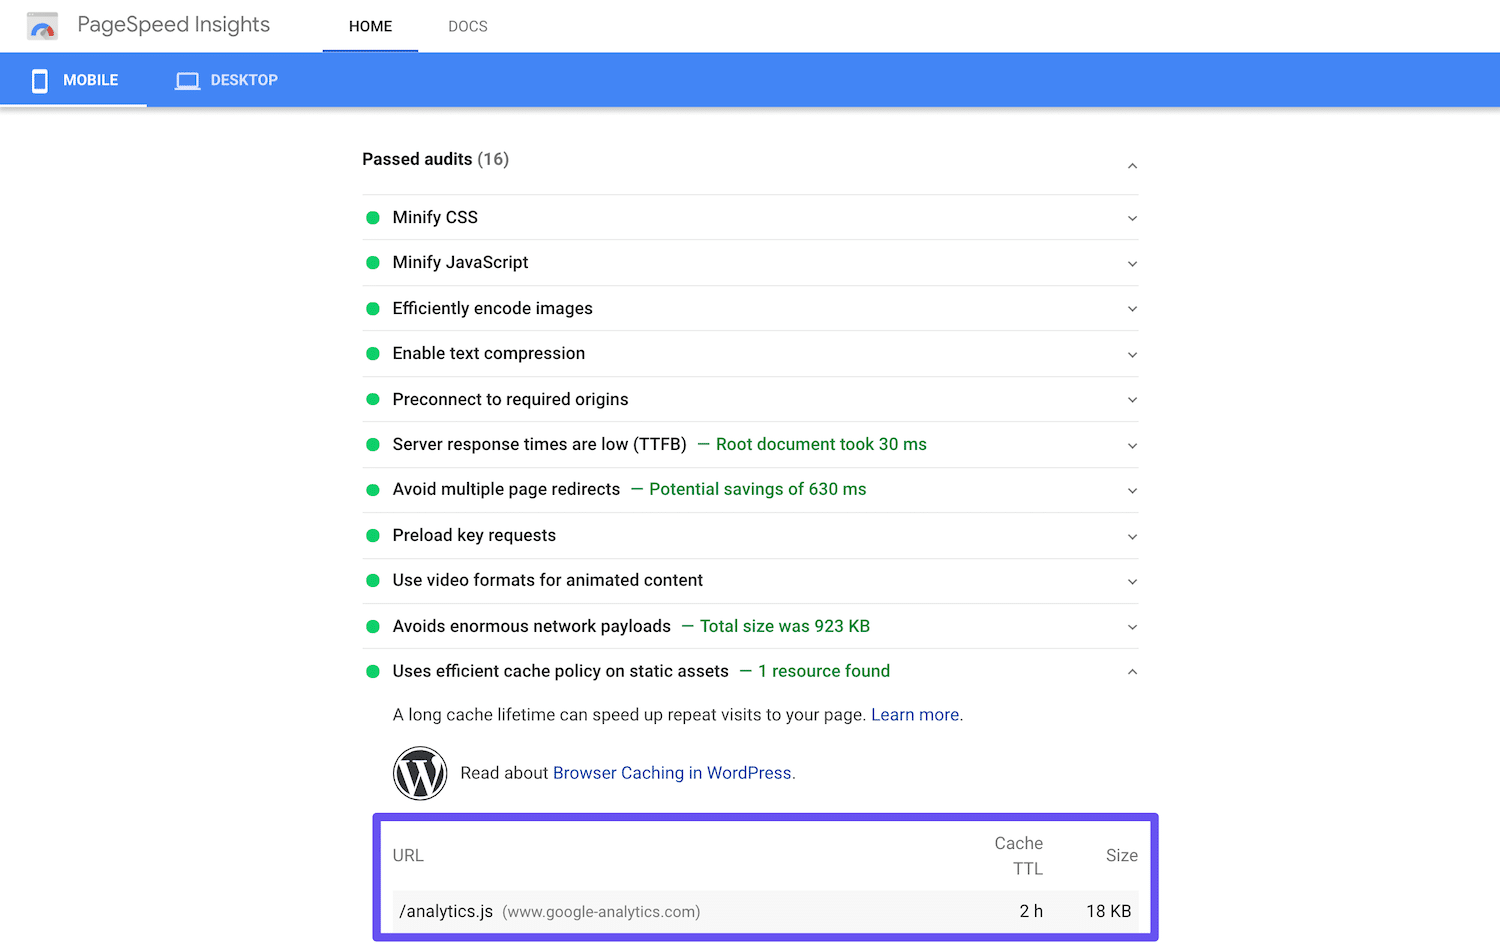
You won’t be able to change this with Cache-Control or Expires headers because the resource isn’t on your server. However, there is a way to leverage browser caching for Google Analytics by hosting the script locally.
Please be aware, though, that this method is not supported by Google.
Leverage Browser Caching for Google Analytics with Complete Analytics Optimization Suite
If you want to resolve the above problem, there’s a free plugin called Complete Analytics Optimization Suite (CAOS) developed by Daan van den Bergh that you can use:

You can download CAOS from the WordPress Plugin Directory or by searching for it under Plugins > Add New in your WordPress dashboard.
Some additional benefits to hosting your analytics script locally include that it reduces your external HTTP requests to Google from two to one and it enables you to gain full control over the caching of the file. This means you can use the cache headers as we showed you earlier.
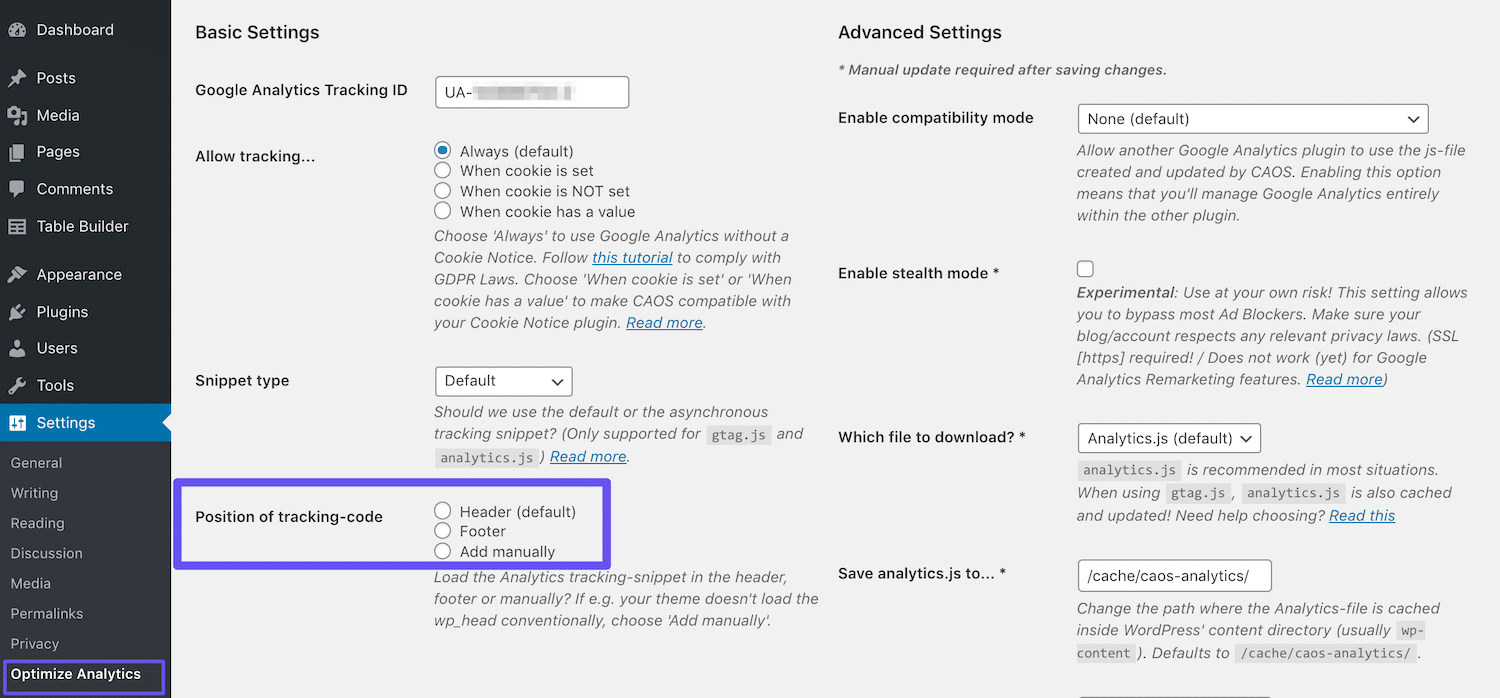
To get started, install the plugin and then enter your Google Analytics Tracking ID. The plugin adds the necessary tracking code for Google Analytics to your WordPress website, downloads and saves the analytics.js file to your server, and keeps it updated using a scheduled script in wp_cron().
We recommend also setting it to load in the footer:
Keep in mind that CAOS won’t work with other Google Analytics WordPress plugins.
Leverage Browser Caching for Google Analytics With WP-Rocket
Alternatively, you can use the WordPress caching plugin WP-Rocket to achieve the same goal:

This plugin’s Google Tracking Add-on enables you to host your analytics script locally with the click of a button. Simply toggle the status on under WP-Rocket > Add-ons.
WP-Rocket and its add-on are compatible with other Google Analytics plugins. As a premium tool, it comes at a price with licenses start ingat $49 per year.
3. Minimize Your Use of Third-Party Scripts
Sometimes the Google Analytics script can cause problems for your Google PageSpeed Insights score because it’s hosted on Google’s server, thus you aren’t in control of the cache.
The same is true for other third-party scripts. If you’re managing a business through your WordPress website, most likely you have additional third-party scripts running to track conversions, A/B tests, and more.
This might include scripts such as Facebook conversion pixels, Crazy Egg, Hotjar, and others. Unfortunately, unless you can find a way to host these scripts locally, there’s nothing much you can do to gain control of them.
One option for Facebook Pixel users is to use yet another WP-Rocket add-on. Ideally, you’ll want to minimize your use of third-party scripts if you want to improve your Google PageSpeed score. So it may be worth conducting an audit of your site and removing any scripts that aren’t necessary for running it.
If you ever measured site performance, there’s a high chance the Leverage Browser Caching warning isn’t new to you. But how do you fix that to make your site faster? Learn how to do it with this in-depth guide! 🚀🗿Click to Tweet
Summary
While not a definitive measure of your site’s performance, Google PageSpeed Insights is still a decent indicator of how it’s running. Improving your score by resolving warnings shown under the “Serve static assets with an efficient cache policy” can help make your website faster and more usable for visitors.
If you’re seeing this warning in Google PageSpeed Insights, you can resolve it by:
- Adding Cache-Control or Expires headers.
- Leveraging browser caching for Google Analytics.
- Minimizing your use of third-party scripts.
Have any other tips about fixing the leverage browser caching? Let us know in the comments section below!
Get all your applications, databases and WordPress sites online and under one roof. Our feature-packed, high-performance cloud platform includes:
- Easy setup and management in the MyKinsta dashboard
- 24/7 expert support
- The best Google Cloud Platform hardware and network, powered by Kubernetes for maximum scalability
- An enterprise-level Cloudflare integration for speed and security
- Global audience reach with up to 35 data centers and 275 PoPs worldwide
Test it yourself with $20 off your first month of Application Hosting or Database Hosting. Explore our plans or talk to sales to find your best fit.
The Expires Headers of a website tell the browser when to load its resource from the server or its cache.
When you build a WordPress website on a VPS or Cloud server, you need to configure expires headers on your server manually. So, your website runs smoothly as electricity.
If you haven’t configured expires headers on your site, you need to do it now. It affects them very badly on site performance.
When we set up our website on the google cloud platform and check-up the GTMetrix or Google Page Speed Insight performance test, we got some ‘F’ grade results, as shown below images.
GTMetrix Performance Score:

Google Pagespeed Insight Score:

As you can see, both of the speed test results. Expires headers affect a terrible impact on website performance. At present, site performance is one of the most important SEO factors for the Google search engine.
So now, we are going to tweak our WordPress VM instances on Google Cloud step by step.
Connect Compute Engine with SSH
First, we will connect our VM instances or Compute engine through SSH, and then we will use some commands for adding expires headers. We will note all commands and certainly down with steps.

Now, (After connecting VM with SSH), we are going to execute a command for editing ‘httpd.conf‘, the command looks like this:
sudo nano /opt/bitnami/apache2/conf/httpd.confIn this step, we will search the expire headers modules, now click CTRL+W, then type “expires” in the search box and hit ENTER. Now a list will open like the picture shown below.


You can see the red box, we going to remove the hash (#) sign like this:
{#LoadModule expires_module modules/mod_expires.so} to {LoadModule expires_module modules/mod_expires.so}After enabling the expires headers modules we need to add some lines of code in the Apache virtual host file.
sudo nano /opt/bitnami/apps/wordpress/conf/httpd-app.confNow, the nano editor will be open, and we need to find the </IfModule> <IfDefine USE_PHP_FPM> tag as shown in the image below.
</IfModule> and <IFDefine USE_PHP_FPM>
Now, the following lines of code you must copy and paste between the following tags, as shown in the image.
<filesMatch ".(ico|pdf|flv|jpg|jpeg|png|gif|js|css|swf)$">
Header set Cache-Control "max-age=2592000, public"
</filesMatch>

<IfModule mod_expires.c>
ExpiresActive On
ExpiresByType image/jpg "access 1 year"
ExpiresByType image/jpeg "access 1 year"
ExpiresByType image/gif "access 1 year"
ExpiresByType image/png "access 1 year"
ExpiresByType text/css "access 1 month"
ExpiresByType application/pdf "access 1 month"
ExpiresByType text/x-javascript "access 1 month"
ExpiresByType application/x-shockwave-flash "access 1 month"
ExpiresByType image/x-icon "access 1 year"
ExpiresDefault "access 2 days"
</IfModule>
Restart the Apache HTTP Server:
sudo /opt/bitnami/ctlscript.sh restart apache
Test Performance
Now the header modification is completed, so we will test the performance of the site.
The performance is not so great, but it is better than the first. Before adding the header’s value, we get 0 out of 100 and now about 45 out of 100.
Conclusion
Expires headers misconfiguration is very bad for your WordPress website. So you can follow these steps to configure correctly on your server.
If you do not want to configure through CLI, you should use a plugin named HTTP headers. This plugin is very easy to configure, and you can also configure other header policies.
If you have any problems or suggestions about expires headers, then throw your comment in the comment section.