Выберите объект с помощью инструмента «Выделение» ( ) или инструмента «Частичное выделение» ( ). Щелкните поле «Заливка» на панели «Инструменты», панели «Свойства» или панели «Цвет», чтобы указать, что вы хотите применить заливку, а не обводку. Примените цвет заливки с помощью панели «Инструменты» или панели «Свойства».
Выбор любого цвета методом сдвига
- Выберите объект, цвет которого вы хотите изменить.
- Удерживая клавишу Shift, нажмите кнопку цвета заливки или цвета обводки вверху на панели управления (подробнее здесь)
Как нарисовать объект в Illustrator?
Как использовать режим рисования внутри в Adobe Illustrator
- С помощью инструмента «Выделение» выберите объект, который вы хотите нарисовать внутри, в данном случае, текстового фрейма. …
- Выберите инструмент рисования, который вы хотите использовать, в данном случае Инструмент «Отрезок линии» и нарисуйте линии через текст.
- Когда вы закончите рисовать, вернитесь на панель инструментов и нажмите Draw Normal.
Рисование в иллюстраторе
Использование инструмента «Живое ведро с краской» позволит вам быстро и легко добавлять цвета и закрашивать области. … Затем просто выберите инструмент «Живое ведро с краской» в меню инструментов. Щелкните внутри области, которую вы хотите раскрасить, и вектор заполнится текущим цветом заливки.
Почему я не могу изменить цвет объекта в Illustrator?
Попробуйте выбрать объект, а затем перейдите в окно цвета (вероятно, верхнее в правом меню). В правом верхнем углу этого окна есть небольшая иконка со стрелкой/списком. Нажмите на нее и выберите RGB или CMYK, в зависимости от того, что вы хотите.
Как преобразовать изображение в вектор в Illustrator?
Вот как легко преобразовать растровое изображение в векторное с помощью инструмента Image Trace в Adobe Illustrator:
- Открыв изображение в Adobe Illustrator, выберите «Окно» > «Трассировка изображения». …
- Выбрав изображение, установите флажок «Предварительный просмотр». …
- Выберите раскрывающееся меню «Режим» и выберите режим, который лучше всего подходит для вашего дизайна.
Как заполнить фигуру цветом в Illustrator?
Применение цвета заливки
Выберите объект с помощью инструмента «Выделение» ( ) или инструмента «Частичное выделение» ( ). Щелкните поле «Заливка» на панели «Инструменты», панели «Свойства» или панели «Цвет», чтобы указать, что вы хотите применить заливку, а не обводку. Примените цвет заливки с помощью панели «Инструменты» или панели «Свойства».
Как заполнить часть объекта в Illustrator?
Выберите нарисованный объект с помощью инструмента «Выделение», а затем выберите инструмент «Обводка» и цвет из образца. Это окрасит линии и штрихи в объекте. Затем выберите инструмент «Заливка» и выберите цвет из образца. Щелчок внутри объекта заполнит его выбранным цветом или узором.
Щелкните значок «Заливка» на панели «Инструменты» или нажмите «X», чтобы активировать инструмент «Заливка». Значок инструмента «Заливка» представляет собой сплошной квадрат из двух перекрывающихся квадратов на панели «Инструменты». Другой квадрат с черным прямоугольником посередине предназначен для внешнего края объекта, известного как обводка.
Как изменить цвет вектора в Illustrator?
Изменение цветов изображения
- Откройте свой векторный рисунок в Illustrator.
- Выберите все нужные изображения с помощью инструмента «Выделение» (V).
- Выберите значок «Перекрасить иллюстрацию» в верхней средней части экрана (или выберите «Правка» → «Редактировать цвета» → «Перекрасить иллюстрацию»).
10.06.2015
Образец заливки находится в нижней части панели «Инструменты». Используйте панель «Образцы» или «Цвет» и выберите любой цвет заливки. С помощью инструмента «Выделение» выделите все круги. Затем щелкните инструмент Live Paint Bucket, который скрыт под инструментом Shape Builder, и щелкните выделение.
Почему все мои цвета СЕРЫЕ в Illustrator?
Что ж, если вы откроете цветовую палитру (Окно>Цвет), вы, скорее всего, обнаружите, что она настроена на оттенки серого. (как показано ниже) Тогда наиболее вероятной причиной является то, что вы используете неправильную цветовую схему для этой цели. Некоторые цветовые схемы дают разные цвета на виртуальном экране и разные цвета на печатном листе.
Почему мои цвета тусклые в Illustrator?
В Illustrator он находится в разделе «Редактирование» > «Настройки цвета». Вам, вероятно, придется прочитать секреты управления цветом, чтобы определить, что лучше для вас. У меня была та же проблема, что и у вас, с Illustrator CS6. Все, что вам нужно сделать, это зайти в «Файл», перейти в «Цветовой режим документа» и выбрать «RGB».
Почему мои образцы цветов исчезли в Illustrator?
Это связано с тем, что файлы не содержат информации о библиотеках материалов, в том числе о библиотеке образцов. Чтобы загрузить образцы по умолчанию: В меню панели образцов выберите «Открыть библиотеку образцов…» > «Библиотека по умолчанию…» >
-

-
November 10 2015, 12:09
- Искусство
- Cancel
Оригинал взят у  katcya_design в Как быстро перекрасить иллюстрацию в Adobe Illustrator.
Итак, сегодня по просьбам
трудящихся
учащихся я расскажу первом методе быстро перекрашивать иллюстрации в Adobe Illustrator.
Эти два способа подходят под разные случаи.
Итак, первый способ перекрашивания изображений в Illustrator
Первый способ пересрасить рисунок в Иллюстраторе подходит для изображений с четкими цветами и достаточно небольшим их количеством.
Например:
Буквально в несколько кликов превращается в это:
1. Открываем изображение, выделяем его. В меню Edit «Редактировать» — выбираем подпункт Edit colors «Редактировать цвета» — и в выпавшем подменю -Recolor artwork «Перекрасить изображение»

2. В открывшемся окне перечислены цвета, использованные в работе. Я почему и говорила, что этот способ больше подойдет для небольшого количества цветов — с большим в этом окне просто будет не очень удобно работать.
Итак, мы имеем возможность выбрать цвет и заменить его новым.
Слева Current colors — это текущие цветаи стрелкой красиво показано окошко выбора, где надо указать цвет, на который заменить.
И так постепенно один за одним мы можем отредактировать все цвета.

В случае, если вам отказала фантазия ( всякое бывает) в этой же панели есть возможность «наложить» цветовую палитку на ваш рисунок случайным образом, при это сохраняя насыщенность цветов (ктстаи, именно поэтому панелька выбора цвета по модели HSB , а не по привычным RGB или CMYK)/
Итак, нажав на эту кнопку в вышеуказанной панели, мы получаем меню выбора цветовой палитры.

Исходный рисунок:
Рисунок после применения палитры «flowers». Программа сохраняет насыщенность цветов.
С помощью трех кнопок на этой же панели можно выбрать вариант распределения цветов.
Левая кнопка — раскидывает цвета случайным образом. Центральная случайным образом изменит яркость и насыщенность цвета.
С помощью самой правой кнопки можно увидеть на изображении выбранный цвет.
Удачных экспериментов!
Не стесняйтесь задавать вопросы в комментариях.
Так же приветствуются комментарии на тему оформления урока — все ли понятно, надо ли рассказывать подробнее, надо ли больше скриншотов и так далее.
Достаточно долгое время задавался вопросом: «Как в иллюстраторе найти и заменить один цвет на другой во всем документе?» и абсолютно случайно нашел для себя наипростейший способ.
Для визуализации прилагается картинка.

1. Как найти и выделить все объекты с нужным цветом?
Если вам понадобилось найти все объекты определенной заливки и выделить их, то делаем следующее: Выделяем нужный объект и жмем Fill color (Select-> same-> Fill color). Также вы можете найти и выделить объекты по заливке и обводке, прозрачности, обводке и других свойствах объекта которые находятся в разделе Same.


Теперь в панели Color вы можете изменить цвет объектов на любой, который вам нужен.
2. Очистка Swatches от неиспользуемых шаблонов цвета, а также добавление цветов находящихся в документе.
Для начала работы с Swatches удалим все неиспользуемые шаблоны цвета. Нажимаем на кнопку в правом верхнем углу панели Swatches, в меню выбираем Select All Unused. Если в Swatches есть ненужные нам для работы шаблоны они выделятся, дальше нужно нажать на иконку корзинки, подтвердить удаление и ваш Swatches абсолютно чист от ненужных цветов.

Далее снимаем выделение с объектов, если они выделены, заходим в меню Swatches и жмем Add Used Color. Замечу, что эта строка появляется только тогда когда выделение с объектов полностью снято. Этим действием мы добавили все действующие шаблоны цвета в документе.

3. Простая замена цвета.
Как оказалось все гениальное просто и не нужно прибегать к поиску и замене, а нужно лишь создать новый образец цвета в Swatches как указано на картинки, либо просто взять цвет с окошка Color и перетащить его в панель Swatches.

Дальше хватаем цвет, который нужно заменить на другой, в моем случае я хочу заменить оранжевый на черный. Я хватаю иконку черного цвета и с зажатым Alt перетаскиваю его на иконку оранжевого шаблона. Цвет меняется.
Для того чтобы узнать какой же из цветовых шаблонов относится в вашему объекту, достаточно лишь выделить нужный объект и наблюдать в Swatches выделение нужного цвета.

При надобности новый шаблон можно удалить, так как он дублируется с тем, который вы заменили.
Думаю вам поможет этот не хитрый урок в работе.
Раскрашивание векторного изображения в Illustrator
В прошлом уроке мы рисовали контур гитары по фотографии, а сейчас раскрасим его. Если рисовать вручную цветные пятна под контуром, это займет много времени, кроме того, в некоторых местах возможна неровность, при использовании автоматического инструмента делается это одним нажатием кнопки . В этом уроке я расскажу, как раскрасить векторное изображение в Adobe Illustrator CC вручную и автоматически.
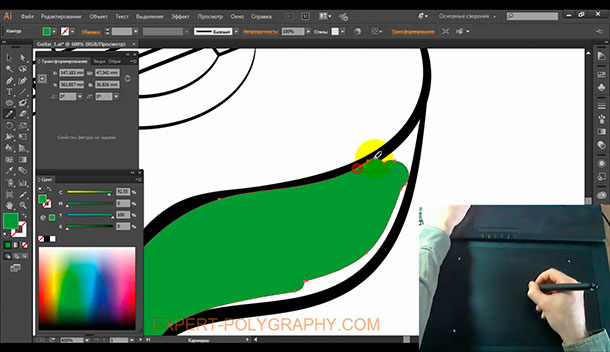
Раскрашивание вручную
Для ручного метода подойдет инструмент «Кисть-клякса«, который можно сочетать с «Карандашом«, чтобы дорисовывать более мелкие детали. Иногда заливка может выходить за контуры, поэтому, периодически это нужно подправлять «Ластиком». Мой графический планшет позволяет стирать лишнее обратной стороной пера.
Ручной способ раскрашивания, требует большой внимательности и много времени. Лучше его применять лишь в крайних ситуациях, когда не срабатывает автоматический.
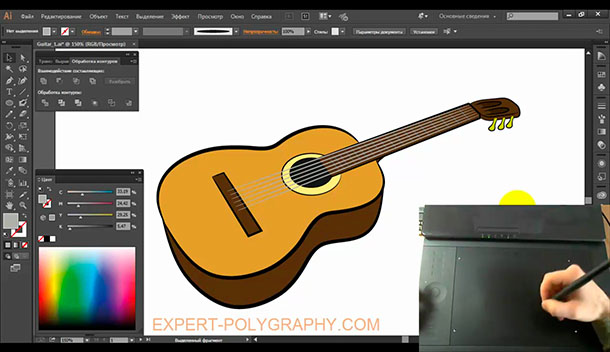
Раскрашивание объекта автоматическим способом
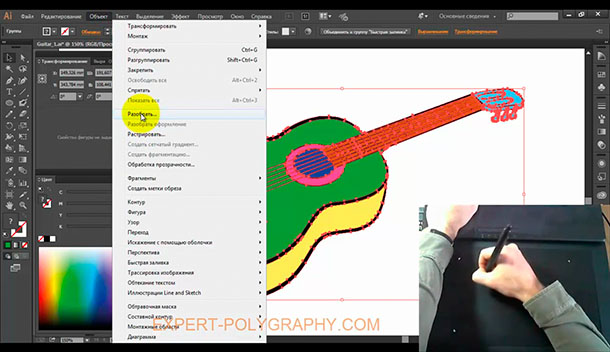
Но есть более легкий способ заливки цветом. Выделите весь рисунок и возьмите инструмент «Быстрая заливка«. Этот инструмент, распознает пространство ограниченное контурами и заливает его выбранным цветом. Выберите нужный цвет и наведите мышкой, контур области подсвечивается. Если этого не происходит, значит есть слишком большой зазор между контурами, желательно перед раскраской все их замкнуть. Теперь, достаточно нажать по областям, которые вы хотите раскрасить.
Выделяйте только те области, цвет между которыми должен быть разный.
Например, струны и лады накладываются поверх рисунка и не разграничивают цвета, поэтому я снял с них выделение.

Инструмент «Быстрая заливка» действует как эффект. Поэтому, после завершения раскрашивания рисунок необходимо еще раз «Разобрать. » на объекты. А затем несколько раз разгруппировать.
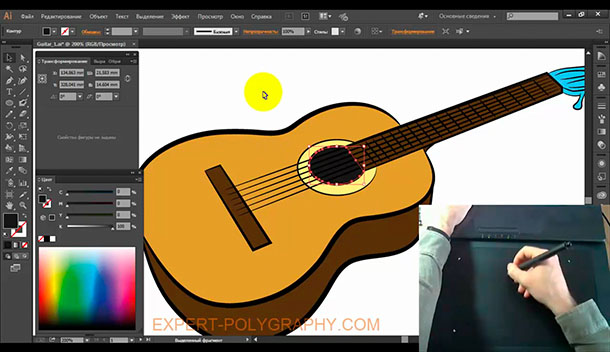
Теперь можно выставить правильные цвета из палитры или взяв образец «Пипеткой» с фотографии.
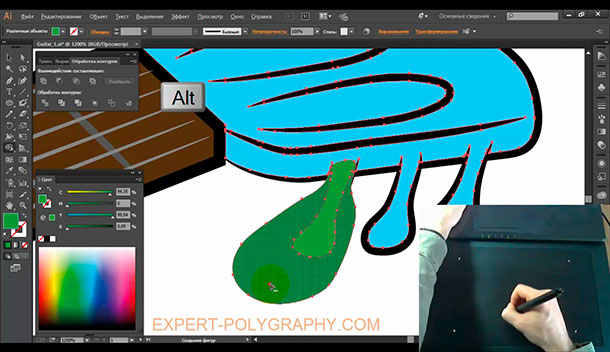
Добавление теней, бликов и дополнительных деталей.
Иногда может потребоваться разграничить заливку еще на несколько цветов, например, для создания теней и бликов или дополнительных деталей. Рисуем карандашом новую фигуру, как показано на снимке ниже, выделяем обе.
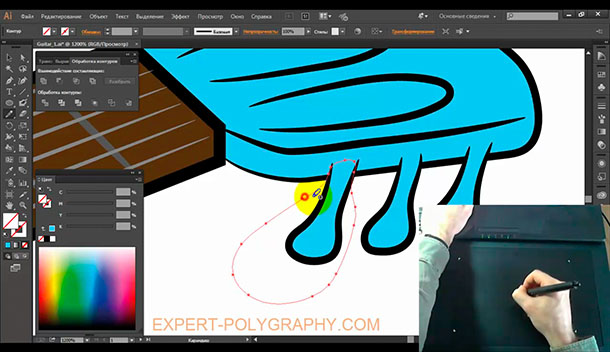
Берем инструмент «Создание фигур» и удерживая клавишу ALT нажимаем по лишней области. Теперь, новый элемент можно перекрасить в другой цвет.
А вот и готовый векторный рисунок гитары, теперь его можно использовать в макете или продать на микростоке.
Подробнее о раскрашивании в видео уроке:
Пишите в комментариях, получилось ли у вас сделать векторный рисунок или возникли трудности.
Перекрашивание графического объекта
Узнайте, как перекрасить графические объекты с помощью предустановленных цветов из библиотеки цветов, создать собственную цветовую палитру с помощью цветового круга или извлечь ее из других изображений с помощью инструмента «Палитра цветовых тем».
В Illustrator можно моментально подобрать любые нужные вам оттенки — с помощью цветового круга, библиотеки предустановленных цветовых тем или инструмента «Палитра цветовых тем». Экспериментируйте с цветами, подбирайте идеальные оттенки и применяйте их к своей работе одним нажатием кнопки.

Начало работы с функцией перекрашивания
Чтобы начать перекрашивать графические объекты, необходимо сделать следующее:
- Выберите графический объект.
- Нажмите значок на панели управления или выберите Правка >Редактировать цвета >Перекрасить графический объект.
- Нажмите кнопку Перекрасить в разделе Быстрые действия в панели «Свойства».
Откроется диалоговое окно с настройками перекрашивания:
- Отменить: отмена последнего изменения цвета графического объекта.
- Повторить: восстановление последнего изменения, отмененного с помощью функции «Отменить».
- Сбросить: сброс настроек цветов и возврат к настройкам по умолчанию.
- Библиотека цветов: выберите цвет из предустановленной библиотеки цветов.
- Цвета: выберите нужное количество цветов на вашем графическом объекте.
- Палитра цветовых тем: извлеките палитры цветов из одного или нескольких изображений, графических объектов или определенных областей и примените их к графическому объекту, с которым вы работаете.
- Цветовой круг: просмотрите и измените используемые цвета, их порядок, яркость, насыщенность и оттенки.
- Порядок цветов: нажмите здесь, чтобы случайным образом изменить порядок цветов.
- Яркие цвета: выберите все яркие цвета на своем графическом объекте — с учетом их оттенка и других свойств.
- «Цветовой тон/Насыщенность» и «Цветовой тон/Яркость»: измените эти параметры с помощью ползунка — или случайным образом, с помощью кнопки рядом с цветовым кругом.
- Сохранить: нажмите эту кнопку, чтобы сохранить цветовую палитру.
- Больше параметров: нажмите эту кнопку, чтобы открыть дополнительные параметры перекрашивания.
Перекрашивание с помощью библиотеки цветов
Вы можете перекрасить графический объект с помощью предустановленных цветов, доступных в раскрывающемся списке Библиотека цветов. Вы можете выбрать группы цветов, цветовые образцы из документов или предустановленные цветовые темы. Все определенные вами цвета и темы добавляются в панель «Цветовые образцы» как группа цветов, и их тоже можно использовать для перекрашивания.
Перекрашивание с помощью инструмента «Палитра цветовых тем»
На базе технологий Adobe Sensei
С помощью инструмента Палитра цветовых тем можно выбрать и извлечь цветовые палитры из одного или нескольких графических объектов или изображений, представленных на холсте, — а также из определенных областей на этих объектах или изображениях — и использовать их для перекрашивания графического объекта, с которым вы работаете. Убедитесь, что нужные вам графические объекты или изображения находятся на холсте. Извлечь цвета можно как из векторных, так и из растровых объектов, представленных на холсте.
Выполните действия, описанные ниже.
- В диалоговом окне Перекрасить графический объект выберите Палитра цветовых тем, чтобы активировать палитру цветов.
- Выполните одно из действий, описанных ниже.
- Выберите на холсте объект, из которого нужно извлечь цветовую палитру.
- Чтобы извлечь цвета из нескольких объектов, нажмите и удерживайте клавишу Shift, пока будете выбирать нужные объекты.
- Перетащите курсор, чтобы отметить области графического объекта, из которых нужно извлечь цвета.
Перекрашивание с помощью цветового круга
На цветовом круге отмечены все цвета, представленные в графическом объекте. Чтобы перекрасить графический объект с помощью цветового круга, сделайте следующее:
- Сдвиньте рычажок в центре цветового круга.
- Чтобы выбрать цвет в диалоговом окне Палитра цветов, дважды щелкните в любом месте на цветовом круге или щелкните правой кнопкой мыши рычажок в его центре и выберите Палитра цветов.
- Чтобы выбрать оттенок, щелкните правой кнопкой мыши рычажок выбора цвета и выберите Выбрать тень.
Добавление и перемещение нескольких маркеров цвета
Чтобы добавить новый маркер цвета, щелкните правой кнопкой мыши в любом месте на цветовом круге и выберите Создать. Затем переместите новый маркер на нужный цвет.
По умолчанию все маркеры цветов перемещаются одновременно. Чтобы отвязать их друг от друга и переместить отдельные маркеры, нажмите значок  . Чтобы восстановить связь, нажмите этот значок еще раз.
Изменение веса и свойств цветов
Чтобы увидеть пропорциональное распределение цветов на графическом объекте, обратитесь к разделу Яркие цвета в диалоговом окне «Перекрасить». Представленные в нем цвета упорядочены по оттенку и насыщенности. Чтобы увеличить или уменьшить количество определенного цвета на графическом объекте, нажмите и перетащите край образца этого цвета.
Чтобы случайным образом изменить порядок цветов, нажмите значок рядом с цветовым кругом.
Изменение насыщенности и оттенка цветов
По умолчанию на цветовом круге показаны насыщенность и оттенок цвета. Чтобы изменить эти параметры, перетащите ползунок.

Изменение яркости и оттенка цветов
Чтобы изменить яркость и оттенок цветов, сделайте следующее:
- Нажмите кнопку
 .
. - Перетащите ползунок на нужный вам уровень.
 .
.Чтобы случайным образом изменить насыщенность, оттенок и яркость, нажмите кнопку рядом с цветовым кругом. Эти параметры будут отрегулированы автоматически и отобразятся на цветовом круге.
Сохранение цветов
Цвета, которые понадобятся вам в дальнейшем, можно сохранить на панели цветовых образцов. Выполните действия, описанные ниже.
Нажмите значок  и выберите Сохранить все цвета, чтобы сохранить все цвета, представленные в панели Цветовые образцы. Вы также можете выбрать вариант Сохранить яркие цвета, чтобы сохранить только цвета из раздела Яркие цвета. Цвета сохранятся в качестве группы цветов и станут также доступны в раскрывающемся списке Библиотека цветов.
Настройка дополнительных параметров перекрашивания
Чтобы отобразить дополнительные параметры перекрашивания, нажмите кнопку Больше параметров. Подробнее см. в разделе Обзор диалогового окна «Перекрасить графический объект».
Если вы хотите в следующий раз сразу открыть дополнительные настройки в диалоговом окне «Перекрасить», выберите Открыть диалоговое окно «Расширенная перекраска графического объекта» при запуске.
У вас есть вопросы или идеи?
Если у вас есть вопросы или идеи, которыми вы хотели бы поделиться, присоединяйтесь к беседе в Сообществе Adobe Illustrator. Мы будем рады узнать ваше мнение.
Как быстро перекрасить иллюстрацию в Adobe Illustrator
В этой статье я расскажу как буквально в несколько нажатий перекрасить любую иллюстрацию, даже состоящую из множества объектов, в любые цвета. Мы не будем пользоваться посторонними плагинами и сделаем все средствами самого Adobe Illustrator.

Это все сделано буквально за несколько минут, большинство из которых ушло на то, чтобы решить, какой цвет будет в итоге.
Последовательность действий
Шаг 1. Выделяем изображение, которое хотим перекрасить
Выделяем все объекты картинки (нажимаем ctrl+A или выделяем мышкой). Если же перекрасить требуется только часть иллюстрации — например, надо изменить цвета персонажа, но фон при этом устраивает — то выделить следует только персонажа.
Шаг 2. Заходим в меню смены цвета
Перед тем, как заходить в меню для того, чтобы перекрасить иллюстрацию, советую немного уменьшить изображение и поместить его ближе к левой части экрана, чтобы при изменении цвета сразу был виден результат.
Далее выбираем пункт меню «Редактирование» — «Редактировать цвета» — «Перекрасить графический объект». В английской версии иллюстратора пункты называются «Edit» — «Edit colors» — «Recolor artwork»

Шаг 3. Меняем цвета, перекрашивая иллюстрацию
В открывшемся окне ставим галку внизу «Перекрасить объект» (если она еще не стоит), чтобы сразу видеть результаты изменений на своей иллюстрации.
Здесь мы видим набор цветов, присутствующих на иллюстрации, и можем менять их. Для этого выбираем строку с тем цветом, который хотим изменить, и тут есть два варианта получения нужного цвета:
- Меняем настройки цвета, пользуясь ползунками внизу, изменяя тон, насыщенность и яркость.
- Делаем двойной щелчок по маленькому прямоугольнику справа, вызывается цветовой круг, где классическим и привычным способом можно выбрать нужный цвет. Минус этого варианта в том, что на картинке выбранный цвет отобразится только когда цветовой круг будет закрыт.

Для того, чтобы вернуть исходные цвета можно воспользоваться значком пипетки в правом верхнем углу окна перекраски.
О других способах через это же окно перекраски изменить цвета читайте дальше.
Другие способы изменить цвет
Выбор количества цветов на изображении
В выпадающем списке «цвета» можно выбрать предпочтительное количество цветов, которые будут находиться на иллюстрации. Иногда это бывает полезно, как, например, в следующем пункте.
Делаем изображение черно-белым
В правой части окна перекраски есть «цветовые группы». Если выбрать группу «оттенки серого», то изображение станет черно-белым.
Чтобы иллюстрация как в примере выглядела хорошо, при переводе в черно-белый вариант стоит поставить количества цветов на 1. Поэтому совет: попробуйте разные варианты комбинаций и выберите тот, с которым ваша картинка будет выглядеть лучше.

Автоматическая расстановка нового цвета
Так же, как в черно-белый, картинку можно автоматически перекрасить в те цвета, которые выбраны на палитре справа. Так же можно добавить свою палитру цветов для перекраски. Для этого используется значок папки в правом верхнем углу, а сами цвета берутся из панели сверху. При этом насыщенность цветов остается такой же, как и в исходном варианте.
Так же есть три кнопки, расположенные под полосками с выбором цвета.
- Случайно изменить порядок цветов. Adobe Illustrator случайным образом перемешивает цвета с иллюстрации. Иногда получаются интересные варианты.
- Произвольно изменить насыщенность и яркость. То же самое, что первый пункт, только теперь меняется не порядок цветов, а параметры яркости и насыщенности.
- Показать, где находится выбранный цвет. Если нажать на эту иконку, то вся картинка станет почти белой, а тот цвет, который вы выберете, будет отображаться на картинке. Удобно для того, чтобы понять с каким именно цветом идет сейчас работа. Для того, чтбы снова видеть все изображение целиком, надо снова нажать на кнопку, она отожмется, и иллюстрация станет прежней.

Назначение цветов через цветовой круг
Еще один способ назначить новые цвета — сверху вместо вкладки «Назначить» выбрать «Редактировать«. Там мы увидим цветовой круг, на котором будут обозначены все использующиеся в картинке цвета. Изменять их можно обычным перетаскиванием точек на кругу.
Здесь есть несколько интересных настроек.
- Круг можно сегментировать. Для этого внизу под кругом нажимаем вторую по порядку кнопку.
- Есть ползунок, изменяющий яркостьвсейвыделенной картинки. Иногда может быть полезно.
- Создавать ссылки на гармоничные цвета. Эта настройка находится снизу справа и представляет из себя перечеркнутую скрепку. Когда она активна, то все точки, обозначающие выбранные цвета, двигаются вместе. За счет этого картинка зачастую получается более гармоничной.
На этом я закончу обзор такого полезного на мой взгляд инструмента Adobe Illustrator как перекраска иллюстрации в другие цвета. Буду рада вашим комментариям!
источники:
http://helpx.adobe.com/ru/illustrator/using/recolor-artwork.html
http://leoda.ru/kak-bystro-perekrasit-slozhnuyu-illyustracziyu-v-adobe-illustrator/
![]()
Download Article
![]()
Download Article
Want to add color to shapes and other vector objects in Adobe Illustrator? This tutorial will teach you how to use Illustrator’s palette, color picker, and eyedropper tool to fill objects with color.
-
1
Open Illustrator. Illustrator has a yellow icon that says «Ai» in the middle. Click the icon on your desktop, Windows Start menu, or Applications folder (on Mac) to open Adobe Illustrator.
-
2
Open or create a new document. To open an existing document, click Open on the launch screen and select a file you want to open. To create a new document, click New on the launch screen. Then enter your document height and width. Then select your document profile and click Ok.
- You can open or create a new document at any time in Illustrator by clicking File in the menu bar at the top, followed by New or Open.
- There are a variety of document profiles you can choose from. These include «Web,» «Print», «Video and Film», «Mobile Devices» and more. This determines what color mode your document uses. Digital display graphics, like video, web, and mobile devices use an «RGB» color mode for Red, Green, and Blue. Print documents use a CMYK color mode for Cyan, Magenta, Yellow, and Black.
Advertisement
-
3
Create shapes. You can create shapes using a variety of tools in Illustrator. You can select the different tools in the Tools panel, which is to the left by default. The following are a few tools you can use:
-
The Shape Tools: The shape tools allows you to create specific shapes, such as rectangles, ellipses, polygons, and stars. You can find the Rectangle tool in the tool panel to the left by default. Click and hold the rectangle tool in the Tools panel to display all available shape tools.[1]
- The Pen Tool: The pen tool allows you to create custom shapes with precise curves. It has an icon that resembles a fountain pen tip. With the pen tool selected, click to place a vector point. Click another spot to create a straight line from one vector point to another. Click and drag to create a curved line from one vector point to another. Click the original vector point to close the shape.
- The Pencil Tool: The pencil tool allows you to create free-form shapes marks as if you were drawing with a pencil on paper. This is most useful for quick sketches and creating a hand-drawn look.
- The Paintbrush Tool: The paintbrush tool allows you to create free-form shapes and marks that have stylized outlines and paths. This is most useful for creating a painted look.
-
The Shape Tools: The shape tools allows you to create specific shapes, such as rectangles, ellipses, polygons, and stars. You can find the Rectangle tool in the tool panel to the left by default. Click and hold the rectangle tool in the Tools panel to display all available shape tools.[1]
-
4
Select the shape you want to color. If you have multiple shapes in your Illustrator project, you will need to select the shape you want to color. To do so, click the icon that resembles a black mouse cursor in the Tools panel (or press «V» on the keyboard) to select the Select tool. Then click the shape you want to color.
-
5
Double-click the colored box in the Tools panel. It’s at the bottom of the Tools panel to the left. It is colored black by default. The box that is completely filled in is the «Fill» color. This is the color of the shape. The box that resembles a colored border next to the «Fill» color box is the «Stroke» color. This is the color of the outline around the shape. Double-clicking either opens the color picker.
-
6
Select a color hue. Click a color in the rainbow-colored strip to select a color hue.
-
7
Select a color shade. With a color hue selected, click a shade in the large box next to the rainbow-colored strip to select a color shade.
-
8
Click Ok. This confirms the color you selected and changes the color of the shape.


Advertisement
-
1
Open Illustrator. Illustrator has a yellow icon that says «Ai» in the middle. Click the icon on your desktop, Windows Start menu, or Applications folder (on Mac) to open Adobe Illustrator.
-
2
Open or create a new document. To open an existing document, click Open on the launch screen and select a file you want to open. To create a new document, click New on the launch screen. Then enter your document height and width. Then select your document profile and click Ok.
- You can open or create a new document at any time in Illustrator by clicking File in the menu bar at the top, followed by New or Open.
- There are a variety of document profiles you can choose from. These include «Web,» «Print», «Video and Film», «Mobile Devices» and more. This determines what color mode your document uses. Digital display graphics, like video, web, and mobile devices use an «RGB» color mode for Red, Green, and Blue. Print documents use a CMYK color mode for Cyan, Magenta, Yellow, and Black.
-
3
Create shapes. You can create shapes using a variety of tools in Illustrator. You can select the different tools in the Tools panel, which is to the left by default. The following are a few tools you can use:
-
The Shape Tools: The shape tools allows you to create specific shapes, such as rectangles, ellipses, polygons, and stars. You can find the Rectangle tool in the tool panel to the left by default. Click and hold the rectangle tool in the Tools panel to display all available shape tools.[2]
- The Pen Tool: The pen tool allows you to create custom shapes with precise curves. It has an icon that resembles a fountain pen tip. With the pen tool selected, click to place a vector point. Click another spot to create a straight line from one vector point to another. Click and drag to create a curved line from one vector point to another. Click the original vector point to close the shape.
- The Pencil Tool: The pencil tool allows you to create free-form shapes marks as if you were drawing with a pencil on paper. This is most useful for quick sketches and creating a hand-drawn look.
- The Paintbrush Tool: The paintbrush tool allows you to create free-form shapes and marks that have stylized outlines and paths. This is most useful for creating a painted look.
-
The Shape Tools: The shape tools allows you to create specific shapes, such as rectangles, ellipses, polygons, and stars. You can find the Rectangle tool in the tool panel to the left by default. Click and hold the rectangle tool in the Tools panel to display all available shape tools.[2]
-
4
Select the shape you want to color. If you have multiple shapes in your Illustrator project, you will need to select the shape you want to color. To do so, click the icon that resembles a black mouse cursor in the Tools panel (or press «V» on the keyboard) to select the Select tool. Then click the shape you want to color.
-
5
Click the colored box at the top of the screen. It is colored black by default. It’s below the menu bar at the top. The box that is completely filled in is the «Fill» color. This is the color of the shape. The box that resembles a colored border next to the «Fill» color box is the «Stroke» color. This is the color of the outline around the shape. Clicking either of these boxes displays a list of colored swatches.
-
6
Click a swatch. This instantly changes the color of the shape. There are only a few basic colors in the default swatch menu. You can use these to get an idea of what color you want to use and use them as a jumping-off-point.
- To view more swatches, click the icon that resembles books (or folders on older versions of Illustrator) to open the swatch library. It’s in the lower-left corner of the swatch menu. Select one of the categories in the swatch library to open a new window with swatches from that category.
-
7
Open the color panel. It has an icon that resembles a painter’s palette. It’s in the panel to the right, by default. Click this icon to open the color panel.
- If you don’t see the Color icon, click Window in the menu bar at the top. Then click Color to open the color panel.
-
8
Use the slider bars to adjust the color. There are three slider bars labeled «R,» «G,» and «B.» Use these slider bars to adjust the amount of red, green, and blue are in the color. This changes the hue and shade of the color.
- If you are working on a document for print, the slider bars will be labeled «C,» «M,» «Y,» and «K» for cyan, magenta, yellow, and black.


Advertisement
-
1
Open Illustrator. Illustrator has a yellow icon that says «Ai» in the middle. Click the icon on your desktop, Windows Start menu, or Applications folder (on Mac) to open Adobe Illustrator.
-
2
Open or create a new document. To open an existing document, click Open on the launch screen and select a file you want to open. To create a new document, click New on the launch screen. Then enter your document height and width. Then select your document profile and click Ok.
- You can open or create a new document at any time in Illustrator by clicking File in the menu bar at the top, followed by New or Open.
- There are a variety of document profiles you can choose from. These include «Web,» «Print», «Video and Film», «Mobile Devices» and more. This determines what color mode your document uses. Digital display graphics, like video, web, and mobile devices use an «RGB» color mode for Red, Green, and Blue. Print documents use a CMYK color mode for Cyan, Magenta, Yellow, and Black.
-
3
Create shapes. You can create shapes using a variety of tools in Illustrator. You can select the different tools in the Tools panel, which is to the left by default. The following are a few tools you can use:
-
The Shape Tools: The shape tools allows you to create specific shapes, such as rectangles, ellipses, polygons, and stars. You can find the Rectangle tool in the tool panel to the left by default. Click and hold the rectangle tool in the Tools panel to display all available shape tools.[3]
- The Pen Tool: The pen tool allows you to create custom shapes with precise curves. It has an icon that resembles a fountain pen tip. With the pen tool selected, click to place a vector point. Click another spot to create a straight line from one vector point to another. Click and drag to create a curved line from one vector point to another. Click the original vector point to close the shape.
- The Pencil Tool: The pencil tool allows you to create free-form shapes marks as if you were drawing with a pencil on paper. This is most useful for quick sketches and creating a hand-drawn look.
- The Paintbrush Tool: The paintbrush tool allows you to create free-form shapes and marks that have stylized outlines and paths. This is most useful for creating a painted look.
-
The Shape Tools: The shape tools allows you to create specific shapes, such as rectangles, ellipses, polygons, and stars. You can find the Rectangle tool in the tool panel to the left by default. Click and hold the rectangle tool in the Tools panel to display all available shape tools.[3]
-
4
Select the shape you want to color. If you have multiple shapes in your Illustrator project, you will need to select the shape you want to color. To do so, click the icon that resembles a black mouse cursor in the Tools panel (or press «V» on the keyboard) to select the Select tool. Then click the shape you want to color.
-
5
Press I or select the Eyedropper tool. The Eyedropper tool has an icon that resembles an eyedropper. Click the icon in the Tools panel to the left, or press «I» on your keyboard to select the Eyedropper tool.
-
6
Click a color in your project. This instantly changes the color of the shape to the color you clicked. The Eyedropper tool is useful for quickly selecting colors you have already used in your project.


Advertisement
-
1
Open Illustrator. Illustrator has a yellow icon that says «Ai» in the middle. Click the icon on your desktop, Windows Start menu, or Applications folder (on Mac) to open Adobe Illustrator.
-
2
Open or create a new document. To open an existing document, click Open on the launch screen and select a file you want to open. To create a new document, click New on the launch screen. Then enter your document height and width. Then select your document profile and click Ok.
- You can open or create a new document at any time in Illustrator by clicking File in the menu bar at the top, followed by New or Open.
- There are a variety of document profiles you can choose from. These include «Web,» «Print», «Video and Film», «Mobile Devices» and more. This determines what color mode your document uses. Digital display graphics, like video, web, and mobile devices use an «RGB» color mode for Red, Green, and Blue. Print documents use a CMYK color mode for Cyan, Magenta, Yellow, and Black.
-
3
Create shapes. You can create shapes using a variety of tools in Illustrator. The following are a few tools you can use:
-
The Shape Tools: The shape tools allows you to create specific shapes, such as rectangles, ellipses, polygons, and stars. You can find the Rectangle tool in the tool panel to the left by default. Click and hold the rectangle tool in the tools panel to display all available shape tools.[4]
- The Pen Tool: The pen tool allows you to create custom shapes with precise curves. It has an icon that resembles a fountain pen tip. It’s in the tools panel to the left. With the pen tool selected, click to place a vector point. Click another spot to create a straight line from one vector point to another. Click and drag to create a curved line from one vector point to another. Click the original vector point to close the shape.
- The Pencil Tool: The pencil tool allows you to create free-form shapes marks as if you were drawing with a pencil on paper. This is most useful for quick sketches and creating a hand-drawn look.
- The Paintbrush Tool: The paintbrush tool allows you to create free-form shapes and marks that have stylized outlines and paths. This is most useful for creating a painted look.
-
The Shape Tools: The shape tools allows you to create specific shapes, such as rectangles, ellipses, polygons, and stars. You can find the Rectangle tool in the tool panel to the left by default. Click and hold the rectangle tool in the tools panel to display all available shape tools.[4]
-
4
Open the Gradient panel. Gradients are two or more colors that blend together. To open the Gradient panel, click the icon that resembles a rectangle with a black and white blend. It’s in the panel to the right, by default.
- If you don’t see the Gradient panel icon on screen, click Window in the menu bar at the top. Then click Gradient to open the Gradient panel.
-
5
Select a gradient type. You can select a linear gradient or a radial gradient. Click one of the two icons next to «Type» in the Gradient panel to select a gradient type.
- Linear gradients blend from one color to another in a straight line.
- Radial gradients blend from one color to another in a circular fashion.
-
6
Double-click one of the gradient’s stops. The gradient stops are the two colored-rectangle notches at the bottom of the gradient strip in the Gradient panel. By default, there is a black and white stop. Double-clicking them opens the swatch menu.
-
7
Select a color. Click one of the colors in the swatch menu to change the color of the stop.
- Alternatively, you can drag and drop a swatch from an open swatch library menu onto one of the stops.
-
8
Select the color panel. It’s the icon that resembles a painter’s palette next to the swatch library below the gradient stop.[5]
-
9
Adjust the shade of the color. Use the RGB (or CMYK) slider bars to adjust the shade and color of the swatch.
- You can also select a new hue by clicking a color in the rainbow-colored bar at the bottom.
-
10
Double-click the other gradient stop. It’s the gradient stop on the other side of the gradient blend bar in the Gradient panel. Double-click it to open the swatch menu.
- You can add more stops to the blend by clicking where you want to add a stop below the gradient blend bar in the Gradient panel. To remove a stop, click and drag it down to remove it from the gradient blend bar.
-
11
Select a color for the stop. Click one of the swatches in the swatch menu to select a color for the stop.
-
12
Adjust the color and shade. To do so, click painter’s palette icon next to the swatch menu and use the RGB (or CMYK) slider bars to adjust the color and shade.
- If you are using CMYK, and there is some grey in between a colored and a black stop, select the black stop and add more of the color you are transitioning from under the black. For example, if you are transitioning from red to black, and it appears grey in the middle. Select the black stop and increase the amount of red in the black stop. This creates a smoother blend.
- You can adjust the position of the stops by clicking and dragging them left and right. You can also click and drag the notch at the top of the gradient blend bar to adjust the blend.
-
13
Select the Gradient tool. It’s the icon that resembles a rectangle with a black and white gradient blend. It’s in the Tools panel to the left, by default.
-
14
Double-click the shape you want to apply a gradient blend to. This applies the gradient to the shape.
-
15
Adjust the direction of the blend. To do so, have the Gradient tool selected and click and drag in the direction you want to apply the blend over the shape.


Advertisement
Add New Question
-
Question
Why would I want to use Illustrator?

Adobe Illustrator is a vector-based art program, so you can scale the created image to any desired size without losing quality. It also has intuitive design, especially if you have tried other graphics software or other Adobe products. If you are new, the icons are still exactly what they look like. Powerful tools such as the color harmonizer and mesh tool allow for almost any kind of art to be designed. This application concentrates more on the shape and color of your vector art than fancy effects, but includes methods for both from the wide set of tools. As you become more familiar with the application, you can make any digital art you want.
-
Question
How many colors are in Adobe Illustrator?
Grayscale, RGB, HSB, CMYK and web-safe RGB swatches are all available in Adobe Illustrator. They can be accessed from the icon with four horizontal lines in the top-left corner of the Colour tab in the Colour window.
Ask a Question
200 characters left
Include your email address to get a message when this question is answered.
Submit
Advertisement
Video
-
If you are working on a document that will go online, double click the fill boxes in the left panel. When your Color Picker box pops up, click the «Web Only» button in the lower left corner. This will allow the tool to only display colors that will show up online.
Thanks for submitting a tip for review!
Advertisement
Things You’ll Need
- Mouse
- Adobe Creative Suite
- Illustrator document
About This Article
Thanks to all authors for creating a page that has been read 130,688 times.
Is this article up to date?
![]()
Download Article
![]()
Download Article
Want to add color to shapes and other vector objects in Adobe Illustrator? This tutorial will teach you how to use Illustrator’s palette, color picker, and eyedropper tool to fill objects with color.
-
1
Open Illustrator. Illustrator has a yellow icon that says «Ai» in the middle. Click the icon on your desktop, Windows Start menu, or Applications folder (on Mac) to open Adobe Illustrator.
-
2
Open or create a new document. To open an existing document, click Open on the launch screen and select a file you want to open. To create a new document, click New on the launch screen. Then enter your document height and width. Then select your document profile and click Ok.
- You can open or create a new document at any time in Illustrator by clicking File in the menu bar at the top, followed by New or Open.
- There are a variety of document profiles you can choose from. These include «Web,» «Print», «Video and Film», «Mobile Devices» and more. This determines what color mode your document uses. Digital display graphics, like video, web, and mobile devices use an «RGB» color mode for Red, Green, and Blue. Print documents use a CMYK color mode for Cyan, Magenta, Yellow, and Black.
Advertisement
-
3
Create shapes. You can create shapes using a variety of tools in Illustrator. You can select the different tools in the Tools panel, which is to the left by default. The following are a few tools you can use:
-
The Shape Tools: The shape tools allows you to create specific shapes, such as rectangles, ellipses, polygons, and stars. You can find the Rectangle tool in the tool panel to the left by default. Click and hold the rectangle tool in the Tools panel to display all available shape tools.[1]
- The Pen Tool: The pen tool allows you to create custom shapes with precise curves. It has an icon that resembles a fountain pen tip. With the pen tool selected, click to place a vector point. Click another spot to create a straight line from one vector point to another. Click and drag to create a curved line from one vector point to another. Click the original vector point to close the shape.
- The Pencil Tool: The pencil tool allows you to create free-form shapes marks as if you were drawing with a pencil on paper. This is most useful for quick sketches and creating a hand-drawn look.
- The Paintbrush Tool: The paintbrush tool allows you to create free-form shapes and marks that have stylized outlines and paths. This is most useful for creating a painted look.
-
The Shape Tools: The shape tools allows you to create specific shapes, such as rectangles, ellipses, polygons, and stars. You can find the Rectangle tool in the tool panel to the left by default. Click and hold the rectangle tool in the Tools panel to display all available shape tools.[1]
-
4
Select the shape you want to color. If you have multiple shapes in your Illustrator project, you will need to select the shape you want to color. To do so, click the icon that resembles a black mouse cursor in the Tools panel (or press «V» on the keyboard) to select the Select tool. Then click the shape you want to color.
-
5
Double-click the colored box in the Tools panel. It’s at the bottom of the Tools panel to the left. It is colored black by default. The box that is completely filled in is the «Fill» color. This is the color of the shape. The box that resembles a colored border next to the «Fill» color box is the «Stroke» color. This is the color of the outline around the shape. Double-clicking either opens the color picker.
-
6
Select a color hue. Click a color in the rainbow-colored strip to select a color hue.
-
7
Select a color shade. With a color hue selected, click a shade in the large box next to the rainbow-colored strip to select a color shade.
-
8
Click Ok. This confirms the color you selected and changes the color of the shape.
Advertisement
-
1
Open Illustrator. Illustrator has a yellow icon that says «Ai» in the middle. Click the icon on your desktop, Windows Start menu, or Applications folder (on Mac) to open Adobe Illustrator.
-
2
Open or create a new document. To open an existing document, click Open on the launch screen and select a file you want to open. To create a new document, click New on the launch screen. Then enter your document height and width. Then select your document profile and click Ok.
- You can open or create a new document at any time in Illustrator by clicking File in the menu bar at the top, followed by New or Open.
- There are a variety of document profiles you can choose from. These include «Web,» «Print», «Video and Film», «Mobile Devices» and more. This determines what color mode your document uses. Digital display graphics, like video, web, and mobile devices use an «RGB» color mode for Red, Green, and Blue. Print documents use a CMYK color mode for Cyan, Magenta, Yellow, and Black.
-
3
Create shapes. You can create shapes using a variety of tools in Illustrator. You can select the different tools in the Tools panel, which is to the left by default. The following are a few tools you can use:
-
The Shape Tools: The shape tools allows you to create specific shapes, such as rectangles, ellipses, polygons, and stars. You can find the Rectangle tool in the tool panel to the left by default. Click and hold the rectangle tool in the Tools panel to display all available shape tools.[2]
- The Pen Tool: The pen tool allows you to create custom shapes with precise curves. It has an icon that resembles a fountain pen tip. With the pen tool selected, click to place a vector point. Click another spot to create a straight line from one vector point to another. Click and drag to create a curved line from one vector point to another. Click the original vector point to close the shape.
- The Pencil Tool: The pencil tool allows you to create free-form shapes marks as if you were drawing with a pencil on paper. This is most useful for quick sketches and creating a hand-drawn look.
- The Paintbrush Tool: The paintbrush tool allows you to create free-form shapes and marks that have stylized outlines and paths. This is most useful for creating a painted look.
-
The Shape Tools: The shape tools allows you to create specific shapes, such as rectangles, ellipses, polygons, and stars. You can find the Rectangle tool in the tool panel to the left by default. Click and hold the rectangle tool in the Tools panel to display all available shape tools.[2]
-
4
Select the shape you want to color. If you have multiple shapes in your Illustrator project, you will need to select the shape you want to color. To do so, click the icon that resembles a black mouse cursor in the Tools panel (or press «V» on the keyboard) to select the Select tool. Then click the shape you want to color.
-
5
Click the colored box at the top of the screen. It is colored black by default. It’s below the menu bar at the top. The box that is completely filled in is the «Fill» color. This is the color of the shape. The box that resembles a colored border next to the «Fill» color box is the «Stroke» color. This is the color of the outline around the shape. Clicking either of these boxes displays a list of colored swatches.
-
6
Click a swatch. This instantly changes the color of the shape. There are only a few basic colors in the default swatch menu. You can use these to get an idea of what color you want to use and use them as a jumping-off-point.
- To view more swatches, click the icon that resembles books (or folders on older versions of Illustrator) to open the swatch library. It’s in the lower-left corner of the swatch menu. Select one of the categories in the swatch library to open a new window with swatches from that category.
-
7
Open the color panel. It has an icon that resembles a painter’s palette. It’s in the panel to the right, by default. Click this icon to open the color panel.
- If you don’t see the Color icon, click Window in the menu bar at the top. Then click Color to open the color panel.
-
8
Use the slider bars to adjust the color. There are three slider bars labeled «R,» «G,» and «B.» Use these slider bars to adjust the amount of red, green, and blue are in the color. This changes the hue and shade of the color.
- If you are working on a document for print, the slider bars will be labeled «C,» «M,» «Y,» and «K» for cyan, magenta, yellow, and black.
Advertisement
-
1
Open Illustrator. Illustrator has a yellow icon that says «Ai» in the middle. Click the icon on your desktop, Windows Start menu, or Applications folder (on Mac) to open Adobe Illustrator.
-
2
Open or create a new document. To open an existing document, click Open on the launch screen and select a file you want to open. To create a new document, click New on the launch screen. Then enter your document height and width. Then select your document profile and click Ok.
- You can open or create a new document at any time in Illustrator by clicking File in the menu bar at the top, followed by New or Open.
- There are a variety of document profiles you can choose from. These include «Web,» «Print», «Video and Film», «Mobile Devices» and more. This determines what color mode your document uses. Digital display graphics, like video, web, and mobile devices use an «RGB» color mode for Red, Green, and Blue. Print documents use a CMYK color mode for Cyan, Magenta, Yellow, and Black.
-
3
Create shapes. You can create shapes using a variety of tools in Illustrator. You can select the different tools in the Tools panel, which is to the left by default. The following are a few tools you can use:
-
The Shape Tools: The shape tools allows you to create specific shapes, such as rectangles, ellipses, polygons, and stars. You can find the Rectangle tool in the tool panel to the left by default. Click and hold the rectangle tool in the Tools panel to display all available shape tools.[3]
- The Pen Tool: The pen tool allows you to create custom shapes with precise curves. It has an icon that resembles a fountain pen tip. With the pen tool selected, click to place a vector point. Click another spot to create a straight line from one vector point to another. Click and drag to create a curved line from one vector point to another. Click the original vector point to close the shape.
- The Pencil Tool: The pencil tool allows you to create free-form shapes marks as if you were drawing with a pencil on paper. This is most useful for quick sketches and creating a hand-drawn look.
- The Paintbrush Tool: The paintbrush tool allows you to create free-form shapes and marks that have stylized outlines and paths. This is most useful for creating a painted look.
-
The Shape Tools: The shape tools allows you to create specific shapes, such as rectangles, ellipses, polygons, and stars. You can find the Rectangle tool in the tool panel to the left by default. Click and hold the rectangle tool in the Tools panel to display all available shape tools.[3]
-
4
Select the shape you want to color. If you have multiple shapes in your Illustrator project, you will need to select the shape you want to color. To do so, click the icon that resembles a black mouse cursor in the Tools panel (or press «V» on the keyboard) to select the Select tool. Then click the shape you want to color.
-
5
Press I or select the Eyedropper tool. The Eyedropper tool has an icon that resembles an eyedropper. Click the icon in the Tools panel to the left, or press «I» on your keyboard to select the Eyedropper tool.
-
6
Click a color in your project. This instantly changes the color of the shape to the color you clicked. The Eyedropper tool is useful for quickly selecting colors you have already used in your project.
Advertisement
-
1
Open Illustrator. Illustrator has a yellow icon that says «Ai» in the middle. Click the icon on your desktop, Windows Start menu, or Applications folder (on Mac) to open Adobe Illustrator.
-
2
Open or create a new document. To open an existing document, click Open on the launch screen and select a file you want to open. To create a new document, click New on the launch screen. Then enter your document height and width. Then select your document profile and click Ok.
- You can open or create a new document at any time in Illustrator by clicking File in the menu bar at the top, followed by New or Open.
- There are a variety of document profiles you can choose from. These include «Web,» «Print», «Video and Film», «Mobile Devices» and more. This determines what color mode your document uses. Digital display graphics, like video, web, and mobile devices use an «RGB» color mode for Red, Green, and Blue. Print documents use a CMYK color mode for Cyan, Magenta, Yellow, and Black.
-
3
Create shapes. You can create shapes using a variety of tools in Illustrator. The following are a few tools you can use:
-
The Shape Tools: The shape tools allows you to create specific shapes, such as rectangles, ellipses, polygons, and stars. You can find the Rectangle tool in the tool panel to the left by default. Click and hold the rectangle tool in the tools panel to display all available shape tools.[4]
- The Pen Tool: The pen tool allows you to create custom shapes with precise curves. It has an icon that resembles a fountain pen tip. It’s in the tools panel to the left. With the pen tool selected, click to place a vector point. Click another spot to create a straight line from one vector point to another. Click and drag to create a curved line from one vector point to another. Click the original vector point to close the shape.
- The Pencil Tool: The pencil tool allows you to create free-form shapes marks as if you were drawing with a pencil on paper. This is most useful for quick sketches and creating a hand-drawn look.
- The Paintbrush Tool: The paintbrush tool allows you to create free-form shapes and marks that have stylized outlines and paths. This is most useful for creating a painted look.
-
The Shape Tools: The shape tools allows you to create specific shapes, such as rectangles, ellipses, polygons, and stars. You can find the Rectangle tool in the tool panel to the left by default. Click and hold the rectangle tool in the tools panel to display all available shape tools.[4]
-
4
Open the Gradient panel. Gradients are two or more colors that blend together. To open the Gradient panel, click the icon that resembles a rectangle with a black and white blend. It’s in the panel to the right, by default.
- If you don’t see the Gradient panel icon on screen, click Window in the menu bar at the top. Then click Gradient to open the Gradient panel.
-
5
Select a gradient type. You can select a linear gradient or a radial gradient. Click one of the two icons next to «Type» in the Gradient panel to select a gradient type.
- Linear gradients blend from one color to another in a straight line.
- Radial gradients blend from one color to another in a circular fashion.
-
6
Double-click one of the gradient’s stops. The gradient stops are the two colored-rectangle notches at the bottom of the gradient strip in the Gradient panel. By default, there is a black and white stop. Double-clicking them opens the swatch menu.
-
7
Select a color. Click one of the colors in the swatch menu to change the color of the stop.
- Alternatively, you can drag and drop a swatch from an open swatch library menu onto one of the stops.
-
8
Select the color panel. It’s the icon that resembles a painter’s palette next to the swatch library below the gradient stop.[5]
-
9
Adjust the shade of the color. Use the RGB (or CMYK) slider bars to adjust the shade and color of the swatch.
- You can also select a new hue by clicking a color in the rainbow-colored bar at the bottom.
-
10
Double-click the other gradient stop. It’s the gradient stop on the other side of the gradient blend bar in the Gradient panel. Double-click it to open the swatch menu.
- You can add more stops to the blend by clicking where you want to add a stop below the gradient blend bar in the Gradient panel. To remove a stop, click and drag it down to remove it from the gradient blend bar.
-
11
Select a color for the stop. Click one of the swatches in the swatch menu to select a color for the stop.
-
12
Adjust the color and shade. To do so, click painter’s palette icon next to the swatch menu and use the RGB (or CMYK) slider bars to adjust the color and shade.
- If you are using CMYK, and there is some grey in between a colored and a black stop, select the black stop and add more of the color you are transitioning from under the black. For example, if you are transitioning from red to black, and it appears grey in the middle. Select the black stop and increase the amount of red in the black stop. This creates a smoother blend.
- You can adjust the position of the stops by clicking and dragging them left and right. You can also click and drag the notch at the top of the gradient blend bar to adjust the blend.
-
13
Select the Gradient tool. It’s the icon that resembles a rectangle with a black and white gradient blend. It’s in the Tools panel to the left, by default.
-
14
Double-click the shape you want to apply a gradient blend to. This applies the gradient to the shape.
-
15
Adjust the direction of the blend. To do so, have the Gradient tool selected and click and drag in the direction you want to apply the blend over the shape.
Advertisement
Add New Question
-
Question
Why would I want to use Illustrator?
Adobe Illustrator is a vector-based art program, so you can scale the created image to any desired size without losing quality. It also has intuitive design, especially if you have tried other graphics software or other Adobe products. If you are new, the icons are still exactly what they look like. Powerful tools such as the color harmonizer and mesh tool allow for almost any kind of art to be designed. This application concentrates more on the shape and color of your vector art than fancy effects, but includes methods for both from the wide set of tools. As you become more familiar with the application, you can make any digital art you want.
-
Question
How many colors are in Adobe Illustrator?
Grayscale, RGB, HSB, CMYK and web-safe RGB swatches are all available in Adobe Illustrator. They can be accessed from the icon with four horizontal lines in the top-left corner of the Colour tab in the Colour window.
Ask a Question
200 characters left
Include your email address to get a message when this question is answered.
Submit
Advertisement
Video
-
If you are working on a document that will go online, double click the fill boxes in the left panel. When your Color Picker box pops up, click the «Web Only» button in the lower left corner. This will allow the tool to only display colors that will show up online.
Thanks for submitting a tip for review!
Advertisement
Things You’ll Need
- Mouse
- Adobe Creative Suite
- Illustrator document
About This Article
Thanks to all authors for creating a page that has been read 130,688 times.
Is this article up to date?
И еще одна подборка полезных и нужных в работе приемов в Adobe Illustrator
Переключение между заливкой и обводкой в Adobe Illustrator
Перед выбором цвета необходимо указать, работаете вы с заливкой или обводкой выделенного объекта. Переключатель находится внизу панели инструментов. Активная в данный момент палитра отображается на переднем плане.

Если вы хотите поменять их местами, нажмите клавишу <X>.Каждое нажатие этой клавиши переключает активность палитр заливки и обводки.
Быстрая отмена заливки и обводки в Adobe Illustrator
Для присвоения заливке или обводке значение None (Нет), нажмите клавишу </>.

Цвет наоборот
Если вы хотите поменять цвет заливки и цвет обводки местами в Adobe Illustrator, нажмите сочетание клавиш <Shift+X>.

Eyedropper (Пипетка) может выбрать только цвет
Инструмент Eyedropper (Пипетка) по умолчанию копирует все атрибуты объекта, то есть цвет заливки и обводки, свойства обводки и прозрачность. Эти параметры устанавливаются двойным щелчком на кнопке этого инструмента (см. рис).

Но можно, не прибегая к выбору атрибутов через Свойства инструмента, скопировать только цвет. Для этого при взятии пробы инструментом Eyedropper удерживайте клавишу <Shift>. Обращайте внимание, какой элемент у вас активен: обводка или заливка, так как цвет присваивается только для активного элемента. Таким образом вы можете спокойно скопировать цвет для заливки одного объекта с цвета обводки другого.

Выборочная трансформация узора
Трансформировать можно не только объект, но и сам узор, оставляя при этом объект нетронутым. При использовании любого инструмента трансформации (Rotate (Поворот), Scale (Масштаб), Shear (Сдвиг) и т.д.) удерживайте нажатой клавишу <~>(тильда). Не отпускайте клавишу до окончания трансформации, иначе будет трансформироваться сам объект.

Использование глобального цвета в Adobe Illustrator
Глобальный цвет (Global) позволяет создавать документ, в котором легко можно изменять цвет всех объектов. Создайте новый образец цвета в палитре Swatches, щелкните на образце два раза и установите флажок Global (Глобальный).

Используйте этот образец для всех объектов, цвет которых вы хотели бы изменять. Когда такая необходимость назреет, просто отредактируйте всеобщий цвет, сделав двойной щелкоч на его образце. Либо перетащите на него, удерживая клавишу <Alt>, другой образец цвета.
На рисунке было создано два глобальных цвета, один для фона, другой для объектов. Так как объекты не были выделены в группу, то их цвет легко изменять именно с помощью глобального цвета.

Цвет со всего экрана
Получить образец цвета можно в любом месте экрана, даже выходя за пределы окна программы Adobe Illustrator. Выберите инструмент Eyedropper (Пипетка) и щелкните им на свободном месте. Удерживая кнопку мыши, перетащите инструмент на любой видимый цвет, даже в других приложениях или на рабочем столе. При передвижении курсора цвет автоматически будет меняться. Вы можете выбрать любой цвет, кроме, пожалуй, цвета с кнопки «Пуск» в Windows :).
Применение выбранных цветов в Adobe Illustrator
После выбора цвета на объекте инструментом Eyedropper (Пипетка), его можно применить к невыделенному объекту, удерживая клавишу <Alt>, при этом кончик указателя инструмента окрасится в черный цвет.
Выбор цвета для градиента в Adobe Illustrator
С помощью Eyedropper (Пипетка) вы еще можете выбирать цвет для градиента. Щелкните на палитре с растяжкой градиента на цветовом ползунке, цвет которого вы хотите изменить, и выберите инструмент Eyedropper (Пипетка). Удерживая клавишу <Shift>, щелкните инструментом на объекте, чтобы назначить цвет его заливки цветом ползунка градиента.

Дублирование цветового ползунка
Если вам нужно использовать один цвет в различных участках градиента, можно копировать цветовой ползунок. Удерживая клавишу <Alt>, щелкните в палитре Gradient на цветовом ползунке и перетащите указатель, чтобы создать на растяжке новый ползунок.

Замена цветового ползунка
Чтобы поменять местами цветовые ползунки на растяжке градиента в палитре Gradient, удерживая клавишу <Alt>, перетащите один ползунок на другой.

Использование образцов цвета в для градиента
Если выделить в палитре Gradient цветовой ползунок, а затем щелкнуть на образец цвета в палитре Swatches, то вместо изменения градиента весь объект будет заполнен указанным цветом. А чтобы применить цвет образца к ползунку, выделите нужный ползунок, нажмите клавишу <Alt> и щелкните на образце цвета в палитре Swatches. Также можно перетащить образец из палитры Swatches в палитру Gradient и опустить его на растяжку градиента, чтобы создать новый ползунок выбранного цвета.
Быстрое изменение обводки
Цвет обводки, можно быстро изменить, даже если она не является выделенной. Нужно перетащить цветовой образец из палитры Swatches или Color на невыделенный контур. Если при этом палитра цвета обводки является неактивной, в процессе перетаскивания нажмите и удерживайте клавишу <Shift>.
Изменение цветовых моделей в палитре Color Adobe Illustrator
Чтобы сменить цветовую панель в палитре Color (Цвет), например, с RGB на HSL, щелкните на цветовой рампе, удерживая клавишу <Shift>. Таким образом вы можете пролистать все доступные цветовые модели.

Серый и радикально серый в Adobe Illustrator
Если вам необходим серый цвет, то его вы можете получить двумя способами. Первый это в модели Grayscale (Оттенки серого) изменять значение насыщенности от белого (0%) до черного (100%). Однако тогда этот объект всегда будет оставаться серым, и вы не сможете сделать его цветным, пока не измените цветовой режим данного объекта. Вместо этого выберите в меню палитры цветовую модель CMYK и введите значение в поле компонента K, тогда в любой момент это объект можно будет сделать цветным.

Использование границ в режиме просмотра
По умолчанию при выравнивании или измерениях Illustrator отталкивается от контура объекта, игнорируя ширину обводки. Независимо от толщины обводки, размеры объекта указываются по его контуру. Чтобы учитывать ширину (и положение) обводки, нажмите сочетание клавиш <Ctrl+K> и установите в появившемся окне Preferences (Предпочтения) флажок Use Preview Bounds (Использовать границы просмотра). Отныне все изменения и расчеты будут проводиться с учетом ширины и положения обводки, как показано на рисунке.
Единственный недостаток предыдущего совета состоит в том, что заданные установки влияют на все операции и изменения. Но при использовании палитры Align (Выравнивание) имеется более быстрый способ применения этой установки.


Приемы в Adobe Illustrator Часть 8
Эта страница была показана 49498 раза.
Пожалуйста, поделитесь, если страница оказалась полезной!