Перейти к содержанию
На чтение 1 мин Просмотров 2.4к. Опубликовано 31.07.2020
Обновлено 31.07.2020
Всем привет, дорогие читатели. Сегодня мы хотим рассказать вам о якорной точке в After Effects, а точнее о том, как ее поменять.
Как поменять якорную точку

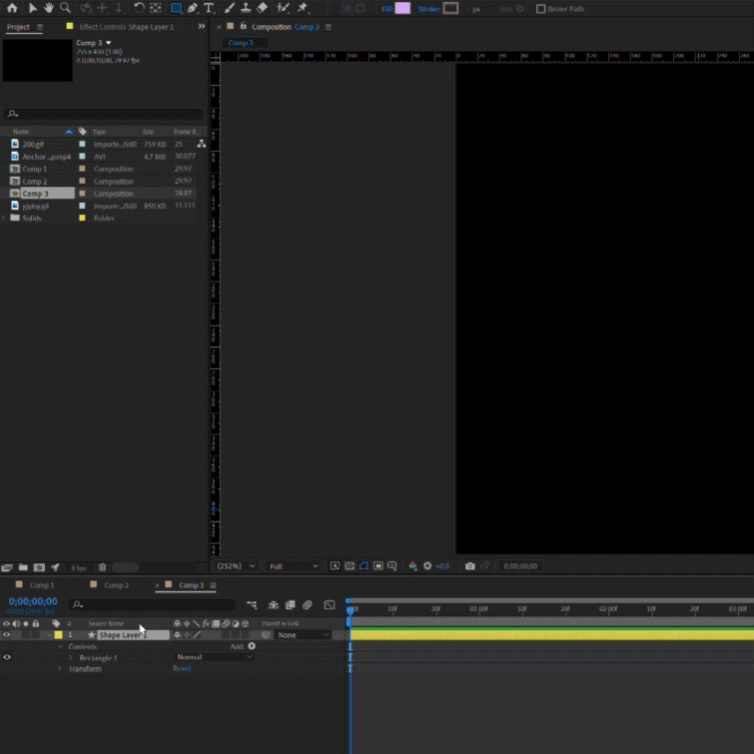
Собственно, начнем с того, что расскажем вам о якорной точке. Якорная точка или опорная точка – это такая точка, по которой вы будете центрировать положение ваших слоев в композиции. С ее помощью вы сможете выбирать начало анимации, на ваших будущих работах. На скрине выше вы можете увидеть, что это центральная нижняя точка, на выделенной надписи.
Чтобы ее перемещать, вам понадобится инструмент Pan Behind, который вы найдете на панели инструментов вверху (либо горячей клавишей Y).

Собственно, выбираете свою точку и смещаете ее, в необходимую сторону кадра.

Собственно, вы можете сместить вашу опорную точку в центр. Для этого вам нужно будет ввести комбинацию горячих клавиш Ctrl+Alt+Home.
Вот так, дорогие читатели, вы и сможете поменять положение якорной точки в Adobe After Effects, для изменения начала вашей анимации или других видов работ.
( 3 оценки, среднее 5 из 5 )
Многие новички сталкиваются с такой проблемой, как центрирование якорной точки (Anchor Point) в After Effects. Я вам покажу несколько способов центрирования якорной точки в After Effects, которые подойдут как для старых версий After Effects (CS5, CS5.5 и прочих), так и подойдут для новых версий After Effects (CC, CC 2014, CC 2015 и более поздних). Также мы будем центрировать сам слой в центр композиции.
Ну что же, давайте начинать?
Первый способ (для новых версий After Effects):
Итак, выполняем следующие шаги, чтобы, во-первых, центрировать якорную точку (Anchor Point), в центр слоя, а затем центрировать сам слой в центр композиции:
- Правой кнопкой мыши жмем по слою в левой части панели Timeline. Открывается контекстное меню.
- Выбираем пункт Transform, там выбираем команду Center Anchor Point In Layer Content (быстрая команда клавиш CTRL + ALT + Home), эта команда центрирует якорную точку в центр слоя.
- Снова правой кнопкой мыши жмем по слою в левой части панели Timeline. Открывается контекстное меню.
- Выбираем пункт Transform, там выбираем команду Center In View (быстрая команда клавиш CTRL + Home), эта команда центрирует слой в центр композиции.
Второй способ (для старых версий After Effects):
Как и в первом способе, мы сначала будем центрировать якорную точку в центр слоя, а затем сам слой в центр композиции. Выполняем шаги:
- Скачиваем скрипт для After Effects, который называется «RepositionAnchorPoint» (данный скрипт может управлять положением якорной точки, центрировать ее, и перемещать по углам слоя). Данный скрипт можно скачать с сайта aescripts, можете ввести в гугле, он вам ее найдет.
- Устанавливаем данный скрипт, в папку Adobe After Effects CS5Support FilesScriptsScriptUI Panels. После чего запускаем ее, через пункт меню Window/ RepositionAnchorPoint. Либо мы можем запустить ее без установки, для этого в программе After Effects, выбираем File/Scripts/Run Script File, затем выбираем скачанный нами скрипт.
- Откроется окно данного скрипта. Здесь мы можем выбрать куда переместить якорную точку слоя. Жмем по средней кнопке чтобы центрировать якорную точку, и затем жмем кнопку «Reposition».
- Правой кнопкой мыши жмем по слою в левой части панели Timeline. Открывается контекстное меню.
- Выбираем пункт Transform, там выбираем команду Center In View (быстрая команда клавиш CTRL + Home), эта команда центрирует слой в центр композиции.
Правда не сложно? Всем удачи!
- After Effects User Guide
- Beta releases
- Beta Program Overview
- After Effects Beta Home
- Features in Beta
- Properties panel (Beta)
- 3D Model Import (Beta)
- Getting started
- Get started with After Effects
- What’s new in After Effects
- Release Notes | After Effects
- After Effects system requirements
- Keyboard shortcuts in After Effects
- Supported File formats | After Effects
- Hardware recommendations
- After Effects for Apple silicon
- Planning and setup
- Workspaces
- General user interface items
- Get to know After Effects interface
- Workflows
- Workspaces, panels, and viewers
- Projects and compositions
- Projects
- Composition basics
- Precomposing, nesting, and pre-rendering
- View detailed performance information with the Composition Profiler
- CINEMA 4D Composition Renderer
- Importing footage
- Preparing and importing still images
- Importing from After Effects and Adobe Premiere Pro
- Importing and interpreting video and audio
- Preparing and importing 3D image files
- Importing and interpreting footage items
- Working with footage items
- Detect edit points using Scene Edit Detection
- XMP metadata
- Text and Graphics
- Text
- Formatting characters and the Character panel
- Text effects
- Creating and editing text layers
- Formatting paragraphs and the Paragraph panel
- Extruding text and shape layers
- Animating text
- Examples and resources for text animation
- Live Text Templates
- Motion Graphics
- Work with Motion Graphics templates in After Effects
- Use expressions to create drop-down lists in Motion Graphics templates
- Work with Essential Properties to create Motion Graphics templates
- Replace images and videos in Motion Graphics templates and Essential Properties
- Text
- Drawing, Painting, and Paths
- Overview of shape layers, paths, and vector graphics
- Paint tools: Brush, Clone Stamp, and Eraser
- Taper shape strokes
- Shape attributes, paint operations, and path operations for shape layers
- Use Offset Paths shape effect to alter shapes
- Creating shapes
- Create masks
- Remove objects from your videos with the Content-Aware Fill panel
- Roto Brush and Refine Matte
- Layers, Markers, and Camera
- Selecting and arranging layers
- Blending modes and layer styles
- 3D layers
- Layer properties
- Creating layers
- Managing layers
- Layer markers and composition markers
- Cameras, lights, and points of interest
- Animation, Keyframes, Motion Tracking, and Keying
- Animation
- Animation basics
- Animating with Puppet tools
- Managing and animating shape paths and masks
- Animating Sketch and Capture shapes using After Effects
- Assorted animation tools
- Work with Data-driven animation
- Keyframe
- Keyframe interpolation
- Setting, selecting, and deleting keyframes
- Editing, moving, and copying keyframes
- Motion tracking
- Tracking and stabilizing motion
- Face Tracking
- Mask Tracking
- Mask Reference
- Speed
- Time-stretching and time-remapping
- Timecode and time display units
- Keying
- Keying
- Keying effects
- Animation
- Transparency and Compositing
- Compositing and transparency overview and resources
- Alpha channels and masks
- Track Mattes and Traveling Mattes
- Adjusting color
- Color basics
- Color management
- Color Correction effects
- OpenColorIO and ACES color management
- Effects and Animation Presets
- Effects and animation presets overview
- Effect list
- Simulation effects
- Stylize effects
- Audio effects
- Distort effects
- Perspective effects
- Channel effects
- Generate effects
- Transition effects
- The Rolling Shutter Repair effect
- Blur and Sharpen effects
- 3D Channel effects
- Utility effects
- Matte effects
- Noise and Grain effects
- Detail-preserving Upscale effect
- Obsolete effects
- Expressions and Automation
- Expression
- Expression basics
- Understanding the expression language
- Using expression controls
- Syntax differences between the JavaScript and Legacy ExtendScript expression engines
- Editing expressions
- Expression errors
- Using the Expressions editor
- Use expressions to edit and access text properties
- Expression language reference
- Expression examples
- Automation
- Automation
- Scripts
- Expression
- Immersive video, VR, and 3D
- Construct VR environments in After Effects
- Apply immersive video effects
- Compositing tools for VR/360 videos
- Tracking 3D camera movement
- Work in 3D Design Space
- 3D Transform Gizmos
- Do more with 3D animation
- Preview changes to 3D designs real time with the Mercury 3D engine
- Add responsive design to your graphics
- Views and Previews
- Previewing
- Video preview with Mercury Transmit
- Modifying and using views
- Rendering and Exporting
- Basics of rendering and exporting
- H.264 Encoding in After Effects
- Export an After Effects project as an Adobe Premiere Pro project
- Converting movies
- Multi-frame rendering
- Automated rendering and network rendering
- Rendering and exporting still images and still-image sequences
- Using the GoPro CineForm codec in After Effects
- Working with other applications
- Dynamic Link and After Effects
- Working with After Effects and other applications
- Sync Settings in After Effects
- Creative Cloud Libraries in After Effects
- Plug-ins
- Cinema 4D and Cineware
- Collaboration: Frame.io, and Team Projects
- Collaboration in Premiere Pro and After Effects
- Frame.io
- Install and activate Frame.io
- Use Frame.io with Premiere Pro and After Effects
- Frequently asked questions
- Team Projects
- Get Started with Team Projects
- Create a Team Project
- Collaborate with Team Projects
- Memory, storage, performance
- Memory and storage
- How After Effects handles low memory issues while previewing
- Improve performance
- Preferences
- GPU and GPU driver requirements for After Effects
- Knowledge Base
- Known issues
- Fixed issues
- After Effects and macOS Ventura
- How After Effects handles low memory issues while previewing
Layer properties in the Timeline
panel
Each layer has properties, many
of which you can modify and animate. The basic group of properties
that every layer has is the Transform group, which includes Position
and Opacity properties. When you add certain features to a layer—for example,
by adding masks or effects, or by converting the layer to a 3D layer—the
layer gains additional properties, collected in property groups.
All
layer properties are temporal—they can change the layer
over time. Some layer properties, such as Opacity, have only a temporal
component. Some layer properties, such as Position, are also spatial—they
can move the layer or its pixels across composition space.
You
can expand the layer outline to display layer properties and change
property values.
Most properties have a stopwatch ![]() . Any
. Any
property with a stopwatch can be animated—that is, changed over
time. (See About
animation, keyframes, and expressions.)


Properties in
the Effects property group (effect properties) are
also layer properties. Many effect properties can also be modified
in the Effect Controls panel.
Show or hide properties in the
Timeline panel
- To expand or collapse a property group, click the triangle to the left of the layer name or property group name.
- To expand or collapse a property group and all of its children, Ctrl-click (Windows) or Command-click (Mac OS) the triangle.
- To expand or collapse all groups for selected layers, press Ctrl+` (accent grave) (Windows) or Command+` (accent grave) (Mac OS).
- To reveal an effect property in the Timeline panel, double-click the property name in the Effect Controls panel.
- To hide a property or property group, Alt+Shift-click (Windows) or Option+Shift-click (Mac OS) the name in the Timeline panel.
- To show only the selected properties or property groups in the Timeline panel, press SS.
The SS shortcut is especially useful for working with paint strokes. Select the paint stroke in the Layer panel, and press SS to open the property group for that stroke in the Timeline panel.
- To show only a specific property or property group, press its shortcut key or keys. (See Showing properties and groups in the Timeline panel (keyboard shortcuts).)
- To add a property or property group to the properties shown in the Timeline panel, hold Shift while pressing the shortcut key for the property or property group.
- To show only properties that have been modified from their default values, press UU, or choose Animation > Reveal Modified Properties.
- To show only properties that have keyframes or expressions, press U, or choose Animation > Reveal Animating Properties.
The U and UU commands are especially useful for learning how animation presets, template projects, or other animated items work, because they isolate the properties that were modified by the designer of those items.
You can also filter layers in the Timeline panel to show only layers with properties that match a search string. See Search and filter in the Timeline, Project, and Effects & Presets panels.
Select a property or property group
in the Timeline panel

- To select a property or property group—including all values, keyframes, and expressions—click the name in the layer outline in the Timeline panel.
Copy or duplicate a property or
property group in the Timeline panel
- To copy properties from one
layer or property group to another, select the layer, property,
or property group, press Ctrl+C (Windows) or Command+C (Mac OS),
select the target layer, property, or property group, and press
Ctrl+V (Windows) or Command+V (Mac OS). - To duplicate a property group, select the property group
and press Ctrl+D (Windows) or Command+D (Mac OS).You can only duplicate some property groups, including
shapes, masks, and effects. However, you can’t duplicate top-level
property groups such as Contents, Masks, Effects, and Transforms.
If you attempt to duplicate a top-level property group, the entire
layer is duplicated, instead.
Copy a value from a layer property
that contains no keyframes
You can copy the current value of a layer
property to another layer, even when the original layer contains
no keyframes.
-
In the Timeline panel, show the layer property
containing the value you want to copy. -
Click the name of the layer property to select it.
-
Select the layer into which you want to paste the value.
-
If the target layer contains keyframes, move the current-time
indicator to the time where you want to paste the value. If the
target layer does not contain keyframes, the new value applies to
the entire duration of the layer.
Set a property value
If multiple layers are selected and you change
a property for one layer, then the property is changed for all selected
layers. Sliders, angle controls, and some other property controls
are only available in the Effect Controls panel.
To
change the units for a property, right-click (Windows) or Control-click
(Mac OS) the underlined value, choose Edit Value, and choose from
the Units menu. The available units are different for different
property types. You can’t change the units for some properties.
- Place the pointer over the underlined value, and drag to the left or right.
- Click the underlined value, enter a new value, and then press Enter (Windows) or Return (Mac OS).
You can enter simple arithmetic expressions for property values and other number entries. For example, you can enter 2*3 instead of 6, 4/2 instead of 2, and 2e2 instead of 200. Such entries can be especially useful when incrementing a value by a specific amount from its original value.
- Right-click (Windows) or Control-click (Mac OS) the underlined value and choose Edit Value.
- Drag the slider left or right.
- Click a point inside the angle control or drag the angle control line.
After you click inside the angle control, you can drag outside it for more precision.
- To increase or decrease the property value by 1 unit, click the underlined value and press the Up Arrow or Down Arrow key. To increase or decrease by 10 units, hold Shift while pressing the Up Arrow or Down Arrow key. To increase or decrease by 0.1 units, hold Ctrl (Windows) or Command (Mac OS) while pressing the Up Arrow or Down Arrow key.
- To reset properties in a property group to their default values, click Reset next to the property group name. To reset an individual property, right-click (Windows) or Control-click (Mac OS) the property name (not the value) and choose Reset from the context menu.
If the property contains keyframes, a keyframe is added at the current time with the default value.
Alan Shisko provides a video tutorial
on his Motion Graphics ‘n Such blog shows how
to use label colors and multiple selections to rapidly change properties
for multiple layers simultaneously.
Charles Bordenave
(nab) provides a script on the After
Effects Scripts website that sets the properties in the Transform
group for selected layers to random values within constraints that
you set.
The LockProperties script, available
from the After Effects Scripts website, locks only specified properties
so that you can prevent accidental changes.
Layer anchor points
Transformations, such as rotation and scale,
occur around the anchor point (sometimes called transformation
point or transformation center) of the layer.
By default, the anchor point ![]() for
for
most layer types is at the center of the layer.
Though there
are times when you’ll want to animate the anchor point, it’s most common
to set the anchor point for a layer before you begin animating.
For example, if you’re animating an image of a person made up of
one layer for each body part, you’ll probably want to move the anchor
point of each hand to the wrist area so that the hand rotates around
that point for the whole animation.
The easiest
way to pan and scan over a large image is to animate
Anchor Point and Scale properties.
Alan Shisko provides
a detailed video tutorial on his website, demonstrating how to
create a complex 3D environment from 3D layers, beginning with simple
2D assets. Manipulating layer anchor points is a crucial part of
this tutorial.

point moved to the end of the text layer (right)

anchor point in the Composition panel (left), After Effects automatically
compensates for the move so that the layer maintains its position
relative to the composition frame (right).
If
you don’t see the anchor point in the Layer panel, select Anchor
Point Path from the View menu at the lower-right area of the Layer
panel.
Move a layer anchor point
- Drag the anchor point using the Selection tool in the Layer panel
Layers of some types, such as text layers and shape layers, can’t be opened in the Layer panel.
- To move a layer anchor point 1 pixel, choose Anchor Point Path from the View menu at the lower-right area of the Layer panel, and press an arrow key. To move 10 pixels, hold Shift as you press an arrow key. Pixel measurements are at the current magnification in the Layer panel.
- To move a layer anchor point in the Composition panel without moving the layer, select the layer and use the Pan Behind (Anchor Point) tool
 to drag the anchor point.
Moving an anchor point with the Pan Behind (Anchor Point) tool changes Position and Anchor Point values so that the layer remains where it was in the composition before you moved the anchor point. To change only the Anchor Point value, Alt-drag (Windows) or Option-drag (Mac OS) with the Pan Behind (Anchor Point) tool.
Charles Bordenave (nab) provides a script on the After Effects Scripts website that moves
the anchor points of selected layers without moving the layers in
the composition frame.
Reset a layer anchor point
- To reset the anchor point
to its default location in the layer, double-click the Pan Behind
(Anchor Point) tool button
in the Tools panel. - To reset the anchor point to its default location in
the layer, Alt-double-click (Windows) or Option-double-click (Mac
OS) the Pan Behind (Anchor Point) tool button. The layer moves to
the center of the composition
Set layer anchor point to center of content
You can set the anchor point to be in the center of the layer content in any of the following ways:
- Select Layer > Transform > Center Anchor Point In Layer Content
- Use the keyboard shortcut Ctrl+Alt+Home (Windows) or Command+Option+Home (Mac OS)
- Ctrl+double-click (Windows) or Command+double-click (Mac OS) the Pan Behind (Anchor Point) tool
Here are a few uses of this command:
- setting the anchor point of a shape layer to the center of a single shape or to the centroid of a group of shapes in a shape layer
- setting the anchor point for a text layer to the center of the text content
- setting the anchor point of a layer to the center of the visible area within a masked region
Scale or flip a layer
As with other transformations, scaling of
a layer occurs around the anchor point of the layer. If you move
the anchor point away from the center of the layer, the layer may
move when you flip it. Some layers—such as camera, light, and audio-only
layers—don’t have a Scale property.
You can scale a layer
beyond the composition frame.
For information on scaling
exponentially, as with a zoom lens, see Use Exponential
Scale to change the speed of scaling.
For information
on scaling or resizing entire movies rather than a single layer,
see Scaling
a movie up and Scaling
a movie down.
To flip a layer is to multiply
the horizontal or vertical component of its Scale property value
by -1. A layer flips around its anchor point.
- To flip selected layers, choose Layer > Transform > Flip Horizontal or Layer > Transform > Flip Vertical.
- To scale a layer proportionally in the Composition panel, Shift-drag any layer handle.
- To scale a layer freely in the Composition panel, drag a corner layer handle.
- To scale one dimension only in the Composition panel, drag a side layer handle.
- To increase or decrease Scale for a selected layer by 1%, hold down Alt (Windows) or Option (Mac OS) as you press + or – on the numeric keypad.
- To increase or decrease Scale for selected layers by 10%, hold down Alt+Shift (Windows) or Option+Shift (Mac OS) as you press + or – on the numeric keypad.
- To scale an entire composition, choose File > Scripts > Scale Composition.jsx.
- To scale and center selected layers to fit in the composition frame, choose Layer > Transform > Fit To Comp.
- To scale and center selected layers to fit the width or height of the composition frame, while preserving the aspect ratio of the layer, choose Layer > Transform > Fit To Comp Width, or Layer > Transform > Fit To Comp Height.
- To scale a layer proportionally in the Timeline panel, select the layer, press S to display the Scale property, click the Constrain Proportions icon to the left of the Scale values, and enter a new value for the x, y, or z scale.
To activate the Constrain Proportions icon and match the height to the width, Alt-click (Windows) or Option-click (Mac OS) it.
- To scale to a specific set of pixel dimensions, right-click (Windows) or Control-click (Mac OS) the Scale value in the Timeline panel, choose Edit Value, and change the units to pixels in the Scale dialog box. Select Include Pixel Aspect Ratio to see and adjust dimensions in terms of the composition’s pixel aspect ratio.
Scaling down a raster (non-vector) layer sometimes causes
a slight softening or blurring of the image. Scaling up a raster
layer by a large factor can cause the image to appear blocky or
pixelated.
Detail-preserving Upscale effect
The Detail-preserving Upscale effect is capable of scaling up images by large amounts while preserving details in the image.
For more information, see Detail-preserving Upscale effect.
Bilinear and bicubic sampling
You can choose between bicubic and bilinear sampling for selected layers, which determines how pixels are sampled for scaling and for all transformations applied using the Transform effect.
For more information, see Layer image quality and subpixel positioning.
Adobe Photoshop provides fine control
over resampling methods used for scaling of images. For fine control
of resampling, you can export frames to Photoshop to change the
image size and then import the frames back into After Effects.
Though it’s not very well suited for movies, the content-aware scaling feature in Photoshop is very useful for extending and scaling still images. This feature can be useful when repurposing images for wide-screen formats that were created for standard-definition formats.
For a script that scales multiple compositions simultaneously, go to the AE Enhancers forum.
Lloyd Alvarez provides a script on the After Effects Scripts website that scales selected layers to fit the composition frame, and provides options for cropping or letterboxing.
Aharon Rabinowitz provides a video tutorial on the Creative COW website that demonstrates the uses of changing and animating a 3D layer’s Scale property, including changing only the z dimension of Scale.
Rotate a 2D layer
As with other transformations, rotation of
a layer occurs around the anchor point of the layer.
To reveal the Rotation property value for selected
layers in the Timeline panel, press R.
The first part
of the Rotation property value is the number of whole rotations;
the second part is the fractional rotation in degrees.
For
information on rotating 3D layers, see Rotate
or orient a 3D layer.
- To rotate a layer by dragging in the
Composition panel, drag the layer using the Rotation tool. To
constrain rotation to 45° increments, hold down Shift as you drag. - To rotate selected layers by 1 degree, press plus (+)
or minus (-) on the numeric keypad. - To rotate selected layers by 10 degrees, press Shift+plus
(+) or Shift+minus (-) on the numeric keypad.
Adjust audio volume levels
When you use footage containing audio, the
default audio level for playback is 0 dB, meaning that the level
is unadjusted in After Effects. Setting a positive decibel level
increases volume, and setting a negative decibel level decreases
volume.
Double-clicking an Audio Levels keyframe activates
the Audio panel.
The VU meter in the Audio panel displays
the volume range for the audio as it plays. The red blocks at the
top of the meter represent the volume limit of your system.
For more precision in setting audio levels by dragging
sliders, increase the height of the Audio panel.
-
In the Audio panel, to adjust volume, do one of
the following:-
To set the level of the left and right
channels together, drag the center slider up or down. -
To set the level of the left channel, drag the left
slider up or down, or type a new value in the levels box at the
bottom of the left slider. -
To set the level of the right channel, drag the
right slider up or down, or type a new value in the levels box at
the bottom of the right slider.
-
Parent and child layers
To synchronize changes to layers by assigning
one layer’s transformations to another layer, use parenting.
After a layer is made a parent to another layer, the other layer
is called the child layer. When you assign a parent,
the transform properties of the child layer become relative to the
parent layer instead of to the composition. For example, if a parent
layer moves 5 pixels to the right of its starting position, then
the child layer also moves 5 pixels to the right of its position.
Parenting is similar to grouping; transformations made to the group
are relative to the anchor point of the parent.
Parenting
affects all transform properties except Opacity: Position, Scale, Rotation,
and (for 3D layers) Orientation.
When parenting layers, helpful text describing alternate parenting behaviors is displayed on the layer bar below the mouse position and in the Info panel.
A layer can have only one
parent, but a layer can be a parent to any number of layers in the
same composition.
You can animate child layers independent
of their parent layers. You can also parent using null objects,
which are hidden layers.
You cannot animate the act of assigning
and removing the parent designation—that is, you cannot designate
a layer as a parent at one point in time and designate it as a normal
layer at a different point in time.
When you create a parenting
relationship, you can choose whether to have the child take on the
transform property values of the parent or retain its own. If you choose
to have the child take on the transform property values of the parent,
the child layer jumps to the parent’s position. If
you choose to have the child retain its own transform property values,
then the child stays where it is. In both cases, subsequent changes
to the transform property values of the parent are applied to the
child. Similarly, you can choose whether the child jumps when
the parenting relationship is removed.
When parenting layers, you can use the Shift key to move the child layer to the location of the parent. This can be useful when you want to attach a layer to a null, but have the layer move to the location of the parent null (for example, attaching a 3D text layer to a null layer created from the 3D Camera Tracker).

To
show or hide the Parent column in the Timeline panel, choose Columns > Parent
from the Timeline panel menu.
- To parent a layer, in the Parent column,
drag the pick whip from the layer that is to be the child layer
to the layer that is to be the parent layer. - To parent a layer, in the Parent column, click the menu
of the layer that you want to be the child, and choose a parent
layer name from the menu. - To remove a parent from a layer, in the Parent column,
click the menu of the layer to remove the parent from, and choose
None. - To extend the selection to include all child layers of
a selected parent layer, right-click (Windows) or Control-click
(Mac OS) the layer in the Composition or Timeline panel, and choose
Select Children. - To make a child layer jump when a parent is assigned
or removed, hold down Alt (Windows) or Option (Mac OS) as you assign
or remove the parent. - To remove a parent from a layer (that is, set Parent
to None), Ctrl-click (Windows) or Command-click (Mac OS) the parenting
pick whip of the child layer in the Timeline panel. Alt+Ctrl-click
(Windows) or Option+Command-click (Mac OS) the parenting pick whip
of the child layer to remove the parent and cause the child layer
to jump.
Online resources about parent and
child layers
Paul Tuersley provides a script on the AE Enhancers forum for duplicating a parent layer and all of its children, preserving the parenting hierarchy.
Carl Larsen provides a video tutorial on the Creative COW website that demonstrates how to use expressions and parenting to relate the rotation of a set of wheels to the horizontal movement of a vehicle.
Robert Powers provides a video tutorial on the Slippery Rock NYC website that demonstrates the use of parenting and the Puppet tools to animate a character.
Null object layers
To assign a parent layer, but keep that layer from being a visible element in your project, use a null object. A null object is an invisible layer that has all the properties of a visible layer so that it can be a parent to any layer in the composition. Adjust and animate a null object as you would any other layer. You use the same commands to modify settings for a null object that you use for a solid-color layer (Layer > Solid Settings).
You can apply Expression Controls effects to null objects and then use the null object as a control layer for effects and animations in other layers. For example, when working with a camera or light layer, create a null object layer and use an expression to link the Point Of Interest property of the camera or light to the Position property of the null layer. Then, you can animate the Point Of Interest property by moving the null object. It is often easier to select and see a null object than it is to select and see the point of interest.
A composition can contain any number of null objects. A null object is visible only in the Composition and Layer panels and appears in the Composition panel as a rectangular outline with layer handles. Effects are not visible on null objects.
-
To create a null object, select the Timeline or
Composition panel and choose Layer > New >
Null Object.
The anchor point of a new null object layer appears
in the upper-left corner of the layer, and the layer is anchored
in the center of the composition at its anchor point. Change the
anchor point as you would for any other layer.
If
a null object is visually distracting in your composition frame,
consider dragging it out of the frame, onto the pasteboard.
Andrew Kramer provides a video tutorial on his Video Copilot website that demonstrates the use of a null object to animate a 3D stroke.
Guide layers
You can create guide layers from
existing layers to use for reference in the Composition panel, to
help you position and edit elements. For example, you can use guide
layers for visual reference, for audio timing, for timecode reference,
or for storing comments to yourself.
A guide layer icon ![]() appears
appears
next to the name of a guide layer or its source in the Timeline
panel.
By default, guide layers aren’t rendered when you create
output but can be rendered when desired by changing the render settings
for the composition.
Guide layers in nested compositions
can’t be viewed in the containing composition.
- To convert selected layers to guide
layers, choose Layer > Guide Layer. - To render a composition with its visible guide layers,
click Render Settings in the Render Queue panel, and choose Current
Settings from the Guide Layers menu in the Render Settings dialog
box. - To render a composition without rendering guide layers,
click Render Settings in the Render Queue panel, and choose All
Off from the Guide Layers menu in the Render Settings dialog box.
After Effects is an incredibly powerful and useful program. However, learning how to initially use it can be daunting. One fundamental technique used for both simple and complex animations is moving the anchor point. It may seem easy to do, but you might have found that simply clicking and dragging didn’t quite do the trick. Here are the three simple steps to learn how to move the anchor point in After Effects.
First, let’s define anchor point
The tool bar, icons, and transform menu in After Effects can be incredibly daunting. Learning what the anchor point is and how to move it is essential for anyone new to After Effects. Let’s first get a solid understanding of the anchor point definition.
ANCHOR POINT DEFINITION
What is an anchor point?
In After Effects, the anchor point is the point which all transformations revolve around. It is the point or the position where a layer or an object will scale or rotate from. A good way to think of an anchor point is the point that establishes a sort of “center of gravity” for the transformation you apply to a layer.
Without an anchor point, there is no central point that serves a frame of reference to where you are moving or scaling from. Inevitably, you will need to move the anchor point to achieve a specific motion or animation.
Moving the anchor point in After Effects is the key to basically everything you will create in the software. Let’s take a look at the step-by-step process of how to move the anchor point in After Effects.
How to move the anchor point in After Effects
1. Select the Pan-Behind Tool
If you’ve ever tried to move an anchor point in After Effects, you may be frustrated to find that the entire layer movies as well. To move your anchor point without moving the entire layer, you need to select the “Pan-Behind Tool”. You can do this by either clicking the icon on the top toolbar or by hitting the (Y) key on your keyboard.

Pan-Behind tool • After effects how to change anchor point
Once you select this you will be able to move your anchor point freely.
After Effects set anchor point movement
2. Move the anchor point
The next step is learning how to move the anchor point in After Effects is, you guessed it, move the anchor point to your desired location. The anchor point values will automatically update in your transform menu as you move the anchor point. This video covers a tutorial to this step and more in depth.
AE how to move anchor point
When moving the anchor point, you can actually move them perfectly along the X or Y axis. Hold down shift and move the anchor point either up or down. Make sure that the Pan-Behind Tool is still selected. This will help you be incredibly precise when moving your anchor point.
How to move the anchor point in After Effects
3. Deselect the Pan-Behind Tool
Once your anchor point is in the desired position, make sure you deselect the pan-behind tool by selecting the Selection tool at the top toolbar or by hitting the (V) key on your keyboard.

Selection Tool • AE how to move anchor point
That is pretty much the gist of moving the anchor point in After Effects. Here’s another useful tip to keep in mind when moving anchor points.
After Effects set anchor point
Recenter the anchor point
When you create a new layer in After Effects, the anchor point will appear in the center as a default. But if you move the anchor point and need to recenter it, simply hit Command+Option+Home on a Mac. If you are using a PC, the keyboard shortcut is Ctrl+Alt+Home.
While there are a lot more techniques and tips when it comes to anchor points, learning how to move the anchor point in After Effects is one of the fundamental tools you will need to learn to get started in After Effects.
In most After Effects projects, you will be moving the anchor point for 60%-80% of your layers. Dialing in this technique and the keyboard hot keys for it will help you work more efficiently and effectively.
UP NEXT
Best Free After Effects Templates
If you’re just learning how to use After Effects, you’ll want to download a few of the best free After Effects templates. Templates save time and can elevate the production value of your project. Check out our next article where we’ve listed the best After Effects templates you can download for free.
Up Next: AE Templates →
Let’s take a look at how different a layer animates when the anchor point is in various locations, and how this will affect your end product.
An anchor point may seem like a useless parameter inside of After Effects, but its location on a layer is extremely important when it comes to animation. An anchor point is a position on a layer that’s used as a base for all transformation properties. You can place it anywhere on a layer, but most of the time I center it. It affects how parameters animate—the most noticeable being with rotation and scale. Let’s go!

I imagine that you’re reading this because you’re trying to move your anchor point, but when you click and drag it on your layer, the whole object moves. There are multiple ways to change an anchor point’s position, but some are significantly faster than others. Once you get this down it’ll become second nature.
Moving Your Anchor Point

You can change your anchor point in your layer’s transform properties, but I never do this. Nor do I recommend using this method. It becomes really complicated to position the anchor point exactly where you want and it’s completely unnecessary, but an option.
The method I suggest using to snap your anchor point to any edge or corner of a shape is the Pan Behind (Anchor Point) tool. It’s on the same toolbar as the selection and hand tool, which should be at the top of After Effects. When you’ve selected the Pan Behind tool, highlight your layer, then click and drag the anchor point wherever you want. If you want to snap the anchor point to a specific corner or edge, you can use the integrated guides.
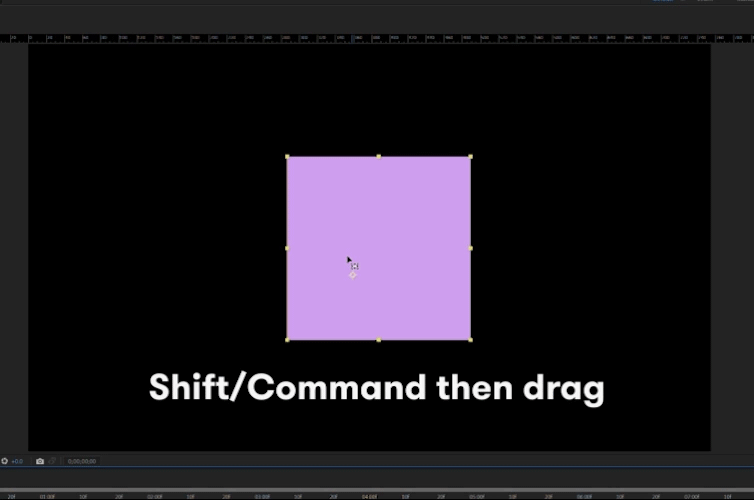
Select your anchor point while holding down Shift on a PC or Command on a Mac. This will easily allow you to snap the anchor point to a specific position of an object, like an edge or corner. It helps you avoid zooming in 5000% to precisely place it.

Most of the time, I’m moving my anchor point to the center of my layer. You can do this a couple of ways. The first is manually dragging and snapping it to the center of the layer with the Pan Behind tool while holding Shift. You can also right-click on the layer, go to Transform, and click on Center Anchor Point in Layer Content. The fastest way, and my preferred method, is just to use the shortcut: Control+Alt+Home on a PC or Command+Option+Home on a Mac.
Wrap-up
If you haven’t already discovered this, here’s an inside tip. Remember to always correctly position your anchor point before you animate any transform property. If you move your anchor point while there are active keyframes, it’ll create a new one and change your object’s motion. I always accidentally do this, but it’s easy to fix just by undoing the action. Anchor points are one of the simplest topics within After Effects so, hopefully, these tips were useful to you. Best of luck to you on your mograph journey!
For more After Effects tips, tricks, and advice, check out these articles:
- 3 Ways to Use the Fractal Noise Effect in Adobe After Effects
- After Effects: 10 Features and Improvements from Recent Releases
- Video Tutorial: How to Make a News Ticker in After Effects
- 4 Clever Tips for Organizing Your After Effects Project
- Create a Video Conference Call Glitch Effect in After Effects
В предыдущей статье мы рассмотрели возможности After Effects и убедились, что эта программа многогранна и идеально подходит для демонстрации анимации интерфейсов, а также создания микроанимаций иконок.
В этом уроке создадим анимацию иконки бургер-меню и узнаем основные принципы работы в After Effects.
Сначала познакомимся с рабочим пространством программы.
- Project — панель проекта, здесь отображаются все рабочие файлы: картинки, видео, аудио.
- Composition — панель композиции, рабочая зона, где вы можете визуально контролировать весь процесс создания проекта.
- Effects & Presets — панель эффектов, фильтров и шаблонов. По умолчанию сюда же включены панели: Review, Info, Align, панели по работе с текстом.
- Layers — панель слоев, отображает все созданные вами слои.
- Timeline — панель монтажного стола. Эта панель нужна для редактирования и настройки анимации.
- Menu — меню программы. Включает в себя все доступные инструменты и настройки.
- Toolbar — панель инструментов. Наглядно отображает основной инструмент программы, а также активный инструмент.
- Default — панель гибкой настройки рабочего пространства под ваши нужды.
Adobe After Effects очень похож на Adobe Photoshop. Такая же работа со слоями, фильтрами, эффектами и так далее. Если вы работали в Photoshop, вам будет несложно освоить и After Effects.
Отличительная особенность After Effects — большое количество всевозможных плагинов, платных и бесплатных. Еще одна особенность — работа со скриптами. Если вы умеете программировать, пишете скрипты или плагины, вам не составит труда использовать всю мощь After Effects. Но даже если вы программист только в душе, не расстраивайтесь, можете воспользоваться готовыми скриптами.
А теперь давайте приступим к созданию анимированной иконки бургер-меню.
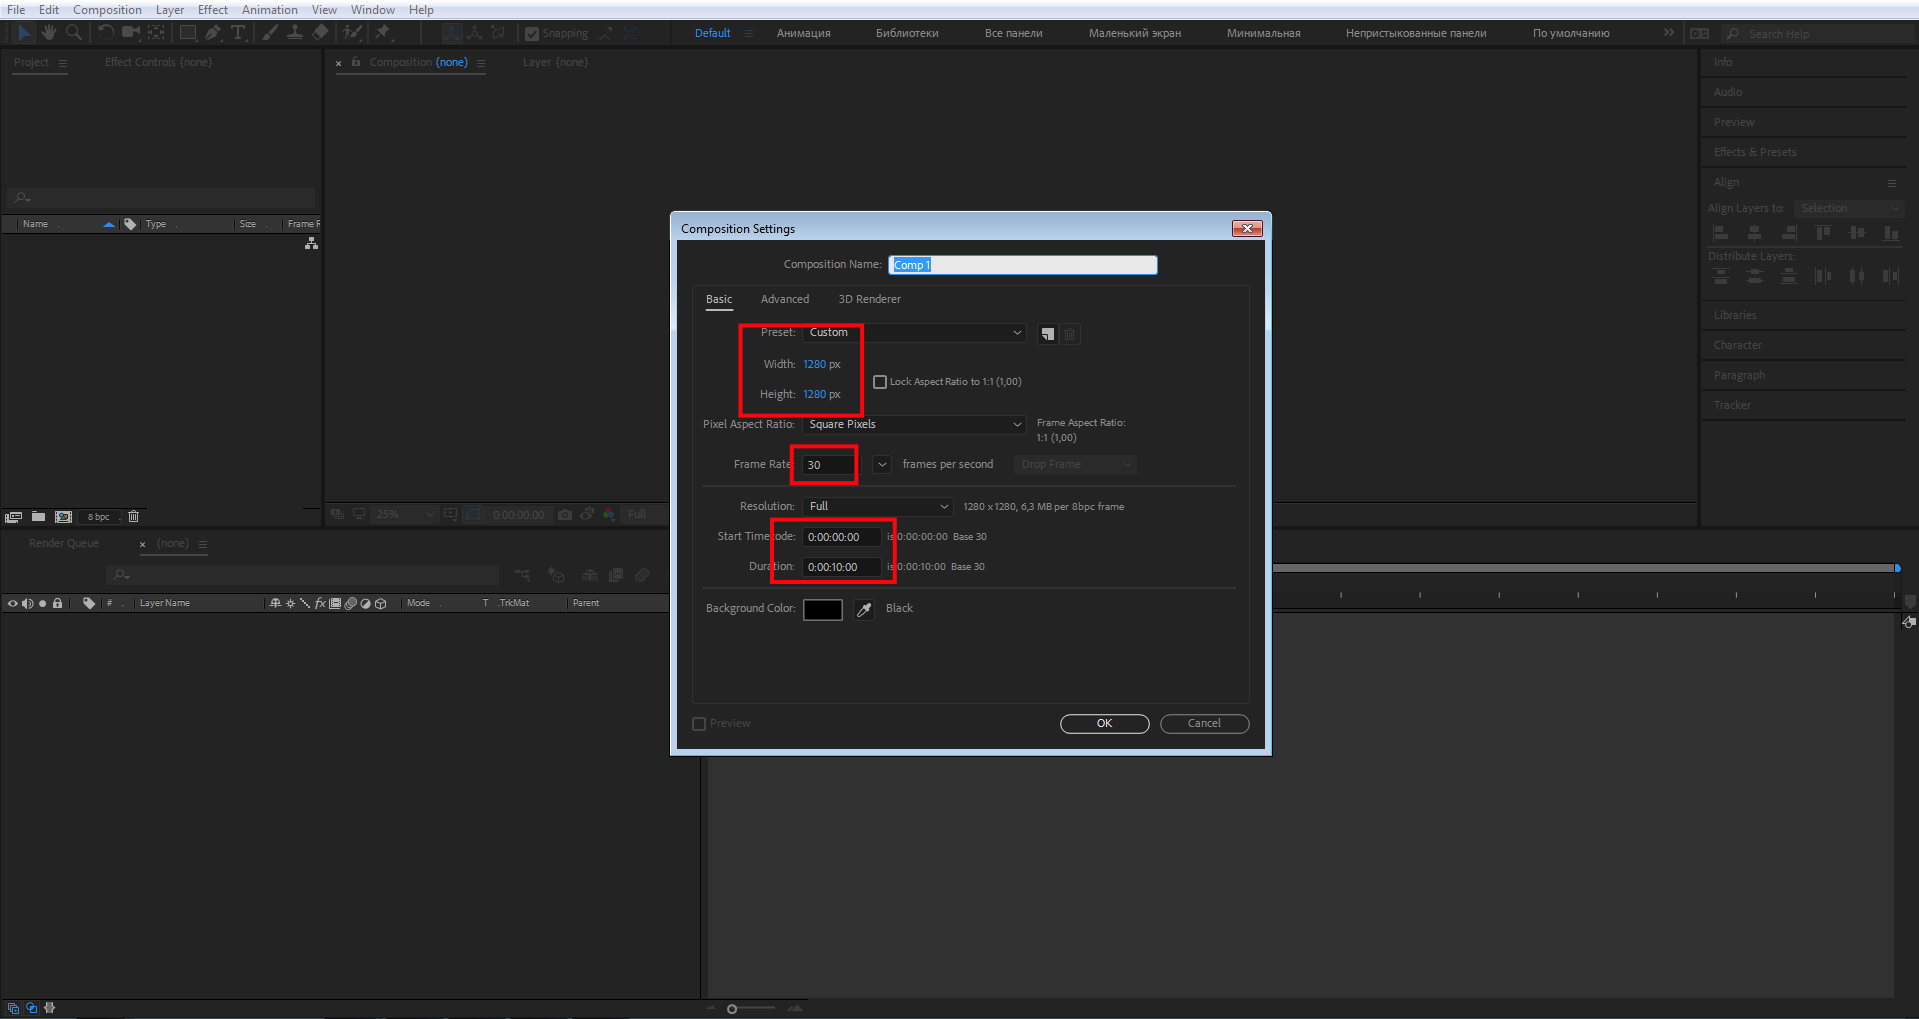
Создайте новую композицию.

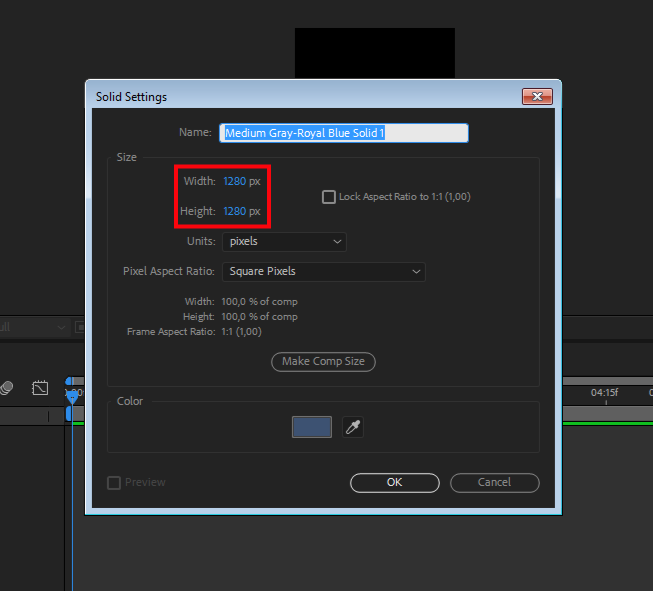
Укажите разрешение композиции, я поставил 1280х1280. Количество кадров установил 30. Продолжительность 10 секунд.
Создайте новый слой на панели слоев. Для этого правой кнопкой мыши откройте контекстное меню и выберете пункт New — Solid. Solid — это тип слоя, залитый сплошным цветом.
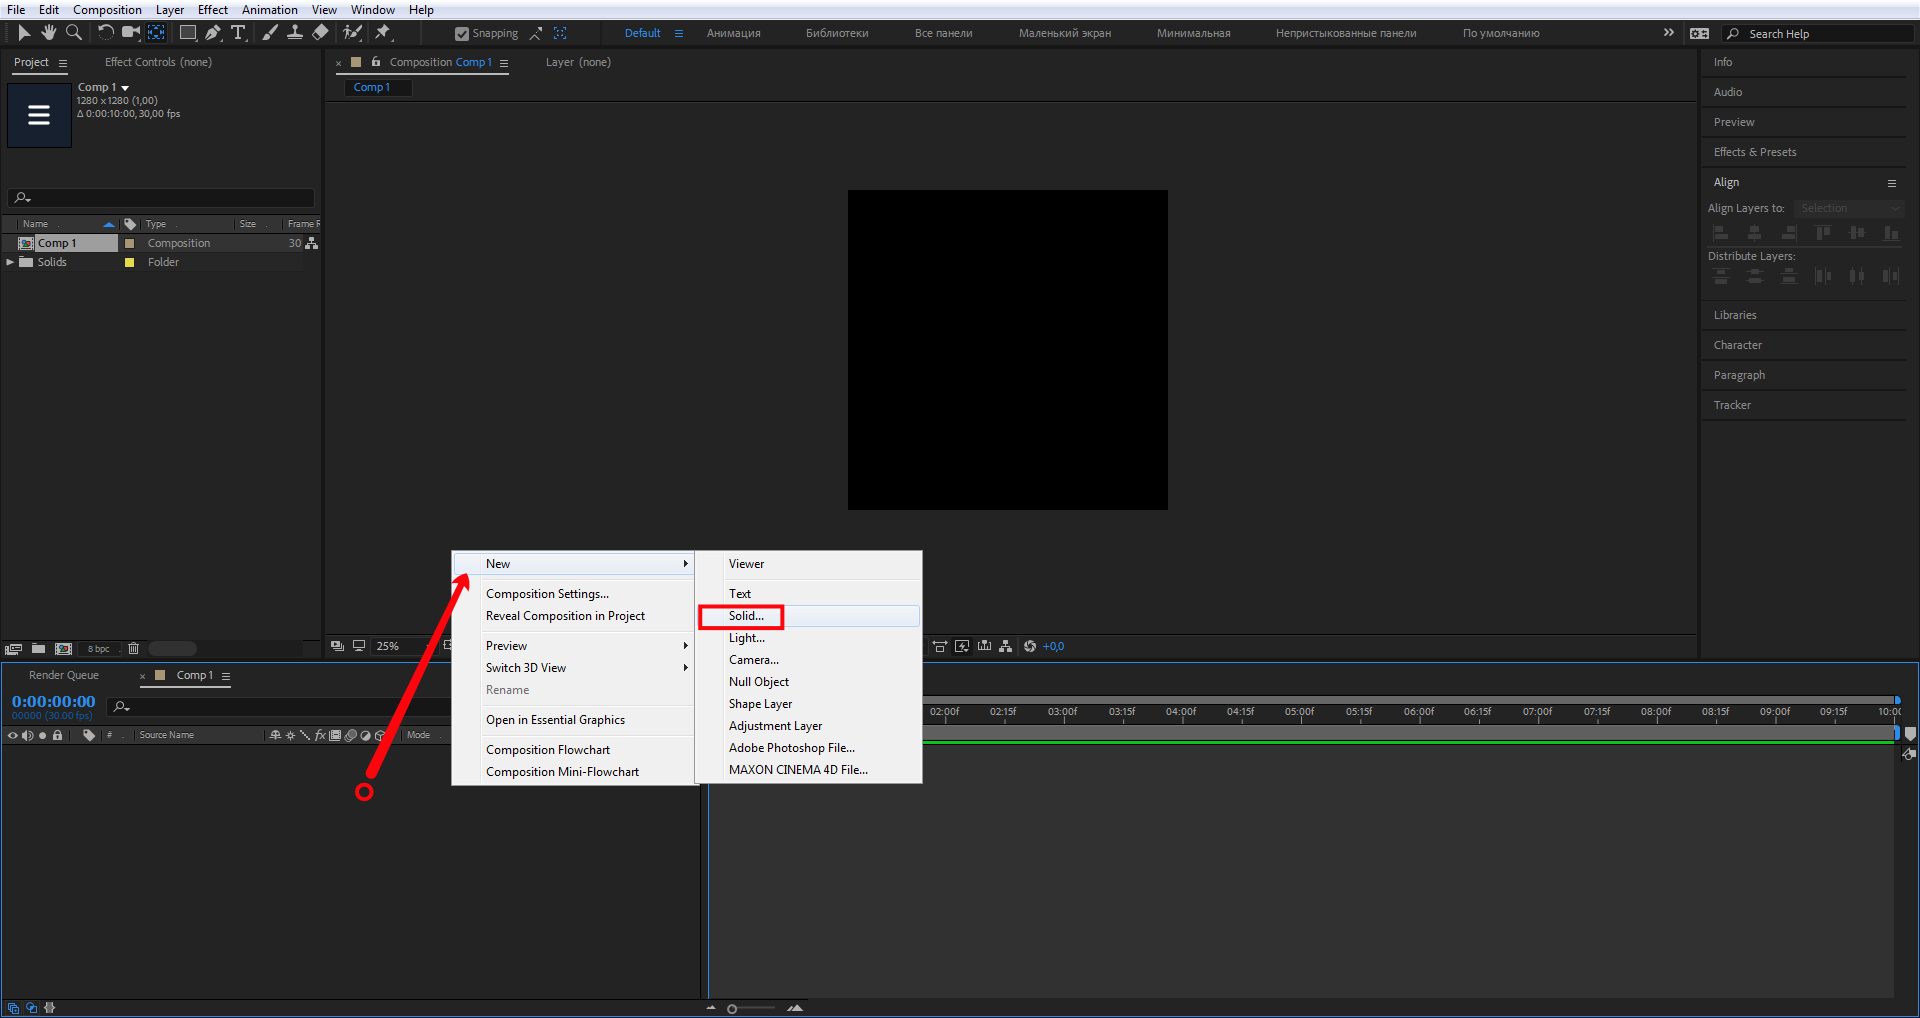
Установите параметры, указанные на скриншоте, цвет можете выбрать любой или выбранный для урока — #3D5272.
Основа готова. Перейдем непосредственно к иконке бургер-меню.
Создайте прямоугольник со скругленными углами — Rounded Rectangle Tool. Найти его можно на панели инструментов.
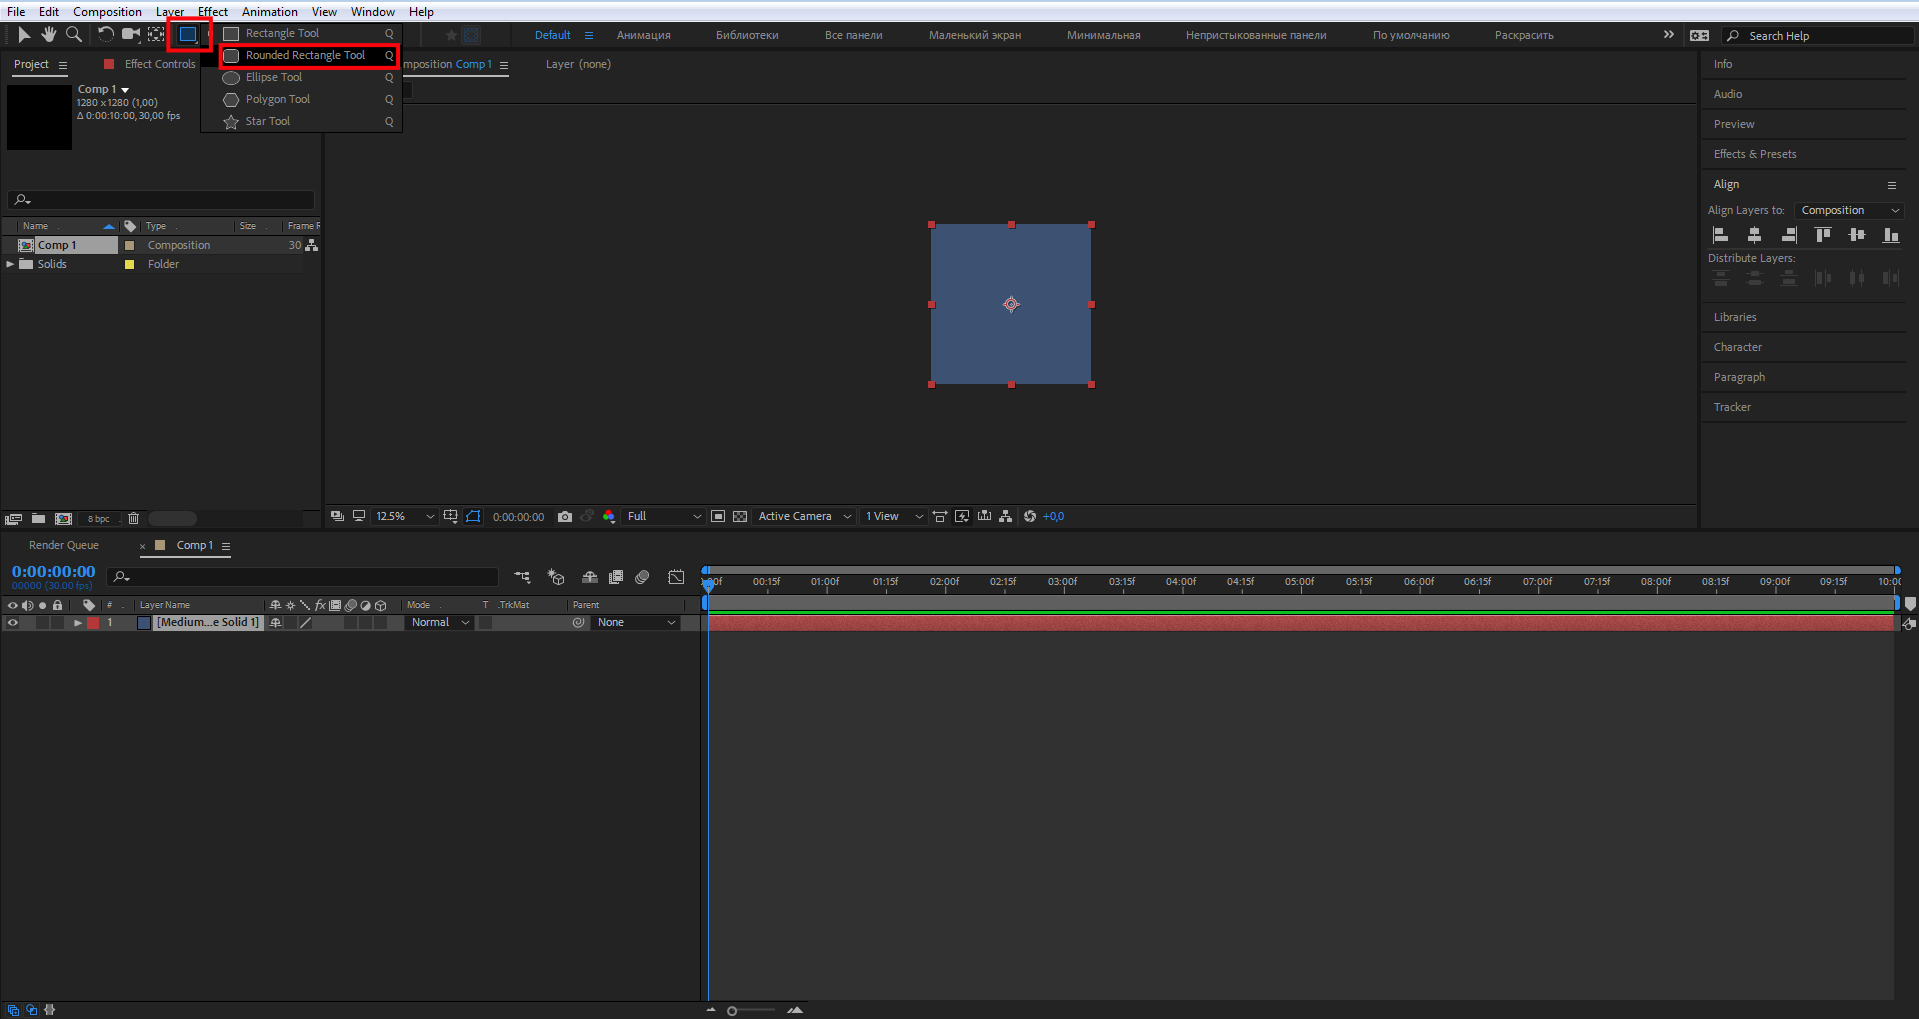
Примерно такого размера. Он сразу отобразится у вас на панели слоев.
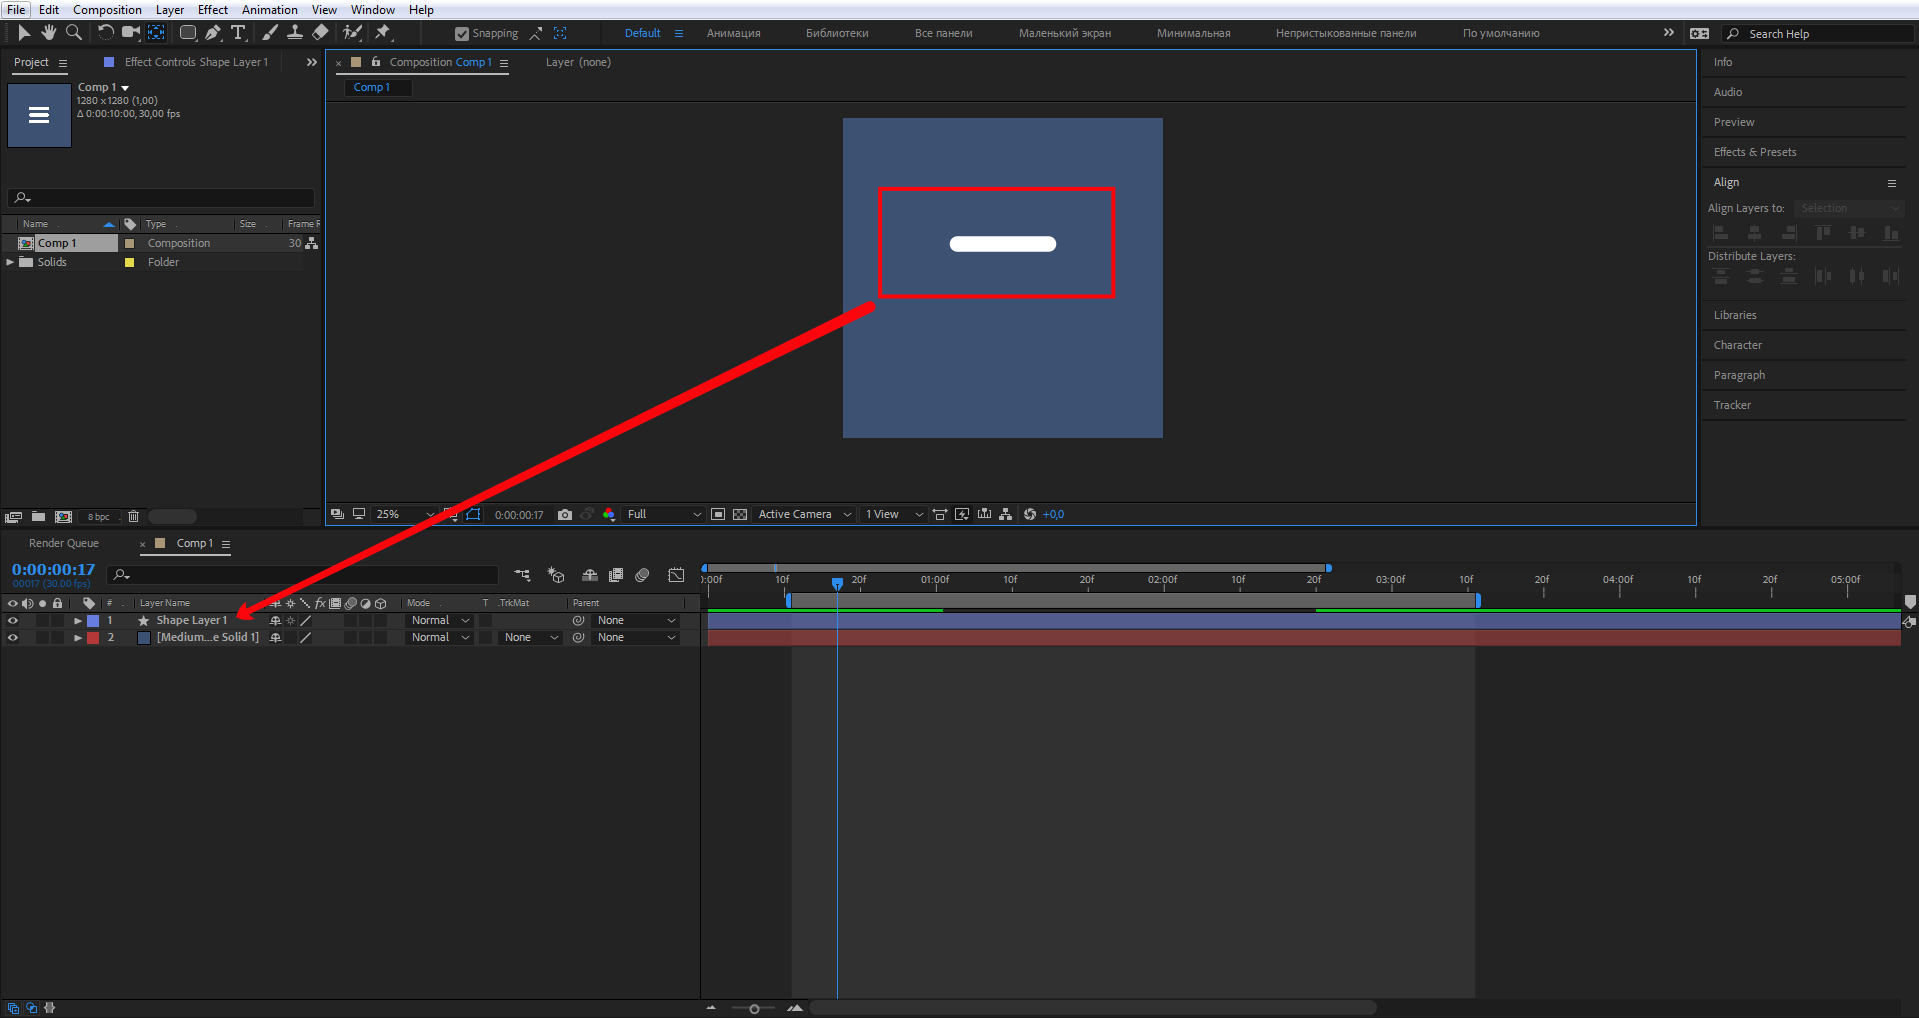
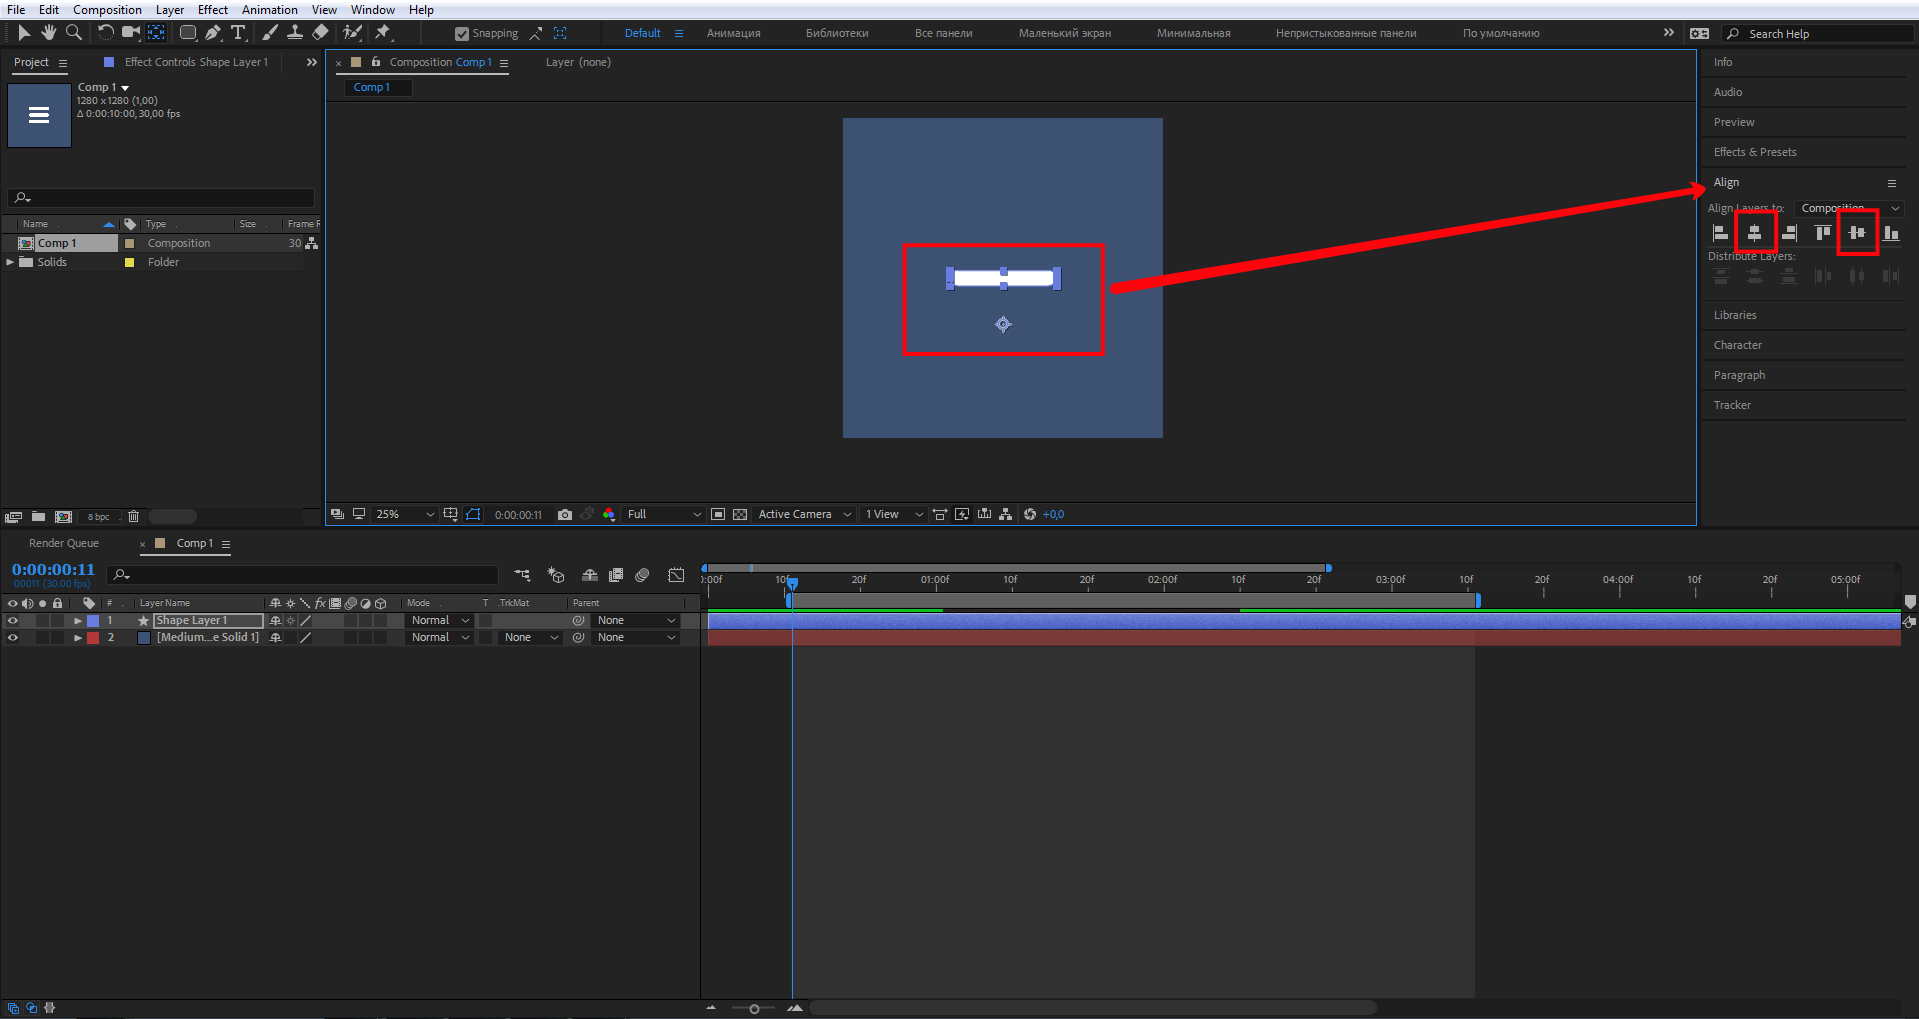
Необходимо разместить этот элемент по центру. Перейдите на панель Align, как показано на скриншоте, и выберите горизонтальное и вертикальное выравнивание.
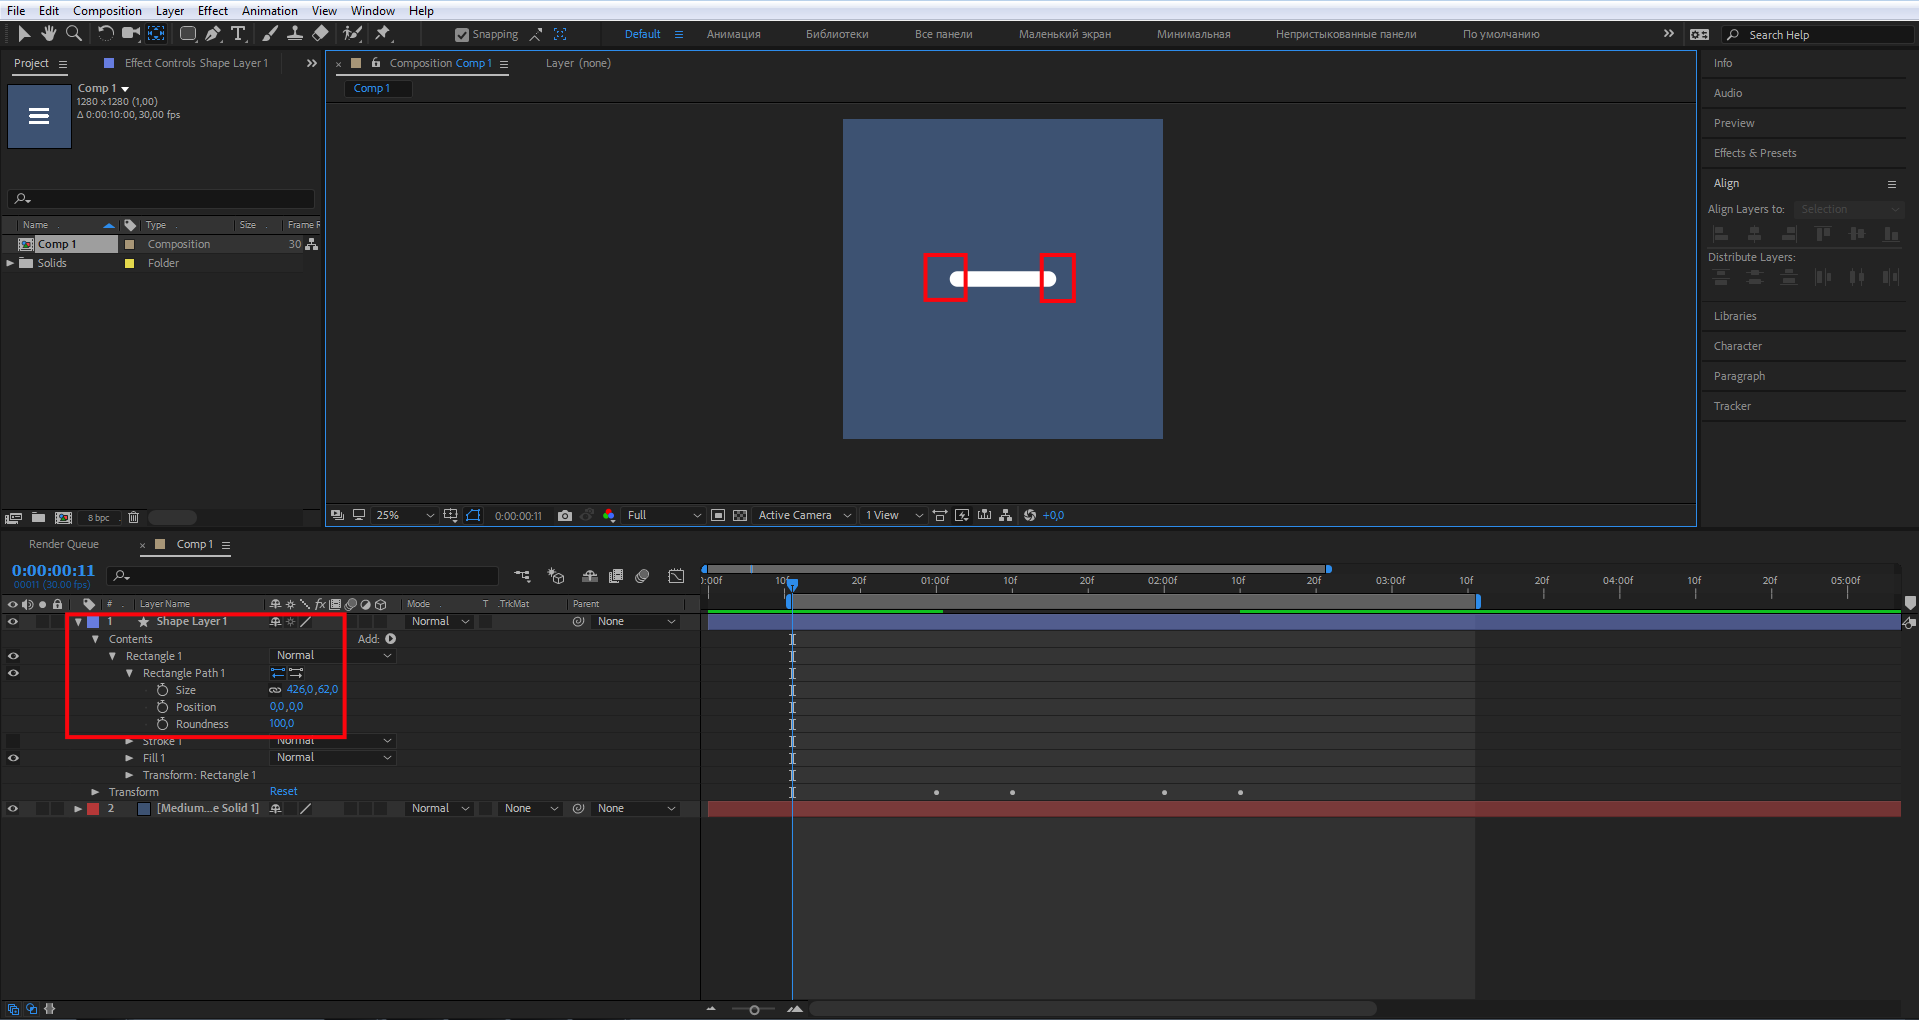
Чтобы скруглить края, раскройте свойства слоя в панели слоев Contents — Rectangle 1 — Rectangle Path 1 — Roundness и выставите значение 100.
Anchor Point — это опорная точка объекта, поворот (Rotation) и масштабирование (Scale) выполняются вокруг этой точки. При создании шейпового слоя (Shape Layers — фигурные слои, для анимации векторной графики) по умолчанию Anchor Point располагается в центре слоя и имеет нулевые координаты X, Y, но будьте внимательны и всегда проверяйте расположение Anchor Point. Если точка находится за пределами объекта, расположите ее по центру.
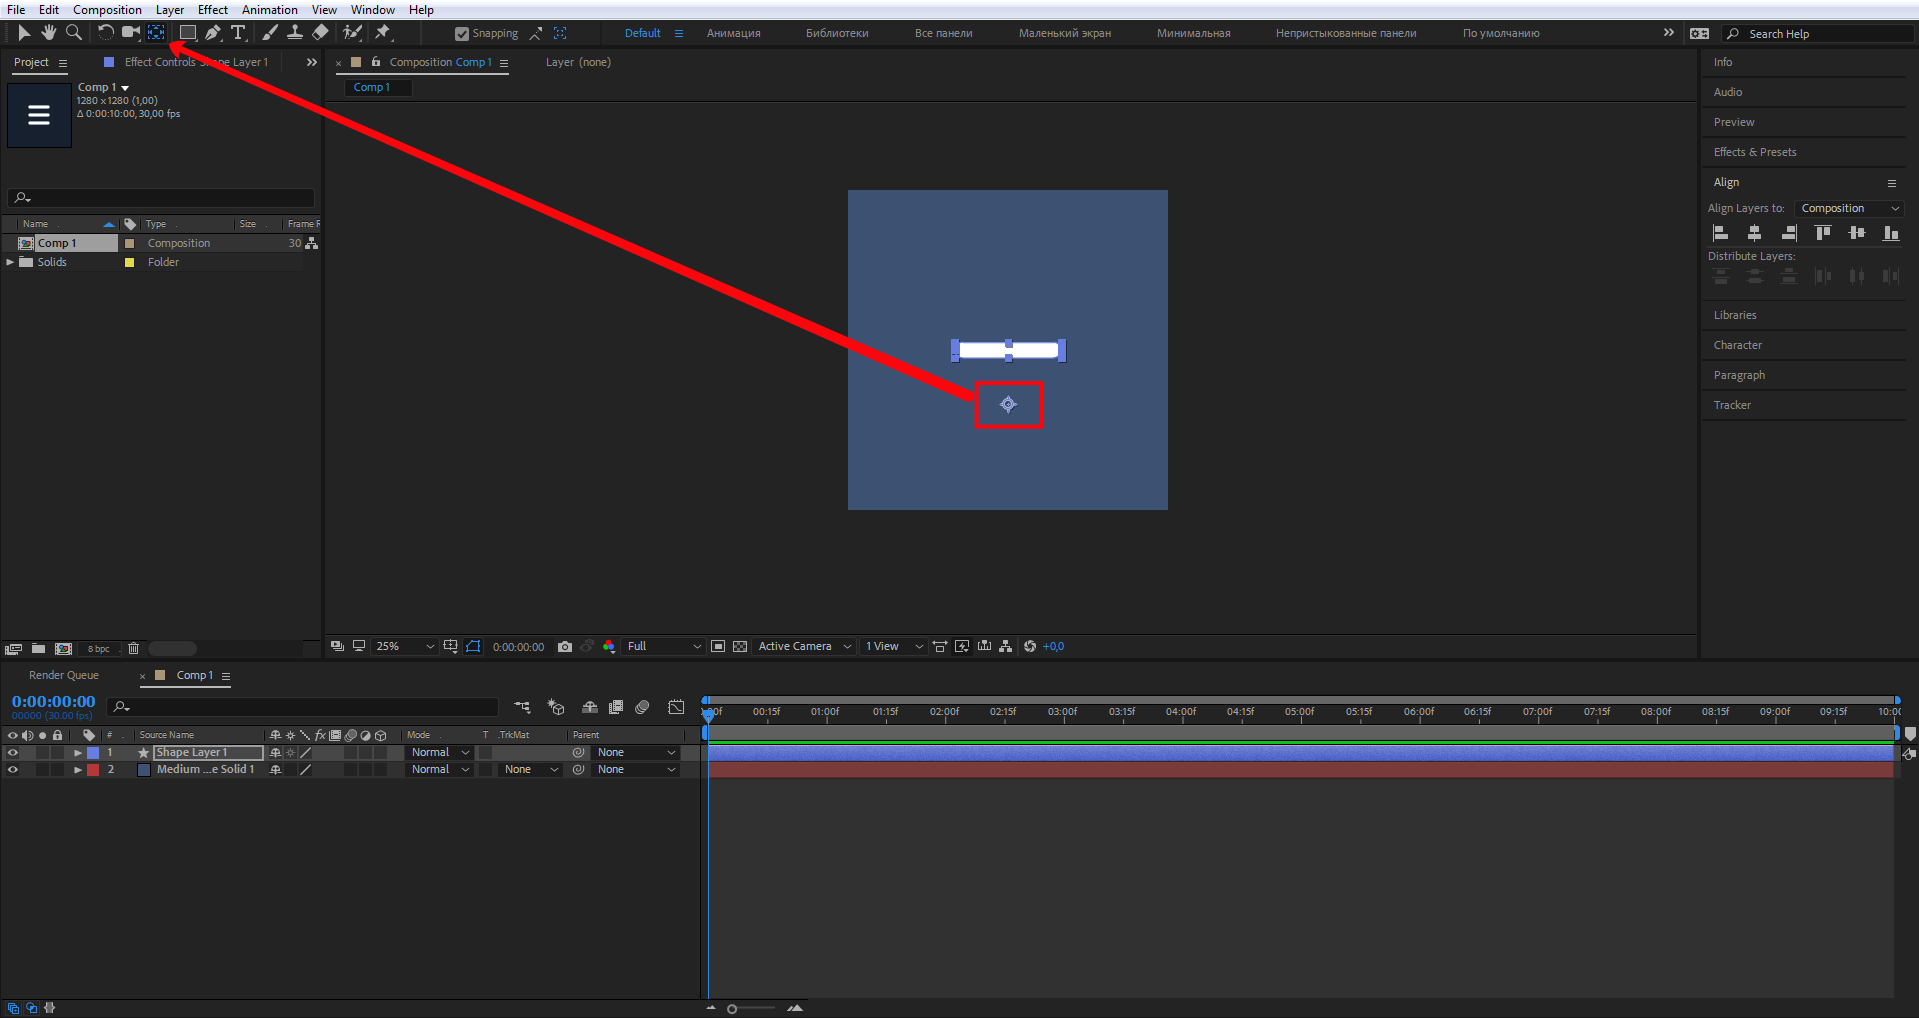
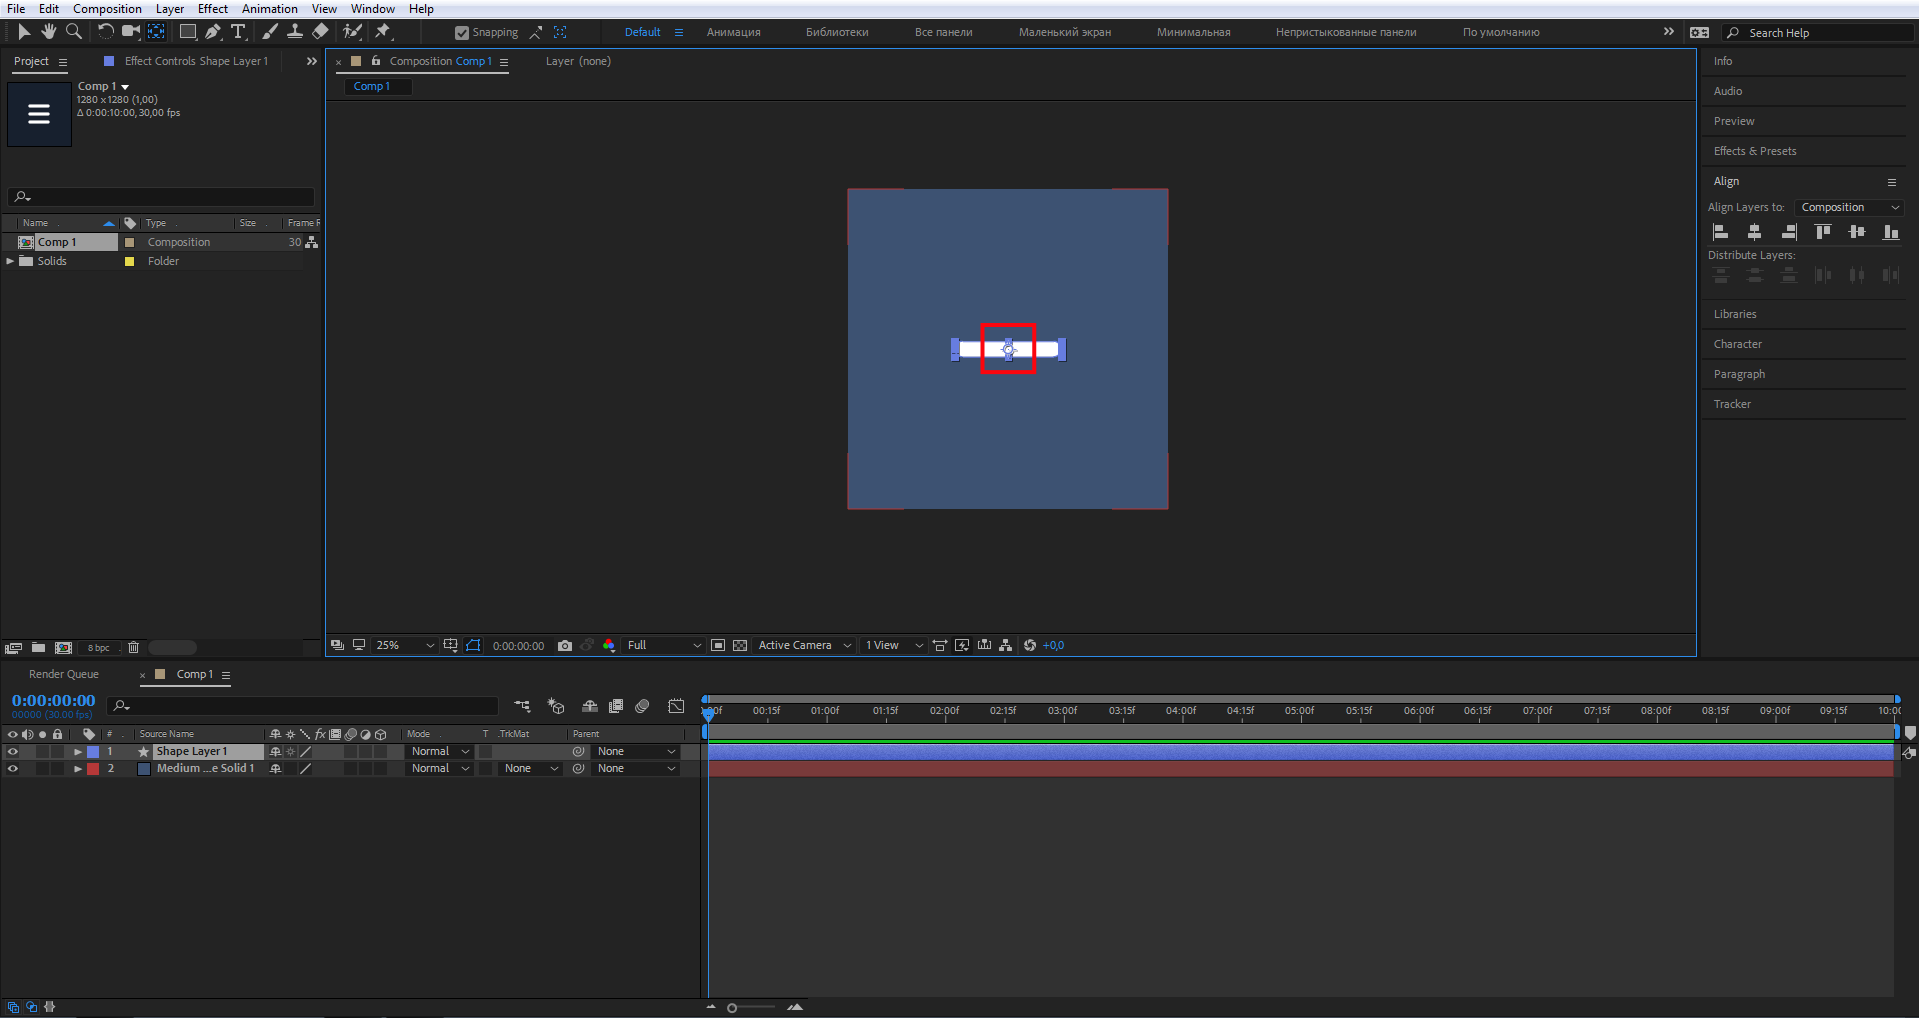
Для этого выделите слой с прямоугольником и нажмите на инструмент Anchor Point, затем мышкой передвиньте эту точку в центр прямоугольника, вот так:
Для чего все это нужно? Покажу на примере. Я разместил два прямоугольника на одной плоскости, у одного прямоугольника Anchor Point расположен по центру, у другого чуть ниже.
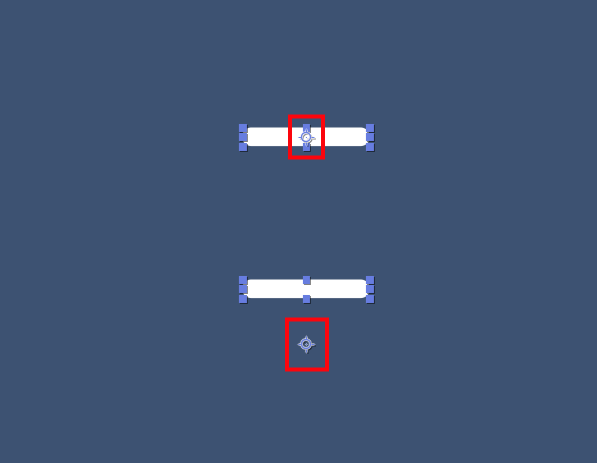
Теперь повернем прямоугольники на 360°.
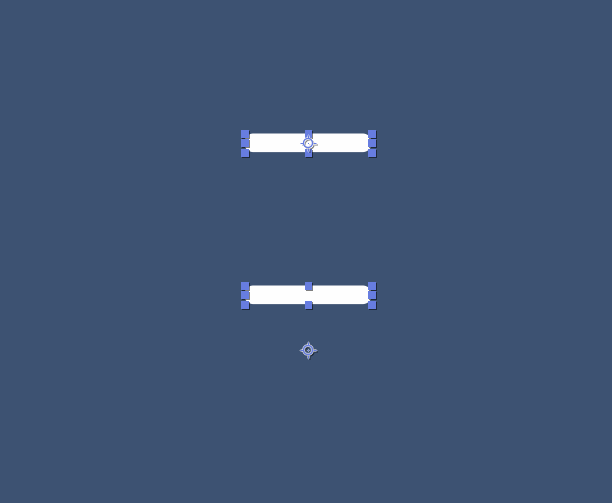
Думаю, разница очевидна.
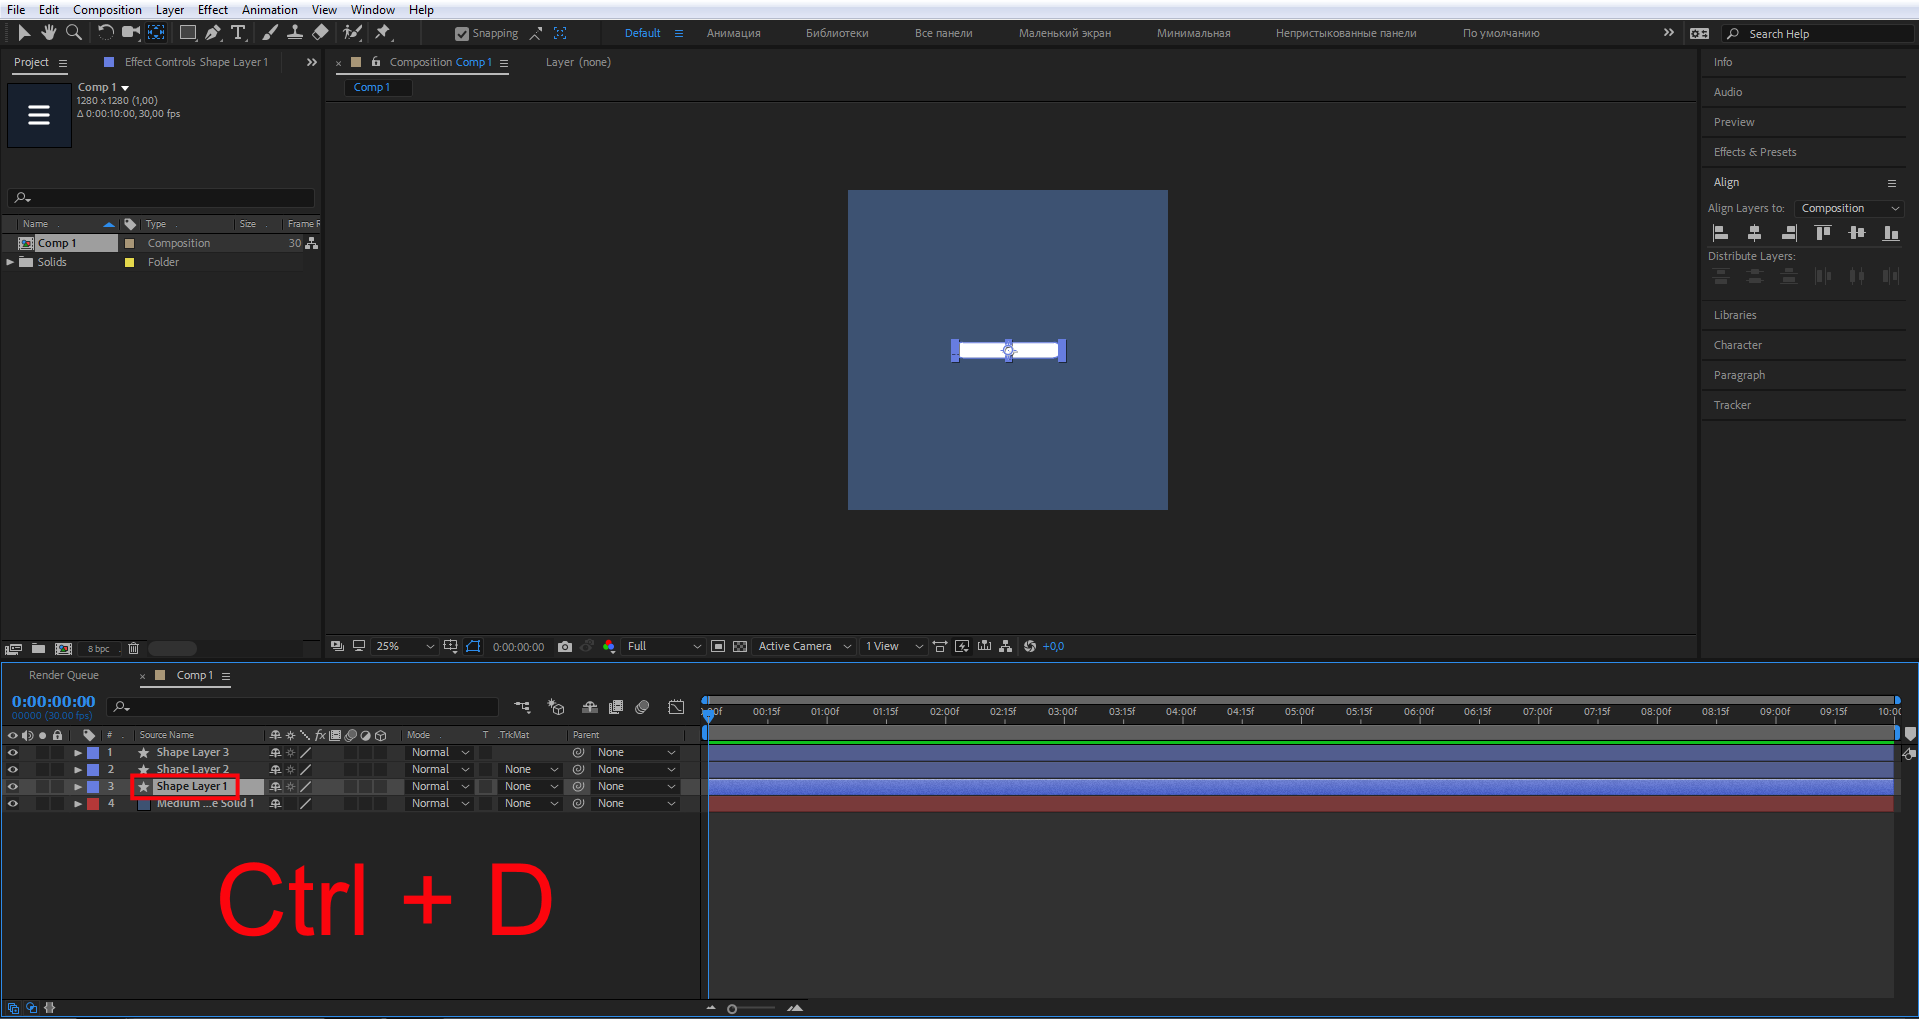
Вернемся к созданию нашей иконки. Перейдите в панель слоев, выделите прямоугольник и нажмите два раза на Ctrl+D, тем самым вы создадите две копии этого прямоугольника.
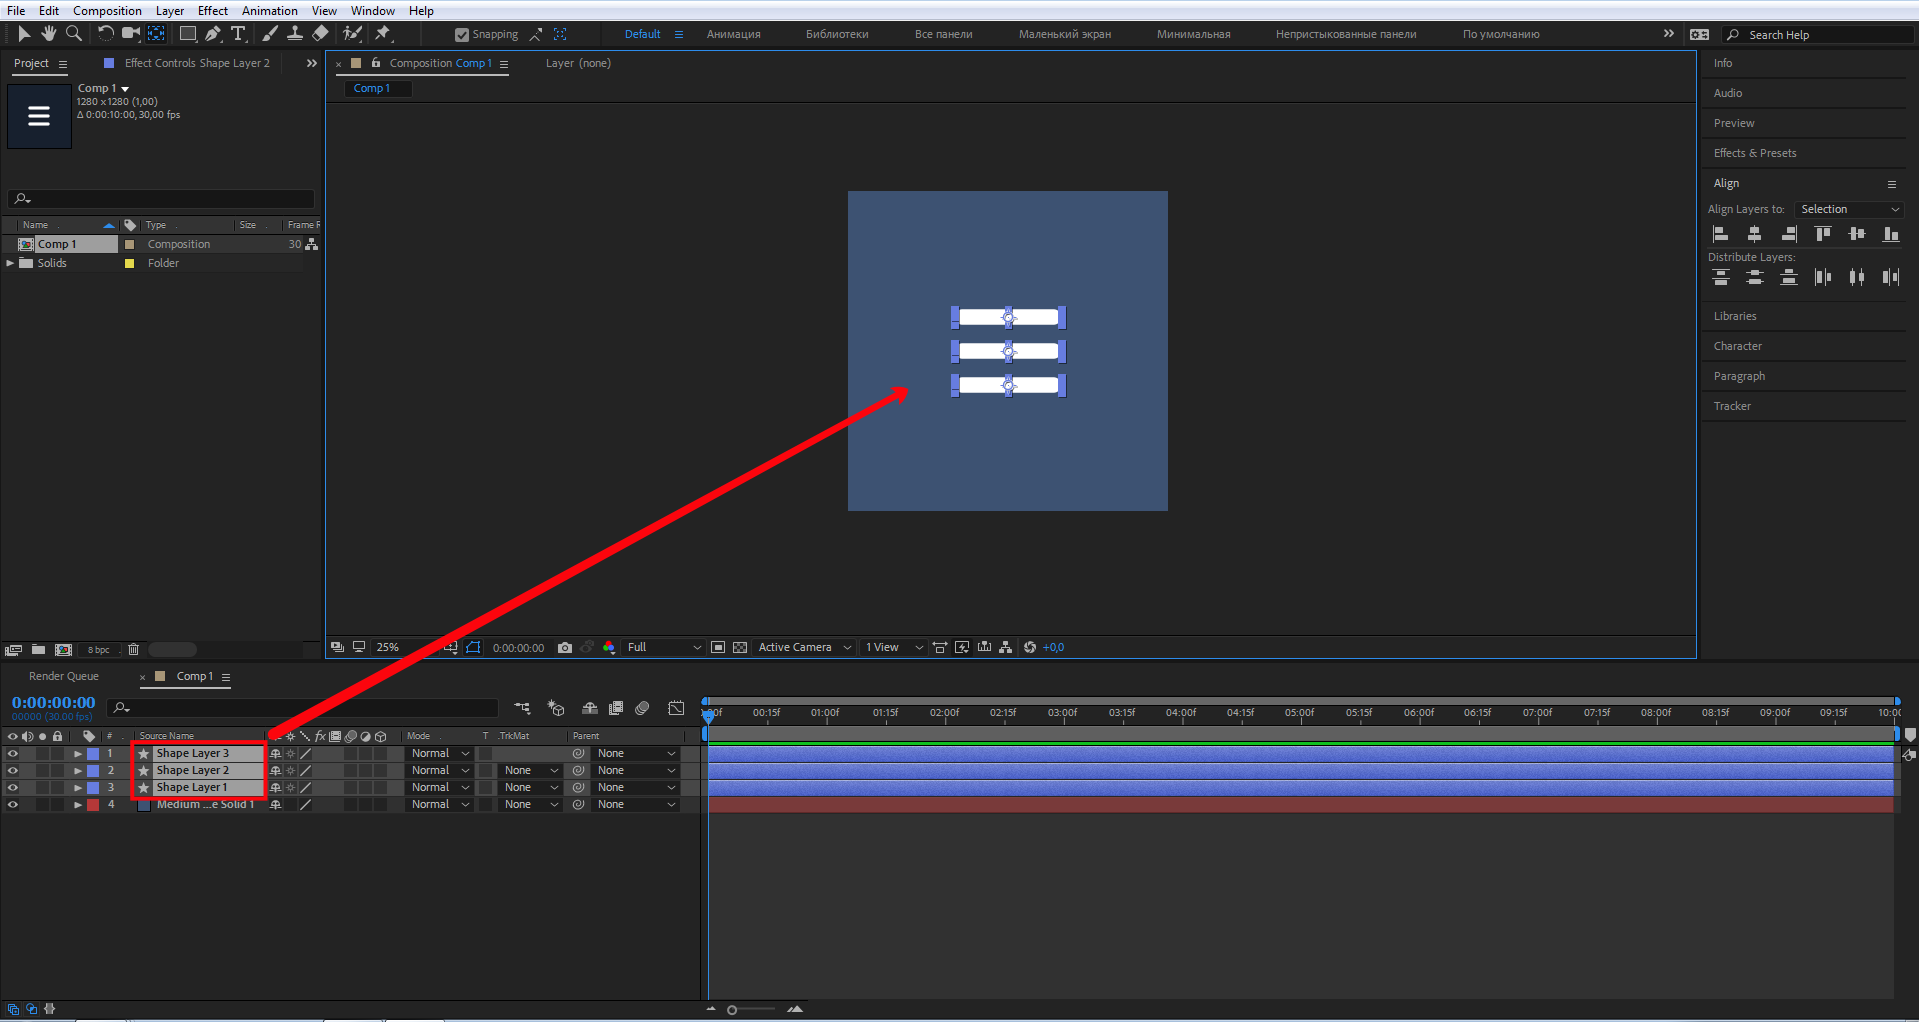
Сдвиньте прямоугольники таким образом, чтобы получилось бургер-меню. Как вариант, зажмите Shift и стрелками вверх и вниз сместите прямоугольники, как показано на скриншоте.
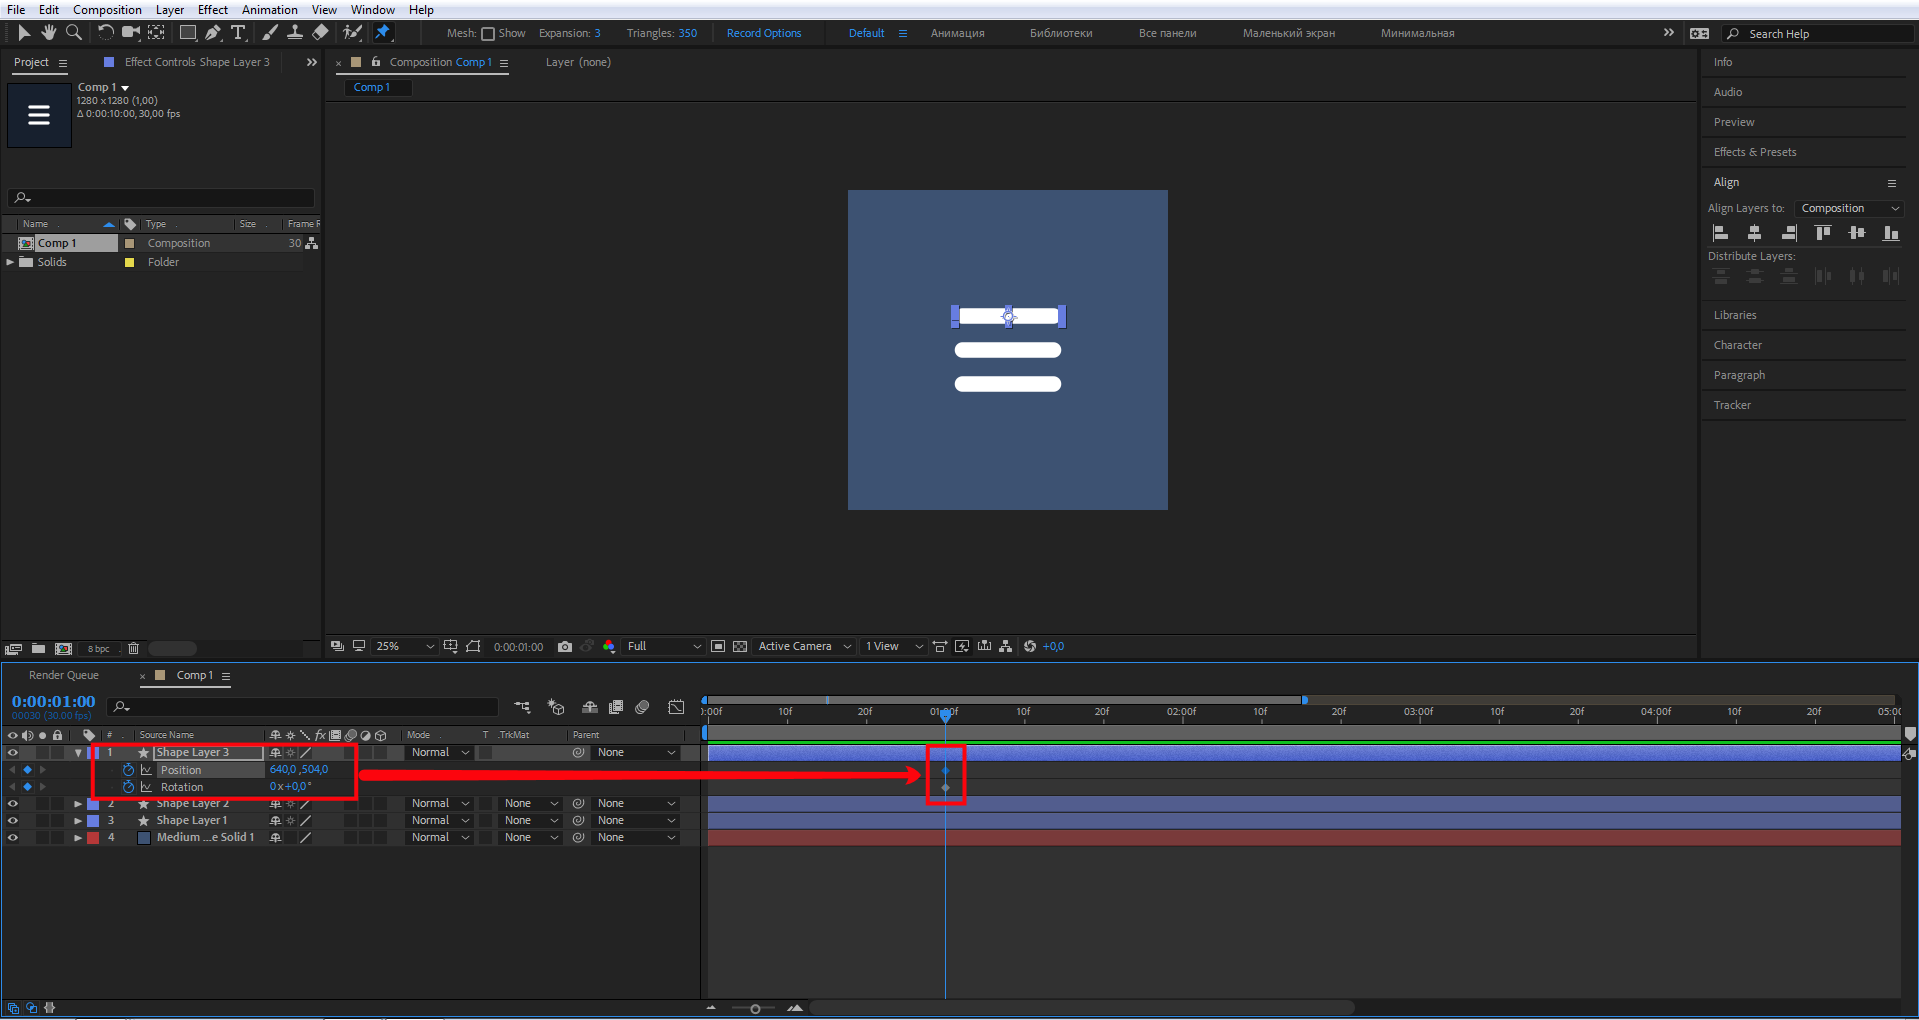
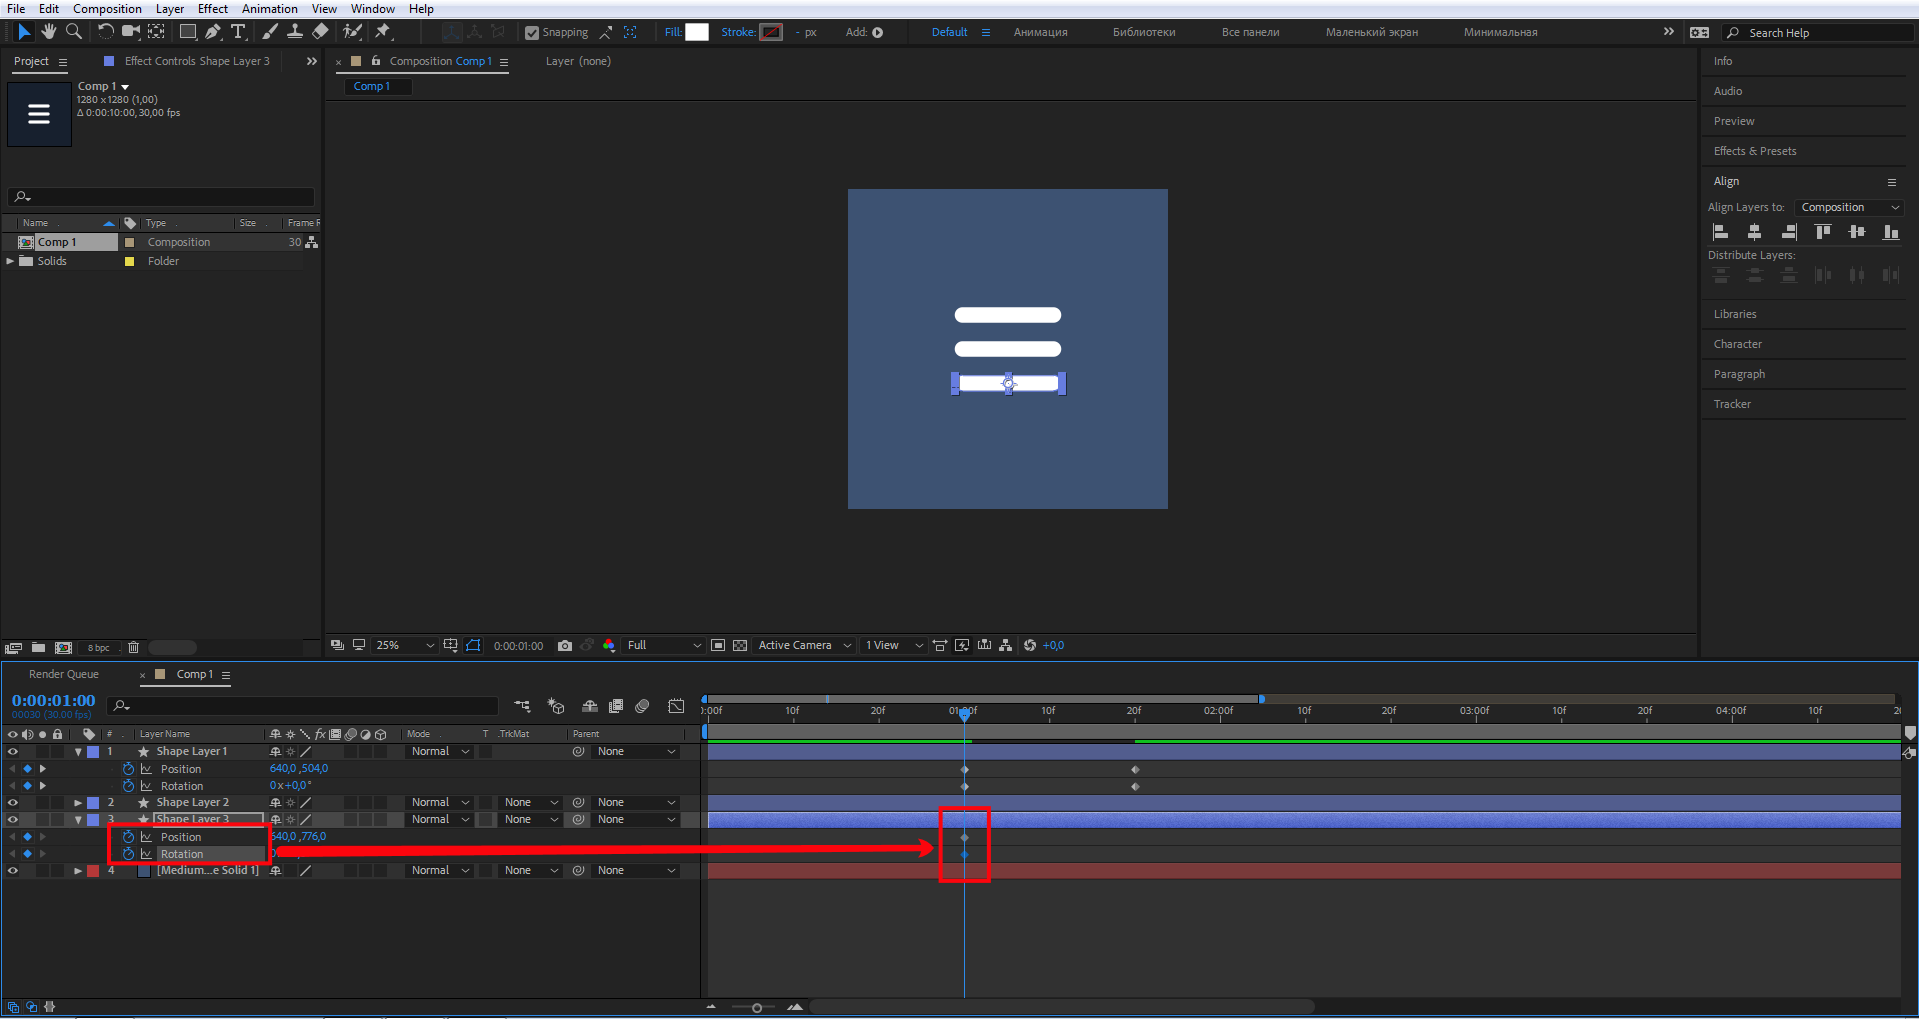
В панели слоев выделите верхний прямоугольник и выберите два свойства слоя: Position и Rotate. Эти свойства мы задействуем в анимации. Повернем и переместим необходимые элементы. Чтобы выбрать именно эти свойства, зажмите Shift, затем, не отпуская, нажмите P, потом R. Должно получиться так:

Вот мы и подошли к самому интересному — анимации. Перейдите на панель Timeline, это та, что справа от панели слоев. Переместите индикатор текущего времени на одну секунду, как показано на скриншоте. Теперь на панели слоев в свойствах Position и Rotation нажмите на иконку секундомера. На панели Timeline у вас появятся два ромбика — это ключевые кадры анимации.
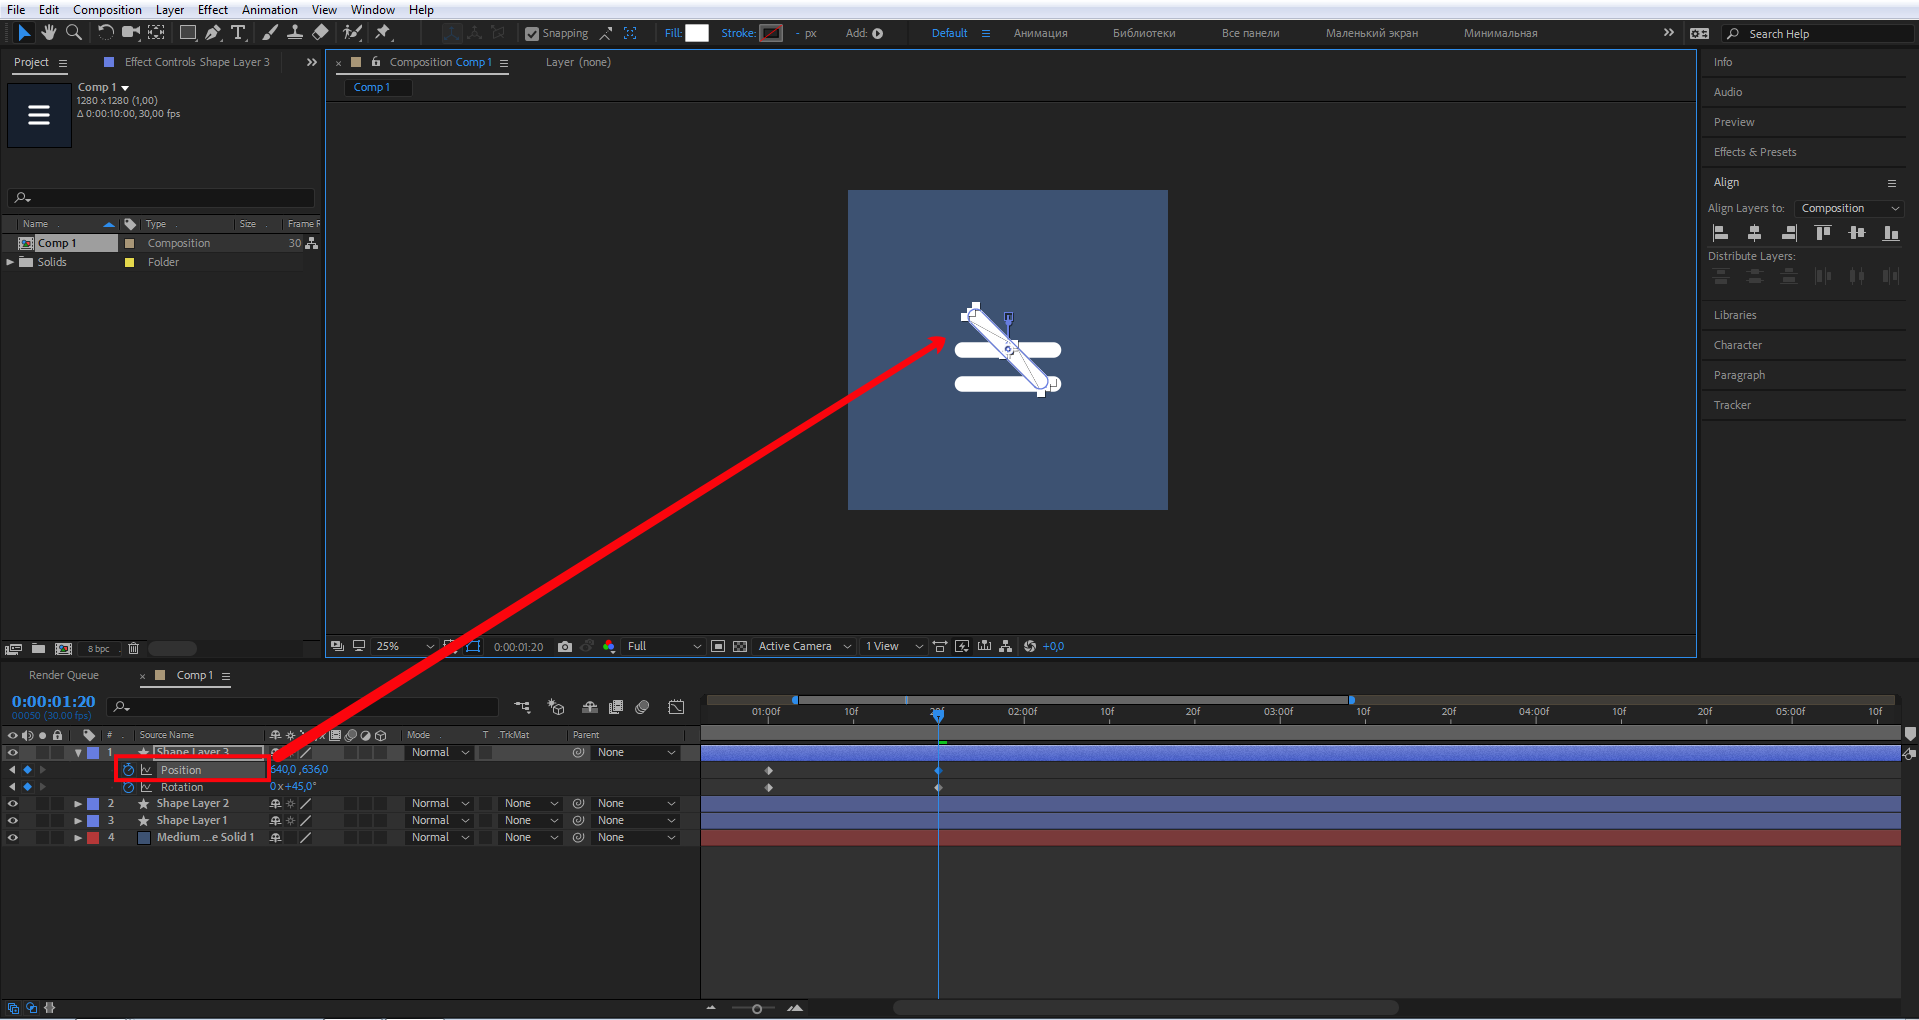
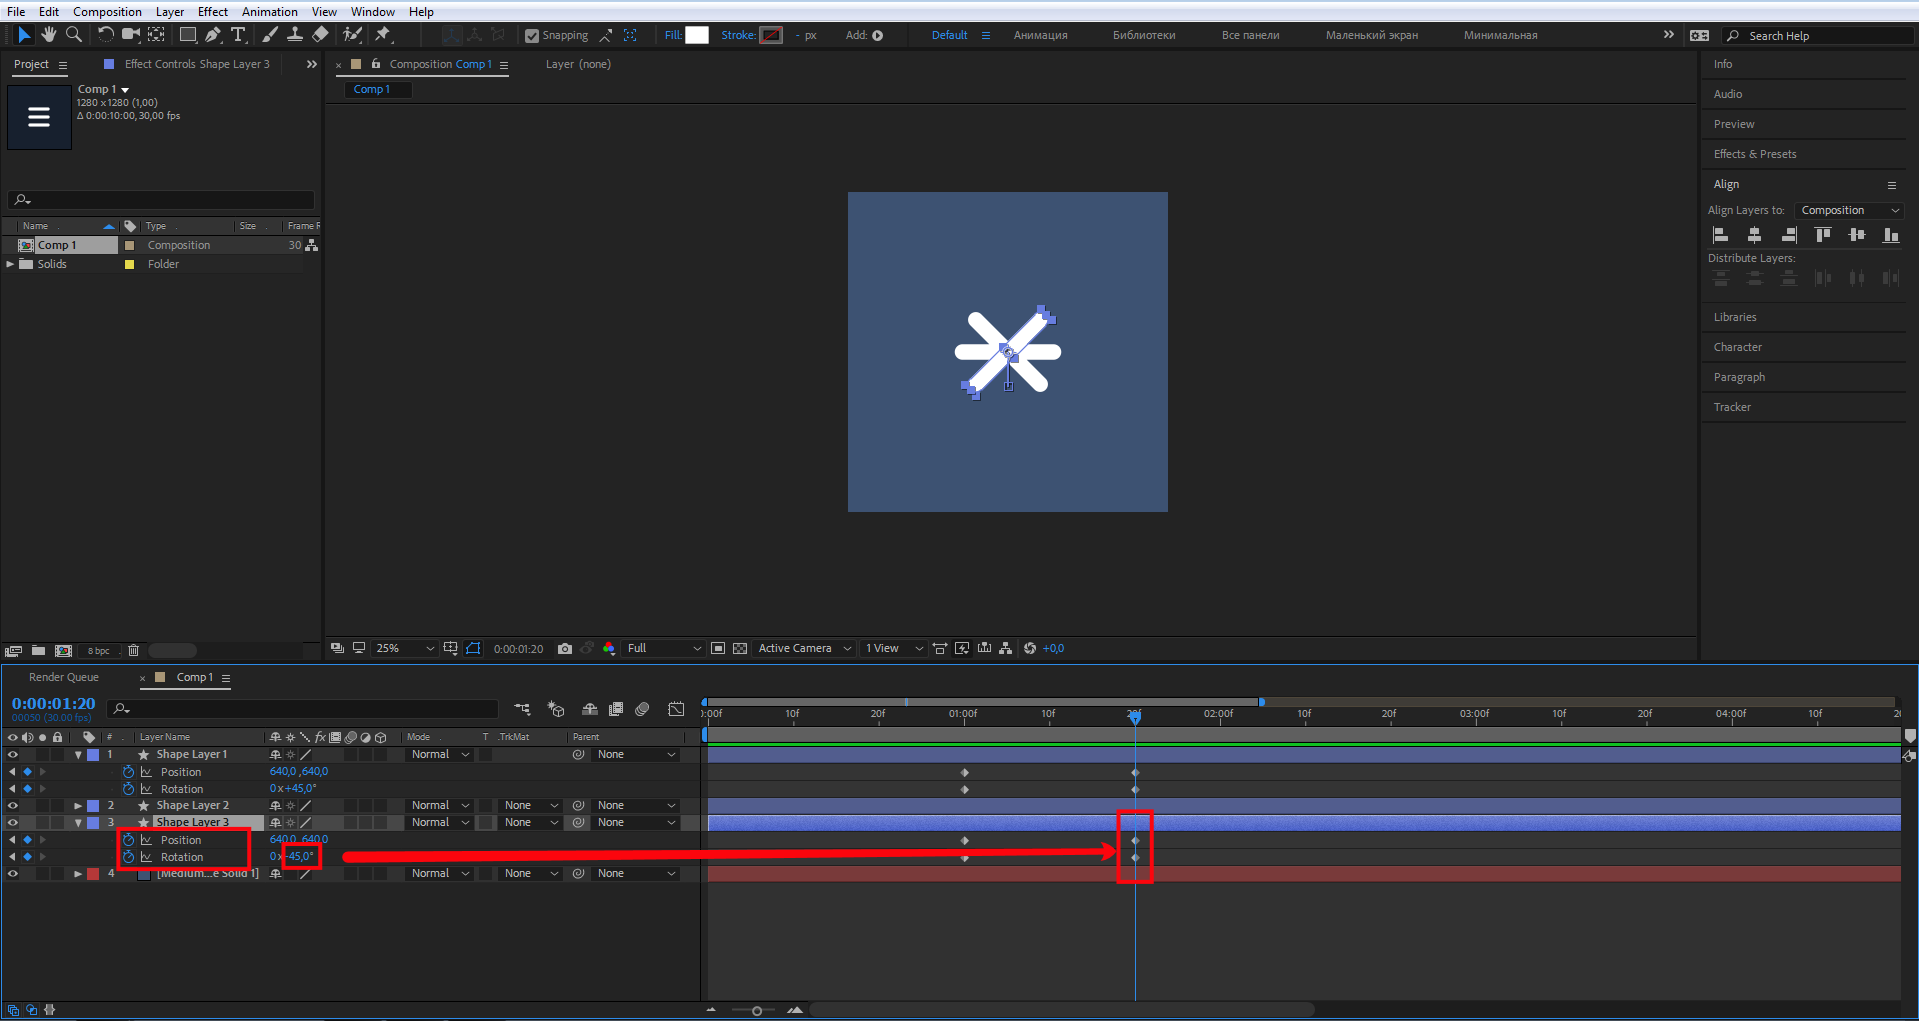
На панели Timeline переместите индикатор, как показано на скриншоте. Теперь создайте ключевой кадр — нажмите на иконку ромбика слева от иконки секундомера свойства Rotation на панели слоев. Поставьте этому свойству значение 45°.

Кликните мышкой на свойстве Position верхнего прямоугольника и передвиньте его, как показано на скрине.
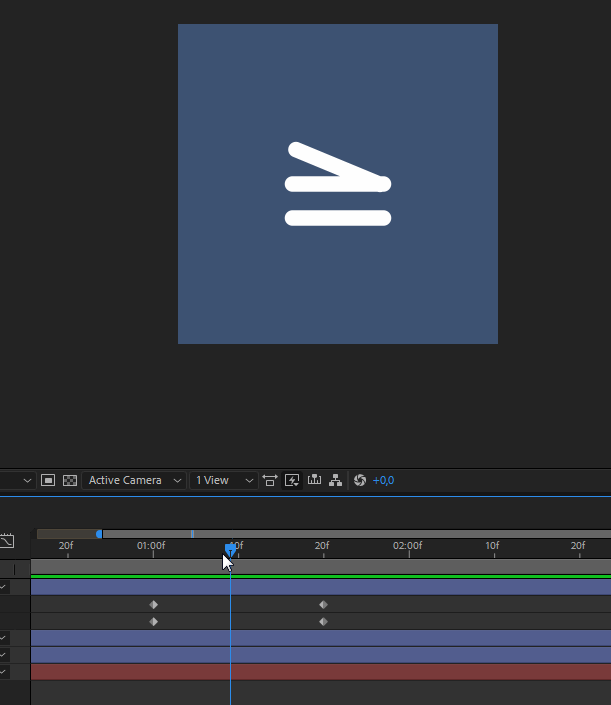
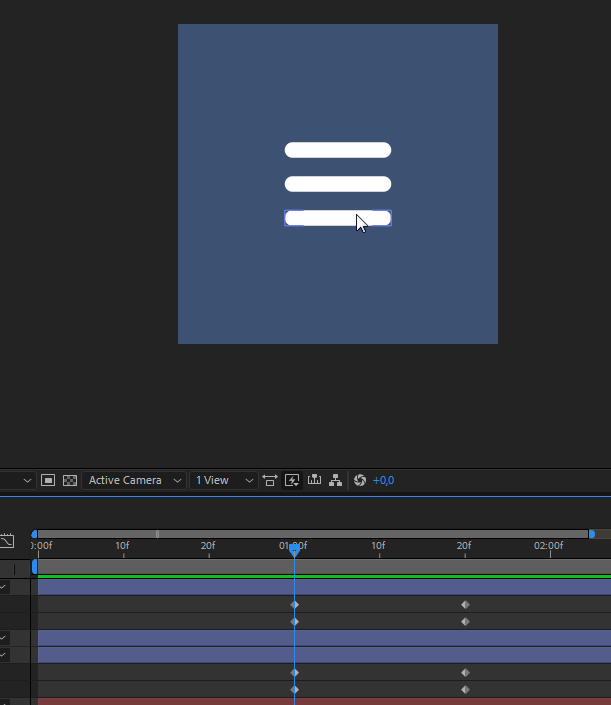
Подвигайте индикатор текущего времени между ключевыми кадрами, чтобы посмотреть на результат. Должно получиться так:
Для того, чтобы просмотреть результат анимации в процессе работы, можно нажать пробел или подвигать индикатор текущего времени на панели Timeline.
Если вам необходимо просмотреть результат конкретной части анимации в зацикленном виде, можно задействовать маркеры рабочей области для ограничения анимации.
Переместите маркеры рабочей области так, чтобы осталась нужная часть.
Далее повторите все действия с нижним прямоугольником. Единственное отличие — в свойстве Rotation вместо 45° нужно поставить –45°.
Активируйте свойства слоя нижнего прямоугольника — зажмите Shift, затем поочередно P и R для отображения свойств слоев Position и Rotation. На панели Timeline переместите индикатор на первую секунду. Кликните на иконки секундомеров, тем самым создав ключевые кадры для свойств слоев Position и Rotation.
Переместите индикатор и создайте новые ключевые кадры, как на скриншоте, для свойства Rotation задайте значение –45°. Находясь на свойстве Position, переместите прямоугольник к центру двух других прямоугольников.
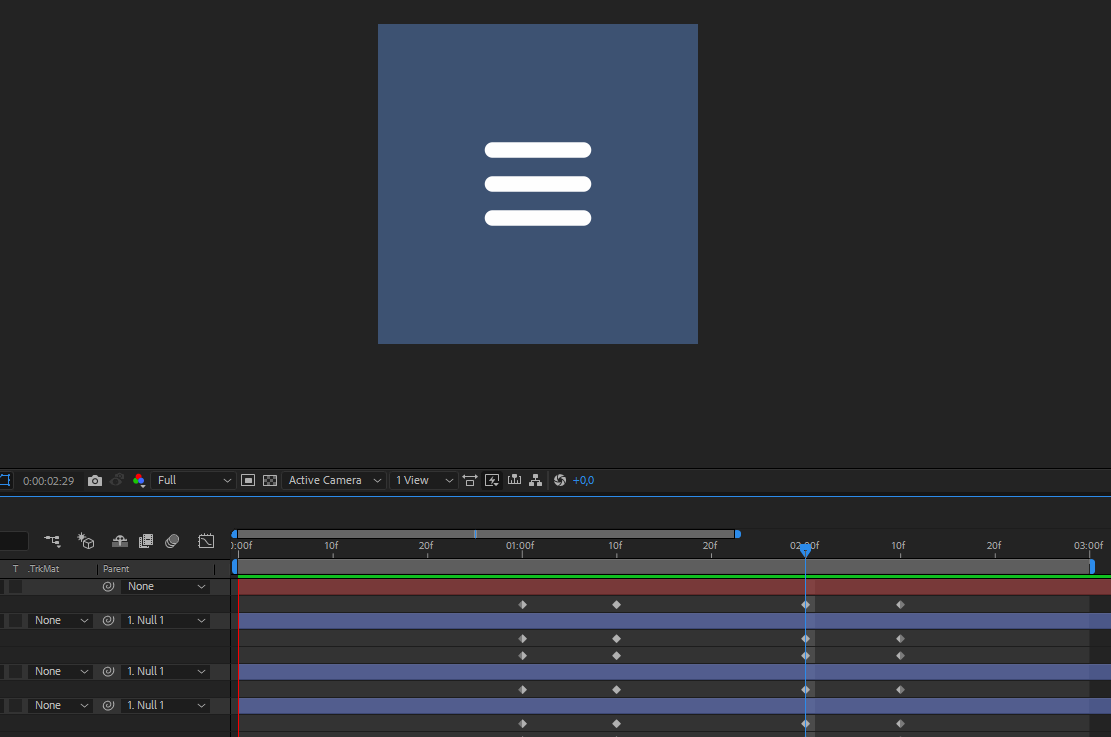
Вот что должно получиться:
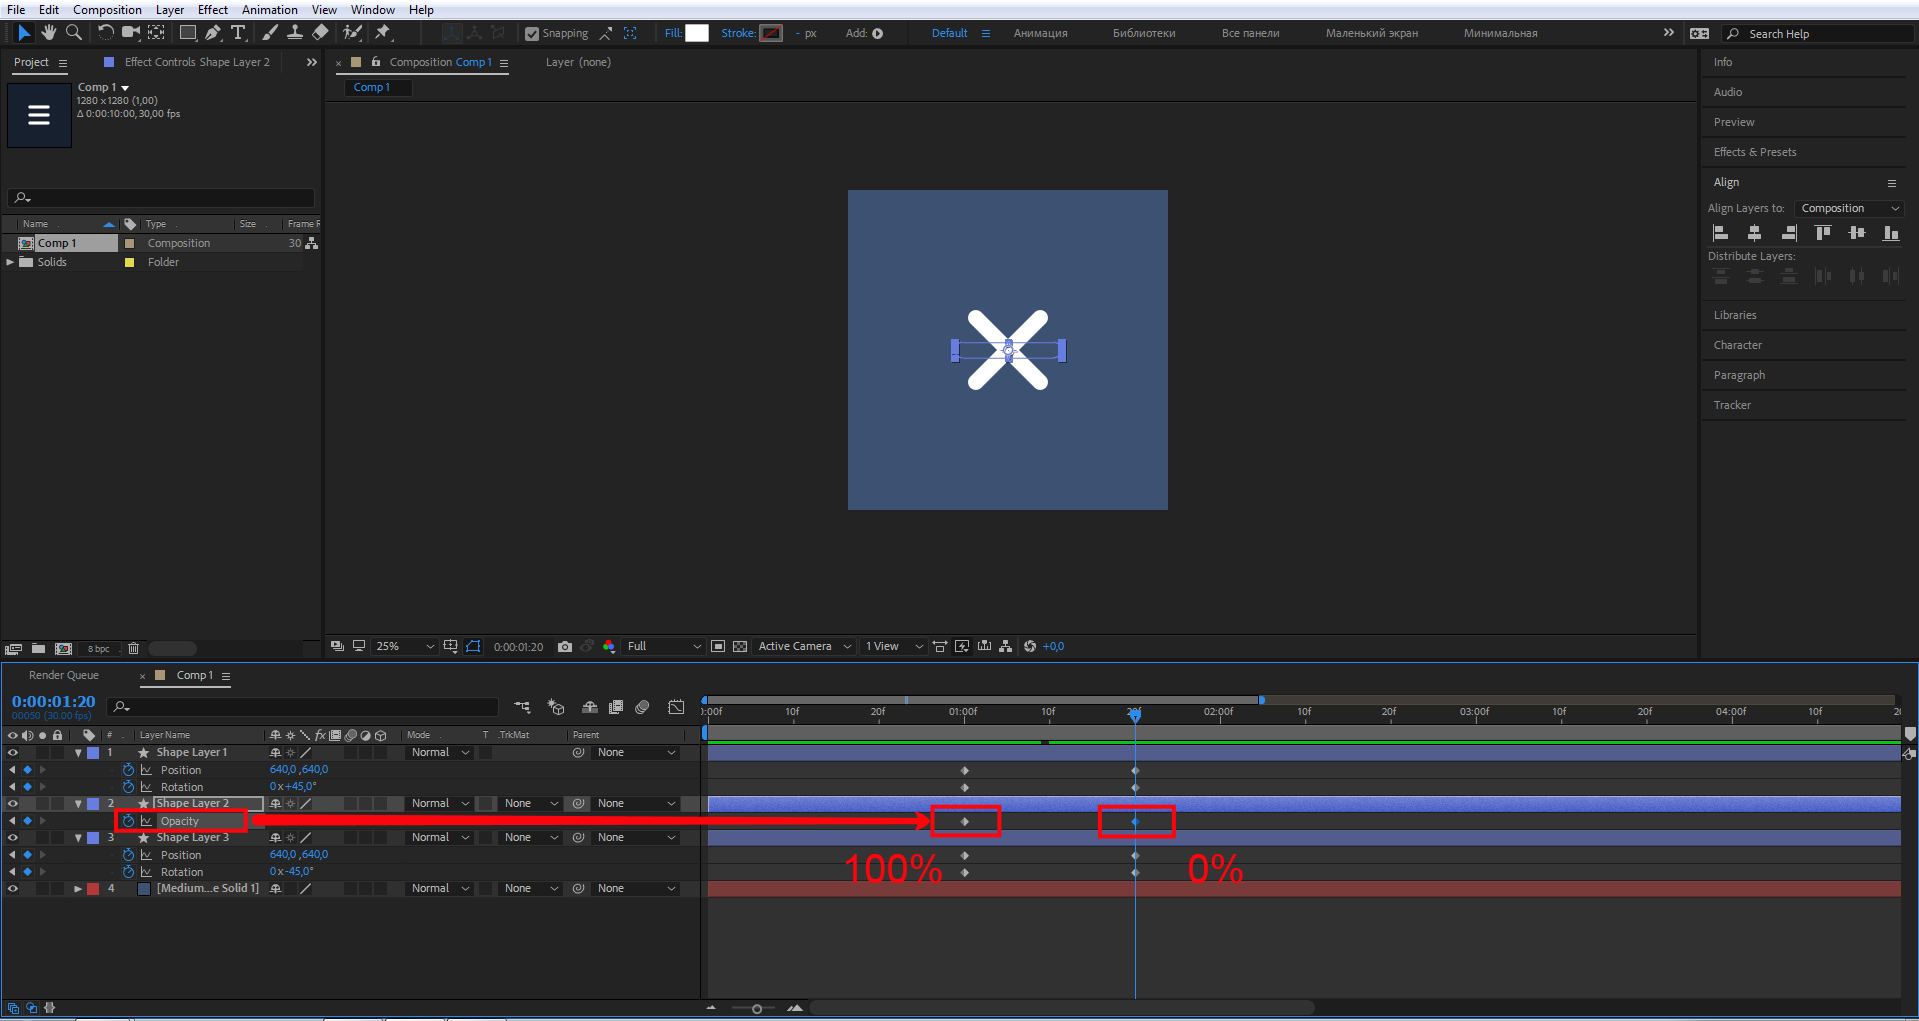
Теперь нам необходимо избавиться от среднего прямоугольника. Можно сделать анимацию прозрачности от 100% до 0%.
Выделите слой среднего прямоугольника и нажмите T, вы увидите свойство Opacity. Создайте ключевые кадры, для первого задайте значение прозрачности 100%, для второго 0%.
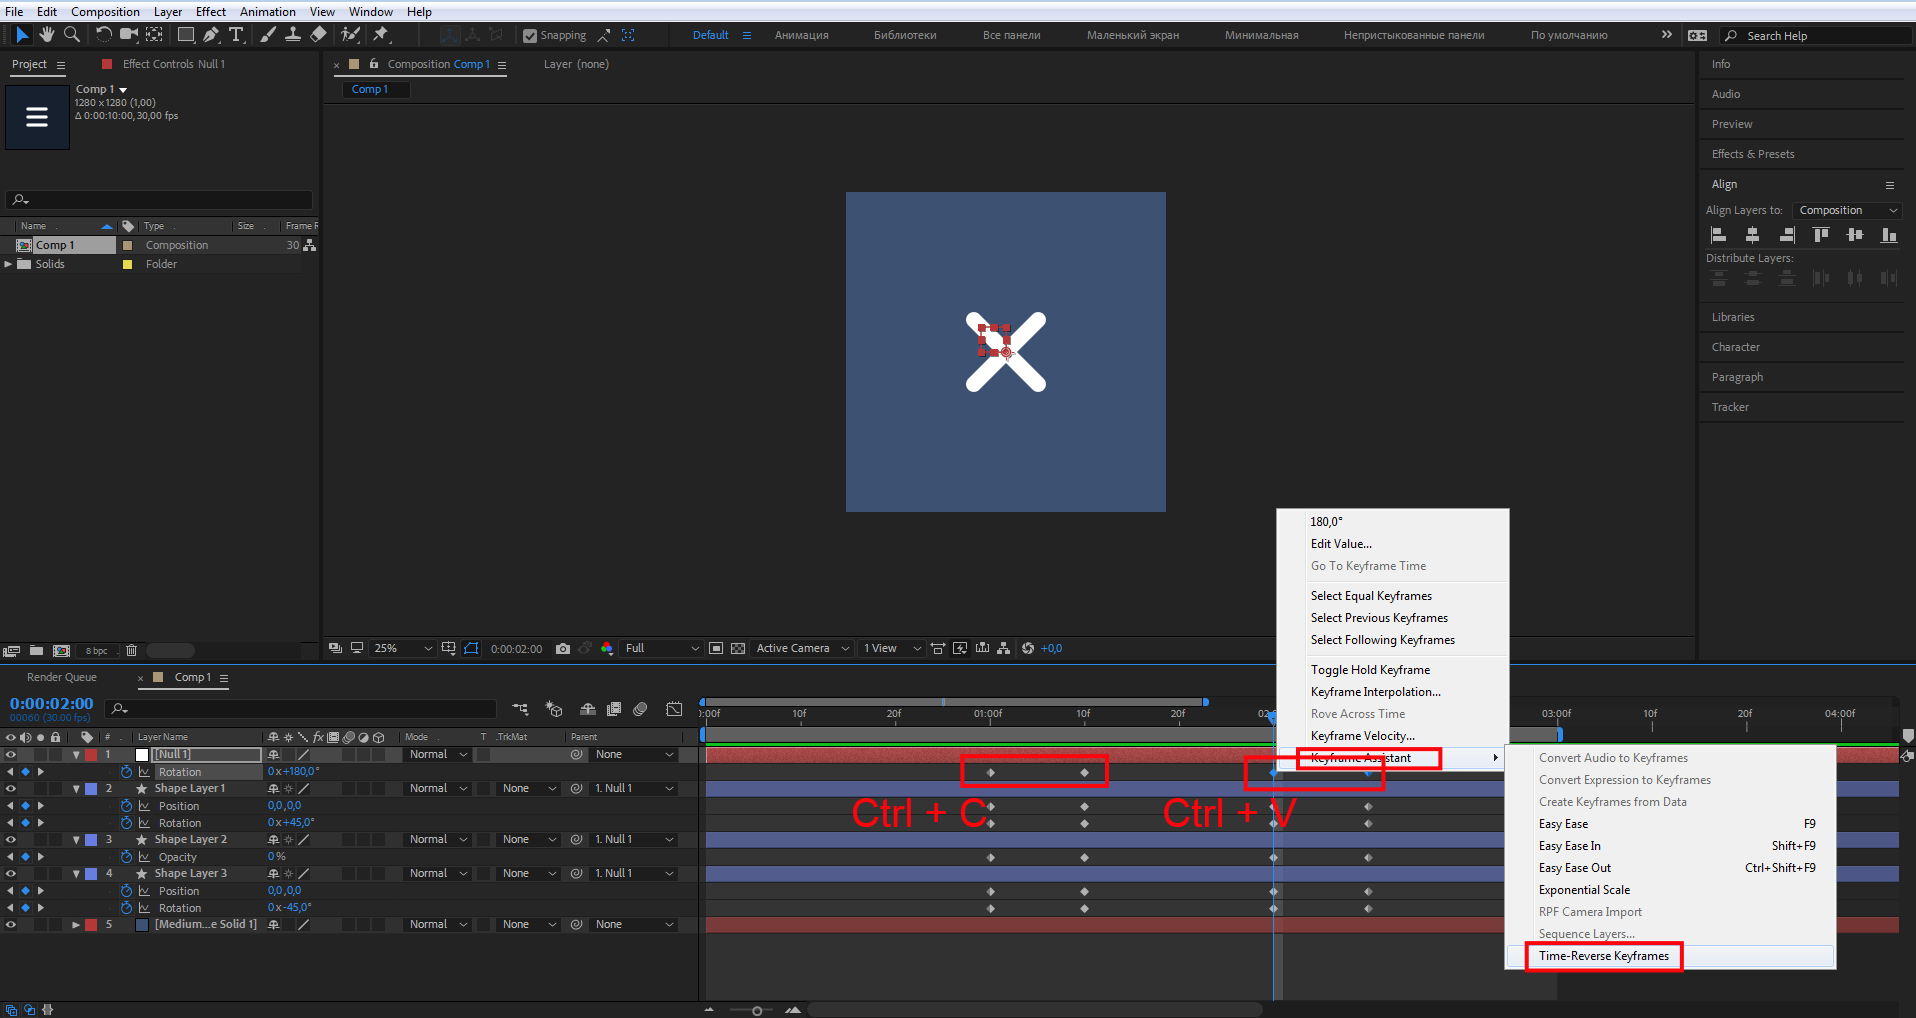
Сделаем так чтобы крестик превращался обратно в бургер. Чтобы это реализовать, используем Time-Reverse Keyframes — воспроизведение ключевых кадров в обратном направлении.
Выберите верхний прямоугольник и на панели Timeline выделите ключевые кадры свойств Position и Rotation, нажмите Ctrl + C. Затем переместите индикатор, как показано на скриншоте, и нажмите Ctrl + V. Тем самым вы скопировали ключевые кадры и свойства этого элемента. Но ключевые кадры еще раз продублируют анимацию от бургер-меню к элементу закрытия. Нам нужно ровно наоборот, чтобы элемент закрытия превращался обратно в бургер-меню.
Для этого, не снимая выделения со скопированных ключевых кадров, нажмите правой кнопкой мыши, в контекстном меню выберите Keyframe Assistant — Time-Reverse Keyframes. Наши ключевые кадры развернулись в нужном направлении от элемента закрытия к бургер-меню.
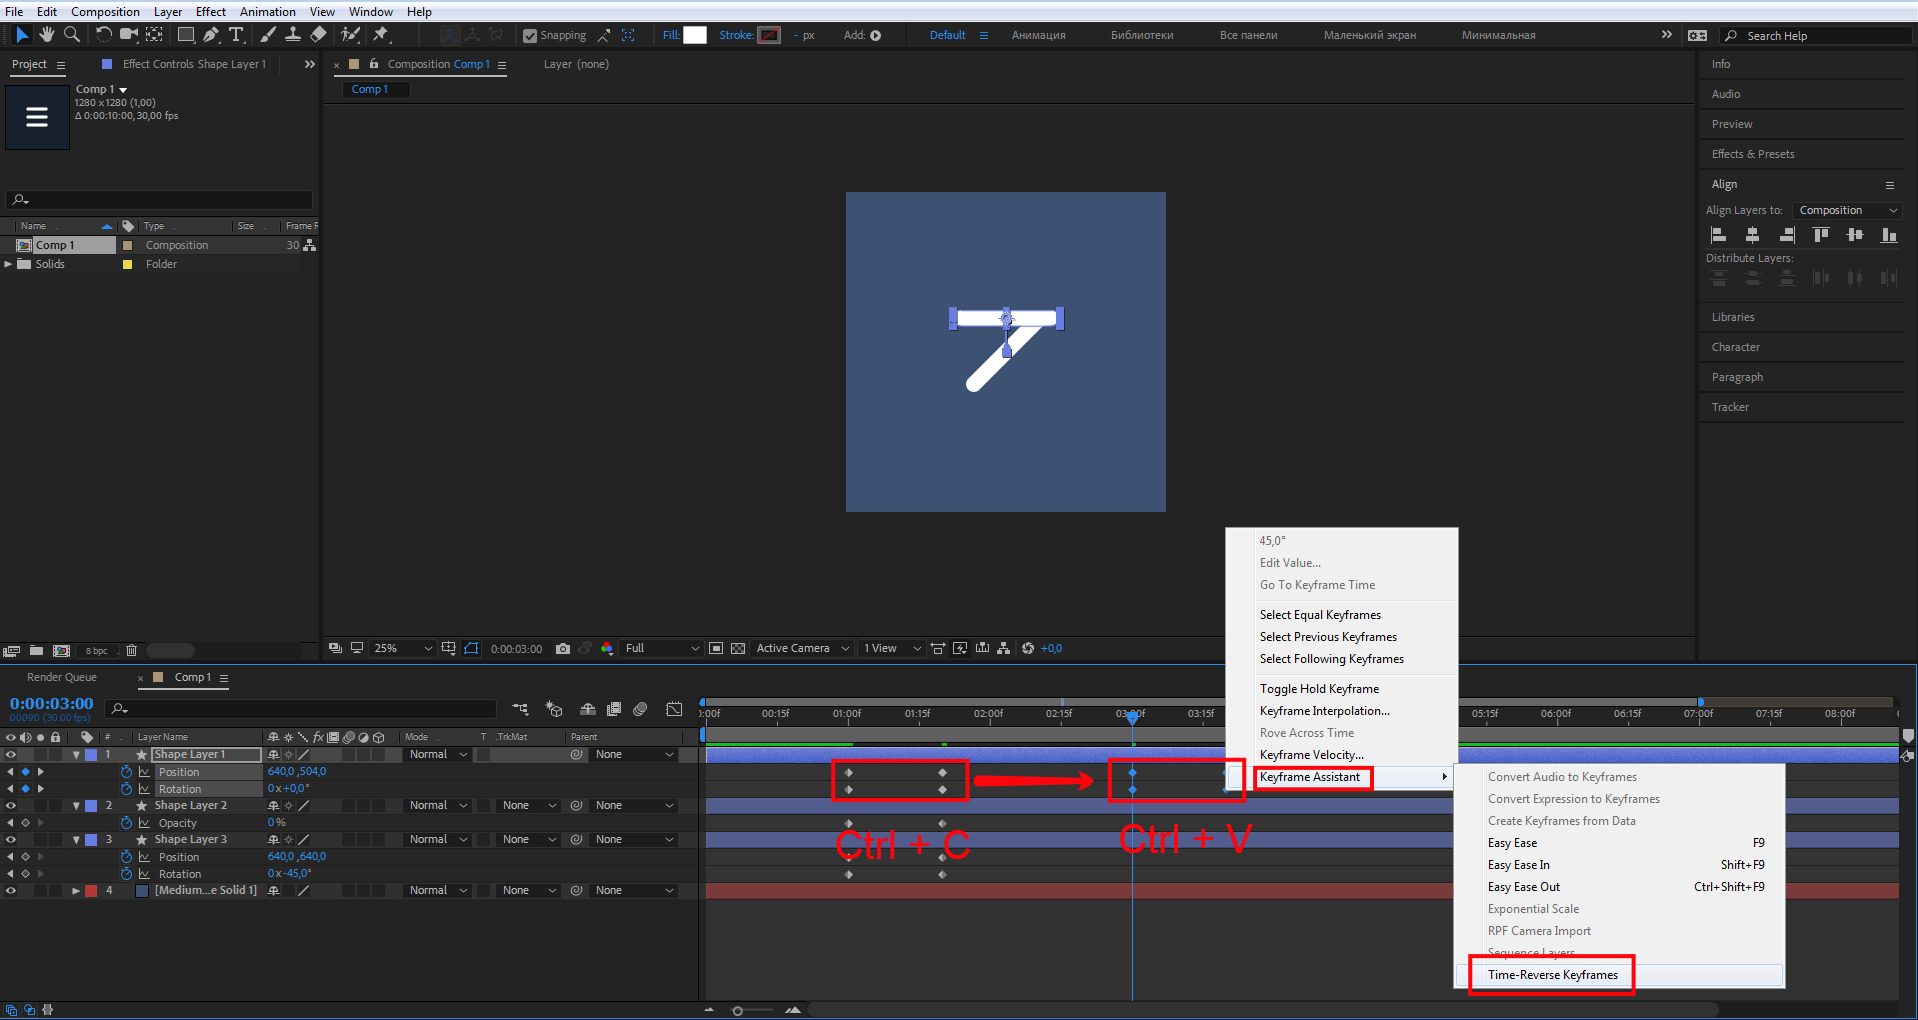
Повторите те же действия для оставшихся двух прямоугольников.
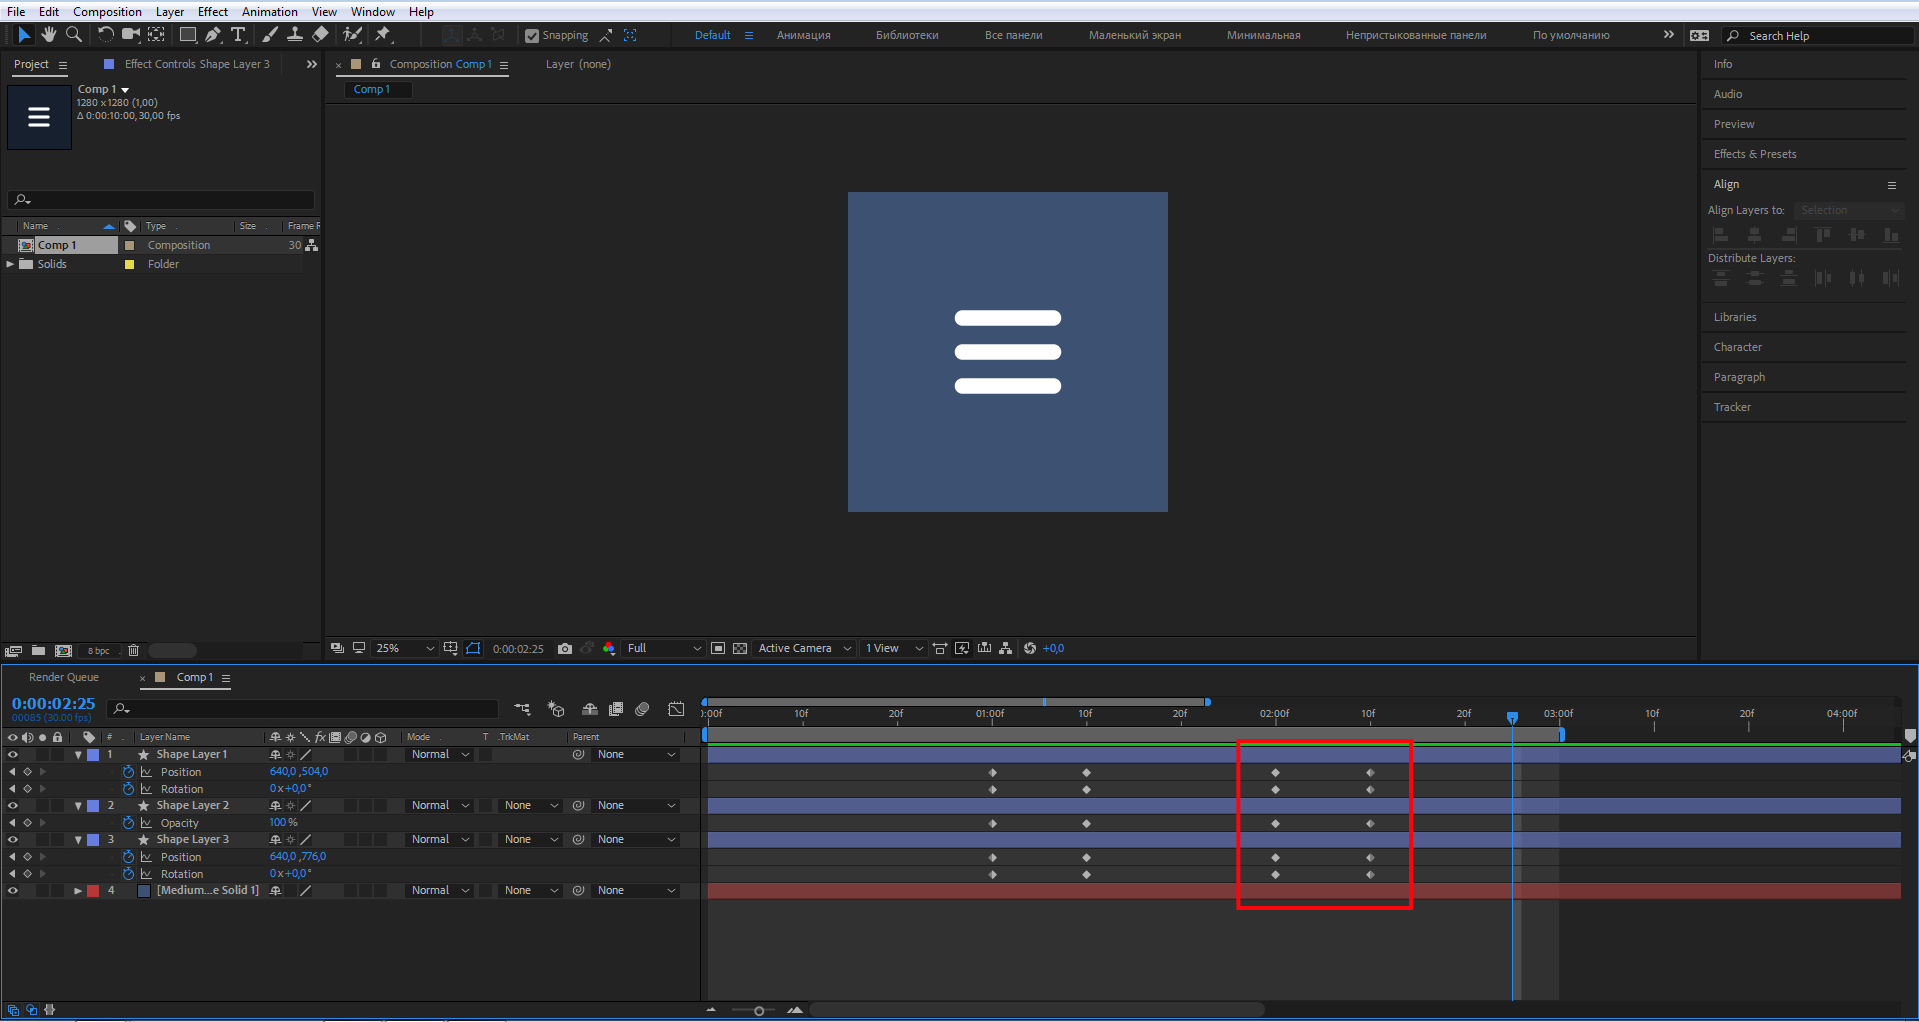
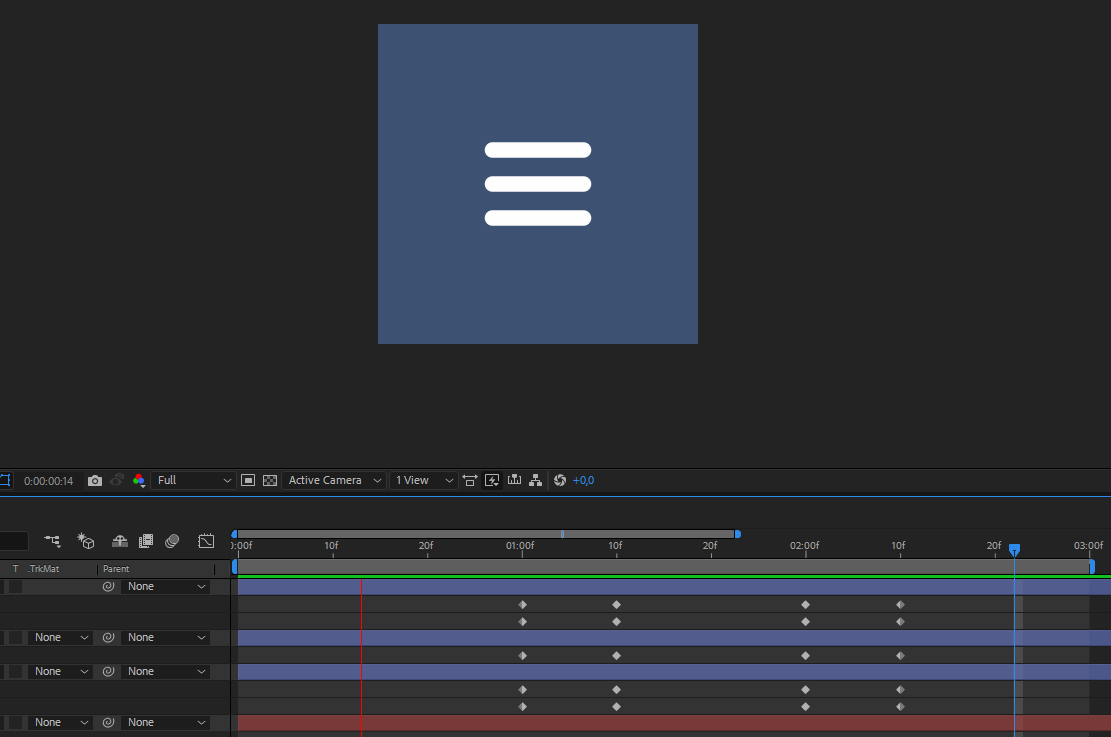
Что у вас должно получиться:
Очень неплохо, и если бы мы не были крутыми UI- и моушн-дизайнерами, то мы бы сказали: круто, в продакшн. Но мы так не скажем, потому что умеем замечать детали и знаем, как сделать еще лучше.
Так что же тут не так? Давайте подумаем. Все верно — прямолинейно, избито, неинтересно. Попробуем поработать с этим и сделать хорошо. На самом деле допиливать и дорабатывать анимацию можно до бесконечности, все зависит от ваших знаний, умений и желаний.
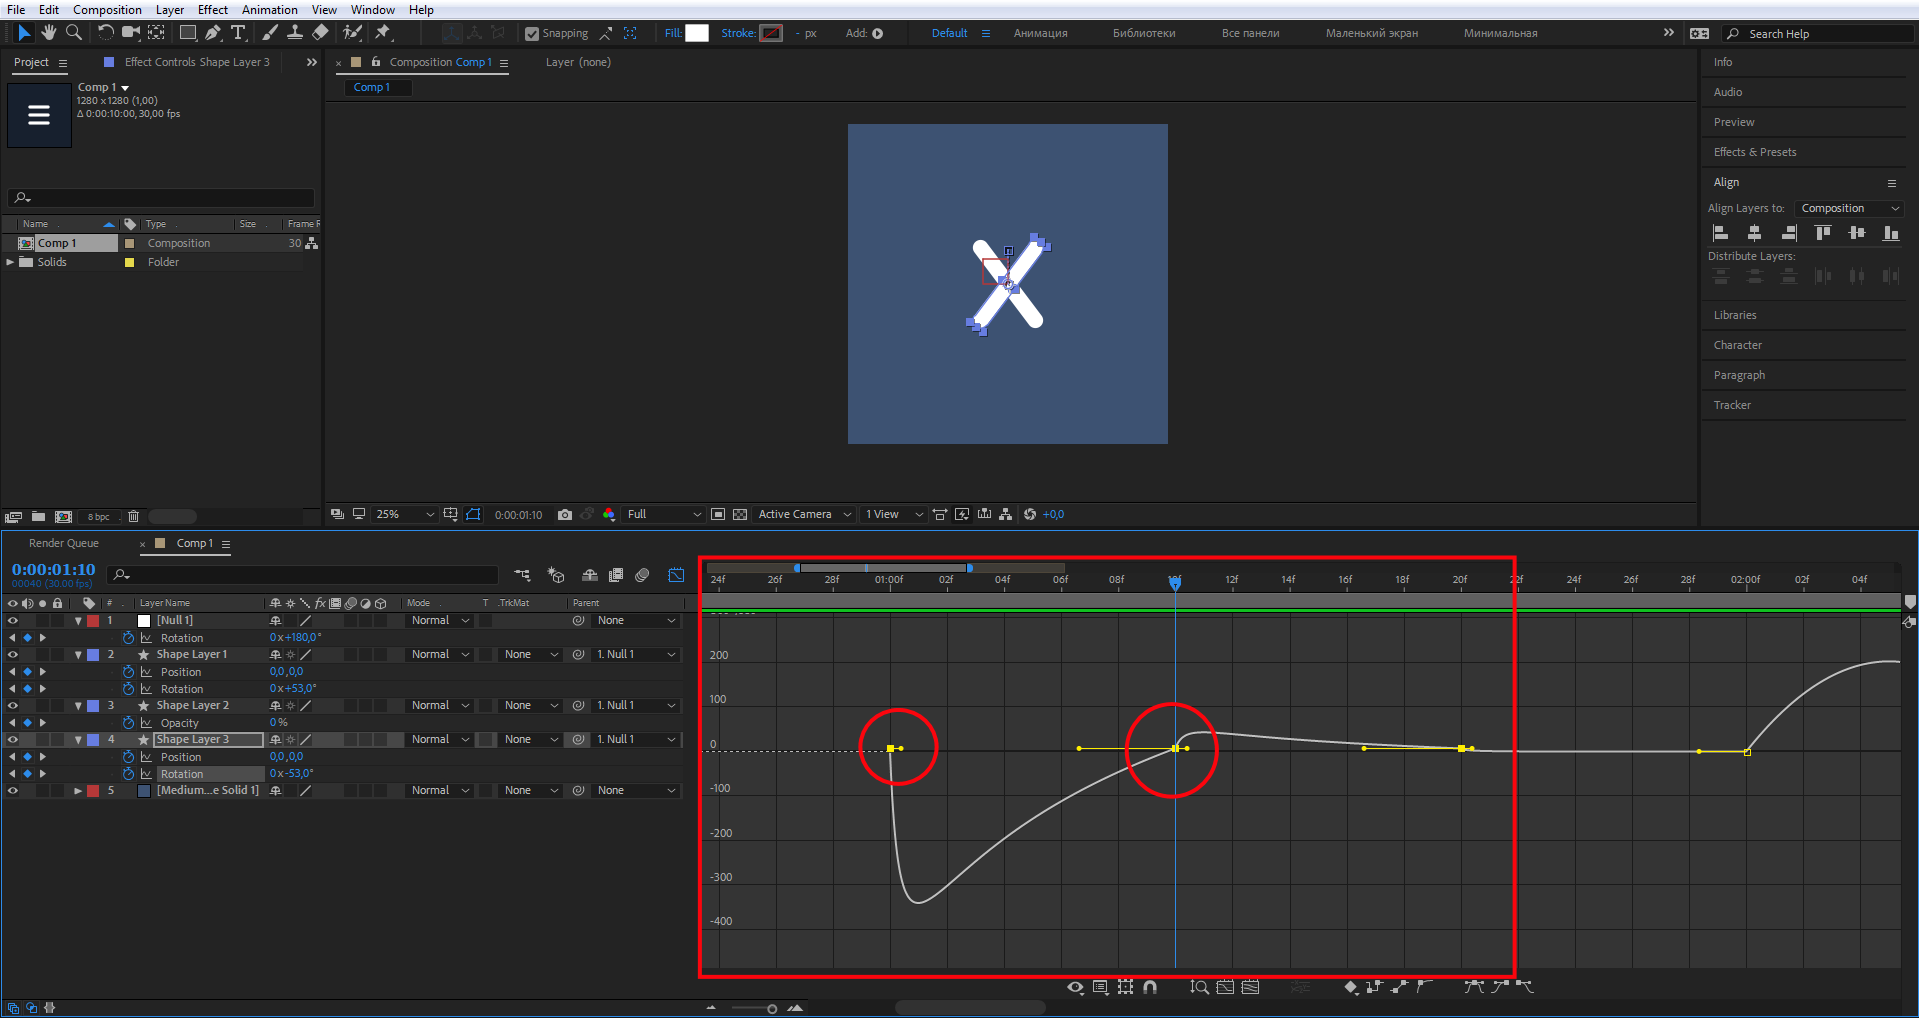
Я выберу три приема которые помогут улучшить анимацию: добавлю разворот на 180°, микроанимацию и Easy Ease. «Сглаживание анимации» (Easy Ease) — это одна из тех особенностей, за которую так любят After Effects.
Для того, чтобы развернуть все прямоугольники на 180° в процессе анимации, не обойтись без Null Object. Это слой без видимых свойств, но он умеет все, что умеют обычные слои. В нашем примере мы используем его, чтобы связать с иконкой и назначить свойство вращения на 180°. Создать новый слой с Null Object можно так:
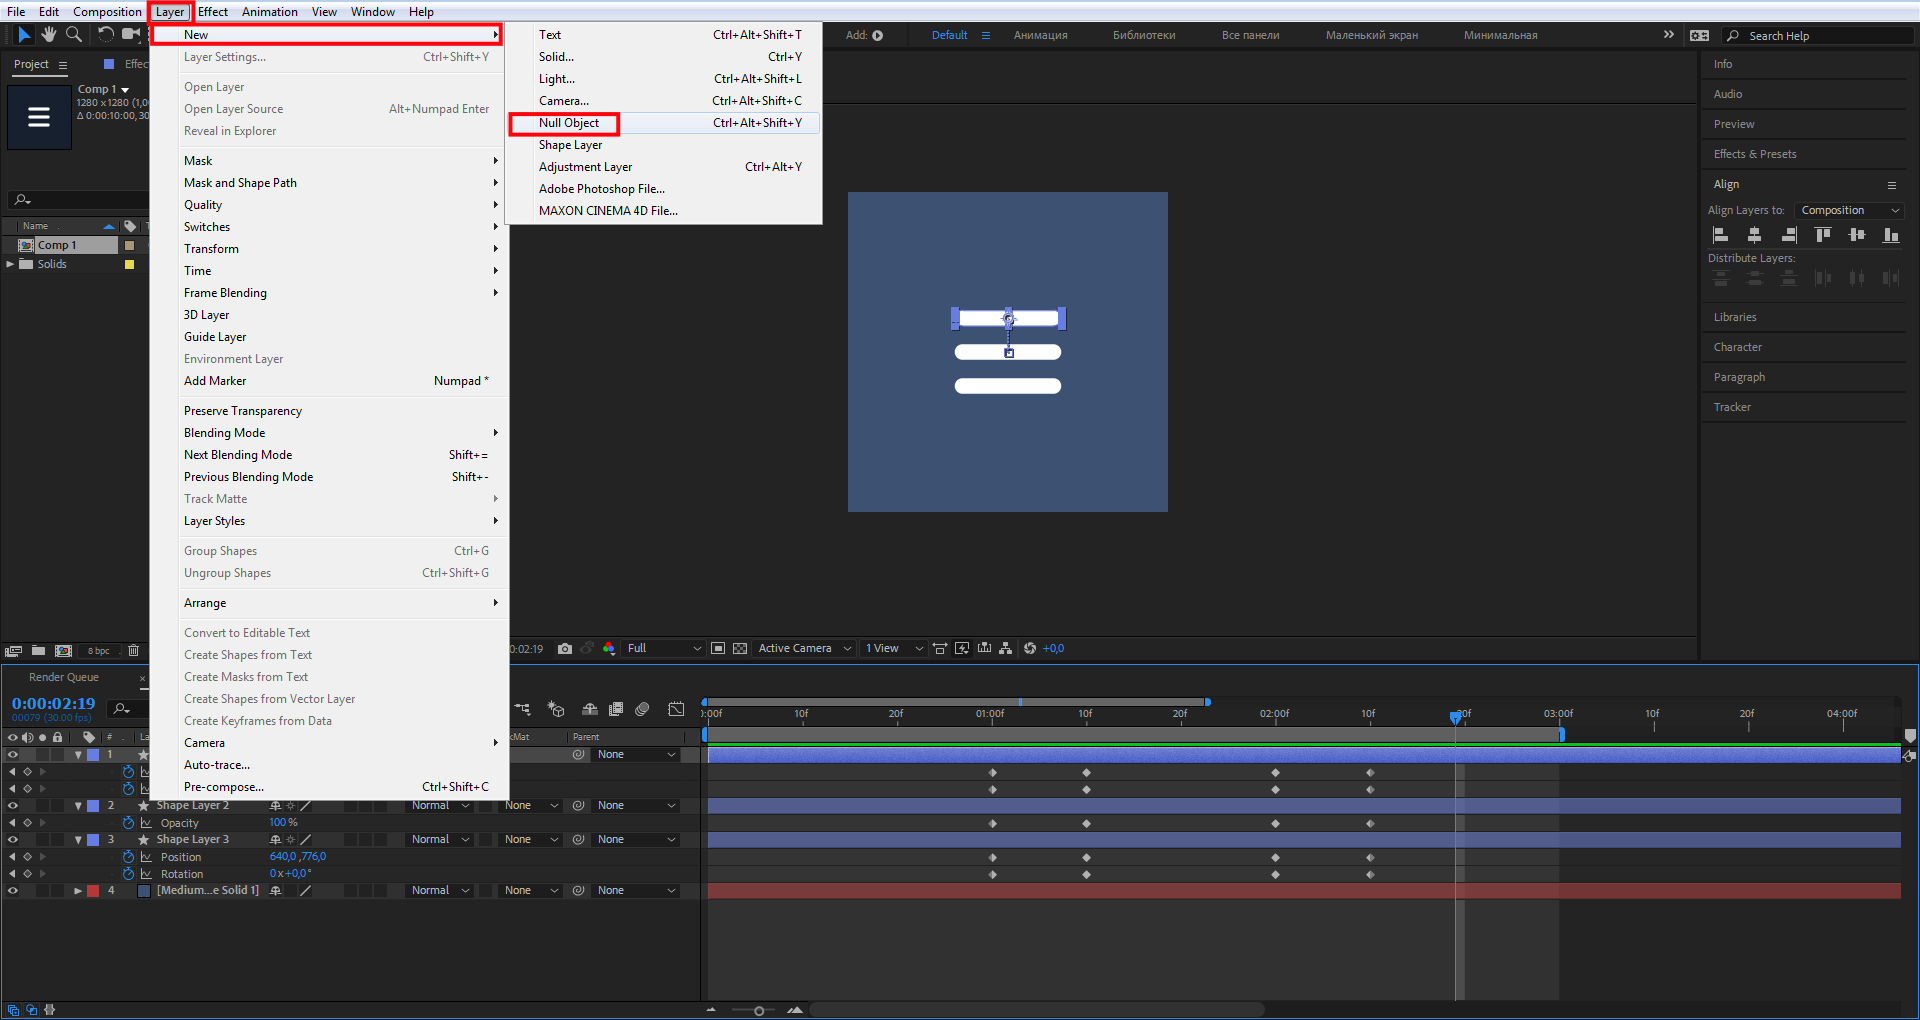
Или так:
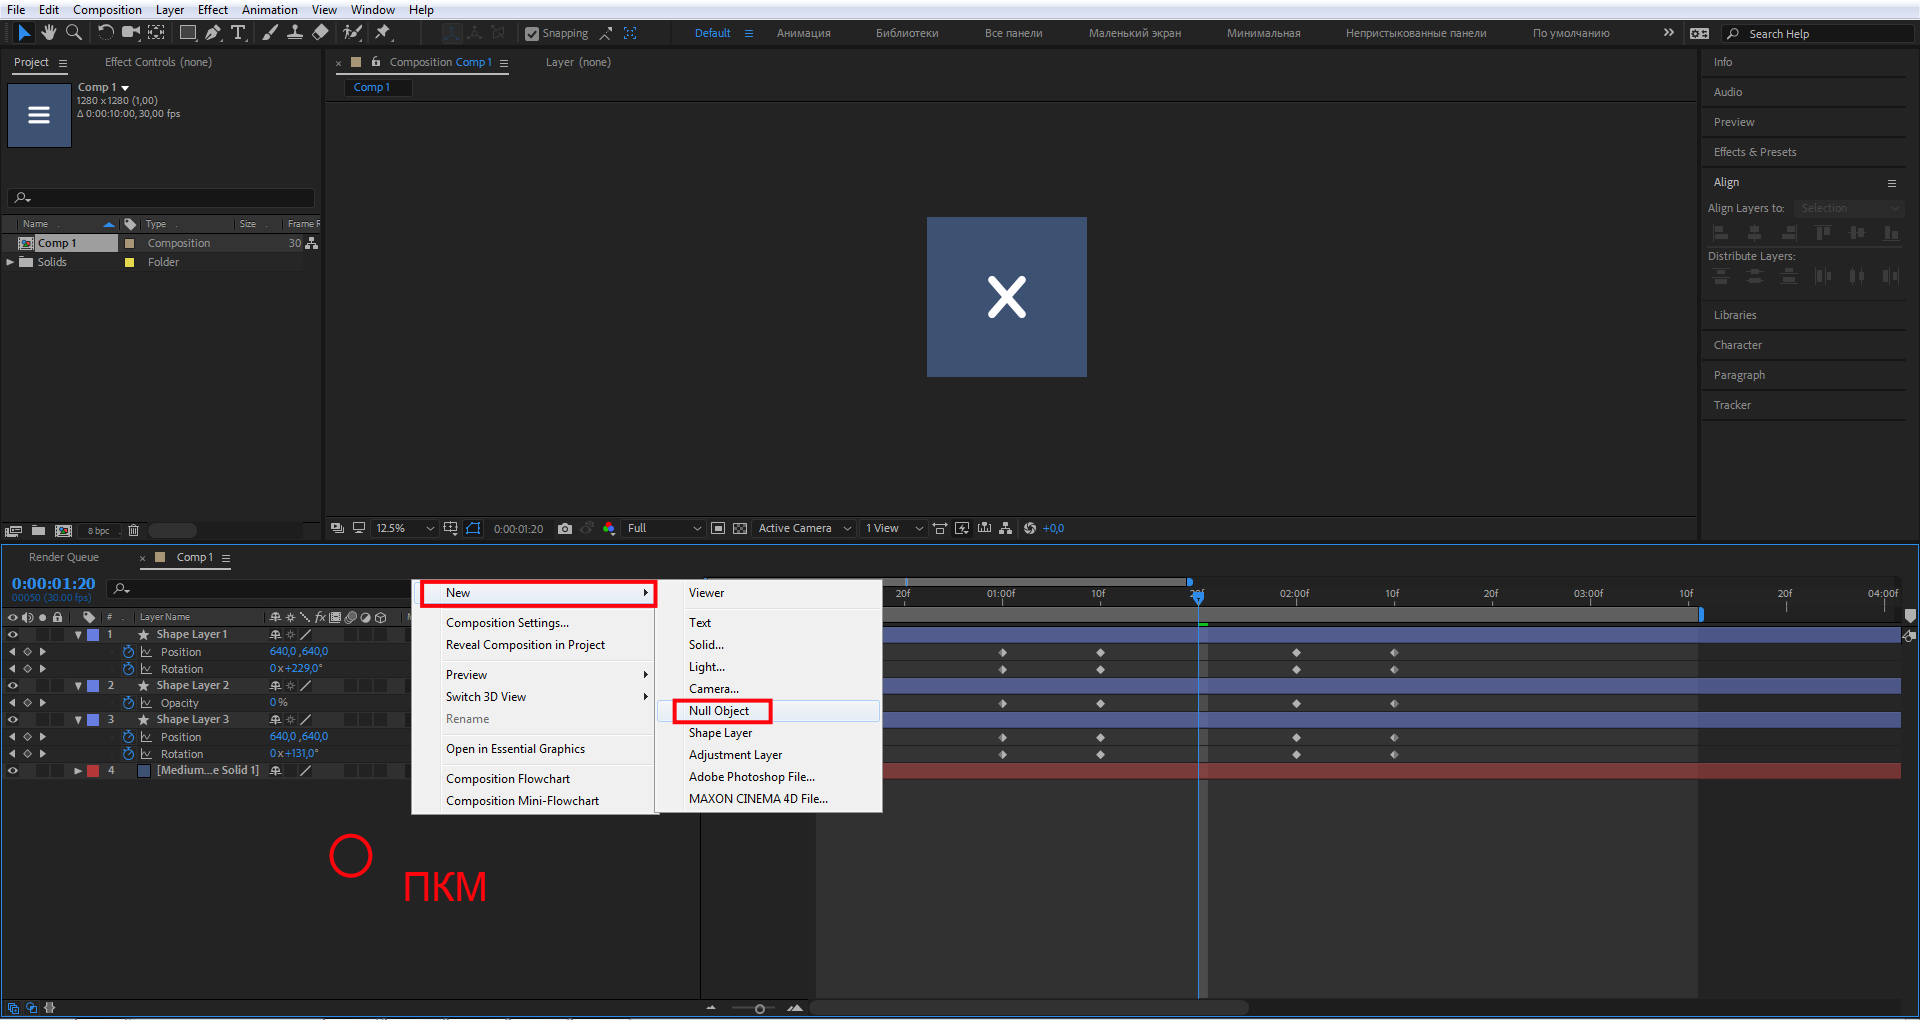
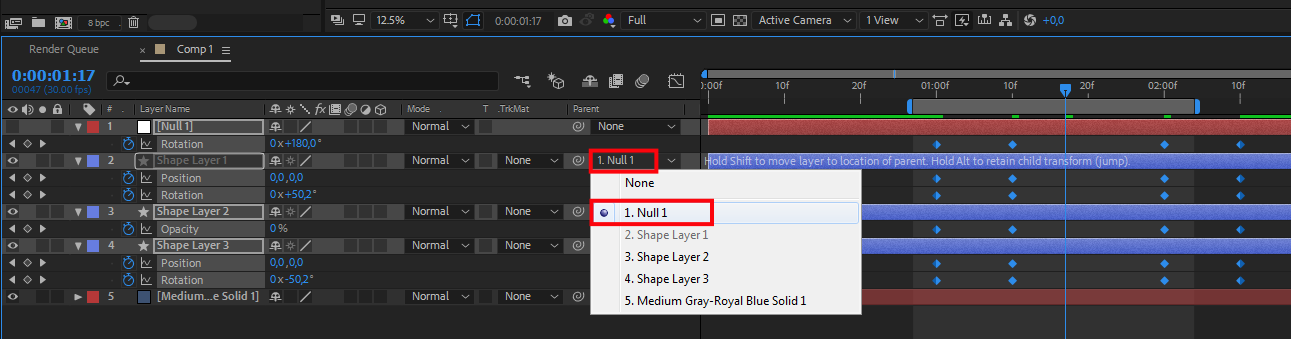
Привяжите все наши прямоугольники к слою Null Object. Сделать это можно двумя способами:
1. Кликните курсором мыши на значке спирали в столбце Parent панели слоев и, удерживая, перетащите на слой Null Object. Так нужно сделать с каждым слоем, который мы хотим привязать.
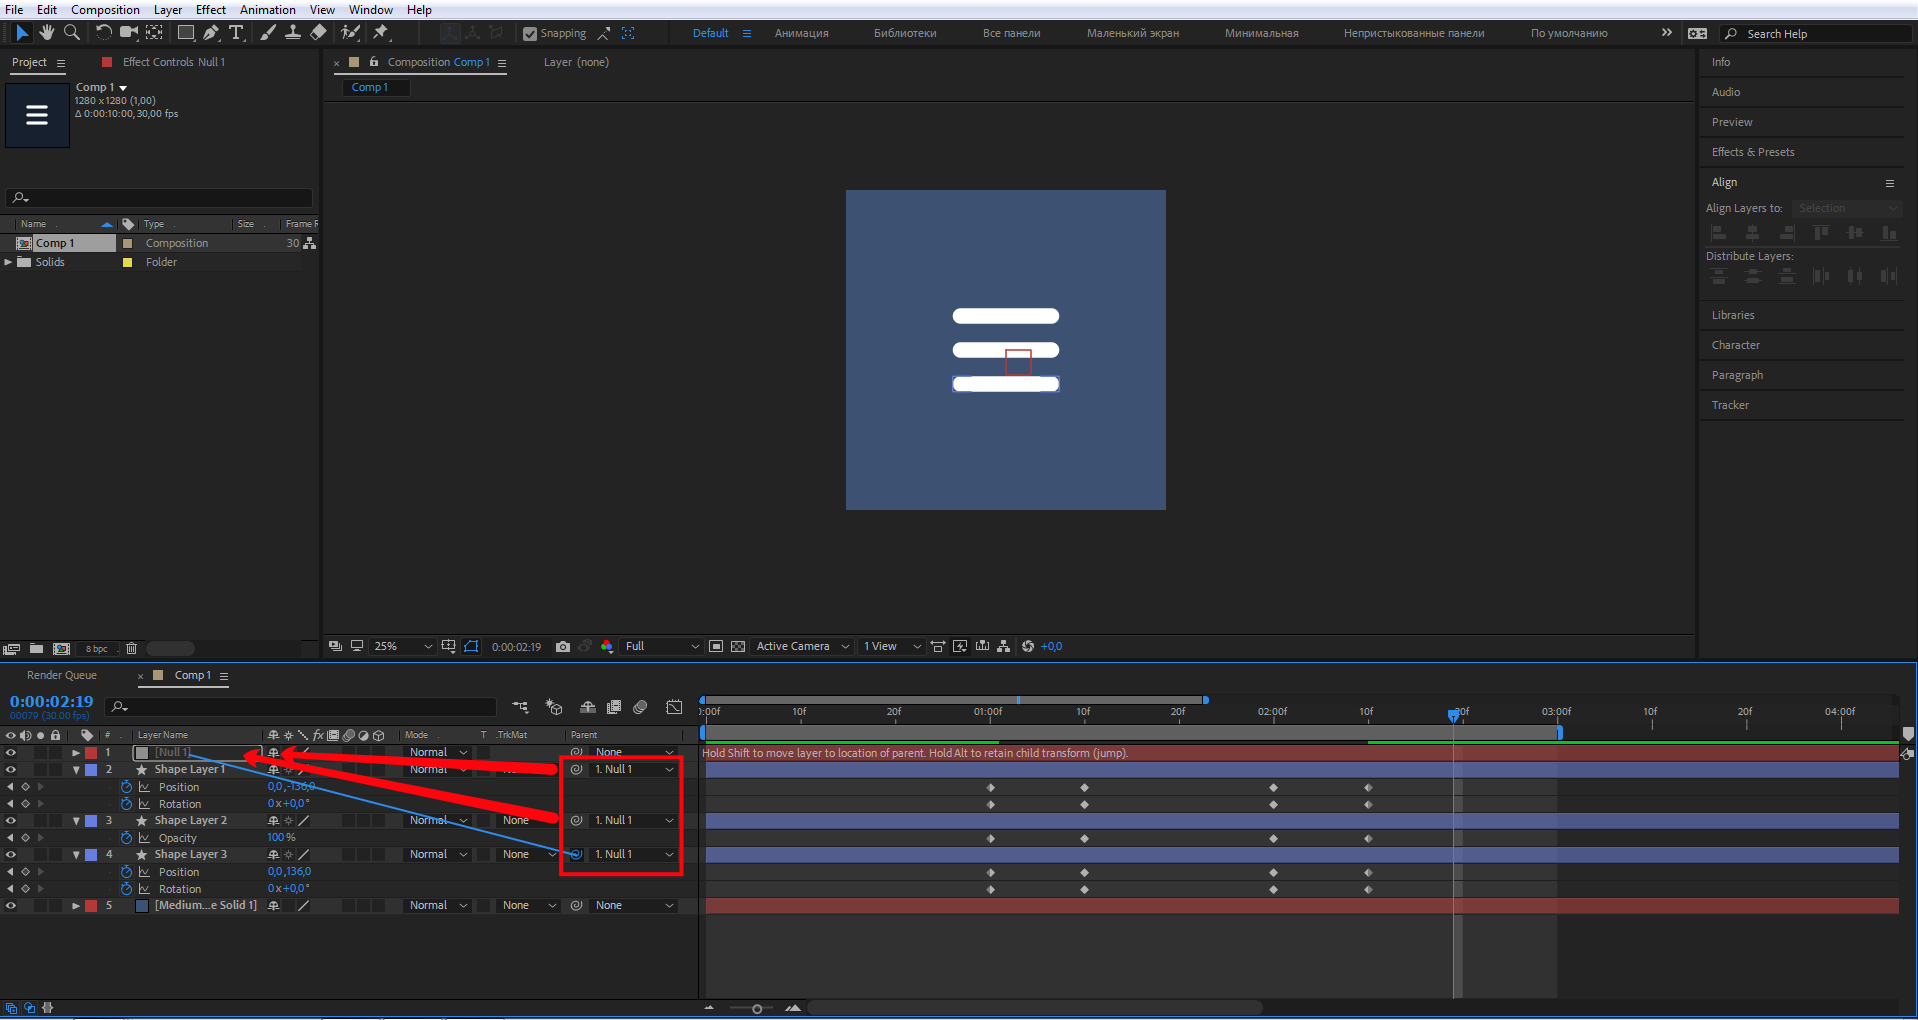
2. Выбрать в выпадающем списке столбца Parent панели слоев — Null Object.
Выделите слой Null Object, в моем случае слой называется Null1. Выберите свойство Rotation этого слоя. Установите ключевые кадры, как показано на скрине, со значением 0° первого кадра и значением 180° второго кадра.
Продублируйте эти кадры и выберите Time-Reverse Keyframes, как показано на скриншоте.
Посмотрим, что получилось:
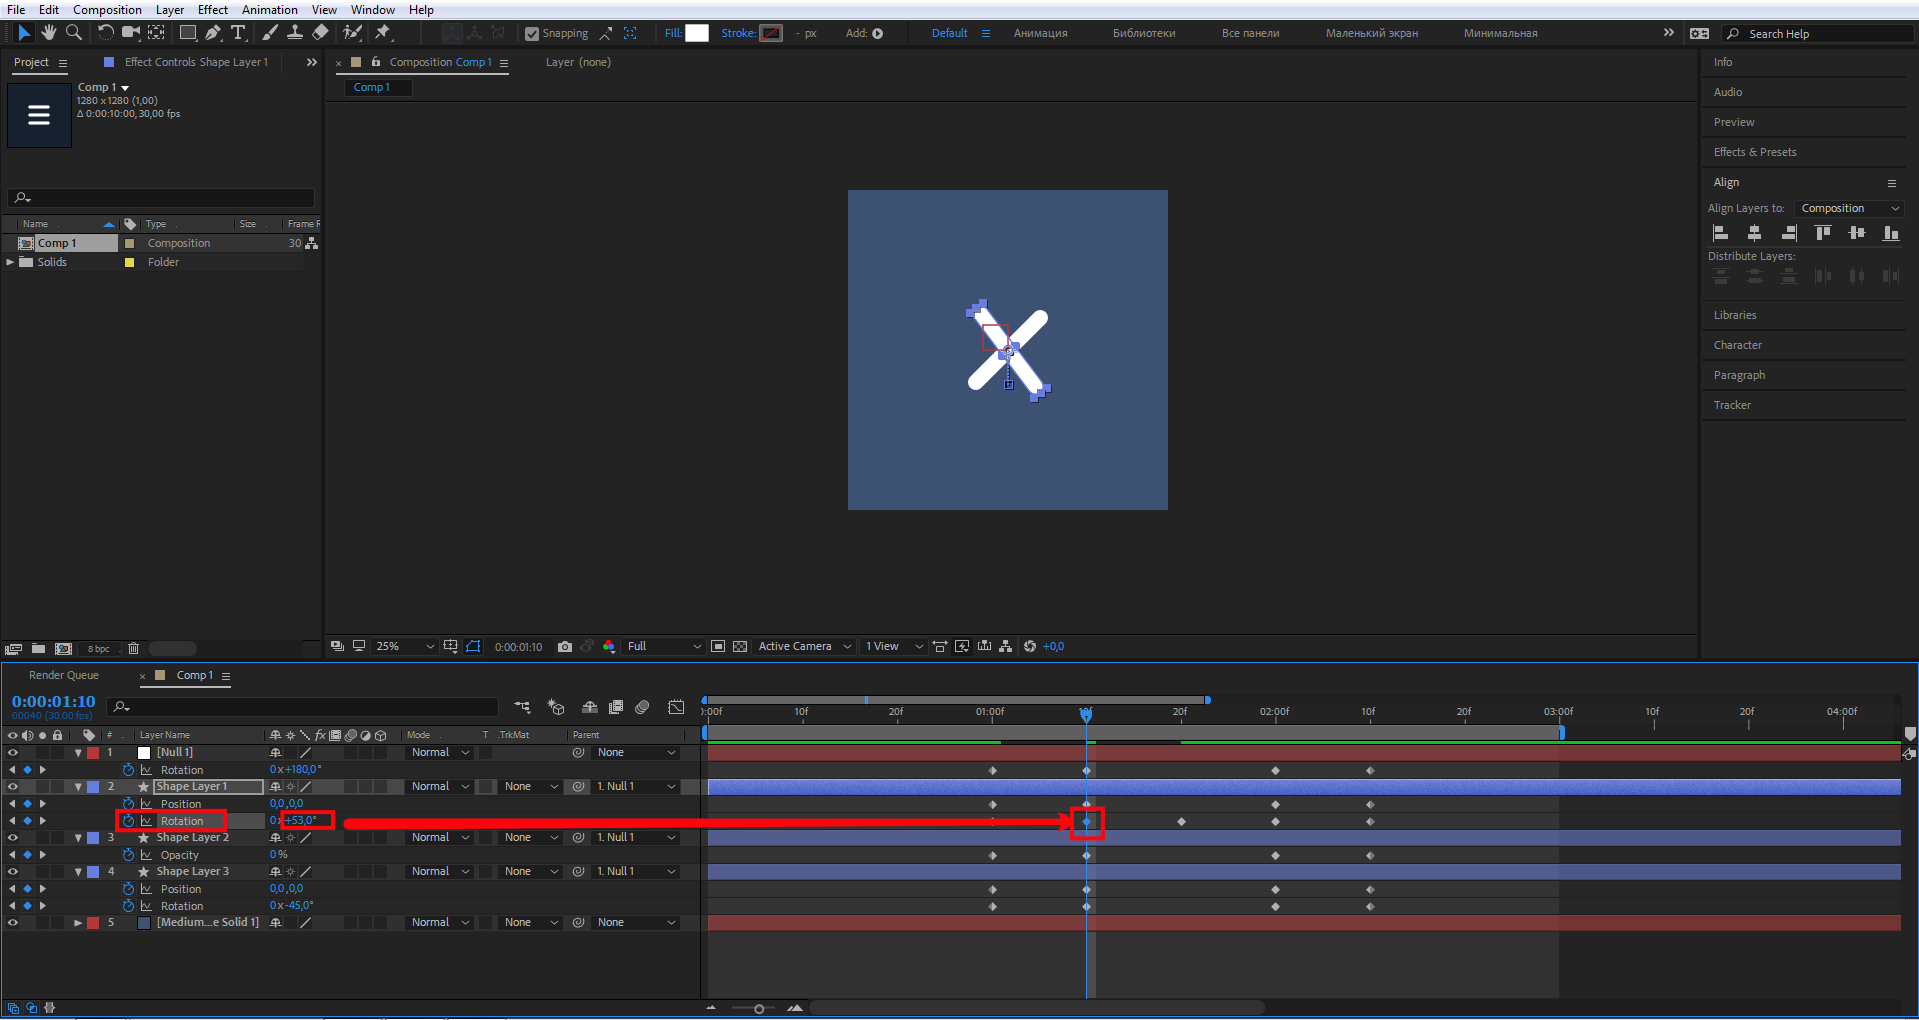
Теперь продублируйте ключевой кадр свойства Rotation верхнего прямоугольника, как показано на скрине.
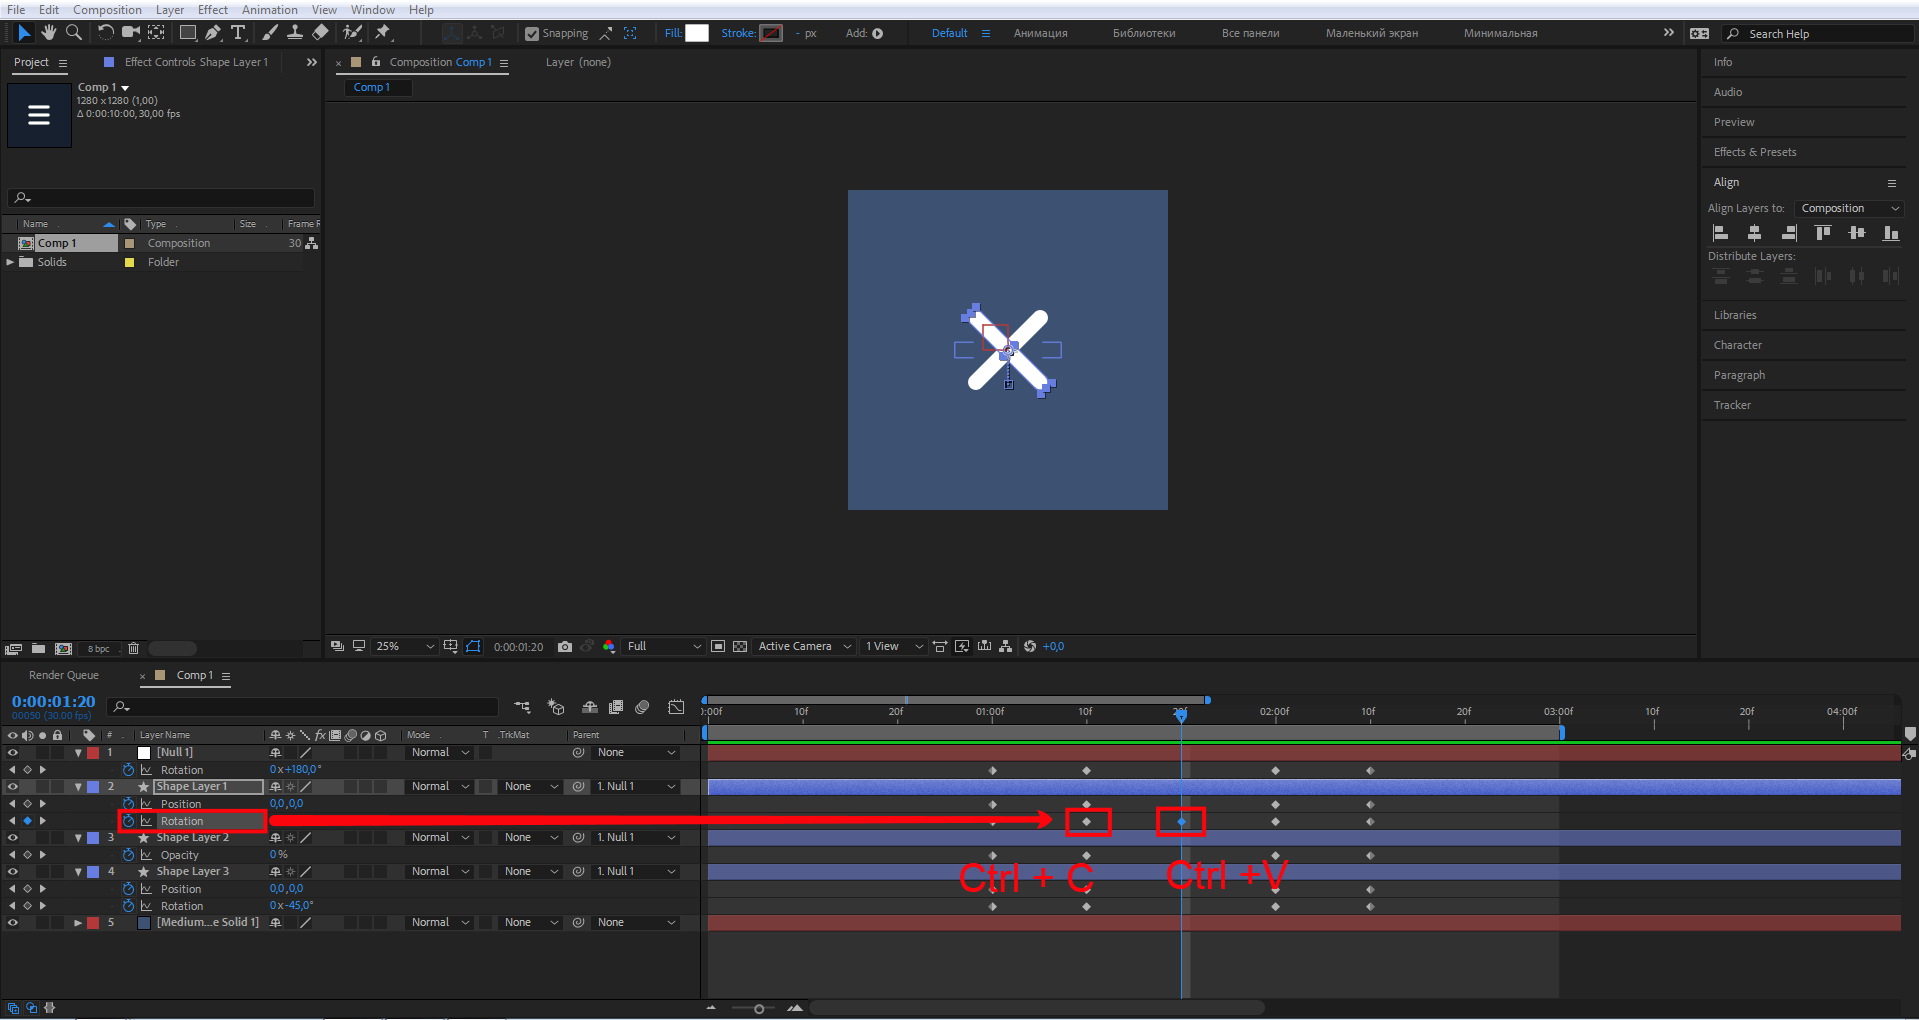
Это нужно для того, чтобы создать микроанимацию возвращения элемента на прежнюю позицию.
Укажите значение Rotation 53°.
Поработаем над плавностью анимации. Выделите все ключевые кадры и нажмите F9 для того, чтобы мы могли корректировать график Easy Ease.
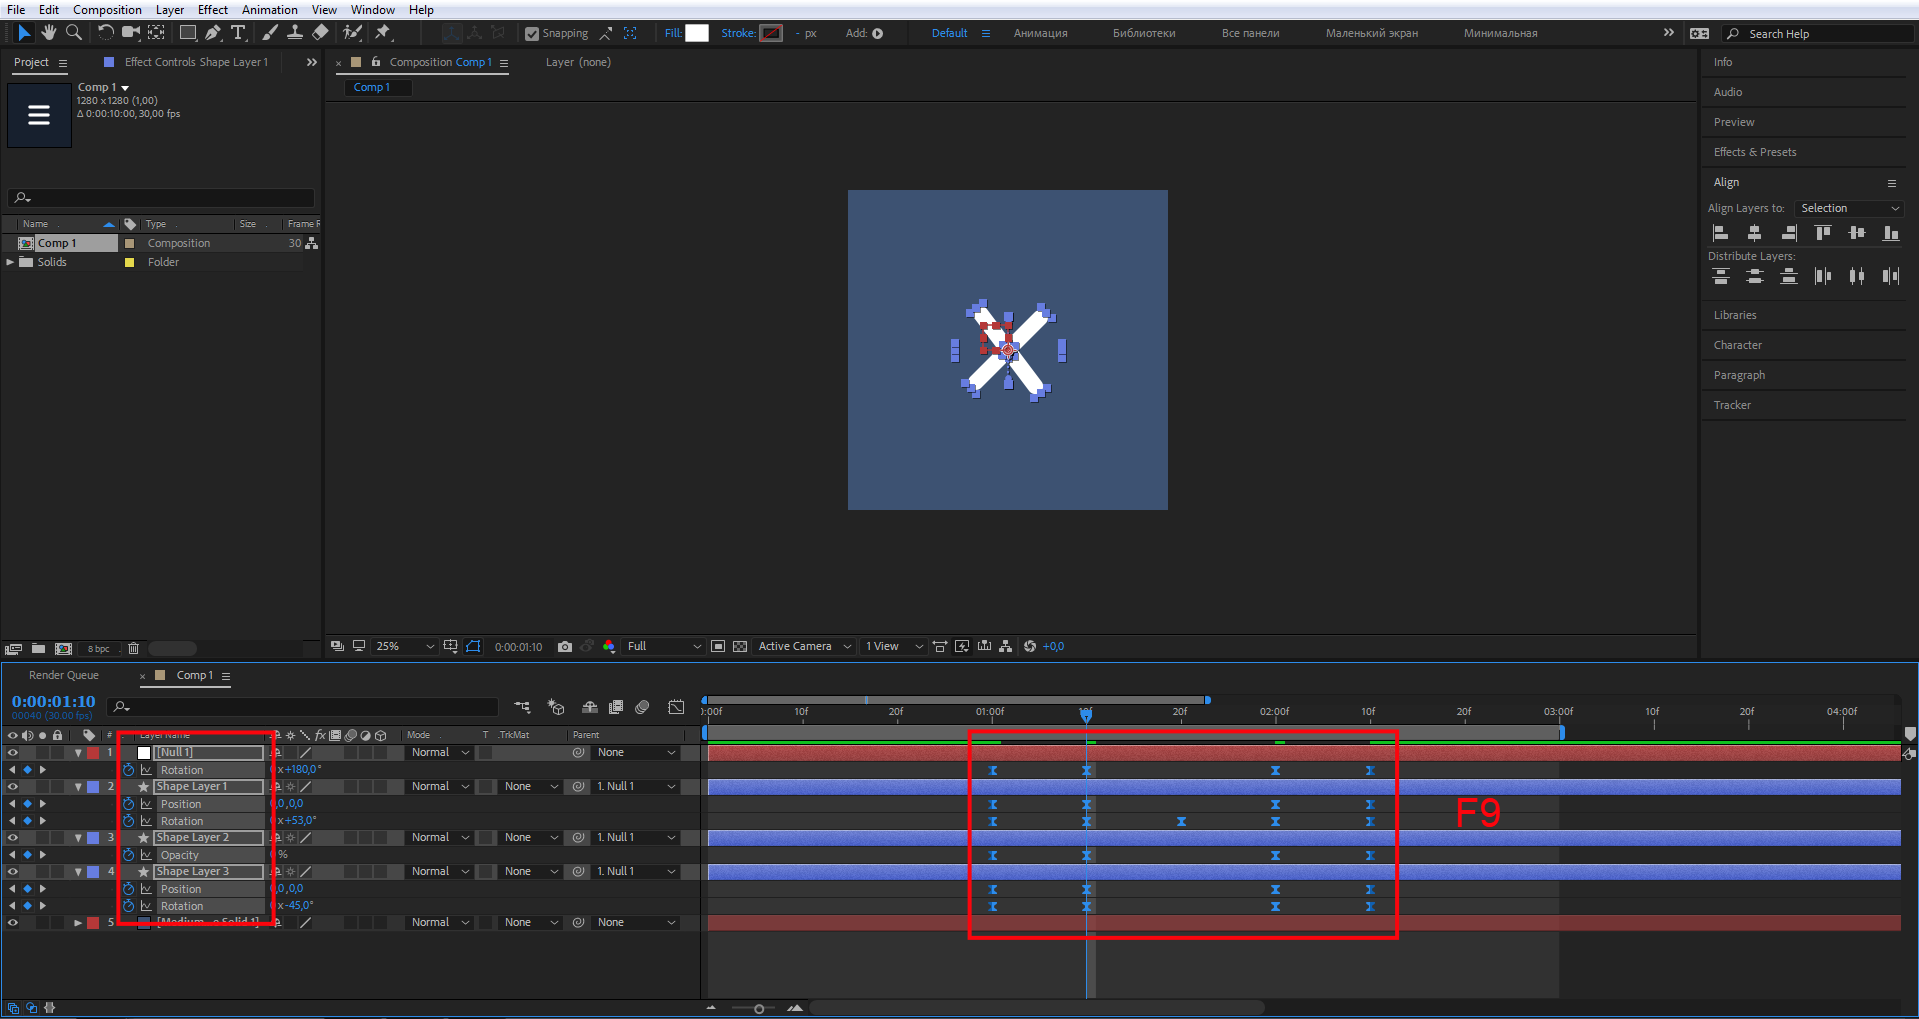
Ключевые кадры перестали быть ромбиками и превратились в значки похожие на песочные часы. Это значит что мы их перевели в режим Easy Ease.
Но перед тем как редактировать графики, продублируйте еще несколько кадров. Эти кадры добавляют микроанимацию на выходе. С ней бургер-иконка смотрится более живо и гармонично. Перейдите на слой Null1 скопируйте ключевой кадр, который находится на десятом кадре второй секунды, и вставьте его на 20-й кадр второй секунды. Значение свойства Rotation укажите 190°. Перейдите на слой нижнего прямоугольника, продублируйте кадр так же, как для слоя Null1, и укажите значение свойства Rotation –45°. Вот так:
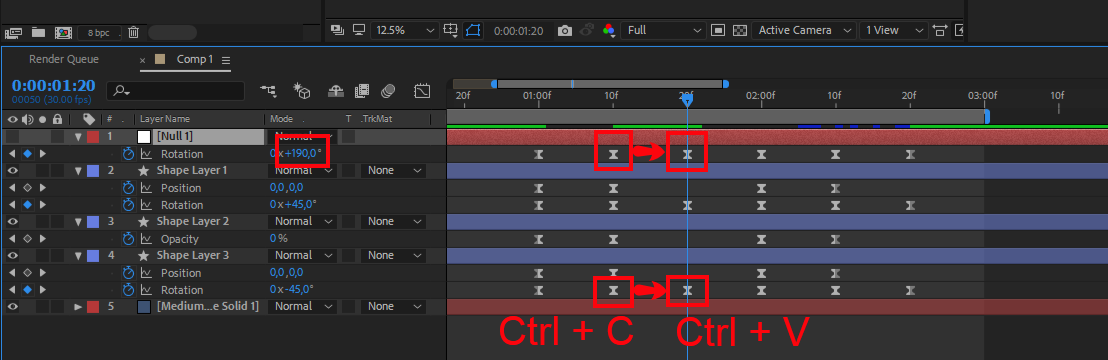
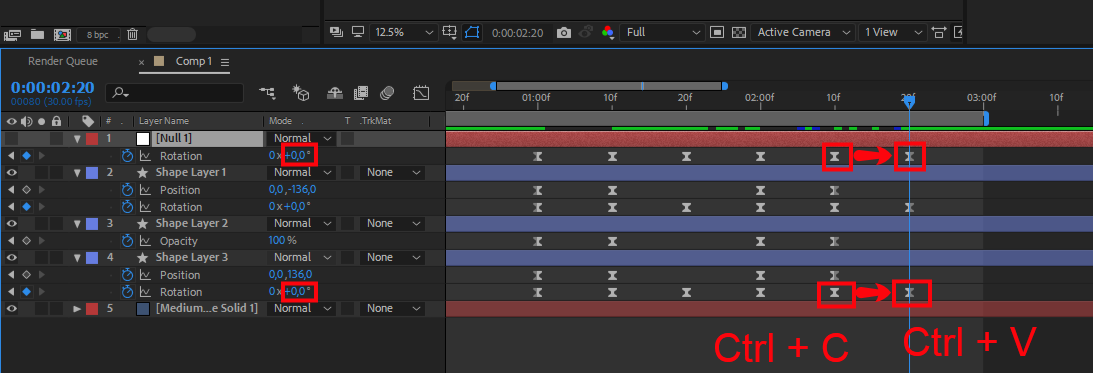
Перейдите на слой Null1, скопируйте ключевой кадр, который находится на десятом кадре третьей секунды, и вставьте его на 20-й кадр третьей секунды. Значение свойства Rotation укажите 0°. Перейдите на слой нижнего прямоугольника, продублируйте кадр так же, как для слоя Null1, и укажите значение свойства Rotation 0°. Вот так:
Выделите три ключевых кадра, как показано ниже, и нажмите на иконку графика Easy Ease, он также указан на скрине.

Теперь настройте кривую, как показано ниже, пользуясь желтыми манипуляторами точек.
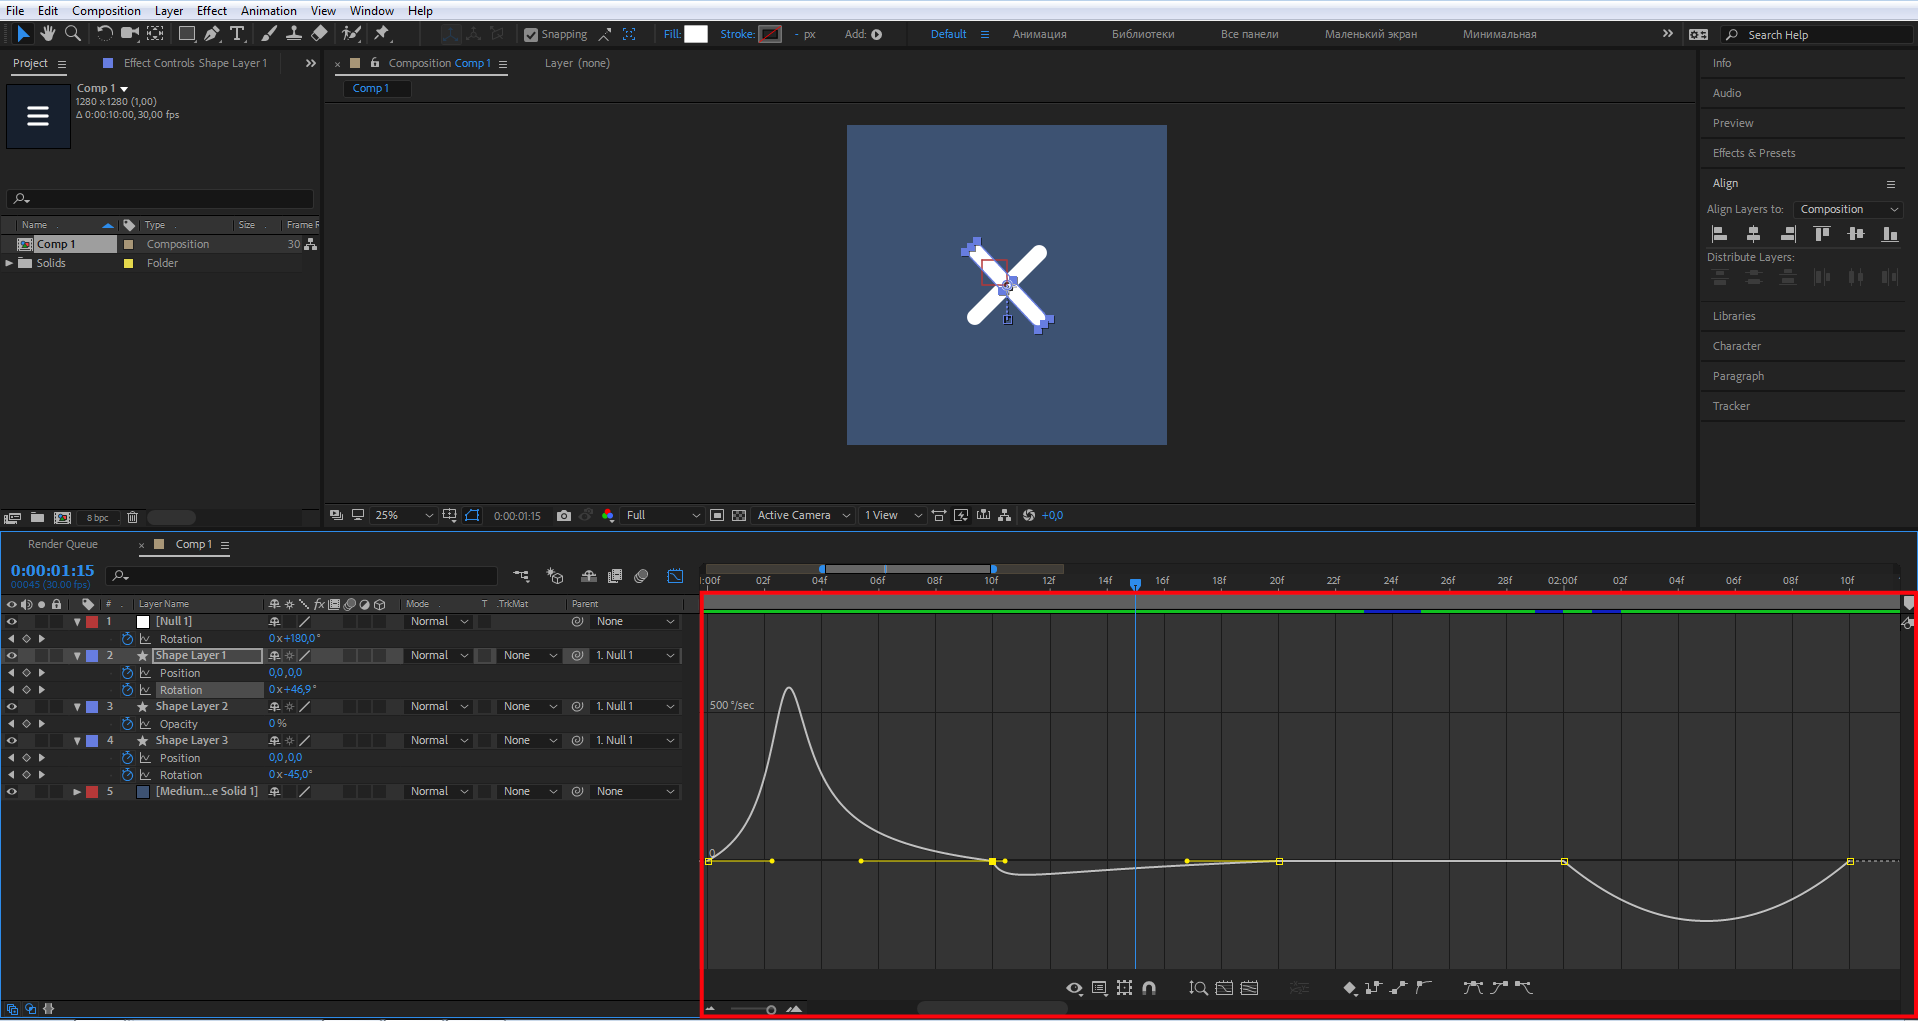
Пример настройки графика:
Протестируем.
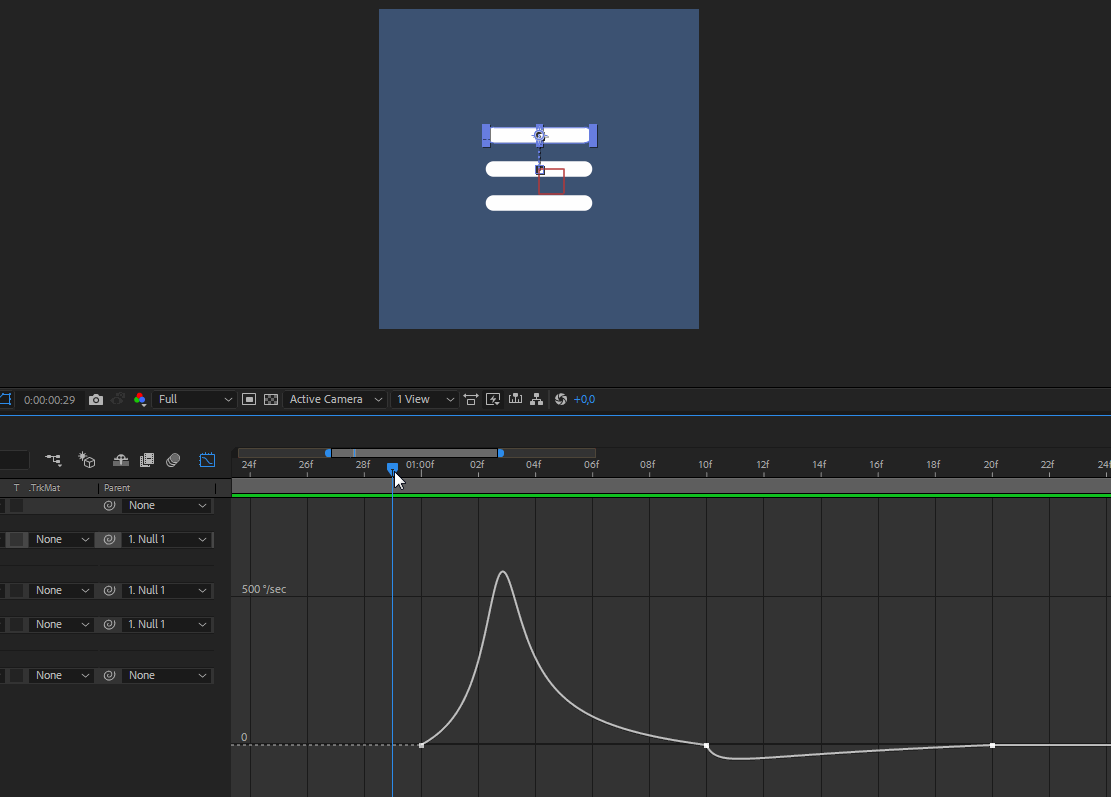
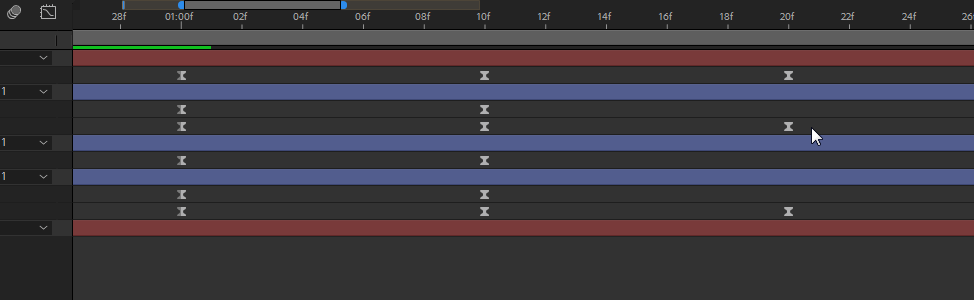
То же самое проделайте для нижнего прямоугольника.
График нижнего прямоугольника.
Давайте посмотрим, что получилось в итоге.

Отлично получилось!
В следующем уроке сделаем небольшую анимацию прелоадера с применением несложных скриптов.
Знание анимации — большой плюс для дизайнера. На курсах Skillbox рассказывают, как анимировать интерфейсы, создавать микровзаимодействия, делать пользовательский опыт «плавным». Вы освоите новые редакторы и приемы, углубите знания во многих областях, повысите свою ценность как специалист.