Ошибка An authentication error has occured. CredSSP encryption oracle remediation.
Проблема:
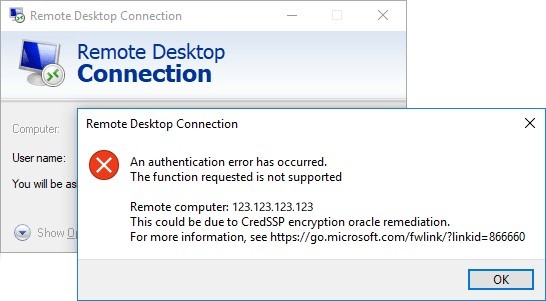
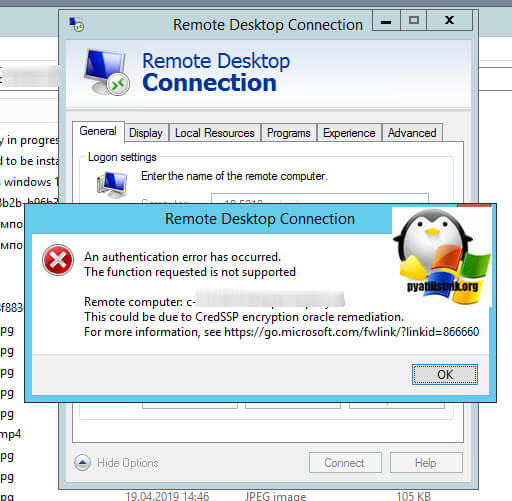
В последнее время от пользователей стало поступать много жалоб на ошибку An authentication error has occured. The function requested is not supported. This could be due to CredSSP encryption oracle remediation при подключении к удаленным компьютерам по RDP. В результате «раскопок» была обнаружена статья, многое объясняющая.
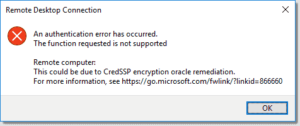
8 мая 2018 года компания Microsoft выпустила новое обновление устраняющее уязвимость в удалённом выполнении кода в незакрепленных версиях CredSSP (поставщик проверки подлинности, который обрабатывает запросы проверки подлинности для других приложений). Злоумышленники, использующие эту уязвимость, могли передавать данные пользователя для выполнения кода в целевой системе, включая установку и удаление произвольного программного обеспечения, удаление или изменение данных на сервере, создание учётных записей с любыми правами. При этом, после обновления, многие пользователи, при попытке подключения к удалённому рабочему столу, столкнулись с ошибкой «CredSSP encryption oracle remediation»:
На самом деле это не ошибка, а уведомление о проблеме безопасности давно не обновлённого сервера.
Microsoft отреагировала на уязвимость и приступила к устранению проблемы, поделив шаги на 3 этапа.
Первый этап – обновление от 13 марта 2018 года, для CredSSP и RDP, которое закрывает дыру в безопасности и добавляет новый пункт в групповые политики.
Второй этап – обновление от 17 апреля 2018 года, которое предупреждает о небезопасном соединении, если у сервера или клиента будут уязвимые CredSSP или RDP.
Третий этап – как раз обновление от 8 мая 2018 г.
Решение:
Для решения проблемы требуется на время отключить на компьютере, с которого Вы пытаетесь подключиться, данное блокирующее уведомление о проблеме безопасности.
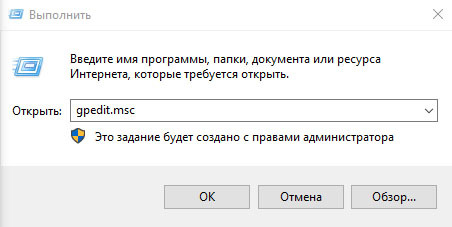
Откройте редактор групповых политик. Для этого запустите «Выполнить»(нажав клавишу Win + R). В диалоговом окне наберите «gpedit.msc» или найдите его через поиск, набрав «Edit group policy»(Изменение групповой политики).
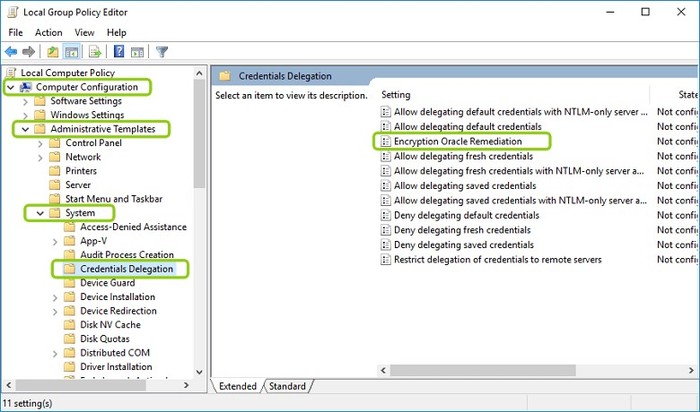
Политика должна располагаться по пути:
Computer Configuration -> Administrative Templates -> System -> Credentials Delegation -> Encryption Oracle Remediation
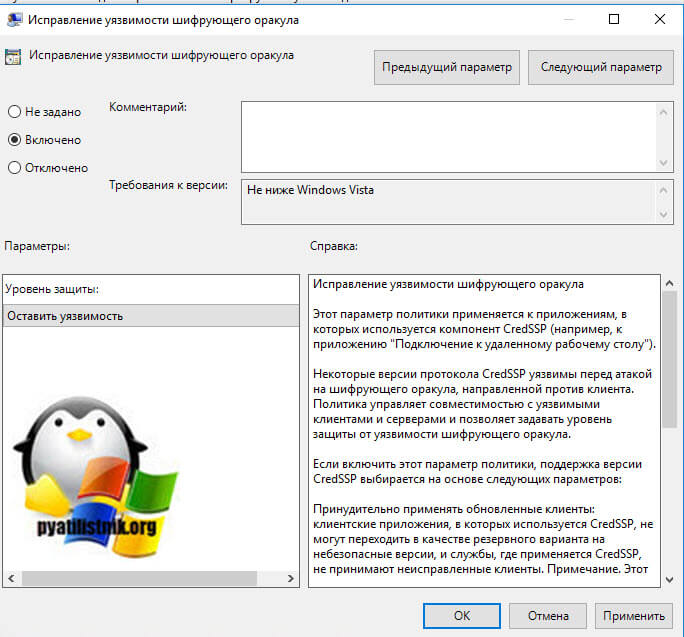
Конфигурация компьютера -> Административные шаблоны -> Система -> Передача учётных данных -> Исправление уязвимости шифрующего оракула
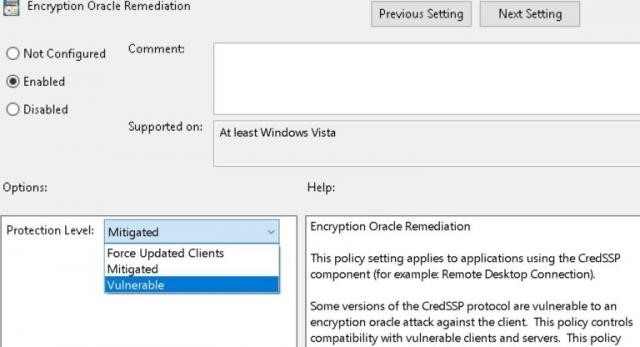
Политика имеет 3 опции:
1. Vulnerable (оставить уязвимость) – клиенты смогут подключаться как раньше, независимо от того, пропатчены они или нет. Это уязвимый уровень безопасности.
2. Mitigated (уменьшить риск) – клиенты не смогут подключаться к непропатченым серверам. В свою очередь, серверы смогут принимать непропатченных клиентов. Средний уровень безопасности.
3. Force Updated Clients (принудительно принимать обновленные клиенты) – безопасный уровень взаимодействия клиентов. Соединение установлено не будет, если один из пары клиент-сервер имеет не пропатченный RDP.
Включите политику, выбрав «Enabled» (Включено), и установите значение параметра в выпадающем списке «Vulnerable» (Оставить уязвимость).
После проделанных действий, Вы сможете подключаться к серверу так же, как и раньше.
А чтобы всё было «секьюрненько»:
Как только вы подключились к серверу, установите последние обновления Windows. Если при попытке установки обновления возникает ошибка , проверьте запущена ли служба «Windows Update».
Служба располагается по пути:
Start -> Control Panel -> Administrative Tools -> Services
Пуск -> Панель управления -> Администрирование -> Службы
Если служба не запускается, проверьте, разрешён ли её запуск – статус не должен быть «Disabled» (Отключена).
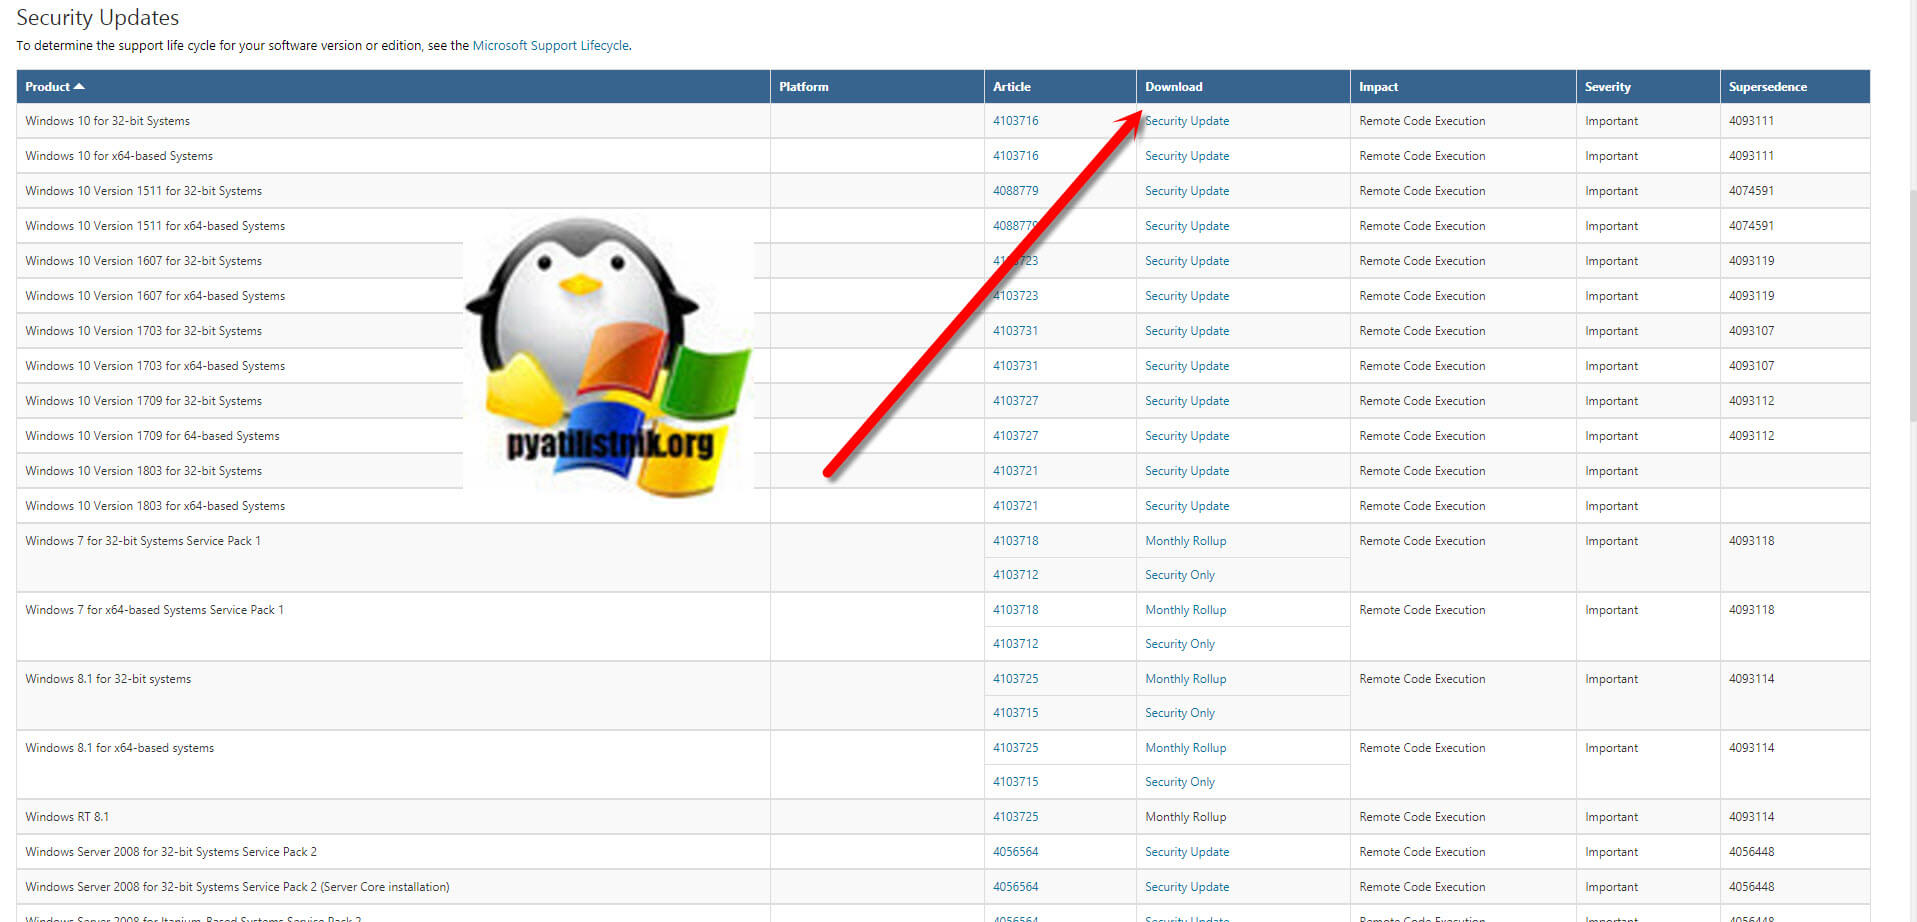
Для Windows Server2008R2SP1 или Server2012R2 можно установить не все обновления, а только устраняющее эту уязвимость. Это сократит время на решение проблемы подключения к серверу.
Скачать обновление можно с сайта Microsoft на странице описания уязвимости (https://portal.msrc.microsoft.com/en-us/security-guidance/ad…):
После обновления сервера, в политике «Encryption Oracle Remediation»(Исправление уязвимости шифрующего оракула) измените опцию с Vulnerable (оставить уязвимость), на Force Updated Clients(принудительно принимать обновленные клиенты). Соответственно, все клиенты должны быть так же обновлены. Или на Mitigated(уменьшить риск) — это даст возможность подключаться к серверу непропатченным клиентам.
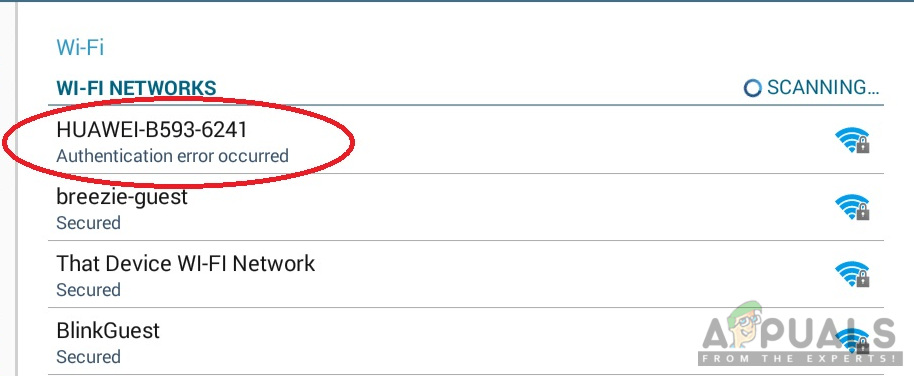
Several users are getting the “Authentication Error Occurred” error on their Android phones whenever they try to connect to a WiFi network. This issue can occur on both adding new network and the existing network. Most of the time this is related to an incorrect password for the WiFi network but there can be other possibilities about which we will discuss in this article.
What is Causing the Authentication Error on Android?
We managed to discover some of the most common causes that will trigger this particular issue. We have done this by looking at various user reports and the repair strategies that they used to get the issue resolved. Here is a shortlist with common scenarios that have the chance of triggering this particular error message:
- Password is incorrect – As it turns out, this issue will mostly occur if the provided password is incorrect. If this scenario is applicable, you can resolve the issue by typing the correct password the visibility option selected.
- Network settings are glitched – In some cases, this issue occurs because of the network settings on your phone, which isn’t letting your WiFI to work properly. Several users finding themselves in a similar situation have reported that they managed to resolve the issue by resetting the network.
- The IP address is incorrect – Sometimes, the DHCP IP settings will not configure the IP address correctly for the WiFI network. Most users were able to solve this by using the static IP address for the network settings.
This article will help you with different methods to resolve the “Authentication error occurred“. We will start from the most common and simple method to the detailed one.
Method 1: Recheck Your Password for the Network
This issue mostly means that your password for the network is wrong due to which it shows the authentication error message. You need to make sure that you have typed the correct password for your WiFi. Sometimes, your password resets on the router because of resetting your router or settings. You should also check your router settings to check your password in wireless settings. We are going to show you both options to check and confirm that your password is correct by following the below steps:
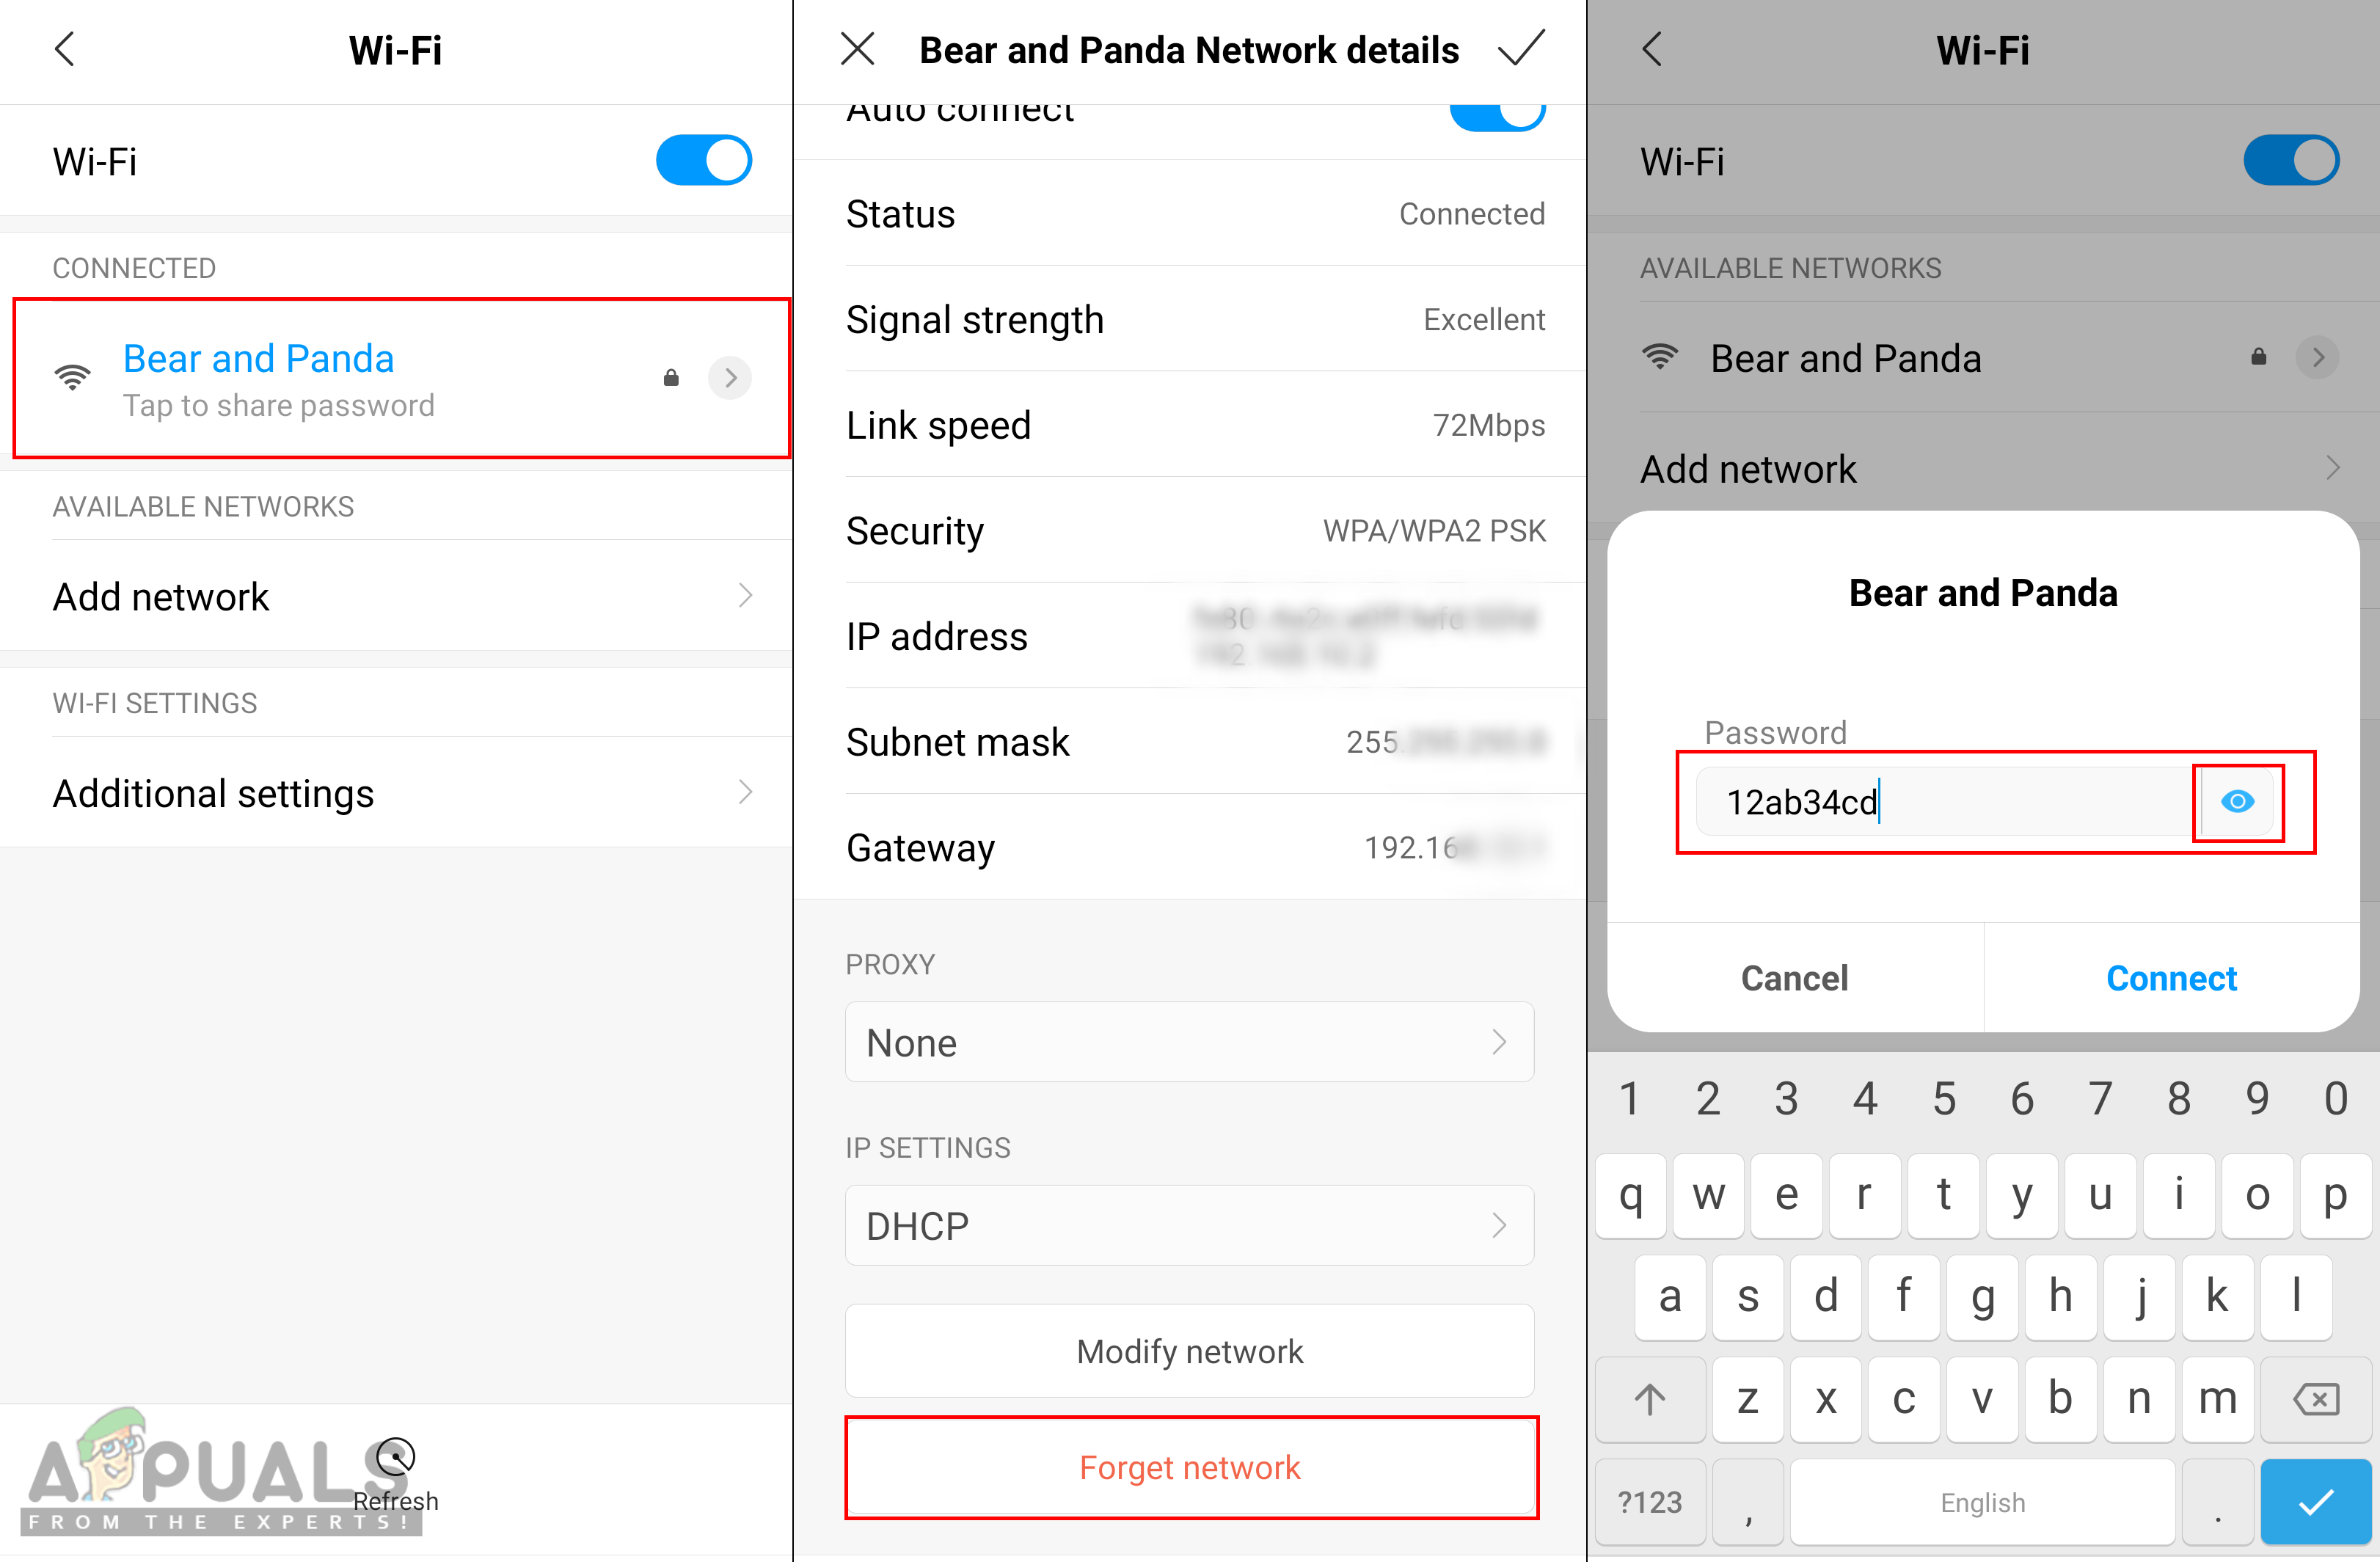
- Go to your phone Settings and tap on WiFi.
- Tap on the WiFi network name that is giving an error and then select Forget the network option.
Note: For some phones, you need to tap and hold the network name and then select the Forget network option. - After that tap on the WiFi network, provide the password and make sure the show password icon is checked to see your password while typing.
Rechecking the password correctly - If it still shows the error, go and check your router settings to confirm the password.
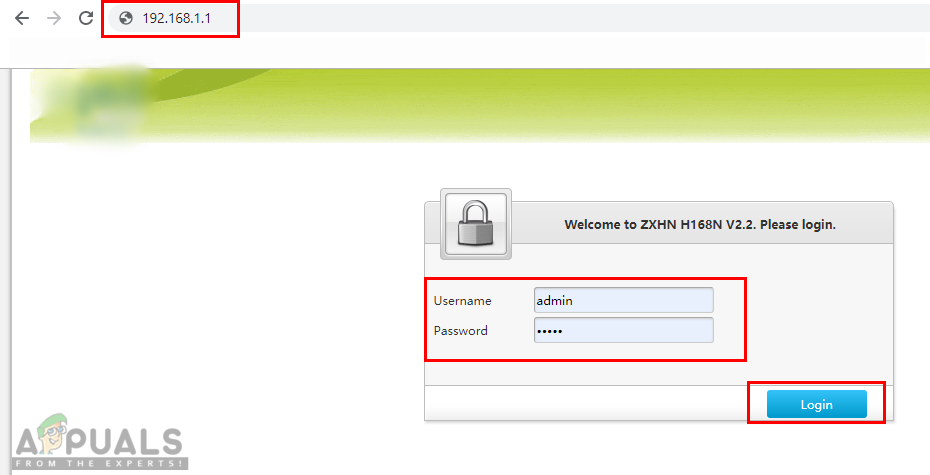
- You can type the IP address ‘192.168.1.1‘ in your computer browser and provide login username and password.
Opening router settings and logging in Note: The above IP address is the default for most, you can find yours by typing this command “ipconfig” in cmd.
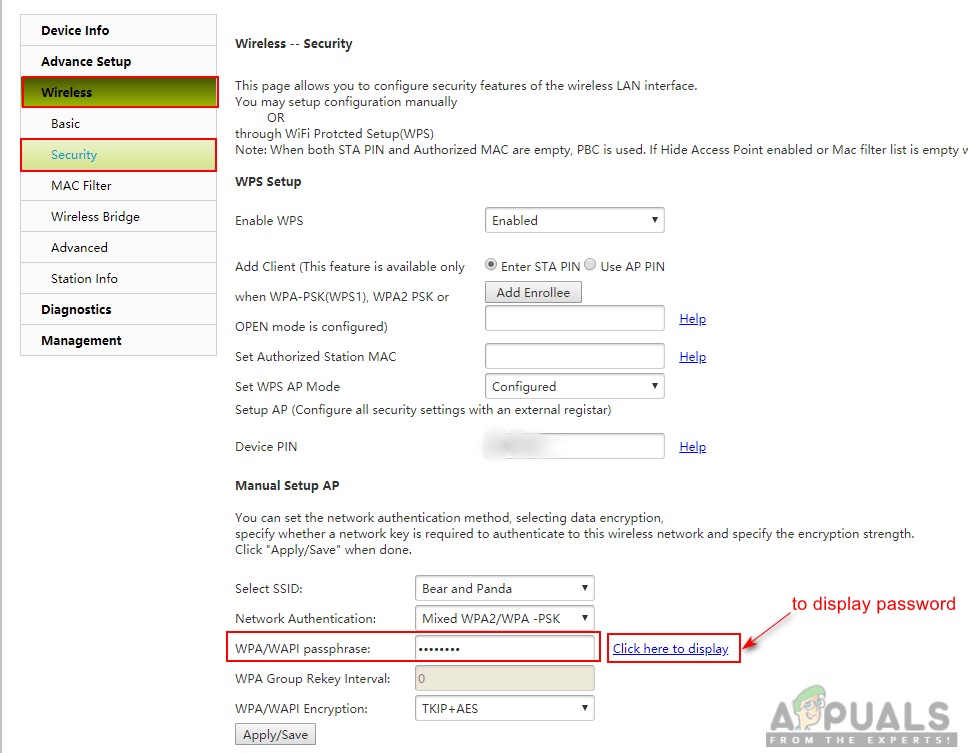
Finding the router IP address - Once you are logged in, go to Wireless > Security and check your password.
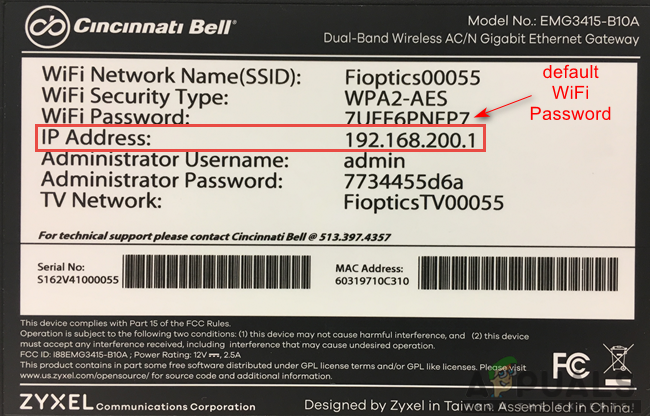
Checking the WiFi password in the router - Some routers also have login and WiFi password listed on the back of the router as shown below:
Router back information.
Method 2: Turning On Airplane Mode
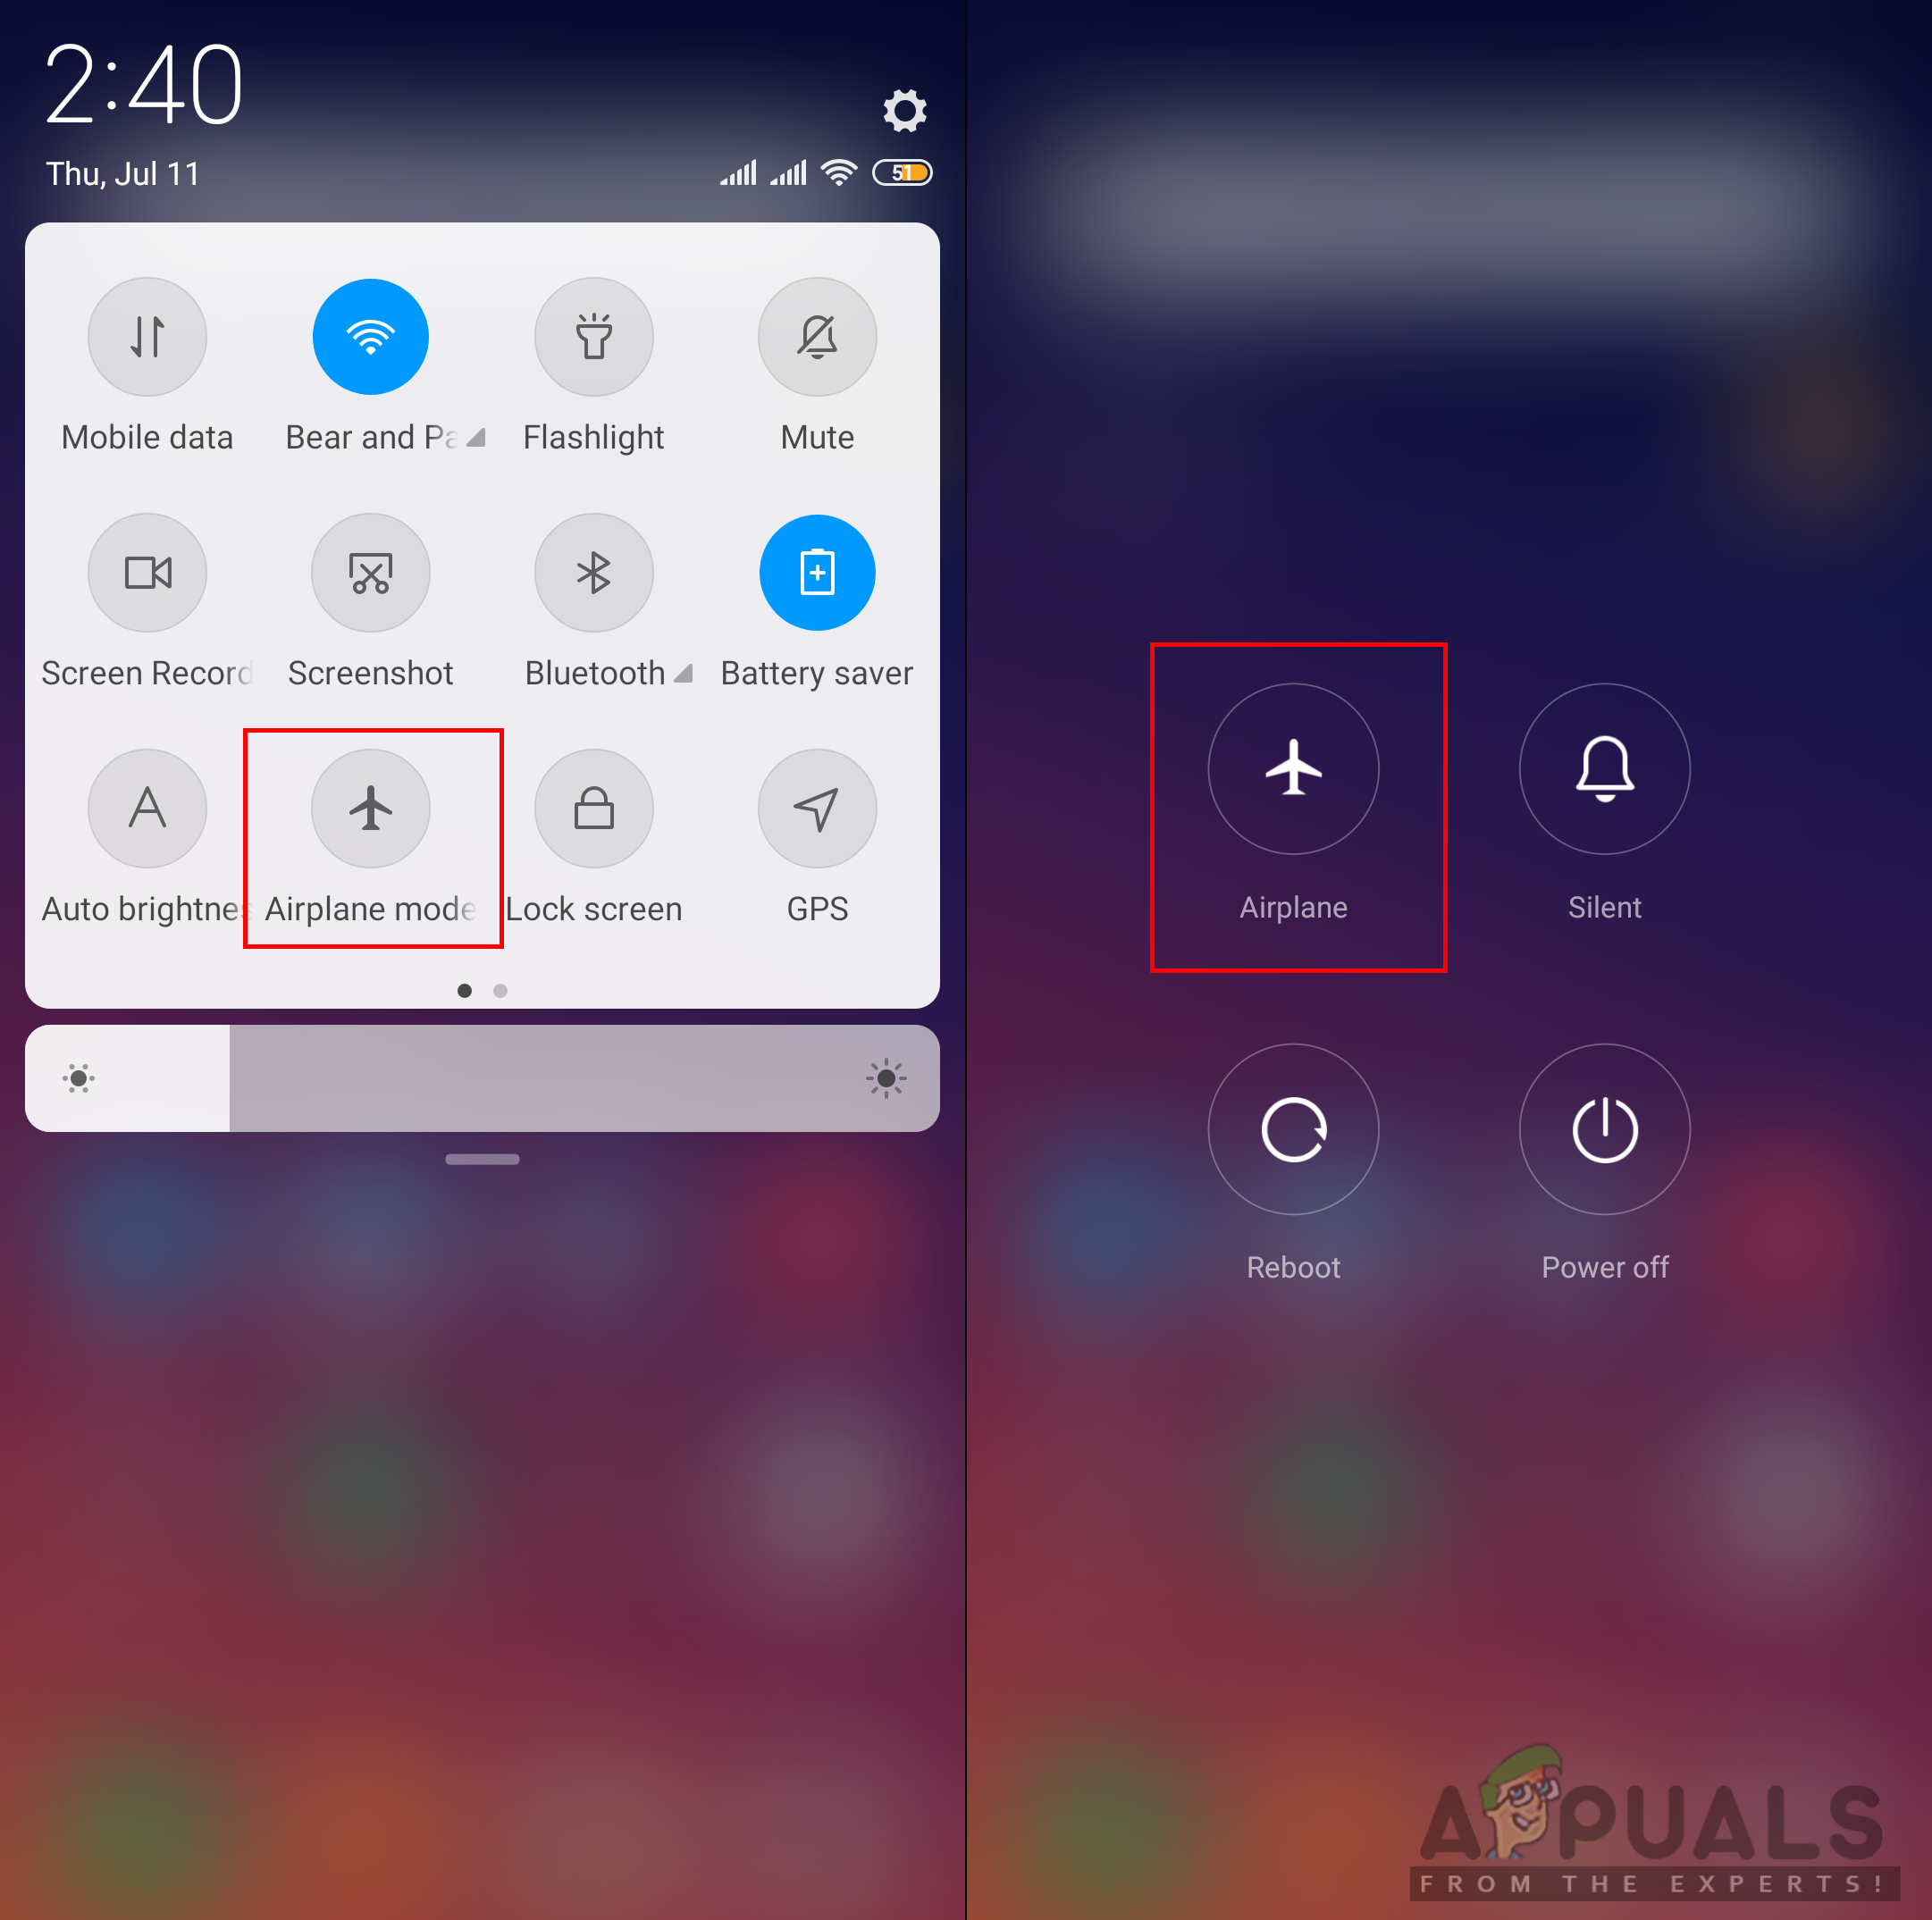
Most of the time, connectivity on the phone become glitched and needs a quick refresh. Turning ON the Airplane Mode will temporarily turn off all the connectivity of the device. You can simply do this by swapping down the notification bar on your main screen and tap on the Airplane Mode option. If you don’t have this option then you need to go to the settings of your phone or use the power button to get to Airplane Mode. After turning ON the Airplane Mode, wait for 30 seconds and then turn it back OFF by using the same method. After applying this method, you can now try connecting to your WiFi network.
Method 3: Reset Network Settings
There is a possible chance that the network settings on the phone can be glitched. Sometimes, the wrong settings of a network can mess up the WiFi network. Several users finding themselves in a similar situation solved this issue by resetting their network settings. You can reset the network settings by following the steps below:
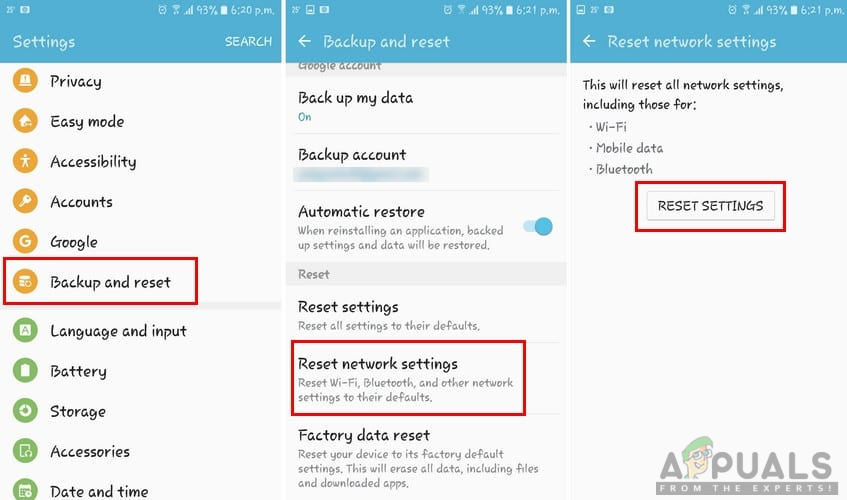
- Go to your phone Settings and open Backup and Reset.
- Scroll down and tap on Reset network settings option.
- Now tap on Reset Settings and confirm the action.
Resetting WiFi network - After resetting network settings go and connect the WiFi network again.
Method 4: Configure IP Address
Sometimes, the culprit can be the IP settings used to connect to the WiFi. When the IP configuration is wrong then the router will not allow internet access. In this method, we will modify the WiFi network connection settings and try the static IP to make it work by using the following steps:
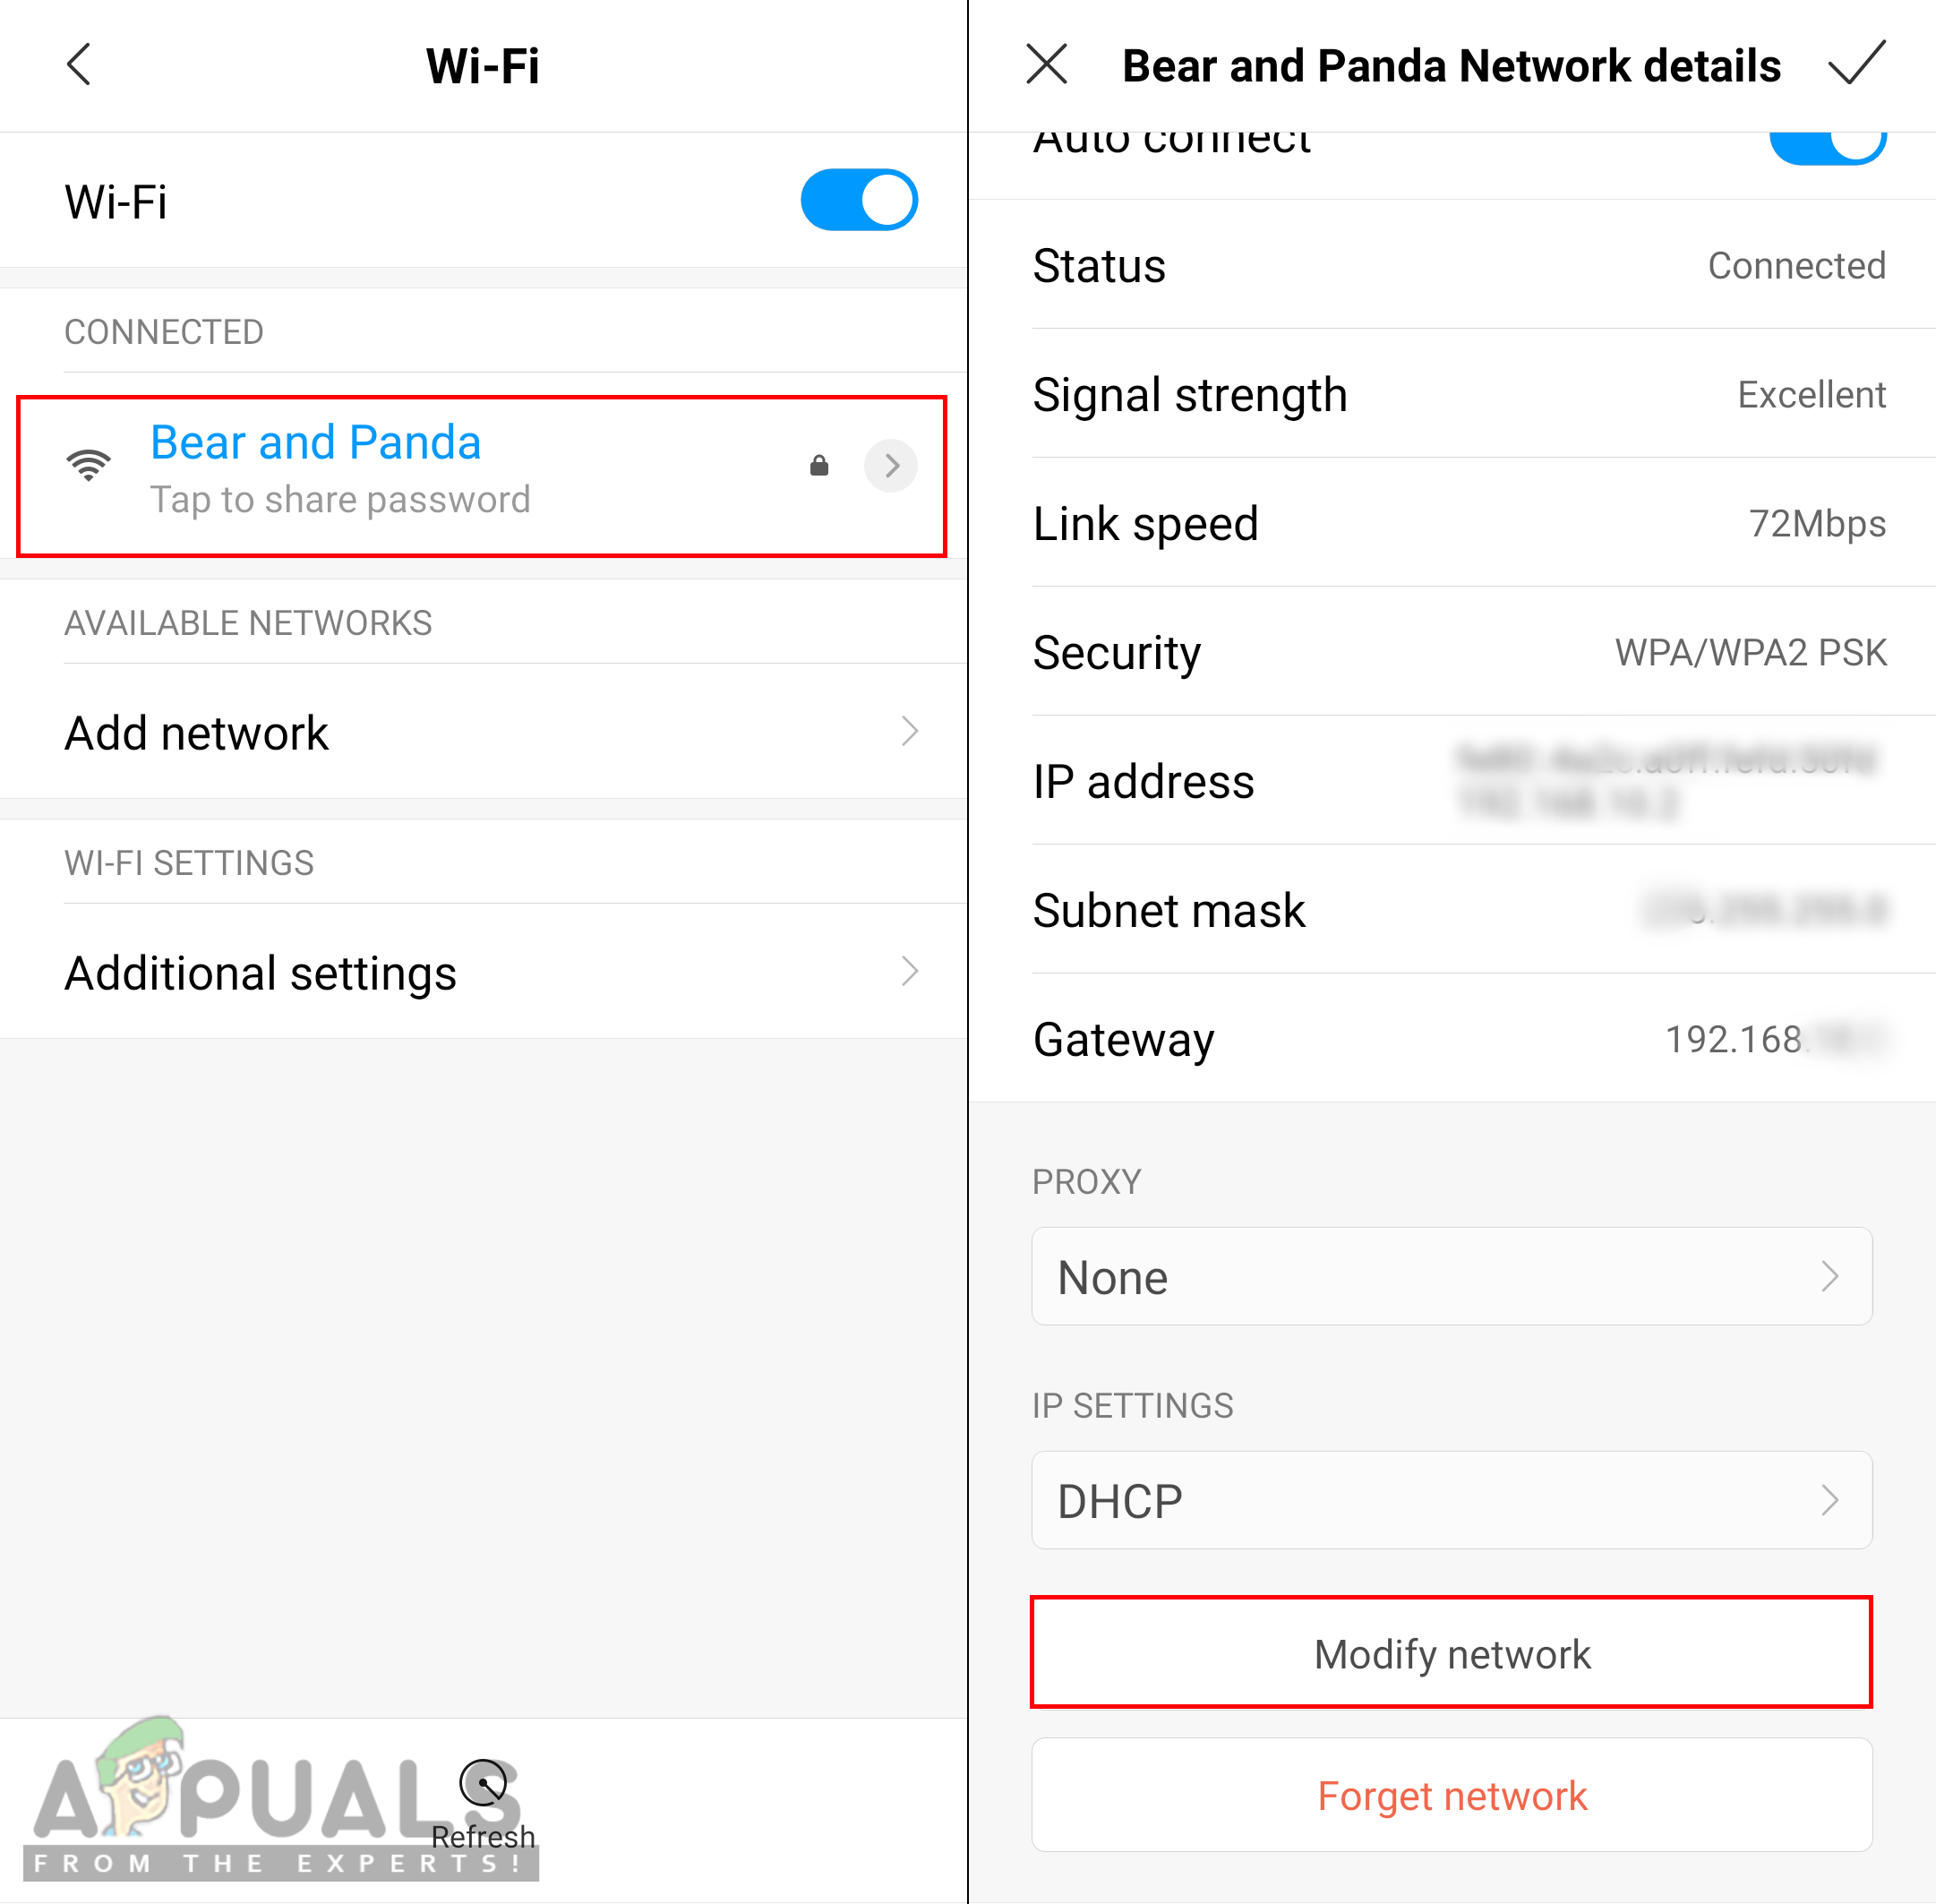
- Go to your phone Settings and tap on WiFi option.
- Now tap on the WiFi network name that is giving an error, then choose the Modify settings.
Note: For some phones, you need to tap and hold the network name and then select the modify option.Opening modify network option - Check the Show Advanced Options if available or you can directly change the settings.
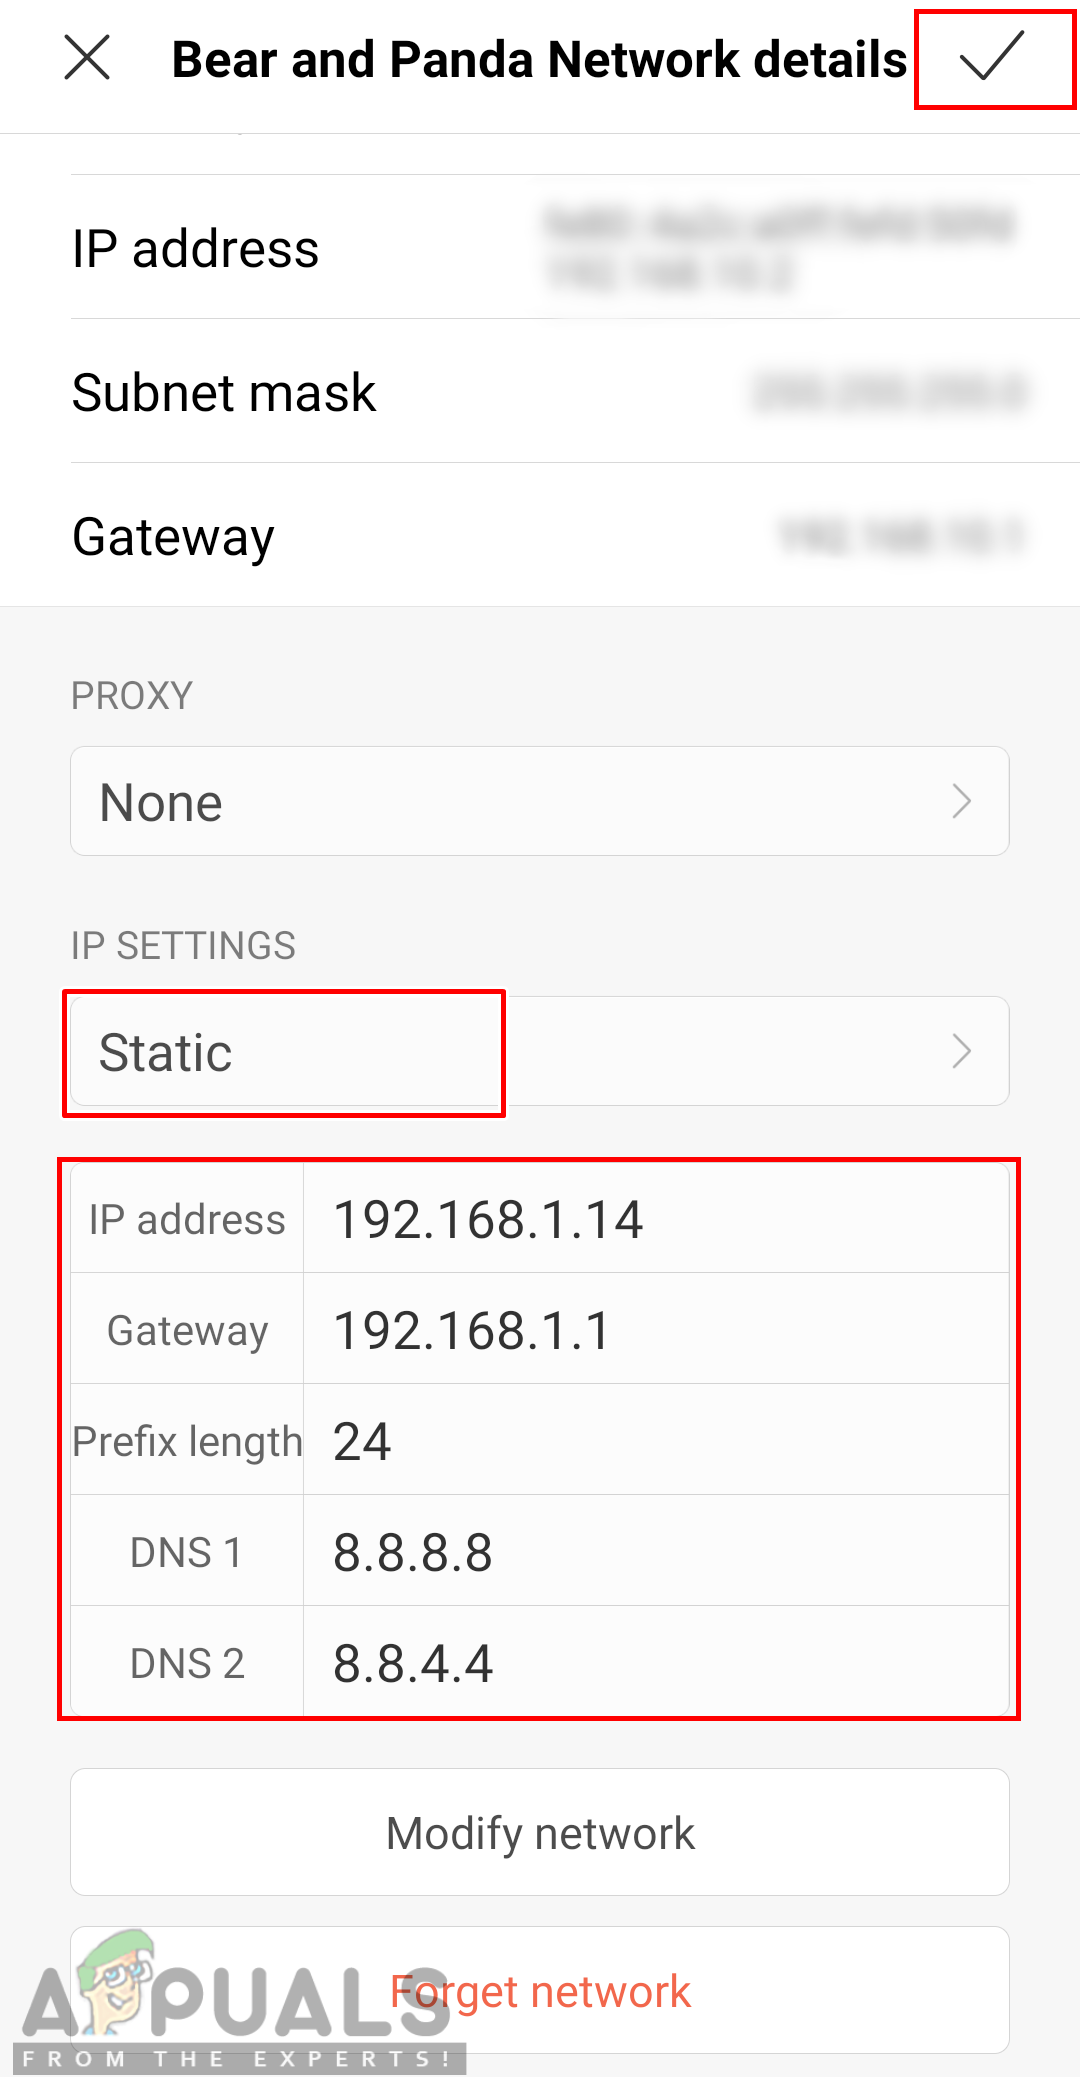
- Tap the IP settings and choose Static for it.
- Scroll down and change the IP address to “192.168.1.14“. The last digit can be changed to any number between ‘1‘ and ‘255‘.
- Other options and DNS number should be the same as shown below:
Configuring IP manually Note: Settings vary for each network, so you can also copy these settings from other devices that are connected to the same network by following the above steps.
- After that, tap on Connect and wait for the network to connect.
If none of the methods shown above helped you at all, you will have to contact your ISP so that he can assist your further regarding this issue.
Kevin Arrows
Kevin is a dynamic and self-motivated information technology professional, with a Thorough knowledge of all facets pertaining to network infrastructure design, implementation and administration. Superior record of delivering simultaneous large-scale mission critical projects on time and under budget.
- Remove From My Forums
-
Question
-
we are unable to RDP to a server.
Both a domain admin account and a local admin account have the same error below:
An authentication error has occurred. The local security authority cannot be contacted.
Remote computer: XX.XX.XX.XX
This could be due to an expired password.
Please update your password if it is expired.
XXXXXXXXXXXXXXXXXXXXXXXXXXXXXXXXXXXXXXXXX
One odd thing. When we use the local admin with the computer name we do not get the error but instead we just a «logon attempt has failed» and do not receive the error above. We only get the error when logon with domain admin and when using
the computer IP.We are needing to access this server and it has already been rebooted.
dsk
-
Edited by
Wednesday, May 31, 2017 3:19 PM
clarification
-
Edited by
Answers
-
-
Marked as answer by
Stoyan ChalakovMVP
Wednesday, May 23, 2018 9:58 AM
-
Marked as answer by
-
https://support.microsoft.com/en-us/help/4295591/credssp-encryption-oracle-remediation-error-when-to-rdp-to-azure-vm
Ended up using the below work around from the link above.
- Open a Command Prompt window as Administrator.
- Run the following command to add a registry value:
REG ADD HKLMSoftwareMicrosoftWindowsCurrentVersionPoliciesSystemCredSSPParameters /v AllowEncryptionOracle /t REG_DWORD /d 2
dsk
-
Edited by
kimdav111
Tuesday, June 5, 2018 9:32 PM -
Marked as answer by
kimdav111
Tuesday, June 5, 2018 9:32 PM
«The past few days my S6 keeps dropping its Wifi connection, no matter where the Wifi is that I’m utilizing (home, work) and reverts back to LTE. It says authentication error occurred. I’ve re-started and done a re-provision, neither of which helped.»
There are several cases just like the one described above where the Android phone users get an authentication error when they connect their phone to a Wifi. this problem is most persistent in an Android device which is trying to establish a secure connection with the wireless network. If you are one such Android device user who is experiencing the problem of authentication error occurred, do not worry! It can be resolved easily! This article is aimed at making the Android phone users more aware of what this authentication problem is and how can the issue be resolved in simple and easy ways.
- Part 1: What Does Authentication Error Occurred Mean?
- Part 2: 10 Basic Ways to Fix Authentication Error Occurred Wi-Fi
- Part 3: One Click to Fix Wifi Authentication Error by Android System Repair
Part 1: What Does Authentication Error Occurred Mean?
Wondering about what does authentication error occurred mean? Whenever you connect your phone or your laptop to a wireless network, a process called Wifi authentication has to be done. In order to authenticate the connection to Wifi from your phone, you need to have the password for the wireless network. But, sometimes even after knowing the correct password to the wireless network you may experience authentication problems while establishing the connection.
This error of an authentication error has occurred the function requested is not supported generally occurs due to the failure of «deal» between the device and the Wifi router. At first, the wireless network password along with the request to connect in encrypted form is sent by the device to the Wifi router. After this, the password sent is decrypted by the Wifi router and the comparison with the stored password is made. If the entered password matches the one stored in Wifi router, the affirmation for the connect request is sent and the device is then allowed to connect to the Wifi network.
There are several reasons why this error of authentication error occurred Wifi may occur. Most of the times, this error occurs when the Wifi router malfunctions. Furthermore, if in case you have recently updated your phone, there could be some sort of issue with the device’s drivers. A security attack can also cause your device to malfunction. Another reason for such an issue maybe the router blockage or unstable connection.
Part 2: 10 Basic Ways to Fix Authentication Error Occurred Wi-Fi
There may be plenty of reasons why the error of an authentication error has occurred may pop up. However, there are several ways in which this can be solved. Some of the most effective ways are given below.
- 1. Reset the Wi-Fi Network
- 2. Restart the Router
- 3. Reset Network Settings
- 4. Turn Airplane Mode on/off
- 5. Check the Number of Supported Devices On Wi-Fi router
- 6. Change Network Security Type
- 7. Change Wireless Network Configuration from DHCP to Static
- 8. Change WiFi to be on always during sleep
- 9. Fix Wi-Fi Authentication Error with WPS Push Button
- 10. Factory Reset Your Android Device
1. Reset the Wi-Fi Network
One of the easiest ways to fix authentication error on your device is to reset the Wifi network, here is how you can do this.
Step 1: From «Settings», tap on «Wifi» and select the network which you wish to reset.

Step 2: Tap on «Forget» and agree to the message on the pop-up window.
Step 3: Turn on the Wifi option on your device and select the network you want to connect to, enter the password and tap on «Connect».
The Wifi network would be reset.
2. Restart the Router
Sometimes, the authentication error may be occurring due to an issue in the Wi-Fi router. To eliminate such a possibility, switch off your router and switch it on again. Connect your device to the Wi-Fi router again and check if the problem persists.
3. Reset Network Settings
Almost all the network issues can be resolved by resetting the network settings on your Android phone in the following way.
Step 1: From «Settings» go to «Backup & Reset».
Step 2: Tap on «Network Settings Reset» and then on «Reset Settings».

When prompted, confirm the process and the network settings on your phone would be reset.
4. Turn Airplane Mode on/off
Most of the issues on your Android phone like the Wifi authentication error occurred can be sorted out by turning on the airplane mode and then turning it off. You can do this by simply selecting «Network & Internet» from your phone settings and toggling the switch in front of «Airplane Mode».
5. Check the Number of Supported Devices On Wi-Fi router
There may be too many devices which are connected to your Wifi router due to which the authentication problem may be occurring. Here is how you can find out about this.
Step 1: There are apps for checking this which is relevant to the company of Wifi router you are using. Open this app.
Step 2: Enter the router’s username and password to log in.
Step 3: Here you can view the devices which are connected to the wireless network.

You can disable the connection to a few devices and check if the authentication problem on your Android device persists.
6. Change Network Security Type
It may be possible that when we try to establish a connection between our device and the Wifi, the device may choose a wrong security type due to which the authentication error occurs. You can check and change this by following the steps below.
Step 1: From Settings, tap on «Add Network» after selecting the wireless network you wish to connect to. If in case the network is already saved, forget the network by following the steps mentioned in the above sections and add it again.
Step 2: On the «Add Network» pop up dialogue box, tap on the down arrow below «Security».
Step 3: Manually select «WPA/WPA2-PSK» and connect to the network.

The network authentication problem will then be solved.
7. Change Wireless Network Configuration from DHCP to Static
The default IP address assignment on your Android device may be set to DHCP which may be causing the authentication error. You can change this to «Static» by following the steps given below.
Step 1: From the «Settings» tap on «Wireless and Networks» and then on «WLAN/WiFi».
Step 2: Tap on the Wifi network which is showing the authentication error.
Step 3: From «IP Settings» switch from «DHCP» to «Static».
Save the settings and see if the problem persists.

8. Change WiFi to be on always during sleep
Sometimes, the Wifi may be off when your device is on sleep, change this by following the steps given below.
Step 1: From the WiFi Settings on your phone, tap on «Advanced».
Step 2: Locate the option to have WiFi on during sleep and switch it to «Never».
Step 3: Reset your phone after this.
Step 4: Then, go back into the same WiFi Settings area and choose «Advanced» and change WiFi to be on always during sleep.

Check if the problem persists.
9. Fix Wi-Fi Authentication Error with WPS Push Button
WPS is used to create a home network with security. Here is how you can fix the authentication problem with this.
Step 1: From «Settings» go to «Wireless & Networks» and tap on «Advanced Settings», you will find WPS options here.
Step 2: Tap on the WPS push button.

Wait for the connection to get established.
10. Factory Reset Your Android Device
This must be your last option if nothing seems to fix the authentication error. Here is how you can factory reset your Android device.
Step 1: From «Settings» tap on «System».
Step 2: From the reset options, tap on «Erase All Data» and then on «Reset Phone».
Step 3: Tap on «Erase Everything» option.

Try establishing the connection with the wireless network and see if the problem persists.
Part 3: One Click to Fix Wifi Authentication Error by Android System Repair
The best way to fix any sort of problem with your Android device is by using ReiBoot for Android to repair your Android phone. This is an extremely useful tool which can effectively fix all the major and minor technical issues with your Android device. Here is how you can use it to fix the authentication problem.

Step 1 After downloading and installing the tool, launch it on your system and connect your Android device to it. From the main interface, select «Repair Android Device».

Step 2 Click on «Repair Now», select the correct information about your Android device and click on «Next».

Step 3 Download the latest firmware package and click on «Repair Now».

Step 4 Upon downloading the firmware, you can start repairing the Android system.

If you are sure that «process com.android.phone has stopped» error has been appearing due to a fault in your Android system, you can use Tenorshare ReiBoot to effectively fix the Android OS, with ease.
Summary
The repair progress will be shown on the screen and you will be notified once the repair is done. This is how easy it is to fix Android Wifi authentication problem with the help of ReiBoot for Android.

How to Fix: RDP “an authentication error has occurred”
Fix the authentification error using these quick fixes
by Matthew Adams
Matthew is a freelancer who has produced a variety of articles on various topics related to technology. His main focus is the Windows OS and all the things… read more
Updated on December 20, 2022
Reviewed by
Vlad Turiceanu
Passionate about technology, Windows, and everything that has a power button, he spent most of his time developing new skills and learning more about the tech world. Coming… read more
- An authentication error has occurred error message pops up on your desktop when you try to connect to another PC with the Remote Desktop Connection app? First, change the Remote Desktop settings.
- To fix the error, you can also try to enable the Encryption Oracle Remediation policy setting with the Group Policy Editor. You can read in the guide below how exactly you can do that.
- In times like this, the remote desktop connection is a very useful feature but comes with some simple-to-solve errors, such as this one.
XINSTALL BY CLICKING THE DOWNLOAD FILE
This software will repair common computer errors, protect you from file loss, malware, hardware failure and optimize your PC for maximum performance. Fix PC issues and remove viruses now in 3 easy steps:
- Download Restoro PC Repair Tool that comes with Patented Technologies (patent available here).
- Click Start Scan to find Windows issues that could be causing PC problems.
- Click Repair All to fix issues affecting your computer’s security and performance
- Restoro has been downloaded by 0 readers this month.
Some users have stated that An authentication error has occurred error message pops up on their Windows desktops.
The error occurs when they try connecting to another PC with the Remote Desktop Connection app.
This issue has become increasingly prevalent since May 2018 updates for Windows 10. These are a few resolutions that might fix the authentication error that has occurred error in Windows.
- How can I fix Remote desktop an authentication error has occurred?
- 1. Adjust the Remote Desktop Settings
- 2. Enable Encryption Oracle Remediation
- 3. Edit the Registry
- 4. Remove the May Updates
- 5. Perform an in-place upgrade
How can I fix Remote desktop an authentication error has occurred?
1. Adjust the Remote Desktop Settings
To fix the Remote desktop an authentication error has occurred the function requested is not supported error, you need to adjust remote desktop settings by doing the following:
- Press the Windows key + R hotkey.
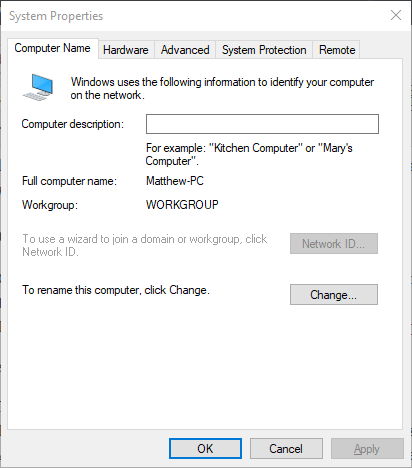
- Enter sysdm.cpl in Run’s Open text box and click OK to open the window below.
- Then select the Remote tab.
- Deselect the Allow connections only form computers running Remote Desktop with Network Level Authentication (recommended) option on the Remote tab.
- Press the Apply and OK buttons.
2. Enable Encryption Oracle Remediation
To fix The remote desktop an authentication error has occurred, the function requested is not supported error, try enabling the Encryption Oracle Remediation policy setting with the Group Policy Editor.
- You can open the Group Policy Editor in Windows 10 Pro and Enterprise by entering gpedit.msc in Run window.
- Click Computer Configuration on the left of the Group Policy Editor window.
- Then select Administrative Templates > System > Credentials Delegation on the left of the window.
- Next, click the Encryption Oracle Remediation on the right to open that setting’s window.
- Select the Enable radio button.
- Then select the Vulnerable option from the Protection drop-down menu.
- Click the Apply button.
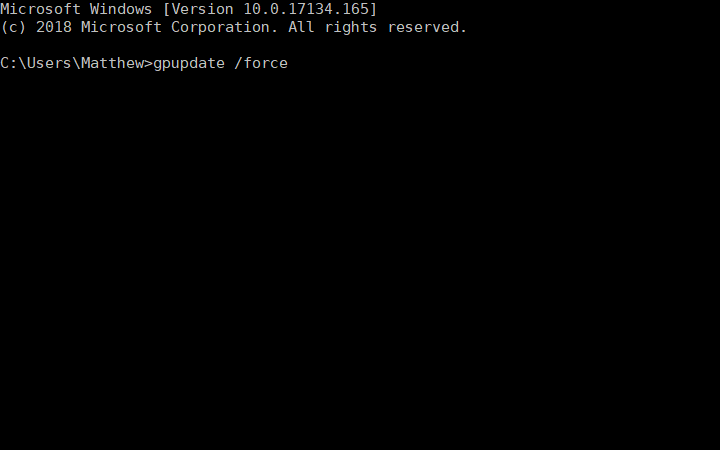
- For the new group policy setting to take immediate effect, enter cmd in Run to open the Command Prompt. Then input ‘gpupdate /force’ in the Prompt’s window and press Enter.
3. Edit the Registry
In order to fix the Remote desktop authentication error that has occurred, the function requested is not supported error, you need to edit the AllowEncryptionOracle registry key.
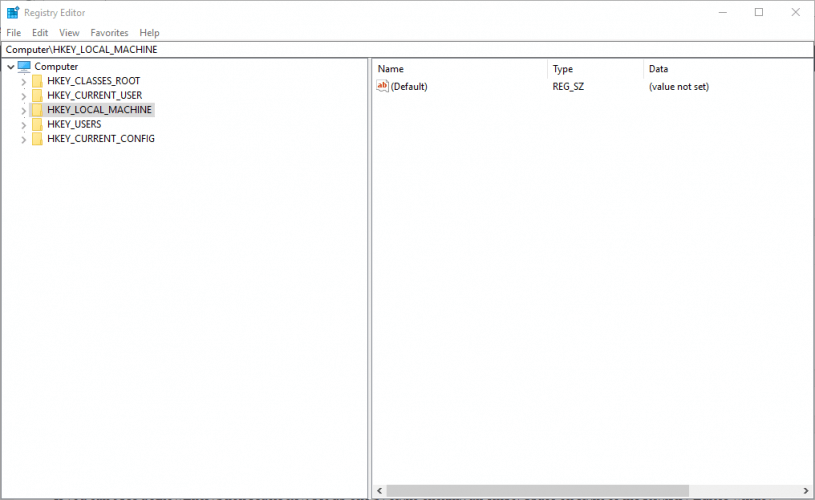
- To do that, enter regedit in Run window and press Return to open the Registry Editor.
- Then open this key in the Registry Editor:
HKEY_LOCAL_MACHINESoftwareMicrosoftWindowsCurrentVersionPoliciesSystemCredSSPParameters
- Double-click the AllowEncryptionOracle DWORD to open its Edit DWORD window.
- Enter the value ‘2‘ in the Value data text box, and press the OK button.
- If you can’t see the AllowEncryptionOracle DWORD, set up a new DWORD by right-clicking an empty space on the right of the Registry Editor window and selecting New > DWORD. Enter ‘ AllowEncryptionOracle‘ as the DWORD title.
- Fix error code 0x800706be & install Windows updates smoothly
- Error Opening File for Writing: 9 Methods to Fix This Issue
- Fix: The Local Device Name is Already in Use in Windows 10
- How to Fix USB Error Code 43 on Windows 10
4. Remove the May Updates
Some PC issues are hard to tackle, especially when it comes to corrupted repositories or missing Windows files. If you are having troubles fixing an error, your system may be partially broken.
We recommend installing Restoro, a tool that will scan your machine and identify what the fault is.
Click here to download and start repairing.
On the Remote Desktop, an authentication error has occurred the function requested is not supported error is primarily due to the May KB4103727 Windows 10 update.
Thus, removing the KB4103727 update from Windows on the client desktop or laptop might fix the Remote Desktop connection error. You can uninstall those updates as follows.
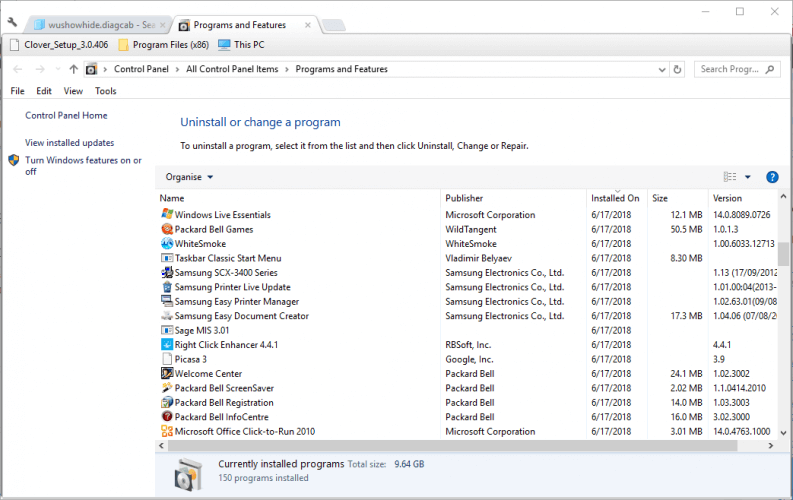
- Open the Run accessory with the Windows key + R keyboard shortcut.
- Enter appwiz.cpl in Run’s Open text box, and then click the OK button.
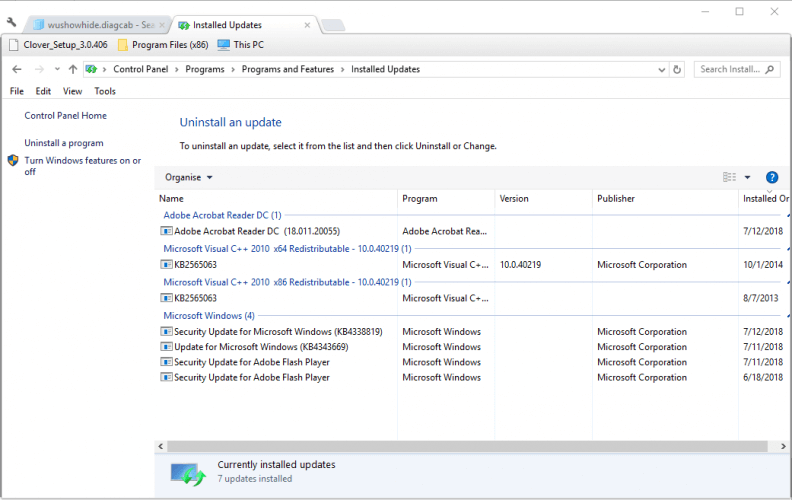
- Click View installed updates to open the window directly below.
- Then select the KB4103727 or KB4103718 update and click Uninstall.
- Click Yes to confirm.
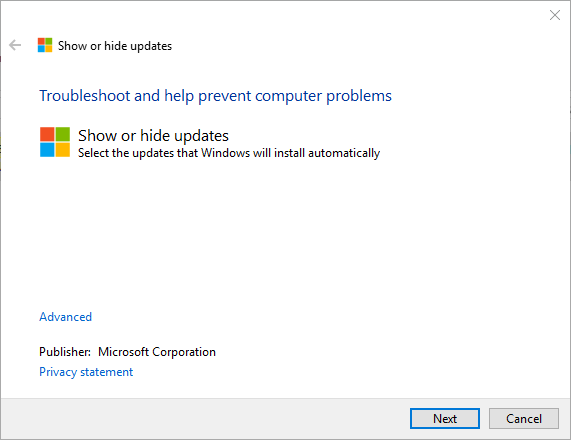
- You can ensure the update doesn’t reinstall with the Show or hide updates utility. Click Download the Show or hide updates troubleshooter package now on this page to save that utility to your HDD.
- Click wushowhide.diagcab in the folder you saved the Show or hide updates utility in to open the window shown below.
- Then click Next, and select the Hide updates option.
- Select the KB4103727 or KB4103718 updates if they are on the update list.
- Press Next to block the selected updates.
5. Perform an in-place upgrade
If you want to fix An authentication error that has occurred code 0x80004005 error, it’s advised to perform an in-place upgrade. To do that, follow these steps:
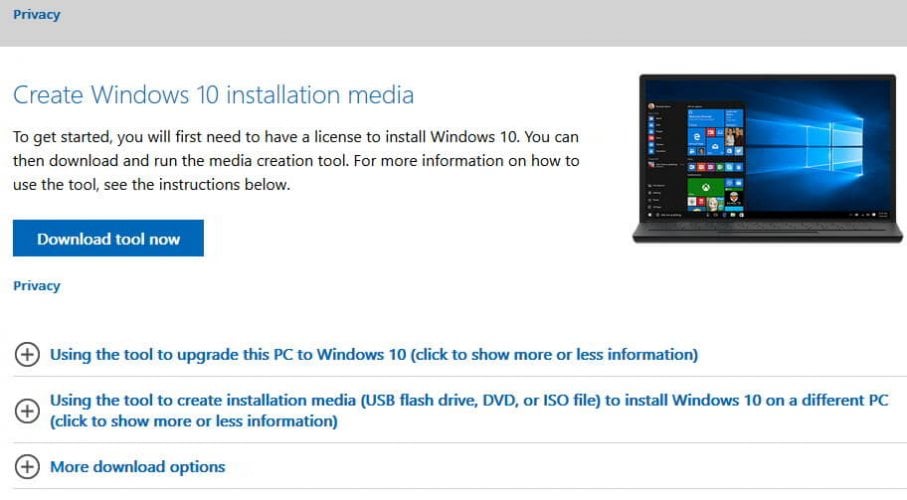
- Download Media Creation Tool from Microsoft’s website and run it.
- Select Upgrade this PC now and click Next.
- Choose Download and install updates (recommended) and click Next.
- Follow instructions on the screen. After you get to the Ready to install screen, click on Change what to keep.
- Select Keep personal files and apps option and then click Next.
- Follow the instructions on the screen to complete the upgrade process.
- Once the process is finished, check if the problem is still there.
If you need more support in terms of remote desktop software solutions, you can visit our article where you will find the best remote troubleshooting tools for your Windows 10 PC. We suggest you try Mikogo, a lightweight remote control software that efficiently offers remote troubleshooting support.
Those are some of the resolutions that will kick-start your Remote Desktop connection. This post also provides further tips for fixing Remote Desktop connections.
- How can I fix Remote Desktop error 0x204?
Start by checking the Remote Desktop Protocol. If that doesn’t solve the problem, read our complete guide to fix the 0x204 error.
- What authentication error means?
Authentication error means that the connection to a certain device failed because the authentification data you provided doesn’t correspond to the ones you entered when you created the secure account in that device.
Newsletter
Обновлено 25.11.2019
Добрый день! Уважаемые читатели и гости IT блога Pyatilistnik.org, в прошлый раз мы с вами чинили HDD с поврежденной файловой системой и состоянием RAW уверен, что вам удалось это сделать. Сегодня я в очередной раз переведу наш вектор траблшутера в сторону терминальных столов, а именно мы рассмотрим ситуацию, что когда вы пытаетесь подключиться к удаленному серверу по RDP протоколу, а у вас после ввода логина и пароля, выскакивает ошибка, что вы не прошли проверку подлинности и причиной ошибки может быть исправление шифрования CredSSP. Давайте разбираться, что за зверь, этот CredSSP и как вам получить доступ к вашему серверу.
Как выглядит ошибка credssp
Перед тем, как я покажу вам известные мне методы ее устранения, я бы как обычно хотел подробно описать ситуацию. Вчера при попытке подключиться к своему рабочему компьютеру, работающему на Windows 10 1709, с терминального стола, входящего в RDS ферму на Windows Server 2012 R2, я получил ошибку после ввода логина и пароля:
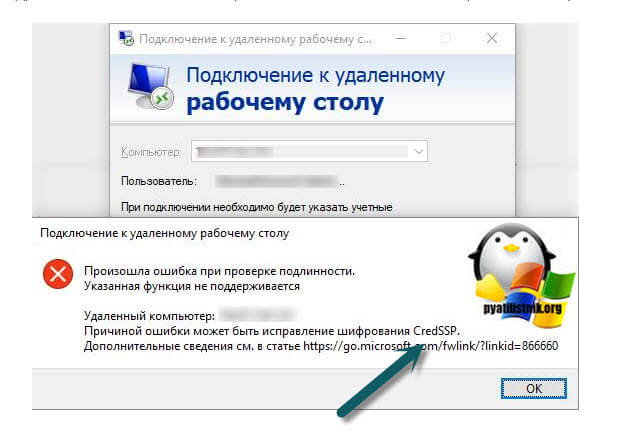
An authentication error has occurred. The function requested is not supported. Remote computer name. This coild be to CredSSP encryption oracle remediation.
Ну и конечно в русском исполнении:
Произошла ошибка при проверке подлинности. Указанная функция не поддерживается. Удаленный компьютер имя. Причиной ошибки может быть исправление шифрования CredSSP
Получается двоякая ситуация, что RDP как бы работает, но вот по какой-то причине ваши учетные данные на принимающей стороне не соответствуют, каким-то критериям, давайте разбираться, что это за зверь CredSSP.
Назначение CredSSP
Что такое CredSSP — это Win32 API, используемый системами Microsoft Windows для выполнения различных операций, связанных с безопасностью, таких как аутентификация. SSPI функционирует, как общий интерфейс для нескольких поставщиков поддержки безопасности (SSP). Поставщик поддержки безопасности — это библиотека динамической компоновки (DLL), которая делает один или несколько пакетов безопасности доступными для приложений.
CredSSP позволяет приложению делегировать учетные данные пользователя от клиента целевому серверу для удаленной аутентификации. CredSSP предоставляет зашифрованный канал протокола безопасности транспортного уровня . Клиент проходит проверку подлинности по зашифрованному каналу с использованием протокола SPNEGO (Simple and Protected Negotiate) с Microsoft Kerberos или Microsoft NTLM.
После проверки подлинности клиента и сервера клиент передает учетные данные пользователя на сервер. Учетные данные дважды шифруются с использованием ключей сеанса SPNEGO и TLS. CredSSP поддерживает вход в систему на основе пароля, а также вход в систему с использованием смарт-карт на основе X.509 и PKINIT.
Подробнее на Microsoft https://docs.microsoft.com/en-us/windows/desktop/secauthn/credential-security-support-provider
Windows SSP
Следующие поставщики общих служб устанавливаются вместе с Windows:
- NTLM (Представлено в Windows NT 3.51 ) (msv1_0.dll) — обеспечивает проверку подлинности NTLM с запросом/ответом для клиент-серверных доменов до Windows 2000 и для не доменной аутентификации (SMB /CIFS).
- Kerberos (Представлен в Windows 2000 и обновлен в Windows Vista для поддержки AES ) (kerberos.dll). Предпочтителен для взаимной аутентификации клиент-серверного домена в Windows 2000 и более поздних версиях.
- Согласование (введено в Windows 2000) (secur32.dll) — выбирает Kerberos и, если не доступно, протокол NTLM. SSP обеспечивает возможность единого входа , иногда называемую встроенной аутентификацией Windows (особенно в контексте IIS). В Windows 7 и более поздних версиях представлен NEGOExts, в котором согласовывается использование установленных пользовательских SSP, которые поддерживаются на клиенте и сервере для аутентификации.
- Безопасный канал (он же SChannel) — Представлен в Windows 2000 и обновлен в Windows Vista и выше для поддержки более надежного шифрования AES и ECC. Этот поставщик использует записи SSL/TLS для шифрования полезных данных. (Schannel.dll)
- PCT (устарел) реализация Microsoft TLS/SSL — криптография SSP с открытым ключом, которая обеспечивает шифрование и безопасную связь для аутентификации клиентов и серверов через Интернет. Обновлено в Windows 7 для поддержки TLS 1.2.
- Digest SSP (Представлено в Windows XP ) (wdigest.dll) — Обеспечивает проверку подлинности HTTP и SASL на основе запросов/ответов между системами Windows и не-Windows, где Kerberos недоступен.
- Учетные данные (CredSSP) (Представлено в Windows Vista и доступно в Windows XP с пакетом обновления 3 (SP3)) (credssp.dll) — обеспечивает SSO и проверку подлинности на уровне сети для служб удаленных рабочих столов.
- Аутентификация с распределенным паролем (DPA) — (Представлено в Windows 2000) (msapsspc.dll) — Обеспечивает аутентификацию через Интернет с использованием цифровых сертификатов.
- Криптография с открытым ключом «пользователь-пользователь» (PKU2U) (представлена в Windows 7 ) (pku2u.dll) — обеспечивает одноранговую аутентификацию с использованием цифровых сертификатов между системами, которые не являются частью домена.
Подробнее на https://en.wikipedia.org/wiki/Security_Support_Provider_Interface
Причины ошибки шифрования CredSSP
В марте 2018 года, компания Microsoft выпустила обновление безопасности для устранения уязвимостей для протокола поставщика поддержки безопасности учетных данных (CredSSP) под именем CVE-2018–0886 (https://support.microsoft.com/en-us/help/4093492/credssp-updates-for-cve-2018-0886-march-13-2018), используемого подключениями по протоколу удаленного рабочего стола (RDP) для клиентов Windows и Windows Server. Как только пользователи и системные администраторы произвели установку апдейтов, то по всему миру начались массовые жалобы, что люди не могут подключаться по протоколу RDP к серверам, компьютерам, получая ошибку, что причиной ошибки может быть шифрование CredSSP.
К сожалению 99% людей и администраторов совершают одну и туже ошибку, они сразу ставят обновления, не дождавшись пары дней после их выхода. Обычно этого времени хватает, чтобы вендор определил проблемы и отозвал глючное обновление.
Уязвимость в протоколе Credential Security Support Provider (CredSSP — провайдер поддержки безопасности учетных данных) допускала удаленный запуск произвольного кода на уязвимой системе и 8 мая 2018 г. Microsoft изменила уровень безопасности подключения с Vulnerable на Mitigated и начались проблемы подключения к удаленному рабочему столу по RDP. Ранее вы могли удаленно подключаться с обновленной машины к машинам без обновления безопасности, так сказать в мягком режиме. Однако с последним обновлением, Microsoft усилила безопасность, и вы больше не можете подключаться к компьютерам без обновления закрывающего брешь CVE-2018–0886.
Под раздачу попали буквально все, клиентские ОС Windows 7, Windows 8.1, Windows 10 с которых были попытки подключиться к RDS ферме или RemoteApp приложениям работающим на Windows Server 2008 R2 и выше. Если бы вы читали ветки обсуждений в эти дни, то вы бы поняли все негодование людей, особенно с запада.
Варианты исправления ошибки CredSSP
На самом деле вариантов много, есть правильные, есть и временные и обходные, которые нужно сделать быстро, чтобы хоть как-то работало, так как бизнес может в этот момент простаивать и терять деньги.
- Вы можете удалить новое обновление безопасности, самый плохой вариант, но в ответственные моменты, иногда используется, чтобы перенести работы на вечер или ночь
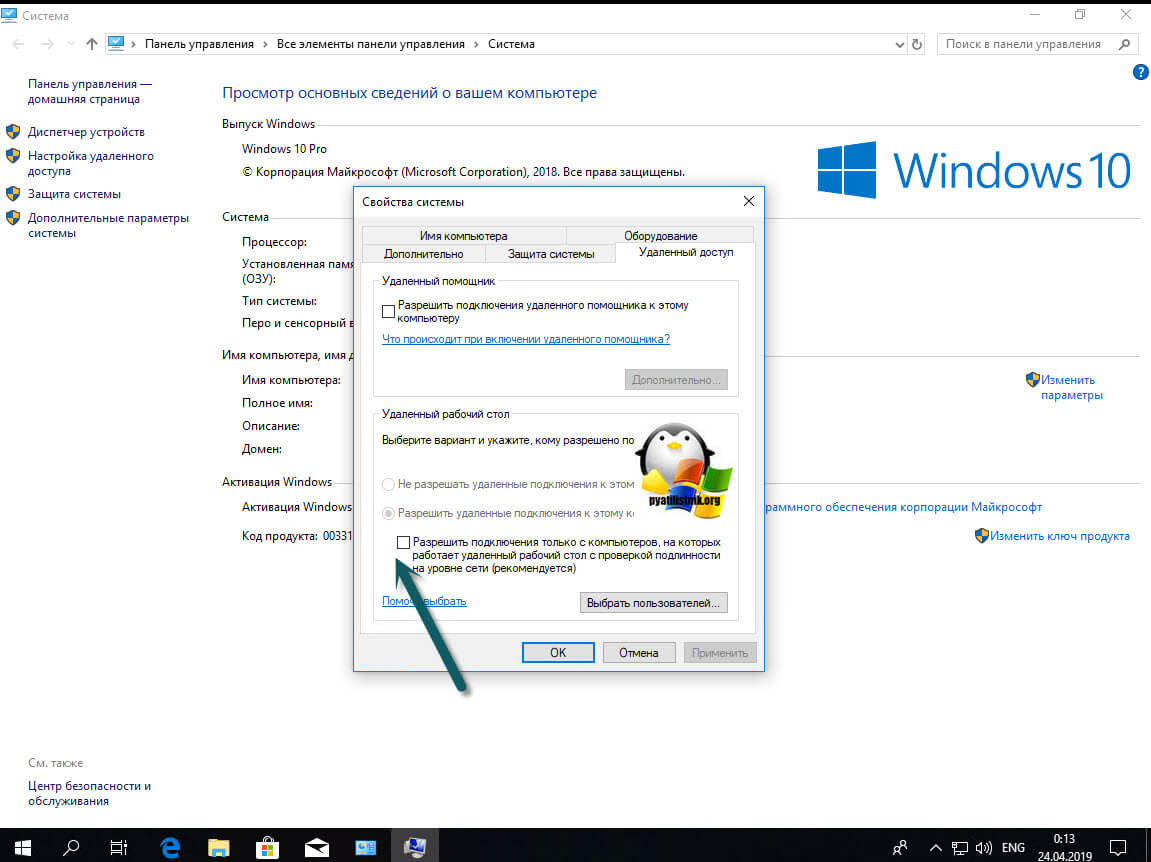
- Если нужно быстро получить доступ к серверу и избежать проверку подлинности credssp, то я вам советую отключить на принимающем подключении сервере галку NLA (Network Level Authentication) в русском варианте «Разрешить подключение только с компьютеров, на которых работает удаленный рабочий стол с проверкой подлинности на уровне сети»
- То же быстрый метод и на массовое применение, это использование групповой политики, которая изменит шифрование Oracle Remediation
- Ну и самый правильный метод, это установка обновлений на все ваши системы
Отключаем credssp в Windows через NLA
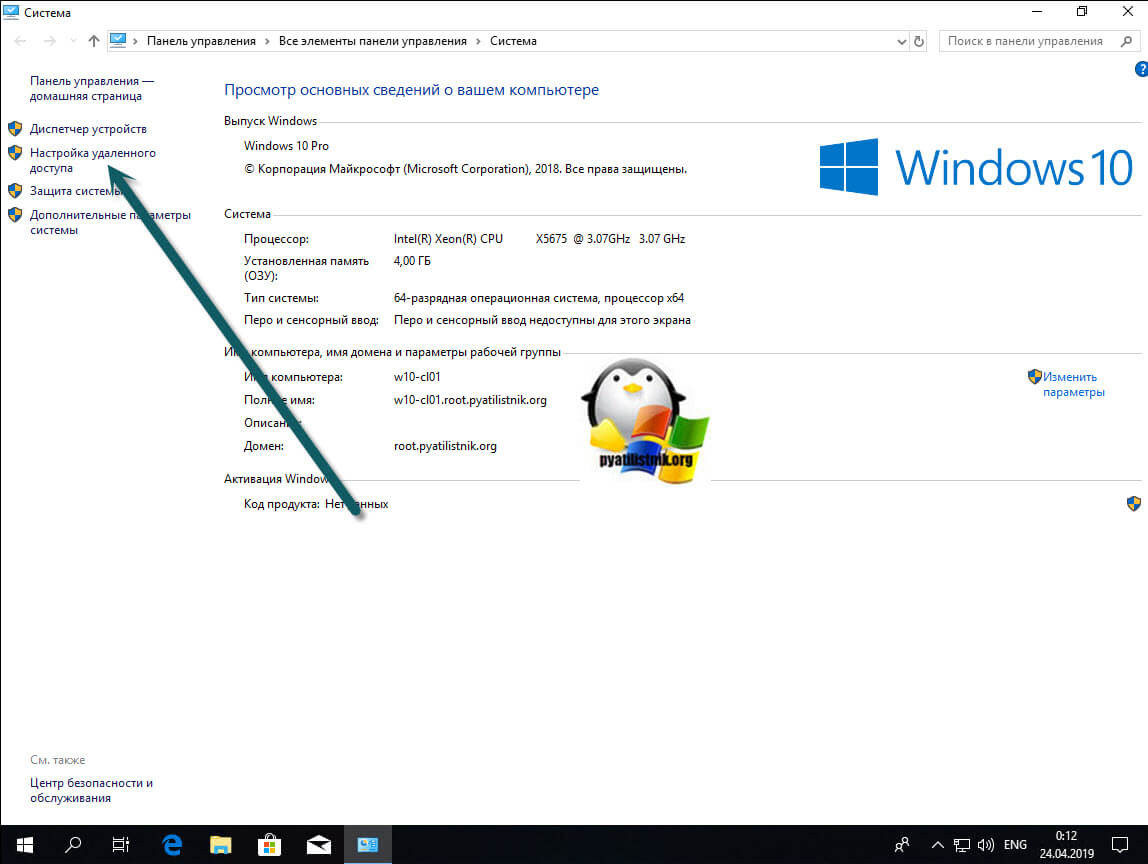
Данный метод выхода из ситуации я бы рассматривал, как быстрое, временное решение, до того, как вы установите обновления безопасности. Чтобы разрешить удаленное подключение к серверу и избегать ситуации, что произошла ошибка при проверке подлинности credssp, сделайте вот что. Откройте свойства моего компьютера, попав в систему, так же можно нажать одновременно WIN+Pause Breake или как вариант в командной строке ввести control /name Microsoft.System. В окне «Система» находим пункт меню «Настройка удаленного доступа»
Снимите галку «Разрешить подключение только с компьютеров, на которых работает удаленный рабочий стол с проверкой подлинности на уровне сети»
После этого вы легко сможете подключиться к данному компьютеру или серверу, но как быть что вы не можете туда попасть и снять эту галку, тут нам на помощь придет реестр Windows. Вы можете удаленно создать нужные ключи реестра, которые отключат галку NLA или политику CredSSP. Для этого вы можете пойти двумя путями:
- Использовать сетевой реестр Windows
- Использовать удаленное управление компьютером, например PsExec.exe, я вам с помощью него уже показывал, как открывать порты в брандмауэре, удаленно.
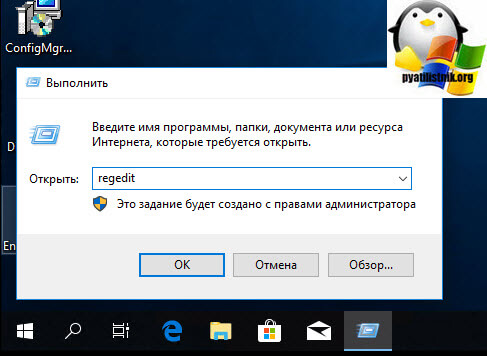
Давайте попробуем через удаленный реестр, для этого открываем Regedit, через окно «Выполнить».
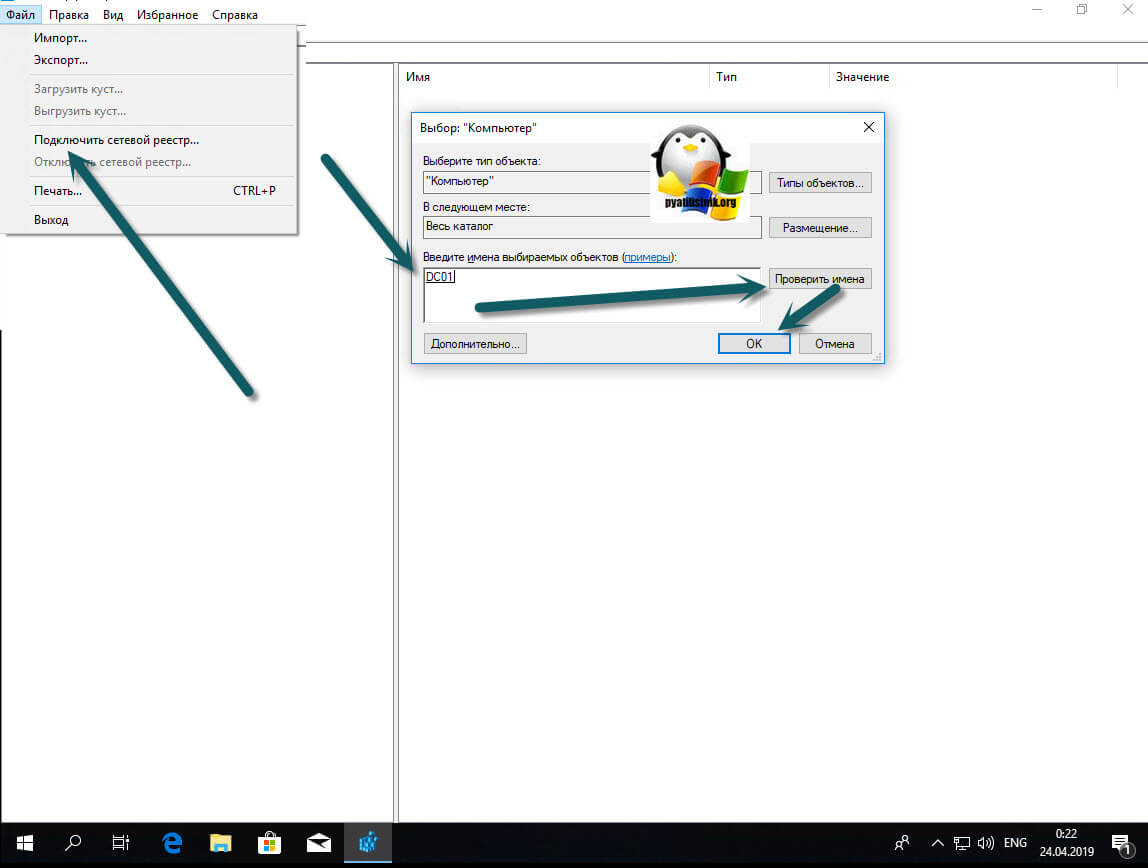
Из меню «Файл» выберите пункт «Подключить сетевой реестр», далее найдите нужный вам сервер.
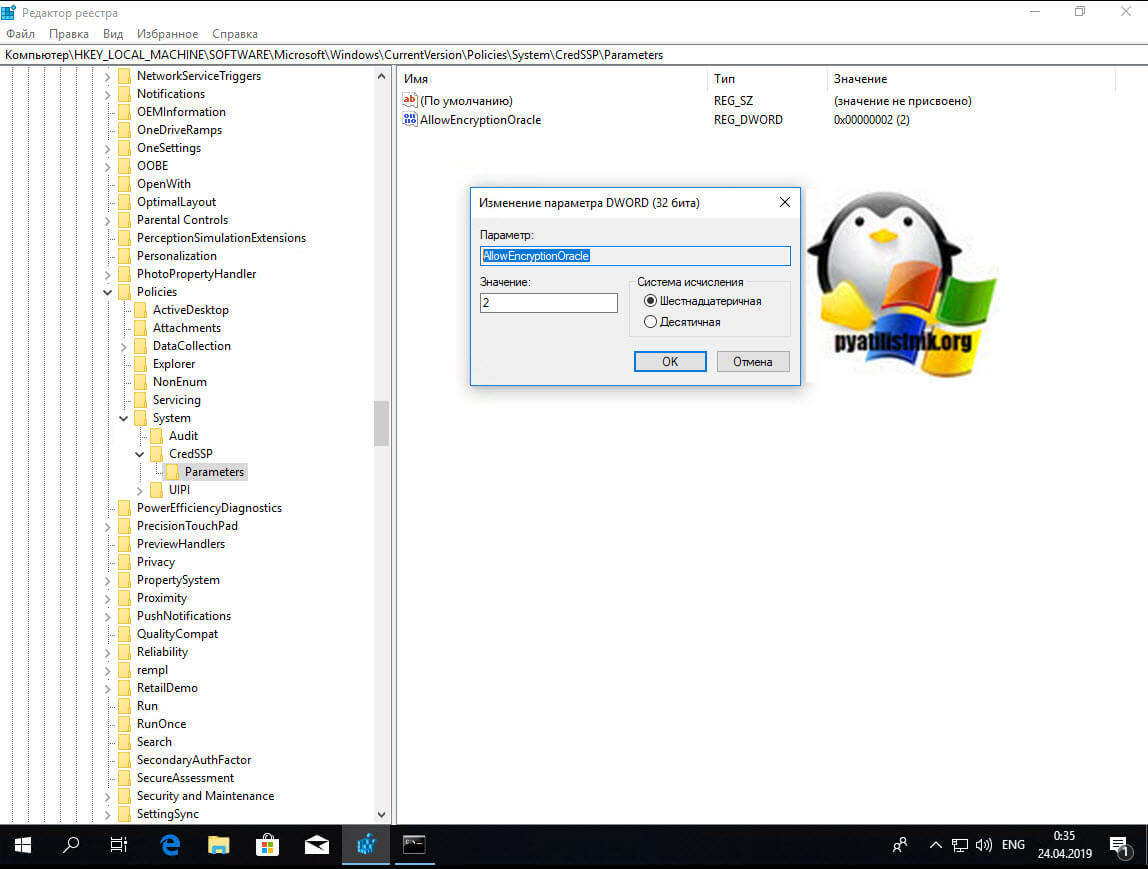
У вас подключится дополнительный реестр с двумя кустами. Переходите по пути (Если у вас не будет CredSSPParameters, то нужно будет их создать):
HKLMSoftwareMicrosoftWindowsCurrentVersion PoliciesSystemCredSSPParameters
Тут вам необходимо создать REG_DWORD ключ с именем AllowEncryptionOracle и значением 2. В данном варианте политика CredSSP выставит Уязвимый уровень — это самый низкий уровень защиты. Это позволит вам подключаться к серверам удаленно, используя RDP. Однако это подвергнет серверы атакам.
Или можно так же отключить NLA, для этого найдите ветку реестра:
HKEY_LOCAL_MACHINESYSTEMCurrentControlSetControl Terminal ServerWinStationsRDP-Tcp
Найдите там ключ SecurityLayer и выставите ему значение 0, чтобы деактивировать Network Level Authentication.
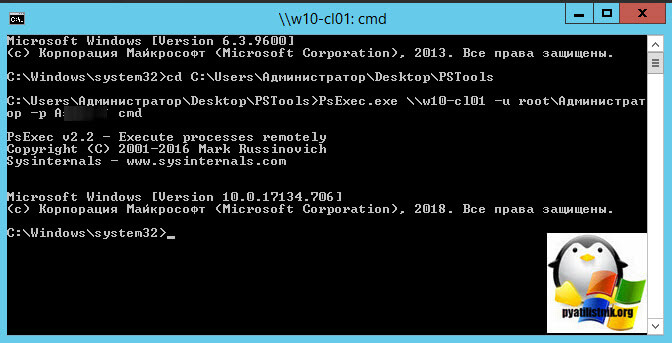
Теперь то же самое вы можете выполнить и через PsExec.exe, выставив для CredSSP минимальный уровень защиты или же отключить NLA, для этого находясь в cmd в режиме администратора введите команду:
PsExec.exe \w10-cl01 -u rootАдминистратор -p пароль cmd
w10-cl01 — это имя компьютера.
Далее имея запущенный сеанс cmd для удаленного компьютера, выполните команду:
REG ADD HKLMSoftwareMicrosoftWindows CurrentVersionPoliciesSystemCredSSPParameters /v AllowEncryptionOracle /t REG_DWORD /d 2 (0 вернет все как было)
Аналогично можно сделать и для отключения Network Level Authentication, команда будет такой:
REG ADD «HKEY_LOCAL_MACHINESYSTEM CurrentControlSetControlTerminal ServerWinStationsRDP-Tcp» /v SecurityLayer /t REG_DWORD /d 0
Еще раз обращаю ваше внимание, что данный метод временный и самый не безопасный, применяемый в случаях, когда уже ничего сделать нельзя или дольше, а нужно уже вчера, обязательно установите все нужные обновления.
Отключаем шифрование credssp через GPO
Если у вас большая инфраструктура, в которой сотни компьютеров и сотни серверов, то вы можете до установки нужных обновлений в вечернее время, временно отключить новый уровень шифрования CredSSP и убрать ошибку «Удаленный компьютер имя. Причиной ошибки может быть исправление шифрования CredSSP». Для этого мы можем воспользоваться всеми плюсами доменной инфраструктуры Active Directory. Тут два варианта, вы можете создать массовую политику для распространения ее на нужные OU или если у вас требование для одного или двух локальных компьютеров, то на них можно запустить локальный редактор групповых политик, тем самым внеся изменения только на них.
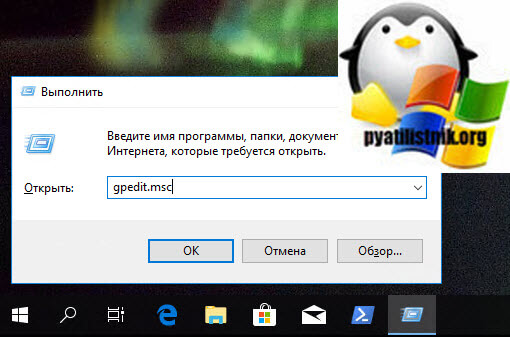
Напоминаю, что оснастку управление групповой политикой вы можете найти на контроллере домена или компьютере с установленным пакетом RSAT, открыть ее можно через команду в окне «Выполнить» gpmc.msc. Если нужно открыть локальный редактор групповых политик, то в окне «Выполнить» введите gpedit.msc.
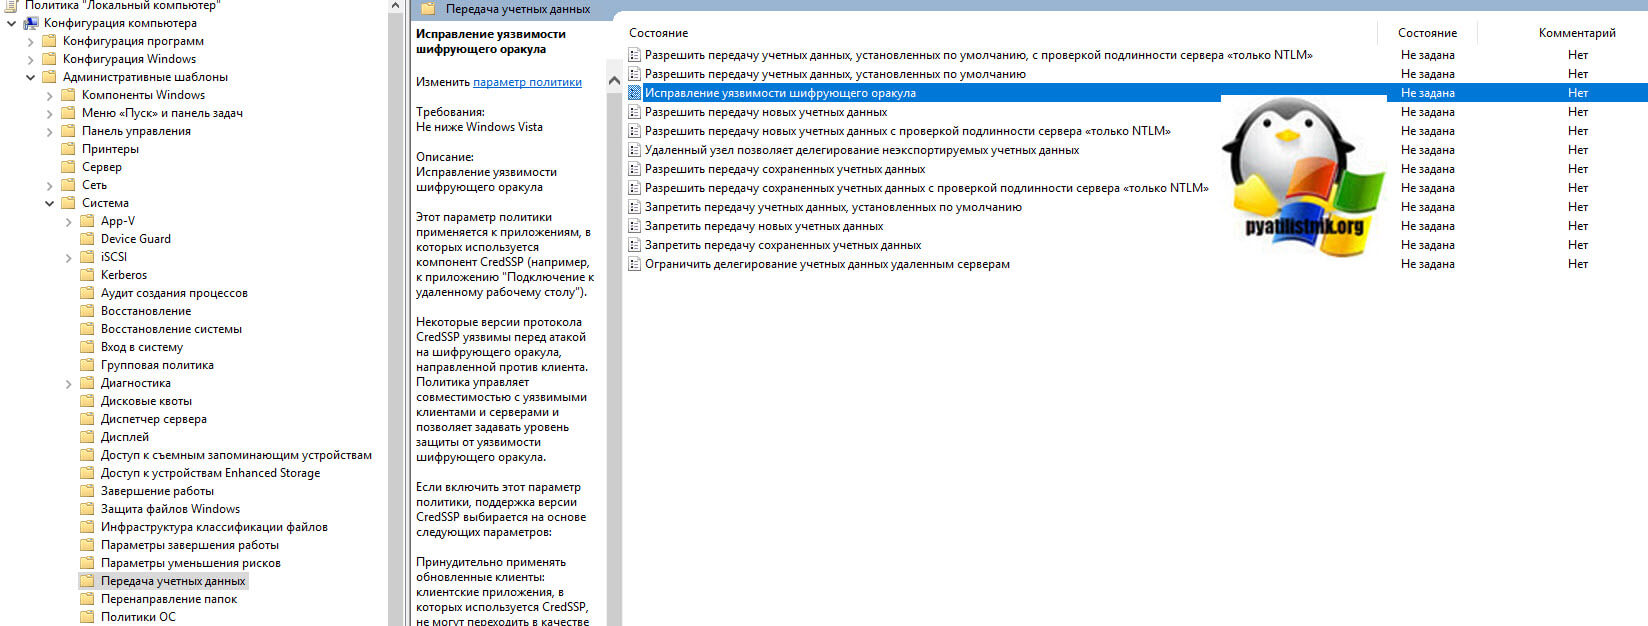
Вам необходимо перейти в ветку:
Конфигурация компьютера — Административные шаблоны — Система — Передача учетных данных — Исправление уязвимости шифрующего оракула (Computer Configuration — Administrative Templates — System — Credentials Delegation — Encryption Oracle Remediation
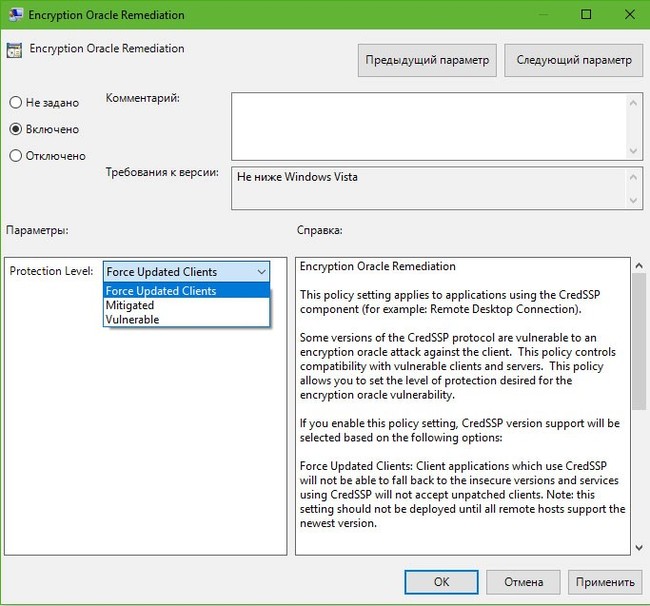
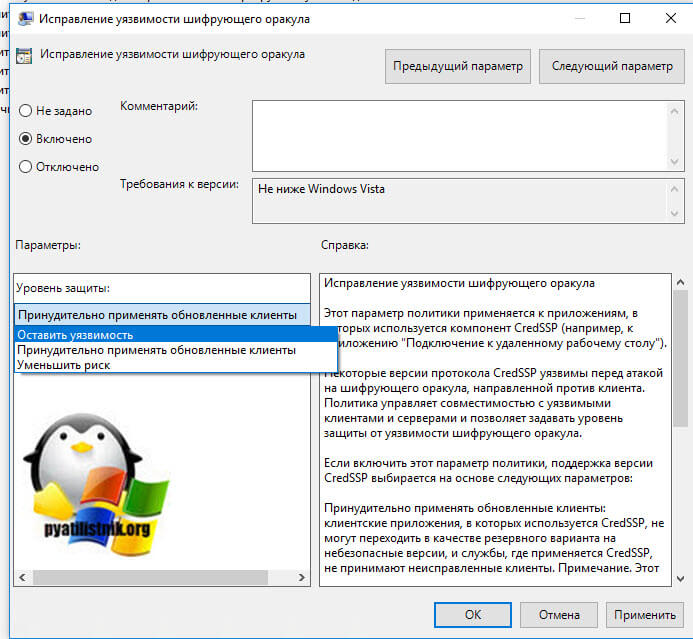
Открываем настройку «Исправление уязвимости шифрующего оракула (Encryption Oracle Remediation)». Включаем политику, у вас активируется опция «Уровень защиты», на выбор будет три варианта:
- Принудительно применять обновленные клиенты (Force Updated Clients) — она будет стоять по умолчанию из-за максимального уровня защиты, вам данную опцию нужно сменить. Это так сказать максимально безопасный уровень взаимодействия клиент, он должен быть в идеале, после установки обновлений на все сервера и компьютеры.
- Оставить уязвимость (Vulnerable) – клиенты могут подключаться на уязвимые машины.
- Уменьшить риск (Mitigated) – клиенты не могут подключаться к уязвимым серверам, но серверы могут принимать уязвимые клиенты.
Выбираем на время пункт «Оставить уязвимость (Vulnerable)». Сохраняем настройки.
После чего вам нужно обновить политику, для этого откройте командную строку и введите gpupdate /force. Если у вас не доменный компьютер, да и еще Windows 10 Home, которая не имеет встроенного локального редактора политик, то вам как я описывал выше, нужно производить правку реестра
REG ADD HKLMSoftwareMicrosoftWindows CurrentVersionPoliciesSystemCredSSPParameters /v AllowEncryptionOracle /t REG_DWORD /d 2 (0 вернет все как было)
На просторах интернета ходит скрипт PowerShell, который поможет включить данную политику на всех компьютерах в Active Directory
Import-Module ActiveDirectory
$PSs = (Get-ADComputer -Filter *).DNSHostName
Foreach ($computer in $PCs) {
Invoke-Command -ComputerName $computer -ScriptBlock {
REG ADD HKLMSOFTWAREMicrosoftWindowsCurrentVersionPoliciesSystemCredSSPParameters /v AllowEncryptionOracle /t REG_DWORD /d 2
}
}
Самый правильный метод, это установка обновлений
Когда вам удалось везде подключиться и подошло время обслуживания ваших серверов, быстренько производим установку обновлений закрывающих брешь (CVE-2018-0886 | CredSSP Remote Code Execution Vulnerability).
https://portal.msrc.microsoft.com/en-us/security-guidance/advisory/CVE-2018-0886
Раньше были вот такие KB, но они со временем могут меняться свой номер, поэтому пройдите по ссылке выше, так будет надежнее.
- Windows Server 2012 R2 / Windows 8: KB4103715
- Windows Server 2008 R2 / Windows 7: KB4103712
- Windows Server 2016 / Windows 10 1607 — KB4103723
- Windows Server 2016 / Windows 10 1703 — KB4103731
- Windows Server 2016 / Windows 10 1709 — KB4103727
- Windows Server 2016 / Windows 10 1803 — KB4103721
На этом у меня все, надеюсь, что вы разобрались в работе CredSSP и научились ей управлять. С вами был Иван Семин, автор и создатель IT портала Pyatilistnik.org.

