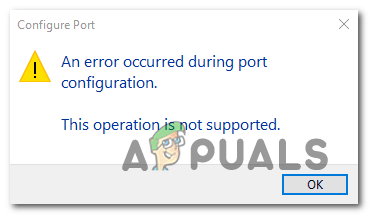
The ‘An error occurred during port configuration‘ occurs when the Printer port is either in use or the Printer Driver installed is corrupt, or outdated.
What’s causing the port configuration error?
- Glitched printer menu – As it turns out, this particular issue might occur due to a common glitch that is interfering with the port configuration of wireless connected printers on Windows 10. In this case, you can resolve the issue by configuring the port via the classic Control Panel menu.
- The printer is stuck in a limbo state – Another potential scenario that will cause this issue is a printer that’s currently stuck in a limbo state (operating system isn’t aware that it’s turned on). If this scenario is applicable, you can get the issue fixed by performing a hard reset on your printer.
- 3rd party firewall interference – As it turns out, another potential scenario in which you might be prevented from accessing the Port Configuration menu is if an overprotective 3rd party firewall prevents it. In this case, you can eliminate the interference by uninstalling the firewall that’s causing the problem.
Method 1: Configuring the port via Device & Printers screen
While this is more of a workaround than an actual fix, it has helped a lot of users to avoid the ‘An error occurred during port configuration’ altogether. But keep in mind that the steps below will only work if you encounter the error while trying to configure your printer ports.
Note: If you encounter the issue while trying to print a file, move directly to Method 2.
As it turns out, if you circumvent the issue by trying to configure the printer ports from the classic Control Panel interface, chances are you will not encounter the same error message.
Here’s a quick guide on how to do this:
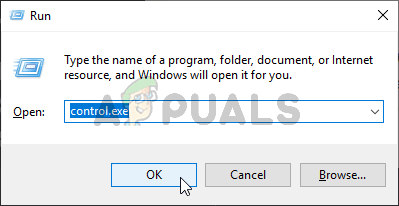
- Press Windows key + R to open up Run dialogue box. Next, inside the window, type ‘control.exe’ and press Enter to open up the classic Control Panel interface. If you’re prompted by the UAC (User Account Control), click Yes to grant administrative privileges.
Running the Control Panel - Once you’re inside the classic Control Panel interface, use the search function in the top-right corner to search for Devices & Printers. Once the results show up, click on Device & Printers.
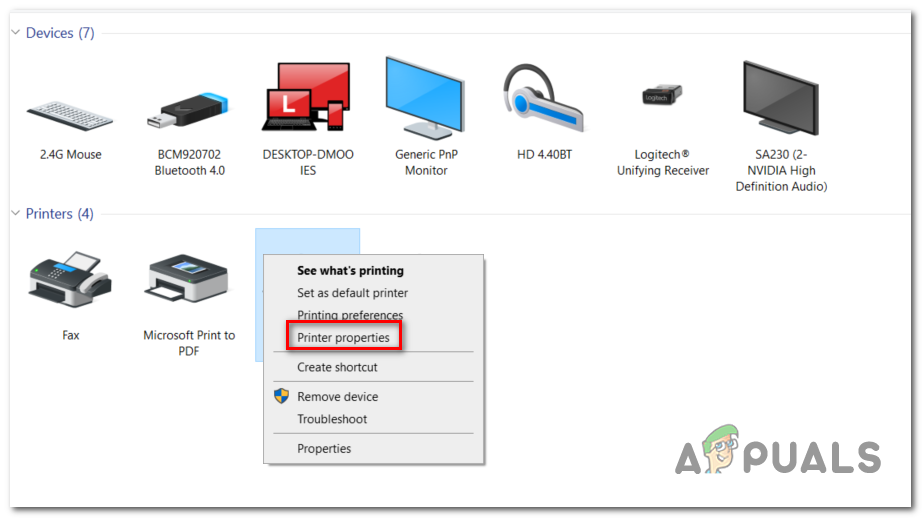
Accessing the Devices & Printers tab - Once you’re inside the Device & Printers menu, right-click on the printer that you’re having issues with and choose Printer Properties from the newly appeared menu.
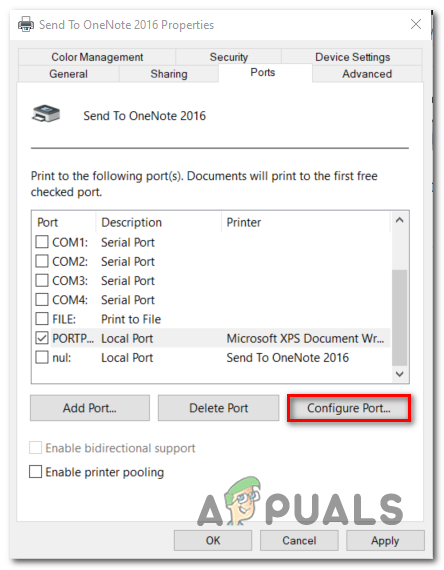
Accessing the Printer Properties screen - Once you’re inside the Properties screen of your printer, select the Ports tab from the menu at the top. Next, select your printer from the list of ports and click on Configure Port…
Accessing the Port Configuration menu via Printer Properties screen - See if you are able to see the next menu without encountering the An error occurred during port configuration’.
If the issue is persisting, move down to the next method below.
Method 2: Doing a printer hard reset
If you’re encountering this issue while trying to use your printer driver, chances are you will be able to resolve the issue swiftly by doing a hard reset procedure on your printer.
This might not be the most focused approach, but it’s a cure-all that a lot of users have successfully used to fix port configuration issues that ended up throwing the ‘An error occurred during port configuration‘ error.
Here’s a quick guide on doing a hard reset on your printer:
- Turn your printer on (if it’s not already on) and wait until it enters idle mode (it completes the startup procedure).
- With the printer fully turned on, physically disconnect the power cord from the rear of the printer.
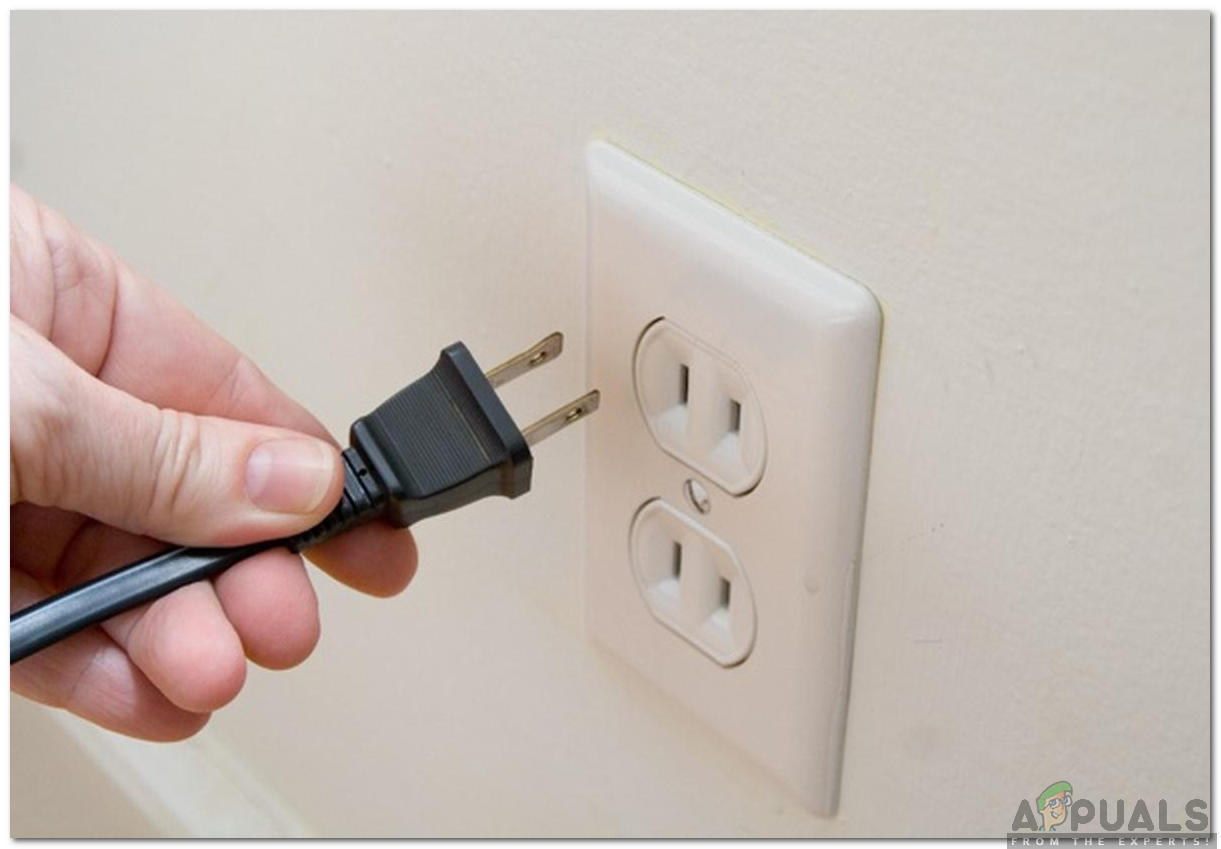
- Unplug the power cord from the wall outlet and wait at least 60 seconds.
Unplugging from the socket - After that time period has passed, plug the power cord back into the wall outlet and reconnect the power cord to the rear of your printer port.
- Turn on your printer again and wait until it enters idle mode again.
Note: Wait until the printer finishes the initial warm-up period. With most manufacturers, the lights will continue flashing until this operation is complete. - Repeat the operation that was previously causing the ‘An error occurred during port configuration‘ error and see if the issue is now resolved.
If the same issue is still occurring, move down to the next method below.
Method 3: Disable 3rd party firewall interference (if applicable)
According to various users that also encountered this problem, an overprotective firewall can also be responsible for the apparition of this particular error.
As it turns out, certain AV suite (particularly firewall modules) will not trust external devices so they will prevent new connections from being established. This is typically reported to occur with printers that are not fully compatible with Windows 10. Several Windows 10 users that encountered this problem have confirmed that they were able to fix the problem by uninstalling the 3rd party firewall component that is causing the problem.
If you’re currently using a 3rd party firewall and you suspect that this might be causing this problem, follow the steps on this article (here) to uninstall it completely and ensure that you’re not leaving behind any leftover files that will still cause this behaviour.
After you uninstall the restart your computer and repeat the action at the next computer startup to see if the issue is still occurring.
If you’re still seeing the ‘An error occurred during port configuration‘ error or this method wasn’t applicable to your scenario, move down to the next potential fix below.
Kevin Arrows
Kevin is a dynamic and self-motivated information technology professional, with a Thorough knowledge of all facets pertaining to network infrastructure design, implementation and administration. Superior record of delivering simultaneous large-scale mission critical projects on time and under budget.
Download PC Repair Tool to quickly find & fix Windows errors automatically
Some users while trying to configure the printer port on their Windows 10 or Windows 11 PC may encounter the error message An error occurred during port configuration. In this post, we offer the most suitable solutions you can try to successfully resolve this issue.
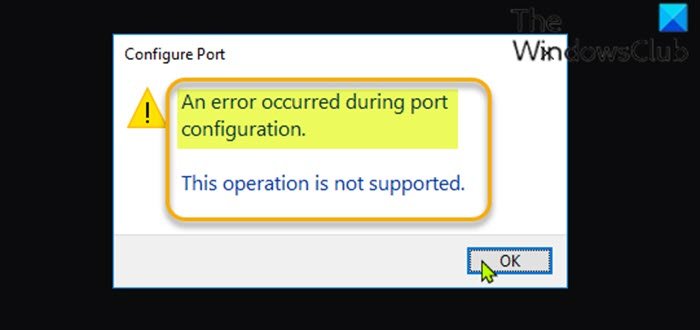
When you encounter this issue, you’ll receive the following error message;
Configure Port
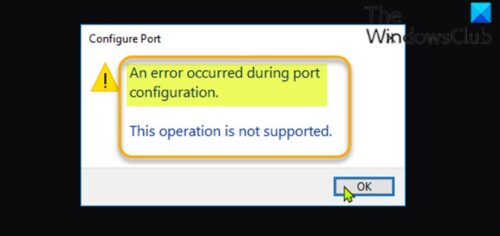
An error occurred during port configuration.
This operation is not supported.
The error occurs when the Printer port is either in use or the Printer Driver installed is corrupt, or outdated.
The most likely culprits to the error include:
- Glitched printer menu.
- The printer is stuck in a limbo state.
- 3rd party firewall interference.
If you’re faced with this issue, you can try our recommended solutions below in no particular order and see if that helps to resolve the issue.
- Hard reset printer
- Manually configure printer port
- Change account type to Administrator
- Manually flush the print queue
- Disable/uninstall any third-party security software
Let’s take a look at the description of the process involved concerning each of the listed solutions.
1] Hard reset printer
This solution requires you to hard reset the printer and see if the An error occurred during port configuration issue is resolved.
Do the following:
- Get the printer into idle mode.
- Disconnect the power cord from the rear of the printer.
- Unplug the power cord from the wall outlet and wait at least 60 seconds.
- After the 60 seconds has elapsed, plug the power cord back into the wall outlet and reconnect the power cord to the rear of your printer port.
- Next, turn on your printer again and wait until it enters idle mode again.
See if the issue is now resolved. Otherwise, try the next solution.
2] Manually configure printer port
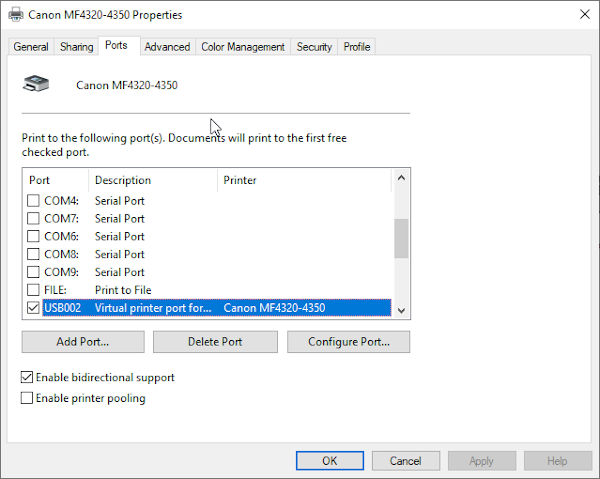
Since the automatic configuration of the printer port is not working, you can manually configure the printer port from the classic Control Panel interface. In the Ports tab, select the printer you’re having an issue with and then click the Configure Port button.
The issue should be solved now. If not, try the next solution.
3] Change account type to Administrator
In some cases, you may encounter this error if you try to configure the printing port from a non-administrative account. To resolve the issue, you need to change the standard account to an administrator account.
4] Manually flush the print queue
This solution requires you to manually flush the print queue on your Windows 10/11 PC.
5] Disable/uninstall any third-party security software
Some third-party security software will not trust external devices so they will prevent new connections from being established. You’re most likely to encounter this error on printers that are not fully compatible with Windows 10/11.
In this case, to fix the problem, you need to disable the AV software and see if the issue is resolved. If not, you’ll have to remove the third-party antivirus program from your PC using the dedicated removal tool to remove all files associated with the antivirus program. Afterward, try the printer port configuration – the task should complete without the error.
Hope this helps!
Obinna Onwusobalu has studied Information & Communication Technology and is a keen follower of the Windows ecosystem. He has been a Windows Insider MVP (2020). He runs a computer software clinic.
by Matthew Adams
Matthew is a freelancer who has produced a variety of articles on various topics related to technology. His main focus is the Windows OS and all the things… read more
Updated on June 5, 2020
XINSTALL BY CLICKING THE DOWNLOAD FILE
This software will repair common computer errors, protect you from file loss, malware, hardware failure and optimize your PC for maximum performance. Fix PC issues and remove viruses now in 3 easy steps:
- Download Restoro PC Repair Tool that comes with Patented Technologies (patent available here).
- Click Start Scan to find Windows issues that could be causing PC problems.
- Click Repair All to fix issues affecting your computer’s security and performance
- Restoro has been downloaded by 0 readers this month.
Adjusting port settings is one way to kick-start offline printers. However, the “An error occurred during port configuration” error message pops up for some users when they press the Configure Ports button in Windows. Consequently, they can’t configure printers’ ports as required. This is how you can fix the port configuration error in Windows 10.
FIX: An error occurred on port configuration
- Modify the Port Settings Within an Admin Account
- Configure the Port Settings Via the Print Server Properties
- Reset the Printer
- Clear the Printer Queue
1. Modify the Port Settings Within an Admin Account
One of the full port configuration error message windows states: “An error occurred during port configuration. Access is denied.” An access is denied error usually highlights that you need elevated admin rights to modify the settings. If you’re configuring the printer’s settings within a standard user account, convert it to an admin account as follows.
- Press the Windows key + I hotkey to open Settings.
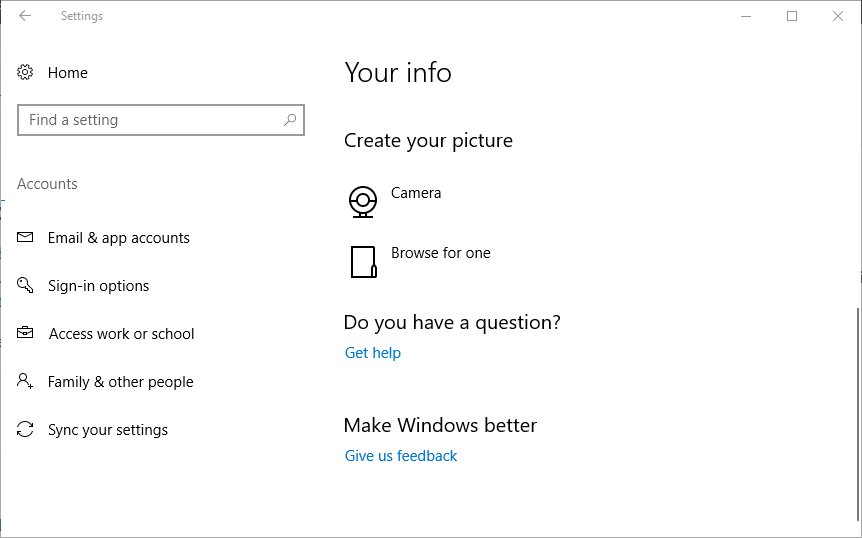
- Click Accounts to open the options shown directly below.
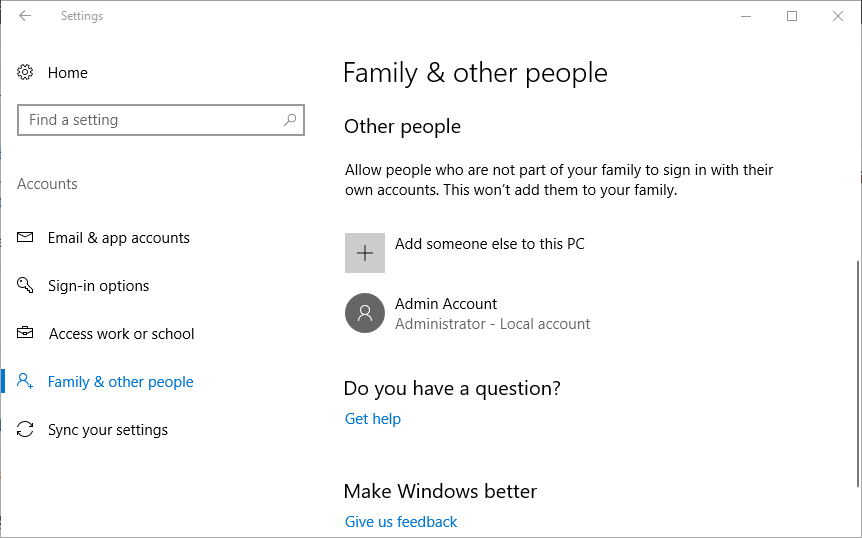
- Click Family and other people on the left of the window.
- Select your account, and press the Change account type button.
- Then select Administrator on the Account type drop-down menu and click OK.
- Restart the desktop or laptop.
— RELATED: Wi-Fi printer not recognized? Fix it with these quick solutions
2. Configure the Port Settings Via the Print Server Properties Window
If the port configuration dialog box still pops up even within an admin account, you can still usually configure the port settings via the Printer Server Properties window. Most users click the Configure Ports button on the printer’s properties window, but then the port configuration error window pops up. This is how you can configure ports via the Printer Server Properties window.
- Open the Win + X menu with the Windows key + X hotkey.
- Click Run to open that accessory.
- Enter ‘Control Panel’ in Run, and press the OK button.
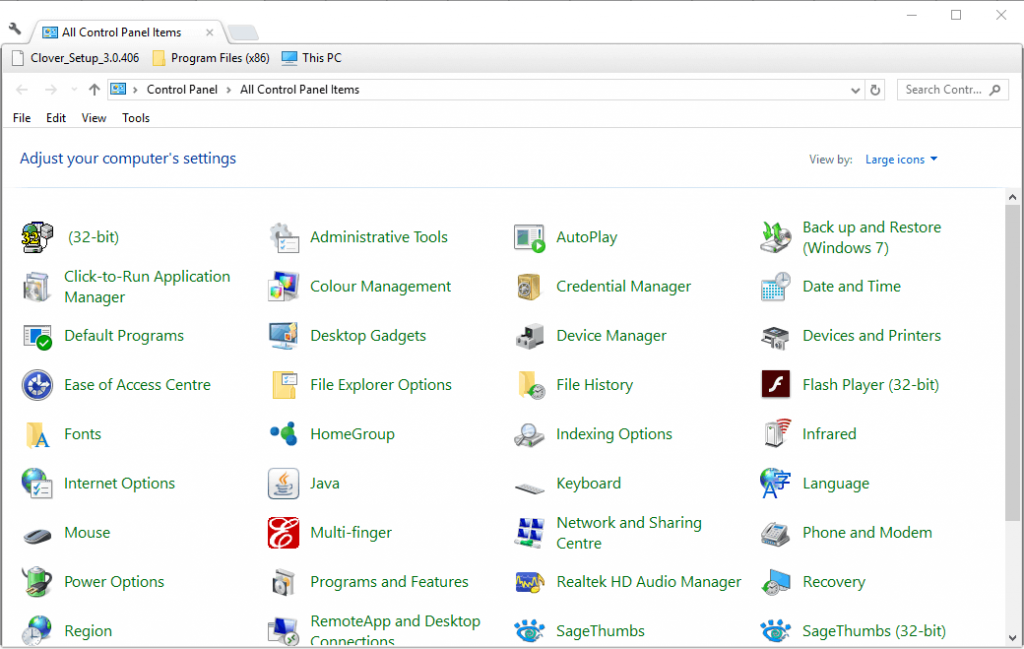
- Select the Devices and Printers Control Panel item shown in the snapshot directly below.
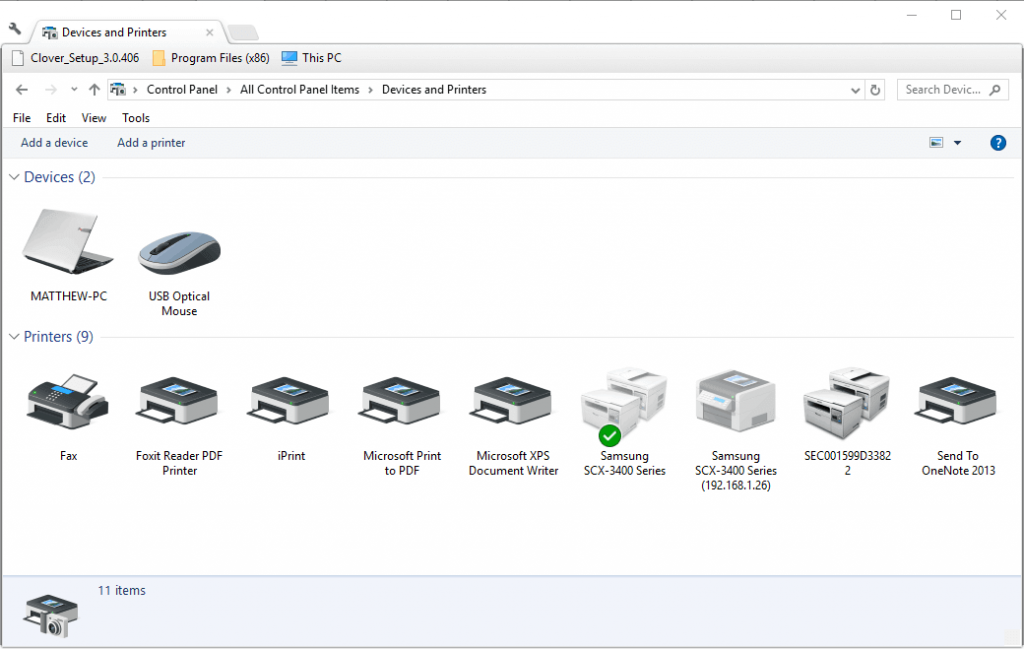
- Then select your default printer.
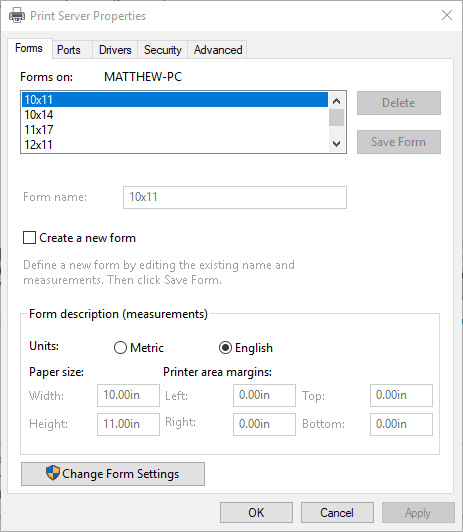
- Click Print server properties to open the window shown directly below.
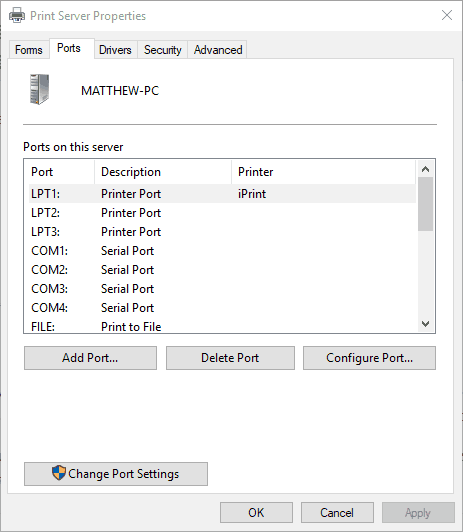
- Select the Ports tab on that window.
- Click the Change Port Settings button.
- Then you can select a listed port and click Configure Port to modify it.
3. Reset the Printer
An alternative port configuration error message window states: “An error occurred during port configuration. This operation is not supported.” That dialog box also pops up for some users when they press the Configure Ports button.
Fully resetting the printer can fix that port configuration error. To do that, switch the printer off and unplug all its cables. Then wait a few minutes before you plug the printer in and switch it back on.
— RELATED: 11 best label printing software to create and print stunning labels
4. Clear the Printer Queue
The port configuration error also occurs when there’s something in the printer queue. Then the printer resource will be in use. As such, clearing the printer queue is another resolution for port configuration error messages. You can clear the printer queue in Windows 10 as follows.
- Open Run with the Windows key + R keyboard shortcut.
- Input ‘services.msc’ in Run’s text box, and press the OK button
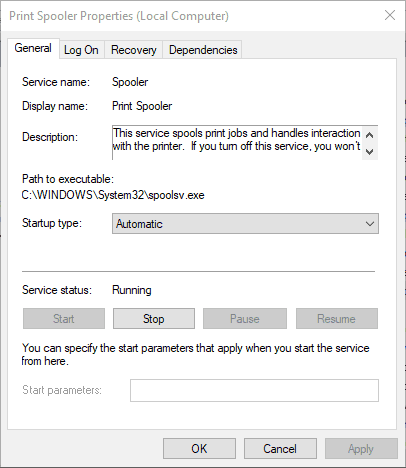
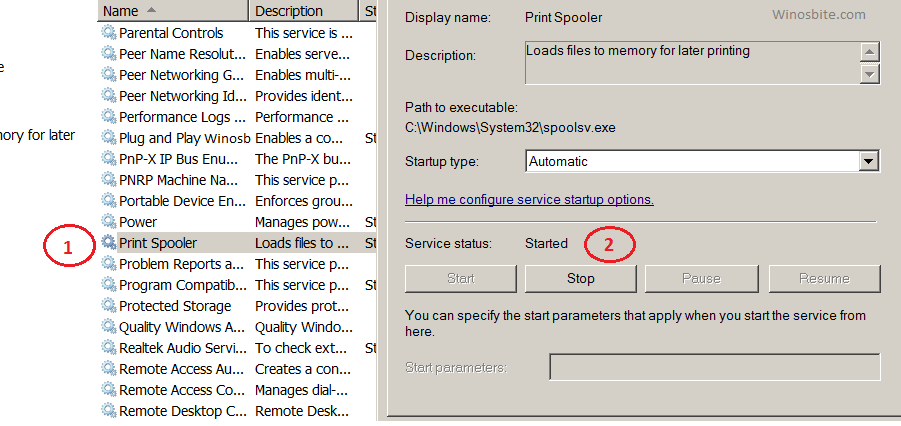
- Double-click Print Spooler to open the window in the snapshot directly below.
- Press the Stop button.
- Click OK to close the window.
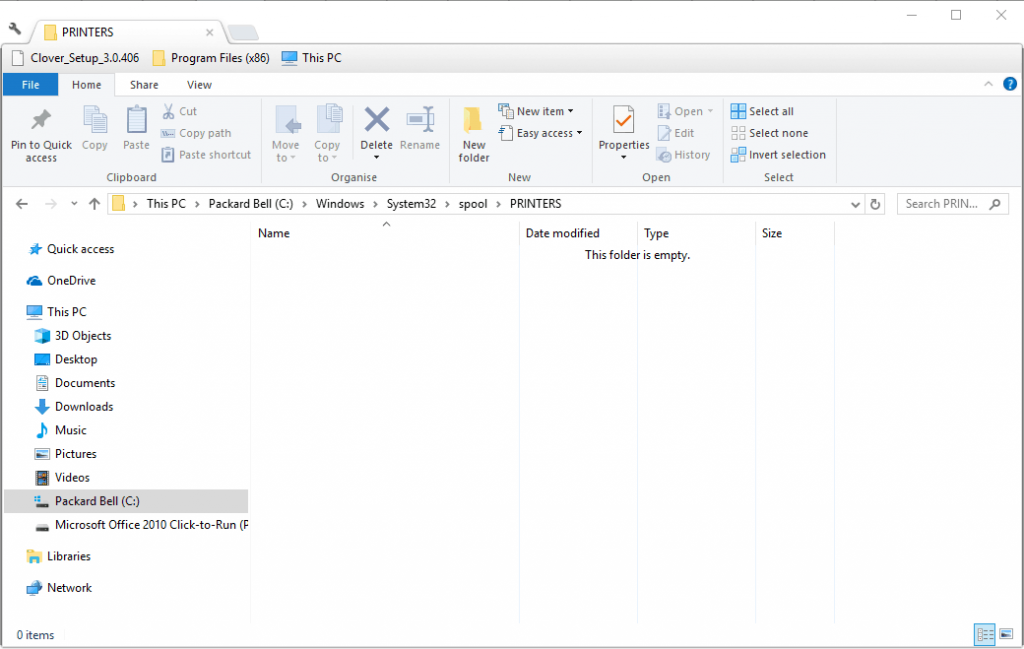
- Open File Explorer in Windows 10.
- Then enter ‘C:WINDOWSSystem32spoolPRINTERS’ in the File Explorer’s folder path bar, and press the Return key.
- Press the Ctrl + A hotkey to select everything in the printer queue.
- Then press the Delete button to erase the printer queue.
- Return to the Services window, double-click Printer Spooler and press the Start button (on Printer Spooler Properties window).
Those are a few resolutions that can fix port configuration errors. Then you can configure the port settings as required for a printer.
RELATED STORIES TO CHECK OUT:
- Printer won’t print on Windows 10 [FIX]
- Windows cannot connect to printer: 8 solutions to fix the error
- Printer won’t work after upgrading to Windows 10? Here are 6 quick solutions
Newsletter
If you are seeing ‘An Error Occurred During Port Configuration‘ message while using the Printer then the main reason behind the driver, power-cable or firewall. Adjusting port settings is used to start offline printers. That error usually happens for some users when they press the configure ports button in Windows 10. That is because they can’t configure the printers as required.
This can happen due to various reasons. They are discussed below.
- Glitched printer menu: The error may appear due to a common glitch that may interfere with the port configuration in Windows 10
- The printer is stuck: Another reason may be that the OS may not be able to recognize the status of the printer if it is turned on.
- 3rd party firewall interference: It also may happen that a third party firewall which is overprotective and may prevent us from accessing the port configuration menu.
This message ‘An Error Occurred During Port Configuration‘ can be fixed using 5 simple methods mentioned below:
Method 1: Modify the Port Settings
This is a method that is suitable if there is a corrupt file that prevents you from configuring it.
- Press the Windows Key and I hotkey simultaneously
- Click accounts to open options
- Click family and other people on the left.
- Select your account and press the Change account type button
- After that, select Administrator on the account type drop-down and click ok
- Restart the laptop or desktop
Method 2: Configure Via Print Server Properties
If the dialogue box appears even after changing the account type to Admin, then you can try to configure the port settings via printer server properties windows. This method is a bit different from the general way of clicking the configure ports button on the printers properties window.
- Click on Windows button, type Control Panel and press OK
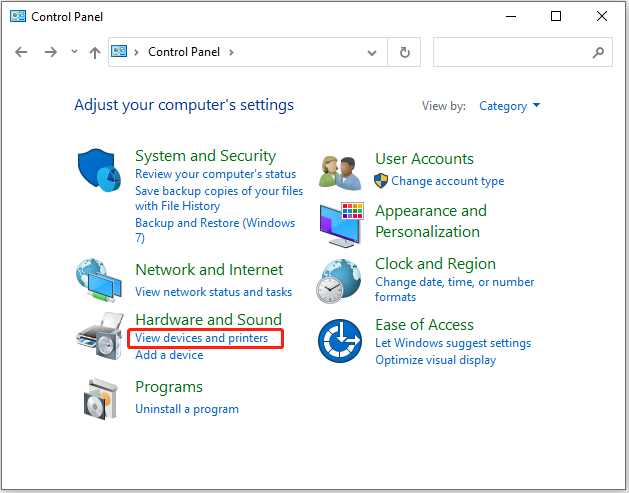
- Click on View devices and printers located under Hardware and Sound
- Now, select your default printer and then click Print properties located on top of the tab as shown below:
- Select the ports tab and click on the Change port Settings
- After that, select a listed port and click on configure the port to modify
Method 3: Resetting Printer
If you see a message like “An error occurred during port configuration. This operation is not supported”, that may require to reset your printer completely.
To do that, switch your printer off and remove all its cables. After that, wait for 10 minutes and then plug-in again and restart your printer. Now, try configuring and see if the problem remains or not. This will most probably fix the problem.
Method 4: Disable 3rd Party Firewall
If you are using a third-party firewall like Little Snitch or ZoneAlarm then it may be blocking the Printer functionality. What happens sometimes is that these Firewalls don’t trust on external device like Printer or Pen Drive and add a shield that will ultimately not allow the outside devices to work properly.
You may try to disable the Firewall for temporary time and then try using your printer.
This will fix the An error occurred during port configuration error message, if not then follow the below method to fix it.
Method 5: Clearing The Printer Queue
This message can also appear when the printer resource is in use. That usually means that something is in the queue. Clearing the printer queue via the following procedure may resolve the problem.
- Press Windows + R key together
- Type services.msc and click on OK button
- Double click on Print Spooler to open the window
- Press Stop and then OK
- Open file explorer in Windows 10
- Type the below link in the folder path and click return
- C:WINDOWSSystem32spoolPRINTERS
- Press Ctrl+A to select everything in the printer queue and press Delete
- Return to Service Window; double click on printer Spooler and click Start.
These are some common methods to fix this error, and we hope these will resolve the issue.
Содержание
- An error occurred during port configuration on Windows 11/10
- An error occurred during port configuration
- 1] Hard reset printer
- 2] Manually configure printer port
- 3] Change account type to Administrator
- 4] Manually flush the print queue
- 5] Disable/uninstall any third-party security software
- Related Posts
- Printer not activated Error Code 41
- Fix Scanning or Feature is Unavailable errors in HP Smart app
- Fix Printer Driver Error 0x000005b3, Operation could not be completed
- [email protected]
- Primary Sidebar
- Latest News
- Microsoft planning to launch ChatGPT-powered Bing to compete with Google
- Microsoft introduces a new Work Vertical feature to Windows Search
- Latest Reviews
- Stellar Repair for Outlook: PST File Recovery Tool Review
- FineVoice Review: The ultimate tool to Change Your Voice
- Fixing An Error Occurred during Port Configuration on Windows 10
- What’s causing the port configuration error?
- Method 1: Configuring the port via Device & Printers screen
- Method 2: Doing a printer hard reset
- Method 3: Disable 3rd party firewall interference (if applicable)
- An error occurred during port configuration [Windows 10/11]
- FIX: An error occurred on port configuration
- 1. Modify the Port Settings Within an Admin Account
- 2. Configure the Port Settings Via the Print Server Properties Window
- 3. Reset the Printer
- 4. Clear the Printer Queue
An error occurred during port configuration on Windows 11/10
Some users while trying to configure the printer port on their Windows 10 or Windows 11 PC may encounter the error message An error occurred during port configuration. In this post, we offer the most suitable solutions you can try to successfully resolve this issue.
When you encounter this issue, you’ll receive the following error message;
Configure Port
An error occurred during port configuration.
This operation is not supported.
The error occurs when the Printer port is either in use or the Printer Driver installed is corrupt, or outdated.
The most likely culprits to the error include:
- Glitched printer menu.
- The printer is stuck in a limbo state.
- 3rd party firewall interference.
An error occurred during port configuration
If you’re faced with this issue, you can try our recommended solutions below in no particular order and see if that helps to resolve the issue.
- Hard reset printer
- Manually configure printer port
- Change account type to Administrator
- Manually flush the print queue
- Disable/uninstall any third-party security software
Let’s take a look at the description of the process involved concerning each of the listed solutions.
1] Hard reset printer
This solution requires you to hard reset the printer and see if the An error occurred during port configuration issue is resolved.
Do the following:
- Get the printer into idle mode.
- Disconnect the power cord from the rear of the printer.
- Unplug the power cord from the wall outlet and wait at least 60 seconds.
- After the 60 seconds has elapsed, plug the power cord back into the wall outlet and reconnect the power cord to the rear of your printer port.
- Next, turn on your printer again and wait until it enters idle mode again.
See if the issue is now resolved. Otherwise, try the next solution.
2] Manually configure printer port
Since the automatic configuration of the printer port is not working, you can manually configure the printer port from the classic Control Panel interface. In the Ports tab, select the printer you’re having an issue with and then click the Configure Port button.
The issue should be solved now. If not, try the next solution.
3] Change account type to Administrator
In some cases, you may encounter this error if you try to configure the printing port from a non-administrative account. To resolve the issue, you need to change the standard account to an administrator account.
4] Manually flush the print queue
This solution requires you to manually flush the print queue on your Windows 10/11 PC.
5] Disable/uninstall any third-party security software
Some third-party security software will not trust external devices so they will prevent new connections from being established. You’re most likely to encounter this error on printers that are not fully compatible with Windows 10/11.
In this case, to fix the problem, you need to disable the AV software and see if the issue is resolved. If not, you’ll have to remove the third-party antivirus program from your PC using the dedicated removal tool to remove all files associated with the antivirus program. Afterward, try the printer port configuration – the task should complete without the error.
Hope this helps!
Date: July 18, 2021 Tags: Printer
Printer not activated Error Code 41
Fix Scanning or Feature is Unavailable errors in HP Smart app
Fix Printer Driver Error 0x000005b3, Operation could not be completed
[email protected]
Obinna Onwusobalu has studied Information & Communication Technology and is a keen follower of the Windows ecosystem. He has been a Windows Insider MVP (2020). He runs a computer software clinic.

Latest News
Microsoft planning to launch ChatGPT-powered Bing to compete with Google
December 21, 2022
Microsoft introduces a new Work Vertical feature to Windows Search
Latest Reviews
January 10, 2023
Stellar Repair for Outlook: PST File Recovery Tool Review
December 22, 2022

Источник
Fixing An Error Occurred during Port Configuration on Windows 10
The ‘An error occurred during port configuration‘ occurs when the Printer port is either in use or the Printer Driver installed is corrupt, or outdated.
What’s causing the port configuration error?
- Glitched printer menu – As it turns out, this particular issue might occur due to a common glitch that is interfering with the port configuration of wireless connected printers on Windows 10. In this case, you can resolve the issue by configuring the port via the classic Control Panel menu.
- The printer is stuck in a limbo state – Another potential scenario that will cause this issue is a printer that’s currently stuck in a limbo state (operating system isn’t aware that it’s turned on). If this scenario is applicable, you can get the issue fixed by performing a hard reset on your printer.
- 3rd party firewall interference – As it turns out, another potential scenario in which you might be prevented from accessing the Port Configuration menu is if an overprotective 3rd party firewall prevents it. In this case, you can eliminate the interference by uninstalling the firewall that’s causing the problem.
Method 1: Configuring the port via Device & Printers screen
While this is more of a workaround than an actual fix, it has helped a lot of users to avoid the ‘An error occurred during port configuration’ altogether. But keep in mind that the steps below will only work if you encounter the error while trying to configure your printer ports.
Note: If you encounter the issue while trying to print a file, move directly to Method 2.
As it turns out, if you circumvent the issue by trying to configure the printer ports from the classic Control Panel interface, chances are you will not encounter the same error message.
Here’s a quick guide on how to do this:
- Press Windows key + R to open up Run dialogue box. Next, inside the window, type ‘control.exe’ and press Enter to open up the classic Control Panel interface. If you’re prompted by the UAC (User Account Control), click Yes to grant administrative privileges.
Running the Control Panel
- Once you’re inside the classic Control Panel interface, use the search function in the top-right corner to search for Devices & Printers. Once the results show up, click on Device & Printers.
Accessing the Devices & Printers tab
- Once you’re inside the Device & Printers menu, right-click on the printer that you’re having issues with and choose Printer Properties from the newly appeared menu.
Accessing the Printer Properties screen
- Once you’re inside the Properties screen of your printer, select the Ports tab from the menu at the top. Next, select your printer from the list of ports and click on Configure Port…
Accessing the Port Configuration menu via Printer Properties screen
- See if you are able to see the next menu without encountering the An error occurred during port configuration’.
If the issue is persisting, move down to the next method below.
Method 2: Doing a printer hard reset
If you’re encountering this issue while trying to use your printer driver, chances are you will be able to resolve the issue swiftly by doing a hard reset procedure on your printer.
This might not be the most focused approach, but it’s a cure-all that a lot of users have successfully used to fix port configuration issues that ended up throwing the ‘An error occurred during port configuration‘ error.
Here’s a quick guide on doing a hard reset on your printer:
- Turn your printer on (if it’s not already on) and wait until it enters idle mode (it completes the startup procedure).
- With the printer fully turned on, physically disconnect the power cord from the rear of the printer.
- Unplug the power cord from the wall outlet and wait at least 60 seconds.
Unplugging from the socket
- After that time period has passed, plug the power cord back into the wall outlet and reconnect the power cord to the rear of your printer port.
- Turn on your printer again and wait until it enters idle mode again.
Note: Wait until the printer finishes the initial warm-up period. With most manufacturers, the lights will continue flashing until this operation is complete. - Repeat the operation that was previously causing the ‘An error occurred during port configuration‘ error and see if the issue is now resolved.
If the same issue is still occurring, move down to the next method below.
Method 3: Disable 3rd party firewall interference (if applicable)
According to various users that also encountered this problem, an overprotective firewall can also be responsible for the apparition of this particular error.
As it turns out, certain AV suite (particularly firewall modules) will not trust external devices so they will prevent new connections from being established. This is typically reported to occur with printers that are not fully compatible with Windows 10. Several Windows 10 users that encountered this problem have confirmed that they were able to fix the problem by uninstalling the 3rd party firewall component that is causing the problem.
If you’re currently using a 3rd party firewall and you suspect that this might be causing this problem, follow the steps on this article (here) to uninstall it completely and ensure that you’re not leaving behind any leftover files that will still cause this behaviour.
After you uninstall the restart your computer and repeat the action at the next computer startup to see if the issue is still occurring.
If you’re still seeing the ‘An error occurred during port configuration‘ error or this method wasn’t applicable to your scenario, move down to the next potential fix below.
Источник
An error occurred during port configuration [Windows 10/11]
- Download Restoro PC Repair Tool that comes with Patented Technologies (patent available here) .
- Click Start Scan to find Windows issues that could be causing PC problems.
- Click Repair All to fix issues affecting your computer’s security and performance
- Restoro has been downloaded by 0 readers this month.
Adjusting port settings is one way to kick-start offline printers. However, the “An error occurred during port configuration” error message pops up for some users when they press the Configure Ports button in Windows. Consequently, they can’t configure printers’ ports as required. This is how you can fix the port configuration error in Windows 10.
FIX: An error occurred on port configuration
1. Modify the Port Settings Within an Admin Account
One of the full port configuration error message windows states: “An error occurred during port configuration. Access is denied.” An access is denied error usually highlights that you need elevated admin rights to modify the settings. If you’re configuring the printer’s settings within a standard user account, convert it to an admin account as follows.
- Press the Windows key + I hotkey to open Settings.
- Click Accounts to open the options shown directly below.
- Click Family and other people on the left of the window.
- Select your account, and press the Change account type button.
- Then select Administrator on the Account type drop-down menu and click OK.
- Restart the desktop or laptop.
2. Configure the Port Settings Via the Print Server Properties Window
If the port configuration dialog box still pops up even within an admin account, you can still usually configure the port settings via the Printer Server Properties window. Most users click the Configure Ports button on the printer’s properties window, but then the port configuration error window pops up. This is how you can configure ports via the Printer Server Properties window.
- Open the Win + X menu with the Windows key + X hotkey.
- Click Run to open that accessory.
- Enter ‘Control Panel’ in Run, and press the OK button.
- Select the Devices and Printers Control Panel item shown in the snapshot directly below.
- Then select your default printer.
- Click Print server properties to open the window shown directly below.
- Select the Ports tab on that window.
- Click the Change Port Settings button.
- Then you can select a listed port and click Configure Port to modify it.
3. Reset the Printer
An alternative port configuration error message window states: “An error occurred during port configuration. This operation is not supported.” That dialog box also pops up for some users when they press the Configure Ports button.
Fully resetting the printer can fix that port configuration error. To do that, switch the printer off and unplug all its cables. Then wait a few minutes before you plug the printer in and switch it back on.
4. Clear the Printer Queue
The port configuration error also occurs when there’s something in the printer queue. Then the printer resource will be in use. As such, clearing the printer queue is another resolution for port configuration error messages. You can clear the printer queue in Windows 10 as follows.
- Open Run with the Windows key + R keyboard shortcut.
- Input ‘services.msc’ in Run’s text box, and press the OK button
- Double-click Print Spooler to open the window in the snapshot directly below.
- Press the Stop button.
- Click OK to close the window.
- Open File Explorer in Windows 10.
- Then enter ‘C:WINDOWSSystem32spoolPRINTERS’ in the File Explorer’s folder path bar, and press the Return key.
- Press the Ctrl + A hotkey to select everything in the printer queue.
- Then press the Delete button to erase the printer queue.
- Return to the Services window, double-click Printer Spooler and press the Start button (on Printer Spooler Properties window).
Those are a few resolutions that can fix port configuration errors. Then you can configure the port settings as required for a printer.
RELATED STORIES TO CHECK OUT:
Источник
-
Partition Wizard
-
Partition Magic
- An Error Occurred During Port Configuration? 5 Methods to Fix It
By Yamila | Follow |
Last Updated September 27, 2022
While trying to configure the printer port on your computer, you may receive the error message: an error occurred during port configuration this operation is not supported. In this post, MiniTool Partition Wizard provides several methods to help you solve this issue.
In some cases, you may fail to configure the port of your printer in Windows 10 with the error message “an error occurred during port configuration. This operation is not supported”. This error always occurs when the Printer port is either in use or the installed Printer Driver is corrupt or outdated.
If you have no idea about how to solve the “an error occurred during port configuration this operation is not supported Windows 10” issue, you can read this post. It summarizes some possible solutions.
Solution 1: Hard Reset the Printer
After the “an error occurred during port configuration this operation is not supported Windows 10” comes out, you can try to fix it by performing a hard reset of the printer. To do this, follow the steps below.
Step 1: Turn on your printer and wait until it gets into idle mode.
Step 2: After that, remove the power cord from the rear of the printer and the wall outlet. Then wait for at least 60 seconds.
Step 3: Reconnect the power cord to the wall outlet and the printer port.
Step 4: Turn on your printer and wait for it to enter idle mode again.
Once you finish the above operation, go to check if the issue is resolved.
Solution 2: Change Your Account Type
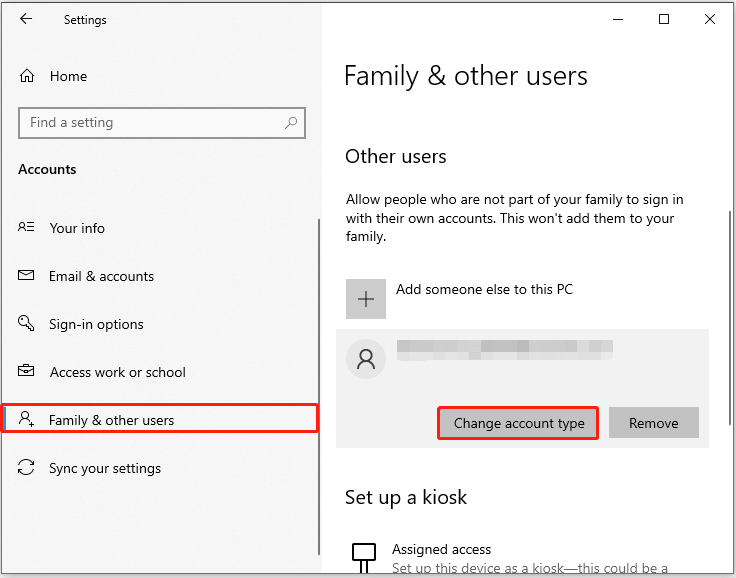
Sometimes, if you are attempting to configure the printer port with a non-administrative account, you may also receive the message “an error occurred during port configuration. this operation is not supported”. In this case, you need to change your account to an administrative one.
Step 1: Press Windows + I to open Windows Settings. Then select Accounts.
Step 2: Go to Family & other users. Then click the account you use for printer configuration and then click Change account type.
Step 3: In the pop-up window, set the account type as Administrator from the drop-down menu and click OK.
Step 4: Once done, restart your computer to see if the error disappears.
Solution 3: Manually Configure the Printer Port
When the “an error occurred during port configuration this operation is not supported” issue shows up, another way you can try is to configure the printer port manually.
Step 1: Press Windows + R to open the Run dialog.
Step 2: Type control.exe in the text box and then press Enter.
Step 3: After you enter Control Panel, click View devices and printers in the Hardware and Sound section.
Step 4: Right-click the printer that shows you the issue and select Printer properties.
Step 5: Go to the Ports tab. Then select the specific port from the list and click Configure Port.
Step 6: Finally, click Apply and OK to save the changes.
Solution 4: Disable Third-party Antivirus Software
Any third-party antivirus software on your PC may recognize the configuring process as a threat and stop it. As a result, you may run into the “an error occurred during port configuration this operation is not supported” issue. On this occasion, you need to disable the antivirus temporarily.
Solution 5: Clear the Printer Queue
The “an error occurred during port configuration this operation is not supported” issue may appear as well if there is something wrong with the printer queue. As for this, it’s recommended you clear the queue.
Step 1: Open the Run dialog. Then type services.msc in the box and press Enter.
Step 2: In the Services window, scroll down to find Print Spooler. Then right-click it and select Stop.
Step 3: Open File Explorer and navigate to C:WINDOWSSystem32spoolPRINTERS. Delete all contents inside this folder.
Step 4: After that, open Services again. Then right-click Printer Spooler and select Start to enable this service.
All the above methods are feasible. Once you are experiencing the “an error occurred during port configuration this operation is not supported Windows 10” issue, you can try them to work it out. If you have any problems with this issue, you can leave a message in our comment part below.
If you are looking for some wonderful tools to manage your partitions and disks, MiniTool Partition Wizard is a good choice. To learn more about this program, you can visit its official website.
About The Author
Position: Columnist
Yamila is a fan of computer science. She can solve many common issues for computer users by writing articles with simple and clear words. The very aspect that she is good at is partition management including create partition, format partition, copy disk and so on.
When she is free, she enjoys reading, doing some excerpts, listening to music and playing games.
Disclaimer: This is a user generated content submitted by a member of the WriteUpCafe Community. The views and writings here reflect that of the author and not of WriteUpCafe. If you have any complaints regarding this post kindly report it to us.
An error occurred during port configuration is one of the most common error on Windows 10 while using a printer. This error message shows up when the user presses the Configure Ports button while tweaking port settings. The error can prevent you from making changes to the Ports settings of your printer. If you are also facing the same error message on your device, then you come to the right place. In this article, we will teach you how to solve “an error occurred during port configuration” message.
Solution 1: Changing the Port Settings from the Admin Account
This error message usually appears due to a lack of the required permissions and privileges. You must need administrator privileges in order to get rid of this error. If you change the port setting with the help of the Windows 10 admin account, then you can remove this error from your computer.
- Head to the Settings by navigating to the Start Menu. Alternatively, you can tap Start + I keys together to bring the Settings windows.
- Navigate to Accounts.
- Head to Family from the left side navigation bar.
- Choose your account and then tap on the Change account type option.
- Then click on the Administrator option.
- Hit the OK button.
- Reboot the device.
Solution 2: Using Print Server Properties
If the “An error occurred during port configuration” message appears even after applying method one, then don’t worry we can still fix the issue. There is an alternative way to tweak the port settings on Windows 10. Here’s how to use print server properties to change the port settings:
- Head to the Start Menu either by hitting the Windows key or clicking on the Start menu button on the lower-left.
- Once the Start Menu appears, search for the Control Panel and then select the Control Panel icon from the results.
- When the Control Panel triggers, Head to the Devices and Printers option.
- Choose your printer device.
- Go to Print Server properties. Tap on the Ports tab.
- Now press the Change Port Settings option.
- Choose the listed port and then go to the Configure Port option.
Solution 3: Resetting the Printer
You can also fix the “an error occurred during port configuration” error message by resetting the Printer on your desktop or laptop. See the below instructions to fix the port configuration error on windows 10:
- Turn off your printer.
- Unplug all printer related cables.
- Wait for a while or for 2-3 minutes.
- After that, plugin all cables back to their desired places.
- Power on the printer and see if the error still persists.
Solution 4: Clear the Queue of your Printer
Stuffing the printer queues with several commands at the same time can trigger the “An error occurred during port configuration” error. In order to resolve the issue, make sure that the printer queue is clear and free from any previous, pending commands. Here is how to clear the printer queue:
- Hit the Start and R keys together for once.
- This will trigger the Run dialogue box for you.
- Now type “services.msc” in the Run dialogue box.
- Hit the Enter key on your computer keyboard.
- Open the Print Spooler just by double-clicking on the Print Spooler option.
- Hit the Stop option in the print spooler window.
- Press the OK button.
- Now open the File Explorer and then navigate to C:WINDOWSSystem32spoolPRINTERS.
- Select all items in the Printers folder by pressing the CTRL + A keys.
- While selecting all items, hit the Delete button.
- Now when everything is deleted in the Printer folder, jump back to the Print Spooler window.
- Run the service again by clicking on the Start button.
Ashley Miller is a Mcafee product expert and has been working in the technology industry since 2002. As a technical expert, she has written technical blogs, manuals, white papers, and reviews for many websites such as mcafee.com/activate.
Source: https://mcafeecomactivate334980539.wordpress.com/2019/12/06/how-to-troubleshoot-an-error-occurred-during-port-configuration/
Member since
December 4, 2019
FIX: An error occurred on port configuration
- Modify the Port Settings Within an Admin Account.
- Configure the Port Settings Via the Print Server Properties.
- Reset the Printer.
- Clear the Printer Queue.
- How do I reset my printer ports?
- How do I manually set a printer port?
- How do I add a printer port in Windows 10?
- How do I setup a printer port?
- Why can’t I configure my printer port?
- How do I manage printer ports?
- Which port should my printer be connected to?
- How do I check my printer configuration?
- What is the default port for the printer?
- How do I find my printer port Windows 10?
- How do I find my printer’s IP address and port?
- How do I connect my computer to my printer server?
How do I reset my printer ports?
- Click the «Start» button on your Windows desktop and select the «Control Panel» option.
- Click «Devices and Printers.»
- Right-click on the icon representing your printer and select «Properties.» Click the «Ports» tab.
- Uncheck the port currently in use and check the box for the computer’s default printer connection.
How do I manually set a printer port?
Setting Up Standard TCP/IP Ports — Windows
- Open the devices and printers screen. …
- Add a printer. …
- Add a local printer. …
- Select Create a new port, select Standard TCP/IP Port as the Port Type, and then click Next. …
- Enter the printer’s IP address or printer name in Host Name or IP Address or Printer Name or IP Address, and then click Next. …
- Set the printer driver.
How do I add a printer port in Windows 10?
To create a print server port, complete the following:
- Press the Windows key.
- Click Settings > Devices > Bluetooth > Printers > Mouse > Add a printer > The printer that I want isn’t listed.
- Select the Add a local printer or network printer with manual settings check box, and click Next.
- Select Create a new port.
How do I setup a printer port?
How to Change a Printer Port on Windows
- Goto Start and type Devices and Printers and press Enter. …
- Right click the printer you want to update and select Printer Properties.
- In the window that opens click the Ports tab.
- Click Add Port…
- Select Standard TCP/IP Port and click New Port…
- On the next page Click Next.
Why can’t I configure my printer port?
Reset the Printer
Fully resetting the printer can fix that port configuration error. To do that, switch the printer off and unplug all its cables. Then wait a few minutes before you plug the printer in and switch it back on.
How do I manage printer ports?
Click “Start” and then click “Devices and Printers.” Right-click any printer you have installed and select “Printer Properties.” Click the “Ports” tab and delete any unwanted ports from there.
Which port should my printer be connected to?
For a printer connected to the computer via Parallel, the Port should be set to LPT1 (or LPT2, LPT3 if you have more than one Parallel interface port on your computer). For a printer connected to a network via a network interface (wired Ethernet or wireless), the Port should be set to EpsonNet Print Port.
How do I check my printer configuration?
Check the printer driver settings
- In the application, open the printer properties dialog box.
- Click the [Setup] tab.
- Check the [Paper type:] setting. Select the paper type from the [Paper type:] dropdown list. For envelopes, select [Envelope].
- Click [OK].
What is the default port for the printer?
Printers usually communicate on TCP port 9100 if you’re using HPPI (formerly the Jet Direct software) from the HP-UX server.
How do I find my printer port Windows 10?
Click start, and then select Devices and Printers. Right-click the printer icon, and then click Printer Properties. Select the Ports tab to check which print port is selected. Print ports selected in the port column are available.
How do I find my printer’s IP address and port?
To find the printer IP address from a Windows machine, perform the following.
- Start -> Printers and Faxes, or Start -> Control Panel -> Printers and Faxes.
- Right-click the printer name, and left-click Properties.
- Click the Ports tab, and widen the first column which displays IP address of the printers.
How do I connect my computer to my printer server?
To create a printer port, complete the following:
- Press the Windows key.
- Click Settings.
- Click Devices > Printers & Scanners.
- Click Add a printer.
- Select Add a local printer or network printer with manual settings, and click Next.
- Select Create a new port.
- Change the Type of port to Standard TCP/IP Port, and click Next.

