Кто не встречал ошибок в процессе обновления Ubuntu? Ошибки обновления в Ubuntu и иных дистрибутивах Linux встречаются часто и не вызывают удивления. В статье описан ряд часто встречающихся ошибок и способы их решения.
Данная статья является частью серии, посвященной новичкам в Ubuntu, и она призвана помочь лучше понять работу с дистрибутивом.
В данном туториале мы рассмотрим часто встречающиеся ошибки, которые можно встретить при обновлении Ubuntu. Они зачастую происходят тогда, когда пытаешься добавить софт или репозитории самостоятельно.
Если во время обновления системы появляются ошибки, паниковать не стоит. Ошибки случаются часто и решения есть. Вы научитесь как решить часто встречающиеся ошибки.
Ошибка 0: Failed to download repository information
Многие пользователи Ubuntu обновляют систему через графическую программное средство обновления. Вам приходит оповещения, что стали доступными обновления для вашей системы и теперь можно нажать на кнопку для начала скачивания и установки.
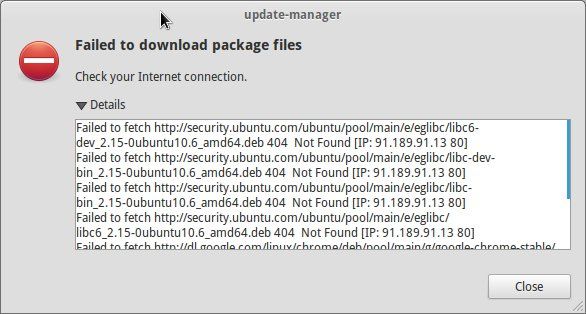
Обычно так и происходит, но иногда можно увидеть подобную ошибку:
Скорее всего ошибка покажется странной, так как интернет работает, но вас все равно просят его проверить.
Заметили, что я назвал ее “Ошибка 0”? Это потому что это по сути не ошибка. То есть, скорее всего, она не связана с подключением к интернету. Тем не менее помимо этого путающего сообщения больше информации нет.
Если вы видите данное сообщение, а подключение к интернету в порядке, то значит пришло время надевать шляпу детектива и пошевелить мозгами.
Нам придется использовать командную строку. Для того чтобы ее быстро открыть можете воспользоваться сочетанием клавиш ctrl+alt+T. Исполните в ней данную команду:
sudo apt update
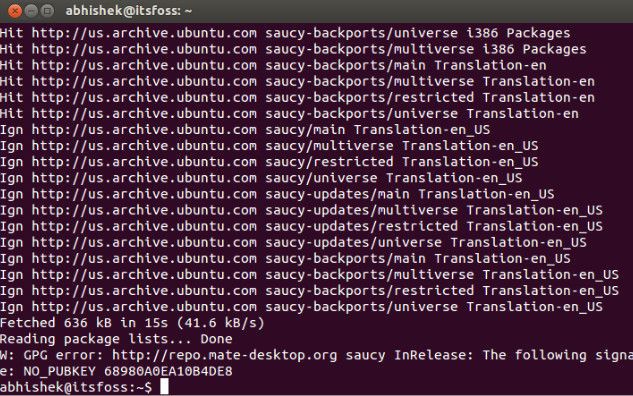
Дождитесь завершения процесса. Рассмотрите последние 3-4 строки вывода. Они покажут действительные причины ошибки sudo apt-get update. Вот пример:
Дальше туториал будет посвящен способам решения ошибок, указанных в нескольких последних строчках вывода командной строки.
Ошибка 1: Problem With MergeList
Когда вы запустите обновление в терминале, то можете увидеть ошибку “Problem With MergeList”:
E:Encountered a section with no Package: header,
E:Problem with MergeList /var/lib/apt/lists/archive.ubuntu.com_ubuntu_dists_precise_universe_binary-i386_Packages,
E:The package lists or status file could not be parsed or opened.’
По какой-то причине файл в директории /var/lib/apt/lists сломался. Вы можете удалить все файлы в указанной директории и запустить обновление снова. Исполните указанные команды одна за другое:
sudo rm -r /var/lib/apt/lists/*
sudo apt-get clean && sudo apt-get update
Проблемы должны исчезнуть
Ошибка 2: Hash Sum mismatch
Вы можете встретиться с ошибкой “Hash Sum mismatch”. Ее решение аналогично тому, что мы написали выше.
W:Failed to fetch bzip2:/var/lib/apt/lists/partial/in.archive.ubuntu.com_ubuntu_dists_oneiric_restricted_binary-i386_Packages Hash Sum mismatch,
W:Failed to fetch bzip2:/var/lib/apt/lists/partial/in.archive.ubuntu.com_ubuntu_dists_oneiric_multiverse_binary-i386_Packages Hash Sum mismatch,
E:Some index files failed to download. They have been ignored, or old ones used instead
Скорее всего ошибка происходит из-за несовпадения на серверах кэша метаданных. Для исправления ситуации используйте данные команды:
sudo rm -rf /var/lib/apt/lists/*
sudo apt update
Ошибка 3: Failed to fetch with error 404 not found
Если вы попытаетесь добавить репозиторий, который недоступен в вашей текущей версии Ubuntu, то увидите ошибку 404 not found:
W: Failed to fetch http://ppa.launchpad.net/venerix/pkg/ubuntu/dists/raring/main/binary-i386/Packages  404  Not Found
E: Some index files failed to download. They have been ignored, or old ones used instead.
Вы добавили PPA в надежде установить приложение, но оно недоступно для вашей версии Ubuntu, и появилась ошибка. Вот почему следует заранее проверять доступно ли PPA для вашей версии Ubuntu или нет. Как удостовериться, что для вашей версии есть PPA, можно посмотреть здесь.
Так или иначе решением данной проблемы является удаление проблемной PPA из списка репозиториев. Название PPA вы найдете в сообщении об ошибке. Зайдите в средство Software & Updates:
Здесь пройдите во вкладку Other Software и поищите PPA. Уберите галочку, чтобы PPA удалилась из системы.
Ваш список программ после этого обновится. Теперь, если вы снова запустите обновление, ошибка исчезнет.
Ошибка 4: Failed to download package files
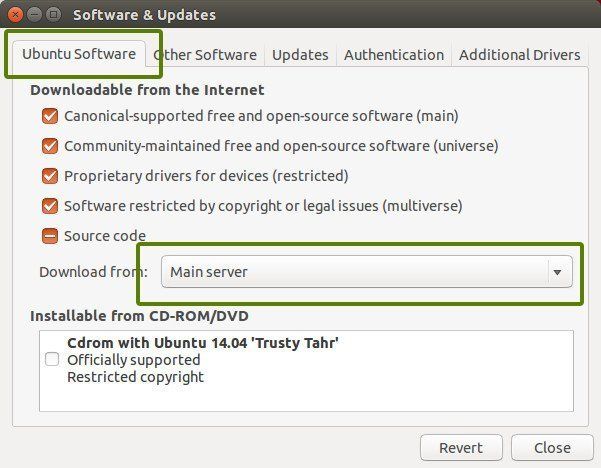
В данной ситуации доступна новая версия программы, но эта версия не распространена на все зеркала. Если вы не используете зеркало, то решить эту проблему просто — сделайте источником программы основной сервер.
Пройдите в Software & Updates там измените сменить сервер с которого происходит скачивание на main (основной):
Ошибка 5: GPG error: The following signatures couldn’t be verified
Добавление PPA может также привести к оповещению “GPG error: The following signatures couldn’t be verified” во время обновления:
W: GPG error: http://repo.mate-desktop.org saucy InRelease: The following signatures couldn’t be verified because the public key is not available: NO_PUBKEY 68980A0EA10B4DE8
Все что надо в данном случае сделать, так это добавить публичный код в систему. Возьмите ключ из сообщения. В сообщении выше это 68980A0EA10B4DE8.
Данный ключ можно использовать так:
sudo apt-key adv --keyserver keyserver.ubuntu.com --recv-keys 68980A0EA10B4DE8
Как только ключ будет добавлен, запустите обновление и все должны быть в порядке.
Ошибка 6: BADSIG error
Еще одна знаковая ошибка при обновлении Ubuntu — это “BADSIG error”, которая выглядит примерно так:
W: A error occurred during the signature verification. The repository is not updated and the previous index files will be used. GPG error: http://extras.ubuntu.com precise Release: The following signatures were invalid: BADSIG 16126D3A3E5C1192 Ubuntu Extras Archive Automatic Signing Key
W: GPG error: http://ppa.launchpad.net precise Release:
The following signatures were invalid: BADSIG 4C1CBC1B69B0E2F4 Launchpad PPA for Jonathan French W: Failed to fetch http://extras.ubuntu.com/ubuntu/dists/precise/Release
Все репозитории подписаны GPG, и по какой-то причине система считает их неверными. Необходимо обновить ключи подписей. Проще всего это сделать путем повторной генерации списка apt get (с ключами подписей) и он должен иметь верный ключ.
Используйте следующие команды одну за другой:
cd /var/lib/apt
sudo mv lists oldlist
sudo mkdir -p lists/partial
sudo apt-get clean
sudo apt-get update
Ошибка 7: Partial upgrade error
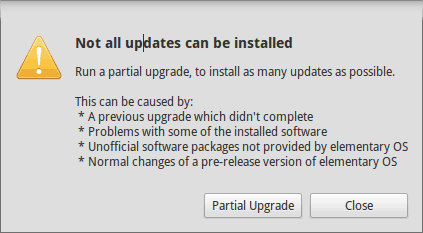
Обновление через терминал может привести к такому:
Not all updates can be installed
Run a partial upgrade, to install as many updates as possible
Для исправления ошибки исполните в терминале данную команду:
sudo apt-get install -f
Ошибка 8: Could not get lock /var/cache/apt/archives/lock
Данная ошибка происходит, когда еще одна программа использует APT. Допустим вы устанавливаете что-то через Ubuntu Software Center и в одновременно пытается запустить apt в терминале.
E: Could not get lock /var/cache/apt/archives/lock – open (11: Resource temporarily unavailable)
E: Unable to lock directory /var/cache/apt/archives/
Проверьте не использует ли apt другая программа. Это может быть команда в терминале, Software Center, Software Updater, Software & Updates или иной другой соф, который занимается установкой и удалением приложений.
Если можете такие программы закрыть, закрывайте. Если что-то в процессе, то дождитесь завершения.
Если ничего найти не можете, используйте данную команду для того, чтобы прекратить все подобные процессы:
sudo killall apt apt-get
Это хитрая проблема, так что придется попотеть. Если это не поможет, то рекомендуем эту статью.
Встречали ли вы другие ошибки при обновлении?
Так завершается обзор часто встречающихся ошибок при обновлении Ubuntu. Надеюсь данная статья поможет вам с ними справится.
Вы не встречали других ошибок при обновлении Ubuntu недавно, о которых здесь не говорится? Расскажите в комментариях.
I follow official docker instructions to install docker on ubuntu 18.04 LTS from https://docs.docker.com/install/linux/docker-ce/ubuntu/
Using the setting up repository I ran:
sudo apt-get install
    apt-transport-https
    ca-certificates
    curl
    gnupg-agent
    software-properties-common
and
curl -fsSL https://download.docker.com/linux/ubuntu/gpg | sudo apt-key add -
and finaly
sudo add-apt-repository
   "deb [arch=amd64] https://download.docker.com/linux/ubuntu
   $(lsb_release -cs)
   stable"
Then, running sudo apt-get update I have errors :
Hit:1 http://eu-west-3.ec2.archive.ubuntu.com/ubuntu bionic InRelease
Get:2 http://eu-west-3.ec2.archive.ubuntu.com/ubuntu bionic-updates InRelease [88.7 kB]
Hit:3 http://eu-west-3.ec2.archive.ubuntu.com/ubuntu bionic-backports InRelease
Err:1 http://eu-west-3.ec2.archive.ubuntu.com/ubuntu bionic InRelease
  The following signatures couldn't be verified because the public key is not available: NO_PUBKEY 3B4FE6ACC0B21F32
Get:6 http://security.ubuntu.com/ubuntu bionic-security InRelease [88.7 kB]
Ign:7 https://download.docker.com/linux/ubuntu buster InRelease
Err:2 http://eu-west-3.ec2.archive.ubuntu.com/ubuntu bionic-updates InRelease
  The following signatures couldn't be verified because the public key is not available: NO_PUBKEY 3B4FE6ACC0B21F32
Hit:8 http://us.archive.ubuntu.com/ubuntu bionic InRelease
Hit:4 http://cdn-fastly.deb.debian.org/debian experimental InRelease
Hit:5 http://cdn-fastly.deb.debian.org/debian sid InRelease
Hit:9 http://us.archive.ubuntu.com/ubuntu xenial InRelease
Err:10 https://download.docker.com/linux/ubuntu buster Release
  404  Not Found [IP: 143.204.229.105 443]
Err:3 http://eu-west-3.ec2.archive.ubuntu.com/ubuntu bionic-backports InRelease
  The following signatures couldn't be verified because the public key is not available: NO_PUBKEY 3B4FE6ACC0B21F32
Err:8 http://us.archive.ubuntu.com/ubuntu bionic InRelease
  The following signatures couldn't be verified because the public key is not available: NO_PUBKEY 3B4FE6ACC0B21F32
Err:9 http://us.archive.ubuntu.com/ubuntu xenial InRelease
  The following signatures couldn't be verified because the public key is not available: NO_PUBKEY 40976EAF437D05B5 NO_PUBKEY 3B4FE6ACC0B21F32
Err:6 http://security.ubuntu.com/ubuntu bionic-security InRelease
  The following signatures couldn't be verified because the public key is not available: NO_PUBKEY 3B4FE6ACC0B21F32
Reading package lists... Done
W: An error occurred during the signature verification. The repository is not updated and the previous index files will be used. GPG error: http://eu-west-3.ec2.archive.ubuntu.com/ubuntu bionic InRelease: The following signatures couldn't be verified because the public key is not available: NO_PUBKEY 3B4FE6ACC0B21F32
W: An error occurred during the signature verification. The repository is not updated and the previous index files will be used. GPG error: http://eu-west-3.ec2.archive.ubuntu.com/ubuntu bionic-updates InRelease: The following signatures couldn't be verified because the public key is not available: NO_PUBKEY 3B4FE6ACC0B21F32
E: The repository 'https://download.docker.com/linux/ubuntu buster Release' does not have a Release file.
N: Updating from such a repository can't be done securely, and is therefore disabled by default.
N: See apt-secure(8) manpage for repository creation and user configuration details.
W: An error occurred during the signature verification. The repository is not updated and the previous index files will be used. GPG error: http://eu-west-3.ec2.archive.ubuntu.com/ubuntu bionic-backports InRelease: The following signatures couldn't be verified because the public key is not available: NO_PUBKEY 3B4FE6ACC0B21F32
W: An error occurred during the signature verification. The repository is not updated and the previous index files will be used. GPG error: http://us.archive.ubuntu.com/ubuntu bionic InRelease: The following signatures couldn't be verified because the public key is not available: NO_PUBKEY 3B4FE6ACC0B21F32
W: An error occurred during the signature verification. The repository is not updated and the previous index files will be used. GPG error: http://us.archive.ubuntu.com/ubuntu xenial InRelease: The following signatures couldn't be verified because the public key is not available: NO_PUBKEY 40976EAF437D05B5 NO_PUBKEY 3B4FE6ACC0B21F32
W: An error occurred during the signature verification. The repository is not updated and the previous index files will be used. GPG error: http://security.ubuntu.com/ubuntu bionic-security InRelease: The following signatures couldn't be verified because the public key is not available: NO_PUBKEY 3B4FE6ACC0B21F32
and I could not install docker using :
sudo apt-get install docker-ce docker-ce-cli containerd.io
What shall I do to get read of these error and go back to a normal configuration ?
Thank you in advance.
Hit:1 http:/ubuntu.melbourneitmirror.net/archive bionic InRelease

Hit:2 http:/ubuntu.melbourneitmirror.net/archive bionic-updates InRelease

Hit:3 http:/ubuntu.melbourneitmirror.net/archive bionic-backports
InRelease

Hit:4 http:/ubuntu.melbourneitmirror.net/archive bionic-security InRelease

Ign:5 http:/dl.google.com/linux/chrome/deb stable InRelease

Hit:7 http:/dl.google.com/linux/chrome/deb stable Release

Get:6 http:/repo.ros2.org/ubuntu/main bionic InRelease [3,209 B]

Err:6 http:/repo.ros2.org/ubuntu/main bionic InRelease
  The following signatures couldn't be verified because the public key is not available: NO_PUBKEY F42ED6FBAB17C654

Get:9 http:/packages.ros.org/ros/ubuntu bionic InRelease [4,669 B]

Err:9 http:/packages.ros.org/ros/ubuntu bionic InRelease
  The following signatures couldn't be verified because the public key is not available: NO_PUBKEY F42ED6FBAB17C654
Fetched 7,878 B in 1s (6,188 B/s)

Reading package lists... Done

W: An error occurred during the signature verification. The repository is not updated and the previous index files will be used. GPG error: http:/repo.ros2.org/ubuntu/main bionic InRelease: The following signatures couldn't be verified because the public key is not available: NO_PUBKEY F42ED6FBAB17C654

W: An error occurred during the signature verification. The repository is not updated and the previous index files will be used. GPG error: http:/packages.ros.org/ros/ubuntu bionic InRelease: The following signatures couldn't be verified because the public key is not available: NO_PUBKEY F42ED6FBAB17C654

W: Failed to fetch http:/packages.ros.org/ros/ubuntu/dists/bionic/InRelease  The following signatures couldn't be verified because the public key is not available: NO_PUBKEY F42ED6FBAB17C654

W: Failed to fetch http:/repo.ros2.org/ubuntu/main/dists/bionic/InRelease  The following signatures couldn't be verified because the public key is not available: NO_PUBKEY F42ED6FBAB17C654

W: Some index files failed to download. They have been ignored, or old ones used instead.
how do i go about solving this?? pls note i am new to linux in general.
thank you for your time
Fanatique
4,3701 gold badge16 silver badges26 bronze badges
asked Aug 9, 2019 at 8:27
You are missing the GPG signing key for the ros2 repositories.
You can add it with the following command:
curl http://repo.ros2.org/repos.key | sudo apt-key add -
After that run the following again:
apt-get update
And you should be ready to go.
answered Aug 9, 2019 at 8:33
FanatiqueFanatique
4,3701 gold badge16 silver badges26 bronze badges
1
Сегодня столкнулся с ошибкой, при попытке обновить репозитории: An error occurred during the signature verification. The repository is not updated and the previous index files will be used….
Полный текст ошибки
|
$ sudo apt—get update ... Fetched 480 kB in 4s (135 kB/s) Reading package lists... Done W: An error occurred during the signature verification. The repository is not updated and the previous index files will be used. GPG error: http://dl.yarnpkg.com/debian stable InRelease: The following signatures were invalid: EXPKEYSIG 23E7166788B63E1E Yarn Packaging <yarn@dan.cx> W: Failed to fetch http://dl.yarnpkg.com/debian/dists/stable/InRelease The following signatures were invalid: EXPKEYSIG 23E7166788B63E1E Yarn Packaging <yarn@dan.cx> W: Some index files failed to download. They have been ignored, or old ones used instead. |
Эта ошибка говорит о том, что ключ подписи поменялся. Чтобы ее исправить, нам нужно найти и установить новый. Сделать этом можно поискав инструкции по установке нужного репозитория. В моем случае это yarn, поэтому инструкция вот такая:
|
$ curl —sS http://dl.yarnpkg.com/debian/pubkey.gpg | sudo apt-key add — OK |
Повторяем апдейт, и в этот раз все проходит гладко
|
$ sudo apt—get update Hit:1 http://ppa.launchpad.net/linuxuprising/shutter/ubuntu disco InRelease Hit:2 http://security.ubuntu.com/ubuntu disco-security InRelease Get:3 http://dl.yarnpkg.com/debian stable InRelease [17.1 kB] ... Fetched 461 kB in 4s (131 kB/s) Reading package lists... Done |
Похожие статьи
Автор:
| Рейтинг: 4/5 |
Теги: package update , ubuntu
Who hasn’t come across an error while doing an update in Ubuntu? Update errors are common and plenty in Ubuntu and other Linux distributions based on Ubuntu. Here are some common Ubuntu update errors and their fixes.
This article is part of Ubuntu beginner series that explains the know-how of Ubuntu so that a new user could understand the things better.
In an earlier article, I discussed how to update Ubuntu. In this tutorial, I’ll discuss some common errors you may encounter while updating Ubuntu. It usually happens because you tried to add software or repositories on your own and that probably caused an issue.
There is no need to panic if you see the errors while updating your system.The errors are common and the fix is easy. You’ll learn how to fix those common update errors.
Before you begin, I highly advise reading these two articles to have a better understanding of the repository concept in Ubuntu.
Understand Ubuntu repositories
Learn what are various repositories in Ubuntu and how they enable you to install software in your system.
Understanding PPA in Ubuntu
Further improve your concept of repositories and package handling in Ubuntu with this detailed guide on PPA.
Error 0: Failed to download repository information
Many Ubuntu desktop users update their system through the graphical software updater tool. You are notified that updates are available for your system and you can click one button to start downloading and installing the updates.
Well, that’s what usually happens. But sometimes you’ll see an error like this:
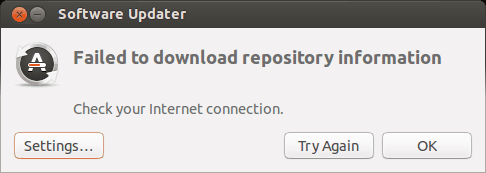
Failed to download repository information. Check your internet connection.
That’s a weird error because your internet connection is most likely working just fine and it still says to check the internet connection.
Did you note that I called it ‘error 0’? It’s because it’s not an error in itself. I mean, most probably, it has nothing to do with the internet connection. But there is no useful information other than this misleading error message.
If you see this error message and your internet connection is working fine, it’s time to put on your detective hat and use your grey cells (as Hercule Poirot would say).
You’ll have to use the command line here. You can use Ctrl+Alt+T keyboard shortcut to open the terminal in Ubuntu. In the terminal, use this command:
sudo apt updateLet the command finish. Observe the last three-four lines of its output. That will give you the real reason why sudo apt-get update fails. Here’s an example:
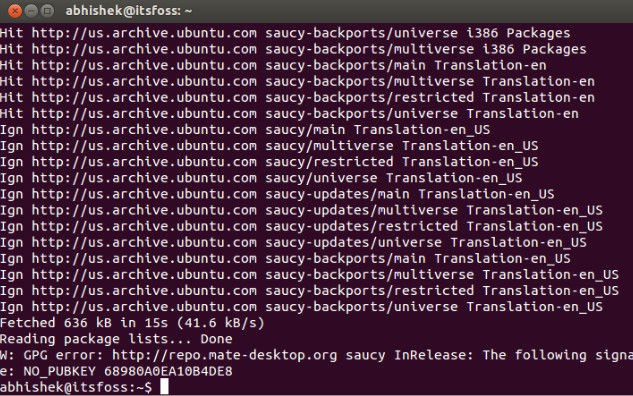
Rest of the tutorial here shows how to handle the errors that you just saw in the last few lines of the update command output.
Error 1: Problem With MergeList
When you run update in terminal, you may see an error “problem with MergeList” like below:
E:Encountered a section with no Package: header,
E:Problem with MergeList /var/lib/apt/lists/archive.ubuntu.com_ubuntu_dists_precise_universe_binary-i386_Packages,
E:The package lists or status file could not be parsed or opened.’
For some reasons, the file in /var/lib/apt/lists directory got corrupted. You can delete all the files in this directory and run the update again to regenerate everything afresh. Use the following commands one by one:
sudo rm -r /var/lib/apt/lists/*
sudo apt-get clean && sudo apt-get update
Your problem should be fixed.
Error 2: Hash Sum mismatch
If you find an error that talks about Hash Sum mismatch, the fix is the same as the one in the previous error.
W:Failed to fetch bzip2:/var/lib/apt/lists/partial/in.archive.ubuntu.com_ubuntu_dists_oneiric_restricted_binary-i386_Packages Hash Sum mismatch,
W:Failed to fetch bzip2:/var/lib/apt/lists/partial/in.archive.ubuntu.com_ubuntu_dists_oneiric_multiverse_binary-i386_Packages Hash Sum mismatch,
E:Some index files failed to download. They have been ignored, or old ones used instead
The error occurs possibly because of a mismatched metadata cache between the server and your system. You can use the following commands to fix it:
sudo rm -rf /var/lib/apt/lists/*
sudo apt update
Error 3: Failed to fetch with error 404 not found
If you try adding a PPA repository that is not available for your current Ubuntu version, you’ll see that it throws a 404 not found error.
W: Failed to fetch http://ppa.launchpad.net/venerix/pkg/ubuntu/dists/raring/main/binary-i386/Packages  404  Not Found
E: Some index files failed to download. They have been ignored, or old ones used instead.
You added a PPA hoping to install an application but it is not available for your Ubuntu version and you are now stuck with the update error. This is why you should check beforehand if a PPA is available for your Ubuntu version or not. I have discussed how to check the PPA availability in the detailed PPA guide.
Anyway, the fix here is that you remove the troublesome PPA from your list of repositories. Note the PPA name from the error message. Go to Software & Updates tool:

In here, move to Other Software tab and look for that PPA. Uncheck the box to remove the PPA from your system.
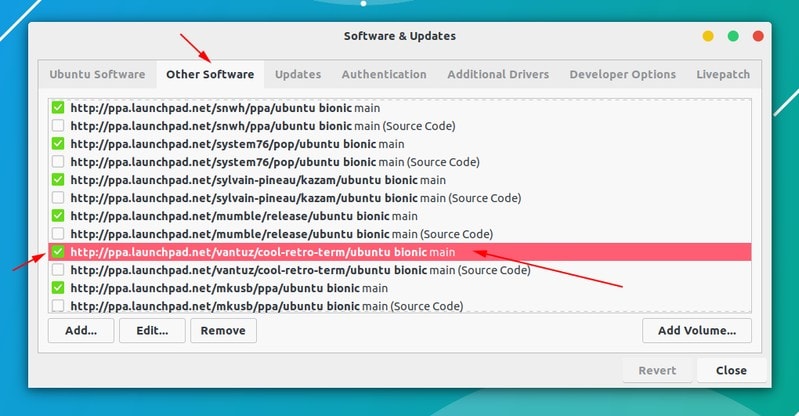
Your software list will be updated when you do that. Now if you run the update again, you shouldn’t see the error.
Error 4: Failed to download package files error
A similar error is failed to download package files error like this:
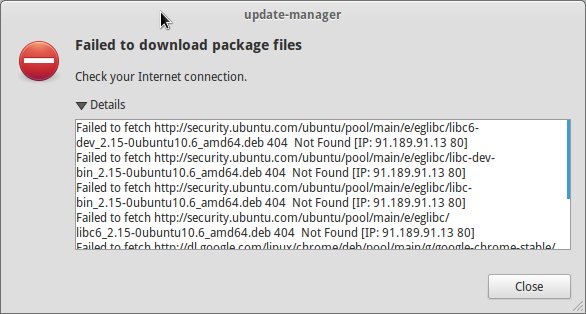
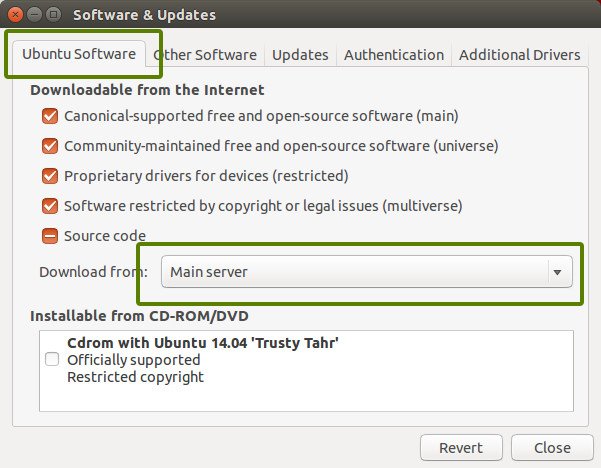
In this case, a newer version of the software is available but it’s not propagated to all the mirrors. If you are not using a mirror, easily fixed by changing the software sources to Main server. Please read this article for more details on failed to download package error.
Go to Software & Updates and in there changed the download server to Main server:
Error 5: GPG error: The following signatures couldn’t be verified
Adding a PPA may also result in the following GPG error: The following signatures couldn’t be verified when you try to run an update in terminal:
W: GPG error: http://repo.mate-desktop.org saucy InRelease: The following signatures couldn’t be verified because the public key is not available: NO_PUBKEY 68980A0EA10B4DE8
All you need to do is to fetch this public key in the system. Get the key number from the message. In the above message, the key is 68980A0EA10B4DE8.
This key can be used in the following manner:
sudo apt-key adv --keyserver keyserver.ubuntu.com --recv-keys 68980A0EA10B4DE8
Once the key has been added, run the update again and it should be fine.
Error 6: BADSIG error
Another signature related Ubuntu update error is BADSIG error which looks something like this:
W: A error occurred during the signature verification. The repository is not updated and the previous index files will be used. GPG error: http://extras.ubuntu.com precise Release: The following signatures were invalid: BADSIG 16126D3A3E5C1192 Ubuntu Extras Archive Automatic Signing Key
W: GPG error: http://ppa.launchpad.net precise Release:
The following signatures were invalid: BADSIG 4C1CBC1B69B0E2F4 Launchpad PPA for Jonathan French W: Failed to fetch http://extras.ubuntu.com/ubuntu/dists/precise/Release
All the repositories are signed with the GPG and for some reason, your system finds them invalid. You’ll need to update the signature keys. The easiest way to do that is by regenerating the apt packages list (with their signature keys) and it should have the correct key.
Use the following commands one by one in the terminal:
cd /var/lib/apt
sudo mv lists oldlist
sudo mkdir -p lists/partial
sudo apt-get clean
sudo apt-get update
Error 7: Partial upgrade error
Running updates in terminal may throw this partial upgrade error:
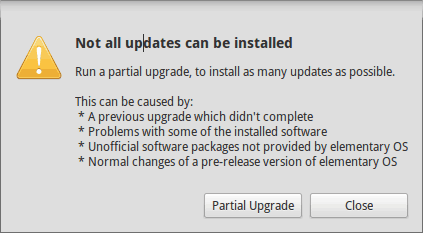
Not all updates can be installed
Run a partial upgrade, to install as many updates as possible
Run the following command in terminal to fix this error:
sudo apt-get install -f
Error 8: Could not get lock /var/cache/apt/archives/lock
This error happens when another program is using APT. Suppose you are installing some thing in Ubuntu Software Center and at the same time, trying to run apt in terminal.
E: Could not get lock /var/cache/apt/archives/lock – open (11: Resource temporarily unavailable)
E: Unable to lock directory /var/cache/apt/archives/
Check if some other program might be using apt. It could be a command running terminal, Software Center, Software Updater, Software & Updates or any other software that deals with installing and removing applications.
If you can close other such programs, close them. If there is a process in progress, wait for it to finish.
If you cannot find any such programs, use the following command to kill all such running processes:
sudo killall apt apt-get
This is a tricky problem and if the problem still persists, please read this detailed tutorial on fixing the unable to lock the administration directory error in Ubuntu.
Any other update error you encountered?
That compiles the list of frequent Ubuntu update errors you may encounter. I hope this helps you to get rid of these errors.
Have you encountered any other update error in Ubuntu recently that hasn’t been covered here? Do mention it in comments and I’ll try to do a quick tutorial on it.

You might see a missing public GPG key error («NO_PUBKEY») on Debian, Ubuntu or Linux Mint when running apt update / apt-get update. This can happen when you add a repository, and you forget to add its public key, or maybe there was a temporary key server error when trying to import the GPG key.
When running an apt update / apt-get update, or trying to refresh the software sources using some GUI tool, apt will complain about not being able to download all repository indexes, showing errors like this:
W: An error occurred during the signature verification. The repository is not updated and the previous index files will be used. GPG error: http://ppa.launchpad.net/linuxuprising/apps/ubuntu bionic InRelease: The following signatures couldn't be verified because the public key is not available: NO_PUBKEY EA8CACC073C3DB2A

W: Failed to fetch http://ppa.launchpad.net/linuxuprising/apps/ubuntu/dists/bionic/InRelease  The following signatures couldn't be verified because the public key is not available: NO_PUBKEY EA8CACC073C3DB2A

W: Some index files failed to download. They have been ignored, or old ones used instead.
This is just an example. This error can occur not only with Launchpad PPA repositories, but any repository, like those provided by Google, Vivaldi or Node.js, etc.
The error message says that the repository is not updated, and the previous index files will be used. That means you won’t receive updates from that repository, so you should import the public GPG key to fix this issue.
This is how to easily fix the The following signatures couldn't be verified because the public key is not available: NO_PUBKEY ... error. It should work on Debian, Ubuntu, Linux Mint, Pop!_OS, elementary OS, and any other Linux distribution based on Debian or Ubuntu.
Solution 1: Quick NO_PUBKEY fix for a single repository / key.
If you’re only missing one public GPG repository key, you can run this command on your Ubuntu / Linux Mint / Pop!_OS / Debian system to fix it:
sudo apt-key adv --keyserver hkp://pool.sks-keyservers.net:80 --recv-keys THE_MISSING_KEY_HEREYou’ll have to replace THE_MISSING_KEY_HERE with the missing GPG key. The key is shown in the apt update / apt-get update log, after NO_PUBKEY. For example, in the error message I posted above, the missing GPG key that must be used in this command is EA8CACC073C3DB2A.
Also see: How To Fix «Could not get lock /var/lib/dpkg/lock — open (11 Resource temporarily unavailable)» Errors
Solution 2: Batch import all missing GPG keys.
When you’re missing multiple public OpenPGP keys you can use a this one-liner to import all of them in one go:
sudo apt update 2>&1 1>/dev/null | sed -ne 's/.*NO_PUBKEY //p' | while read key; do if ! [[ ${keys[*]} =~ "$key" ]]; then sudo apt-key adv --keyserver hkp://pool.sks-keyservers.net:80 --recv-keys "$key"; keys+=("$key"); fi; done
There’s no need to change any part of the command, just run it as is. This also works for fixing a single missing GPG key, but it’s a bit redundant. Nonetheless, it works with any number of missing GPG keys.
The command runs sudo apt update to update your software sources and detect missing GPG keys, and it imports each missing key using hkp://pool.sks-keyservers.net:80 as its server. This server is synchronized with many other servers continuously, so it should have updated keys. You could use some other server if you wish.
The command also uses an array to store missing GPG keys for which we’ve already imported the key. Without that, the key import command would run twice for each missing key.
You might also be interested in: How To Make A PGP Key On Linux Using A GUI (And Publish It)
If you’ve noticed apt moaning about a missing GPG key this weekend, you can throw Google your aggrieved glances.
The public signing key that Google issues to sign and authenticate packages distributed through its Linux repositories has changed, resulting in users, perhaps yourself included, seeing various errors thrown up by the package manager.
If you’ve run an apt update since August 4 you may have seen this error:
W: An error occurred during the signature verification. The repository is not updated and the previous index files will be used. GPG error: dl.google.com/linux/chrome/d… stable Release: The following signatures couldn't be verified because the public key is not available: NO_PUBKEY 6494C6D6997C215E

W: Failed to fetch dl.google.com/linux/chrome/d… The following signatures couldn't be verified because the public key is not available: NO_PUBKEY 6494C6D6997C215E

W: Some index files failed to download. They have been ignored, or old ones used instead.
Google signs its packages with GPG keys so that you (and your package manager) can “verify product updates”. When a GPG expires, changes, or is otherwise missing from your system your package manager will display an error, which is precisely what the monospaced gunk above is.
The good news is that it’s easy fix the missing Google GPG key error on Ubuntu: just pop open a new Terminal window and run:
wget -q -O - https://dl.google.com/linux/linux_signing_key.pub | sudo apt-key add -
You’ll be prompted to enter your password (do) and then, well, that’s it. No more ‘failed to fetch’ error on Ubuntu when you run an apt update.
Thanks Oer H.

I typed the following commands in terminal in attempt to update the system.
sudo apt-get clean
sudo apt-get update
sudo apt-get upgrade
The “clean” command did nothing.
The sudo apt-get update command came up with an error:
Reading package lists... Done<br>
W: A error occurred during the signature verification. The repository is not updated and the previous index files will be used. GPG error: http://extras.ubuntu.com oneiric Release: The following signatures were invalid: BADSIG 16126D3A3E5C1192 Ubuntu Extras Archive Automatic Signing Key <ftpmaster@ubuntu.com><p></p>
W: A error occurred during the signature verification. The repository is not updated and the previous index files will be used. GPG error: http://archive.canonical.com oneiric Release: The following signatures were invalid: BADSIG 40976EAF437D05B5 Ubuntu Archive Automatic Signing Key <ftpmaster@ubuntu.com>
W: GPG error: http://ppa.launchpad.net oneiric Release: The following signatures were invalid: BADSIG E0319082F37F3AB0 Launchpad fixes for aprsd
W: GPG error: http://ppa.launchpad.net oneiric Release: The following signatures were invalid: BADSIG 73AD8184264CE9C6 Launchpad PPA for Simon Schneegans
W: GPG error: http://ppa.launchpad.net oneiric Release: The following signatures were invalid: BADSIG DFB844B8BB91632D Launchpad PPA for Weather Indicator Team
W: A error occurred during the signature verification. The repository is not updated and the previous index files will be used. GPG error: http://ppa.launchpad.net oneiric Release: The following signatures were invalid: BADSIG C2518248EEA14886 Launchpad VLC
W: Failed to fetch http://extras.ubuntu.com/ubuntu/dists/oneiric/Release
W: Failed to fetch http://archive.canonical.com/ubuntu/dists/oneiric/Release
W: Failed to fetch http://ppa.launchpad.net/webupd8team/gnome3/ubuntu/dists/oneiric/Release
W: Some index files failed to download. They have been ignored, or old ones used instead.
Did you notice the last few lines? Those are the crucial ones and we need to focus on it. It says:
W: A error occurred during the signature verification. The repository is not updated and the previous index files will be used. GPG error: http://extras.ubuntu.com oneiric Release: The following signatures were invalid: BADSIG 16126D3A3E5C1192 Ubuntu Extras Archive Automatic Signing Key <ftpmaster@ubuntu.com>
That is our culprit here: Invalid signature error BADSIG.
To remove the bad signature error, open the terminal (Ctrl+Alt+T) and use the commands given below one by one:
sudo apt-get clean
cd /var/lib/apt
sudo mv lists lists.old
sudo mkdir -p lists/partial
sudo apt-get clean
sudo apt-get update
After using these commands you should get rid of the errors and your Update Manager should be working fine.
Still got problem? Do tell me if you still facing difficulties with the BADSIG or Ubuntu Update Manger. I would like to help you out. Keep in touch by subscribing to the newsletter. Enjoy 
Image credit: Big Stock Photo
Abhishek Prakash
Abhishek is a Linux lover and Opens Source enthusiast. He takes a keen interest in day-to-day computer life and wishes to share his experience with others to make their computer experience better and easier. He is the owner of increasingly popular tech blog Computer And You and Open Source blog It’s FOSS.
Subscribe to our newsletter!
Our latest tutorials delivered straight to your inbox


