-
Partition Wizard
-
Partition Magic
- [Solved] An Error Occurred While Applying Security Information
By Amanda | Follow |
Last Updated November 24, 2020
Some Windows users complain that they receive error message “an error occurred while applying security information to” while they are trying to change file/folder security settings. This issue can be fixed easily by following the solutions in this post from MiniTool.
“An error occurred while applying security information” error prevents you from change security setting of a file or folder. And this error may happen to both your local computer and external media connected to your PC.
When you are stopped by the error, you will be also prompted that Access is denied in the Error Applying Security window. So, it’s safe to say that this error occurs mainly because the file is in Read-only mode or the current account don’t have the ownership of the file.
Focusing on this error, I have collected several possible solutions for you and hope they will help you out.
Fix 1: Turn off the Read-only Mode
If the Read-only mode is enabled for the file or folder, you cannot access it freely. So, to fix this issue, you need to make sure the Read-only mode is turned off firstly before trying other methods.
You just need to right-click the problematic file or folder and choose Properties. Then, in General tab, uncheck Read-only in Attributes section, and click Apply and OK to save the change.
Fix 2: Take Ownership of the File
Perhaps, your current user account doesn’t have the permission to edit or copy the file or folder, casing error applying security. In this case, you can take ownership of the file. Just follow the instructions prepared for you below.
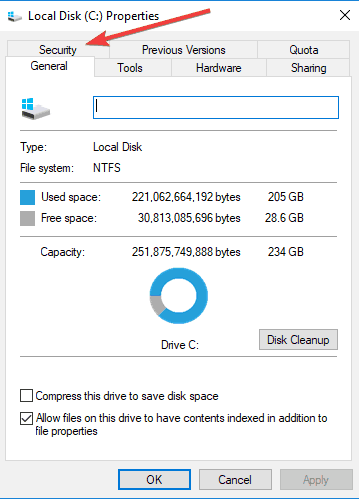
Step 1: Right-click the file or folder and choose Properties.
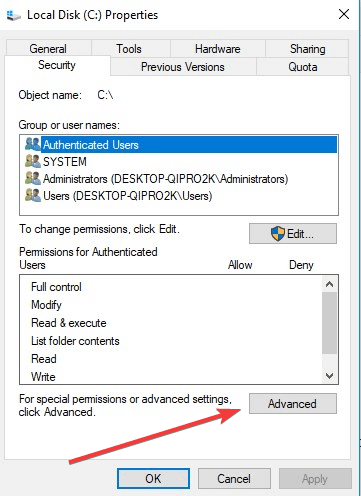
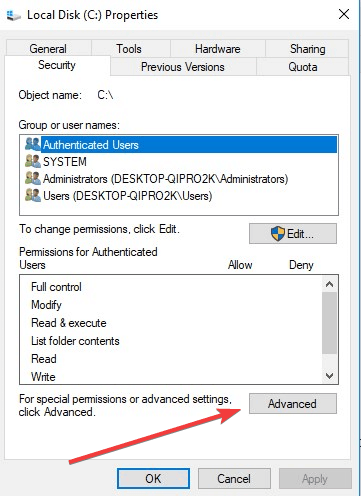
Step 2: Under Security tab, click Advanced button.
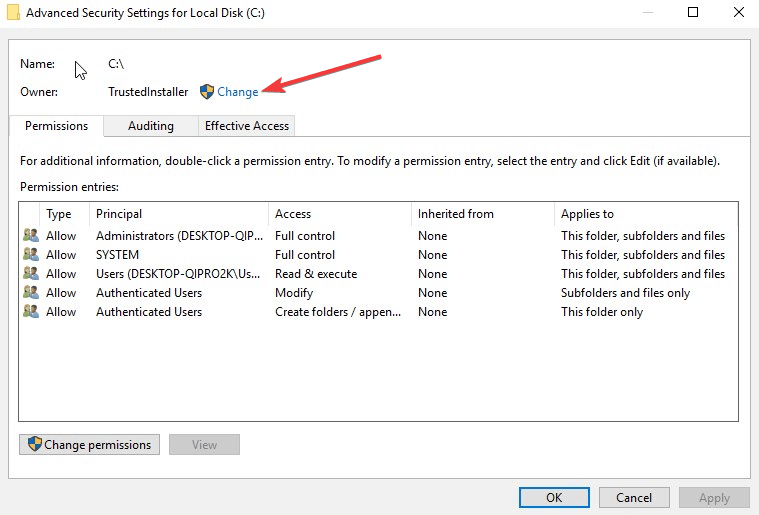
Step 3: In the pop-up Advanced Security Settings window, click Change.
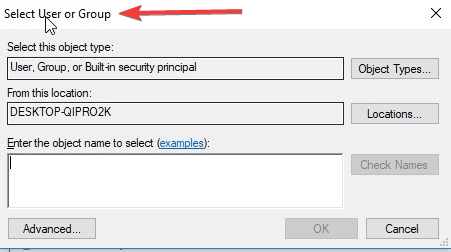
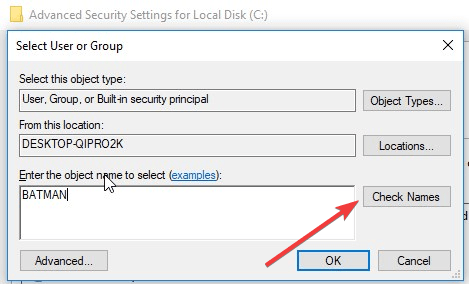
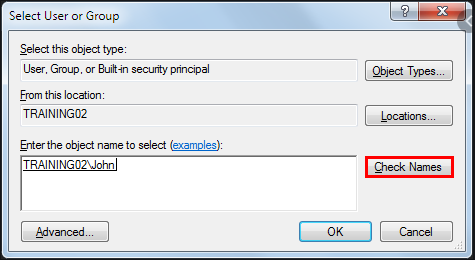
Step 4: In the new dialog, enter the name of your user account in the empty box, click Check Names and click OK button to select the user account.
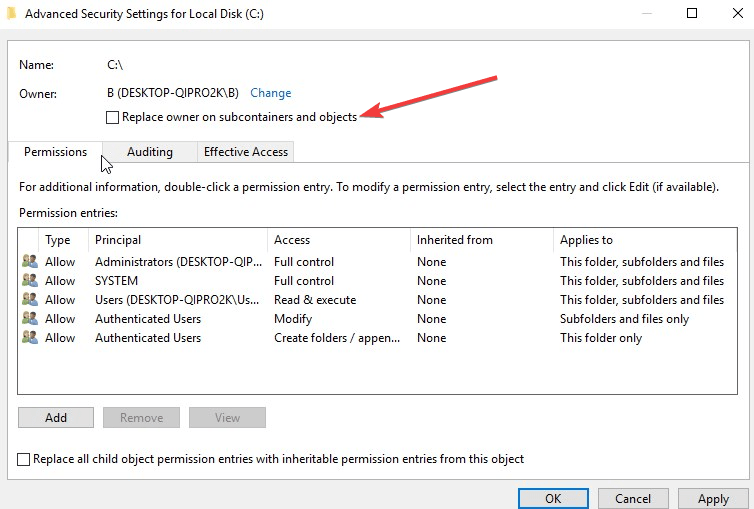
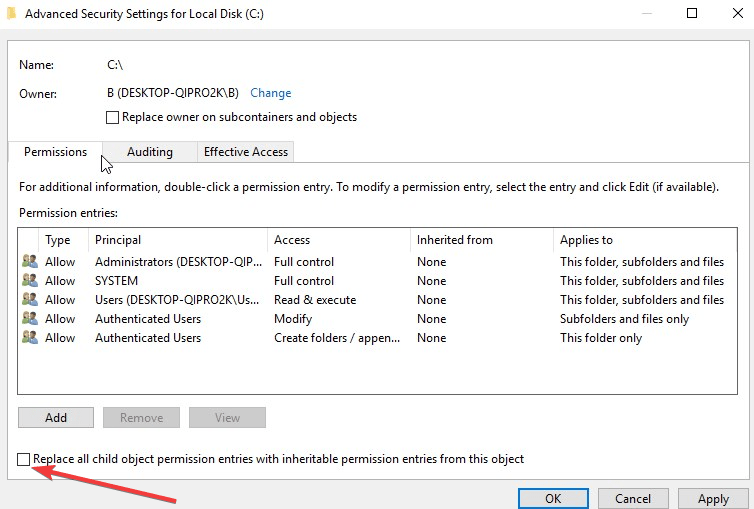
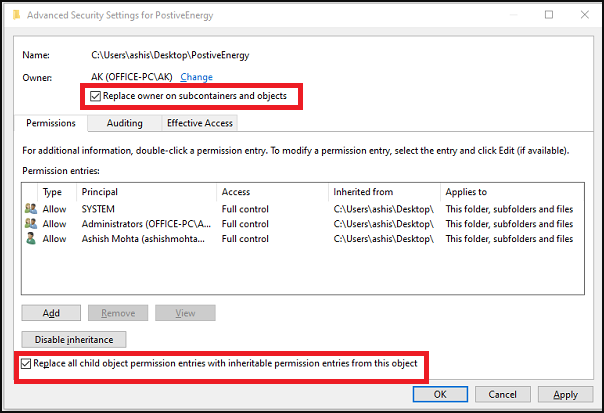
Step 5: When you back to the Advanced Security Settings window, check the following 2 options and click OK to change the ownership of the file/folder.
- Replace owner on subcontainers and objects
- Replace all child object permission entries with inheritable permission entries from this object.
After that, restart your computer and check if “an error occurred while applying security information” error message disappears. If it still exists, you can go to Security tab in Properties window again, click Edit button to get Full control of the file/folder.
Fix 3: Change Drive Ownership
If this error prevents you from access the whole external or internal drive, you can try changing the ownership of drive.
The steps are almost the same as Fix 4, but you need to use the hidden administrator account to complete the operation. Just execute the command net user administrator /active:yes in Command Prompt to enable the built-in administrator account.
Then, log in to this account, access the Properties of the drive, and repeat the steps in Fix 2 to change the ownership of the drive.
Fix 4: Change UAC Setting
Besides, you can also change User Account Control setting to fix error applying security. Here’s a simple guide to do that.
Step 1: Press Windows + R to open Run window.
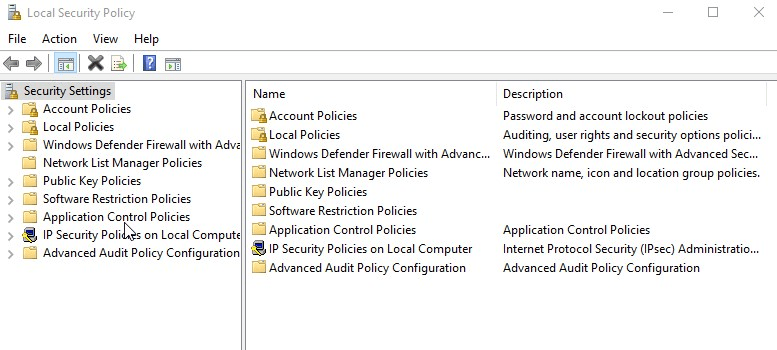
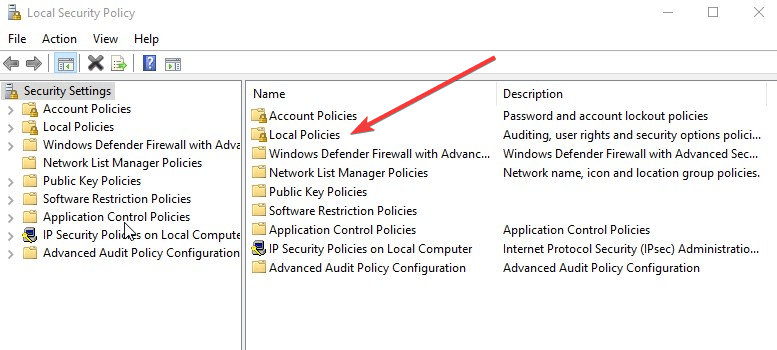
Step 2: Type secpol.msc and click OK to open Local Security Policy.
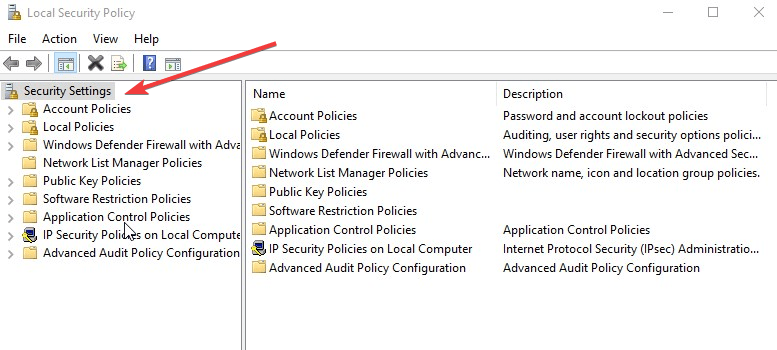
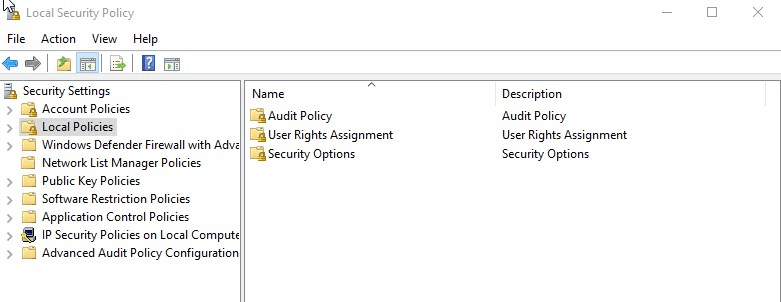
Step 3: In the left pane, open Security Settings > Local Policies > Security Options.
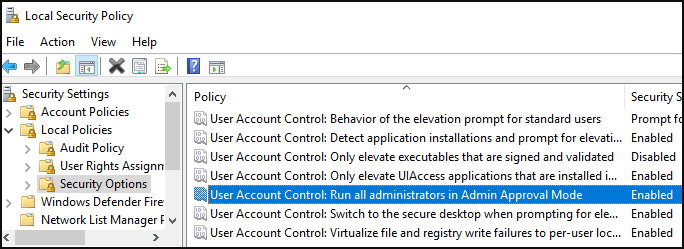
Step 4: In the right pane, double-click User Account Control: Run all administrators in Admin Approval Mode to open its Properties.
Step 5: In the new window, check Disabled, and click Apply and OK to save the change.
Then, you will be required to restart your computer. After restarting, the issue should have been removed.
About The Author
Position: Columnist
Amanda has been working as English editor for the MiniTool team since she was graduated from university. She enjoys sharing effective solutions and her own experience to help readers fix various issues with computers, dedicated to make their tech life easier and more enjoyable.
She has published many articles, covering fields of data recovery, partition management, disk backup, and etc. In order to provide more useful tips and information, she is still committed to expand her technical knowledge.
Неполадка в Windows 10 с проблемой безопасности обычно вызвана неправильно настроенными параметрами или, если не вы владелец запрашиваемого контента. Визуально определяется по сообщению «Failed to enumerate objects in the container. Access is denied».
Доступ разрешается путем изменения настроек разрешений либо устранением шифрования. Чтобы проверить, связана ли проблема с файловым шифрованием, щелкните правой кнопкой мыши на папке, затем «Свойства» и перейдите в «Дополнительные настройки».
Эта же сообщение возникает при попытке сохранить или создать новый файл на главном диске напрямую, что сообщает о том, что у вас нет разрешения на создание и редактирование файлов, в том числе если вы администратор.
В этой статье рассматриваются различные решения для помощи в этой ситуации.
Создайте новую учетную запись пользователя
Если текущая учетка зарегистрирована как гость, а файлы находятся под именем владельца, то у пользователя нет доступа.
Выполняйте следующее:
- Откройте меню «Пуск» -> «Настройки».
- Выберите учетные записи.
- Нажмите «Семья и другие люди».
- В разделе Другие люди перейдите к «Добавить кого-нибудь еще на этот ПК».
- Заполните форму с логином и паролем.
- Далее — «Изменить тип учетной записи».
- Щелкните «Администратор» для установки учетке прав админа.
- Перезагрузите компьютер.
- Войдите в учетку, которую вы создали.
- С помощью новой учетки примените к своему старому аккаунту уровень админа.
Измените параметры защиты
- Щелкните на каталог.
- Перейдите в «Свойства» -> «Безопасность» -> «Дополнительно».
- Установите флажок «Заменить все записи разрешения дочерних объектов наследуемыми правами доступа с этого объекта».
- Подтвердите изменения.
Редактирование разрешений
- Перейдите в корневую папку через «Проводник».
- Щелкните «Этот компьютер» слева.
- Найдите внешний жесткий диск (или диск C
и перейдите к «Свойства».
- Откройте вкладку «Безопасность», далее «Дополнительно».
- В всплывающем окне отобразится текущий владелец, поэтому нажмите «Изменить».
- Появится «Выбрать пользователя или группу». В текстовом поле введите свое текущее имя, если вы администратор.
- Нажмите кнопку «Проверить имена». Ваш логин заменится официальным именем системы (которому предшествуют имя компьютера и символ обратной косой черты).
- Возникнет новое поле с текстом: «Заменить владельца на текущие объекты»
- Установите флажок «Replace all child object permission entries with inheritable permission entries from this object».
- Убедитесь, что в окне «Права доступа» отображается «все», если нет, нажмите «Добавить».
- Закройте настройки, проверьте наличие доступа.
Разрешить «Full Control»
- Откройте в свойствах файла «Безопасность» -> «Дополнительно».
- Во всплывающем окне отобразится текущий владелец, далее «Изменить».
- Измените владельца на свой логин.
- Еще раз откройте св-ва. Жмем «Отключить наследование» > «Преобразовать унаследованные разрешения».
- Убедитесь, что у всех пользователей есть разрешение на полный контроль.
- Щелкните «ОК».
Используйте параметр UAC для изменения привилегий
- «Пуск» -> «Выполнить».
- Введите «secpol.msc».
- Появится окно «Локальная политика».
- Перейдите в левую панель к настройкам безопасности.
- Выберите Локальные политики -> Параметры безопасности.
- Найдите «Контроль учетных записей»: запустите все в режиме одобрения администратора.
- В его свойствах измените настройку с «Включено» на «Отключено»
- Появится уведомление: «Вы должны перезагрузить компьютер, чтобы отключить контроль учетных записей пользователей».
- Перезапустите ПК.
This error usually appears when trying to change various security settings of a file or folder located on your computer or on an external media connected to it. The error message is usually preceded by an ‘access denied’ message appearing when trying to move, copy, or delete the files you don’t have proper access to.
The error appears problematic because it prevents users from adding proper permissions for making the file available for use and it seems like there is no way out. Still, we have prepared several working methods for you to check out and we hope they will help you out!
- Read Only mode may be turned on, preventing any access to the file or folder
- You may need to be the owner of the file before you can perform any valid action over it
Solution 1: Disable the Read-Only Mode
Sometimes the file’s properties prevent it from being freely accessed, especially if the Read Only mode is active in the file’s or folder’s properties. The easiest way to resolve this specific error code is to disable the Read Only mode. It might not work for everyone but it’s the easiest way of resolving this issue.
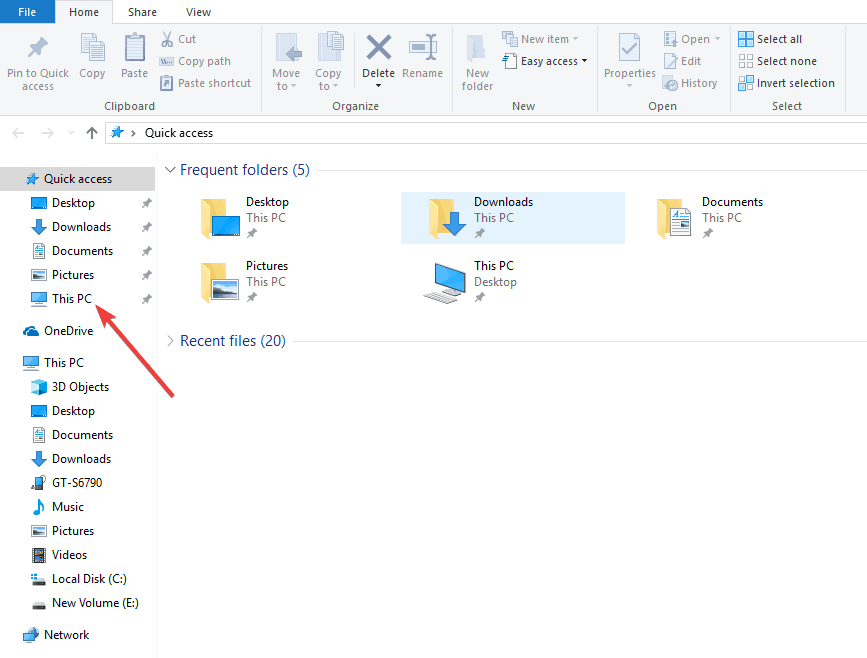
- Open your Libraries entry on your PC or open any folder on your computer and click on This PC option from the left side menu.
- Navigate to the location where your problematic file or folder is located.
- Right-click on the problematic folder and click the Properties option from the context menu. Stay in the General tab and locate the Attributes section at the bottom. Clear the box next to the Read-only option and click on Apply before exiting. Check to see if the problem still appears.
Solution 2: Take Ownership of the File
Taking ownership of the file is sometimes vital if you want to add permissions to various user accounts to edit or copy the file. Changing the owner is generally an easy process and it will grant you full access to security properties of the file if you follow the instructions we have prepared below with great care.
- Open your Libraries entry on your PC or open any folder on your computer and click on This PC option from the left side menu.
- Navigate to the location where your problematic file or folder is located.
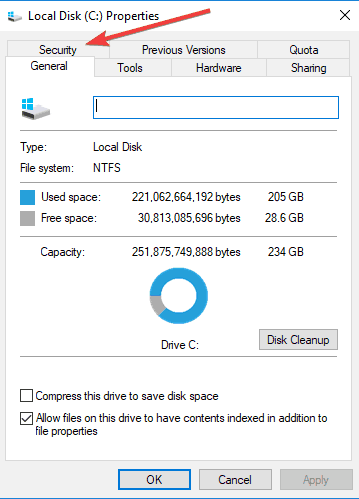
- You will need to take ownership of the file or folder located inside. Right-click the folder, click Properties, and then click the Security Click the Advanced button. The “Advanced Security Settings” window will appear. Here you need to change the Owner of the key.
- Click the Change link next to the “Owner:” label The Select User or Group window will appear.
- Select the user account via the Advanced button or just type your user account in the area which says ‘Enter the object name to select’ and click OK. Add your user account.
- Optionally, to change the owner of all subfolders and files inside the folder, select the check box “Replace owner on subcontainers and objects” in the “Advanced Security Settings” window. Click OK to change the ownership.
- Now that you have complete control over the folder, open it, select everything you find inside and access the files properly. Restart your computer and the problem should be resolved.
Alternative: Since some users have still failed to take ownership of the file or folder via the means explained above because of lack of permissions or administrator access, the best alternative thing you can do is to use Command Prompt to resolve the problem. The end result is essentially the same!
- Search for “Command Prompt” by typing it either right in the Start menu or by pressing the search button right next to it. Right-click the first entry which will pop up as a search result and select the “Run as administrator” context menu entry.
- Additionally, you can also use the Windows Logo Key + R key combination in order to bring up the Run dialog box. Type in “cmd” in the dialog box which appears and use the Ctrl + Shift + Enter key combination for admin Command Prompt.
- Type in the following commands in the window and make sure you press Enter after typing each one. Wait for the “Operation completed successfully” message or something similar to know that the method worked.
takeown  /f   "F:ProblemFolder"   /a   /r   /d y
icacls "F:ProblemFolder"  /t /c /grant administrators:F  System:F  everyone:F
- If the commands above report no errors, then you have managed to change the permissions and the ownership of the file or folder!
Solution 3: Changing Drive Ownership
If the whole external or internal is refusing to cooperate by displaying this exact same error message, you can try the fix below which will essentially use hidden administrator permissions in order to give ownership to the administrator account and fix things. The solution is lengthy but it worked for plenty of people!
- On the login screen of your computer, when the computer boots or after you log out, click on the Power icon and hold the Shift key while clicking restart.
- Instead of restarting, a blue screen will appear with a couple of options. Choose Troubleshoot >> Advanced Options >> Command Prompt.
- Of course, you can open Command Prompt simply by using the Windows Key + R key combination and typing “cmd” before clicking OK or by searching for it.
- Copy and paste the following command in Command Prompt and click Enter. You should be able to see the “The command completed successfully” message in no time.
net user administrator /active:yes
- Log into this admin account and wait for a couple of minutes before everything is ready.
- Open the Disk Management utility by searching for it in the Start menu or the search bar and clicking the first option.
- The alternative is to either use the Windows Key + X key combination or right-click on the Start menu and choose the Disk Management option in order to open its console.
- Locate the drive you want to fix by checking out its name under the Volume column or by checking under for it. Right-click on it and choose the Properties option from within the context menu which will appear.
- Navigate to the Security tab. Click the Advanced button. The “Advanced Security Settings” window will appear. Here you need to change the Owner of the key.
- Click the Change link next to the “Owner:” label The Select User or Group window will appear. Navigate to the Advanced tab and click Find Now.
- Select the Administrator user account via the Advanced button under your computer name and not your username.
- Also, to change the owner of all subfolders and files inside the folder, select the check box “Replace owner on subcontainers and objects” in the “Advanced Security Settings” window. Make sure you check the “Replace all child object permission entries with inheritable permission entries from this object” option at the bottom.
- Click OK and you’ll see a security window pop up but make sure you click yes for each appearance.
Kevin Arrows
Kevin is a dynamic and self-motivated information technology professional, with a Thorough knowledge of all facets pertaining to network infrastructure design, implementation and administration. Superior record of delivering simultaneous large-scale mission critical projects on time and under budget.
Back to top button
Содержание
- [Solved] An Error Occurred While Applying Security Information [Partition Magic]
- Fix 1: Turn off the Read-only Mode
- Fix 2: Take Ownership of the File
- Fix 3: Change Drive Ownership
- Fix 4: Change UAC Setting
- Fix: An Error Occurred while Applying Security Information
- What Causes the An Error Occurred while Applying Security Information?
- Solution 1: Disable the Read-Only Mode
- Solution 2: Take Ownership of the File
- Solution 3: Changing Drive Ownership
[Solved] An Error Occurred While Applying Security Information [Partition Magic]
Some Windows users complain that they receive error message “an error occurred while applying security information to” while they are trying to change file/folder security settings. This issue can be fixed easily by following the solutions in this post from MiniTool.
“An error occurred while applying security information” error prevents you from change security setting of a file or folder. And this error may happen to both your local computer and external media connected to your PC.
When you are stopped by the error, you will be also prompted that Access is denied in the Error Applying Security window. So, it’s safe to say that this error occurs mainly because the file is in Read-only mode or the current account don’t have the ownership of the file.
Focusing on this error, I have collected several possible solutions for you and hope they will help you out.
Have you ever encountered NVIDIA access denied error while making some changes for your NVIDIA Control Panel? This post is written to help you fix this problem.
Fix 1: Turn off the Read-only Mode
If the Read-only mode is enabled for the file or folder, you cannot access it freely. So, to fix this issue, you need to make sure the Read-only mode is turned off firstly before trying other methods.
You just need to right-click the problematic file or folder and choose Properties. Then, in General tab, uncheck Read-only in Attributes section, and click Apply and OK to save the change.
Fix 2: Take Ownership of the File
Perhaps, your current user account doesn’t have the permission to edit or copy the file or folder, casing error applying security. In this case, you can take ownership of the file. Just follow the instructions prepared for you below.
Step 1: Right-click the file or folder and choose Properties.
Step 2: Under Security tab, click Advanced button.
Step 3: In the pop-up Advanced Security Settings window, click Change.
Step 4: In the new dialog, enter the name of your user account in the empty box, click Check Names and click OK button to select the user account.
Step 5: When you back to the Advanced Security Settings window, check the following 2 options and click OK to change the ownership of the file/folder.
- Replace owner on subcontainers and objects
- Replace all child object permission entries with inheritable permission entries from this object.
After that, restart your computer and check if “an error occurred while applying security information” error message disappears. If it still exists, you can go to Security tab in Properties window again, click Edit button to get Full control of the file/folder.
Fix 3: Change Drive Ownership
If this error prevents you from access the whole external or internal drive, you can try changing the ownership of drive.
The steps are almost the same as Fix 4, but you need to use the hidden administrator account to complete the operation. Just execute the command net user administrator /active:yes in Command Prompt to enable the built-in administrator account.
Then, log in to this account, access the Properties of the drive, and repeat the steps in Fix 2 to change the ownership of the drive.
Fix 4: Change UAC Setting
Besides, you can also change User Account Control setting to fix error applying security. Here’s a simple guide to do that.
Step 1: Press Windows + R to open Run window.
Step 2: Type secpol.msc and click OK to open Local Security Policy.
Step 3: In the left pane, open Security Settings > Local Policies > Security Options.
Step 4: In the right pane, double-click User Account Control: Run all administrators in Admin Approval Mode to open its Properties.
Step 5: In the new window, check Disabled, and click Apply and OK to save the change.
Then, you will be required to restart your computer. After restarting, the issue should have been removed.
‘An unexpected error has occurred’ message pops up when Windows users try managing their disks via Disk management. The post shows the solutions.
Источник
Fix: An Error Occurred while Applying Security Information
This error usually appears when trying to change various security settings of a file or folder located on your computer or on an external media connected to it. The error message is usually preceded by an ‘access denied’ message appearing when trying to move, copy, or delete the files you don’t have proper access to.
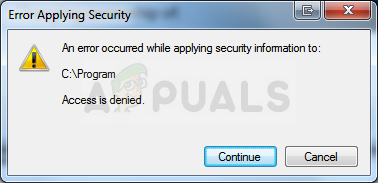
The error appears problematic because it prevents users from adding proper permissions for making the file available for use and it seems like there is no way out. Still, we have prepared several working methods for you to check out and we hope they will help you out!
What Causes the An Error Occurred while Applying Security Information?
- Read Only mode may be turned on, preventing any access to the file or folder
- You may need to be the owner of the file before you can perform any valid action over it
Solution 1: Disable the Read-Only Mode
Sometimes the file’s properties prevent it from being freely accessed, especially if the Read Only mode is active in the file’s or folder’s properties. The easiest way to resolve this specific error code is to disable the Read Only mode. It might not work for everyone but it’s the easiest way of resolving this issue.
- Open your Libraries entry on your PC or open any folder on your computer and click on This PC option from the left side menu.
- Navigate to the location where your problematic file or folder is located.
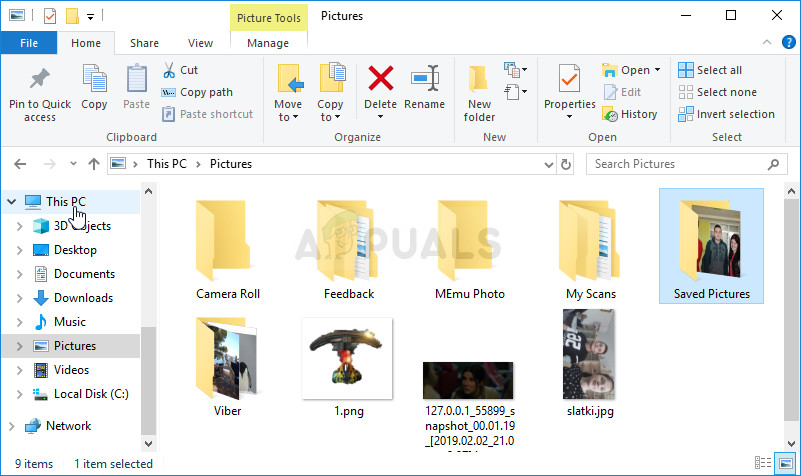
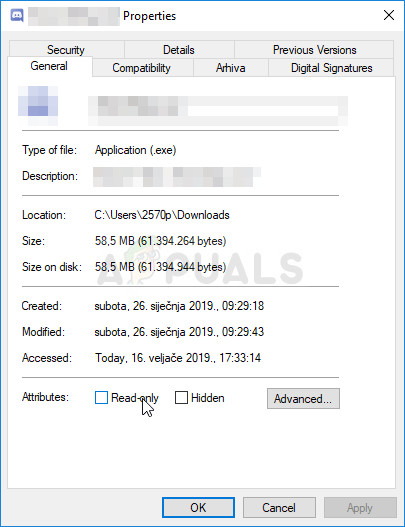
- Right-click on the problematic folder and click the Properties option from the context menu. Stay in the General tab and locate the Attributes section at the bottom. Clear the box next to the Read-only option and click on Apply before exiting. Check to see if the problem still appears.
Solution 2: Take Ownership of the File
Taking ownership of the file is sometimes vital if you want to add permissions to various user accounts to edit or copy the file. Changing the owner is generally an easy process and it will grant you full access to security properties of the file if you follow the instructions we have prepared below with great care.
- Open your Libraries entry on your PC or open any folder on your computer and click on This PC option from the left side menu.
- Navigate to the location where your problematic file or folder is located.
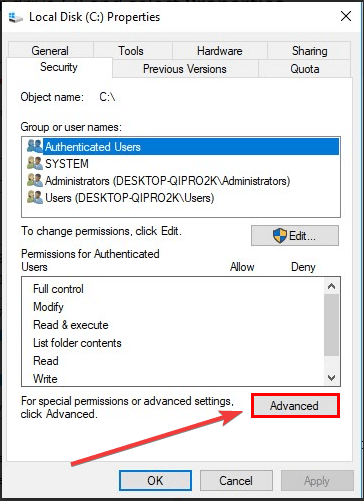
- You will need to take ownership of the file or folder located inside. Right-click the folder, click Properties, and then click the Security Click the Advanced button. The “Advanced Security Settings” window will appear. Here you need to change the Owner of the key.
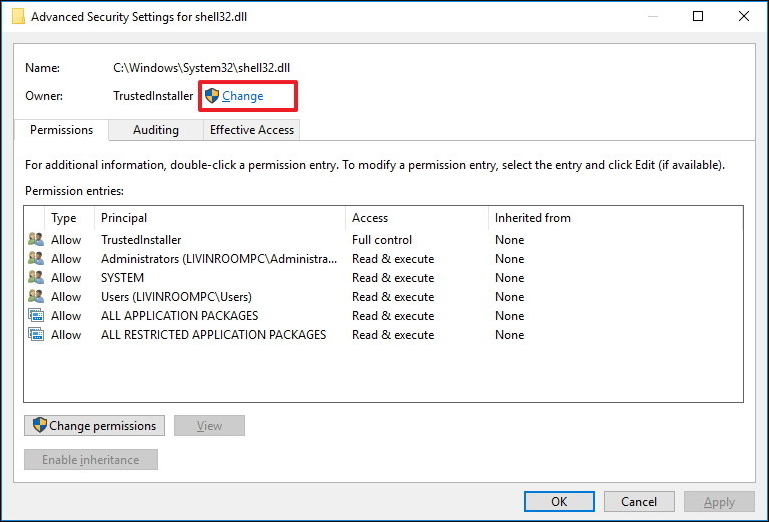
- Click the Change link next to the “Owner:” label The Select User or Group window will appear.
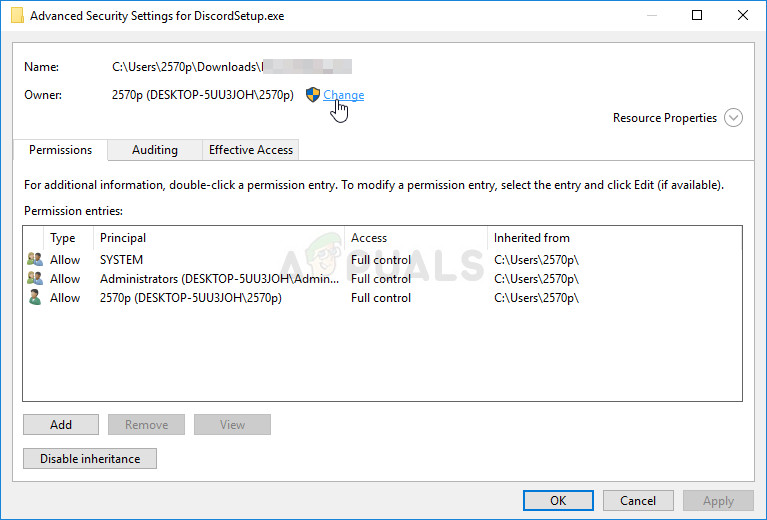
- Select the user account via the Advanced button or just type your user account in the area which says ‘Enter the object name to select’ and click OK. Add your user account.
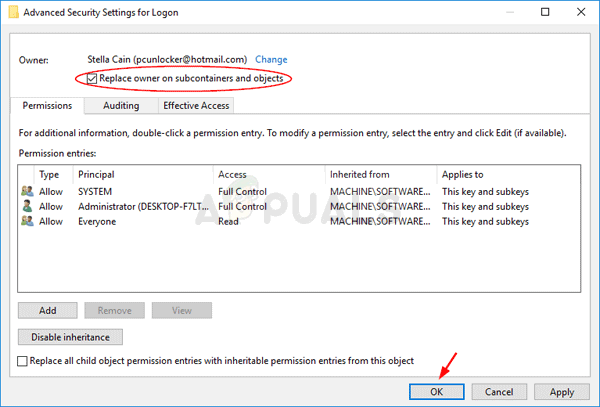
- Optionally, to change the owner of all subfolders and files inside the folder, select the check box “Replace owner on subcontainers and objects” in the “Advanced Security Settings” window. Click OK to change the ownership.
- Now that you have complete control over the folder, open it, select everything you find inside and access the files properly. Restart your computer and the problem should be resolved.
Alternative: Since some users have still failed to take ownership of the file or folder via the means explained above because of lack of permissions or administrator access, the best alternative thing you can do is to use Command Prompt to resolve the problem. The end result is essentially the same!
- Search for “Command Prompt” by typing it either right in the Start menu or by pressing the search button right next to it. Right-click the first entry which will pop up as a search result and select the “Run as administrator” context menu entry.
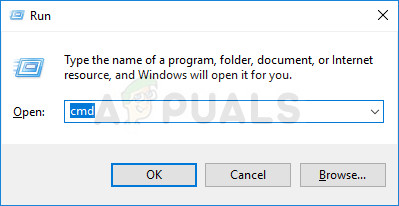
- Additionally, you can also use the Windows Logo Key + R key combination in order to bring up the Run dialog box. Type in “cmd” in the dialog box which appears and use the Ctrl + Shift + Enter key combination for admin Command Prompt.
- Type in the following commands in the window and make sure you press Enter after typing each one. Wait for the “Operation completed successfully” message or something similar to know that the method worked.
- If the commands above report no errors, then you have managed to change the permissions and the ownership of the file or folder!
Solution 3: Changing Drive Ownership
If the whole external or internal is refusing to cooperate by displaying this exact same error message, you can try the fix below which will essentially use hidden administrator permissions in order to give ownership to the administrator account and fix things. The solution is lengthy but it worked for plenty of people!
- On the login screen of your computer, when the computer boots or after you log out, click on the Power icon and hold the Shift key while clicking restart.
- Instead of restarting, a blue screen will appear with a couple of options. Choose Troubleshoot >>Advanced Options >>Command Prompt.
- Of course, you can open Command Prompt simply by using the Windows Key + R key combination and typing “cmd” before clicking OK or by searching for it.

- Copy and paste the following command in Command Prompt and click Enter. You should be able to see the “The command completed successfully” message in no time.
- Log into this admin account and wait for a couple of minutes before everything is ready.
- Open the Disk Management utility by searching for it in the Start menu or the search bar and clicking the first option.
- The alternative is to either use the Windows Key + X key combination or right-click on the Start menu and choose the Disk Management option in order to open its console.
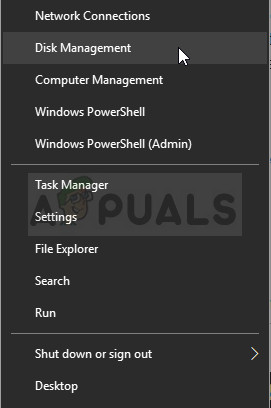
- Locate the drive you want to fix by checking out its name under the Volume column or by checking under for it. Right-click on it and choose the Properties option from within the context menu which will appear.
- Navigate to the Security tab. Click the Advanced button. The “Advanced Security Settings” window will appear. Here you need to change the Owner of the key.
- Click the Change link next to the “Owner:” label The Select User or Group window will appear. Navigate to the Advanced tab and click Find Now.
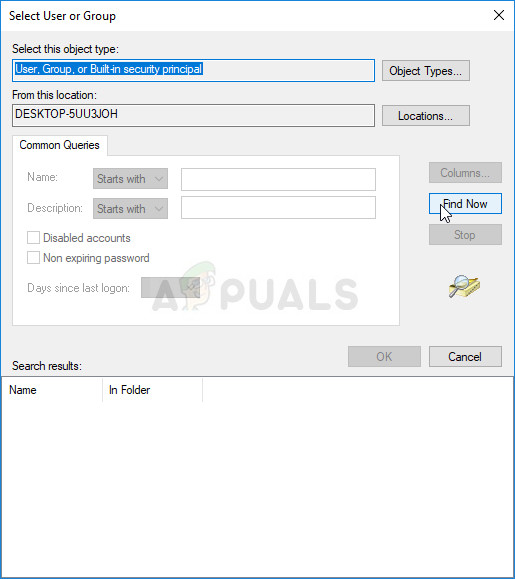
- Select the Administrator user account via the Advanced button under your computer name and not your username.
- Also, to change the owner of all subfolders and files inside the folder, select the check box “Replace owner on subcontainers and objects” in the “Advanced Security Settings” window. Make sure you check the “Replace all child object permission entries with inheritable permission entries from this object” option at the bottom.

- Click OK and you’ll see a security window pop up but make sure you click yes for each appearance.
Источник
- Remove From My Forums
-
Question
-
Hi,
I am using an administrator account to change the permission setting in the c: drive of my w2k8 x64 server.
Every time I try edit a permission (read, write, read & execute….. anything), I got a whole wack of paremeter errors (this happen to all account i used):
First, I would get the message
An error occurred while applying security information to: c:boot
and I click continue, a new message would appares say
An error occurred while applying security information to: c:bootmgr, and so on, until c:windows.
I tried to turn off/on UAC but this doesn’t help.
I need your help on soving this problem.
Thanks
Answers
-
Hi,
The behavior is expected. By default, the owner of this kind of folders is TrustedInstaller rather than Administrator. Administrators has a special set of permissions for the folders which does not include the Take Ownership or Change Permissions permission.
For security purpose, it is not recommended to change the default permissions for these system folders. If you have to change the permissions, you can take ownership of the folders and assign Administrator Full Controller permission.
Thanks.
-
Proposed as answer by
Tuesday, July 28, 2009 11:56 AM
-
Marked as answer by
TuBong
Tuesday, July 28, 2009 4:46 PM
-
Proposed as answer by
by Milan Stanojevic
Milan has been enthusiastic about technology ever since his childhood days, and this led him to take interest in all PC-related technologies. He’s a PC enthusiast and he… read more
Updated on March 23, 2021
- The Windows 10 error applying security is usually caused by incorrect security settings.
- You can also get the error while trying to create or save a new file directly on your hard drive.
- A good idea to solve this problem is to create a new user account and try to fix your profile.
- You can also take ownership of the specific folder in Windows as instructed in our guide.
XINSTALL BY CLICKING THE DOWNLOAD FILE
This software will keep your drivers up and running, thus keeping you safe from common computer errors and hardware failure. Check all your drivers now in 3 easy steps:
- Download DriverFix (verified download file).
- Click Start Scan to find all problematic drivers.
- Click Update Drivers to get new versions and avoid system malfunctionings.
- DriverFix has been downloaded by 0 readers this month.
When you get a Windows 10 apply security error, the issue is usually caused by incorrect settings, or, when you are not the owner of the content you’re trying to access.
The error, which reads as Failed to enumerate objects in the container. Access is denied is usually resolved by changing permission settings and can also be brought about by file encryption.
Another variation of the same error comes with the following message: An error occurred while applying security information to Windows 10.
In order to check whether the problem is with the file encryption, right-click on the folder, then select Properties, and go to Advanced settings.
The same error pops up when you try to save or create a new file on your main drive directly, which essentially is saying you have no permission to create or edit your files even if you’re an admin in Windows 10.
Admin accounts are heavily limited as to what you can do even if your User Account Control settings are on the lowest level possible.
This article looks at the various other solutions so you can try and see which one helps.
How can I fix the applying security error in Windows 10?
- Create a new user account
- Change security settings to open the folder
- Change Permissions
- Allow permission to Full Control
- Use UAC setting to change privileges
1. Create a new user account
1.1 Create another user account
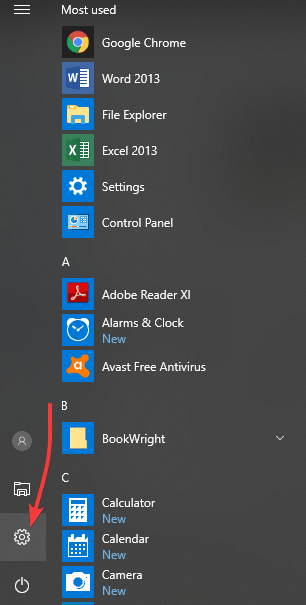
- Click Start.
- Select Settings.
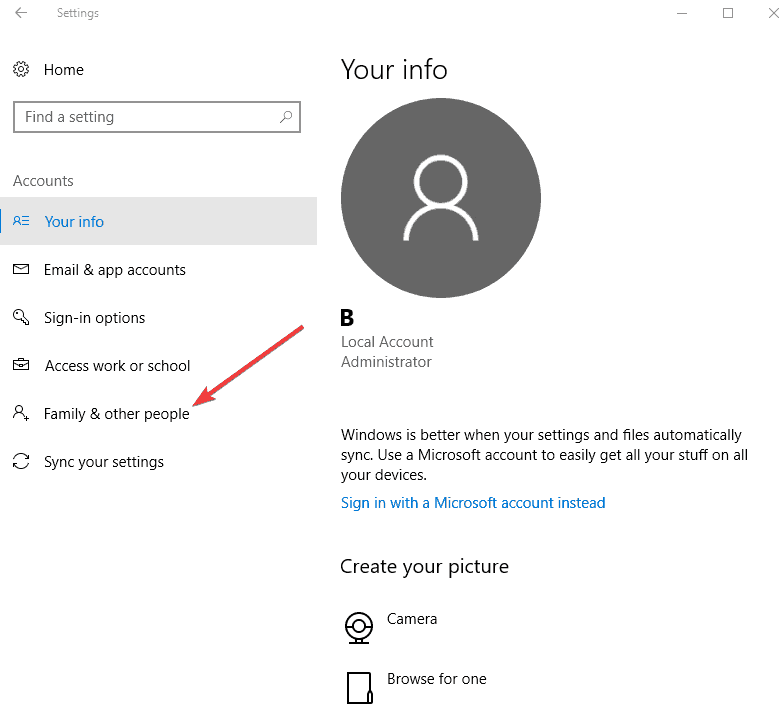
- Select Accounts.
- Click Family and Other people.
- Under Other people, click Add someone else to this PC.
- Fill in the form with the user name and password. Your new user account will be created.
- Click on Change account type.
- Click the drop-down arrow and choose Administrator to set the account to administrator level.
- Restart your computer.
- Login to the new account you just created.
If the issue is resolved in the new profile, then it may mean your other user profile is corrupted, you need to fix the profile.
1.2 Fix your profile
- On your new account, use it to downgrade your usual account.
- Click Apply or OK.
- Raise back your old account to its default admin level.
- Rinse and repeat a few times as this will help to remove any corruption.
- Leave your account on as Administrator.
Some Windows operating system files are usually under the ownership of the system by default as these are the core files needed for the smooth running of the OS.
Other files and folders like pictures, videos among others, are under the owner’s name (the current person logged in as user or admin).
Some PC issues are hard to tackle, especially when it comes to corrupted repositories or missing Windows files. If you are having troubles fixing an error, your system may be partially broken.
We recommend installing Restoro, a tool that will scan your machine and identify what the fault is.
Click here to download and start repairing.
If the problem disappears, then you can either fix the old user account or migrate to the new account.
2. Change security settings to open the folder

- Right-click the Main Folder.
- Go to Properties.
- Select Security Tab.
- Click Advanced.
- Check the box Replace all child object permission entries with inheritable permission entries from this object
- Click OK or press Enter.
This will change all the permissions for the child accounts and will prevent the security error from Windows.
If the security settings block you from downloading a file from the Internet, check out this expert article that will help you fix the problem quickly.
3. Change Permissions
- Press Windows key + E to start File Explorer.
- Click on This PC from the left pane.
- Right-click on the external hard disk drive (or drive C:) and select Properties.
- Select the Security tab.
- Click Advanced.
- The popup window should show the current owner, so click Change.
- The Select User or Group pop-up box appears.
- In the text box, type in your current username if you’re the administrator.
- Click the Check Names button. Your name will be replaced with the official system name (preceded by the computer name and back slash symbol).
- Click OK or press Enter.
- The box disappears, sending you back to the Advanced Security Settings window.
- A new tick box appears below owner, with the text: Replace owner on subcontainers and objects. Select this tick box.
- Select the tick box Replace all child object permission entries with inheritable permission entries from this object.
- Make sure that everyone appears on the Permission entries window, if not, click Add.
- Type everyone, click Check Names, and then OK.
- Click Apply.
Did you accidentally deleted the Admin account? Here’s a great guide that will help you fix that.
4. Allow permission to Full Control
4.1 Manually change permissions to Full Control
- Right-click on the file.
- Select Properties.
- Select Security tab.
- Click Advanced.
- The popup window should show the current owner, so click Change.
- Change the Owner to your user name; you need to have admin access to change this. Close the window once this is done.
- Right-click on the file again.
- Select Properties.
- Select Security tab and click on Advanced.
- Click Disable Inheritance and select Convert inherited permissions into explicit permissions on this object.
- Remove any permissions entries which you don’t want. Make sure Everyone and your user has Allow permission to Full Control.
- Click OK. Now you should be able to open the file.
4.2 Use Command Prompt to take ownership
- Type cmd in Windows search and click on Run as administrator to run Command Prompt with full privileges.
- Type the following command and press Enter:
takeown /f <foldername> /r /d y - Type the following command and press Enter (replace <foldername> with the path of the folder):
icacls <foldername> /grant administrators:F /T
The above process lets you take ownership of the folder and then assigns the Admin group Full Control of the Permissions folder.
If you can’t run Command Prompt as administrator, here’s a helpful guide that will help you solve the problem right away.
5. Use UAC setting to change privileges
- Right-click Start and select Run.
- Type secpol.msc to load Local Security Policy with admin privileges.
- Go to the left pane and navigate to Security Settings.
- Select Local Policies.
- Select Security Options.
- Scroll down on the right-hand list to find the User Account Control setting: Run all administrators in Admin Approval Mode
- Double click it or right-click and select Properties.
- Change the setting from Enabled to Disabled.
- Click Apply.
- Click OK or press Enter.
A notification will pop up saying You must restart your computer to off User Account Control.
Restart your computer, and you’re good to go! You can now add, change or edit your files without receiving Windows 10 error applying security, or other permission errors.
However, you need to note that if the UAC is turned off, some potentially bad programs can run without your permission, but these can be thwarted if your security software is up to date.
Did any of these solutions help you fix the Error applying security. Access is denied? Let us know in the comments section below.
Newsletter
What a hassle if an error occurred while applying security information to file or folder settings. So in this article, we will tackle the step by step to fixing it.
One of the hassles things you may meet. You can encounter it while changing various security settings.
After this error, message access denied will appear also. It happens you start moving, copying, or deleting the files.
This kind of error arises because it limits users from adding proper permits. And, it’s like there is no way out.
Other reasons are:
- Some files or folders are in “read-only’ mode. So it prevents user access or changes.
- You need to be the owner or have permission from the owner to perform valid action.
However, here are several steps that can be a help.
An Error Occurred While Applying Security Information: Solution Number 1- Disable the Read-only Mode
Disabled the Read-only mode is the easiest way to fix the problem.
But there is no harm in trying.
So how to do it?
Step 1: Open your “libraries” entry on the pc. Also, you can open any folder on your computer.
Step 2: Click on the “This PC” choice from the left side menu.
Step 3: Drive to the location where your problematic file.
Step 4: Right-click on the unsettled file. And click the “Properties” option from the setting menu.
Step 5: Stay in the “General”. Then look for the “Attributes” part.
Step 6: Clear the box next to the “Read-only” option. Then before you exit click first the “Apply” button.
After doing these steps, check to see if the problem still appears.
Solution Number 2- Get Ownership Of The File
This kind of method is like asking for permission from the owner. This may be an easy process.
Moreover, you will have full access to security properties. Just follow the steps.
Step 1: Open your “Libraries” entry on your PC. Or also you can open any folder on your computer. On the left side menu, click the “This PC”.
Step 2: Drive to the location or file where the issue is.
Step 3: You need to take possession of the “File or folder” located within. Right-click the folder.
Then click “Properties” next to the “Security” then after the “Advanced” button. If you did the following, an “Advanced Security Settings” will appear.
So you start to replace the “Owner” key.
Step 4: Click the “Change” link, next -> “Owner:” label. After this, the “Select User” or “Group” window will rise.
Step 5: Via “Advance Button” you can choose a user account. Or just type your own user account. Then click the “enter” and add a user account.
Step 6: This is only optionally, adjusting the owner of all subfolders and files inside the folder.
Lastly, select the check box “Replace owner on sub-containers and objects”. After, to change ownership click the “OK”.
But, if still failed by trying these steps you can use the Command Prompt.
Click to rate this post!
[Total: 1 Average: 1]
I’m an administrator on a Windows 2008 server. When I try to change file permissions on a directory, I get an error:
Error Applying Security
Access is denied.
I am an administrator on the machine, and I made sure nothing has the file(s) locked (with Process Explorer). I even booted another user who had a logged-in Remote Desktop session.
Some of the files it complains about are in a .hg folder, as there is a Mercurial repository in the directory I’m working on.
I noticed that something in the directory is set to read-only so I unchecked that and applied. It looked like it worked, but looking again it’s back to read-only and setting permissions still fails.
There is a site in IIS using a subdirectory of this directory.
Update:
I just found this article about this sort of problem. The note at the bottom mentions that if it’s not working, check out LockHunter. It told me that the directory was locked by IIS, so I ran iisreset -stop and tried setting permissions again. Same error. 
asked Oct 19, 2010 at 23:48
adamboxadambox
8274 gold badges9 silver badges14 bronze badges
This can happen if you really don’t have access to that directory. In Windows you CAN lock out the administrator. Ran into this last week, in fact. Check the permissions on that directory to ensure that Administrators is in the list. If you can’t even do that, you’ll have to take ownership of the folder first (it’s a tab in the Advanced Permissions dialog screen).
answered Oct 20, 2010 at 0:00
sysadmin1138♦sysadmin1138
132k18 gold badges174 silver badges299 bronze badges
2
If anyone else comes across this problem — it happened for me when I wanted to add a service account user to a folder containing thousands of files and the error came up for a lot of them. MDSN says that if you click Continue it still applies the permission on that file. Problem is nobody wants to click it thousands of times.
What worked at the end was changing ownership (Security tab -> Advanced -> Ownership). I changed ownership to a different user than original and applied it to all sub folders. After it finished I changed it back to original owner and again opted to apply to all sub folders.
After you do that the error no longer occurs when applying permissions. Seems like the above procedure resets any errors there are on folders and files.
answered Sep 3, 2013 at 15:59
1
try again using the default administrator. In Windows 7/Server 2008 there are UAC type restrictions that do not apply to the default administrator. When using other administrative or domain administrative accounts, access denied type errors when applying permissions do often occur. I’m not one to turn the UAC off, we just need learn to operate in a more secure system.
answered Jul 19, 2012 at 19:42
i reached here via google, though very late to the party, but hopefully can help someone.
in my case, the cause is simply because of a funny folder name in a certain parent folder, after i get rid of the special characters, they are all going fine by taking ownership normally via GUI.
answered Feb 10, 2018 at 0:57
You May need to boot the server and run a cacls command through a startup script before it can be locked.
answered Oct 20, 2010 at 6:03
rerunrerun
1763 bronze badges
takeown /f G:folder /R /A /D y
the /A foregoes the need to icacls administrators after. It is important to remember that this will remove any preexisting permissions and users actively using this folder will no longer have access.
I find takeown works much better than the gui for difficult permissions. If this were on a Windows server than RDPing into the file server directly would allow you to rectify the issue without removing current access though this is not an option for most of us.
answered Mar 29, 2017 at 15:13


 и перейдите к «Свойства».