Unable to access Hyper V Manager after the Windows Update 1809. Getting the following error.
Hyper-V Virtual Machine Management service is running properly.
User is a part of Hyper-V Administrators.
All Hyper-V features are turned on as well.
Hardware virtualization is enabled. Desktop is running with high end specifications with 32gb of RAM.
Thanks!
Regards,
Yousuf.
Any updates? I’m encountering the very same issue too
Any resolution found for this issue?
Guessing this is still not resolved…
This worked for me.
- Open «Window Security«
- Open «App & Browser control«
- Click «Exploit protection settings» at the bottom
- Switch to «Program settings» tab
- Locate «C:WINDOWSSystem32vmcompute.exe» in the list and expand it
- Click «Edit«
- Scroll down to «Code flow guard (CFG)» and uncheck «Override system settings«
- Start vmcompute from powershell as administrator
net start vmcompute - Restart
Start Hyper-V Manager as administrator
vinothsundararajan reacted with laugh emoji
prafful-panwar reacted with hooray emoji
prafful-panwar reacted with heart emoji
prafful-panwar and riccardocastana reacted with rocket emoji
@henskjold73 Your solution which is worked for me thanks for the step by step procedure.
Worked for me as well. Thank you:)
Worked for me too!!!
Thank you, Morgan Henskjold
I had to run ‘MOFCOMP %SYSTEMROOT%System32WindowsVirtualization.V2.mof’ from Command Prompt to fix this…..
Seemed to happen after I installed the HPE ProLiant Support Pack!
I had to run ‘MOFCOMP %SYSTEMROOT%System32WindowsVirtualization.V2.mof’ from Command Prompt to fix this…..
Seemed to happen after I installed the HPE ProLiant Support Pack!
Worked for me, too. The code flow guard fix did not. THanks for the mofcomp solution.
Running Windows 10 1809 — not sure what changed since friday, but I come in on Monday and no-go for Hyper-V. I’m back — thanks. Need to get some testing done.
I had to run ‘MOFCOMP %SYSTEMROOT%System32WindowsVirtualization.V2.mof’ from Command Prompt to fix this…..
I ran into this error today too. I am also not sure what changed on my machine to cause this, but the MOFCOMP command resolved the issue. Code flow guard did not fix it for me.
I had to run ‘MOFCOMP %SYSTEMROOT%System32WindowsVirtualization.V2.mof’ from Command Prompt to fix this…..
I ran into this error today too. I am also not sure what changed on my machine to cause this, but the MOFCOMP command resolved the issue. Code flow guard did not fix it for me.
Not sure if it is related or not. But once my Hyper-V was working, my docker in my WSL2 distro stopped working. Even though it is configured in docker desktop settings it says it is not activated any more. It was working fine yesterday,
$ docker images

The command 'docker' could not be found in this WSL 2 distro.
We recommend to activate the WSL integration in Docker Desktop settings.

See https://docs.docker.com/docker-for-windows/wsl/ for details.
I have tried cycling the enable integration in for the distro to no avail.
I had to run ‘MOFCOMP %SYSTEMROOT%System32WindowsVirtualization.V2.mof’ from Command Prompt to fix this…..
I ran into this error today too. I am also not sure what changed on my machine to cause this, but the MOFCOMP command resolved the issue. Code flow guard did not fix it for me.
Not sure if it is related or not. But once my Hyper-V was working, my docker in my WSL2 distro stopped working. Even though it is configured in docker desktop settings it says it is not activated any more. It was working fine yesterday,
$ docker images

The command 'docker' could not be found in this WSL 2 distro.
We recommend to activate the WSL integration in Docker Desktop settings.

See https://docs.docker.com/docker-for-windows/wsl/ for details.
I have tried cycling the enable integration in for the distro to no avail.
Finally what worked for me is I had to disable the WSL 2 based engine, wait for docker desktop to recreate/mount the DockerDesktopVM. Once what was done, I re-enabled the WSL 2 based engine, and enabled in my distro and I am back to normal.
Hopefully this helps anyone else that runs into this issue.
None of the above solutions work for me. I haven’t been able to use Hyper-V since an inside build from summer 2019. How can this still be an issue? Is anyone working on it on Microsoft or have any official roadmap to fixing this?
@pkarakal
TL;DR
In Hyper-V manager, connect to ‘server.local’ instead of ‘server’
Verbose
Randomly this problem pops up on me after updates, and the same fix rarely seems to fix it.
I’m running Hyper-V manager on Win10 1607, connecting to Hyper-V Core 1607 without a domain, with a configured workgroup.
It used to work fine but as of an update, many months ago, on every workstation it has stopped connecting to the server.
After reading through the MS Support document section related to my setup I decided to confirm connectivity, you know Layer-1 foils and all.
While pinging the hyper-v server, for no particular reason I pinged both ‘server’ and ‘server.local’. I noticed that ‘server’ returned an IPv4 response and ‘server.local’ returned an IPv6 response.
After modifying the power shell commands with every combination, the Hyper-V manager still wouldn’t connect.
For kicks and grins, I tried connecting to ‘server.local’ and, why look at that, it comes right up.
Final config:
power shell commands use ‘server’
Hyper-v connects to ‘server.local’
If anyone has any insight as to why hyper-v requires ipv6 all of a sudden, I’d love to read about it.
@gwata Thanks for the insight! I had just enabled an IPv6 network at home, and did not connect that to the Hyper-v problem.
I’m not sure if that was the problem (or the only problem), because I also have another one: a long hostname. I named the machine a long hostname when it was first created, and Windows also created another one, truncated at 15 characters. I’m not sure why Windows sometimes uses one, and sometimes the other. Probably some legacy stuff.
In my case, it would not connect. My hostname, returned by the hostname command, was resolving to an ipv6 address. And localhost also was. Hyper-v was trying to connect to the hostname that was truncated when I named the machine. So, I added an entry to my hosts file (C:WindowsSystem32driversetchosts), pointing to 127.0.0.1. After I did that it was working again.
This also solved the issue on PowerShell. I was getting Get-VM: The computer '<REDACTED>' could not be resolved. Make sure you typed the machine name correctly and that you have network access.. The redacted part was the truncated hostname.
Docker was working fine before, and is still working fine now. But I was already using WSL2.
I hope this helps someone.
I had to run ‘MOFCOMP %SYSTEMROOT%System32WindowsVirtualization.V2.mof’ from Command Prompt to fix this…..
Seemed to happen after I installed the HPE ProLiant Support Pack!
This worked for me from upgrading from server 2012 R2 to 2019. I guess best option is to upgrade to 2016 them to 2019 so it wont break hyperv management
This worked for me.
- Open «Window Security«
- Open «App & Browser control«
- Click «Exploit protection settings» at the bottom
- Switch to «Program settings» tab
- Locate «C:WINDOWSSystem32vmcompute.exe» in the list and expand it
- Click «Edit«
- Scroll down to «Code flow guard (CFG)» and uncheck «Override system settings«
- Start vmcompute from powershell as administrator
net start vmcompute- Restart
Start Hyper-V Manager as administrator
Thank you! Worked for me!
This worked for me.
1. Open "_Window Security_"

2. Open "_App & Browser control_"

3. Click "_Exploit protection settings_" at the bottom

4. Switch to "_Program settings_" tab

5. Locate "_C:WINDOWSSystem32vmcompute.exe_" in the list and expand it

6. Click "_Edit_"

7. Scroll down to "_Code flow guard (CFG)_" and **uncheck** "_Override system settings_"

8. Start vmcompute from powershell as administrator `net start vmcompute`

9. Restart
Start Hyper-V Manager as administrator
谢谢,非常管用。
This worked for me.
- Open «Window Security«
- Open «App & Browser control«
- Click «Exploit protection settings» at the bottom
- Switch to «Program settings» tab
- Locate «C:WINDOWSSystem32vmcompute.exe» in the list and expand it
- Click «Edit«
- Scroll down to «Code flow guard (CFG)» and uncheck «Override system settings«
- Start vmcompute from powershell as administrator
net start vmcompute- Restart
Start Hyper-V Manager as administrator
Thanks you
You just save my day of i3 gen 1 laptop
This worked for me.
- Open «Window Security«
- Open «App & Browser control«
- Click «Exploit protection settings» at the bottom
- Switch to «Program settings» tab
- Locate «C:WINDOWSSystem32vmcompute.exe» in the list and expand it
- Click «Edit«
- Scroll down to «Code flow guard (CFG)» and uncheck «Override system settings«
- Start vmcompute from powershell as administrator
net start vmcompute- Restart
Start Hyper-V Manager as administrator
did not work for me 
I tried everything under the sun. What finally worked was restoring WINRM to default — Type -> winrm invoke Restore winrm/config
I had to run ‘MOFCOMP %SYSTEMROOT%System32WindowsVirtualization.V2.mof’ from Command Prompt to fix this…..
Seemed to happen after I installed the HPE ProLiant Support Pack!
Worked for me after the broken KB5009624. Thanks @jamiet147 !
I had to run ‘MOFCOMP %SYSTEMROOT%System32WindowsVirtualization.V2.mof’ from Command Prompt to fix this…..
Seemed to happen after I installed the HPE ProLiant Support Pack!Worked for me after the broken KB5009624. Thanks @jamiet147 !
did not work for me 
I’m having the same problem, only I’m trying to connect o a Hyper-V Server 2019 from a Windows 11 22H2, the first solution didn’t work because there is no vmcompute in the list and for the second solution I get WindowsVirtualization.V2.mof doesn’t exist, it was working properly before I updated Windows 11 to version 22H2, I even re-installed the Hyper-V Management Tools, but the service to manage Hyper-V Servers is not in services anymore.
Any ideas?
When I try to connect to my host servers in Windows 10, I get an error message.
I am running 10 pro 10240_x64 as a VM. It is joined to the domain as my Hyper-V hosts are. After installing the Hyper-V Management Tools, rebooting and then trying to connect to one of my hosts, I get the same error shown above.
My account is a member of the domain admins group and the hyper-v console works fine on my Win 8.1 PC.
Also, I tried using a third party management tool (5Nine Manager for Hyper-V) and it connects just fine.
As a test, I tried the following.
1. Created a new VM from Win 8.1 Pro ISO. Joined it to the domain and logged in as a domain admin. Added the Windows feature Hyper-V Management Tools. I was able to connect to my host server just fine.
2. Created a new VM from Win 10 Pro ISO (build 10240). Joined it to the domain and logged in as a domain admin. Added the Windows feature Hyper-V Management Tools. I got the same error message shown above when I tried to connect to my host
servers.
Both test VMs have the firewall disabled.
Since both installs are clean and nothing was done other than the steps listed above, I have to assume there is some issue managing Windows 2012 R2 hosts with Windows 10 or some additional steps are necessary that weren’t needed in Windows 8.1.
I tried Win 10 Hyper-V Manager on another domain and it worked! The main difference is that the one that won’t connect is using Failover Clustering and the other is not.
I found a MS document that stated «Hyper-V on Windows 10 Technical Preview doesn’t support failover clustering». Even though I’m running the RTM (not one of the earlier preview versions).
https://technet.microsoft.com/en-us/library/dn765471.aspx
I can’t be the only person experiencing this issue. I had some feedback when I posted this in the TP forum but nothing suggested fixed the issue.
Thanks,
Brian
While setting up a new Hyper-V failover cluster I got an error when trying to connect using the Hyper-V manager console:
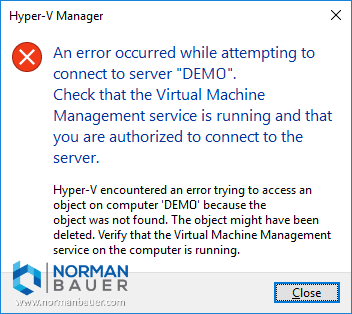
An error occurred while attempting to connect to server “[computername]”. Check that the Virtual Machine Management service is running and that you are authorized to connect to the server.
Hyper-V encountered an error trying to access an object on Computer ‘[computername]’ because the object was not found. The object might have been deleted. Verify that the Virtual Machine Management service on the computer is running.
There is nothing in the logs and everything I tried didn’t work. In the end uninstalling the Hyper-V role and reinstalling it did fix the issue. However, sometimes simply reinstalling roles is not possible. When I experienced the same error again on another machine I investigated a bit more and finally ended up in restoring the Hyper-V WMI registration which fixed the issue without reinstalling the role.
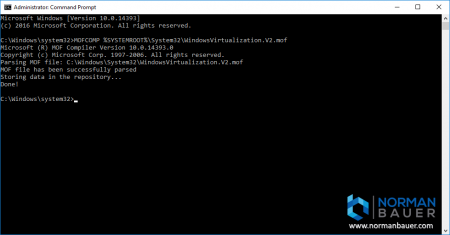
You can do so by running the following command in an elevated command prompt locally on the server where hyper-v is installed:
MOFCOMP %SYSTEMROOT%System32WindowsVirtualization.V2.mof
Join
- Home
- Virtualization
- Virtualization
- How-tos


to enable IT peers to see that you are a professional.
Last Updated:
Aug 29, 2015
1 Minute Read
-
Spice
-
Reply (22)
-
Subscribe
-
Share
Opens a new window
-
Facebook
Opens a new window -
Twitter
Opens a new window -
Reddit
Opens a new window -
LinkedIn
Opens a new window
-


to enable IT peers to see that you are a professional.

- Virtualization |
- Windows Server |
- Windows 10 |
- Spiceworks General Support |
- General Networking
Sign Up
Load More
Successfully deployed Hyper-V infrastructure is managed by using Hyper-V Manager or Windows Admin Center. It can be done locally or remotely, but in many cases, remotely management is a more efficient way, especially if we have more servers. Starting from Windows 8, Microsoft has integrated Hyper-V Client in the Professional and Enterprise editions of the operating system (Windows 8, Windows 8.1 and Windows 10). It gives additional flexibility, because you as IT admin don’t need to do it from Windows Server, but from your Windows client machine.
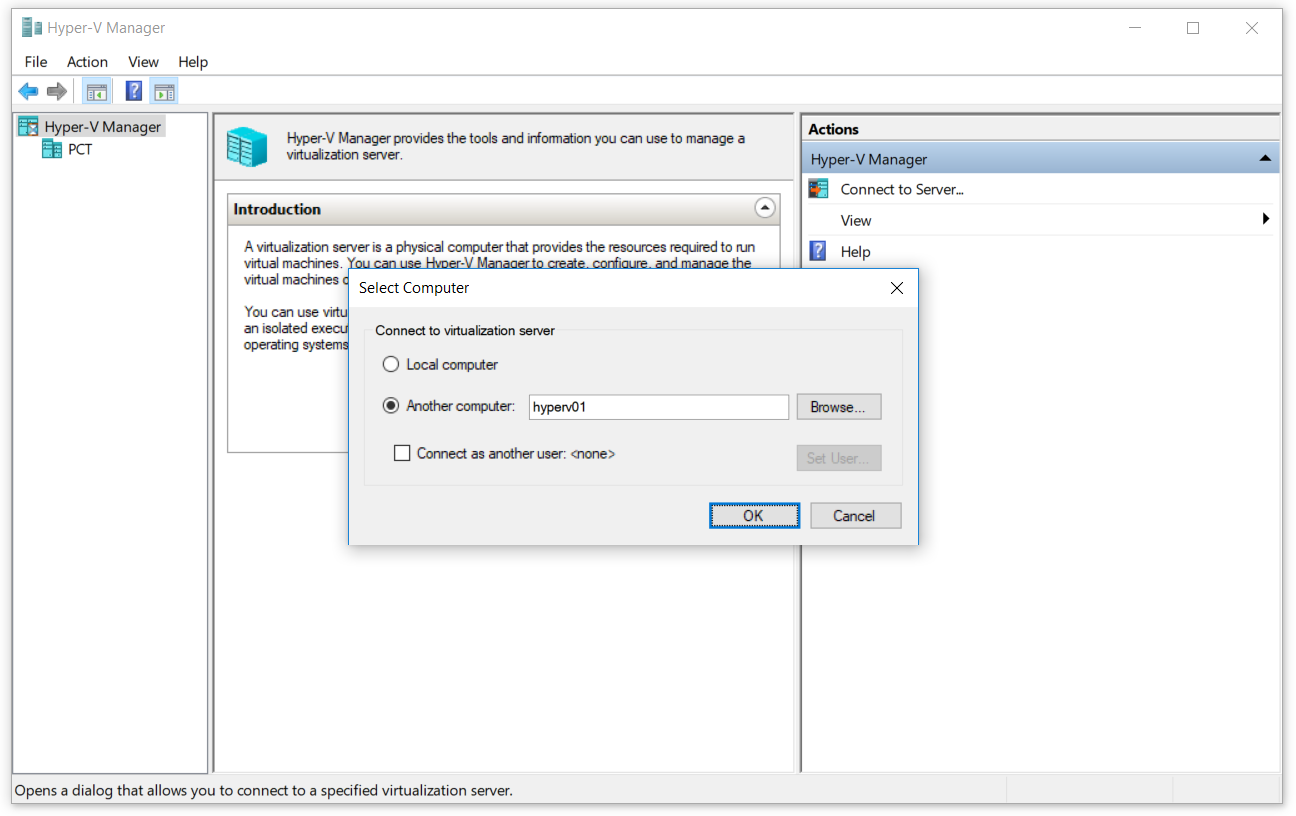
The procedure of connecting to remote Hyper-V server is straightforward. All we need is to open Hyper-V Manager and connect to remote virtualization server by clicking on Connect to Server… on the right side of the Hyper-V Manager console.
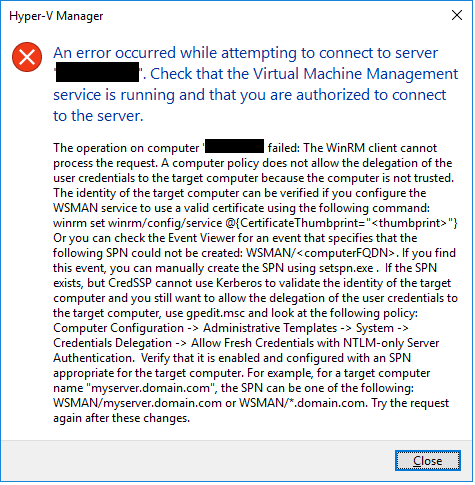
Some IT Admins are experiencing problems when connecting from Windows client to remote Hyper-V server. There are different reasons why this problem could happen, but in this article, we will talk about lacking trust between the source and the target machine. The error is known as: “An error occurred while attempting to connect to server “ServerName”. Check that the Virtual Machine Management service is running and that you are authorized to connect to the server. Connecting to remote server failed: The WinRM client cannot process the request. A computer policy does not allow the delegation of the user credentials to the target computer…” as shown on the screenshot below.
As the reason is quite obvious, in the next few steps we will walk you through the process of enabling trust between Windows client machine and remote Hyper-V Server.
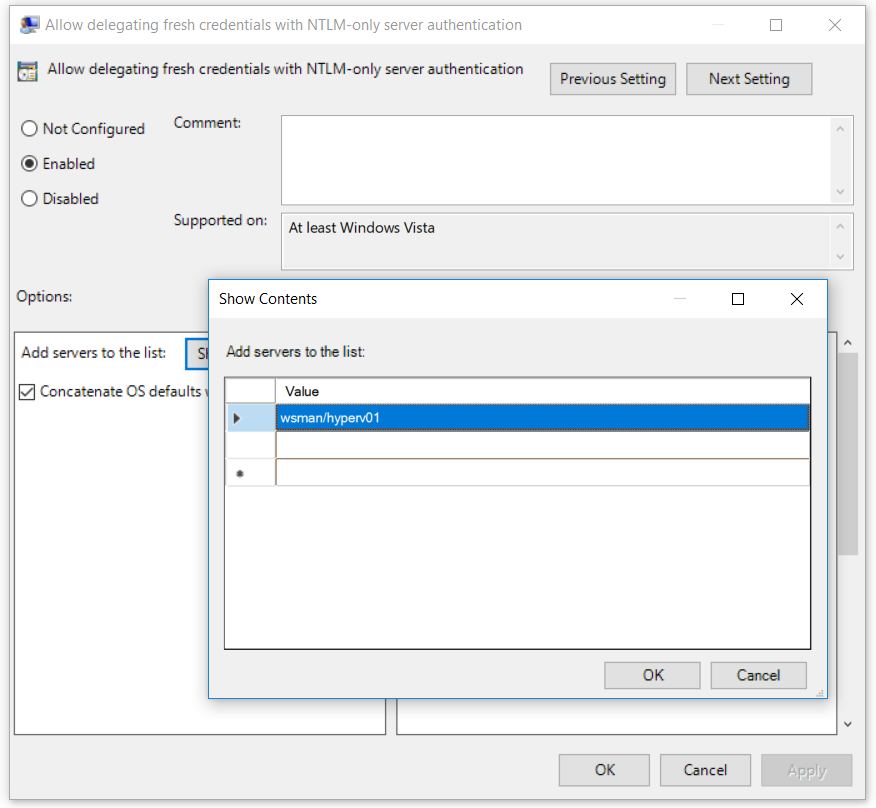
Allow delegating fresh credentials with NTLM-only server authentification
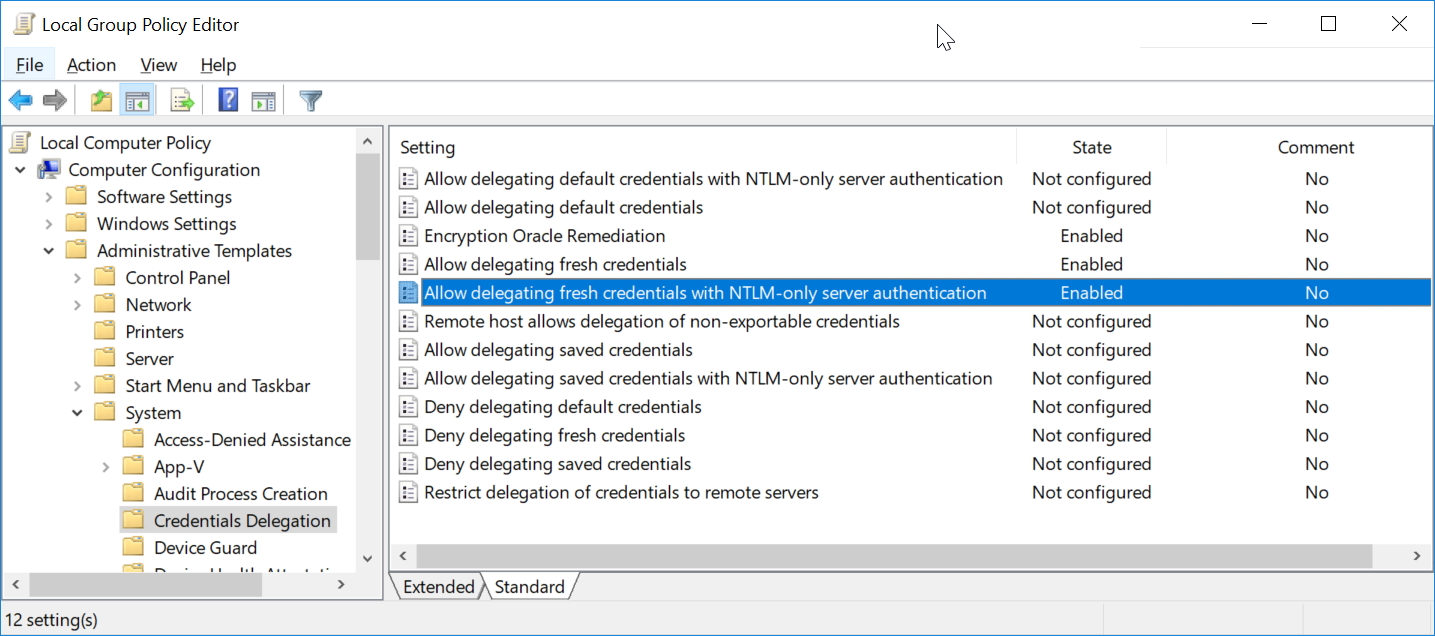
Enabling trust on a Windows client machine can be done via GUI or a Powershell. In this article, we will do it by using the Local Group Policy Editor (GUI). The policy is called Allow delegating fresh credentials with NTLM-only server authentification. This policy setting applies to applications using the Cred SSP component (for example Remote Desktop Connection). Credential Security Support Provider protocol (CredSSP) is an authentication provider that processes authentication requests for other applications. If you enable this policy setting, you can specify the servers to which the user’s fresh credentials can be delegated (fresh credentials are those that you are prompted for when executing the application). If you do not configure (by default) this policy setting, after proper mutual authentication, a delegation of fresh credentials is permitted to Remote Desktop Session Host running on any machine (TERMSRV/*). If you disable this policy setting, a delegation of fresh credentials is not permitted to any machine. In our example, we will enable policy on a source Windows machine from which we are connecting to the remote Hyper-V server. So, let’s start.
- Right click on Start Menu and search for Group Policy Editor by typing gpedit
- Open Edit Group Policy
- Navigate to Computer Settings > Administrative Templates > System > Credentials Delegation
- Double click on Allow delegating fresh credentials with NTLM-only server authentication
- Activate policy by clicking on Enable
- Click Show… next to Add servers to the list
- Click on the field and type WSMAN/Hyper-V Server name. In our example server is called hyperv01, so we will type wsman/hyperv01
- Click OK to confirm
- Click Apply and then OK
By default, computer Group Policy is updated in the background every 90 minutes, with a random offset of 0 to 30 minutes. As we don’t want to wait for it, we will enforce an update by using CMD or a Powershell. Please follow the procedure below. Also, we can change a refresh interval for Group policy starting from 0 minutes to 31 days.
- Right click on Start Menu and open Windows PowerShell (Admin) or Command Prompt (Admin)
- Click Yes to Confirm opening as Administrator
- Type gpupdate /force and press The policy will be updated in a few seconds.
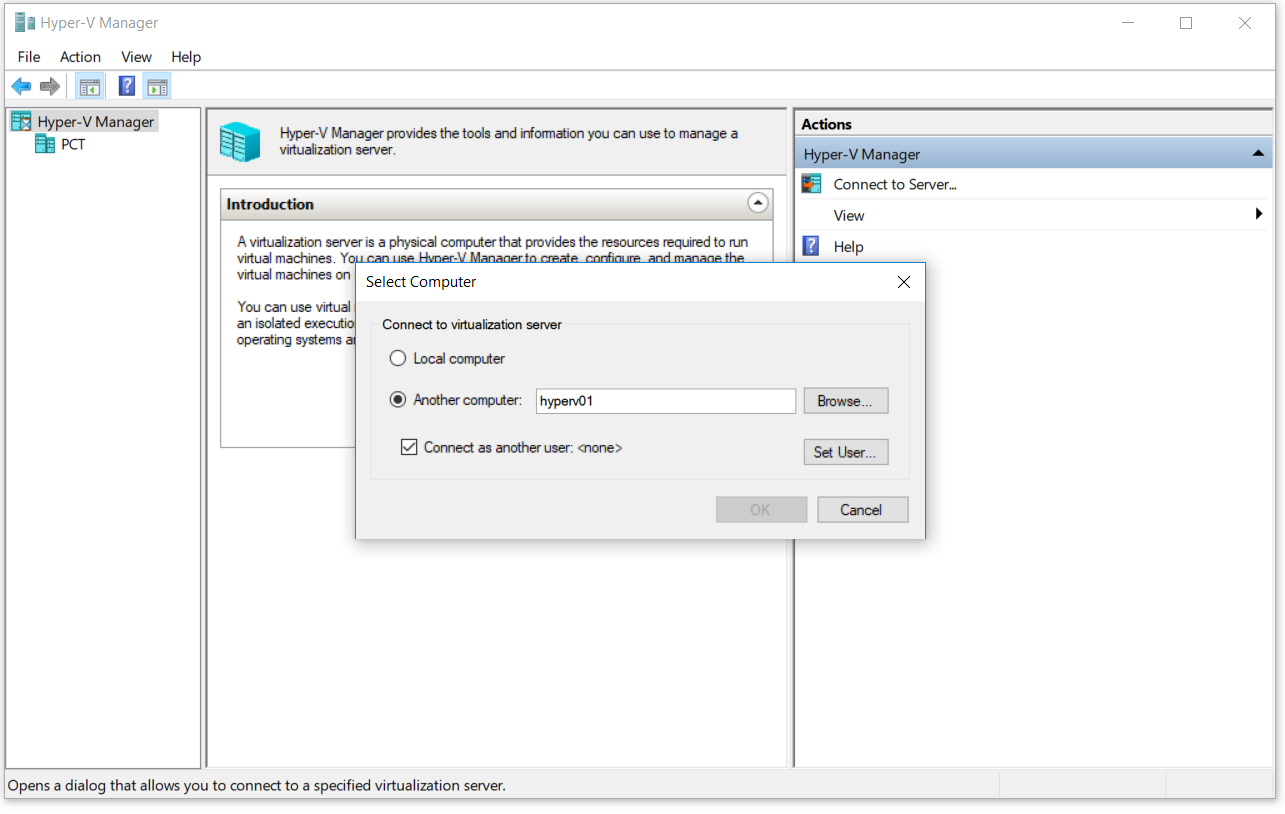
- Open Hyper-V Manager on Windows client machine
- Click on Connect to Server… on the right side of the Hyper-V Manager console
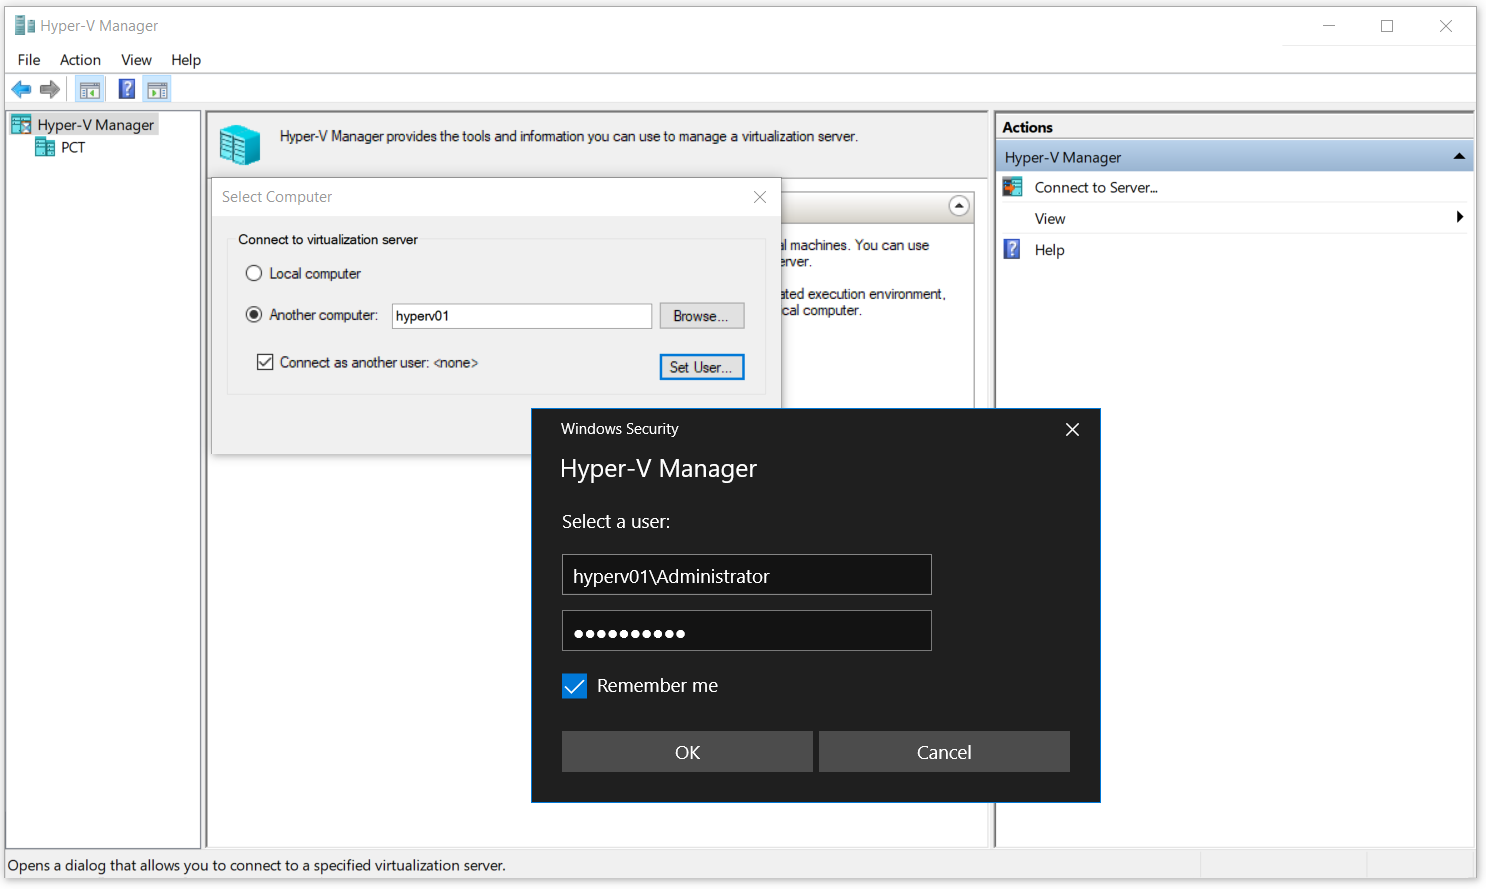
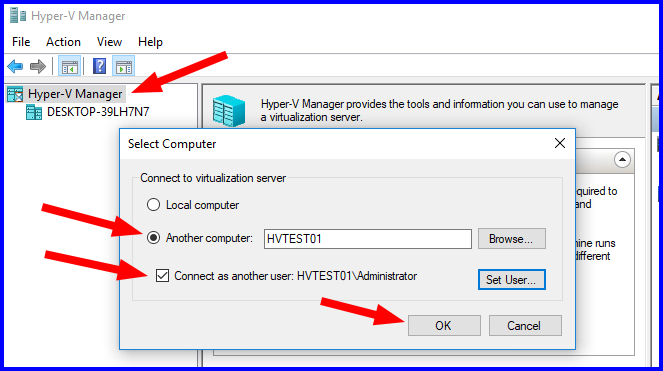
- Type Hyper-V 2019 server name under Another Computer, select Connect as another user. <none> and then click on Set User…. In our example, we are connecting to a remote Hyper-V server called hyperv01
- Type username and password. The username should be in a format <servernameuser> or <domainuser>. In our example, we are using the server name hyperv01Administrator.
- Click OK and then OK again
- You are successfully connected to your remote Hyper-V server
- Enjoy playing with your virtual machines
Jasmin Kahriman
Jasmin is a certified Senior Systems Engineer with over 15 years in IT Infrastructure. Jasmin holds multiple IT certifications which include CNIP, MTA, MCP, MCSA, MCT, Server+, and Network+.
In this post, my goal is to provide the steps one must take in a typical non-domain environment to set up Hyper-V Server 2016 or 2019 host and remotely manage it via Hyper-V Manager from a Windows 10 PC. I will split this post into three sections; what to do on the Hyper-V Server host, the Windows 10 PC, and some troubleshooting steps.
When you aren’t using Hyper-V Server in a domain in which you have group policies in place to take care of the automatic configuration of systems for seamless remote manageability, there are quite a few steps one must take on both the Hyper-V Server host and the Windows 10 PC from which you are trying to manage the host.
Most of the information out there, even as recent as September 2020, regarding managing Hyper-V remotely in a workgroup or non-domain environment, results in one of these two outcomes: not enough information, therefore leaving you still unable to connect properly to your Hyper-V host, or incorrect or too much information, leaving your systems vulnerable and insecure, possibly still unable to connect to the Hyper-V host.
Table of Contents
- 1 Hyper-V Server 2016 or 2019 Host
- 2 Windows 10 PC
- 3 Troubleshooting
- 3.1 The operation is not supported
- 3.1.1 The Fix
- 3.2 An error occurred while attempting to connect; WinRM, TrustedHosts, operation failed…
- 3.2.1 The Fix
- 3.3 An authentication error has occurred. CredSSP encryption…
- 3.3.1 The fix
- 3.1 The operation is not supported
- 4 References
Hyper-V Server 2016 or 2019 Host
All steps in this section are to be done on your Hyper-V Server host server. In this example, I am starting from a fresh install of Hyper-V Server 2016 that is fully patched and up-to-date.
- Install Hyper-V Server 201x
- Go through the typical install dance:
- Set a password at first boot.
- Change the computer name in
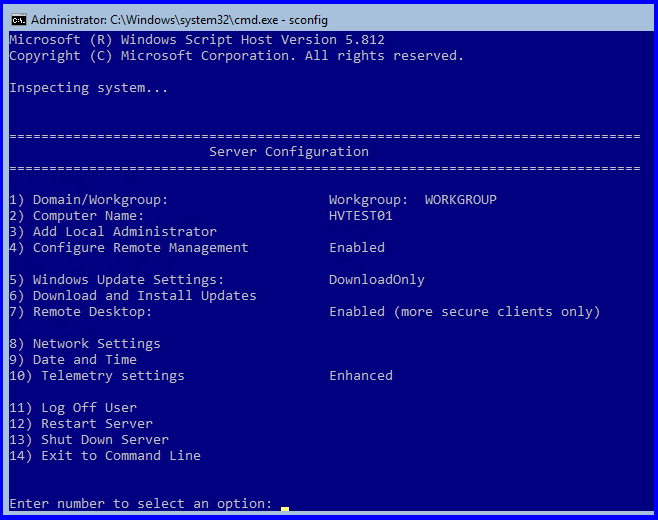
sconfig(option 2). - Verify Remote Management is Enabled (option 4).
- Enable Remote Desktop (option 7).
- Go through the typical install dance:
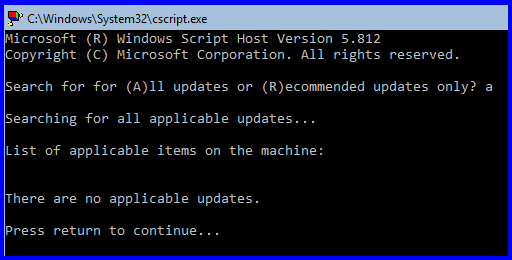
- Run Windows Update and make sure your server is 100% up-to-date. (option 6, then (A)ll updates)
- This is the most important step, because depending on which patch level Hyper-V Server 2016 is on, versus the patch level of your Windows 10 PC, you WILL get errors and will not be able to remotely connect via Hyper-V Manager.
- This is the most important step, because depending on which patch level Hyper-V Server 2016 is on, versus the patch level of your Windows 10 PC, you WILL get errors and will not be able to remotely connect via Hyper-V Manager.
- Enable PSRemoting:
- Enter the following command in an elevated PowerShell window:
Enable-PSRemoting
- Enter the following command in an elevated PowerShell window:
- Allow remote access on public zones and enable firewall rules for CredSSP and WinRM:
- Enter the following command in an elevated PowerShell window, then enter Y when prompted:
Enable-WSManCredSSP -Role server
- Enter the following command in an elevated PowerShell window, then enter Y when prompted:
Windows 10 PC
All steps in this section are to be done on your Windows 10 PC. At the time of this article’s creation, I used a fresh installed of Windows 10 Pro 1803 fully patched and up to date as of the end of July 2018. I know, scary! (but working)
- Run Windows Update:
- This is very important, and depending on which patch level your Windows 10 PC and Hyper-V Server 2016 or 2019 host is on, you WILL get errors and will not be able to remotely manage your Hyper-V host:
- This is very important, and depending on which patch level your Windows 10 PC and Hyper-V Server 2016 or 2019 host is on, you WILL get errors and will not be able to remotely manage your Hyper-V host:
- Install the Hyper-V Management Tools:
- Open up an elevated PowerShell window (Run as Administrator)
- Enter the following command, which installs the Hyper-V Management tools, then enter Y to reboot:
Enable-WindowsOptionalFeature -Online -FeatureName Microsoft-Hyper-V-Tools-All -All
- Set the network connection category to private:
- Enter the following command in an elevated PowerShell window:
Set-NetConnectionProfile -InterfaceAlias Ethernet -NetworkCategory Private- You may need to change “Ethernet” (InterfaceAlias) to match the name of your network connection(s).
- You can use Get-NetConnectionProfile to list your connections and their categories.
- Enter the following command in an elevated PowerShell window:
- Add the Hyper-V Server host to the local “hosts” file:
- Enter the following command, which appends the host name of the Hyper-V host and it’s IP address to the local hosts file:
Add-Content -Path C:WindowsSystem32driversetchosts -Value "`n172.30.32.151`tHVTEST01"- The `n is new line
- The `t is horizontal tab character
- Replace HVTEST01 and 172.30.32.151 with the host name and IP address of your Hyper-V Server host.
- Enter the following command, which appends the host name of the Hyper-V host and it’s IP address to the local hosts file:
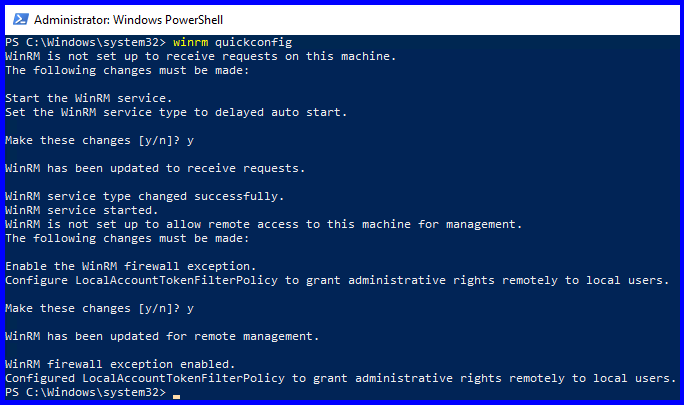
- Configure Remote Management Service:
- Enter the following in an elevated PowerShell window, and enter Y when prompted:
winrm quickconfig
- Enter the following in an elevated PowerShell window, and enter Y when prompted:
- Add the Hyper-V Server host to the trusted hosts of the Win10 PC:
- Enter the following command in an elevated PowerShell window, and enter Y when prompted:
Set-Item WSMan:localhostClientTrustedHosts -Value "HVTEST01"
- Enter the following command in an elevated PowerShell window, and enter Y when prompted:
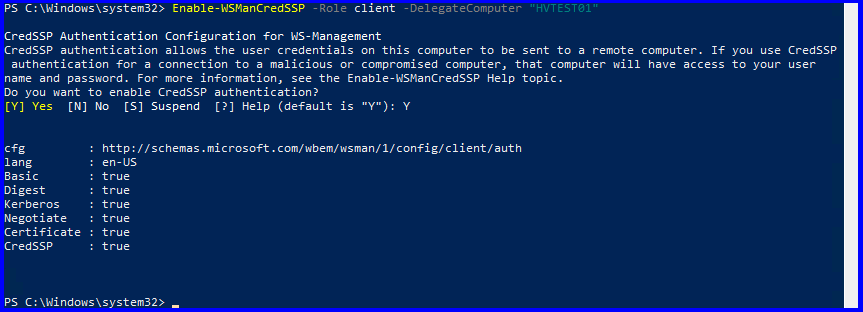
- Allow the Win10 PC credentials to be delegated to the Hyper-V Server host:
- Enter the following command in an elevated PowerShell window, enter Y when prompted:
Enable-WSManCredSSP -Role client -DelegateComputer "HVTEST01"
- Enter the following command in an elevated PowerShell window, enter Y when prompted:
- Allow delegating fresh credentials with NTLM-only server authentication:
- Enter the following commands in an elevated PowerShell window:
New-Item -Path "HKLM:SOFTWAREPoliciesMicrosoftWindows" -Name 'CredentialsDelegation'
New-ItemProperty -Path "HKLM:SOFTWAREPoliciesMicrosoftWindowsCredentialsDelegation" -Name 'AllowFreshCredentialsWhenNTLMOnly' -PropertyType DWord -Value "00000001"
New-ItemProperty -Path "HKLM:SOFTWAREPoliciesMicrosoftWindowsCredentialsDelegation" -Name 'ConcatenateDefaults_AllowFreshNTLMOnly' -PropertyType DWord -Value "00000001"
New-Item -Path "HKLM:SOFTWAREPoliciesMicrosoftWindowsCredentialsDelegation" -Name 'AllowFreshCredentialsWhenNTLMOnly'
New-ItemProperty -Path "HKLM:SOFTWAREPoliciesMicrosoftWindowsCredentialsDelegationAllowFreshCredentialsWhenNTLMOnly" -Name '1' -Value "wsman/HVTEST01"
- Or, configure the following local group policy (does the same as above):
- Change “HVTEST01” to match the name of your Hyper-V host in either of the above steps.
- Enter the following commands in an elevated PowerShell window:
- Open up Hyper-V Manager:
- Right-Click on “Hyper-V Manager”, and select “Connect to server…”.
- Select “Another computer” and type the name of your Hyper-V Server host.
- Check “Connect as another user”, then use the local admin account of the Hyper-V Host. Check “Remember me”. Use HOSTNAMEAdministrator
- Success!
- It should now connect successfully, allowing you to mange your Hyper-V Server host, set-up, and configure VMs:
- It should now connect successfully, allowing you to mange your Hyper-V Server host, set-up, and configure VMs:
Troubleshooting
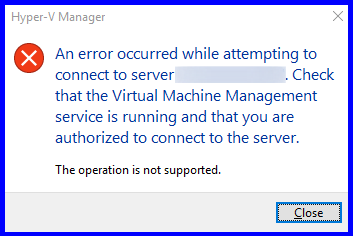
The operation is not supported
You get an error when trying to connect to the Hyper-V host (pictured below):
“An error occurred while attempting to connect to server <serverName>. Check that the Virtual Machine Management service is running and that you are authorized to connect to the server.
The operation is not supported.“
The Fix
The most likely resolution to this issue is to make sure all systems involved are up to date. This error may be related to this error:
https://timothygruber.com/hyper-v-2/remotely-managing-hyper-v-server-in-a-workgroup-or-non-domain/#An_authentication_error_has_occurred_CredSSP_encryption8230
An error occurred while attempting to connect; WinRM, TrustedHosts, operation failed…
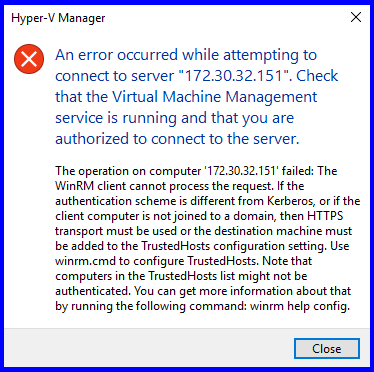
If you see the following error (pictured below):
“An error occurred while attempting to connect to server “<serverName>”. Check that the Virtual Machine Management service is running and that you are authorized to connect to the server.
The operation on computer ‘<serverName>’ failed: The WinRM client cannot process the request. If the authentication scheme is different from Kerberos, or if the client computer is not joined to a domain, then HTTPS transport must be used or the destination machine must be added to the TrustedHosts configuration setting. Use winrm.cmd to configure TrustedHosts. Note that computers in the TrustedHosts list might not be authenticated. You can get more information about that by running the following command: winrm help config.“
It means you are unable to connect to the Hyper-V Server host, and the most likely causes are that the remote server is not in the TrustedHosts and WinRM isn’t configured properly (obviously, there’s more to it than that). Hyper-V Server has the “Virtual Machine Management” service running by default, so we know it’s not that, but you can verify this by running the following command on your Hyper-V host:
Get-Service vmms
The Fix
The best way to resolve this error is to verify all the above steps have been completed.
An authentication error has occurred. CredSSP encryption…
If you see the following error (pictured below):
“An authentication error has occurred.
The function requested is not supportedRemote computer: <computerName>
This could be due to CredSSP encryption oracle remediation.
For more information, see https://go.microsoft.com/fwlink/?linkid=866660“
This error is most likely being produced due to a recent update in March 2018 to either your Hyper-V Server host or the PC in which you are trying to connect from.
The fix
To fix this error, you must make sure all systems involved are updated. This means your Hyper-V host, the VM you’re trying to access, and the PC you are trying to connect from.
Click the link below for more information from Microsoft:
https://portal.msrc.microsoft.com/en-us/security-guidance/advisory/CVE-2018-0886
References
Remotely Manage Hyper-V Hosts via Microsoft Docs:
https://docs.microsoft.com/en-us/windows-server/virtualization/hyper-v/manage/remotely-manage-hyper-v-hosts#manage-hyper-v-hosts-remotely
Microsoft Hyper-V codenamed Viridian lets you create and run a software version of a computer, called a virtual machine. Each virtual machine acts like a complete computer, running an operating system and programs. When you need computing resources, virtual machines give you more flexibility, help save time and money, and are a more efficient way to use hardware than just running one operating system on physical hardware. You may also want to see Why does the legacy PXE not does work on Generation 2 VM, How to set up a VM via PXE boot on a Generation 1 VM, Generation 2 VM: How to set up a Hyper-V Virtual Machine through PXE boot, how to install Windows Server 2022 on VMware Workstation, how to install Windows Server 2016 Operating System on VirtualBox, and how to install Windows Server 2019 on Virtualbox.
The following error below can be attributed to a whole lot of issues. But as you can see from the error description (image below), this is also as a result of unauthorized access. Kindly refer to this guide on how to install Hyper-V Server Core Mode: How to install a free Hyper-V Server on a VMware Workstation.

As you can see below, the management service is running. Also, the WinRM is configured, yet the remote connection to the server isn’t possible.
Reason: The following error is because you are connecting to the Hyper V Manager NOT as an Administrator that wasn’t defined in the Hyper-V Manager Administrators group in AD or Hyper-V Administrators group on the HyperV server. The below image might help you see what you are doing wrong.

Solution: You must run Hyper-V Manager using an account that is in the Administrators group or Hyper-V Administrators group on the target server. Otherwise, you won’t even be able to connect to the Hyper-V host. If your management workstation’s administrator account does not have those capabilities, hold down [Shift] while right-clicking the Hyper-V Manager shortcut, and then choose Run as different user:
You will be prompted to enter your username and password as shown below. This user account is part of the Local Administrators User Group on the HyperV server.

Click on Connect to Server, enter the server name when prompted and click on Ok.

As you can see below, you should be able to connect to the server. That is all that needs to be done to correctly connect to the HyperV server remotely from a Windows 10 device.

Other suggestions you could try: If you are having further issues and this isn't part of a Domain joined device, please perform the steps below.If you are connecting from an arbitrary client to an arbitrary Hyper-V Server, you will need to configure winrm before you can connect. On the Windows 10 client, you will need to configure WinRM. Open PowerShell as Administrator and run the command in the image below.

Add the IP address or servername of our Hyper-V Server to your WinRM client Trusted Hosts list as shown below.

Kindly save the Administrator and password credentials for our Hyper-V Server (substituting the IP address or server name with your information as needed).

DCOMCNFG is a Windows NT 4.0 utility that allows you to configure various DCOM-specific settings in the registry. DCOM is a programming construct that allows a computer to run programs over the network on a different computer as if the program was running locally. DCOM is an acronym that stands for Distributed Component Object Mode.
– Run the dcomcnfg from the command prompt or Windows search and expand the Component Services
– Computers
– My Computer in it. Right-click here, select Properties and go to COM Security
– Access Permissions
– Edit Limits. In the next window check Remote Access permissions for everyone.
As you can see, everyone has Remotte Access permission.

If you aren’t using an IP Address to connect, and you aren’t using DNS and you wish to connect using the server name, please create a host file record. Edit the host file with notepad (++) or any of the editors of your choice. I will not be demonstrating these steps as these are just added suggestions.
C:WindowsSystem32driversetchosts
Add a line with the “IP of your Microsoft Hyper-V Server 2012” followed by the “name of your Hyper-V server”. Then click on File and Save.

You may also want to see the steps highlighted by Microsoft on how Remotely manage Hyper-V hosts with Hyper-V Manager. I hope you found this blog post helpful. If you have any questions, please let me know in the comment session.
I am using Windows 10 professional, connected to office domain network.
I just enabled Hyper-V program with other related features in Windows Features.
Hyper V and related program in Windows feature
After reboot computer, I click Connect to Server in Hyper-V
Then I got an error message: related to Virtual Machine Management
The message says:
Hyper-V Manager «An error occurred while attempting to connect to server XX. Check that the Virtual Machine Management service is running and that you are authorized to connect to the server
I have googled everywhere, but there is no result. The closest post I could find is from this GitHub web link: GitHub.
Could anyone suggest how to solve this issue so I could begin using Hyper-V program?
Take note that I have switched my internet to a public WiFi and it still shows the same error message.
Update 01: Hyper-V Virtual Machine Management is running in Services.msc
Update 02: My Hyper-V Manager version is 10.0.17763.1. My colleague managed to get his Hyper-V Manager working and his version is 10.0.17134.1


