Обновлено 08.12.2022

Описание проблемы
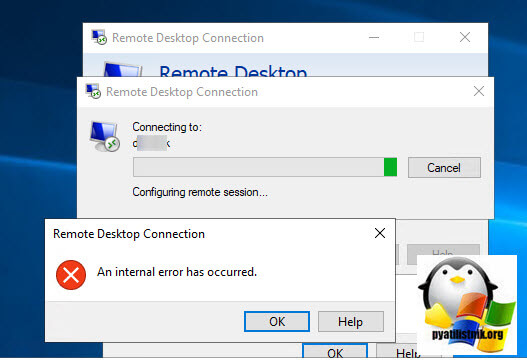
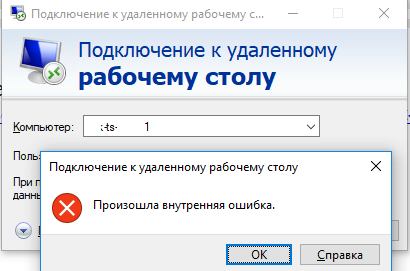
Есть сервер с операционной системой Windows Server 2012 R2, сотрудник пытается к нему подключиться, через классическую утилиту «Подключение к удаленному рабочему столу», в момент авторизации, выскакивает окно с ошибкой «Произошла внутренняя ошибка».
В английском варианте ошибка звучит вот так:
An internal error has occurred
После этого у вас разрывается соединение. Когда мы видели моргающий экран по RDP, там хотя бы вы попадали на сервер и могли открыть диспетчер устройств, тут сразу все обрубается на корню. Давайте смотреть, что можно сделать.
🆘 Что есть в логах?
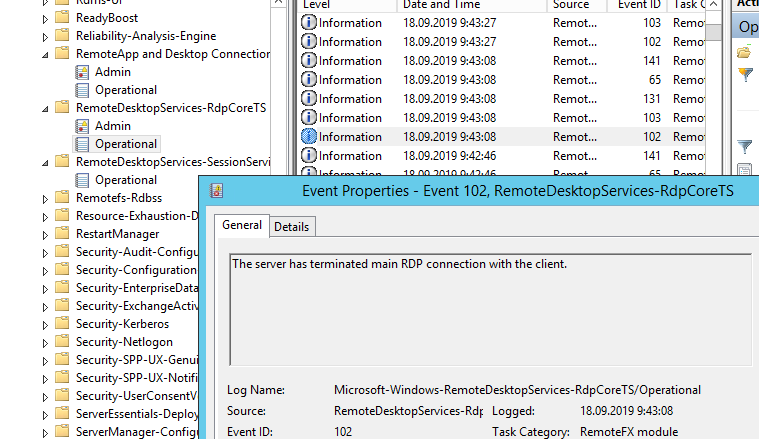
Если посмотреть журналы событий на удаленном сервере, куда вы пытаетесь подключиться, то там порядок событий будет такой:
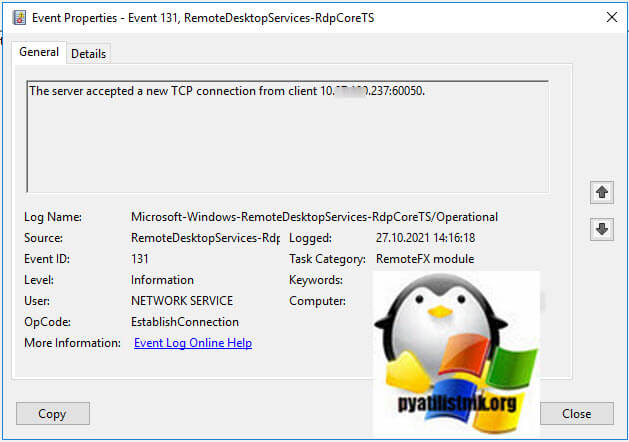
События нужно искать в журнале Microsoft-Windows-RemoteDesktopServices-RdpCoreTS/Operational
- 1️⃣ Первым будет идти событие ID 131 «The server accepted a new TCP connection from client IP-адрес:60050.». Тут вы увидите IP-адрес с которого идет попытка входа.
- 2️⃣ Далее событие ID 65 «Connection RDP-Tcp#11 created «.
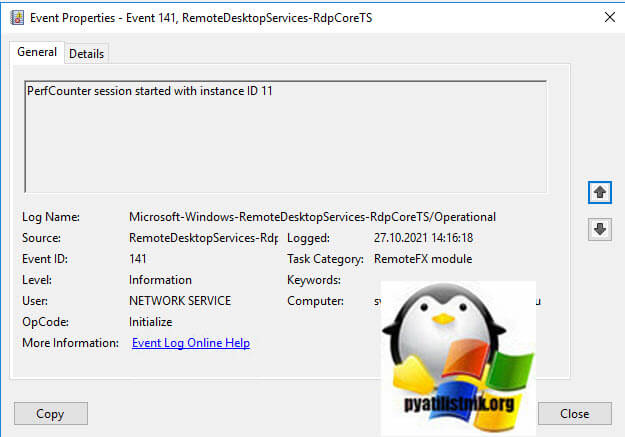
- 3️⃣ Затем событие 141 «PerfCounter session started with instance ID 11». Тут сессии будет назначен ID.
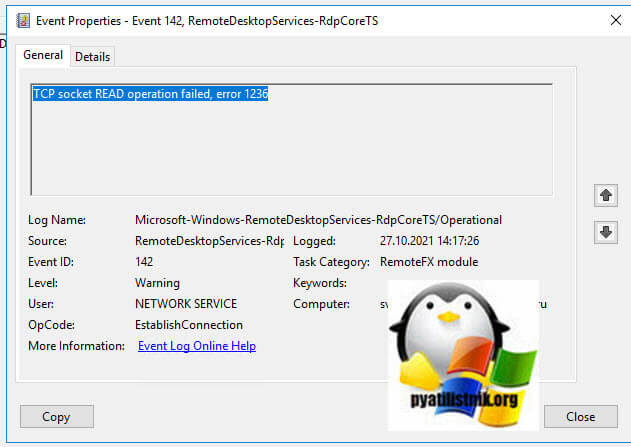
- 4️⃣ За ним будет идти ID 142 «TCP socket READ operation failed, error 1236».
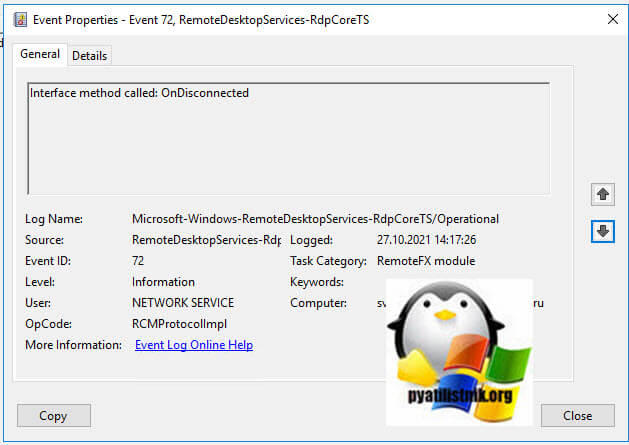
- 5️⃣ Потом вы увидите ID 72 «Interface method called: OnDisconnected»
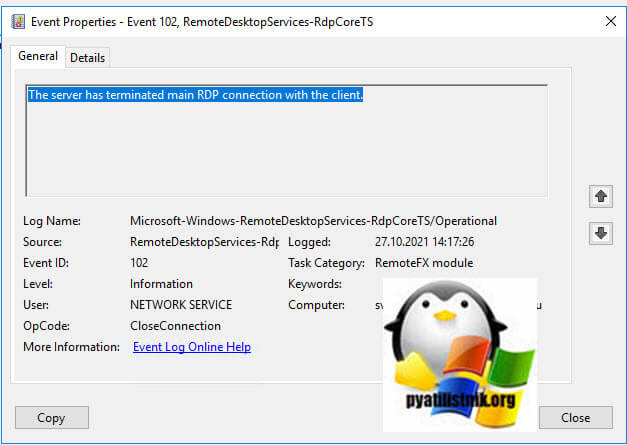
- 6️⃣ И же после этого вам покажут, что сервер разорвал подключение: «ID 102 The server has terminated main RDP connection with the client.»
- 7️⃣ В событии ID 145 так же появляются подробности «During this connection, server has not sent data or graphics update for 0 seconds (Idle1: 0, Idle2: 0).».
- 8️⃣ Могут быть события с ID 148 «Channel rdpinpt has been closed between the server and the client on transport tunnel: 0.» или «Channel rdpcmd has been closed between the server and the client on transport tunnel: 0.» или «Channel rdplic has been closed between the server and the client on transport tunnel: 0.»
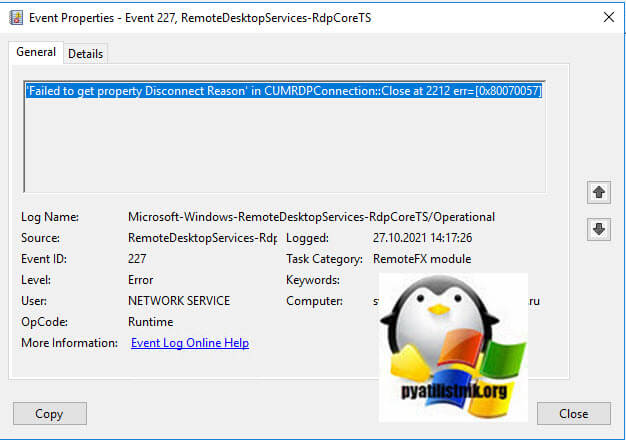
- 9️⃣ Ну и вишенка на торте, ошибка ID 227 «‘Failed to get property Disconnect Reason’ in CUMRDPConnection::Close at 2212 err=[0x80070057]»
Исправляем ошибку «Произошла внутренняя ошибка»
Так как по RDP подключиться не получается, то первым делом нужно проверить отвечает ли порт, по умолчанию это 3389. О том, как проверить порт на удаленном сервере я вам описывал, там все сводилось к выполнению команды Telnet, ознакомьтесь. Если порт отвечает, то делаем следующее.
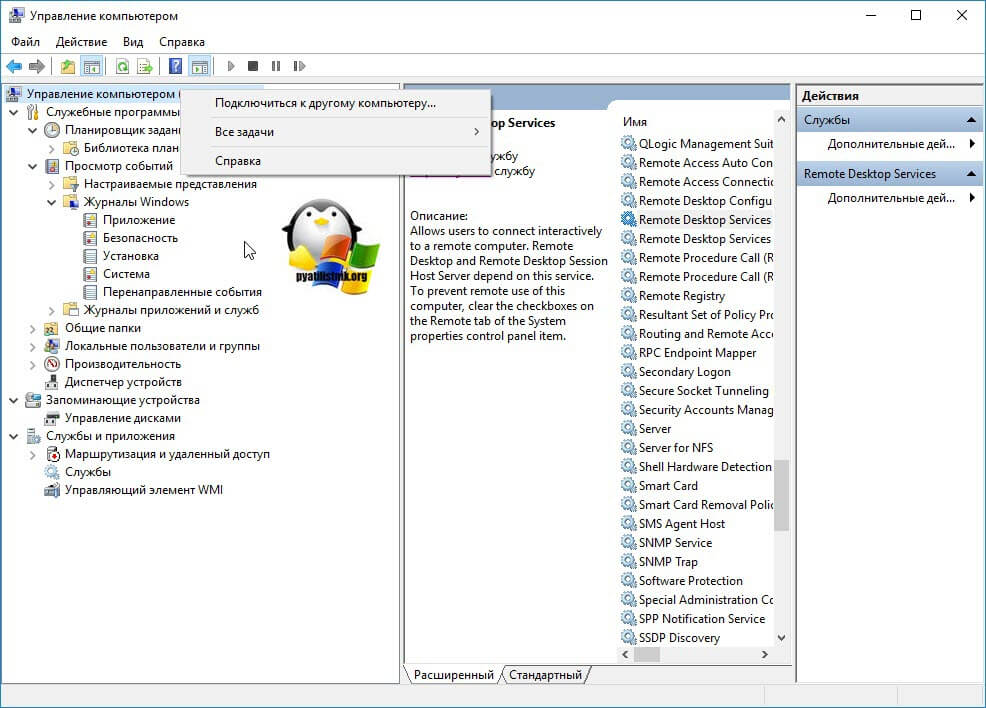
Нужно удаленно перезапустить службу на этом сервере, чтобы сам сервер не перезагружать, так как в этот момент, он может выполнять важные задачи, можно использовать утилиту «Управление компьютером». Открыть ее можно через команду вызова оснастки, вызываем окно «Выполнить», через одновременное нажатие клавиш WIN и R, в котором пишем:
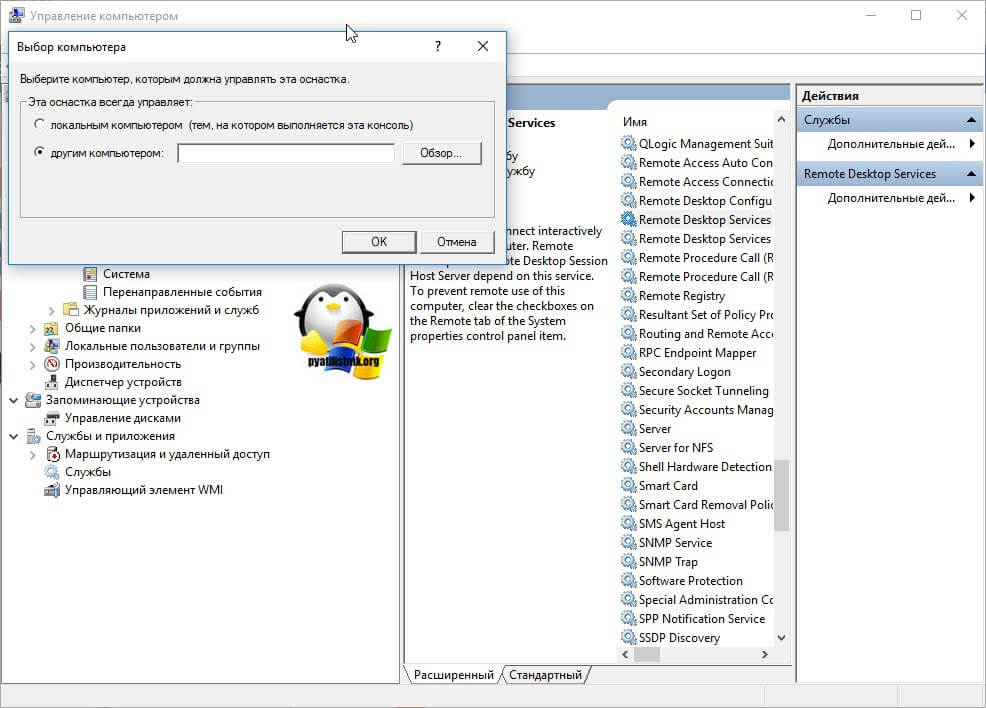
В открывшейся оснастке, щелкните в самом верху по пункту «Управление компьютером» правым кликом мыши, и выберите пункт «Подключиться к удаленному компьютеру».
Выберите пункт «Другим компьютером» и укажите его DNS имя, или найдите его через кнопку обзор.
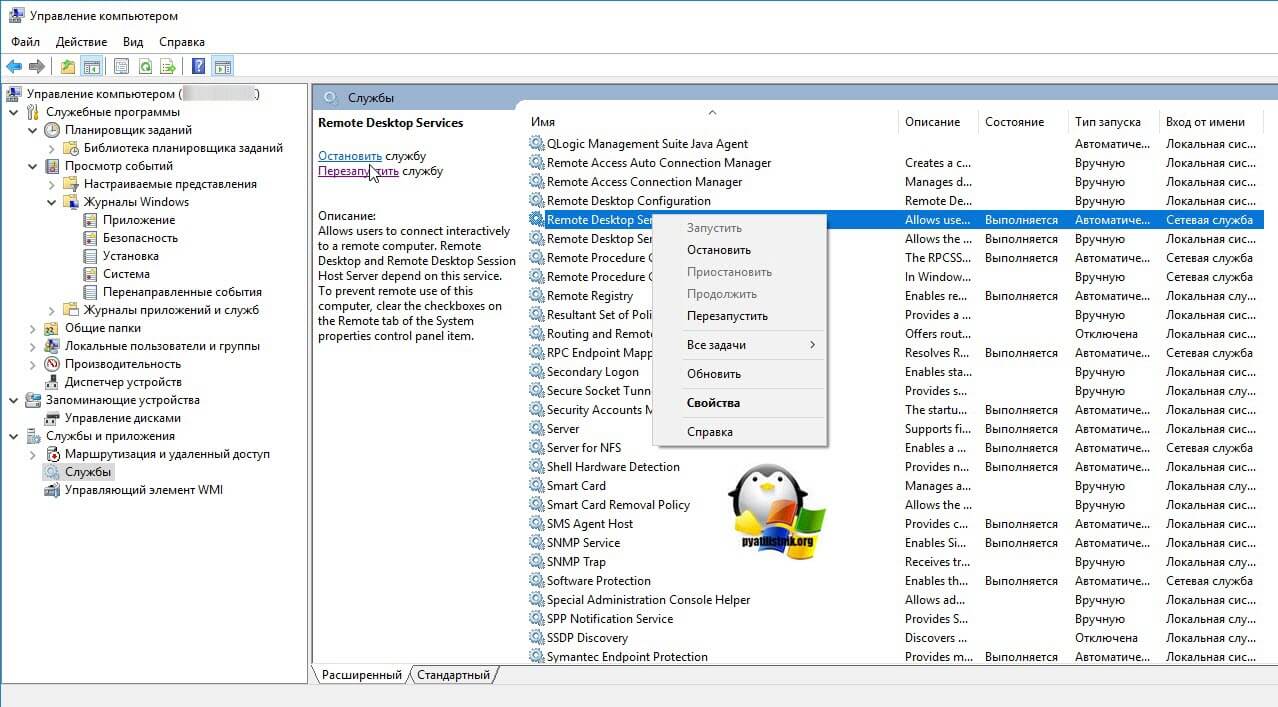
Когда вы подключитесь к нужному серверу, перейдите в пункт «Службы и приложения — Службы», в списке сервисов найдите службу удаленных рабочих столов (Remote Desktop Services), и перезапускаем ее. После этого ошибка подключения по RDP «Произошла внутренняя ошибка», у вас должна пропасть.
Так же вы можете использовать оболочку PowerShell запущенную от имени пользователя, у которого есть права на удаленный сервер, где будет перезапускаться служба RDP. Выполните:
Get-Service TermService -ComputerName Имя сервера | Restart-Service –force –verbose
Дополнительные методы решения
Если вам не помог первый метод, перезапускающий службу удаленных рабочих столов, то можно попробовать выполнить правку реестра. Открываете редактор реестра Windows, если у вас физического доступа к серверу нет или он далеко и вам лень до него идти, то можно попробовать подключиться к реестру удаленного сервера.
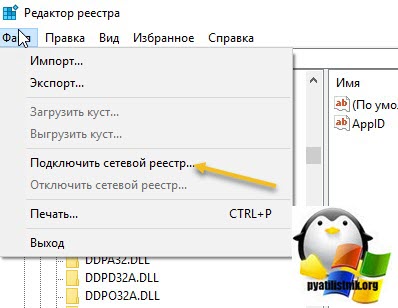
Для этого в окне «Редактор реестра» пункт меню «Файл — Подключить сетевой реестр».
В открывшемся окне «Выбор компьютера» указываем его DNS-имя или ip-адрес и нажимаем ок. У вас будет установлено подключение к удаленному реестру сервера, что испытывает проблемы.
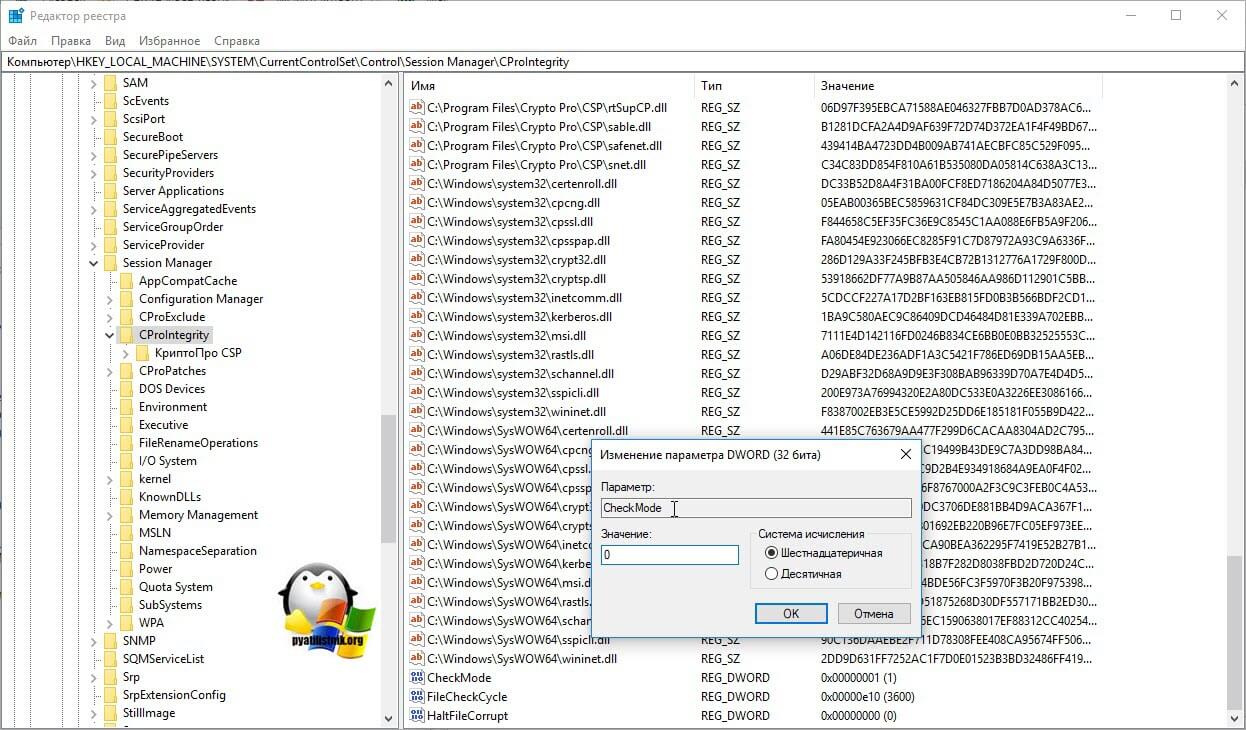
Находим ключ CheckMode по пути
HKEY_LOCAL_MACHINESYSTEMCurrentControlSetControl Session ManagerCProIntegrityCheckMode
Перед любыми правками реестра, обязательно сделайте выгрузку нужной ветки, чтобы можно было восстановить все в оперативном режиме
Выставляем ему значение о, чтобы отключить у программы КриптоПРО CSP проверку контрольных сумм. Еще один важный момент, если у вас старая версия КриптоПРО, то это так же может быть источником, проблем, недавний пример, это ошибка «Windows installer service could not be accessed». Для этого удаляем правильно КриптоПРО CSP и ставим последнюю доступную версию.
Еще можно попробовать изменить значение вот такого ключа реестра:
HKEY_LOCAL_MACHINESYSTEMCurrentControlSetControl Session ManagerMemory ManagementSessionImageSize
Найдите ключ SessionImageSize и задайте ему значение 0x00000020.
Дополнительные настройки RDP клиента
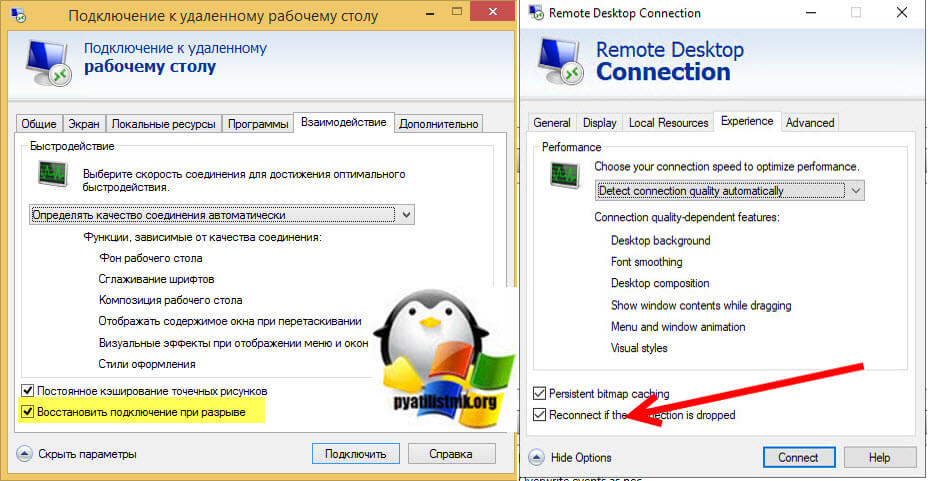
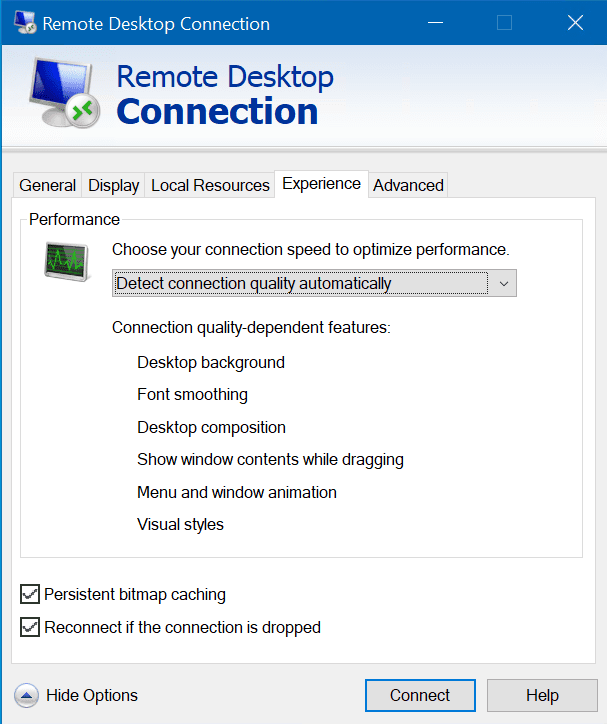
Например ошибка «An internal error has occurred» у меня встретилась на Windows Server 2022 и там мне помогло в настройках клиента RDP отключение некой опции. Перейдите в дополнительные настройки клиента для удаленного подключения, где н вкладке «Experiens (Взаимодействие)» вам нужно убрать галку с опции «Восстановить подключение при разрыве (Reconnect if the connection is droped)«
На каких-то сайтах предлагалось именно активировать данный пункт.
Удаление кэша подключений
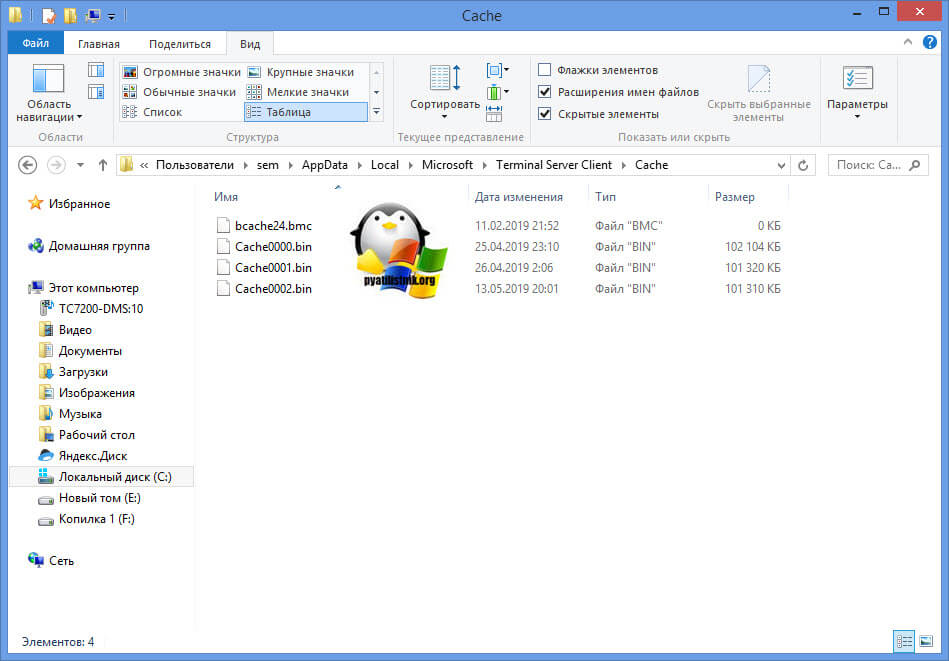
Еще одним методом решения внутренней ошибки подключения по RDP может выступать поврежденный кэш, который хранится на локальном компьютере пользователя. Для его отображения вам необходимо включить отображение скрытых папок и удалить содержимое папки:
C:Usersимя пользователяAppDataLocalMicrosoftTerminal Server Client
Обновление 07.12.2022
В декабре я вновь столкнулся с внутренней ошибкой, она еще стала проявлять себя вот так:
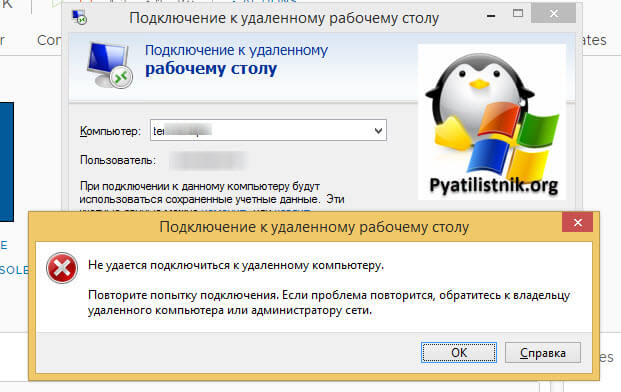
Не удается подключиться к удаленному компьютеру
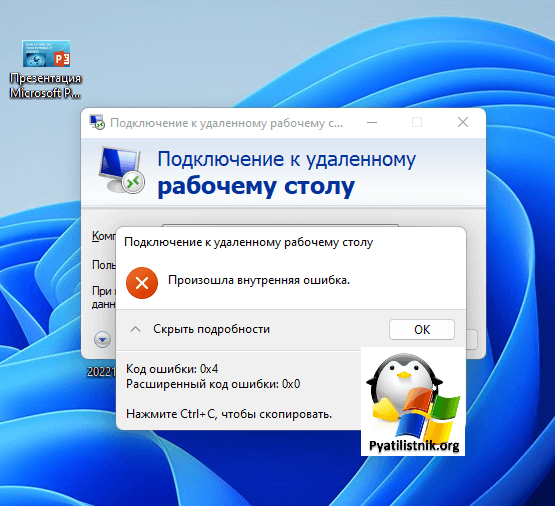
Произошла внутренняя ошибка. Код ошибки: 0x4. Расширенный код ошибки: 0x0
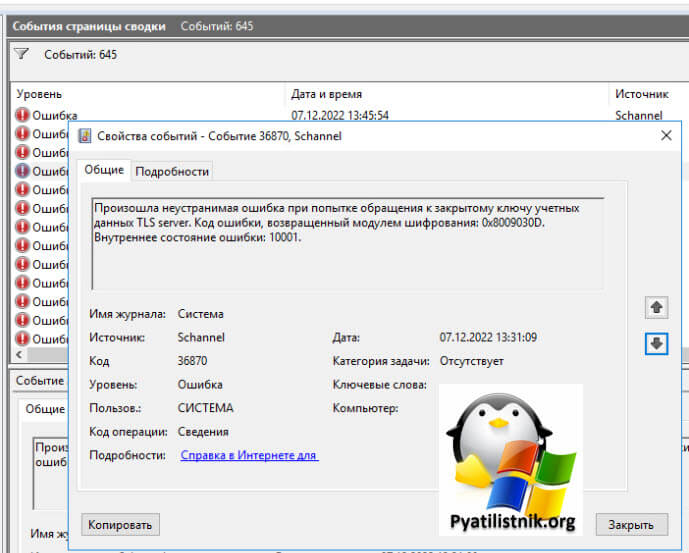
В логах сервера очень много ошибок:
Она возникает, при каждой попытке войти на рабочий стол, это и есть проблема в моем конкретном случае. Устраните ее, и ошибка с подключекнием уйдет. Перезагрузка не нужна.
Данная ошибка говорит, что на тот сертификат, что использует удаленный сервер, нет прав у самого сервера, подробности выше по ссылке
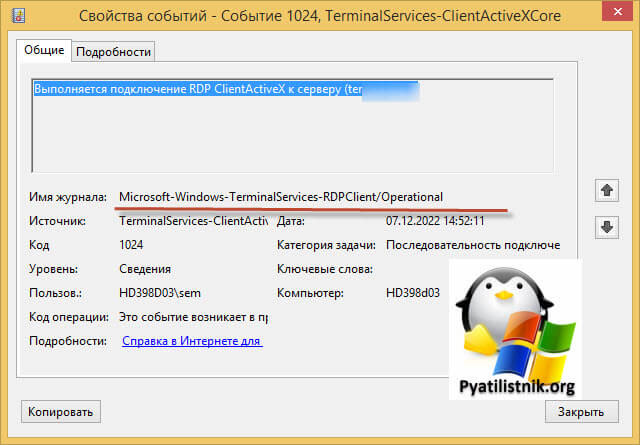
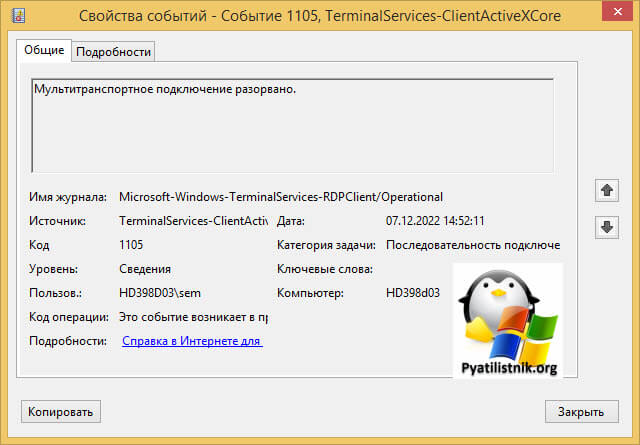
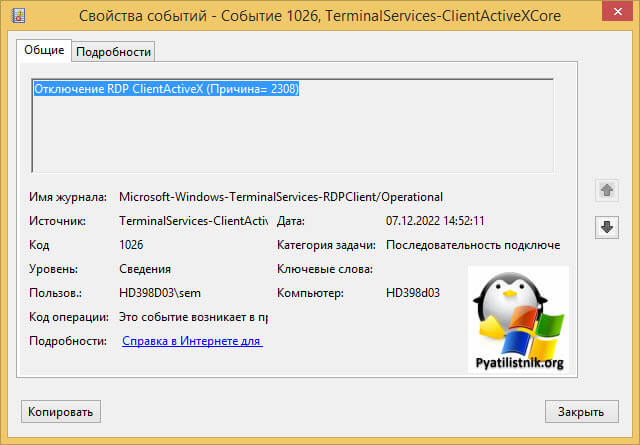
На клиентской машине откуда я пытался произвести подключение было три события:
ID 1024: Выполняется подключение RDP ClientActiveX к серверу (ter104)
ID 1105: Мультитранспортное подключение разорвано.
ID 1028: Отключение RDP ClientActiveX (Причина= 2308)
Код 2808 — Ваш сеанс служб удаленных рабочих столов завершен. Соединение с удаленным компьютером было потеряно, возможно, из-за проблем с сетевым подключением. Попробуйте снова подключиться к удаленному компьютеру. Если проблема не исчезнет, обратитесь к сетевому администратору или в службу технической поддержки.
Так как у меня это была виртуальная машина, то я смог легко подключиться через консоль. В случае с ошибкой «Отключение RDP ClientActiveX (Причина= 2308)«, я отключил на сервере и клиенте autotuninglevel:
netsh interface tcp set global autotuninglevel=disabled
Не забываем перезагрузиться.
Это не помогло, далее я выполнил еще несколько рекомендаций. Я установил на сервер валидный SSL сертификат для RDP сессии. В ошибке 0x907, RDP соединение разрывалось, так как клиентская система не доверяла самоподписному сертификату удаленного сервера. Это нужно поправить, ссылку я указал, обязательно проверьте, кто сейчас выступает в роли активного:
Get-WmiObject «Win32_TSGeneralSetting» -Namespace rootcimv2terminalservices -Filter «TerminalName=’RDP-tcp'»
Еще я создал параметр реестра MaxOutstandingConnections. В Windows по умолчанию есть ограничения на количество сетевых подключений, так например в серверной версии, это параметр равен 3000, в десктопной 100. Из-за нестабильной сети, они могут быстро забиваться. Одно из решений проблемы с внутренней ошибкой подключения, является увеличение этого значения. В командной строке в режиме администратора выполните:
REG ADD «HKLMSYSTEMCurrentControlSetControlTerminal Server» /v MaxOutstandingConnections /t REG_DWORD /d 65536
New-ItemProperty -Path «HKLM:SYSTEMCurrentControlSetControlTerminal Server»
-Name MaxOutstandingConnections -Value 10000 -PropertyType DWORD -Force
После этого нужно перезагрузиться.
Временное решение
Пока вы не уберете ошибку «Код ошибки, возвращенный модулем шифрования: ошибка 0x8009030D», описанную выше, вы можете понизить уровень безопасности вот такими манипуляциями, это устранит «An internal error has occurred».
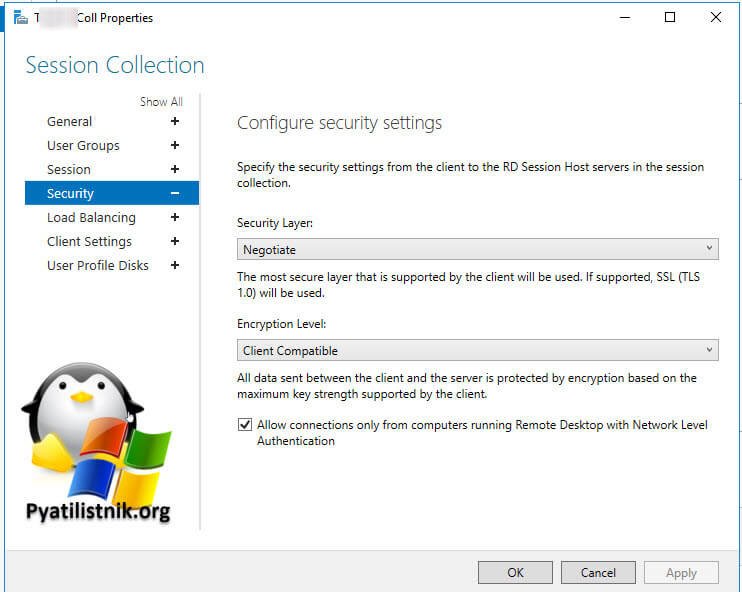
На обычном сервере все это помогло, а вот на ноде RDSH ошибка оставалась. Тут я решил проверить догадку с уровнем безопасности «Configure security settings». На моей ферме был уровень «Согласования (Negotiate)«
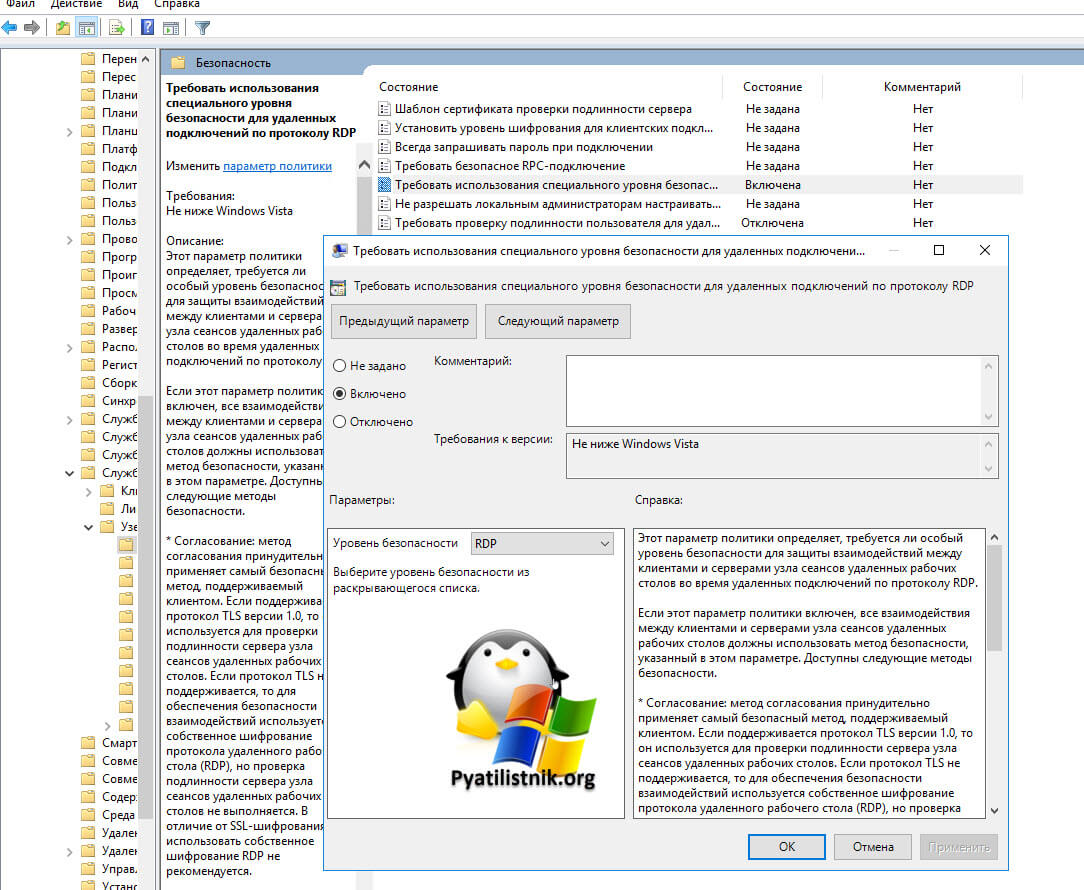
Я пошел на сервер, где были проблемы подключения и решил проверить один параметр локальной политики gpedit.msc.
Конфигурация компьютера — Административные шаблоны- Компоненты Windows — Службы удаленных рабочих столов — Узел сеансов удаленных рабочих столов — Безопасность — Требовать использование специального уровня безопасности для удаленных подключений по протоколу RDP
Тут попробуйте выставить уровень RDP. В результате у меня после этих настроек все заработало. Теперь нужно понять, что изменилось. В настройках RDS фермы указано, что мы используем уровень согласование:
* Согласование: метод согласования принудительно применяет самый безопасный метод, поддерживаемый клиентом. Если поддерживается протокол TLS версии 1.0, то он используется для проверки подлинности сервера узла сеансов удаленных рабочих столов. Если протокол TLS не поддерживается, то для обеспечения безопасности взаимодействий используется собственное шифрование протокола удаленного рабочего стола (RDP), но проверка подлинности сервера узла сеансов удаленных рабочих столов не выполняется. В отличие от SSL-шифрования, использовать собственное шифрование RDP не рекомендуется.
Если и это вам не помогло, то нужно смотреть вариант в сторону обновления или переустановки драйверов на сетевую карту, тут вы определяете модель вашей карты или материнской платы, если в нее все интегрировано и обновляете. С вами был Иван Семин, автор и создатель IT портала Pyatilistnik.org.
Дополнительные ссылки
- https://serverfault.com/questions/934026/windows-10-pro-rdp-server-an-internal-error-has-occurred
- https://social.technet.microsoft.com/Forums/en-US/e1d60cc0-0096-4859-a0e7-eb7f11905737/remote-desktop-v10-error-0x4-from-mac?forum=winRDc
- https://learn.microsoft.com/en-us/answers/questions/108219/can-not-rdp-to-2012-r2-standard-server-after-septe.html
- https://serverfault.com/questions/541364/how-to-fix-rdp-on-windows-server-2012
Столкнулся со странным сообщением “
Произошла внутренняя ошибка
/
An internal error has occurred
” при RDP подключении к недавно развернутому серверу RDSH на Windows Server 2012 R2 из Windows 10. Буквально вчера RDP подключение к серверу работало нормально, но после установки и настройки RemotApp приложений и перезагрузки сервера, я не могу удаленно подключиться к его рабочему столу. Служба Remote Desktop Services судя по всему работает, так как пароль пользователя при подключении запрашивается.
Как я понял, сообщение RDP консоли “Произошла внутренняя ошибка” может появляться в различных случаях и иметь совершенно различные причины, связанные как с сервером Remote Desktop, так и с клиентом. В этой статье я постарался собрать все варианты решения и сценарий, который помог мне.
В первую очередь, убедитесь, что на RDS сервере доступен RDP порт 3389, и подключение не блокируется файерволом (Test-NetConnection rdsserver –port 3389).
Изучив логи RDP подключений на удаленном RDS сервере, я не увидел никаких особенных ошибок. В журнале Microsoft-Windows-RemoteDesktopServices-RdpCoreTS/Operational видно, что RDP сессия создается:
The server accepted a new TCP connection from client 10.10.1.60:64379.
Connection RDP-Tcp#3 created
Но потом без какой-либо ошибки RDP сеанс завершается:
The server has terminated main RDP connection with the client.
The disconnect reason is 0
Проверьте состояние службу Remote Desktop Services на удаленном сервере и перезапустите ее. Вы можете удаленно перезапустить службу через консоль Services.msc (Connect to another computer), но гораздо проще проверить состояние службы и перезапустить ее через PowerShell:
(Get-Service TermService -ComputerName msk-ts1).status
Служба запушена (Running), перезапустим ее:
Get-Service TermService -ComputerName msk-ts1| Restart-Service –force –verbose
Но проблему это не решило.
Какие еще варианты решения проблемы мне удалось найти в сети:
- Если у вас на удаленном сервере установлен КриптоПРО, он может быть источником проблем с rdp подключением. Попробуйте отключить проверку контрольных целостности файлов (проверки контрольных сумм) в КриптоПро через реестр. Перейдите в ветку реестра
HKLMSYSTEMCurrentControlSetControlSession ManagerCProIntegrity
и измените значение параметра CheckMode на 0. Перезагрузите сервер. - Если в журнале событий TerminalServices-RemoteConnectionManager вы встретите событие с EventID 1057 (The RD Session Host Server has failed to create a new self signed certificate to be used for RD Session Host Server authentication on SSL connections), перейдите в каталог
C:ProgramDataMicrosoftCryptoRSA
, переименуйте папку Machinekeys в Machinekeys_bak и перезапустите службу TermService. - Также нашел информацию, что RDP проблема “Произошла внутренняя ошибка” встречалась в Windows 10 1809, если на удаленном компьютере включена политика Configure H.264/AVC hardware encoding for Remote Desktop connections (находится в секции GPO: Computer Configuration -> Administrative Templates -> Windows Components -> Remote Desktop Services -> Remote Desktop Session Host -> Remote Session Environment). Для решения этой проблемы достаточно отключить UDP протокол для RDP, создав в ветке реестра
HKLMSOFTWAREPoliciesMicrosoftWindows NTTerminal ServicesClient
параметр
fClientDisableUDP
со значением 1. - В комментариях Ivan оставил очень полезный фикс.
Проблема с ошибкой RDP может быть в наличии некоего счетчика учитывающего максимальное количество подключений в Windows.
В десктопных версиях Windows — 100, в Windows Server -3000. Для сброса счетчика достаточно перезагрузить компьютер, или просто увеличить лимит через реестр:
REG ADD "HKLMSYSTEMCurrentControlSetControlTerminal Server" /v MaxOutstandingConnections /t REG_DWORD /d 65536
Ни один из рассмотренных выше сценариев не был применим в моем случае. Я совершенно случайно обнаружил, что с других компьютеров нет проблем с подключением к этому RDS серверу. Значить проблема только с моим компьютером, а не с сервером.
Я очистил историю RDP подключений в ветке
HKEY_CURRENT_USERSoftwareMicrosoftTerminal Server ClientServers
и сбросил кэш RDP в каталоге
C:Users%Username%AppDataLocalMicrosoftTerminal Server ClientCache
(перед удалением закройте все запущенные сеансы mstsc.exe):
del "C:Users%Username%AppDataLocalMicrosoftTerminal Server Clientcache"
После этого перезагрузил свой компьютер, и ошибка RDP подключения исчезла!
“An Internal Error has Occurred” Error appears while connecting to a desktop or laptop through the Remote Desktop Connection. The error can be caused by misconfigured Remote Desktop Protocol (RDP) and security settings. When the error popups, that means RDP is not able to create a connection with the RDP server between the user and the client.
Before going further, we recommend reading the causes below. So you will understand deeply about this error:
- Disabled Remote Connection- If the Remote Desktop connection is not enabled on your computer, the error will likely appear. Hence, allow the Remote Desktop connection on your Windows to fix this error.
- Misconfigured RDP Security Settings- The misconfiguration of the Remote Desktop Protocol settings can cause this error. However, you can easily fix this error by configuring RDP settings correctly.
- Corrupt Windows Update- According to some users, the error can appear due to a corrupt Windows Update installation. Therefore, reinstalling the Windows update might fix your issue.
- Disabled Remote Desktop Service- If the Remote Desktop Service is disabled, you might encounter several errors such as this one. Hence, you need to ensure that the Remote Desktop Service is running properly.
- Using Static IP- Another reason that can lead you to this issue is using a static IP address like Google, Cloudfare, and among others. If the DNS server is down, this error might appear. Therefore try switching to the automatic DNS to avoid this error.
1. Change RDP Security Settings
The error can often be caused by a disabled RDP setting in the Local Group Policy. The settings specify whether to use the RDP security layer feature to communicate between clients and the RDP server. However, in many scenarios, you might encounter this error if this setting is disabled. Several users have managed to fix this error by enabling this setting. Follow the steps:
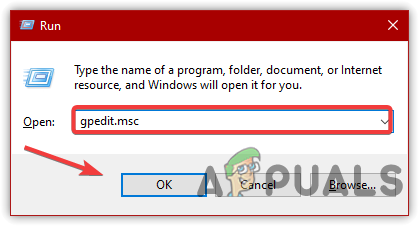
- Press the Win + R Simultaneously on the keyboard to open Run Window
- Type gpedit.msc and click OK
Opening Run Window - Go to the following directory
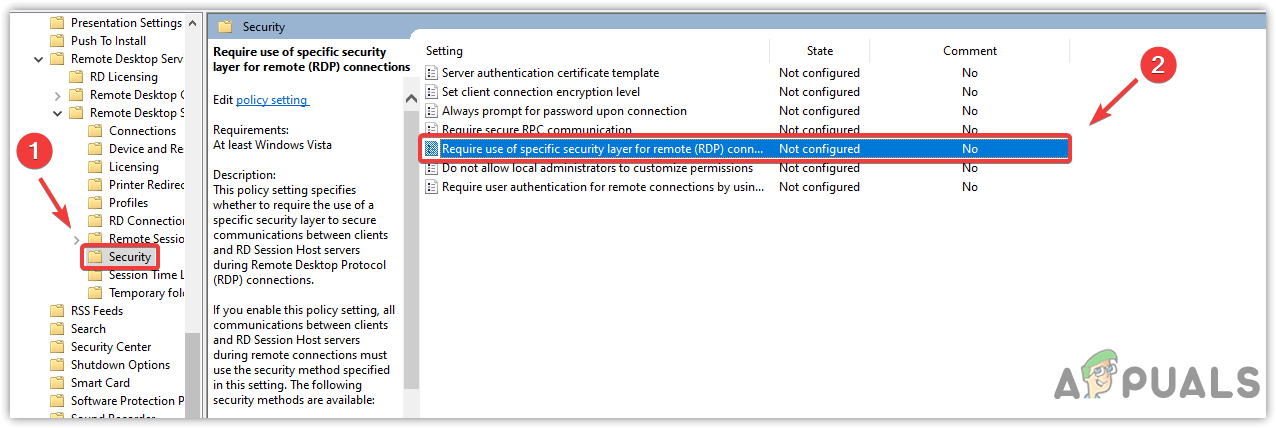
Computer Configuration > Administrative Templates > Windows Components > Remote Desktop Services > Remote Desktop Session Host > Security
- Find and open Require Use Of Specific Security Layer For Remote (RDP) Connections from the right pane
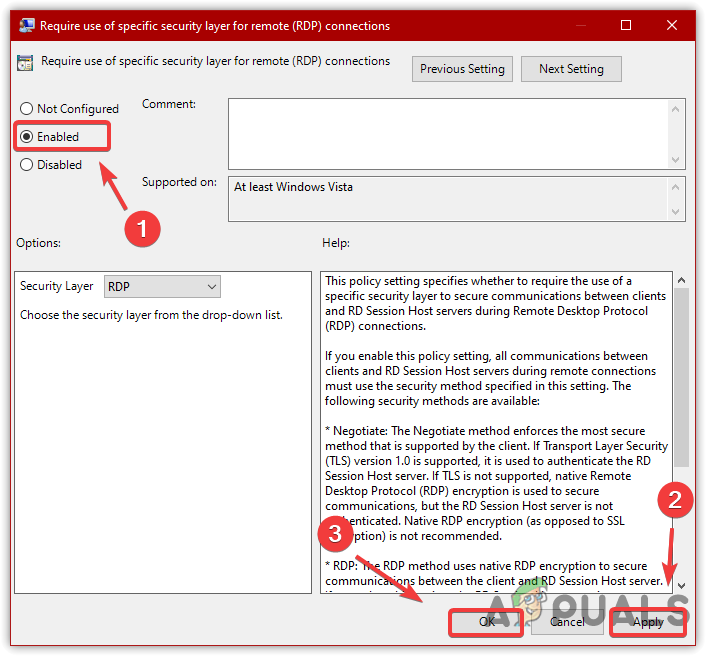
Opening RDP Service - Choose the Enabled option from the top left
- Click Apply and click OK
Enabling RDP Security Layer Settings - Once all is finished, restart your computer and then try reconnecting to check if the error is fixed.
2. Allowing Remote Connections
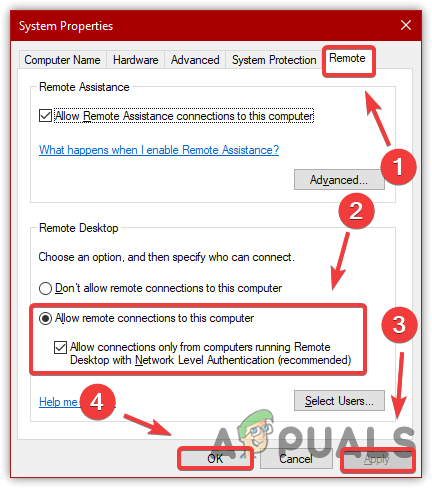
The error also occurs if the Allow Remote connection option for your computer is not enabled from the settings. Hence, allow the Remote Desktop Connection and then try connecting to check if the error is fixed. Follow the steps to allow Remote Connection:
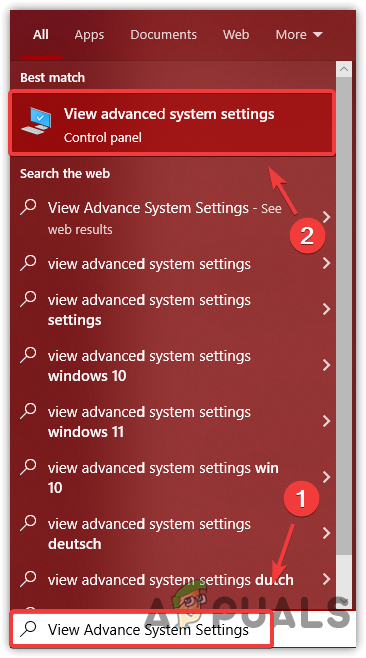
- Press the Windows key and type View Advance System Settings
Opening Advance System Settings - Hit Enter to open the System Settings
- Click on Remote from top
- Select Allow Remote Connections To This Computer
- Click Apply, then click OK
Allowing Remote Connection - Once done, try connecting through a Remote Desktop connection to check if the error persists.
3. Enable Reconnect If the Connection is Dropped
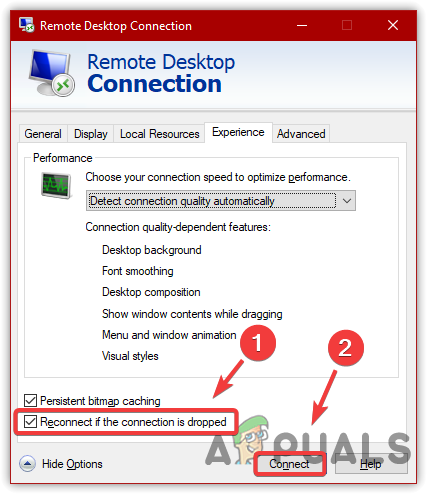
There is an option in the Remote Desktop Connection app that allows the user to reconnect when the user disconnects suddenly. So if the error is occurring due to an unstable network connection, enabling this option might help as it reconnects the user when the connection drops. Below are the steps:
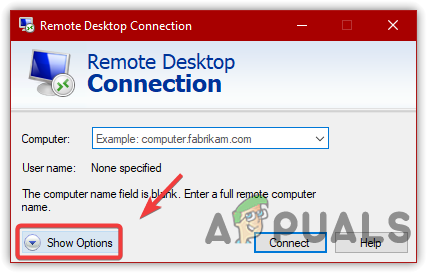
- Press the Windows key and type Remote Desktop Connection
- Click Show Options
Click Show Options - Then, click Experience and check the option Reconnect If The Connection Is Dropped
Enabling Reconnect If The Connection Is Dropped - After that, try connecting to a Windows system.
4. Delete MachineKeys
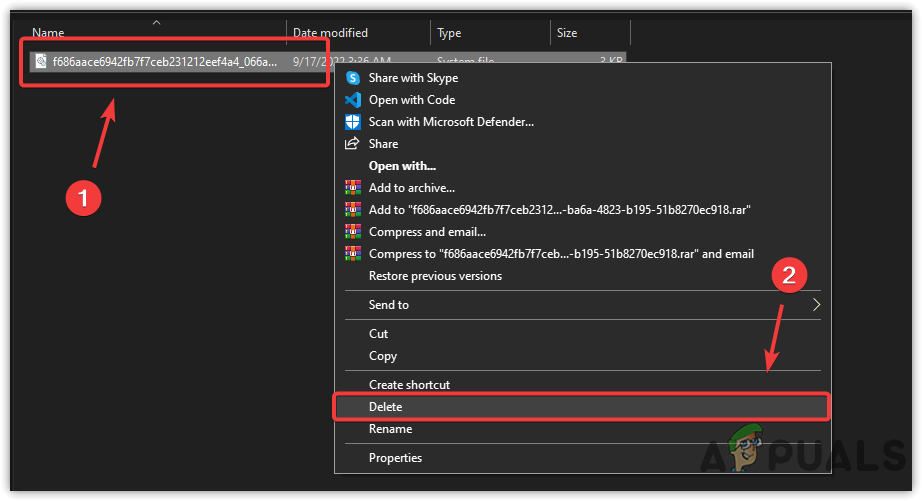
Another solution that can fix this issue is deleting a machine keys folder. As per the affected users, deleting the Machinekeys fixed their issue. Hence, follow the steps to delete the MachineKeys.
- Open File Explorer, navigate to the following path
C:ProgramDataMicrosoftCryptoRSAMachineKeys
- Right-click the f686.. file and click Delete
Deleting Machine Key File - If you get an error message, right-click the file and go to Properties
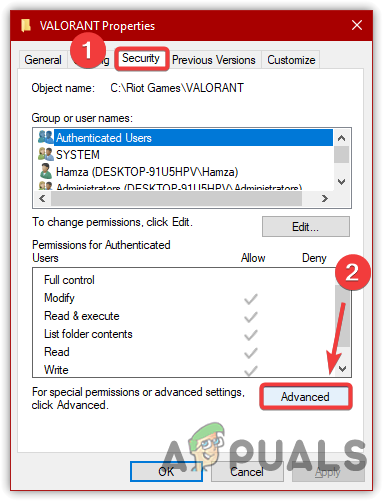
- Click Security from the top, then click Advanced
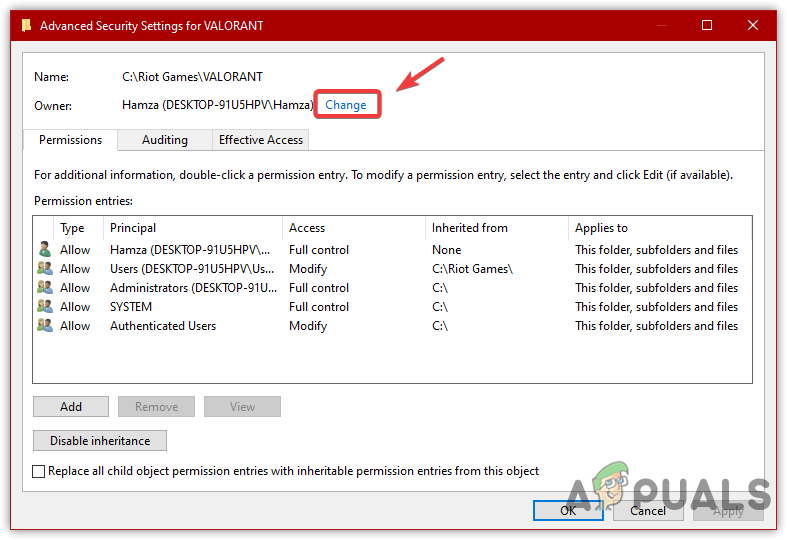
Opening Advanced Folder Settings - Click Change and type the username of your local account
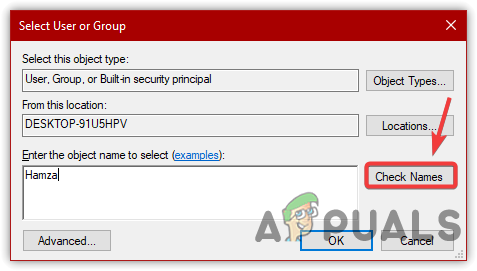
Click Change - Then, click Check Names and click OK
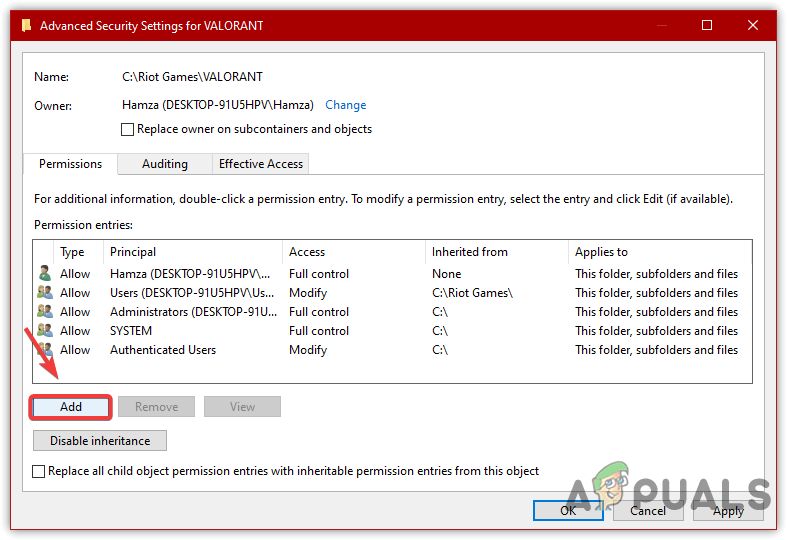
Entering Microsoft Local Account Name - Click Add, then click Select A Principal
Clicking Add Button - Again, type the username and click Check Names, then click OK
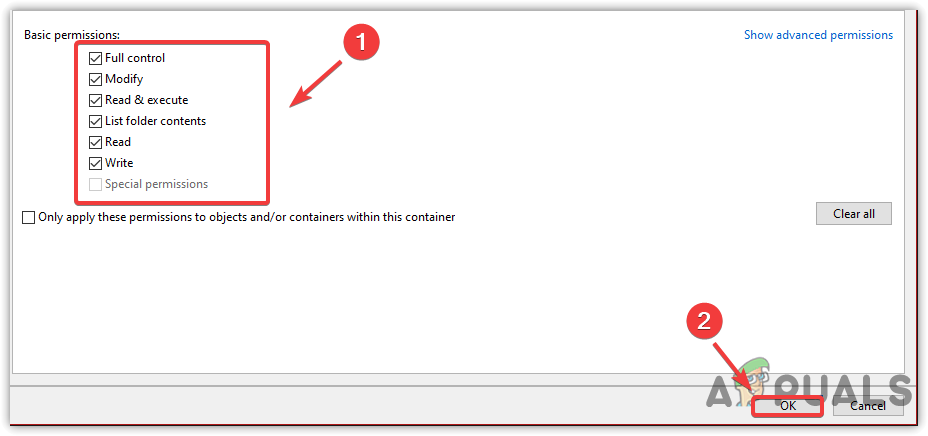
- Tick all the permissions under Basic Permissions
Taking Full Access to the File - Click OK, then click Apply and again click OK
- Again, click OK to close the Window
- Now try to delete the file and check if the error is fixed.
5. Restarting Remote Desktop Service
Remote Desktop Service allows the user to access the other Windows computer system. If this service is not working properly, it can cause this error. Hence, to fix this, try restarting the Remote Desktop Service. Below are the steps:
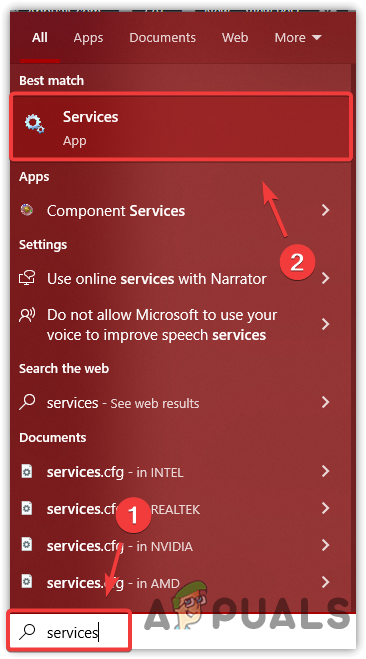
- Press the Win key and type Services from Start Menu
Opening Services App - Open Services Window and find Remote Desktop Services
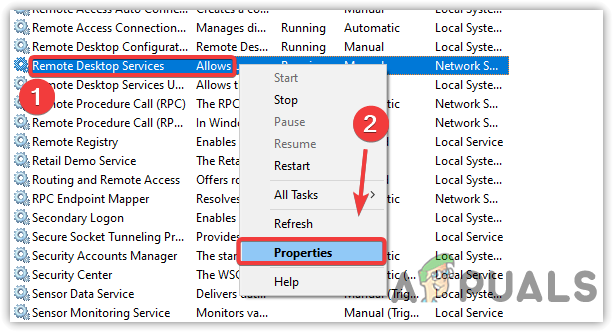
- Right-click on the service and click Properties
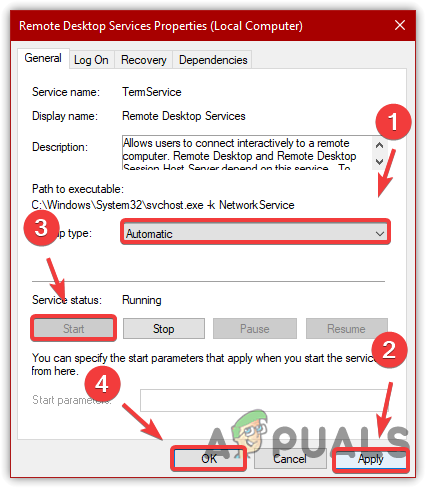
Opening Service Properties - Change the startup type to Automatic
- Then click Apply and if the service is stopped, click the Start button
Restarting RDP Service - Once done, check if it fixes the issue.
6. Disable or Uninstall VPN
If you use a VPN, your connection might be routed to another server; that is why you are encountering this error. Therefore, disable any Proxy server or uninstall VPN from the computer to fix this issue. Below are the steps:
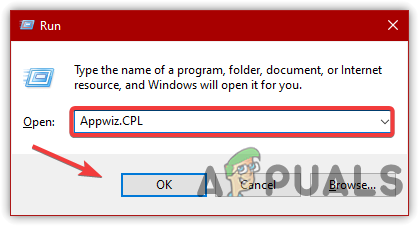
- Press the Windows key and type Appwiz.CPL and click OK
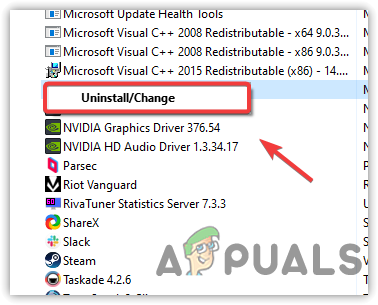
Opening Programs And Features - Select the VPN and click Uninstall
Uninstalling VPN Program - To disable proxy, follow the first method mentioned in this article
- Once done, now check if the issue is fixed.
7. Switch to Automatic DNS
If you use a manual DNS instead of the automatic one, this error will likely appear as it is possible that the DNS you are using is facing server issues or the DNS is incompatible with RDP. Hence, to fix this, try switching to automatic DNS. Below are the steps:
- Press Win + I to navigate into Settings
- Then, go to Network & Internet
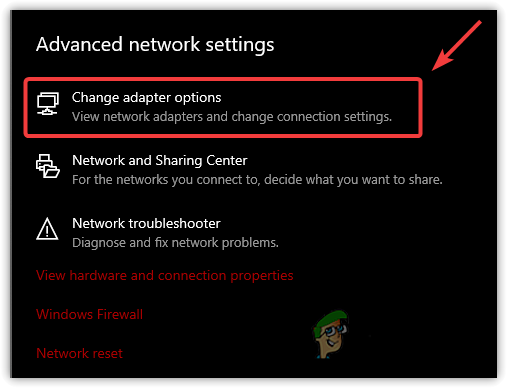
- Click Change Adapter Settings
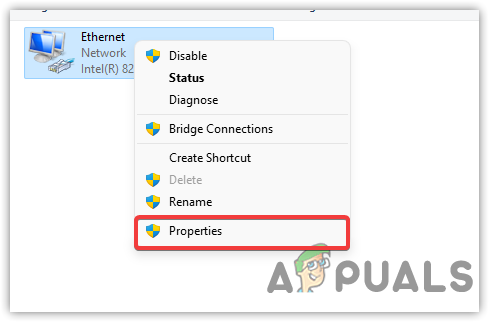
Navigating to Network Adapter Settings - Right-click the network adapter and select Properties
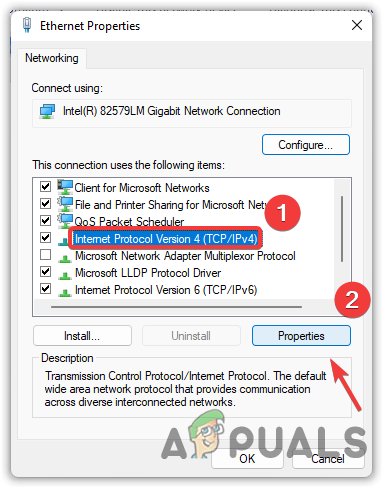
Opening Network Adapter Properties - Select Internet Protocol Version (TCP/IPv4) and click Properties
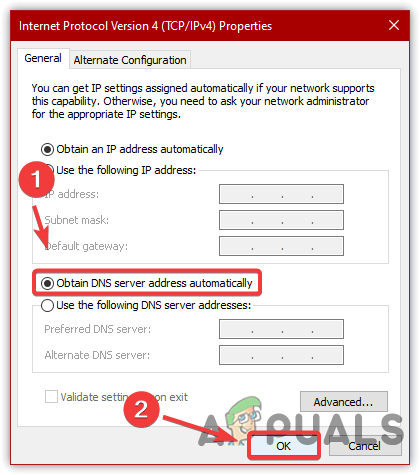
Opening Internet Protocol Version 4 (TCP IPv4) Properties - Choose Obtain DNS Server Address Automatically and click OK
Switching to Automatic DNS - Once done, check if the Remote Desktop app still gives the same error message.
8. Reinstall Windows Update
As per the affected users, a corrupt Windows update can lead to this error. Therefore, try reinstalling the recent Windows update to check if it fixes the error. If this method does not help, try to disable the HP printer driver, as it can cause this issue. Below are the steps to reinstall a recent Windows update:
- Click Start Menu and type Control Panel
- Open the control panel, then click Uninstall Programs
- Click View Installed Updates from the left pane
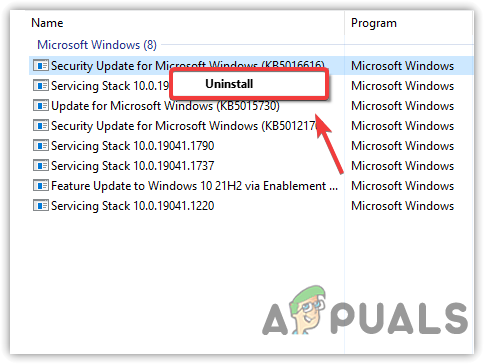
Viewing Installed Updates - Select the recent Windows Update and click Uninstall
Uninstalling Recent Windows Update - Now type Windows update from Start Menu and open it
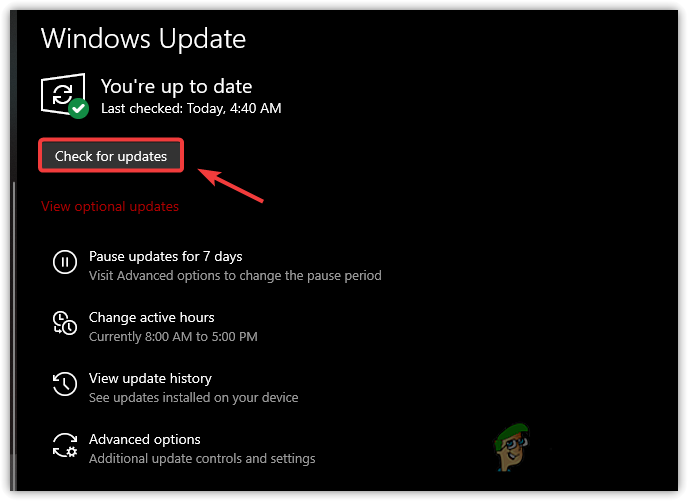
- Click on Check for Updates
Updating Windows update - Download and install pending updates
- Restart your computer, and then try connecting the Remote Desktop app to see if the error is resolved.
9. Use System Restore
Unfortunately, if none of the solutions have worked, try restoring Windows to a previous state, as it can fix this issue. However, for this process, you will need a restore point, which should be created before encountering the error.
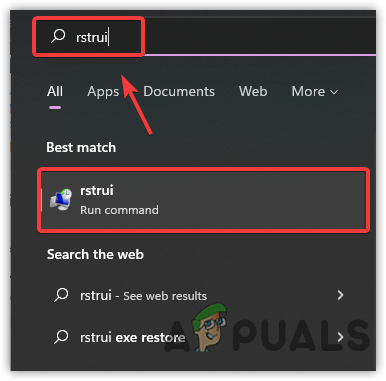
- To use a System Restore, type rstrui from the start menu
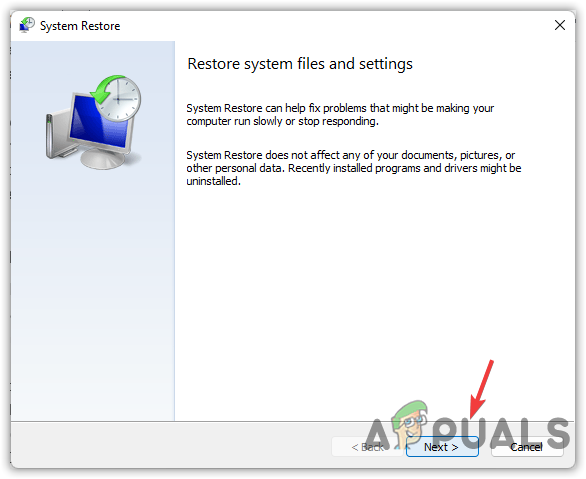
Opening System Restore Settings - Open the restore settings and click Next
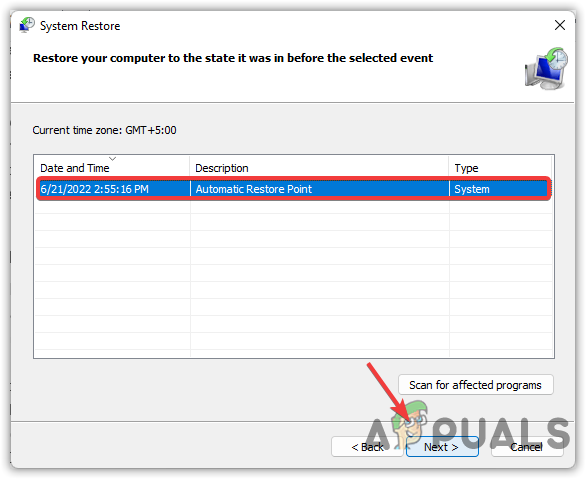
Clicking Next - Then, select a restore point and click Next
Selecting a Restore Point - Then, click Finish to start the process.
Kevin Arrows
Kevin is a dynamic and self-motivated information technology professional, with a Thorough knowledge of all facets pertaining to network infrastructure design, implementation and administration. Superior record of delivering simultaneous large-scale mission critical projects on time and under budget.
An improper RDP setting or local group policy security generally cause the error, Remote Desktop Connection: An Internal Error has Occurred.
Here, at Bobcares we have come across situations where RDP client freezes with this error.
Yeah, we hate it too. That’s why our Experienced Server Admins are here to help you.
Remote Desktop Connection: An Internal Error has Occurred
Since Remote Desktop Connection is used by many users for their business or personal purposes, this error can turn out to be quite the pain.
For example,
While trying to connect from Windows 10 to a server running Windows Server 2012 R2 using RDP, we received the following error:
This might be a result of installation and configuration of RemoteApps.
The RDP console message “An internal error has occurred” may appear in different cases and the cause can be either Remote Desktop server or client issues.
In this article, let us see a few methods our Support Techs use to solve the problem.
Causes of Remote Desktop Connection: An Internal Error has Occurred
- Connection settings:
For some users, their Remote Desktop Connection client settings can be a cause for this error.
- RDP Security:
In some cases, the error can appear due to the Security of the Remote Desktop Protocol. In this case, we have to change the security layer.
- Computer’s domain:
Another possible reason can be the domain to which the system connects. In such a case, removing the domain and then joining it again will fix the issue.
Solutions for Remote Desktop Connection: An Internal Error has Occurred
First of all, we should make sure that the RDP port 3389 accepts connection on the RDS server, and that the connection is not blocked by the firewall (Test-NetConnection your_rdp_server –port 3389).
For instance, the Microsoft-Windows-RemoteDesktopServices-RdpCoreTS/Operational log once showed that it creates the RDP session:
The server accepts a new TCP connection from client (IP address):64379.
Connection RDP-Tcp#4 created
However, the RDP session terminates the later without any error:
The server has terminated main RDP connection with the client.
The disconnect reason is 0
We have to check the status of the Remote Desktop Services on our remote server and restart the service.
We can do it remotely through the Services.msc console (“Connect to another computer” option), but it is easier to check a service status and restart it using PowerShell:
(Get-Service TermService -ComputerName ny-rds1).statusOnce the service is running, we restart it:
Get-Service TermService -ComputerName ny-rds1| Restart-Service –force –verboseLet us now see some more ways our Support Techs use to fix, Remote Desktop Connection: An Internal Error has Occurred
Here are some other ways to solve it
- In the EventID 1057 in the TerminalServices-RemoteConnectionManager event log , go to the folder
C:ProgramDataMicrosoftCryptoRSA,here, we rename the Machinekeys folder into Machinekeys_bak and restart the TermService
- The RDP problem happen in Windows 10 1809 if the Configure H.264/AVC hardware encoding for Remote Desktop connections policy is enabled on the remote computer.It is located in the following GPO section: Computer Configuration -> Administrative Templates -> Windows Components -> Remote Desktop Services -> Remote Desktop Session Host -> Remote Session Environment.To solve the problem, we need to disable the UDP protocol for RDP by creating the fClientDisableUDP parameter with the value 1 in the registry key
HKLMSOFTWAREPoliciesMicrosoftWindows NTTerminal ServicesClient
- If the error appears immediately after clicking connect, we have to try increasing the maximum outstanding RDP connections limit.On Windows 10 the SKUs by default is set to 100, but on Windows Server is 3000.Run the
regedit.exeand create the DWORD registry parameterMaxOutstandingConnectionswith the value 10000 in the reg keyHKEY_LOCAL_MACHINESYSTEMCurrentControlSetControlTerminal Server.
- In the client machine, clear the RDP connection history in the registry key
HKEY_CURRENT_USERSoftwareMicrosoftTerminalServerClientServersOnce it is done, reset the RDP cache inC:Users%Username%AppDataLocalMicrosoftTerminal Server ClientCache.Prior to doing it, we have to close all running mstsc.exe sessions):del “C:Users%Username%AppDataLocalMicrosoftTerminal Server Clientcache”RRestart the computer.
Moving forward, our support techs found that there are various other possible ways to fix, ‘Remote Desktop Connection: An Internal Error has Occurred’. Let us discuss it in detail.
-
Change Remote Desktop Connection Settings
To start off, we will try to isolate the issue by changing the RDP settings a little bit. Some users have reported that their issue was resolved once they checked the ‘Reconnect if the connection is dropped’ box.
Let us see how we do it:
- Go to the Start Menu, search for Remote Desktop Connection, and open it up.
- Click on Show Options to unveil all the settings.
- Switch to the Experience tab and then make sure ‘Reconnect if the connection is dropped’ box is checked.
- Try connecting again.
Rejoin Domain
The error message is sometimes generated due to the domain we have connected our system to. In such cases, removing the domain and then joining it again will fix the issue.
Here is how we do it:
- Press Windows Key + I to open Settings.
- Navigate to Accounts and then switch to the Access work or school tab.
- Select the domain connected to our system to and then click Disconnect.
- Click Yes when prompted to confirm.
- Disconnect the system and then restart as prompted.
- Once done, join the domain again if required.
- Try using RDP again.
Change MTU Value
Another way of fixing the issue would be to change the MTU value. Maximum Transmission Unit is the largest size of a packet that can be sent in a network. Dropping the MTU value can help in fixing the issue.
Here is how we do it:
- To change MTU value, download TCP Optimizer.
- Once downloaded, open up TCP Optimizer as an administrator.
- At the bottom, select Custom in front of Choose settings.
- Change the MTU value to 1458.
- Click Apply Changes and then exit the program.
- Check if it fixes the issue.
Change Security of RDP in Group Policy Editor
In some cases, the error message pops up due to our RDP security layer in the Windows group policies. In such scenarios, we will have to force it to use the RDP Security layer.
Here is how we do it:
- Go to the Start Menu, search for Local Group Policy and open up ‘Edit group policy’.
- Navigate to the following directory:
Computer Configuration > Administrative Templates > Windows Components > Remote Desktop Services > Remote Desktop Session Host > Security - On the right-hand side, locate the ‘Require use of specific security layer for remote (RDP) connections’ and double-click it to edit it.
- If it is set to ‘Not configured’, select Enabled and then in front of Security Layer, choose RDP.
- Click Apply and then hit OK.
- Restart the system so that the changes take effect.
- Try connecting again.
Disable Network Level Authentication
We can also try to fix the issue by disabling Network Level Authentication or NLA. The issue can, at times, be caused if we or the target system is configured to only allow remote connections that are running Remote Desktop with NLA. Disabling it will fix the issue.
Here is how we do it:
- Go to Desktop, right-click on This PC and select Properties.
- Click on Remote Settings.
- Under Remote Desktop, un-tick the ‘Allow connections only from computers running Remote Desktop with Network Level Authentication’ box.
- Click Apply and then hit OK.
- See if it isolates the issue.
Restart Remote Desktop Service
In some cases, restarting the Remote Desktop Service does the trick, so, in this step, we will be manually restarting it.
For that:
- Press “Windows” + “R” to open Run prompt.
- Type in “services.msc” and press “Enter“.
- Double click on “Remote Desktop Service” and click on “Stop”.
- Click on “Start” after waiting for at least 5 seconds.
- Check to see if the issue persists.
Disable VPN Connection
It is possible that our computer might be configured to use a proxy or a VPN connection due to which its internet connection might be routed through another server.
This might be preventing from being able to properly establish a connection. Therefore in this step, we will be disabling the internet explorer’s proxy settings and we also have to make sure to disable any VPNs running on the computer.
- Press Windows + R key on the keyboard simultaneously.
- A run dialog box will appear on the screen, type “MSConfig” in the empty box, and press OK.
- Select the boot option from the system configuration window and then check the “Safe Boot” option.
- Click apply and press OK.
- Restart PC to boot into the safe mode.
- Again, press the same “Windows” + “R” keys simultaneously and type “inetcpl.cpl” in the Run dialog box and press “Enter” to execute it.
- An internet properties dialog box would appear, select the “Connections” tab from there.
- Uncheck the “Use a proxy server for your LAN” box and then click OK.
- Open MSConfig again now and this time uncheck the safe boot option save the changes and restart computer.
- Check to see if the error message persists.
-
Reconfigure Local Security Policy
This is another way to fix the issue in which we should use the Local Security Policy utility. We can do it by proceeding with the following steps:
- Press “Windows” + “R” to open the Run prompt.
- Type in “Secpol.msc” and press “Enter” to launch the Local Security Policy Utility.
- In the local security policy Utility, click on the “Local Policies” option, and then select the “Security Option” from the left pane.
- In the right pane, scroll and click on the “System Cryptography” option
- Use FIPS 140 compliant cryptographic algorithms, including encryption, hashing and signing algorithms” option.
- Double click on this option and then check the “Enabled” button on the next window.
- Click on “Apply” to save changes and then on “OK” to close out of the window.
- Check to see if doing so fixes the issue.
Allow Remote Connections
It is possible that Remote Connections are not allowed according to some system configurations. In this step, we will be reconfiguring this setting from the Control Panel and then we will check to see if doing so fixes this issue on our computer.
In order to do that:
- Press “Windows” + “R” to launch the Run prompt.
- Type in “Control Panel” and press “Enter” to launch the classical control panel interface.
- In the Control Panel, click on the “System and Security” option and then select the “System” button.
- In system settings, click “Advanced System Settings” from the left pane.
- Click on the “Remote” tab and make sure that the “Allow Remote Assistance Connections to this Computer” option is checked.
- In addition to that, make sure that the “Allow Remote Connections to this Computer” tab below it is also checked.
- Click on “Apply” to save the changes and then on “OK” to exit out of the window.
- Check to see if doing so fixes this issue on computer.
Change the Startup of Service
It is possible that the Remote Desktop service has been configured in such a way that it is not allowed to start up automatically. Hence, we will be changing this configuration and we will allow the service to be started automatically.
To do it, we follow the steps below.
- Press “Windows” + “R” to launch the Run prompt.
- Type in “Services.msc” and press “Enter” to launch the service management window.
- In the service management window, double click on the “Remote Desktop Services” option and then click on the “Stop” button.
- Click on the “Startup Type” option and select the “Automatic” option.
- Closeout of this window and return to to the desktop.
- After doing so, restart computer and check to see if the issue persists.
Enable Persistent Bitmap Caching
Another possible reason is the “Persistent Bitmap Caching” feature being disabled from the RDP settings. In this step, we will launch the Remote Desktop Connections app and then change this setting from its experience panel.
In order to do this, we follow the steps below:
- Press “Windows” + “S” on keyboard and type in “Remote Desktop Connection” in the search bar.
- Click on the “Show Options” button and then click on the “Experience” tab.
- In the experience tab, check the “Persistent Bitmap Caching” option and save changes.
- Try to make the Remote Desktop connection and then check to see if the issue still persists.
Disable Static IP on Computer
One possible cause is that we might have configured our network adapter to use a static IP and it is not aligning with the Remote Desktop Connection properly. So, we will be disabling the Static IP on our computer through the network configuration settings.
For that:
- Press “Windows” + “R” to launch the Run prompt.
- Type in “ncpa.cpl” and press “Enter” to launch the network configuration panel.
- In the network configuration panel, right-click on the network adapter and select “Properties”.
- Double-click on the “Internet Protocol Version 4 (TCP/IPV4)” option and then click on the “General” tab.
- Check the “Obtain IP Address automatically” option and save changes.
- Click on “OK‘ to exit out of the window and check to see if the issue still persists.
Reconfigure SonicWall VPN
If we are using the SonicWall VPN client and use the default configurations with that application, this error might spring up. Therefore, in this step, we will be changing some settings from within the VPN.
For that:
- Launch Sonicwall on the computer.
- Click on “VPN” and then select the “Settings” option.
- Look for “WAN” under the VPN policies list.
- Click on the “Configure” option to the right and then select the “Client” tab.
- Click on “Virtual Adapter Settings” dropdown and select the “DHCP Lease” option.
- Check to see if doing so fixes the issue.
- If this issue still is not fixed, we will have to remove the current DHCP lease from the VPN.
- Navigate to the “VPN” option and then select the “DHCP over VPN” button.
- Delete the already existing DHCP lease and restart the connection
- Check to see if the issue persists after doing this.
Diagnose Connection through Command Prompt
It is possible that the computer that we are trying to connect to might not be available for connection. Hence, we will have to diagnose.
For this purpose, we will be using the command prompt to first identify the IP address of the computer and then we will use the command prompt on our computer to try and ping it.
If the ping is successful, the connection can be made, if it isn’t that means that the computer that we are trying to connect to is at fault.
For this purpose:
- Gain access to the computer we want to connect to locally and press the “Windows” + “R” keys on its keyboard to launch the run prompt.
- Type in “Cmd” and press “Enter” to launch the command prompt.
- In the command prompt, type in the following command and press “Enter” to display the IP information for the computer.
- Note the IP address listed under the “Default Gateway” heading which should be in the “192.xxx.x.xx” or a similar format.
- Once we have acquired the IP address of the computer, we can come back to our own computer for further testing.
- On personal computer, press “Windows” + “R” to launch the Run prompt and type in “Cmd” to open the command prompt.
- Type in the following command in the command prompt and press “enter” to execute it:
ping (IP ADDRESS of the computer that we want to connect to) - Wait for the command prompt to finish the pinging of the IP address and note down the results.
- If the ping is successful, it means that the IP address is accessible.
- Now we will be testing the “telnet” capability of the computer by checking if telnet is possible over the IP address.
- For that, press “Windows” + “R” and type in “Cmd” to open the command prompt.
- Type in the following command to check if telnet is possible on the port which is required to be open by the RDP client:
telnet <IP address> 3389 - We should be seeing a black screen if this telnet is successful, if it is not it means that the port is being blocked on our computer.
Reconfiguring the Windows Firewall
If the black screen is not returned, it means that the port might not be opened on our computer due to which this issue is being shown while trying to telnet on the port.
Therefore, in this step, we will be reconfiguring the Windows Firewall to open the specific port on our computer. For that:
- Press “Windows” + “I” to open settings and click on “Update & Security”.
- Select the “Windows Security” tab from the left pane and click on the “Firewall and Network Security” option.
- Select the “Advanced Settings” button from the list.
- A new window will open up, Click on the “Inbound Rules” option, and select “New Rule“.
- Select “Port” and click on “Next”.
- Click on “TCP” and select the “Specified Local Ports” option.
- Enter in “3389” into the port number.
- Click on “Next” and select “Allow the Connection“.
- Select “Next” and make sure all three options are checked.
- Again, click on “Next” and write a “Name” for the new rule.
- Select “Next” after writing a name and click on “Finish“.
- Similarly, go back to the 4th step that we have listed and select “Outbound Rules” this time and repeat the whole process to create an Outbound Rule for this process as well.
- After creating both an inbound and an Outbound rule, check to see if the issue persists.
Turn off UDP on Client
It is possible to fix this issue by simply changing a setting inside the registry or from the group policy.
If we are using Windows Home version, we can try going about this solution using the registry method, and otherwise, implement the group policy method from the steps below.
Registry Method:
- Press “Windows” + “R” to launch the run prompt.
- Type in “regedit” and press “Enter” to launch the Registry.
- Inside the registry, navigate through the following options.
HKLMSOFTWAREPoliciesMicrosoftWindows NTTerminal ServicesClient - Inside this folder, set the fClientDisableUDP option to “1”.
- Save changes and exit out of the registry.
- Check to see if adding this value to the registry fixes this issue.
Group Policy Method:
- Press “Windows” + “R” buttons on keyboard to launch the run prompt.
- Type in “Gpedit.msc” and press “Enter” to launch the Group Policy Manager.
- In the Group Policy Manager, double click on the “Computer Configuration” option and then open the “Administrative Templates” option.
- Double click on “Windows Components” and then double click on the “Remote Desktop Services” option.
- Double click on the “Remote Desktop Connection Client” and then double click on the “Turn off UDP on Client” option.
- Check the “Enabled” button and save changes.
- Exit out of the Group Policy manager and then check to see if the issue persists.
Use PowerShell Command
If for some reason we are unable to add the registry value as indicated above, we can also implement this change using the Windows Powershell utility. For that purpose:
- Press “Windows” + “X” on keyboard and select the “Powershell (Admin)” option.
- Type in the following command inside the PowerShell window and press “Enter” to execute it:
New-ItemProperty ‘HKLM:SOFTWAREMicrosoftTerminal Server Client’ -Name UseURCP -PropertyType DWord -Value 0 - After the command is executed, check to see if the issue still persists.
[Still facing the error? We are here to help you fix!]
Conclusion
In short, the error, Remote Desktop Connection Error: Internal Error has Occurred is often caused by RDP settings or its local group policy security. But the fix involves various ways.
Today, we saw some solutions provided by our Support Engineers.
PREVENT YOUR SERVER FROM CRASHING!
Never again lose customers to poor server speed! Let us help you.
Our server experts will monitor & maintain your server 24/7 so that it remains lightning fast and secure.
GET STARTED
var google_conversion_label = «owonCMyG5nEQ0aD71QM»;

The “Remote Desktop Connection: an internal error has occurred” message can show up on a Windows PC when the Remote Desktop Protocol (RDP) client is unable to make a connection with an RDP server. The error is due to one or more configuration issues related to RDP and security.
In this guide, we’ll help you troubleshoot this issue with a step-by-step tutorial. Throughout the different steps, we’ll be taking a look at the most important RDP settings you can check on your Windows PC.
Table of Contents
- How to fix the “Remote Desktop Connection: An internal error has occurred” error
- 1. Allow remote connections
- 2. Change Remote Desktop connection settings
- 3. Allow the Windows Firewall to connect to RDP
- 4. Leave and re-join a domain
- 5. Restart the Remote Desktop Services service
- 6. Change the startup status of the Remote Desktop Protocol service
- 7. Change Remote Desktop Protorocl security in Group Policy Editor
- 8. Change the local security policy
- 9. Change the MTU value
- 10. Disable Network Level authentication
- 11. Disable VPN connections
- 12. Disable static IP on your PC
- 13. Enable persistent bitmap caching
- Conclusion
As an IT pro, and especially as a server engineer for almost the last twenty years, I take ‘RDP’ing into a server for granted ALL the time. That is, using Remote Desktop Connection (or similar front-end software tools) to remotely log in to another server or computer, be it at my workplace, in Azure, etc.
Not surprisingly, there is a hell of a lot of technical environment variables that have to be just right in place in order for that Windows login screen to appear, showing you logging into that server. Oftentimes, especially when setting up a new server or a new Remote Desktop Host, you can run into errors trying to make that connection.
How to fix the “Remote Desktop Connection: An internal error has occurred” error
Let’s go through the most common RDP settings and configuration snafus that can cause the “Remote Desktop Connection: an internal error has occurred” message to appear. Then, we’ll show you how to solve them!
1. Allow remote connections
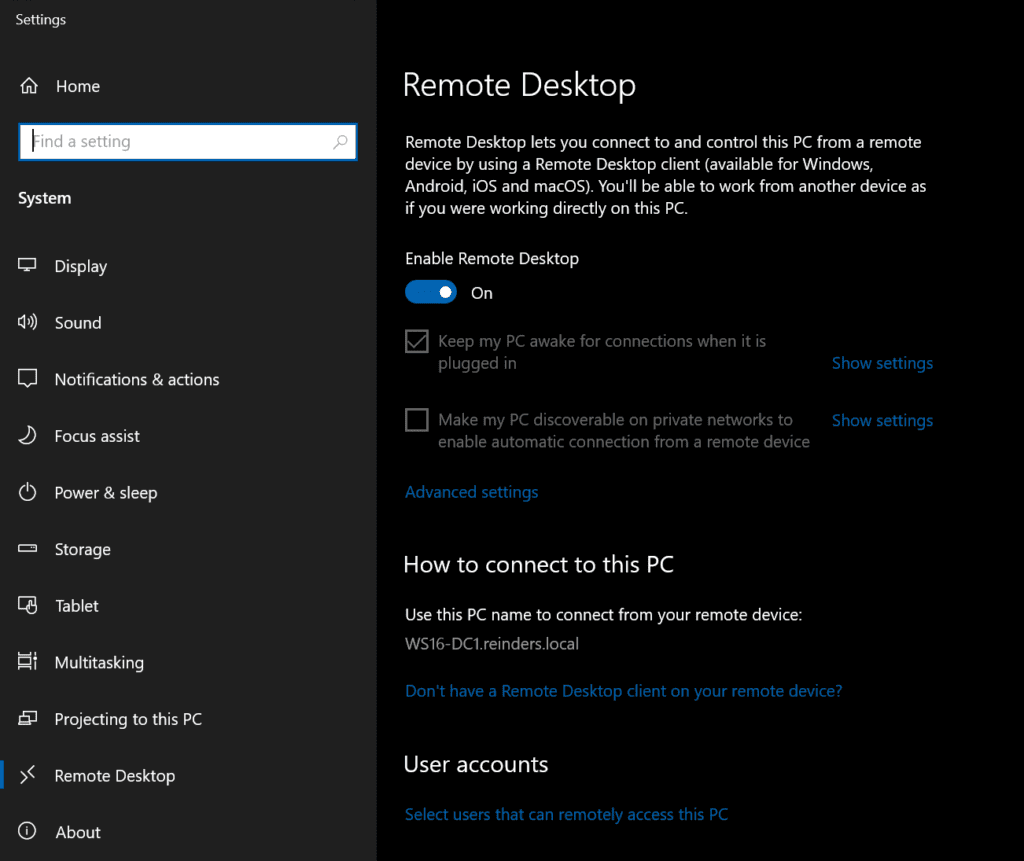
This is perhaps the most fundamental setting you will need to verify – checking your remote settings. You need to verify if ‘RDP is enabled’. Again, this can be discovered by clicking Start -> Settings -> Remote Desktop and verifying that ‘Enable Remote Desktop‘ is on.
2. Change Remote Desktop connection settings
There are some basic settings related to RDP that are crucial, at the lowest layer of the TCP/IP stack. The default TCP port that Remote Desktop Host (RDH) listens on is ‘3389.’
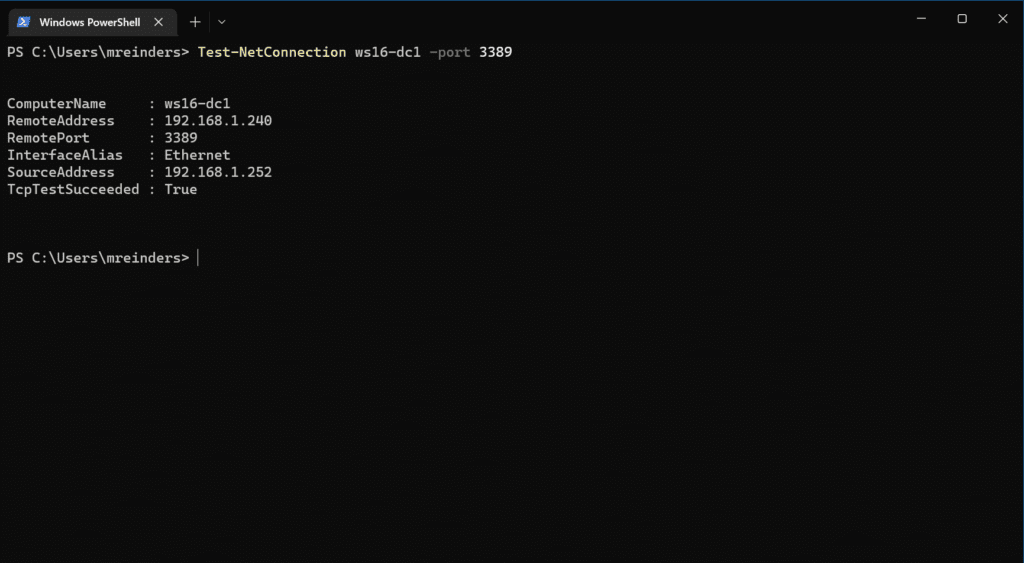
To run a simple test from your client machine, run the Test-NetConnection command from a PowerShell prompt to test connecting to the server’s name or IP address on port 3389. I will test the connection to one of my Windows Server 2022 domain controllers (DCs).
Test-NetConnection WS16-DC1 –port 3389
Well, that worked. And already, this is showing that quite a few blocks are in their right place. It doesn’t guarantee an RDP attempt will work, but it does confirm that at least something is listening on port 3389. There’s about a 99.9% chance it’s the server’s remote desktop service.
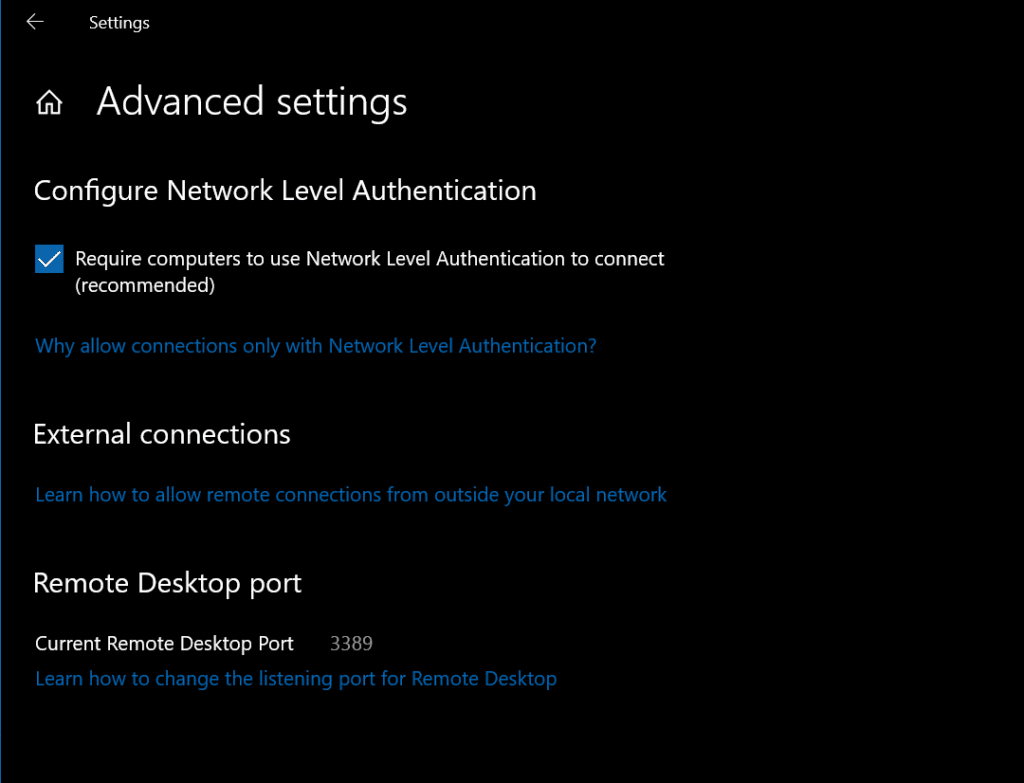
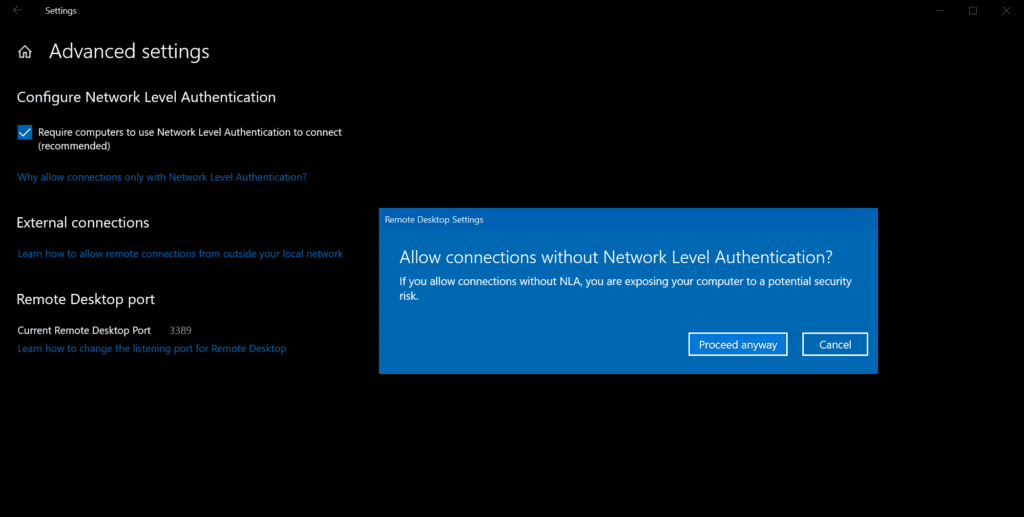
We can check more “basics” on the server side by going to Start -> Settings -> Remote Desktop. Here, I can click Advanced Settings and see a few more settings. I highly recommend keeping the ‘Require computers to use Network Level Authentication to connect (recommend)‘ checked. Definitely a wise and secure setting.
Notice the ‘Current Remote Desktop Port‘ is set to 3389. That checks. And yes, you still need to use the Registry if you want to change the TCP port that the Remote Desktop service listens on.
3. Allow the Windows Firewall to connect to RDP
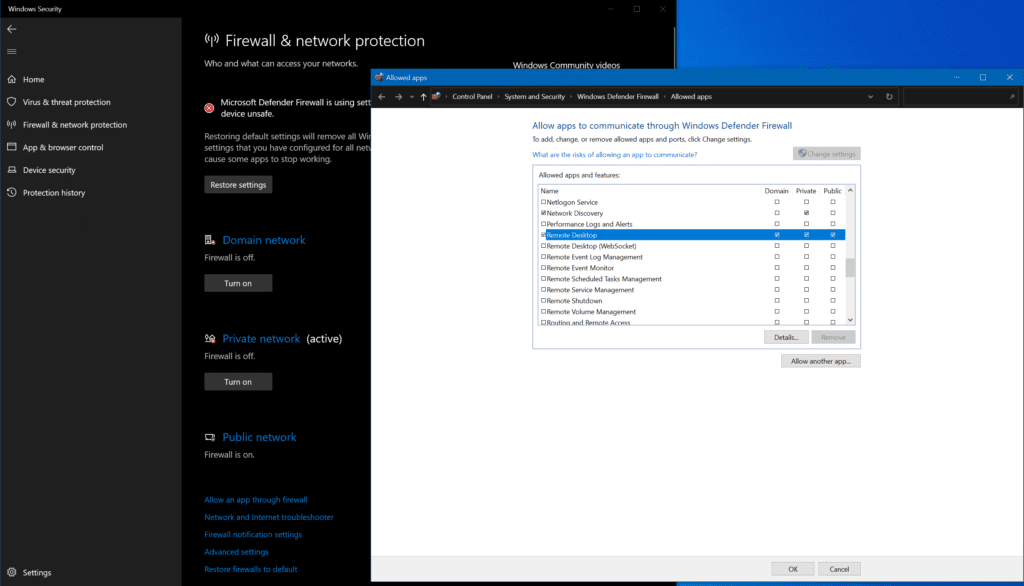
One of the reasons the ‘Test-NetConnection’ from item #2 may fail is that the Windows Defender Firewall may be blocking TCP traffic. We need to make sure the inbound rules on the server allow for Remote Desktop Protocol traffic (port 3389).
- On the server, click the Start menu, and search for ‘firewall‘ to open ‘Firewall & network protection.’
- At the bottom, scroll down and click on ‘Allow an app through firewall.’
- In the ‘Allow apps to communicate through Windows Defender Firewall‘ screen, scroll down and make sure ‘Remote Desktop‘ has a checkmark in the specific network type you are using (should be Domain).
4. Leave and re-join a domain
You do have the option of disjoining your client PC from the Active Directory domain, rebooting, and then re-joining it. This doesn’t necessarily solve a lot of problems in this area, but, like rebooting, it can clear up innocuous issues.
I won’t go through the steps here, but you can use the Remove-Computer cmdlet in PowerShell to accomplish this task.
5. Restart the Remote Desktop Services service
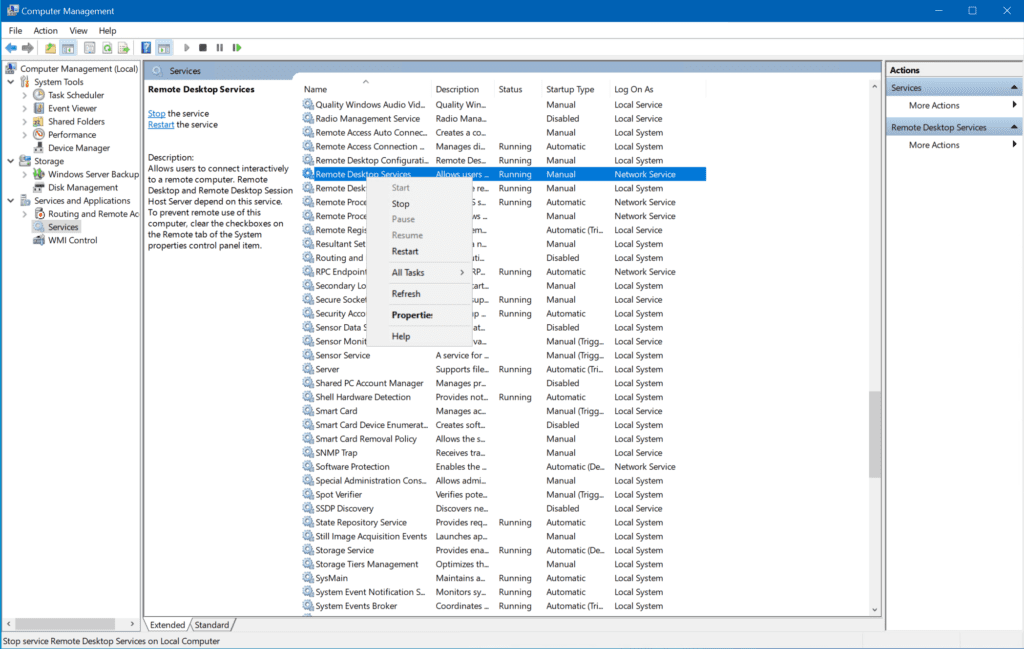
There are times when you just need to “reboot” in a way. There are several methods you can use to restart the Remote Desktop Services service: the Services MMC snap-in, PowerShell, etc. I’ll show you the Computer Management way.
- Right-click the Start button and click on Computer Management.
- Expand Services and Applications, and click on Services.
- Find the Remote Desktop Services service and Restart it.
You may not be able to restart the service if you are logged into it remotely, of course. You may need to log in interactively to the Console session of the server (KVM).
6. Change the startup status of the Remote Desktop Protocol service
Yes, there are many steps you need to take to troubleshoot why you can’t access your server! 😉 Here’s another: The Remote Desktop Services (TermService) service might not be running. It also may not be set to automatic, meaning it doesn’t start when the server boots up.
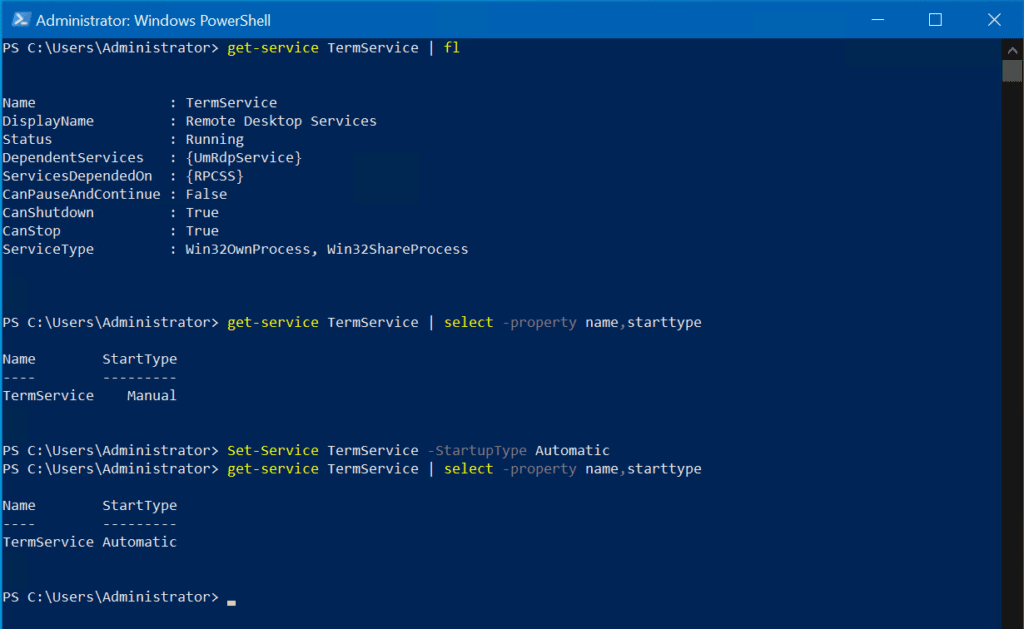
Here’s a simple way for you to confirm all is good. Let’s use the PowerShell get-service command here:
get-service TermService | fl
Here, we can see that the status of the Remote Desktop Services service is set to ‘Running’. That’s a good thing. 🙂 Next, let’s check the Startup type with another PowerShell command:
get-service TermService | select -property name,starttype
We can see it is set to ‘Manual’. Let’s change the startup type to Automatic with the set-service command:
Set-Service TermService -StartupType Automatic
Done!
7. Change Remote Desktop Protorocl security in Group Policy Editor
There are some cases where the security settings for the Remote Desktop Protocol are not behaving correctly. In that case, we can edit the group policy on the server.
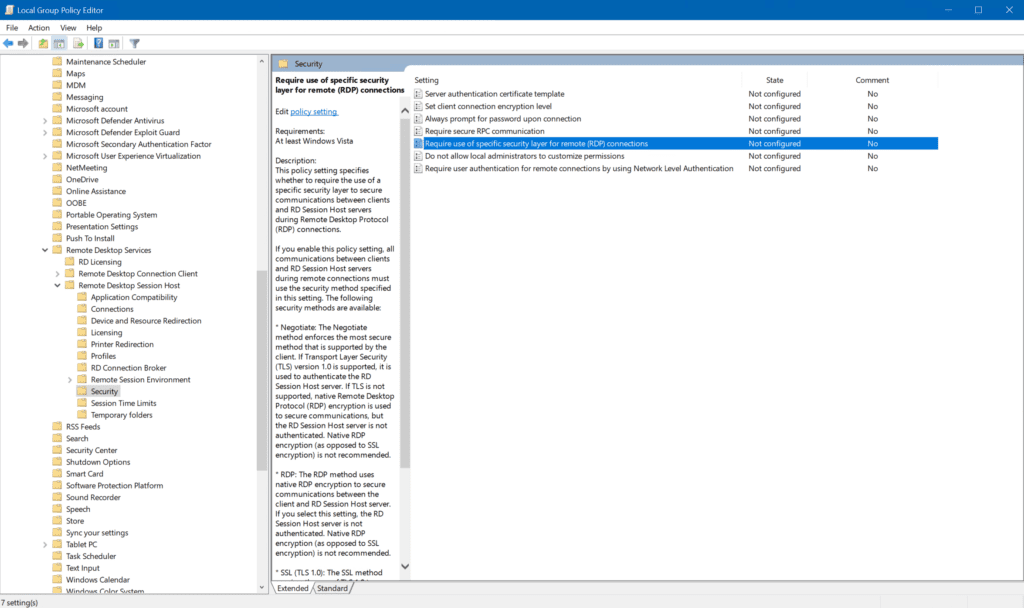
You can open the local Group Policy Editor to do some trial and error in this realm.
- Press ‘Windows key + R‘ and type in ‘gpedit.msc’.
- Navigate to this location: Computer Configuration -> Administrative Templates -> Windows Components -> Remote Desktop Services -> Remote Desktop Session Host -> Security.
- If the “Require use of specific security layer for remote (RDP) connections” parameter is set to Not Configured, select Enabled, and in Security Layer, choose RDP.
- Close all programs, reboot your server and attempt to reconnect your RDP connection.
8. Change the local security policy
Another potential security issue can be looked into and resolved using the local security policy. Let’s follow through with these steps to gain more insight:
- Press Windows key + ‘R’ to open the Run dialog.
- Type in ‘secpol.msc’ to open the local security policy utility.
- Click on ‘Local Policies‘ and select the ‘Security Option‘ on the left side.
- Scroll down and double-click on the ‘System cryptography: Use FIPS compliant algorithms for encryption, having, and signing.’
- Select ‘Enabled‘ and click OK.
- Exit your programs and reboot the server.
- Attempt to connect via the Remote Desktop Protocol again.
9. Change the MTU value
There is another somewhat obscure troubleshooting step that could assist in this troubleshooting. This involves changing the Maximum Transmission Unit (MTU) value on the client network interface. See the steps below.
Open an administrative command prompt/PowerShell window and type in this command where you replace “Ethernet” with the display name of the network interface you want to adjust.
netsh interface ipv4 set subinterface "Ethernet" mtu=1458
The default MTU size is 1500 bytes. This setting will resolve some less common connection issues.
Another method you can use to make this change is to download TCP Optimizer from here, a free program that can help you optimize your Internet connection.
10. Disable Network Level authentication
We’ve already discussed Network Level Authentication (NLA) briefly, but we can use this as another troubleshooting step. In some situations, the chance of success of an RDP connection is the use of a specific security layer. We can temporarily disable the requirement of connecting clients using NLA on the server.
However, this is only a troubleshooting step. In this day and age, you do not want to leave your server in this mode. Let’s check some advanced system settings related to the Remote Desktop Protocol.
Click Start -> Settings -> System -> Remote Desktop -> Advanced Settings.
If you uncheck the box, you will see a warning, but again, this is only for troubleshooting. If you prefer, you can also use PowerShell to disable Network Level Authentication.
Try again to connect with your client. If the RDP connection does work now, you will need to do some research on why the client is not utilizing NLA when making that connection to your server. This Microsoft documentation may be able to assist you.
11. Disable VPN connections
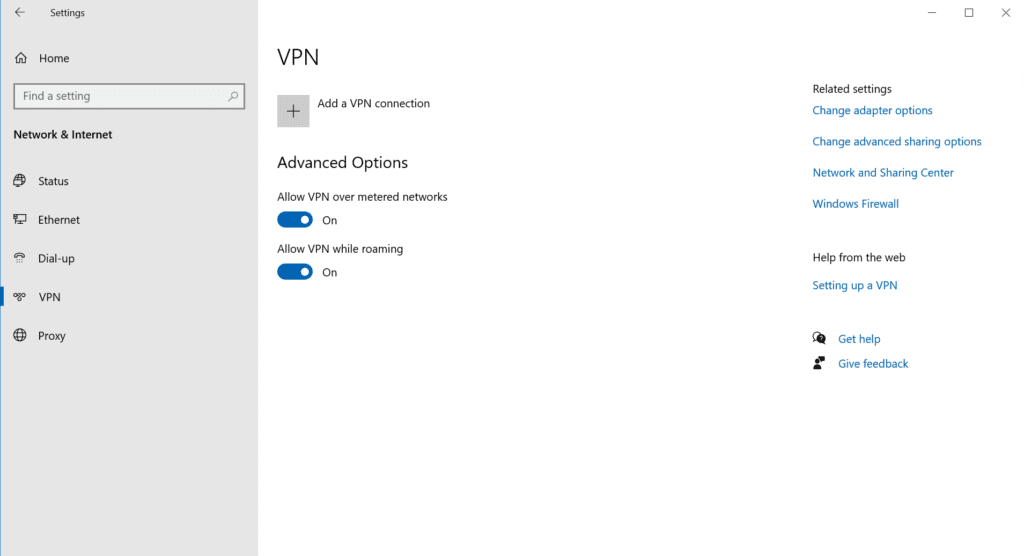
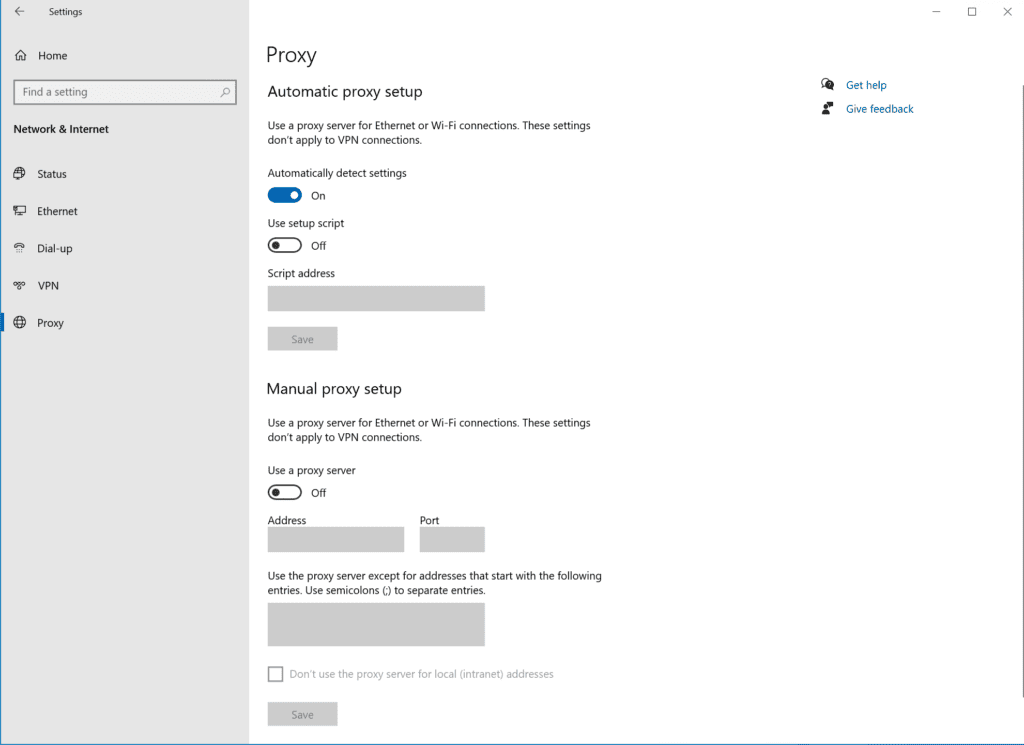
There are a few settings related to Virtual Private Networks (VPNs) or Proxy settings that may be interfering with the traffic between your client and server in negotiating that RDP connection. There are easy-to-find options in the Settings app to verify the current config and make potential changes.
Click Start -> Settings -> Network & Internet. First, click the ‘VPN‘ category on the left.
If by chance you have any ‘Windows’ VPNs in use, disconnect them and try your RDP connection again.
Next, click the ‘Proxy‘ category on the left.
The most common setup you’ll have is either the ‘Automatically detect settings‘ being set to on, or under ‘Manual proxy setup‘, the ‘Use a proxy server‘ set to on with an IP address or server name.
Basically, disable one of these settings for a moment, and try your RDP connection again. If it now does work, you can speak to your network administration team to inform them of the scenario you’re hitting. There may be some network traces they can run to identify where exactly (on the network) misconfiguration may be causing you grief.
There is a more drastic set of steps you can perform to be more thorough in identifying the root cause of potential VPN software connections. Follow these steps to find out if other system configurations are causing a blockage:
- Press the Windows key + ‘R’.
- Type ‘msconfig‘ and press Enter.
- Select the boot option from the system configuration window and then check the ‘safe boot‘ option.
- Click apply and then press OK.
- Restart your PC into safe mode.
- See if this resolves your issue.
If it does, you’ll need to work on finding the root piece of software or configuration setting that is interfering with the RDP connection.
12. Disable static IP on your PC
There is a relatively small chance that your client’s PC is using a static IP Address. There exists a scenario where the server you’re trying to RDP to has network-layer restrictions on what network IP addresses or subnet ranges it allows those connections from. In case your client’s static IP Address is NOT in that list, your connection will fail.
A troubleshooting step you can employ is to change from static to DHCP. It is very likely an IP address from your DHCP server will play more nicely with our post topic here. 🙂
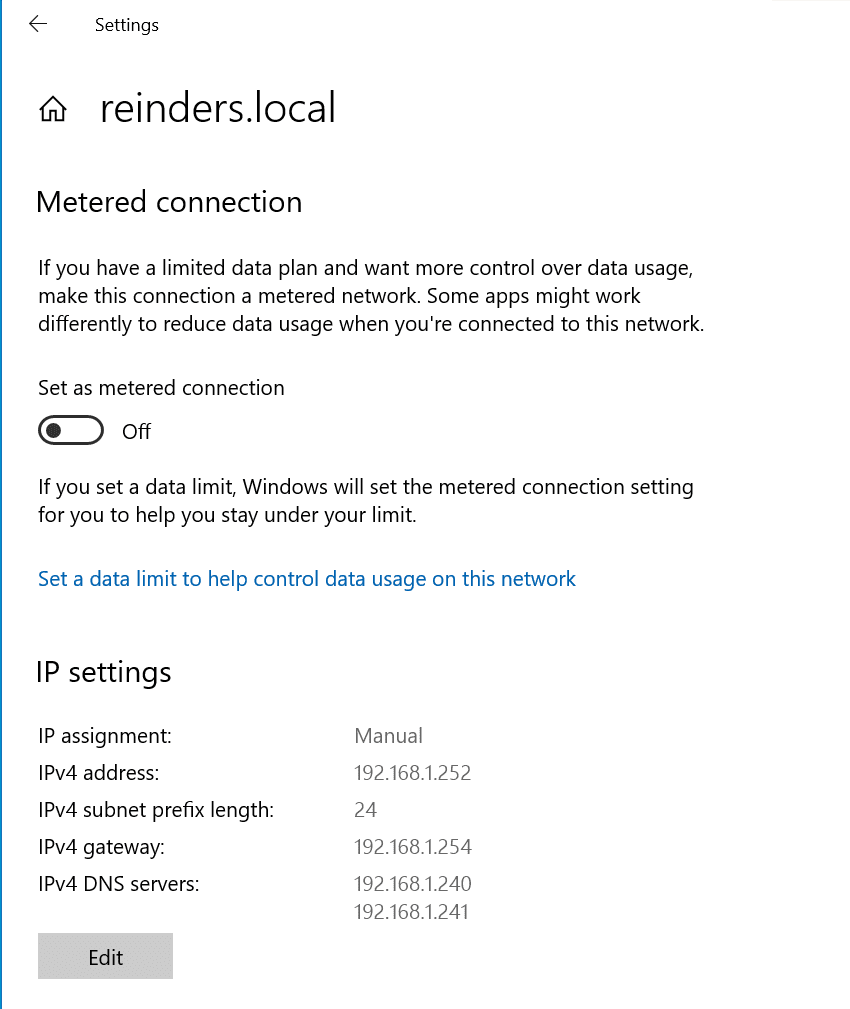
Click Start -> open Settings -> Network & Internet -> Ethernet. Click on the Ethernet connection (or whatever the display name is).
Incidentally, if you’ve read my prior posts, you’ll know that I’m running these machines in my Windows Server 2022 Hyper-V lab environment. I chose (for reasons) to allocate static IP addresses for my servers/workstations, etc. Here, you can see my machine is set to 192.168.1.252.
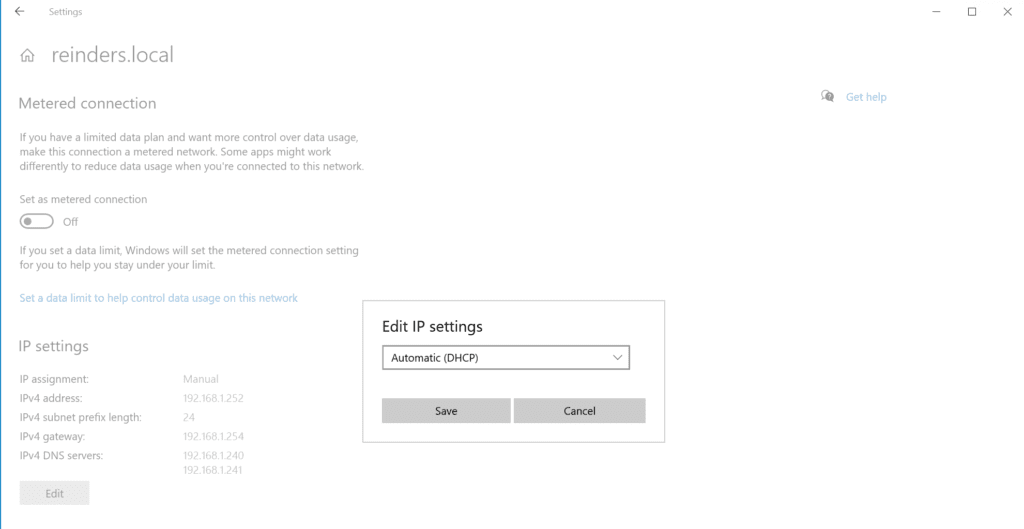
All you need to do is click the ‘Edit‘ button, click the dropdown at the top of the ‘Edit IP settings‘ window, and choose ‘Automatic (DHCP)‘ and click Save.
13. Enable persistent bitmap caching
And, for our final troubleshooting step, another less prevalent but possible issue is a setting on the Experience tab in the Remote Desktop Connection application. Persistent bitmap caching can improve performance by storing bitmap images that were sent to the RDP client using the cache bitmap, and this feature requires additional disk space.
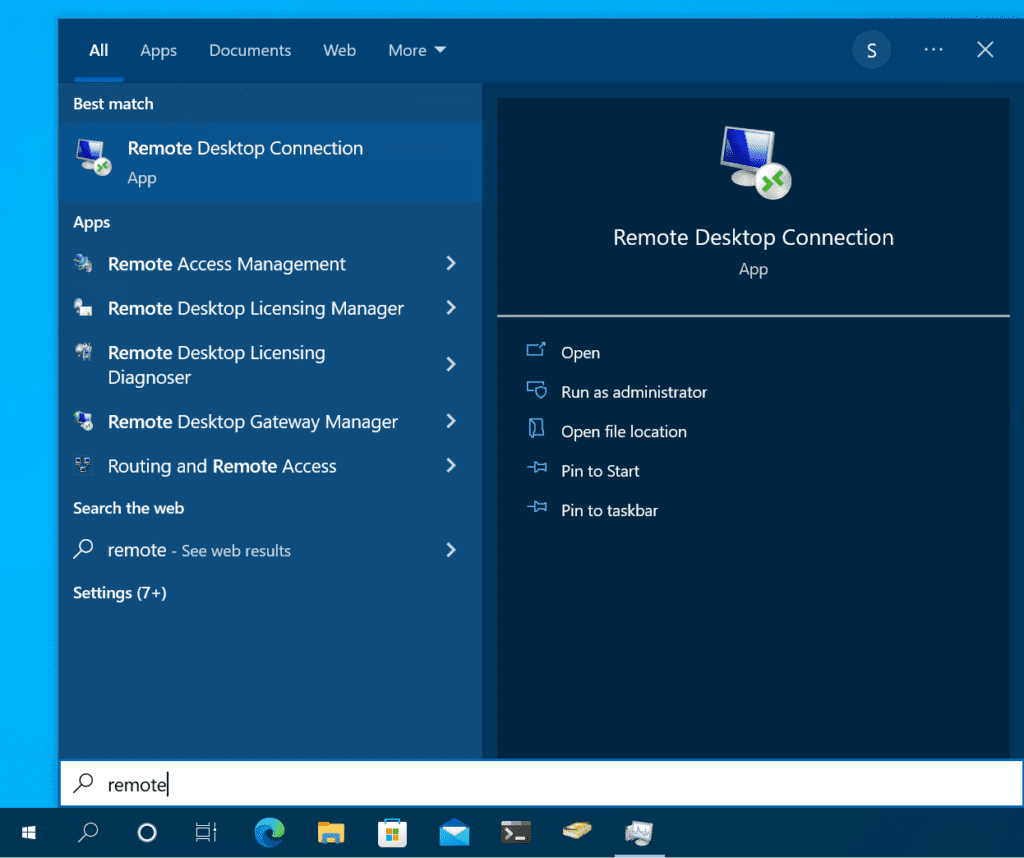
Let’s find out how to check and verify if persistent bitmap caching is enabled in the Remote Desktop Connection client, or more traditionally, the terminal server client. Press the Start button and start typing in ‘remote‘. Choose Remote Desktop Connection.
Click the ‘Show options‘ link at the bottom to expand the dialog. Click the ‘Experience‘ tab.
Regardless of the state of the ‘Persistent bitmap caching‘ setting, toggle it: If it’s off, turn it on, and vice versa. 😉 Then attempt your connection again.
Conclusion
Well, well. As we’ve discovered here, there is a myriad of settings on the client computer, on the server (or computer) you’re trying to remotely log into, your network, your firewalls (hardware and software), and other settings that can cause the “Remote Desktop Connection: An internal error has occurred” issue. There are even potential Internet and/or ISP scenarios in case you’re attempting to RDP from your home office into your secure work networks.
We hope the troubleshooting steps we detailed in this guide helped you to fix your RDP connection issues. There are really a LOT of variables, settings, and configurations involved here, though if you’re methodical you shouldn’t have too much trouble getting your RDP connection up and running again.
I have a Windows 10 Pro machine that is functioning as a RDP terminal for a single user.
This machine was configured more than 2 years ago and has had no major changes made to its configuration, except of course for the obligatory Windows 10 automatic updates.
Everything has been working fine until a few months ago, when the user started getting this error when window attempting to connect via RDC:
Remote Desktop Connection
An internal error has occurred.
I tried logging in via RDC via my Admin credentials, and I get the same error. The error appears immediately after clicking connect. There is no processing time and the connection attempt seem to be immediately rejected by the server.
I can’t trace the problem down to any specific time, or event. It occurs seemingly at random. Sometimes after a few days, sometimes twice in one day.
Restarting the Windows 10 Pro machine always seems to fix the problem.
Strangely, accessing the Event Viewer on the Windows 10 Pro machine also seemed to fix the problem, but it almost always returns much more quickly if I use this «fix».
Speaking of the Event Viewer, these are relevant errors I found in the log related to RDC at the time that my login was rejected:
Error Event 227 RemoteDesktopServices-RdpCoreTS
    General: 'Failed OnConnected to Listener callback' in CUMRDPConnection::InitializeInstance at 606 err=[0x8007050c]
    Log Name: Microsoft-Windows-RemoteDesktopServices-RdpCoreTS/Operational
    Source: RemoteDesktopServices-RdpCoreTS
    EventID: 227
    Task Category: RemoteFX module
    Level: Error
    User: NETWORK SERVICE
    OpCode: Runtime

Error Event 227 RemoteDesktopServices-RdpCoreTS
    General: spCoreConnection is NULL!' in CUMRDPConnection::TerminalInstance at 741 err=[0x8007139f]
    Log Name: Microsoft-Windows-RemoteDesktopServices-RdpCoreTS/Operational
    Source: RemoteDesktopServices-RdpCoreTS
    EventID: 227
    Task Category: RemoteFX module
    Level: Error
    User: NETWORK SERVICE
    OpCode: Runtime
These are some other errors I noticed in the log, but don’t correspond to the moment I try to connect:
Warning Event 226, RemoteDesktopServices-RdpCoreTS
    General: RDP_TCP: An error was encountered when transitioning from StateUnknown in response to Event_Disconnect (error code 0x80070040)

Warning Event 142, RemoteDesktopServices-RdpCoreT
    General: TCP socket READ operation failed, error 64
Note that the client machines are also running Windows 10 Pro.
In some cases, when connecting to remote computers/RDS servers via Remote Desktop (RDP), users may encounter an “An internal error has occurred” error. This error may appear due to various reasons related to both the settings of the RDP/RDS server and the client (Windows settings, or settings in the Remote Desktop Connection window).
The error “An internal error has occurred” usually appears after user credentials are entered in the mstsc.exe window or immediately after clicking the Connect button.
Since there may be several causes for this RDP error, try to use the following tips one by one until you find a solution that will help you.
The easiest way to fix the problem is to reboot the remote RDP/RDS host and the computer from which you are establishing an RDP connection. If you cannot restart the server right now, you should try to restart the Remote Desktop Service (together with the Remote Desktop Services UserMode Port Redirector). You can do this with the following commands running in the elevated cmd.exe:
net stop termservice

net start termservice
Or you can restart Remote Desktop Services from the services.msc console.
Reset the DNS client cache on your computer by running the following command from an elevated command prompt:
ipconfig /flushdns
If you are using a VPN to connect to a remote network, try disabling the VPN connections and try reconnecting to the RDP host. You can find and disable all active native Windows VPN connections using PowerShell:
foreach ($item in get-vpnconnection | where { $_.ConnectionStatus -eq "Connected" })

{

Rasdial $item.Name /disconnect

}
If you are using third-party VPN software, disconnect VPN sessions from its interface.
Open the properties of your RDP connection in Remote Desktop Connection windows and make sure the ‘Reconnect if the connection is dropped‘ option is enabled on the Experience tab.
Try to disable the Server Authentication warning in the Advanced tab of the RDC client. Set the If server authentication fails to Connect and don’t warn me.
Check the Security Event Log for the following event ID 5379:
Credential Manager credentials were read.
This event occurs when a user performs a read operation on stored credentials in Credential Manager.
Your RDP client may have tried to use saved credentials for RDP connections. You need to remove it from Credential Manager:
- Open Windows Credentials in Control Panel (or by running the command: rundll32.exe keymgr.dll,KRShowKeyMgr);
- Delete the saved RDP logon credentials for your remote host. Find the entry that starts with TERMSRVyour_rdp_host_name or TERMSRVyour_rdp_IP_address and click the Remove button;
Next, try to recreate the RDP certificate:
- Open local computer certificates MMC snap-in, by running the certlm.msc command;
- Go to the following certificate section: Remote Desktop > Certificates;
- Right-click your self-signed certificate RDP cert and delete it (if there are several RDP certs, remove them all);
- Restart the Remote Desktop Services as described above.
You can try to change the maximum outstanding connections limit on your RDP server via the registry. Set the following registry value via regedit.exe:
HKEY_LOCAL_MACHINESYSTEMCurrentControlSetControlTerminal Server
DWORD: MaxOutstandingConnections
VALUE: 10000
Or with PowerShell:
New-ItemProperty -Path "HKLM:SYSTEMCurrentControlSetControlTerminal Server"

-Name MaxOutstandingConnections -Value 10000 -PropertyType DWORD -Force
Check the current MTU size in your Windows with the command:
netsh interface ipv4 show subinterfaces
If the current MTU size for your network interface is equal to or more than 1500 (default Windows value), reduce it by using the command:
netsh interface ipv4 set subinterface "vEthernet (vSwithcExternal)" mtu=1452 store=persistent
Try to change some Group Policy settings using the Local GPO editor (gpedit.msc) or domain Group Policy Management Console (gpmc.msc).
- Disable UDP protocol for RDP connection on client side: Computer configuration > Administrative Templates > Windows Components > Remote Desktop Services > Remote Desktop Connection Client > Turn Off UDP on Client = Enabled;
- Enable FIPS compliant algorithms: Computer configuration > Windows Settings > Security Settings > Local Policies > Security Options > System cryptography: Use FIPS compliant algorithms for encryption, hashing, and signing = Enabled;
- Disable the hardware encoding and enforced AVC:444 mode on the RDP server side: Computer configuration > Administrative Templates > Windows Components > Remote Desktop Services > Remote Desktop Session Host > Remote Session Environment > Prioritize H.264/AVC 444 Graphics mode for Remote Desktop Connection = Disabled;
- Try to adjust the RDP security level to RDP mode. Enable the policy ‘Require use of specific security layer for remote connections’ under the GPO section Computer configuration > Administrative Templates > Windows Components > Remote Desktop Services > Remote Desktop Session Host > Security and set the Security level to RDP (according to the article). Restart the remote host to apply this setting.
After changing the local Group Policy settings on a remote server, you need to apply them on the client and server using the gpupdate command.
If you are using NIC Teaming on your Windows Server host, make sure that the receive side scaling is disabled.
- Open the Device Manager console (devmgmt.msc);
- Expand the Network adapters and open the properties of the Microsoft Network Adapter Multiplexor Driver;
- Go to the Advanced tab and set Receive Side Scaling to Disabled.
When you use a smart card certificate to authenticate on the Remote Desktop server, you may encounter the following events in the RemoteDesktopServices-RdpCoreT log on the Windows Server 2019/2016 RDS host:
Warning Event 226, RemoteDesktopServices-RdpCoreTS
General: RDP_TCP: An error was encountered when transitioning from StateUnknown in response to Event_Disconnect (error code 0x80070040)
Warning Event 142, RemoteDesktopServices-RdpCoreT
General: TCP socket READ operation failed, error 64
Make sure your certificate has not been revoked.
Now check that your RDP client connects to the remote host without errors.
- About
- Latest Posts
I enjoy technology and developing websites. Since 2012 I’m running a few of my own websites, and share useful content on gadgets, PC administration and website promotion.
Иногда при попытки подключиться к удаленному рабочему столу, пользователи могут столкнуться с ошибкой. Описание ошибки, ясности не дает. “Произошла внутренняя ошибка” что это и как от нее избавиться – постараемся ответить в этой статье.
Причины появления окна “Произошла внутренняя ошибка” могут быть совершенно различным, и могу быть как с сервером Remote Desktop, так и с клиентом.
UPD (01.05.2020): В первую очередь попробуйте перезапустить службу удаленных рабочих столов на сервере. Если это не поможет :
Одним из способов решить данную проблему это очистка историю RDP подключений на клиенте в ветке HKEY_CURRENT_USERSoftwareMicrosoftTerminal Server ClientServers
Так же может помочь сброс кеша RDP в каталоге C:Users%Username%AppDataLocalMicrosoftTerminal Server ClientCache (перед очисткой завершите все запущенные сеансы mstsc.exe).
Для очистки кеша используйте команду:
del "C:Users%Username%AppDataLocalMicrosoftTerminal Server Clientcache"
(не забудьте указать корректный путь)
Одной из возможных причин возникновения данной ошибки, могут быть множественные попытки несанкционированного доступа. Иными словами, если ваш RDP сервер доступен для всего интернета по стандартному порту 3389 – велика вероятность, что вас пытаются взломать. Косвенным признаком, что “Внутренняя ошибка” происходит именно по причине ломящихся снаружи – в журнале (о том как открыть журнал – в конце статьи) RDP подключений будут ошибки с кодом 1006 “Сервер узлов сеансов удаленных рабочих столов получил большое количество незавершенных подключений. Возможно, система атакована.”
Решений тут несколько:
- Закрыть доступ к серверу по порту 3389 для неизвестных IP-адресов через firewall
- Сменить порты 3389 на любой другой
Как изменить RDP Порт
- Открываем редактор реестра regedit
- Открываем ветку HKEY_LOCAL_MACHINESystemCurrentControlSetControlTerminalServerWinStationsRDP-Tcp
- Правим параметр PortNumber в десятичном фрмате
- Порт RDP по умолчанию 3389
- Перезагружаем сервер
В интернете можно встретить и другие варианты решений, какие подойдут именно вам – надо проверять.
-
- Если у вас на удаленном сервере установлен КриптоПРО, он может быть источником проблем с rdp подключением. Попробуйте отключить проверку контрольных целостности файлов (проверки контрольных сумм) в КриптоПро через реестр. Перейдите в ветку реестра HKLMSYSTEMCurrentControlSetControlSession ManagerCProIntegrity и измените значение параметра CheckMode на 0. Перезагрузите сервер.
- Если в журнале событий TerminalServices-RemoteConnectionManager вы встретите событие с EventID 1057 (The RD Session Host Server has failed to create a new self signed certificate to be used for RD Session Host Server authentication on SSL connections), перейдите в каталог C:ProgramDataMicrosoftCryptoRSA, переименуйте папку Machinekeys в Machinekeys_bak и перезапустите службу TermService.
- Также нашел информацию, что RDP проблема “Произошла внутренняя ошибка” встречалась в Windows 10 1809, если на удаленном компьютере включена политика Configure H.264/AVC hardware encoding for Remote Desktop connections (находится в секции GPO: Computer Configuration -> Administrative Templates -> Windows Components -> Remote Desktop Services -> Remote Desktop Session Host -> Remote Session Environment). Для решения этой проблемы достаточно отключить UDP протокол для RDP, создав в ветке реестра HKLMSOFTWAREPoliciesMicrosoftWindows NTTerminal ServicesClient параметр fClientDisableUDP со значением 1.
Пользователи windows 10 иногда сталкиваются с “Внутренней ошибкой” при подключении к RDP еще и из-за обновлений безопасности. В редких случаях, вместо ошибки “Ошибка RDP подключения CredSSP encryption oracle remediation” – пользователи могут получать “внутренняя ошибка подключения”. Если ни один из приведенных выше способов не помог – попробуйте решения описанные в статье RPD: ошибка подключения CredSSP encryption oracle remediation
Открыть журнала событий RDP
Откройте меню пуск и в строке поиска введите “Просмотр событий” (англ. Event Viewer).
В нем Журналы приложений и служб > Microsoft > Windows > TerminalServices-RemoteConnectionManager


