I have downloaded the latest android studio android-studio-bundle-135.1740770-windows from the official site. But when I install the downloaded application file, it starts the installer and shows it extracting and then I get the following error in a small alert window:
Unable to elevate[error:1812]
I have also tried running the application as administrator, but no luck!
asked Apr 8, 2015 at 6:24
![]()
1
Right-click on the installer > Properties > Compatibility > Run Compatibility Troubleshooter
answered Aug 12, 2015 at 2:48
![]()
ShadowShadow
1011 silver badge3 bronze badges
I am facing same issue from last 2 days
Issue is related to USER ACCESS most company’s have set up user account that doesn’t have access to install any application they have one admin user that have all this access
So when I open setup from admin account It open perfectly
Solution 1 — First try to simple right click on Android studio exe -> Click on Run as Administrator
Solution 2 — Press shift key and hold it -> Right Click on Android studio exe -> Run as different user then enter userName and Password of Admin user it work smoothly
answered Aug 30, 2018 at 13:26
![]()
Sushant GosaviSushant Gosavi
3,5293 gold badges32 silver badges54 bronze badges
2
For me it worked with compatibility for win xp
answered Dec 12, 2017 at 19:44
![]()
2
Download it in c drive and Right click and run as administrator. I tried this and it worked for me
answered Feb 22, 2018 at 16:51
![]()
1
for me also when I tried to install from download folder i got same error so .Just copy the android studio installation file to the Desktop you downloaded, and then Right Click and Click on Run As Administrator
it worked .
answered Mar 21, 2019 at 6:59
![]()
1
I think that your application is on a drive other than C drive. Try and copy it from that drive and paste it to the desktop then I think it would work — it worked for me at least.
![]()
answered Sep 4, 2017 at 15:47
![]()
Check Compatibility mode
Run as Windows XP (Service Pack3)
Also check Run this program as an administrator
It works for me. If you are running Windows 10 64bit.
answered Mar 13, 2019 at 23:57
![]()
Right-click on the installer > Properties > Run Compatibility Troubleshooter. It will recommend some settings and it will apply them as well. Then you should be able to run it.
answered Dec 2, 2015 at 7:56
![]()
Just copy the android studio installation file to the Desktop you downloaded, and then Right Click and Click on Run As Administrator.
answered Feb 18, 2018 at 5:20
![]()
1
I followed these steps and the problem was gone:
- Disable UAC
- Reboot
- Installation (as Administrator)
- Enable UAC
- Reboot
There’s a quick way you can enable or disable this annoying window from the command line:
Disable UAC:
C:WindowsSystem32cmd.exe /k %windir%System32reg.exe ADD HKLMSOFTWAREMicrosoftWindowsCurrentVersionPoliciesSystem /v EnableLUA /t REG_DWORD /d 0 /f
Enable UAC:
C:WindowsSystem32cmd.exe /k %windir%System32reg.exe ADD HKLMSOFTWAREMicrosoftWindowsCurrentVersionPoliciesSystem /v EnableLUA /t REG_DWORD /d 1 /f
After you enable or disable UAC, you will have to reboot your computer for the changes to take effect.
![]()
answered Sep 26, 2016 at 11:13
![]()
DrwhiteDrwhite
1,4754 gold badges21 silver badges43 bronze badges
These are the steps I took:
- Clear temp folder ( Go to Run type
"%temp%"and delete all files. It may skip a few files that’s OK!) - Right click your android-studio-bundle-135.1740770-windows.exe and go to properties and click unblock buttons if it’s available.
- Make sure Firewall was Disabled and your antivirus software.
- Finally just intall
It works 99% and you don’t need to install any other software to support it.
![]()
answered Aug 26, 2017 at 14:25
![]()
1
9 ответов
Щелкните правой кнопкой мыши установщик > Свойствa > Совместимость > Запустить средство устранения неполадок совместимости
Shadow
12 авг. 2015, в 02:55
Поделиться
Загрузите его на диск c и щелкните правой кнопкой мыши и запустите его как администратор. Я попробовал это, и это сработало для меня.
Abhijit Thorat
22 фев. 2018, в 17:40
Поделиться
Для меня это работало с совместимостью для win xp
user9090650
12 дек. 2017, в 20:24
Поделиться
Я думаю, что ваше приложение находится на диске, отличном от диска C. Попробуйте и скопируйте его с этого диска и вставьте его на рабочий стол, тогда я думаю, что это сработает — это сработало для меня как минимум.
user8559520
04 сен. 2017, в 17:26
Поделиться
Проверьте этот материал:
- Щелкните правой кнопкой мыши свой Android-studio-bundle-135.1740770-windows.exe и идите
для свойств и нажмите кнопку разблокирования, если она доступна. - Убедитесь, что брандмауэр отключен и ваше антивирусное программное обеспечение.
- Отключить UAC.
И некоторые блогеры говорят об этом:
Преобразуйте файл установщика в образ компакт-диска (например, с помощью Magic ISO Maker, http://www.magiciso.com/download.htm)
2) Установите с CD-привода.
http://setup-steps.blogspot.com/2014/12/android-studio-unable-to-elevate.html
Elshan
08 апр. 2015, в 07:35
Поделиться
Просто скопируйте установочный файл студии Android на загруженный Desktop и затем щелкните правой кнопкой мыши и выберите «Запуск от имени администратора» .
Niha Sharma
18 фев. 2018, в 06:53
Поделиться
Это шаги, которые я сделал:
- Очистить папку temp (перейдите к типу запуска
"%temp%"и удалите все файлы. Он может пропустить несколько файлов, которые ОК!) - Щелкните правой кнопкой мыши свой Android-studio-bundle-135.1740770-windows.exe и перейдите к свойствам и нажмите кнопку разблокировать, если это доступно.
- Убедитесь, что брандмауэр отключен и ваше антивирусное программное обеспечение.
- Наконец, просто intall
Он работает на 99%, и вам не нужно устанавливать какое-либо другое программное обеспечение для его поддержки.
Asyran
26 авг. 2017, в 16:11
Поделиться
Я выполнил следующие шаги, и проблема исчезла:
- Отключить UAC
- Reboot
- Установка (в качестве администратора)
- Включить UAC
- Reboot
Это быстрый способ включить или отключить это раздражающее окно из командной строки:
Отключить UAC:
C:WindowsSystem32cmd.exe /k %windir%System32reg.exe ADD HKLMSOFTWAREMicrosoftWindowsCurrentVersionPoliciesSystem /v EnableLUA /t REG_DWORD /d 0 /f
Включить UAC:
C:WindowsSystem32cmd.exe /k %windir%System32reg.exe ADD HKLMSOFTWAREMicrosoftWindowsCurrentVersionPoliciesSystem /v EnableLUA /t REG_DWORD /d 1 /f
После включения или отключения UAC вам придется перезагрузить компьютер, чтобы изменения вступили в силу.
Drwhite
26 сен. 2016, в 12:34
Поделиться
Щелкните правой кнопкой мыши установщик > Свойствa > Запустить средство устранения неполадок совместимости. Он порекомендует некоторые настройки, и он также применит их. Затем вы сможете запустить его.
Swat
02 дек. 2015, в 09:08
Поделиться
Ещё вопросы
- 0Вызов функции Javascript из мобильного тела HTML onorientationchange
- 1Значения оси x амхарта меняются, не двигаясь / не сдвигаясь
- 1Элементы PriorityQueue не упорядочены [дубликаты]
- 0Автоматическая прокрутка аккордеона в верхнюю часть выделенного раздела
- 0Поверните это изображение на клик — JQuery
- 1Невозможно нарисовать линии в JPanel
- 0Передать переменные Java из активности Android в JavaScript в приложении phonegap
- 0C ++ скомпилирован в сценарии cgi с curl не работает
- 0Предотвратить 500 внутренних ошибок сервера при обслуживании большого количества фотографий через библиотеку миниатюр PHP
- 0Игры на основе Python — как они сделаны?
- 0Проблемы с записью в динамически именованную таблицу MySQL
- 1Заставить кнопку распознавать текст в JTextField
- 0CodeIgniter не загружает загружаемую библиотеку
- 0AngularJS — двойные фигурные скобки, вызывающие синтаксическую ошибку
- 0curlopt_postfields $ params ‘to’ как массив?
- 0Проектирование базы данных — система «много ко многим» или «один ко многим»?
- 0Используйте Javascript, чтобы сделать кнопки HTML
- 0Предотвращение перехода якоря при загрузке страницы
- 1Как инициализировать класс со списком в?
- 1Как разбить большой текстовый файл на основе регулярных выражений с помощью Python
- 0Удаление текста из текстовых полей путем запуска события нажатия клавиши для возврата
- 064-битные и 32-битные исполняемые файлы C ++ с code :: blocks
- 1Словарь итерации
- 1Kivy scatterLayout вернуться к оригинальному размеру
- 0Получить изображение из окна
- 0Код jQuery для адаптации заполнения класса CSS
- 1Файл существует, но файл статуса 404 не найден на главной странице asp.net
- 0c ++ вектор push_back с указателем на объект
- 0AngularJS Количество Да / Нет Значения
- 1Проблемы с glDrawTex_OES
- 0Использование плагина readmore.js с динамически создаваемым тегом div
- 1Создание ярлыка на андроид
- 1Модуль ES2015 импортирует загрязняющее глобальное пространство имен
- 1Как установить содержание деятельности на основе текущей ориентации экрана?
- 0Подсчет количества строк в текстовом файле C ++
- 1Получение ошибки Tomcat 404 при запуске моего файла WAR
- 0Использование нескольких SQL-запросов в одном операторе
- 1JavaFX ComboBox не показывает то же значение при выборе в раскрывающемся списке после сброса предыдущего выбора
- 1Почему я не могу получить доступ к «item2.UserName»
- 0Отладить утверждение с помощью CListBox :: GetTopIndex (). Идеи?
- 0Отправка локальной переменной на асинхронном сервере с помощью BOOST ASIO
- 0вход с пружинной безопасностью и угловой версией js 403
- 0Создание ионного приложения с помощью Cordova Cli
- 1Представление индексных меток на оси x диаграммы рассеяния с Seaborn
- 0Атрибут `complete` для фреймов
- 1Как изменить цвет рамки и разделителя виджета Spinner
- 0Почему таймер не может работать при использовании библиотеки asio?
- 0SpringBoot — MySQL — Неизвестное поле столбца в списке ошибок
- 1Лучший стиль программирования для условия if в JS
- 1Потеря форматирования TableLayout после поворота устройства
Отключить UAC
Отключить брандмауэр и антивирус
Перезагрузиться
Если не поможет, к тому что выше прибавьте:
смонтируйте это как образ и запустите с виртуального привода.
Удачи!
Ivan Ponamaryoff3
Всего 1 ответ.
Другие интересные вопросы и ответы
Что делать если при установке симс 4 у меня выходит ошибка Runtime error (at-1:0):
Сannot Import EXPANDCONSTANT.
Гость7
От администратора попробуйте. Я так понимаю, просто не мовозможно найти путь или прав не хватает на свершения действия. Если не поможет, лучше переустановить винду, т.к. это уже похоже в системе что-то не так. Если это только с симс 4, попробуйте другую раздачу.The Sims 4 RU6
Всего 1 ответ.
Почему после скачиваний приложений на андроид, их установка не выполняется?
После завершения скачивания приложений (любых — viber, skype и т.д.) на мобильник Samsung GT- s6802 при последующем выполнении команды «установить» идет текст «Ошибка разбора.Сбой разбора пакета» и отказ в установке. Что произошло, как исправить?
Наталья1002
Быть может это тот самый, популярный глюк с «Play Маркет’ом»?
Попробуйте очистить кэш приложения «Play Market», затем удалите само приложение и запустите его. Не беспокойтесь, удаление этого приложения не означает, что его больше не будет на вашем устройстве, оно привязано к ОС и вы просто-навсего загрузите новую версию приложения. Лично мне помогало, когда сталкивался с подобным случаем.
ЕвгенийБВ2
Всего 5 ответов.
Помогите! Что делать когда при установки Android studio выскакивает эта ошибка «unable to elevate 1812»
Guest4
Отключить UAC
Отключить брандмауэр и антивирус
Перезагрузиться
Если не поможет, к тому что выше прибавьте:
смонтируйте это как образ и запустите с виртуального привода.
Удачи!
Гость6
Всего 1 ответ.
Что делать, если при удалении игры появляется «Внутренняя ошибка»?
Гость7
Проблема с ответом в том, под «Внутренней ошибкой», может скрывается все что угодно, абсолютно любой баг в игре, несовместимость игры и системы, недостача файлов, старая версия программы — иными словами любая проблема, приводящая вылету из игры. Если говорить непосредственно про удаление, тут все индивидуально, и вряд ли похоже на то, что вызывает ошибку на телефонах.
Лев С.6
Всего 1 ответ.
- GTA IV Social Club проблема. со входом.
- Хэлп плиз вопрос про сайт вконтакте?
- Blender. В чем разница между flip normals и recalculate normals?
- При запуске проекта ничего не работает — Android Studio
- как узнать на сколько забанели в кубезумие 2

Возможные ошибки и их решение
Здесь собраны рецепты исправления ошибок, которые могут возникнуть при выполнении шагов из статей этой главы. В случае, если вашей ситуации здесь нет, отпишитесь, пожалуйста, в комментариях и я постараюсь помочь решить вам вашу проблему.
Если при ошибке выводится некая надпись, то её описание и решение будет находиться ниже под заголовком содержащим эту надпись.
Your project location contains non-ASCII characters. This can cause problems on Windows. Proceed with caution.

Она появляется при создании нового проекта в Android Studio. Предупреждает о том, что путь к рабочей папке не валидный.
Решение
Выбрать путь к рабочей папке не содержащий кириллицу. Например, создать папку в корне диска D, чтобы путь был наподобие следующего D:Android
emulator: ERROR: x86 emulation currently requires hardware acceleration!
>emulator: ERROR: x86 emulation currently requires hardware acceleration!
>Please ensure Intel HAXM is properly installed and usable.
>CPU acceleration status: HAX kernel module is not installed!.
Эта ошибка появляется при попытке запуска приложения на эмуляторе. Она означает, что не был установлен Intel Hardware Accelerated Execution Manager. Если интересно, вот здесь подробнее.
Решение
Убедитесь в SDK Manager, что вы установили «Intel x86 Emulator Accelerator (HAXM installer)».

Установите в случае необходимости.
Перейдите в директорию SDK (обычно это C:users<имя пользователя>AppDataLocalAndroidsdk), там перейдите в папку extrasintelHardware_Accelerated_Execution_Manager, там найдите файл intelhaxm-android.exe, запустите его и пройдите через мастер установки.
В случае если при установке вылетела ошибка «This computer meets requirements for HAXM, but VT-x is not turned on. «

То надо пойти в BIOS и включить Intel Virtual Technology.
Источник
Code, Live and Travel
Monday, January 19, 2015
Android Studio Installation — Unable to elevate error
I had recently downloaded android-studio-bundle-135.1641136.exe
in anticipation to upgrade to faster development from my earlier environment of Eclipse. However, when in tried installing the executable it gave «Unable to elevate error» and exited the installation process without giving any further troubleshooting information.
Note: I have a Windows 7 Ultimate Service pack 1 running on HP Pavillion DV6000, 2.5 GB RAM
Based on the message I thought that probably its related to some permission issue so I tried the following step by step and tried installing after each step which eventually succeeded at the final step.
- Changed the unblock settings in the properties of the files (for some reasons I don’t see the property window many times.)
- Run the exe as «Administrator».
- Changed the UAC settings from the control panel to the lowest level «Never Notify». Even after following all the above steps I was still getting the error «Unable to elevate error»and I was totally perplexed at the behavior of the program and was wondering «How can Google can do such a mess?». Well, that wasn’t a possibility so started to figure out who else was possibly messing around.
- Next I checked the SHA-1 hash to ensure the program is not corrupted and found it to be matching as on the Google site.
- Finally, I had a doubt on the friendly Avast Anti-Virus program’s invisible hand in all this mess and so I disabled it for 10 minutes and started the android installation exe and Voila! it ran and showed its beautiful face.
Moral of the story : If you are getting «Unable to elevate» error even when you are executing as a «administrator» then probably you need to disable your anti-virus program for sometime to let the installation to happen.
Источник
Методы лечения различных ошибок в Android Studio при разработке проекта
Сегодня хотел бы поделиться своим анализом и способами лечением разных ошибок при разработке своего продукта в Android Studio. Лично я, не раз сталкивался с различными проблемами и ошибками при компиляции и/или тестировании мобильного приложения. Данный процесс, всегда однообразный и в 99% случаев и всегда нужно тратить n-колличество времени на его устранение. Даже, когда ты уже сталкивался с данной проблемой, ты все равно идешь в поисковик и вспоминаешь, как же решить ту или иную ситуацию.
Я для себя завел файлик, в котором отметил самые частые ошибки — потратив на это несколько часов и перечислил самые популярные ошибки (в дальнейшем планирую просто их запомнить), чтоб сократить свое время в дальнейшем.
Итак, начну по порядку с самой распространенной проблемы и дальше буду перечислять их по мере появления:
1) Если подчеркивает красным код, где используются ресурсы: R. — попробовать (но вероятно не поможет): Build -> Clean Project.
В принципе на Build -> Clean Project можно не терять времени, а лучше всего — слева переключиться на Project, открыть каталог .idea, затем каталог libraries и из него удалить все содержимое. Затем нажать кнопку Sync Project. А затем (если все еще красное, но скорее всего уже будет все ок ) Build -> Clean Project.
2) После внезапного выключения компьютера, после перезапуска может быть во всех проектах весь код красным. Перед этим может быть ошибка: Unable to create Debug Bridge: Unable to start adb server: Unable to obtain result of ‘adb version’. Есть три решения — первое помогло, второе нет (но может быть для другого случая), а третье — не пробовал:
а) File — Invalidate Caches/Restart — Invalidate and Restart
б) Закрыть студию. В корне папки проекта удалить файл(ы) .iml и папку .idea. Вновь запустить студию и импортировать проект.
в) Нажать Ctrl-Alt-O и запустить оптимизацию импорта.
Кстати, adb сервер можно проверить на версию (и работоспособность) и затем перезапустить:
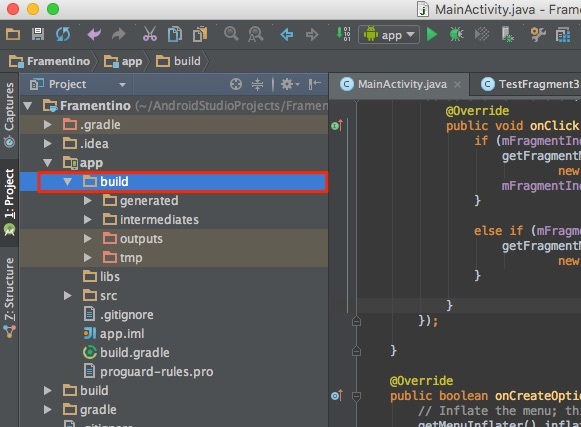
3) Если Android Studio выдает приблизительно такую ошибку: Error:Execution failed for task ‘:app:dexDebug’.
Надо слева переключиться на опцию Project, найти и удалить папку build которая лежит в папке app, т.е. по пути app/build. Затем перестроить весь проект заново: Build -> Rebuild Project.
Такое же решение если ошибка типа: «не могу удалить (создать) папку или файл» и указан путь, который в ведет в app/build. Тоже удаляем папку build и ребилдим проект.
4) В сообщении об ошибке упоминается heap — виртуальная память. А ошибка обычно вызвана ее нехваткой, т.е. невозможностью получить запрашиваемый объем. Поэтому этот запрашиваемый объем надо уменьшить, т.е. переписать дефолтное значение (обычно 2048 MB которое можно изменить в настройках), на меньшее 1024 MB.
В файле проекта gradle.properties пишем:

5) Android Studio пришет примерно такую ошибку: Plugin is too old, please update to a more recent version, or set ANDROID_DAILY_OVERRIDE environment variable to «83648b99316049d63656d7276cb19cc7e95d70a5»
Возможные причины (кроме необходимости регулярного обновления SDK):
а) Загруженный проект был скомпилирован с помощью уже несовместимого старого gradle плагина. В этом случае надо найти и подключить в своем build.gradle проекта этот более старый плагин. т.е. попробовать более старые версии, например: 1.1.3 (часто именно 1.1.x и подходит).
Найти все версии можно здесь.
б) Если в build.gradle проекта используется beta-версия плагина — это означает, что срок ее истек. Посмотреть последние релизы (продакшн и бета) можно также здесь:
6) Иногда при подключении сторонних библиотек могут дублироваться некоторые файлы (обычно связанные с лицензированием). В сообщении будет что-то содержащее слова: duplicate files. Решение — надо посмотреть в сообщении об ошибке или в документации подключенной сторонней библиотеки — какие именно файлы стали избыточными, и перечислить их в build.gradle модуля для исключения (exclude) из билда.
Это делается в директиве packagingOptions (которая, в свою очередь, находится в директиве android).
Источник
Android Installation Error — Unable to elevate [error:1812]
November 2018
24.9k time
I have downloaded the latest android studio android-studio-bundle-135.1740770-windows from the official site. But when I install the downloaded application file, it starts the installer and shows it extracting and then I get the following error in a small alert window:
I have also tried running the application as administrator, but no luck!
10 answers
Загрузите его в диск и правой кнопкой мыши и запустить от имени администратора. Я попробовал это, и она работала для меня
Щелкните правой кнопкой мыши на установщике> Свойства> Совместимость> Run Compatibility Troubleshooter
Эти шаги, которые я взял:
- Очистить папку Temp (Перейти Выполнить тип «%temp%» и удалить все файлы. Это может пропустить несколько файлов это нормально!)
- Щелкните правой кнопкой мыши ваш Android-студия-расслоением-135.1740770-windows.exe и перейти к свойствам и нажмите кнопку разблокировки, если он доступен.
- Убедитесь, что брандмауэр был отключен и антивирусное программное обеспечение.
- Наконец просто intall
Он работает 99%, и вам не нужно устанавливать какое-либо другое программное обеспечение для его поддержки.
Просто скопируйте андроида файл установки студии на рабочий стол был загружен, а затем правой кнопкой мыши и нажмите на Run As Administrator .
Для меня он работал с совместимостью для Win XP
Щелкните правой кнопкой мыши на установщике> Свойства> Run Compatibility Troubleshooter. Она будет рекомендовать некоторые настройки, и он будет применять их. Тогда вы должны быть в состоянии запустить его.
Проверьте это питание:
- Щелкните правой кнопкой мыши ваш Android-студия-расслоением-135.1740770-windows.exe и перейти к свойствам и нажмите кнопку разблокировки, если он доступен.
- Убедитесь, что брандмауэр был отключен и антивирусное программное обеспечение.
- Отключение контроля учетных записей.
И некоторый блоггер говорит, что этот шаг:
Преобразовать файл установки в CD Image (например , с помощью магии ISO Maker, http://www.magiciso.com/download.htm )
Я последовал за эти шаги, и проблема исчезла:
- Отключение контроля учетных записей
- перезагружать
- Установка (от имени администратора)
- Включить контроль учетных записей
- перезагружать
Там быстрый способ вы можете включить или отключить это досадное окно из командной строки:
Отключение контроля учетных записей:
Включить контроль учетных записей:
После включения или отключения UAC, вам придется перезагрузить компьютер, чтобы изменения вступили в силу.
Я думаю, что ваше приложение на диске, отличном от C диска. Попробуйте и скопировать его с этого диска и вставить его на рабочий стол, то я думаю, что это будет работать — он работал для меня по крайней мере.
Я перед такой же вопрос за последние 2 дня
Проблема связана с USER ACCESS наиболее компании создали учетную запись пользователя , который не имеет доступа устанавливать какое — либо приложение , которое они имеют одного пользователя администратора , которые имеют весь этот доступ
Поэтому , когда я открываю настройки из учетной записи администратора Это открытие совершенно
Решение 1 — Сначала попробуйте просто кликните правой кнопкой мыши на Android студии ехе -> Нажмите на Запуск от имени Administrato г
Решение 2 — Нажмите кнопку переключения и удерживайте ее -> Щелкните правой кнопкой мыши на Android студии ехе -> Запуск от имени другого пользователя введите имя пользователя и пароль пользователя с правами администратора он работает гладко
Источник
[Windows 7] [Installer] Unable to elevate, error: 5 #5178
Comments
olahaye74 commented Sep 13, 2016 •
Issue similar to issue #2616 but with error 5 (not 6). Installer is unable to elevate privileges despite the correct admin login and pasword has been provided to the popup window.
Expected behaviour
Installer can elevate privileges once admin password is provided.
Actual behaviour
privilege elevation fails with error 5
Steps to reproduce
- login as a active directory user with no privilege at all.
- Either start the installer (or, if already installed, request upgrade)
- when prompted, give a local administrator account (.local-admin) and the correct password
- Error raises: «Unable to elevate, error: 5»
=> If I runas the installer with the .local-admin, it works, but if I run it as simple active directory user and gives the local-admin login and password, it fails with error 5.
OS:
Some security policies are in place, but I don’t know which ones. Any parameter that I could give to the installer to have more output about the error 5? (BTW, I can’t understand why in 2016 we still have numbers for errors instead of meangfull messages. In the pas it was usefull to same memory, but eighties are over, now we have enough disk and ram to have full error messages (even translated)).
Client configuration
Client version:
2.2.3.6307 (same problem on previous versions)
Operating system:
Windows 7 Enterprise Service Pack 1 64bits
OS language:
fr (French)
Installation path of client:
C:Users DownloadsownCloud-2.2.3.6307-setup.exe
Unfortunately no output from installer except the error popup. Even when starting the installer from a cmd.exe, no /v switch will help.
Want to back this issue? Post a bounty on it! We accept bounties via Bountysource.
The text was updated successfully, but these errors were encountered:
guruz commented Sep 13, 2016
We’re using NSIS, maybe check their error message mappings
olahaye74 commented Sep 14, 2016
After a lot of goggling, it seems that error 5 is related to «access denied». To what? I can’t tell.
Looking around in our windows setup,, the UAC is enabled to the max.
When running secpol.msc, the security setup is the following (using my french to english translation :-/ )
- UAC: use secure desktop when elevation request: activated
- UAC: permit UIAccess application to request elevation without using secure desktop: disabled
- UAC: requester behavior for admin using admin auth mode: request ack
- UAC: elevation requester behavior for normal user: request admin login using secure desktop
- UAC: detect app install and ask for elevation: enabled
- UAC: only elevate app UIAccess installed in secure paths: enabled
- UAC: only elevate signed executable: disabled
- UAC: run admin account in admin approbation mode: enabled
- UAC: view file and registry write failures in user defined places: Enabled
Источник
Lost keystore
If you use the same keystore when updating AndroidAPS you do not have to uninstall the previous version on your smartphone. That’s why it is recommended to store the keystore in a save place.
If you try to install the apk, signed with a different keystore than before, you will get an error message that the installation failed!
In case you cannot find your old keystore or its password anymore, proceed as follows:
-
Export settings on your phone.
-
Copy or upload the settings file from your phone to an external location (i.e. your computer, cloud storage service…).
-
Generate signed apk of new version as described on the Update guide and transfer it to your phone.
-
Uninstall previous AAPS version on your phone.
-
Install new AAPS version on your phone.
-
Import settings to restore your objectives and configuration.
-
Check your battery optimization options and disable them again.
If you can’t find them on your phone copy them from the external storage to your phone.
-
Keep on looping.
Gradle Sync failed
Gradle Sync can fail to various reasons. Wen you get a message saying that gradle sync failed, open the “Build” tab (1) at the bottom of Android Studio and check what error message (2) is displayed.

These are the usual gradle sync failures:
-
Uncommitted changes
-
No cached version of … available
-
Android Gradle requires Java 11 to run
Important:
After you have followed the instructions for your specific problem, you need to trigger the gradle sync again.
Uncommitted changes
If you receive a failure message like
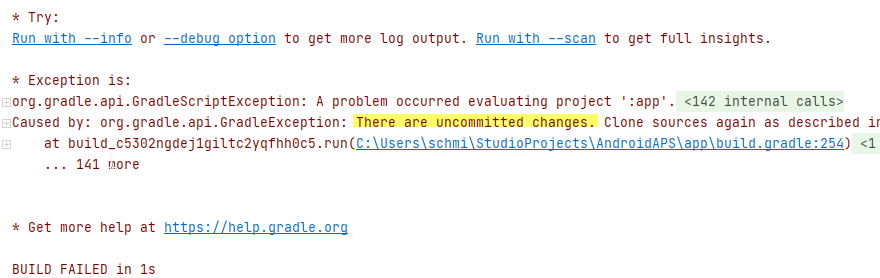
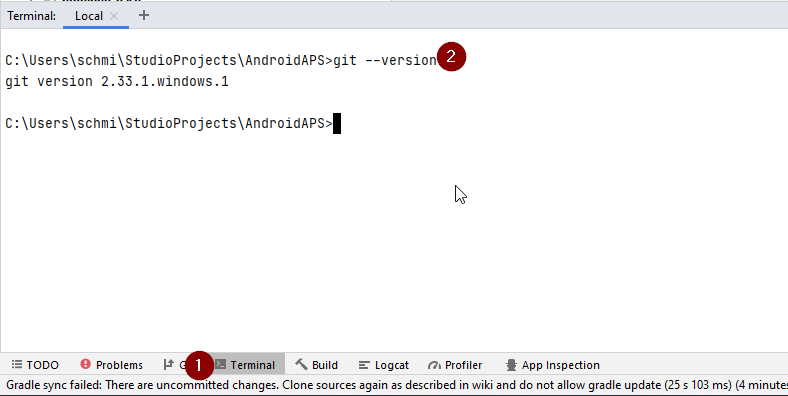
Step 1 — Check git installation
-
Open the terminal tab (1) at the bottom of Android Studio and copy the following text and paste or type into the terminal.

Note: There is a space and two hyphens between git and version!
-
You must receive a message saying what git version is installed, as you can see in the screenshot above. In this case, go to Step 2.
-
In case you get an message saying
your Git installation is not right.
-
Check git installation
-
if on Windows and git was just installed, you should restart your computer to make git globally available after the installation
-
If Git is installed, you have restarted (if on windows), and git still couldn’t found:
-
Search your computer for a file “git.exe”.
Note for yourself, what directory it is in.
-
Go to the Environment variables in windows, select the variable “PATH” and click edit. Add the directory where
you have found your git installation. -
Save and close.
-
Restart Android Studio.
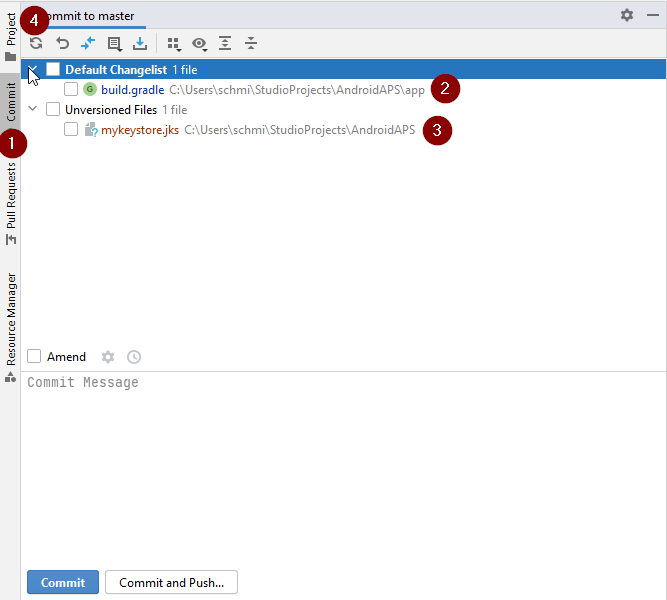
Step 2: Check for uncommitted changes.
-
In Android Studio, oben the “Commit” Tab (1) on the left-hand side.
-
You can see either a “Default changeset” (2) or “Unversioned files” (3):
-
For “Default changeset”, you probably updated gradle or changed some of the file contents by mistake.
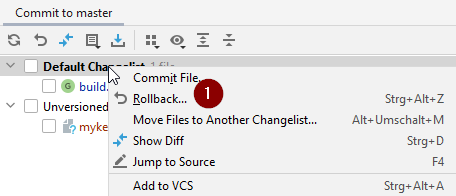
-
Right click on “Default Changeset” and select “Rollback”
-
The files are fetched again from the Git server. If there are no other changes in the commit tab, go to Step 3.
-
-
If you can see “Unversioned Files”, you might have stored files in your sourecode directory which should be better places somewhere else, e.g. your keystore file.
-
Use your regular file explorer on your computer to move or cut and paste that file to a save place.
-
Go back to Android Studio and click the Refresh button (4) within the Commit tab to make sure the file is not stored in the AndroidAPS directory anymore.
If there are no other changes in the commit tab, go to Step 3.
-
Step 3: Resync Gradle (again)
Follow the instructions at Gradle Resync.
Android Gradle plugin requires Java 11 to run
You might experience this error message:

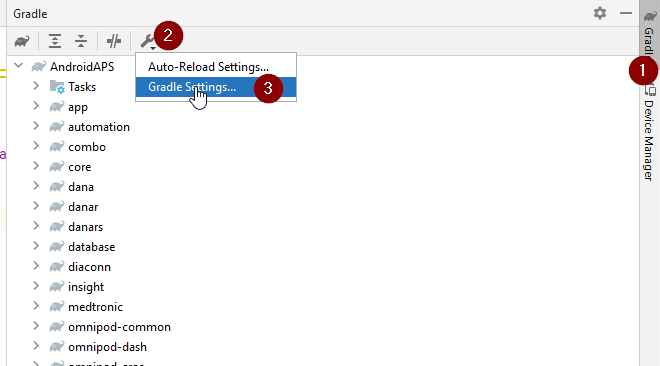
Click on “Gradle Settings” (1) to go to open the gradle settings.
If you don’t have the link to the “Gradle Settings”, open the Gradle settings manually by selecting the Gradle Tab on the right border (1), select the tools icon (2) and there the item ‘Gradle Settings’ (3).
When you have opened the Gradle settings dialog, open the options (1) at “Gradle JDK” and selected the “Embedded JDK version” (2).
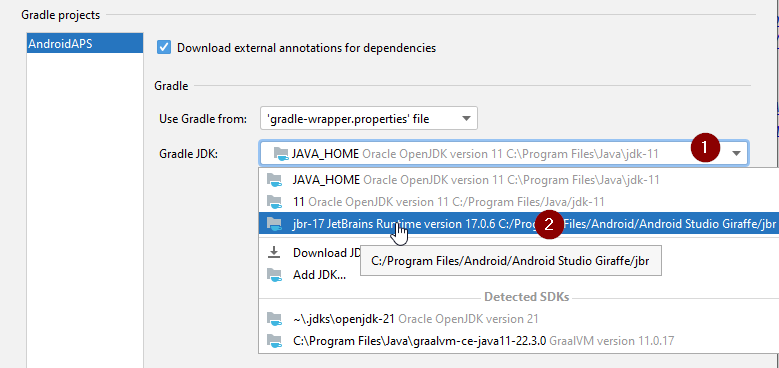
Press “OK” to save and close the settings dialog.
Important: If you don’t see the setting “Gradle JDK”, you might have not updated Android Studio. Make sure you are using Android Studio 2021.1.1 Bumblebee) or newer.
Now you need to trigger a Gradle Resync
Could not resolve/No cached version
You might get this error message:

-
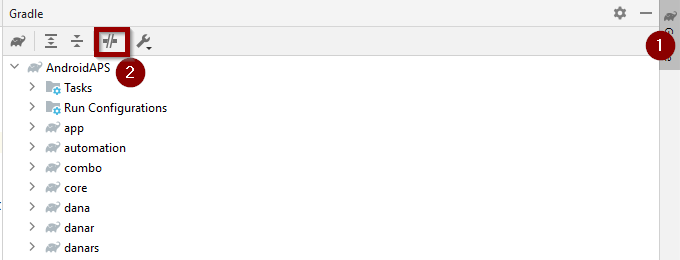
On the right side, open the Gradle tab (1).
Make sure the button shown at (2) is NOT selected.
-
Now you need to trigger a Gradle Resync
Unable to start daemon process
If you see an error message like the one below you probably use a Windows 10 32-bit system. This is not supported by Android Studio 3.5.1 and above and unfortunately nothing the AAPS developer can do about.
If you are using Windows 10 you must use a 64-bit operating system.
There are a lot of manuals on the internet how to determine wether you have a 32-bit or 64-bit OS — i.e. this one.

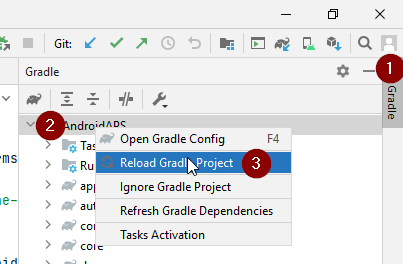
Gradle Resync
If you can still see the message that the gradle sync failed, now select the Link “Try again”.

If you don’t see the a message anymore, you can still trigger this manually:
-
Open the Gradle tab (1) on the right border of Android Studio.
-
Right-click on AndroidAPS (2)
-
Click on “Reload Gradle Project” (3)
Generate Signed APK generated successfully with 0 build variants
When you generate the signed apk, you might get the notification that generation was successfully but are told that 0 build variants where generated:
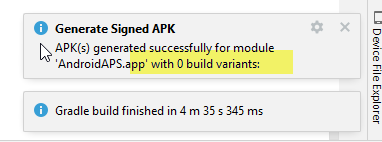
This is a false warning. Check the directory your selected as “Destination folder” for generation (step Generate Signed APK) and you will find the generated apk there!
App was created with compiler/kotlin warnings
If your build completed successfully but you get compiler or kotlin warnings (indicated by a yellow or blue exclamation mark) then you can just ignore these warnings.

Your app was build successfully and can be transferred to phone!
Key was created with errors
When creating a new keystore for building the signed APK, on Windows the following error message might appear

This seems to be a bug with Android Studio 3.5.1 and its shipped Java environment in Windows. The key is created correctly but a recommendation is falsely displayed as an error. This can currently be ignored.
No CGM data is received by AndroidAPS
-
In case you are using patched Dexcom G6 app: This app is outdated. Use the BYODA app instead.
-
In case you are using xDrip+: Identify receiver as described on xDrip+ settings page.
App not installed
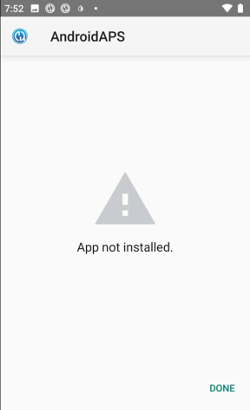
-
Make sure you have transferred the “app-full-release.apk” file to your phone.
-
If “App not installed” is displayed on your phone follow these steps:
-
Export settings (in AAPS version already installed on your phone)
-
Uninstall AAPS on your phone.
-
Enable airplane mode & turn off bluetooth.
-
Install new version (“app-full-release.apk”)
-
Import settings
-
Turn bluetooth back on and disable airplane mode
App installed but old version
If you built the app successfully, transferred it to your phone and installed it successfully but the version number stays the same then you might have missed to update your local copy
None of the above worked
If non of the above tips helped you might consider building the app from scratch:
-
Export settings (in AAPS version already installed on your phone)
-
Have your key password and key store password ready. In case you have forgotten passwords you can try to find them in project files as described here.
Or you just use a new keystore.
-
Build app from scratch as described here.
-
When you have build the APK successfully delete the exiting app on your phone, transfer the new apk to your phone and install.
-
Import settings again to restore your objectives and settings.
-
You should check your battery optimization options and disable them again.
Worst case scenario
In case even building the app from scratch does not solve your problem you might want to try to uninstall Android Studio completely. Some Users reported that this solved their problem.
Make sure to uninstall all files associated with Android Studio. If you do not completely remove Android Studio with all hidden files, uninstalling may cause new problems instead of solving your existing one(s). Manuals for complete uninstall can be found online i.e.
https://stackoverflow.com/questions/39953495/how-to-completely-uninstall-android-studio-from-windowsv10.
Install Android Studio from scratch as described here.