I am trying to do validation using the <mat-form-field> and <mat-error>. This works fine when user tabs out of the input without filling. But how do I force this error to show when I click a button? I am not using submit. Also, using template-driven forms.
This is my code:
HTML:
<mat-form-field>
    <input matInput placeholder="Due Date" name="dueDate" [(ngModel)]="dueDate" [formControl]="dueDateValidator" required>
    <mat-error *ngIf="dueDateValidator.invalid">Due Date is required for Tasks</mat-error>
</mat-form-field>
TS:
dueDateValidator: FormControl = new FormControl('', [Validators.required]);
![]()
Jan Nielsen
10.6k13 gold badges66 silver badges115 bronze badges
asked Oct 14, 2017 at 13:35
![]()
1
See how to use a form with a custom ErrorStateMatcher
If you wish to override this behavior (e.g. to show the error as soon
as the invalid control is dirty or when a parent form group is
invalid), you can use the errorStateMatcher property of the matInput.
The property takes an instance of an ErrorStateMatcher object. An
ErrorStateMatcher must implement a single method isErrorState which
takes the FormControl for this matInput as well as the parent form and
returns a boolean indicating whether errors should be shown. (true
indicating that they should be shown, and false indicating that they
should not.)
I would make a separate file such as default.error-matcher.ts
/** Error when invalid control is dirty or touched*/
export class MyErrorStateMatcher implements ErrorStateMatcher {
  isErrorState(control: FormControl | null, form: FormGroupDirective | NgForm | null): boolean {
    return !!(control && control.invalid && (control.dirty || control.touched));
  }
}
Then in the TS file add:
matcher = new MyErrorStateMatcher();
Then change the input to use matcher:
<mat-form-field>
    <input matInput placeholder="Due Date" name="dueDate" [(ngModel)]="dueDate" [formControl]="dueDateValidator" [errorStateMatcher]="matcher" required>
    <mat-error *ngIf="dueDateValidator.invalid">Due Date is required for Tasks</mat-error>
</mat-form-field>
answered Dec 7, 2017 at 1:50
![]()
Kyle PfromerKyle Pfromer
1,4441 gold badge15 silver badges26 bronze badges
1
Since you want to show mat error on button’s click, please try the below:
For Angular6 version:
- Import the required classes
import { FormControl, FormBuilder, FormGroup } from '@angular/forms';
- Declare form control in your component.ts file:
nameControl = new FormControl('');
- Add the control in html:
<mat-form-field  style="width: 100%" floatPlaceholder="never">
    <input matInput placeholder="your placeholder text" [formControl]="nameControl" required/>
    <mat-error *ngIf="nameControl.errors?.required">name is required</mat-error>
</mat-form-field>
- Add this to your button click event handler:
this.nameControl.markAsTouched();
It’s important to check how you are using the form control, «.markAsTouched()» on point 4 will show the mat error for the corresponding form control.
![]()
answered Aug 24, 2018 at 12:34
![]()
Simran kaurSimran kaur
3583 silver badges7 bronze badges
3
Angular 8 has a new forms method: markAllAsTouched();
This will mark a control/form and ALL DESCENDANTS as touched!!!
So:
this.form.markAllAsTouched();
Is the solution.
answered Jun 9, 2019 at 9:18
![]()
Spock Spock
2,40429 silver badges27 bronze badges
This works for me.  On button’s click:
this.nameControl.markAsTouched();
answered Aug 30, 2018 at 10:19
![]()
TejashreeTejashree
71312 silver badges13 bronze badges
0
I am providing 3 different solutions for different scenarios, use the one which suits you.
-
If you are using a form, then do
this.form.markAllAsTouched(); -
If you need a particular field to be affected inside form, then filter that nameControl and do
nameControl.markAsTouched(); -
If you are not using forms, then specify a
reffor theinputelement and initialize variable in ts file & do as follows,@ViewChild('myInputRef') myInputRef; // Initialize the ref of input element . . this.myInputRef.control.markAsTouched()
answered Nov 15, 2019 at 7:48
![]()
GaneshGanesh
1,8002 gold badges18 silver badges40 bronze badges
2
Either you can do as «Kyle Pfromer» suggested or as you are using form group, you can mark element as touched on submit with
onSubmit(){ this.formName.get('formControlName').markAsTouched(); }
answered Mar 20, 2020 at 11:08
![]()
NikhilKrtNikhilKrt
662 silver badges3 bronze badges
1
Based on Kyle Pfromer’s post, I found my solution (to the same problem):
In the TS file I added the StateMatcher after I found an invalid form, eg.
if (this.myFormGroup.invalid) {
  this.matcher = new MyErrorStateMatcher();
  return;
}
In the MyErrorStateMatcher class I changed as following:
return !!(control && control.invalid);
I find it confusing that Angular Material is not detecting the error anyway.
answered Apr 27, 2018 at 0:05
![]()
snibbosnibbo
16911 bronze badges
GLOBALLY: Show mat-error while typing or touched:
Unlike the provided solution, this method will take care of all mat-errors in the app without applying the matcher to each input.
1- Create touched-error-state.matcher.ts file:
import {FormControl, FormGroupDirective, NgForm } from '@angular/forms';
import {ErrorStateMatcher} from '@angular/material/core';

export class TouchedErrorStateMatcher implements ErrorStateMatcher {
    isErrorState(control: FormControl | null, form: FormGroupDirective | NgForm | null): boolean {
        return !!(control && control.invalid && (control.dirty || control.touched));
    }
}
2- In app.module import:
import { ErrorStateMatcher } from '@angular/material/core';
import { TouchedErrorStateMatcher } from './your-folder-path/touched-error-state.matcher';
3- Now provide it into the providers:
@NgModule({
  providers: [
    AuthService,
    UserService,
    { provide: ErrorStateMatcher, useClass: TouchedErrorStateMatcher }
  ],
})
4- Re-Serve the app.
answered Jan 4, 2021 at 6:52
![]()
Reza TabaReza Taba
90010 silver badges14 bronze badges
You can also easily call the AbstractControl.updateValueAndValidity() function on button click. This will run the validation process on the corresponding ForControl again and show errors, if there are some (based on your Validators).
So, in your example:
    checkForErrorsOnButtonClick(): void {
      dueDateValidator.updateValueAndValidity();
    }
answered Jan 22, 2018 at 12:44
![]()
0
the easiest way is call markUserNameTouched() method as below on button click on template. We use markAsTouched() on formControl.
public staffLoginForm: FormGroup;
ngOnInit(){
this.staffLoginForm = new FormGroup({
username: new FormControl(null),
password: new FormControl(null)});

markUserNameTouched():void{
  this.staffLoginForm.get('username').markAsTouched();
}
answered Feb 5, 2020 at 1:44
![]()
vijayvijay
4654 silver badges9 bronze badges
Table of Contents
- How do you validate an Angular form?
- How to use HTML validation attributes with an Angular form
- How to specify form validation inside the FormGroup?
- But how do you use an Angular form validation pattern?
- How do you create a custom validator?
- How do you display an error message?
- What about displaying an error message for a custom validator?
- How do you validate an Angular form on submit?
Garbage in.
And…
Garbage out.
Have you ever heard someone say that? ☝️

If you build forms with Angular and the popular Angular Material library then validating user input is one of the best ways to avoid hazards.
If your Angular form accepts any kind of input under the sun… with no or even minimal input validation… expect it to blow up in your face. 💥💥💥
So how do we validate user input when working with Angular forms?

How do you validate an Angular form?
There are 2 different ways to specify the way an Angular form is validated.
- Using HTML validation attributes.
- Defining the validators when we declare the FormGroup in our Typescript class.
And although the Angular docs specifically say that you should avoid HTML validation attributes when using a reactive Angular form, you still can do some validation with the HTML attributes.
So which one should you use?
My experience has been that it really doesn’t matter. It boils down to personal choice or your teams decision.
How to use HTML validation attributes with an Angular form
An Angular form that uses HTML validators would look something like this.
<form [formGroup]="registerForm" (ngSubmit)="onSubmit()">
    <div fxLayout="column" fxLayoutAlign="center center">
      <div fxFlex="100%">
        <mat-form-field appearance="outline" class="form-field">
          <mat-label>Full Name</mat-label>
          <input matInput formControlName="name" name="name" required pattern="/s/">
        </mat-form-field>
      </div>
      <div fxFlex="100%">
        <mat-form-field appearance="outline" class="form-field">
          <mat-label>Email</mat-label>
          <input matInput formControlName="email" name="email" required type="email">
        </mat-form-field>
      </div>
      <div fxFlex="100%">
        <mat-form-field appearance="outline" class="form-field">
          <mat-label>Password</mat-label>
          <input matInput formControlName="password" name="password" type="password" required pattern="^(?=.*[A-Z])(?=.*[0-9])(?=.*[a-z]).{8,}$">
          <mat-error *ngIf="registerForm.value.password">Password must be a combination of lower-case, upper-case, numbers and at least 9 characters long</mat-error>
        </mat-form-field>
      </div>
      <div fxFlex="100%">
        <mat-form-field appearance="outline" class="form-field">
          <mat-label>Confirm Password</mat-label>
          <input matInput formControlName="confirmPassword" name="confirmPassword" type="password" required pattern="{{registerForm.value.password}}">
          <mat-error *ngIf="registerForm.value.verifyPassword">Passwords do not match.</mat-error>
        </mat-form-field>
      </div>
      <div fxFlex="100%">
          <button mat-stroked-button color="primary" type="submit" [disabled]="!registerForm.valid">Register<mat-icon>chevron_right</mat-icon></button>
      </div>
    </div>
</form>
And our Typescript file.
import { Component, OnInit } from '@angular/core';
import { FormControl, FormGroup } from '@angular/forms';

@Component({
  selector: 'app-register',
  templateUrl: './register.component.html',
  styleUrls: ['./register.component.css']
})
export class RegisterComponent {

  registerForm = new FormGroup({
    name: new FormControl(''),
    email: new FormControl(''),
    password: new FormControl(''),
    confirmPassword: new FormControl('')
  });

}
Notice that in this example we’ve used HTML validators such as…
- required
- pattern
- type
One of the advantages of this approach is that we’re not so dependent on the validation tools that the Angular framework gives us — allowing us to decouple from the framework.
If you’re interested in learning more about all the available HTML validators then you’ll find this article about Constraint validation helpful.
How to specify form validation inside the FormGroup?
But what if we want to avoid HTML validators? And use the Angular form validators instead?
Grabbing the same example above, here’s what it would look like beginning with our Typescript file.
import { Component } from '@angular/core';
import { AbstractControl, FormControl, FormGroup, ValidationErrors, ValidatorFn, Validators } from '@angular/forms';

@Component({
  selector: 'app-register',
  templateUrl: './register.component.html',
  styleUrls: ['./register.component.css']
})
export class RegisterComponent {

  registerForm = new FormGroup({
    name: new FormControl('', [Validators.pattern(/s/), Validators.required]),
    email: new FormControl('', [Validators.required, Validators.email]),
    password: new FormControl('', [Validators.required, Validators.pattern('^(?=.*[A-Z])(?=.*[0-9])(?=.*[a-z]).{8,}$')]),
    confirmPassword: new FormControl('', Validators.required)
  });

  onSubmit(): void {
    // display some fireworks
  }
}
And our HTML file.
<form [formGroup]="registerForm" (ngSubmit)="onSubmit()">
  <div fxLayout="column" fxLayoutAlign="center center">
    <div fxFlex="100%">
      <mat-form-field appearance="outline" class="form-field">
        <mat-label>Full Name</mat-label>
        <input matInput formControlName="name" name="name">
      </mat-form-field>
    </div>
    <div fxFlex="100%">
      <mat-form-field appearance="outline" class="form-field">
        <mat-label>Email</mat-label>
        <input matInput formControlName="email" name="email">
      </mat-form-field>
    </div>
    <div fxFlex="100%">
      <mat-form-field appearance="outline" class="form-field">
        <mat-label>Password</mat-label>
        <input matInput formControlName="password" name="password" type="password">
        <mat-error *ngIf="registerForm.value.password">Password must be a combination of lower-case, upper-case, numbers and at least 9 characters long</mat-error>
      </mat-form-field>
    </div>
    <div fxFlex="100%">
      <mat-form-field appearance="outline" class="form-field">
        <mat-label>Confirm Password</mat-label>
        <input matInput formControlName="confirmPassword" name="confirmPassword" type="password">
        <mat-error *ngIf="registerForm.value.confirmPassword">Passwords do not match.</mat-error>
      </mat-form-field>
    </div>
    <div fxFlex="100%">
        <button mat-stroked-button color="primary" type="submit" [disabled]="!registerForm.valid">Register<mat-icon>chevron_right</mat-icon></button>
    </div>
  </div>
</form>
But how do you use an Angular form validation pattern?
Angular has a lot of validators to choose from like…
- required
- minLength
It also has the pattern validator that allows us to require that a certain input match a specified regex expression.
A great scenario for this one is validating the strength of a password.
In the example below, we’ve declared a FormGroup with a password field. The validators pattern specifies that the password must have upper-case and lower-case letters as well as numbers. And it also needs to be at least 9 characters long.
registerForm = new FormGroup({
    name: new FormControl('', Validators.pattern(/s/)),
    email: new FormControl('', Validators.email),
    password: new FormControl('', Validators.pattern('^(?=.*[A-Z])(?=.*[0-9])(?=.*[a-z]).{8,}$')),
    confirmPassword: new FormControl('')
});
Any input in your Angular form that can be validated with a regex express is a great place to use the pattern validator.
How do you create a custom validator?
Now, what if the built-in Angular validators are not enough?
What if you want to do some custom validation? And create a custom validator?
One example scenario would be to compare the password fields in a register form to make sure the user entered the same password twice.
Here’s how it’s done.
import { Component } from '@angular/core';
import { AbstractControl, FormControl, FormGroup, ValidationErrors, ValidatorFn, Validators } from '@angular/forms';

@Component({
  selector: 'app-register',
  templateUrl: './register.component.html',
  styleUrls: ['./register.component.css']
})
export class RegisterComponent {

  registerForm = new FormGroup({
    name: new FormControl('', [Validators.pattern(/s/), Validators.required]),
    email: new FormControl('', [Validators.required, Validators.email]),
    password: new FormControl('', [Validators.required, Validators.pattern('^(?=.*[A-Z])(?=.*[0-9])(?=.*[a-z]).{8,}$')]),
    confirmPassword: new FormControl('', Validators.required)
  }, { validators: confirmPasswordValidator});

  onSubmit(): void {
    // crack an egg or split a nut
  }

}

export const confirmPasswordValidator: ValidatorFn = (control: AbstractControl): ValidationErrors | null => {
  const password = control.get('password');
  const confirmPassword = control.get('confirmPassword');

  return password && confirmPassword && password.value === confirmPassword.value ? { confirmPassword: true } : null;
};
And how do you display an error message?
So how do you display any validation errors to the user?
This is where Angular Material really shines because of it’s mat-error directive.
Here’s how to display a custom error message if validation fails.
<mat-form-field>
   <mat-label>Password</mat-label>
    <input matInput formControlName="password" name="password" type="password" required>
    <mat-error *ngIf="registerForm.value.password">Password must be a combination of lower-case, upper-case, numbers and at least 9 characters long</mat-error>
 </mat-form-field>
But what if you have multiple validators?
And you want to display different error messages depending on which validation fails?
 <mat-form-field appearance="outline" class="form-field">
        <mat-label>Full Name</mat-label>
        <input matInput formControlName="name" name="name">
        <mat-error *ngIf="registerForm.get('name').hasError('required')">This field is required</mat-error>
        <mat-error *ngIf="registerForm.get('name').hasError('pattern')">Must be your full name</mat-error>
</mat-form-field>
Here’s a screenshot of the error messages our form will display, when invalid.

What about displaying an error message for a custom validator?
But what if we have a custom validator and want to specify an error message when our validator fails?
The first step is to modify our custom validator to look like this.
export const confirmPasswordValidator: ValidatorFn = (control: AbstractControl): ValidationErrors | null => {
  const password = control.get('password');
  const confirmPassword = control.get('confirmPassword');

  return password && confirmPassword && password.value === confirmPassword.value ? { confirmPassword: true } : { confirmPassword: false };
};
All we’ve changed is that instead of returning null we now return confirmPassword with a false value.
And finally, our Angular Material form field.
<mat-form-field appearance="outline" class="form-field">
    <mat-label>Confirm Password</mat-label>
    <input matInput formControlName="confirmPassword" name="confirmPassword" type="password" required pattern="{{registerForm.value.password}}">
    <mat-error *ngIf="registerForm.value.confirmPassword">Passwords do not match.</mat-error>
</mat-form-field>
This will produce an error like the one below.

How do you validate an Angular form on submit?
By now we’ve got the validators set up and rolling…
…but…
How do we make sure that an invalid form is never submitted? Or ensure that invalid data never gets posted to an API?
One way to do it is to check the state of our form in the submit function.
We could declare an onSubmit function like this.
<form [formGroup]="registerForm" (ngSubmit)="onSubmit()">
    ...
</form>
And then inside of our Typescript file we can declare the onSubmit function and check if our Angular form is valid.
onSubmit(): void {
    if (this.registerForm.invalid) {
      return;
    }
    // continue work here
  }
Another way to do it is by disabling the submit button if the form is not valid. Like this.
<button
        mat-stroked-button
        color="primary"
        type="submit"
        [disabled]="!registerForm.valid">
    Submit
</button>
What’s your evaluation?
Validating user input is important and also helpful in that we can show our users helpful error messages. That said you should never trust your users or your forms. Instead, you’ll earn a heap of security benefits by always verifying user input in the back-end as well.
What do you think could happen if input was only validated in our Angular form?
Let me know in the comments below.

Angular Consultant
P.S. If you’re a skimmer like me then here’s what this article is all about.
- How to validate your Angular Material form — even if you’re just getting started with Angular.
- The different ways you can use to validate an Angular Material form.
- How to use Angular validation patterns and create your own.
- How to validate user input and verify that no «junk» has been entered.
- The easiest way to display an error field if form validation fails.
- Making sure that your form is never submitted with invalid data.
We will make a series of tutorials on Angular material components and in the article, we will explore how to implement Angular material form in the Angular project. Angular Materials provide the developer with reusable UI components that help the developer to use ready-made components, fast development, and one best UI design. In Angular, we can use different UI libraries, but Angular Material is one of the best UI component libraries that are made specifically for Angular.
We have three objectives behind this tutorial, first will learn how to use Angular material form in reactive form and second we’ll look how used different material component like material form field, material hint, error , date picker, material select and material radio buttons. Last how to apply material icon on these material inputs. Let’s get started.
Step 1: Setting up and configuring Angular material form the project
Let’s first create our Angular material form project. In our previous articles, we learned how to install and the best approach for configuring Angular material in our project. Run the following command to create and add Angular Material to our project.
ng new angularMaterialFormApp
cd angularMaterialFormApp
ng add @angular/material
While running the 3rd command will ask you the select theme, material typography, and animation, press yes on all. To use the Angular material component, we have to import it into our app module. Let’s create a module and import all material components on it.
ng g m ng-material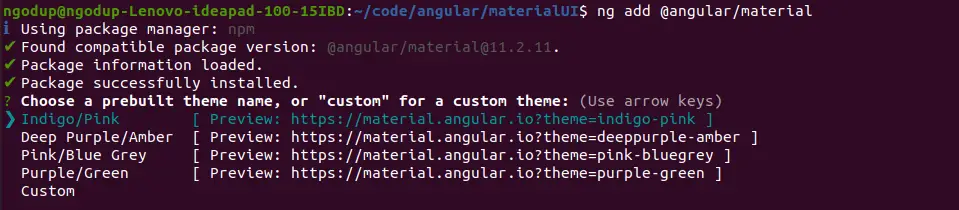
Open src/app/ng-material/ng-material.module.ts and replace the existing code with the code shown below.
import { NgModule } from '@angular/core';
import { CommonModule } from '@angular/common';
import { MatNativeDateModule } from '@angular/material/core';
import { MatDatepickerModule } from '@angular/material/datepicker';
import { MatFormFieldModule } from '@angular/material/form-field';
import { MatInputModule } from '@angular/material/input';
import { MatSortModule } from '@angular/material/sort';
import { MatTableModule } from '@angular/material/table';
import { MatIconModule } from '@angular/material/icon';
import { MatSelectModule } from '@angular/material/select';
import { MatRadioModule } from '@angular/material/radio';
import { MatButtonModule } from '@angular/material/button';

@NgModule({
    declarations: [],
    imports: [
        CommonModule,
        MatTableModule,
        MatSortModule,
        MatFormFieldModule,
        MatInputModule,
        MatDatepickerModule,
        MatNativeDateModule,
        MatIconModule,
        MatSelectModule,
        MatRadioModule,
        MatButtonModule,
    ],
    exports: [
        CommonModule,
        MatTableModule,
        MatSortModule,
        MatFormFieldModule,
        MatInputModule,
        MatDatepickerModule,
        MatNativeDateModule,
        MatIconModule,
        MatSelectModule,
        MatRadioModule,
        MatButtonModule
    ]
})
export class NgMaterialModule { }
We are importing all the required modules in our custom material module file and keeping separate modules for Angular material will make the application easy to maintain. Now we need to import our material module and ReactiveFormModule in our src/app/app.module.ts file.
import { NgMaterialModule } from './ng-material/ng-material.module';
@NgModule({
...
imports: [
   ...
  ReactiveFormsModule,
  NgMaterialModule,
],
})
Step 2: Angular material form example
We have completed our configure of material form, now let’s demonstrate the Angular material form example. We have learned that Angular has two different types of forms, template-driven, and reactive forms. We are using the Reactive form to demonstrate the Angular material form example. If you have no idea how to use these forms please check our previous tutorial on them, as in this tutorial we are only focused on how to implement material forms.
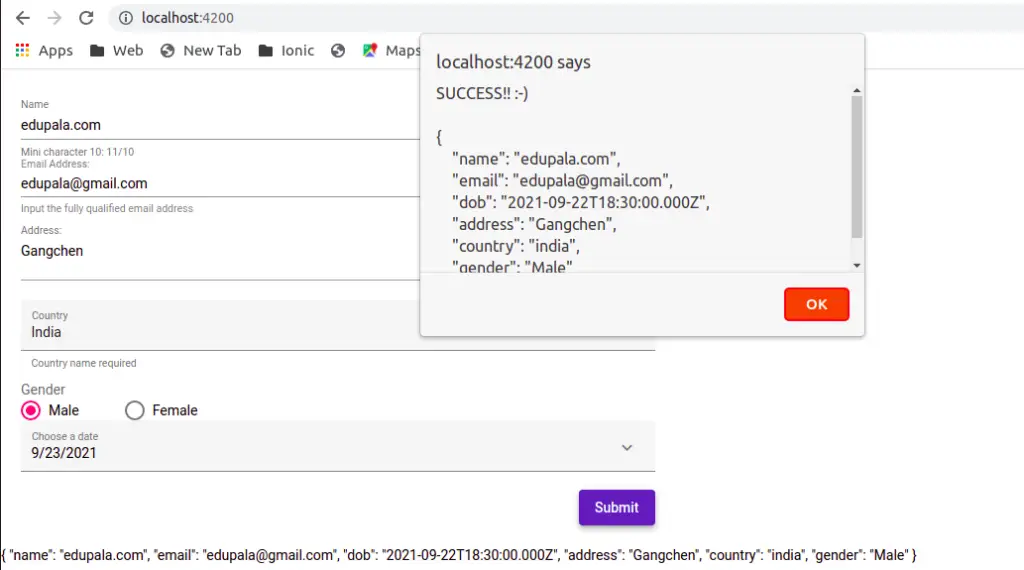
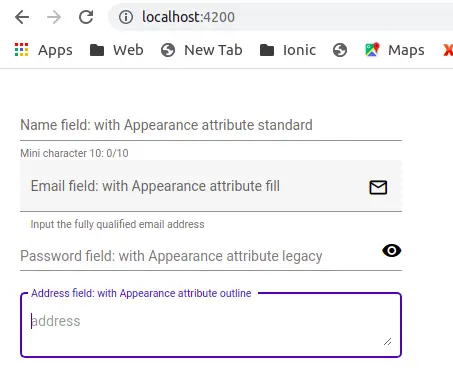
Here is a screenshot of our Angular material form example
Step 3: Initialize form and add Angular material form validation rule
In our component typescript, we need to add Angular material form validation rules, like required, email validation, min and max length of the input, etc. Now let’s create a form and add validation in the app.component.ts file
import { Component, OnInit } from '@angular/core';
import { FormGroup, FormBuilder, Validators } from '@angular/forms';

@Component({
  selector: 'app-form',
  templateUrl: './form.component.html',
  styleUrls: ['./form.component.scss']
})
export class FormComponent implements OnInit {
  form: FormGroup = new FormGroup({});

  constructor(private fb: FormBuilder) { }

  ngOnInit(): void {
    this.form = this.fb.group({
      name: [null, [Validators.required, Validators.minLength(10)]],
      email: [null, [Validators.required, Validators.pattern("^[a-z0-9._%+-]+@[a-z0-9.-]+\.[a-z]{2,4}$")]],
      dob: [null, [Validators.required]],
      address: [null],
      country: [null],
      gender: [null]
    });
  }

  saveDetails(form: any) {
    alert('SUCCESS!! :-)nn' + JSON.stringify(form.value, null, 4));
  }
}- required: This attribute is used to specify a value that must be provided.
- minlength: This attribute is used to specify a minimum number of characters.
- maxlength: This attribute is used to specify a maximum number of characters. This type of validation cannot be applied directly to form elements because it conflicts with the HTML5 attribute of the same name. It can be used with model-based forms.
- pattern: This attribute is used to specify a regular expression that the value provided by the user must match.
Here we don’t have to do anything related to material form, as material components are declared and used inside our component template. We have declared form rules and if the form is valid, then we output it through the alert function.
Step 4: Adding material form component in Angular material form template.
Now we will add material form components in our component template, we have used mat-form-field, mat-label, mat-select, mat-radio-button, mat-datepicker-toggle, mat-hint, and mat-error. Here we have listed and uses of material components.
| Material component | Description |
| mat-form-field | The component is used to wrap several Angular Material components and apply common text field styles such as the underline, floating label, and hint messages. |
| mat-label | The label component allows indicating a form field as optional by using the optional input property. |
| mat-select | The mat-select is a form control for selecting a value from a set of options. |
| mat-radio-button | Provide the same functionality of radio buttons with material design styles. |
| mat-datepicker-toggle | The date picker allows users to enter a date either through text input or by choosing a date from the calendar. |
| mat-hint | Is optional, we can add hints for the input field for validation. |
| mat-error | .how form validation error with this component without any styling |
| mat-button | Same HTML button with material design style. |
Let’s edit our material form, in the app.component.html file.
<div class="container">
    <form [formGroup]="form" (ngSubmit)="saveDetails(form)">
        <mat-form-field appearance="standard">
            <mat-label>Name</mat-label>
            <input matInput maxlength="15" inputmode="tel" placeholder="Type name" formControlName="name" #nameInput>
            <mat-hint>Mini character 10: {{ nameInput.value.length }}/10</mat-hint>
            <mat-error>Name is required</mat-error>
            <mat-error *ngIf="form.controls['name'].errors?.['minlength']">
                Please enter more than 10 character
            </mat-error>
        </mat-form-field>

        <mat-form-field appearance="legacy">
            <mat-label>Email Address:</mat-label>
            <input matInput type="email" formControlName="email" placeholder="Your email">
            <mat-icon matSuffix>mail_outline</mat-icon>
            <mat-hint>Input the fully qualified email address</mat-hint>
            <mat-error *ngIf="form.controls['email'].errors?.['required']">Email is required</mat-error>
            <mat-error *ngIf="form.controls['email'].errors?.['pattern']">Please enter valid email</mat-error>
        </mat-form-field>

        <mat-form-field appearance="standard">
            <mat-label>Address:</mat-label>
            <textarea matInput placeholder="address" formControlName="address"></textarea>
        </mat-form-field>

        <mat-form-field appearance="fill" hintLabel="Country name required">
            <mat-label>Country</mat-label>
            <mat-select matNativeControl name="country" formControlName="country">
                <mat-option value="india">India</mat-option>
                <mat-option value="france">France</mat-option>
                <mat-option value="germany">Germany</mat-option>
                <mat-option value="japan">Japan</mat-option>
                <mat-option value="Mongolia">Mongolia</mat-option>
            </mat-select>
        </mat-form-field>

        <div style="margin-top:10px;">
            <div style="margin-right:3%; color:#6b6b6b;">
                <mat-label>Gender</mat-label>
            </div>
            <mat-radio-group formControlName="gender">
                <mat-radio-button value="Male">Male</mat-radio-button>
                <mat-radio-button value="Female">Female</mat-radio-button>
            </mat-radio-group>
        </div>

        <mat-form-field class="example-full-width" appearance="fill">
            <mat-label>Choose a date</mat-label>
            <input matInput [matDatepicker]="picker" formControlName="dob">
            <mat-datepicker-toggle matSuffix [for]="picker">
                <mat-icon matDatepickerToggleIcon>keyboard_arrow_down</mat-icon>
            </mat-datepicker-toggle>
            <mat-datepicker #picker></mat-datepicker>
        </mat-form-field>
        <div mat-dialog-actions align="end">
            <button mat-raised-button color="primary" type="submit" [disabled]="!form.valid">Submit</button>
        </div>
    </form>
    <div>{{ form.value | json }}</div>
</div>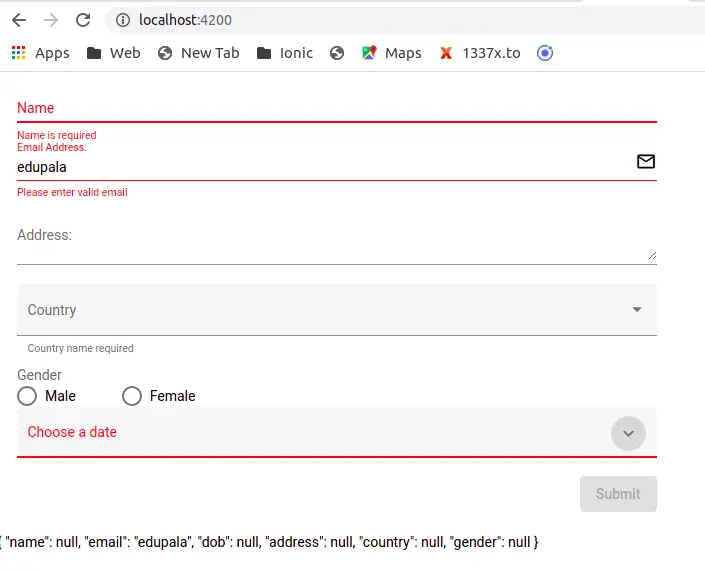
The angular material library has a mat-form-field component, which we have used extensively in Material form. This mat-form-field component wraps several material subform components inside it and applies common Text field styles such as the underline, floating label, and hint message on the following form controls.
- Input text
- Select text field: mat-select
- Text area
- Chip or tags input: mat-chip
- Date picker
The text input in our component template uses the matInput directive to add material design looks and feel.
How do we validate Angular material form elements?
As we are using a reactive form, we can access each individual form element in our template. Angular form control elements have different states like touched, dirty, errors, valid, invalid, untouched, and pristine. We can access individual elements using the form.get() method with the name of the individual form control element and then we can check its control status.
We have validated, and require minLength and email patterns like this in our template.
<mat-error *ngIf="form.controls['email'].errors?.['required']">
Email is required
</mat-error>
<mat-error *ngIf="form.controls['email'].errors?.['pattern']">
Please enter valid email
</mat-error>
<mat-error *ngIf="form.controls['name'].errors?.['minlength']">
Please enter more than 10 character
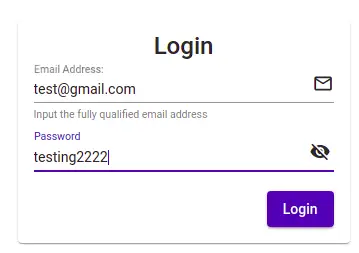
</mat-error>We have learned how to configure and use Angular material form components in angular projects. Let now demonstrate an example of an angular material login form. Here is a screenshot of our angular material login form example.
Let’s edit the app.component.ts file to include the reactive form module, form group, and form builder for the angular material login form.
import { Component, OnInit } from '@angular/core';
import { FormGroup, FormBuilder, Validators } from '@angular/forms';

@Component({
  selector: 'app-form',
  templateUrl: './form.component.html',
  styleUrls: ['./form.component.scss']
})
export class FormComponent implements OnInit {
  form: FormGroup = new FormGroup({});
  flag: boolean = true;

  constructor(private fb: FormBuilder) { }

  ngOnInit(): void {
    this.form = this.fb.group({
      email: [null, [Validators.required, Validators.pattern("^[a-z0-9._%+-]+@[a-z0-9.-]+\.[a-z]{2,4}$")]],
      password: [null, [Validators.required, Validators.minLength(6)]],
    });
  }

  saveDetails(form: any) {
    alert('SUCCESS!! :-)nn' + JSON.stringify(form.value, null, 4));
  }
}
In our component template, we have used another material component called material card, you need to import MatCardModule in our material module. We also have matSuffix, and matPrefix attributes to set mat-icon at the end or start. As the name suggests that matPrefix adds an icon at the start of input and matSuffix at end of the input.
We have used visibility on and off to see and make password type text visible or password by the toggle flag button. Let’s edit the app.component.html file.
<mat-card>
    <mat-card-title>Login</mat-card-title>
    <mat-card-content>
        <form [formGroup]="form" (ngSubmit)="saveDetails(form)" autocomplete="off">
            <div>
                <mat-form-field appearance="legacy">
                    <mat-label>Email Address:</mat-label>
                    <input matInput type="email" formControlName="email" placeholder="Your email">
                    <mat-icon matSuffix>mail_outline</mat-icon>
                    <mat-hint>Input the fully qualified email address</mat-hint>
                    <mat-error *ngIf="form.controls['email'].errors?.['required']">Email is required</mat-error>
                    <mat-error *ngIf="form.controls['email'].errors?.['pattern']">Please enter valid email</mat-error>
                </mat-form-field>
            </div>

            <div>
                <mat-form-field appearance="standard">
                    <mat-label>Password </mat-label>
                    <input matInput [type]="flag ? 'password' : 'text'" placeholder="Enter your password"
                        formControlName="password">
                    <mat-icon (click)="flag=!flag" matSuffix>{{ flag ? 'visibility' : 'visibility_off' }}</mat-icon>
                    <mat-error>Name is required</mat-error>
                    <mat-error *ngIf="form.controls['password'].errors?.['minlength']">
                        Please enter more than 6 character
                    </mat-error>
                </mat-form-field>
            </div>

            <div>
                <button mat-raised-button color="primary" type="submit" [disabled]="!form.valid">Login</button>
            </div>

        </form>
    </mat-card-content>
</mat-card>
Like before we have added angular material login form validation, when all login inputs are valid, then we will enable the login button.
Angular material input field appearance attribute
Angular material form field component mat-form-field component have appearance attribute, that allows us to apply different appearance on an input field. The mat-form-field have the following four different value we can apply to the appearance attribute.
- Fill
- Outline
- Standard
- Legacy
How to set autosize to Text area?
We can add the matInput directive on textarea element. The HTML Textarea element has a row attribute to add and configure the numbers of rows on textarea input. But the row attribute is static, we can’t increment or decrement on running the application. The <textarea> elements can be made to automatically resize by using the cdkTextareaAutosize directive available in the CDK.
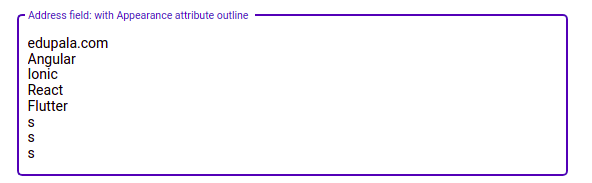
<mat-form-field appearance="outline">
    <mat-label>Address field: with Appearance attribute outline</mat-label>
    <textarea cdkTextareaAutosize cdkAutosizeMinRows="2"
    cdkAutosizeMaxRows="10" matInput placeholder="address"
    formControlName="address"></textarea>
 </mat-form-field>
Check articles on the best and latest 2022, and 2021 Angular books to read for your journey from beginner to advanced level.
BEST BOOK ON ANGULAR 2022 – 2021
Conclusion
We have completed our Angular material form tutorial, and we have learned how to use the material form field and Angular material form validation. At last, we have one more example on the Angular material login form to perform password visibility and matPrefix and matSuffix to align icons on input. I hope you had learned something, if so then please share it with others and on social networks, this will encourage me to add more content. Follow me on my GitHub collection, I had code on Angular, react, and Ionic framework.
Related Articles
- How to install Angular material?
- Angular Radio button |angular material radio button?
- Angular material checkbox: color, label direction
- How to implement Angular checkbox input in Angular?
- How to use Angular Material tooltip in Angular?
- Angular Material input components and directives
- Angular material autocomplete example
- How to implement Angular material dropdown | select .?
- Angular material button: Color, Size, toggle button
- How to implement Angular material accordion in Angular .?
- How to implement Angular material tabs?
- How to implement angular material snackbar | toast in Angular?
- How to implement Angular material dialog .?
- How to implement Angular material grid .?
- How to implement Angular material list in Angular .?
- How to implement Angular material card in Angular?
- How to implement angular material datepicker in Angular .?
- How to implement the Angular material table?
I have a user signup form that asks for a password. The requirements for the password are minimum 8 characters long and at least 3 of those characters have to be unique. I want to have two separate error messages on that field — one that checks length and one that checks uniqueness. I can’t get the messages to actually toggle between each other. Uniqueness is the only one that shows up no matter what I do. Code as it currently stands:
Component:
import { Component, OnInit } from '@angular/core';
import { FormGroup, FormBuilder, Validators, AbstractControl, FormControl, FormGroupDirective, NgForm } from '@angular/forms';
import { ErrorStateMatcher } from '@angular/material/core';
import { UserService } from './user.service';import { User } from './user';

// instantiate a new user
export class NewUser {
    constructor(
        public firstName = '',
        public lastName = '',
        public email = '',
        public password = '',
        public passwordConfirmation = '',
    ) { }
}

// Custom validator to match passwords.
export function matchValidator(form: FormGroup) {
    const condition = form.get('password').value !== form.get('passwordConfirmation').value;
    return condition ? { mismatch: true } : null;
}

// Custom validator to confirm 3 unique characters.
export function uniqueValidator(control: AbstractControl) {
    const condition = new Set(control.value).size < 3;
    return condition ? { unique: true } : null;
}

// https://stackoverflow.com/questions/47884655/display-custom-validator-error-with-mat-error
export class CrossFieldErrorMatcher implements ErrorStateMatcher {
    isErrorState(control: FormControl | null, form: FormGroupDirective | NgForm | null): boolean {
        return control.touched && form.invalid;
    }
}

// https://stackoverflow.com/questions/47884655/display-custom-validator-error-with-mat-error
export const formErrors: { [key: string]: string } = {
    required: 'This is a required field',
    pattern: 'Email must be a valid email address (leia@alderaan.net).',
    minLength: 'Password must contain at least 8 characters.',
    mismatch: 'Passwords don't match.',
    unique: 'Passwords must contain at least 3 unique characters.'
};

@Component({
    selector: 'app-new-user-form',
    templateUrl: './new-user-form.component.html',
    styleUrls: ['./new-user-form.component.css'],
})

export class NewUserFormComponent implements OnInit {
    newUserForm: FormGroup;
    newUser = new NewUser;
    users: User[];
    httpErrors: string;
    formErrors = formErrors;
    crossFieldErrorMatcher = new CrossFieldErrorMatcher();
    hide = true;
    userSaved = false;

    constructor(private fb: FormBuilder, private userService: UserService) { }

    ngOnInit(): void {
        this.newUserForm = this.fb.group({
            firstName: ['', Validators.required],
            lastName: ['', Validators.required],
            email: ['', [Validators.required, Validators.pattern('[\w\.-]+@[\w\.-]+\.\w{2,4}')]],
            password: ['', [Validators.required, Validators.minLength(8), uniqueValidator]],
            passwordConfirmation: ['', Validators.required],
        }, { validator: matchValidator })
    ;}

    save(): void {
        if (this.newUserForm.valid) {
            const u = { ...this.newUser, ...this.newUserForm.value };
            this.userService.createUser(u)
                .subscribe(
                    () => this.onSaveComplete(),
                    error => this.httpErrors = error
                );
        } else {
            this.httpErrors = 'Please correct the validation errors.';
        }
    }

    onSaveComplete(): void {
        this.userSaved = true;
        setTimeout(function () {
            this.userSaved = false;
        }.bind(this), 3000);
        this.newUserForm.reset();
        return;
    }
}
HTML:
<form (ngSubmit)="save()" [formGroup]="newUserForm" class="col-12" (keyup.enter)="save()">

    <!-- FIRST NAME -->
    <mat-form-field appearance="standard">
    <mat-label>First name</mat-label>
    <input matInput type="text" formControlName="firstName" required>
</mat-form-field>

<!-- LAST NAME -->
<mat-form-field appearance="standard">
    <mat-label>Last name</mat-label>
    <input matInput type="text" formControlName="lastName" required>
</mat-form-field>

    <!-- EMAIL -->
<mat-form-field appearance="standard">
    <mat-label>Email</mat-label>
    <input matInput type="email" formControlName="email" required>
    <mat-hint>{{ formErrors.pattern }}</mat-hint>
    <mat-error>{{ formErrors.pattern }}</mat-error>
</mat-form-field>

    <!-- PASSWORD -->
<mat-form-field appearance="standard">
    <mat-label>Password</mat-label>
        <input matInput [type]="hide ? 'password' : 'text'" formControlName="password" required>
    <div matSuffix matRipple [matRippleColor]="myColor" style="border-radius: 50%; padding: 0.3rem;">
        <mat-icon (click)="hide = !hide">{{hide ? 'visibility_off' : 'visibility'}}</mat-icon>
    </div>
    <mat-error *ngIf="newUserForm.get('password').errors?.minLength">{{ formErrors.minLength }}</mat-error>
    <mat-error *ngIf="newUserForm.get('password').errors?.unique">{{ formErrors.unique }}</mat-error>
</mat-form-field>

    <!-- PASSWORD CONFIRMATION -->
<mat-form-field appearance="standard">
    <mat-label>Confirm password</mat-label>
    <input matInput type="password" formControlName="passwordConfirmation" required [errorStateMatcher]="crossFieldErrorMatcher">
    <mat-error>{{ formErrors.mismatch }}</mat-error>
    </mat-form-field>

</form>