|
Разберём плейбук который будет проверять наличие установленных пакетов: Проверяем используя shell: — name: Check install java shell: java -version 2>&1 | grep version | awk ‘{print $1}‘ | sed ‘s/«//g’ # команда вернёт java или openjdk register: java_result #записываем результат в данную переменную — debug: var: java_result # вывод записанного результата — name: Install default packages yum: name: «{{item}}« state: present with_items: — java-1.8.0-openjdk when: java_result.stdout != «java» and java_result.stdout != «openjdk» # когда stdout у записанной ранее переменной НЕ равен java или openjdk |
|
# то тогда будет установлена java-1.8.0-openjdk |
===========================================================================
Проверяем наличие 2х установленных пакетов python и tcpdump используем модуль package_facts
|
1 2 3 4 5 6 7 8 9 10 11 12 13 14 15 16 17 18 19 20 21 22 |
— — hosts: 123.456.789.000 user: ansible become: true gather_facts: yes ignore_errors: yes become_method: sudo tasks: — name: «Check if python and tcpdump is installed» package_facts: manager: «auto» — name: «python or tcpdump is installed» debug: msg: «Packpage FOUND» #Данное сообщение будет выведено если выполнится условие ниже when: — «‘python’ in ansible_facts.packages» #Если пакет python содержится в ansible_facts.packages — «‘tcpdump’ in ansible_facts.packages» #Если пакет tcpdump содержится в ansible_facts.packages — name: «python or tcpdump is NOT installed» debug: msg: «Packpage NOT found» #Данное сообщение будет выведено если выполнится условие ниже when: «‘python’ not in ansible_facts.packages or ‘tcpdump’ not in ansible_facts.packages» # если пакет python или tcpdump не установлены |
========================================
|
1 2 3 4 5 6 7 8 9 10 11 12 13 14 15 16 17 18 19 20 21 22 23 24 25 26 27 28 29 30 31 |
— — hosts: 10.242.144.142 user: ansible become: true gather_facts: yes ignore_errors: yes become_method: sudo tasks: — name: «Check if python and tcpdump is installed» package_facts: manager: «auto» register: version # — debug: # var: ansible_facts.packages — name: list some packages yum: list=git register: out_some — debug: var=out_some.results[1].version — name: «python or tcpdump is installed» debug: msg: «Packpage FOUND« when: — «‘python’ in ansible_facts.packages» — «‘tcpdump’ in ansible_facts.packages» — name: «python or tcpdump is NOT installed» debug: msg: «Packpage NOT found» when: «‘python’ not in ansible_facts.packages or ‘tcpdump’ not in ansible_facts.packages» |
====================================
Делегирование задачи другому хосту
Иногда требуется выполнить задачу на определённом узле, но в контексте другого узла. Например, во время обновления узла может возникнуть необходимость отключить для него мониторинг, находящийся на отдельном сервере. Для этого используется управляющая директива delegate_to. Приведём пример:
|
— name: disable nagios alerts <span class=«hljs-keyword»>for</span> <span class=«hljs-keyword»>this</span> host webserver service nagios: action=disable_alerts host={{inventory_hostname}} services=dnsserver delegate_to: mon_host.example.com |
Результатом выполнения этой задачи будет отключение сообщений для сервиса dnsserver в Nagios.
====================================================
Узнать определена ли (существует ли) переменная в Ansible:
|
tasks: — shell: echo «The variable ‘foo’ is defined: ‘{{ foo }}‘» when: foo is defined — fail: msg=»The variable ‘bar’ is not defined» when: bar is undefined |
Проверить является ли переменная в Ansible пустой:
|
tasks: — fail: msg=»The variable ‘bar’ is empty» when: bar|length == 0 — shell: echo «The variable ‘foo’ is not empty: ‘{{ foo }}‘» when: foo|length > 0 |
Убедиться что переменная в Ansible определена и не является пустой:
|
tasks: — shell: echo «The variable ‘foo’ is defined and not empty» when: (foo is defined) and (foo|length > 0) — fail: msg=»The variable ‘bar’ is not defined or empty» when: (bar is not defined) or (bar|length == 0) |
Узнать имеет ли переменная в Ansible значение True или False:
|
tasks: — shell: echo «The variable ‘foo’ is ‘True'» when: foo|bool == True — shell: echo «The variable ‘bar’ is ‘False'» when: bar|bool == False |
выполнение задачи на определённой группе из группы:
cat /etc/ansible/hosts
[nfs:children]
nfsmaster
nfsclient
[nfsmaster]
192.168.1.112
[nfsclient]
192.168.1.111
192.168.1.110
|
— — name: Create a directory if it does not exist file: path: /share state: directory mode: 0755 owner: root group: root when: inventory_hostname in groups[‘nfsmaster’] |
Печать Переменных & Вывод Всех Переменных — Playbook
Во время отладки плейбука в Ansible, полезно знать как, отобразить заданные переменные или известные о хосте факты.
В Ansible, для печати сообщений из плейбука, а также для вывода значений переменных, мы можем использовать модуль debug.
В следующих примерах я показываю, как напечатать конкретные переменные в Ansible и как вывести список всех известных фактов и переменных в Ansible с помощью плейбука.
Debug Ansible Playbook — Печать Переменных
Вывести значение переменной:
|
— name: «Ansible | Print a variable» debug: msg: «The operating system is {{ ansible_distribution }}« |
Напечатать переменную только если она определена:
|
— name: «Ansible | Print a variable if defined» debug: msg: «The ‘foo’ variable value is {{ foo }}« when: foo is defined — name: «Ansible | Print a message if a variable is undefined« debug: msg: «The ‘bar’ variable is undefined» when: bar is not defined |
Печать нескольких переменных:
|
— name: «Ansible | Print multiple variable» debug: msg: | The role is {{ host_role }} The environment is {{ host_environment }} |
Вывести список всех известных фактов и переменных:
|
— name: «Ansible | List all known variables and facts» debug: var: hostvars[inventory_hostname] |
Jinja2: Проверка Существования и Значения Переменной
В Jinja2-темплейтах является хорошей практикой заранее проверять существует ли переменная и какое у нее значение.
Существует несколько полезных проверок, которые вы можете сделать с помощью встроенных в Jinja2 тестов и фильтров.
В этой статье я покажу, как проверить, существует ли переменная, является ли она пустой или она установлена в значение True.
Проверка Переменной в Jinja2
Проверить существует ли (определена ли) переменная:
|
{% if variable is defined %} variable is defined {% else %} variable is not defined {% endif %} |
Проверить является ли пустой переменная:
|
{% if variable|length %} variable is not empty {% else %} variable is empty {% endif %} |
Проверить установлена ли в значение true переменная:
|
{% if variable is sameas true %} variable is true {% else %} variable is not true {% endif %} |
Проверить что переменная существует и не является пустой:
|
{% if variable is defined and variable|length %} variable is defined and not empty {% else %} variable is not defined or empty {% endif %} |
Проверить что переменная существует и установлена в значение true:
|
{% if variable is defined and variable is sameas true %} variable is defined and true {% else %} variable is not defined or not set to true {% endif %} |
======================================================================================
Ещё немного о WHEN
Использование когда с фактами
Вы можете использовать условные выражения when для запуска задачи, только если выполняется определенное условие. Для демонстрации создайте новую книгу воспроизведения с именем ubuntu-server.yml со следующим содержимым:
[codesyntax lang=»php»]
|
— name: Using when with facts hosts: all tasks: — name: Detect Ubuntu Servers debug: msg: «This is an Ubuntu Server.» when: ansible_facts[‘distribution’] == «Ubuntu» |
[/codesyntax]
Теперь запустите playbook:
|
1 2 3 4 5 6 7 8 9 10 11 12 13 14 15 16 17 18 19 20 21 22 23 24 |
[des@andrey]$ ansible-playbook ubuntu-servers.yml PLAY [Using when with facts] ******************************************* TASK [Gathering Facts] ********************************************************* ok: [node4] ok: [node1] ok: [node3] ok: [node2] TASK [Detect Ubuntu Servers] *************************************************** skipping: [node1] skipping: [node2] skipping: [node3] ok: [node4] => { «msg»: «Это сервер Ubuntu.» } PLAY RECAP ********************************************************************* node1 : ok=1 changed=0 unreachable=0 failed=0 skipped=1 node2 : ok=1 changed=0 unreachable=0 failed=0 skipped=1 node3 : ok=1 changed=0 unreachable=0 failed=0 skipped=1 node4 : ok=2 changed=0 unreachable=0 failed=0 skipped=0 |
Обратите внимание, как мы использовали факт Ansible ansible_facts[‘distribution’] в условии when, чтобы проверить, на каких узлах работает Ubuntu. Также обратите внимание, что вам не нужно заключать переменные в фигурные скобки при использовании условных выражений when.
В выходных данных playbook обратите внимание, как TASK [Detect Ubuntu Servers] пропущены первые три узла, поскольку все они работают под CentOS и работают только на node4, поскольку он работает под управлением Ubuntu.
Использование when с регистрами
Вы также можете использовать условные выражения с зарегистрированными переменными. Например, следующая книга centos-servers.yml покажет, на каких узлах работает CentOS:
[codesyntax lang=»php»]
|
— name: Using when with registers hosts: all tasks: — name: Save the contents of /etc/os-release command: cat /etc/os-release register: os_release — name: Detect CentOS Servers debug: msg: «Запуск CentOS…» when: os_release.stdout.find(‘CentOS’) != -1 |
[/codesyntax]
Плейбук сначала начинается с сохранения содержимого файла /etc/os-release в регистр os_release . Затем вторая задача отображает сообщение «Запуск CentOS…», только если слово «CentOS» встречается в стандартном выводе os_release .
Идите вперед и запустите playbook:
|
1 2 3 4 5 6 7 8 9 10 11 12 13 14 15 16 17 18 19 20 21 22 23 24 25 26 27 28 29 30 31 32 33 |
[des@andrey]$ ansible-playbook centos-servers.yml PLAY [Using when with registers] *********************************************** TASK [Gathering Facts] ********************************************************* ok: [node4] ok: [node1] ok: [node3] ok: [node2] TASK [Save the contents of /etc/os-release] ************************************ changed: [node4] changed: [node1] changed: [node2] changed: [node3] TASK [Detect CentOS Servers] *************************************************** ok: [node1] => { «msg»: «Запуск CentOS…» } ok: [node2] => { «msg»: «Запуск CentOS…» } ok: [node3] => { «msg»: «Запуск CentOS…» } skipping: [node4] PLAY RECAP ********************************************************************* node1 : ok=3 changed=1 unreachable=0 failed=0 skipped=0 node2 : ok=3 changed=1 unreachable=0 failed=0 skipped=0 node3 : ok=3 changed=1 unreachable=0 failed=0 skipped=0 node4 : ok=2 changed=1 unreachable=0 failed=0 skipped=1 |
Обратите внимание, как работает TASK [Detect CentOS Servers] только на первых трех узлах и пропускается node4 (Ubuntu).
Тестирование нескольких условий с помощью when
Вы также можете проверить несколько условий одновременно, используя логические операторы. Например, следующая перезагрузка-centos8.yml Playbook использует логический и оператора для перезагрузки серверов, работающих под управлением CentOS версии 8:
[codesyntax lang=»php»]
|
— name: Reboot Servers hosts: all tasks: — name: Reboot CentOS 8 servers reboot: msg: «Сервер перезагружается…» when: ansible_facts[‘distribution’] == «CentOS» and ansible_facts[‘distribution_major_version’] == «8» |
[/codesyntax]
Вы также можете использовать логический оператор или для запуска задачи, если выполняется какое-либо из условий. Например, следующая задача будет перезагружать серверы , на которых работает CentOS или RedHat :
[codesyntax lang=»php»]
|
tasks: — name: Reboot CentOS and RedHat Servers reboot: msg: «Сервер перезагружается…» when: ansible_facts[‘distribution’] == «CentOS» or ansible_facts[‘distribution’] == «RedHat» |
[/codesyntax]
Использование when с петлями
Если вы объедините условный оператор when с циклом, Ansible проверит условие для каждого элемента в цикле отдельно.
Например, следующий сценарий print-even.yml напечатает все четные числа в диапазоне (1,11):
[codesyntax lang=»php»]
|
— name: Print Some Numbers hosts: node1 tasks: — name: Print Even Numbers debug: msg: Number {{ item }} is Even. loop: «{{ range(1,11) | list }}« when: item % 2 == 0 |
[/codesyntax]
Продолжайте и запустите playbook, чтобы увидеть список всех четных чисел в диапазоне (1,11):
|
1 2 3 4 5 6 7 8 9 10 11 12 13 14 15 16 17 18 19 20 21 22 23 24 25 26 27 28 29 30 31 |
[des@andrey]$ ansible-playbook print-even.yml PLAY [Print Some Numbers] ********************************** TASK [Gathering Facts] **************************** ok: [node1] TASK [Print Even Numbers] ****************************** skipping: [node1] => (item=1) ok: [node1] => (item=2) => { «msg»: «Число 2 четное.» } skipping: [node1] => (item=3) ok: [node1] => (item=4) => { «msg»: «Число 4 четное.» } skipping: [node1] => (item=5) ok: [node1] => (item=6) => { «msg»: «Число 6 четное.» } skipping: [node1] => (item=7) ok: [node1] => (item=8) => { «msg»: «Число 8 четное.» } skipping: [node1] => (item=9) ok: [node1] => (item=10) => { «msg»: «Число 10 четное.» } PLAY RECAP *********************************** node1 : ok=2 changed=0 unreachable=0 failed=0 skipped=0 |
Использование when с переменными
Вы также можете использовать условные операторы when с вашими собственными определенными переменными. Помните, что условные выражения требуют логических входных данных; то есть, для срабатывания условия тест должен быть истинным, поэтому вам нужно использовать фильтр bool с небулевыми переменными.
Чтобы продемонстрировать это, взгляните на следующий сборник сценариев isfree.yml :
[codesyntax lang=»php»]
|
— name: hosts: node1 vars: weekend: true on_call: «no» tasks: — name: Run if «weekend» is true and «on_call» is false debug: msg: «Вы свободны!» when: weekend and not on_call | bool |
[/codesyntax]
Обратите внимание, что здесь я использовал фильтр bool для преобразования значения on_call в его логический эквивалент (no -> false).
Кроме того, вы должны знать, что not false – это истина, и поэтому в этом случае все условие будет оцениваться как true; ты свободен!
Вы также можете проверить, установлена ли переменная или нет; например, следующая задача будет выполняться, только если определена переменная car :
[codesyntax lang=»php»]
|
tasks: — name: Run only if you got a car debug: msg: «Давай отправимся в путешествие…» when: car is defined |
[/codesyntax]
Следующая задача использует сбой модуля потерпеть неудачу , если ключи переменная не определена:
[codesyntax lang=»php»]
|
tasks: — name: Fail if you got no keys fail: msg: «Эта игра требует некоторых ключей» when: keys is undefined |
[/codesyntax]
Обработка исключений с помощью блоков
Поговорим об обработке исключений.
Группировка задач с блоками
Вы можете использовать блоки для группировки связанных задач. Для демонстрации взгляните на следующую книгу install-apache.yml :
[codesyntax lang=»php»]
|
1 2 3 4 5 6 7 8 9 10 11 12 13 14 15 16 17 18 19 |
— name: Install and start Apache Play hosts: webservers tasks: — name: Install and start Apache block: — name: Install httpd yum: name: httpd state: latest — name: Start and enable httpd service: name: httpd state: started enabled: yes — name: This task is outside the block debug: msg: «Сейчас я нахожусь за пределами блока…» |
[/codesyntax]
Playbook запускается на хостах группы веб-серверов и имеет один блок с именем Установить и запустить Apache, который включает в себя две задачи:
- Установить httpd
- Запустить и включить httpd
Первая задача Install httpd использует модуль yum для установки пакета httpd apache. Вторая задача использует служебный модуль для запуска и разрешает запуск httpd при загрузке.
Обратите внимание, что в playbook есть третья задача, которая не принадлежит блоку Install and start Apache.
Теперь запустите playbook, чтобы установить и запустить httpd на узлах веб-серверов:
|
1 2 3 4 5 6 7 8 9 10 11 12 13 14 15 16 17 18 19 20 21 22 23 24 25 26 27 |
[des@andrey]$ ansible-playbook install-apache.yml PLAY [Install and start Apache Play] ******************************************* TASK [Gathering Facts] ********************************************************* ok: [node3] ok: [node2] TASK [Install httpd] *********************************************************** changed: [node2] changed: [node3] TASK [Start and enable httpd] ************************************************** changed: [node3] changed: [node2] TASK [This task is outside the block] ****************************************** ok: [node2] => { «msg»: «Сейчас я нахожусь за пределами квартала…» } ok: [node3] => { «msg»: «Сейчас я нахожусь за пределами квартала…» } PLAY RECAP ********************************************************************* node2 : ok=4 changed=2 unreachable=0 failed=0 skipped=0 node3 : ok=4 changed=2 unreachable=0 failed=0 skipped=0 |
Вы также можете выполнить специальную команду, чтобы убедиться, что httpd действительно запущен и работает:
|
1 2 3 4 5 6 7 8 9 10 11 12 13 14 15 16 17 18 19 20 21 22 23 24 25 26 27 28 29 30 31 32 33 34 35 36 37 38 39 |
[des@andrey]$ ansible webservers -m command -a «systemctl status httpd» node3 | CHANGED | rc=0 >> ● httpd.service — The Apache HTTP Server Loaded: loaded (/usr/lib/systemd/system/httpd.service; enabled; vendor preset: disabled) Active: active (running) since Tue 2020-11-03 19:35:13 UTC; 1min 37s ago Docs: man:httpd.service(8) Main PID: 47122 (httpd) Status: «Running, listening on: port 80″ Tasks: 213 (limit: 11935) Memory: 25.1M CGroup: /system.slice/httpd.service ├─47122 /usr/sbin/httpd -DFOREGROUND ├─47123 /usr/sbin/httpd -DFOREGROUND ├─47124 /usr/sbin/httpd -DFOREGROUND ├─47125 /usr/sbin/httpd -DFOREGROUND └─47126 /usr/sbin/httpd -DFOREGROUND Nov 03 19:35:13 node3 systemd[1]: Starting The Apache HTTP Server… Nov 03 19:35:13 node3 systemd[1]: Started The Apache HTTP Server. Nov 03 19:35:13 node3 httpd[47122]: Server configured, listening on: port 80 node2 | CHANGED | rc=0 >> ● httpd.service — The Apache HTTP Server Loaded: loaded (/usr/lib/systemd/system/httpd.service; enabled; vendor preset: disabled) Active: active (running) since Tue 2020-11-03 19:35:13 UTC; 1min 37s ago Docs: man:httpd.service(8) Main PID: 43695 (httpd) Status: «Running, listening on: port 80″ Tasks: 213 (limit: 11935) Memory: 25.1M CGroup: /system.slice/httpd.service ├─43695 /usr/sbin/httpd -DFOREGROUND ├─43696 /usr/sbin/httpd -DFOREGROUND ├─43697 /usr/sbin/httpd -DFOREGROUND ├─43698 /usr/sbin/httpd -DFOREGROUND └─43699 /usr/sbin/httpd -DFOREGROUND Nov 03 19:35:13 node2 systemd[1]: Starting The Apache HTTP Server… Nov 03 19:35:13 node2 systemd[1]: Started The Apache HTTP Server. Nov 03 19:35:13 node2 httpd[43695]: Server configured, listening on: port 80 |
Обработка сбоев с помощью блоков
Вы также можете использовать блоки для обработки ошибок задач, используя разделы rescue и always. Это очень похоже на обработку исключений в языках программирования, таких как try-catch в Java или try-except в Python.
Вы можете использовать раздел восстановления, чтобы включить все задачи, которые вы хотите запустить в случае сбоя одной или нескольких задач в блоке.
Для демонстрации давайте взглянем на следующий пример:
[codesyntax lang=»php»]
|
1 2 3 4 5 6 7 8 9 10 11 12 13 14 15 16 17 |
tasks: — name: Handling error example block: — name: run a command command: uptime — name: run a bad command command: blabla — name: This task will not run debug: msg: «Я не запускаю потому что вышеприведенная задача провалилась.» rescue: — name: Runs when the block failed debug: msg: «Блок не удался; давайте попробуем исправить это здесь…» |
[/codesyntax]
Обратите внимание, как вторая задача в блоке run a bad command генерирует ошибку, и, в свою очередь, третья задача в блоке никогда не получает возможности запустить. Задачи внутри спасательной секции будут работать , потому что вторая задача в блоке не удалась.
Вы также можете использовать ignore_errors: yes, чтобы гарантировать, что Ansible продолжит выполнение задач в playbook, даже если задача не удалась:
[codesyntax lang=»php»]
|
1 2 3 4 5 6 7 8 9 10 11 12 13 14 15 16 17 18 |
tasks: — name: Handling error example block: — name: run a command command: uptime — name: run a bad command command: blabla ignore_errors: yes — name: This task will run debug: msg: «Запуск потому что вышеуказанные ошибки задачи были проигнорированы.» rescue: — name: This will not run debug: msg: «Ошибки были проигнорированы! … не собирается запускаться.» |
[/codesyntax]
Обратите внимание, что в этом примере вы проигнорировали ошибки во второй задаче в блоке run a bad command, и поэтому третья задача была запущена. Кроме того, спасательный раздел не будет работать , как вы игнорировали ошибку во второй задаче в блоке.
Вы также можете добавить в блок раздел всегда. Задачи в разделе всегда будут выполняться всегда, независимо от того, произошел сбой блока или нет.
Чтобы продемонстрировать это, взгляните на следующую книгу воспроизведения handle-errors.yml, в которой есть все три раздела блока (block, rescue, always):
[codesyntax lang=»php»]
|
1 2 3 4 5 6 7 8 9 10 11 12 13 14 15 16 17 18 19 20 21 22 23 24 |
— name: Handling Errors with Blocks hosts: node1 tasks: — name: Handling Errors Example block: — name: run a command command: uptime — name: run a bad command command: blabla — name: This task will not run debug: msg: «Я не запускаюсь потому что вышеприведенная задача провалилась!» rescue: — name: Runs when the block fails debug: msg: «Блок провалился! давайте попробуем исправить это здесь…» always: — name: This will always run debug: msg: «Независимо от того, провалился блок или нет ... Я всегда буду запускаться.!« |
[/codesyntax]
Идите вперед и запустите playbook:
|
1 2 3 4 5 6 7 8 9 10 11 12 13 14 15 16 17 18 19 20 21 22 23 24 25 |
[des@andrey]$ ansible-playbook handle-errors.yml PLAY [Handling Errors with Blocks] ********************************************* TASK [Gathering Facts] ********************************************************* ok: [node1] TASK [run a command] *********************************************************** changed: [node1] TASK [run a bad command] ******************************************************* fatal: [node1]: FAILED! => {«changed»: false, «cmd»: «blabla», «msg»: «[Errno 2] No such file or directory: b’blabla’: b’blabla'», «rc»: 2} TASK [Runs when the block fails] *********************************************** ok: [node1] => { «msg»: «Block failed! let’s try to fix it here …» } TASK [This will always run] **************************************************** ok: [node1] => { «msg»: «Whether the block has failed or not … I will always run!» } PLAY RECAP ********************************************************************* node1 : ok=4 changed=1 unreachable=0 failed=0 skipped=0 |
Как вы видете; спасательный раздел ли работать как 2 – й задача в блоке произошел сбой, и вы не игнорировать ошибки. Кроме того, всегда выполнялся (и будет всегда) раздел всегда.
Запуск задач при изменении с помощью обработчиков
Посмотрим, как менять обработчики и запускать задачи.
Запуск вашего первого обработчика
Вы можете использовать обработчики для запуска задач при изменении на ваших управляемых узлах. Чтобы продемонстрировать это, взгляните на следующий сборник handler-example.yml:
[codesyntax lang=»php»]
|
1 2 3 4 5 6 7 8 9 10 11 12 13 14 15 16 17 18 |
— name: Simple Handler Example hosts: node1 tasks: — name: Create engineers group group: name: engineers notify: add destroyer — name: Another task in the play debug: msg: «I am just another task.» handlers: — name: add destroyer user: name: destroyer groups: engineers append: yes |
[/codesyntax]
Первая задача Create engineers groupсоздает группу инженеров, а также уведомляет обработчика add destroyer.
Давайте запустим сценарий, чтобы увидеть, что произойдет:
|
1 2 3 4 5 6 7 8 9 10 11 12 13 14 15 16 17 18 19 20 |
[des@andrey]$ ansible-playbook handler-example.yml PLAY [Simple Handler Example] ************************************************** TASK [Gathering Facts] ********************************************************* ok: [node1] TASK [Create engineers group] ************************************************** changed: [node1] TASK [Another task in the play] ************************************************ ok: [node1] => { «msg»: «I am just another task.» } RUNNING HANDLER [add destroyer] *************************************************** changed: [node1] PLAY RECAP ********************************************************************* node1 : ok=4 changed=2 unreachable=0 failed=0 skipped=0 |
Обратите внимание, что создание инженеров вызвало изменение на node1 и в результате запустило add destroyerобработчик.
Вы также можете запустить быструю специальную команду, чтобы убедиться, что пользователь destroyer действительно является членом группы инженеров:
|
[des@andrey]$ ansible node1 -m command -a «id destroyer» node1 | CHANGED | rc=0 >> uid=1000(destroyer) gid=1000(destroyer) groups=1000(destroyer),4(adm),190(systemd-journal),1004(engineers) |
Плейбуки и модули Ansible являются идемпотентными, что означает, что если на управляемых узлах произошло изменение конфигурации; он больше не повторится!
Чтобы полностью понять концепцию идемпотентности Ansible; запустите playbook handler-example.yml еще раз:
|
1 2 3 4 5 6 7 8 9 10 11 12 13 14 15 16 17 |
[des@andrey]$ ansible-playbook handler-example.yml PLAY [Simple Handler Example] ************************************************** TASK [Gathering Facts] ********************************************************* ok: [node1] TASK [Create engineers group] ************************************************** ok: [node1] TASK [Another task in the play] ************************************************ ok: [node1] => { «msg»: «I am just another task.» } PLAY RECAP ********************************************************************* node1 : ok=3 changed=0 unreachable=0 failed=0 skipped=0 |
Как вы видете; на этот раз Create engineers group задача не вызвала и не сообщила об изменении, потому что группа инженеров уже существует на node1 и, как результат; обработчик add destroyer не запустился.
Контроль, когда сообщать об изменении
Вы можете использовать ключевое слово changed_when, чтобы указать, когда задача должна сообщать об изменении. Чтобы продемонстрировать это, взгляните на следующий сценарий control-change.yml:
[codesyntax lang=»php»]
|
— name: Control Change hosts: node1 tasks: — name: Run the date command command: date notify: handler1 — name: Run the uptime command command: uptime handlers: — name: handler1 debug: msg: «I can handle dates» |
[/codesyntax]
Обратите внимание, как первая задача Run the date commandзапускает handler1. А теперь запустите playbook:
|
1 2 3 4 5 6 7 8 9 10 11 12 13 14 15 16 17 18 19 20 |
[des@andrey]$ ansible-playbook control-change.yml PLAY [Control Change] ********************************************************** TASK [Gathering Facts] ********************************************************* ok: [node1] TASK [Run the date command] **************************************************** changed: [node1] TASK [Run the uptime command] ************************************************** changed: [node1] RUNNING HANDLER [handler1] ***************************************************** ok: [node1] => { «msg»: «I can handle dates» } PLAY RECAP ********************************************************************* node1 : ok=4 changed=2 unreachable=0 failed=0 skipped=0 |
Обе задачи Run the date command и Run the uptime command зарегистрированные изменения, и обработчик handler1 был запущен. Вы можете утверждать, что выполнение команд date и uptime на самом деле ничего не меняет на управляемом узле, и вы совершенно правы!
Теперь давайте отредактируем playbook, чтобы задача не сообщала об изменениях:
[codesyntax lang=»php»]
|
— name: Control Change hosts: node1 tasks: — name: Run the date command command: date notify: handler1 changed_when: false — name: Run the uptime command command: uptime handlers: — name: handler1 debug: msg: «I can handle dates» |
[/codesyntax]
Теперь снова запустите playbook:
|
[des@andrey]$ ansible-playbook control-change.yml PLAY [Control Change] ********************************************************** TASK [Gathering Facts] ********************************************************* ok: [node1] TASK [Run the date command] **************************************************** ok: [node1] TASK [Run the uptime command] ************************************************** changed: [node1] PLAY RECAP ********************************************************************* node1 : ok=3 changed=1 unreachable=0 failed=0 skipped=0 |
Как видите, на этот раз задача не сообщила об изменении, и в результате handler1 не был запущен.
Настройка сервисов с обработчиками
Обработчики особенно полезны, когда вы редактируете конфигурации служб с помощью Ansible. Это потому, что вы хотите перезапустить службу только при изменении ее конфигурации службы.
Чтобы продемонстрировать это, взгляните на следующую инструкцию configure-ssh.yml :
[codesyntax lang=»php»]
|
1 2 3 4 5 6 7 8 9 10 11 12 13 14 15 16 17 |
— name: Configure SSH hosts: all tasks: — name: Edit SSH Configuration blockinfile: path: /etc/ssh/sshd_config block: | MaxAuthTries 4 Banner /etc/motd X11Forwarding no notify: restart ssh handlers: — name: restart ssh service: name: sshd state: restarted |
[/codesyntax]
Обратите внимание, что мы использовали модуль blockinfile для вставки нескольких строк текста в файл конфигурации /etc/ssh/sshd_config. Задача также вызывает обработчик restart ssh по изменению.
Идите вперед и запустите playbook:
|
1 2 3 4 5 6 7 8 9 10 11 12 13 14 15 16 17 18 19 20 21 22 23 24 25 26 27 |
[des@andrey]$ ansible-playbook configure-ssh.yml PLAY [Configure SSH] *********************************************************** TASK [Gathering Facts] ********************************************************* ok: [node4] ok: [node3] ok: [node1] ok: [node2] TASK [Edit SSH Configuration] ************************************************** changed: [node4] changed: [node2] changed: [node3] changed: [node1] RUNNING HANDLER [restart ssh] ************************************************** changed: [node4] changed: [node3] changed: [node2] changed: [node1] PLAY RECAP ********************************************************************* node1 : ok=3 changed=2 unreachable=0 failed=0 skipped=0 node2 : ok=3 changed=2 unreachable=0 failed=0 skipped=0 node3 : ok=3 changed=2 unreachable=0 failed=0 skipped=0 node4 : ok=3 changed=2 unreachable=0 failed=0 skipped=0 |
Все хорошо! Теперь давайте быстро взглянем на последние несколько строк в файле/etc/ssh/sshd_config:
|
[des@andrey]$ ansible node1 -m command -a «tail -5 /etc/ssh/sshd_config» node1 | CHANGED | rc=0 >> # BEGIN ANSIBLE MANAGED BLOCK MaxAuthTries 4 Banner /etc/motd X11Forwarding no # END ANSIBLE MANAGED BLOCK |
Удивительно! Точно так, как вы ожидали. Имейте в виду, что если вы повторно запустите playbook configure-ssh.yml, Ansible не будет редактировать (или добавлять) файл /etc/ssh/sshd_config. Вы можете попробовать это сами.
Мы также рекомендуем вам взглянуть на страницы документации blockinfile и lineinfile, чтобы понять различия и использование каждого модуля:
|
[des@andrey]$ ansible-doc blockinfile [des@andrey]$ ansible-doc lineinfile |
Topics
-
Error Handling In Playbooks
-
Ignoring Failed Commands
-
Resetting Unreachable Hosts
-
Handlers and Failure
-
Controlling What Defines Failure
-
Overriding The Changed Result
-
Aborting the play
-
Using blocks
-
Ansible normally has defaults that make sure to check the return codes of commands and modules and
it fails fast – forcing an error to be dealt with unless you decide otherwise.
Sometimes a command that returns different than 0 isn’t an error. Sometimes a command might not always
need to report that it ‘changed’ the remote system. This section describes how to change
the default behavior of Ansible for certain tasks so output and error handling behavior is
as desired.
Ignoring Failed Commands
Generally playbooks will stop executing any more steps on a host that has a task fail.
Sometimes, though, you want to continue on. To do so, write a task that looks like this:
- name: this will not be counted as a failure
  command: /bin/false
  ignore_errors: yes
Note that the above system only governs the return value of failure of the particular task,
so if you have an undefined variable used or a syntax error, it will still raise an error that users will need to address.
Note that this will not prevent failures on connection or execution issues.
This feature only works when the task must be able to run and return a value of ‘failed’.
Resetting Unreachable Hosts
New in version 2.2.
Connection failures set hosts as ‘UNREACHABLE’, which will remove them from the list of active hosts for the run.
To recover from these issues you can use meta: clear_host_errors to have all currently flagged hosts reactivated,
so subsequent tasks can try to use them again.
Handlers and Failure
When a task fails on a host, handlers which were previously notified
will not be run on that host. This can lead to cases where an unrelated failure
can leave a host in an unexpected state. For example, a task could update
a configuration file and notify a handler to restart some service. If a
task later on in the same play fails, the service will not be restarted despite
the configuration change.
You can change this behavior with the --force-handlers command-line option,
or by including force_handlers: True in a play, or force_handlers = True
in ansible.cfg. When handlers are forced, they will run when notified even
if a task fails on that host. (Note that certain errors could still prevent
the handler from running, such as a host becoming unreachable.)
Controlling What Defines Failure
Ansible lets you define what “failure” means in each task using the failed_when conditional. As with all conditionals in Ansible, lists of multiple failed_when conditions are joined with an implicit and, meaning the task only fails when all conditions are met. If you want to trigger a failure when any of the conditions is met, you must define the conditions in a string with an explicit or operator.
You may check for failure by searching for a word or phrase in the output of a command:
- name: Fail task when the command error output prints FAILED
  command: /usr/bin/example-command -x -y -z
  register: command_result
  failed_when: "'FAILED' in command_result.stderr"
or based on the return code:
- name: Fail task when both files are identical
  raw: diff foo/file1 bar/file2
  register: diff_cmd
  failed_when: diff_cmd.rc == 0 or diff_cmd.rc >= 2
In previous version of Ansible, this can still be accomplished as follows:
- name: this command prints FAILED when it fails
  command: /usr/bin/example-command -x -y -z
  register: command_result
  ignore_errors: True

- name: fail the play if the previous command did not succeed
  fail:
    msg: "the command failed"
  when: "'FAILED' in command_result.stderr"
You can also combine multiple conditions for failure. This task will fail if both conditions are true:
- name: Check if a file exists in temp and fail task if it does
  command: ls /tmp/this_should_not_be_here
  register: result
  failed_when:
    - result.rc == 0
    - '"No such" not in result.stdout'
If you want the task to fail when only one condition is satisfied, change the failed_when definition to:
failed_when: result.rc == 0 or "No such" not in result.stdout
If you have too many conditions to fit neatly into one line, you can split it into a multi-line yaml value with >:
- name: example of many failed_when conditions with OR
  shell: "./myBinary"
  register: ret
  failed_when: >
    ("No such file or directory" in ret.stdout) or
    (ret.stderr != '') or
    (ret.rc == 10)
Overriding The Changed Result
When a shell/command or other module runs it will typically report
“changed” status based on whether it thinks it affected machine state.
Sometimes you will know, based on the return code
or output that it did not make any changes, and wish to override
the “changed” result such that it does not appear in report output or
does not cause handlers to fire:
tasks:

  - shell: /usr/bin/billybass --mode="take me to the river"
    register: bass_result
    changed_when: "bass_result.rc != 2"

  # this will never report 'changed' status
  - shell: wall 'beep'
    changed_when: False
You can also combine multiple conditions to override “changed” result:
- command: /bin/fake_command
  register: result
  ignore_errors: True
  changed_when:
    - '"ERROR" in result.stderr'
    - result.rc == 2
Aborting the play
Sometimes it’s desirable to abort the entire play on failure, not just skip remaining tasks for a host.
The any_errors_fatal option will end the play and prevent any subsequent plays from running. When an error is encountered, all hosts in the current batch are given the opportunity to finish the fatal task and then the execution of the play stops. any_errors_fatal can be set at the play or block level:
- hosts: somehosts
  any_errors_fatal: true
  roles:
    - myrole

- hosts: somehosts
  tasks:
    - block:
        - include_tasks: mytasks.yml
      any_errors_fatal: true
for finer-grained control max_fail_percentage can be used to abort the run after a given percentage of hosts has failed.
Using blocks
Most of what you can apply to a single task (with the exception of loops) can be applied at the Blocks level, which also makes it much easier to set data or directives common to the tasks.
Blocks also introduce the ability to handle errors in a way similar to exceptions in most programming languages.
Blocks only deal with ‘failed’ status of a task. A bad task definition or an unreachable host are not ‘rescuable’ errors:
tasks:
- name: Handle the error
  block:
    - debug:
        msg: 'I execute normally'
    - name: i force a failure
      command: /bin/false
    - debug:
        msg: 'I never execute, due to the above task failing, :-('
  rescue:
    - debug:
        msg: 'I caught an error, can do stuff here to fix it, :-)'
This will ‘revert’ the failed status of the outer block task for the run and the play will continue as if it had succeeded.
See Blocks error handling for more examples.

Ansible Error handling – In this lesson, you will learn the different ways of how to handle failures in Ansible tasks by using the ignore_errors, force_handlers, Ansible blocks, Ansible rescue, and Ansible always directives in a playbook.
Contents
- How Can You Handle Error In Ansible
- Specifying Task Failure Conditions
- Managing Changed Status
- Using Ansible Blocks
- Using Ansible Blocks With Rescue and Always Statement
How Can Error Handling Be Done In Ansible
Ansible plays and tasks are executed in the order they are defined in a playbook, and by default, if a task fails, the other tasks will not be executed in that order. However, this behavior can be changed with the use of a keyword called “ignore_errors: true“.
This keyword can be added to a play or a task as the case may be. If it is added to a play, it means that all the errors in the tasks associated to a play will be ignored. More so, if it is added to a task, it means all the errors in the task will be ignored.
Well, we learnt about handlers in one of our previous lessons, what about handlers? Yes, this is also applicable to handlers, handlers error can be handled by the keyword, “force_handlers:yes”.
If a task that is supposed to notify a handler fails, the handlers will not be executed. This behavior can also be changed by using the keyword, “force_handler: yes” .
As usual, let’s understand better with examples.
If we were to install the httpd package and the autofs package using a playbook, the name argument will consist of the “httpd” value and the “autofs” value.
Now, we are going to write a playbook, and we will intentionally make an error by making the name argument of autofs containing “autos“.
1. Create a playbook
[lisa@drdev1 ~]$ vim playbook7.yml- name: Install basic package
hosts: hqdev1.tekneed.com
tasks:
- name: install autofs
yum:
name: autos
state: present
ignore_errors: true
- name: install httpd
yum:
name: httpd
state: present2. Run the playbook
[lisa@drdev1 ~]$ ansible-playbook playbook7.yml

PLAY [Install basic package] ***********************************************************
........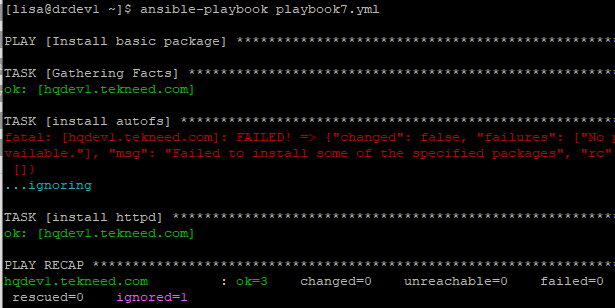
This playbook we run should have resulted in an error or task failure, and the second task shouldn’t have run because the first task failed, but because we used the “ignore_errors” keyword, the task did not fail and the play run.
Also, remember that you can choose to use the “ignore_errors” keyword at a play level or at a task level. In our case, it was used at the task level.
Again, let’s see an example of how we can use the force_handlers keyword to forcefully run a task with handlers.
1. create a playbook
- name: restarting httpd using handlers
  hosts: hqdev1.tekneed.com
  force_handlers: yes
  tasks:
    - name: restart httpd
      service:
        name: httpd
        state: restarted
      notify: restart httpd

  handlers:
    - name: restart httpd
      service:
        name: httpd
        state: restarted
The force_handler directive will always force handlers to run whether it is called or not. Note that the keyword can only be used at a play level
2. Run the playbook
[lisa@drdev1 ~]$ ansible-playbook playbook3.yml

PLAY [restarting httpd using handlers] ********************************
......
Because the force_handlers directive is set to yes, the handler will always run.
Specifying Task Failure conditions
Ansible may run a task/command successfully, however may be a failure due to the final result a user desires to get. In this sense, one can specify a condition for tasks to fail or in other words, you are at liberty to determine what a failure is.
Let’s see how this can be done by using the “failed_when” directive. The failed_when directive, from its word, simply means the task should fail when a condition is met or not met.
Let’s use the playbook below as an example,
[lisa@drdev1 ~]$ vim playbook5.yml- name: Web page fetcher
hosts: hqdev1.tekneed.com
tasks:
- name: connect to website
uri:
url: https://tekneed.com
return_content: true
register: output
- name: verify content
debug:
msg: "verifying content"
failed_when:
- '"this content" not in output.content'
- '"other content" not in output.content'
This is what this playbook will do. The uri module will interact with the webserver and fetch the page, https://www.tekneed.com.
More so, With the true value for the return_content argument, the body of the response of https://tekneed.com will be returned as content, and output will be captured with the aid of the register directive.
For the second task, the content “verifying content” will be printed by the debug module with the aid of the msg argument, and with the “failed_when” directive, the task will fail when the string, “this content” and “other content” is not in the captured output.
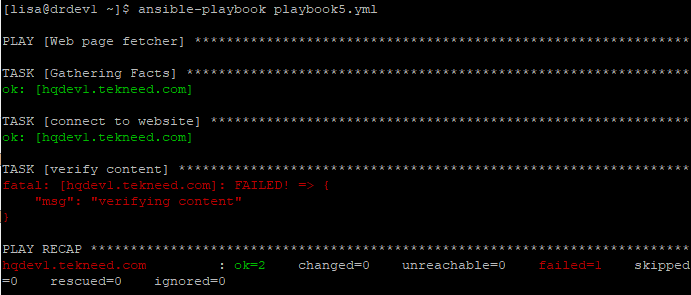
Run the playbook
[lisa@drdev1 ~]$ ansible-playbook playbook5.yml

PLAY [Web page fetcher] ************************************************************
.......
Alternatively, the “fail” module can be used to specify when a task fails. This module can only be very useful if the “when” keyword is used to specify the exact failure condition.
Let’s use the same example we used above, but this time around use the “fail” module and “when” keyword
[lisa@drdev1 ~]$ vim playbook5.yml- name: Web page fetcher
hosts: hqdev1.tekneed.com
tasks:
- name: connect to website
uri:
url: https://tekneed.com
return_content: true
register: output
- name: verify content
fail:
msg: "verifying content"
when:
- '"this content" not in output.content'
- '"other content" not in output.content'Run the playbook
[lisa@drdev1 ~]$ ansible-playbook playbook5.yml

PLAY [Web page fetcher] ************************************************************
.......
Managing Changed Status
Managing a changed status can be useful in avoiding unexpected results while running a playbook. Some tasks may even report a changed status and nothing in the real sense has really changed. It could just be that information was retrieved.
In some cases, you may not want a task to result in a changed status. In this case, one needs to use the “changed_when: false” keyword. The playbook will only report “ok” or “failed” status, and will never report a changed status.
An example of such task can be seen below.
- name: copy in nginx conf
  template: src=nginx.conf.j2
            dest=/etc/nginx/nginx.conf

- name: validate nginx conf
  command: nginx -t
  changed_when: false
One can also specify a condition when a task should change, an example of such task is seen in the playbook below.
- name: Web page fetcher
  hosts: hqdev1.tekneed.com
  tasks:
    - name: connect to website
      uri:
        url: https://tekneed.com
        return_content: true
      register: output

    - name: verify content
      fail:
        msg: "verifying content"
      changed_when: "'success' in output.stdout"
Using Ansible Blocks
Blocks are used to group tasks, specific tasks that are related, and can be very useful with a conditional statement.
If tasks are grouped conditionally, and the conditions is/are true, all the tasks will be executed. You should also know that block is a directive in Ansible and not a module, hence the block directive and the when directive will be at the same indentation level.
Let’s see how blocks can be used with examples.
create a playbook
[lisa@drdev1 ~]$ vim playbook8.yml- name: setting up httpd
hosts: localhost
tasks:
- name: Install start and enable httpd
block:
- name: install httpd
yum:
name: httpd
state: present
- name: start and enable httpd
service:
name: httpd
state: started
enabled: true
when: ansible_distribution == "Red Hat"
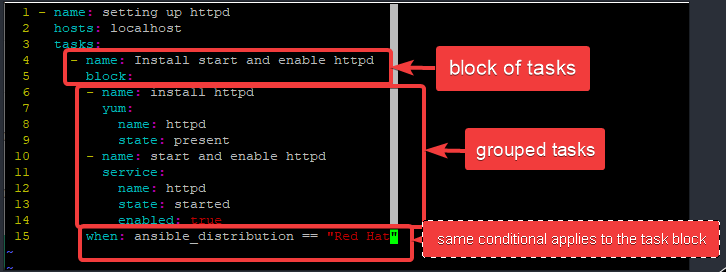
This playbook will group only two tasks in a block(install and enable httpd). The first task name is “install httpd” while the second task name is “start and enable httpd“. These tasks will only execute if the condition is true, which is, the OS ansible will execute against is/are Red Hat.
Run the playbook
[lisa@drdev1 ~]$ ansible-playbook playbook8.yml

PLAY [setting up httpd] ********************************************************
.......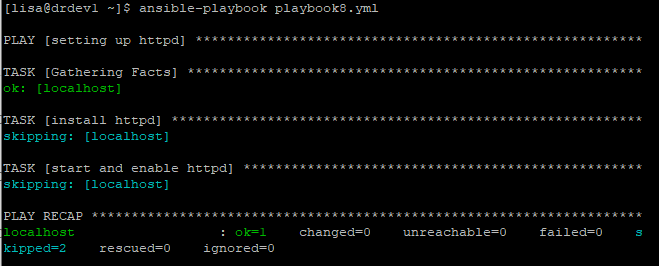
With this kind of playbook, if the condition fails, other tasks will not be executed. Let’s see how we can use block with rescue and always if we don’t want this type of condition.
Using Ansible block With rescue and always Statement
Apart from blocks being used to group different tasks, they can also be used specifically for error handling with the rescue keyword.
It works in a way that; if a task that is defined in a block fails, the tasks defined in the rescue section will be executed. This is also similar to the ignore_errors keyword.
More so, there is also an always section, this section will always run either the task fails or not. This is also similar to the ignore_errors keyword.
Let’s understand better with examples.
create a playbook.
[lisa@drdev1 ~]$ vim playbook9.yml- name: setting up httpd
hosts: localhost
tasks:
- name: Install the latest httpd and restart
block:
- name: install httpd
yum:
name: htt
state: latest
rescue:
- name: restart httpd
service:
name: httpd
state: started
- name: Install autofs
yum:
name: autofs
always:
- name: restart autofs
service:
name: autofs
state: started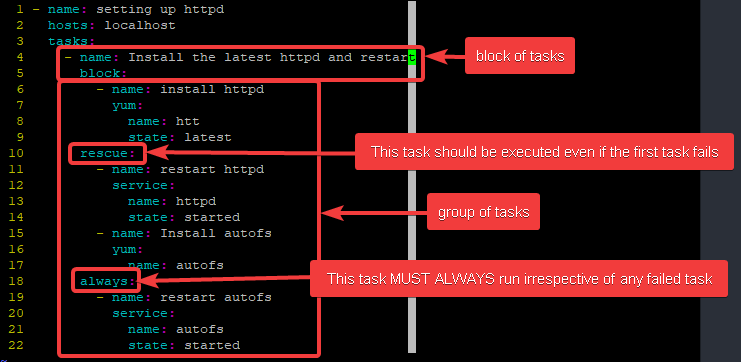
This playbook will group four tasks in a block(install the latest httpd and restart).
The first task in the block section will fail because the name of the package is incorrect. However, the second and third tasks will run because they are in the rescue section. More so, the fourth task will run because it is in the always section.
Note that you can have as many tasks you want in the block section, rescue section or always section
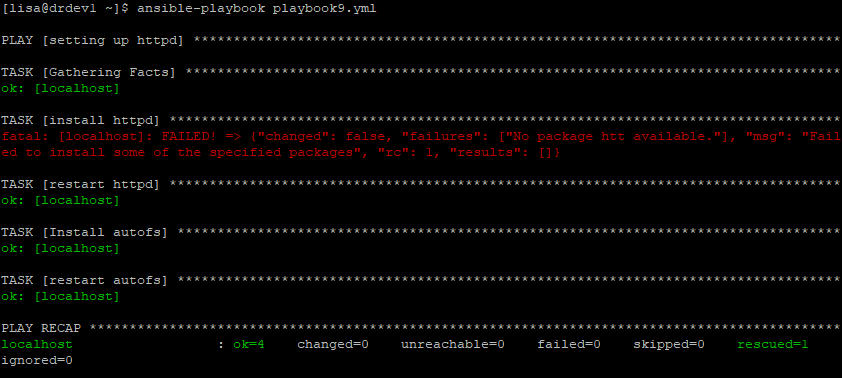
Run the playbook
[lisa@drdev1 ~]$ ansible-playbook playbook9.yml

PLAY [setting up httpd] *********************************************************
......
Class Activity
create a playbook that contains 1 play with tasks using block, always and rescue statements
If you like this article, you can support us by
1. sharing this article.
2. Buying the article writer a coffee (click here to buy a coffee)
3. Donating to push our project to the next level. (click here to donate)
If you need personal training, send an email to info@tekneed.com
Click To Watch Video On Ansible Error Handling
RHCE EX294 Exam Practice Question On Ansible Error Handling
Suggested: Managing Layered Storage With Stratis – Video
Your feedback is welcomed. If you love others, you will share with others