Передний наклон таза

Фитсевен уже рассказывал о том, что главной причиной болей в пояснице и нарушения осанки является ослабление мышц низа спины, вызванное постоянным нахождением в сидячем положении и неправильным выполнением большинства упражнений на пресс.
Сегодня мы остановимся на одной из наиболее распространенных причин болей в спине —переднем наклоне таза, при котором позвоночник искривляется, создавая нетипичную нагрузку. Мы расскажем о причинах появления нарушения, симптомах и методах исправления.
Внешняя диагностика
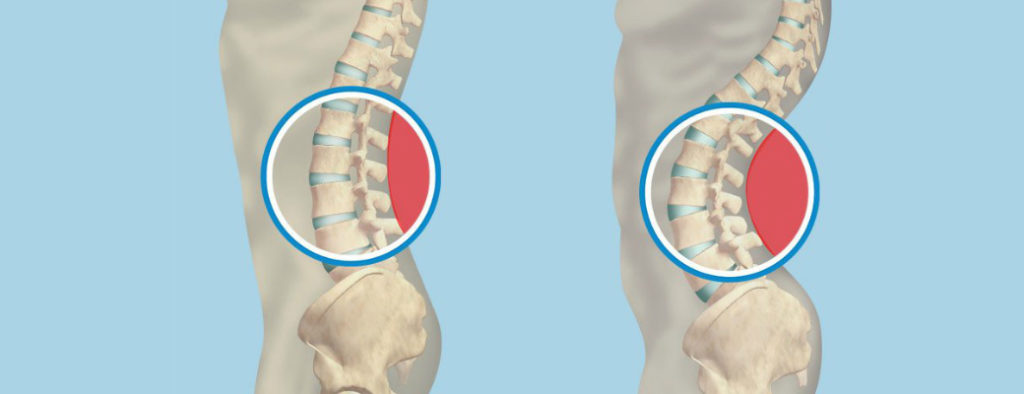
Иллюстрацией переднего наклона таза (англ: anterior pelvic tilt) служит вторая фигура слева: ягодицы излишне выведены назад, прогиб в позвоночнике заметно увеличен, живот словно вываливается. Поскольку зад заметно «оттопыривается», может присутствовать сутулость.
Человеку, страдающим подобным искривлением позвоночника, достаточно сложно придать спине прямое состояние — даже в положении лежа сохраняется небольшой прогиб в пояснице. С возрастом, когда позвоночник становится менее подвижным, болезнь проявляется сильнее.
Причины
Исследования показывают, что в том или ином виде передний наклон таза встречается у 85% современного населения(1). Причины могут быть как врожденными, так и поведенческими (плоскостопие, ходьба на высоких каблуках, постоянное сидение в неправильной позе).
Важно отметить, что болезнью современная медицина считает лишь крайние проявления подобного наклона таза, формирующие чрезмерный прогиб позвоночника и вызывающие боль в пояснице. Если же боли нет, даже самая кривая осанка может считаться «нормальной».
Передний наклон таза и пресс
В результате постоянного нахождения таза в неправильном положении ягодичные мышцы и мышцы задней поверхности бедер постепенно растягиваются и теряют силу, а мускулатура передней поверхности бедер укорачивается и становится менее эластичной.
Низ спины получает при этом двойной удар: с одной стороны, изменение центра тяжести переносит нагрузку на поясницу, с другой стороны, растянутый и слабый пресс также перекалывает на нее свою работу, не имея сил поддерживать вертикальное положение.
Влияние на силовые тренировки
Первое, на что наклон таза вперед оказывает воздействие при силовых тренировках — это нарушение техники выполнения становой тяги и приседаний со штангой. Косвенно ослабление ягодичных и абдоминальных мышц сказывается почти на всех упражнениях.
При жиме штанги лежа или жиме стоя слабый пресс не позволяет поддерживать необходимый уровень внутрибрюшного давления, заставляя перераспределять нагрузку. Хуже всего и то, что многие упражнения усугубляют ситуацию, заставляя таз отклоняться вперед еще сильнее.
Упражнения для исправления

1. Опускания таза лежа. Данное упражнение выполняет важную функцию — оно показывает человеку правильную, так называемую «нейтральную» позицию позвоночника и таза, в котором прогиб в нижней части спины становится минимален.
Исходное положение: лежа на полу, колени согнуты, ноги уверенно стоят на поверхности, руки вдоль тела ладонями вниз. Прижмите спину к полу как можно сильнее, задействуя в этом усилии мышцы пресса; задержитесь на 20-30 секунд. Расслабьтесь. Повторите 5-8 раз.
***

2. Подтягивания таза стоя. После того, как вы научитесь чувствовать прогиб позвоночника в первом упражнении, переходите к выполнению упражнения стоя. Однако не торопитесь — если ваш позвоночник «тугой», на первую фазу может потребоваться несколько недель.
Встаньте ровно, ноги на ширине плеч. Выдохните, разверните колени немного наружу; сожмите ягодицы как можно сильнее, одновременно направляя таз вверх. Если мышцы бедер стянуты, примите положение легкого полуприседа (буквально 5-10 см вниз). Повторите 10-15 раз.
***

3. Выбрасывание таза вперед на блоках. Следующим шагом станет повторение движения таза при выталкивании гири вперед и становой тяге. Выполняйте это упражнение в качестве разминки перед каждой силовой тренировкой, делая 3-4 подхода с легким весом.
Встаньте спиной к блоку, наклонитесь, разверните колени слегка в стороны, возьмите рукоятку двумя руками. Посмотрите на себя в зеркало — низ спины должен быть строго прямым. Поднимайтесь вверх за счет движения таза; в верхней точке сожмите ягодицы как можно сильнее.
***
Отклонение таза вперед является одним из наиболее типичных нарушений осанки, вызванных сидячей работой. Последствиями являются как боли в спине, так и невозможность достижения плоского живота. Для исправления важно научиться держать нейтральное положение таза. Также для коррекции переднего наклона таза может помочь упражнение гиперэкстензия.
Научные источники:
- Assessment of the degree of pelvic tilt within a normal asymptomatic population, source
- 5 Steps for Dealing With Anterior Pelvic Tilt, source
- Fixing Anterior Pelvic Tilt, source
![]()
Download Article
![]()
Download Article
Pelvic tilt is an uncomfortable condition that can occur when the muscles around your stomach and back become loose and overly flexible. In some cases, this can be caused by a natural variation in your bone structure. If it doesn’t cause you pain or limit your mobility, you may not need to treat it.[1]
With anterior pelvic tilt (APT) your lower back appears overly arched forward. With posterior pelvic tilt (PPT) your back arches out backwards. The good news is that both types of pelvic tilt are usually treatable with an exercise regimen and some lifestyle changes. Working with your doctor or a trainer can also help you to straighten out your tilt. Doing exercises that strengthen your core abdominal, back, and hip muscles can improve your hip alignment and help with both types of pelvic tilt.
-

1
Foam roll your pelvic area each day. Place a foam roller on an exercise mat. Then, lay down on your side on the mat with the roller touching your hip area. Support your head with a bent arm and bend your knees for stability, too. Use your feet to gently push your body up and down the roller around the hip area. Continue for 30 second intervals before pausing and repeating.[2]
- This roller stretch may not completely fix your pelvic tilt, but it can help to lengthen the muscles surrounding your pelvis.
- You can use a foam roller while at the gym. They are also sold at athletic and fitness stores.
-
2
Perform a kneeling hip flexor stretch each day. Kneel down so that your left knee makes contact with the exercise mat, but your right knee stays positioned over your right foot. Keep your spine straight. Push your weight forward towards the right hip. Keep this pressure on for 30 seconds before releasing and switching legs.[3]
- This is a great stretch for people who are sitting a lot during the day, which is a common problem with sufferers of pelvic tilt.
Advertisement
-
3
Stretch your lower back daily. Sit on a sturdy chair. Let your arms, shoulders, and head hang down off the chair in a relaxed way. Imagine releasing all of the muscles in your upper body and pushing everything toward the ground. When you start to feel a stretching sensation continue in this position for 1-2 minutes.[4]
- After this stretch, stand up and wiggle your upper body around to release any tension. Repeat this complete process 3-4 times.
-
4
Do a squat. Position your feet apart and slightly wider than your hips. Take a deep breath in and lower your hips towards the ground. Keep going until your knees are just about to extend past your toes. Your thighs will be parallel to the ground. Breathe out and rise up to a standing position. This exercise is great for building strong buttock muscles, which will improve your overall posture.[5]
- Your toes should be angled slightly outwards.
- Try to do this exercise at least 2 times per week.
-
5
Do a pelvic tilt. Lie down with your knees bent upwards. Flex your stomach (ab) muscles until your back lifts off the floor. Continue to push your pelvis upwards until you back is almost straight. Count out between 5-10 seconds before releasing your muscles and lying back on the floor. This exercise helps to develop your core and keep your pelvis aligned.[6]
- Repeat this exercise twice a week for as many reps as you like, but make sure to stop if your back shows signs of strain.
-
6
Complete kneeling rear leg raises. Position yourself on all fours on an exercise mat. Spread your weight out evenly across your hands and knees. Flex your abs and push your right leg back out straight behind you. Hold it level for 5 seconds before pulling it back in. Repeat with the same leg or alternate. This exercise helps to extend your back and pelvic muscles.[7]
- In the starting position, place your knees directly under your hips and your hands below your shoulders.
- Try to do this exercise 2-3 times per week.
-
7
Perform a plank. Place yourself face down on an exercise mat. Place your hands under your shoulders. Flex your stomach muscles until they lift you off the ground. Keep your spine straight. Hold this position for as long as you can before releasing. This is a great exercise for developing your back muscles that help to hold your pelvis in place.[8]
- Do this exercise 3 times per week. Over time, try to build up to a 60-second plank.
- When done correctly, a plank position will look very similar to a traditional push-up. The main difference is that you are not pumping up and down off the ground.


Advertisement
-
1
Get up and move every hour. One of the main risk factors for pelvic tilt is spending too long in a sitting position each day. Set a timer on your phone to remind you to take a quick walk around your office or home once every 60 minutes. Even standing and stretching in place can make a difference.[9]
- Make this more fun by enlisting others to walk around with you for a few minutes every hour on the hour.
-
2
Adjust your office chair, desk, and monitor to keep your back straight. Move around the levers on your office chair until it keeps your spine straight when sitting. Then, position your desk so that you don’t have to slouch to use it. The same goes with your monitor. This may mean setting your monitor up on a slightly raised platform.[10]
- If your chair isn’t adjustable, try placing a memory foam pad at the back to provide more spine support.
-
3
Give yourself a few months to see results. It will take time to build up your muscles once more. Keep in mind that your body might be changing in the interior without showing external improvements. Track your exercises and you’ll see that you are doing better every week.[11]
- You can keep track of the number of exercise sets and reps that you finish by each week by using a fitness app or simply writing them down on paper.
- If you are in pain, log your pain on a scale of 0 (no pain) to 5 (extreme pain) each week. Watch to see if your pain levels diminish over time.


Advertisement
-
1
Consult with your doctor before starting treatment. Before you implement a new exercise program, talk with your doctor and see if they have any suggestions to address your pelvic tilt. It’s also important to see your doctor if you are suffering any pain in your pelvis or back, as this could indicate a more serious problem.[12]
- General practitioners usually refer children on to an orthopedic specialist who can help to ensure that the child’s spine develops properly.
-
2
Perform the Thomas test for a partial diagnosis. This is one way for your doctor to identify if you are suffering from pelvic tilt. It can also be used to gauge your progress as you work to fix your tilt. Lie down on a table with your knees and lower legs hanging off the side. Flex one leg and pull it toward your upper body. Repeat with the other side. With a properly aligned pelvis, your resting leg will stay in place on the table when you lift the other one.[13]
- Any raising movement from the resting leg is a possible indication of pelvic tilt.
- As you improve, do this test at home and watch to see if your resting leg stays closer to the table over time.
-
3
Find a physical therapist. Ask your primary physician for therapist suggestions. You can also go to the website of the American Physical Therapy Association at www.apta.org and search for therapists in your area. Look for one that has experience working with patients suffering from pelvic tilt or other back/pelvic problems.
-
4
Let your therapist video your walking or running movements. It’s sometimes hard to determine if your pelvis is in the proper position when you are in the middle of a physical activity. Your therapist will likely suggest taking a quick side-view video of you walking or running. Then, you both can look over the video to see if your hips seem to be pushed forward or backward.
-
5
Work with a chiropractor. Ask your doctor to recommend a trustworthy chiropractor who has experience assessing and treating pelvic tilt.[14]
A chiropractor can evaluate your pelvic tilt and work with you to come up with a treatment plan.- Check to make sure your chiropractor is licensed by your local chiropractic licensing and regulation board.


Advertisement
Ask a Question
200 characters left
Include your email address to get a message when this question is answered.
Submit
Advertisement
-
Go ahead and make an appointment with your doctor when you first see signs of pelvic tilt. Addressing it early on can make the treatment process easier.
Advertisement
-
If you ever experience sharp, spiking pains down your spine and pelvis, get emergency help immediately, as this can be a sign of internal problems.
Advertisement
References
About This Article
Thanks to all authors for creating a page that has been read 31,923 times.
Did this article help you?
Get all the best how-tos!
Sign up for wikiHow’s weekly email newsletter
Subscribe
You’re all set!
![]()
Download Article
![]()
Download Article
Pelvic tilt is an uncomfortable condition that can occur when the muscles around your stomach and back become loose and overly flexible. In some cases, this can be caused by a natural variation in your bone structure. If it doesn’t cause you pain or limit your mobility, you may not need to treat it.[1]
With anterior pelvic tilt (APT) your lower back appears overly arched forward. With posterior pelvic tilt (PPT) your back arches out backwards. The good news is that both types of pelvic tilt are usually treatable with an exercise regimen and some lifestyle changes. Working with your doctor or a trainer can also help you to straighten out your tilt. Doing exercises that strengthen your core abdominal, back, and hip muscles can improve your hip alignment and help with both types of pelvic tilt.
-
1
Foam roll your pelvic area each day. Place a foam roller on an exercise mat. Then, lay down on your side on the mat with the roller touching your hip area. Support your head with a bent arm and bend your knees for stability, too. Use your feet to gently push your body up and down the roller around the hip area. Continue for 30 second intervals before pausing and repeating.[2]
- This roller stretch may not completely fix your pelvic tilt, but it can help to lengthen the muscles surrounding your pelvis.
- You can use a foam roller while at the gym. They are also sold at athletic and fitness stores.
-
2
Perform a kneeling hip flexor stretch each day. Kneel down so that your left knee makes contact with the exercise mat, but your right knee stays positioned over your right foot. Keep your spine straight. Push your weight forward towards the right hip. Keep this pressure on for 30 seconds before releasing and switching legs.[3]
- This is a great stretch for people who are sitting a lot during the day, which is a common problem with sufferers of pelvic tilt.
Advertisement
-
3
Stretch your lower back daily. Sit on a sturdy chair. Let your arms, shoulders, and head hang down off the chair in a relaxed way. Imagine releasing all of the muscles in your upper body and pushing everything toward the ground. When you start to feel a stretching sensation continue in this position for 1-2 minutes.[4]
- After this stretch, stand up and wiggle your upper body around to release any tension. Repeat this complete process 3-4 times.
-
4
Do a squat. Position your feet apart and slightly wider than your hips. Take a deep breath in and lower your hips towards the ground. Keep going until your knees are just about to extend past your toes. Your thighs will be parallel to the ground. Breathe out and rise up to a standing position. This exercise is great for building strong buttock muscles, which will improve your overall posture.[5]
- Your toes should be angled slightly outwards.
- Try to do this exercise at least 2 times per week.
-
5
Do a pelvic tilt. Lie down with your knees bent upwards. Flex your stomach (ab) muscles until your back lifts off the floor. Continue to push your pelvis upwards until you back is almost straight. Count out between 5-10 seconds before releasing your muscles and lying back on the floor. This exercise helps to develop your core and keep your pelvis aligned.[6]
- Repeat this exercise twice a week for as many reps as you like, but make sure to stop if your back shows signs of strain.
-
6
Complete kneeling rear leg raises. Position yourself on all fours on an exercise mat. Spread your weight out evenly across your hands and knees. Flex your abs and push your right leg back out straight behind you. Hold it level for 5 seconds before pulling it back in. Repeat with the same leg or alternate. This exercise helps to extend your back and pelvic muscles.[7]
- In the starting position, place your knees directly under your hips and your hands below your shoulders.
- Try to do this exercise 2-3 times per week.
-
7
Perform a plank. Place yourself face down on an exercise mat. Place your hands under your shoulders. Flex your stomach muscles until they lift you off the ground. Keep your spine straight. Hold this position for as long as you can before releasing. This is a great exercise for developing your back muscles that help to hold your pelvis in place.[8]
- Do this exercise 3 times per week. Over time, try to build up to a 60-second plank.
- When done correctly, a plank position will look very similar to a traditional push-up. The main difference is that you are not pumping up and down off the ground.
Advertisement
-
1
Get up and move every hour. One of the main risk factors for pelvic tilt is spending too long in a sitting position each day. Set a timer on your phone to remind you to take a quick walk around your office or home once every 60 minutes. Even standing and stretching in place can make a difference.[9]
- Make this more fun by enlisting others to walk around with you for a few minutes every hour on the hour.
-
2
Adjust your office chair, desk, and monitor to keep your back straight. Move around the levers on your office chair until it keeps your spine straight when sitting. Then, position your desk so that you don’t have to slouch to use it. The same goes with your monitor. This may mean setting your monitor up on a slightly raised platform.[10]
- If your chair isn’t adjustable, try placing a memory foam pad at the back to provide more spine support.
-
3
Give yourself a few months to see results. It will take time to build up your muscles once more. Keep in mind that your body might be changing in the interior without showing external improvements. Track your exercises and you’ll see that you are doing better every week.[11]
- You can keep track of the number of exercise sets and reps that you finish by each week by using a fitness app or simply writing them down on paper.
- If you are in pain, log your pain on a scale of 0 (no pain) to 5 (extreme pain) each week. Watch to see if your pain levels diminish over time.
Advertisement
-
1
Consult with your doctor before starting treatment. Before you implement a new exercise program, talk with your doctor and see if they have any suggestions to address your pelvic tilt. It’s also important to see your doctor if you are suffering any pain in your pelvis or back, as this could indicate a more serious problem.[12]
- General practitioners usually refer children on to an orthopedic specialist who can help to ensure that the child’s spine develops properly.
-
2
Perform the Thomas test for a partial diagnosis. This is one way for your doctor to identify if you are suffering from pelvic tilt. It can also be used to gauge your progress as you work to fix your tilt. Lie down on a table with your knees and lower legs hanging off the side. Flex one leg and pull it toward your upper body. Repeat with the other side. With a properly aligned pelvis, your resting leg will stay in place on the table when you lift the other one.[13]
- Any raising movement from the resting leg is a possible indication of pelvic tilt.
- As you improve, do this test at home and watch to see if your resting leg stays closer to the table over time.
-
3
Find a physical therapist. Ask your primary physician for therapist suggestions. You can also go to the website of the American Physical Therapy Association at www.apta.org and search for therapists in your area. Look for one that has experience working with patients suffering from pelvic tilt or other back/pelvic problems.
-
4
Let your therapist video your walking or running movements. It’s sometimes hard to determine if your pelvis is in the proper position when you are in the middle of a physical activity. Your therapist will likely suggest taking a quick side-view video of you walking or running. Then, you both can look over the video to see if your hips seem to be pushed forward or backward.
-
5
Work with a chiropractor. Ask your doctor to recommend a trustworthy chiropractor who has experience assessing and treating pelvic tilt.[14]
A chiropractor can evaluate your pelvic tilt and work with you to come up with a treatment plan.- Check to make sure your chiropractor is licensed by your local chiropractic licensing and regulation board.
Advertisement
Ask a Question
200 characters left
Include your email address to get a message when this question is answered.
Submit
Advertisement
-
Go ahead and make an appointment with your doctor when you first see signs of pelvic tilt. Addressing it early on can make the treatment process easier.
Advertisement
-
If you ever experience sharp, spiking pains down your spine and pelvis, get emergency help immediately, as this can be a sign of internal problems.
Advertisement
References
About This Article
Thanks to all authors for creating a page that has been read 31,923 times.
Did this article help you?
Get all the best how-tos!
Sign up for wikiHow’s weekly email newsletter
Subscribe
You’re all set!
Personal Trainer Development Center написали о 5 шагах по коррекции наклона таза вперед или поясничного гиперлордоза. Зожник перевел для вас эту важную статью.
Наклон таза вперед опознать легко – вот пара самых очевидных признаков:
● Чрезмерный прогиб в пояснице (гиперлордоз),
● Выдающийся вперед живот даже при минимальном проценте жира.
Но есть важный нюанс: наклон – понятие растяжимое. Кто-то просто родился со слегка наклоненным вперед тазом и прекрасно себя чувствует. Но у кого-то наклон таза вперед – нарушение осанки, выработанное из-за ряда одних дисфункций, которые порождают за собой другие проблемы.
Чтобы определить, мешает ли наклон таза вперед конкретному человеку, надо проанализировать работу мышц. Если квадрицепсы и поясница перехватывают нагрузку в упражнениях, сгибатели бедер слишком туги, а ягодичные, бицепсы бедер и пресс – слабы, то это проблема. Такое состояние таза портит технику многих важных упражнений (особенно становой и приседания), приводит к травмам низа спины и даже вызывает боль в коленных суставах. И любой из этих факторов еще больше усугубляет наклон таза вперед, образуя порочный круг.
Что мы знаем о наклоне таза
Так называемое «нейтральное» положение таза в действительности является чуть наклонным вперед – до 5 градусов у мужчин и до 10 у женщин. Это обеспечивает нормальный небольшой прогиб в пояснице. Если же естественного лордоза нет и таз наклонен назад – это тоже может быть нарушением.
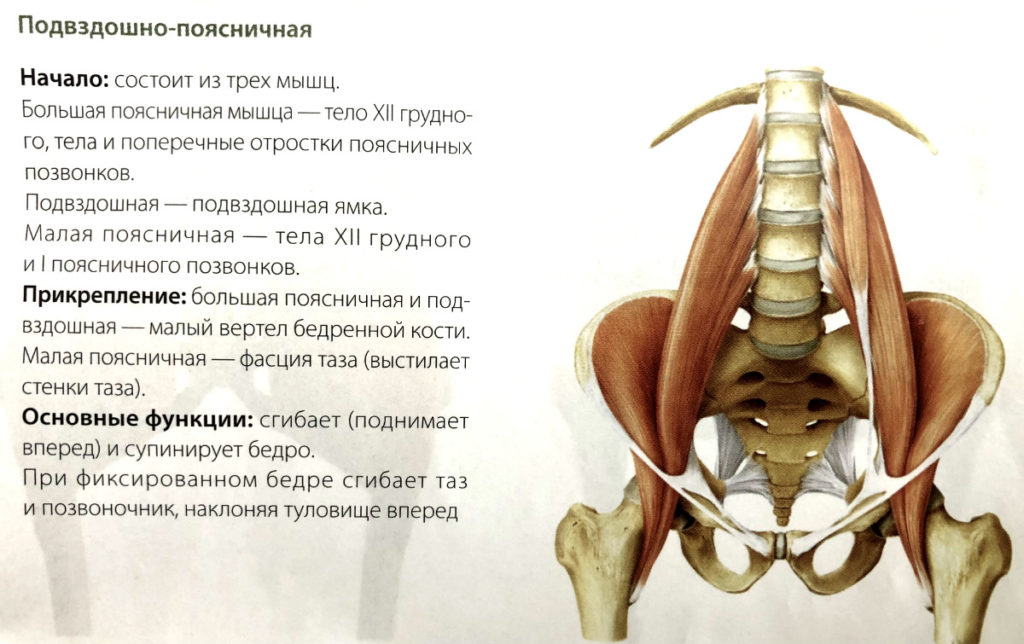
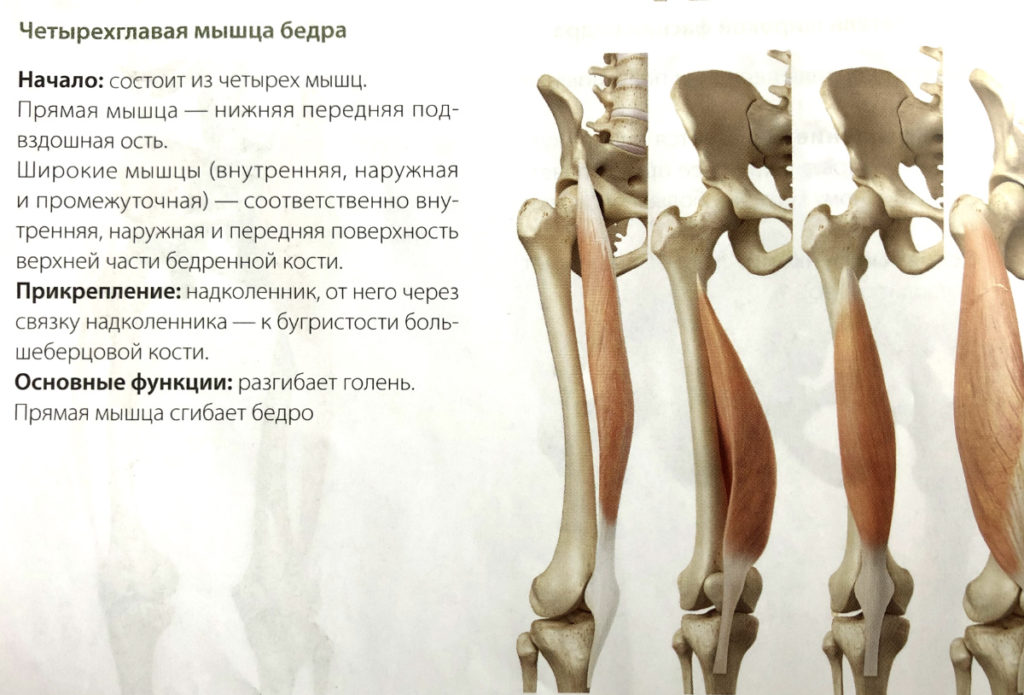
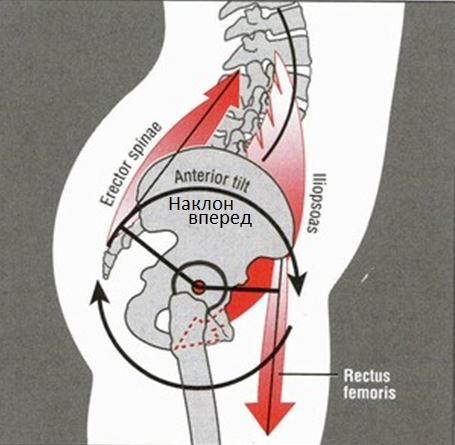
Главная особенность наклона таза вперед – короткие и тугие сгибатели бедра. Хотя подвздошно-поясничная и прямая мышца бедра могут быть укороченными от природы, зачастую мы сами доводим их до этого неправильными тренировками и/или образом жизни. В любом случае эти мышцы могут тянуть таз вперед, ослабляя мышцы задней поверхности (ягодичные и бицепсы бедер).
Также бывает, что причина гиперлордоза – слишком стянутые мышцы низа спины и удлиненные и ослабленные мышцы пресса из-за чего живот выдается вперед даже у худых людей.
Самые распространенные причины наклона таза вперед
Сидячий образ жизни
Чем больше мы просиживаем за столом в течение дня, тем дольше сгибатели бедра остаются в сокращенной позиции (и привыкают к ней). А ягодичные и бицепсы бедер привыкают ничего не делать, служа лишь подушкой. Зато все время напряжены разгибатели спины, удерживающие вертикальное положение корпуса.
Неправильная техника движения
Потом, когда после дня офисного просиживания мы приходим в зал делать полезные упражнения, их уже не удается выполнить качественно. Ягодичные и бицепсы бедер меньше активируются в становой и приседе, зато перерабатывает низ спины, приученный все время напрягаться. И в упражнениях для верха, например, в жиме стоя неправильная осанка влияет на технику. Хотя может казаться, что вы все делаете правильно, со временем (и с повышением рабочих весов) чрезмерный прогиб в поясничном отделе повышает риск травм спины и коленных суставов, а также повреждения бицепса бедра.
Как исправить наклон таза вперед / гиперлордоз
Сперва о том, что «не работает». Поскольку при наклоне таза вперед стянуты сгибатели бедер, то многие считают, что исправить ситуацию можно с помощью растяжки. Логично? Не очень.
1. Растягивание сгибателей бедра не устраняет причину их стягивания. И даже может добавить проблем с поясницей [1].
2. Лучший способ исправить чрезмерный наклон таза вперед – поработать над наклоном назад, практикуя противоположный двигательный паттерн и укрепляя ослабевшие мышцы.
Шаг 1: научитесь наклонять таз назад лежа
Многие люди, страдающие от болей в спине и выпирающего живота из-за гиперлордоза, даже не понимают, как научиться отклонять таз назад. Вот простой первый шаг: лягте на спину и постарайтесь прижать поясницу к полу.
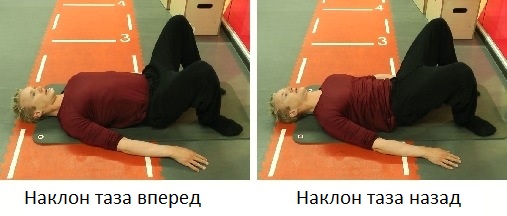
Шаг 2: отрабатывайте то же стоя
Теперь повторите тот же наклон назад стоя, сокращая ягодичные (эта подсказка помогает принять нужное положение).
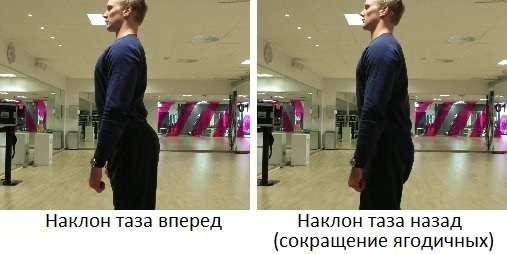
Примечание от Зожника: первые 2 упражнения – это базовое движение в тайцзи и цигуне, поэтому есть смысл практиковать их для исправления проблемы.
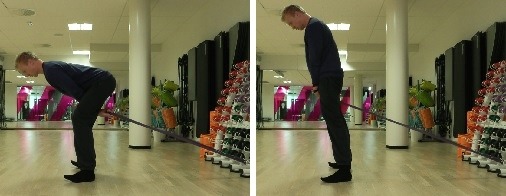
Шаг 3: улучшайте технику становой с помощью блока
Тяга блока между ног – отличное упражнение для правильного «складывания» (тот же двигательный паттерн, что и в становой, наклоне со штангой на плечах и прочих упражнениях)
Три ключевые момента:
1. Держите грудь колесом в начальной позиции,
2. Отводите таз назад при опускании,
3. Сокращайте ягодичные при подъеме.
Но не старайтесь прогибать спину (подробнее об этом – чуть ниже).
Шаг 4: практикуйте планку
Многие делают одну критическую ошибку в планке – держат ее с излишним прогибом в пояснице (то есть излишне наклоненном вперед тазе).
Знаменитый Павел Цацулин предлагает вариант с противоположным эффектом: напрягая пресс и сокращая ягодичные, наклонять таз назад:
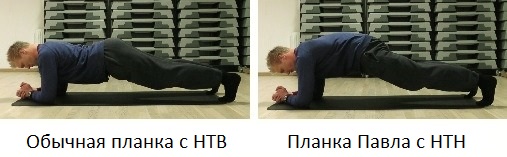
О пользе этого написал подробную статью доктор Джон Расин [2]
Шаг 5: правильно держите спину в многосуставных упражнениях
Призыв прогнуть спину важен, когда клиент норовит скруглить, например, при выполнении становой. Однако в случаях чрезмерного наклона таза вперед – это плохой совет. Гиперлордоз и так присутствует, «сознательное» увеличение прогиба может лишь навредить, повышая риск травмы позвоночника. И это касается не только упражнений для низа, наклон таза вперед также мешает правильно выполнять жим или тягу верхнего блока.
В становой и приседании мысленно сосредоточьтесь на работе ног: «раздвигайте пол» (то есть упирайтесь внешними сторонами стоп) и «продавливайте пятками». А позвоночник держите в нейтральном положении – с естественными изгибами.
Что же касается головы (наклона вперед-назад или нейтральной позиции) – надо подбирать индивидуально, а не заставлять всех делать одно и то же. Без фанатизма, конечно: не пялиться в потолок и не вертеть в стороны.
Число повторов и подходов
При обучении всему этому избегайте многоповторных сетов, в которых накапливается утомление (и портится техника). Лучше сделать больше подходов с малым числом качественных повторений без наклона таза вперед.
То же и с планкой Павла – меньше объем и выше интенсивность. Достаточно держать всего по 10 секунд, но с правильной техникой, когда вы действительно стараетесь максимально сокращать пресс и ягодичные, наклоняя таз назад. Делайте 2-4 подхода с паузами отдыха не менее 30 секунд.
Сокращайте ягодичные во всех упражнениях
Полезно заниматься этим не только в приседаниях и тягах, но в любых других упражнениях. Если наклон таза вперед стал серьезной проблемой, то работайте над его устранением и в жимах-тягах для верха, даже в упражнениях для бицепсов и трицепсов. И, разумеется, максимальное сокращение ягодичных должно быть завершающим усилием в становых, приседаниях, мостах и других упражнениях.
Вопросы и ответы
1. Что приводит к чрезмерному наклону таза вперед?
Как уже говорилось в самом начале, обычно лордоз связан с укороченностью и тугостью сгибателей бедра. Однако это может быть и совокупность факторов: слабость и «деактивация» ягодичных и бицепсов бедер, ослабленные мышцы пресса, перенапряженная поясница.
В ряде случаев наклон таза вперед задан генетически и может быть не связан с силой/длиной конкретных мышц. Или же развивается вследствие определенного тренировочного подхода, например, в легкой атлетике наклон таза вперед бывает полезен [3]: короткие сгибатели бедер и растянутые бицепсы бедер помогают быстрее бегать и выше прыгать.
Подобное происходит и с силовиками, как считает Брет Контрерас [4]. Но следует знать, что из-за гиперлордоза нагрузка со «спящих» ягодичных переносится на перенапряженную поясницу.
В каждом случае необходимо оценивать степень влияния наклона таза вперед на технику и здоровье человека индивидуально.
2. Почему тугие бицепсы бёдер не отклоняют таз назад?
Хотя бицепсы бёдер обычно растянуты и ослаблены при наклоне таза вперед, может казаться, что они туги и должны тянуть таз назад. Как объясняет тренер и физиотерапевт Майк Рейнольд [5], таз наклонен вперед из-за укороченных и тугих сгибателей бедра, потому даже здоровые и сильные бицепсы постоянно находятся в растянутом положении, создавая ощущение «тугости». Из-за чего, например, мы с трудом наклоняемся вперед, пытаясь коснуться пальцами пола.
3. Может ли от гиперлордоза болеть спина?
Тут тоже не все так однозначно. По мнению тренера и физиотерапевта Чеда Уотербери, надо оценивать не сам наклон таза вперед, а то, как конкретный индивидуум с ним передвигается и выполняет упражнения. Однако гиперлордоз явно не помогает в тех видах спорта, где необходимо резко поворачивать корпус: гольф, бейсбол, теннис и другие. С такими пациентами Чед первым делом работает над восстановлением нейтрального положения таза.
Также следует протестировать состояние грудного отдела позвоночника: «Любой человек должен быть в состоянии повернуться на 45 градусов в каждую сторону, сидя с руками за головой». Если верх тела поворачивается в ограниченном диапазоне движения, то для компенсации начинает подключаться поясничный отдел – а вот это уже приводит к хроническим болям.
4. Сколько времени требуется на исправление чрезмерного наклона таза вперед?
Это индивидуально. Чем чаще вы будете вспоминать об устранении гиперлордоза (когда сидите, стоите, ходите, тренируетесь), тем быстрее восстановите нейтральное положение.
Даже если некоторый наклон таза вперед у вас есть от природы, все равно полезно работать над мышцами, наклоняющими таз назад. Это сведет к минимуму риск травм и двигательных дисфункций.
В заключении повторимся, что величина наклона таза вперед задается генетически, потому каждому надо не только визуально оценивать положение таза, но и тестировать гибкость, силу и качество выполнения упражнений прежде, чем расписывать программу коррекции.
Источник: theptdc.com
Перевод для Зожника: Алексей Republicommando
Читайте также на Зожнике:
Как тренироваться, если ты не профессиональный бодибилдер
Как тренироваться людям с сердечно-сосудистыми заболеваниями
Как тренироваться при варикозе
Можно ли тренироваться во время болезни?
20 способов тренироваться умнее
Anterior Pelvic Tilt — A Deep Dive
Today we’ll cover the infamous anterior pelvic tilt. I see a lot of questions about anterior pelvic tilt (APT) as it’s a pretty big buzz word used by physical therapists, chiropractors, massage therapists, and personal trainers (pretty much anyone in the health and movement industry).
What this post will cover:
-
We’ll Define Anterior Pelvic Tilt
-
What Muscles Work During APT & PPT (Biomechanics)
-
Why APT Matters
-
If The APT Is Really That Bad
-
How To «Fix» Your APT
-
How To Know If You Have An APT
-
Exercises To Fix APT
TLDR;
APT is a position of the pelvis that occurs in the sagittal plane. This position is often labeled to be the cause of many ailments such as “bad” posture and low back pain. In reality, the APT is an innate part the human skeletal positioning. It occurs in ~50% of our walking cycle and allows for more energy efficient movement compared to our ape relatives. The true issue with an APT is being stuck in the position or lacking control over the APT. This leads to increased reliance on the low back, quadriceps, and hip flexor musculature due to the inability to achieve a posterior pelvic tilt (PPT) and true hip extension. Using exercises that bias the pelvis toward a PPT and influencing the nervous system can teach an individual how to properly control the pelvis and the APT that accompanies movement at the skeletal structure. How to test for an APT: Modified Thomas Test, Posture Assessment, Functional Squat. Exercises to try: 90-90 Hip Lift and Sink Squat.
What Is An Anterior Pelvic Tilt?
“A short-arc anterior rotation of the pelvis about the hip joints, with the trunk held upright and stationary.” — Essentials of Kinesiology for the Physical Therapist Assistant (Third Edition)
An anterior pelvic tilt is when the pelvis rotates forward and downward toward the floor. This movement occurs with co-contractions between the spinal extensor and hip flexor musculature. The APT also occurs with general relaxation and gravity pulling downward on the body. Now, to appreciate the anterior pelvic tilt, we must also look at the opposite motion that occurs at the pelvis. The opposite of an anterior pelvic tilt is a posterior pelvic tilt. This is a backward rotation or tipping back and down toward the floor (think your back pockets sliding down toward the back of the knees). A PPT occurs via co-contractions of the abdominals and hip extensor musculature. This movement takes effort and does not occur with relaxation or gravity. These pelvic tilts and their corresponding muscles are shown in the image below.
These are the primary muscles that activate during both posterior and anterior pelvic tilts of the pelvis.
ANTERIOR PELVIC TILT MUSCLES (TOP DOWN)
-
Concentric A.K.A. Shortening
-
Spinal Erectors
-
Quadratus Lumborum
-
Latissimus Dori
-
Tensor Fascia Lata
-
Quadriceps
-
-
Eccentric A.K.A. Lengthening
-
Abdominals
-
Gluteus Maximus
-
Hamstring Musculature
-
POSTERIOR PELVIC TILT MUSCLES (TOP DOWN)
-
Concentric A.K.A. Shortening
-
Abdominals
-
Gluteus Maximus
-
Hamstring Musculature
-
-
Eccentric A.K.A. Lengthening
-
Spinal Erectors
-
Quadratus Lumborum
-
Latissimus Dori
-
Tensor Fascia Lata
-
Quadriceps
-
Why Do We Care About The Anterior Pelvic Tilt?
Anterior and posterior pelvic tilts occur in the sagittal plane. This plane makes up the majority of motion and is where walking, running, and general locomotive activities live. Basically if you didn’t have pelvic tilt abilities, you’d have some wild and crazy movement compensations throughout the rest of the body (we’ll talk about that, I promise).
Is An Anterior Pelvic Tilt Bad?
Now, a lot of folks demonize the anterior pelvic tilt. But why, Kyle? Well I’m glad you asked! Anterior pelvic tilt can potentially be detrimental to your static standing posture. It just doesn’t look great to our societal standards of “good posture.” It typically causes increased lordotic and kyphotic curvatures up the spine as well as the gnarly forward head and rounded shoulders that accompany.
But if you thought your static posture was bad, an anterior pelvic tilt is probably most detrimental to our movement capabilities. It limits the use of your glute, hamstring, and abdominal musculature due to these muscle being unable to find proper leverage during movement activities. Then you’re stuck using hip flexors, quads, and your low back for the majority of your movement tasks. Okay, so now that I’ve officially fear mongered you into the potentially negative effects of an anterior pelvic tilt, let’s dial it back.
“The human body is naturally biased toward an anterior pelvic tilt.”
“This makes us far more efficient from an energy system view (AKA we burn less calories making us awesome)”
The human body is naturally biased toward an anterior pelvic tilt. When walking, your pelvis is in an anterior pelvic tilt ~50% of the time and a posterior pelvic tilt ~20% (Lewis, C. et al. 2017). The anterior pelvic tilt was a key component in human evolution and our ability to walk upright. The anterior pelvic tilt changes the leverage capabilities of the hip extension / hyper extension. This actually makes us more efficient movers compared to our ape relatives far more efficient from an energy system view (AKA we burn less calories making us awesome) (Pontzer, H. 2017).
How To Fix Anterior Pelvic Tilt
Ahhhh now I finally gotcha. I lured you into my knowledge trap just to prove my biased point. Muhahaha! But really, if you’ve gotten this far you already can tell where this is going.
You can’t simply “fix” or get rid of your anterior pelvic tilt. It’s a part of our innate anatomical structure. Unless you really wanted me to do some crazy illegal surgery, that I have no business doing, it’s impossible. Sorry you read all this to learn absolutely nothing.
Wait, come back!
Let’s do this.
Let’s change our communication.
I can help you fix a “stuck” or “excessive” anterior pelvic tilt. That’s a lot easier and less invasive than your planned illegal surgery (dude, you’re crazy and I like it!).
So to get out of this excessive or stuck anterior pelvic tilt, we need to learn how to posteriorly pelvic tilt as as previously talked about (see I wouldn’t waste your time reading all that unless it was important). Mastering the posterior pelvic tilt helps to strengthen the hip extension musculature and learn to control your anterior pelvic tilt
Remember, APT actually helps us with hip extension during movement, but if you lack control over it, you’re just going to use hip flexors, quads, and low back muscles). You naturally fall into anterior pelvic tilt and that’s a good thing. It makes you efficient. I just want you to be able to control that fall and be able to jump in and out of that pelvic positioning depending on the task you’re doing (e.g. running, squatting, walking, movement in general).
How To Know If You’re “Stuck” In An Anterior Pelvic Tilt
We now know that everyone has an anterior pelvic tilt but the real issue is if you’re stuck or the tilt is excessive. Here’s a couple of ways to check and see if you’re stuck.
SUBJECTIVE ASSESSMENTS —
-
You feel your weight in the toes of the feet
-
You sense that your hamstrings are “tight”
-
Your hamstrings cramp with certain activities (e.g. bridging)
-
You feel tightness in your low back
-
You can’t feel the heels of your feet on the ground when standing
-
You can’t feel abdominals with activity (e.g. planks)
-
You lay on your back, legs straight out and you can’t get your low back flat
These are all things you may “feel” or have experienced. They maybe ways to check if you are stuck in this position but they’re kinda hard to measure or retest.
OBJECTIVE ASSESSMENT —
Modified Thomas Test —
-
If this test is positive, it really tells you that you have some “tension” and lack of hip extension.
-
My only problem is that some folks, in particular yogis, will have a negative finding due to increased tissue flexibility. Yet when assessing posture they have a clear APT. That would mean they’re flexible (yay!), but they may lack control of the musculature at the pelvis.
Functional Squat Test
-
This is my go to test and is really easy. This is also just a great video with a lot of good info.
-
The goal is to squat hip width apart while holding a posterior pelvic tilt
-
This is a test I recommend for my yogis or people that are super flexible because it test the control aspect of the anterior tilt during movement in the sagittal plane.
-
If you have an APT, this is going to be really tough because you’ll run out of real estate at the hips. Basically if your hips are anteriorly rotated, you’re already relatively flexed at the hip, thus you have less room to flex the hip up while squatting down.
-
If you can get to parallel or ass to grass with this test, you’re in business.
Posture Assessment
-
Super easy, just take a photo of yourself from the side.
-
Make sure you’re completely relaxed.
-
You’re looking at the hips to see if they are dropping forward and down to the floor as seen in the 8/9/18 photo.
-
The lumbar spine may also have a bit ore exacerbated curvature.
Exercises To Fix A “Stuck” Anterior Pelvic Tilt
Alright so you now know we just need to learn how to control your anterior pelvic tilt. We do that by influencing the nervous system and putting you in positions where the muscles that help you achieve a posterior pelvic tilt get leverage. If you don’t know what I mean by “influencing the nervous system”, go read my Reddit post: Get More Out Of You Posture Training — Influence The Nervous System
EQUIPMENT:
-
Your floor
-
A chair or wall
-
(Optional) Pillow
-
(Optional) yoga block, ball, or towel between the knees
SET UP:
-
Lay down on your back with your legs at 90 degrees and feet against the wall
-
(Optional) Place a pillow under your head and neck
-
Place the hands on the lower portion of your ribs (where you feel them stick out a little)
-
Feel the heels of your feet pull down on the wall like your scraping paint (feel hamstrings)
-
Gently tuck your back pockets toward the back of your knees (posterior pelvic tilt) leaving belt line on the floor
-
Hold the yoga block between the knees with a gentle squeeze
-
Maintain set up throughout execution
EXECUTION:
-
Exhale every spit of air you got in the tank out through the mouth
-
Feel your lower abdominals around your belt line turn on while the lower ribs fall down and back toward the spine
-
Hold breath at the end of the exhale with your tongue against the roof of your mouth for 3-5 seconds
-
Maintain abdominal tension and lower ribs down while silently inhaling through the nose with the tongue still against the roof of the mouth
-
Feel expansion throughout front and sides of the ribcage
-
Repeat for recommended sets and reps
ADDITIONAL TIPS:
-
When the abs or lower ribs start to move, that’s your cue to start exhaling again
-
Keep your neck and face relaxed when breathing
-
You may want to really squeeze the yoga block depending if we’ve done an assessment
-
Use a chair at home if you’re struggling to feel hamstrings
WHY DO THIS?
-
Potentially decrease stress and global muscle tone (down regulate the central nervous system)
-
Loosen up your back and neck
-
Learn to maintain internal pressure throughout thorax and abdomen
-
Decrease anterior pelvic tilt
START WITH 3-5 SETS OF 5 BREATHS (EXHALE + INHALE)
EQUIPMENT:
-
Kitchen sink or something to hold onto
-
(Optional) yoga block, ball, or towel between the knees
SET UP:
-
Grab the sink or chair and stand about 1-2 steps away
-
(Optional) Place a yoga block between the knees
-
Squat down reaching your knees toward the base of the sink or chair
-
Feel all of your weight in your heels, but don’t lift the toes off the ground
-
Attempt to keep your bottom directly under your head
-
(Optional) Hold the yoga block between the knees with a gentle squeeze
-
Maintain set up throughout execution
EXECUTION:
-
Exhale every spit of air you got in the tank out through the mouth
-
Feel your lower abdominals around your belt line turn on while the lower ribs fall down and back toward the spine
-
Hold breath at the end of the exhale with your tongue against the roof of your mouth for 3-5 seconds
-
Maintain abdominal tension and lower ribs down while silently inhaling through the nose with the tongue still against the roof of the mouth
-
Feel expansion throughout the chest, sides of the ribcage, and upper/lower back
-
Repeat for recommended sets and reps
ADDITIONAL TIPS:
-
When the abs or lower ribs start to move, that’s your cue to start exhaling again
-
Keep your neck and face relaxed when breathing
-
Imagine the arms are meat hooks. They shouldn’t be tense
-
Reach the knees as far as possible till heels start to lift. That’s usually where you want to hangout in your set up
-
Less is more. Don’t worry about going super low with this move
WHY DO THIS?
-
Potentially decrease stress and global muscle tone (down regulate the central nervous system)
-
Loosen up your back
-
Learn to maintain internal pressure throughout thorax and abdomen
-
Decrease anterior pelvic tilt
-
Improve squat
START WITH 3-5 SETS OF 5 BREATHS (EXHALE + INHALE)
The primary goal of these to exercises is to achieve a posterior pelvic tilt that sits stacked below the cranium. This can allow for the brain’s perception of where it is in space to readjust, while also promoting new length tension relationships of the musculature. Think about these exercises as full body PNF with some true diaphragmatic breathing sprinkled on top.
Summary
In conclusion, an anterior pelvic tilt isn’t to blame for your poor posture or pain. If there’s anything to take away from this post, it’s that a lack of movement variability (AKA things are stuck and can’t get unstuck) is what causes weird things to happen. You get those things moving by… well… moving and making the brain feel safe and in balance. Then load those positions up and get super strong!
I really appreciate you taking the time out of your day to read this. If you have any questions, feel free to comment or DM me. I’ll answer to the best of my ability.
If you enjoyed this information, please consider signing up for my newsletter where I send blog posts, exercise tips, posture deep dives, and much more:
Newsletter Sign Up
Instagram: @waughfit
Citation
Lewis, Cara L et al. “The Human Pelvis: Variation in Structure and Function During Gait.” Anatomical record (Hoboken, N.J. : 2007) vol. 300,4 (2017): 633-642. doi:10.1002/ar.23552
Pontzer H. “Economy and Endurance in Human Evolution.” Curr Biol. 2017 Jun 19;27(12):R613-R621. doi: 10.1016/j.cub.2017.05.031. Review.