Im not sure if I posted it already or not (since it doesnt show), but I will ask again:
in the CURRENT patch, I saw some things changed (including the lines position), but I did what EthicsGradient suggested. It DID work. I used the Pearlescent Rhomboid Helsone. It works great! I wonder why this one wasn’t default usable by Godlike, as it has NO effect on his head-sike and stuff. Bad decision, Devs. Look:

I also tried downloaded his .dll file and replaced the one in the data, but in that case the game then did not open the main menu (only the OBSIDIAN and VersusEvil logos, then black screen).
So for future reference: try manually changing the file, do not download his .dll because it’s old code.
Also, I saw these lines of code below the helmet one and I wonder if it relates to other characters using pet slots…
Anyone got code changes to make it happen? Or at least the Eder one (that I know it’s coded in-game due to Berath’s favors).
Edited August 10, 2020 by BRUNO NEVES OLIVEIRA
Hey MPGH users!
Introduction
Here’s a detailed, step-by-step, tutorial on modifying 7DTD’s Assembly-CSharp.dll that’s hopefully comprehensive enough to shine light onto how to make basic «hacks» for 7DTD. This is aimed for an average 7DTD player that wants to make their own modified assembly file.To make things clear, this will not bypass EAC. You can only use this on servers with EAC disabled. You also have to start the game with EAC disabled. So you’ll need to either start it manually, or disable EAC in the launcher. If you’re looking for a quick troll, I’d recommend finding a peer-to-peer game. The majority of those usually always have EAC disabled and obviously always has at least one player online.
Most tutorials like this, that I’ve seen, always use .NET Reflector with the Reflexil plugin. However, I’m going to be using ILSpy, which is a free alternative, with the Reflexil plugin. However, if you want to use .NET Reflector, the process should pretty much the same. I personally use .NET Reflector in my day-to-day use, as I think it works better, but most people don’t want to spend money for a program that they’re only going to use a couple of times. Unless you pirated it, of course. However, that’s not my business. Do whatever floats your boat.
Setting up ILSpy
So to start out, you’ll need to download ILSpy. Just google «ILSpy.» It should the first .net URL you come across. Once there, simply click the blue «Download Binaries» button and download the .zip file containing the program. Once downloaded, extract it to your desired location.
Next you’ll need to get Reflexil. So google «Reflexil.» As before, the website you’re looking for should be a .net address. Just like with ILSpy, find the blue «Download» button and click it. This time instead of downloading a .zip file, it should redirect you to the Reflexil Github repository. Find the latest release and download the .zip file called «reflexil.for.ILSpy.<version>.<number>.AIO.bin.zip .» It’s usually the top file. Then, extract that file and copy the .dll file inside (it should be called «Reflexil.ILSpy.Plugin.dll») to the ILSpy directory with all the other .dlls that ILSpy comes with.
Now make sure 7DTD isn’t running, then go to the location where 7DTD is installed. It’s usually at «C:Program Files (x86)SteamSteamAppscommon7 Days To Die.» Then navigate into the «7DaysToDie_Data» folder, then from there, into the «Managed» folder. Find the .dll called «Assembly-CSharp.dll» and make a backup of it. This is so if you mess up, or want to restore back to vanilla 7DTD.
Now start ILSpy and open the «Assembly-CSharp.dll» file. (Hopefully you’ll be able to managed this without detailed instructions.) Then expand the assembly by pressing the «+» button next to the assembly’s name in the list of linked assemblies on the left side of the ILSpy window. (The name of the assembly is probably «Assembly-CSharp (0.0.0.0).») Then expand the «sub-directory» «-» of the Assembly-CSharp. In this «directory» you’ll find most of the code that you’ll be modifying.«Hack» locations
The following section are several examples of editing the assembly to enable a particular «hack.» You will need the locations for different «hacks» before you can edit them. You can either find them yourself, or you can find a fullish list of locations for A16.1 in the MPGH thread called «A16.1 B1 Cheat Sheet.» The only notable difference is that the location for the creative/debug menu is now «-/GameManager/UD/MoveNext(): Boolean» instead of «-/GameManager/GL/MoveNext(): Boolean» in A16.1. Just note that these locations can change with every game update.Editing the assembly
So for example, If I wanted to enable the debug menu in A16.1. I’ll go to big list of «directories» that appeared when I expanded the «-» «directory» earlier, I’m going to look for the «sub-directory» «GameManager.» Once I find that, I’ll expand it. (My «path» so far, counting the «-» «directory», is «-/GameManager/.») Then I’ll look for the inner class called «UD.» (If it’s not visible in ILSpy, make sure the code is decompiled to «IL» and the option «Show internal types and members» is enabled. However, having the code decompiled to C# is preferred, if possible.) Once I find it, I’ll expand it. Then I’ll look for the method «MoveNext(): Boolean» and select it. (Now my «path» is «-/GameManager/UD/MoveNext(): Boolean.») A whole bunch of code should appear in the right side of the ILSpy window. Now I can read the code, but I can’t modify it. This is where the Reflexil plugin comes into play. So to activate Reflexil, go to the «View» tab on the top-left of the ILSpy window. Inside that, you should see an option for «Reflexil <versionnumber>.» Once clicked, an additional window should appear on the bottom of where the decompiled code is being displayed. Inside this new window, under the «Instructions» tab, there should be several columns called «Offset,» «OpCode,» and «Operand.» Now while looking at the «OpCode» column, scroll down that list until you see the opcode of «ldc.i4.s,» with the operand of «40». (This is referring to the entry at index 40 in the «EnumGamePrefs» enumerator. In this case, the «DebugMenuEnabled» entry.) For A16.1, it should be at line 133, but this changes with every 7DTD update. Once I find it, I’ll select the opcode that’s immediately after it. It should be «ldc.i4.0.» (In case you’re wondering, this typically means false, in code) Right-click it and select the «Edit…» button. Then I’ll change the «OpCode» from «Idc.i4.0» to «Idc.i4.1» and click the «Update» button. Don’t touch the «Operand type» or «Operand» fields. By doing this, I’ve changed a false to true in the code, and by doing so, enabled the debug menu.
Since the location for the creative menu is located at the same place. I’ll enabled it since I’m already there. So I will continue to scroll down in the list of opcodes until I find the opcode «ldc.i4.s,» with the operand of «42». (Like before, this is referring to the «CreativeMenuEnabled» entry in the «EnumGamePrefs» enum.) I will repeat what I did to the first one and change the «ldc.i4.0» immediately after it to «Idc.i4.1» by selecting it. Then by right-clicking the «Edit…» button and changing the «OpCode» to «ldc.i4.1,» and clicking «Update.» Now I have both the creative and debug menus enabled.I’ll do two more different examples, then I’ll wrap up with exporting the finished .dll file.
So now I’ll enable extreme damage. There are several ways to do this, but for this example, I’m going to use my favorite method. So back in the base «-» «directory», I’m going to look the for the «sub-directory» «EntityPlayerLocal.» Once I’ve expanded it, I’ll look for the «GetStaminaMultiplier(): Single» method (the return type, the «: Single,» can change depending on the language the code is decompiled to). Once this method is selected, in Reflexil’s «Instructions» tab, I’ll right-click in the list of opcodes and click «Delete all.» Now I’ll right-click and click the «Create new…» button. Now in the OpCode field I’ll type «ldc.r4,» in the «Operand» field, I’ll type «99999,» and finally change the «Operand type» to «Single,» then click «Append.» Now I’ll create another opcode and type in «ret» in the OpCode field (leaving the other fields blank), then the click «Insert after selection» button. Just make sure the «ret» is after the «ldc.r4» in the list of opcodes. If it’s not, drag it to the proper spot. Now I have extreme damage enabled.
Finally I’ll add all players to my map. So again starting from the «-» «directory,» I’ll find the «sub-directory» «EntityPlayer.» (It’s the «directory» above «EntityPlayerLocal.») Now I’ll select the method «IsDrawMapIcon(): Boolean,» delete all the opcodes like before. I’ll create a new opcode of «ldc.i4.1,» making sure to leave the «Operand» and «Operand type» fields blank. Then I’ll create another opcode of «ret,» also like before, making sure that it’s after the «ldc.i4.1» opcode in the list of opcodes.
Just as a note, the decompiled code inside ILSpy will not change when modifying with Reflexil until the assembly is save and re-opened. So don’t freak out and think it’s not working because of that.
Saving the edited assembly
Now that I’ve made my modifications, I’m going to save my changes. I’ll do this by right-clicking on the assembly (it’s probably called «Assembly-CSharp (0.0.0.0),» if you haven’t been paying attention) and clicking on the «Save as…» button. (Under the Reflexil tab if you’re using .NET Reflector.) Now I’ll navigate to my «Managed» folder in my 7DTD directory, then naming by new assembly «Assembly-CSharp.dll,» and clicking «Save.» (Make sure you have a backup of the original before overwriting it!) Now I’m ready to go. I can start 7DTD (making sure EAC is disabled) and troll some nubs on their server.Wrapping up
I’ve read this thing to death, but there are still probably unclear portions, or flat out mistakes. If you find one, feel free to msg me or leave a reply. Leave a thanks if this helped you out!Happy hacking!
— Sqeegie
Assembly Editing Instruction
Now a days, mobile games uses Assembly-CSharp.dll wherein they hide the codes, procedures, function of their games even the IP address and ports where the client connect to game server.
So how to edit this assembly? This is based on my experience in editing unprotected Assembly. There are two types of assembly, unprotected and protected. Take note that you cannot edit the protected assembly, you need too much time to do it.
Now, we will talk on how to edit unprotected assembly…
Lets begin…
To edit the Assembly-CSharp.dll you will need the following:
1. dnSpy — .NET assembly editor, debugger, decompiler
2. a bit knowledge in C# or VB (optional)
3. common sense
What’s so special about DNSpy? Well, this:

Yes! We can now edit the code directly using normal coding methods!
So how you will start?
1. Open dnSpy
2. Load the Assembly-CSharp.dll, usually it is located in «assetsbinDataManaged»

3. In the search option, you can search a string or a class and even a reference.

4. If the search string or data is searchable but you cannot see the original data, kindly switch the module to IL then search it again.

5. Don’t forget to save the assembly.
In dnSpy, you can save the code or in a project. Goodluck!

You can try also:
ILSPY (http://ilspy.net/)
REFLEXIL pluggin for ilspy (http://reflexil.net/)
Разработчики игр с удовольствием пользуются теми удобствами, что им предоставляет движок Unity, но, как выяснилось, он столь же удобен и для любого желающего вскрыть эти игры. Для примера я возьму Poker World и покажу на ней, как можно не только менять параметры, но и влезть в саму логику, переиначить все на свой лад и перепаковать APK. Заодно соберем небольшой набор утилит, который поможет в работе с мобильным софтом.
Все манипуляции с приложением делались исключительно в исследовательских целях и не преследуют финансовой выгоды в каком-либо виде.
Работа работой, а отдыхать тоже нужно. Человек я не азартный, но в карты покидать люблю. Недавно я приметил офлайновое приложение для игры в покер под названием Poker World. У него аскетичный интерфейс, минимальный набор функций, но есть почти все, что мне нужно. Напрягал только повышенный интерес разработчиков к донату. Поэтому с каждой раздачей исследовательская жилка напрягалась и таки не выдержала. Я взялся за клавиатуру с твердой уверенностью раздобыть себе немного виртуальных деньжат.
Содержание
- Первые шаги
- Начинаем веселье в iOS
- Властвуем в Poker World для Android
- Выводы
Первые шаги

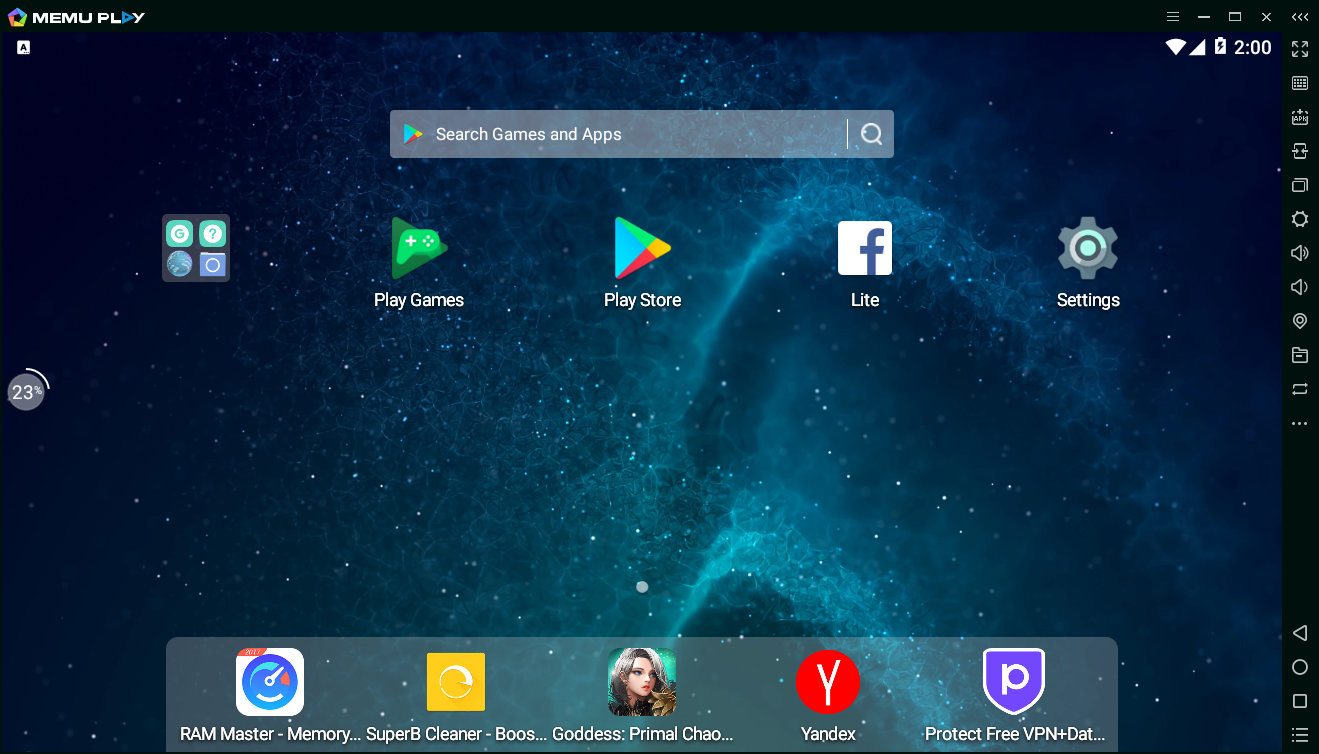
Чтобы начать вивисекцию приложения нам понадобится небольшой стенд. В первую очередь стоит поставить нормальный эмулятор Android. Раньше я использовал Andy, но теперь он скурвился и даже начал пихать майнеры в свои дистрибутивы. Мне в срочном порядке пришлось искать замену. Моя основная ОС — Windows и поэтому все поиски были направлены на дистрибутивы для этой платформы. Я перебрал с десяток вариантов из топа выдачи Google, и все они, культурно выражаясь, оставляли желать лучшего. Однако мои молитвы были услышаны, и я наткнулся на Memu. На момент написания статьи последняя версия была 5.5.1. Тут есть все, что тебе может понадобиться. Создавать можно виртуальные машины Android версий 4.4 и 5.1, а также поддерживает эмуляцию нескольких моделей устройств.
Также тут присутствуют разные приятные фишки типа эмуляции камеры, спуфинга GPS, мак-адреса и сотового оператора, и, конечно же, есть поддержка трехмерной графики, то есть возможность запускать игры.
Что очень важно, MEmu поддерживает установку приложений из файлов APK и, о боги, в нем есть обычные настройки сетевого подключения Android. Это позволяет легко настроить устройство на работу через прокси типа Burp и перехватывать трафик. Ты удивишься, но часть эмуляторов не поддерживала работу через прокси и не имела стандартных сетевых настроек.
В общем, пока у меня не возникало претензий к MEmu. Если ты знаешь о более достойных вариантах, не стесняйся и пиши о них в комментариях.
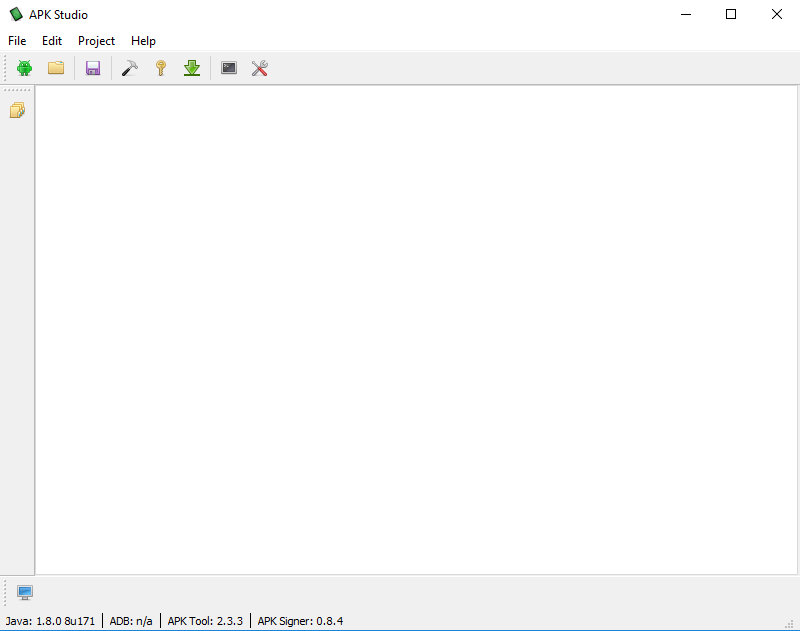
Еще нам понадобится APK Studio, чтобы иметь возможность удобно распаковывать, пересобирать и подписывать пакеты. Для подписи пакетов к нему потребуется скачать uber-apk-signer и положить в директорию
C:Users<имя_юзера>.apkstudiovendor, предварительно переименовав в
uber—apk—signer.jar. Также можешь обновить apktool до последней версии и скопировать в ту же папку.
И, конечно же, само приложение. Его можно скачать из Play Market и App Store, но нам ведь нужен сам дистрибутив. Тут на помощь приходят сайты-агрегаторы приложений. Такого рода сервисы легко гуглятся по запросу
apk download. Я, например, остановился на https://apkpure.com/, где помимо текущей версии приложения можно скачать и предыдущие (иногда бывает полезно).
Переходим по ссылке и скачиваем нашего подопытного. На момент написания статьи последняя версия приложения — 1.3.5.

Теперь можно установить скачанный apk в эмуляторе. Для этого достаточно перетащить его на окно с запущенным MEmu — практически в лучших традициях macOS.
На этом этапе базовые приготовления закончены. Обо всех остальных полезных штуках и утилитах я расскажу в процессе препарирования приложения.
Начинаем веселье в iOS
Так получилось, что играть я начал на айфоне. И где-то на третьем уровне денег начало катастрофически не хватать. Аппарат был без джейлбрейка, и делать мне его совершенно не хотелось, поэтому я начал искать баги в логике самого приложения. Такие, чтобы можно было провернуть, не закапываясь в его дебри.
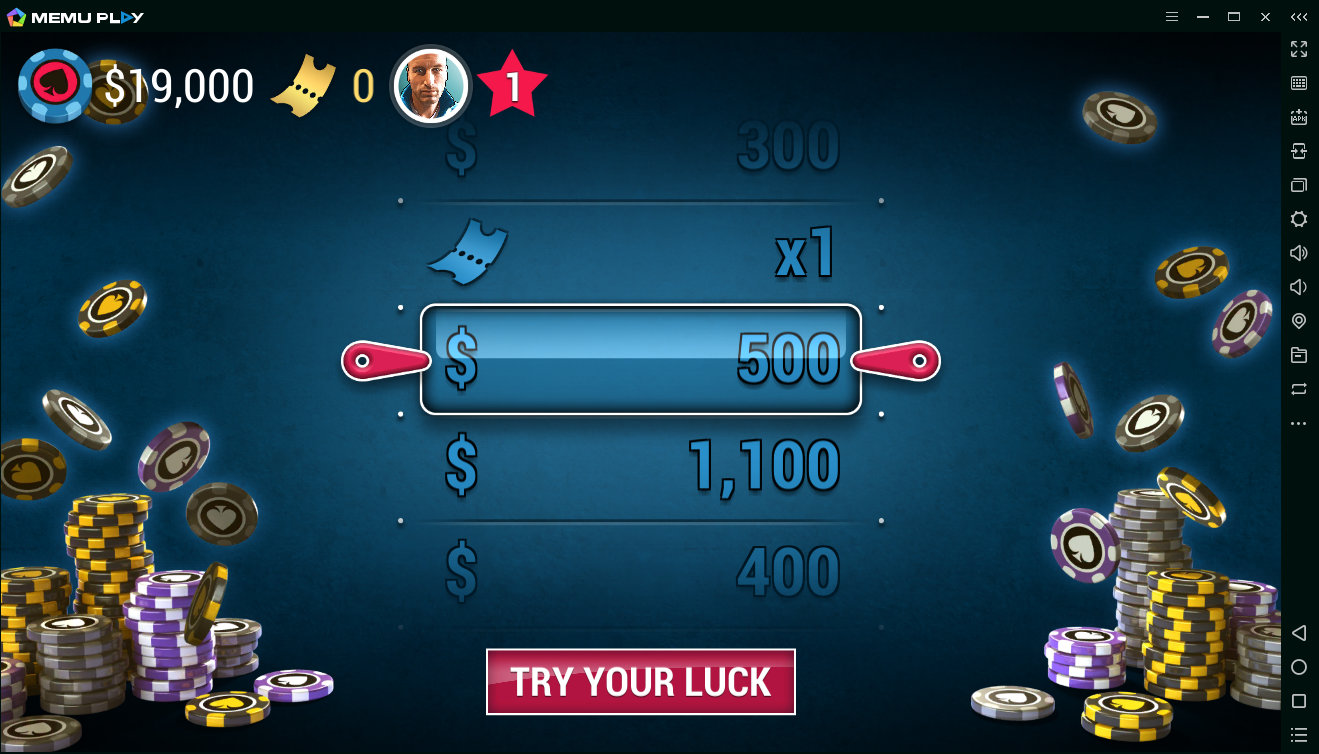
Парочку таких я и обнаружил. В игре есть возможность раз в четыре часа крутить однорукого бандита, из которого тебе рандомно выпадают всякие ништяки. Их в игре всего два вида — это деньги и билеты. И те, и другие нужны для участия в турнирах. Так вот в местном аналоге тотализатора можно выиграть небольшое количество денег или один билетик. Количество денег, которые ты можешь срубить, зависит от уровня твоего персонажа. Каждые несколько уровней суммы выигрыша в этой рулетке удваиваются. На самом первом они составляют от $400 до $2000.
Про билет и 2000 баксов можно забыть, за месяц игры и тысячи кручений этой рулетки ни разу ничего подобного мне не выпало. Интересно будет взглянуть на алгоритм.

Тем не менее, через пять таких спинов ты получаешь возможность сделать джекпот спин, в котором все выигрыши умножены на три и, соответственно, можно урвать аж три билета.
Баг заключался в том, что время до следующего спина считалось от установленной в системе даты. Поэтому достаточно просто свернуть приложение, перевести часы на четыре часа вперед, развернуть его и снова крутить барабан. Так можно делать до бесконечности.
Чтобы бесконечно не переводить время в будущее, можно сделать так:
- сворачиваем приложение, находясь на экране с таблицей спинов и таймером до следующего;
- переводим часы на четыре часа вперед;
- разворачиваем, видим, что появилась кнопка Spin Now. Нажимать ее не нужно;
- сворачиваем;
- переводим время на четыре часа назад;
- снова разворачиваем и теперь уже нажимаем кнопку.
Я проводил такую процедуру после каждого джекпот спина. Это дает возможность не уходить далеко в будущее, так как от системного времени много чего зависит. Срабатывание алертов, событий в календаре и прочее.
Вообще, я сильно удивился тому, какие проблемы может вызвать изменение даты на устройстве с iOS. Например, после того как я выставил 2030, меня разлогинил iCloud и отказывался пускать обратно с неизвестной ошибкой. Я уж было подумал, что мой аккаунт заблокировали за путешествия во времени. Повторно авторизоваться удалось только после перезагрузки девайса.
Два года назад в iOS нашли баг: устройство окирпичивалось, если поставить дату на 1970 год. Можно предположить, что от системной даты многое зависит.
Плюс сама смена даты неудобна — чтобы сменить год, нужно прокрутить все 365 дней. Вот и сиди, вози пальцем как сумасшедший.

Помимо бесплатных спинов, имеются еще игры без вложений, которые тоже доступны каждые четыре часа. В цепочке — пять игр, в каждой ты можешь выиграть определенную сумму, причем чем дальше по цепочке ты проходишь, тем больше куш. Приз за выигрыш в последней — один билет.
Ускорить можно точно таким же способом — изменение системного времени. К слову сказать, этот стандартный финт с переводом часов еще много где прокатывает, не стесняйся и чекай в тех приложениях, где предлагают чего-то подождать.
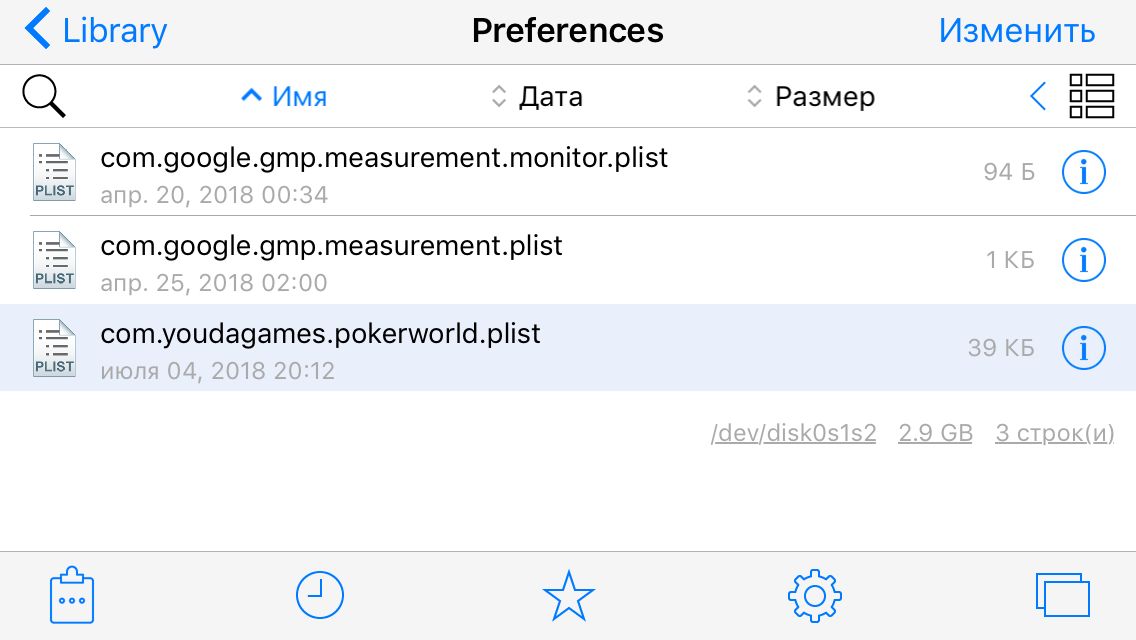
Но это все цветочки. У меня завалялся старый джейлбрейкнутый айфон, а это значит, что настало время заглянуть поглубже в недра игры и посмотреть, что там творится. Запускаю утилиту Filza и смотрю, где располагаются файлы приложения. У меня это
/path. Немного покопавшись, я обнаружил интересный файл
com.youdagames.pokerworld.plist.
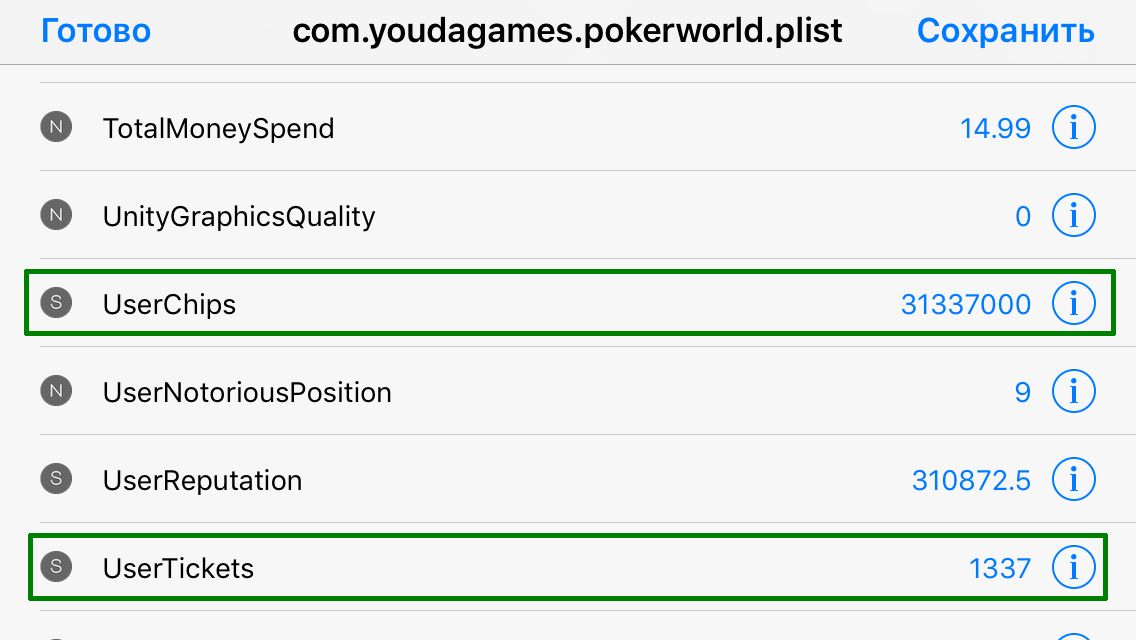
Сам файловый менеджер Filza позволяет открывать, редактировать и сохранять файлы plist. В нем располагаются разные настройки, которые касаются игры в целом и текущего пользователя, в частности. Мой взгляд зацепился за парочку интересных переменных с названиями —
UserChips,
UserTickets. И да, они означают именно то, что ты подумал. Это количество твоих денег (фишек) и билетов. Я поменял значения на нужные и запустил игру.

И вуаля! Виртуальный миллионер. Помимо этого в файле находится куча интересных параметров — таких как текущий уровень игрока, его позиция в десятке лидеров, какие уровни уже пройдены, лимиты столов и прочее. Если будет интересно, то можешь поэкспериментировать на досуге, а я перехожу к версии приложения для Android и более интересным вещам.
Властвуем в Poker World для Android
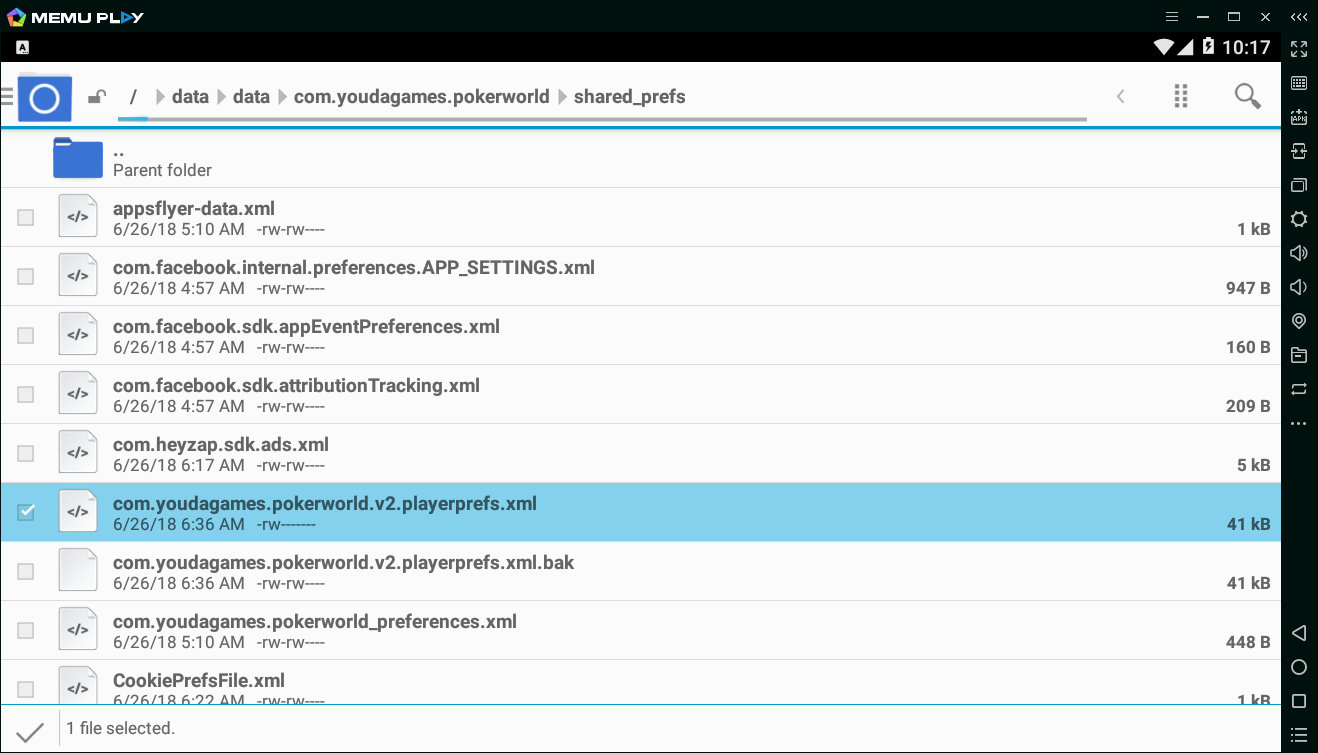
Первым делом точно так же проверяем домашнюю папку приложения. Не лежат ли там какие-нибудь интересные файлы? Для этих целей я воспользуюсь файловым менеджером из Cyanogen Mod и перейду в папку
/data/data/com.youdagames.pokerworld/shared_prefs/.
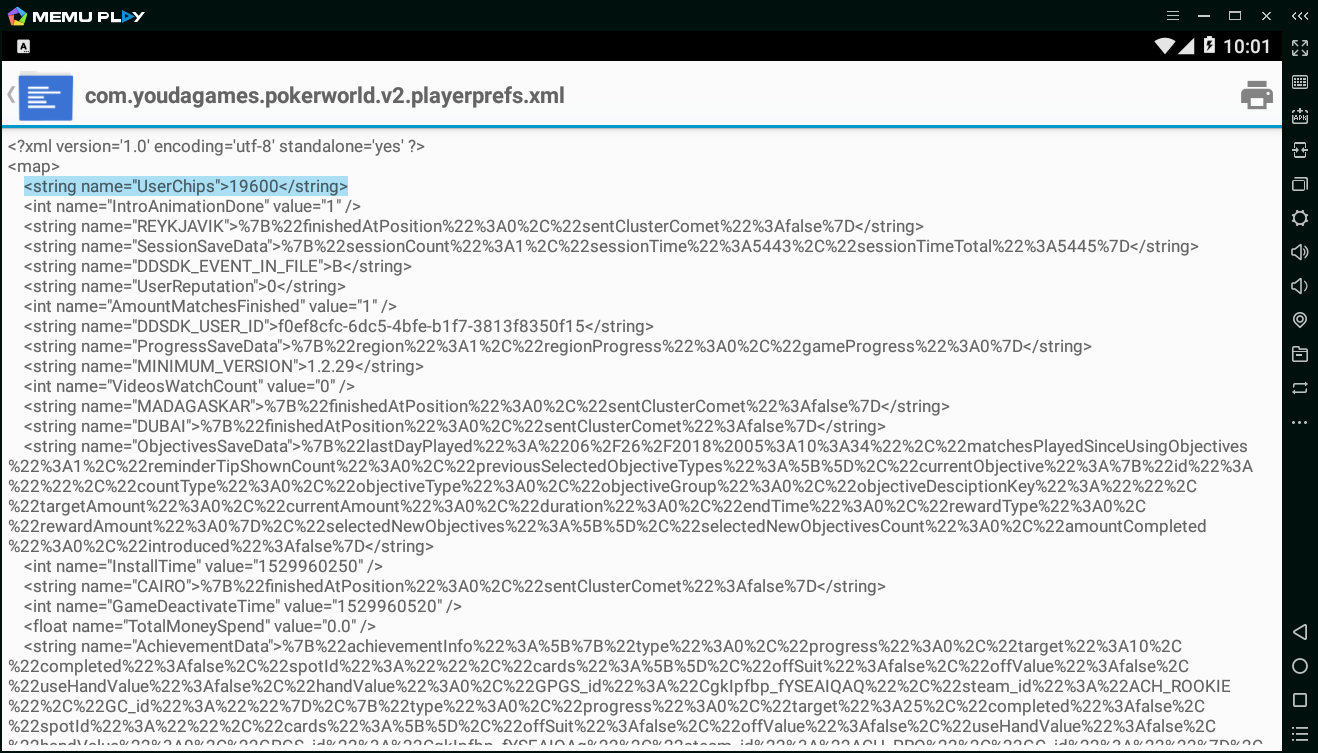
Сразу же бросается в глаза файл
com.youdagames.pokerworld.v2.playerprefs.xml. Откроем его и убедимся: там все то же самое, что и в iOS, только в формате XML.
Но мы это уже проходили, поэтому ценность этой находки для нас минимальна. Пойдем чуть дальше.
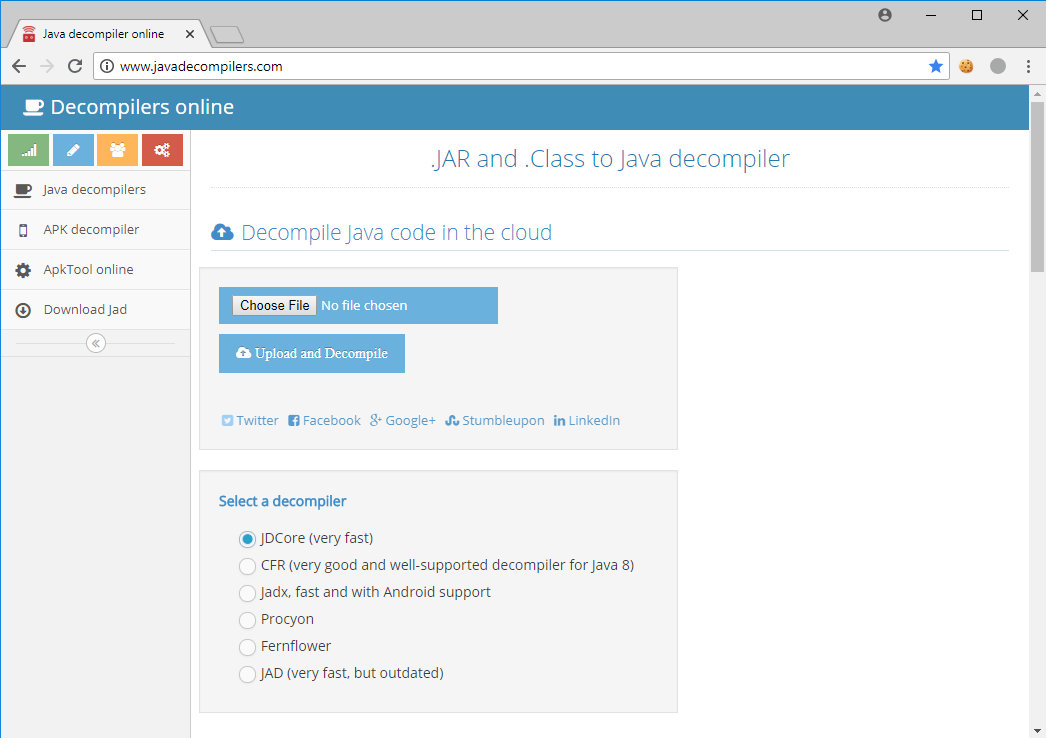
Попробуем декомпилировать apk-файл с игрой. Для этих целей я почти всегда использую замечательный онлайновый сервис javadecompilers.com/apk. Кстати, помимо приложений для Android, он может декомпилировать файлы JAR, причем разными методами. На выбор декомпиляторы JDCore, CFR, Jadx и т.д.
В общем, декомпильнули наш файл, скачали его, распаковали и видим, что ничего особо интересного там нет. Печаль.
Также есть целый фреймворк, который неплохо помогает в исследовании мобильных приложений, он называется Mobile Security Framework, MobSF. Он тоже выполняет декомпиляцию приложения и ищет в получившихся исходниках всякие интересные вещи и потенциальные уязвимости. Рекомендую не брезговать им и натравливать его на исследуемые приложения. Фреймворк легко устанавливается и, помимо этого, существует в виде контейнера Docker, что сводит его установку к одной команде.
|
[crayon—63e498994bc05800975442 inline=«true» ]<span class=«pun»>></span><span class=«pln»> docker run </span><span class=«pun»>—</span><span class=«pln»>it </span><span class=«pun»>—</span><span class=«pln»>p </span><span class=«lit»>8000</span><span class=«pun»>:</span><span class=«lit»>8000</span><span class=«pln»> opensecurity</span><span class=«pun»>/</span><span class=«pln»>mobile</span><span class=«pun»>—</span><span class=«pln»>security</span><span class=«pun»>—</span><span class=«pln»>framework</span><span class=«pun»>—</span><span class=«pln»>mobsf</span><span class=«pun»>:</span><span class=«pln»>latest</span> |
[/crayon]
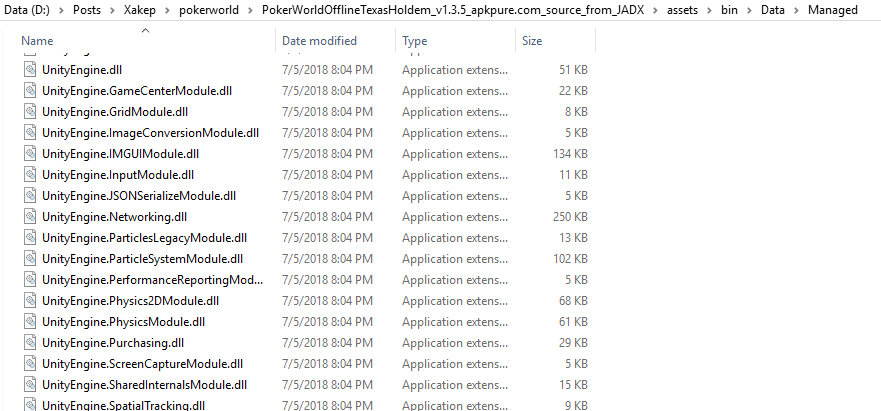
Но нам это тоже не поможет. У нас здесь игра на движке Unity, на что недвусмысленно намекает наличие характерных файлов.
Я, конечно же, слышал про этот игровой движок, но никогда не приходилось иметь с ним дело в плане реверса. Немного покурив мануалы, я узнал, что все самое интересное обычно находится в файлах
Assembly—CSharp.dll,
Assembly—CSharp—firstpass.dll и
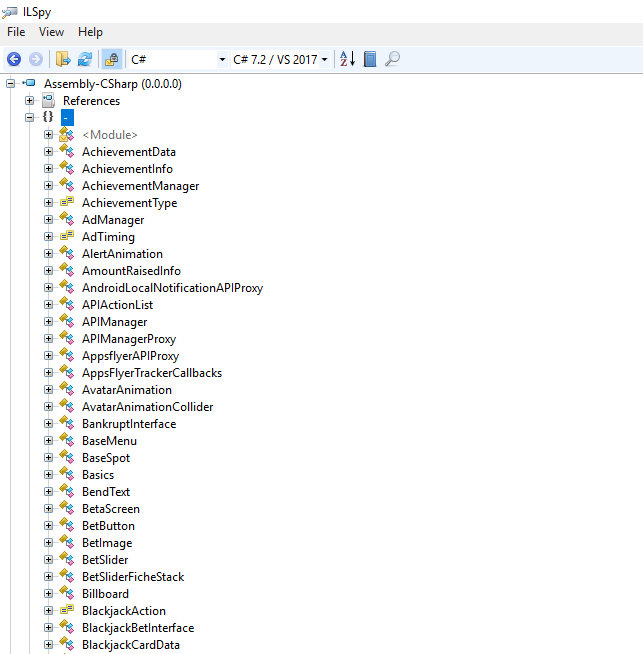
Assembly—UnityScript.dll из папки Managed. Как видно из названия, они написаны на C#, поэтому нам нужен соответствующий декомпилятор. Есть несколько классных вариантов, среди них ILSpy и DotPeek. Обе утилиты абсолютно бесплатны и имеют свои фишки; я остановился на ILSpy. Откроем в нем
Assembly—CSharp.dll и
Assembly—CSharp—firstpass.dll.
Разворачиваем дерево файла
Assembly—CSharp.dll и наблюдаем огромное количество классов с интересными названиями. Это абсолютна вся логика игры. Есть где развернуться!
Но как вносить изменения, чтобы можно было их сохранить? Первый вариант — это экспортировать исходники, отредактировать и попробовать скомпилировать их обратно в библиотеку. Думаю, что при таком раскладе понадобится устранить кучу зависимостей и возникнет немало подводных камней, которые отнимут значительное количество времени — результат просто того не стоит.
Сначала я было расстроился, но немного погуглив, я нашел отличное решение. При помощи утилиты под названием dnSpy мы можем вносить изменения напрямую в DLL, причем так, как если бы мы просто редактировали ее код на C#. Просто магия вне Хогвардса!
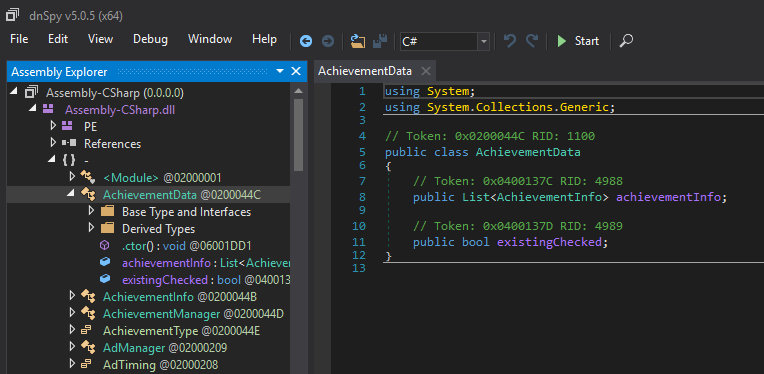
Скачиваем программу и открываем наши библиотеки в ней.
Если встроенный редактор покажется тебе недостаточно удобным, можешь сохранить все исходники как проект и пользоваться привычным. Для этого в меню File имеется команда Export to Project.
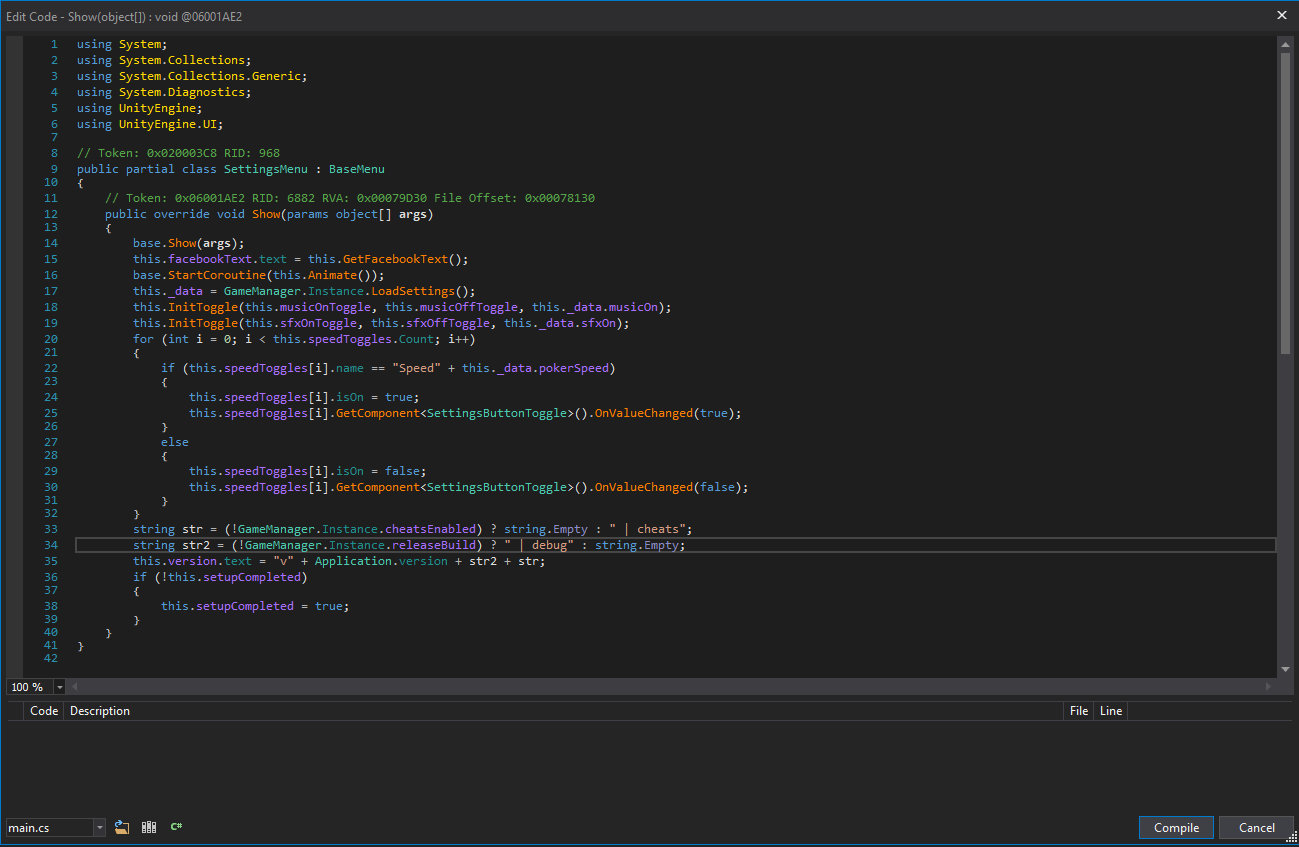
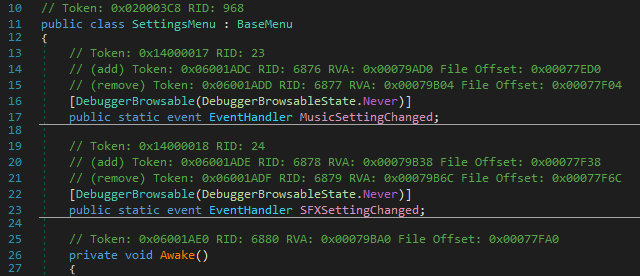
Сначала изменим что-нибудь простое, чтобы понять, сработает ли. Например, я нашел класс, который отвечает за отображение меню настроек игры. В нем есть метод
Show(), который отрабатывает при нажатии на кнопку настроек.
/Assembly-CSharp/SettingsMenu.cs
|
088: // Token: 0x06001AE2 RID: 6882 RVA: 0x00079D30 File Offset: 0x00078130 089: public override void Show(params object[] args) 090: { 091: base.Show(args); 092: this.facebookText.text = this.GetFacebookText(); 093: base.StartCoroutine(this.Animate()); 094: this._data = GameManager.Instance.LoadSettings(); ... 110: string str = (!GameManager.Instance.cheatsEnabled) ? string.Empty : » | cheats»; 111: string str2 = (!GameManager.Instance.releaseBuild) ? » | debug» : string.Empty; 112: this.version.text = «v» + Application.version + str2 + str; |

Здесь задается переменная
this.version.text, которая содержит номер текущей версии игры. Он выводится в левом нижнем углу на экране настроек.
Добавим к этой строчке что-нибудь свое. Для этого нужно кликнуть правой кнопкой мыши внутри метода и выбрать пункт меню Edit Method (C#) или просто нажать Ctrl-Shift-E.
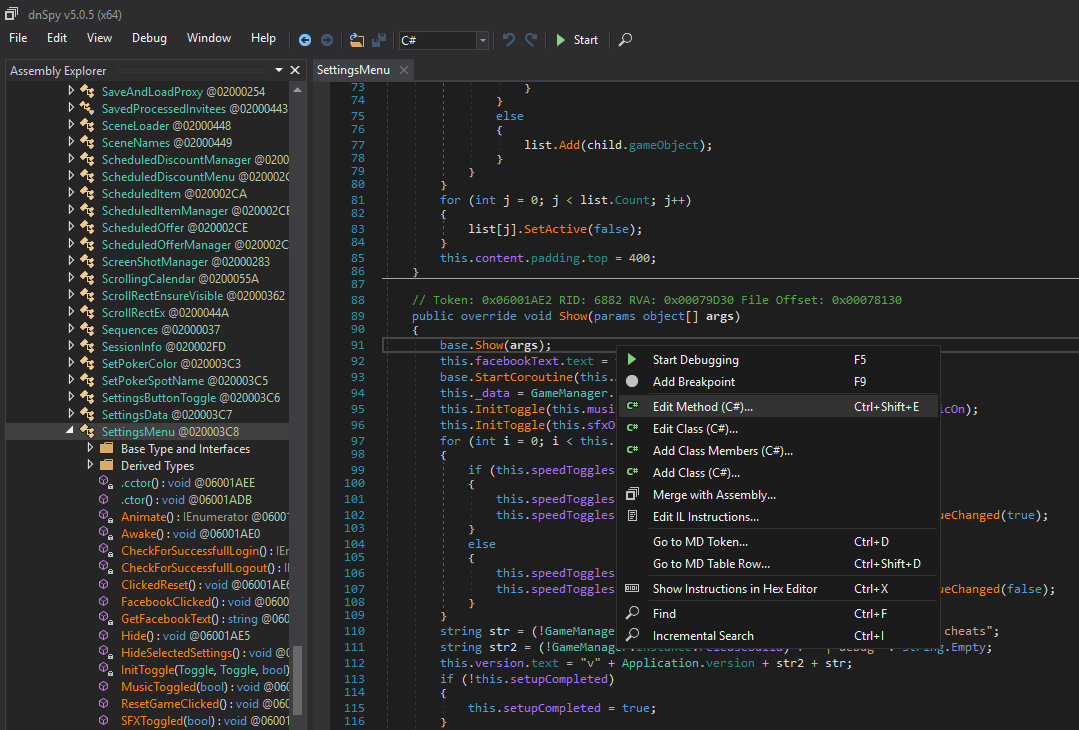
Контекстное меню выбранного метода
Откроется окно для внесения изменений только в выбранный метод. Ты можешь выбрать Edit Class (C#) и редактировать весь класс целиком, но сейчас нам это не нужно.
Окно редактирования выбранного метода в dnSpy
Я добавил переменную
str3, в которой написал небольшое приветствие.
/Assembly-CSharp/SettingsMenu.cs
|
111: string str2 = (!GameManager.Instance.releaseBuild) ? » | debug» : string.Empty; 112: string str3 = » | Hello from dnSpy»; 113: this.version.text = «v» + Application.version + str2 + str + str3; |
После этого нажимаем кнопку
Compile. Тут компилятор может вернуть ошибки.

Ошибки компиляции метода в dnSpy
Не будем сильно вдаваться в суть ошибок; посмотрим лучше на место, где они обнаружились. Видишь то же самое имя файла, который мы редактируем, только с постфиксом
g? Это означает global, то есть ошибки (по мнению компилятора dnSpy) содержит основной файл класса. Но мы ведь изменяем лишь один метод, а значит этими ошибками можно спокойно пренебречь. Поэтому двойным кликом по сообщению об ошибке, переходим в место, где они обитают, и просто комментируем неугодные строки.

Устраняем ошибки компиляции метода в dnSpy
После этих действий компиляция прошла успешно. Теперь можешь посмотреть в начало класса и заметить, что те строки, что мы комментировали, находятся в изначальном состоянии.
Состояние класса после рекомпиляции метода
Метод перекомпилирован, теперь идем в меню File и выбираем Save Module.
Таким образом, у нас появилась обновленная DLL. Осталось собрать все обратно в APK, чтобы запустить на телефоне. Хоть APK — это обычный архив ZIP, но просто запаковать и изменить расширение недостаточно. Нужен верный манифест-файл и правильная подпись.
В этих делах нам поможет утилита apkstudio. Откроем APK с игрой и распакуем в какую-нибудь папку при помощи пункта меню File → Open → APK.
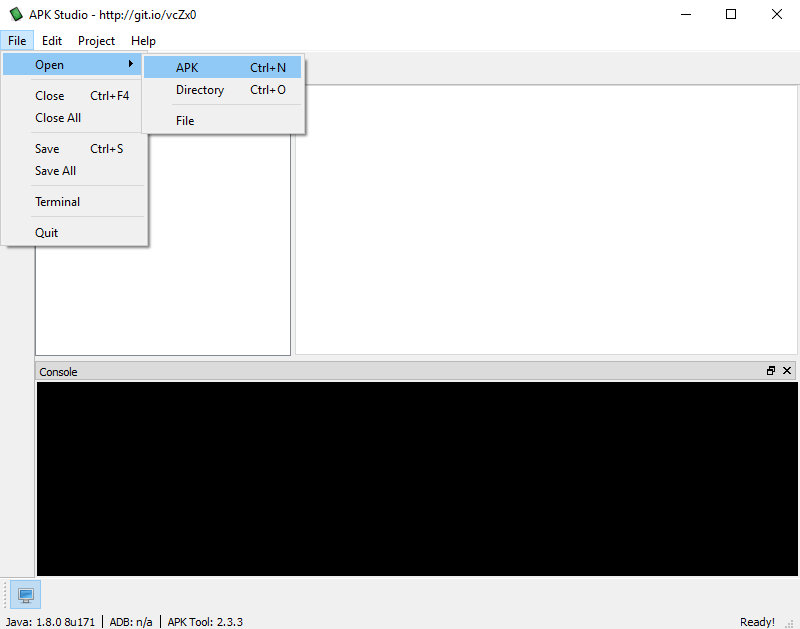
Меню File утилиты APK Studio
В опциях открытия файла в Project Path указываем путь, куда складывать распакованные данные. Также можешь убрать галочки с пунктов Decompile Source и Decode Resources, так как нам не нужно декомпилировать исходники и декодировать ресурсы приложения.
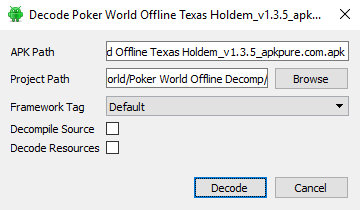
Настройки декодирования APK-файла
Теперь жмем Decode и переходим в папку с распакованным приложением. Копируем отредактированный DLL (
Assembly—CSharp.dll) в
/assets/bin/Data/Managed с заменой существующей. Снова идем в APK Studio и жмем F5 или выбираем пункт Build из меню Project. В директории, где лежит содержимое APK появился собранная версия. Но просто так установить ее не получится. Остался еще один шаг — подпись.
Сначала нужно сгенерировать ключ. Это можно сделать с помощью входящей в состав Java утилиты keytool. Для создания выполним следующую команду:
|
> keytool.exe —genkey —keystore <имя_контейнера> —storepass <пароль> —alias <имя_ключа> —validity <срок_действия_в_днях> —keyalg RSA —storetype pkcs12 |
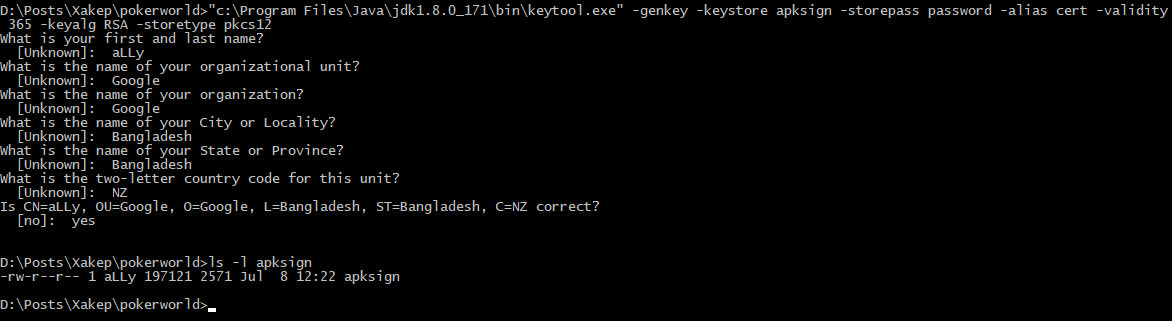
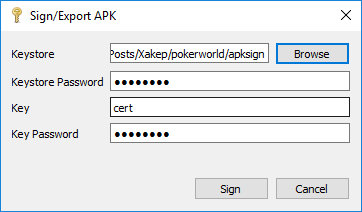
Возвращаемся в APK Studio, переходим в меню Project → Sign/Export. Выбираем свежесозданный контейнер и указываем пароль к нему, название ключа и его пароль.
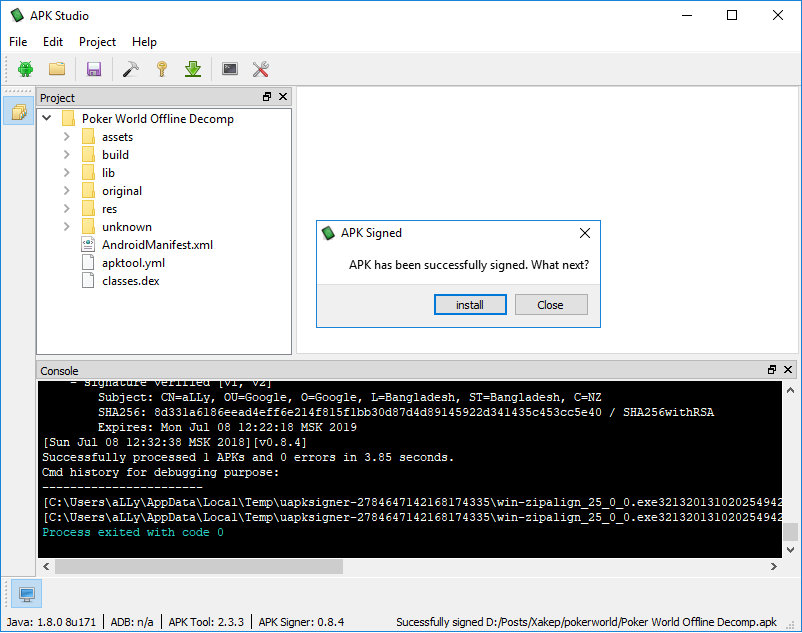
Нажимаем Sign. Программа немного подумает и скажет, что все прошло успешно.

Вот теперь можно устанавливать получившееся приложение. Запускаем его, переходим в настройки и видим, что наша строка красуется рядом с версией приложения.
Ну что, теперь пора браться за дела покруче, чем простое добавление строчек.
Немного побродив по исходникам, я наткнулся на интересные классы
Cheat и
CheatMenu. Это менюшка с читами и, судя по методам, есть очень интересные: выиграть текущую игру, показать карты соперников, выиграть текущую игровую зону.
/Assembly-CSharp/CheatMenu.cs
|
008: public class CheatMenu : MonoBehaviour 009: { ... 169: public void WinPoker(int place) ... 189: public void ShowCards() ... 199: public void CompleteCluster(int clusterNumber) |
Посмотрим в метод Start, чтобы узнать какой код выполняется при запуске
|
109: private void Start() 110: { 111: this.Init(); 112: } |
В методе Init происходит инициализация меню.
|
1 2 3 4 5 6 7 8 9 10 11 12 13 14 15 16 17 18 19 20 21 22 23 24 25 26 27 28 |
079: private void Init() 080: { 081: if (CheatCamera.instance == null) 082: { 083: return; 084: } 085: if (this.transformsToTouch == null || this.transformsToTouch.Length == 0 || this.transformsToTouch[0] == null) 086: { 087: this.transformsToTouch = CheatCamera.instance.transformsToTouch; 088: } 089: this.pointsToTouch = new Vector3[this.transformsToTouch.Length]; 090: for (int i = 0; i < this.pointsToTouch.Length; i++) 091: { 092: this.pointsToTouch[i] = this.transformsToTouch[i].position; 093: } 094: if (GameManager.Instance.releaseBuild) 095: { 096: base.gameObject.SetActive(false); 097: } 098: else if (GameManager.Instance.cheatsEnabled) 099: { 100: base.gameObject.SetActive(true); 101: } 102: else 103: { 104: base.gameObject.SetActive(false); 105: } 106: } |
Пробежавшись по коду, понимаем, что менюшка не работает на релизных версиях приложения. Досадно. Давай исправим это.
|
1 2 3 4 5 6 7 8 9 10 11 12 13 14 15 16 17 |
79: private void Init() 80: { 81: if (CheatCamera.instance == null) 82: { 83: return; 84: } 85: if (this.transformsToTouch == null || this.transformsToTouch.Length == 0 || this.transformsToTouch[0] == null) 86: { 87: this.transformsToTouch = CheatCamera.instance.transformsToTouch; 88: } 89: this.pointsToTouch = new Vector3[this.transformsToTouch.Length]; 90: for (int i = 0; i < this.pointsToTouch.Length; i++) 91: { 92: this.pointsToTouch[i] = this.transformsToTouch[i].position; 93: } 94: base.gameObject.SetActive(true); 95: } |
Однако просто активировать чит-меню недостаточно. Обрати внимание на метод Update.
|
104: private void Update() 105: { 106: if (CheatCamera.instance == null) 107: { 108: return; 109: } 110: this.CheckTouches(); 111: } |
Каждый раз вызывается
CheckTouches.
|
1 2 3 4 5 6 7 8 9 10 11 12 13 14 15 16 17 18 19 20 21 22 23 24 25 26 27 28 29 |
114: private void CheckTouches() 115: { 116: if (Input.touchCount >= this.pointsToTouch.Length) 117: { 118: Touch[] touches = Input.touches; 119: this.pointsTouched = new bool[touches.Length]; 120: for (int i = 0; i < touches.Length; i++) 121: { 122: Vector3 vector = CheatCamera.instance.GetComponent<Camera>().ScreenToWorldPoint(touches[i].position); 123: Vector3 a = new Vector3(vector.x, vector.y, 0f); 124: foreach (Vector3 b in this.pointsToTouch) 125: { 126: if (Vector3.Distance(a, b) <= 1f) 127: { 128: this.pointsTouched[i] = true; 129: } 130: } 131: } 132: for (int k = 0; k < this.pointsTouched.Length; k++) 133: { 134: if (!this.pointsTouched[k]) 135: { 136: return; 137: } 138: } 139: this.cheats.gameObject.SetActive(true); 140: return; 141: } 142: } |
Судя по телу этого метода, чтобы менюшка показалась, нужно тапнуть в нужных местах. Давай сделаем, чтобы она открывалась сразу после загрузки приложения.
|
1 2 3 4 5 6 7 8 9 10 11 12 13 14 15 16 17 18 |
79: private void Init() 80: { 81: if (CheatCamera.instance == null) 82: { 83: return; 84: } 85: if (this.transformsToTouch == null || this.transformsToTouch.Length == 0 || this.transformsToTouch[0] == null) 86: { 87: this.transformsToTouch = CheatCamera.instance.transformsToTouch; 88: } 89: this.pointsToTouch = new Vector3[this.transformsToTouch.Length]; 90: for (int i = 0; i < this.pointsToTouch.Length; i++) 91: { 92: this.pointsToTouch[i] = this.transformsToTouch[i].position; 93: } 94: base.gameObject.SetActive(true); 95: this.cheats.gameObject.SetActive(true); 96: } |

Сохраняем, билдим, подписываем, устанавливаем, запускаем и видим чит-меню. Можно убедиться, что все кнопочки рабочие.
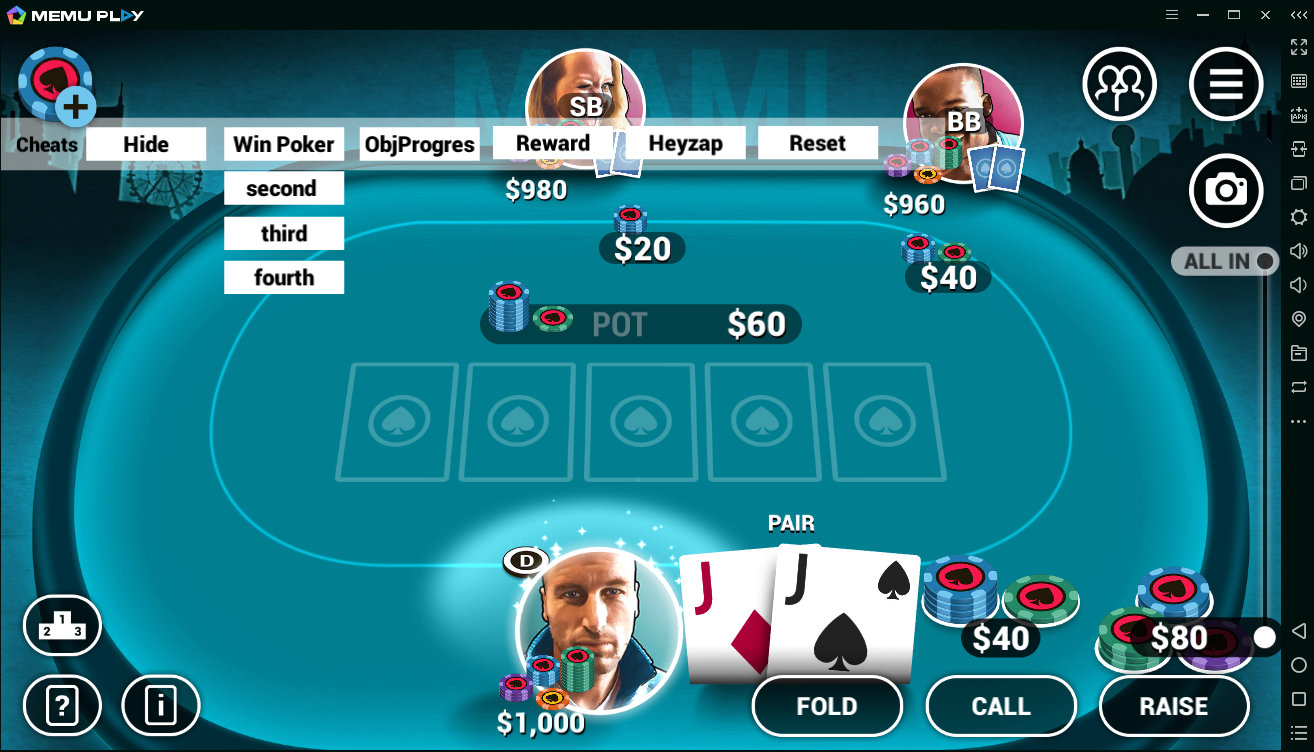
Но что-то я не вижу в нем самой интересной функции — показать карты соперников. Нужно исправлять это досадное упущение. Посмотрим на то, как выглядит экран во время игры.
В левом нижнем углу есть кнопочка с символом
?, которая показывает, какие карты были на руках в последней раздаче. Давай изменим ее функцию на показ карт соперников. Для этого найдем код, который отвечает за клик по этой кнопке.
/Assembly-CSharp/LastHandMenuButton.cs
|
05: public class LastHandMenuButton : MonoBehaviour 06: { 07: // Token: 0x0600192D RID: 6445 RVA: 0x0006CF11 File Offset: 0x0006B311 08: public void OnClick() 09: { 10: MenuManager.Instance.Show<LastHandMenu>(new object[0]); 11: } 12: } |

Пересобираем приложение и теперь при нажатии на нужную кнопку будут показываться карты противников.
РЕКОМЕНДУЕМ:
Как писать читы для игр
Получается, ты можешь почти полностью менять логику работы приложения. Можно добавлять фишки прямо при игре на столе, можно выкидывать ботов, влиять на алгоритм раздачи карт и тому подобное.
Выводы
Благодаря таким манипуляциям можно «подправить» почти с любую игру, написанную на Unity, а это, как ты знаешь, очень и очень популярный движок. У dnSpy есть даже специальные билды библиотеки
Mono.dll. Заменив оригинальную версию такой библиотеки, можно отлаживать приложение с помощью встроенного в dnSpy дебаггера. Очень удобная вещь.
Лично я получил немало удовольствия от того, что разобрался в логике работы приложения. Надеюсь, тебе тоже понравилось!
 (4 оценок, среднее: 5,00 из 5)
![]() Загрузка…
Загрузка…
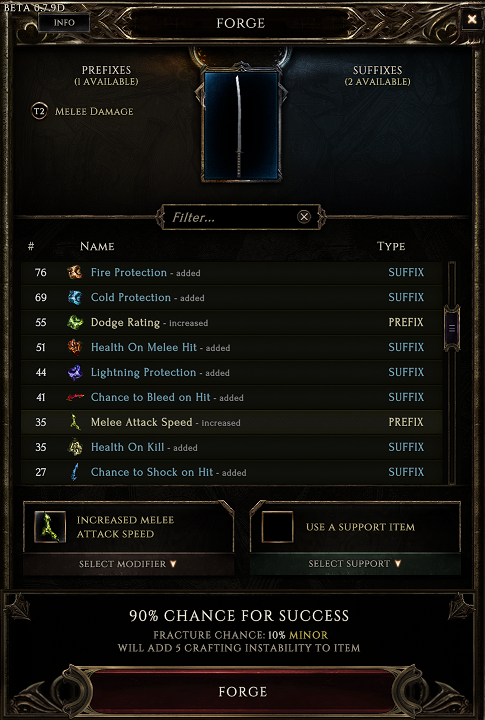
Last Epoch — это однопользовательская ARPG на Unity и C#. В игре присутствует система крафта — игрок находит модификаторы, которые затем применяет к экипировке. С каждым модификатором накапливается «нестабильность», которая увеличивает шанс поломки предмета
Я преследовал две цели:
- Убрать «поломку» предмета в результате применения модификаторов
- Не расходовать модификаторы при крафте

Вот так выглядит окно крафта в игре:
Часть первая, где мы редактируем .NET код без регистрации и смс
Для начала я опишу процесс модификации старой версии игры (0.7.8)
После компиляции C# превращается в IL (Intermediate Language) код. IL-код напоминает ассемблер высокого уровня абстракции и замечательно декомпилируется. В Unity проектах IL-код игры как правило находится в <GameFolder>/Managed/Assembly-CSharp.dll
Для редактирования IL-кода мы будем использовать dnSpy — лучший из всех инструментов подобного рода для .NET, что я встречал. dnSpy делает работу со скомпилированными .NET приложениями настолько легкой, что ее можно спутать с разработкой в обычной IDE.
Ищем логику крафта
Итак, запускаем dnSpy и открываем Assembly-CSharp.dll

Мы сразу видим невероятно длинный список классов. В данном случае целью является модификация системы крафта, поэтому поступаю просто — ищу классы, в названии которых встречается Craft и просматриваю их логику по диагонали.
После непродолжительных поисков мы нашли искомое — класс CraftingSlotManager:

А именно метод Forge() в данном классе:

Полная версия кода метода для желающих
// CraftingSlotManager
// Token: 0x06002552 RID: 9554 RVA: 0x0015E958 File Offset: 0x0015CB58
public void Forge()
{
    if (!this.forging)
    {
        this.forging = true;
        base.StartCoroutine(this.ForgeBlocker(10));
        bool flag = false;
        int num = -1;
        if (this.main.HasContent())
        {
            int num2 = 0;
            int num3 = 0;
            if (this.debugNoFracture)
            {
                num3 = -10;
            }
            float num4 = 1f;
            int num5 = -1;
            bool flag2 = false;
            ItemData data = this.main.GetContent()[0].data;
            ItemData itemData = null;
            if (this.support.HasContent())
            {
                itemData = this.support.GetContent()[0].data;
                num5 = (int)itemData.subType;
                if (itemData.subType == 0)
                {
                    num3--;
                    flag2 = true;
                }
                else if (itemData.subType == 1)
                {
                    num4 = UnityEngine.Random.Range(0.4f, 1f);
                    flag2 = true;
                }
            }
            if (this.appliedAffixID >= 0)
            {
                Debug.Log("applied ID: " + this.appliedAffixID.ToString());
                if (this.forgeButtonText.text == "Forge")
                {
                    if (data.AddAffixTier(this.appliedAffixID, Mathf.RoundToInt((float)(5 + num2) * num4), num3))
                    {
                        num = this.appliedAffixID;
                        flag = true;
                    }
                    GlobalDataTracker.instance.CheckForShard(this.appliedAffixID);
                    if (flag2)
                    {
                        this.support.Clear();
                    }
                    if (!GlobalDataTracker.instance.CheckForShard(this.appliedAffixID))
                    {
                        this.DeselectAffixID();
                    }
                }
            }
            else if (this.modifier.HasContent())
            {
                Debug.Log("modifier lets go");
                ItemData data2 = this.modifier.GetContent()[0].data;
                if (data2.itemType == 102)
                {
                    if (data2.subType == 0)
                    {
                        Debug.Log("shatter it");
                        Notifications.CraftingOutcome(data.Shatter());
                        if (num5 == 0)
                        {
                            flag2 = false;
                        }
                        this.main.Clear();
                        flag = true;
                        this.ResetAffixList();
                    }
                    else if (data2.subType == 1)
                    {
                        Debug.Log("refine it");
                        if (data.AddInstability(Mathf.RoundToInt((float)(2 + num2) * num4), num3, 0))
                        {
                            data.ReRollAffixRolls();
                        }
                        flag = true;
                    }
                    else if (data2.subType == 2 && data.affixes.Count > 0)
                    {
                        Debug.Log("remove it");
                        if (data.AddInstability(Mathf.RoundToInt((float)(2 + num2) * num4), num3, 0))
                        {
                            ItemAffix affixToRemove = data.affixes[UnityEngine.Random.Range(0, data.affixes.Count)];
                            data.RemoveAffix(affixToRemove);
                        }
                        flag = true;
                    }
                    else if (data2.subType == 3 && data.affixes.Count > 0)
                    {
                        Debug.Log("cleanse it");
                        List<ItemAffix> list = new List<ItemAffix>();
                        foreach (ItemAffix item in data.affixes)
                        {
                            list.Add(item);
                        }
                        foreach (ItemAffix affixToRemove2 in list)
                        {
                            data.RemoveAffix(affixToRemove2);
                        }
                        if (num5 == 0)
                        {
                            flag2 = false;
                        }
                        data.SetInstability((int)((Mathf.Clamp(UnityEngine.Random.Range(5f, 15f), 0f, (float)data.instability) + (float)num2) * num4));
                        flag = true;
                    }
                    else if (data2.subType == 4 && data.sockets == 0)
                    {
                        Debug.Log("socket it");
                        data.AddSocket(1);
                        data.SetInstability((int)((Mathf.Clamp(UnityEngine.Random.Range(5f, 15f), 0f, (float)data.instability) + (float)num2) * num4));
                        flag = true;
                    }
                }
            }
            if (flag)
            {
                UISounds.playSound(UISounds.UISoundLabel.CraftingSuccess);
                if (this.modifier.HasContent())
                {
                    ItemData data3 = this.modifier.GetContent()[0].data;
                    this.modifier.Clear();
                    if (num >= 0 && GlobalDataTracker.instance.CheckForShard(num))
                    {
                        this.PopShardToModifierSlot(num);
                    }
                    else if (data3.itemType == 102)
                    {
                        foreach (SingleSubTypeContainer singleSubTypeContainer in ItemContainersManager.instance.materials.Containers)
                        {
                            if (singleSubTypeContainer.CanAddItemType((int)data3.itemType) && singleSubTypeContainer.allowedSubID == (int)data3.subType && singleSubTypeContainer.HasContent())
                            {
                                singleSubTypeContainer.MoveItemTo(singleSubTypeContainer.GetContent()[0], 1, this.modifier, new IntVector2?(IntVector2.Zero), Context.SILENT);
                                break;
                            }
                        }
                    }
                    if (num >= 0 && this.prefixTierVFXObjects.Length != 0 && this.suffixTierVFXObjects.Length != 0)
                    {
                        ItemData itemData2 = null;
                        if (this.main.HasContent())
                        {
                            itemData2 = this.main.GetContent()[0].data;
                        }
                        if (itemData2 != null && this.main.HasContent())
                        {
                            List<ItemAffix> list2 = new List<ItemAffix>();
                            List<ItemAffix> list3 = new List<ItemAffix>();
                            foreach (ItemAffix itemAffix in itemData2.affixes)
                            {
                                if (itemAffix.affixType == AffixList.AffixType.PREFIX)
                                {
                                    list2.Add(itemAffix);
                                }
                                else
                                {
                                    list3.Add(itemAffix);
                                }
                            }
                            for (int i = 0; i < list2.Count; i++)
                            {
                                if ((int)list2[i].affixId == num && this.prefixTierVFXObjects[i])
                                {
                                    this.prefixTierVFXObjects[i].SetActive(true);
                                }
                            }
                            for (int j = 0; j < list3.Count; j++)
                            {
                                if ((int)list3[j].affixId == num && this.suffixTierVFXObjects[j])
                                {
                                    this.suffixTierVFXObjects[j].SetActive(true);
                                }
                            }
                        }
                    }
                }
                if (!flag2)
                {
                    goto IL_6B3;
                }
                this.support.Clear();
                using (List<SingleSubTypeContainer>.Enumerator enumerator2 = ItemContainersManager.instance.materials.Containers.GetEnumerator())
                {
                    while (enumerator2.MoveNext())
                    {
                        SingleSubTypeContainer singleSubTypeContainer2 = enumerator2.Current;
                        if (singleSubTypeContainer2.CanAddItemType((int)itemData.itemType) && singleSubTypeContainer2.allowedSubID == (int)itemData.subType && singleSubTypeContainer2.HasContent())
                        {
                            singleSubTypeContainer2.MoveItemTo(singleSubTypeContainer2.GetContent()[0], 1, this.support, new IntVector2?(IntVector2.Zero), Context.SILENT);
                            break;
                        }
                    }
                    goto IL_6B3;
                }
            }
            this.modifier.Clear();
            this.support.Clear();
        }
        IL_6B3:
        if (!flag)
        {
            UISounds.playSound(UISounds.UISoundLabel.CraftingFailure);
        }
        this.slamVFX.SetActive(true);
        this.UpdateItemInfo();
        this.UpdateFractureChanceDisplay();
        this.UpdateForgeButton();
        ShardCountText.UpdateAll();
    }
}
С моей точки зрения данный код выглядит не так уж и плохо. Даже и не скажешь сразу, что это декомпелированная версия (выдают только названия переменных в духе num1, num2…). Есть даже логирование, которое позволяет легче понять назначение веток.
После изучения кода я выяснил примерный механизм работы — у нас есть несколько CraftingSlot‘ов, в которые мы помещаем предмет крафта и модификаторы. CraftingSlotManager соответсвенно управляет взаимодействием этих слотов и в целом отвечает за логику крафта.
Отключаем расходование ресурсов при крафте
Нас интересуют две переменные: this.modifier и this.support
Это слоты для модификаторов, которые используются во время крафта.
Как оказалось уничтожение модификаторов происходит в процессе следующих вызовов:
this.modifier.Clear();
this.support.Clear();
Хотя для меня не очевидно, почему очистка слота обязательно должна удалять его содержимое (а не, например, возвращать обратно в инвентарь) — это вопрос наименования методов и переменных и к нашему исследованию отношения не имеет.
Удаляем все вызовы this.modifier.Clear(); и this.support.Clear(); из кода функции и радуемся
Процесс редактирования в dnSpy просто фантастика — просто поправили код и сохранили в .dll — все изменения будут скомпилированы автоматически:
Убираем поломку предмета в процессе крафта
В игре поломка предмета в процессе крафта называется Fracture, поэтому мне сразу бросился в глаза данный кусок кода:
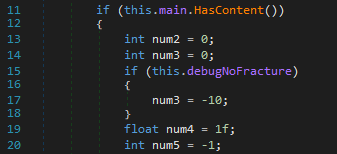
И действительно — модификация вида int num3 = -10; полностью отключает поломку — спасибо разработчикам за оставленный дебаг флаг.
Часть вторая, где мы испытываем боль и страдания
Начиная с версии 0.7.9 разработчики начали использовать IL2CPP для того, чтобы собирать проект напрямую в нативный бинарник под нужную платформу. В результате у нас больше нет IL-кода, а есть лишь хардкорный ассемблер… но кого это останавливало?
Дисклеймер
Автор статьи не является реверс-инженером, а имеет за спиной только остатки университетского курса Ассемблера и один No-CD, сделанный в OllyDbg 10 лет назад. Вполне возможно, что какие-то вещи были сделаны неправильно или их можно было сделать намного лучше и проще
Ищем иголку в стоге Гидры
Итак, из папки игры пропали все старые .dll-ки и мы взамен получили один огромный GameAssembly.dll весом в 55 мегабайт. Наши цели не изменились, но теперь все будет намного сложнее.
Первым делом загружаем dll-ку в Ghidra’у и соглашаемся на все виды анализа, которые она предлагает (анализ занимает довольно много времени и в дальнейшем я останавливал его на стадии Analyze Address Table)

На этом я, как начинающий реверсер, и закончил бы, ведь каким образом тут искать нужный нам код — совершенно мне непонятно.
К счастью погуглив на тему IL2CPP я нашел утилиту Il2CppDumper, которая позволяет частично восстановить информацию на основе метадата-файла (который обнаружился по пути <GameFolder>/il2cpp_data/Metadata/global-metadata.dat). Не знаю является ли данный файл необходимостью или разработчики просто забыли убрать его, но он сильно облегчил нашу задачу.
Скармливаем утилите наши файлы dll и метадаты и получаем набор восстановленных данных:
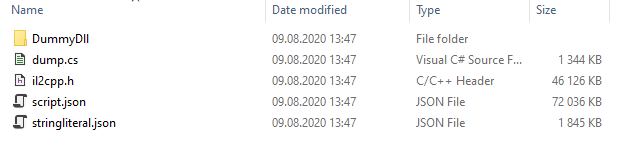
В папке DummyDll находятся восстановленные dll-ки с частично восстановленным IL-кодом. Загружаем восстановленный Assembly-CSharp.dll в dnSpy и идем в наш любимый CraftingSlotManager:

Ну что же, кода у нас больше нет, зато у нас есть адрес! В аннотации
Address(RVA = "0x5B9FC0", Offset = "0x5B89C0", VA = "0x1805B9FC0")Нам нужно значение VA — это оффceт, по которому мы найдем нашу функцию в Гидре:

Теперь мы хотя бы нашли начало нашей функции, что уже неплохо.
Можно ли сделать лучше? Вспоминаем, что Il2CppDumper генерирует данные, котрые можно импортировать в Гидру — копируем скрипт в папку скриптов Гидры, запускаем ghidra.py и скармливаем ему script.json, сгенерированный из нашей метадаты. Теперь у всех функций, которые были объявлены в исходном коде, появились имена.
Отключаем расходование ресурсов при крафте
Мы уже знаем, что нам достаточно убрать вызовы this.modifier.Clear(); и this.support.Clear();. Осталось найти их в коде. К счастью восстановленные имена функций помогают решить эту задачу довольно просто.

Ломать — не строить. Чтобы убрать вызов функции нам достаточно заменить все байты, участвующие в CALL на NOP
Разбиваем команду на отдельные байты (выделив ее и нажав C, или Clear Code Bytes), затем в бинарном представлении просто впечатываем 90 пять раз. Готово!

Такую операцию повторяем для всех вызвов OneSlotItemContainer$$Clear() из нашей функции Forge() (На самом деле это нужно делать не для всех вызовов, потому что в коде есть один вызов this.main.Clear(); Но мне было слишком лениво выискивать конкретное исключение в ассемблерной каше, поэтому я убрал все вызовы).
Убираем поломку предмета в процессе крафта
Изначально мы делали int num3 = -10; и благодарили разработчика за оставленный дебаг флаг в качестве подсказки. Теперь это не кажется такой простой задачей — сложно понять, какая из ~60 локальных переменных, найденных Гидрой, является нужной. После 15 минут поиска мне наконец удалось понять, что зубодробительная строчка на скриншоте ниже является той самой проверкой дебаг флага и вычитанием из переменной.

К сожалению моих знаний Ассемблера не хватило, чтобы понять как именно это работает (судя по Гидре этот процесс занимает 4 команды начиная с MOVZX и заканчивая на AND), поэтому деликатно изменить эту часть я не смог. Другого способа изменить эту переменную я тоже не нашел в силу своих ограниченных знаний, поэтому я изменил подход.
Посмотрев еще раз в замечательный (после работы с Гидрой) код старой версии игры в dnSpy я увидел, что за накопление «нестабильности» отвечает метод AddInstability
public bool AddInstability(int addedInstability, int fractureTierModifier = 0, int affixTier = 0)
    {
        int num = this.RollFractureTier(fractureTierModifier, affixTier);
        if (num > 0)
        {
            this.Fracture(num); // <----- Предмет ломается тут
            return false;
        }
        this.instability = ((int)this.instability + addedInstability).clampToByte();
        this.RebuildID();
        return true;
    }
Гидра радует нас относитлеьно простым кодом данной функции:
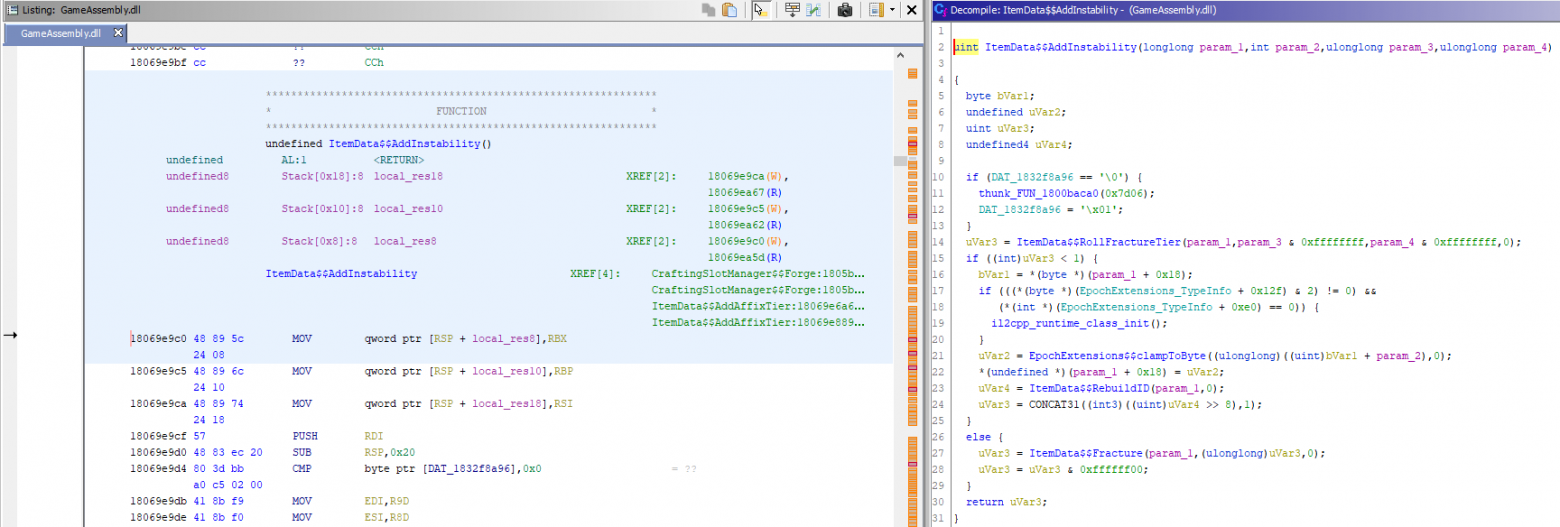
По коду мы видим, что сначала происходит вызов CALL ItemData$$RollFractureTier, затем мы проверяем результат TEST EAX и прыгаем в нужную ветку:

Нам нужно, чтобы мы всегда шли по ветке uVar3 < 1. Тут можно сделать разные исправления — например (могу ошибаться) поменять JG(Jump short if greater) на JLE(Jump short if less or equal).
Я решил вопрос иначе — просто сделаем проверяемый регистр равным нулю и тогда остальной код будет работать как надо. Меняем CALL на XOR EAX, EAX (самый просто способ обнулить регистр в Ассемблере), который занимает два байта и оставшиеся три байта заполняем NOP’ами.

Готово! Сохраняем, заменяем существующий GameAssembly.dll (почему-то Гидра в процессе экспорта файла всегда добавляет расширение .bin и его нужно удалять) и чувствуем себя хакерами.
Выводы
Для многих компиляция является «путем в один конец», а бинарные файлы представляются неуязвимыми бастионами, которые способны пасть только перед лучшими хакерами.
В реальности многие популярные языки компилируются в примежуточный код, который замечательно трактуется и модифицируется профильными декомпиляторами. Для подобных модификаций зачастую хватит обычного умения программировать хоть на чем-нибудь.
И, хотя нативные бинарники и могут представлять опасность для ваших глаз и мозга, поверхностных знаний о том, как работают программы на уровне, близком к железу, зачастую бывает достаточно в связке с современными open-source инструментами для небольших модификаций.
|
Authenticator Code |


| Thread Tools |
| How to edit Assembly-CSharp.dll |
|
|
#1 |
|||||||||||
|
hcbarbarians Supreme G0d
Join Date: May 2015
Reputation: 2583 Points: 13,835, Level: 15 Level up: 17%, 1,165 Points needed Activity: 2.4%
Last Achievements |
Requirements
Tutorial (As an example I will show you how to turn off aimcone)
Server Tutorial (Required)
If you spot anything wrong with this tutorial please feel free to reply with my errors. Thanks for reading and I hope you all have a great day! |
|||||||||||
|
hcbarbarians is offline |
|


![]()
|
|
#2 |
|||||||||||
|
baebae4444 n00bie
Join Date: Aug 2016
Reputation: 50 Points: 2,135, Level: 4 Level up: 5%, 665 Points needed Activity: 10.9%
Last Achievements |
When I open my assembly-csharp.dll, i just get // C:Users(user)DesktopAssembly-CSharpAssembly-CSharp.dll. It doesn’t open my dll correctly. I’m only asking in this old thread because I’m desperate. |
|||||||||||
|
baebae4444 is offline |
|

![]()
 Similar Threads |
||||
| Thread | Thread Starter | Forum | Replies | Last Post |
| [Release] Oxidizer and RustStripper (Assembly-CSharp.dll loader and dumper) | UnrealIncident | Rust | 224 | 11th February 2016 03:32 PM |
| [Help] Always Day (Assembly-CSharp.dll) | thebox | Rust | 7 | 27th January 2014 07:32 PM |
| [Help] How to find Assembly-CSharp.dll ? | midem2011 | Rust | 1 | 15th January 2014 08:04 PM |
| [Discuss] party’s over: no editing assembly-csharp.dll anymore | ._. | Rust | 9 | 9th January 2014 08:16 PM |
|
Tags |
| file, click, server, original, dnspy, press, tutorial, connect, search, top |
«
Previous Thread
|
Next Thread
»
|
Forum Jump |
All times are GMT. The time now is 06:54 AM.
Contact Us —
Toggle Dark Theme
Terms of Use Information Privacy Policy Information
Copyright ©2000-2023, Unknowncheats� UKCS #312436
 |
no new posts
I have been investigating adding mod support to a Unity3D game. I am new to Unity (but not .NET), so if it seems like I am missing something obvious, please let me know because I probably am.
I would like to be able to export objects, including custom scripts, directly from the editor. It is easy enough to get the assembly associated with the script. Any loose scripts in the project seem to get compiled down to Assembly-CSharp.dll. The problem comes in when I try to load the assembly at runtime in another Unity project. Calling Assembly.Load(byte[]) returns to me the assembly of the current project, not the one represented by the byte array. I am assuming this is because the AssemblyName of the assembly from the mod project and the host project are both identical (Assembly-CSharp, Version=0.0.0.0, Culture=neutral, PublicKeyToken=null).
As a test, I updated my Visual Studio project for the mod project, renaming it from Assembly-CSharp to something different. This gets wiped out by Unity, but I can do a build before that happens and get the assembly I am looking for with a name other than Assembly-CSharp. Loading this via Assembly.Load(byte[]) seems to do the trick in a very simple ‘import a script to rotate a cube’ sort of scenario. While this appears to work, I am really looking for something more auto-magic single step from the Unity editor.
Now, on to the question…
If I understand the problem, what I am looking for is a programmatic way to change the AssemblyName of an assembly after compilation. All suggestions & advice welcome.
Some possible routes I have investigated or considered:
1) A magic API method to change AssemblyName and save it.
This would be ideal, but I have yet to stumble across anything useful here.
2) Edit raw bytes of an assembly to change the name? Not sure if this is possible, but if I could safely and reliably overwrite some of the raw bytes of an assembly to change its name, that would be swell.
3) Create a new dynamic assembly containing the types in the original assembly. My experience with dynamic assemblies is limited. I can create one, but what I am unsure how to do (if possible) is copy types defined in the original assembly to the new dynamic assembly.
4) Use the CSharpCodeProvider to manually compile the assembly. Assuming Unity supports it, then I assume this might work, seems like a pain though. I have not yet investigated what it would take to locate all scripts and references needed for compilation. I’d like to avoid it if possible.
5) *Some magic with ilasm/ildasm.* Assuming there is unity equivalents.. Is this something do-able with theses tools?
6) Programmatically update the csproj file and recompile. Seems pretty hacky and a pain. Guessing I would need to have code to support both Visual Studio and MonoDevelop.
I would prefer to avoid external tools and recompilation so one of the first three options would be ideal. Thoughts, ideas? Thanks!
Bonus Question:
My ‘import a script to rotate a cube’ test seemed to work, however in the log during the loading of the assembly, I see the two messages below. That is not the assembly name I used, not sure where it came from. Should I be concerned? Is this going to come back to bite me later?
> Non platform assembly: data-0B9D7940 (this message is harmless)
> Fallback handler could not load library C:/Dev/Test
> Projects/ModTest/Build/ModHost1/ModHost1_Data/Mono/data-0B9D7940.dll