")
In this guide, you will see how to fix your “irritating” workshop errors such as the “Asset bundle error: “bundlename” version mismatch”, “Asset Bundle Error: 4 of 5 installed”.
How to unsubscribe
First of all, open steam.
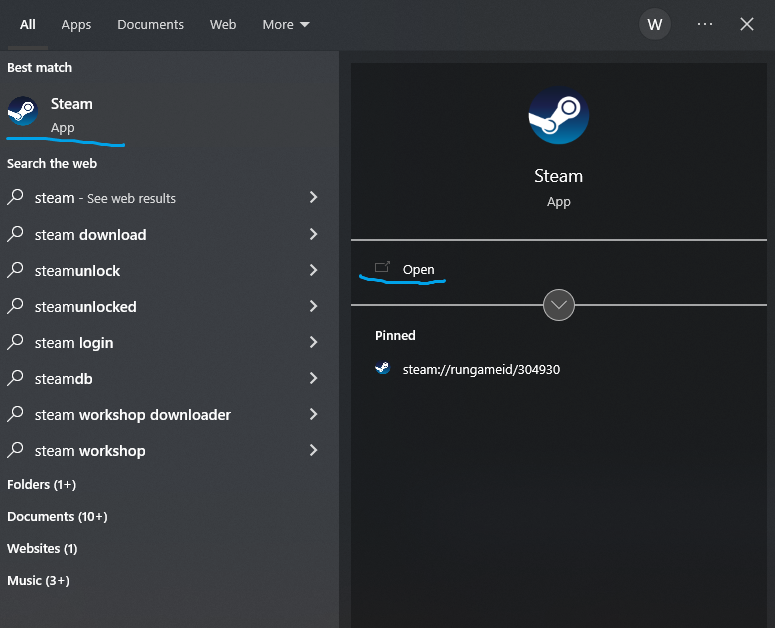
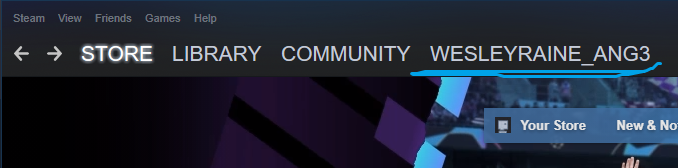
Click on your steam name.
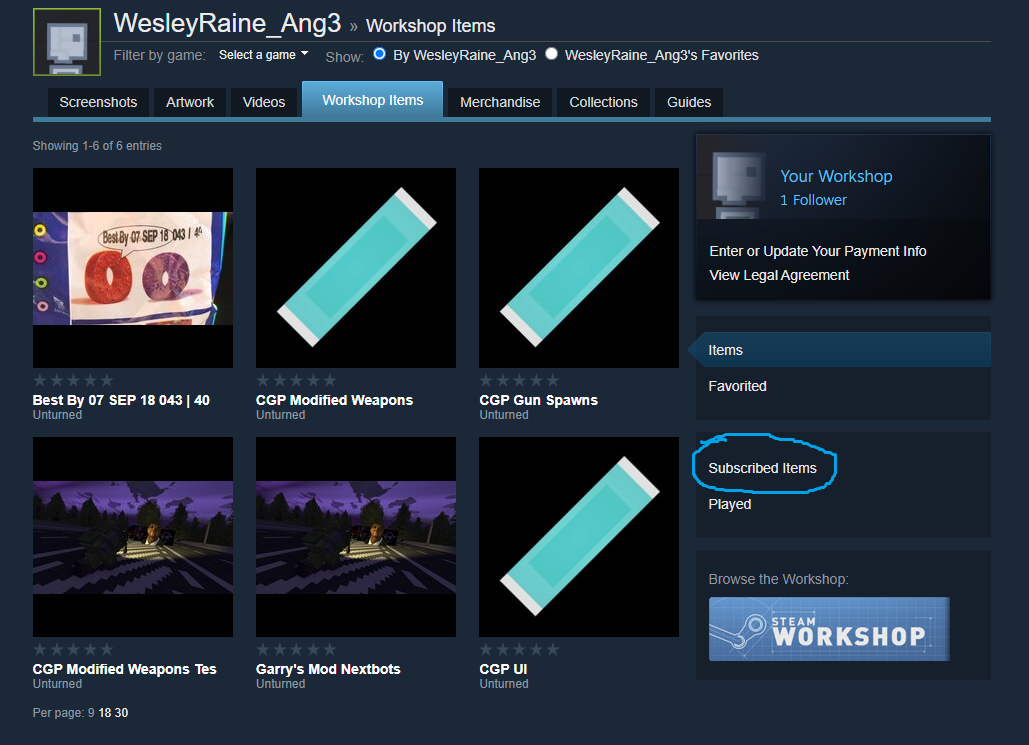
Click on Workshop Items.

Click on Subscribed items.
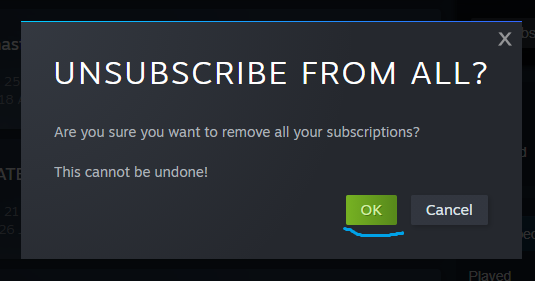
Click Unsubscribe From All.
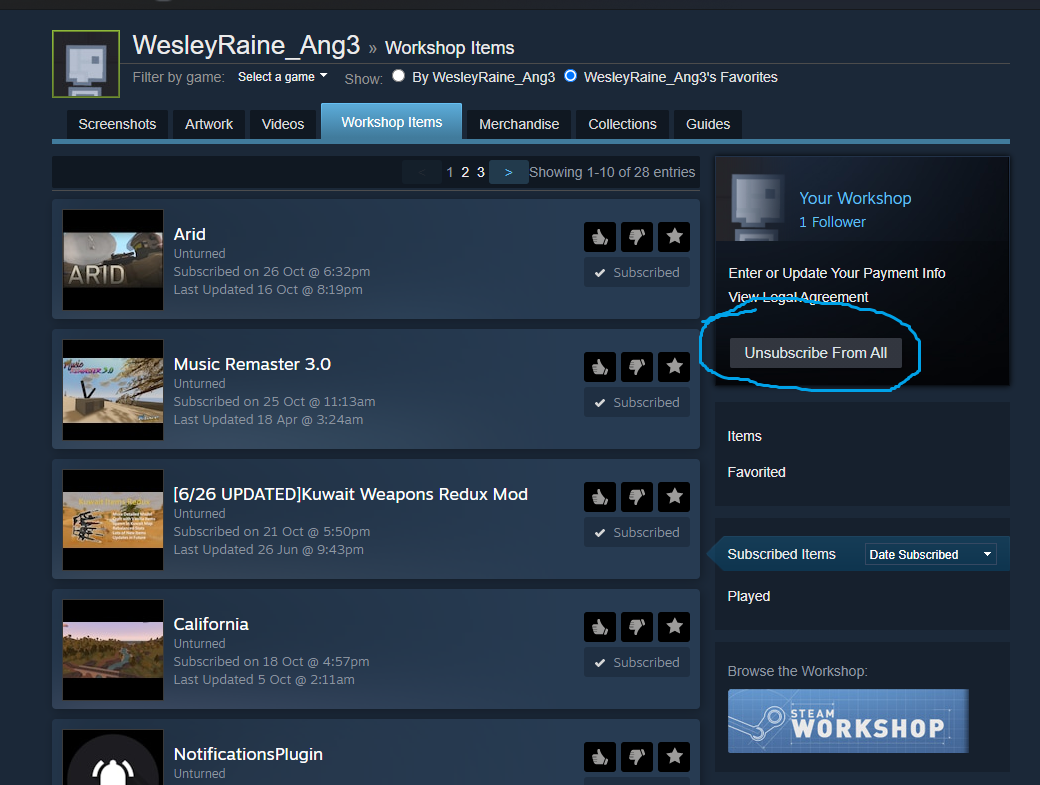
Click OK.
You’re done unsubscribing.
How to remove ALL workshop folders
NOTE:
Make sure to close Unturned before doing these steps, because the loaded mods are in your RAM and will not fix your problem if you didn’t close Unturned before doing these steps.
For easy access, make a shortcut to the 304930 folder and put it on your desktop.
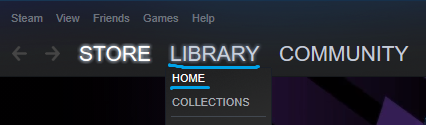
Open steam.
Click either Library or Home.
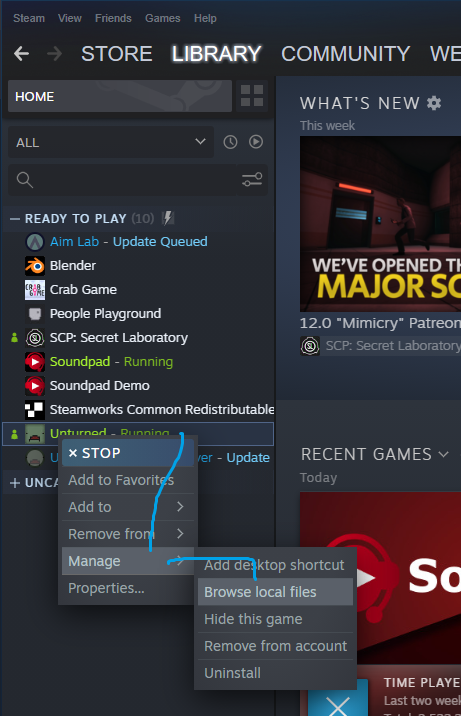
Now that you’re at the Library, find and right click Unturned, hover Manage, and click Browse Local Files..
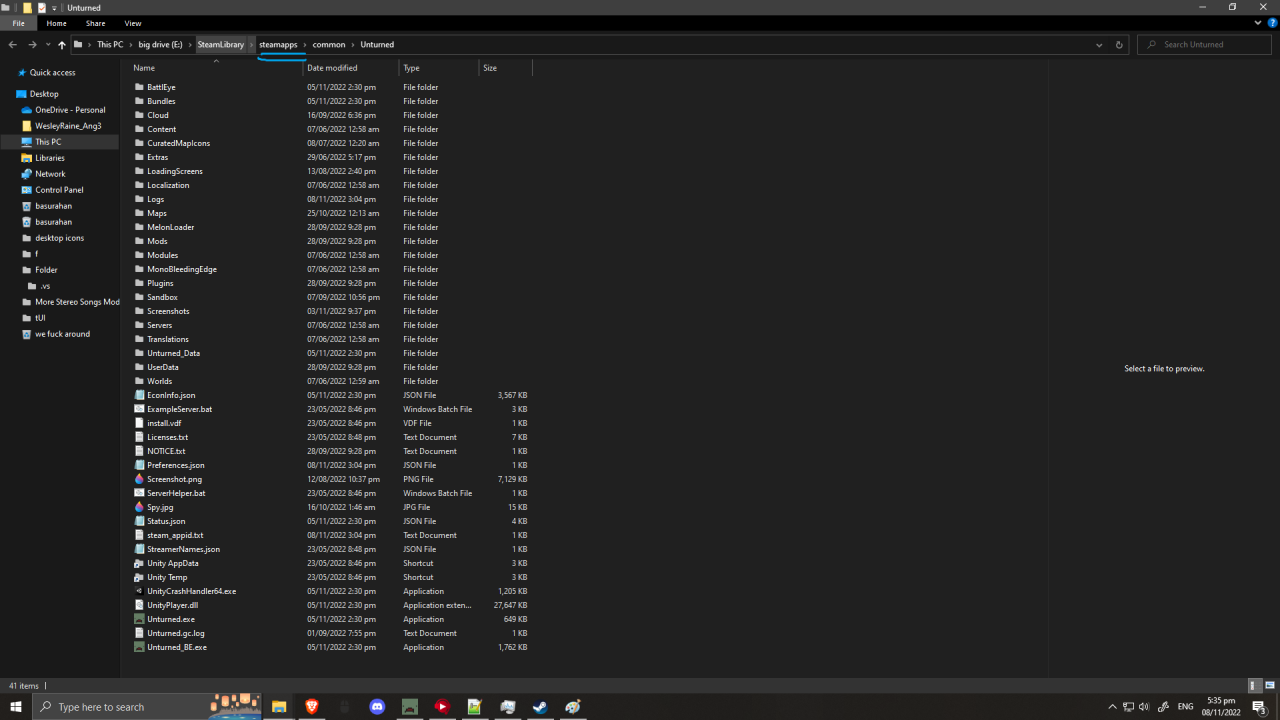
Great, you are now at the file directory! Click on steamapps.
Double click on workshop.
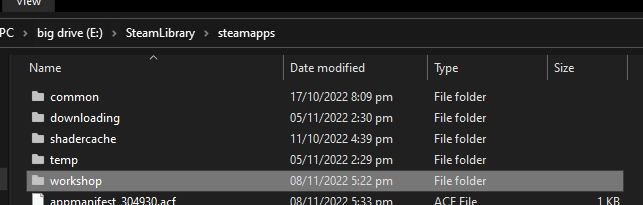
Double click on content.
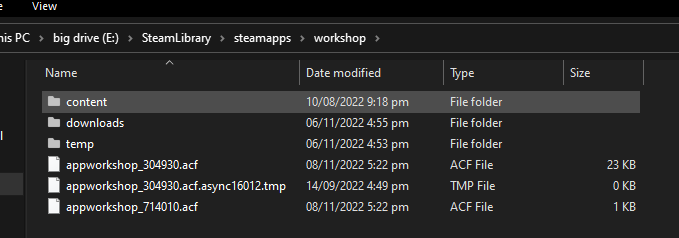
Double click on 304930.

Select all by holding CTRL and A, then right click and hold shift then click Delete, so it dosen’t have to go to Recycle Bin.
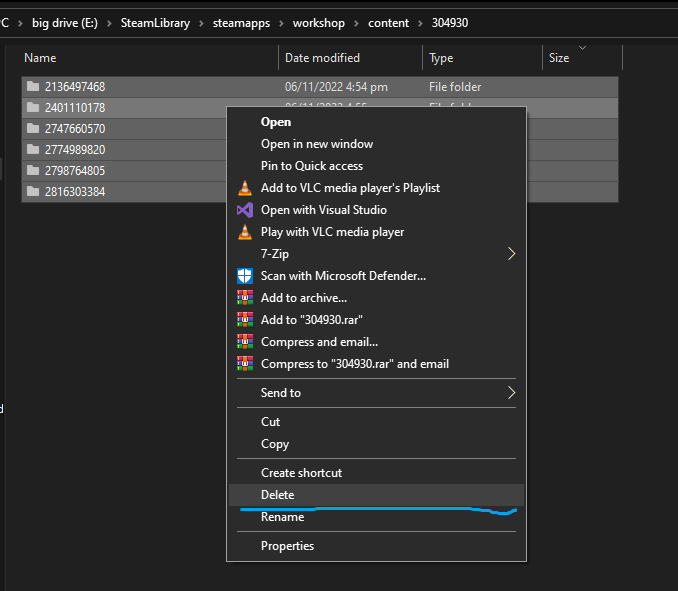
You’re done deleting ALL mods.
How to remove conflicting workshop ID’s
For mods that causes errors, you don’t need to delete all folders. Just delete the folder with the conflicting workshop ID named on it.
How to find:
Go to the Unturned workshop directory like I told you how to delete all workshop folders.
Close Unturned first.
Let’s take Elver for example.
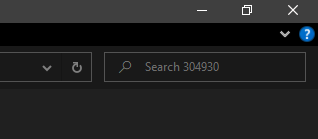
Type in there “metro”
Nice, you found the asset bundle name! To delete it, follow these steps.
Open the folder location.
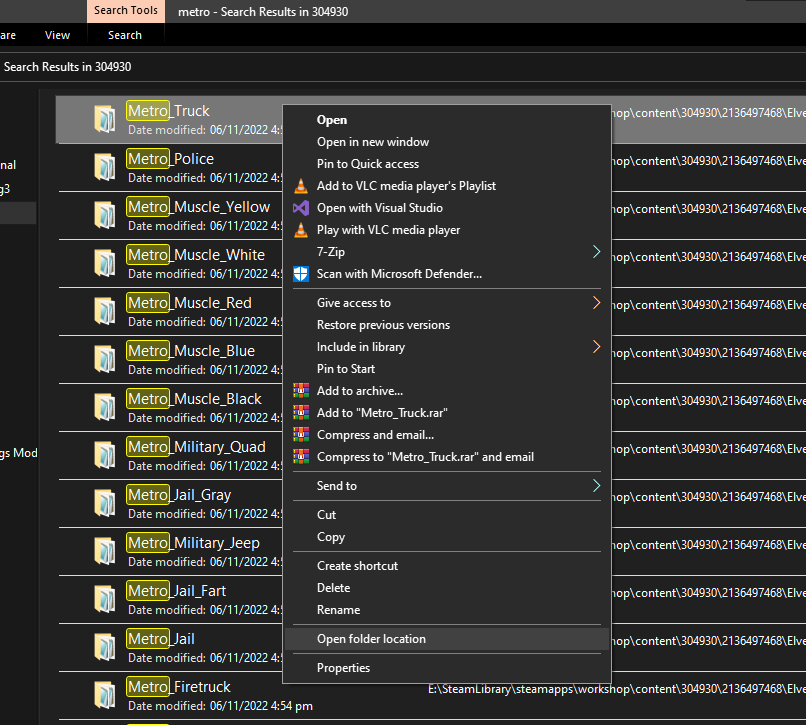
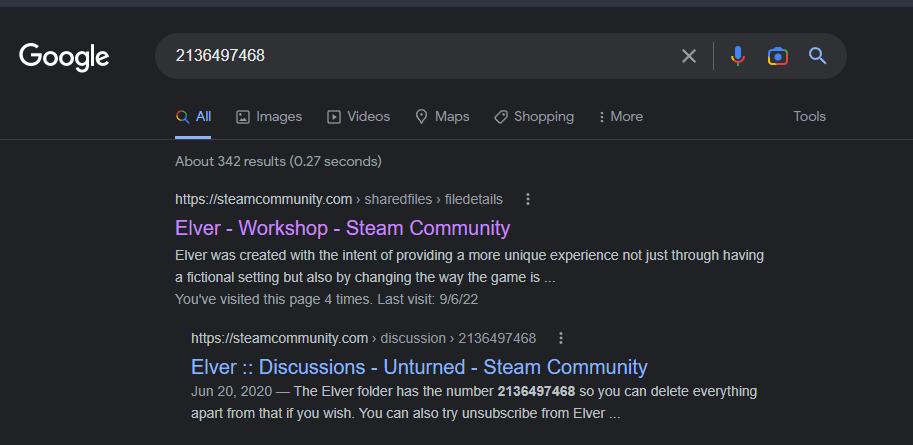
You see that number thing near 304930? That’s the workshop ID. 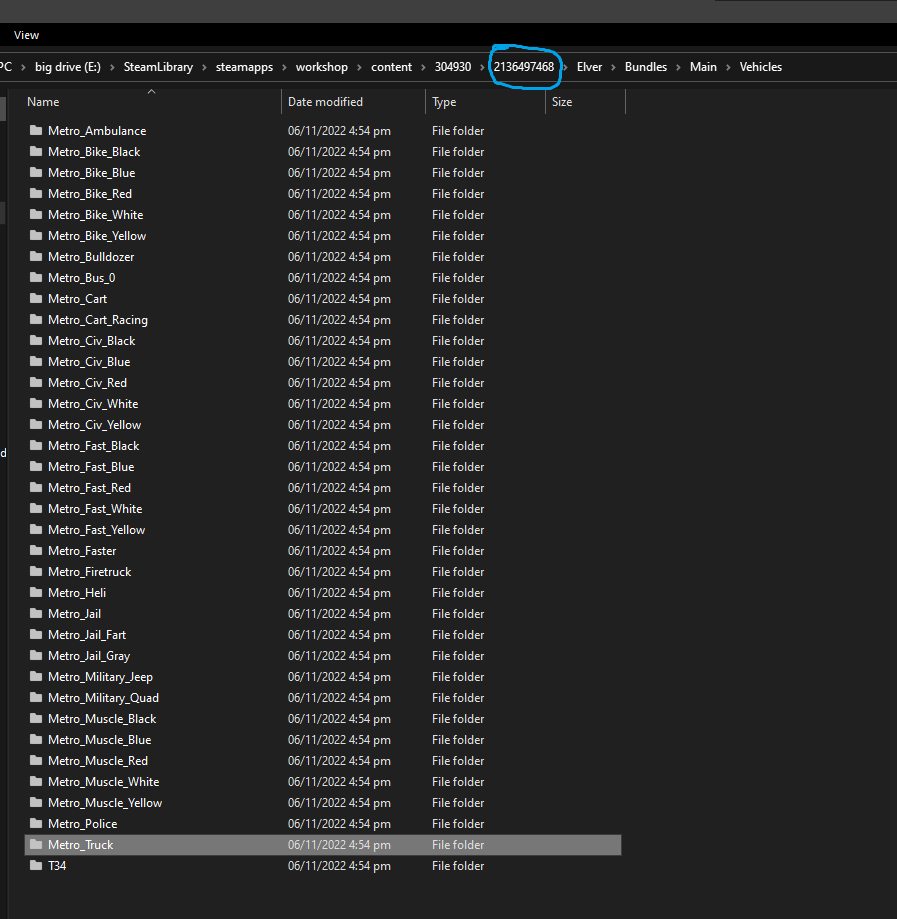
If you search it on google, Elver will pop up.
Then click on the file ID on the directory. Delete the mod.
Client and server have different assets with the same ID!
The error:
Client and server have different assets with the same ID! (00000000000000000000000000000000)
This probably means an existing file was copied, but the mod creator can fix it by changing the ID.
Client display name is "Wood Boat", whereas server display name is "Деревянная лодка [200]".
File name "Wood_Boat" matches between client and server.
Client asset is from Workshop File (1662206041), whereas server asset is from Workshop File "[Migliore] ItemsPack 5.2" (2012765949).
How it’s caused:
Different workshop mods has the same file asset; however both mods have the same ID, making a conflict.
This can also happen with translated mods with the same ID, like wood boat to Деревянная лодка (wooden boat).
How to fix:
Delete the client asset workshop folder just like I told you.
Client and server disagree on asset “Asset Name” configuration.
The error:
Client and server disagree on asset "Scrap Buggy" configuration. (File: "Car_Scrap_2" ID: 3a89265619284aa6a67d1218a03a8e83)
Usually this means the files are different versions in which case updating the client and server might fix it.
Alternatively the file may have been corrupted, locally modified, or modified on the server.
Client hash is 8DD6E207E0CA564F8C8F58424FB1014A8E4F7729, whereas server hash is C97FA469E5F1E27F236F9BDA1F161DD9BDDA82DA.
Client and server agree this asset is from Workshop File "Hyperion Rust Vehicles" (2871728167).
How to fix:
Close Unturned.
Go to the file directory.
Find the workshop file that’s listed on the error. Let’s use 2871728167.
Delete it.
If it does not work, tell the admin or a server manager of your server that you’re joining to delete the corresponding mod into this directory then restart the server.

You were kicked from this server because: missing asset: “Item Name” File: “Item_Asset”
How it’s caused:
Client has a missing file, and server has your missing asset, causing this.
How to fix:
Go to your 304930 folder.
Delete all mods.
If you recognise the file from where it’s from, delete that folder instead.
Modified or corrupted asset: “Workshop Asset” File: “workshop_asset”
How it’s caused:
Either you tried to modified it’s .dat file, or the server modified the corresponding .dat file.
How to fix:
Go to your 304930 folder.
Search the missing asset name listed in the error. For this error it’s “workshop_asset”
Open file directory
Click the workshop ID on the directory, next to 304930.
Click 304930.
Delete that mod.
If it does not work, show the server manager you are joining from to delete the workshop ID you just deleted, at this directory.
Asset bundle error: “mapbundlename” version mismatch
This can vary on what mod you are having a error from.
mapbundlename is the bundle name of the map.
How to fix:
Delete the bundle name associated with the error code.
Example: Asset bundle error: “prosur” version mismatch
For custom maps that isn’t listed at the list below, follow the Elver example I told you earlier.
For curated maps that is listed here, find the workshop ID inside the 304930 folder and delete it.
Make sure Unturned is closed before deleting mods.
Map Name
Map Workshop ID
Map Bundle Name
Easter Island
1983200271
easterisland
Ireland
1411633953
ireland
Belgium
1767554683
belgium
Rio de Janeiro
1821848824
riodejaneiro
Canyon Arena
1850209768
canyon
Asset Bundle Error: number of number installed
Since the error did not give a workshop ID on what mod it’s causing from, you need to delete your entire folder.
How to fix:
Go to the workshop folder.
Select all and hold Shift and click Delete.
[h1]If it does not work:[/h1]
Verify game fil
If it does not work:
Verify game files.
The Steam anticheat servers are not responding.
It’s not your client having the error, just try joining again later.
You are banned from playing multiplayer.
More Guides:
- Unturned
27.07.2022
1,382 Просмотры
Всем привет. В этом руководстве я помогу людям у которых есть проблема с запуском карты ”Hawaii”. Сама проблема в том что при загрузке карты пишет в низу ”Queu position №1 (позиция в очереди №1)” или же ”map loading (загрузка карты)”. Это будет легко, так что погнали!
Как исправить ошибку Asset bundle error hawaii version mismatch.
Подготовка
Итак, для начала мы должны проверить целестность файлов игры. Это нужно сделать что бы
все работало нормально если вы ЧТО НИБУДЬ МЕНЯЛИ В ФАЙЛАХ ИГРЫ! или удаляли. заходим в библиотеку Steam. Ищем unturned. далее нажимаем на шестеренку:
далее нажимаем ”Свойства”, после чего переходим во вкладку ”Локальные файлы” :
далее нажимаем “проверить целестность файлов”.
После чего у вас пройдет проверка. ГОТОВО
Переустановка карты
Как вы поняли, мы собираемся переустанавливать саму карту. Для этого мы переходим в ”Steam Workshop” или же по русскому ”Мастерская Steam”. Дальше ищем саму карту. УЧТИТЕ, нужно писать ” HAWAII” по буквам – “H-A-W-A-I-I” тесть нужно писать ДВЕ буквы i, сам писал с одной буквой и немог постоянно найти карту, так что пишите с 2 буквами i.
дальше нам нужно установить САМУ карту и ASSETS для нее.
ВНИМАНИЕ – Автор должен быть SDGNelson
Если у вас уже установлена карта и ассетс то нужно отпистаься от продукта и опять подписаться.Если раньше вы играли на карте и вы хотите сохранить сохранение то перейдите в корневую папку игры (диск на котором игра – Program files x86 – steam – steamapps – common – Unturned) и перейдите в – worlds – singleplayer_0. скопируйте папку и положите на робочий стол что бы потом после установки опять поставить обратно ( желанно что бы сохранение было без модов но можете побробовать). Если вы переустановили все это щитайте что этот пункт завершен!
Графоний
Дальше нам нужно зайти в саму игру и поменять все настройки до МИНИМУМА! Все, этот мили-пиз#@%^ский этап завершен!
Последние шаги
Дальше нужно выйти из игры и перейти по : “steamappsworkshopcontent30493017 53 13 46 36″ – там будет папка ”Hawaii” и файл ”Map.meta”
Дальше копируем папку ”Hawaii” и вставляем в : “steamappscommonUnturnedMaps”Дальше переходим в : “steamappsworkshopcontent30493017 53 13 19 03” и копируем АБСОЛЮТНО ВСЕ ЧТО ТАМ ЕСТЬ.
И вставляем все это в : “steamappscommonUnturnedMapsHawaii”
ГОТОВО! Теперь можете зайти в игру, зайти на саму карту, и уже в самой карте выставить те настройки графона которие у вас были!
Пожайлуста, поставте лайк руководстве если все получилось, очень старался исправить проблему и помочь вам!
Hawaii version mismatch server on unturned server manager
Я переустановил мод на steam и на app, но проблема все еще возникает, каждый раз, когда я пытаюсь присоединиться к серверу, появляется ошибка, говорящая: hawaii assets version mismatch, это происходит потому, что моя карта мастерской требует активов из hawaii. Могу ли я как-то решить эту проблему?
На сервере просто установлена старая версия, я не думаю, что вы можете что-то сделать.
‘ERROR WHILE DOWNLOADING ASSET BUNDLE: CRC MISMATCH’ ERROR IS THROWN WHEN CHANGING ASSET VERSIONS
![]() Как сделать:
Как сделать:
1. Откройте прикрепленный пользователем проект “BundleCRC.zip”.
2. Перейдите в Окно > Управление активами > Адресаты > Группы
3. В правом верхнем углу выберите Build > New Build > Default Build Script
4. Войдите в режим воспроизведения
5. Нажмите кнопку “StartDownloading”
6. Измените версии активов в текстовых полях на “0.13.10.1”, “online/0.13.31.1/Android”.
7. Снова запустите кнопку
Ожидаемые результаты: отсутствие ошибок компилятора в консоли
Фактические результаты: ‘Error while downloading Asset Bundle: CRC Mismatch’ возникла ошибка
Переведено с помощью www.DeepL.com/Translator (бесплатная версия)
![]() Загрузка…
Загрузка…
Обновлено: 08.02.2023
- Open with Desktop
- View raw
- Copy raw contents Copy raw contents
Copy raw contents
Copy raw contents
The game loads textures, audio, meshes, prefabs, etc. from Unity Asset Bundles at runtime. How these are setup and used has evolved over the years from individual *.unity3d bundles to .content bundles to .masterbundle files.
Master Bundles should be used for essentially all new projects.
Prior to using any of these tools they must be imported into a Unity project
- Inside Unity open the Assets > Import Package > Custom Package. wizard.
- Find the Unturned installation directory.
- Navigate to the Bundles/Sources directory.
- Import the Project.unitypackage.
Master Bundles (*.masterbundle)
Most official files including curated maps have been transitioned to master bundles, and they will be used for the forseeable future.
Master bundles can be loaded from any directory the game loads *.dat files from. Unless an override is specified, the nearest master bundle in the file hierarchy is used. While loading each directory is checked for a MasterBundle.dat file signalling the presence of a master bundle. For example, refer to the core.masterbundle in the Bundles directory.
MasterBundle.dat can set the following keys:
Individual asset *.dats can set the following keys:
- Follow Tool Setup instructions.
- Open the tool from the Window > Unturned > Master Bundle Tool menu.
- Select directories of assets in the Project window.
- In the Inspector window tag them in any asset bundle.
- Click the checkbox next to an asset bundle’s name in the tool to mark it as a master bundle. This filters the list of asset bundles to show, and tracks an export path associated with it.
- Click the . to choose a destination for the bundle file.
- Click Export.
- (optional) When redistributing the asset bundle the «multiplatform» toggle should be enabled. This ensures the appropriate shaders for each platform are included, and exports a «.hash» file so the server can validate client asset bundle integrity.
When upgrading to Unity 2017.4 LTS it became apparent that all asset bundles would have to be re-exported from Unity due to shader compatibility changes. This would be an incredible amount of files, so it was time to re-approach the *.content issue in a way that could quickly convert all existing content. This was handled by keeping the file hierarchy 1:1 and guessing the file extension for the by-name loading.
Individual Asset Bundles (*.unity3d)
Most official files have transitioned to the master bundle system, but some uses still exist like the per-map road textures.
- Follow Tool Setup instructions.
- Open the tool from the Window > Unturned > Bundle Tool menu.
- Select individual assets or directories of assets in the Project window.
- Click Grab to preview which assets will be exported.
- Click Bundle to choose a destination for the asset bundle file.
When beginning development of 3.0, it was key to support runtime loading of custom modded content. At the time files in asset bundles were loaded by name without extension, so each game type looked for specific names like «Item», «Object», «Animal», etc. The .unity3d extension was chosen for web browser compatibility. Obviously this system did not age well.
Content Bundles (*.content) DEPRECATED
This format was used by terrain, material palettes and radio songs. After the 3.21.15.0 update on 2021-04-23 these can all use master bundles instead. Old references from these assets will continue to function, but new references should use a master bundle name and relative path for the «Name» and «Path» properties.
- Follow Tool Setup instructions.
- Open the tool from the Window > Unturned > Content Tool menu.
- Select directories of assets in the Project window.
- In the Inspector window tag them in an asset bundle ending with «.content».
- Click . to choose a destination for the content bundle file.
- Click Export.
In late 2016 and early 2017 development was focused on improving the editor experience, and one aspect of that was asset bundling. Content bundles scanned a manifest of contained assets in order to allow browsing individually from the in-game editor, and the idea was to allow each content reference to be configured per-game-property. Unfortunately, this effort was far too broad — from building an interface between the game code / online subsystem code to revising the ID system to use GUIDs. In retrospect it would have been wiser to crack down on individual features which has been the approach since then.


Никита Киселев


Никита, Ахахах, я обновлял, удалял, проверял целостность кеша, удалял моды из мастерской
Никита Киселев ответил Даниле
Данила, жди новую версию Анта.


Это значит что нет серверов для этой версии либо обнови антёрн либо удали но не через стим а в ручную а потом восстанови файлы или фильтры поставь стандартные или удали моды
Данила, third person поменяй на другое просто у тебя стоит вид только от третего лица а таких Серов не делают
Чувак, если сработает , респект тебе, сча проверю, но игра переустонавливается


Иван Варламов
Нажми слева на вкладку Интернет и все, потому что по умолчанию ищет в локалке


Александр Редин ответил Даниле
Данила, Нет серверов на данную версию. Крч. Сервера не обновились до данной версии. Подожди. (Это не точно)

A guide that attemps to teach you how to use the Master Bundle tool.

| 1,215 | уникальных посетителей |
| 30 | добавили в избранное |

Install a version of Unity 2019.4.x, to do this, download Unity Hub, and install a version through the client, the latest the better. Install with Mac & Linux support, without this support, Mac and Linux players wouldn’t be able to play on your map without issues.
If you have any mods/assets that need updating your gonna have to bundle on this version. If you’re on a Curated project, get all the assets into one Unity Project and bundle from there.
Make sure to import the «Project» and «Standard Assets» unity packages into your project. (Unturned>Bundles>Sources>).
This part ain’t hard, just takes a lot of time, here’s what you do.
Let’s say you’re making a Curated map, what you need to do is put all your assets into a folder, let’s say the map is set in Texas so we’ll just call that folder «TexasMasterBundle». Next, you’re going to want to start sorting all your unity assets. Set up the folder like in the Unturned bundle’s folder. If a tank top in the Map’s files is located at Unturned>Maps>Texas>Bundles>Items>Clothing>Shirt>Tank_Top then in unity it would be located in Assets>TexasMasterBundle>Items>Clothing>Shirt>Tank_Top. In the Tank Top’s folder should also look something like this: In Unity, you’re going to need to make an «Asset Bundle» (You can do this by selecting any .prefab in unity and going to your Inspector tab, at the Bottom right you should see a tab that reads «AssetBundle None» click on the «None» and click new, type in the name of the Master Bundle, something like Texas.masterbundle (you have to have this .masterbundle bit on there for it to work) Now give the TexasMasterBundle and the «Main» folders (would be in here, Assets>TexasMasterBundle) this AssetBundle tag. Now you’re finally ready to export. Select TexasMasterBundle and click on the Masterbundle tab. Select «Asset Bundles» and «Master Bundles». Don’t select «Multi-Platform» unless this is a final export, it just takes longer and is unneeded.
You also need to have installed Mac & Linux support when installing Unity for it to work
. Select the AssetBundle Tag you’re using in the export (texas.masterbundle) and then click the three . ‘s, export to your map’s Bundles folder.:
Now, for the final and easiest part, you need to make a .dat file and put it into your Bundles folder. It needs to be called «MasterBundle.dat» the contents of the .dat should be as follows
Asset_Bundle_Name texas.masterbundle Asset_Prefix Assets/Texas
(The texas.masterbundle has to be lowercase)
Of course, replace the Texas part with your maps name/codename (peaks, cliffs, etc)
Your Bundles folder should look like this (of course there would prop be more folders)
In case you applied the Masterbundle Tag to all of you assets, a handy thing you can do is to go to the inspector tab and click «Filter Selected Name» this will show you all the assets with this tag.
If any part of this guide didn’t make sense to you let me know and I will try to make it more clear.
Thanks for reading, and happy modding!
. wouldn’t reading the guide answer that for you?
No, Masterbundles are not just for maps, but they aren’t that useful if you’re only bundling one or two asserts, they’re useful when you need to bundle a lot of things at once.
im trying to make a rocket launcher vehicle and im wondering how to export all of my folders. do i need to use a masterbundle for it to work (there is an item, magazine and vehicle). if so do i have to bundle it regularly in the individual folders and then start masterbundling?
i learnt all of this from scratch and have made basic mods before. this is the last step before exporting and another test in game.
previously i have failed multiple times. (also, ^^ are masterbundles only for maps?)
/im-a-noob/
Эта публикация удалена, так как она нарушает рекомендации по поведению и контенту в Steam. Её можете видеть только вы. Если вы уверены, что публикацию удалили по ошибке, свяжитесь со службой поддержки Steam.
Этот предмет несовместим с Unturned. Пожалуйста, прочитайте справочную статью, почему этот предмет может не работать в Unturned.
Этот предмет виден только вам, администраторам и тем, кто будет отмечен как создатель.
В результатах поиска этот предмет сможете видеть только вы, ваши друзья и администраторы.
Хотите присоединиться к обсуждению? Для этого нужно войти или создать аккаунт.
1
2
0
2
6 мар в 14:59
okay so when i join any elver server it says «asset bundle error: «metro» version mismatch. ive launched it on singleplayer and it worked? it only shows that up for servers, ive tried reinstalling yada yada but it doesn’t let me play on any server. anyone know what to do?
Читайте также:
- Inf driver как установить
- Ошибка инициализации симс 4 135dec40 90f690cf 00000075 495f32a0
- Как запустить лимон крафт
- Как установить халф лайф 2 эпизод 2 на андроид
- Произошла неизвестная ошибка попробуйте еще раз roblox
The game loads textures, audio, meshes, prefabs, etc. from Unity Asset Bundles at runtime. How these are setup and used has evolved over the years from individual *.unity3d bundles to .content bundles to .masterbundle files.
Master Bundles should be used for essentially all new projects.
Prior to using any of these tools they must be imported into a Unity project
- Inside Unity open the Assets > Import Package > Custom Package… wizard.
- Find the Unturned installation directory.
- Navigate to the Bundles/Sources directory.
- Import the Project.unitypackage.
Individual Asset Bundles (*.unity3d)
Most official files have transitioned to the master bundle system, but some uses still exist like the per-map road textures.
Tool Usage
- Follow Tool Setup instructions.
- Open the tool from the Window > Unturned > Bundle Tool menu.
- Select individual assets or directories of assets in the Project window.
- Click Grab to preview which assets will be exported.
- Click Bundle to choose a destination for the asset bundle file.
Motivations
When beginning development of 3.0, it was key to support runtime loading of custom modded content. At the time files in asset bundles were loaded by name without extension, so each game type looked for specific names like «Item», «Object», «Animal», etc. The .unity3d extension was chosen for web browser compatibility. Obviously this system did not age well.
Content Bundles (*.content)
Warning
The game no longer loads .content files. MasterBundles now support all the features of a .content file, and the .content file tooling has been removed from Project.unitypackage
This format was by devkit landscapes, material palettes and radio songs, but has now replaced by master bundles.
Tool Usage
- Follow Tool Setup instructions.
- Open the tool from the Window > Unturned > Content Tool menu.
- Select directories of assets in the Project window.
- In the Inspector window tag them in an asset bundle ending with «.content».
- Click … to choose a destination for the content bundle file.
- Click Export.
Motivations
In late 2016 and early 2017 development was focused on improving the editor experience, and one aspect of that was asset bundling. Content bundles scanned a manifest of contained assets in order to allow browsing individually from the in-game editor, and the idea was to allow each content reference to be configured per-game-property. Unfortunately, this effort was far too broad — from building an interface between the game code / online subsystem code to revising the ID system to use GUIDs. In retrospect it would have been wiser to crack down on individual features which has been the approach since then.
Master Bundles (*.masterbundle)
Most official files including curated maps have been transitioned to master bundles, and they will be used for the foreseeable future.
File Setup
Master bundles can be loaded from any directory the game loads *.dat files from. Unless an override is specified, the nearest master bundle in the file hierarchy is used. While loading each directory is checked for a MasterBundle.dat file signaling the presence of a master bundle. For example, refer to the core.masterbundle in the Bundles directory.
MasterBundle.dat can set the following keys:
// Name of asset bundle file in the same directory as MasterBundle.dat.
Asset_Bundle_Name core.masterbundle

// Path to the asset bundle within Unity.
// Unity subfolders should match 1:1 with dat subfolders.
Asset_Prefix Assets/CoreMasterBundle

// Version 3 is Unity 2018.4 LTS. Older versions have shader consolidation enabled for backwards compatibility.
Asset_Bundle_Version 3
Individual asset *.dats can set the following keys:
// Name of master bundle to load files from.
Master_Bundle_Override core.masterbundle

// If included, look for an individual *.unity3d asset bundle instead.
Exclude_From_Master_Bundle

// Path within master bundle to load files from.
// Used by notes to share a common object prefab.
Bundle_Override_Path /Objects/Medium/Furniture/Note
Tool Usage
- Follow Tool Setup instructions.
- Open the tool from the Window > Unturned > Master Bundle Tool menu.
- Select directories of assets in the Project window.
- In the Inspector window tag them in any asset bundle.
- Click the checkbox next to an asset bundle’s name in the tool to mark it as a master bundle. This filters the list of asset bundles to show, and tracks an export path associated with it.
- Click the … to choose a destination for the bundle file.
- Click Export.
Motivations
When upgrading to Unity 2017.4 LTS it became apparent that all asset bundles would have to be re-exported from Unity due to shader compatibility changes. This would be an incredible amount of files, so it was time to re-approach the *.content issue in a way that could quickly convert all existing content. This was handled by keeping the file hierarchy 1:1 and guessing the file extension for the by-name loading.
Last update: July 24, 2022
-
#1
Valve отредактировала карты = сломали (в очередной раз) сервера сообщества
Сменились сигнатуры и тем самым сервера ушли в постоянный краш (см 1.10)
[MaZa] [HotGuard] — Failed Offset 1
[SM] Unable to load extension «hotguard.ext»:
[SDKTOOLS] Sigscan for WriteBaselines failed
[SDKTOOLS] Failed to find WriteBaselines signature — stringtable error workaround disabled.
[AntiDLL] Sigscan for Signature failed
[SM] Unable to load extension «AntiDLL.ext»: Failed to create interceptor
[SM] Failed to load plugin «hotguard.smx»: Unable to load plugin (bad header).
[SM] Unable to load plugin «AntiDLL.smx»: Required extension «AntiDLL» file(«AntiDLL.ext») not running
[SM] Exception reported: Failed to get engine poiters. Data: 0, 0, F0D92D44, F0E311CC.
[SM] Blaming: block_print_garbage_messages.smx
[SM] Call stack trace:
[SM] [0] SetFailState
[SM] [1] Line 48, d:SourcePawn1.10block_print_garbage_messages.sp::OnPluginStart
[SM] Unable to load plugin «block_print_garbage_messages.smx»: Error detected in plugin startup (see error logs)
[SM] Unable to load plugin «CrashPlayer_AntiDLL.smx»: Required extension «AntiDLL» file(«AntiDLL.ext») not running
[SM] Exception reported: Can’t get offset for «CBaseServer::RejectConnection».
[SM] Blaming: server_redirect.smx
[SM] Call stack trace:
[SM] [0] SetFailState
[SM] [1] Line 9, server_redirect/redirect.sp::SetupSDKCalls
[SM] [2] Line 198, C:UsersartDesktopaddonsёsourcemodscriptingserver_redirect.sp::OnPluginStart
[SM] Unable to load plugin «server_redirect.smx»: Error detected in plugin startup (see error logs)
[SM] Exception reported: Failed to load CBaseServer::IsExclusiveToLobbyConnections signature from gamedata
[SM] Blaming: nolobbyreservation.smx
[SM] Call stack trace:
[SM] [0] SetFailState
[SM] [1] Line 87, nolobbyreservation.sp::OnPluginStart
[SM] Unable to load plugin «nolobbyreservation.smx»: Error detected in plugin startup (see error logs)
Послетали сигнатуры
CBaseServer::RejectConnection
CBaseServer::IsExclusiveToLobby
upd: Если хотите до сих пор использовать см 1.10 linux — скачивайте архив с см 1.11 6928, оттуда переносите все файлы из папки addons/sourcemod/gamedata/ с заменой. (остальные файлы из других папок не трогайте)
Под остальные плагины исправления — ищите файлы с фиксом сигнатур в соответствующих темах.
Последнее редактирование: Суббота в 10:30
-
#661
Сервер работает минут 10-15 и крашится. Отключил папку plugins и запустил без плагинов и не крашит. Сейчас сижу перебираю, какой из плагинов крашит его.
-
#662
@j1ton, все скрипты скомпилируй под обнову, у меня всё работает, только вип шприцы не робят, жду обнову
Последнее редактирование: Суббота в 14:43
-
#663
у кого нибудь крашит при смене карты? или только у меня, все обновлено… без единой ошибки
Сообщения автоматически склеены: Суббота в 14:41
@j1ton, все скрипты скомпилируй под обнову, у меня всё работает, только вип шприцы не робят, жду обнову
upd: серв падает спустя минут 10 онлайна, ошибка чтения errors_log, не знаю в чём трабл
gamedatу обнови и все.
Последнее редактирование: Суббота в 14:41
-
#664
у кого нибудь крашит при смене карты? или только у меня, все обновлено… без единой ошибки
Сообщения автоматически склеены: Суббота в 14:41
gamedatу обнови и все.
мне не помогла обнова gamedata, у меня проблема в каком-то плагине видимо, вот сижу ищу
-
#665
у кого нибудь крашит при смене карты? или только у меня, все обновлено… без единой ошибки
Сообщения автоматически склеены: Суббота в 14:41
gamedatу обнови и все.
так же. При компиляции пишет ошибки в синтаксисе.
-
#666
У меня sourcemod 1.11 сервер отлично работает, только проблема с плагином shop_skins.smx (не выключаются скины) и с плагином res.smx (не проигрывается музыка)
Приложу свои gamedata и extensions, (не нужное вам, удалите) попробуйте.
» Не забудьте в /addons/sourcemod/configs/core.cfg «DisableAutoUpdate» поставить на «yes» «
-
gamedata.zip
135.7 КБ
· Просмотры: 24
-
extensions.zip
22.1 МБ
· Просмотры: 24
-
#667
L 02/04/2023 - 15:11:04: Info (map "de_mirage") (file "/home/server26921/game/csgo/addons/sourcemod/logs/errors_20230204.log")
L 02/04/2023 - 15:11:04: [SM] Exception reported: Failed to create native "BaseComm_IsClientGagged", name is probably already in use
L 02/04/2023 - 15:11:04: [SM] Blaming: basecomm.smx
L 02/04/2023 - 15:11:04: [SM] Call stack trace:
L 02/04/2023 - 15:11:04: [SM]   [0] CreateNative
L 02/04/2023 - 15:11:04: [SM]   [1] Line 71, /home/builds/sourcemod/debian9-1.11/build/plugins/basecomm.sp::AskPluginLoad2
L 02/04/2023 - 15:11:04: [SM] Failed to load plugin "basecomm.smx": unexpected error 23 in AskPluginLoad callback.
L 02/04/2023 - 15:11:04: [AntiDLL] Sigscan for Signature failed
L 02/04/2023 - 15:11:04: [SM] Unable to load extension "AntiDLL.ext": Failed to create interceptor
L 02/04/2023 - 15:11:04: [Discord/DropsSummoner_discord.smx] At address g_pDropForAllPlayersPatch received not what we expected, drop for all players will be unavailable.
L 02/04/2023 - 15:11:04: [SM] Exception reported: [System Panel] [Users Chat DataBase] Failed to connection SP_users in databased.cfg
L 02/04/2023 - 15:11:04: [SM] Blaming: users_chat.smx
L 02/04/2023 - 15:11:04: [SM] Call stack trace:
L 02/04/2023 - 15:11:04: [SM]   [0] SetFailState
L 02/04/2023 - 15:11:04: [SM]   [1] Line 39, c:UsersauthtDesktopplugins-syspaneladdonssourcemodscriptingusers_chat.sp::Connection_BD
L 02/04/2023 - 15:11:04: [SM]   [2] Line 31, c:UsersauthtDesktopplugins-syspaneladdonssourcemodscriptingusers_chat.sp::OnPluginStart
L 02/04/2023 - 15:11:04: [SM] Unable to load plugin "users_chat.smx": Error detected in plugin startup (see error logs)
L 02/04/2023 - 15:11:04: [SM] Exception reported: [MA] Database failure: Could not find Database conf "materialadmin"
L 02/04/2023 - 15:11:04: [SM] Blaming: admin/materialadmin.smx
L 02/04/2023 - 15:11:04: [SM] Call stack trace:
L 02/04/2023 - 15:11:04: [SM]   [0] SetFailState
L 02/04/2023 - 15:11:04: [SM]   [1] Line 44, materialadmin/database.sp::ConnectBd
L 02/04/2023 - 15:11:04: [SM]   [2] Line 16, materialadmin/database.sp::MAConnectDB
L 02/04/2023 - 15:11:04: [SM]   [3] Line 286, materialadmin.sp::OnPluginStart
L 02/04/2023 - 15:11:04: [SM] Unable to load plugin "admin/materialadmin.smx": Error detected in plugin startup (see error logs)
L 02/04/2023 - 15:11:04: [SM] Unable to load plugin "admin/ma_mutenotification.smx": Could not find required plugin "materialadmin"
L 02/04/2023 - 15:11:04: [SM] Exception reported: [Clans] No database configuration in databases.cfg!
L 02/04/2023 - 15:11:04: [SM] Blaming: clans/clans.smx
L 02/04/2023 - 15:11:04: [SM] Call stack trace:
L 02/04/2023 - 15:11:04: [SM]   [0] SetFailState
L 02/04/2023 - 15:11:04: [SM]   [1] Line 11, clans/database.sp::ConnectToDatabase
L 02/04/2023 - 15:11:04: [SM]   [2] Line 240, A:ssmodscriptingclans.sp::OnPluginStart
L 02/04/2023 - 15:11:04: [SM] Unable to load plugin "clans/clans.smx": Error detected in plugin startup (see error logs)
L 02/04/2023 - 15:11:04: [SM] Unable to load plugin "clans/clan_createall.smx": Native "Clans_GetClientTimeToCreateClan" was not found
L 02/04/2023 - 15:11:04: [SM] Unable to load plugin "clans/clans_coinsbykill.smx": Native "Clans_AreClansLoaded" was not found
L 02/04/2023 - 15:11:04: [SM] Exception reported: [CustomPlayerArms] - Не удалось получить адрес s_playerViewmodelArmConfigs
L 02/04/2023 - 15:11:04: [SM] Blaming: CustomPlayerArms.smx
L 02/04/2023 - 15:11:04: [SM] Call stack trace:
L 02/04/2023 - 15:11:04: [SM]   [0] SetFailState
L 02/04/2023 - 15:11:04: [SM]   [1] Line 38, C:UsersanakaineDesktopxxxCustomPlayerArms.sp::OnPluginStart
L 02/04/2023 - 15:11:04: [SM] Unable to load plugin "CustomPlayerArms.smx": Error detected in plugin startup (see error logs)
L 02/04/2023 - 15:11:04: [SM] Exception reported: [System Panel] [Users Visits DataBase] Failed to connection SP_users in databased.cfg
L 02/04/2023 - 15:11:04: [SM] Blaming: users_visits.smx
L 02/04/2023 - 15:11:04: [SM] Call stack trace:
L 02/04/2023 - 15:11:04: [SM]   [0] SetFailState
L 02/04/2023 - 15:11:04: [SM]   [1] Line 28, c:UsersauthtDesktopplugins-syspaneladdonssourcemodscriptingusers_visits.sp::Connection_BD
L 02/04/2023 - 15:11:04: [SM]   [2] Line 23, c:UsersauthtDesktopplugins-syspaneladdonssourcemodscriptingusers_visits.sp::OnPluginStart
L 02/04/2023 - 15:11:04: [SM] Unable to load plugin "users_visits.smx": Error detected in plugin startup (see error logs)
L 02/04/2023 - 15:11:05: [SM] Unable to load plugin "vip/vip_clancreate.smx": Native "Clans_SetCreatePerm" was not found
L 02/04/2023 - 15:11:05: [SM] Unable to load plugin "Admins.smx": Could not find required plugin "materialadmin"
L 02/04/2023 - 15:11:05: [SM] Exception reported: [System Panel] [Users DataBase] Failed to connection SP_users in databased.cfg
L 02/04/2023 - 15:11:05: [SM] Blaming: users.smx
L 02/04/2023 - 15:11:05: [SM] Call stack trace:
L 02/04/2023 - 15:11:05: [SM]   [0] SetFailState
L 02/04/2023 - 15:11:05: [SM]   [1] Line 44, c:UsersauthtDesktopplugins-syspaneladdonssourcemodscriptingusers.sp::Connection_BD
L 02/04/2023 - 15:11:05: [SM]   [2] Line 21, c:UsersauthtDesktopplugins-syspaneladdonssourcemodscriptingusers.sp::OnPluginStart
L 02/04/2023 - 15:11:05: [SM] Unable to load plugin "users.smx": Error detected in plugin startup (see error logs)
есть фиксы этих плагинов?
-
#668
У меня sourcemod 1.11 сервер отлично работает, только проблема с плагином shop_skins.smx (не выключаются скины) и с плагином res.smx (не проигрывается музыка)
Приложу свои gamedata и extensions, (не нужное вам, удалите) попробуйте.
» Не забудьте в /addons/sourcemod/configs/core.cfg «DisableAutoUpdate» поставить на «yes» »
включаю сервер и при запуске он включается но в консоле пишет Could not establish connection to Steam servers.
-
#669
Тоже замечаю краши, но пока понять не могу из за какого плагина…
-
#670
L 02/04/2023 - 15:29:43: [STVM] Sigscan for CHLTVServer::BroadcastLocalChat failed
L 02/04/2023 - 15:29:43: [STVM] CHLTVServer::BroadcastLocalChat detour could not be initialized.
L 02/04/2023 - 15:29:43: [STVM] Sigscan for CHLTVDemoRecorder::StartRecording failed
L 02/04/2023 - 15:29:43: [STVM] CHLTVDemoRecorder::StartRecording detour could not be initialized.
L 02/04/2023 - 15:29:43: [STVM] Sigscan for CHLTVDemoRecorder::StopRecording failed
L 02/04/2023 - 15:29:43: [STVM] CHLTVDemoRecorder::StopRecording detour could not be initialized.
L 02/04/2023 - 15:29:43: [STVM] Failed to get CHLTVServer::m_DemoRecorder offset.
gamedata sourcetvmanager.
-
#671
Тоже замечаю краши, но пока понять не могу из за какого плагина…
Попробуй выключить всё, что связано со скинами(shop, ws, vip)
У меня к примеру после оф. Фикса не стартовал сервер с ws о фени.
И осталась одна ошибка:
[CSTRIKE] [CStrike] Failed to locate NET_SendPacket signature.Решил попробовать перейти на 1.12 но без изменений, ошибка так и осталась.
Можете подсказать, что это и как решить? Буду очень благодарен
-
#672
L 02/04/2023 - 15:29:43: [STVM] Sigscan for CHLTVServer::BroadcastLocalChat failed
L 02/04/2023 - 15:29:43: [STVM] CHLTVServer::BroadcastLocalChat detour could not be initialized.
L 02/04/2023 - 15:29:43: [STVM] Sigscan for CHLTVDemoRecorder::StartRecording failed
L 02/04/2023 - 15:29:43: [STVM] CHLTVDemoRecorder::StartRecording detour could not be initialized.
L 02/04/2023 - 15:29:43: [STVM] Sigscan for CHLTVDemoRecorder::StopRecording failed
L 02/04/2023 - 15:29:43: [STVM] CHLTVDemoRecorder::StopRecording detour could not be initialized.
L 02/04/2023 - 15:29:43: [STVM] Failed to get CHLTVServer::m_DemoRecorder offset.
gamedata sourcetvmanager.
Решение.
-
sourcetvmanager.games.txt
12.5 КБ
· Просмотры: 14
-
#673
есть какие ни будь рабочие gamedata и extensions на 1.11 то уже все перепробовал нечего не хочет запускаться
-
#674
есть какие ни будь рабочие gamedata и extensions на 1.11 то уже все перепробовал нечего не хочет запускаться
листай тему, тут всё скидывали.
У меня всё запускается и всё работает, но вот проблема в том что у меня сервер онли мираж, и почему он меняет карту на рандомную и сервер крашится.
-
#675
листай тему, тут всё скидывали.
У меня всё запускается и всё работает, но вот проблема в том что у меня сервер онли мираж, и почему он меняет карту на рандомную и сервер крашится.
те которые кидали не работают
-
#676
Есть у кого сошка феникса под 1.11?
-
#677
кинте пожалуйста basecomm.smx рабочий
-
#678
Есть у кого сошка феникса под 1.11?
На 1.11 нет сошки, если не ошибаюсь
-
#680
у кого то было что тоже не робит AntiDLL?
Unable to load plugin "AntiDLL.smx": Required extension "AntiDLL" file("AntiDLL.ext") not runningРоль Asset Bundle:
1. AssetBundle — это сжатый пакет, содержащий модели, текстуры, префабы, звуки и даже всю сцену, которую можно загрузить во время работы игры;
2. Сам AssetBundle поддерживает взаимные зависимости;
3. Сжатый пакет может использовать алгоритмы сжатия LZMA и LZ4 для уменьшения размера пакета и ускорения передачи по сети;
4. Поместите некоторый загружаемый контент в AssetBundle, что может уменьшить размер установочного пакета;
Что такое AssetBundle
Можно разделить на два пункта:
1. Это файл, существующий на жестком диске. Его можно назвать сжатым пакетом. Этот сжатый пакет можно рассматривать как папку, содержащую несколько файлов. Эти файлы можно разделить на две категории: сериализованные файлы и файлы ресурсов. (Сериализованные файлы и исходные файлы)
сериализованный файл: ресурс разбивается на объект и, наконец, записывается в один файл (только один).
файлы ресурсов: некоторые двоичные ресурсы (изображения, звуки) сохраняются отдельно для быстрой загрузки.
2. Это объект AssetBundle, который можно загрузить из конкретного сжатого пакета с помощью кода. Этот объект содержит все содержимое, которое мы добавили в сжатый пакет, и мы можем загрузить его и использовать через этот объект.
Пример упаковки ресурсов Asset Bundle
Независимо от того, являются ли это ресурсы модели или ресурсы пользовательского интерфейса, лучше всего сначала поместить их в Prefab, а затем превратить их в Assetbundle. Возьмем модель в качестве примера. Одна или несколько моделей могут быть помещены в Assetbundle. Он очень гибкий, поэтому самое важное, что нужно учитывать, — это занимаемое пространство модели.
Давайте возьмем реальную операцию. Сначала создайте два 3D-объекта, Cube и Capsule, и превратите их в Prefab, а затем перейдите к указанию свойства AssetBundle ресурса. Здесь я упакую эти две модели в пакет model.ab.
(xxxa / xxx) Здесь xxxa сгенерирует каталог с именем xxx, а следующий ab — суффиксное имя, которое можно настроить.

После настройки свойств начните сборку пакета AssetBundle. Сначала создайте папку с именем Editor. Эта папка является специальной папкой расширения редактора, которая не будет упакована. Затем мы создаем класс расширения редактора CreateAssetbundles. Напишите следующий код
using UnityEditor;using System.IO; public class CreateAssetbundles { [MenuItem("AssetsBundle/Build AssetBundles")] static void BuildAllAssetBundles () // Упаковка { string dir = "AssetBundles"; // Определяем, существует ли каталог if (Directory.Exists(dir) == false) { Directory.CreateDirectory (dir); // Создаем каталог AssetBundles в проекте } // Первый параметр - это путь к пакету, второй параметр, параметр сжатия, третий параметр, цель платформы BuildPipeline.BuildAssetBundles(dir, BuildAssetBundleOptions.None,BuildTarget.StandaloneWindows64); }}1. BuildAssetBundleOptions.None: используйте алгоритм LZMA для сжатия, сжатый пакет меньше, но время загрузки больше. Перед использованием его нужно полностью распаковать. После распаковки пакет будет повторно сжат с использованием LZ4. При использовании ресурсов нет необходимости полностью распаковывать. Вы можете использовать алгоритм LZMA при загрузке. После загрузки он будет сохранен локально с использованием алгоритма LZ4.
2. BuildAssetBundleOptions.UncompressedAssetBundle: без сжатия, большой пакет, быстрая загрузка.
3. BuildAssetBundleOptions.ChunkBasedCompression: при использовании сжатия LZ4 степень сжатия не такая высокая, как у LZMA, но мы можем загружать указанные ресурсы, не распаковывая их все.
Обратите внимание, что при использовании сжатия LZ4 вы можете получить скорость загрузки, сопоставимую с несжатыми файлами, и она меньше, чем несжатые файлы.
Затем вернитесь в Unity и нажмите кнопку пакета, которую мы только что расширили.

После щелчка наша модель упакована. Вы можете найти каталог AssetBundles в каталоге проекта. В AssetBundles есть папка Scene, которая содержит наши упакованные файлы с расширением .ab.

Загрузка AssetBundle
Есть несколько способов загрузить AssetBundle: LoadFromMemoryAsync используется для загрузки из памяти, LoadFromFile может использоваться для загрузки из локальных файлов, а UnityWbRequest может использоваться для загрузки из Интернета на сервер. Давайте посмотрим на эти способы загрузки.
Сначала удалите Prefab Cube и Capsule двух моделей в нашем Unity, затем создайте скрипт, который будет висеть на камере, и откройте скрипт.
Первый метод загрузки (LoadFromMemoryAsync) загружается из памяти
using UnityEngine;
using System.IO;
using System.Collections;
public class LoadFromFileExample : MonoBehaviour {

    IEnumerator  Start () {
        string path = "AssetBundles/scene/model.ab";
                 // Первый способ загрузки AB LoadFromMemoryAsync
                 // Асинхронная загрузка
        AssetBundleCreateRequest request = AssetBundle.LoadFromMemoryAsync(File.ReadAllBytes(path));
        yield return request;
        AssetBundle ab = request.assetBundle;
                 // Синхронно
        //AssetBundle ab=  AssetBundle.LoadFromMemory(File.ReadAllBytes(path));

                   // Используем ресурсы внутри
                 Object [] obj = ab.LoadAllAssets <GameObject> (); // Загружаем и помещаем в массив
                 // Создано
        foreach (Object o in obj)
        {
            Instantiate(o);
        }
    }
}
Второй способ (LoadFromFile) загружается локально
using UnityEngine;
using System.Collections;

public class LoadFromFileExample : MonoBehaviour {

    IEnumerator  Start () {
        string path = "AssetBundles/scene/model.ab";
        // Второй метод загрузки LoadFromFile
                 // Асинхронная загрузка
        AssetBundleCreateRequest request = AssetBundle.LoadFromFileAsync(path);
        yield return request;
        AssetBundle ab = request.assetBundle;
                 // Синхронная загрузка
        //AssetBundle ab = AssetBundle.LoadFromFile(path);

                 // Используем ресурсы внутри
             Object [] obj = ab.LoadAllAssets <GameObject> (); // Загружаем и помещаем в массив
                 // Создано
        foreach (Object o in obj)
        {
            Instantiate(o);
        }
     }
}
Третий метод (UnityWbRequest) загружается с сервера или локально
using UnityEngine;
using System.Collections;
using UnityEngine.Networking;

public class LoadFromFileExample: MonoBehaviour {

  IEnumerator Start() {
    // Третий способ загрузки - загрузка сервера UnityWbRequest с использованием локальной загрузки http с использованием файла
    //string uri = @"file:///C:UsersAdministratorDesktopAssetBundleProjectAssetBundlesmodel.ab";
    string uri = @ "http://localhost/AssetBundlesmodel.ab";
    UnityWebRequest request = UnityWebRequest.GetAssetBundle(uri);
    yield
    return request.Send();
    AssetBundle ab = DownloadHandlerAssetBundle.GetContent(request);

    // Используем ресурсы внутри
    Object[] obj = ab.LoadAllAssets < GameObject > (); // Загружаем и помещаем в массив
    // Создано
    foreach(Object o in obj) {
      Instantiate(o);
    }
  }
}
Таким образом, ресурсы в нашем пакете Model загружаются и создаются в сцене. В это время запустите Unity, и вы увидите, что две модели были созданы отдельно.

Конечно, вы также можете создавать указанные ресурсы, такие как
 AssetBundle ab=AssetBundle.LoadFromFile("AssetBundles/scene/model.ab");        GameObject go = ab.LoadAsset<GameObject>("Cube");
 Instantiate(go)
Таким образом осуществляется загрузка ресурсов Asset Bundle.
Стратегия группировки AssetBundle
1. Поместите часто обновляемые ресурсы в отдельный пакет и отделите их от редко обновляемых пакетов.
2. Поместите ресурсы, которые необходимо загрузить одновременно, в пакет.
3. Вы можете поместить ресурсы, общие для других пакетов, в отдельный пакет.
4. Упакуйте несколько небольших ресурсов, которые необходимо загрузить одновременно, в пакет.
5. Если есть две версии одного и того же ресурса, рассмотрите возможность использования суффикса для различения v1 v2 v3 unity3dv1 unity3dv2
1. Группировка логических объектов
a, один интерфейс пользовательского интерфейса или один пакет для всех интерфейсов пользовательского интерфейса (один пакет для текстур и информации о макете в этом интерфейсе)
b, пакет для одного или всех персонажей (пакет для модели и анимации в этом персонаже)
c, пакет, общий для всех сцен (включая текстуры и модели)
2. Группировать по типу
Все звуковые ресурсы упакованы в один пакет, все шейдеры упакованы в один пакет, все модели упакованы в один пакет, а все материалы упакованы в один пакет
3. Группировать по использованию
объединяет все ресурсы, используемые в определенное время, в один пакет. Его можно разделить по уровням: все ресурсы, необходимые для уровня, включая персонажей, текстуры, звуки и т. Д., Сгруппированы в пакет. Его также можно разделить на сцены, один пакет ресурсов, необходимых для одной сцены
Упаковка зависимостей
Это означает, что, например, если две модели используют один и тот же материал и текстуру, то между моделью и картой текстуры существует отношение зависимости. Если наши две модели упакованы отдельно, тогда будут упакованы два материала и текстуры, так что пакет станет больше, тогда как мы его решим, вот способ в Unity, на который в первую очередь нужно положиться Упакуйте материалы и текстуры отдельно в папку, а затем упакуйте две модели, которые зависят от этого материала и текстуры. Таким образом, Unity будет искать карту материалов и обнаруживать, что материал и текстура были упакованы, поэтому не будет повторять упаковку материала и текстуры, что значительно уменьшает размер упаковки.

Вышеупомянутый метод предназначен для непосредственной упаковки двух моделей по отдельности. Вы можете видеть, что материалы и текстуры упакованы отдельно, каждый из которых составляет 63 КБ, а следующий — первый пакет материалов и текстур до 62 КБ. Затем упакуйте две модели по 2 КБ, а общий размер составит всего 64 КБ.

Это пакет зависимостей, поставляемый с Unity.
Но модель, материал и текстура должны быть загружены при загрузке, иначе будут финансовые потери.
using UnityEngine;
public class LoadFromFileExample: MonoBehaviour {
  void Start() {
    AssetBundle ab = AssetBundle.LoadFromFile("AssetBundles/cube.ab");
    AssetBundle abShare = AssetBundle.LoadFromFile("AssetBundles/share.ab"); //GameObject go = ab.LoadAsset<GameObject>("Cube");
    //Instantiate(go);
    Object[] obj = ab.LoadAllAssets < GameObject > (); // Загружаем и помещаем в массив                 // Создано
    foreach(Object o in obj) {
      Instantiate(o);
    }
  }
}
Удаление AssetBundle
Есть два аспекта для удаления
1. Уменьшите использование памяти.
2, может привести к потере
Итак, когда удалять ресурсы
AssetBundle.Unload (true) Выгрузить все ресурсы, даже если ресурсы используются
1. При переключении между уровнями и сценами
2, когда ресурс не вызывается
AssetBundle.Unload (false) Выгрузить все неиспользуемые ресурсы
Как удалить отдельные ресурсы
1 через Resources.UnloadUnusedAssets.
2, когда сцена переключается
Проверка документов
Проверка файла может гарантировать целостность файла во время передачи файла. Например, A сгенерирует проверочный код перед передачей мне файла. Для этого файла будет сгенерирован только этот уникальный проверочный код, если он будет передан мне. Если файл немного отличается, код проверки будет совершенно другим. Поэтому, когда A передает мне файл, мне будут переданы и файл, и контрольный код. Когда я получу файл, я также буду использовать тот же алгоритм, что и A, для генерации контрольного кода файла, а затем возьму этот Значение сравнивается с контрольным кодом, который мне прислал A, если он совпадает, значит, файл готов, если нет, то повторите передачу. Ниже приведены контрольные значения, сгенерированные несколькими алгоритмами.
CRC MD5 SHA1
Сходства:
Все CRC, MD5, SHA1 вычисляются путем вычисления данных для создания контрольного значения, которое используется для проверки целостности данных.
Разница:
- Алгоритм другой. CRC использует полиномиальное деление, MD5 и SHA1 используют подстановку, вращение и другие методы;
- Длина контрольного значения разная. Длина контрольного бита CRC зависит от его полинома, обычно 16 или 32 бита; MD5 — 16 байтов (128 бит); SHA1 — 20 байтов (160 бит);
- Имя контрольного значения другое. CRC обычно называется значением CRC, MD5 и SHA1 обычно называются хеш-значением (Hash) или хеш-значением;
- Безопасность бывает разной. Безопасность здесь означает способность обнаруживать ошибки, то есть ошибки данных могут быть обнаружены с помощью контрольного бита. Безопасность CRC во многом связана с полиномами и намного слабее, чем MD5 и SHA1; MD5 очень безопасен, но он был взломан Ван Сяоюном из Университета Шаньдун в 2004 году; SHA1 имеет самую высокую безопасность.
- Эффективность разная, эффективность вычисления CRC очень высока, MD5 и SHA1 относительно медленны.
- Различное использование. CRC обычно используется для проверки данных связи; MD5 и SHA1 используются в области безопасности, такой как проверка файлов и цифровые подписи.