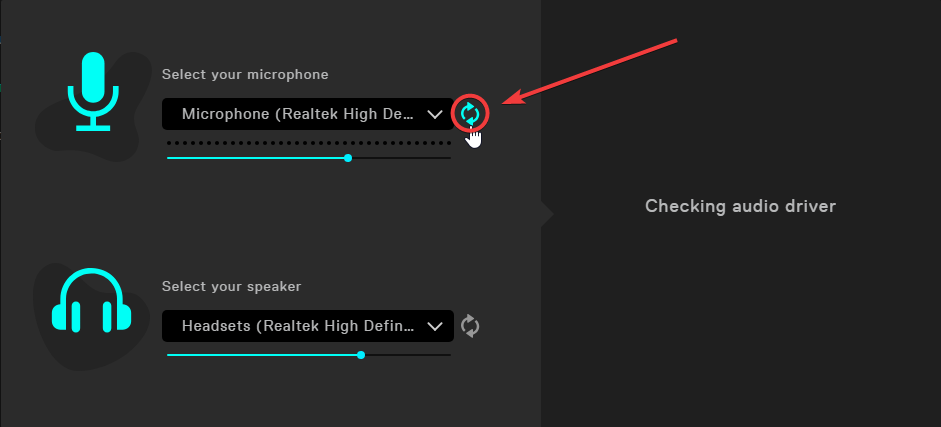
Are you stuck on the message «Checking audio driver» when configuring Voicemod through the Audio Wizard?
It is likely that one of the chosen devices will have one (or more) space at the beginning of the device name or even no name at all:
You must follow the steps below to get back Voicemod working back.
Go to the Sound control panel window via the Start Menu, the sound icon on the taskbar, or by running a command:
Check your Playback and Recording tab to find the device with the problem.
Open the Properties of this device.
Delete the space at the beginning or add a name for your device.

— Just click on Apply and OK.
— And try again in the Voicemod Audio Wizard:
If this doesn’t work and you keep getting the same error, please write us a ticket to the support form: https://www.voicemod.net/support by choosing the following categories:
— Technical Support
— Audio
— Can’t select input/output
Источник
[Решено] Voicemod не работает в Windows 10
Voicemod Not Working Windows 10
Здесь мы собрали для вас несколько решений, опробовали их и сразу же исправили проблему с неработающим Voicemod.
Когда вы пытаетесь обмануть своих друзей, изменив свой голос в Discord, Zoom или Fortnite, вы определенно обломаетесь, узнав, что ваш Voicemod Voice Changer не работает. Но не волнуйтесь, вы попали в нужное место. Здесь мы собрали для вас несколько рабочих решений, опробуем их и сразу же решим вашу проблему.
Попробуйте эти исправления
Возможно, вам не придется пробовать все исправления. Просто двигайтесь вниз, пока не найдете тот, который вам подходит.
- Перезагрузите компьютер
- Убедитесь, что ваш микрофон настроен правильно
- Установите все обновления Windows
- Переустановите драйверы Voicemod
Исправление 1: перезагрузите компьютер
Каким-то образом, перезагрузка вашего компьютера может устранить конфликты программного обеспечения и исправить некоторые неправильные настройки. Кроме того, для вступления в силу некоторых изменений может потребоваться перезагрузка. Перезагрузка компьютера всегда должна быть вашим первым шагом при устранении проблем с голосовой связью — вы будете удивлены, как часто трюк с его выключением и повторным включением срабатывает.
Если перезагрузка компьютера не принесла вам удачи, попробуйте следующее исправление ниже.
Исправление 2: убедитесь, что ваш микрофон настроен правильно
Далее вам нужно убедитесь, что ваш микрофон настроен правильно , и работает без проблем. Неправильные настройки могут помешать правильной работе Voicemod.
Вы можете выполнить следующие действия, чтобы проверить:
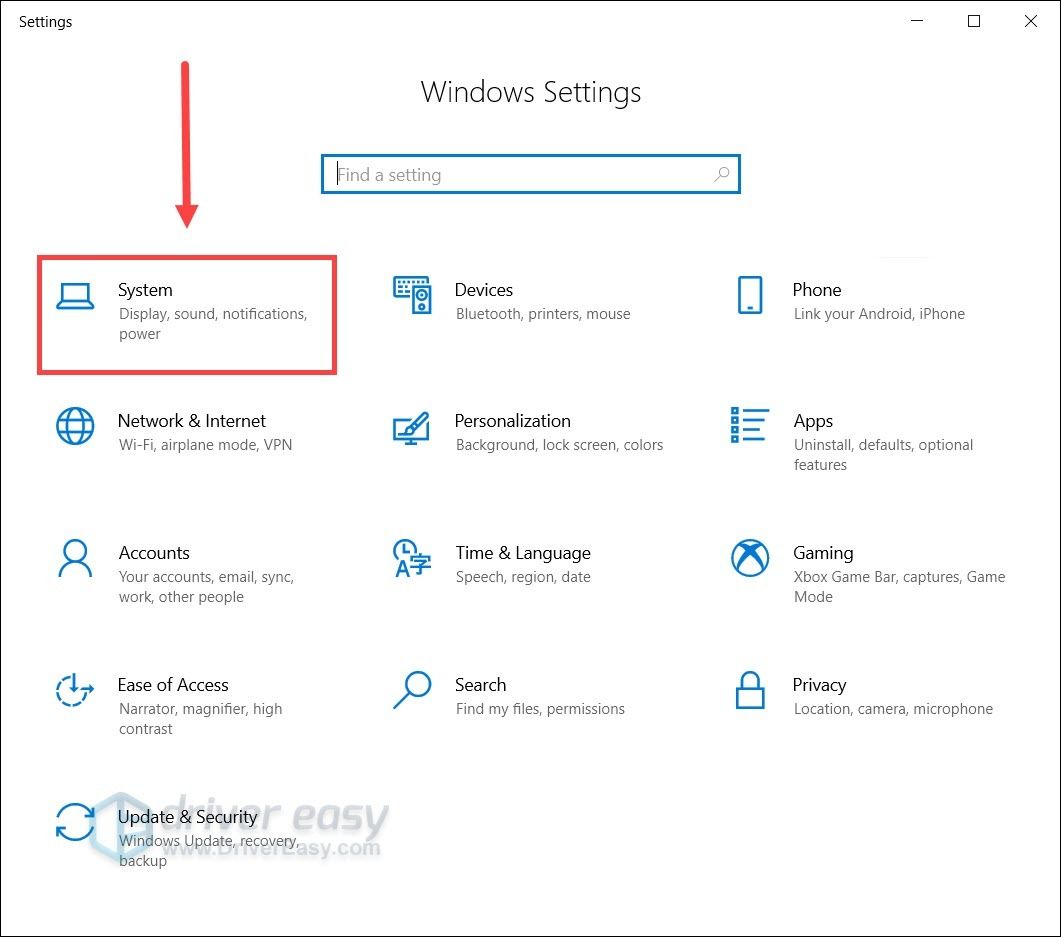
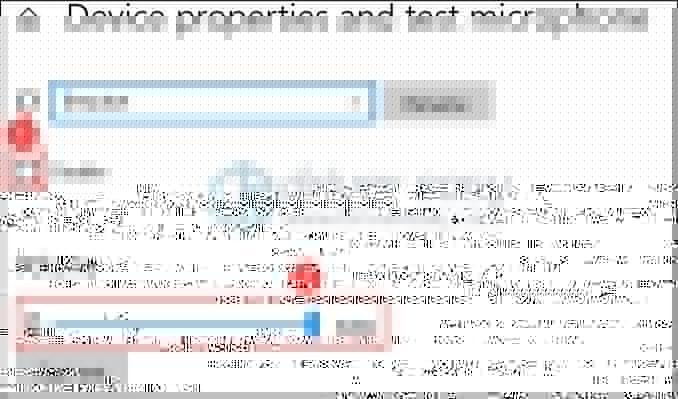
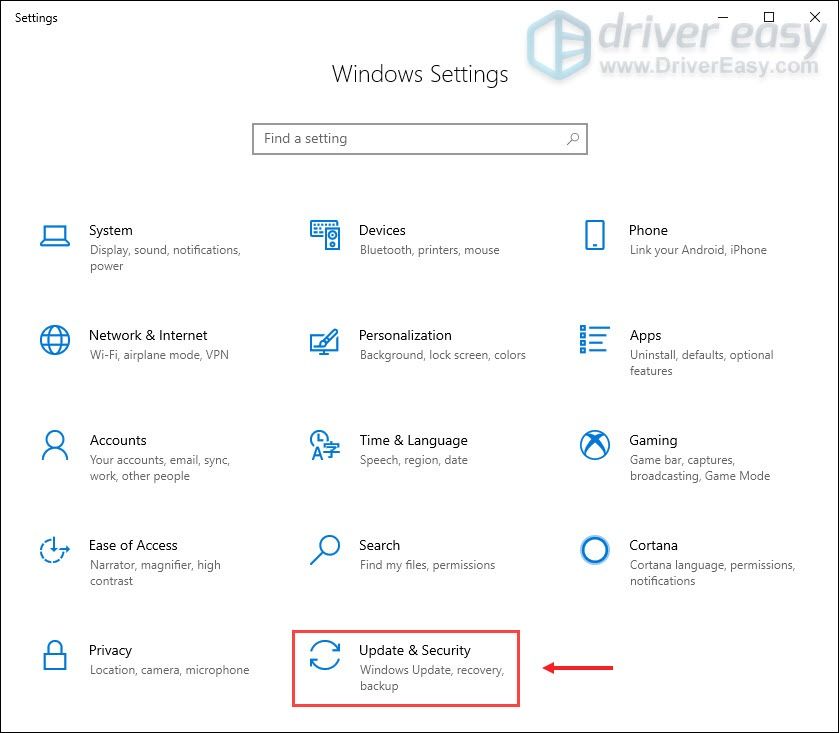
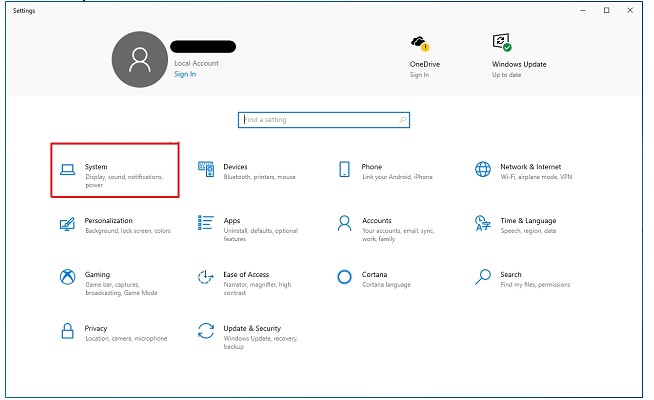
- На клавиатуре нажмите Win + I (клавиша с логотипом Windows и клавиша i) одновременно, чтобы открыть приложение настроек Windows. Нажмите Система .

- В левом меню нажмите Звук .
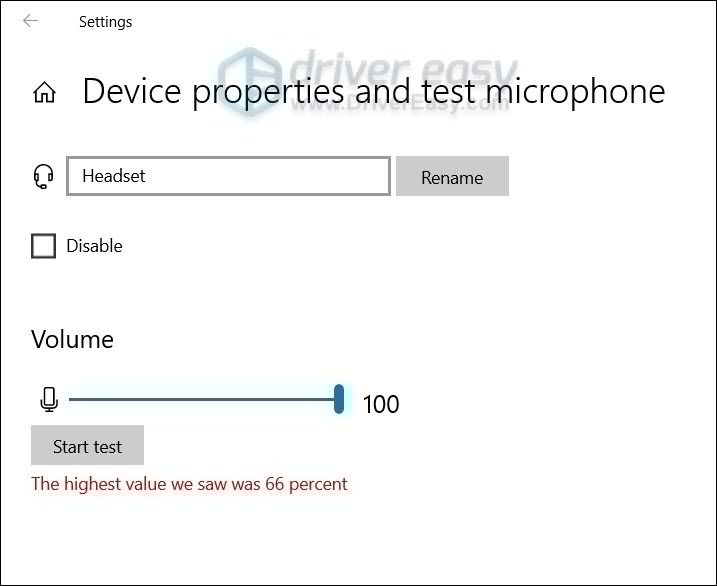
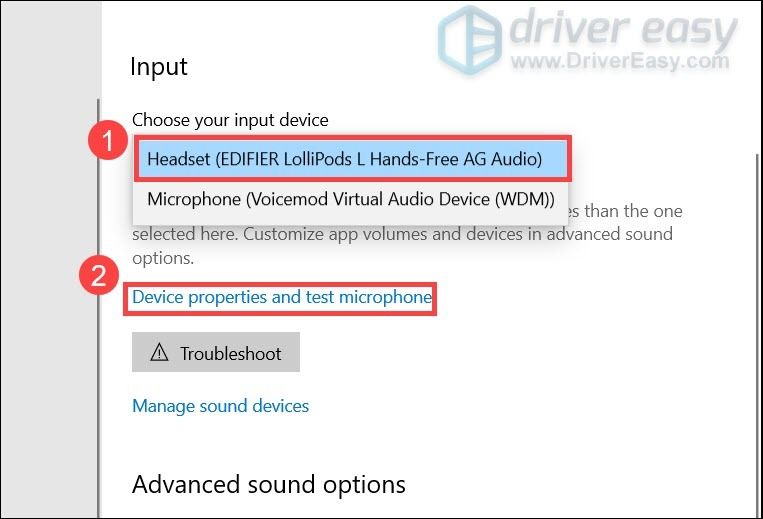
- Сначала вам нужно проверить свой микрофон. Под Вход раздел, установите устройство ввода на физический (например, гарнитура) вместо виртуального микрофона Voicemod. Затем нажмите Свойства устройства и тестовый микрофон .
- Убедитесь, что вы снял флажок следующий за Запрещать , а ползунок под Объем раздел установлен на 100 .
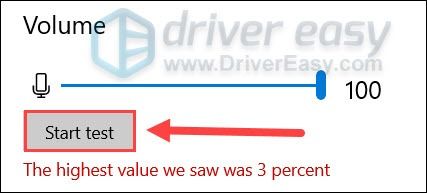
- Нажмите Начать тест и коснитесь или говорите в микрофон. Затем нажмите Остановить тест . Если вам будет предложено Наибольшее значение, которое мы видели, было xx (xx> 0) процентов. , это означает, что ваш микрофон работает правильно.
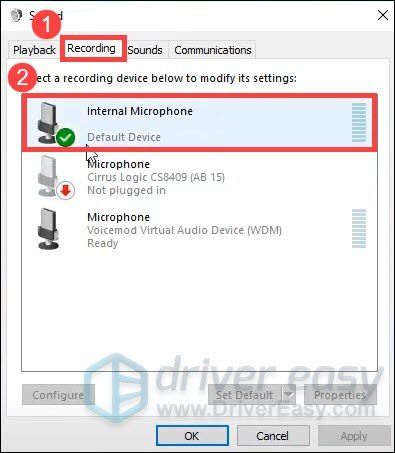
- В правом нижнем углу экрана щелкните значок звука правой кнопкой мыши и выберите Звуки .
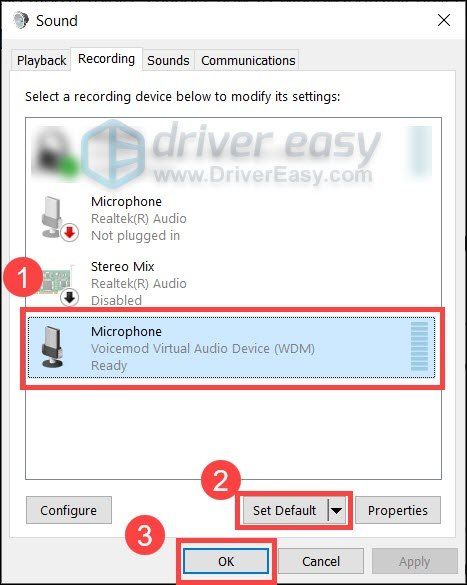
- Перейдите к Запись На вкладке дважды щелкните свой физический микрофон, чтобы просмотреть его свойства.
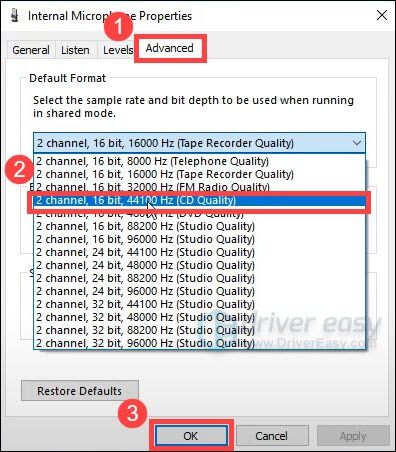
- Во всплывающем окне перейдите к Передовой таб. в Формат по умолчанию в разделе проверьте, можете ли вы выбрать частоту дискретизации. Если да, измените его на 2 канала, 16 бит, 44100 Гц (качество CD) . Нажмите хорошо .
- В окне шага 7 выберите Микрофон Виртуальное аудиоустройство Voicemod и нажмите Установить по умолчанию . Затем нажмите хорошо .

Теперь вы можете перезапустить Voicemod и посмотреть, работает ли он.
Если проблема не исчезла, попробуйте следующее исправление.
Исправление 3: Установите все обновления Windows
Windows 10 включает в себя 2 типа обновлений, которые соответственно предлагают исправления безопасности и повышение производительности. Иногда обновления Windows автоматически устраняют некоторые конфликты программного обеспечения или драйверов. Учитывая это, ваша проблема с голосовым чатом может быть легко решена с помощью обновление вашей системы .
Вот краткое руководство для этого:
- На клавиатуре нажмите Win + I (клавиша с логотипом Windows и клавиша i), чтобы открыть приложение «Настройки Windows». Нажмите Обновление и безопасность .
- Нажмите Проверить обновления . После этого Windows автоматически выполнит поиск и установит обновления системы.
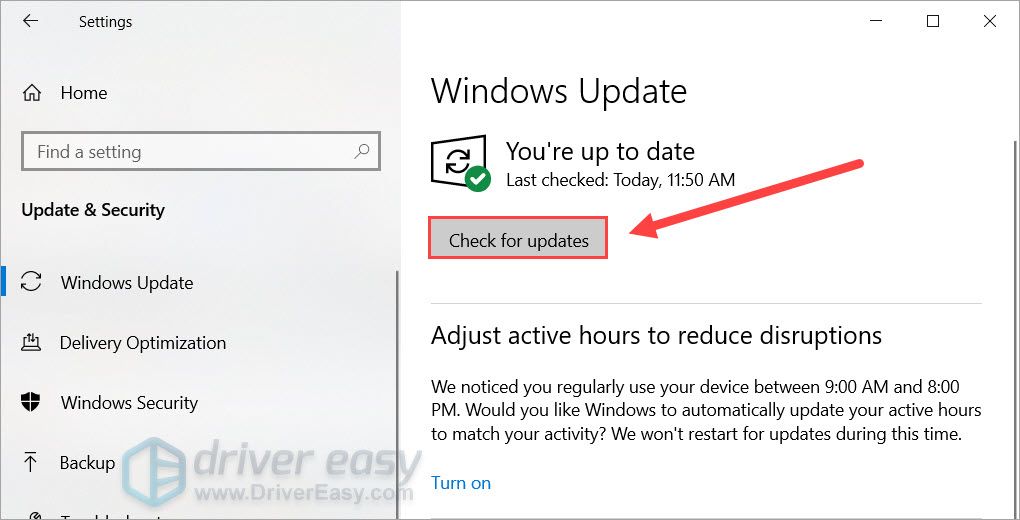
Чтобы убедиться, что вы установили все система обновляется, повторяйте эти шаги до тех пор, пока не появится сообщение Вы в курсе, когда вы нажмете Проверить обновления .
После завершения перезагрузите компьютер и проверьте, правильно ли работает Voicemod.
Если это исправление не помогает, попробуйте следующее.
Исправление 4: переустановите драйверы Voicemod
В некоторых случаях проблема указывает на то, что вы используете неисправные или устаревшие драйверы . Чтобы исправить это, вы можете просто переустановить драйвер Voicemod.
Сначала вам нужно удалить драйвер Voicemod:
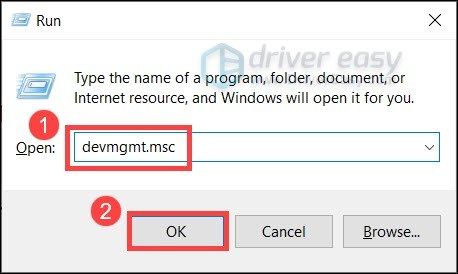
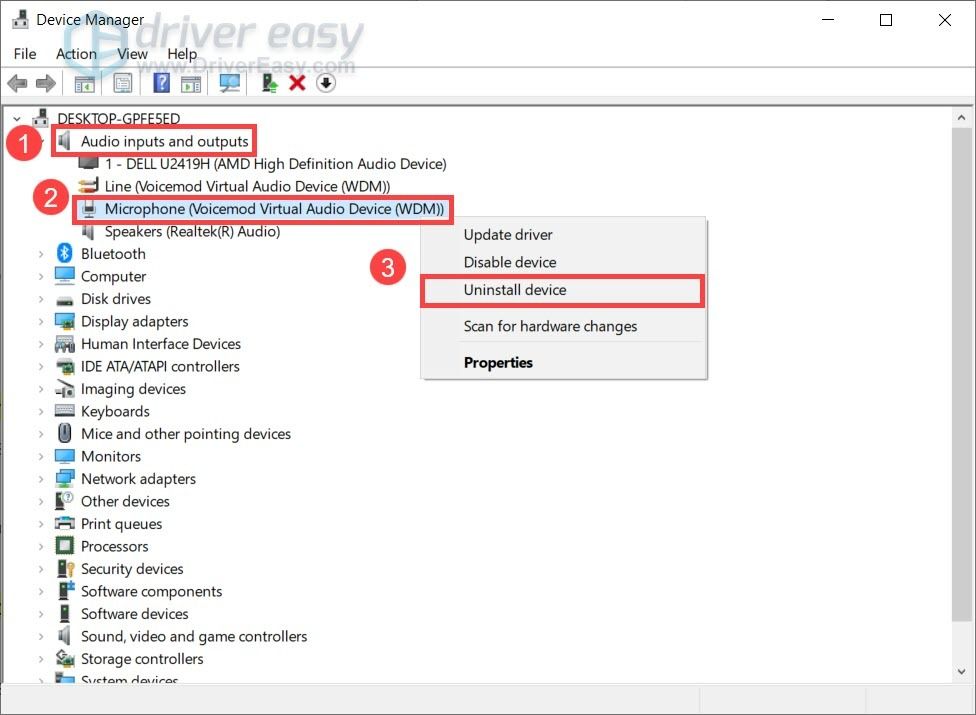
- На клавиатуре нажмите Win + R (клавиша с логотипом Windows и клавиша r) одновременно, чтобы вызвать окно «Выполнить». Введите или вставьте devmgmt.msc и нажмите хорошо , чтобы открыть диспетчер устройств.
- Нажмите, чтобы развернуть Аудиовходы и выходы . Щелкните правой кнопкой мыши Микрофон (виртуальное аудиоустройство Voicemod (WDM)) и выберите Удалить устройство .
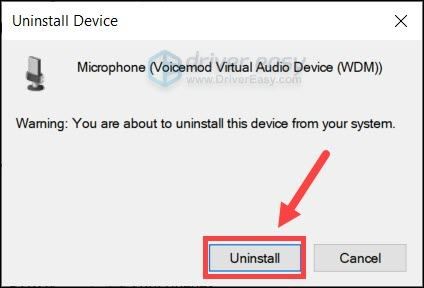
- Во всплывающем окне нажмите Удалить .
- Перезагрузите компьютер.
Затем вам нужно установить драйвер Voicemod. Вы можете сделать это вручную или автоматически.
Вариант 1. Установите драйвер Voicemod вручную
Если вы знакомы с компьютерным оборудованием, вы можете попробовать установить драйвер вручную. Для этого просто посетите Официальный сайт Voicemod , затем следуйте инструкциям по установке.
Вариант 2. Автоматическая установка драйвера Voicemod (рекомендуется)
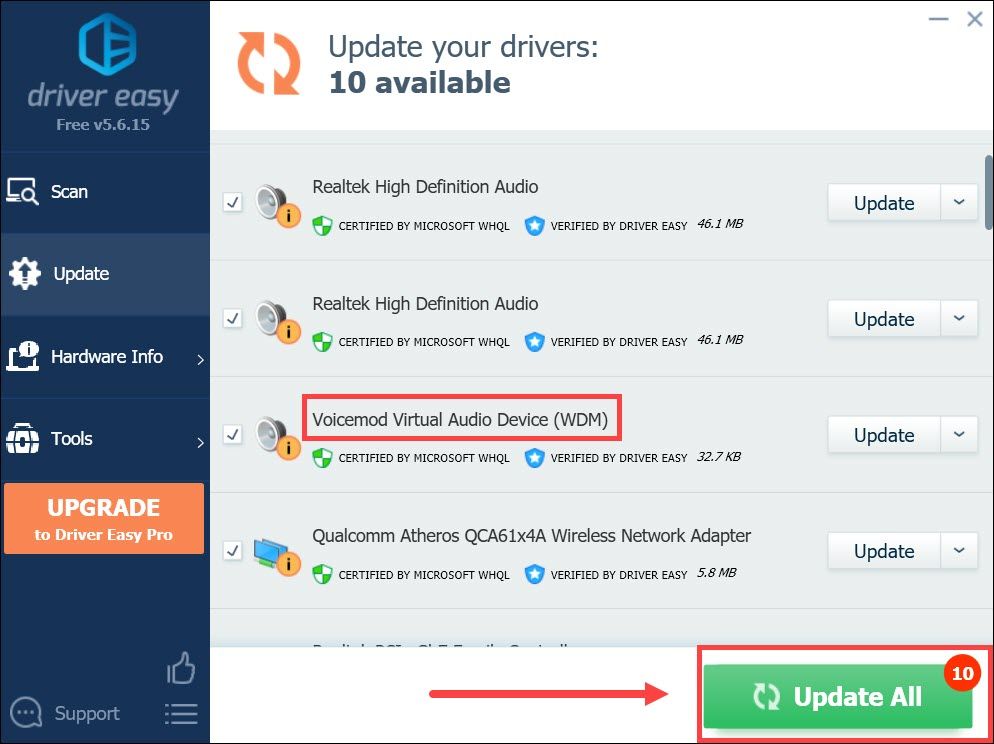
Если у вас нет времени, терпения или компьютерных навыков для установки драйвера Voicemod вручную, вы можете вместо этого сделать это автоматически с помощью Водитель Easy . Driver Easy автоматически распознает вашу систему и найдет правильные драйверы для ваших устройств и вашей версии Windows, а также правильно загрузит и установит их:
- Скачать и установите Driver Easy.
- Запустите Driver Easy и щелкните Сканировать сейчас кнопка. Затем Driver Easy просканирует ваш компьютер и обнаружит все проблемные драйверы.
- Нажмите Обновить все для автоматической загрузки и установки правильной версии все драйверы, которые отсутствуют или устарели в вашей системе.
(Для этого требуется Pro версия — вам будет предложено выполнить обновление, когда вы нажмете «Обновить все». Если вы не хотите платить за версию Pro, вы все равно можете загрузить и установить все необходимые драйверы вместе с бесплатной версией; вам просто нужно загрузить их по одному и установить вручную, как обычно в Windows.)

Профессиональная версия Driver Easy приходит с полная техническая поддержка . Если вам нужна помощь, пожалуйста, свяжитесь с нами. Служба поддержки Driver Easy в support@letmeknow.ch .
После установки драйвера Voicemod перезагрузите компьютер и посмотрите, сможете ли вы изменить свой голос с помощью Voicemod.
Итак, это исправления вашей проблемы с Voicemod, которая не работает. Если у вас есть какие-либо вопросы или идеи, не стесняйтесь оставлять комментарии, и мы свяжемся с вами в ближайшее время.
Источник
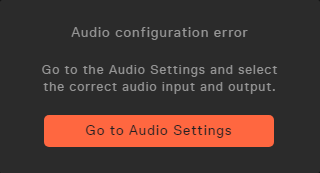
Audio configuration error: Disconnected Input or Output device
Are you getting frequent disconnection warnings from your input and/or output devices?
Are you receiving frequent «Audio configuration error» warnings and you have to reconfigure your audio devices in Voicemod*?
*NOTE: Voicemod (its voices and sounds) will remain unusable until you reconfigure your audio devices. Even if the disconnected device(s) appears selected, click on the device(s) to re-establish the connection. If the disconnected device(s) do not appear, you will have to reconnect them physically or choose other devices. If the connection to the device(s) is still not established, try using the audio assistant.
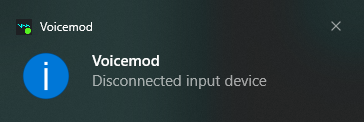
It means that you are having disconnections of your devices related to the use of wireless and/or USB-connected devices. It is usually a performance and/or power management problem with these devices.
We will proceed with the following actions to see if the problem is solved.
1.- It could be a problem related to the Windows sound mixer.
Please, follow me on the next steps to reset it:
1.- Open Voicemod.
2.- Go to the Voicemod Settings->Advanced settings tab.
3.- Disable the anti-popping mode.
4.- Disable the exclusive mode.
5.- And without closing Voicemod (this is very important), resets the Windows sound mixer:
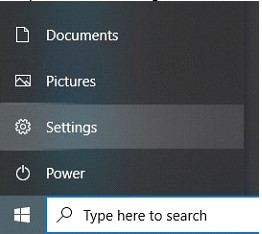
— Open Start -> Settings
— Look for «Advanced sound options» and go to «App Volume and device preferences»:
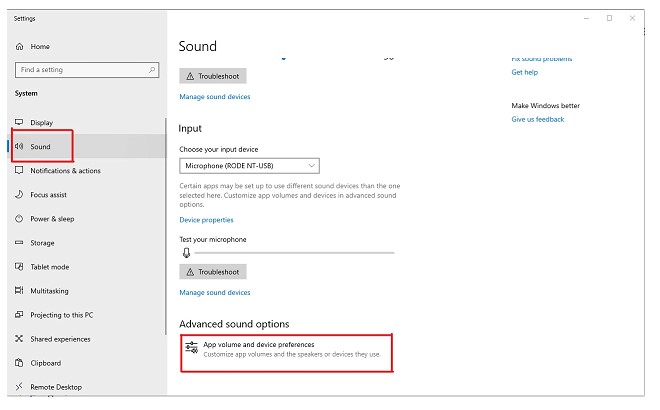
— Here, click on «Reset»:
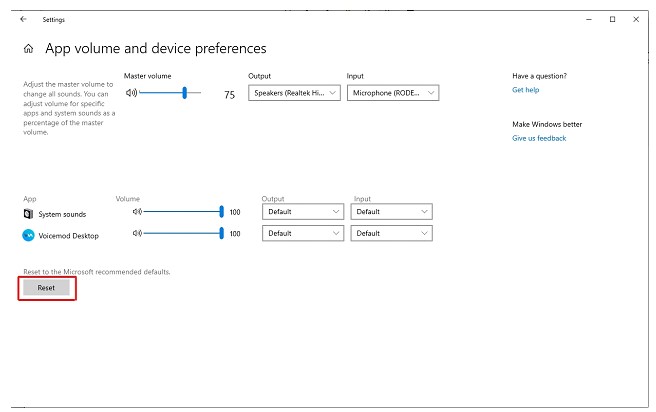
After that, restart Voicemod completely.
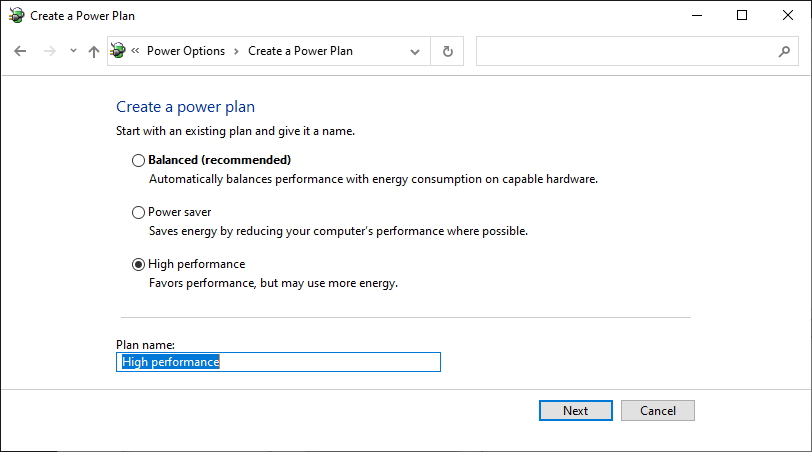
2.- If this doesn’t solve the problem, adjust your power plan and match the sample rate of your devices for the best possible performance.
+ Settings/Power&sleep/Additional power settings (right-column)/Create a power plan/High performance.

+ The audio flows from the microphone to Voicemod and from there we create two output signals; one goes straight to the headphones and the other goes through the Voicemod Virtual Audio Device to our Voicemod Virtual Microphone. If you have different sample rates in the devices where the audio is flowing, we have to resample each audio package, which means, a lot of processes.
If you want to optimize performance you can set your input and output Sample Rate of all your devices to 16bits 48.000 Hz:
- Close the Voicemod app.
- Go to Control Panel -> Sound.
- Go to Recording Tab.
- Double click on your Microphone to open the Properties Tab.
- Go to Advanced.
- Set the Default format to 16bits 48000 Hz.
If you are using more devices in your audio flow, set all of them to 48000 Hz.
- Open Voicemod.
- Go to Voicemod -> Settings.
- Select again your Microphone and Headphones.
3.- If the above actions have not resolved the problem, try reinstalling the drivers for the affected devices.
4.- If this doesn’t solve the problem either and your microphone (or the transmitter of your microphone if it is wireless) is connected via USB, it would be interesting to try this as well:
— Firstly, change the USB port or even the cable and/or USB adapter.
— USB SELECTIVE SUSPEND: This allows you to disable an individual port without affecting the operation of the other USB ports.
1.- Edit the Power plan by clicking on Change plan settings — Change advanced power settings:
2.- Disabled the USB selective suspend setting:
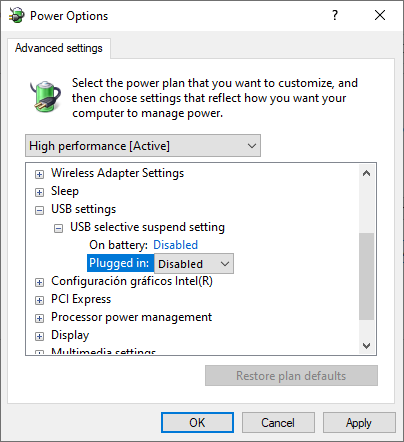
3.- Click on Apply and OK.
— PROCESSOR POWER MANAGEMENT: This optimizes energy processing.
1.- Edit the Power plan by clicking on Change plan settings — Change advanced power settings:
2.- Set the Minimum and Maximum processor state at 100%:
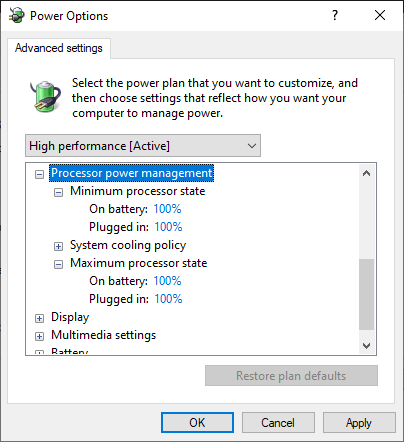
3.- Click on Apply and OK.
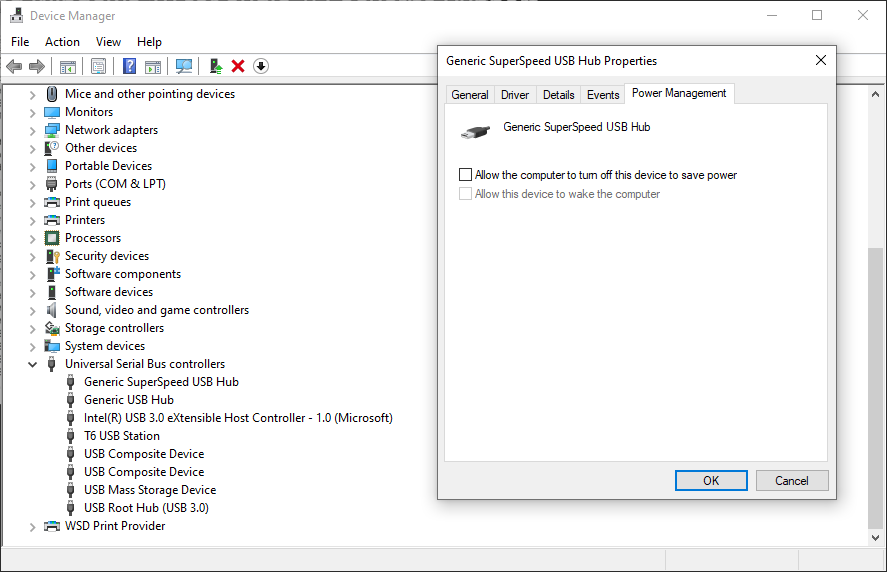
— USB POWER MANAGEMENT: This disables the power-saving features on all USB ports.
1.- Go to Device Manager — Universal Serial Bus controllers.
2.- Go to Properties — Power Management tab for each controller (and for all controllers) and uncheck «Allow the computer to turn off this device to save power»
— DISABLE STARTUP PROGRAMS: This identifies the software programs that launch automatically when you turn your Windows machine on.
1.- Go to Task Manager — Startup tab.
2.- Disable the programs with the greatest impact and that you use the least.
— DISABLE SYSTEMS SOUNDS: System sound effects affect your machine’s performance.
1.- Go to Sound — Sounds Tab.
2.- Set the Sound Scheme to No Sounds.
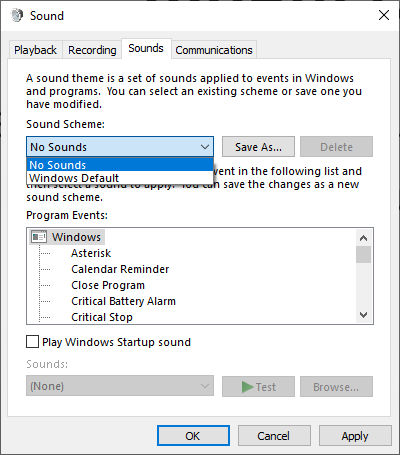
3.- Click on Apply and OK.
If this doesn’t work and you keep getting the same error, please write us a ticket to the support form: https://www.voicemod.net/support by choosing the following categories:
— Technical Support
— Audio
— Can’t select input/output
Источник
Внутренняя ошибка устройства ММЕ [Решено]
Ошибка Adobe Premiere Pro в Windows 10, при настройке аудиооборудования (звуковых устройств).
Не удалось применить настройки устройства, так как возникла следующая ошибка: Внутренняя ошибка устройства MME.

При указании настройки Ввод по умолчанию — микрофон, после чего все звуковые устройства в Adode Premiere Pro получают статус — Не работает.
В Windows 10 проблема возникает из-за ограничения доступа к микрофону для сторонних приложений.
Как исправить ошибку устройства MME:
- Щелкните по кнопке Пуск правой клавишей мыши и выберите Параметры;
- Выберите Конфиденциальность;
- В левой части окна выберите пункт Микрофон, в правой части окна нажмите переключатель Разрешить приложениям доступ к микрофону — Вкл.
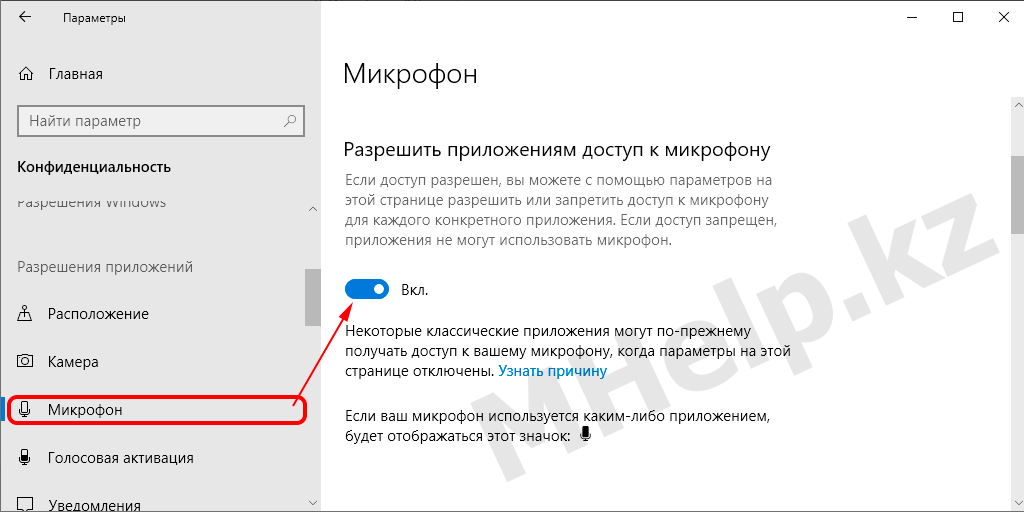
После разрешения доступа к микрофону, звуковые устройства в Adobe Premiere Pro будут доступны.
Внутренняя ошибка устройства MME может возникнуть и в других приложениях при попытке использования микрофона, исправьте её предложенным в статье способом.

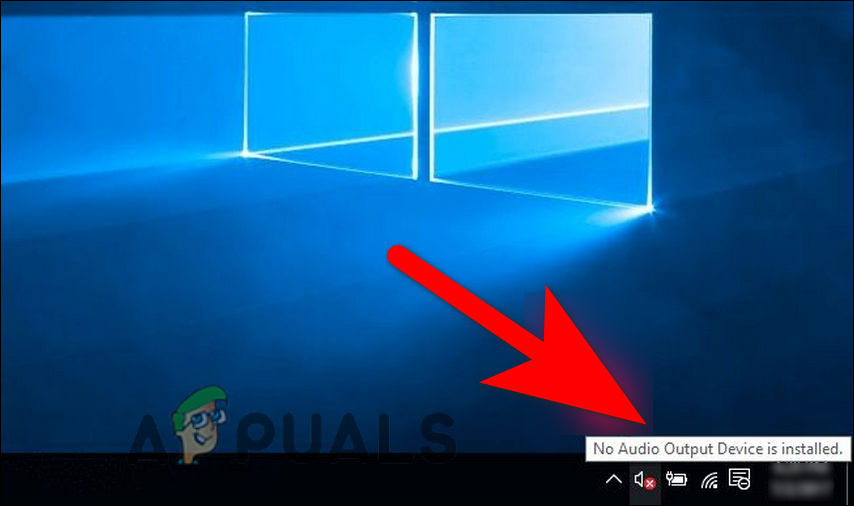
Кажется, самой большой угрозой для стабильности наших ПК являются обновления ОС Windows 10, причем последняя проблема заключается в том, что у пользователей ПК пропадает звук с компьютера.
Обычно это сопровождается ошибкой «No Audio Output Device is Installed» (отсутствуют аудио устройства).
Проблема заключается в неправильном аудио драйвере, который устанавливается автоматически при обновлении системы. Подобные проблемы проявляются у небольшого количества пользователей. К счастью, решение относительно простое.
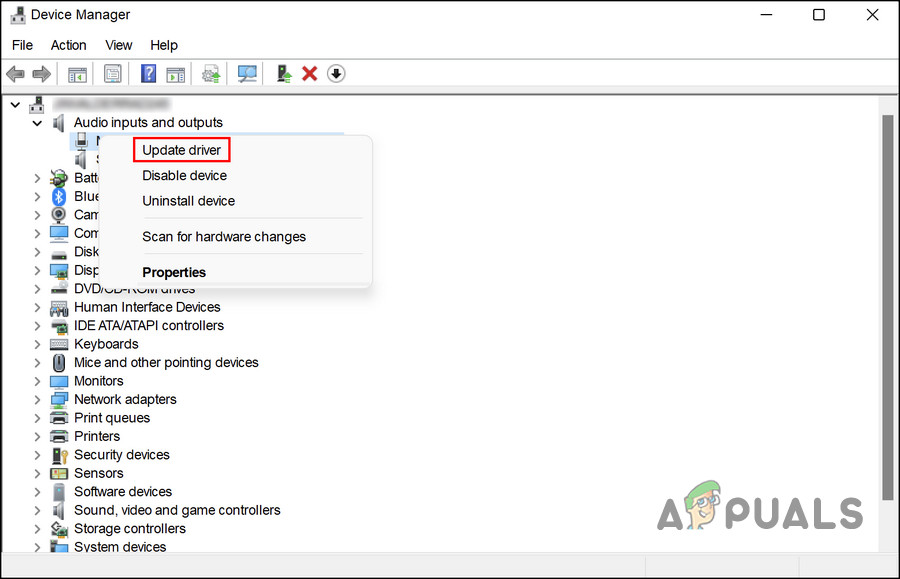
- Откройте Диспетчер устройств (откройте меню Пуск, введите Диспетчер устройств и нажмите Enter) и выберите Системные устройства.
- Найдите драйвер Intel Smart Sound Technology driver (SST).
- Щелкните правой кнопкой мыши и выберите Обновить драйвер в контекстном меню.
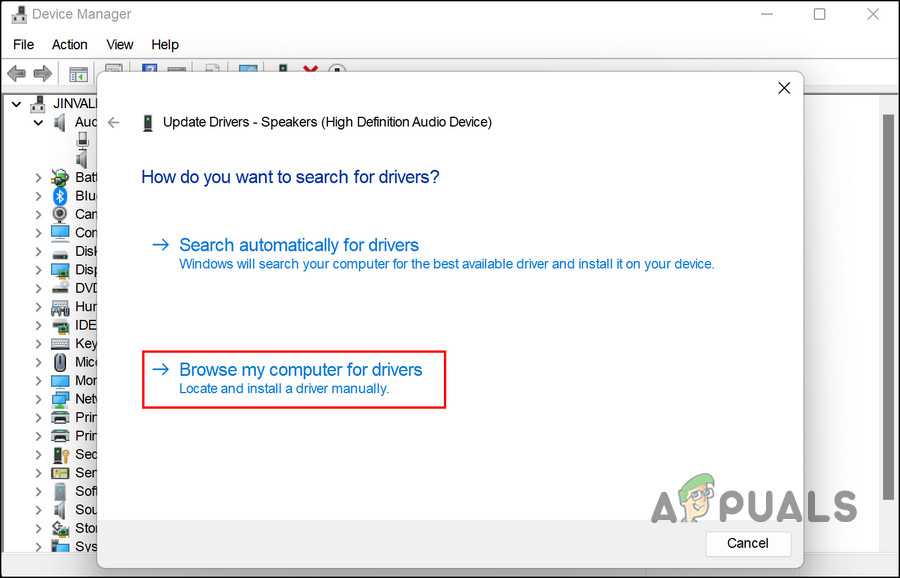
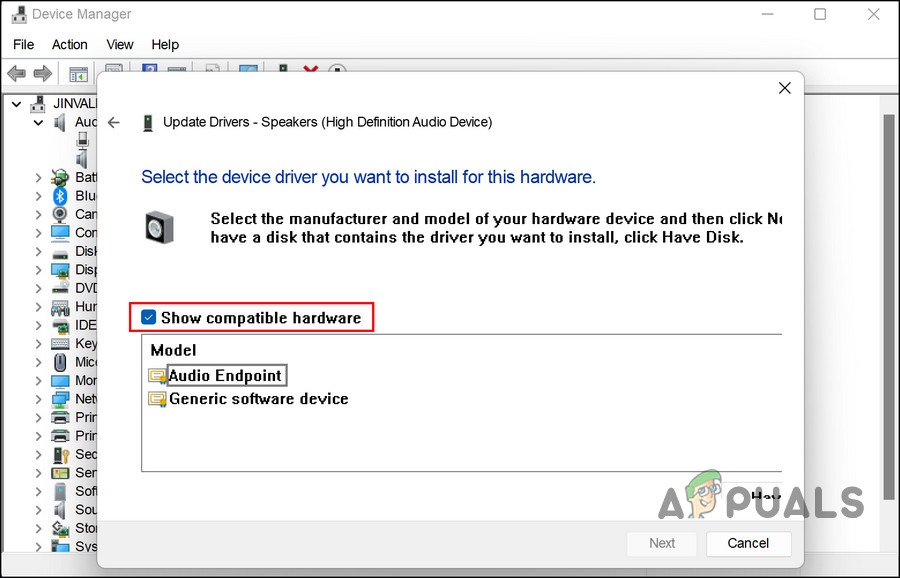
- Выберите поиск драйверов на моем компьютере, а затем выберите из списка доступных драйверов на моем компьютере High Definition Audio.
- Нажимать Далее.
- Intel Smart Sound Technology (SST) драйвер исчезнет, и звук появится.
Кто-нибудь из наших читателей с Windows 10 пострадал?
The ‘No audio output device is installed’ error is accompanied by a red cross on the speaker icon in the taskbar, preventing users from using the system sound. You can see the error message upon hovering the cursor over the cross on the sound icon.
Let’s look at the troubleshooting methods that can fix the issue.
1. Update Your Audio Output Driver
In most cases, If your audio driver is outdated or corrupted, you will likely run into this error. The drivers bridge the system and the hardware components, allowing the external devices to work properly. Here are the steps to update your audio driver.
- Press the Windows + X key simultaneously on your keyboard and now click ‘Device Manager’.
- In the following window, expand the Audio inputs and outputs category.
- Locate your audio driver and right-click on it.
- Choose Update driver from the context menu.

Update driver option in the context menu - Now, choose to Browse my computer for drivers.

Choose the Browse my computer for drivers option - Click on Let me pick from a list of available drivers on my computer.
- Checkmark the Show compatible hardware option.
Show compatible hardware option - Pick Generic Software device and click Next.
- Once the process is complete, close the Device Manager window and see if the problem is resolved.
You can also try uninstalling the audio driver and installing the latest version from the manufacturer’s official website.
2. Manually Add the Audio Device
Systems are configured to detect and add audio devices automatically. If your system fails to do so, you can add the targeted device manually to fix the problem. If the issue is popping up because you have no device connected, then this should fix the problem.
Here is what you need to do:
- Launch Settings by pressing the Win + I keys on your keyboard simultaneously.
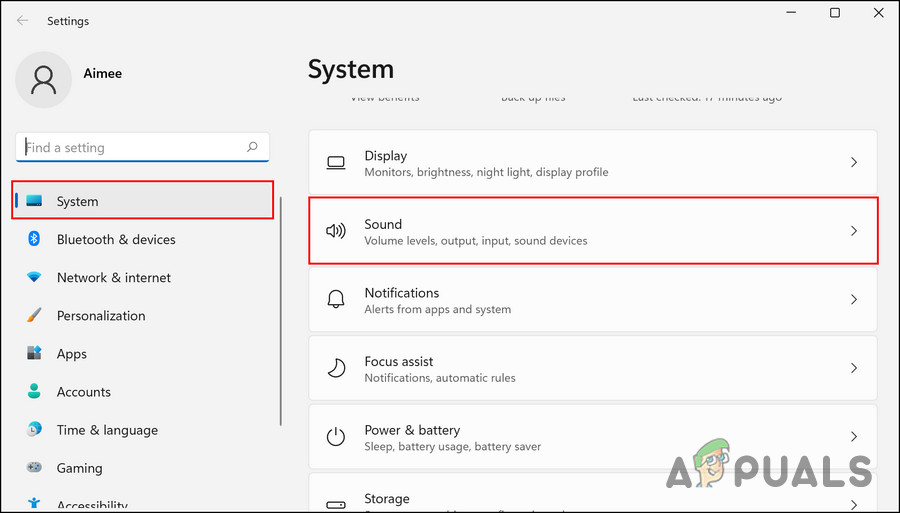
- Navigate to System > Sound.

Sound settings - In the following window, scroll down to the Output section and click on your targeted device.
- Hit the Allow button to Allow apps and Windows to use this device for audio.
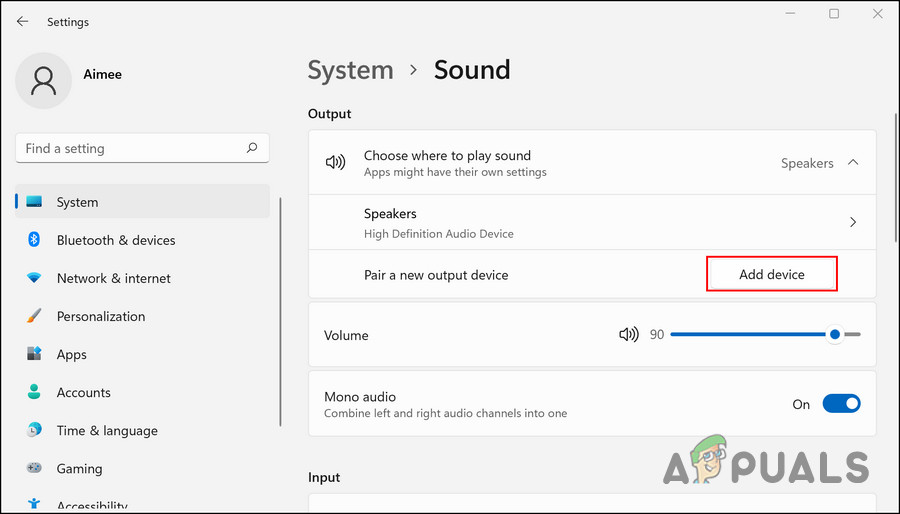
Allow button - If you cannot locate your audio device, click on the Add device button in the Output section of Sound settings.

Add device button - Follow the on-screen instructions to add the device manually.
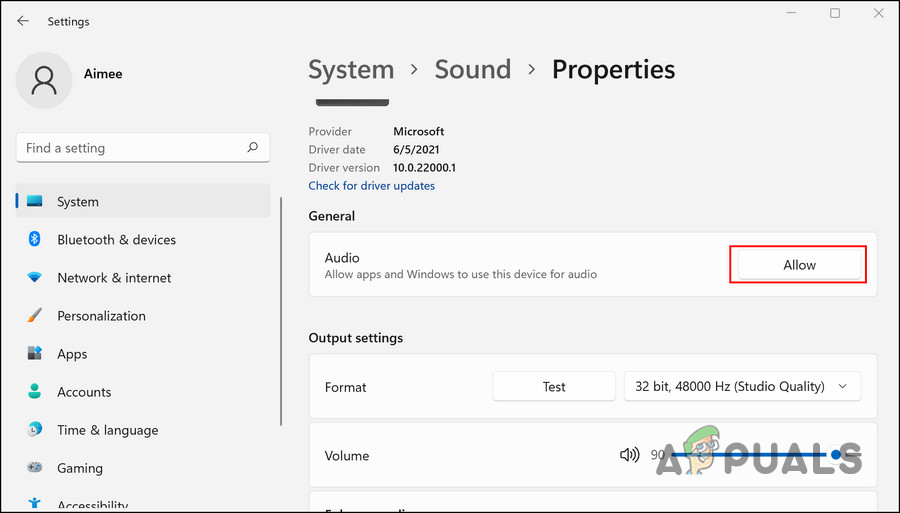
Once the device is added, ensure the apps and Windows are allowed to use it for audio.
3. Pick a Default Audio Device
You might also face the ‘No audio output device is installed’ error because the targeted hardware is not set as the default device. In this case, we suggest you set the targeted device as the default preference and see if that helps.
Below, we will show you how to set your speakers as the default audio device. Follow the same steps for other devices, like headphones, if that is what you are trying to use.
Follow these steps to proceed:
- Right-click on the speaker icon on your taskbar and click on Sound settings.

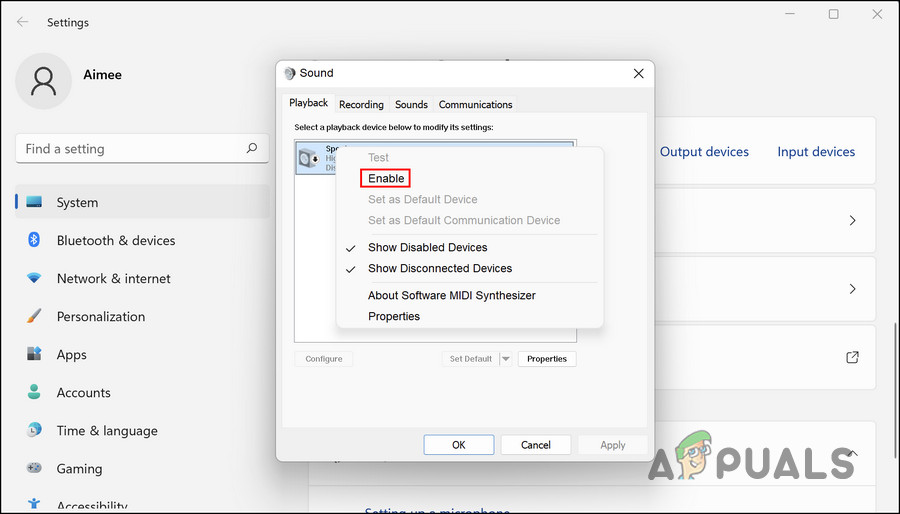
Sound settings option - Click More sound settings in the following window.
- Head over to the Playback tab and locate your targeted device. If you cannot find it, enable the Show disabled devices option.
- Now, right-click on the targeted device and choose Enable.
Choose Enable - Then, right-click on it again and choose Set as Default device from the context menu.

You can now see if the targeted device is working properly.
4. Disable Third-Party Driver Updater (If Applicable)
You can also install the latest driver and system updates automatically by using third-party software, but there are times when these programs cause issues like the one at hand.
According to a few affected users, the issue was caused by such programs installed on their system, and they were able to fix the issue after uninstalling the utility. If you are using any such tool, we suggest you uninstall it and check if that helps you get the audio back.
5. Use the Built-In Troubleshooter
You can also try running the audio troubleshooter to fix the ‘No audio output device is installed’ error.
Here is what you need to do:
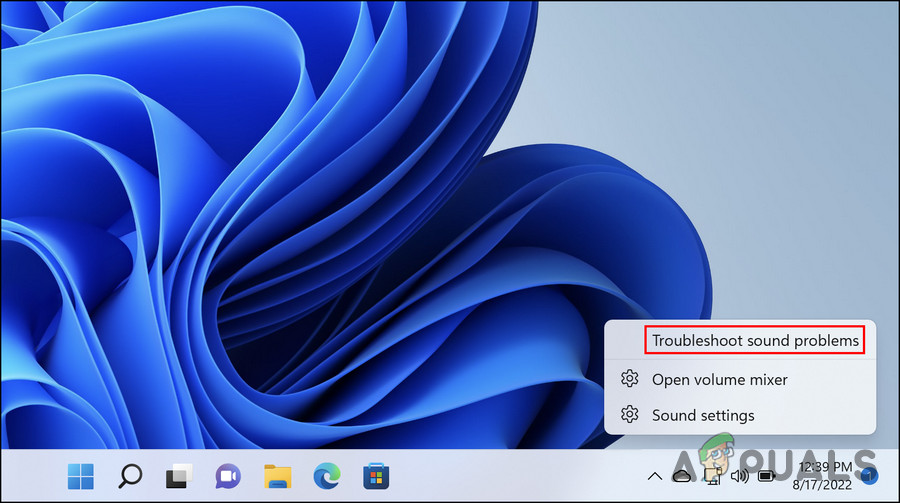
- Right-click on the speaker icon on the taskbar.
- Choose Troubleshoot sound problems from the context menu.
Troubleshoot sound problems option - This should launch the troubleshooter automatically. After the troubleshooter completes its scan, it will display the issues identified alongside their fixes. Click on Apply this fix to resolve the problem.
Alternatively, you can manually run the troubleshooter as well. Here is how:
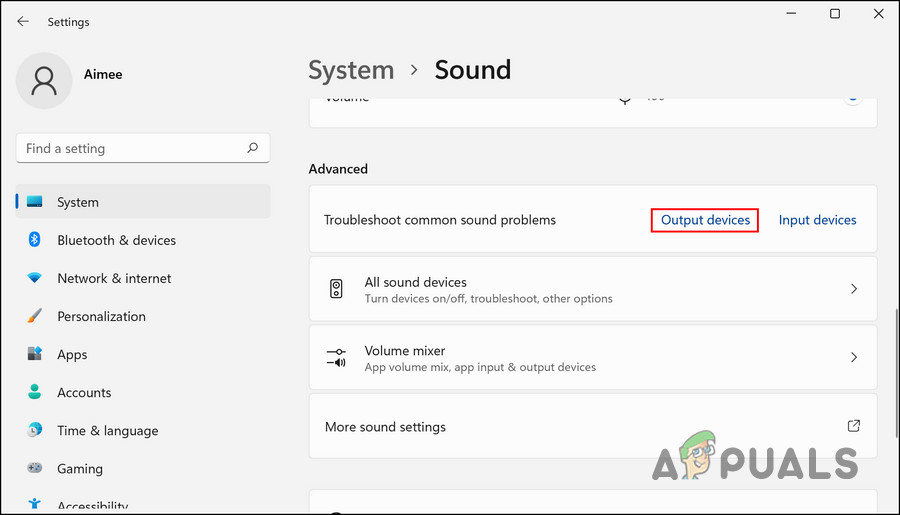
- Press the Win + I keys together to open the Settings app.
- Choose Sound in the following window.
- Now, scroll down to the Advanced section and click on Output devices next to the Troubleshoot common problems option.

Output devices settings - In the following Get Help dialog, click Yes to proceed.
- The utility will now scan your device for potential issues and fix any found.
If the utility fails to fix the ‘No audio output device is installed’ error, click on the Contact support button in the same window. You can then report the issue to Microsoft’s official support team. They will be able to pinpoint the exact cause of the issue and suggest a relevant fix that will fix the error once and for all.

Muhammad Zubyan
Zubyan is a certified Google IT Support Professional with extensive experience spanning over 7 long years. Having worked on 1500+ computers, he gained many valuable insights and is currently able to detect and troubleshoot any Windows related issue/error no matter how complicated its root cause is. When he is not managing Appuals as a Senior Editor, he is working on his own Game Optimization program to facilitate both gamers and casual users alike.