axios.get('/user/12345')
  .catch(function (error) {
    if (error.response) {
      // The request was made and the server responded with a status code
      // that falls out of the range of 2xx
      console.log(error.response.data);
      console.log(error.response.status);
      console.log(error.response.headers);
    } else if (error.request) {
      // The request was made but no response was received
      // `error.request` is an instance of XMLHttpRequest in the browser and an instance of
      // http.ClientRequest in node.js
      console.log(error.request);
    } else {
      // Something happened in setting up the request that triggered an Error
      console.log('Error', error.message);
    }
    console.log(error.config);
  });
Using the validateStatus config option, you can define HTTP code(s) that should throw an error.
axios.get('/user/12345', {
  validateStatus: function (status) {
    return status < 500; // Resolve only if the status code is less than 500
  }
})
Using toJSON you get an object with more information about the HTTP error.
axios.get('/user/12345')
  .catch(function (error) {
    console.log(error.toJSON());
  });
I’m trying to understand javascript promises better with Axios. What I pretend is to handle all errors in Request.js and only call the request function from anywhere without having to use catch().
In this example, the response to the request will be 400 with an error message in JSON.
This is the error I’m getting:
Uncaught (in promise) Error: Request failed with status code 400
The only solution I find is to add .catch(() => {}) in Somewhere.js but I’m trying to avoid having to do that. Is it possible?
Here’s the code:
Request.js
export function request(method, uri, body, headers) {
  let config = {
    method: method.toLowerCase(),
    url: uri,
    baseURL: API_URL,
    headers: { 'Authorization': 'Bearer ' + getToken() },
    validateStatus: function (status) {
      return status >= 200 && status < 400
    }
  }

  ...

  return axios(config).then(
    function (response) {
      return response.data
    }
  ).catch(
    function (error) {
      console.log('Show error notification!')
      return Promise.reject(error)
    }
  )
}
Somewhere.js
export default class Somewhere extends React.Component {

  ...

  callSomeRequest() {
    request('DELETE', '/some/request').then(
      () => {
        console.log('Request successful!')
      }
    )
  }

  ...

}
asked Apr 22, 2018 at 15:45
![]()
4
Actually, it’s not possible with axios as of now. The status codes which falls in the range of 2xx only, can be caught in .then().
A conventional approach is to catch errors in the catch() block like below:
axios.get('/api/xyz/abcd')
  .catch(function (error) {
    if (error.response) {
      // Request made and server responded
      console.log(error.response.data);
      console.log(error.response.status);
      console.log(error.response.headers);
    } else if (error.request) {
      // The request was made but no response was received
      console.log(error.request);
    } else {
      // Something happened in setting up the request that triggered an Error
      console.log('Error', error.message);
    }

  });
Another approach can be intercepting requests or responses before they are handled by then or catch.
axios.interceptors.request.use(function (config) {
    // Do something before request is sent
    return config;
  }, function (error) {
    // Do something with request error
    return Promise.reject(error);
  });

// Add a response interceptor
axios.interceptors.response.use(function (response) {
    // Do something with response data
    return response;
  }, function (error) {
    // Do something with response error
    return Promise.reject(error);
  });
answered Aug 9, 2018 at 13:26
![]()
Plabon DuttaPlabon Dutta
6,5493 gold badges29 silver badges32 bronze badges
7
If you want to gain access to the whole the error body, do it as shown below:
 async function login(reqBody) {
  try {
    let res = await Axios({
      method: 'post',
      url: 'https://myApi.com/path/to/endpoint',
      data: reqBody
    });

    let data = res.data;
    return data;
  } catch (error) {
    console.log(error.response); // this is the main part. Use the response property from the error object

    return error.response;
  }

}
answered Mar 24, 2020 at 5:22
![]()
elonaireelonaire
1,7681 gold badge9 silver badges16 bronze badges
1
You can go like this:
error.response.data
In my case, I got error property from backend. So, I used error.response.data.error
My code:
axios
  .get(`${API_BASE_URL}/students`)
  .then(response => {
     return response.data
  })
  .then(data => {
     console.log(data)
  })
  .catch(error => {
     console.log(error.response.data.error)
  })
answered Mar 26, 2020 at 14:08
![]()
0
If you wan’t to use async await try
export const post = async ( link,data ) => {
const option = {
    method: 'post',
    url: `${URL}${link}`,
    validateStatus: function (status) {
        return status >= 200 && status < 300; // default
      },
    data
};

try {
    const response = await axios(option);
} catch (error) {
    const { response } = error;
    const { request, ...errorObject } = response; // take everything but 'request'
    console.log(errorObject);
}
![]()
Ben T
4,4663 gold badges21 silver badges22 bronze badges
answered Oct 16, 2019 at 15:59
![]()
user4920718user4920718
1,0351 gold badge9 silver badges12 bronze badges
1
I tried using the try{}catch{} method but it did not work for me. However, when I switched to using .then(...).catch(...), the AxiosError is caught correctly that I can play around with. When I try the former when putting a breakpoint, it does not allow me to see the AxiosError and instead, says to me that the caught error is undefined, which is also what eventually gets displayed in the UI.
Not sure why this happens I find it very trivial. Either way due to this, I suggest using the conventional .then(...).catch(...) method mentioned above to avoid throwing undefined errors to the user.
![]()
Dharman♦
29.3k21 gold badges80 silver badges131 bronze badges
answered Feb 2, 2021 at 8:02
![]()
1
For reusability:
create a file errorHandler.js:
export const errorHandler = (error) => {
  const { request, response } = error;
  if (response) {
    const { message } = response.data;
    const status = response.status;
    return {
      message,
      status,
    };
  } else if (request) {
    //request sent but no response received
    return {
      message: "server time out",
      status: 503,
    };
  } else {
    // Something happened in setting up the request that triggered an Error
    return { message: "opps! something went wrong while setting up request" };
  }
};
Then, whenever you catch error for axios:
Just import error handler from errorHandler.js and use like this.
  try {
    //your API calls
  } catch (error) {
    const { message: errorMessage } = errorHandlerForAction(error);
     //grab message
  }
answered Jan 12, 2022 at 15:51
![]()
If I understand correctly you want then of the request function to be called only if request is successful, and you want to ignore errors. To do that you can create a new promise resolve it when axios request is successful and never reject it in case of failure.
Updated code would look something like this:
export function request(method, uri, body, headers) {
  let config = {
    method: method.toLowerCase(),
    url: uri,
    baseURL: API_URL,
    headers: { 'Authorization': 'Bearer ' + getToken() },
    validateStatus: function (status) {
      return status >= 200 && status < 400
    }
  }


  return new Promise(function(resolve, reject) {
    axios(config).then(
      function (response) {
        resolve(response.data)
      }
    ).catch(
      function (error) {
        console.log('Show error notification!')
      }
    )
  });

}
answered Feb 10, 2021 at 22:19
![]()
Damir MiladinovDamir Miladinov
1,0741 gold badge10 silver badges15 bronze badges
1
https://stackabuse.com/handling-errors-with-axios/
    let res = await axios.get('/my-api-route');

    // Work with the response...
} catch (err) {
    if (err.response) {
        // The client was given an error response (5xx, 4xx)
    } else if (err.request) {
        // The client never received a response, and the request was never left
    } else {
        // Anything else
    }
}
try {
    let res = await axios.get('/my-api-route');

    // Work with the response...
} catch (err) {
    if (err.response) {
        // The client was given an error response (5xx, 4xx)
    } else if (err.request) {
        // The client never received a response, and the request was never left
        console.log(err.request);
    } else {
        // Anything else
    }
}
answered Jun 6, 2022 at 7:50
![]()
call the request function from anywhere without having to use catch().
First, while handling most errors in one place is a good Idea, it’s not that easy with requests. Some errors (e.g. 400 validation errors like: «username taken» or «invalid email») should be passed on.
So we now use a Promise based function:
const baseRequest = async (method: string, url: string, data: ?{}) =>
  new Promise<{ data: any }>((resolve, reject) => {
    const requestConfig: any = {
      method,
      data,
      timeout: 10000,
      url,
      headers: {},
    };

    try {
      const response = await axios(requestConfig);
      // Request Succeeded!
      resolve(response);
    } catch (error) {
      // Request Failed!

      if (error.response) {
        // Request made and server responded
        reject(response);
      } else if (error.request) {
        // The request was made but no response was received
        reject(response);
      } else {
        // Something happened in setting up the request that triggered an Error
        reject(response);
      }
    }
  };
you can then use the request like
try {
  response = await baseRequest('GET', 'https://myApi.com/path/to/endpoint')
} catch (error) {
  // either handle errors or don't
}
answered Feb 24, 2020 at 12:35
![]()
David SchumannDavid Schumann
12.7k8 gold badges70 silver badges89 bronze badges
2
One way of handling axios error for response type set to stream that worked for me.
.....
.....
try{
   .....
   .....
   // make request with responseType: 'stream'
   const url = "your url";
   const response = axios.get(url, { responseType: "stream" });
   // If everything OK, pipe to a file or whatever you intended to do
   // with the response stream
   .....
   .....
} catch(err){
  // Verify it's axios error
  if(axios.isAxios(err)){
    let errorString = "";
    const streamError = await new Promise((resolve, reject) => {
      err.response.data
        .on("data", (chunk) => {
           errorString += chunk;
          }
        .on("end", () => {
           resolve(errorString);
         }
      });
    // your stream error is stored at variable streamError.
    // If your string is JSON string, then parse it like this
    const jsonStreamError = JSON.parse(streamError as string);
    console.log({ jsonStreamError })
    // or do what you usually do with your error message
    .....
    .....
  }
  .....
  .....
}
answered Oct 10, 2021 at 8:58
![]()
BikashBikash
1601 silver badge6 bronze badges
If I understand you correctly, you want some kind of global handler, so you don’t have to attach a catch handler to every request you make. There is a window event for that called unhandledrejection.
You can read more about this Event in the official documentation: https://developer.mozilla.org/en-US/docs/Web/API/Window/unhandledrejection_event
Here is how you can attach a listener for this Event:
window.addEventListener('unhandledrejection', (event) => {
  // Handle errors here...
});
answered Dec 1, 2022 at 9:15
![]()
DavidDavid
516 bronze badges
![]()
If you have been searching the web for some information about AXIOS error messages, and would like to understand how to use them, then you have come to the right place.
TLTR; Find the code snippets in the following section
If you search the web on this topic, all you can find is:
- catching error body using axios post
- Unable to catch the body of error
- JS Axios – how to get response body in event of error?
- How to see axios error response JSON in React
The list could have gone on and on, but they all ask for the sample simple question:
How can someone get the actual error information coming from a bad request made with AXIOS.
In this post we are going to provide information on “why” so many people ask for information, and “how” this information can be found.
Why so many people ask for this
If you have ever worked with an api, you perfectly know that request not always go to plan. You hope to always get a lovely response with a status of 200, but this does not always happens.
In many instances the status of our request may return some kind of error (400, 500), and when this happens we would like to be able to have a readable error message.
axios.get('EndpointWithAuthorizedError')
    .then((response) => {})
    .catch((error) => {
        console.log(error);
    })
Enter fullscreen mode
Exit fullscreen mode
Unfortunately if the above would ever fail with a meaningful error, we would still see this within our console, as the variable passed by the catch statement seem to be of type “string”.
Error: Request failed with status code 401
Enter fullscreen mode
Exit fullscreen mode
This is actually the main reason why so many people are “forced” to ask for help.
How can we process AXIOS error message
There is actually no magic when processing the error messages. In fact, the catch is in the fact that the variable received by the catch statement seem to be a string, but in reality it is not.
The AXIOS error message can actually return 3 different structure, depending from what kind of failure it has (crazy right… I thought that too).
Error in setting up the request
This error can happen if we have made an actual mistake in setting up the AXIOS request. It could be something with the data passed, or a configuration setting.
When this happen we can actually find the information we need by accessing the message parameter of the catch.
axios.get('wrongSetup')
    .then((response) => {})
    .catch((error) => {
        console.log(error.message);
    })

//or using destructuring
axios.get('wrongSetup')
    .then((response) => {})
    .catch(({message) => {
        console.log(message);
    })
Enter fullscreen mode
Exit fullscreen mode
No response – Network Error
This scenario will take place when our request had no response at all. This can happen when the URL is incorrect, or if the receiving server is down.
When this happen we can access more information about our request bu accessing the request parameter. This will return the actual “request” information.
axios.get('network error')
     .then((response) => {})
     .catch((error) => {
         console.log(error. request );
     })
//or using destructuring
 axios.get('network error')
     .then((response) => {})
     .catch(({ request ) => {
         console.log( request );
     })
Enter fullscreen mode
Exit fullscreen mode
Request returned with an error status
This is one of the most common, or more specifically the one type of “error” that need to be manage to make sure our web applications function properly.
There are hundreds of status code differently than 200 (https://developer.mozilla.org/en-US/docs/Web/HTTP/Status), that would fit in this category. I am going to list below the most important:
- 400: Bad request
- 401: Unauthorized
- 403: Forbidden
- 404: Not Found
- 500: Internal Server error
- 502: Bad Gateway
When any of the above happen, we would like to know more about the request. In this case there are more information provided to us: data, status, header.
axios.get('errorStatus')
     .then((response) => {})
     .catch((error) => {
         console.log(error.response.data);
         console.log(error.response.status);
         console.log(error.response.headers);
     })

//or using destructuring
 axios.get('errorStatus')
     .then((response) => {})
     .catch(({ response }) => {
         console.log(response.data);
         console.log(response.status);
         console.log(response.headers);
     })
Enter fullscreen mode
Exit fullscreen mode
With the above code, we will be able to get all the information we need about the response to our request. These includes the status code, the header and last but not least the data that the server has sent with the request.
When using any kind of API, the data parameter is going to include essential information, usually used for development purposes, but at times also good to show to the end users.
I hope to have saved you some time, and please feel free to comment, or provide suggestion to improve this post and help future readers
Note: If you want to see how to handle these in React, take a look at my new post on that here — handling async errors with axios in react.
Whenever you’re making a backend API call with axios, you have to consider what to do with the .catch() block of your promise. Now, you might think that your API is highly available and it’ll be running 24/7. You might think that the user workflow is pretty clear, your javascript is sane, and you have unit tests. So when you stare at the catch block when making requests using axios you might think — «Well… I’ll just console.log it. That’ll be fine.»
axios.get('/my-highly-available-api').then(response => {
    // do stuff
})
.catch(err => {
    // what now?
    console.log(err);
})
But there are so many many many more things that are outside of your control that could throw errors when making API requests. And you probably don’t even know that they’re happening!
This post deals mainly with errors you see in the browser. Things can get pretty funny looking on the back end too — just take a look at 3 things you might see in your backend logs
Below are 3 types of errors that could appear, and how to handle it, when using axios.
Catching axios errors
Below is a snippet I’ve started including in a few JS projects.
axios.post(url, data).then(res => {
        // do good things
})
.catch(err => {
    if (err.response) {
      // client received an error response (5xx, 4xx)
    } else if (err.request) {
      // client never received a response, or request never left
    } else {
      // anything else
    }
})
Each condition is meant to capture a different type of error.
Checking error.response
If your error object contains a response field, that means your server responded with a 4xx/5xx error. Usually this is the error we’re most familiar with, and is most straightforward to handle.
Do things like a show a 404 Not Found page/error message if your API returns a 404. Show a different error message if your backend is returning a 5xx or not returning anything at all. You might think your well-architected backend won’t throw errors — but its a matter of when, not if.
Checking error.request
The second class of errors is where you don’t have a response but there’s a request field attached to the error. When does this happen? This happens when the browser was able to make a request, but for some reason, it didn’t see a response.
This can happen if:
- you’re in a spotty network (think underground subway, or a building wireless network)
- if your backend is hanging on each request and not returning a response on time
- if you are making cross-domain requests and you’re not authorized to make the request
- if you’re making cross-domain requests and you are authorized, but the backend API returns an error
One of the more common versions of this error had a message «Network Error» which is a useless error message. We have a front-end and a backend api hosted on different domains, so every backend API call is a cross-domain request.
Due to security constraints on JS in the browser, if you make an API request, and it fails due to crappy networks, the only error you’ll see is «Network Error» which is incredibly unhelpful. It can mean anything from «your device doesn’t have internet connectivity» to «your OPTIONS returned a 5xx» (if you make CORS requests). The reason for «Network Error» is described well here on this StackOverflow answer
All the other types of errors
If your error object doesn’t have the response or request field on it, that means its not an axios error and theres likely something else wrong in your app. The error message + stack trace should help you figure out where its coming from.
How do you fix it?
Degrading the user experience
This all depends on your app. For the projects I work on, for each of the features that use those endpoints, we degrade the user experience.
For example, if the request fails, and the page is useless without that data, then we have a bigger error page that will appear and offer users a way out — which sometimes is only a «Refresh the page» button.
Another example, if a request fails for a profile picture in a social media stream, we can show a placeholder image and disable profile picture changes, along with a toaster message explaining why the «update profile picture» button is disabled. However, showing an alert saying «422 Unprocessable Entity» is useless to see as a user.
Spotty networks
The web client I work on is used in school networks which can be absolutely terrible. The availability of your backend barely has anything to do with it, the request sometimes fail to leave the school network.
To solve these types of intermittent network problems, we added in axios-retry. This solved a good amount of the errors we were seeing in production. We added this to our axios setup:
const _axios = require('axios')
const axiosRetry = require('axios-retry')

const axios = _axios.create()

// https://github.com/softonic/axios-retry/issues/87
const retryDelay = (retryNumber = 0) => {
    const seconds = Math.pow(2, retryNumber) * 1000;
    const randomMs = 1000 * Math.random();
    return seconds + randomMs;
};

axiosRetry(axios, {
    retries: 2,
    retryDelay,
    // retry on Network Error & 5xx responses
    retryCondition: axiosRetry.isRetryableError,
});

module.exports = axios;
We were able to see that 10% of our users (which are in crappy school networks) were seeing sporadic «Network Errors» and that dropped down to <2% after adding in automatic retries on failure.

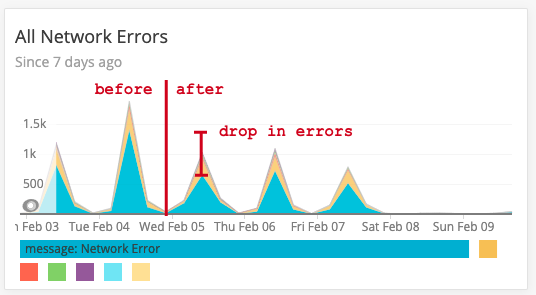
^ This is a screenshot of our errors is the count of «Network Errors» as they appear in NewRelic and are showing <1% of requests are erroring out.
Which leads to my last point:
Add error reporting to your front-end
Its helpful to have front-end error/event reporting so that you know whats happening in prod before your users tell you. At my day job, we use NewRelic Browser (paid service — no affiliation, just a fan) to send error events from the front-end. So whenever we catch an exception, we log the error message, along with the stack trace (although thats sometimes useless with minified bundles), and some metadata about the current session so we can try to recreate it.
Other tools that fill this space are Sentry + browser SDK, Rollbar, and a whole bunch of other useful ones listed here
Wrapping up
If you get nothing else out of this, do one thing.
Go to your code base now, and review how you’re handling errors with axios.
- Check if you’re doing automatic retries, and consider adding
axios-retryif you aren’t - Check that you’re catching errors, and letting the user know that something has happened.
axios.get(...).catch(console.log)isn’t good enough.
So. How do you handle your errors? Let me know in the comments.

Когда вы делаете вызов к бэкенд API с axios, вы должны рассмотреть, что делать с блоком .catch() вашего промиса. Теперь вам может показаться, что ваш API высокодоступен и он будет работать 24/7, что рабочий процесс пользователя довольно ясен, ваш JavaScript вменяем и у вас есть модульные тесты. Поэтому, когда вы смотрите на блок catch при выполнении запросов с помощью axios, вы можете подумать: “Ну… Я просто использую console.log. Все будет в порядке.”

axios.get('/my-highly-available-api')
  .then(response => {
    // do stuff
  })
  .catch(err => {
    // what now?
    console.log(err);
  })
Но есть еще так много вещей, которые находятся вне вашего контроля, которые могут вызвать ошибки при выполнении запросов API — и вы, вероятно, даже не знаете, что они происходят!
Эта статья посвящена в основном ошибкам, которые вы видите в браузере. На бэкенде тоже все может выглядеть довольно забавно. Просто взгляните на три вещи, которые вы можете увидеть в своих бэкенд журналах.
Ниже приведены три типа ошибок, которые могут появиться, и как их обрабатывать при использовании axios.
Отлов ошибок Axios
Ниже приведен фрагмент кода, который я начал включать в несколько проектов JS:
axios.post(url, data)
  .then(res => {
    // do good things
  })
  .catch(err => {
    if (err.response) {
      // client received an error response (5xx, 4xx)
    } else if (err.request) {
      // client never received a response, or request never left
    } else {
      // anything else
    }
  })
Каждое условие предназначено для фиксации различного типа ошибки.
Проверка error.response
Если ваш объект error содержит поле response, это означает, что сервер ответил с ошибкой 4xx/5xx. Обычно это та ошибка, с которой мы лучше всего знакомы и с которой легче всего справиться.
Применяйте следующее: “Показать страницу 404 Not Found / сообщение об ошибке, если ваш API возвращает 404.” Покажите другое сообщение об ошибке, если ваш бэкенд возвращает 5xx или вообще ничего не возвращает. Вы может показаться, что ваш хорошо сконструированный бэкенд не будет генерировать ошибки, но это всего лишь вопрос времени, а не “если”.
Проверка error.request
Второй класс ошибок — это когда у вас нет ответа, но есть поле request, прикрепленное к ошибке. Когда же это происходит? Это происходит, когда браузер смог сделать запрос, но по какой-то причине не получил ответа. Это может произойти, если:
• Вы находитесь в обрывочной сети (например, в метро или используете беспроводную сеть здания).
• Ваш бэкенд зависает на каждом запросе и не возвращает ответ вовремя.
• Вы делаете междоменные запросы, но вы не авторизованы, чтобы их делать.
• Вы делаете междоменные запросы, и вы авторизованы, но бэкенд API возвращает ошибку.
Одна из наиболее распространенных версий этой ошибки имела бесполезное сообщение “Ошибка сети”. У нас есть API для фронтенда и бэкенда, размещенные в разных доменах, поэтому каждый вызов к бэкенд API — это междоменный запрос.
Из-за ограничений безопасности на JS в браузере, если вы делаете запрос API, и он не работает из-за плохих сетей, единственная ошибка, которую вы увидите — это “Ошибка сети”, которая невероятно бесполезна. Она может означать что угодно: от “Ваше устройство не имеет подключения к Интернету” до “Ваши OPTIONS вернули 5xx” (если вы делаете запросы CORS). Причина ошибки сети хорошо описана в этом ответе на StackOverflow.
Все остальные типы ошибок
Если ваш объект error не содержит поля response или request, это означает, что это не ошибка axios и, скорее всего, в вашем приложении что-то еще не так. Сообщение об ошибке + трассировка стека должны помочь вам понять, откуда оно исходит.
Как вам их исправить?
Ухудшение пользовательского опыта
Все это зависит от вашего приложения. Для проектов, над которыми я работаю, для каждой функции, использующей эти конечные точки, мы ухудшаем пользовательский опыт.
Например, если запрос не выполняется и страница бесполезна без этих данных, то у нас будет большая страница ошибок, которая появится и предложит пользователям выход — иногда это всего лишь кнопка “Обновить страницу”.
Другой пример: если запрос на изображение профиля в потоке социальных сетей не выполняется, мы можем показать изображение-плейсхолдер и отключить изменения изображения профиля вместе с всплывающим уведомлением, объясняющим, почему кнопка “Обновить изображение профиля” отключена. Однако показывать предупреждение с надписью “422 необработанных объекта” бесполезно для пользователя.
Обрывистые сети
Веб-клиент, над которым я работаю, используется в школьных сетях, которые бывают совершенно ужасны. Доступность бэкенда едва ли имеет к этому какое-то отношение. Запрос иногда не выходит из школьной сети.
Для решения такого рода периодических проблем с сетью, мы добавили axios-retry, что решило большое количество ошибок, которые мы наблюдали в продакшне. Это было добавлено в нашу настройку axios:
const _axios = require('axios')
const axiosRetry = require('axios-retry')
const axios = _axios.create()
// https://github.com/softonic/axios-retry/issues/87 const retryDelay = (retryNumber = 0) => {
  const seconds = Math.pow(2, retryNumber) * 1000;
  const randomMs = 1000 * Math.random();
  return seconds + randomMs;
};
axiosRetry(axios, {
  retries: 2,
  retryDelay,
  // retry on Network Error & 5xx responses
  retryCondition: axiosRetry.isRetryableError,
});
module.exports = axios;
Мы увидели, что 10% наших пользователей (которые находятся в плохих школьных сетях) периодически наблюдали ошибки сети, но число снизилось до <2% после добавления автоматических повторных попыток при сбое.
Скриншот количества ошибок сети, как они появляются в браузере New Relic. <1% запросов неверны. Это подводит меня к последнему пункту.
Добавляйте отчеты об ошибках в свой интерфейс
Полезно иметь отчеты об ошибках и событиях фронтенда, чтобы вы знали, что происходит в разработке, прежде чем ваши пользователи сообщат вам о них. На моей основной работе мы используем браузер New Relic для отправки событий ошибок с фронтенда. Поэтому всякий раз, когда мы ловим исключение, мы регистрируем сообщение об ошибке вместе с трассировкой стека (хотя это иногда бесполезно с минимизированными пакетами) и некоторыми метаданными о текущем сеансе, чтобы попытаться воссоздать его.
Другие инструменты, используемые нами— Sentry + SDK браузер, Rollbar и целая куча других полезных инструментов, перечисленных на GitHub.
Заключение
Если вы больше ничего не можете выжать из этого, сделайте одно: перейдите в свою кодовую базу и просмотрите, как вы обрабатываете ошибки с помощью axios.
- Проверьте, выполняете ли вы автоматические повторы, и, если нет, добавьте
axios-retry. - Проверьте, что вы отлавливаете ошибки и сообщаете пользователю, что что-то произошло. Использовать только
axios.get(...).catch(console.log)недостаточно.
Читайте также:
- React TypeScript: Основы и лучшие практики
- Первые шаги в анимации React Native
- Как предотвратить состояние гонки с помощью React Context API
Перевод статьи Danny Perez: How to Handle API Errors in Your Web App Using Axios
Promise based HTTP client for the browser and node.js
Website •
Documentation

Table of Contents
- Features
- Browser Support
- Installing
- Package manager
- CDN
- Example
- Axios API
- Request method aliases
- Concurrency 👎
- Creating an instance
- Instance methods
- Request Config
- Response Schema
- Config Defaults
- Global axios defaults
- Custom instance defaults
- Config order of precedence
- Interceptors
- Multiple Interceptors
- Handling Errors
- Cancellation
- AbortController
- CancelToken 👎
- Using application/x-www-form-urlencoded format
- URLSearchParams
- Query string
- 🆕 Automatic serialization
- Using multipart/form-data format
- FormData
- 🆕 Automatic serialization
- Files Posting
- HTML Form Posting
- 🆕 Progress capturing
- 🆕 Rate limiting
- Semver
- Promises
- TypeScript
- Resources
- Credits
- License
Features
- Make XMLHttpRequests from the browser
- Make http requests from node.js
- Supports the Promise API
- Intercept request and response
- Transform request and response data
- Cancel requests
- Automatic transforms for JSON data
- 🆕 Automatic data object serialization to
multipart/form-dataandx-www-form-urlencodedbody encodings - Client side support for protecting against XSRF
Browser Support
 |
 |
 |
 |
 |
 |
|---|---|---|---|---|---|
| Latest ✔ | Latest ✔ | Latest ✔ | Latest ✔ | Latest ✔ | 11 ✔ |
Installing
Package manager
Using npm:
Using bower:
Using yarn:
Using pnpm:
Once the package is installed, you can import the library using import or require approach:
import axios, {isCancel, AxiosError} from 'axios';
You can also use the default export, since the named export is just a re-export from the Axios factory:
import axios from 'axios';

console.log(axios.isCancel('something'));
If you use require for importing, only default export is available:
const axios = require('axios');

console.log(axios.isCancel('something'));
For cases where something went wrong when trying to import a module into a custom or legacy environment,
you can try importing the module package directly:
const axios = require('axios/dist/browser/axios.cjs'); // browser commonJS bundle (ES2017)
// const axios = require('axios/dist/node/axios.cjs'); // node commonJS bundle (ES2017)
CDN
Using jsDelivr CDN (ES5 UMD browser module):
<script src="https://cdn.jsdelivr.net/npm/axios@1.1.2/dist/axios.min.js"></script>
Using unpkg CDN:
<script src="https://unpkg.com/axios@1.1.2/dist/axios.min.js"></script>
Example
Note CommonJS usage
In order to gain the TypeScript typings (for intellisense / autocomplete) while using CommonJS imports withrequire(), use the following approach:
import axios from 'axios';
//const axios = require('axios'); // legacy way

// Make a request for a user with a given ID
axios.get('/user?ID=12345')
  .then(function (response) {
    // handle success
    console.log(response);
  })
  .catch(function (error) {
    // handle error
    console.log(error);
  })
  .finally(function () {
    // always executed
  });

// Optionally the request above could also be done as
axios.get('/user', {
    params: {
      ID: 12345
    }
  })
  .then(function (response) {
    console.log(response);
  })
  .catch(function (error) {
    console.log(error);
  })
  .finally(function () {
    // always executed
  });

// Want to use async/await? Add the `async` keyword to your outer function/method.
async function getUser() {
  try {
    const response = await axios.get('/user?ID=12345');
    console.log(response);
  } catch (error) {
    console.error(error);
  }
}
Note
async/awaitis part of ECMAScript 2017 and is not supported in Internet
Explorer and older browsers, so use with caution.
Performing a POST request
axios.post('/user', {
    firstName: 'Fred',
    lastName: 'Flintstone'
  })
  .then(function (response) {
    console.log(response);
  })
  .catch(function (error) {
    console.log(error);
  });
Performing multiple concurrent requests
function getUserAccount() {
  return axios.get('/user/12345');
}

function getUserPermissions() {
  return axios.get('/user/12345/permissions');
}

Promise.all([getUserAccount(), getUserPermissions()])
  .then(function (results) {
    const acct = results[0];
    const perm = results[1];
  });
axios API
Requests can be made by passing the relevant config to axios.
axios(config)
// Send a POST request
axios({
  method: 'post',
  url: '/user/12345',
  data: {
    firstName: 'Fred',
    lastName: 'Flintstone'
  }
});
// GET request for remote image in node.js
axios({
  method: 'get',
  url: 'https://bit.ly/2mTM3nY',
  responseType: 'stream'
})
  .then(function (response) {
    response.data.pipe(fs.createWriteStream('ada_lovelace.jpg'))
  });
axios(url[, config])
// Send a GET request (default method)
axios('/user/12345');
Request method aliases
For convenience, aliases have been provided for all common request methods.
axios.request(config)
axios.get(url[, config])
axios.delete(url[, config])
axios.head(url[, config])
axios.options(url[, config])
axios.post(url[, data[, config]])
axios.put(url[, data[, config]])
axios.patch(url[, data[, config]])
NOTE
When using the alias methods url, method, and data properties don’t need to be specified in config.
Concurrency (Deprecated)
Please use Promise.all to replace the below functions.
Helper functions for dealing with concurrent requests.
axios.all(iterable)
axios.spread(callback)
Creating an instance
You can create a new instance of axios with a custom config.
axios.create([config])
const instance = axios.create({
  baseURL: 'https://some-domain.com/api/',
  timeout: 1000,
  headers: {'X-Custom-Header': 'foobar'}
});
Instance methods
The available instance methods are listed below. The specified config will be merged with the instance config.
axios#request(config)
axios#get(url[, config])
axios#delete(url[, config])
axios#head(url[, config])
axios#options(url[, config])
axios#post(url[, data[, config]])
axios#put(url[, data[, config]])
axios#patch(url[, data[, config]])
axios#getUri([config])
Request Config
These are the available config options for making requests. Only the url is required. Requests will default to GET if method is not specified.
{
  // `url` is the server URL that will be used for the request
  url: '/user',

  // `method` is the request method to be used when making the request
  method: 'get', // default

  // `baseURL` will be prepended to `url` unless `url` is absolute.
  // It can be convenient to set `baseURL` for an instance of axios to pass relative URLs
  // to methods of that instance.
  baseURL: 'https://some-domain.com/api/',

  // `transformRequest` allows changes to the request data before it is sent to the server
  // This is only applicable for request methods 'PUT', 'POST', 'PATCH' and 'DELETE'
  // The last function in the array must return a string or an instance of Buffer, ArrayBuffer,
  // FormData or Stream
  // You may modify the headers object.
  transformRequest: [function (data, headers) {
    // Do whatever you want to transform the data

    return data;
  }],

  // `transformResponse` allows changes to the response data to be made before
  // it is passed to then/catch
  transformResponse: [function (data) {
    // Do whatever you want to transform the data

    return data;
  }],

  // `headers` are custom headers to be sent
  headers: {'X-Requested-With': 'XMLHttpRequest'},

  // `params` are the URL parameters to be sent with the request
  // Must be a plain object or a URLSearchParams object
  params: {
    ID: 12345
  },

  // `paramsSerializer` is an optional config in charge of serializing `params`
  paramsSerializer: {
    encode?: (param: string): string => { /* Do custom ops here and return transformed string */ }, // custom encoder function; sends Key/Values in an iterative fashion
    serialize?: (params: Record<string, any>, options?: ParamsSerializerOptions ), // mimic pre 1.x behavior and send entire params object to a custom serializer func. Allows consumer to control how params are serialized.
    indexes: false // array indexes format (null - no brackets, false (default) - empty brackets, true - brackets with indexes)
  },

  // `data` is the data to be sent as the request body
  // Only applicable for request methods 'PUT', 'POST', 'DELETE , and 'PATCH'
  // When no `transformRequest` is set, must be of one of the following types:
  // - string, plain object, ArrayBuffer, ArrayBufferView, URLSearchParams
  // - Browser only: FormData, File, Blob
  // - Node only: Stream, Buffer, FormData (form-data package)
  data: {
    firstName: 'Fred'
  },

  // syntax alternative to send data into the body
  // method post
  // only the value is sent, not the key
  data: 'Country=Brasil&City=Belo Horizonte',

  // `timeout` specifies the number of milliseconds before the request times out.
  // If the request takes longer than `timeout`, the request will be aborted.
  timeout: 1000, // default is `0` (no timeout)

  // `withCredentials` indicates whether or not cross-site Access-Control requests
  // should be made using credentials
  withCredentials: false, // default

  // `adapter` allows custom handling of requests which makes testing easier.
  // Return a promise and supply a valid response (see lib/adapters/README.md).
  adapter: function (config) {
    /* ... */
  },

  // `auth` indicates that HTTP Basic auth should be used, and supplies credentials.
  // This will set an `Authorization` header, overwriting any existing
  // `Authorization` custom headers you have set using `headers`.
  // Please note that only HTTP Basic auth is configurable through this parameter.
  // For Bearer tokens and such, use `Authorization` custom headers instead.
  auth: {
    username: 'janedoe',
    password: 's00pers3cret'
  },

  // `responseType` indicates the type of data that the server will respond with
  // options are: 'arraybuffer', 'document', 'json', 'text', 'stream'
  //   browser only: 'blob'
  responseType: 'json', // default

  // `responseEncoding` indicates encoding to use for decoding responses (Node.js only)
  // Note: Ignored for `responseType` of 'stream' or client-side requests
  responseEncoding: 'utf8', // default

  // `xsrfCookieName` is the name of the cookie to use as a value for xsrf token
  xsrfCookieName: 'XSRF-TOKEN', // default

  // `xsrfHeaderName` is the name of the http header that carries the xsrf token value
  xsrfHeaderName: 'X-XSRF-TOKEN', // default

  // `onUploadProgress` allows handling of progress events for uploads
  // browser & node.js
  onUploadProgress: function ({loaded, total, progress, bytes, estimated, rate, upload = true}) {
    // Do whatever you want with the Axios progress event
  },

  // `onDownloadProgress` allows handling of progress events for downloads
  // browser & node.js
  onDownloadProgress: function ({loaded, total, progress, bytes, estimated, rate, download = true}) {
    // Do whatever you want with the Axios progress event
  },

  // `maxContentLength` defines the max size of the http response content in bytes allowed in node.js
  maxContentLength: 2000,

  // `maxBodyLength` (Node only option) defines the max size of the http request content in bytes allowed
  maxBodyLength: 2000,

  // `validateStatus` defines whether to resolve or reject the promise for a given
  // HTTP response status code. If `validateStatus` returns `true` (or is set to `null`
  // or `undefined`), the promise will be resolved; otherwise, the promise will be
  // rejected.
  validateStatus: function (status) {
    return status >= 200 && status < 300; // default
  },

  // `maxRedirects` defines the maximum number of redirects to follow in node.js.
  // If set to 0, no redirects will be followed.
  maxRedirects: 21, // default

  // `beforeRedirect` defines a function that will be called before redirect.
  // Use this to adjust the request options upon redirecting,
  // to inspect the latest response headers,
  // or to cancel the request by throwing an error
  // If maxRedirects is set to 0, `beforeRedirect` is not used.
  beforeRedirect: (options, { headers }) => {
    if (options.hostname === "example.com") {
      options.auth = "user:password";
    }
  },

  // `socketPath` defines a UNIX Socket to be used in node.js.
  // e.g. '/var/run/docker.sock' to send requests to the docker daemon.
  // Only either `socketPath` or `proxy` can be specified.
  // If both are specified, `socketPath` is used.
  socketPath: null, // default

  // `httpAgent` and `httpsAgent` define a custom agent to be used when performing http
  // and https requests, respectively, in node.js. This allows options to be added like
  // `keepAlive` that are not enabled by default.
  httpAgent: new http.Agent({ keepAlive: true }),
  httpsAgent: new https.Agent({ keepAlive: true }),

  // `proxy` defines the hostname, port, and protocol of the proxy server.
  // You can also define your proxy using the conventional `http_proxy` and
  // `https_proxy` environment variables. If you are using environment variables
  // for your proxy configuration, you can also define a `no_proxy` environment
  // variable as a comma-separated list of domains that should not be proxied.
  // Use `false` to disable proxies, ignoring environment variables.
  // `auth` indicates that HTTP Basic auth should be used to connect to the proxy, and
  // supplies credentials.
  // This will set an `Proxy-Authorization` header, overwriting any existing
  // `Proxy-Authorization` custom headers you have set using `headers`.
  // If the proxy server uses HTTPS, then you must set the protocol to `https`.
  proxy: {
    protocol: 'https',
    host: '127.0.0.1',
    // hostname: '127.0.0.1' // Takes precedence over 'host' if both are defined
    port: 9000,
    auth: {
      username: 'mikeymike',
      password: 'rapunz3l'
    }
  },

  // `cancelToken` specifies a cancel token that can be used to cancel the request
  // (see Cancellation section below for details)
  cancelToken: new CancelToken(function (cancel) {
  }),

  // an alternative way to cancel Axios requests using AbortController
  signal: new AbortController().signal,

  // `decompress` indicates whether or not the response body should be decompressed
  // automatically. If set to `true` will also remove the 'content-encoding' header
  // from the responses objects of all decompressed responses
  // - Node only (XHR cannot turn off decompression)
  decompress: true // default

  // `insecureHTTPParser` boolean.
  // Indicates where to use an insecure HTTP parser that accepts invalid HTTP headers.
  // This may allow interoperability with non-conformant HTTP implementations.
  // Using the insecure parser should be avoided.
  // see options https://nodejs.org/dist/latest-v12.x/docs/api/http.html#http_http_request_url_options_callback
  // see also https://nodejs.org/en/blog/vulnerability/february-2020-security-releases/#strict-http-header-parsing-none
  insecureHTTPParser: undefined // default

  // transitional options for backward compatibility that may be removed in the newer versions
  transitional: {
    // silent JSON parsing mode
    // `true`  - ignore JSON parsing errors and set response.data to null if parsing failed (old behaviour)
    // `false` - throw SyntaxError if JSON parsing failed (Note: responseType must be set to 'json')
    silentJSONParsing: true, // default value for the current Axios version

    // try to parse the response string as JSON even if `responseType` is not 'json'
    forcedJSONParsing: true,

    // throw ETIMEDOUT error instead of generic ECONNABORTED on request timeouts
    clarifyTimeoutError: false,
  },

  env: {
    // The FormData class to be used to automatically serialize the payload into a FormData object
    FormData: window?.FormData || global?.FormData
  },

  formSerializer: {
      visitor: (value, key, path, helpers) => {}; // custom visitor function to serialize form values
      dots: boolean; // use dots instead of brackets format
      metaTokens: boolean; // keep special endings like {} in parameter key
      indexes: boolean; // array indexes format null - no brackets, false - empty brackets, true - brackets with indexes
  },

  // http adapter only (node.js)
  maxRate: [
    100 * 1024, // 100KB/s upload limit,
    100 * 1024  // 100KB/s download limit
  ]
}
Response Schema
The response for a request contains the following information.
{
  // `data` is the response that was provided by the server
  data: {},

  // `status` is the HTTP status code from the server response
  status: 200,

  // `statusText` is the HTTP status message from the server response
  statusText: 'OK',

  // `headers` the HTTP headers that the server responded with
  // All header names are lowercase and can be accessed using the bracket notation.
  // Example: `response.headers['content-type']`
  headers: {},

  // `config` is the config that was provided to `axios` for the request
  config: {},

  // `request` is the request that generated this response
  // It is the last ClientRequest instance in node.js (in redirects)
  // and an XMLHttpRequest instance in the browser
  request: {}
}
When using then, you will receive the response as follows:
axios.get('/user/12345')
  .then(function (response) {
    console.log(response.data);
    console.log(response.status);
    console.log(response.statusText);
    console.log(response.headers);
    console.log(response.config);
  });
When using catch, or passing a rejection callback as second parameter of then, the response will be available through the error object as explained in the Handling Errors section.
Config Defaults
You can specify config defaults that will be applied to every request.
Global axios defaults
axios.defaults.baseURL = 'https://api.example.com';

// Important: If axios is used with multiple domains, the AUTH_TOKEN will be sent to all of them.
// See below for an example using Custom instance defaults instead.
axios.defaults.headers.common['Authorization'] = AUTH_TOKEN;

axios.defaults.headers.post['Content-Type'] = 'application/x-www-form-urlencoded';
Custom instance defaults
// Set config defaults when creating the instance
const instance = axios.create({
  baseURL: 'https://api.example.com'
});

// Alter defaults after instance has been created
instance.defaults.headers.common['Authorization'] = AUTH_TOKEN;
Config order of precedence
Config will be merged with an order of precedence. The order is library defaults found in lib/defaults.js, then defaults property of the instance, and finally config argument for the request. The latter will take precedence over the former. Here’s an example.
// Create an instance using the config defaults provided by the library
// At this point the timeout config value is `0` as is the default for the library
const instance = axios.create();

// Override timeout default for the library
// Now all requests using this instance will wait 2.5 seconds before timing out
instance.defaults.timeout = 2500;

// Override timeout for this request as it's known to take a long time
instance.get('/longRequest', {
  timeout: 5000
});
Interceptors
You can intercept requests or responses before they are handled by then or catch.
// Add a request interceptor
axios.interceptors.request.use(function (config) {
    // Do something before request is sent
    return config;
  }, function (error) {
    // Do something with request error
    return Promise.reject(error);
  });

// Add a response interceptor
axios.interceptors.response.use(function (response) {
    // Any status code that lie within the range of 2xx cause this function to trigger
    // Do something with response data
    return response;
  }, function (error) {
    // Any status codes that falls outside the range of 2xx cause this function to trigger
    // Do something with response error
    return Promise.reject(error);
  });
If you need to remove an interceptor later you can.
const myInterceptor = axios.interceptors.request.use(function () {/*...*/});
axios.interceptors.request.eject(myInterceptor);
You can also clear all interceptors for requests or responses.
const instance = axios.create();
instance.interceptors.request.use(function () {/*...*/});
instance.interceptors.request.clear(); // Removes interceptors from requests
instance.interceptors.response.use(function () {/*...*/});
instance.interceptors.response.clear(); // Removes interceptors from responses
You can add interceptors to a custom instance of axios.
const instance = axios.create();
instance.interceptors.request.use(function () {/*...*/});
When you add request interceptors, they are presumed to be asynchronous by default. This can cause a delay
in the execution of your axios request when the main thread is blocked (a promise is created under the hood for
the interceptor and your request gets put on the bottom of the call stack). If your request interceptors are synchronous you can add a flag
to the options object that will tell axios to run the code synchronously and avoid any delays in request execution.
axios.interceptors.request.use(function (config) {
  config.headers.test = 'I am only a header!';
  return config;
}, null, { synchronous: true });
If you want to execute a particular interceptor based on a runtime check,
you can add a runWhen function to the options object. The interceptor will not be executed if and only if the return
of runWhen is false. The function will be called with the config
object (don’t forget that you can bind your own arguments to it as well.) This can be handy when you have an
asynchronous request interceptor that only needs to run at certain times.
function onGetCall(config) {
  return config.method === 'get';
}
axios.interceptors.request.use(function (config) {
  config.headers.test = 'special get headers';
  return config;
}, null, { runWhen: onGetCall });
Multiple Interceptors
Given you add multiple response interceptors
and when the response was fulfilled
- then each interceptor is executed
- then they are executed in the order they were added
- then only the last interceptor’s result is returned
- then every interceptor receives the result of its predecessor
- and when the fulfillment-interceptor throws
- then the following fulfillment-interceptor is not called
- then the following rejection-interceptor is called
- once caught, another following fulfill-interceptor is called again (just like in a promise chain).
Read the interceptor tests for seeing all this in code.
Handling Errors
the default behavior is to reject every response that returns with a status code that falls out of the range of 2xx and treat it as an error.
axios.get('/user/12345')
  .catch(function (error) {
    if (error.response) {
      // The request was made and the server responded with a status code
      // that falls out of the range of 2xx
      console.log(error.response.data);
      console.log(error.response.status);
      console.log(error.response.headers);
    } else if (error.request) {
      // The request was made but no response was received
      // `error.request` is an instance of XMLHttpRequest in the browser and an instance of
      // http.ClientRequest in node.js
      console.log(error.request);
    } else {
      // Something happened in setting up the request that triggered an Error
      console.log('Error', error.message);
    }
    console.log(error.config);
  });
Using the validateStatus config option, you can override the default condition (status >= 200 && status < 300) and define HTTP code(s) that should throw an error.
axios.get('/user/12345', {
  validateStatus: function (status) {
    return status < 500; // Resolve only if the status code is less than 500
  }
})
Using toJSON you get an object with more information about the HTTP error.
axios.get('/user/12345')
  .catch(function (error) {
    console.log(error.toJSON());
  });
Cancellation
AbortController
Starting from v0.22.0 Axios supports AbortController to cancel requests in fetch API way:
const controller = new AbortController();

axios.get('/foo/bar', {
   signal: controller.signal
}).then(function(response) {
   //...
});
// cancel the request
controller.abort()
CancelToken 👎deprecated
You can also cancel a request using a CancelToken.
The axios cancel token API is based on the withdrawn cancellable promises proposal.
This API is deprecated since v0.22.0 and shouldn’t be used in new projects
You can create a cancel token using the CancelToken.source factory as shown below:
const CancelToken = axios.CancelToken;
const source = CancelToken.source();

axios.get('/user/12345', {
  cancelToken: source.token
}).catch(function (thrown) {
  if (axios.isCancel(thrown)) {
    console.log('Request canceled', thrown.message);
  } else {
    // handle error
  }
});

axios.post('/user/12345', {
  name: 'new name'
}, {
  cancelToken: source.token
})

// cancel the request (the message parameter is optional)
source.cancel('Operation canceled by the user.');
You can also create a cancel token by passing an executor function to the CancelToken constructor:
const CancelToken = axios.CancelToken;
let cancel;

axios.get('/user/12345', {
  cancelToken: new CancelToken(function executor(c) {
    // An executor function receives a cancel function as a parameter
    cancel = c;
  })
});

// cancel the request
cancel();
Note: you can cancel several requests with the same cancel token/abort controller.
If a cancellation token is already cancelled at the moment of starting an Axios request, then the request is cancelled immediately, without any attempts to make a real request.
During the transition period, you can use both cancellation APIs, even for the same request:
Using application/x-www-form-urlencoded format
URLSearchParams
By default, axios serializes JavaScript objects to JSON. To send data in the application/x-www-form-urlencoded format instead, you can use the URLSearchParams API, which is supported in the vast majority of browsers,and Node starting with v10 (released in 2018).
const params = new URLSearchParams({ foo: 'bar' });
params.append('extraparam', 'value');
axios.post('/foo', params);
Query string (Older browsers)
For compatibility with very old browsers, there is a polyfill available (make sure to polyfill the global environment).
Alternatively, you can encode data using the qs library:
const qs = require('qs');
axios.post('/foo', qs.stringify({ 'bar': 123 }));
Or in another way (ES6),
import qs from 'qs';
const data = { 'bar': 123 };
const options = {
  method: 'POST',
  headers: { 'content-type': 'application/x-www-form-urlencoded' },
  data: qs.stringify(data),
  url,
};
axios(options);
Older Node.js versions
For older Node.js engines, you can use the querystring module as follows:
const querystring = require('querystring');
axios.post('https://something.com/', querystring.stringify({ foo: 'bar' }));
You can also use the qs library.
Note
Theqslibrary is preferable if you need to stringify nested objects, as thequerystringmethod has known issues with that use case.
🆕 Automatic serialization to URLSearchParams
Axios will automatically serialize the data object to urlencoded format if the content-type header is set to «application/x-www-form-urlencoded».
const data = {
  x: 1,
  arr: [1, 2, 3],
  arr2: [1, [2], 3],
  users: [{name: 'Peter', surname: 'Griffin'}, {name: 'Thomas', surname: 'Anderson'}],
};

await axios.postForm('https://postman-echo.com/post', data,
  {headers: {'content-type': 'application/x-www-form-urlencoded'}}
);
The server will handle it as:
  {
    x: '1',
    'arr[]': [ '1', '2', '3' ],
    'arr2[0]': '1',
    'arr2[1][0]': '2',
    'arr2[2]': '3',
    'arr3[]': [ '1', '2', '3' ],
    'users[0][name]': 'Peter',
    'users[0][surname]': 'griffin',
    'users[1][name]': 'Thomas',
    'users[1][surname]': 'Anderson'
  }
If your backend body-parser (like body-parser of express.js) supports nested objects decoding, you will get the same object on the server-side automatically
  var app = express();

  app.use(bodyParser.urlencoded({ extended: true })); // support encoded bodies

  app.post('/', function (req, res, next) {
     // echo body as JSON
     res.send(JSON.stringify(req.body));
  });

  server = app.listen(3000);
Using multipart/form-data format
FormData
To send the data as a multipart/formdata you need to pass a formData instance as a payload.
Setting the Content-Type header is not required as Axios guesses it based on the payload type.
const formData = new FormData();
formData.append('foo', 'bar');

axios.post('https://httpbin.org/post', formData);
In node.js, you can use the form-data library as follows:
const FormData = require('form-data');

const form = new FormData();
form.append('my_field', 'my value');
form.append('my_buffer', new Buffer(10));
form.append('my_file', fs.createReadStream('/foo/bar.jpg'));

axios.post('https://example.com', form)
🆕 Automatic serialization to FormData
Starting from v0.27.0, Axios supports automatic object serialization to a FormData object if the request Content-Type
header is set to multipart/form-data.
The following request will submit the data in a FormData format (Browser & Node.js):
import axios from 'axios';

axios.post('https://httpbin.org/post', {x: 1}, {
  headers: {
    'Content-Type': 'multipart/form-data'
  }
}).then(({data}) => console.log(data));
In the node.js build, the (form-data) polyfill is used by default.
You can overload the FormData class by setting the env.FormData config variable,
but you probably won’t need it in most cases:
const axios = require('axios');
var FormData = require('form-data');

axios.post('https://httpbin.org/post', {x: 1, buf: new Buffer(10)}, {
  headers: {
    'Content-Type': 'multipart/form-data'
  }
}).then(({data}) => console.log(data));
Axios FormData serializer supports some special endings to perform the following operations:
{}— serialize the value with JSON.stringify[]— unwrap the array-like object as separate fields with the same key
Note
unwrap/expand operation will be used by default on arrays and FileList objects
FormData serializer supports additional options via config.formSerializer: object property to handle rare cases:
-
visitor: Function— user-defined visitor function that will be called recursively to serialize the data object
to aFormDataobject by following custom rules. -
dots: boolean = false— use dot notation instead of brackets to serialize arrays and objects; -
metaTokens: boolean = true— add the special ending (e.guser{}: '{"name": "John"}') in the FormData key.
The back-end body-parser could potentially use this meta-information to automatically parse the value as JSON. -
indexes: null|false|true = false— controls how indexes will be added to unwrapped keys offlatarray-like objectsnull— don’t add brackets (arr: 1,arr: 2,arr: 3)false(default) — add empty brackets (arr[]: 1,arr[]: 2,arr[]: 3)true— add brackets with indexes (arr[0]: 1,arr[1]: 2,arr[2]: 3)
Let’s say we have an object like this one:
const obj = {
  x: 1,
  arr: [1, 2, 3],
  arr2: [1, [2], 3],
  users: [{name: 'Peter', surname: 'Griffin'}, {name: 'Thomas', surname: 'Anderson'}],
  'obj2{}': [{x:1}]
};
The following steps will be executed by the Axios serializer internally:
const formData = new FormData();
formData.append('x', '1');
formData.append('arr[]', '1');
formData.append('arr[]', '2');
formData.append('arr[]', '3');
formData.append('arr2[0]', '1');
formData.append('arr2[1][0]', '2');
formData.append('arr2[2]', '3');
formData.append('users[0][name]', 'Peter');
formData.append('users[0][surname]', 'Griffin');
formData.append('users[1][name]', 'Thomas');
formData.append('users[1][surname]', 'Anderson');
formData.append('obj2{}', '[{"x":1}]');
Axios supports the following shortcut methods: postForm, putForm, patchForm
which are just the corresponding http methods with the Content-Type header preset to multipart/form-data.
Files Posting
You can easily submit a single file:
await axios.postForm('https://httpbin.org/post', {
  'myVar' : 'foo',
  'file': document.querySelector('#fileInput').files[0]
});
or multiple files as multipart/form-data:
await axios.postForm('https://httpbin.org/post', {
  'files[]': document.querySelector('#fileInput').files
});
FileList object can be passed directly:
await axios.postForm('https://httpbin.org/post', document.querySelector('#fileInput').files)
All files will be sent with the same field names: files[].
🆕 HTML Form Posting (browser)
Pass HTML Form element as a payload to submit it as multipart/form-data content.
await axios.postForm('https://httpbin.org/post', document.querySelector('#htmlForm'));
FormData and HTMLForm objects can also be posted as JSON by explicitly setting the Content-Type header to application/json:
await axios.post('https://httpbin.org/post', document.querySelector('#htmlForm'), {
  headers: {
    'Content-Type': 'application/json'
  }
})
For example, the Form
<form id="form">
  <input type="text" name="foo" value="1">
  <input type="text" name="deep.prop" value="2">
  <input type="text" name="deep prop spaced" value="3">
  <input type="text" name="baz" value="4">
  <input type="text" name="baz" value="5">

  <select name="user.age">
    <option value="value1">Value 1</option>
    <option value="value2" selected>Value 2</option>
    <option value="value3">Value 3</option>
  </select>

  <input type="submit" value="Save">
</form>
will be submitted as the following JSON object:
{
  "foo": "1",
  "deep": {
    "prop": {
      "spaced": "3"
    }
  },
  "baz": [
    "4",
    "5"
  ],
  "user": {
    "age": "value2"
  }
}
Sending Blobs/Files as JSON (base64) is not currently supported.
🆕 Progress capturing
Axios supports both browser and node environments to capture request upload/download progress.
await axios.post(url, data, {
  onUploadProgress: function (axiosProgressEvent) {
    /*{
      loaded: number;
      total?: number;
      progress?: number; // in range [0..1]
      bytes: number; // how many bytes have been transferred since the last trigger (delta)
      estimated?: number; // estimated time in seconds
      rate?: number; // upload speed in bytes
      upload: true; // upload sign
    }*/
  },

  onDownloadProgress: function (axiosProgressEvent) {
    /*{
      loaded: number;
      total?: number;
      progress?: number;
      bytes: number;
      estimated?: number;
      rate?: number; // download speed in bytes
      download: true; // download sign
    }*/
  }
});
You can also track stream upload/download progress in node.js:
const {data} = await axios.post(SERVER_URL, readableStream, {
   onUploadProgress: ({progress}) => {
     console.log((progress * 100).toFixed(2));
   },

   headers: {
    'Content-Length': contentLength
   },

   maxRedirects: 0 // avoid buffering the entire stream
});
Note:
Capturing FormData upload progress is currently not currently supported in node.js environments.
⚠️ Warning
It is recommended to disable redirects by setting maxRedirects: 0 to upload the stream in the node.js environment,
as follow-redirects package will buffer the entire stream in RAM without following the «backpressure» algorithm.
🆕 Rate limiting
Download and upload rate limits can only be set for the http adapter (node.js):
const {data} = await axios.post(LOCAL_SERVER_URL, myBuffer, {
  onUploadProgress: ({progress, rate}) => {
    console.log(`Upload [${(progress*100).toFixed(2)}%]: ${(rate / 1024).toFixed(2)}KB/s`)
  },

  maxRate: [100 * 1024], // 100KB/s limit
});
Semver
Until axios reaches a 1.0 release, breaking changes will be released with a new minor version. For example 0.5.1, and 0.5.4 will have the same API, but 0.6.0 will have breaking changes.
Promises
axios depends on a native ES6 Promise implementation to be supported.
If your environment doesn’t support ES6 Promises, you can polyfill.
TypeScript
axios includes TypeScript definitions and a type guard for axios errors.
let user: User = null;
try {
  const { data } = await axios.get('/user?ID=12345');
  user = data.userDetails;
} catch (error) {
  if (axios.isAxiosError(error)) {
    handleAxiosError(error);
  } else {
    handleUnexpectedError(error);
  }
}
Because axios dual publishes with an ESM default export and a CJS module.exports, there are some caveats.
The recommended setting is to use "moduleResolution": "node16" (this is implied by "module": "node16"). Note that this requires TypeScript 4.7 or greater.
If use ESM, your settings should be fine.
If you compile TypeScript to CJS and you can’t use "moduleResolution": "node 16", you have to enable esModuleInterop.
If you use TypeScript to type check CJS JavaScript code, your only option is to use "moduleResolution": "node16".
Online one-click setup
You can use Gitpod, an online IDE(which is free for Open Source) for contributing or running the examples online.
Resources
- Changelog
- Ecosystem
- Contributing Guide
- Code of Conduct
Credits
axios is heavily inspired by the $http service provided in AngularJS. Ultimately axios is an effort to provide a standalone $http-like service for use outside of AngularJS.
License
MIT
Introduction
Axios is a JavaScript library that uses the Promise API to create HTTP requests with http in Node.js runtime or XMLHttpRequests in the browser. Because these requests are promises, they work with the newer async/await syntax, as well as .then() functions for promise chaining and the .catch() mechanism for error handling.
try {
    let res = await axios.get('/my-api-route');

    // Work with the response...
} catch (err) {
    // Handle error
    console.log(err);
}
In this article, we will see how to handle errors with Axios, as this is very important when making any HTTP calls knowing fully well that there are times when the service you’re calling might not be available or return other unexpected errors. We’ll show the
.then()/.catch()method, but primarily use the async/await syntax.
Then and Catch
Promises can be handled in two ways using modern JS — the async/await syntax, which was shown above, as well as .then() and .catch() methods. Note that both of these methods can produce the same functionality, but async/await is typically regarded as being easier to work with and requires less boilerplate code in longer promise chains.
Here is how you’d achieve the same thing, but using the then/catch method:
axios.get('/my-api-route')
    .then(res => {
        // Work with the response...
    }).catch(err => {
        // Handle error
        console.log(err);
    });
Both the res and err objects are the same as with the async/await syntax.
Handling Errors
In this section, we will look at two primary categories of problems, as well as other issues that we may encounter and how to manage them using Axios. It is critical that you understand that this applies to all types of HTTP queries handled by Axios, including GET, POST, PATCH, and so on.
Here you can see the syntax for the three aspects — this will capture the error; it is crucial to note that this error carries a large error object with a lot of information:
try {
    let res = await axios.get('/my-api-route');

    // Work with the response...
} catch (err) {
    if (err.response) {
        // The client was given an error response (5xx, 4xx)
    } else if (err.request) {
        // The client never received a response, and the request was never left
    } else {
        // Anything else
    }
}
The differences in the error object, highlighted above in the catch code, indicate where the request encountered the issue. We’ll look deeper into this in the following sections.
error.response
This is the type of mistake we are most familiar with, and it is much easier to deal with. Many sites display a 404 Not Found page/error message or various response codes based on what the API provides; this is often handled via the response.
If your error object has a response property, it signifies your server returned a 4xx/5xx error. This will assist you choose what sort of message to return to users; the message you’ll want to provide for 4xx may differ from that for 5xx, and if your backend isn’t returning anything at all.
try {
    let res = await axios.get('/my-api-route');

    // Work with the response...
} catch (err) {
    if (err.response) {
        // The client was given an error response (5xx, 4xx)
        console.log(err.response.data);
        console.log(err.response.status);
        console.log(err.response.headers);
    } else if (err.request) {
        // The client never received a response, and the request was never left
    } else {
        // Anything else
    }
}
error.request
This error is most commonly caused by a bad/spotty network, a hanging backend that does not respond instantly to each request, unauthorized or cross-domain requests, and lastly if the backend API returns an error.
Note: This occurs when the browser was able to initiate a request but did not receive a valid answer for any reason.
try {
    let res = await axios.get('/my-api-route');

    // Work with the response...
} catch (err) {
    if (err.response) {
        // The client was given an error response (5xx, 4xx)
    } else if (err.request) {
        // The client never received a response, and the request was never left
        console.log(err.request);
    } else {
        // Anything else
    }
}
Earlier we mentioned that the underlying request Axios uses depends on the environment in which it’s being run. This is also the case for the err.request object. Here the err.request object is an instance of XMLHttpRequest when being executed in the browser, whereas it’s an instance of http.ClientRequest when being used in Node.js.
Other Errors
It’s possible that the error object does not have either a response or request object attached to it. In this case it is implied that there was an issue in setting up the request, which eventually triggered an error.
try {
    let res = await axios.get('/my-api-route');

    // Work with the response...
} catch (err) {
    if (err.response) {
        // The client was given an error response (5xx, 4xx)
    } else if (err.request) {
        // The client never received a response, and the request was never left
    } else {
        // Anything else
        console.log('Error', err.message);
    }
}
For example, this could be the case if you omit the URL parameter from the .get() call, and thus no request was ever made.
Conclusion
In this short article, we looked at how we may handle various sorts of failures and errors in Axios. This is also important for giving the correct message to your application/website visitors, rather than always returning a generic error message, sending a 404, or indicating network problems.
In the course of fetching APIs, if the API request doesn’t go as planned, we may encounter errors. Let’s see how to manage these errors using Axios.
If you don’t want to use the built-in Fetch API, you can opt for the many 3rd party libraries available on npm, and Axios is the most popular among them. It is essentially a wrapper around the Fetch API and allows you to make HTTP requests using a promise-based HTTP client.
API Errors
When a request to an API doesn’t go as planned, an API error occurs. So, the API must respond to the client specifying whether the request was successful or not. In this case, we should send an error response, and it is the only way for the developers to diagnose what went wrong. HTTP Status Codes are used for this purpose. The following status codes notify about the errors.
4xx— Client error. Such as404: Requested URL not found.5xx— Server error.
Informing the client about the error helps them understand the error and its cause.
Using Axios
To handle errors in a standard API call using Axios, we use a try...catch block. For example, take a look at the following code, which fetches random quotes from the Famous Quotes API from RapidAPI Hub.
js
import axios from 'axios';
const fetchQuotes = async () => {
try {
const res = await axios.get(
`https://famous-quotes4.p.rapidapi.com/random`
);
} catch (error) {
// Do something with the error here
}
};
If an error occurs, the catch block captures it. We need to add some logic in this block to handle the errors. We have to take care of three scenarios of errors:
-
Request is made, but the server responds with an error.
-
Request is made, but no response is received from the server.
-
When an error occurs while setting up the request.
To handle these scenarios, we can use an if-else block like this:
js
try {
const res = await axios.get(`https://famous-quotes4.p.rapidapi.com/random`);
} catch (error) {
if (error.response) {
// Request made but the server responded with an error
} else if (error.request) {
// Request made but no response is received from the server.
} else {
// Error occured while setting up the request
}
}
It is critical to check for the request and response properties because there will be no response property if we do not receive a response. Similarly, there will be no request property if the request is not set up. Let’s take a look at these properties.
error.response
If the request is made and the server gives an error response, the error object will have a response property. It means that a 4XX or 5XX error has occurred. The response object has many properties which we can log, like the status property, which has the status code of the error.
error.request
error.request is the request object of the HTTP request that the client made. It contains information such as the HTTP method, URL, and the headers sent with the request. For Axios, it is an instance of XMLHttpRequest when running in the browser and an instance of http.ClientRequest when executed in Node.js. We use it when we do not receive a valid response from the API due to a poor network or unauthorized access.
Logging Errors
Finally, we can use these properties to log errors properly. It will look like this in code:
js
try {
const res = await axios.get(`https://famous-quotes4.p.rapidapi.com/random`);
} catch (error) {
if (error.response) {
// Request made but the server responded with an error
console.log(error.response.data);
console.log(error.response.status);
console.log(error.response.headers);
} else if (error.request) {
// Request made but no response is received from the server.
console.log(error.request);
} else {
// Error occured while setting up the request
console.log('Error', error.message);
}
}
The same goes for Axios POST, PUT, PATCH, and all other types of requests. Now you know how to manage API errors using Axios. Find a suitable API from RapidAPI Hub and integrate it into your projects using Axios.