You can intercept requests or responses before they are handled by then or catch.
// Add a request interceptor
axios.interceptors.request.use(function (config) {
    // Do something before request is sent
    return config;
  }, function (error) {
    // Do something with request error
    return Promise.reject(error);
  });

// Add a response interceptor
axios.interceptors.response.use(function (response) {
    // Any status code that lie within the range of 2xx cause this function to trigger
    // Do something with response data
    return response;
  }, function (error) {
    // Any status codes that falls outside the range of 2xx cause this function to trigger
    // Do something with response error
    return Promise.reject(error);
  });
If you need to remove an interceptor later you can.
const myInterceptor = axios.interceptors.request.use(function () {/*...*/});
axios.interceptors.request.eject(myInterceptor);
You can add interceptors to a custom instance of axios.
const instance = axios.create();
instance.interceptors.request.use(function () {/*...*/});
I’m trying to understand javascript promises better with Axios. What I pretend is to handle all errors in Request.js and only call the request function from anywhere without having to use catch().
In this example, the response to the request will be 400 with an error message in JSON.
This is the error I’m getting:
Uncaught (in promise) Error: Request failed with status code 400
The only solution I find is to add .catch(() => {}) in Somewhere.js but I’m trying to avoid having to do that. Is it possible?
Here’s the code:
Request.js
export function request(method, uri, body, headers) {
  let config = {
    method: method.toLowerCase(),
    url: uri,
    baseURL: API_URL,
    headers: { 'Authorization': 'Bearer ' + getToken() },
    validateStatus: function (status) {
      return status >= 200 && status < 400
    }
  }

  ...

  return axios(config).then(
    function (response) {
      return response.data
    }
  ).catch(
    function (error) {
      console.log('Show error notification!')
      return Promise.reject(error)
    }
  )
}
Somewhere.js
export default class Somewhere extends React.Component {

  ...

  callSomeRequest() {
    request('DELETE', '/some/request').then(
      () => {
        console.log('Request successful!')
      }
    )
  }

  ...

}
asked Apr 22, 2018 at 15:45
![]()
4
Actually, it’s not possible with axios as of now. The status codes which falls in the range of 2xx only, can be caught in .then().
A conventional approach is to catch errors in the catch() block like below:
axios.get('/api/xyz/abcd')
  .catch(function (error) {
    if (error.response) {
      // Request made and server responded
      console.log(error.response.data);
      console.log(error.response.status);
      console.log(error.response.headers);
    } else if (error.request) {
      // The request was made but no response was received
      console.log(error.request);
    } else {
      // Something happened in setting up the request that triggered an Error
      console.log('Error', error.message);
    }

  });
Another approach can be intercepting requests or responses before they are handled by then or catch.
axios.interceptors.request.use(function (config) {
    // Do something before request is sent
    return config;
  }, function (error) {
    // Do something with request error
    return Promise.reject(error);
  });

// Add a response interceptor
axios.interceptors.response.use(function (response) {
    // Do something with response data
    return response;
  }, function (error) {
    // Do something with response error
    return Promise.reject(error);
  });
answered Aug 9, 2018 at 13:26
![]()
Plabon DuttaPlabon Dutta
6,5493 gold badges29 silver badges32 bronze badges
7
If you want to gain access to the whole the error body, do it as shown below:
 async function login(reqBody) {
  try {
    let res = await Axios({
      method: 'post',
      url: 'https://myApi.com/path/to/endpoint',
      data: reqBody
    });

    let data = res.data;
    return data;
  } catch (error) {
    console.log(error.response); // this is the main part. Use the response property from the error object

    return error.response;
  }

}
answered Mar 24, 2020 at 5:22
![]()
elonaireelonaire
1,7681 gold badge9 silver badges16 bronze badges
1
You can go like this:
error.response.data
In my case, I got error property from backend. So, I used error.response.data.error
My code:
axios
  .get(`${API_BASE_URL}/students`)
  .then(response => {
     return response.data
  })
  .then(data => {
     console.log(data)
  })
  .catch(error => {
     console.log(error.response.data.error)
  })
answered Mar 26, 2020 at 14:08
![]()
0
If you wan’t to use async await try
export const post = async ( link,data ) => {
const option = {
    method: 'post',
    url: `${URL}${link}`,
    validateStatus: function (status) {
        return status >= 200 && status < 300; // default
      },
    data
};

try {
    const response = await axios(option);
} catch (error) {
    const { response } = error;
    const { request, ...errorObject } = response; // take everything but 'request'
    console.log(errorObject);
}
![]()
Ben T
4,4663 gold badges21 silver badges22 bronze badges
answered Oct 16, 2019 at 15:59
![]()
user4920718user4920718
1,0351 gold badge9 silver badges12 bronze badges
1
I tried using the try{}catch{} method but it did not work for me. However, when I switched to using .then(...).catch(...), the AxiosError is caught correctly that I can play around with. When I try the former when putting a breakpoint, it does not allow me to see the AxiosError and instead, says to me that the caught error is undefined, which is also what eventually gets displayed in the UI.
Not sure why this happens I find it very trivial. Either way due to this, I suggest using the conventional .then(...).catch(...) method mentioned above to avoid throwing undefined errors to the user.
![]()
Dharman♦
29.3k21 gold badges80 silver badges131 bronze badges
answered Feb 2, 2021 at 8:02
![]()
1
For reusability:
create a file errorHandler.js:
export const errorHandler = (error) => {
  const { request, response } = error;
  if (response) {
    const { message } = response.data;
    const status = response.status;
    return {
      message,
      status,
    };
  } else if (request) {
    //request sent but no response received
    return {
      message: "server time out",
      status: 503,
    };
  } else {
    // Something happened in setting up the request that triggered an Error
    return { message: "opps! something went wrong while setting up request" };
  }
};
Then, whenever you catch error for axios:
Just import error handler from errorHandler.js and use like this.
  try {
    //your API calls
  } catch (error) {
    const { message: errorMessage } = errorHandlerForAction(error);
     //grab message
  }
answered Jan 12, 2022 at 15:51
![]()
If I understand correctly you want then of the request function to be called only if request is successful, and you want to ignore errors. To do that you can create a new promise resolve it when axios request is successful and never reject it in case of failure.
Updated code would look something like this:
export function request(method, uri, body, headers) {
  let config = {
    method: method.toLowerCase(),
    url: uri,
    baseURL: API_URL,
    headers: { 'Authorization': 'Bearer ' + getToken() },
    validateStatus: function (status) {
      return status >= 200 && status < 400
    }
  }


  return new Promise(function(resolve, reject) {
    axios(config).then(
      function (response) {
        resolve(response.data)
      }
    ).catch(
      function (error) {
        console.log('Show error notification!')
      }
    )
  });

}
answered Feb 10, 2021 at 22:19
![]()
Damir MiladinovDamir Miladinov
1,0741 gold badge10 silver badges15 bronze badges
1
https://stackabuse.com/handling-errors-with-axios/
    let res = await axios.get('/my-api-route');

    // Work with the response...
} catch (err) {
    if (err.response) {
        // The client was given an error response (5xx, 4xx)
    } else if (err.request) {
        // The client never received a response, and the request was never left
    } else {
        // Anything else
    }
}
try {
    let res = await axios.get('/my-api-route');

    // Work with the response...
} catch (err) {
    if (err.response) {
        // The client was given an error response (5xx, 4xx)
    } else if (err.request) {
        // The client never received a response, and the request was never left
        console.log(err.request);
    } else {
        // Anything else
    }
}
answered Jun 6, 2022 at 7:50
![]()
call the request function from anywhere without having to use catch().
First, while handling most errors in one place is a good Idea, it’s not that easy with requests. Some errors (e.g. 400 validation errors like: «username taken» or «invalid email») should be passed on.
So we now use a Promise based function:
const baseRequest = async (method: string, url: string, data: ?{}) =>
  new Promise<{ data: any }>((resolve, reject) => {
    const requestConfig: any = {
      method,
      data,
      timeout: 10000,
      url,
      headers: {},
    };

    try {
      const response = await axios(requestConfig);
      // Request Succeeded!
      resolve(response);
    } catch (error) {
      // Request Failed!

      if (error.response) {
        // Request made and server responded
        reject(response);
      } else if (error.request) {
        // The request was made but no response was received
        reject(response);
      } else {
        // Something happened in setting up the request that triggered an Error
        reject(response);
      }
    }
  };
you can then use the request like
try {
  response = await baseRequest('GET', 'https://myApi.com/path/to/endpoint')
} catch (error) {
  // either handle errors or don't
}
answered Feb 24, 2020 at 12:35
![]()
David SchumannDavid Schumann
12.7k8 gold badges70 silver badges89 bronze badges
2
One way of handling axios error for response type set to stream that worked for me.
.....
.....
try{
   .....
   .....
   // make request with responseType: 'stream'
   const url = "your url";
   const response = axios.get(url, { responseType: "stream" });
   // If everything OK, pipe to a file or whatever you intended to do
   // with the response stream
   .....
   .....
} catch(err){
  // Verify it's axios error
  if(axios.isAxios(err)){
    let errorString = "";
    const streamError = await new Promise((resolve, reject) => {
      err.response.data
        .on("data", (chunk) => {
           errorString += chunk;
          }
        .on("end", () => {
           resolve(errorString);
         }
      });
    // your stream error is stored at variable streamError.
    // If your string is JSON string, then parse it like this
    const jsonStreamError = JSON.parse(streamError as string);
    console.log({ jsonStreamError })
    // or do what you usually do with your error message
    .....
    .....
  }
  .....
  .....
}
answered Oct 10, 2021 at 8:58
![]()
BikashBikash
1601 silver badge6 bronze badges
If I understand you correctly, you want some kind of global handler, so you don’t have to attach a catch handler to every request you make. There is a window event for that called unhandledrejection.
You can read more about this Event in the official documentation: https://developer.mozilla.org/en-US/docs/Web/API/Window/unhandledrejection_event
Here is how you can attach a listener for this Event:
window.addEventListener('unhandledrejection', (event) => {
  // Handle errors here...
});
answered Dec 1, 2022 at 9:15
![]()
DavidDavid
516 bronze badges
![]()

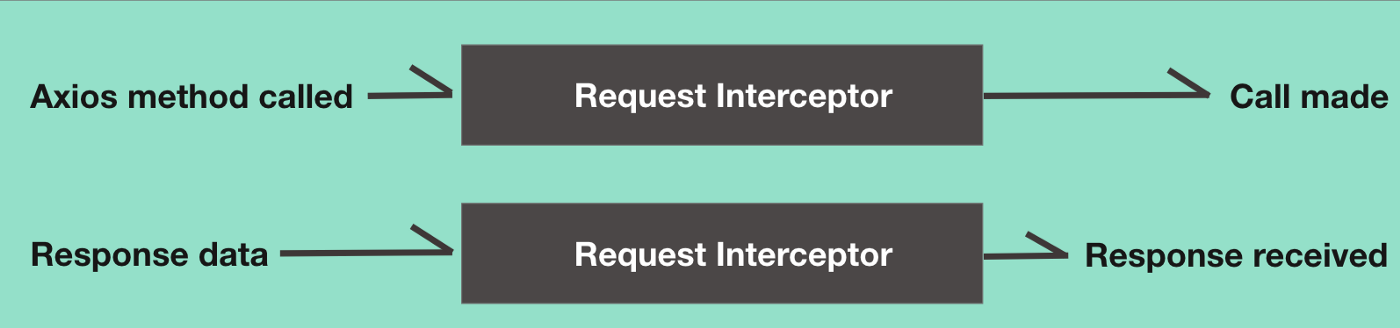
What is Axios?
Axios is a promise-based HTTP client for the browser and node.js. It comes with many useful defaults like automatically detecting JSON responses and returning an object instead of plain text, throwing an error if the response status code is greater than 400.
What is an axios interceptor?
An Axios interceptor is a function that the library calls every time it sends or receives the request. You can intercept requests or responses before they are handled by “then” or “catch”.
Example:
// Add a request interceptor
axios.interceptors.request.use(function (config) {
    // Do something before request is sent
    return config;
  }, function (error) {
    // Do something with request error
    return Promise.reject(error);
  });

// Add a response interceptor
axios.interceptors.response.use(function (response) {
    // Any status code that lie within the range of 2xx cause this function to trigger
    // Do something with response data
    return response;
  }, function (error) {
    // Any status codes that falls outside the range of 2xx cause this function to trigger
    // Do something with response error
    return Promise.reject(error);
  });
Enter fullscreen mode
Exit fullscreen mode
You can also remove the interceptor from Axios.
const myInterceptor = axios.interceptors.request.use(function ({/*...*/});
axios.interceptors.request.eject(myInterceptor);
Enter fullscreen mode
Exit fullscreen mode
Inject auth token header in every request using interceptors
There is a big chance when building an app that you will use an API that requires some credentials like api_token or a user Auth token. Usually, you will have to append the required headers with every HTTP request you make. Using Axios interceptors, you can set this up once, and anywhere you call your Axios instance, you are sure that the token is there.
axios.interceptors.request.use(req => {
  // `req` is the Axios request config, so you can modify
  // the `headers`.
  req.headers.authorization = ‘Bearer mytoken’;
  return req;
});

// Automatically sets the authorization header because
// of the request interceptor
const res = await axios.get(‘https://api.example.com’);
Enter fullscreen mode
Exit fullscreen mode
Log every request and response using interceptors.
Logging requests can be beneficial, especially when you have a large app and you don’t know where all your requests are triggered. Using an Axios interceptor, you can log every request and response quickly.
const axios = require(‘axios’);

axios.interceptors.request.use(req => {
  console.log(`${JSON.stringify(req, null, 2)}`);
  // you must return the request object after you are done
  return req;
});

axios.interceptors.response.use(res => {
  console.log(res.data.json);
  // you must return the response object after you are done
  return res;
});

await axios.post(‘https://example.com/‘);
Enter fullscreen mode
Exit fullscreen mode
Error handling using Axios interceptors
You can use An Axios interceptor to capture all errors and enhance them before reaching your end user. If you use multiple APIs with different error object shapes, you can use an interceptor to transform them into a standard structure.
const axios = require(‘axios’);
axios.interceptors.response.use(
  res => res,
  err => {
    throw new Error(err.response.data.message);
  }
)
const err = await axios.get(‘http://example.com/notfound’).
  catch(err => err);
// “Could not find page /notfound”
err.message;
Enter fullscreen mode
Exit fullscreen mode
Add rate limiting to requests using interceptors.
Backend resources are limited and can cost a lot of money. As a client, you help reduce the load on your server by rate-limiting your HTTP calls. Here’s how you can do it using an Axios interceptor.
const axios = require(‘axios’);
const debounce = require('lodash.debounce');
axios.interceptors.request.use(
  res => {
return new Promise((resolve) => {
// only fire a request every 2 sec
       debounce(
          () => resolve(config),2000);
       });
    });
  }
)
Enter fullscreen mode
Exit fullscreen mode
Promise based HTTP client for the browser and node.js
Website •
Documentation

Table of Contents
- Features
- Browser Support
- Installing
- Package manager
- CDN
- Example
- Axios API
- Request method aliases
- Concurrency 👎
- Creating an instance
- Instance methods
- Request Config
- Response Schema
- Config Defaults
- Global axios defaults
- Custom instance defaults
- Config order of precedence
- Interceptors
- Multiple Interceptors
- Handling Errors
- Cancellation
- AbortController
- CancelToken 👎
- Using application/x-www-form-urlencoded format
- URLSearchParams
- Query string
- 🆕 Automatic serialization
- Using multipart/form-data format
- FormData
- 🆕 Automatic serialization
- Files Posting
- HTML Form Posting
- 🆕 Progress capturing
- 🆕 Rate limiting
- Semver
- Promises
- TypeScript
- Resources
- Credits
- License
Features
- Make XMLHttpRequests from the browser
- Make http requests from node.js
- Supports the Promise API
- Intercept request and response
- Transform request and response data
- Cancel requests
- Automatic transforms for JSON data
- 🆕 Automatic data object serialization to
multipart/form-dataandx-www-form-urlencodedbody encodings - Client side support for protecting against XSRF
Browser Support
 |
 |
 |
 |
 |
 |
|---|---|---|---|---|---|
| Latest ✔ | Latest ✔ | Latest ✔ | Latest ✔ | Latest ✔ | 11 ✔ |
Installing
Package manager
Using npm:
Using bower:
Using yarn:
Using pnpm:
Once the package is installed, you can import the library using import or require approach:
import axios, {isCancel, AxiosError} from 'axios';
You can also use the default export, since the named export is just a re-export from the Axios factory:
import axios from 'axios';

console.log(axios.isCancel('something'));
If you use require for importing, only default export is available:
const axios = require('axios');

console.log(axios.isCancel('something'));
For cases where something went wrong when trying to import a module into a custom or legacy environment,
you can try importing the module package directly:
const axios = require('axios/dist/browser/axios.cjs'); // browser commonJS bundle (ES2017)
// const axios = require('axios/dist/node/axios.cjs'); // node commonJS bundle (ES2017)
CDN
Using jsDelivr CDN (ES5 UMD browser module):
<script src="https://cdn.jsdelivr.net/npm/axios@1.1.2/dist/axios.min.js"></script>
Using unpkg CDN:
<script src="https://unpkg.com/axios@1.1.2/dist/axios.min.js"></script>
Example
Note CommonJS usage
In order to gain the TypeScript typings (for intellisense / autocomplete) while using CommonJS imports withrequire(), use the following approach:
import axios from 'axios';
//const axios = require('axios'); // legacy way

// Make a request for a user with a given ID
axios.get('/user?ID=12345')
  .then(function (response) {
    // handle success
    console.log(response);
  })
  .catch(function (error) {
    // handle error
    console.log(error);
  })
  .finally(function () {
    // always executed
  });

// Optionally the request above could also be done as
axios.get('/user', {
    params: {
      ID: 12345
    }
  })
  .then(function (response) {
    console.log(response);
  })
  .catch(function (error) {
    console.log(error);
  })
  .finally(function () {
    // always executed
  });

// Want to use async/await? Add the `async` keyword to your outer function/method.
async function getUser() {
  try {
    const response = await axios.get('/user?ID=12345');
    console.log(response);
  } catch (error) {
    console.error(error);
  }
}
Note
async/awaitis part of ECMAScript 2017 and is not supported in Internet
Explorer and older browsers, so use with caution.
Performing a POST request
axios.post('/user', {
    firstName: 'Fred',
    lastName: 'Flintstone'
  })
  .then(function (response) {
    console.log(response);
  })
  .catch(function (error) {
    console.log(error);
  });
Performing multiple concurrent requests
function getUserAccount() {
  return axios.get('/user/12345');
}

function getUserPermissions() {
  return axios.get('/user/12345/permissions');
}

Promise.all([getUserAccount(), getUserPermissions()])
  .then(function (results) {
    const acct = results[0];
    const perm = results[1];
  });
axios API
Requests can be made by passing the relevant config to axios.
axios(config)
// Send a POST request
axios({
  method: 'post',
  url: '/user/12345',
  data: {
    firstName: 'Fred',
    lastName: 'Flintstone'
  }
});
// GET request for remote image in node.js
axios({
  method: 'get',
  url: 'https://bit.ly/2mTM3nY',
  responseType: 'stream'
})
  .then(function (response) {
    response.data.pipe(fs.createWriteStream('ada_lovelace.jpg'))
  });
axios(url[, config])
// Send a GET request (default method)
axios('/user/12345');
Request method aliases
For convenience, aliases have been provided for all common request methods.
axios.request(config)
axios.get(url[, config])
axios.delete(url[, config])
axios.head(url[, config])
axios.options(url[, config])
axios.post(url[, data[, config]])
axios.put(url[, data[, config]])
axios.patch(url[, data[, config]])
NOTE
When using the alias methods url, method, and data properties don’t need to be specified in config.
Concurrency (Deprecated)
Please use Promise.all to replace the below functions.
Helper functions for dealing with concurrent requests.
axios.all(iterable)
axios.spread(callback)
Creating an instance
You can create a new instance of axios with a custom config.
axios.create([config])
const instance = axios.create({
  baseURL: 'https://some-domain.com/api/',
  timeout: 1000,
  headers: {'X-Custom-Header': 'foobar'}
});
Instance methods
The available instance methods are listed below. The specified config will be merged with the instance config.
axios#request(config)
axios#get(url[, config])
axios#delete(url[, config])
axios#head(url[, config])
axios#options(url[, config])
axios#post(url[, data[, config]])
axios#put(url[, data[, config]])
axios#patch(url[, data[, config]])
axios#getUri([config])
Request Config
These are the available config options for making requests. Only the url is required. Requests will default to GET if method is not specified.
{
  // `url` is the server URL that will be used for the request
  url: '/user',

  // `method` is the request method to be used when making the request
  method: 'get', // default

  // `baseURL` will be prepended to `url` unless `url` is absolute.
  // It can be convenient to set `baseURL` for an instance of axios to pass relative URLs
  // to methods of that instance.
  baseURL: 'https://some-domain.com/api/',

  // `transformRequest` allows changes to the request data before it is sent to the server
  // This is only applicable for request methods 'PUT', 'POST', 'PATCH' and 'DELETE'
  // The last function in the array must return a string or an instance of Buffer, ArrayBuffer,
  // FormData or Stream
  // You may modify the headers object.
  transformRequest: [function (data, headers) {
    // Do whatever you want to transform the data

    return data;
  }],

  // `transformResponse` allows changes to the response data to be made before
  // it is passed to then/catch
  transformResponse: [function (data) {
    // Do whatever you want to transform the data

    return data;
  }],

  // `headers` are custom headers to be sent
  headers: {'X-Requested-With': 'XMLHttpRequest'},

  // `params` are the URL parameters to be sent with the request
  // Must be a plain object or a URLSearchParams object
  params: {
    ID: 12345
  },

  // `paramsSerializer` is an optional config in charge of serializing `params`
  paramsSerializer: {
    encode?: (param: string): string => { /* Do custom ops here and return transformed string */ }, // custom encoder function; sends Key/Values in an iterative fashion
    serialize?: (params: Record<string, any>, options?: ParamsSerializerOptions ), // mimic pre 1.x behavior and send entire params object to a custom serializer func. Allows consumer to control how params are serialized.
    indexes: false // array indexes format (null - no brackets, false (default) - empty brackets, true - brackets with indexes)
  },

  // `data` is the data to be sent as the request body
  // Only applicable for request methods 'PUT', 'POST', 'DELETE , and 'PATCH'
  // When no `transformRequest` is set, must be of one of the following types:
  // - string, plain object, ArrayBuffer, ArrayBufferView, URLSearchParams
  // - Browser only: FormData, File, Blob
  // - Node only: Stream, Buffer, FormData (form-data package)
  data: {
    firstName: 'Fred'
  },

  // syntax alternative to send data into the body
  // method post
  // only the value is sent, not the key
  data: 'Country=Brasil&City=Belo Horizonte',

  // `timeout` specifies the number of milliseconds before the request times out.
  // If the request takes longer than `timeout`, the request will be aborted.
  timeout: 1000, // default is `0` (no timeout)

  // `withCredentials` indicates whether or not cross-site Access-Control requests
  // should be made using credentials
  withCredentials: false, // default

  // `adapter` allows custom handling of requests which makes testing easier.
  // Return a promise and supply a valid response (see lib/adapters/README.md).
  adapter: function (config) {
    /* ... */
  },

  // `auth` indicates that HTTP Basic auth should be used, and supplies credentials.
  // This will set an `Authorization` header, overwriting any existing
  // `Authorization` custom headers you have set using `headers`.
  // Please note that only HTTP Basic auth is configurable through this parameter.
  // For Bearer tokens and such, use `Authorization` custom headers instead.
  auth: {
    username: 'janedoe',
    password: 's00pers3cret'
  },

  // `responseType` indicates the type of data that the server will respond with
  // options are: 'arraybuffer', 'document', 'json', 'text', 'stream'
  //   browser only: 'blob'
  responseType: 'json', // default

  // `responseEncoding` indicates encoding to use for decoding responses (Node.js only)
  // Note: Ignored for `responseType` of 'stream' or client-side requests
  responseEncoding: 'utf8', // default

  // `xsrfCookieName` is the name of the cookie to use as a value for xsrf token
  xsrfCookieName: 'XSRF-TOKEN', // default

  // `xsrfHeaderName` is the name of the http header that carries the xsrf token value
  xsrfHeaderName: 'X-XSRF-TOKEN', // default

  // `onUploadProgress` allows handling of progress events for uploads
  // browser & node.js
  onUploadProgress: function ({loaded, total, progress, bytes, estimated, rate, upload = true}) {
    // Do whatever you want with the Axios progress event
  },

  // `onDownloadProgress` allows handling of progress events for downloads
  // browser & node.js
  onDownloadProgress: function ({loaded, total, progress, bytes, estimated, rate, download = true}) {
    // Do whatever you want with the Axios progress event
  },

  // `maxContentLength` defines the max size of the http response content in bytes allowed in node.js
  maxContentLength: 2000,

  // `maxBodyLength` (Node only option) defines the max size of the http request content in bytes allowed
  maxBodyLength: 2000,

  // `validateStatus` defines whether to resolve or reject the promise for a given
  // HTTP response status code. If `validateStatus` returns `true` (or is set to `null`
  // or `undefined`), the promise will be resolved; otherwise, the promise will be
  // rejected.
  validateStatus: function (status) {
    return status >= 200 && status < 300; // default
  },

  // `maxRedirects` defines the maximum number of redirects to follow in node.js.
  // If set to 0, no redirects will be followed.
  maxRedirects: 21, // default

  // `beforeRedirect` defines a function that will be called before redirect.
  // Use this to adjust the request options upon redirecting,
  // to inspect the latest response headers,
  // or to cancel the request by throwing an error
  // If maxRedirects is set to 0, `beforeRedirect` is not used.
  beforeRedirect: (options, { headers }) => {
    if (options.hostname === "example.com") {
      options.auth = "user:password";
    }
  },

  // `socketPath` defines a UNIX Socket to be used in node.js.
  // e.g. '/var/run/docker.sock' to send requests to the docker daemon.
  // Only either `socketPath` or `proxy` can be specified.
  // If both are specified, `socketPath` is used.
  socketPath: null, // default

  // `httpAgent` and `httpsAgent` define a custom agent to be used when performing http
  // and https requests, respectively, in node.js. This allows options to be added like
  // `keepAlive` that are not enabled by default.
  httpAgent: new http.Agent({ keepAlive: true }),
  httpsAgent: new https.Agent({ keepAlive: true }),

  // `proxy` defines the hostname, port, and protocol of the proxy server.
  // You can also define your proxy using the conventional `http_proxy` and
  // `https_proxy` environment variables. If you are using environment variables
  // for your proxy configuration, you can also define a `no_proxy` environment
  // variable as a comma-separated list of domains that should not be proxied.
  // Use `false` to disable proxies, ignoring environment variables.
  // `auth` indicates that HTTP Basic auth should be used to connect to the proxy, and
  // supplies credentials.
  // This will set an `Proxy-Authorization` header, overwriting any existing
  // `Proxy-Authorization` custom headers you have set using `headers`.
  // If the proxy server uses HTTPS, then you must set the protocol to `https`.
  proxy: {
    protocol: 'https',
    host: '127.0.0.1',
    // hostname: '127.0.0.1' // Takes precedence over 'host' if both are defined
    port: 9000,
    auth: {
      username: 'mikeymike',
      password: 'rapunz3l'
    }
  },

  // `cancelToken` specifies a cancel token that can be used to cancel the request
  // (see Cancellation section below for details)
  cancelToken: new CancelToken(function (cancel) {
  }),

  // an alternative way to cancel Axios requests using AbortController
  signal: new AbortController().signal,

  // `decompress` indicates whether or not the response body should be decompressed
  // automatically. If set to `true` will also remove the 'content-encoding' header
  // from the responses objects of all decompressed responses
  // - Node only (XHR cannot turn off decompression)
  decompress: true // default

  // `insecureHTTPParser` boolean.
  // Indicates where to use an insecure HTTP parser that accepts invalid HTTP headers.
  // This may allow interoperability with non-conformant HTTP implementations.
  // Using the insecure parser should be avoided.
  // see options https://nodejs.org/dist/latest-v12.x/docs/api/http.html#http_http_request_url_options_callback
  // see also https://nodejs.org/en/blog/vulnerability/february-2020-security-releases/#strict-http-header-parsing-none
  insecureHTTPParser: undefined // default

  // transitional options for backward compatibility that may be removed in the newer versions
  transitional: {
    // silent JSON parsing mode
    // `true`  - ignore JSON parsing errors and set response.data to null if parsing failed (old behaviour)
    // `false` - throw SyntaxError if JSON parsing failed (Note: responseType must be set to 'json')
    silentJSONParsing: true, // default value for the current Axios version

    // try to parse the response string as JSON even if `responseType` is not 'json'
    forcedJSONParsing: true,

    // throw ETIMEDOUT error instead of generic ECONNABORTED on request timeouts
    clarifyTimeoutError: false,
  },

  env: {
    // The FormData class to be used to automatically serialize the payload into a FormData object
    FormData: window?.FormData || global?.FormData
  },

  formSerializer: {
      visitor: (value, key, path, helpers) => {}; // custom visitor function to serialize form values
      dots: boolean; // use dots instead of brackets format
      metaTokens: boolean; // keep special endings like {} in parameter key
      indexes: boolean; // array indexes format null - no brackets, false - empty brackets, true - brackets with indexes
  },

  // http adapter only (node.js)
  maxRate: [
    100 * 1024, // 100KB/s upload limit,
    100 * 1024  // 100KB/s download limit
  ]
}
Response Schema
The response for a request contains the following information.
{
  // `data` is the response that was provided by the server
  data: {},

  // `status` is the HTTP status code from the server response
  status: 200,

  // `statusText` is the HTTP status message from the server response
  statusText: 'OK',

  // `headers` the HTTP headers that the server responded with
  // All header names are lowercase and can be accessed using the bracket notation.
  // Example: `response.headers['content-type']`
  headers: {},

  // `config` is the config that was provided to `axios` for the request
  config: {},

  // `request` is the request that generated this response
  // It is the last ClientRequest instance in node.js (in redirects)
  // and an XMLHttpRequest instance in the browser
  request: {}
}
When using then, you will receive the response as follows:
axios.get('/user/12345')
  .then(function (response) {
    console.log(response.data);
    console.log(response.status);
    console.log(response.statusText);
    console.log(response.headers);
    console.log(response.config);
  });
When using catch, or passing a rejection callback as second parameter of then, the response will be available through the error object as explained in the Handling Errors section.
Config Defaults
You can specify config defaults that will be applied to every request.
Global axios defaults
axios.defaults.baseURL = 'https://api.example.com';

// Important: If axios is used with multiple domains, the AUTH_TOKEN will be sent to all of them.
// See below for an example using Custom instance defaults instead.
axios.defaults.headers.common['Authorization'] = AUTH_TOKEN;

axios.defaults.headers.post['Content-Type'] = 'application/x-www-form-urlencoded';
Custom instance defaults
// Set config defaults when creating the instance
const instance = axios.create({
  baseURL: 'https://api.example.com'
});

// Alter defaults after instance has been created
instance.defaults.headers.common['Authorization'] = AUTH_TOKEN;
Config order of precedence
Config will be merged with an order of precedence. The order is library defaults found in lib/defaults.js, then defaults property of the instance, and finally config argument for the request. The latter will take precedence over the former. Here’s an example.
// Create an instance using the config defaults provided by the library
// At this point the timeout config value is `0` as is the default for the library
const instance = axios.create();

// Override timeout default for the library
// Now all requests using this instance will wait 2.5 seconds before timing out
instance.defaults.timeout = 2500;

// Override timeout for this request as it's known to take a long time
instance.get('/longRequest', {
  timeout: 5000
});
Interceptors
You can intercept requests or responses before they are handled by then or catch.
// Add a request interceptor
axios.interceptors.request.use(function (config) {
    // Do something before request is sent
    return config;
  }, function (error) {
    // Do something with request error
    return Promise.reject(error);
  });

// Add a response interceptor
axios.interceptors.response.use(function (response) {
    // Any status code that lie within the range of 2xx cause this function to trigger
    // Do something with response data
    return response;
  }, function (error) {
    // Any status codes that falls outside the range of 2xx cause this function to trigger
    // Do something with response error
    return Promise.reject(error);
  });
If you need to remove an interceptor later you can.
const myInterceptor = axios.interceptors.request.use(function () {/*...*/});
axios.interceptors.request.eject(myInterceptor);
You can also clear all interceptors for requests or responses.
const instance = axios.create();
instance.interceptors.request.use(function () {/*...*/});
instance.interceptors.request.clear(); // Removes interceptors from requests
instance.interceptors.response.use(function () {/*...*/});
instance.interceptors.response.clear(); // Removes interceptors from responses
You can add interceptors to a custom instance of axios.
const instance = axios.create();
instance.interceptors.request.use(function () {/*...*/});
When you add request interceptors, they are presumed to be asynchronous by default. This can cause a delay
in the execution of your axios request when the main thread is blocked (a promise is created under the hood for
the interceptor and your request gets put on the bottom of the call stack). If your request interceptors are synchronous you can add a flag
to the options object that will tell axios to run the code synchronously and avoid any delays in request execution.
axios.interceptors.request.use(function (config) {
  config.headers.test = 'I am only a header!';
  return config;
}, null, { synchronous: true });
If you want to execute a particular interceptor based on a runtime check,
you can add a runWhen function to the options object. The interceptor will not be executed if and only if the return
of runWhen is false. The function will be called with the config
object (don’t forget that you can bind your own arguments to it as well.) This can be handy when you have an
asynchronous request interceptor that only needs to run at certain times.
function onGetCall(config) {
  return config.method === 'get';
}
axios.interceptors.request.use(function (config) {
  config.headers.test = 'special get headers';
  return config;
}, null, { runWhen: onGetCall });
Multiple Interceptors
Given you add multiple response interceptors
and when the response was fulfilled
- then each interceptor is executed
- then they are executed in the order they were added
- then only the last interceptor’s result is returned
- then every interceptor receives the result of its predecessor
- and when the fulfillment-interceptor throws
- then the following fulfillment-interceptor is not called
- then the following rejection-interceptor is called
- once caught, another following fulfill-interceptor is called again (just like in a promise chain).
Read the interceptor tests for seeing all this in code.
Handling Errors
the default behavior is to reject every response that returns with a status code that falls out of the range of 2xx and treat it as an error.
axios.get('/user/12345')
  .catch(function (error) {
    if (error.response) {
      // The request was made and the server responded with a status code
      // that falls out of the range of 2xx
      console.log(error.response.data);
      console.log(error.response.status);
      console.log(error.response.headers);
    } else if (error.request) {
      // The request was made but no response was received
      // `error.request` is an instance of XMLHttpRequest in the browser and an instance of
      // http.ClientRequest in node.js
      console.log(error.request);
    } else {
      // Something happened in setting up the request that triggered an Error
      console.log('Error', error.message);
    }
    console.log(error.config);
  });
Using the validateStatus config option, you can override the default condition (status >= 200 && status < 300) and define HTTP code(s) that should throw an error.
axios.get('/user/12345', {
  validateStatus: function (status) {
    return status < 500; // Resolve only if the status code is less than 500
  }
})
Using toJSON you get an object with more information about the HTTP error.
axios.get('/user/12345')
  .catch(function (error) {
    console.log(error.toJSON());
  });
Cancellation
AbortController
Starting from v0.22.0 Axios supports AbortController to cancel requests in fetch API way:
const controller = new AbortController();

axios.get('/foo/bar', {
   signal: controller.signal
}).then(function(response) {
   //...
});
// cancel the request
controller.abort()
CancelToken 👎deprecated
You can also cancel a request using a CancelToken.
The axios cancel token API is based on the withdrawn cancellable promises proposal.
This API is deprecated since v0.22.0 and shouldn’t be used in new projects
You can create a cancel token using the CancelToken.source factory as shown below:
const CancelToken = axios.CancelToken;
const source = CancelToken.source();

axios.get('/user/12345', {
  cancelToken: source.token
}).catch(function (thrown) {
  if (axios.isCancel(thrown)) {
    console.log('Request canceled', thrown.message);
  } else {
    // handle error
  }
});

axios.post('/user/12345', {
  name: 'new name'
}, {
  cancelToken: source.token
})

// cancel the request (the message parameter is optional)
source.cancel('Operation canceled by the user.');
You can also create a cancel token by passing an executor function to the CancelToken constructor:
const CancelToken = axios.CancelToken;
let cancel;

axios.get('/user/12345', {
  cancelToken: new CancelToken(function executor(c) {
    // An executor function receives a cancel function as a parameter
    cancel = c;
  })
});

// cancel the request
cancel();
Note: you can cancel several requests with the same cancel token/abort controller.
If a cancellation token is already cancelled at the moment of starting an Axios request, then the request is cancelled immediately, without any attempts to make a real request.
During the transition period, you can use both cancellation APIs, even for the same request:
Using application/x-www-form-urlencoded format
URLSearchParams
By default, axios serializes JavaScript objects to JSON. To send data in the application/x-www-form-urlencoded format instead, you can use the URLSearchParams API, which is supported in the vast majority of browsers,and Node starting with v10 (released in 2018).
const params = new URLSearchParams({ foo: 'bar' });
params.append('extraparam', 'value');
axios.post('/foo', params);
Query string (Older browsers)
For compatibility with very old browsers, there is a polyfill available (make sure to polyfill the global environment).
Alternatively, you can encode data using the qs library:
const qs = require('qs');
axios.post('/foo', qs.stringify({ 'bar': 123 }));
Or in another way (ES6),
import qs from 'qs';
const data = { 'bar': 123 };
const options = {
  method: 'POST',
  headers: { 'content-type': 'application/x-www-form-urlencoded' },
  data: qs.stringify(data),
  url,
};
axios(options);
Older Node.js versions
For older Node.js engines, you can use the querystring module as follows:
const querystring = require('querystring');
axios.post('https://something.com/', querystring.stringify({ foo: 'bar' }));
You can also use the qs library.
Note
Theqslibrary is preferable if you need to stringify nested objects, as thequerystringmethod has known issues with that use case.
🆕 Automatic serialization to URLSearchParams
Axios will automatically serialize the data object to urlencoded format if the content-type header is set to «application/x-www-form-urlencoded».
const data = {
  x: 1,
  arr: [1, 2, 3],
  arr2: [1, [2], 3],
  users: [{name: 'Peter', surname: 'Griffin'}, {name: 'Thomas', surname: 'Anderson'}],
};

await axios.postForm('https://postman-echo.com/post', data,
  {headers: {'content-type': 'application/x-www-form-urlencoded'}}
);
The server will handle it as:
  {
    x: '1',
    'arr[]': [ '1', '2', '3' ],
    'arr2[0]': '1',
    'arr2[1][0]': '2',
    'arr2[2]': '3',
    'arr3[]': [ '1', '2', '3' ],
    'users[0][name]': 'Peter',
    'users[0][surname]': 'griffin',
    'users[1][name]': 'Thomas',
    'users[1][surname]': 'Anderson'
  }
If your backend body-parser (like body-parser of express.js) supports nested objects decoding, you will get the same object on the server-side automatically
  var app = express();

  app.use(bodyParser.urlencoded({ extended: true })); // support encoded bodies

  app.post('/', function (req, res, next) {
     // echo body as JSON
     res.send(JSON.stringify(req.body));
  });

  server = app.listen(3000);
Using multipart/form-data format
FormData
To send the data as a multipart/formdata you need to pass a formData instance as a payload.
Setting the Content-Type header is not required as Axios guesses it based on the payload type.
const formData = new FormData();
formData.append('foo', 'bar');

axios.post('https://httpbin.org/post', formData);
In node.js, you can use the form-data library as follows:
const FormData = require('form-data');

const form = new FormData();
form.append('my_field', 'my value');
form.append('my_buffer', new Buffer(10));
form.append('my_file', fs.createReadStream('/foo/bar.jpg'));

axios.post('https://example.com', form)
🆕 Automatic serialization to FormData
Starting from v0.27.0, Axios supports automatic object serialization to a FormData object if the request Content-Type
header is set to multipart/form-data.
The following request will submit the data in a FormData format (Browser & Node.js):
import axios from 'axios';

axios.post('https://httpbin.org/post', {x: 1}, {
  headers: {
    'Content-Type': 'multipart/form-data'
  }
}).then(({data}) => console.log(data));
In the node.js build, the (form-data) polyfill is used by default.
You can overload the FormData class by setting the env.FormData config variable,
but you probably won’t need it in most cases:
const axios = require('axios');
var FormData = require('form-data');

axios.post('https://httpbin.org/post', {x: 1, buf: new Buffer(10)}, {
  headers: {
    'Content-Type': 'multipart/form-data'
  }
}).then(({data}) => console.log(data));
Axios FormData serializer supports some special endings to perform the following operations:
{}— serialize the value with JSON.stringify[]— unwrap the array-like object as separate fields with the same key
Note
unwrap/expand operation will be used by default on arrays and FileList objects
FormData serializer supports additional options via config.formSerializer: object property to handle rare cases:
-
visitor: Function— user-defined visitor function that will be called recursively to serialize the data object
to aFormDataobject by following custom rules. -
dots: boolean = false— use dot notation instead of brackets to serialize arrays and objects; -
metaTokens: boolean = true— add the special ending (e.guser{}: '{"name": "John"}') in the FormData key.
The back-end body-parser could potentially use this meta-information to automatically parse the value as JSON. -
indexes: null|false|true = false— controls how indexes will be added to unwrapped keys offlatarray-like objectsnull— don’t add brackets (arr: 1,arr: 2,arr: 3)false(default) — add empty brackets (arr[]: 1,arr[]: 2,arr[]: 3)true— add brackets with indexes (arr[0]: 1,arr[1]: 2,arr[2]: 3)
Let’s say we have an object like this one:
const obj = {
  x: 1,
  arr: [1, 2, 3],
  arr2: [1, [2], 3],
  users: [{name: 'Peter', surname: 'Griffin'}, {name: 'Thomas', surname: 'Anderson'}],
  'obj2{}': [{x:1}]
};
The following steps will be executed by the Axios serializer internally:
const formData = new FormData();
formData.append('x', '1');
formData.append('arr[]', '1');
formData.append('arr[]', '2');
formData.append('arr[]', '3');
formData.append('arr2[0]', '1');
formData.append('arr2[1][0]', '2');
formData.append('arr2[2]', '3');
formData.append('users[0][name]', 'Peter');
formData.append('users[0][surname]', 'Griffin');
formData.append('users[1][name]', 'Thomas');
formData.append('users[1][surname]', 'Anderson');
formData.append('obj2{}', '[{"x":1}]');
Axios supports the following shortcut methods: postForm, putForm, patchForm
which are just the corresponding http methods with the Content-Type header preset to multipart/form-data.
Files Posting
You can easily submit a single file:
await axios.postForm('https://httpbin.org/post', {
  'myVar' : 'foo',
  'file': document.querySelector('#fileInput').files[0]
});
or multiple files as multipart/form-data:
await axios.postForm('https://httpbin.org/post', {
  'files[]': document.querySelector('#fileInput').files
});
FileList object can be passed directly:
await axios.postForm('https://httpbin.org/post', document.querySelector('#fileInput').files)
All files will be sent with the same field names: files[].
🆕 HTML Form Posting (browser)
Pass HTML Form element as a payload to submit it as multipart/form-data content.
await axios.postForm('https://httpbin.org/post', document.querySelector('#htmlForm'));
FormData and HTMLForm objects can also be posted as JSON by explicitly setting the Content-Type header to application/json:
await axios.post('https://httpbin.org/post', document.querySelector('#htmlForm'), {
  headers: {
    'Content-Type': 'application/json'
  }
})
For example, the Form
<form id="form">
  <input type="text" name="foo" value="1">
  <input type="text" name="deep.prop" value="2">
  <input type="text" name="deep prop spaced" value="3">
  <input type="text" name="baz" value="4">
  <input type="text" name="baz" value="5">

  <select name="user.age">
    <option value="value1">Value 1</option>
    <option value="value2" selected>Value 2</option>
    <option value="value3">Value 3</option>
  </select>

  <input type="submit" value="Save">
</form>
will be submitted as the following JSON object:
{
  "foo": "1",
  "deep": {
    "prop": {
      "spaced": "3"
    }
  },
  "baz": [
    "4",
    "5"
  ],
  "user": {
    "age": "value2"
  }
}
Sending Blobs/Files as JSON (base64) is not currently supported.
🆕 Progress capturing
Axios supports both browser and node environments to capture request upload/download progress.
await axios.post(url, data, {
  onUploadProgress: function (axiosProgressEvent) {
    /*{
      loaded: number;
      total?: number;
      progress?: number; // in range [0..1]
      bytes: number; // how many bytes have been transferred since the last trigger (delta)
      estimated?: number; // estimated time in seconds
      rate?: number; // upload speed in bytes
      upload: true; // upload sign
    }*/
  },

  onDownloadProgress: function (axiosProgressEvent) {
    /*{
      loaded: number;
      total?: number;
      progress?: number;
      bytes: number;
      estimated?: number;
      rate?: number; // download speed in bytes
      download: true; // download sign
    }*/
  }
});
You can also track stream upload/download progress in node.js:
const {data} = await axios.post(SERVER_URL, readableStream, {
   onUploadProgress: ({progress}) => {
     console.log((progress * 100).toFixed(2));
   },

   headers: {
    'Content-Length': contentLength
   },

   maxRedirects: 0 // avoid buffering the entire stream
});
Note:
Capturing FormData upload progress is currently not currently supported in node.js environments.
⚠️ Warning
It is recommended to disable redirects by setting maxRedirects: 0 to upload the stream in the node.js environment,
as follow-redirects package will buffer the entire stream in RAM without following the «backpressure» algorithm.
🆕 Rate limiting
Download and upload rate limits can only be set for the http adapter (node.js):
const {data} = await axios.post(LOCAL_SERVER_URL, myBuffer, {
  onUploadProgress: ({progress, rate}) => {
    console.log(`Upload [${(progress*100).toFixed(2)}%]: ${(rate / 1024).toFixed(2)}KB/s`)
  },

  maxRate: [100 * 1024], // 100KB/s limit
});
Semver
Until axios reaches a 1.0 release, breaking changes will be released with a new minor version. For example 0.5.1, and 0.5.4 will have the same API, but 0.6.0 will have breaking changes.
Promises
axios depends on a native ES6 Promise implementation to be supported.
If your environment doesn’t support ES6 Promises, you can polyfill.
TypeScript
axios includes TypeScript definitions and a type guard for axios errors.
let user: User = null;
try {
  const { data } = await axios.get('/user?ID=12345');
  user = data.userDetails;
} catch (error) {
  if (axios.isAxiosError(error)) {
    handleAxiosError(error);
  } else {
    handleUnexpectedError(error);
  }
}
Because axios dual publishes with an ESM default export and a CJS module.exports, there are some caveats.
The recommended setting is to use "moduleResolution": "node16" (this is implied by "module": "node16"). Note that this requires TypeScript 4.7 or greater.
If use ESM, your settings should be fine.
If you compile TypeScript to CJS and you can’t use "moduleResolution": "node 16", you have to enable esModuleInterop.
If you use TypeScript to type check CJS JavaScript code, your only option is to use "moduleResolution": "node16".
Online one-click setup
You can use Gitpod, an online IDE(which is free for Open Source) for contributing or running the examples online.
Resources
- Changelog
- Ecosystem
- Contributing Guide
- Code of Conduct
Credits
axios is heavily inspired by the $http service provided in AngularJS. Ultimately axios is an effort to provide a standalone $http-like service for use outside of AngularJS.
License
MIT
May 17, 2019
By default, Axios error messages only include the status code. This is a sensible default, but the default error message is often not helpful.
const app = express();
app.get('*', (req, res) => {
  res.status(404).json({ message: `Could not find page ${req.url}` });
});
const server = await app.listen(3000);

const err = await axios.get('http://localhost:3000/test').
  catch(err => err);
// "Request failed with status code 404"
err.message;
Thankfully, Axios makes it easy to transform errors so the error message makes sense for your application. Axios interceptors allow you to transform all errors coming out of Axios.
// Create an Axios instance to
const client = axios.create();
// Interceptors take 2 parameters:
// Axios calls the first function if the request succeeds
// Axios calls the second function if the request fails
client.interceptors.response.use(
  res => res,
  err => {
    throw new Error(err.response.data.message);
  }
)
const err = await client.get('http://localhost:3000/test').
  catch(err => err);
// "Could not find page /test"
err.message;
More Axios Tutorials
- How to Send Headers With an Axios POST Request
- HTTP DELETE Requests with Body in Axios
- How to Use JSON with Axios
- How to Use the User-Agent Header in Axios
- Axios Multipart Form Data
- How to use Axios’ create() Method with POST Requests
- Axios Response `data` Property
In this tutorial, I will show you how to work with Axios Interceptors: eject, error, 401 status, handling infinite loop and Refresh Token example.
Related Post:
– Axios request: Get/Post/Put/Delete example
– Axios File Upload example
– React Refresh Token with Axios Interceptors
– React + Redux: Refresh Token with Axios Interceptors
– Vue Refresh Token with Axios Interceptors
– Vue 3 Refresh Token with Axios Interceptors
Contents
- Axios interceptors Overview
- Axios interceptors Error
- Axios interceptors Eject
- Axios interceptors for 401 status
- Axios interceptor Infinite loop
- Axios Interceptors with Refresh Token example
- Conclusion
- Further Reading
Axios interceptors Overview
An Interceptor can be understood as a filter of http requests and responses before they are actually sent or received.
This allows us to manipulate the header, body, parameters of the requests sent to the server as well as check the responses received from the server for the most reasonable.
We can intercept requests or responses before they are handled by then or catch.
// Request interceptor
axios.interceptors.request.use((config) => {...});

// Response interceptor
axios.interceptors.response.use((response) => {...});
You can also get request errors or response errors in Axios interceptors:
– Request:
axios.interceptors.request.use(
  (config) => {
    // Do something before request is sent
    return config;
  },
  (error) => {
    // Do something with request error
    return Promise.reject(error);
  });
– Response:
axios.interceptors.response.use(
  (response) => { // Any status code from range of 2xx
    // Do something with response data
    return response;
  },
  (error) => { // Any status codes outside range of 2xx
    // Do something with response error
    return Promise.reject(error);
  });
Axios interceptors Eject
You can add an Interceptors to an instance of Axios.
const instance = axios.create(...);
const myInterceptor = instance.interceptors.request.use(...);
And then, remove the interceptor:
axios.interceptors.request.eject(myInterceptor);
Axios interceptors for 401 status
If we want to handle 401 status on interceptor response or ANOTHER_STATUS_CODE, just check error.response.status like this:
axios.interceptors.response.use(
  (response) => {
    return res;
  },
  async (error) => {
    if (error.response) {
      if (error.response.status === 401) {
        // Do something, call refreshToken() request for example;
        // return a request
        return axios_instance(config);
      }

      if (error.response.status === ANOTHER_STATUS_CODE) {
        // Do something
        return Promise.reject(error.response.data);
      }
    }

    return Promise.reject(error);
  }
);
Axios interceptor Infinite loop
In case the request is failed again, and the server continue to return 401 status code, it may go to Infinite loop. How to handle this?
We use a flag call _retry on original Request (config). _retry is set to true right after the first time we meet 401 status.
axios.interceptors.response.use(
  (response) => {
    return res;
  },
  async (error) => {
    const originalConfig = error.config;
    if (error.response) {
      if (error.response.status === 401 && !originalConfig._retry) {
        originalConfig._retry = true;

        // Do something, call refreshToken() request for example;
        // return a request
        return axios_instance(config);
      }

      if (error.response.status === ANOTHER_STATUS_CODE) {
        // Do something
        return Promise.reject(error.response.data);
      }
    }

    return Promise.reject(error);
  }
);
Axios Interceptors with Refresh Token example
In previous posts, we have implement JWT refresh token on server side:
- Spring Boot JWT Refresh Token example
- Node.js JWT Refresh Token example with MySQL/PostgreSQL
- Node.js JWT Refresh Token example with MongoDB
The diagram shows flow of how we implemented Authentication process with Access Token and Refresh Token.
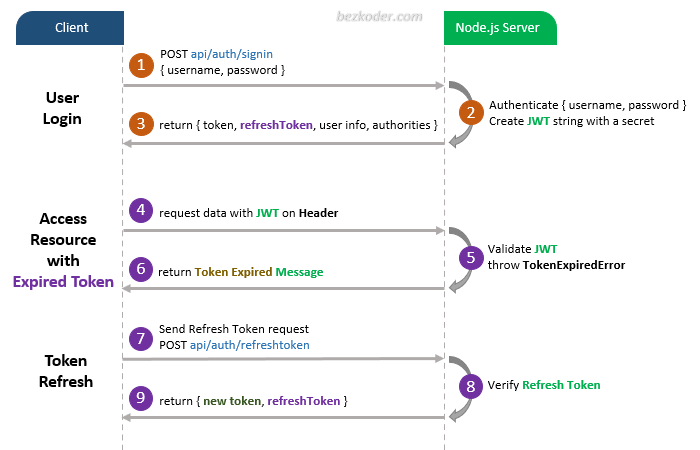
– A legal JWT must be added to HTTP Header if Client accesses protected resources.
– A refreshToken will be provided at the time user signs in.
This is Client that we’re gonna create:
– Login and receive access Token and refresh Token:
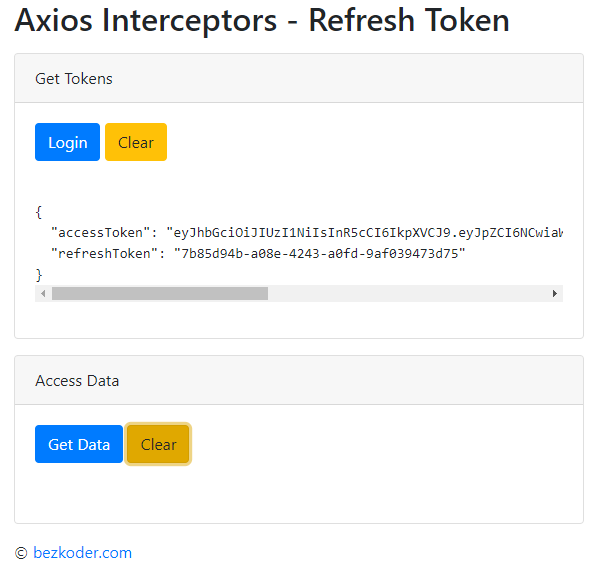
– Access resource successfully with accessToken.

– Continue to access resource with accessToken but when the server returns response telling that the accessToken is expired.
Interceptor automatically sends /refreshtoken request, get new accessToken.
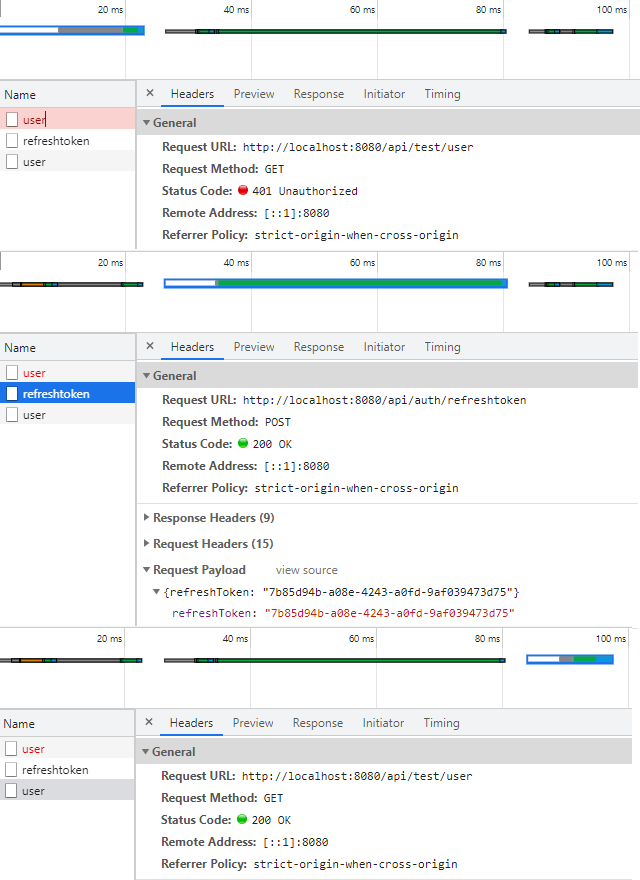
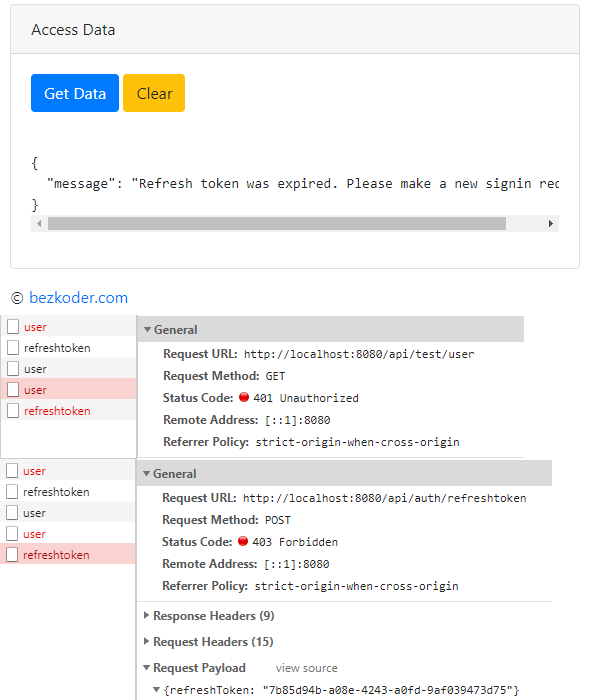
– Wait for the Refresh Token expired, send a new Request.
Implement Refresh Token using Axios Interceptors
First we create HTML file with following code.
index.html
<!DOCTYPE html>
<html>
  <head>
    <meta charset="utf-8" />
    <meta name="viewport" content="width=device-width, initial-scale=1" />
    <title>Axios Interceptors - Refresh Token</title>
    <link
      rel="stylesheet"
      href="https://cdn.jsdelivr.net/npm/[email protected]/dist/css/bootstrap.min.css"
    />
  </head>
  <body>
    <div class="container my-3" style="max-width: 600px">
      <h2>Axios Interceptors - Refresh Token</h2>

      <div class="card mt-3">
        <div class="card-header">Get Tokens</div>
        <div class="card-body">
          <button class="btn btn-primary" onclick="login()">Login</button>
          <button class="btn btn-warning" onclick="clearOutput1()">
            Clear
          </button>
        </div>
        <div class="card-body" id="getResult1"></div>
      </div>

      <div class="card mt-3">
        <div class="card-header">Access Data</div>
        <div class="card-body">
          <button class="btn btn-primary" onclick="getData()">Get Data</button>
          <button class="btn btn-warning" onclick="clearOutput2()">
            Clear
          </button>
        </div>
        <div class="card-body" id="getResult2"></div>
      </div>

      <p class="mt-3">
        ©
        <a href="https://www.bezkoder.com" target="_blank">bezkoder.com</a>
      </p>
    </div>

    <script src="https://unpkg.com/axios/dist/axios.min.js"></script>

    <script src="main.js"></script>
  </body>
</html>
Now we use Axios Interceptors to work with Refresh Token.
main.js
function getLocalAccessToken() {
  const accessToken = window.localStorage.getItem("accessToken");
  return accessToken;
}

function getLocalRefreshToken() {
  const refreshToken = window.localStorage.getItem("refreshToken");
  return refreshToken;
}

const instance = axios.create({
  baseURL: "http://localhost:8080/api",
  headers: {
    "Content-Type": "application/json",
  },
});

instance.interceptors.request.use(
  (config) => {
    const token = getLocalAccessToken();
    if (token) {
      config.headers["x-access-token"] = token;
    }
    return config;
  },
  (error) => {
    return Promise.reject(error);
  }
);

instance.interceptors.response.use(
  (res) => {
    return res;
  },
  async (err) => {
    const originalConfig = err.config;

    if (err.response) {
      // Access Token was expired
      if (err.response.status === 401 && !originalConfig._retry) {
        originalConfig._retry = true;

        try {
          const rs = await refreshToken();
          const { accessToken } = rs.data;
          window.localStorage.setItem("accessToken", accessToken);
          instance.defaults.headers.common["x-access-token"] = accessToken;

          return instance(originalConfig);
        } catch (_error) {
          if (_error.response && _error.response.data) {
            return Promise.reject(_error.response.data);
          }

          return Promise.reject(_error);
        }
      }

      if (err.response.status === 403 && err.response.data) {
        return Promise.reject(err.response.data);
      }
    }

    return Promise.reject(err);
  }
);

function signin() {
  return instance.post("/auth/signin", {
    username: "zkoder",
    password: "12345678",
  });
}

function refreshToken() {
  return instance.post("/auth/refreshtoken", {
    refreshToken: getLocalRefreshToken(),
  });
}

function getUserContent() {
  return instance.get("/test/user");
}

async function login() {
  var resultElement = document.getElementById("getResult1");
  resultElement.innerHTML = "";

  try {
    const res = await signin();

    const { accessToken, refreshToken } = res.data;
    window.localStorage.setItem("accessToken", accessToken);
    window.localStorage.setItem("refreshToken", refreshToken);

    resultElement.innerHTML =
      "<pre>" +
      JSON.stringify({ accessToken, refreshToken }, null, 2) +
      "</pre>";
  } catch (err) {
    resultElement.innerHTML = err;
  }
}

async function getData() {
  var resultElement = document.getElementById("getResult2");
  resultElement.innerHTML = "";

  try {
    const res = await getUserContent();

    resultElement.innerHTML =
      "<pre>" + JSON.stringify(res.data, null, 2) + "</pre>";
  } catch (err) {
    resultElement.innerHTML = "<pre>" + JSON.stringify(err, null, 2) + "</pre>";
  }
}

function clearOutput1() {
  var resultElement = document.getElementById("getResult1");
  resultElement.innerHTML = "";
}

function clearOutput2() {
  var resultElement = document.getElementById("getResult2");
  resultElement.innerHTML = "";
}
Conclusion
Today we’ve known the way to work with Refresh Token using Axios Interceptors. I also show you how to use Axios Interceptors eject, error along with handling 401 status and infinite loop.
You will need back-end code that implements JWT with Refresh Token in one of following tutorials:
- Spring Boot JWT Refresh Token example
- Node.js JWT Refresh Token example with MySQL/PostgreSQL
- Node.js JWT Refresh Token example with MongoDB
You can also apply this in:
– React Refresh Token with Axios Interceptors
– React + Redux: Refresh Token with Axios Interceptors
– Vue Refresh Token with Axios Interceptors
– Vue 3 Refresh Token with Axios Interceptors
Further Reading
– Axios request: Get/Post/Put/Delete example
– Axios File Upload example
– Nodejs Express + React/Angular/Vue:
- Node.js Express + React: JWT Authentication & Authorization example
- Node.js Express + Angular 8: JWT Authentication & Authorization example
- Node.js Express + Angular 10: JWT Authentication & Authorization example
- Node.js Express + Angular 11: JWT Authentication & Authorization example
- Node.js Express + Angular 12: JWT Authentication & Authorization example
- Node.js Express + Angular 13: JWT Authentication & Authorization example
- Node.js Express + Angular 14: JWT Authentication & Authorization example
- Node.js Express + Vue.js: JWT Authentication & Authorization example
– Spring Boot + React/Angular/Vue:
- React + Spring Boot: JWT Authentication & Authorization example
- Angular 8 + Spring Boot: JWT Authentication & Authorization example
- Angular 10 + Spring Boot: JWT Authentication & Authorization example
- Angular 11 + Spring Boot: JWT Authentication & Authorization example
- Angular 12 + Spring Boot: JWT Authentication & Authorization example
- Angular 13 + Spring Boot: JWT Authentication & Authorization example
- Angular 14 + Spring Boot: JWT Authentication & Authorization example
- Vue + Spring Boot: JWT Authentication & Authorization example
Share Axios Interceptors with React
Axios interceptors are the default configurations that are added automatically to every request or response that a user receives. It is useful to check response status code for every response that is being received.
Interceptors are methods which are triggered before or after the main method. There are two types of interceptors:
- request interceptor: — It allows you to write or execute a piece of your code before the request gets sent.
- response interceptor: — It allows you to write or execute a piece of your code before response reaches the calling end.
The steps to create Axios request & response interceptors are:
- Create a new Axios instance with a custom config
- Create request, response & error handlers
- Configure/make use of request & response interceptors from Axios
- Export the newly created Axios instance to be used in different locations
Add a request interceptor
Add a response interceptor
Error handling using Axios interceptors
You can use an Axios interceptor to capture all errors and enhance them before reaching your end user. If you use multiple APIs with different error object shapes, you can use an interceptor to transform them into a standard structure.
Conclusion
This is how we can make use of the Axios interceptor functions to intercept every request, update the request with authorization header, API key, etc. if it’s set up like that, and forward the request. Once the request is resolved, take the response, perform predefined checks/filters if any, and return/forward the response to complete the request made.