I have a form in my react which allows users fill out their info and then sends a Post requests to create a new user in my database once submitted. I am using axios to make the http call with a node backend. The post request works on the backend, but I am now trying to handle errors on the front end (i.e. if a user enters an invalid email, the backend catches this and sends an error status back, and I want to display a message to the user saying they need to enter a valid email, etc).
I have the following code on my backend to handle the request:
const { check, validationResult } = require('express-validator/check');

studentRoutes.route('/add').post([
  check('email').isEmail(), check('class_year').isInt({min: 2014, max: 2022})],
  function (req, res) {

  //make sure input is valid
  const errors = validationResult(req);
  if (!errors.isEmpty()) {
    return res.status(422).json({ errors: errors.array() });
  }
  .
  .
  .
  //post call succesful
  res.status(200).send("Student successfully Added to database");
});
On the front end, I make the http call as follows:
app.post('student/add', obj)
    .then(res => console.log(res.data))
    .catch(err => console.log(err));
where app is axios.
When I try this with correct data (i.e. should not return error), the message «Student successfully added to database» prints to the console as expected.
When I try this with a bad email (i.e. should return error), all that is printed to my console is:
(X) POST http://localhost:4000/student/add 422 (Unprocessable Entity)
Error: Request failed with status code 422
    at createError (createError.js:17)
    at settle (settle.js:19)
    at XMLHttpRequest.handleLoad (xhr.js:78)
Where the first POST error is caught by my browser and the second part starting «Error: …» is printed to the console.
When I try to access the error (err.errors or similar) it returns undefined. How can I access the status code and the body of the error sent?
Note: I have also tried replacing the line return res.status(422).json({ errors: errors.array() }); with return res.status(422).send({ errors: errors.array() }); but that does not help and the results are the same.
axios.get('/user/12345')
  .catch(function (error) {
    if (error.response) {
      // The request was made and the server responded with a status code
      // that falls out of the range of 2xx
      console.log(error.response.data);
      console.log(error.response.status);
      console.log(error.response.headers);
    } else if (error.request) {
      // The request was made but no response was received
      // `error.request` is an instance of XMLHttpRequest in the browser and an instance of
      // http.ClientRequest in node.js
      console.log(error.request);
    } else {
      // Something happened in setting up the request that triggered an Error
      console.log('Error', error.message);
    }
    console.log(error.config);
  });
Using the validateStatus config option, you can define HTTP code(s) that should throw an error.
axios.get('/user/12345', {
  validateStatus: function (status) {
    return status < 500; // Resolve only if the status code is less than 500
  }
})
Using toJSON you get an object with more information about the HTTP error.
axios.get('/user/12345')
  .catch(function (error) {
    console.log(error.toJSON());
  });
Comments
![]()
This was referenced
Jan 31, 2020
jasonsaayman
pushed a commit
that referenced
this issue
Apr 19, 2021
![]()
…be passed directly as payload for encoding to JSON #2613, #61, #907 (#3688)

* Draft

* Added support for primitive types to be converted to JSON if the request Content-Type is 'application/json';
Added throwing SyntaxError if JSON parsing failed and responseType is json;
Added transitional option object;
Added options validator to assert transitional options;
Added transitional option `silentJSONParsing= true` for backward compatibility;
Updated README.md;
Updated typings;

* Fixed isOlderVersion helper;
Fixed typo;
Added validator.spec.js;

* Added forcedJSONParsing transitional option #2791

* `transformData` is now called in the default configuration context if the function context is not specified (for tests compatibility);

* Added `transitional.clarifyTimeoutError` to throw ETIMEDOUT error instead of generic ECONNABORTED on request timeouts;
Added support of onloadend handler if available instead of onreadystatechange;
Added xhr timeout test;
Fixed potential bug of xhr adapter with proper handling timeouts&errors (FakeXMLHTTPRequest failed to handle timeouts);
mbargiel
pushed a commit
to mbargiel/axios
that referenced
this issue
Jan 27, 2022
![]()
…be passed directly as payload for encoding to JSON axios#2613, axios#61, axios#907 (axios#3688)

* Draft

* Added support for primitive types to be converted to JSON if the request Content-Type is 'application/json';
Added throwing SyntaxError if JSON parsing failed and responseType is json;
Added transitional option object;
Added options validator to assert transitional options;
Added transitional option `silentJSONParsing= true` for backward compatibility;
Updated README.md;
Updated typings;

* Fixed isOlderVersion helper;
Fixed typo;
Added validator.spec.js;

* Added forcedJSONParsing transitional option axios#2791

* `transformData` is now called in the default configuration context if the function context is not specified (for tests compatibility);

* Added `transitional.clarifyTimeoutError` to throw ETIMEDOUT error instead of generic ECONNABORTED on request timeouts;
Added support of onloadend handler if available instead of onreadystatechange;
Added xhr timeout test;
Fixed potential bug of xhr adapter with proper handling timeouts&errors (FakeXMLHTTPRequest failed to handle timeouts);
This was referenced
Nov 9, 2022
![]()
If you have been searching the web for some information about AXIOS error messages, and would like to understand how to use them, then you have come to the right place.
TLTR; Find the code snippets in the following section
If you search the web on this topic, all you can find is:
- catching error body using axios post
- Unable to catch the body of error
- JS Axios – how to get response body in event of error?
- How to see axios error response JSON in React
The list could have gone on and on, but they all ask for the sample simple question:
How can someone get the actual error information coming from a bad request made with AXIOS.
In this post we are going to provide information on “why” so many people ask for information, and “how” this information can be found.
Why so many people ask for this
If you have ever worked with an api, you perfectly know that request not always go to plan. You hope to always get a lovely response with a status of 200, but this does not always happens.
In many instances the status of our request may return some kind of error (400, 500), and when this happens we would like to be able to have a readable error message.
axios.get('EndpointWithAuthorizedError')
    .then((response) => {})
    .catch((error) => {
        console.log(error);
    })
Enter fullscreen mode
Exit fullscreen mode
Unfortunately if the above would ever fail with a meaningful error, we would still see this within our console, as the variable passed by the catch statement seem to be of type “string”.
Error: Request failed with status code 401
Enter fullscreen mode
Exit fullscreen mode
This is actually the main reason why so many people are “forced” to ask for help.
How can we process AXIOS error message
There is actually no magic when processing the error messages. In fact, the catch is in the fact that the variable received by the catch statement seem to be a string, but in reality it is not.
The AXIOS error message can actually return 3 different structure, depending from what kind of failure it has (crazy right… I thought that too).
Error in setting up the request
This error can happen if we have made an actual mistake in setting up the AXIOS request. It could be something with the data passed, or a configuration setting.
When this happen we can actually find the information we need by accessing the message parameter of the catch.
axios.get('wrongSetup')
    .then((response) => {})
    .catch((error) => {
        console.log(error.message);
    })

//or using destructuring
axios.get('wrongSetup')
    .then((response) => {})
    .catch(({message) => {
        console.log(message);
    })
Enter fullscreen mode
Exit fullscreen mode
No response – Network Error
This scenario will take place when our request had no response at all. This can happen when the URL is incorrect, or if the receiving server is down.
When this happen we can access more information about our request bu accessing the request parameter. This will return the actual “request” information.
axios.get('network error')
     .then((response) => {})
     .catch((error) => {
         console.log(error. request );
     })
//or using destructuring
 axios.get('network error')
     .then((response) => {})
     .catch(({ request ) => {
         console.log( request );
     })
Enter fullscreen mode
Exit fullscreen mode
Request returned with an error status
This is one of the most common, or more specifically the one type of “error” that need to be manage to make sure our web applications function properly.
There are hundreds of status code differently than 200 (https://developer.mozilla.org/en-US/docs/Web/HTTP/Status), that would fit in this category. I am going to list below the most important:
- 400: Bad request
- 401: Unauthorized
- 403: Forbidden
- 404: Not Found
- 500: Internal Server error
- 502: Bad Gateway
When any of the above happen, we would like to know more about the request. In this case there are more information provided to us: data, status, header.
axios.get('errorStatus')
     .then((response) => {})
     .catch((error) => {
         console.log(error.response.data);
         console.log(error.response.status);
         console.log(error.response.headers);
     })

//or using destructuring
 axios.get('errorStatus')
     .then((response) => {})
     .catch(({ response }) => {
         console.log(response.data);
         console.log(response.status);
         console.log(response.headers);
     })
Enter fullscreen mode
Exit fullscreen mode
With the above code, we will be able to get all the information we need about the response to our request. These includes the status code, the header and last but not least the data that the server has sent with the request.
When using any kind of API, the data parameter is going to include essential information, usually used for development purposes, but at times also good to show to the end users.
I hope to have saved you some time, and please feel free to comment, or provide suggestion to improve this post and help future readers
Note: If you want to see how to handle these in React, take a look at my new post on that here — handling async errors with axios in react.
Whenever you’re making a backend API call with axios, you have to consider what to do with the .catch() block of your promise. Now, you might think that your API is highly available and it’ll be running 24/7. You might think that the user workflow is pretty clear, your javascript is sane, and you have unit tests. So when you stare at the catch block when making requests using axios you might think — «Well… I’ll just console.log it. That’ll be fine.»
axios.get('/my-highly-available-api').then(response => {
    // do stuff
})
.catch(err => {
    // what now?
    console.log(err);
})
But there are so many many many more things that are outside of your control that could throw errors when making API requests. And you probably don’t even know that they’re happening!
This post deals mainly with errors you see in the browser. Things can get pretty funny looking on the back end too — just take a look at 3 things you might see in your backend logs
Below are 3 types of errors that could appear, and how to handle it, when using axios.
Catching axios errors
Below is a snippet I’ve started including in a few JS projects.
axios.post(url, data).then(res => {
        // do good things
})
.catch(err => {
    if (err.response) {
      // client received an error response (5xx, 4xx)
    } else if (err.request) {
      // client never received a response, or request never left
    } else {
      // anything else
    }
})
Each condition is meant to capture a different type of error.
Checking error.response
If your error object contains a response field, that means your server responded with a 4xx/5xx error. Usually this is the error we’re most familiar with, and is most straightforward to handle.
Do things like a show a 404 Not Found page/error message if your API returns a 404. Show a different error message if your backend is returning a 5xx or not returning anything at all. You might think your well-architected backend won’t throw errors — but its a matter of when, not if.
Checking error.request
The second class of errors is where you don’t have a response but there’s a request field attached to the error. When does this happen? This happens when the browser was able to make a request, but for some reason, it didn’t see a response.
This can happen if:
- you’re in a spotty network (think underground subway, or a building wireless network)
- if your backend is hanging on each request and not returning a response on time
- if you are making cross-domain requests and you’re not authorized to make the request
- if you’re making cross-domain requests and you are authorized, but the backend API returns an error
One of the more common versions of this error had a message «Network Error» which is a useless error message. We have a front-end and a backend api hosted on different domains, so every backend API call is a cross-domain request.
Due to security constraints on JS in the browser, if you make an API request, and it fails due to crappy networks, the only error you’ll see is «Network Error» which is incredibly unhelpful. It can mean anything from «your device doesn’t have internet connectivity» to «your OPTIONS returned a 5xx» (if you make CORS requests). The reason for «Network Error» is described well here on this StackOverflow answer
All the other types of errors
If your error object doesn’t have the response or request field on it, that means its not an axios error and theres likely something else wrong in your app. The error message + stack trace should help you figure out where its coming from.
How do you fix it?
Degrading the user experience
This all depends on your app. For the projects I work on, for each of the features that use those endpoints, we degrade the user experience.
For example, if the request fails, and the page is useless without that data, then we have a bigger error page that will appear and offer users a way out — which sometimes is only a «Refresh the page» button.
Another example, if a request fails for a profile picture in a social media stream, we can show a placeholder image and disable profile picture changes, along with a toaster message explaining why the «update profile picture» button is disabled. However, showing an alert saying «422 Unprocessable Entity» is useless to see as a user.
Spotty networks
The web client I work on is used in school networks which can be absolutely terrible. The availability of your backend barely has anything to do with it, the request sometimes fail to leave the school network.
To solve these types of intermittent network problems, we added in axios-retry. This solved a good amount of the errors we were seeing in production. We added this to our axios setup:
const _axios = require('axios')
const axiosRetry = require('axios-retry')

const axios = _axios.create()

// https://github.com/softonic/axios-retry/issues/87
const retryDelay = (retryNumber = 0) => {
    const seconds = Math.pow(2, retryNumber) * 1000;
    const randomMs = 1000 * Math.random();
    return seconds + randomMs;
};

axiosRetry(axios, {
    retries: 2,
    retryDelay,
    // retry on Network Error & 5xx responses
    retryCondition: axiosRetry.isRetryableError,
});

module.exports = axios;
We were able to see that 10% of our users (which are in crappy school networks) were seeing sporadic «Network Errors» and that dropped down to <2% after adding in automatic retries on failure.

^ This is a screenshot of our errors is the count of «Network Errors» as they appear in NewRelic and are showing <1% of requests are erroring out.
Which leads to my last point:
Add error reporting to your front-end
Its helpful to have front-end error/event reporting so that you know whats happening in prod before your users tell you. At my day job, we use NewRelic Browser (paid service — no affiliation, just a fan) to send error events from the front-end. So whenever we catch an exception, we log the error message, along with the stack trace (although thats sometimes useless with minified bundles), and some metadata about the current session so we can try to recreate it.
Other tools that fill this space are Sentry + browser SDK, Rollbar, and a whole bunch of other useful ones listed here
Wrapping up
If you get nothing else out of this, do one thing.
Go to your code base now, and review how you’re handling errors with axios.
- Check if you’re doing automatic retries, and consider adding
axios-retryif you aren’t - Check that you’re catching errors, and letting the user know that something has happened.
axios.get(...).catch(console.log)isn’t good enough.
So. How do you handle your errors? Let me know in the comments.
Making API calls is integral to most applications and while doing this we use an HTTP client usually available as an external library. Axios is a popular HTTP client available as a JavaScript library with more than 22 million weekly downloads as of May 2022.
We can make API calls with Axios from JavaScript applications irrespective of whether the JavaScript is running on the front-end like a browser or the server-side.
In this article, we will understand Axios and use its capabilities to make different types of REST API calls from JavaScript applications.
Example Code
This article is accompanied by a working code example on GitHub.
Why do we need Axios
Let us first understand why do we need to use a library like Axios. JavaScript already provides built-in objects: XMLHttpRequest and the Fetch API for interacting with APIs.
Axios in contrast to these built-in objects is an open-source library that we need to include in our application for making API calls over HTTP. It is similar to the Fetch API and returns a JavaScript Promise object but also includes many powerful features.
One of the important capabilities of Axios is its isomorphic nature which means it can run in the browser as well as in server-side Node.js applications with the same codebase.
Axios is also a promise-based HTTP client that can be used in plain JavaScript as well as in advanced JavaScript frameworks like React, Vue.js, and Angular.
It supports all modern browsers, including support for IE 8 and higher.
In the following sections, we will look at examples of using these features of Axios in our applications.
Installing Axios and Other Prerequisites For the Examples
We have created the following applications to simulate APIs on the server consumed by other applications on the server and the browser with REST APIs :

apiserver: This is a Node.js application written using the Express Framework that will contain the REST APIs.serversideapps: This is also a Node.js written in Express that will call the REST APIs exposed by theapiserverapplication using theAxiosHTTP client.reactapp: This is a front-end application written in React which will also call the REST APIs exposed by theapiserverapplication.
Instead of Express, we could have used any other JavaScript framework or even raw JavaScript applications. To understand Express, please refer to our Express series of articles starting with Getting started on Express.
We will need to install the Axios library in two of these applications: serversideapps and reactapp which will be making API calls. Let us change to these directories one by one and install Axios using npm:
The package.json in our Node.js express application after installing the axios module looks like this:
{
  "name": "serversideapp",
  "version": "1.0.0",
  "description": "",
  "main": "index.js",
  ...
  ...
  "dependencies": {
    "axios": "^0.27.2",
    "cors": "^2.8.5",
    "express": "^4.18.1"
  }
}
We can see the axios module added as a dependency in the dependencies element.
If we want to call APIs with Axios from a vanilla JavaScript application, then we need to include it from a Content delivery network (CDN) as shown here:
<script src="https://unpkg.com/axios/dist/axios.min.js"></script>
After setting up our applications, let us now get down to invoking the APIs exposed by the apiserver from the serversideapp and the reactapp using the Axios HTTP client in the following sections.
Sending Requests with the Axios Instance
Let us start by invoking a GET method with the Axios HTTP client from our server-side application: serversideapp.
For doing this, we will add an Express route handler function with a URL: /products to the application. In the route handler function, we will fetch the list of products by calling an API from our apiserver with the URL: http://localhost:3002/products.
We will use the signature: axios(config) on the default instance provided by the Axios HTTP client for doing this:
const express = require('express')

// Get the default instance
const axios = require('axios')

const app = express()

// Express route handler with URL: '/products' and a handler function
app.get('/products', (request, response) => {

  // Make the GET call by passing a config object to the instance
  axios({
    method: 'get',
    url: 'http://localhost:3002/products'
  }).then(apiResponse => {
     // process the response
     const products = apiResponse.data
     response.json(products)
  })

})
In this example, we are first calling require('axios') for getting an instance: axios set up with a default configuration.
Then we are passing a configuration argument to the axios instance containing the method parameter set to the HTTP method: get and the url parameter set to the URL of the REST endpoint: http://localhost:3002/products. The url parameter is mandatory while we can omit the method parameter that will then default to get.
This method returns a JavaScript Promise object which means the program does not wait for the method to complete before trying to execute the subsequent statement. The Promise is either fulfilled or rejected, depending on the response from the API.
We use the then() method as in this example for processing the result. The then() method gets executed when the Promise is fulfilled . In our example, in the then method, we are extracting the list of products by calling apiResponse.data.
Similarly, a POST request for adding a new product made with the axios default instance will look like this:
const express = require('express')

// Get the default instance
const axios = require('axios')

const app = express()

// Express route handler with URL: '/products/new' and a handler function
app.post('/products/new', async (request, response) => {

  const name = request.body.name
  const brand = request.body.brand

  const newProduct = {name: name, brand:brand}

  // Make the POST call by passing a config object to the instance
  axios({
    method: 'post',
    url: 'http://localhost:3002/products',
    data: newProduct,
    headers: {'Authorization': 'XXXXXX'}
  }).then(apiResponse=>{
     const products = apiResponse.data
     response.json(products)
  })
})
In this example, in addition to what we did for calling the GET method, we have set the data element containing the JSON representation of the new Product along with an Authorization header. We are processing the response in the then function on the Promise response where we are extracting the API response data by calling apiResponse.data.
For more involved processing of the API response, it will be worthwhile to understand all the elements of the response returned by the API call made with axios :
- data: Response payload sent by the server
- status: HTTP status code from the server response
- statusText: HTTP status message from the server response
- headers: HTTP headers received in the API response
- config: config sent to the
axiosinstance for sending the request - request: Request that generated this response. It is the last ClientRequest instance in node.js (in redirects) and an XMLHttpRequest instance in the browser.
Sending Requests with the Convenience Instance Methods of Axios
Axios also provides an alternate signature for making the API calls by providing convenience methods for all the HTTP methods like:axios.get(), axios.post(), axios.put(), axios.delete(), etc.
We can write the previous example for calling the GET method of the REST API using the convenience method: axios.get() as shown below:
const express = require('express')

// Get the default instance
const axios = require('axios')

const app = express()

// Express route handler for making a request for fetching a product
app.get('/products/:productName', (request, response) => {

  const productName = request.params.productName

  axios.get(`http://localhost:3002/products/${productName}`)
  .then(apiResponse => {
     const product = apiResponse.data
     response.json(product)
  })
})
In this example, in the Express route handler function, we are calling the get() method on the default instance of axios and passing the URL of the REST API endpoint as the sole argument. This code looks much more concise than the signature: axios(config) used in the example in the previous section.
The signature: axios.get() is always preferable for calling the REST APIs due to its cleaner syntax. However, the signature: axios(config) of passing a config object containing the HTTP method, and URL parameters to the axios instance can be used in situations where we want to construct the API calls dynamically.
The get() method returns a JavaScript Promise object similar to our earlier examples, where we extract the list of products inside the then function.
Instead of appending the request query parameter in the URL in the previous example, we could have passed the request parameter in a separate method argument: params as shown below:
const axios = require('axios')
axios.get(`http://localhost:3002/products/`, {
    params: {
      productName: productName
    }
  })
  .then(apiResponse => {
     const product = apiResponse.data
     response.json(product)
  })
We could have also used the async/await syntax to call the get() method:
const express = require('express')
const axios = require('axios')

const app = express()

app.get('/products/async/:productName', async (request, response) => {
  const productName = request.params.productName

  const apiResponse = await axios.get(`http://localhost:3002/products/`, {
    params: {
      productName: productName
    }
  })

  const product = apiResponse.data
  response.json(product)
})
async/await is part of ECMAScript 2017 and is not supported in older browsers like IE.
Let us next make a POST request to an API with the convenience method axios.post():
const express = require('express')
const axios = require('axios')

const app = express()

app.post('/products', async (request, response) => {

    const name = request.body.name
    const brand = request.body.brand

    const newProduct = {name: name, brand:brand}

    const apiResponse = await axios.post(`http://localhost:3002/products/`, newProduct)

    const product = apiResponse.data
    response.json({result:"OK"})
})
Here we are using the async/await syntax to make a POST request with the axios.post() method. We are passing the new product to be created as a JSON as the second parameter of the post() method.
Using Axios in Front-End Applications
Let us look at an example of using Axios in a front-end application built with the React library. The below snippet is from a React component that calls the API for fetching products:
import React, { useState } from 'react'
import axios from 'axios'
export default function ProductList(){
const [products, setProducts] = useState([])
const fetchProducts = ()=>{
axios.get(`http://localhost:3001/products`)
.then(response => {
const products = response.data
setProducts(products)
})
}
return (
<>
<p>Product List</p>
<p><button onClick={fetchProducts}>Fetch Products</button></p>
<ul>
{
products
.map(product =>
<li key={product.id}>{product.name} {product.brand}</li>
)
}
</ul>
</>
)
}
As we can see, the code for making the API call with Axios is the same as what we used in the Node.js application in the earlier sections.
Sending Multiple Concurrent Requests with Axios
In many situations, we need to combine the results from multiple APIs to get a consolidated result. With the Axios HTTP client, we can make concurrent requests to multiple APIs as shown in this example:
const express = require('express')

// get the default axios instance
const axios = require('axios')

const app = express()

// Route Handler
app.get('/products/:productName/inventory', (request, response) => {

  const productName = request.params.productName

  // Call the first API for product details
  const productApiResponse = axios
            .get(`http://localhost:3002/products/${productName}`)

  // Call the second API for inventory details
  const inventoryApiResponse = axios
            .get(`http://localhost:3002/products/${productName}/itemsInStock`)

  // Consolidate results into a single result
  Promise.all([productApiResponse, inventoryApiResponse])
  .then(results=>{
      const productData = results[0].data
      const inventoryData = results[1].data
      let aggregateData = productData
      aggregateData.unitsInStock = inventoryData.unitsInStock
      response.send(aggregateData)

  })
})
In this example, we are making requests to two APIs using the Promise.all() method. We pass an iterable of the two Promise objects returned by the two APIs as input to the method.
In response, we get a single Promise object that resolves to an array of the results of the input Promise objects.
This Promise object returned as the response will resolve only when all of the input promises are resolved, or if the input iterable contains no promises.
Overriding the default Instance of Axios
In all the examples we have seen so far, we used the require('axios') to get an instance of axios which is configured with default parameters. If we want to add a custom configuration like a timeout of 2 seconds, we need to use Axios.create() where we can pass the custom configuration as an argument.
An Axios instance created with Axios.create() with a custom config helps us to reuse the provided configuration for all the API invocations made by that particular instance.
Here is an example of an axios instance created with Axios.create() and used to make a GET request:
const express = require('express')
const axios = require('axios')

const app = express()

// Express Route Handler
app.get('/products/deals', (request, response) => {

  // Create a new instance of axios
  const new_instance = axios.create({
    baseURL: 'http://localhost:3002/products',
    timeout: 1000,
    headers: {
      'Accept': 'application/json',
      'Authorization': 'XXXXXX'
    }
  })

  new_instance({
    method: 'get',
    url: '/deals'
  }).then(apiResponse => {
     const products = apiResponse.data
     response.json(products)
  })

})
In this example, we are using axios.create() to create a new instance of Axios with a custom configuration that has a base URL of http://localhost:3002/products and a timeout of 1000 milliseconds. The configuration also has an Accept and Authorization headers set depending on the API being invoked.
The timeout configuration specifies the number of milliseconds before the request times out. If the request takes longer than the timeout interval, the request will be aborted.
Intercepting Requests and Responses
We can intercept requests or responses of API calls made with Axios by setting up interceptor functions. Interceptor functions are of two types:
- Request interceptor for intercepting requests before the request is sent to the server.
- Response interceptor for intercepting responses received from the server.
Here is an example of an axios instance configured with a request interceptor for capturing the start time and a response interceptor for computing the time taken to process the request:
const express = require('express')
const axios = require('axios')

const app = express()

// Request interceptor for capturing start time
axios.interceptors.request.use(
   (request) => {
    request.time = { startTime: new Date() }
    return request
  },
  (err) => {
    return Promise.reject(err)
  }
)

// Response interceptor for computing duration
axios.interceptors.response.use(
   (response) => {
    response.config.time.endTime = new Date()
    response.duration =
           response.config.time.endTime - response.config.time.startTime
    return response
  },
  (err) => {
    return Promise.reject(err);
  }
)

// Express route handler
app.get('/products', (request, response) => {

  axios({
    method: 'get',
    url: 'http://localhost:3002/products'
  }).then(apiResponse=>{
     const products = apiResponse.data

     // Print duration computed in the response interceptor
     console.log(`duration ${apiResponse.duration}` )
     response.json(products)
  })

})
In this example, we are setting the request.time to the current time in the request interceptor. In the response interceptor, we are capturing the current time in response.config.time.endTime and computing the duration by deducting from the current time, the start time captured in the request interceptor.
Interceptors are a powerful feature that can be put to use in many use cases where we need to perform actions common to all API calls. In the absence of interceptors, we will need to repeat these actions in every API call. Some of these examples are:
- Verify whether the access token for making the API call has expired in the request interceptor. If the token has expired, fetch a new token with the refresh token.
- Attach specific headers required by the API to the request in the request interceptor. For example, add the
Authorizationheader to every API call. - Check for HTTP status, headers, and specific fields in the response to detect error conditions and trigger error handling logic.
Handling Errors in Axios
The response received from Axios is a JavaScript promise which has a then() function for promise chaining, and a catch() function for handling errors. So for handling errors, we should add a catch() function at the end of one or more then() functions as shown in this example:
const express = require('express')
const axios = require('axios')

const app = express()

// Express route handler
app.post('/products/new', async (request, response) => {

  const name = request.body.name
  const brand = request.body.brand

  const newProduct = {name: name, brand: brand}

  axios({
    method: 'post',
    url: 'http://localhost:3002/products',
    data: newProduct,
    headers: {'Authorization': 'XXXXXX'}
  }).then(apiResponse=>{
     const products = apiResponse.data
     response.json(products)
  }).catch(error => {
    if (error.response) {
        console.log("response error")
    } else if (error.request) {
        console.log("request error")
    } else {
      console.log('Error', error.message);
    }
    response.send(error.toJSON())
  })
})
In this example, we have put the error handling logic in the catch() function. The callback function in the catch() takes the error object as input. We come to know about the source of the error by checking for the presence of the response property and request property in the error object with error.response and error.request.
An error object with a response property indicates that our server returned a 4xx/5xx error and accordingly return a helpful error message in the response.
In contrast, An error object with a request property indicates network errors, a non-responsive backend, or errors caused by unauthorized or cross-domain requests.
The error object may not have either a response or request object attached to it. This indicates errors related to setting up the request, which eventually triggered the error. An example of this condition is an URL parameter getting omitted while sending the request.
Cancelling Initiated Requests
We can also cancel or abort a request when we no longer require the requested data for example, when the user navigates from the current page to another page. To cancel a request, we use the AbortController class as shown in this code snippet from our React application:
import React, { useState } from 'react'
import axios from 'axios'

export default function ProductList(){
    const [products, setProducts] =  useState([])

    const controller = new AbortController()

    const abortSignal = controller.signal
    const fetchProducts = ()=>{
       axios.get(`http://localhost:3001/products`, {signal: abortSignal})
      .then(response => {
        const products = response.data
        setProducts(products)
      })
      controller.abort()
    }

    return (
        <>
          ...
          ...
        </>
    )
}
As we can see in this example, we are first creating a controller object using the AbortController() constructor, then storing a reference to its associated AbortSignal object using the signal property of the AbortController.
When the axios request is initiated, we pass in the AbortSignal as an option inside the request’s options object: {signal: abortSignal}. This associates the signal and controller with the axios request and allows us to abort the request by calling the abort() method on the controller.
Using Axios in TypeScript
Let us now see an example of using Axios in applications authored in TypeScript.
We will first create a separate folder: serversideapp_ts and create a project in Node.js by running the below command by changing into this directory:
cd serversideapp_ts
npm init -y
Let us next add support for TypeScript to our Node.js project by performing the following steps:
- Installing Typescript and
ts-nodewithnpm:
npm i -D typescript ts-node
- Creating a JSON file named
tsconfig.jsonwith the below contents in our project’s root folder to specify different options for compiling the TypeScript code:
{
  "compilerOptions": {
    "module": "commonjs",
    "target": "es6",
    "rootDir": "./",
    "esModuleInterop": true
  }
}
- Installing the
axiosmodule withnpm:
Axios includes TypeScript definitions, so we do not have to install them separately.
After enabling the project for TypeScript, let us add a file index.ts which will contain our code for making API calls with Axios in TypeScript.
Next, we will make an HTTP GET request to our API for fetching products as shown in this code snippet:
import axios from 'axios';

type Product = {
  id: number;
  email: string;
  first_name: string;
};

type GetProductsResponse = {
  data: Product[];
};

async function getProducts() {
  try {
    // 👇️ fetch products from an API
    const { data, status } = await axios.get<GetProductsResponse>(
      'http://localhost:3002/products',
      {
        headers: {
          Accept: 'application/json',
        },
      },
    );

    console.log(JSON.stringify(data, null, 4));

    console.log(`response status is: ${status}`);

    return data;
  } catch (error) {
    if (axios.isAxiosError(error)) {
      console.log(`error message: ${error.message}`);
      return error.message;
    } else {
      console.log(`unexpected error: ${error}`);
      return 'An unexpected error occurred';
    }
  }
}

getProducts();
In this example, we are getting the axios instance by importing it from the module in the first line. We have next defined two type definitions: Product and GetProductsResponse.
After that we have defined a method getProducts() where we are invoking the API with the axios.get() method using the async/await syntax. We are passing the URL of the API endpoint and an Accept header to the axios.get() method.
Let us now run this program with the below command:
We are calling the method: getProducts() in the last line in the program, which prints the response from the API in the terminal/console.
Conclusion
In this article, we looked at the different capabilities of Axios. Here is a summary of the important points from the article:
- Axios is an HTTP client for calling REST APIs from JavaScript programs running in the server as well as in web browsers.
- We create default instance of
axiosby callingrequire('axios') - We can override the default instance of
axioswith thecreate()method ofaxiosto create a new instance, where we can override the default configuration properties like ‘timeout’. - Axios allows us to attach request and response interceptors to the
axiosinstance where we can perform actions common to multiple APIs. - Error conditions are handled in the
catch()function of thePromiseresponse. - We can cancel requests by calling the
abort()method of theAbortControllerclass. - The Axios library includes TypeScript definitions, so we do not have to install them separately when using Axios in TypeScript applications.
You can refer to all the source code used in the article
on Github.

In this guide, you will see exactly how to use Axios.js with React using tons of real-world examples featuring React hooks.
You’ll see why you should use Axios as a data fetching library, how to set it up with React, and perform every type of HTTP request with it.
Then we’ll touch on more advanced features like creating an Axios instance for reusability, using async-await with Axios for simplicity, and how to use Axios as a custom hook.
Let’s dive right in!
Want Your Own Copy? 📄
Click here to download the cheatsheet in PDF format (it takes 5 seconds).
It includes all of the essential information here as a convenient PDF guide.
Table of Contents
- What is Axios?
- Why Use Axios in React?
- How to Set Up Axios with React
- How to Make a GET Request (Retrieve Data)
- How to Make a POST Request (Create Data)
- How to Make a PUT Request (Update Data)
- How to Make a DELETE Request (Delete Data)
- How to Handle Errors with Axios
- How to Create an Axios Instance
- How to Use the Async-Await Syntax with Axios
- How to Create a Custom
useAxiosHook
What is Axios?
Axios is an HTTP client library that allows you to make requests to a given endpoint:
This could be an external API or your own backend Node.js server, for example.
By making a request, you expect your API to perform an operation according to the request you made.
For example, if you make a GET request, you expect to get back data to display in your application.
Why Use Axios in React
There are a number of different libraries you can use to make these requests, so why choose Axios?
Here are five reasons why you should use Axios as your client to make HTTP requests:
- It has good defaults to work with JSON data. Unlike alternatives such as the Fetch API, you often don’t need to set your headers. Or perform tedious tasks like converting your request body to a JSON string.
- Axios has function names that match any HTTP methods. To perform a GET request, you use the
.get()method. - Axios does more with less code. Unlike the Fetch API, you only need one
.then()callback to access your requested JSON data. - Axios has better error handling. Axios throws 400 and 500 range errors for you. Unlike the Fetch API, where you have to check the status code and throw the error yourself.
- Axios can be used on the server as well as the client. If you are writing a Node.js application, be aware that Axios can also be used in an environment separate from the browser.
Using Axios with React is a very simple process. You need three things:
- An existing React project
- To install Axios with npm/yarn
- An API endpoint for making requests
The quickest way to create a new React application is by going to react.new.
If you have an existing React project, you just need to install Axios with npm (or any other package manager):
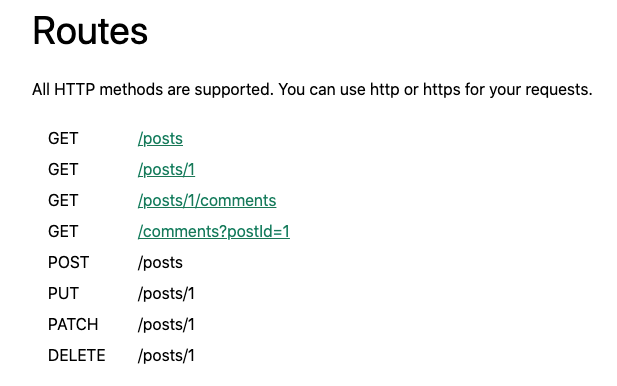
npm install axiosIn this guide, you’ll use the JSON Placeholder API to get and change post data.
Here is a list of all the different routes you can make requests to, along with the appropriate HTTP method for each:
Here is a quick example of all of the operations you’ll be performing with Axios and your API endpoint — retrieving, creating, updating, and deleting posts:
How to Make a GET Request
To fetch data or retrieve it, make a GET request.
First, you’re going to make a request for individual posts. If you look at the endpoint, you are getting the first post from the /posts endpoint:
import axios from "axios";
import React from "react";

const baseURL = "https://jsonplaceholder.typicode.com/posts/1";

export default function App() {
  const [post, setPost] = React.useState(null);

  React.useEffect(() => {
    axios.get(baseURL).then((response) => {
      setPost(response.data);
    });
  }, []);

  if (!post) return null;

  return (
    <div>
      <h1>{post.title}</h1>
      <p>{post.body}</p>
    </div>
  );
}
To perform this request when the component mounts, you use the useEffect hook. This involves importing Axios, using the .get() method to make a GET request to your endpoint, and using a .then() callback to get back all of the response data.
The response is returned as an object. The data (which is in this case a post with id, title, and body properties) is put in a piece of state called post which is displayed in the component.
Note that you can always find the requested data from the .data property in the response.
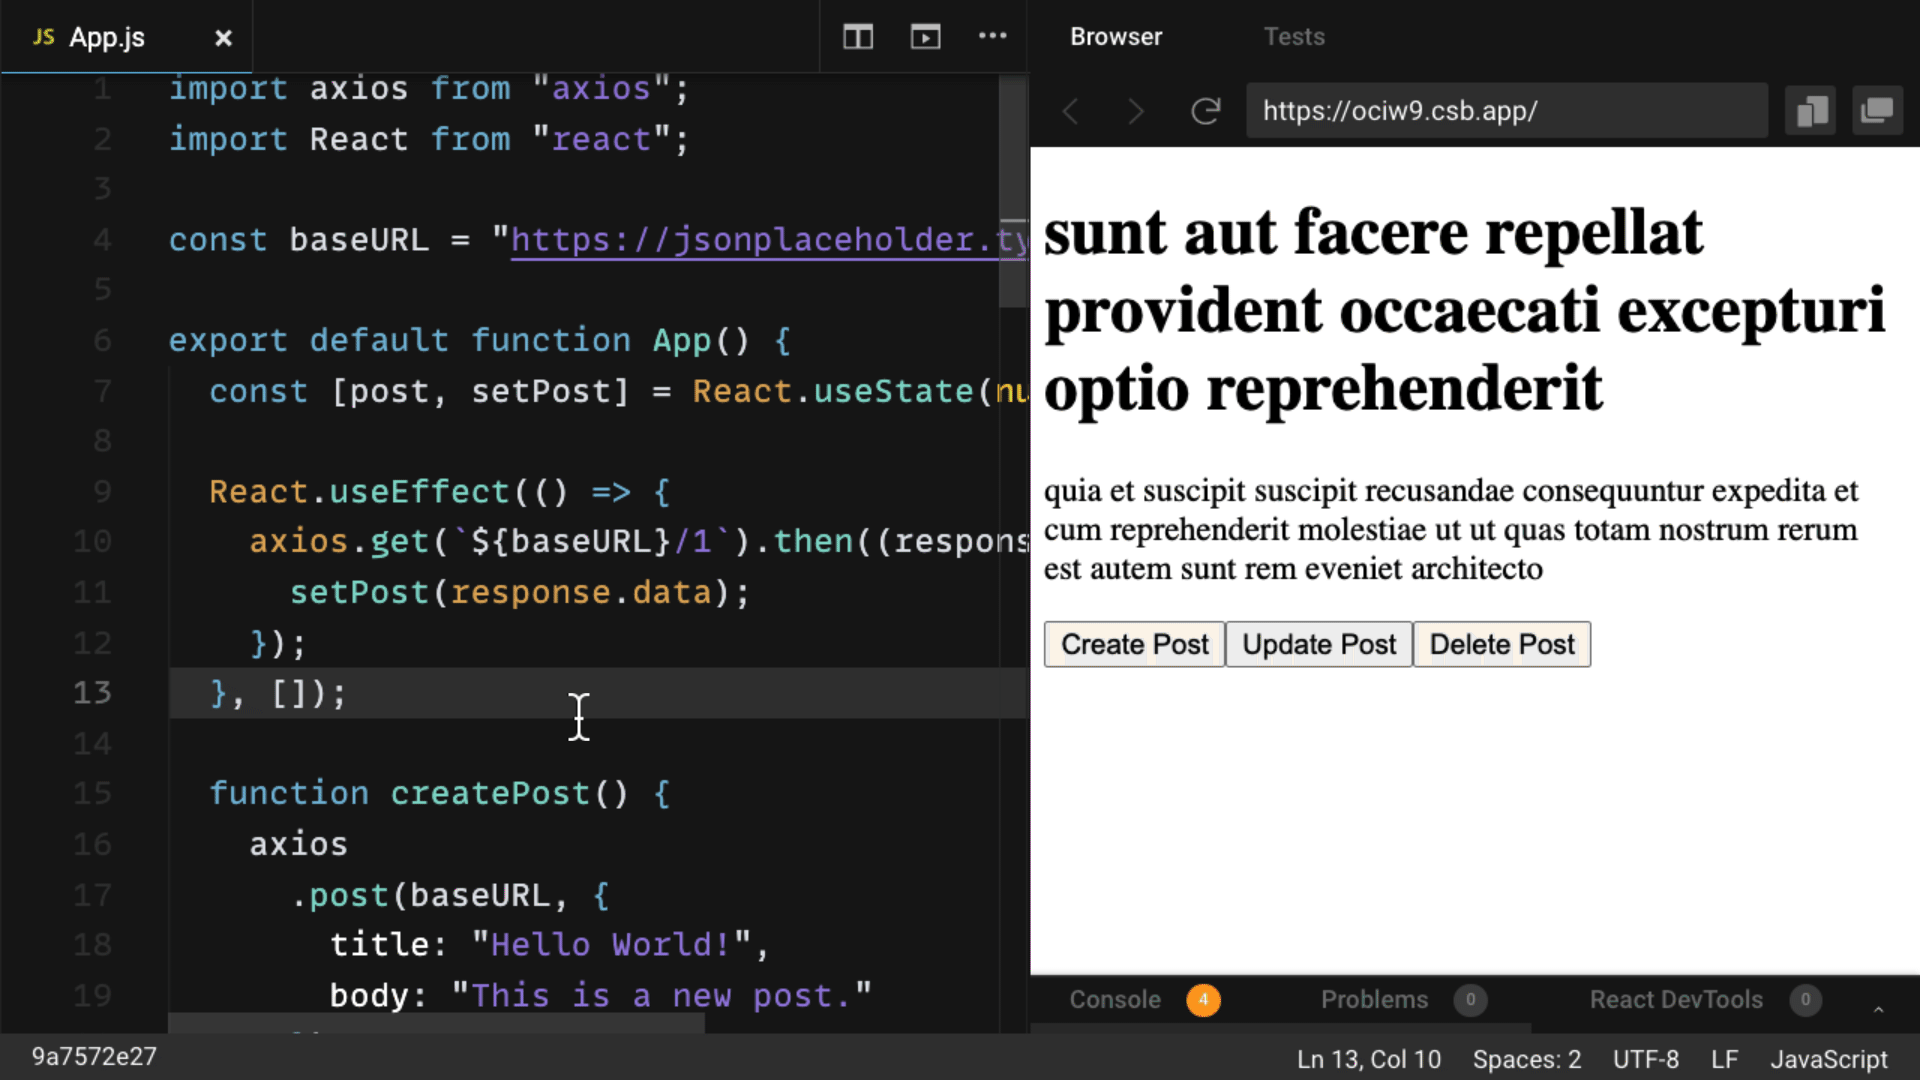
How to Make a POST Request
To create new data, make a POST request.
According to the API, this needs to be performed on the /posts endpoint. If you look at the code below, you’ll see that there’s a button to create a post:
import axios from "axios";
import React from "react";

const baseURL = "https://jsonplaceholder.typicode.com/posts";

export default function App() {
  const [post, setPost] = React.useState(null);

  React.useEffect(() => {
    axios.get(`${baseURL}/1`).then((response) => {
      setPost(response.data);
    });
  }, []);

  function createPost() {
    axios
      .post(baseURL, {
        title: "Hello World!",
        body: "This is a new post."
      })
      .then((response) => {
        setPost(response.data);
      });
  }

  if (!post) return "No post!"

  return (
    <div>
      <h1>{post.title}</h1>
      <p>{post.body}</p>
      <button onClick={createPost}>Create Post</button>
    </div>
  );
}
When you click on the button, it calls the createPost function.
To make that POST request with Axios, you use the .post() method. As the second argument, you include an object property that specifies what you want the new post to be.
Once again, use a .then() callback to get back the response data and replace the first post you got with the new post you requested.
This is very similar to the .get() method, but the new resource you want to create is provided as the second argument after the API endpoint.
How to Make a PUT Request
To update a given resource, make a PUT request.
In this case, you’ll update the first post.
To do so, you’ll once again create a button. But this time, the button will call a function to update a post:
import axios from "axios";
import React from "react";

const baseURL = "https://jsonplaceholder.typicode.com/posts";

export default function App() {
  const [post, setPost] = React.useState(null);

  React.useEffect(() => {
    axios.get(`${baseURL}/1`).then((response) => {
      setPost(response.data);
    });
  }, []);

  function updatePost() {
    axios
      .put(`${baseURL}/1`, {
        title: "Hello World!",
        body: "This is an updated post."
      })
      .then((response) => {
        setPost(response.data);
      });
  }

  if (!post) return "No post!"

  return (
    <div>
      <h1>{post.title}</h1>
      <p>{post.body}</p>
      <button onClick={updatePost}>Update Post</button>
    </div>
  );
}
In the code above, you use the PUT method from Axios. And like with the POST method, you include the properties that you want to be in the updated resource.
Again, using the .then() callback, you update the JSX with the data that is returned.
How to Make a DELETE Request
Finally, to delete a resource, use the DELETE method.
As an example, we’ll delete the first post.
Note that you do not need a second argument whatsoever to perform this request:
import axios from "axios";
import React from "react";

const baseURL = "https://jsonplaceholder.typicode.com/posts";

export default function App() {
  const [post, setPost] = React.useState(null);

  React.useEffect(() => {
    axios.get(`${baseURL}/1`).then((response) => {
      setPost(response.data);
    });
  }, []);

  function deletePost() {
    axios
      .delete(`${baseURL}/1`)
      .then(() => {
        alert("Post deleted!");
        setPost(null)
      });
  }

  if (!post) return "No post!"

  return (
    <div>
      <h1>{post.title}</h1>
      <p>{post.body}</p>
      <button onClick={deletePost}>Delete Post</button>
    </div>
  );
}
In most cases, you do not need the data that’s returned from the .delete() method.
But in the code above, the .then() callback is still used to ensure that your request is successfully resolved.
In the code above, after a post is deleted, the user is alerted that it was deleted successfully. Then, the post data is cleared out of the state by setting it to its initial value of null.
Also, once a post is deleted, the text «No post» is shown immediately after the alert message.
How to Handle Errors with Axios
What about handling errors with Axios?
What if there’s an error while making a request? For example, you might pass along the wrong data, make a request to the wrong endpoint, or have a network error.
To simulate an error, you’ll send a request to an API endpoint that doesn’t exist: /posts/asdf.
This request will return a 404 status code:
import axios from "axios";
import React from "react";

const baseURL = "https://jsonplaceholder.typicode.com/posts";

export default function App() {
  const [post, setPost] = React.useState(null);
  const [error, setError] = React.useState(null);

  React.useEffect(() => {
    // invalid url will trigger an 404 error
    axios.get(`${baseURL}/asdf`).then((response) => {
      setPost(response.data);
    }).catch(error => {
      setError(error);
    });
  }, []);

  if (error) return `Error: ${error.message}`;
  if (!post) return "No post!"

  return (
    <div>
      <h1>{post.title}</h1>
      <p>{post.body}</p>
    </div>
  );
}
In this case, instead of executing the .then() callback, Axios will throw an error and run the .catch() callback function.
In this function, we are taking the error data and putting it in state to alert our user about the error. So if we have an error, we will display that error message.
In this function, the error data is put in state and used to alert users about the error. So if there’s an error, an error message is displayed.
When you run this code code, you’ll see the text, «Error: Request failed with status code 404».
How to Create an Axios Instance
If you look at the previous examples, you’ll see that there’s a baseURL that you use as part of the endpoint for Axios to perform these requests.
However, it gets a bit tedious to keep writing that baseURL for every single request. Couldn’t you just have Axios remember what baseURL you’re using, since it always involves a similar endpoint?
In fact, you can. If you create an instance with the .create() method, Axios will remember that baseURL, plus other values you might want to specify for every request, including headers:
import axios from "axios";
import React from "react";

const client = axios.create({
  baseURL: "https://jsonplaceholder.typicode.com/posts"
});

export default function App() {
  const [post, setPost] = React.useState(null);

  React.useEffect(() => {
    client.get("/1").then((response) => {
      setPost(response.data);
    });
  }, []);

  function deletePost() {
    client
      .delete("/1")
      .then(() => {
        alert("Post deleted!");
        setPost(null)
      });
  }

  if (!post) return "No post!"

  return (
    <div>
      <h1>{post.title}</h1>
      <p>{post.body}</p>
      <button onClick={deletePost}>Delete Post</button>
    </div>
  );
}
The one property in the config object above is baseURL, to which you pass the endpoint.
The .create() function returns a newly created instance, which in this case is called client.
Then in the future, you can use all the same methods as you did before, but you don’t have to include the baseURL as the first argument anymore. You just have to reference the specific route you want, for example, /, /1, and so on.
How to Use the Async-Await Syntax with Axios
A big benefit to using promises in JavaScript (including React applications) is the async-await syntax.
Async-await allows you to write much cleaner code without then and catch callback functions. Plus, code with async-await looks a lot like synchronous code, and is easier to understand.
But how do you use the async-await syntax with Axios?
In the example below, posts are fetched and there’s still a button to delete that post:
import axios from "axios";
import React from "react";

const client = axios.create({
  baseURL: "https://jsonplaceholder.typicode.com/posts"
});

export default function App() {
  const [post, setPost] = React.useState(null);

  React.useEffect(() => {
    async function getPost() {
      const response = await client.get("/1");
      setPost(response.data);
    }
    getPost();
  }, []);

  async function deletePost() {
    await client.delete("/1");
    alert("Post deleted!");
    setPost(null);
  }

  if (!post) return "No post!"

  return (
    <div>
      <h1>{post.title}</h1>
      <p>{post.body}</p>
      <button onClick={deletePost}>Delete Post</button>
    </div>
  );
}
However in useEffect, there’s an async function called getPost.
Making it async allows you to use the await keword to resolve the GET request and set that data in state on the next line without the .then() callback.
Note that the getPost function is called immediately after being created.
Additionally, the deletePost function is now async, which is a requirement to use the await keyword which resolves the promise it returns (every Axios method returns a promise to resolve).
After using the await keyword with the DELETE request, the user is alerted that the post was deleted, and the post is set to null.
As you can see, async-await cleans up the code a great deal, and you can use it with Axios very easily.
How to Create a Custom useAxios Hook
Async-await is a great way to simplify your code, but you can take this a step further.
Instead of using useEffect to fetch data when the component mounts, you could create your own custom hook with Axios to perform the same operation as a reusable function.
While you can make this custom hook yourself, there’s a very good library that gives you a custom useAxios hook called use-axios-client.
First, install the package:
npm install use-axios-clientTo use the hook itself, import useAxios from use-axios-client at the top of the component.
Because you no longer need useEffect, you can remove the React import:
import { useAxios } from "use-axios-client";

export default function App() {
  const { data, error, loading } = useAxios({
    url: "https://jsonplaceholder.typicode.com/posts/1"
  });

  if (loading || !data) return "Loading...";
  if (error) return "Error!";

  return (
    <div>
      <h1>{data.title}</h1>
      <p>{data.body}</p>
    </div>
  )
}
Now you can call useAxios at the top of the app component, pass in the URL you want to make a request to, and the hook returns an object with all the values you need to handle the different states: loading, error and the resolved data.
In the process of performing this request, the value loading will be true. If there’s an error, you’ll want to display that error state. Otherwise, if you have the returned data, you can display it in the UI.
The benefit of custom hooks like this is that it really cuts down on code and simplifies it overall.
If you’re looking for even simpler data fetching with Axios, try out a custom useAxios hook like this one.
What’s Next?
Congratulations! You now know how to use one of the most powerful HTTP client libraries to power your React applications.
I hope you got a lot out of this guide.
Remember that you can download this guide as a PDF cheatsheet to keep for future reference.
Want Even More? Join The React Bootcamp
The React Bootcamp takes everything you should know about learning React and bundles it into one comprehensive package, including videos, cheatsheets, plus special bonuses.
Gain the insider information 100s of developers have already used to become a React pro, find their dream job, and take control of their future:

Click here to be notified when it opens
Learn to code for free. freeCodeCamp’s open source curriculum has helped more than 40,000 people get jobs as developers. Get started