|
Message |
|
|
Scott Gartner |
Scott Gartner posted 6 February 2018 5:20 PM HOT |
|
New Member
Group: Awaiting Activation |
I am getting an error when doing backups. The error is «Backup aborted! — Unable to read from disk — Error Code 23 — Data error (cyclic redundancy check).» I have tested every connected drive for errors and cannot find any problems. The error does not say what drive is throwing the error. I don’t know what else to do to figure out why it is getting the error. I’ve looked in the logs and there is no further error. The VSS log file shows no errors at all. My backups have not occurred for a couple of days now, so I really need to get this figured out. |
|
|
|
|
jphughan |
jphughan posted 6 February 2018 5:51 PM |
|
Macrium Evangelist
Group: Forum Members |
It’s probably the disk you’re trying to back up. If you haven’t already, run CHKDSK /R against the partition(s) you’re backing up. If you’re backing up some partitions that don’t currently have drive letters assigned (as is the case when backing up the partitions necessary to run Windows), then you can use diskpart to temporarily assign them drive letters so that you can run CHKDSK /R against those partitions as well. Note that running CHKDSK with the /R option can take a very long time because it scans every cluster within the partition.
Edited |
|
|
|
|
Scott Gartner |
Scott Gartner posted 6 February 2018 6:04 PM |
|
New Member
Group: Awaiting Activation |
Thanks for the reply. I had run chkdsk, but had not scanned all bits. I’ll do that and see if it finds anything. I wish the error had made it clear which drive had the error (one of the ones being backed up or the one it was writing). The drive I’m backing up is an SSD and I did run the Micron SSD tool on the drive and it found no errors. Really frustrating… |
|
|
|
|
Nick |
Nick posted 6 February 2018 7:18 PM |
|
Macrium Representative
Group: Administrators |
Hi, it’s a ‘Read’ error so it’s the source disk that’s being read, and it’s the partition that was being backed up at the time, Please see here: https://knowledgebase.macrium.com/display/KNOW7/Imaging+disks+with+bad+sectors Kind Regards Nick Macrium Support
See our reviews on
|
|
|
|
|
Scott Gartner |
Scott Gartner posted 6 February 2018 11:16 PM |
|
New Member
Group: Awaiting Activation |
I doesn’t actually follow that read could only mean the source drives. It’s not like they only write to the output drive, they have to read as well if only to manage directory structures, but creating any partial backup requires reading a lot of data from the backup drive to determine what does and doesn’t need to be backed up (to build the «delta»). Either way, I’ve now run a deep scan on all drives with chkdsk as well as dedicated testing tools and found no errors at all, so it’s still a mystery what’s going on. |
|
|
|
|
Scott Gartner |
Scott Gartner posted 7 February 2018 12:25 AM |
|
New Member
Group: Awaiting Activation |
More information. Since I couldn’t find any errors on any of the drives, I thought I would do a full verification on the most recent backup and I got this concerning error:
I have to believe the problems are related. Since these files are created and read only by Reflect I’m not sure how the permissions can get screwed up. And, of course, here is another example of an error that could give me much more information about exactly what file it was trying to access when the error occurred! I instead only did a verification on the last file listed and strangely it produces a Permission denied error 41% into verifying just this one file. How can it have permission to the first 41% of the file and not permission on the 42nd percent? I don’t get this at all. So, I tried just copying the file and I get the following very strange error:
I can only assume that this is the real problem and the «permission» error given by reflect is a red herring.
Edited |
|
|
|
|
jphughan |
jphughan posted 7 February 2018 1:15 AM |
|
Macrium Evangelist
Group: Forum Members |
What happens if you try to copy that file using the regular Windows copy function, perhaps to a location other than that same folder? And where are those files stored, e.g. local drive, NAS appliance, file share hosted by another Windows PC, etc.? Permissions are typically set on the parent folder (or some even higher parent folder) with files just inheriting those as opposed to being set directly on individual files. Although the latter is supported, Reflect doesn’t set custom permissions on files it generates. That said, I too am puzzled by an error encountered partway through the file being chalked up to permissions. And just in case there is something irreparably wrong with your backup set, I would create a new Full backup right away just to be safe if you have enough storage to do so — or at least a Diff backup since it appears your Full backup verified successfully. You can always delete that backup later, after all, and if the backup and verification errors are in fact related, you may find that Reflect CAN create a Full or Diff backup even if it’s not creating Inc backups. In fact, that would be a useful test.
Edited |
|
|
|
|
Scott Gartner |
Scott Gartner posted 7 February 2018 4:12 AM |
|
New Member
Group: Awaiting Activation |
So, I can confirm that there were multiple issues, but they are all with the destination drive. Even though the drive passes SMART and seemed to be good at least one of the MRIMG files in the backup set is corrupted (possibly other stuff, obviously). I think the USB cable connecting the drive had gone bad. A new cable made the drive speed up a bit and stopped giving me the semaphore timeout. I’m hoping that it was the bad cable (versus a bad backup drive) that caused corruption. Clearly, however, the tests for this encrypted drive are not as complete as I thought they were (since it passed them with clear issues remaining on the drive). However, I tried having Reflect create a new full backup (into the same directory) and it failed with the same error, so it is still trying to read the last differential. I guess it was trying to combine some of the files to cut down on space usage. My next step is to move the backup drive to another computer which has forensic tools on it and see if it can recover the file that has problems (I’d still like to have the historical backups just in case). In the meantime I will do a full backup to a new location. Thanks for the advice! |
|
|
|
|
jphughan |
jphughan posted 7 February 2018 4:22 AM |
|
Macrium Evangelist
Group: Forum Members |
A popular phrase among people who deal frequently with hard drives is that «SMART is dumb». Unfortunately, it’s not at all unusual for SMART to report that everything is ok right up until a drive fails. Another complication is that tools designed to check for file system errors (like CHKDSK in its regular mode) won’t catch hardware-level problems, and vice versa, so if you’re only looking for problems at the wrong «level» of the drive, you might miss the problems that exist on the other. Still, you should have been able to create a new Full backup. Reflect wouldn’t need to touch or even access the last Differential to create a new Full. Combining files is only possible between Incrementals (or between Incrementals and a Full if you’re using Synthetic Fulls, but you wouldn’t be if you run any Diffs), but that function is related to the Incremental retention policy, and therefore it would only ever occur if the current job were creating a new Incremental. If you’re creating a new Full, the only thing that MIGHT happen depending on your retention policy would be the deletion of an old Full, along with all of its child backups. Even if you triggered the low disk space threshold purge, that would simply delete the oldest Full and all of its children rather than trying to combine anything. So bottom line, if you can’t create a new Full, something is still wrong, either with the destination or the source. Hopefully you can get a good backup to another location at least as an interim solution!
Edited |
|
|
|
|
Nick |
Nick posted 7 February 2018 9:24 AM |
|
Macrium Representative
Group: Administrators |
Just to clarify. The backup process only Reads from the source drive not from the target. The error in the log was a CRC error on the source drive. You may also have problems wit the target drive, but the error in your opening post was thrown by the drive you are imaging not the target. Kind Regards Nick Macrium Support
See our reviews on
Edited |
|
|


|
Message |
|
|
Clairvaux |
Clairvaux posted 5 June 2020 1:41 AM HOT |
|
Junior Member
Group: Forum Members |
This error message often occurs a short while after an image is launched. The context is the following. It happened in two phases. One is over the last days, and the other one was 2 years ago. I cannot vouch the error message was the same the last time, but the rest of the context was. I don’t know whether it’s relevant, but it might. Each time, imaging attempts fail repeatedly. After a while, normal operation resumes. Right now, my last attempt was unsuccessful. Each time, it happens shortly after (or before) one of my external backup disks, linked by USB 3, becomes RAW and unreadable. Each time, this is accompanied at some point by blue screens. Right now, I have regained access to my external backup disk, through CHKDSK /F. All images were there. Fulls and differentials could be mounted and browsed, hower incrementals could not. A fresh full image was made. It could be mounted, and browsed. However, Macrium said the backup failed, because it could not be verified. At that point, I decided to do a full format of the drive. Then I attempted a full image again. That’s when I got the above error message, which I also got several times during the last few days, while I was trying to solve this RAW problem, when trying to backup on my other external disk. The last imaging attempt was done through an eSATA cable. I believe the formerly RAW disk is physically sound. The critical SMART attributes are good, and it passes the short SMART self-test. Thank you for your help. Windows Home Premium 64-bit, homemade computer. Tags RAWUSB |
|
|
|
|
jphughan |
jphughan posted 5 June 2020 1:46 AM |
|
Macrium Evangelist
Group: Forum Members |
Try CHKDSK /R rather than /F. That will cause CHKDSK to scan the disk surface looking for bad sectors. It will take quite a bit longer than a /F operation though, so plan accordingly. I believe a full format also includes a surface scan, but practically nobody does those anymore because they take forever on large drives, which is why the Quick Format option is checked by default (but doesn’t include this scan). |
|
|
|
|
Clairvaux |
Clairvaux posted 5 June 2020 9:05 AM |
|
Junior Member
Group: Forum Members |
jphughan — 5 June 2020 1:46 AM
Anyway, since I published my post, I made two new fresh attempts at imaging, which produced the same error message early in the process. One on that formerly RAW disk, by USB 2 cable, and one on my other, good backup disk, by USB 3 cable. It’s quite unlikely that both disks developed bad sectors to the point of failing Macrium. Also, the once-RAW disk has good SMART scores, and a 100 % bill of health by Hard Disk Sentinel. Does anybody know what that error message means ? I searched the forum for it and found nothing.
Edited |
|
|
|
|
Nick |
Nick posted 5 June 2020 9:47 AM |
|
Macrium Representative
Group: Administrators |
Thanks for posting. Why ? I’ve already done a full format. Does this error message indicate bad sectors on the target disk ? The error is generated by the Windows IO sub system and is the result of a bad sector (Cyclic Redundancy Check) reported by the source disk of the image when the disk data cannot be read reliably. More info here: https://knowledgebase.macrium.com/display/KNOW72/Imaging+disks+with+bad+sectors Kind Regards Nick Macrium Support
See our reviews on
Edited |
|
|
|
|
Clairvaux |
Clairvaux posted 6 June 2020 9:03 PM |
|
Junior Member
Group: Forum Members |
Thank you, Nick. Very interesting links. Meanwhile, I had suspected as much, ran CHKDSK /R on the C: partition of one of my two internal drives, and the subsequent image completed successfully. A few questions, though. The KB says :
A disk with bad sectors is permanently damaged.
Edited |
|
|
|
|
Nick |
Nick posted 7 June 2020 2:40 PM |
|
Macrium Representative
Group: Administrators |
Thanks for getting back. Does bad sector here exclusively mean physically bad sector, as opposed to logical ? And is this error message exclusively generated by physical bad sectors ? It’s irrelevant whether a physical or logical sector read fails. The disk is unable to read the requested block. All logical sectors map to physical sectors. Physical sectors map to the underlying storage media which may or may not be contiguous physical storage. It really doesn’t matter. The Raymond Chen blog linked above does a good job of explaining how CRC errors ‘bubble up’ from the disk. I reckon activating the option to ignore bad sectors, when creating an image, makes the image less reliable, should be used as last resort only, and would be especially risky for system partitions. Is that correct ? A disk image is an exact representation of the file system at the time the image is taken. Bad sectors cannot be read so the image has the same ‘reliability’ as the file system being imaged. If you have bad sectors then it’s time to replace the disk. Can bad sectors on the imaged disk somehow «export» to the backup disk, and make it turn RAW ? In the two instances the latter happened to me, it more or less coincided with bad sectors on the imaged disks, and blue screens. Or is there no relationship ? No, this can’t happen. There’s a problem with the backup target disk or the data transport to the disk. Kind Regards Nick Macrium Support
See our reviews on
|
|
|
|
|
Clairvaux |
Clairvaux posted 10 July 2020 4:15 PM |
|
Junior Member
Group: Forum Members |
Thanks for the reply. Sorry I’m late, I did not receive an email alert, don’t know why. Apologies for not finding the way to quote properly. I have one «damaged sector» on my system disk (says Hard Disk Sentinel), but this comes and goes. Sometimes the disk auto-corrects it, and it disappears, sometimes it reappears. I applied the Repair feature of Hard Disk Sentinel, and this brought back the disk to a pristine state (according to the same program). Now this «damaged sector» (not «bad», according to the software’s lingo), has cropped up again. Should really a disk be discarded because it has one single bad (or otherwise defective) sector ? I was under the impression that a certain amount of bad sectors was considered normal, and not the end of the world per se.
Edited |
|
|
|
|
dbminter |
dbminter posted 10 July 2020 4:30 PM |
|
Macrium Evangelist
Group: Forum Members |
Something out of the ordinary appears to be going wrong. When a sector is marked as «bad,» it should be completely ignored for all future write requests. Why a sector would be marked as bad and then require it be marked bad again, I couldn’t say. To be honest, I wouldn’t necessarily say the drive is going bad. Something may be marking and unmarking that sector as bad repeatedly. |
|
|
|
|
Nick |
Nick posted 19 July 2020 6:56 PM |
|
Macrium Representative
Group: Administrators |
Thanks for posting. I have another observation regarding this phantom read error. If indeed it is Windows throwing the error, one would expect Windows Event Logs to record it. On my system, there is no such disk read error logged. Since I can’t find any disk issues, not even remapped sectors/block within my disk allocation tables, or reported as such by my SSD tools, and Windows says there haven’t been any disk read errors, I must assume the problem is Macrium Reflect Home 7.2 … and NOT a real disk issue. This is a Windows error and is in response to the ReadFile Windows API when reading the disk directly or from the volume shadow copy. It’s ‘bubbled up’ from the disk I/O sub-system and ultimately originates from the disk firmware. It is very strange if there are no events logged but you really don’t want to ignore it or assume that it isn’t real. Raymond Chen has an excellent blog on this error here: https://devblogs.microsoft.com/oldnewthing/20130711-00/?p=3833 Have you run chkdsk /r on the volume with the error? The ‘/r’ switch is important as it scans the entire volume for bad sectors. Kind Regards Nick Macrium Support
See our reviews on
|
|
|
|
|
dbminter |
dbminter posted 19 July 2020 8:36 PM |
|
Macrium Evangelist
Group: Forum Members |
This was an SSD showing up with a CRC error, correct? I forget. If so, what make and model? I ask because if it’s a specific one, there was a post somewhere else about an SSD that was returning weird Reflect errors until a disk utility included by the manufacturer of the SSD was uninstalled. Reflect performed fine on it with that utility uninstalled. |
|
|


Содержание
- Восстановление раздела жесткого диска или флешки в TestDisk
- Как восстановить раздел диска в TestDisk
- Lba 0 попытка 1 winerror 23 data error cyclic redundancy check
- Lba 0 попытка 1 winerror 23 data error cyclic redundancy check
- How to fix the Windows System Error 23 ERROR_CRC
Восстановление раздела жесткого диска или флешки в TestDisk
 Если по раздел на жестком диске, карте памяти или USB флешке оказался поврежден или случайно удален, во многих случаях его может оказаться возможным восстановить. Существуют различные утилиты для восстановления разделов, как платные, так и бесплатные. Среди программ с возможностью бесплатного использования можно выделить TestDisk и DMDE.
В этом руководстве — о том, как восстановить поврежденный или удаленный раздел с помощью бесплатной программы TestDisk, поддерживающей большинство распространенных файловых систем (NTFS, FAT, ExFAT, ext2/ext3/ext4) и доступной бесплатно как для Windows 10, 8.1 и Windows 7, так и для Mac OS или Linux. На схожу тему: Как восстановить диск RAW, Способы восстановить удаленный раздел диска Windows.
Как восстановить раздел диска в TestDisk
В приведенном далее примере будет демонстрироваться простая ситуация: с флешки был удален раздел с важными данными и его требуется восстановить. Аналогично процесс будет выглядеть и для подобных ситуаций с жестким диском или картой памяти, при условии, что на них не были созданы новые разделы и записаны дополнительные данные.
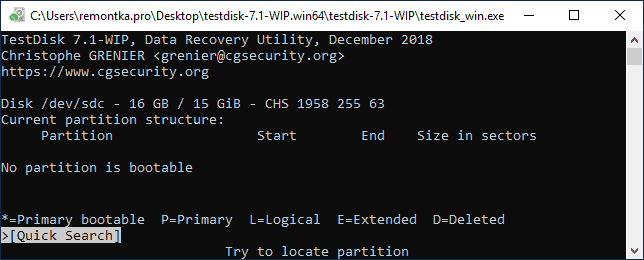
Скачать TestDisk можно с официального сайта https://www.cgsecurity.org/wiki/TestDisk_Download — программа не требует установки на компьютер: достаточно распаковать архив и запустить файл testdisk_win.exe.
Следующие шаги по восстановлению раздела с диска будут выглядеть следующим образом:
- На первом экране вам предложат создать журнал производимых TestDisk операций: выбираем «Create» для его создания или «No log», если он не требуется.

- Следующий этап — выбор физического диска, на котором будет выполнен поиск разделов. После выбора с помощью стрелок нажимаем Enter для продолжения.
- На 3-м этапе следует выбрать, какой тип разделов следует найти. Обычно требуется первый пункт — Intel/PC partition, включающий поиск разделов NTFS и различных вариантов FAT.
- В базовом случае, рассматриваемом в этом обзоре, на этом этапе достаточно выбрать «Analyze», чтобы запустить поиск потерянных разделов.
- Следующий экран отобразит текущие разделы на диске (в моем случае таковых нет). Нажмите Enter для запуска быстрого поиска удаленных разделов.
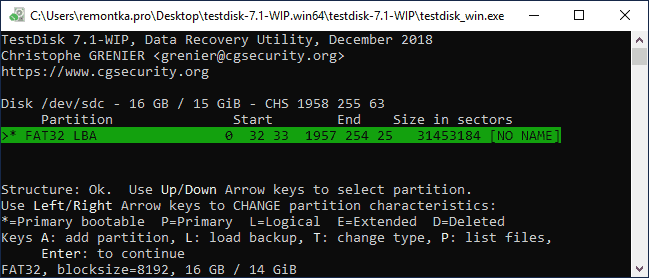
- В результате поиска отобразится список найденных на накопителе потерянных разделов. В моем случае — единственный раздел FAT32, ранее удаленный с флешки. Если вы не уверены, тот ли это раздел, вы можете нажать по клавише P на этом экране для просмотра содержимого найденного раздела.
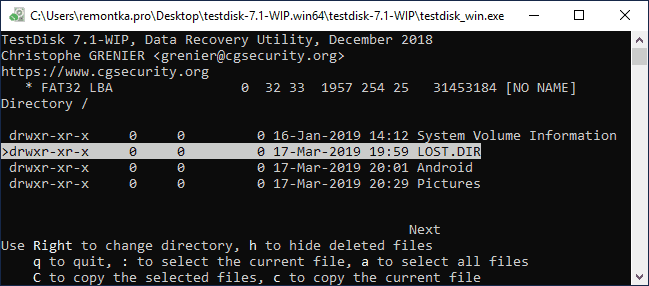
- При просмотре содержимого вы можете перемещаться по папкам (учитывайте, что кириллические имена будут отображаться неверно), сохранять файлы с раздела. Для возврата на экран со списком разделов нажмите клавишу Q.
- Нажмите Enter, а на следующем экране, если вы решили восстановить найденный раздел, выберите пункт «Write» (записать изменения) и нажмите Enter. Обратите внимание, что здесь же присутствует пункт «Deeper Search» (глубокий поиск) на случай, если на 6-м шаге разделы найдены не были.
- Подтвердите запись таблицы разделов с найденным разделом, нажав Y.
- Готово. Вы увидите сообщение о том, что для вступления изменений в силу необходимо перезагрузить компьютер, однако обычно потерянные разделы появляются на диске незамедлительно.


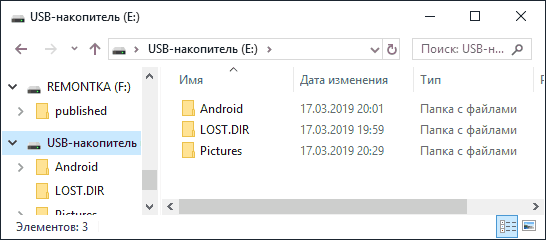
В моем случае раздел с флешки был успешно восстановлен, данные в сохранности и не повреждены.
Обратите внимание, что в тех случаях, когда речь идет о восстановлении разделов на системном диске при не загружающейся ОС, вам может потребоваться подключить жесткий диск к другому компьютеру или же использовать LiveCD, на котором имеется TestDisk (например, программа присутствует на Hiren’s Boot CD).
Среди дополнительных возможностей программы:
- Восстановление удаленных файлов на существующих разделах (выбираем Advanced на 4-м шаге, раздел и пункт Undelete). Но здесь бы я рекомендовал использовать другие программы восстановления данных.
- Создание образов разделов и работа с образами.
- Восстановление загрузочных записей.
Дополнительная справка по TestDisk и подробные примеры использования (большинство на английском) присутствуют на официальном сайте.
Источник
Lba 0 попытка 1 winerror 23 data error cyclic redundancy check
Да, как я и предположил, внутри контейнера Transcend установлен диск Seagate-Samsung(но собственно всё-таки Samsung; двойная маркировка модели диска по первому скриншоту из CrystalDiskInfo : ST1000LM024 — это «отсебятина» компании Seagate, HN-M101MBB — это Samsung). Второй скриншот показывает что операционная система не может прочитать определённые фрагменты файловой системы из-за ошибок чтения диска и, соответственно, открыть его содержимое. Видно, что значение S.M.A.R.T. атрибута( Wikipedia ) 01(hex) — Read Error Rate(кол-во ошибок чтения) увеличилось на 866(dec) единиц, по сравнению со скриншотом из Victoria : в Виктории было 8735(dec), в CrystalDiskInfo уже 2581(hex)=9601(dec)( dec — десятичная система исчисления, hex — шестнадцатиричная). И значение атрибута C5(hex) — Current Pending Sector Count(нестабильные сектора) увеличилось на 29(dec) единиц: в Виктории было 7(dec), в CrystalDiskInfo уже 24(hex)=36(dec). Это означает что НЖМД плоховастенько. Самым лучшим вариантом, как я считаю, будет сделать посекторную копию больного диска. А потом уже пробовать с копии восстанавливать данные. Хотя может и не придётся. Всё зависит от того насколько хорошо «умирающий» диск «отдастся» во время посекторного копирования. Но для этого придётся найти ещё один НЖМД-приёмник объёмом не меньше больного — 1 ТБ(один терабайт) минимум; желательно(но не обязательно) пустой. Данные на НЖМД-приёмнике будут, соответственно, уничтожены.
А в данный момент будет лучше отключить таблицу разделов на больном диске чтобы операционная система не пыталась лишний раз его «дёргать» в попытке смонтировать раздел. Делается это так: идёте на сайт программы DMDE ( «Показать разделы» , нажмите внизу окна кнопку «Параметры» , выберите в закладке «Интерфейс» режим передачи «I/O SCSI» ; в закладке «Ошибки ввода-вывода» в полях «Число авто повторов при ошибке CRC» и «Число авто повторов, если сектор не найден» поставьте цифру 4; в закладке «Дополнительно» в поле «SCSI/ATA Timeout, s» поставьте цифру 45; далее «OK» ( смотрите приложенные скриншоты в качестве примера ). Далее Ctrl+E чтобы включить режим редактирования. Мигающий курсор должен находиться на секторе диска LBA:0(№0)(в левом верхнем углу окна должно быть написано LBA:0 блок: 0). Перемещаете курсор в самый конец сектора №0. Там должны быть записаны два байта: 55 AA. Вот их значения меняете на 00 00, нажимаете Ctrl+W чтобы сохранить изменения, в появившемся окне снимаете галочку с пункта «Перед записью сохранить в файл данные для отката» , и нажимаете «Да». После проделанной операции операционная система будет считать что на НЖМД нет никаких разделов — диск будет в состоянии «Не инициализирован». По этой причине если операционная система будет предлагать инициализировать диск — отказывайтесь(нажимайте «Отмена»). И саму программу DMDE не удаляйте — будет нужна для осуществления операции посекторного копирования.
Ищите диск объёмом => 1 ТБ, когда найдёте — «свистнете»  .
.
Источник
Lba 0 попытка 1 winerror 23 data error cyclic redundancy check
Да, как я и предположил, внутри контейнера Transcend установлен диск Seagate-Samsung(но собственно всё-таки Samsung; двойная маркировка модели диска по первому скриншоту из CrystalDiskInfo : ST1000LM024 — это «отсебятина» компании Seagate, HN-M101MBB — это Samsung). Второй скриншот показывает что операционная система не может прочитать определённые фрагменты файловой системы из-за ошибок чтения диска и, соответственно, открыть его содержимое. Видно, что значение S.M.A.R.T. атрибута( Wikipedia ) 01(hex) — Read Error Rate(кол-во ошибок чтения) увеличилось на 866(dec) единиц, по сравнению со скриншотом из Victoria : в Виктории было 8735(dec), в CrystalDiskInfo уже 2581(hex)=9601(dec)( dec — десятичная система исчисления, hex — шестнадцатиричная). И значение атрибута C5(hex) — Current Pending Sector Count(нестабильные сектора) увеличилось на 29(dec) единиц: в Виктории было 7(dec), в CrystalDiskInfo уже 24(hex)=36(dec). Это означает что НЖМД плоховастенько. Самым лучшим вариантом, как я считаю, будет сделать посекторную копию больного диска. А потом уже пробовать с копии восстанавливать данные. Хотя может и не придётся. Всё зависит от того насколько хорошо «умирающий» диск «отдастся» во время посекторного копирования. Но для этого придётся найти ещё один НЖМД-приёмник объёмом не меньше больного — 1 ТБ(один терабайт) минимум; желательно(но не обязательно) пустой. Данные на НЖМД-приёмнике будут, соответственно, уничтожены.
А в данный момент будет лучше отключить таблицу разделов на больном диске чтобы операционная система не пыталась лишний раз его «дёргать» в попытке смонтировать раздел. Делается это так: идёте на сайт программы DMDE ( «Показать разделы» , нажмите внизу окна кнопку «Параметры» , выберите в закладке «Интерфейс» режим передачи «I/O SCSI» ; в закладке «Ошибки ввода-вывода» в полях «Число авто повторов при ошибке CRC» и «Число авто повторов, если сектор не найден» поставьте цифру 4; в закладке «Дополнительно» в поле «SCSI/ATA Timeout, s» поставьте цифру 45; далее «OK» ( смотрите приложенные скриншоты в качестве примера ). Далее Ctrl+E чтобы включить режим редактирования. Мигающий курсор должен находиться на секторе диска LBA:0(№0)(в левом верхнем углу окна должно быть написано LBA:0 блок: 0). Перемещаете курсор в самый конец сектора №0. Там должны быть записаны два байта: 55 AA. Вот их значения меняете на 00 00, нажимаете Ctrl+W чтобы сохранить изменения, в появившемся окне снимаете галочку с пункта «Перед записью сохранить в файл данные для отката» , и нажимаете «Да». После проделанной операции операционная система будет считать что на НЖМД нет никаких разделов — диск будет в состоянии «Не инициализирован». По этой причине если операционная система будет предлагать инициализировать диск — отказывайтесь(нажимайте «Отмена»). И саму программу DMDE не удаляйте — будет нужна для осуществления операции посекторного копирования.
Ищите диск объёмом => 1 ТБ, когда найдёте — «свистнете» .
Источник
How to fix the Windows System Error 23 ERROR_CRC
This article features error number Code 23, commonly known as ERROR_CRC and it is described as Data error (cyclic redundancy check).
Error Information
Error name: ERROR_CRC
Error number: Error 23
Applies to: Windows 10, 8, 7, Vista, XP
HEX: 0x17
Description: Data error (cyclic redundancy check).
This repair tool can fix common computer errors like BSODs, system freezes and crashes. It can replace missing operating system files and DLLs, remove malware and fix the damage caused by it, as well as optimize your PC for maximum performance.
About Windows System Error
Windows system errors occur at various times during normal use of the operating system. Users should receive an error code that they can use to analyze and investigate what happened to the computer. However, these codes will not necessarily provide detailed information. And since non-system software can also return these codes, the user will need to have an understanding of the program and runtime context when analyzing errors. Here are some ways to understand symptoms, causes and general solutions.
Definitions (Beta)
Here we list some definitions for the words contained in your error, in an attempt to help you understand your problem. This is a work in progress, so sometimes we might define the word incorrectly, so feel free to skip this section!
- Redundancy — Redundancy is the duplication of critical components or functions of a system with the intention of increasing reliability of the system, usually in the case of a backup or fail-safe.
Symptoms of Code 23 — ERROR_CRC
When processing, Windows send System Error codes to tell the user the kind of problem happening to the computer. They appear at unexpected instances so it is difficult to detect unless one analyzes the error message that comes with it. Windows System Error codes are symptoms to other problems happening to the computer, and since they are, users need to consider the error message, the time and the processes running while it occurred.
(For illustrative purposes only)
Causes of ERROR_CRC — Error 23
Windows system errors can be caused by software or hardware breakdown. Sometimes, your software is not working in consistency with the hardware because of changes or general hardware failures. At some instances, users might have installed conflicting drivers or the OS got corrupted. Perhaps a component had some abnormal power surge which can damage parts and affect its operation. Different kinds of factors may have happened which caused the system to display a System error at certain periods of computer usage. Problems with software and hardware, of course, easily resolved if user can easily pinpoint the portion that are causing the failure. To address problems with these kinds of error, try the following repair methods.
Repair Methods
If a repair method works for you, please click the upvote button to the left of the answer, this will let other users know which repair method is currently working the best.
Источник
Hi
A few weeks ago, my laptop started to stall, meaning that any action like moving the mouse or clicking on a button would take minutes to complete
Started seeing a lot of messages in Event Viewer like tis one:
The IO operation at logical block address 4e53920 for Disk 0 was retried.
I created a Restore point and Reset my laptop to it’s original setting (Reset)
Everything worked out but when I tried to restore the Recovery point, same issue
So I planned to simply clone my Windows into an differnt HDD and replace my orginal boot HDD
I’ve tried various Cloning Software and none work, and most give me a generic error
But Macrium Reflect finally gave me a usable error (Title)
It’s due to bad sectors
(If a bad sector is encountered during image creation then you receive this error in your backup log)
When I try to run chkdsk c: /r, I get the message below (I’m part of the admin group)
C:UsersMiguel>chkdsk c: /r
Access Denied as you do not have sufficient privileges.
You have to invoke this utility running in elevated mode.
I’m at a lose
Thanks
Как исправить систему Windows Ошибка 23 ERROR_CRC
В этой статье представлена ошибка с номером Ошибка 23, широко известная как ERROR_CRC, и ее описание Ошибка данных (циклический контроль избыточности).
О системной ошибке Windows
Системные ошибки Windows возникают в разное время во время нормального использования операционной системы. Пользователи должны получить код ошибки, который они могут использовать для анализа и расследования того, что произошло с компьютером. Однако эти коды не всегда предоставляют подробную информацию. А поскольку такие коды может выдавать и несистемное программное обеспечение, при анализе ошибок пользователю потребуется понимание контекста программы и времени выполнения. Вот несколько способов понять симптомы, причины и общие решения.
Определения (Бета)
Здесь мы приводим некоторые определения слов, содержащихся в вашей ошибке, в попытке помочь вам понять вашу проблему. Эта работа продолжается, поэтому иногда мы можем неправильно определить слово, так что не стесняйтесь пропустить этот раздел!
- Избыточность. Избыточность — это дублирование критических компонентов или функций системы с целью повышения надежности системы, обычно в случае резервного или отказоустойчивого. < / li>
Симптомы Ошибка 23 — ERROR_CRC
Во время обработки Windows отправляет коды системных ошибок, чтобы сообщить пользователю о проблеме, возникшей с компьютером. Они появляются в неожиданное время, поэтому их трудно обнаружить, если не проанализировать сообщение об ошибке. Коды системных ошибок Windows являются симптомами других проблем, происходящих с компьютером, поэтому пользователям необходимо обратить внимание на сообщение об ошибке, время и процессы, запущенные во время ее возникновения.
 Repair Tool")
(Только для примера)
Причины ERROR_CRC — Ошибка 23
Системные ошибки Windows могут быть вызваны программным или аппаратным сбоем. Иногда программное обеспечение не работает согласованно с аппаратным обеспечением из-за изменений или общих аппаратных сбоев. В некоторых случаях пользователи могли установить противоречивые драйверы или повредить ОС. Возможно, в каком-то компоненте произошел аномальный скачок напряжения, который может повредить детали и повлиять на его работу. Могли произойти различные факторы, которые привели к появлению ошибки System в определенные периоды использования компьютера. Проблемы с программным и аппаратным обеспечением, конечно, легко решаются, если пользователь может точно определить часть, которая вызывает сбой. Чтобы решить проблемы с ошибками такого рода, попробуйте следующие методы ремонта.
Методы ремонта
Если метод ремонта вам подошел, пожалуйста, нажмите кнопку upvote слева от ответа, это позволит другим пользователям узнать, какой метод ремонта на данный момент работает лучше всего.
Обратите внимание: ни ErrorVault.com, ни его авторы не несут ответственности за результаты действий, предпринятых при использовании любого из методов ремонта, перечисленных на этой странице — вы выполняете эти шаги на свой страх и риск.
Метод 3 — Откатите свой драйвер
Вы также можете вернуться к исходному драйверу, установленному на вашем компьютере. Для этого:
- В диспетчере устройств найдите проблемный драйвер.
- Щелкните устройство правой кнопкой мыши и выберите «Свойства».
- Когда вы увидите окно «Свойства», щелкните вкладку «Драйвер».
- Вы увидите кнопку «Откатить драйвер», нажмите ее.
- Подтвердите откат, нажав «Да», когда появится вопрос «Вы уверены, что хотите вернуться к ранее установленному программному обеспечению драйвера?»
- После этого перезагрузите компьютер.
Метод 5 — Восстановите переустановку с помощью компакт-диска с ОС или флэш-накопителя
- Лучший способ восстановить системное программное обеспечение — это переустановить его. Процесс восстановления и переустановки помогает сохранить файлы при восстановлении операционной системы. Тем не менее, вам нужно убедиться, что вы создали резервную копию своего файла, если вам действительно нужно переустановить компьютер. Вам нужно будет вставить установочный носитель и перезагрузить компьютер.
- Войдите в BIOS, процесс отличается от модели компьютера к модели, это может быть кнопка F1, F2 или Del.
- Оказавшись там, перейдите в раздел загрузки, установите загрузку с установочного диска и сохраните настройки.
- Для более ранней версии Windows вам может потребоваться нажать на клавиатуру, пока вы ждете, пока компьютер не получит доступ к установочному диску.
- Сначала выберите утилиту восстановления, а не чистую установку ОС. Это может сэкономить вам много хлопот. Однако, если проблема не исчезнет после перезагрузки компьютера, просто сделайте резервную копию файлов и выполните чистую переустановку.
Метод 1 — Восстановить поврежденные или отсутствующие системные файлы
Проверка системных файлов — этот инструмент работает почти так же, как программа проверки реестра, но помогает находить и восстанавливать поврежденные или отсутствующие системные файлы, поэтому его запуск занимает немного больше времени.
- Чтобы запустить команду, откройте командную строку с повышенными привилегиями, набрав ее в окне поиска, затем щелкните правой кнопкой мыши командную строку и выберите «Запуск от имени администратора».
- Введите в командной строке sfc / scannow и дождитесь успешного завершения процесса проверки.
Запустите Checkdisk — Chkdsk исправляет многие несоответствия с ОС. Системные ошибки также можно исправить с помощью этой утилиты. Чтобы запустить это,
- Откройте командную строку, введя ее в поле поиска, а затем, когда вы увидите результат в верхней части списка, щелкните его правой кнопкой мыши и выберите «Запуск от имени администратора».
- Ваша система может сказать, что вы не можете запустить ее в данный момент, потому что вы все еще обрабатываете данные, и спросит вас, хотите ли вы запустить ее перед следующим запуском, просто нажмите y для подтверждения, а затем выйдите с экрана и перезагрузите компьютер.
- После перезагрузки компьютера вы увидите, что checkdisk работает вне Windows, просто дайте ему закончить, пока он не даст вам отчет о том, что было найдено, исправлено или отмечено.
- Закройте окно и дайте компьютеру нормально перезагрузиться.
Метод 2 — Обновите или переустановите драйвер
Изменения, внесенные в ваш компьютер, могут испортить ваш драйвер. В этом случае вы можете переустановить драйвер или обновить его. Для этого вы можете сделать следующее.
- Если вы получили код ошибки диспетчера устройств, обратите внимание на описание, чтобы вы могли точно определить драйвер или компонент, вызывающий ошибку.
- Запустите диспетчер устройств, выполнив поиск Диспетчер устройств или запустив «devmgmt.msc»
- Найдите драйвер в списке и щелкните его правой кнопкой мыши.
- Нажмите Удалить , если вы хотите переустановить драйвер, или Обновить программное обеспечение драйвера , если пытаетесь его обновить.
- Появится окно подтверждения. Убедитесь, что флажок Удалить программное обеспечение драйвера снят.
- Нажмите «ОК» и перезагрузите компьютер.
Вы можете сделать это поочередно:
- Вы можете вручную загрузить драйвер от производителя.
- Запустите его, чтобы заменить текущий драйвер, который вы используете.
- После этого перезагрузите компьютер.
Метод 4 — Использовать восстановление системы
Для окна 7
- Нажмите «Пуск»> «Все программы»> «Стандартные»> «Системные инструменты».
- Нажмите «Восстановление системы», а затем нажмите «Далее».
- Выбирайте точку восстановления, когда знаете, что с вашим компьютером все в порядке.
- Продолжайте нажимать «Далее», а затем — «Готово».
- Это займет время, так что наберитесь терпения и дождитесь полной остановки операции.
Для Windows 8, 8.1 или 10
- Щелкните правой кнопкой мыши кнопку «Пуск», затем выберите «Система».
- В окне «Система» нажмите «Система и безопасность».
- Нажмите «Система» и слева нажмите «Защита системы».
- Нажмите «Восстановление системы», следуйте инструкциям, чтобы выбрать точку восстановления, а затем нажимайте «Далее», пока не увидите кнопку «Готово».
- Дождитесь завершения процесса восстановления.
Другие языки:
How to fix Error 23 (ERROR_CRC) — Data error (cyclic redundancy check).
Wie beheben Fehler 23 (ERROR_CRC) — Datenfehler (zyklische Redundanzprüfung).
Come fissare Errore 23 (ERROR_CRC) — Errore dati (controllo di ridondanza ciclico).
Hoe maak je Fout 23 (ERROR_CRC) — Datafout (cyclische redundantiecontrole).
Comment réparer Erreur 23 (ERROR_CRC) — Erreur de données (contrôle de redondance cyclique).
어떻게 고치는 지 오류 23 (ERROR_CRC) — 데이터 오류(주기적 중복 검사).
Como corrigir o Erro 23 (ERROR_CRC) — Erro de dados (verificação de redundância cíclica).
Hur man åtgärdar Fel 23 (ERROR_CRC) — Datafel (cyklisk redundanskontroll).
Jak naprawić Błąd 23 (BŁĄD_CRC) — Błąd danych (cykliczna kontrola nadmiarowa).
Cómo arreglar Error 23 (ERROR_CRC) — Error de datos de comprobación de redundancia cíclica).
![]() Об авторе: Фил Харт является участником сообщества Microsoft с 2010 года. С текущим количеством баллов более 100 000 он внес более 3000 ответов на форумах Microsoft Support и создал почти 200 новых справочных статей в Technet Wiki.
Об авторе: Фил Харт является участником сообщества Microsoft с 2010 года. С текущим количеством баллов более 100 000 он внес более 3000 ответов на форумах Microsoft Support и создал почти 200 новых справочных статей в Technet Wiki.
Следуйте за нами: ![]()
![]()
![]()
Последнее обновление:
15/01/23 08:41 : Пользователь Android проголосовал за то, что метод восстановления 3 работает для него.

Этот инструмент восстановления может устранить такие распространенные проблемы компьютера, как синие экраны, сбои и замораживание, отсутствующие DLL-файлы, а также устранить повреждения от вредоносных программ/вирусов и многое другое путем замены поврежденных и отсутствующих системных файлов.
ШАГ 1:
Нажмите здесь, чтобы скачать и установите средство восстановления Windows.
ШАГ 2:
Нажмите на Start Scan и позвольте ему проанализировать ваше устройство.
ШАГ 3:
Нажмите на Repair All, чтобы устранить все обнаруженные проблемы.
СКАЧАТЬ СЕЙЧАС
Совместимость
![]()
Требования
1 Ghz CPU, 512 MB RAM, 40 GB HDD
Эта загрузка предлагает неограниченное бесплатное сканирование ПК с Windows. Полное восстановление системы начинается от $19,95.
ID статьи: ACX013909RU
Применяется к: Windows 10, Windows 8.1, Windows 7, Windows Vista, Windows XP, Windows 2000
Совет по увеличению скорости #39
Уменьшение использования памяти Outlook:
Outlook — это программа, потребляющая много памяти, которая может сильно замедлить работу вашего компьютера. Чтобы оптимизировать его и убедиться, что он работает быстро и чисто, вам нужно выполнить некоторые рутинные задачи. Это включает в себя включение автоархивации, отключение несущественных надстроек, использование другой программы для RSS-каналов и календарей и очистку папок для спама и мусора.
Нажмите здесь, чтобы узнать о другом способе ускорения работы ПК под управлением Windows
Ошибки в алфавитном порядке: A B C D E F G H I J K L M N O P Q R S T U V W X Y Z
Логотипы Microsoft и Windows® являются зарегистрированными торговыми марками Microsoft. Отказ от ответственности: ErrorVault.com не связан с Microsoft и не заявляет о такой связи. Эта страница может содержать определения из https://stackoverflow.com/tags по лицензии CC-BY-SA. Информация на этой странице представлена исключительно в информационных целях. © Copyright 2018

-
- Apr 15, 2020
-
- 27
-
- 2
-
- 1,545
- 1
-
#1

-
- Jan 4, 2016
-
- 26,494
-
- 2,792
-
- 98,390
- 4,201
-
#16
I still got error 9. I guess the drive is damaged.
Try imaging instead.
Then restore from image.

-
- Apr 19, 2021
-
- 3,294
-
- 519
-
- 4,940
- 376
-
#2
-
- Jan 4, 2016
-
- 26,494
-
- 2,792
-
- 98,390
- 4,201
-
#3
I get «Clone failed — Error 9 — Read Failed — 23 — Data error (cyclic redundancy check)».
Also, whenever it gives me the error, I get a windows 10 notification saying that the drive needs to be formatted.
Probably bad blocks, pending sectors on the drive.
Can you show screenshot from Hdtune health?
(upload to imgur.com and post link)
-
- Apr 15, 2020
-
- 27
-
- 2
-
- 1,545
- 1
-
#4
The Cyclic Redundancy Check (CRC) error occurs due to hard drive corruption, misconfigured files, registry file corruption, cluttered disk, unsuccessful program installation, or when there’s a bad spot on the storage media. To fix the Cyclic Redundancy Check error:
- Run CHKDSK Utility Scan
- Run SFC Scan
Hope it will help!
Damn. I hoped it wasn’t this, but I guess so. It is a pretty old hard drive, and it’s probably had its fair share of questionable files. Thanks for your response, I really appreciate it!
-
- Apr 15, 2020
-
- 27
-
- 2
-
- 1,545
- 1
-
- Apr 15, 2020
-
- 27
-
- 2
-
- 1,545
- 1
-
#6
The Cyclic Redundancy Check (CRC) error occurs due to hard drive corruption, misconfigured files, registry file corruption, cluttered disk, unsuccessful program installation, or when there’s a bad spot on the storage media. To fix the Cyclic Redundancy Check error:
- Run CHKDSK Utility Scan
- Run SFC Scan
Hope it will help!
So I ran CHKDSK on both of the drives, and they were both healthy. What should I do now?

-
- Mar 16, 2013
-
- 161,377
-
- 13,426
-
- 176,090
- 24,454
-
#7
It can’t be read all the way through for a full clone.
-
- Jan 4, 2016
-
- 26,494
-
- 2,792
-
- 98,390
- 4,201
-
#8
Please list model names of all your drives.
What did you try to clone and to where?
Disk 0 — 250GB — is this your original SSD?
Disk 1 — 500GB — looks like some borked clone.
Disk 2 — 500GB — Destiny Balls D: . You said that’s your SSD. Are you sure?
Disk 3 — new 2TB HDD. Right?
-
- Apr 15, 2020
-
- 27
-
- 2
-
- 1,545
- 1
-
#9
Please list model names of all your drives.What did you try to clone and to where?
Disk 0 — 250GB — is this your original SSD?
Disk 1 — 500GB — looks like some borked clone.
Disk 2 — 500GB — Destiny Balls D: . You said that’s your SSD. Are you sure?
Disk 3 — new 2TB HDD. Right?
I’m sorry, the SSD is disk 1. I gave you the wrong letter. Disk 2 is data, disk 3 is new, disk 0 is my home HDD. Disk one could be a borked clone, as I remember attempting to clone a while back but I think I got the same error. However, I was still able to boot from it.
-
- Jan 4, 2016
-
- 26,494
-
- 2,792
-
- 98,390
- 4,201
-
#10
If health of those drives is fine then..
- Clean Disk 1. Use Diskpart clean method.
- Redo cloning from Disk 0 to Disk 1.
- Shutdown, disconnect 250GB disk, check boot priority in BIOS, set 500GB drive as first in boot priority.
- Boot into windows.
- If everything goes good, shutdown, reconnect 250GB disk, check boot priority, boot into windows, clean 250GB disk, repartition,reformat and repurpose.

-
- Apr 15, 2020
-
- 27
-
- 2
-
- 1,545
- 1
-
#11
Can you show screenshot from Hdtune health for Disk 0 and Disk 1 ?
If health of those drives is fine then..
- Clean Disk 1. Use Diskpart clean method.
- Redo cloning from Disk 0 to Disk 1.
- Shutdown, disconnect 250GB disk, check boot priority in BIOS, set 500GB drive as first in boot priority.
- Boot into windows.
- If everything goes good, shutdown, reconnect 250GB disk, check boot priority, boot into windows, clean 250GB disk, repartition,reformat and repurpose.
View: https://imgur.com/gallery/vO085kw
After I ran diskpart, I still got error 9. As you can see in the screenshots (unless there’s another thing you wanted me to do in HDtune) the drives are healthy. Should I still carry on booting from the new SSD even though I still got the error?
-
- Jan 4, 2016
-
- 26,494
-
- 2,792
-
- 98,390
- 4,201
-
#12
After I ran diskpart, I still got error 9.
Drives seem healthy.
But because of CRC error — cloning process can not work properly.
run:
This will require reboot.
-
- Apr 15, 2020
-
- 27
-
- 2
-
- 1,545
- 1
-
#13
Drives seem healthy.
But because of CRC error — cloning process can not work properly.
run:
This will require reboot.
Still not working. I did this, restarted, and tried to clone but still got error 9. I’m attaching an image of the clone summary in case that will help. The issue always seems to occur when cloning the third partition. Could it be because it has no name?View: https://imgur.com/gallery/asNwFex
-
- Mar 16, 2013
-
- 161,377
-
- 13,426
-
- 176,090
- 24,454
-
#14
Disk 0 is the source?
Try the clone again, this time leaving off the 3rd partition.
If it still fails, cloning may not be possible with this source drive.
-
- Apr 15, 2020
-
- 27
-
- 2
-
- 1,545
- 1
-
#15
-
- Jan 4, 2016
-
- 26,494
-
- 2,792
-
- 98,390
- 4,201
-
#16
I still got error 9. I guess the drive is damaged.
Try imaging instead.
Then restore from image.
-
- Jan 4, 2016
-
- 26,494
-
- 2,792
-
- 98,390
- 4,201
-
#17
For example Minitool partition wizard free.
-
- Apr 15, 2020
-
- 27
-
- 2
-
- 1,545
- 1
-
#18
Try imaging instead.
Then restore from image.
This worked for me! Now I just have to extend the C partition. Thanks for the help!
| Thread starter | Similar threads | Forum | Replies | Date |
|---|---|---|---|---|
|
P
|
Question Can you just switch a cloned backup and a main hard drive and still boot? | Storage | 13 | Nov 2, 2022 |
|
A
|
[SOLVED] switching to ssd. | Storage | 4 | Oct 14, 2022 |
|
|
[SOLVED] Switch place for m.2 ssd | Storage | 1 | Oct 6, 2022 |
|
G
|
Question Can someone explain to me how switching from hdd to ssd works? | Storage | 4 | Sep 29, 2022 |
|
|
Question Can I switch users from Admin account to my work account while Admin account performs Full Format on 2TB external drive? | Storage | 3 | Jun 16, 2022 |
|
|
[SOLVED] BSOD: Inaccessible Boot Device when switching to AHCI | Storage | 1 | Mar 20, 2022 |
|
D
|
Question HDD not showing in bios ( switched motherboard and cpu recently) | Storage | 3 | Mar 17, 2022 |
|
H
|
[SOLVED] Switching HDDs between two (almost) exact same specifications | Storage | 5 | Mar 10, 2022 |
|
N
|
Question Smart switch for external drive | Storage | 1 | Mar 9, 2022 |
|
Z
|
Question Switching hard drives | Storage | 3 | Mar 2, 2022 |


- Advertising
- Cookies Policies
- Privacy
- Term & Conditions
- Topics
Windows and errors go hand in hand. Most of these errors have simple fixes which you don’t even have to spend two minutes on. However, if it’s an error related to your data, things can get a little bit messy. The data error cyclic redundancy check is one such error. But first, what is a cyclic redundancy check? A cyclic redundancy check is sort of a verification carried out by your device to check for the accuracy of raw data on the various storage devices. If this check fails due to any reason it leads to the data error (cyclic redundancy check).
This error should not be ignored as it makes it impossible to access the stored data on the device. Luckily, there exist several ways in which you can get out of this problem and we have listed them all in this guide, let’s go through them one by one.

How to Fix Cyclic Redundancy Check Error (CRC)? Step-by-Step Guide
Part 1: Overview of Data Error (Cyclic Redundancy Check)
1. What is Cyclic Redundancy Check Data Error?
As mentioned earlier, a cyclic redundancy check is an oversight mechanism by the system to check the accuracy of raw data on your device. If the check is unable to tally the check values of a processed file with the existing one, it results in what we know as the data error cyclic redundancy check ssd.
2. What Causes Cyclic Redundancy Check Data Error?
A Lot of factors can contribute to this error, the most common ones being network or storage-related issues. Some of the known causes include:
- Corrupted partition, application, file, or storage device.
- Device connected to an unstable or bad network.
- Changes in files metadata or file name while in use.
- Changes in the registry file.
- Abrupt shut down.
- Improperly connected hard drive.
Prepare: Recover Data from Hard Drive with Cyclic Redundancy Check Error
A hard drive affected with a data error cyclic redundancy check external hard drive error runs a high risk of losing all data. You should be ready with a solution to retrieve the data if it gets lost. Tenorshare 4DDiG Data Recovery is that solution. A fast and compact tool that is primed to recover data from almost any situation, the 4DDiG is the only thing you need for data retrieval after fixing the CRC error. Follow these simple steps to get your data back in no time.
- Recover files from inaccessible cyclic redundancy check devices.
- Recover files from internal/external HDD/SSD, SD card, USB flash drive, SD card, etc.
- Support 1000+ files types such as photos, videos, documents and more.
- Supports file systems including as FAT16,FAT32,exFAT,NTFS, APFS and HFS+.
- 100% easy and secure.
- Step 1:Choose a Hard Drive
- Step 2:Scan Hard Drive
- Step 3:Preview and Recover Files
Connect the external drive and locate it on 4DDiG. Then click scan to proceed. In the next pop-up windows, you can customize file types to start scanning.
4DDiG immediately examines the selected drive all around for missing data, and you may pause or stop the searching at any time if you’ve identified the files you want to recover. There are categories like Deleted Files, Existing Files, Lost Location, RAW Files, and Tag Files under the Tree View. You can also switch to File View to check file types such as Photo, Video, Document, Audio, Email, and others. Besides, you can search for target files or use Filter to narrow down your search on the left side of the panel.
Following the discovery of the target files, you can preview and recover them to a secure location. In case of disk overwriting and permanent data loss, please do not save to the same partition where you lost them.
After the data recovery, you can now start fixing this error.
Fix 1: Run Disk Check to Troubleshoot
The great thing about Windows is that it has a variety of tools that you can employ to troubleshoot the data error cyclic redundancy check hard drive error. Disk Check is one of them and amongst the safest at preserving your data during the fix. Here’s how you can use it.
Step 1: Go to My Computer and right-click on the partition with the error and go to Properties.
Step 2: Once in the Properties window, go to the Tools tab and press the ‘Check now’ option under the error checking section.
Step 3: Now, you can choose to scan the drive to troubleshoot it and solve the CRC error.
Fix 2: Use CHKDSK Utility to Repair Hard Drive
CHKDSK is the go-to utility for most of the data-related issues on Windows and the diskpart has encountered an error data error (cyclic redundancy check) is no different. To use the CHKDSK for this problem, follow these steps:
Step 1: Bring up Command prompt select run as Administrator. Type in the following command, ‘chkdsk /r x:’. Here, x is the particular drive that is giving you the error.
Step 2: The CHKDSK utility will now scan the partition and give you the report and restart your PC. Your device will be fixed on startup if this method works. If not, move on to the next one.
Fix 3: Run SFC Scan to Repair System Files
If a logical issue with your hard drive is the source of this error then a System File Check (SFC) scan may also be able to solve your problem. Here’s how:
Step 1: Run command prompt as Admin and type in the following command, ‘sfc /scannow’.
Step 2: The scan will now commence and will troubleshoot the issue.
Fix 4: Format the Devices
If you are using a Seagate or any other company’s hard drive and still can not get around the data error cyclic redundancy check external hard drive seagate error then it’s time to format your hard drive.
Step 1: Open Control Panel and go to Computer Management.
Step 2: In the Disk Management application, select the partition to be formatted and right-click on it. In the menu that pops up, select the Format option.
Step 3: Now a format Window will pop up in which you’ll have to select the type of format you want to do and other related things. Click OK and the Format process will begin.
Tips: If your format the drive, the data on it will be erased. No worries, download Tenorshare 4DDiG data recovery to effortlessly retrieve any lost files from the formatted drive.
Fix 5: Go for Manual Repair
If none of the above methods work then you should get in contact with the registered dealers of your device or hard drive and try to get it fixed there.
Part 3: How to Prevent Data Error Cyclic Redundancy Check External Hard Drive?
The fixes given in this guide will solve your problem, but it’s your responsibility to prevent the virtual disk manager data error cyclic redundancy check error from happening again. For this, you can put the following points into practice.
- Scan your device regularly with Windows Defender and keep it up to date.
- Power off and power on your device correctly. Avoid abrupt shutdowns.
- Do not interfere with the registry or metadata of your device.
- At any given time, keep 20% of free data on your system.
- Use only a genuine copy of Windows.
FAQs
1. How can I solve a data error cyclic redundancy check for a hard drive that is not initialized?
To fix data error cyclic redundancy check initialize disk error you can use the CHKDSK utility. Open up the command prompt and enter the command, ‘chkdsk /r x:’, x being the name of the drive, and run it.
2. How do I fix a cyclic redundancy check without a drive letter?
If you can not find the drive letter of your hard drive, update all the drivers related to the hard disk and restart your computer.
3. How do I fix data error cyclic redundancy check unallocated?
You can fix the data error cyclic redundancy check unallocated by the fixes mentioned here:
- Run Disk Check to Troubleshoot
- Use CHKDSK Utility to Repair Hard Drive
- Run SFC Scan to Repair System Files
- Format the Devices
- Go for Manual Repair
Conclusion:
That was all that you needed to know about the pesky Cyclic redundancy error. Right from the causes to the solution, we have laid down all that’s important along with the supremely important data recovery hack, the Tenorshare 4DDiG Data Recovery. It ensures that your problems get fixed without even losing a byte of data in the process. All of this and more with no costs whatsoever. So what are you waiting for?