Sorry for my bad English.
I have Ubuntu 19.10 and I upgrade my BareOS 18.2.5 to 19.2.5.
But webgui doesnot work after it.
Server version: Apache/2.4.41 (Ubuntu)
mysql Ver 8.0.19-0ubuntu0.19.10.3 for Linux on x86_64 ((Ubuntu))
In log-file I found this message:
фев 10 14:40:55 host138 systemd[1]: Starting Bareos Director Daemon service…
фев 10 14:40:55 host138 bareos-dir[6430]: bareos-dir: dird/check_catalog.cc:65-0 Could not open Catalog «MyCatalog», database «bareos».
фев 10 14:40:55 host138 bareos-dir[6430]: bareos-dir: dird/check_catalog.cc:71-0 Version error for database «bareos». Wanted 2192, got 2171
фев 10 14:40:55 host138 bareos-dir[6430]: bareos-dir ERROR TERMINATION
фев 10 14:40:55 host138 bareos-dir[6430]: Please correct the configuration in /etc/bareos/bareos-dir.d/*/*.conf
When I go to /usr/lib/bareos/scripts and run update_bareos_tables
Updating mysql tables
Upgrading database schema from version 2171 to 2192
ERROR 1064 (42000) at line 6: You have an error in your SQL syntax; check the manual that corresponds to your MySQL server version for the right syntax to use near ‘IF NOT EXISTS jobtdate_idx ON Job (JobTDate)’ at line 1
Failed to upgrade database schema from version 2171 to 2192
Please help if this possible!
Thanks.
Содержание
- Install Bareos on CentOS 7
- 1. Upgrade the system
- 2. Install MariaDB
- 3. Install Bareos on CentOS 7
- 4. Prepare Bareos database
- 5. Install Bareos WebUI
- Conclusion
- Troubleshooting
- Debug Messages
- Client Access Problems
- Difficulties Connecting from the FD to the SD
- Authorization Errors
- Concurrent Jobs
- Media VolWrites: integer out of range
- Tape Labels: ANSI or IBM
- Reading
- Writing
- Tape Drive
- Get Your Tape Drive Working
- Autochanger
- Testing Autochanger and Adapting mtx-changer script
- Restore
- Restore a pruned job using a pattern
- Problems Restoring Files
- Restoring Files Can Be Slow
- Restoring When Things Go Wrong
Install Bareos on CentOS 7

Data backup is essential for a sysadmin and any real user of a system. Doing so will bring many advantages to our company because, in case of failures, you will have your data well protected. Recently, I was talking about preventing the accidental deletion of certain files in Linux, but today I’ll show you how to install Bareos a tool to back up CentOS 7.
Bareos is a fairly reliable, robust and secure tool for backing up and protecting data on our operating system. In addition, it is a 100% open source fork of the backup project from Bacula. The code is released under the aGPL license which guarantees flexibility for working with the code. Code that is available in GitHub.
So, let us start.
1. Upgrade the system
First, you need to upgrade the whole system. Just run these commands on the terminal:
 1.- Upgrade the system
After that, you will have a more secure system thanks to the new security patches newly installed.
2. Install MariaDB
Bareos for its operation requires a database manager like MariaDB. So the next step is to install MariaDB.
 2.- install MariaDB
After that, enable and start the MariaDB service.
 3.- Enable the mariadb service
So, that’s it for now.
3. Install Bareos on CentOS 7
Now it is your turn to install Bareos. For this, we will use the dedicated Bareos repository for CentOS. This is the safest and easiest way to install Bareos. Since we can always count on the latest stable version of the program. It also simplifies installation times.
 5.- Adding the repository
After that, install it. You also need to install the MariaDB / MySQL connector. On the other hand, you can choose between MariaDB or PostgreSQL.
 6.- Install Bareos
4. Prepare Bareos database
The next step is to set up the Bareos database. In the installation files, Bareos has a series of databases ready for use. Let’s go for it.
 7.- Preparing the dataases
Bareos uses the ports 9101 and 9103. So, you have to open the ports.
 9.- Creating the firewall rules
Next, start Bareos services.
 8.- start the bareos services
Next, start it with bconsole:
 9.- bconsole
5. Install Bareos WebUI
In order to make the use of Bareos simpler, you need to install your web interface. To do this you need to install apache web server and PHP. So, let’s do it.
 10.- Install apache and php
Remember to create a rule for apache in the firewall.
Finally, enable the services:
 11.- Starting httpd service
After that, install bareos web ui.
 12.- Install bareos web ui
Then, create a new file to access web UI.
And add the following:
 13.- Creating the user
You can set the name and password you want.
Next, restart the service.
Finally, open the web browser and go to http://SERVER_IP/bareos-webui.
 Bareos log in
Log in and start to use it.
Conclusion
Bareos is a great application to backup data on a CentOS 7 server. For this, only a little time and some application commands are required.
Please share this article with your friends.
Источник
Troubleshooting
Debug Messages
The Bareos programs contain a lot of debug messages. Normally, these are not printed. See the setdebug chapter about how to enable them.
Client Access Problems
There are several reasons why a Bareos Director could not contact a client on a different machine. They are:
- Check if the client file daemon is really running.
- The Client address or port is incorrect or not resolved by DNS. See if you can ping the client machine using the same address as in the Client record.
- You have a firewall, and it is blocking traffic on port 9102 between the Director’s machine and the Client’s machine (or on port 9103 between the Client and the Storage daemon machines).
- If your system is using Tcpwrapper ( hosts.allow or hosts.deny file), verify that is permitting access.
- Your password or names are not correct in both the Director and the Client machine. Try configuring everything identical to how you run the client on the same machine as the Director, but just change the address. If that works, make the other changes one step at a time until it works.
Some of the DNS and Firewall problems can be circumvented by configuring clients using Client Initiated Connection or as Passive Clients .
Difficulties Connecting from the FD to the SD
If you are having difficulties getting one or more of your File daemons to connect to the Storage daemon, it is most likely because you have not used a fully qualified domain name on the Address (Dir->Storage) directive. That is the resolver on the File daemon’s machine (not on the Director’s) must be able to resolve the name you supply into an IP address. An example of an address that is guaranteed not to work: localhost. An example that may work: bareos-sd1. An example that is more likely to work: bareos-sd1.example.com.
You can verify how a Bareos File Daemon resolves a DNS name by the following command:
If your address is correct, then make sure that no other program is using the port 9103 on the Storage daemon’s machine. The Bacula project has reserved these port numbers by IANA, therefore they should only be used by Bacula and its replacements like Bareos. However, apparently some HP printers do use these port numbers. A netstat -lntp on the Bareos Storage Daemon’s machine can determine who is listening on the 9103 port (used for FD to SD communications in Bareos).
For security reasons, Bareos requires that both the File daemon and the Storage daemon know the name of the Director as well as its password. As a consequence, if you change the Director’s name or password, you must make the corresponding change in the Storage daemon’s and in the File daemon’s configuration files.
During the authorization process, the Storage daemon and File daemon also require that the Director authenticates itself, so both ends require the other to have the correct name and password.
If you have edited the configuration files and modified any name or any password, and you are getting authentication errors, then your best bet is to go back to the original configuration files generated by the Bareos installation process. Make only the absolutely necessary modifications to these files – e.g. add the correct email address. Then follow the instructions in the Running Bareos chapter of this manual. You will run a backup to disk and a restore. Only when that works, should you begin customization of the configuration files.
Some users report that authentication fails if there is not a proper reverse DNS lookup entry for the machine. This seems to be a requirement of gethostbyname(), which is what Bareos uses to translate names into IP addresses. If you cannot add a reverse DNS entry, or you don’t know how to do so, you can avoid the problem by specifying an IP address rather than a machine name in the appropriate Bareos configuration file.
Here is a picture that indicates what names/passwords in which files/Resources must match up:
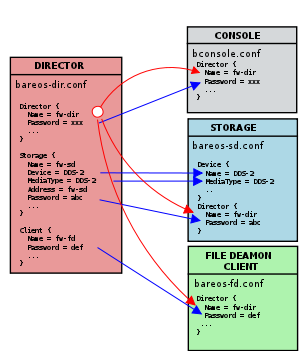
In the left column, you will find the Director, Storage, and Client resources, with their names and passwords – these are all in the Bareos Director configuration. The right column is where the corresponding values should be found in the Console, Storage daemon (SD), and File daemon (FD) configuration files.
Another thing to check is to ensure that the Bareos component you are trying to access has Maximum Concurrent Jobs set large enough to handle each of the Jobs and the Console that want to connect simultaneously. Once the maximum connections has been reached, each Bareos component will reject all new connections.
Concurrent Jobs
Bareos can run multiple concurrent jobs. Using the Maximum Concurrent Jobs directives, you can configure how many and which jobs can be run simultaneously:
Bareos Storage Daemon
Bareos File Daemon
For example, if you want two different jobs to run simultaneously backing up the same Client to the same Storage device, they will run concurrently only if you have set Maximum Concurrent Jobs greater than one in the Director (Dir) resource, the Client (Dir) resource, and the Storage (Dir) resource in Bareos Director configuration.
When running concurrent jobs without Data Spooling , the volume format becomes more complicated, consequently, restores may take longer if Bareos must sort through interleaved volume blocks from multiple simultaneous jobs. This can be avoided by having each simultaneous job write to a different volume or by using data spooling We recommend that you read the Data Spooling of this manual first, then test your multiple concurrent backup including restore testing before you put it into production.
When using random access media as backup space (e.g. disk), you should also read the chapter about Concurrent Disk Jobs .
Below is a super stripped down bareos-dir.conf file showing you the four places where the the file must be modified to allow the same job NightlySave (Dir->Job) to run up to four times concurrently. The change to the Job resource is not necessary if you want different Jobs to run at the same time, which is the normal case.
In some situation, you receive an error message similar to this:
The database column VolWrites in the Media table stores the number of write accesses to a volume. It is only used for statistics.
However, it has happened that the number of write accesses exceeds the maximum value supported by the database column (on PostgreSQL it is currently 2147483647, 32 bit, signed integer). The result is a database error, similar to the one mentioned above.
As a temporary fix, just reset this counter:
In the long run, it is planed to modify the database schema to enable storing much larger numbers.
Tape Labels: ANSI or IBM
By default, Bareos uses its own tape label (see Tape Formats and Label Type (Dir->Pool) ). However, Bareos also supports reading and write ANSI and IBM tape labels.
Reading
Reading ANSI/IBM labels is important, if some of your tapes are used by other programs that also support ANSI/IBM labels. For example, LTFS tapes are indicated by an ANSI label.
If your are running Bareos in such an environment, you must set Check Labels (Sd->Device) to yes, otherwise Bareos will not recognize that these tapes are already in use.
Writing
To configure Bareos to also write ANSI/IBM tape labels, use Label Type (Dir->Pool) or Label Type (Sd->Device) . With the proper configuration, you can force Bareos to require ANSI or IBM labels.
Even though Bareos will recognize and write ANSI and IBM labels, it always writes its own tape labels as well.
If you have labeled your volumes outside of Bareos, then the ANSI/IBM label will be recognized by Bareos only if you have created the HDR1 label with BAREOS.DATA in the filename field (starting with character 5). If Bareos writes the labels, it will use this information to recognize the tape as a Bareos tape. This allows ANSI/IBM labeled tapes to be used at sites with multiple machines and multiple backup programs.
Tape Drive
This chapter is concerned with testing and configuring your tape drive to make sure that it will work properly with Bareos using the btape program.
Get Your Tape Drive Working
In general, you should follow the following steps to get your tape drive to work with Bareos. Start with a tape mounted in your drive. If you have an autochanger, load a tape into the drive. We use /dev/nst0 as the tape drive name, you will need to adapt it according to your system.
Do not proceed to the next item until you have succeeded with the previous one.
Make sure that Bareos (the Storage daemon) is not running or that you have unmounted the drive you will use for testing.
Use tar to write to, then read from your drive:
Make sure you have a valid and correct Device resource corresponding to your drive. For Linux users, generally, the default one works. For FreeBSD users, there are two possible Device configurations (see below). For other drives and/or OSes, you will need to first ensure that your system tape modes are properly setup (see below), then possibly modify you Device resource depending on the output from the btape program (next item). When doing this, you should consult the Storage Daemon Configuration of this manual.
If you are using a Fibre Channel to connect your tape drive to Bareos, please be sure to disable any caching in the NSR (network storage router, which is a Fibre Channel to SCSI converter).
Run the btape test command:
It isn’t necessary to run the autochanger part of the test at this time, but do not go past this point until the basic test succeeds. If you do have an autochanger, please be sure to read the Autochanger chapter of this manual.
Run the btape fill command, preferably with two volumes. This can take a long time. If you have an autochanger and it is configured, Bareos will automatically use it. If you do not have it configured, you can manually issue the appropriate mtx command, or press the autochanger buttons to change the tape when requested to do so.
Run Bareos, and backup a reasonably small directory, say 60 Megabytes. Do three successive backups of this directory.
Stop Bareos, then restart it. Do another full backup of the same directory. Then stop and restart Bareos.
Do a restore of the directory backed up, by entering the following restore command, being careful to restore it to an alternate location:
Do a diff on the restored directory to ensure it is identical to the original directory. If you are going to backup multiple different systems (Linux, Windows, Mac, Solaris, FreeBSD, …), be sure you test the restore on each system type.
If you have an autochanger, you should now go back to the btape program and run the autochanger test:
Adjust your autochanger as necessary to ensure that it works correctly. See the Autochanger chapter of this manual for a complete discussion of testing your autochanger.
Autochanger
Testing Autochanger and Adapting mtx-changer script
In case, Bareos does not work well with the Autochanger, it is preferable to “hand-test” that the changer works. To do so, we suggest you do the following commands:
Make sure Bareos is not running.
/usr/lib/bareos/scripts/mtx-changer /dev/sg0 list 0 /dev/nst0 0
This command should print:
or one number per line for each slot that is occupied in your changer, and the number should be terminated by a colon (:). If your changer has barcodes, the barcode will follow the colon. If an error message is printed, you must resolve the problem (e.g. try a different SCSI control device name if /dev/sg0 is incorrect). For example, on FreeBSD systems, the autochanger SCSI control device is generally /dev/pass2.
/usr/lib/bareos/scripts/mtx-changer /dev/sg0 listall 0 /dev/nst0 0
This command should print:
/usr/lib/bareos/scripts/mtx-changer /dev/sg0 transfer 1 2
This command should transfer a volume from source (1) to destination (2)
/usr/lib/bareos/scripts/mtx-changer /dev/sg0 slots
This command should return the number of slots in your autochanger.
/usr/lib/bareos/scripts/mtx-changer /dev/sg0 unload 1 /dev/nst0 0
If a tape is loaded from slot 1, this should cause it to be unloaded.
/usr/lib/bareos/scripts/mtx-changer /dev/sg0 load 3 /dev/nst0 0
Assuming you have a tape in slot 3, it will be loaded into drive (0).
/usr/lib/bareos/scripts/mtx-changer /dev/sg0 loaded 0 /dev/nst0 0
It should print “3” Note, we have used an “illegal” slot number 0. In this case, it is simply ignored because the slot number is not used. However, it must be specified because the drive parameter at the end of the command is needed to select the correct drive.
/usr/lib/bareos/scripts/mtx-changer /dev/sg0 unload 3 /dev/nst0 0
will unload the tape into slot 3.
Once all the above commands work correctly, assuming that you have the right Changer Command in your configuration, Bareos should be able to operate the changer. The only remaining area of problems will be if your autoloader needs some time to get the tape loaded after issuing the command. After the mtx-changer script returns, Bareos will immediately rewind and read the tape. If Bareos gets rewind I/O errors after a tape change, you will probably need to configure the load_sleep paramenter in the config file /etc/bareos/mtx-changer.conf . You can test whether or not you need a sleep by putting the following commands into a file and running it as a script:
If the above script runs, you probably have no timing problems. If it does not run, start by putting a sleep 30 or possibly a sleep 60 in the script just after the mtx-changer load command. If that works, then you should configure the load_sleep paramenter in the config file /etc/bareos/mtx-changer.conf to the specified value so that it will be effective when Bareos runs.
A second problem that comes up with a small number of autochangers is that they need to have the cartridge ejected before it can be removed. If this is the case, the load 3 will never succeed regardless of how long you wait. If this seems to be your problem, you can insert an eject just after the unload so that the script looks like:
If this solves your problems, set the parameter offline in the config file /etc/bareos/mtx-changer.conf to “1”.
Restore
Restore a pruned job using a pattern
It is possible to configure Bareos in a way, that job information are still stored in the Bareos catalog, while the individual file information are already pruned.
If all File records are pruned from the catalog for a Job, normally Bareos can restore only all files saved. That is there is no way using the catalog to select individual files. With this new feature, Bareos will ask if you want to specify a Regex expression for extracting only a part of the full backup.
See also FileRegex bsr option for more information.
Problems Restoring Files
The most frequent problems users have restoring files are error messages such as:
Both these kinds of messages indicate that you were probably running your tape drive in fixed block mode rather than variable block mode. Fixed block mode will work with any program that reads tapes sequentially such as tar, but Bareos repositions the tape on a block basis when restoring files because this will speed up the restore by orders of magnitude when only a few files are being restored. There are several ways that you can attempt to recover from this unfortunate situation.
Try the following things, each separately, and reset your Device resource to what it is now after each individual test:
- Set “Block Positioning = no” in your Device resource and try the restore. This is a new directive and untested.
- Set “Minimum Block Size = 512” and “Maximum Block Size = 512” and try the restore. If you are able to determine the block size your drive was previously using, you should try that size if 512 does not work. This is a really horrible solution, and it is not at all recommended to continue backing up your data without correcting this condition. Please see the Tape Drive section for more on this.
- Try editing the restore.bsr file at the Run xxx yes/mod/no prompt before starting the restore job and remove all the VolBlock statements. These are what causes Bareos to reposition the tape, and where problems occur if you have a fixed block size set for your drive. The VolFile commands also cause repositioning, but this will work regardless of the block size.
- Use bextract to extract the files you want – it reads the Volume sequentially if you use the include list feature, or if you use a .bsr file, but remove all the VolBlock statements after the .bsr file is created (at the Run yes/mod/no) prompt but before you start the restore.
Restoring Files Can Be Slow
Restoring files is generally much slower than backing them up for several reasons. The first is that during a backup the tape is normally already positioned and Bareos only needs to write. On the other hand, because restoring files is done so rarely, Bareos keeps only the start file and block on the tape for the whole job rather than on a file by file basis which would use quite a lot of space in the catalog.
Bareos will forward space to the correct file mark on the tape for the Job, then forward space to the correct block, and finally sequentially read each record until it gets to the correct one(s) for the file or files you want to restore. Once the desired files are restored, Bareos will stop reading the tape.
Finally, instead of just reading a file for backup, during the restore, Bareos must create the file, and the operating system must allocate disk space for the file as Bareos is restoring it.
For all the above reasons the restore process is generally much slower than backing up (sometimes it takes three times as long).
Restoring When Things Go Wrong
This and the following sections will try to present a few of the kinds of problems that can come up making restoring more difficult. We will try to provide a few ideas how to get out of these problem situations. In addition to what is presented here, there is more specific information on restoring a Client and your Server in the Disaster Recovery Using Bareos chapter of this manual.
Problem My database is broken. Solution
For SQLite, use the vacuum command to try to fix the database. For either MySQL or PostgreSQL, see the vendor’s documentation. They have specific tools that check and repair databases, see the Catalog Maintenance sections of this manual for links to vendor information.
Assuming the above does not resolve the problem, you will need to restore or rebuild your catalog. Note, if it is a matter of some inconsistencies in the Bareos tables rather than a broken database, then running bareos-dbcheck might help, but you will need to ensure that your database indexes are properly setup.
Problem How do I restore my catalog? Solution with a Catalog backup
If you have backed up your database nightly (as you should) and you have made a bootstrap file, you can immediately load back your database (or the ASCII SQL output). Make a copy of your current database, then re-initialize it, by running the following scripts:
After re-initializing the database, you should be able to run Bareos. If you now try to use the restore command, it will not work because the database will be empty. However, you can manually run a restore job and specify your bootstrap file. You do so by entering the run command in the console and selecting the restore job. If you are using the default bareos-dir.conf, this Job will be named RestoreFiles. Most likely it will prompt you with something such as:
A number of the items will be different in your case. What you want to do is: to use the mod option to change the Bootstrap to point to your saved bootstrap file; and to make sure all the other items such as Client, Storage, Catalog, and Where are correct. The FileSet is not used when you specify a bootstrap file. Once you have set all the correct values, run the Job and it will restore the backup of your database, which is most likely an ASCII dump.
You will then need to follow the instructions for your database type to recreate the database from the ASCII backup file. See the Catalog Maintenance chapter of this manual for examples of the command needed to restore a database from an ASCII dump (they are shown in the Compacting Your XXX Database sections).
Also, please note that after you restore your database from an ASCII backup, you do NOT want to do a make_bareos_tables command, or you will probably erase your newly restored database tables.
Solution with a Job listing
If you did save your database but did not make a bootstrap file, then recovering the database is more difficult. You will probably need to use bextract to extract the backup copy. First you should locate the listing of the job report from the last catalog backup. It has important information that will allow you to quickly find your database file. For example, in the job report for the CatalogBackup shown below, the critical items are the Volume name(s), the Volume Session Id and the Volume Session Time. If you know those, you can easily restore your Catalog.
From the above information, you can manually create a bootstrap file, and then follow the instructions given above for restoring your database. A reconstructed bootstrap file for the above backup Job would look like the following:
Where we have inserted the Volume name, Volume Session Id, and Volume Session Time that correspond to the values in the job report. We’ve also used a FileIndex of one, which will always be the case providing that there was only one file backed up in the job.
The disadvantage of this bootstrap file compared to what is created when you ask for one to be written, is that there is no File and Block specified, so the restore code must search all data in the Volume to find the requested file. A fully specified bootstrap file would have the File and Blocks specified as follows:
Once you have restored the ASCII dump of the database, you will then to follow the instructions for your database type to recreate the database from the ASCII backup file. See the Catalog Maintenance chapter of this manual for examples of the command needed to restore a database from an ASCII dump (they are shown in the Compacting Your XXX Database sections).
Also, please note that after you restore your database from an ASCII backup, you do NOT want to do a make_bareos_tables command, or you will probably erase your newly restored database tables.
Solution without a Job Listing
If you do not have a job listing, then it is a bit more difficult. Either you use the bscan program to scan the contents of your tape into a database, which can be very time consuming depending on the size of the tape, or you can use the bls program to list everything on the tape, and reconstruct a bootstrap file from the bls listing for the file or files you want following the instructions given above.
There is a specific example of how to use bls below.
Trying to restore the last known good full backup by specifying item 3 on the restore menu then the JobId to restore, but Bareos then reports:
and restores nothing.
Most likely the File records were pruned from the database either due to the File Retention period expiring or by explicitly purging the Job. By using the “llist jobid=nn” command, you can obtain all the important information about the job:
Then you can find the Volume(s) used by doing:
Finally, you can create a bootstrap file as described in the previous problem above using this information.
Bareos will ask you if you would like to restore all the files in the job, and it will collect the above information and write the bootstrap file for you.
Problem You don’t have a bootstrap file, and you don’t have the Job report for the backup of your database, but you did backup the database, and you know the Volume to which it was backed up. Solution
Either bscan the tape (see below for bscanning), or better use bls to find where it is on the tape, then use bextract to restore the database. For example,
Might produce the following output:
Of course, there will be many more records printed, but we have indicated the essential lines of output. From the information on the Begin Job and End Job Session Records, you can reconstruct a bootstrap file such as the one shown above.
Problem How can I find where a file is stored? Solution
Normally, it is not necessary, you just use the restore command to restore the most recently saved version (menu option 5), or a version saved before a given date (menu option 8). If you know the JobId of the job in which it was saved, you can use menu option 3 to enter that JobId.
If you would like to know the JobId where a file was saved, select restore menu option 2.
You can also use the query command to find information such as:
This is probably the worst of all cases, and you will probably have to re-create your database from scratch and then bscan in all your volumes, which is a very long, painful, and inexact process.
There are basically three steps to take:
- Ensure that your SQL server is running (MySQL or PostgreSQL) and that the Bareos database (normally bareos) exists. See the Prepare Bareos database chapter of the manual.
- Ensure that the Bareos databases are created. This is also described at the above link.
- Start and stop the Bareos Director using the propriate bareos-dir.conf file so that it can create the Client and Storage records which are not stored on the Volumes. Without these records, scanning is unable to connect the Job records to the proper client.
When the above is complete, you can begin bscanning your Volumes. Please see the bscan chapter for more details.
© Copyright 2019 Bareos GmbH & Co. KG and others.. Revision January 11, 2022 .
Источник
установка bareos:
wget -O /etc/yum.repos.d/bareos.repo http://download.bareos.org/bareos/release/latest/CentOS_6/bareos.repo
yum install bareos
Включить службу bareos
/etc/init.d/bareos-dir start  # Director
/etc/init.d/bareos-sd start  # Storage Daemon
/etc/init.d/bareos-fd start  # File Daemon
Установите bareos webui
Bareos-webui — это графический интерфейс управления bareos.
Поскольку это веб-версия, необходимо установить Apache и PHP.
(после установки PHP будет установлен Apache)
По умолчанию CentOS 6 имеет версию php 5.3, и ее необходимо обновить до php 5.5 / 5.6.
Справочный адрес:https://www.mojowill.com/geek/howto-install-php-5-4-5-5-or-5-6-on-centos-6-and-centos-7/
Далее официально устанавливаем bareos webui
cd /var/www/html/
wget https://github.com/bareos/bareos-webui/archive/Release/17.2.5.zip -O bareos-webui.zip
unzip bareos-webui.zip
mv bareos-webui-Release-17.2.5 bareos-webui
cp bareos-webui/install/apache/bareos-webui.conf /etc/httpd/conf.d/
Затем измените файл bareos-webui.conf
vim /etc/httpd/conf.d/bareos-webui.conf 
Следующий:
mkdir /etc/bareos-webui
cp /var/www/html/bareos-webui/install/directors.ini /etc/bareos-webui/
cp /var/www/html/bareos-webui/install/configuration.ini /etc/bareos-webui/
cp /var/www/html/bareos-webui/install/bareos/bareos-dir.d/console/admin.conf.example  /etc/bareos-webui/admin.conf
cp /var/www/html/bareos-webui/install/bareos/bareos-dir.d/profile/webui-admin.conf  /etc/bareos-webui/
Измените файл /etc/bareos/bareos-dir.d/director/bareos-dir.conf и добавьте следующие две строки в конце
@/etc/bareos-webui/admin.conf
@/etc/bareos-webui/webui-admin.conf
перезагружать
/etc/init.d/httpd restart
/etc/init.d/bareos-dir restart
контрольная работа
Откройте браузер и введите localhost / bareos-webui  Возврат каретки
 Введите имя пользователя admin и пароль admin для входа в систему
Если возникает эта ошибка:
Error: Permission denied, director seems to be down or blocking our request
Затем необходимо выполнить еще одну команду:
setsebool -P httpd_can_network_connect onПосле этого все должно быть хорошо.
reference:https://www.cnblogs.com/wsl222000/p/7080097.html
bareos 17.2 с локальной базой работает без проблем. При попытке изменить catalog на внешний сервер базы данных, bareos_dir перезапускается без ошибок, но отваливается webui с ошибкой Connection refused, director seems to be down or blocking our request.
MySQL стоит на винде 2012, bareos на ubuntu 16, с консоли подключение к базе успешно.
Catalog {
Name = MyCatalog
dbdriver = «mysql»
dbaddress = «sql»
dbport = «3306»
dbname = «bareos»
dbuser = «bareos»
dbpassword = «bareos»
}
Подскажите куда копать.
-
Вопрос заданболее трёх лет назад
-
201 просмотр
отвечаю сам себе, может кому то пригодиться, так как я на поиск решения потратил весь день.
для начала прописываем файл /etc/my.cnf
[client]
host=sql (удаленный сервер)
user=bareos
password=bareos
После этого запускаем скрипты по очереди:
/usr/lib/bareos/scripts/create_bareos_database
/usr/lib/bareos/scripts/make_bareos_tables
/usr/lib/bareos/scripts/grant_bareos_privileges
Пригласить эксперта
-
Показать ещё
Загружается…
09 февр. 2023, в 10:11
1500 руб./в час
09 февр. 2023, в 09:53
10 руб./за проект
09 февр. 2023, в 09:28
5000 руб./за проект
Минуточку внимания
Corint Official
unread,
Feb 19, 2020, 4:19:32 PM2/19/20
to bareos-users
Hello everyone,
i’ve been using Bacula for ages and now im trying to test bareos..
I installed everything correctly but when i login into the webgui i get the message «Error: , director seems to be down or blocking our request.» The director is also active and running but gives this message.
systemctl status bareos-dir -l
Feb 19 14:06:22 systemd[1]: Starting Bareos Director Daemon service…
Feb 19 14:06:22 systemd[1]: Can’t open PID file /var/lib/bareos/bareos-dir.9101.pid (yet?) after start: No such file or directory
Feb 19 14:06:22 systemd[1]: Started Bareos Director Daemon service.
I’ve been searching for fixes etc. on google for hours but couldn’t find anything related that has been answered.
Maybe you guys can help me out.
Wilson Meier
unread,
Feb 19, 2020, 8:31:36 PM2/19/20
to bareos…@googlegroups.com, Corint Official
Hi,
i’m new to bareos too so don’t expect to much from me.
I would start checking the basics.
— are permissions on /var/lib/bareos ok?
— is the service really listening (netstat)?
— what does bconsole say?
— are all package versions the same (webui, director, …)?
— is iptables blocking requests on the loopback interface?
— what are your logs saying (apache, …)?
Regards
Bug 262153
— www/bareos-webui: 21.0.0 cannot authenticate
Summary:
www/bareos-webui: 21.0.0 cannot authenticate
|
|
||||||||||||||||||||||||||||||||||||||||||||
|
|
Note |
— Advertisement —
Data backup is essential for a sysadmin and any real user of a system. Doing so will bring many advantages to our company because, in case of failures, you will have your data well protected. Recently, I was talking about preventing the accidental deletion of certain files in Linux, but today I’ll show you how to install Bareos a tool to back up CentOS 7.
Bareos is a fairly reliable, robust and secure tool for backing up and protecting data on our operating system. In addition, it is a 100% open source fork of the backup project from Bacula. The code is released under the aGPL license which guarantees flexibility for working with the code. Code that is available in GitHub.
So, let us start.
1. Upgrade the system
First, you need to upgrade the whole system. Just run these commands on the terminal:
:~$ su
:~# yum update
After that, you will have a more secure system thanks to the new security patches newly installed.
2. Install MariaDB
Bareos for its operation requires a database manager like MariaDB. So the next step is to install MariaDB.
:~# yum install mariadb-server
After that, enable and start the MariaDB service.
:~# systemctl enable mariadb
:~# systemctl start mariadb
So, that’s it for now.
3. Install Bareos on CentOS 7
Now it is your turn to install Bareos. For this, we will use the dedicated Bareos repository for CentOS. This is the safest and easiest way to install Bareos. Since we can always count on the latest stable version of the program. It also simplifies installation times.
:~# yum install wget
:~# wget -O /etc/yum.repos.d/bareos.repo http://download.bareos.org/bareos/release/latest/CentOS_7/bareos.repo
After that, install it. You also need to install the MariaDB / MySQL connector. On the other hand, you can choose between MariaDB or PostgreSQL.
:~# yum install bareos bareos-database-mysql
4. Prepare Bareos database
The next step is to set up the Bareos database. In the installation files, Bareos has a series of databases ready for use. Let’s go for it.
:~# /usr/lib/bareos/scripts/create_bareos_database
:~# /usr/lib/bareos/scripts/make_bareos_tables
:~# /usr/lib/bareos/scripts/grant_bareos_privileges
Bareos uses the ports 9101 and 9103. So, you have to open the ports.
:~# firewall-cmd --add-port=9101/tcp --permanent
:~# firewall-cmd --add-port=9103/tcp --permanent
:~# firewall-cmd --reload
Next, start Bareos services.
:~# systemctl start bareos-dir
:~# systemctl start bareos-sd
:~# systemctl start bareos-fd
Next, start it with bconsole:
:~# bconsole
5. Install Bareos WebUI
In order to make the use of Bareos simpler, you need to install your web interface. To do this you need to install apache web server and PHP. So, let’s do it.
:~# yum install httpd php php-cli php-common
Remember to create a rule for apache in the firewall.
:~# firewall-cmd --add-service=http --permanent
:~# firewall-cmd --reload
Finally, enable the services:
:~# systemctl enable httpd
:~# systemctl start httpd
After that, install bareos web ui.
:~# yum install bareos-webui
Then, create a new file to access web UI.
:~# nano /etc/bareos/bareos-dir.d/console/admin.conf
And add the following:
# Restricted console used by bareos-webui
Console {
Name = admin
Password = “admin”
Profile = “webui-admin”
}
You can set the name and password you want.
Next, restart the service.
:~# systemctl restart bareos-dir
:~# systemctl restart bareos-sd
:~# systemctl restart bareos-fd
Finally, open the web browser and go to http://SERVER_IP/bareos-webui.
Log in and start to use it.
Conclusion
Bareos is a great application to backup data on a CentOS 7 server. For this, only a little time and some application commands are required.
Please share this article with your friends.
Bareos является форком Bacula, отделение произошло в 2010-м году по ряду причин, в том числе потому, что Bacula медленно развивалась и разработчики практически переориентировались на коммерцию.
В большинстве случаев мануалы по Bacula будут подходить и для Bareos, но это на стадии «вкуривания в суть», а после всё же рекомендую пользоваться примерами конфигов из своей инсталляции и официальной документацией, мало ли что там поменялось 🙂 . Есть много статей в бложиках и на хабре.
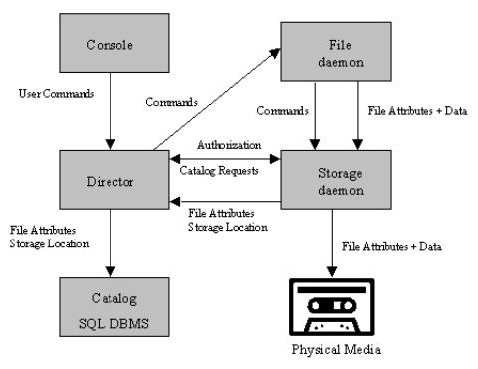
На мой взгляд, чтобы понять логику работы такой системы, нужно рисовать. Поэтому я перерисовал и вольно перевёл схему из документации, описывающую взаимодействие компонентов.

Я разворачивал Bareos на CentOS 7 x64 и сначала поставил версию 15.2 из родного репозитория, а потом узнал что есть поновее (16.2), да и веб интерфейс хотелось поинтереснее, поэтому обновил пакеты и… и оказалось что в новой версии кое-что поменяли. Например поменяли структуру каталогов и если у вас есть конфиги из старой версии — используются они, если нет — используются конфиги из каталогов (по сути раздербанили большие конфиги на составляющие и разложили по папкам). На тот момент у меня в голове совсем всё смешалось и я снёс все конфиги и поставил Bareos заново.
cd /opt

# Добавляем репозиторий и обновляем список пакетов
wget -O /etc/yum.repos.d/bareos-16.2.repo http://download.bareos.org/bareos/release/16.2/CentOS_7/bareos.repo
sudo yum update
sudo yum install epel-release

# Устанавливаем, БД MySQL (MariaDB)
sudo yum install -y bareos-client bareos-database-tools bareos-filedaemon bareos-database-mysql bareos bareos-bconsole bareos-database-common bareos-storage bareos-director bareos-common mariadb-server

# Добавляем службы в "автозапуск"
sudo systemctl enable bareos-dir
sudo systemctl enable bareos-sd
sudo systemctl enable bareos-fd
sudo systemctl enable mariadb
sudo systemctl start mariadb

# Скрипт первоначальной настройки MySQL
# Естественно записываем себе куда-нибудь все логины и пароли
sudo mysql_secure_installation

# Создаем БД bareos
/usr/lib/bareos/scripts/create_bareos_database -uroot -p
/usr/lib/bareos/scripts/make_bareos_tables -uroot -p
/usr/lib/bareos/scripts/grant_bareos_privileges -uroot -p

# Устанавливаем пароль на пользователя bareos
mysql -uroot -p -e "UPDATE mysql.user SET Password=PASSWORD('пароль_пользователя_bareos') WHERE User='bareos';"

# Устанавливаем Apache и WebUI
sudo yum install httpd bareos-webui
sudo systemctl enable httpd
sudo systemctl start httpd

# Чтобы к серверу могли подключиться клиенты
# и "заработал" Apache нужно открыть доступ к портам,
# у меня этот пункт немало крови попил,
# всё-таки Debian расслабляет - там всё по умолчанию открыто.
sudo firewall-cmd --permanent --add-port=80/tcp
sudo firewall-cmd --permanent --add-port=443/tcp
# console
sudo firewall-cmd --permanent --add-port=9101/tcp
# dir
sudo firewall-cmd --permanent --add-port=9102/tcp
# dir, fd
sudo firewall-cmd --permanent --add-port=9103/tcp
sudo firewall-cmd --reload
sudo firewall-cmd --list-all
sudo setsebool -P httpd_can_network_connect on

# Так же httpd по умолчанию ругается на отсутствие ServerName, правим в
sudo nano /etc/httpd/conf/httpd.conf

# После чего перезапускаем его
sudo systemctl restart httpd

# Не забывайте что все сервисы bareos у нас ещё не запущены,
# а при изменении в конфигурационных файлах сервисы нужно перезапускать!
# Ну или делать sudo systemctl reload <service>

# Идём на http://ip_или_доменное_имя_сервера/bareos-webui/
# Кстати, службы bareos могут тестировать конфиги, например bareos-dir -t

# Делаем тупой редирект
sudo nano /var/www/html/index.html
<html>
<head>
<meta HTTP-EQUIV="REFRESH" content="0; url=http://ip_или_доменное_имя_сервера/bareos-webui/">
</head>
</html>

# Прописываем пароль на доступ к БД
sudo nano /etc/bareos/bareos-dir.d/catalog/MyCatalog.conf

# Создаём аккаунт для webui
sudo cd /etc/bareos/bareos-dir.d/console
sudo mv admin.conf.example admin.conf

# Меняем пароль в файле и перезапускаем сервис директора
sudo systemctl restart bareos-dir
Надо сказать что WebUI, как и Monitor используются для мониторинга, а управление работой осуществляется либо в консоли (bconsole), либо через конфигурационные файлы.
По дальнейшей логике работы может быть опишу позже… но что важно понимать:
При описании каждого задания (Job) указывается какие файлы сохранять (FileSet), откуда их сохранять (Client), когда сохранять (Shedule), куда сохранять (Pool).
Кроме заданий на сохранение можно описывать задания на восстановление, верификацию и администрирование.
Так же отдельной темой является понимание пулов (Pool) и томов (Volume).
 Опубликовано: 13.02.2022
Используемые термины: Bareos, Rocky Linux, PostgreSQL.
В инструкции рассмотрим основные моменты по развертыванию системы резервного копирования на базе бесплатного программного продукта Bareos. В качестве операционной системы мы будем использовать Rocky Linux (также протестировано на CentOS 7). Bareos поддерживает работу с базами данных PostgreSQL и MySQL — однако, в последней версии (на момент написания инструкции) установка была возможна только для первой.
Предварительная настройка
Установка и обновление пакетов
Настройка времени
Открытие нужных портов
Обновление корневых сертификатов
Настройка SELinux
Установка основных компонентов Bareos
Конфигурирование сервера баз данных
Настройка веб-интерфейса
Установка и запуск
Создание пользователя для доступа к веб-консоли
Настройка https
Конфигурирование агента на удаленную систему
Установка клиента
Регистрация агента на сервере
Работа с заданиями
Вводные данные по работе с задачами
Задание резервного копирования локальных файлов
Резервирование данных на удаленном сервере
Применение шаблона
Выполнение заданий по расписанию
Дополнительные опции при настройке заданий
Работа с уведомлениями
Отправка с локального хоста
Отправка через почтовый релей
Настройка задания для отправки оповещений
Использование Zulip для отправки уведомлений
Конфигурирование носителей для хранения резервных копий
Устройства хранения
Создание и настройка пулов
Настройка Director для связи с устройством хранения
Настройка задания для работы с устройствами хранения
Проверка настройки
Включение и настройка API
Шпаргалка по командам в bconsole
Удаление сервера резервного копирования
Примеры настройки заданий
База данных MySQL/MariaDB
База данных MySQL/MariaDB в docker
Анализ проблем и ошибок
Включение отладки для заданий
Примеры встречающихся ошибок и способы их решения
Подготовка системы
Выполним предварительные настройки.
Пакеты
Несмотря на то, что, начиная с версии 8 в CentOS и Rocky Linux используется пакетный менеджер dnf, мы будем использовать команду yum для обратной совместимости с CentOS 7.
Обновим список пакетов в репозиториях:
yum makecache
На свежеустановленной системе также рекомендуется выполнить обновление пакетов:
yum update
Установим пакет:
yum install wget
* данный пакет позволяет загружать файлы по протоколам http и ftp.
Время
Для корректного отображения времени создания резервных копий и работы расписания, настроим часовой пояс и синхронизацию времени.
Установим сервис, запустим его и разрешим автозапуск:
yum install chrony
systemctl enable chronyd —now
Для настройки часового пояса вводим:
timedatectl set-timezone Europe/Moscow
Настройка брандмауэра
Нам нужно разрешить следующие порты:
- 80 и 443 — для веб-интерфейса.
- 9101 — для Bareos Director: управление заданиями (служба bareos-dir).
- 9102 — File Daemon: сбор данных с клиентов (служба bareos-fd).
- 9103 — Storage Daemon: работа с накопителями для хранения резервных копий (служба bareos-sd).
Выполняем команды:
firewall-cmd —permanent —add-port={80,443}/tcp
firewall-cmd —permanent —add-port={9101,9102,9103}/tcp
firewall-cmd —reload
Корневые сертификаты
Репозиторий Bareos работает по https с сертификатом от Let’s Encrypt. Если наши корневые сертификаты будут неактуальны, мы получим ошибку Issued certificate has expired.
Нам нужно выполнить две команды:
yum install ca-certificates
update-ca-trust
Подробнее процесс описан в инструкции Обновление корневых сертификатов на Linux.
Настройка SELinux
Проще всего, отключить SELinux. Но, если мы хотим его оставить, включаем политику:
setsebool -P httpd_can_network_connect on
* данное правило разрешает httpd-сервису и веб-скриптам подключение по сети.
Установка Bareos
Установка выполняется из репозитория. Однако, его нет в базовых репозиториях, поэтому сначала, выполним дополнительные действия.
На странице официального сайта мы должны ознакомиться с версиями релизов и поддерживаемых дистрибутивов. На момент обновления инструкции, последний релиз был 21. Для удобства работы, создаем переменные:
RELEASE=21
DIST=EL_8
* в нашем примере мы будем устанавливать программный продукт версии 21 для группы релизов EL_8.
Установим репозиторий командой:
wget https://download.bareos.org/bareos/release/${RELEASE}/${DIST}/bareos.repo -O /etc/yum.repos.d/bareos_${RELEASE}_${DIST}.repo
* данной командой мы скачаем готовые настройки репозитория в локальный каталог /etc/yum.repos.d.
Можно устанавливать bareos:
yum install bareos bareos-database-postgresql
* мы установим сам пакет bareos и набор файлов для его работы с postgresql.
На все запросы принять GPG key отвечаем утвердительно:
Is this ok [y/N]: y
Установка завершена. Разрешим автозапуск следующих сервисов:
systemctl enable bareos-dir bareos-fd bareos-sd
Развертывание и настройка сервера баз данных
На момент обновления инструкции в последней версии 21 была прекращена поддержка базы MySQL/MariaDB — осталась только postgresql. Выполним установку его серверной части:
yum install postgresql-server postgresql-contrib
Проинициализируем базу:
postgresql-setup initdb
Разрешим автозапуск и запустим сервис:
systemctl enable postgresql —now
Выполним скрипты для подготовки базы данных, которые шли в комплекте с установленным пакетом bareos-database-postgresql:
su — postgres -c /usr/lib/bareos/scripts/create_bareos_database
Мы должны увидеть результат:
Creating postgresql database
CREATE DATABASE
ALTER DATABASE
Database encoding OK
Creating of bareos database succeeded.
su — postgres -c /usr/lib/bareos/scripts/make_bareos_tables
su — postgres -c /usr/lib/bareos/scripts/grant_bareos_privileges
* в соответствии с названиями скриптов, первый создает базу, второй создает таблицы и третий — настраивает привилегии для созданных объектов.
Стартуем сервисы:
systemctl start bareos-dir bareos-fd bareos-sd
Посмотрим состояние командой:
systemctl status bareos-dir bareos-fd bareos-sd
Запускаем веб-интерфейс
Разобьем процесс на несколько этапов.
1. Установка и запуск веб-сервера
Устанавливаем компонент для обеспечения веб-интерфейса:
yum install bareos-webui
Откроем файл:
vi /etc/php.ini
Добавим строку:
date.timezone = «Europe/Moscow»
* где Europe/Moscow — часовой пояс, который нужно заменить на нужный вам.
Запускаем веб-сервер:
systemctl enable httpd —now
Перезапускаем компонент Director:
systemctl restart bareos-dir
Открываем браузер и переходим по адресу http://<IP-адрес сервера> — мы должны увидеть стартовую страницу Apache:

Веб-сервер работает. Идем дальше.
2. Создание доступа и вход
Создаем учетную запись для доступа к UI. Для этого входим в консоль управления bareos:
bconsole
И вводим команду:
* configure add console name=admin password=my_password profile=webui-admin tlsenable=no
* где:
- admin — имя учетной записи для входа;
- my_password — пароль.
- profile — профиль с политиками доступа. Хранятся в каталоге /etc/bareos/bareos-dir.d/profile. По умолчанию создается 3 профиля:
- webui-admin — расширенный доступ к системе.
- operator — доступы для работы с заданиями.
- webui-readonly — только просмотр статусов и конфигурации.
- tlsenable — наше подключение к сервису Director должно работать не по защищенному каналу. В противном случае, мы получим ошибку Sorry, cannot authenticate. Wrong username, password or SSL/TLS handshake failed.
Мы должны увидеть:
Created resource config file «/etc/bareos/bareos-dir.d/console/admin.conf»:
Console {
Name = «admin»
Password = «my_password»
Profile = webui-admin
TlsEnable = no
}
Перезапускаем bareos и выходим из консоли:
* reload
* exit
Открываем браузер и переходим по адресу http://<IP-адрес сервера>/bareos-webui/ — мы должны увидеть окно авторизации. Вводим наши логин и пароль:

Мы должны попасть на страницу со панели управления.
Стоит отметить, что мы могли обойтись и без командной оболочки bconsole — нужно создать файл /etc/bareos/bareos-dir.d/console/admin.conf с нужными значениями и перезапустить bareos.
3. SSL (опционально)
Хорошей идеей будет настройка доступа к веб-интерфейсу по защищенному протоколу https. Для этого нам нужно:
- Выделить доменное имя подключения к серверу.
- Получить корректных сертификат для имени, по которому мы решили обращаться к серверу.
- Настроить веб-сервер Apache для работы с полученным сертификатом.
В рамках данной инструкции, мы не будем рассматривать подробно каждый из пунктов.
Доменное имя
Домен можно зарегистрировать на внутреннем DNS. Для большинства компаний это самый актуальный вариант. Если наш сервер должен быть доступен из глобальной сети, то можно использовать глобальный DNS для нашего домена. Ну и самый быстрый вариант, прописать hostname в локальный файл hosts, с которого мы будем заходить на сервер. Предположим, что наш сервер резервного копирования должен быть доступен по имени bareos.dmosk.ru.
Сертификат
Получить сертификат можно тоже несколькими способами:
- купить для нашего домена или использовать уже купленный wildcard.
- получить бесплатно от Let’s Encrypt.
- получить от внутреннего центра сертификации, если такой имеется.
Предположим, что наш сертификат получен и его файлы размещены в каталогах /etc/pki/tls/certs. и /etc/pki/tls/certs.
Настройка Apache
Подробнее, процесс описан в инструкции Настройка Apache + SSL для работы сайта по HTTPS. Мы рассмотрим настройку кратко.
Устанавливаем модуль работы по SSL:
yum install mod_ssl
Открываем файл:
vi /etc/httpd/conf.d/ssl.conf
Находим опции и приводим их к виду:
SSLCertificateFile /etc/pki/tls/certs/bareos.crt
…
SSLCertificateKeyFile /etc/pki/tls/private/bareos.key
…
SSLCertificateChainFile /etc/pki/tls/certs/bareos-chain.crt
* где SSLCertificateFile и SSLCertificateKeyFile — пути до файлов ключей с нашим сертификатом. SSLCertificateChainFile — при необходимости, путь до цепочки сертификатов (нужно использовать, если внутри файла SSLCertificateFile нет информации о всех сертификационных центрах).
Проверяем корректность настроек в Apache:
apachectl configtest
Если видим:
Syntax OK
Перечитываем конфигурацию apache:
apachectl graceful
Открываем браузер и переходим по адресу https://bareos.dmosk.ru/bareos-webui/, где bareos.dmosk.ru — имя хоста, для которого мы получили сертификат. Мы должны подключиться к веб-интерфейсу по защищенному соединению.
Установка и настройка клиента
Рассмотрим процесс подключения клиентов, которые работают под управлением Linux Ubuntu и CentOS.
Установка клиента
Также как с сервером, на странице официального сайта мы должны ознакомиться с версиями релизов и поддерживаемых дистрибутивов. После чего создаем переменные, настраиваем репозиторий и выполняем установку пакета. В зависимости от дистрибутива операционной системы, наши действия будут отличаться.
а) на Linux Ubuntu
Задаем переменные:
RELEASE=21
DIST=xUbuntu_20.04
* для Ubuntu версии 20.04.
Скачиваем настройки для репозитория:
wget https://download.bareos.org/bareos/release/${RELEASE}/${DIST}/bareos.list -O /etc/apt/sources.list.d/bareos_${RELEASE}_${DIST}.list
* если получим ошибку Issued certificate has expired переходим к решению ниже.
Устанавливаем ключ подписи пакетов в репозитории:
wget -q http://download.bareos.org/bareos/release/${RELEASE}/${DIST}/Release.key -O- | apt-key add —
Обновляем список пакетов:
apt update
Устанавливаем пакет для bareos-fd:
apt install bareos-filedaemon
Разрешаем автозапуск сервиса:
systemctl enable bareos-filedaemon
Настраиваем брандмауэр (открываем порт 9102/tcp):
iptables -I INPUT -p tcp —dport 9102 -j ACCEPT
apt-get install iptables-persistent
netfilter-persistent save
б) на Linux CentOS
Задаем переменные:
RELEASE=21
DIST=CentOS_7
* для CentOS версии 7.
Скачиваем настройки для репозитория:
wget https://download.bareos.org/bareos/release/${RELEASE}/${DIST}/bareos.repo -O /etc/yum.repos.d/bareos_${RELEASE}_${DIST}.repo
* если получим ошибку Issued certificate has expired переходим к решению ниже.
Устанавливаем пакет для bareos-fd:
yum install bareos-fd
На все запросы принять ключ отвечаем утвердительно.
Разрешаем автозапуск сервиса:
systemctl enable bareos-fd
Настраиваем брандмауэр (открываем порт 9102/tcp):
firewall-cmd —permanent —add-port=9102/tcp
firewall-cmd —reload
Добавление клиента на сервер
Подключаемся к серверу и заходим в консоль bareos:
bconsole
И добавляем нового клиента:
* configure add client name=client_name address=192.168.0.22 password=client_password
* где client_name — произвольное имя, по которому нам будет удобно идентифицировать клиента; 192.168.0.22 — IP-адрес компьютера-клиента; client_password — пароль, который нужно будет использовать данному клиенту для подключения к серверу.
Мы получим вывод на подобие:
Exported resource file «/etc/bareos/bareos-dir-export/client/client_name/bareos-fd.d/director/bareos-dir.conf»:
Director {
Name = bareos-dir
Password = «[md5]23ea8b731947b6aff12b13c98bca39ae»
}
Created resource config file «/etc/bareos/bareos-dir.d/client/client_name.conf»:
Client {
Name = «client_name»
Address = «192.168.0.22»
Password = «client_password»
}
You have messages.
Для нас теперь важно содержимое для экспорта, которое в нашем примере имеет вид:
Director {
Name = bareos-dir
Password = «[md5]23ea8b731947b6aff12b13c98bca39ae»
}
Перезапускаем сервис директора и выходим из консоли:
* reload
* exit
Переходим в консоль клиента, открываем файл:
vi /etc/bareos/bareos-fd.d/director/bareos-dir.conf
И меняем содержимое на то, что мы получили на стороне сервера:
Director {
Name = bareos-dir
Password = «[md5]23ea8b731947b6aff12b13c98bca39ae»
}
На клиенте перезапускаем файловую службу. Команды немного отличаются в зависимости от дистрибутива системы.
а) на Ubuntu:
systemctl restart bareos-filedaemon
б) на CentOS:
systemctl restart bareos-fd
Заходим на веб-интерфейс в раздел «Клиенты» — мы должны увидеть добавленных клиентов:

* нас не должно смущать отсутствие значков и версий для клиентов — они появятся после выполнения первых заданий на них.
Работа с заданиями
Bareos предлагает довольно большое количество настроек для создания заданий. Это могут быть задачи резервного копирования, восстановления, проверки. Также задачи могут подразделяться, например, для резервного копирования — полный бэкап, дифференциальный, инкрементальный. Мы можем настраивать полноценные задания или применять шаблоны. Попробуем в этом всем разобраться пошагово.
0. Вводная часть
Опишем общие моменты для наших заданий.
Мы будем работать в каталогах:
- /etc/bareos/bareos-dir.d/job — хранение файлов с описанием заданий.
- /etc/bareos/bareos-dir.d/fileset — списки файлов для резервного копирования или восстановления.
- /etc/bareos/bareos-dir.d/jobdefs — .каталог для хранения шаблонов.
- /etc/bareos/bareos-dir.d/schedule — расписания для автоматического выполнения заданий.
Уровни резервирования и восстановления:
- Full. Полная копия файлов, указанных в задании. Удобен для восстановления, но занимает много места.
- Differential. Копия всех файлов, которые были изменены с момента последней копии Full. Для восстановления требуется 1 копия Differential и сделанная перед этим Full. Занимает намного меньше места, по сравнению с Full, но менее удобное восстановление.
- Incremental. Копия всех файлов, которые были изменены с момента последней копии Differential и/или Full. Для восстановления требуются все копии Incremental, которые сделаны после Differential и/или Full. Занимает мало места, но процесс восстановления самый неудобный.
Типы заданий:
- Restore — восстановление.
- Backup — резервное копирование.
- Admin — очистка каталога от мусора.
- Migrate — задание для проверки, есть ли что-то для миграции.
- Copy — задание для проверки, есть ли что-то для копирования.
- Verify — проверка резервных копий — сравнение файлов на источнике и целевом носителе.
- Consolidate — объединяет файлы для инкрементальных и дифференциальных копий. Доступно с версии bareos 16.2.4.
Синтаксис для расписаний:
| Момент выполнения | Описание | Варианты |
|---|---|---|
| <week-keyword> | Неделя месяца | 1st | 2nd | 3rd | 4th | 5th | first | second | third | fourth | fifth | last |
| <wday-keyword> | День недели | sun | mon | tue | wed | thu | fri | sat | sunday | monday | tuesday | wednesday | thursday | friday | saturday |
| <week-of-year-keyword> | Неделя года | w00 | w01 | … w52 | w53 |
| <month-keyword> | Месяц | jan | feb | mar | apr | may | jun | jul | aug | sep | oct | nov | dec | january | february | … | december |
| <12hour> | Время в формате 12am/pm | 0 | 1 | 2 | … 12 |
| <hour> | Время в формате 24 | 0 | 1 | 2 | … 23 |
| <minute> | Минуты | 0 | 1 | 2 | … 59 |
| <day> | Дни месяца | 1 | 2 | … 31 |
| <time> | Время | <hour>:<minute> | <12hour>:<minute>am | <12hour>:<minute>pm |
| <time-spec> | Указать на время выполнения | at <time> | hourly |
| <day-range> | Диапазон дней | <day>-<day> |
| <month-range> | Диапазон месяцев | <month-keyword>-<month-keyword> |
| <wday-range> | Диапазон дней недели | <wday-keyword>-<wday-keyword> |
| <modulo> | Чет, нечет | <day>/<day> | <week-of-year-keyword>/<week-of-year-keyword> |
| <date> | Дата | <date-keyword> | <day> | <range> |
| <day-spec> | Варианты для указания дней недели | <day> | <wday-keyword> | <day> | <wday-range> | <week-keyword> <wday-keyword> | <week-keyword> <wday-range> | daily |
| <month-spec> | Варианты для указания месяцев | <month-keyword> | <month-range> | monthly |
* примеры взяты с официального сайта.
1. Создание простого задания резервного копирования
Для начала создадим задание резервного копирования некоторых файлов нашего сервера, которое нужно запускать вручную.
Создаем файл с описанием задания:
vi /etc/bareos/bareos-dir.d/job/FirstJob.conf
Job {
Name = «FirstJob»
Client = «bareos-fd»
Description = «Job Backup»
Level = Full
Storage = File
Pool = Full
Type = Backup
FileSet = «FirstFileset»
Messages = Standard
Priority = 5
}
* где:
- Name — любое произвольное название для нашего задания.
- Description — произвольное описание.
- Level — глубина задания: полное (Full), разностное (Differential), инкрементальное (Incremental).
- Storage — устройство хранения файлов с резервными копиями. По умолчанию, создано только одно с названием File.
- Pool — пулы хранения информации на устройстве. Создаются с целью настройки ограничений по времени хранения и разрешения ротации. По умолчанию, создано 3 пула — Full, Differential и Incremental, каждый из которых оптимален под соответствующий Level.
- Type — тип задания. Доступны варианты Backup, Restore и Verify.
- FileSet — набор файлов для резервного копирования. Описывается в отдельном файле. Мы создадим соответствующее описание ниже.
- Messages — пресет для сбора сообщений с клиентов.
- Priority — чем ниже число, тем выше приоритет. Низкий приоритет задания может привести к выполнению его в полследнюю очередь, если в данный момент нужно выполнить другие задания.
Теперь создадим файл со списком объектов для резервирования:
vi /etc/bareos/bareos-dir.d/fileset/FirstFileset.conf
FileSet {
Name = «FirstFileset»
Description = «Backup files»
Include {
Options {
Signature = MD5
}
File = «/tmp»
}
}
* где:
- Name — любое произвольное название для списка файлов.
- Description — произвольное описание.
- Include — директива для добавления файлов с дополнительными настройками.
- Options — дополнительные настройки для группы файлов, которые нужно включить в задание.
- Signature — алгоритм для расчета контрольной суммы для всех файлов в директиве Include. Возможны варианты MD5 или SHA1.
- File — путь до файла или каталога, который нужно включить в задание. Обязательно использовать двойные кавычки. Одинарные не работают.
Тестируем задание
Попробуем создать тестовый файл:
echo «test» > /tmp/backup_test_file
Открываем консоль bareos:
bconsole
Перезапускаем конфигурацию (чтобы применить наши настройки):
* reload
Запустим наше первое задание:
* run job=FirstJob
Система покажет сводную информацию и задаст вопрос, запустить ли задание — отвечаем утвердительно:
OK to run? (yes/mod/no): yes
Задание будет помещено в очередь:
Job queued. JobId=8
В веб-интерфейсе на вкладке «Задания» мы должны увидеть информацию об успешно выполненном задании:

Выходим из консоли
* exit
Попробуем удалить наш тестовый файл:
rm -f /tmp/backup_test_file
Заходим на веб-интерфейс — переходим на вкладку «Восстановление» — выбираем клиента и задание резервного копирования — справа в нее появится список файлов, которые попали в резервную копию — выбираем наш тестовый файл:

Пропишем путь до каталога, куда нужно восстановить файл и нажимаем Восстановление:

* в каталог /tmp будет восстановлен файл /tmp/backup_test_file. Полный путь будет /tmp/tmp/backup_test_file.
В списке заданий дожидаемся успешного выполнения и проверяем, что в каталоге /tmp/tmp появился нужный нам файл.
2. Задание для выполнения на агенте
Наши действия будут похожими на задание 1. Нам только нужно указать другого агента. Для начала, сделаем копии наших конфигурационных файлов:
cp /etc/bareos/bareos-dir.d/job/FirstJob.conf /etc/bareos/bareos-dir.d/job/SecondJob.conf
cp /etc/bareos/bareos-dir.d/fileset/FirstFileset.conf /etc/bareos/bareos-dir.d/fileset/SecondFileset.conf
Отредактируем файлы:
vi /etc/bareos/bareos-dir.d/job/SecondJob.conf
Меняем значение для:
Name = «SecondJob»
Client = «ubuntu»
…
FileSet = «SecondFileset»
* в нашем примере резервная копия будет делаться для клиента ubuntu, а также меняем набор файлов на SecondFileset.
Теперь открываем файл:
vi /etc/bareos/bareos-dir.d/fileset/SecondFileset.conf
И изменим набор файлов на:
Name = «SecondFileset»
…
…
File = «/tmp»
File = «/etc»
* обратите внимание, в данном примере мы перечислили 2 цели для бэкапа — каталоги /tmp и /etc.
Для проверки задания заходим в консоль, применяем настройки, запускаем задание:
bconsole
* reload
* run job=SecondJob
… и находим статус выполнения в веб-интерфейсе.
Попытка восстановления была рассмотрена в примере 1 — по аналогии можно попробовать вернуть некоторые файлы.
3. Использование шаблона
Усложним задачу — настроим шаблоны для более удобного управления заданиями.
По настройкам шаблоны ничем не отличаются от обычных заданий — они просто объединяют в себе нужные опции, чтобы не нужно было их повторять при описании заданий. Поняв это, работать с ними будет просто. Давайте приведем пример.
Создадим файл:
vi /etc/bareos/bareos-dir.d/jobdefs/DefThirdJob.conf
JobDefs {
Name = «DefThirdJob»
Description = «Job Definition Backup»
Level = Full
Storage = File
Pool = Full
Type = Backup
FileSet = «SettingsFileset»
Messages = Standard
Priority = 10
}
* как видим, все эти настройки мы уже использовали, когда создавали первую задачу.
В шаблоне мы используем набор файлов SettingsFileset — создадим его:
vi /etc/bareos/bareos-dir.d/fileset/SettingsFileset.conf
FileSet {
Name = «SettingsFileset»
Description = «Backup of Setting files»
Include {
Options {
Signature = MD5
Compression = LZ4
}
File = «/etc»
}
}
* мы добавили опцию Compression — позволяет архивировать наши файлы. Возможны варианты LZ4 и GZIP.
Теперь можно создать файл с заданием:
vi /etc/bareos/bareos-dir.d/job/ThirdJob.conf
Job {
Name = «ThirdJob»
Client = «CentOS»
Description = «Job Backup»
JobDefs = «DefThirdJob»
}
* наше задание будет привязано к шаблону DefThirdJob и выполняться для клиента CentOS.
Готово — запускаем:
bconsole
* reload
* run job=ThirdJob
… и находим статус выполнения в веб-интерфейсе.
4. Планируем задачу
Теперь сделаем так, чтобы наша задача выполнялась по расписанию.
Создаем файл:
vi /etc/bareos/bareos-dir.d/schedule/EveryDay.conf
Schedule {
Name = «EveryDay»
Run = daily at 21:00
Run = daily at 07:00
}
* наше задание должно выполняться ежедневно 2 раза — в 7 утра и 9 вечера.
Привязать задачу к расписанию можно в файле самого задания или в его шаблоне:
Schedule = «EveryDay»
Перезапустим сервис:
systemctl reload bareos-dir
* обратите внимание, что в этом примере мы решили перезапустить конфигурацию без консоли bconsole.
Переходим в веб-интерфейсе на вкладку «Расписания» — мы должны увидеть наше задание:

5. Дополнительные директивы
Рассмотрим некоторые дополнительные полезные опции.
Cкрипты до и после задания
Мы можем выполнить определенные команды до или после выполнения задания. Существует 2 метода настройки — полностью на стороне Bareos или запуск скрипта на агенте.
а) Запуск скрипта. Данные способ удобнее, если на удаленной системе есть готовый скрипт или требуется сложная логика выполнения, которую не описать одной командой и нужен скрипт.
Настраиваем в шаблоне или задании:
Run Before Job = ‘/path/to/script.sh’
Run After Job = ‘/path/to/script.sh’
* запустить скрипт на сервере соответственно до и после выполнения задания.
Client Run Before Job = ‘/path/to/script.sh’
Client Run After Job = ‘/path/to/script.sh’
* запустить скрипт на клиенте соответственно до и после выполнения задания.
Важно отметить, что данная директива требует в качестве значения использовать только путь до исполняемого скрипта и не передает параметров.
б) Команда при описании задания. Данным способом мы создаем дополнительную директиву RunScript при описании шаблона или задания. Это удобнее, если мы хотим полностью контролировать процесс на стороне сервера.
Например:
Job {
…
RunScript {
FailJobOnError = Yes
RunsOnClient = Yes
RunsWhen = Before
Command = «su postgres -c ‘pg_dumpall > /var/tmp/postgresql_dump.sql'»
}
RunScript {
RunsOnSuccess = Yes
RunsOnClient = Yes
RunsWhen = After
Command = «/var/tmp/postgresql_dump.sql»
}
…
}
* где:
- FailJobOnError — завершить процесс резервного копирования, если скрипт вернул ошибку.
- RunsOnSuccess — запускать только при успешном выполнении резервной копии.
- RunsOnClient — запустить на клиенте (Yes) или на сервере (No).
- RunsWhen — когда запускать. Да резервного копирования (Before) или после (After).
- Command — команда, которую нужно выполнить.
Не забываем:
systemctl reload bareos-dir
Отправка уведомлений
Отправка сообщений на почту выполняется с помощью клиента bsmtp — проприетарной консольной программы. Она принимает параметры подключения к почтовому серверу, но по умолчанию, пытается отправлять письма от локального сервера. Мы рассмотрим вариант с отправкой с сервера bareos и использовании стороннего почтового сервера. Подробнее с вариантами настройки можно ознакомиться на официальном сайте.
Отправка с сервера резервного копирования
Для возможности выполнять отправку, устанавливаем MTA, например, Postfix:
yum install postfix
Открываем конфигурационный файл:
vi /etc/postfix/main.cf
Меняем значения для следующих опций:
inet_interfaces = all
…
inet_protocols = ipv4
* однако, если мы используем IPv6, то менять значение для опции inet_protocols не нужно.
После внесения настроек разрешаем автозапуск Postfix и стартуем его:
systemctl enable postfix —now
Базовая настройка готова и сообщения могут отправляться. В настройках задания или шаблона мы можем определять адрес почтового ящика, куда нужно отправлять письма:
Write Bootstrap = «|/usr/bin/bsmtp -h localhost -f «(Bareos) » -s «Bootstrap for Job %j» master@dmosk.ru»
* в данном примере отправка будет выполнена на ящик master@dmosk.ru.
После правки конфигурационного файла не забываем перезапустить сервис:
systemctl reload bareos-dir
Для корректной отправки почтовых сообщений нужно правильно настроить обратный адрес и домен отправки. Подробнее можно прочитать в инструкции Настройка почтового сервера для массовой рассылки сообщений.
Отправка через сторонний почтовый сервер
Команда bsmtp принимает параметры, в том числе те, с помощью которых мы укажем сторонний сервер. В настройках задания или шаблона мы можем определить ее поведение:
Write Bootstrap = «|/usr/bin/bsmtp -h mail.dmosk.local -f «(Bareos) » -s «Bootstrap for Job %j» master@dmosk.ru»
* в данном примере отправка будет выполнена через сервер mail.dmosk.local.
Утилита bsmtp не умеет проходить аутентификацию. Поэтому, если наш почтовый сервер требует проверку подлинности, нам не удастся ее использовать. Потребуется более сложная схема с использованием MTA. Пример такой настройки можно прочитать в инструкции Отправка почты от Postfix через почтовый сервер Яндекса. Также можно просто использовать утилиту командной строки — подробнее в инструкции Отправка почты из командной строки Linux.
Настройка отправки уведомлений
По умолчанию, нам будут приходить все сообщения, что может быть не совсем удобно для повседневного использования системы. Мы можем создать основные настройки для оповещений в каталоге /etc/bareos/bareos-dir.d/messages. Откроем на редактирование новый файл:
vi /etc/bareos/bareos-dir.d/messages/Alarms.conf
Messages {
Name = Alarms
Description = «Message delivery for fail jobs»
mailcommand = «/usr/bin/bsmtp -h localhost -f «(Bareos) <%r>» -s «Bareos alarm message» %r»
mail = master@dmosk.ru = error, fatal, terminate, notsaved
console = alert, !skipped
}
* в данном типе оповещений под названием Alarms мы определили адрес получателя письма, а также типы событий, на которые нужно реагировать. Обратите внимание, что для консоли мы используем все события категории alert, за исключением skipped.
Теперь в нашем шаблоне или задании мы можем использовать данный тип сообщения:
Messages = Alarms
И не забываем перезапускать демон bareos-dir:
systemctl reload bareos-dir
Отправка уведомлений в Zulip
В качестве примера также рассмотрим отправку уведомлений в Zulip. Для этого мы установим на наш сервер резервного копирования утилиту zulip-send и создадим новый профиль для отправки сообщений.
Вышеупомянутая утилита zulip-send является расширением для Python. Для его установки сначала ставим менеджер pip:
yum install python3-pip
Теперь установим расширение:
pip3 install zulip
Если в ходе установки мы получили ошибку, попробуем обновить pip:
pip3 install —upgrade pip
Создаем файл:
vi ~/.zuliprc
[api]
key=a0b1c2d3e4f5a6b7c8d9e0f1a2b3c4d5
email=bot_name@zulip.dmosk.ru
site=https://zulip.dmosk.ru
* где:
- key — токен, который был сгенерирован на стороне Zulip сервера для бота.
- email — адрес бота, от которого будет выполняться отправка.
- site — URL-адрес до нашего сервера zulip.
Попробуем выполнить тестовую отправку:
/usr/local/bin/zulip-send postmaster@dmosk.ru —message ‘Test Message’
* где postmaster@dmosk.ru — адрес учетной записи, а zulip, на который будет отправлено сообщение.
Мы должны получить сообщение в наш чат.
Теперь копируем файл .zuliprc в домашнюю директорию пользователя bareos:
cp ~/.zuliprc /var/lib/bareos/
Создаем профиль для отправки сообщений:
vi /etc/bareos/bareos-dir.d/messages/Zulip.conf
Messages {
Name = ZulipAlarms
Description = «Message delivery for fail jobs over Zulip Chat»
mailcommand = «/usr/local/bin/zulip-send %r —message ‘The job with id %i has been failed with code %e.'»
mail = postmaster@dmosk.ru = error, fatal, terminate, notsaved
console = alert, !skipped
}
Для отправки сообщения на канал используем команду:
mailcommand = «/usr/local/bin/zulip-send —stream %r —subject ‘Bareos’ —message ‘The job with id %i has been failed with code %e.'»
Также нужно поменять адресата на название канала:
mail = admins = …
* в данном примере мы будем отправлять сообщения только на события с ошибками; отправка будет осуществляться на аккаунт zulip с адресом postmaster@dmosk.ru.
** для отправки сообщений мы можем задействовать следующие переменные:
- %% — просто знак %
- %c — Имя клиента.
- %d — Имя сервера, где установлена роль директора.
- %e — код завершения задания.
- %h — адрес клиента.
- %i — идентификатор задания.
- %j — уникальное имя задания.
- %l — уровень задания.
- %n — имя задания.
- %r — получатель.
- %s — время.
- %t — тип задания.
- %v — имя тома для чтения.
- %V — имя тома для записи.
В задание или шаблоне указываем, что для отправки сообщений должен использоваться ZulipAlarms:
Messages = ZulipAlarms
Перезапускаем bareos-dir:
systemctl reload bareos-dir
Работа с устройствами хранения
По умолчанию, при установке Bareos в качестве хранилища для резервных копий используется свободное пространство корневой директории (а именно, каталог /var/lib/bareos/storage).
С точки зрения абстракции:
- Данные хранятся в пулах, которые определяют правила хранения информации (создаются в каталоге /etc/bareos/bareos-dir.d/pool).
- В пулы входят тома, которые создаются в Storage Devices (настраиваются в каталоге /etc/bareos/bareos-sd.d/device). Важно отметить, что у пулов нет жесткой привязки к Storage Devices. То есть настройки для одного и того же пула можно использовать для нескольких устройств хранения.
- Storage Devices являются каталогами файловой системы или файлами устройств.
- Устройство в сервисе Director должно быть привязано к соответствующему устройству Storage Devices.
Рассмотрим пример использования дополнительного раздела для размещения сохраненной информации.
1. Работа с устройством хранения
Данная настройка затрагивает сервис Storage Daemon.
Добавим новое устройство:
vi /etc/bareos/bareos-sd.d/device/NewStorage.conf
Device {
Name = NewFileStorage
Media Type = File
Archive Device = /backups
LabelMedia = yes
Random Access = yes
AutomaticMount = yes
RemovableMedia = no
AlwaysOpen = no
Description = «New File device. A connecting Director must have the same Name and MediaType.»
}
* где:
- Name — имя устройства. По нему можно будет обращаться к устройству при настройке хранилища на сервисе Director.
- Media Type — имя типа устройства. Может быть произвольным.
- Archive Device — путь до каталога или устройства хранения.
- LabelMedia — можно ли маркировать носители.
- Random Access — является ли устройство носителя с произвольным доступом. Для дисковых носителей и USB стоит выставлять Yes, для ленточных библиотек — No.
- AutomaticMount — автоматически монтировать, при подключении.
- RemovableMedia — данная опция очень плохо документирована. Но похоже, ее значение нужно выставлять в Yes для съемных носителей.
- AlwaysOpen — держать готовым для чтения и записи всегда (yes) или по необходимости (no).
- Description — произвольное описание.
Создаем каталог, который мы указали в качестве Archive Device:
mkdir /backups
И назначаем в качестве владельца пользователя bareos:
chown bareos:bareos /backups
Чтобы применить настройку, перезапускаем демон для работы с носителями:
systemctl restart bareos-sd
2. Работа с пулами
Теперь добавим, для примера, новый пул:
vi /etc/bareos/bareos-dir.d/pool/FullNew.conf
Pool {
Name = FullNew
Pool Type = Backup
Recycle = yes
AutoPrune = yes
Volume Retention = 180 days
Maximum Volume Bytes = 10G
Maximum Volumes = 15
Label Format = «FullNew-«
}
* где:
- Name — произвольное имя, по которому мы будем обращаться к пулу.
- Pool Type — указываем тип пула, который должен соответствовать типам заданий: Backup, Archive, Cloned, Migration, Copy, Save.
- Recycle — можно ли автоматически чистить тома пула от устаревших данных.
- AutoPrune — можно ли удалять тома пула с устаревшей информацией.
- Volume Retention — сколько должны храниться данные, прежде чем они будут считаться устаревшими.
- Maximum Volume Bytes — максимальный размер одного тома.
- Maximum Volumes — максимальное число томов, на которые может расширяться пул.
- Label Format — префикс, с которым будут создаваться новые тома в пуле.
По умолчанию, при установке bareos создается 4 пула:
- Full.
- Differential.
- Incremental.
- Scratch.
Мы можем использовать их, оставив значения опций или отредактировав их на нужные.
3. Привязка устройства Director к устройству Storage Daemon
За устройства хранения и контроль резервного копирования отвечают разные роли Bareos, а значит нам нужно настроить привязку.
Создаем новый файл:
vi /etc/bareos/bareos-dir.d/storage/FileNew.conf
Storage {
Name = NewStorage
Address = bareos.dmosk.ru
Password = «hKENa9DPmJUBYKJbKN90vkwvmo72OomuYBoufpmfqFfD»
Device = NewFileStorage
Media Type = File
}
* где:
- Name — любое произвольное имя. По нему мы будем обращаться к устройству из задания.
- Address — адрес сервера с ролью Storage Daemon. По документации, не рекомендуется использовать localhost, даже если Director и Storage Daemon стоят на одном сервере.
- Password — пароль доступа для внутреннего шифрования при передаче данных.
- Device — имя устройства на стороне Storage Daemon. В нашем примере это созданный NewFileStorage.
- Media Type — имя типа устройства.
4. Настройка задания
Указать использование пулов и устройства хранения можно в конфигурационном файле задания или шаблона:
Storage = NewStorage
Pool = FullNew
* где NewFileStorage и FullNew, соответственно, созданные нами устройство хранения и пул на сервисе Director.
Обратите внимание, что Storage и Pool независимы. Storage, по сути, определит место расположения данных, Pool — правила хранения.
5. Применение настроек и проверка
После внесения необходимых изменений необходимо перезапустить службу Bareos Director:
systemctl reload bareos-dir
В веб-интерфейсе на странице Хранение мы должны увидеть наше новое устройство:

Теперь можно попробовать запустить наше задание, которое должно хранить данные на новом устройстве. В нашем примере, это каталог /backups — проверим, что там появился том нового пула:
ls /backups
Мы должны увидеть что-то на подобие:
FullNew-0004
Настройка API
Рассмотрим инструкцию по развертыванию Rest API в Bareos. Для его корректной работы необходимо установить python версии 3.8 и выше. На момент обновления инструкции актуальной версией была 3.9:
yum install python39
После устанавливаем приложение python:
/usr/bin/pip3.9 install bareos-restapi
Отредактируем скрипт запуска:
vi /usr/local/bin/uvicorn
Первую строчку меняем на:
#!/usr/bin/python3.9
* где python3.9 — установленная версия python.
Переходим в каталог с bareos_restapi:
cd /usr/local/lib/python3.9/site-packages/bareos_restapi
* опять же, 3.9 — версия python.
Сгенерируем секрет:
openssl rand -hex 32
Мы получим строку на 64 символа, например:
7f38df2a6688d099b0ebc9539053b28fcf06f1436e69e52152816f6c334db100
* сохраняем данную строку, которую будем использовать в качестве секрета.
Создаем конфигурационный файл:
vi api.ini
[Director]
Name=bareos-dir
Address=127.0.0.1
Port=9101
[JWT]
secret_key = 7f38df2a6688d099b0ebc9539053b28fcf06f1436e69e52152816f6c334db100
algorithm = HS256
access_token_expire_minutes = 30
* где для нас важны следующие параметры:
- Name — имя для подключения к bareos director.
- Address — адрес сервера с bareos director.
- Port — порт подключения к bareos director.
- secret_key — секрет, который мы сгенерировали выше.
По умолчанию, сервис работает на порту 8000 — необходимо его открыть в брандмауэре:
firewall-cmd —permanent —add-port=8000/tcp
firewall-cmd —reload
Запустим наш веб-сервер с Rest API:
uvicorn bareos_restapi:app —host 0.0.0.0 —reload
Если мы хотим запустить API на https, добавляем опции —ssl-keyfile и —ssl-certfile, например:
uvicorn bareos_restapi:app —host 0.0.0.0 —ssl-keyfile /etc/pki/tls/private/bareos.key —ssl-certfile /etc/pki/tls/certs/bareos.crt —reload
* в данном примере мы запустим сервис, который будет слушать на всех портах.
Открываем браузер и переходим по адресу http://<IP-адрес сервера>:8000/docs — мы должны увидеть страницу с инструкцией по использованию API для Bareos.
Прервем работу сервиса комбинацией Ctrl + С, и выполним настройку автозапуска Rest API. Для этого создаем файл:
vi /etc/systemd/system/uvicorn.service
[Unit]
Description=Uvicorn Bareos Rest API Service
After=network.target
[Service]
Type=simple
WorkingDirectory=/usr/local/lib/python3.9/site-packages/bareos_restapi
ExecStart=/usr/local/bin/uvicorn bareos_restapi:app —host 0.0.0.0 —reload
ExecReload=/bin/kill -HUP $MAINPID
Restart=on-failure
[Install]
WantedBy=multi-user.target
* где 3.9 — версия python.
Перечитываем конфигурацию systemd:
systemctl daemon-reload
Разрешаем автозапуск нашего сервиса и стартуем его:
systemctl enable uvicorn —now
Посмотреть статус можно командой:
systemctl status uvicorn
Шпаргалка по командам
Рассмотрим некоторые полезные команды консоли bconsole.
1. Работа с клиентами.
Посмотреть список зарегистрированных агентов:
* list clients
Увидеть статусы клиентов:
* status client
Мы получим список клиентов и должны будем выбрать номер того, для которого хотим узнать статус:
The defined Client resources are:
1: bareos-fd
2: CentOS
3: ubuntuSelect Client (File daemon) resource (1-3): 2
Отключить клиента:
* disable client client_name
* где client_name — имя для нашего клиента, зарегистрированного в системе.
Включить отключенного клиента:
* enable client client_name
2. Работа с задачами.
Показать список заданий:
* list jobs
Запустить на выполнение созданную задачу:
* run job=job_name
* где job_name — имя задачи.
Показать запланированные задания:
* status dir
Удаление bareos
Если нам нужно уделить сервер резервного копирования, выполним необходимые действия.
Описанные в данном разделе операции приведут к полному удалению программного продукта и файлов с резервными копиями.
Останавливаем сервисы и запрещаем их автозапуск:
systemctl disable bareos-dir bareos-fd bareos-sd
systemctl stop bareos-dir bareos-fd bareos-sd
Для удаления bareos выполняем команду:
yum remove bareos-*
Для удаления томов на устройстве хранения по умолчанию вводим:
rm -rf /var/lib/bareos
Удаляем каталоги с конфигурационными файлами и логами:
rm -rf /etc/bareos /var/log/bareos
Удаляем конфигурационные файлы для юнитов systemd:
rm -f /etc/systemd/system/bareos-*
rm -f /etc/systemd/system/multi-user.target.wants/bareos-*
Удалим репозиторий и почистим кэш для yum:
rm -f /etc/yum.repos.d/bareos*
yum clean all
Примеры заданий резервного копирования
В данном разделе мы рассмотрим конкретные примеры для резервирования сервисов. Без описания подробностей и без разделения на задание и шаблон. По возможности, будут указываться ссылки на документацию.
База данных MySQL/MariaDB
В официальном источнике предлагается использовать 2 способа:
- Задействовать плагин bpipe при описании файлсета.
- Запускать скрипт до резервирования, который сначала сделает дамп базы.
Мы воспользуемся вторым способом: он, довольно, понятный и не потребует установки дополнительных пакетов.
Пример задания:
Job {
Name = «MySQLBackup»
Client = server
Level = Full
FileSet=»MySQLFileSet»
RunScript {
FailJobOnError = Yes
RunsOnClient = Yes
RunsWhen = Before
Command = «sh -c ‘mysqldump -ubackup -ppassword dbname | gzip > /var/lib/bareos/mysql_dump.sql.gz'»
}
RunScript {
RunsOnSuccess = Yes
RunsOnClient = Yes
RunsWhen = After
Command = «rm /var/lib/bareos/mysql_dump.sql.gz»
}
}
Пример файлсета:
FileSet {
Name = «MySQLFileSet»
Include {
Options {
signature = MD5
compression = gzip
}
File = «/var/lib/bareos/mysql_dump.sql.gz»
}
}
База данных MySQL/MariaDB в docker
В целом, задача похожа, но предположим, что мы хотим сделать дамп из хостовой системы, подключившись к базе данных удаленно.
На стороне агента создаем скрипт:
vi /scripts/bareos_backup_mariadb_before.sh
#!/bin/bash
PATH=/etc:/bin:/sbin:/usr/bin:/usr/sbin:/usr/local/bin:/usr/local/sbin
docker_mysql_ip=`docker inspect -f «{{ range.NetworkSettings.Networks }}{{ .IPAddress }}{{ end }}» container_name_mariadb`
mysqldump -h${docker_mysql_ip} dbname | gzip > /var/lib/bareos/mysql_dump.sql.gz
Также на стороне клиента создадим:
vi /root/.my.cnf
[mysqldump]
user=backup
password=»password»
* где user и password — логин и пароль для подключения к базе с целью создания дампа.
Задание bareos:
Job {
Name = «MySQLBackup»
Client = server
FileSet=»MySQLFileSet»
Client Run Before Job = ‘/scripts/bareos_backup_mariadb_before.sh’
RunScript {
RunsOnSuccess = Yes
RunsOnClient = Yes
RunsWhen = After
Command = «rm -f /var/lib/bareos/mysql_dump.sql.gz»
}
…
}
Файлсет:
FileSet {
Name = «MySQLFileSet»
Include {
Options {
signature = MD5
compression = gzip
}
File = «/var/lib/bareos/mysql_dump.sql.gz»
}
}
Анализ и устранение проблем
Для резервного копирования очень важно уметь отслеживать и устранять ошибки. Мы рассмотрим процесс дебага при выполнении заданий, а также пример ошибок при настройке и эксплуатации сервера.
Debug при выполнении заданий
В консоли веб-интерфейса, а также логах сервера мы не сможем найти достаточно информации об ошибках, которые возникают в ходе выполнения заданий.
Чтобы получить нужную для процесса отслеживания ошибок информацию, мы должны включить трейс для клиента. Это делается в консоли bconsole, например:
* setdebug client=client_name level=200 trace=1
* в данном примере мы запустим логирование на клиенте client_name с уровнем детализации 200.
В ответ мы получим что-то на подобие:
2000 OK setdebug=200 trace=1 hangup=0 timestamp=0 tracefile=/var/lib/bareos/client_name-fd.trace
Готово, теперь на агенте в файл /var/lib/bareos/client_name-fd.trace будет записываться отладочная информация. Посмотреть ее можно командой:
tail -f /var/lib/bareos/client_name-fd.trace
После отладки и устранения проблемы, не забываем выключить режим дебага:
* setdebug client=client_name level=0 trace=0
А также на клиенте можно удалить файл с логами:
rm -f /var/lib/bareos/client_name-fd.trace
Возможные ошибки
Рассмотрим примеры ошибок, с которыми столкнулся я.
1. configure error: Could not find config Resource «Profile» referenced on line 4 : Profile = webui-admin
Ошибка появляется при попытке создать учетную запись для доступа к веб-интерфейсу.
Причина: bareos не видит файлы с описанием профилей, которые устанавливаются с пакетом bareos-webui.
Решение: как правило, такое происходит, если мы не перезапустили службу директора после установки дополнительного компонента. Выполним команду:
systemctl restart bareos-dir
2. Sorry, cannot authenticate. Wrong username, password or SSL/TLS handshake failed
Ошибка появляется при попытке входа в веб-интерфейс.
Причина: с версии 18.2 bareos использует по умолчанию TLS-PSK, которая не поддерживается со стороны PHP по умолчанию.
Решение: к сожалению, мне не удалось разобраться с правильным вариантом использования TLS-PSK, поэтому, в качестве решения, предлагается не использовать шифрование между основным сервисом bareos и UI. Для этого открываем файл с настроенной учетной записью входа (в нашем примере, admin):
vi /etc/bareos/bareos-dir.d/console/admin.conf
И добавим строку:
Console {
…
TLS Enable = No
}
Перезапустим сервис:
systemctl restart bareos-dir
Можно проверять.
3. Error: lib/bsock_tcp.cc:186 BnetHost2IpAddrs() for host «XXX» failed: ERR=Name or service not known
Ошибка появляется при выполнении задания резервного копирования.
Причина: система не может подключиться к хосту или самому себе по имени, которое указано в конфигурационном файле для storage. Возможно, было изменено имя сервера.
Решение: открываем файл:
vi /etc/bareos/bareos-dir.d/storage/File.conf
Необходимо убедиться, что в директиве Address у нас указано актуальное имя сервера:
…
Address = bareos.dmosk.ru
…
После перезапустим сервис:
systemctl restart bareos-dir
4. Issued certificate has expired
При попытке загрузить файл с настройками репозитория мы можем получить ошибку сертификата. Пример сообщения:
ERROR: cannot verify download.bareos.org’s certificate, issued by ‘/C=US/O=Let’s Encrypt/CN=R3’:
Issued certificate has expired.
To connect to download.bareos.org insecurely, use `—no-check-certificate’.
Причина: наша система не доверяет сертификату, который используется репозиторием. Как правило, это наблюдается при устаревании корневых сертификатов на нашем компьютере.
Решение: мы можем решить проблемы 2 способами.
а) быстрый способ: подходит как временное решение. Мы можем сказать утилите wget не проверять сертификат — для этого добавляем опцию —no-check-certificate:
wget —no-check-certificate …
б) правильный способ: обновить корневые сертификаты.
Подробнее процесс описан в статье Обновление корневых сертификатов на Linux.
5. Could not connect to Storage daemon on XXX:9103. ERR=No route to host
Задание зависает и выпадает с ошибкой. В сообщениях директора мы можем увидеть сообщение:
bareos-dir JobId 3: Warning: lib/bsock_tcp.cc:123 Could not connect to Storage daemon on bareos:9103. ERR=No route to host
Причина: сервер резервного копирования подключается к Storage daemon по сети. Данная ошибка говорит о том, что подключение не удалось.
Решение: открываем файл:
vi /etc/bareos/bareos-dir.d/storage/File.conf
А также остальные файлы из каталога /etc/bareos/bareos-dir.d/storage. Находим:
Address = bareos
* где bareos — имя сервера с ролью Storage daemon.
Нам нужно убедиться, что сервер из директивы Address доступен по сети.
6. DateTime::__construct()
При попытке загрузить данные в веб-интерфейсе на закладке Timeline ничего не происходит, а в консоль браузера отображается ошибка 500 при попытке загрузить данные со страницы /bareos-webui/job/getData/?data=timeline. Если перейти на данную страницу мы увидим исключение с текстом:
DateTime::__construct(): It is not safe to rely on the system’s timezone settings. You are *required* to use the date.timezone setting or the date_default_timezone_set() function. In case you used any of those methods and you are still getting this warning, you most likely misspelled the timezone identifier. We selected the timezone ‘UTC’ for now, but please set date.timezone to select your timezone.
Причина: по умолчанию php устанавливается без настройки временной зоны. Без данной настройки приложение не может работать корректно, так как не отрабатывает функция date_default_timezone_set.
Решение: открываем файл:
vi /etc/php.ini
Добавляем строку:
date.timezone = «Europe/Moscow»
* где Europe/Moscow — нужный часовой пояс.
Перезапускаем веб-сервер:
systemctl reload httpd