Содержание
- Bfsvc error could not open the bcd template store status c0000022 windows 10
- Вопрос
- Ответы
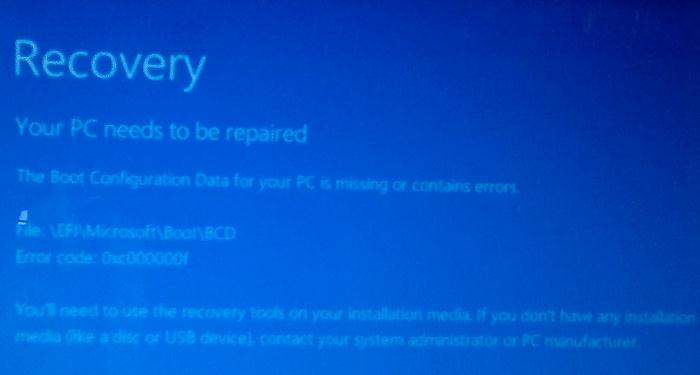
- Ошибка 0xc000000f при загрузке Windows 10/7
- Как исправить ошибку BootBCD с кодом 0xc000000f
- Восстановление загрузчика Windows 8.1. Удаляем шифрованный (EFI) системный раздел 300 Мб, а также раздел MSR 128 Мб и создаём их заново
- Комментарии (54)
- Рекламный блок
- Подпишитесь на рассылку
- Навигация
- Облако тегов
- Архив статей
- Сейчас обсуждаем
- admin
- admin
- vld32
- Александр АНАТОЛЬЕВИЧ
- О проекте RemontCompa.ru
Bfsvc error could not open the bcd template store status c0000022 windows 10

Вопрос
Доброго времени суток!
В результате сбоя повредились системные файлы ОС. Система в конце загрузки перезагружается без каких либо сообщений и входит в режим восстановления. Откат предыдущего состояния и безопасный режим не помогают. Необходимо восстановить системные файлы или накатить систему сверху не повреждая установленный exchange, можно ли это сделать?
Попытался выполнить команду из консоли восстановления;
BFSVC Error: Could not open the BCD template store. Status = [c000015c]
Ответы
Вы устанавливали с диска? Если с диска, то Вам нужно вставить диск и выбрать «починку»,но, имейте ввиду, если у Вас диск SP1, а у Вас установлен SP2, то сперва Вам нужно удалить SP2, и тогда уже проделать «починку». Если Вы не удалите SP2 и проделайте процедуру, то Вам потом придется проделать чистую установку заново всей ОС!
Мнения, высказанные здесь, являются отражением моих личных взглядов, а не позиции корпорации Microsoft. Вся информация предоставляется «как есть» без каких-либо гарантий. Не забывайте помечать сообщения как ответы и полезные, если они Вам помогли.
Источник
Ошибка 0xc000000f при загрузке Windows 10/7
При включении компьютера мы можем обнаружить код ошибки 0xc000000f. Также может быть описание к данному коду ошибки «File: bootbcd«. Эта ошибка связана с диспетчером загрузки Windows, а точнее повреждением загрузочной записи. Когда система Windows пытается прочитать данные из загрузчика, которые повреждены, то она не может прочитать данные конфигурации загрузки и выдает вам ошибку bootbcd с кодом 0xc000000f, настаивая на том, чтобы вы восстановили ПК с помощью установочного носителя Windows. Ошибка 0xc000000f с комментарием BootBCD может появится в Windows 7 и Windows 10.

Как исправить ошибку BootBCD с кодом 0xc000000f
В первую очередь вы должны извлечь все USB устройства с вашего ПК и проверить, загружается ли система. Также рекомендую выставить в BIOS на первое место SSD или HDD диск на котором система Windows.
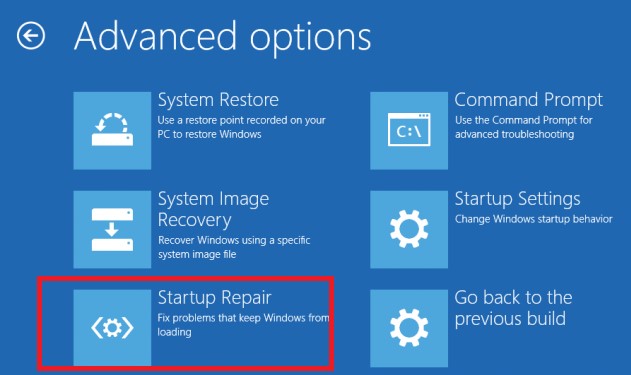
Поскольку эта ошибка не позволяет нам загружать нашу операционную систему, мы не можем прибегать к обычным средствам восстановления данных, но мы вынуждены анализировать нашу систему с помощью средств восстановления Microsoft. Что нам потребуется, так это установочная флешка windows 10. Клшжа вы начали установку с флещки, то дойдите до пункта установки и нажмите снизу на «Восстановление системы«. Тем самым мы попадем в дополнительные параметры загрузки.

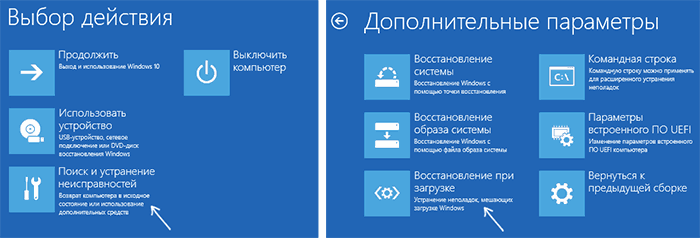
После того, как нажали на восстановление системы, вам нужно запустить командную строку (CMD). Примерное местонахождение «Поиск и устранение неисправностей» > «Командная строка«.
Советую в первую очередь нажать на «Восстановление при загрузке«, а потом запускать CMD.

Шаг 1. Введите команду, чтобы проверить и исправить битые сектора на диске, которые могут находиться на загрузчике, что не давая системе нормально считать оттуда информацию.
После окончание процесса перезагрузите ПК и проверьте, устранена ли ошибка 0xc000000f.

Шаг 2. Если выше способ не помог исправить ошибку 0xc000000f, то воспользуемся инструментом Bootrec, чтобы восстановить главную загрузочную запись. Введите команды ниже по порядку, нажимая Enter после каждой:

Если вам выдало какую-либо ошибку при вводе выше команд, то вы должны удалить предыдущую BCD и перестроить ее заново, чтобы получить совершенно новые данные конфигурации загрузки. Введите ниже команды по очереди, нажимая Enter после каждой:
Примечание: Если вам сложно понять, или у вас не получается восстановить загрузчик, то есть отличный мануал, как восстановить загрузочную запись для BIOS и UEFI с разными разметками GPT и MBR. Особенно обратите внимание на способ 3.
Источник

Восстановление загрузчика Windows 8.1. Удаляем шифрованный (EFI) системный раздел 300 Мб, а также раздел MSR 128 Мб и создаём их заново


открывается окно командной строки, вводим команды:
lis dis (выводит список физических дисков).
lis par (показ всех разделов выбранного диска, первые три раздела будем удалять).
sel par 1 (выбираем первый раздел
del par override (удаляем раздел, для удаления раздела ESP и MSR или раздела OEM-изготовителя ноутбука, необходимо указать параметр override)
Всё, все три скрытых раздела мы удалили.


Создаём заново шифрованный (EFI) системный раздел 300 Мб, а также раздел MSR 128 Мб
lis dis (выводим список дисков).
sel dis 0 (выбираем жёсткий диск ноутбука).
create par efi size=300 (создаём шифрованный (EFI) системный раздел 300 Мб).
format fs=fat32 (форматируем его в файловую систему FAT32).
creat par msr size=128 (создаём раздел MSR 128 Мб)

lis vol (выводятся все разделы жёсткого диска).
exit (выходим из diskpart)
Создаём загрузчик командой
Файлы загрузки успешно созданы.

Всё, перезагружаемся и Windows 8.1 должна загрузиться.
Читаем по этой теме:
Комментарии (54)
Рекламный блок
Подпишитесь на рассылку
Навигация
Облако тегов
Архив статей
Сейчас обсуждаем

admin
Хватит с избытком. Можно даже взять 4К монитор.
admin
Могут ли они работать поочерёдно Как понять поочерёдно? Системы уже установлены?
![]()
vld32
Admin, Спасибо за ответ!. Прилагаю ссылки на скрины. https://wdfiles.ru/abfd20
![]()
Статья от 11.02.2022. на дворе середина октября 2022.. 1660 super tuf gaming x3 в цене на рынке.
![]()
Александр АНАТОЛЬЕВИЧ
недозагружается, ошибка 80070643
О проекте RemontCompa.ru
RemontCompa — сайт с огромнейшей базой материалов по работе с компьютером и операционной системой Windows. Наш проект создан в 2010 году, мы стояли у истоков современной истории Windows. У нас на сайте вы найдёте материалы по работе с Windows начиная с XP. Мы держим руку на пульсе событий в эволюции Windows, рассказываем о всех важных моментах в жизни операционной системы. Мы стабильно выпускаем мануалы по работе с Windows, делимся советами и секретами. Также у нас содержится множество материалов по аппаратной части работы с компьютером. И мы регулярно публикуем материалы о комплектации ПК, чтобы каждый смог сам собрать свой идеальный компьютер.
Наш сайт – прекрасная находкой для тех, кто хочет основательно разобраться в компьютере и Windows, повысить свой уровень пользователя до опытного или профи.
Источник
- Remove From My Forums
-
Question
-
Hi,
I’d like to add a Win 8 VHD to Win 8.1 boot menu. The same VHD used to work for boot before. I used it in Hyper-V afterwards, and now want it back as a boot option.
However, I’m getting an error message when trying to add it to BCD:
C:Windowssystem32>bcdboot h:/windows
BFSVC Error: Could not open the BCD template store. Status = [c000000f]Any idea how to fix this…?
Jan
Answers
-
Okay, finally got this working. In case anyone else encounters the issue, here’s the solution. Go to Windows 8 repair console. Rebuild BCD with the following commands:
attrib c:bootbcd -h -r -s
del c:bootbcd
bootrec /rebuildbcdBoot Windows 8, and go to command prompt as admin. Enable hypervisor:
bcdedit /set hypervisorlaunchtype auto
Restart again. Done.
-
Marked as answer by
Monday, February 10, 2014 8:12 AM
-
Marked as answer by
 Если после установки второй ОС, попыток воспользоваться свободным местом на скрытых разделах диска или их форматирования, в случае системных сбоев, при экспериментах с EasyBCD и в других случаях вы столкнулись с тем, что Windows 10 не загружается, сообщая «An operating system wasn’t found», «No bootable device found. Insert boot disk and press any key», то, возможно, вам требуется восстановление загрузчика Windows 10, о чем и пойдет речь ниже.
Вне зависимости от того, UEFI у вас или BIOS, установлена ли система на GPT диск со скрытым FAT32 разделом EFI загрузки или на MBR с разделом «Зарезервировано системой», действия по восстановлению будут одинаковыми для большинства ситуаций. Если ничто из нижеописанного не помогает, попробуйте Сброс Windows 10 с сохранением данных (третьим способом). Примечание: ошибки, подобные указанным выше, необязательно вызваны поврежденным загрузчиком ОС. Причиной может оказаться вставленный компакт-диск или подключенный USB-накопитель (попробуйте вынуть), новый дополнительный жесткий диск или проблемы с имеющимся жестким диском (прежде всего взгляните, а виден ли он в БИОС).
- Автоматическое восстановление загрузчика Windows 10
- Простое восстановление вручную
- Второй метод восстановить загрузчик Windows 10 вручную
- Видео инструкция
Автоматическое восстановление загрузчика
Среда восстановления Windows 10 предлагает опцию восстановления при загрузке, которое работает на удивление хорошо и в большинстве случаев оказывается достаточным (но не всегда). Чтобы восстановить загрузчик данным способом, проделайте следующие действия.
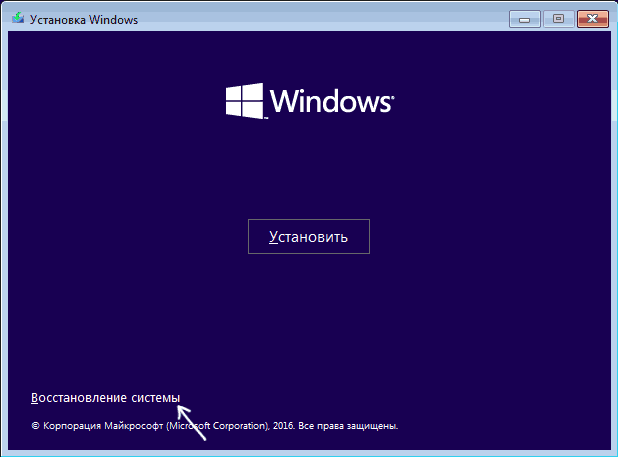
- Загрузитесь с диска восстановления Windows 10 или загрузочной флешки с Windows 10 в той же разрядности, что и ваша система (диска). Для выбора накопителя для загрузки можно использовать Boot Menu.
- В случае загрузки с установочного накопителя, на экране после выбора языка внизу слева нажмите пункт Восстановление системы.

- Выберите пункт Поиск и устранение неисправностей, а затем — Восстановление при загрузке. Выберите целевую операционную систему. Дальнейший процесс будет произведен автоматически.

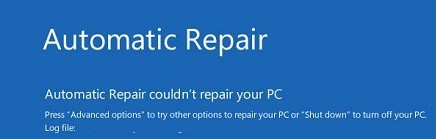
По завершении вы либо увидите сообщение о том, что восстановление не удалось, либо компьютер автоматически перезагрузится (не забудьте вернуть загрузку с жесткого диска в БИОС) уже в восстановленную систему (но не всегда).
Если описанный способ не помог решить проблему, переходим к более результативному, ручному способу.
Процедура восстановления вручную
Для восстановления загрузчика вам потребуется либо дистрибутив Windows 10 (загрузочная флешка или диск), либо диск восстановления Windows 10. Если вы ими не обзавелись, придется воспользоваться другим компьютером для их создания. Подробнее о том, как сделать диск восстановления можно прочитать в статье Восстановление Windows 10.
Следующий этап — загрузиться с указанного носителя, поставив загрузку с него в БИОС (UEFI), либо используя Boot Menu. После загрузки, если это установочная флешка или диск, на экране выбора языка нажмите клавиши Shift + F10 или Shift+Fn+F10 на некоторых ноутбуках (откроется командная строка). Если это диск восстановления в меню выберите Диагностика — Дополнительные параметры — Командная строка.
В командной строке введите по порядку три команды (после каждой нажимаем Enter):
- diskpart
- list volume
- exit
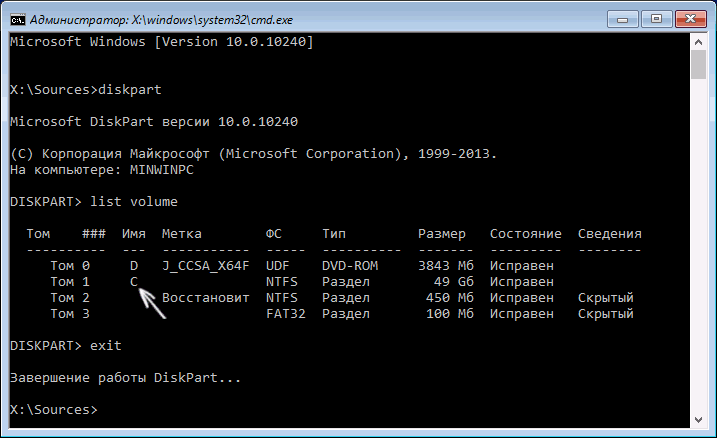
В результате выполнения команды list volume, вы увидите список подключенных томов. Запомните букву того тома, на котором располагаются файлы Windows 10 (в процессе восстановления это может быть не раздел C, а раздел под какой-либо другой буквой).
В большинстве случаев (на компьютере только одна ОС Windows 10, скрытый раздел EFI или MBR в наличии), для того, чтобы восстановить загрузчик, достаточно после этого выполнить одну команду:
bcdboot C:windows (где вместо C может потребоваться указать другую букву, о чем было сказано выше).
Примечание: если на компьютере несколько ОС, например, Windows 10 и 8.1, вы можете выполнить эту команду дважды, в первом случае указав путь к файлам одной ОС, во втором — другой (не сработает для Linux и XP. Для 7-ки зависит от конфигурации).
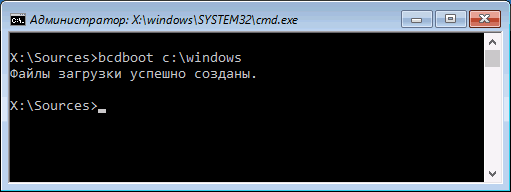
После выполнения этой команды вы увидите сообщение о том, что файлы загрузки успешно созданы. Можно попробовать перезагрузить компьютер в обычном режиме (вынув загрузочную флешку или диск) и проверить, загружается ли система (после некоторых сбоев загрузка происходит не сразу после восстановления загрузчика, а после проверки HDD или SSD и перезагрузки, также может проявиться ошибка 0xc0000001, которая в этом случае также обычно исправляется простой перезагрузкой).
Второй способ восстановить загрузчик Windows 10
Если вышеописанный способ не сработал, то возвращаемся в командную строку так же, как делали это ранее. Вводим команды diskpart, а потом — list volume. И изучаем подключенные разделы дисков.
Если у вас система с UEFI и GPT, в списке вы должны увидеть скрытый раздел с файловой системой FAT32 и размером 99-300 Мб. Если же BIOS и MBR, то должен обнаружиться раздел размером 500 Мб (после чистой установки Windows 10) или меньше с файловой системой NTFS. Вам требуется номер этого раздела N (Том 0, Том 1 и т.д.). Также обратите внимание на букву, соответствующую разделу, на котором хранятся файлы Windows.
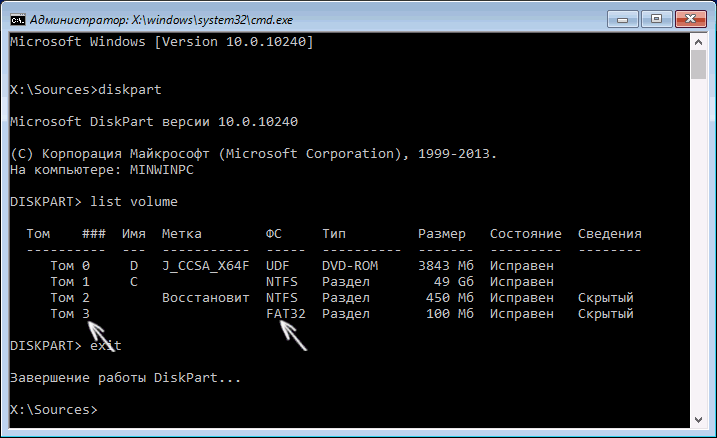
Введите по порядку следующие команды:
- select volume N
- format fs=fat32 или format fs=ntfs (в зависимости от того, какая файловая система на разделе).
- assign letter=Z (присваиваем букву Z этому разделу).
- exit (выходим из Diskpart)
- bcdboot C:Windows /s Z: /f ALL (где C: — диск с файлами Windows, Z: — буква, которую мы присвоили скрытому разделу).
- Если у вас несколько ОС Windows, повторите команду для второй копии (с новым расположением файлов).
- diskpart
- list volume
- select volume N (номер скрытого тома, которому мы присваивали букву)
- remove letter=Z (удаляем букву, чтобы том не отображался в системе, когда мы перезагрузимся).
- exit
По завершении, закрываем командную строку и перезагружаем компьютер уже не с внешнего загрузочного накопителя, проверяем, загружается ли Windows 10.
Видео инструкция
Надеюсь, изложенная информация сможет вам помочь. Кстати, можно попробовать также и «Восстановление при загрузке» в дополнительных параметрах загрузки или с диска восстановления Windows 10. К сожалению, не всегда все проходит гладко, и проблема легко решается: часто (при отсутствии повреждений HDD, что тоже может быть) приходится прибегать к переустановке ОС. Также для восстановления можно попробовать простую команду bootrec.exe /fixboot (см. Использование bootrec.exe для исправления загрузочных записей).
Многие пользователи сообщают об ошибке, как только они загружают свой компьютер:
Фатальная ошибка C0000022.
Эта ошибка характерна для систем HP и не позволяет пользователям загружаться в систему в обычном режиме. Однако мы можем войти в систему в режиме восстановления.
Причина
1]Определенный Центр обновления Windows мог быть установлен неправильно.
2]Аппаратный сбой.
3]Вредоносное ПО или антивирус могли вызвать повреждение файлов.
Мы попытаемся устранить следующие неполадки один за другим:
Решение 1]Аппаратный сброс
В случае ноутбуков аппаратный сброс может помочь решить проблему.
1]Выключите систему и отсоедините шнур питания и аккумулятор.
2]Нажмите кнопку питания на 30-40 секунд и дайте конденсаторам системы разрядиться.
3]Теперь подключите шнур питания и попробуйте загрузить систему.
Решение 2]Восстановление системы
Восстановление системы будет работать только в том случае, если точка восстановления была создана заранее.
1]Как только вы включите систему, продолжайте нажимать F11, чтобы загрузить систему в режиме восстановления.
Примечание. — Вы также можете попробовать загрузиться в режиме автоматического восстановления, выполнив следующие действия:
- Выключите ПК с помощью кнопки питания.
- Теперь включите его с помощью кнопки питания, и как только появится логотип, просто нажмите кнопку питания и удерживайте ее нажатой в течение 5 секунд, чтобы принудительно полностью отключить его.
- Повторите процесс 2–3 раза, пока на экране не появится сообщение о подготовке к автоматическому восстановлению.
2]Теперь выберите «Устранение неполадок» >> «Дополнительные параметры».
3]Выберите Восстановление системы из списка.
4]Выберите точку восстановления и подтвердите то же самое.
5]Запустите процесс восстановления системы, а затем перезапустите систему. Вот подробная процедура выполнения восстановления системы.
Проверьте, работает ли это, или загрузите систему в безопасном режиме, чтобы продолжить устранение неполадок. Вот процедура загрузки системы Windows 10 в безопасном режиме.
Решение 3]Запустите сканирование SFC
После того, как вы загрузили систему в безопасном режиме, выполните сканирование SFC, которое может помочь восстановить отсутствующие или поврежденные файлы. Вот процедура сканирования SFC.
Решение 4]Установите обновления Windows вручную
Основной причиной проблемы является сбой обновлений Windows. Вот процедура обновления системы вручную. Это, очевидно, необходимо сделать после загрузки системы в безопасном режиме.
Решение 5]Запустите сканирование CHKDSK
Одной из причин проблемы является аппаратный сбой. В данном случае этим проблемным оборудованием может быть жесткий диск.
Решение 6]Установите последнее обновление бюллетеня по безопасности Microsoft.
Последнее обновление Microsoft Security Bulletin можно установить с здесь. Пожалуйста, выберите последнюю версию для Windows 10.
In this article, we will learn how to repair the Windows bootloader on a modern computer that uses UEFI instead of a classic BIOS and GPT disk partition table (instead of MBR). The corruption of the Windows bootloader can occur after installing a second OS (in Dual Boot configurations), file system corruption, incorrect actions during Windows recovery, removal of some data on hidden partitions, malicious software (virus, ransomware, etc.), and for some other reasons.
This article contains a step-by-step guide for repairing a damaged or deleted bootloader in Windows 11/10/8.1 and Windows Server 2022/2019/2016/2012R2 on computers running in native (non-compatible) UEFI mode. You can use this guile both to repair the binary files of the Windows bootloader, and the bootloader configuration EFIMicrosoftBootBCD file (in cases where Windows doesn’t boot due to the missing or corrupted BCD boot configuration file).
Contents:
- Windows Boot Error: Boot Configuration Data is Missing (EFIMicrosoftBootBCD)
- Automatic Windows Bootloader Repair with WinRE
- Using BCDBoot to Manually Repair EFI Bootloader in Windows
Windows Boot Error: Boot Configuration Data is Missing (EFIMicrosoftBootBCD)
A UEFI computer with Windows installed in native mode will not be able to boot if the Windows EFI bootloader is corrupted. When trying to boot from a disk with a damaged or missing EFI bootloader, the following BSOD (Blue Screen of Death) error appear:
The boot configuration data for your PC is missing or contains errors.
File :EFIMicrosoftBootBCD
Error code: 0xc000000f
or:
Error code: 0xc000014c
This error indicates that the Windows bootloader configuration (Boot Configuration Data, BCD) has been corrupted or even completely removed. If you try to repair the bootloader on a UEFI computer using bcdedit tool, you will receive an error:
The boot configuration data store could not be found.
The requested system device cannot be found.
If Windows 10/11 is installed in native UEFI mode on a GPT disk, then the Windows EFI bootloader (Windows Boot Manager) stores the boot manager and BCD configuration on a separate hidden EFI volume (100 MB in size with the FAT32 file system). The bcdedit tool doesn’t see this EFI partition, and cannot manage the bootloader configuration on it.
If you only see a black screen with the message “An operating system wasn’t found” when you boot your computer, it’s likely that the Windows bootloader has been completely removed. Follow the instructions on the link.
Automatic Windows Bootloader Repair with WinRE
The procedure for the automatic repair of the EFI bootloader used in the Windows Recovery Environment (WinRE) is usually useless in such cases. But it’s still worth a try:
- Boot your device from the recovery disc or Windows 10/11 installation media;
- Click the Restore System on the installation screen;
- Then select Troubleshoot -> Startup Repair and select the OS whose bootloader you want to try to repair;

- But most likely the result will be negative:
Automatic Repair couldn’t repair your PC.
Using BCDBoot to Manually Repair EFI Bootloader in Windows
Let’s move on to the procedure for manually repairing the EFI Windows bootloader on a UEFI computer.
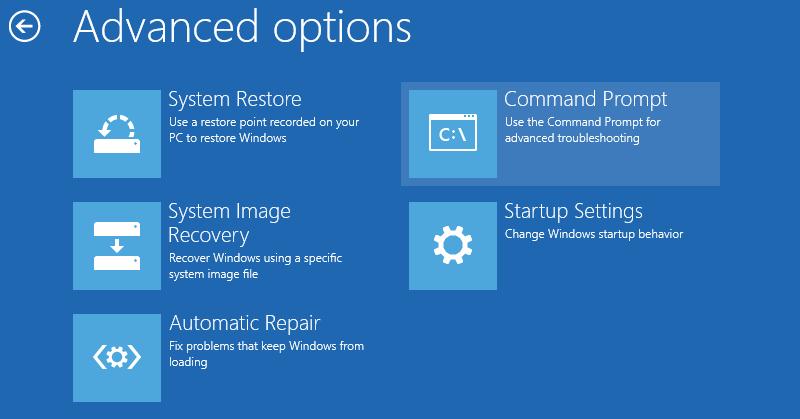
To repair the bootloader configuration (BCD), you have to boot from the original Windows installation media (also, you can use a recovery disk or a special UEFI bootable USB flash drive). After booting into the recovery environment, you need to open a command-line console: select System Restore – > Troubleshoot-> Command Prompt).
You can run the Command Prompt even if you only have a Windows installation media at hand. To do this, it is enough to press the key combination Shift + F10 (or Shift + Fn + F10 on some laptop models) on the first Windows setup screen (when choosing a language and keyboard layout).
In the command prompt that opens, run the disk management tool:
diskpart
Display the list of drives on the computer:
list disk
At this stage, it is very important to determine the type of partition table on the disk on which your Windows is installed: MBR or GPT. The point is that the EFI bootloader is used only on disks with a GPT partition table.
If the asterisk (*) is in the Gpt column, then the GPT partition table is used on disk. If not, the MBR is used.

If your disk uses a GPT partition table, follow the steps below in the instructions to repair the Windows EFI bootloader.
If you have an MBR partition table on your disk, this guide won’t work for your computer. Most likely you have a computer with BIOS or Legacy/Compatibility Support Mode (CSM) option enabled in the UEFI settings.
On MBR disks, the Windows bootloader is stored on a separate System Reserved partition, and not on the EFI partition (in any case, don’t convert the MBR partition table to GPT until you fix the Windows bootloader !!). Use another guide to restore the BCD bootloader on a BIOS computer with MBR (Master Boot Record) disk.
Select the drive where your Windows is installed (if there is only one hard drive in the system, its index should be 0):
sel disk 0
Display the list of partitions and volumes on this disk: list partition
list volume
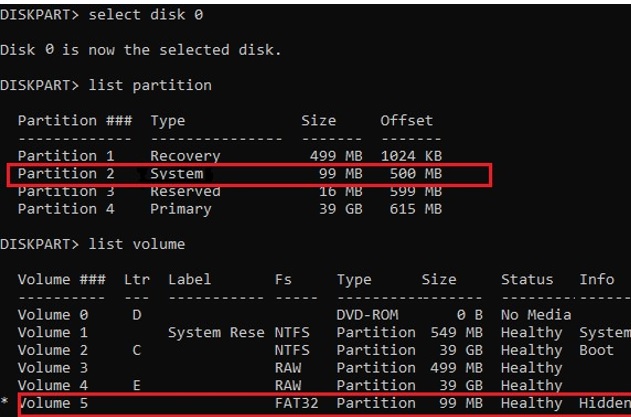
In this example, you can see that the EFI boot partition has the partition 2 index (aka Volume 5 with the Hidden label). The easiest way to identify an EFI partition is by the FAT32 file system and 100 MB in size (this is the standard minimum size of EFI partition for Windows computers; in rare cases, the partition size may differ). The most commonly used label for it is System EFI or ESP/EFI System Partition).
In our example, the main partition on which Windows is installed has a volume 2 index, is formatted in the NTFS file system, and is assigned the drive letter C:.
dir C:
Make sure that this drive contains the Windows, Program Files, Users, and other directories.
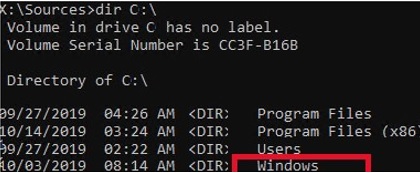
If these directories are missing, then your Windows drive has a different drive letter. Check the contents of drives with different drive letters assigned.
Write down the drive letter assigned to the Windows partition. We will use it as one of the arguments of the bcdboot command a little later.
The partition table must also contain an MSR (Microsoft System Reserved) partition of 16 MB in Windows 10/11 (or 128 MB in Windows 8.1).
Assign the drive letter K: to the hidden EFI volume:
select volume 5
assign letter K:
A message that the drive letter has been successfully assigned to the EFI partition should appear:
DiskPart is successfully assigned the drive letter or mount point.
Close the diskpart:
exit
Go to the bootloader directory on the hidden volume:
cd /d K:efimicrosoftboot
In this case, K: is the drive letter assigned to the EFI partition just above. If the EFIMicrosoftBoot directory is missing (error The system cannot find the path specified), try the following commands:
cd /d K:Boot
or
cd /d K:ESDWindowsEFIMicrosoftBoot
At this point, many guides recommend running the following commands, which should overwrite the partition boot record, find the installed Windows, and add them to the BCD:
bootrec /fixboot

bootrec /scanos

bootrec /rebuildbcd
or even:
bootrec /FixMbr (preparing MBR record for a GPT disk looks strang)
You can use all these commands only for MBR-based disks. If your computer boots in UEFI mode, then it definitely uses the GPT partition table (as in our case). Therefore, when you run bootrec commands, you will see an error: access is denied
You need to use the BCDBoot.exe tool to restore bootloader files and fix the boot records on the EFI partition by copying them from the system directory on the Windows partition. The BCD bootloader configuration is recreated using the %WINDIR%System32ConfigBCD-Template file.
Use the attrib command to remove the hidden, read-only, and system attributes from the BCD file:
attrib BCD -s -h -r
Delete the current BCD configuration file by renaming it (this will keep the old boot configuration as a backup): ren BCD BCD.bak
Using the bcdboot tool, you need to copy the critical files of the UEFI boot environment from the system directory to the EFI boot partition and recreate the BCD bootloader config file:
bcdboot C:Windows /l en-us /s k: /f ALL
- C:Windows – the path to the root Windows system directory on the disk (this is your disk on which your Windows is installed, we determined it earlier using the diskpart command);
- f ALL –means that you need to copy the Windows Boot Environment files, including those for UEFI and BIOS computers (theoretically able to boot both on UEFI and BIOS computers). To copy only the EFI bootloader, use the /f UEFI command;
- /l en-us —specifies the system locale that is used when initializing the BCD store. By default, en-us – English (USA) is used;
- /s K: — copy the bootloader EFI files to the specified partition;
- /c – this is a new BCDBoot option in Windows 10 that allows you to overwrite existing boot records (including debugsettings). Use this option to ignore old boot settings and create a clean BCD configuration;
- /v – used to enable BCDBoot verbose output.
Now, if you run the bcdedit command, you will see the following :
An entry should appear in the Windows Boot Manager section containing the full path to the UEFI boot file (EFIMICROSOFTBOOTBOOTMGFW.EFI).In this example, it is located on volume 5 (partition=DeviceHarddiskVolume5).
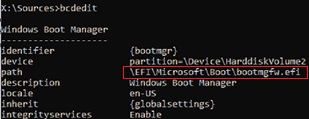
Windows Boot Manager
--------------------
identifier              {bootmgr}
device                  partition=DeviceHarddiskVolume5
path                    EFIMicrosoftBootbootmgfw.efi
description             Windows Boot Manager
locale                  en-US
inherit                 {globalsettings}
bootshutdowndisabled    Yes
default                 {CURRENT}
resumeobject            {xxxxxxxx-xxxx-xxxx-xxxx-xxxxxxxxxxxx}
displayorder            {default}
toolsdisplayorder       {memdiag}
timeout                 30
Windows Boot Loader
-------------------
identifier              {current}
device                  partition=C:
path                    Windowssystem32winload.efi
description             Windows 10
locale                  en-US
inherit                 {bootloadersettings}
recoverysequence       {xxxxxxxx-xxxx-xxxx-xxxx-xxxxxxxxxxxx}
recoveryenabled         Yes
isolatedcontext         Yes
allowedinmemorysettings 0x15000075
osdevice                partition=C:
systemroot              Windows
resumeobject            {xxxxxxxx-xxxx-xxxx-xxxx-xxxxxxxxxxxx}
The Windows Boot Manager section must contain the path to the EFI partition (=DeviceHarddiskVolume5 ) and the path to the boot manager file (bootmgfw.efi). The Windows Boot Loader section contains the Windows partition info and the path to the Windows EFI bootloader ( Windowssystem32winload.efi). When you turn it on, your computer will pass control to the EFI bootloader, which will start the Windows bootloader.
Possible errors:
Now you need to restart your computer and disconnect the bootable media. If you did everything correctly, the Windows Boot Manager should appear in the list of bootable devices, where you can choose a desired operating system to boot. Your EFI bootloader and BCD configuration have been restored successfully!
In some cases, after repairing the BCD bootloader, when Windows boots, a BAD SYSTEM CONFIG INFO error appears. To fix the error:
Make sure you haven’t made any recent changes to UEFI settings. Undo all changes.
Boot your computer from the installation/bootable flash drive and change the bootloader configuration with the commands:
bcdedit /deletevalue {default} numprocbcdedit /deletevalue {default} truncatememory
Okay, I’ve had time to put together a proper outline here. It’s long, but it’s pretty complete and should help you see what’s going on.
First, one way this can happen:
- Your BIOS loses its settings.
- No problem, all that stuff’s stored in the EFI partition.
- …except for the SATA IDE vs AHCI setting, for obvious reasons.
- Were you using SATA-AHCI? You’re probably using SATA-IDE now.
- Did you try to boot before you figured that out?
- If you did, it failed. Did you let Windows try to fix it?
- If you did, BLAM, it may very well have destroyed the Boot Configuration Database.
- Make sure you’re using the correct SATA setting you were using last time.
Here’s what you’ve probably done by now. IF ANY OF THIS DOES NOT MATCH, CAREFULLY EVALUATE WHETHER THIS IS IN FACT YOUR PROBLEM, and READ this for ideas but don’t FOLLOW it without thinking first.
- You have HOPEFULLY ignored all the crap about fixing the Master Boot Record (MBR), partition table, partition flags, and other garbage that DOES NOT APPLY to an EFI boot scenario. AT ALL. At best, you would be able to completely rebuild a new, unrelated, NON-EFI boot solution. That might not be trivial, however, because:
- You have figured out that Windows is certain it does not have a Boot Configuration Database, but it is, unfortunately, either completely clueless or VERY certain about where it goes— you can’t quite tell which.
- You’re aware that the boot store is normally
(somewhere)BootBCDand that the file is HIDDEN; view it usingdir /a:hs. - You’ve familiarized yourself a bit with
BCDedit.exeand figured out that it will let you «mock up» a Boot Configuration Database in a staging file using/CreateStore(and please don’t name it «BCD»), that you can explicitly use the staging file with the/Storeoption, that you can add a menu entry for the Windows Boot Manager using/Create {bootmgr}, and that you SHOULD be able to import it using/Import… - …but when you try to do this, you can’t. You look into the
/SysStoreoption, which sounds right, but you can’t get it to use another store because it’s «ambiguous». You have a hunch that it knows where the store is— or should be— but you can’t find it. - You’ve tried to use
MountVolto mount the EFI partition, but it doesn’t even show in the list, so you can’t.
If ALL of that applies fairly closely to you, here is what MAY be going on:
- Windows can tell you’re set up for EFI (you have booted the DVD via a UEFI boot, you have an EFI partition, etc.).
- It therefore knows WHERE TO LOOK for the BCD file— however, it either somehow has the location wrong (not this problem, but similar) or the BCD has been deleted.
- Apparently, because it knows where it SHOULD be, this breaks
/SysStore— and actually, that’s probably correct behavior, because otherwise you’d put it in the wrong place. - As near as I can tell,
MountVoldeliberately hides the EFI partition (or is somehow incapable of noticing it). This prevents mounting the filesystem, which prevents finding the correct subdirectory, verifying that the database exists, etc.
So here, finally, is what you need to do about it. The good news is that it’s probably a lot simpler than you’re hoping by now.
- You do indeed have to mount the EFI partition.
Actually, I have a hunch that’s not strictly correct— I strongly suspect the EFI partition is already mounted by some internal subsystem, which is why
BCDeditgets cranky— it doesn’t see the database, but it knows where it should go. Whatever it does not have, however, is a drive letter. So— what to do?Well…how far back do your DOS roots go? Do you remember the
Assigncommand? Guess what. - Start
DiskPart. - If you are not familiar with
DiskPart, the way it basically works is a hierarchy of sets; you must select exactly one element at one level to proceed to the next. So,List Disk, and thenSelect Disk nwherenis whatever’s appropriate for you. - Use
List PartitionandList Volume(note non-plural) to get some insight and identify your EFI partition.It is usually a 100MB FAT32 partition marked
System. Keep in mind that your disk should be using a GPT partition table by now, so you may see quite a few partitions. Some of these are for emergency recovery— fat lot of good they do for EFI problems, eh? Oh well.Notice that the EFI partition, and a few others, do not have drive letters. If you’re so inclined, you can also view the GPT partition attributes, which may give you a few tangentially-related «Aha» moments as well.
Select Partition nwhere n is the EFI partition. (I expect you could select the volume instead if you need to.)Assign. That’s it. Don’t specify a drive letter; justAssign.List Volume. You should now see a drive letter assigned to the EFI partition.ExitDiskPart.And now… a big fat warning. You will probably go directly to S: (or whatever you got from
Assign) and notice a Boot partition. «AHA!» You will say. «There is noBCDfile here!» First… remember that file is hidden. Second… dig around a bit more, and you will notice that while there isS:EFIBootand alsoS:EFIMicrosoftBootYou need to check both of these for problems.
S:EFIBootis for the motherboard, and contains the Windows Boot LOADER (and possibly other things for other operating systems). This has this name because the motherboard has no idea if you’re going to have Windows or not, and needs a fixed path that makes sense.- Inspect
S:EFIBoot. For Windows 7 Professional, 64-bit, you should see:bootx64.efi
If you have installed an EFI shell (always a good idea), you might additionally seeshellx64.efi.NOTE: Dual-boot Linux users using
chainloader+1WILL NOT see an extra entry here. - Inspect
S:EFIMicrosoftBootusing bothdiranddir a:h. For Windows 7 Professional, 64-bit, you should see a bunch of language templates (en_US, etc.) and the following files:bootmgr.efi bootmgfw.efi memtest.efi BCD BCD.Backup.001 BCD.Backup.002…except that you probably don’t see
BCD, do you? But those backup files sure look tempting. - Determine which backup file you want to use. Whatever recent changes it’s missing are nowhere near as important as your ability to boot the system, so go for the one that’s most intact. Probably you will see one large one and one fairly small one. The small one is already corrupt, and is an artifact of the failed repair process— don’t use it. If they’re both large, use the older one. IN ANY CASE, make ADDITIONAL BACKUP COPIES OF THE BACKUPS somewhere else.
- Copy the backup you’ve decided to use to
BCD. - Exit the shell, shutdown cleanly, and reboot.
- Tell Windows to start NORMALLY. At this point, it should start.
Q: What if you don’t HAVE a backup BCD?
A: Well, that really shouldn’t happen. It likely means you’re either in the wrong directory, support EFI but weren’t actually using it, or somehow rebuilt your entire EFI partition without all of the required Windows materials (possible, especially when using multiple versions of Windows). In that case, you’ll need to copy the EFI materials from the DVD, then either modify or rebuild the Boot Configuration Database using BCDedit.
Q: Can you give me an example of a scenario where BCDedit /SysStore can be used to do anything at all on an EFI system?
A: So far, no.
Anyway, hope this helps solve some problems for people, or at least gets them thinking. As a very important final point, please note that you can mount and inspect your EFI partition under Windows normally using the DiskPart: Assign technique above. You should do this at least once, to get a complete backup of your EFI partition, BEFORE you run into this kind of trouble. I recommend one backup into a subdirectory on your C: drive, and one on a USB flash drive.
Sorry that’s so long-winded. I need to turn this into a proper article at some point, but there are so many people who are SO frustrated that I felt the need to document my experience as completely and rapidly as I could.
Я разобрался — флешка была отформатирована в ntfs.
Добавлено через 1 час 22 минуты
В старт-топике я спрашивал — почему не показываются менюхи из BCD винды, так вот — они появились. Я так и не понял — что изменилось.
************************
Вопрос: как редактировать UEFI-меню на флешке? То есть, BootIce редактирует настройки текущей системы и текущей NVRAM, а если требуется флешку настроить? У неё есть K:efibootbootx64.efi, известно что ему нужно подключить существующие менюхи USB-реаниматора, который нормально грузится в BIOS-режиме, и на данный момент загрузиться в UEFI-режиме не представляется возможным.
Далее, у меня есть непреодолимое желание имет возможность держать на флешке файлы больше 4-х гигабайт, для этого я размечаю флешку в формате ntfs. Этот формат не увидится UEFI-системой, для обхода чего я делаю дополнительный раздел FAT, и, учитывая скромность загрузчика, наличие неразмеченного пространства и желание не переделывать настроенный и нормальный раздел с прогами, я его делаю маленьким — 15 мегабайт. Это требует использования FAT16, но разные проги отказываются его форматировать по причине — что он меньше 16-ти метров, либо форматируют как 8 метров. Ещё встречал мнениячто UEFI-система может не распознать FAT16, а только FAT32. Я, конечно, могу всё переразметить и переделать раздел на метров пятьдесят, но всё-же интересно — что за чехарда, и нормально ли система распознает FAT16 на двадцати метрах?
Собственно главный вопрос в другом — при создании второго раздела мне говорят что не дадут назначить ему букву диска, а следовательно я не смогу скопировать туда файлы. — Это что ещё за новости? Вариации с созданием основной/расширенный/логический ни к чему ни привели.
Далее, если я сделаю конструкция на двух разделах, то на этапе работы системы UEFI они не будут иметь букв, и на разных компьютерах они могут по разному обозначаться внутренними идентификаторами. На рабочей системе на винчестере я точно знаю — какой файл какому пункту меню назначить, файл содержит нужный загрузчик, который загрузит винду и только её, посредством единсвенного BCD-файла, но в случае с флешкой — грузится общего назначения загрузчик. Как тут быть? Что ему указывать? Какую букву диска?