
Почему появляется BIOS id Check Error при обновлении Bios?
С данной ошибкой можно столкнуться в процессе обновления прошивки BIOS на материнских платах Gigabyte. Появляется она после выбора файла обновления в стандартной утилите Q-Flash. В данной статье мы рассмотрим возможные варианты устранения этой ошибки, а также способы ее обхода для удачного обновления BIOS.
Из-за чего может появляться ошибка?
BIOS id Check Error говорит о том, что проверка идентификатора BIOS не пройдена. Другими словами – этот BIOS, который Вы пытаетесь прошить, несовместим с материнской платой.
Итак, первое, что Вам стоит знать для успешного обновления BIOS через утилиту Q-Flash – флешка, на которую вы сбрасываете файл обновления, должна быть отформатирована в системе Fat32.
Далее проверяем все пункты, описанные ниже.
Соответствие BIOS вашей материнской плате
Как бы банально это не звучало, но достаточно часто пользователи неправильно определяют модель своей материнской платы и как следствие, скачивают неподходящий BIOS.
Поэтому внимательно сверьте модель своей мат.платы с той, для которой вы скачиваете BIOS. Соответствие должно быть полным! Вплоть до последней цифры и буквы!
Промежуточное обновление
Бывает так, что если между той версией BIOS, которая у Вас установлена, и той, которую вы пытаетесь установить, выходили промежуточные обновления, сперва следует установить их.
Разнообразие версий BIOS
К примеру, на Вашей плате стоит BIOS версии 1a, установить Вы пытаетесь версию 3c, а между ними были еще 1b, 2a, 2c и 3b, то при возникновении ошибки BIOS id Check Error перед установкой версии 3c попробуйте поставить 1b или 2a, а после успешной установки уже версию 3c.
Использование утилиты @bios
На сайте Gigabyte в разделе поддержки есть ссылка на скачивание утилиты @BIOS. Она позволяет легко и быстро обновить BIOS прямо из-под Windows.
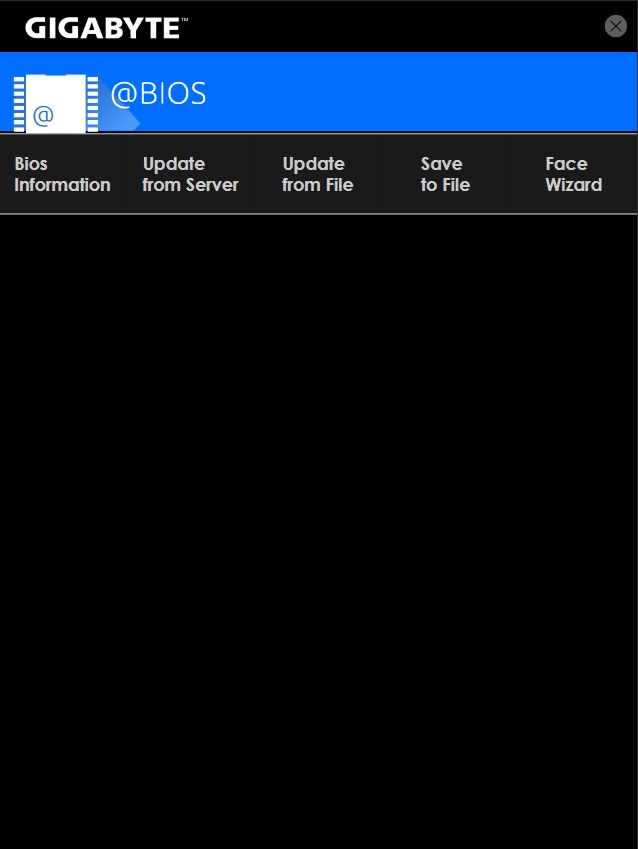
Утилита @BIOS
Поэтому при возникновении проблем с обновлением BIOS утилитой Q-Flash можно попробовать @BIOS.
Прошивка программатором
Если ничего из вышеперечисленного не помогло и обновить BIOS все равно не получилось, то остается лишь один вариант – прошивка программатором. Но для этого потребуется снятие флешки BIOS с мат. платы, а также специальный программатор. Доверить это лучше сервисному центру.
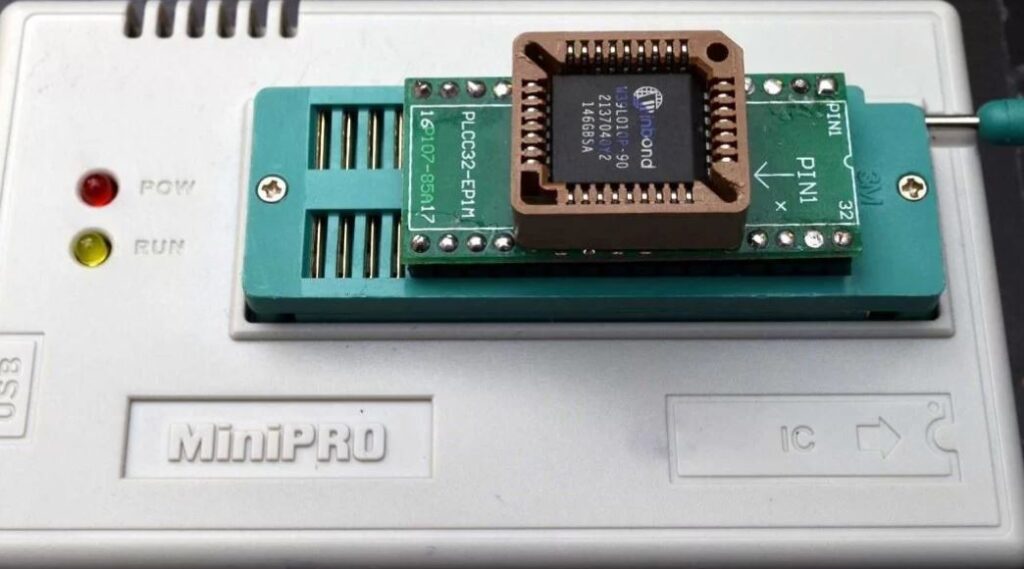
Прошивка на программаторе
Лучшая благодарность автору — репост к себе на страничку:
Содержание
- Invalid bios image gigabyte как исправить
- Invalid bios image gigabyte как исправить
- BIOS id Check Error у Gigabyte что значит?
- Invalid BIOS Image на платах Gigabyte
- Unleashing mode что это?
- Advanced Mode в биосе что это?
- Ошибка BIOS id Check Error при обновлении на плате Gigabyte
- Из-за чего может появляться ошибка?
- Соответствие BIOS вашей материнской плате
- Промежуточное обновление
- Использование утилиты @bios
- Прошивка программатором
- Как обновить BIOS Gigabyte через Q-Flash и Q-Flash Plus
- Как обновить BIOS Gigabyte через Q-Flash
- Как пользоваться Q-Flash Plus Gigabyte
- Айтишник
- Как отключить Security Boot Fail на Acer
- Ошибка: An operating system wasn’t found. Try disconnecting any drives that don’t contain operating system
- Как устранить A:Drive Error Press F1 to Resume
- 4 комментариев на “ Как обновить BIOS Gigabyte через Q-Flash и Q-Flash Plus ”
- Gigabyte gaming 7 z170 — «Invalid Bios Image»
- batman2million
- Dr Dev
- Calvin7
- batman2million
Invalid bios image gigabyte как исправить
Invalid bios image gigabyte как исправить
Ответы на вопросы в Железячнике Ru.Board
Искусcтво перешивки BIOS — статья на wiki.rom.by
Часть 1. Для тех, кому лень читать, а хочется побыстрей прошить и забыть.
Часть 2. Для тех, кому это нужно/интересно, либо было лень читать первую, а теперь надо восстановить «как было»…
Часть 3. Для тех, кому, всё же, нужно разобраться. Азы.
Часть 4. «Хабовые» флэши.
Часть 5. Собственный «перешивочный» комплекс.
Часть 6. Восстановление запаянных биосов БЕЗ их выпаивания.
А если бут-блок (это примерно 1 Кб кода) стёрт? Всегда было проще сунуть чип в программатор, благо на работе на полке лежал. А в Вашем случае с вероятностью близкой к 100% повреждён именно код bootblock BIOS, потому надёжнее переписать чип программатором, благо он заодно и проверит его на исправность. Были у меня случаи, и не раз когда случайно люди жгли чип ПЗУ.
Купите новую плату — в Вашем лично случае это единственный разумный выход. Скупой платит трижды.
Пробовал разные варианты буткеев, ниодин не срабатывает.
подскажите буткеи для ноутов самсунга (BIOS Phoenix)
Сомнительно, однако, что подойдет. Но попробуйте. Результат напишете.
Если говоря «рабоче-крестьянским языком»(я сам таков). Работа Boot Block на начальном уровне происходит в машинных кодах примерно так:
— извлекается из него адрес, команда для проца и т.д.
— заносится в регистры проца
— исполняется команда
А схемотехника материнок разная бывает, хотя фирма биоса одна и та же — Award. Т.е. нужной команды или нужного адреса может и не быть — уйдет не туда.
Источник
BIOS id Check Error у Gigabyte что значит?
Почему появляется BIOS id Check Error при обновлении Bios?
Invalid BIOS Image на платах Gigabyte
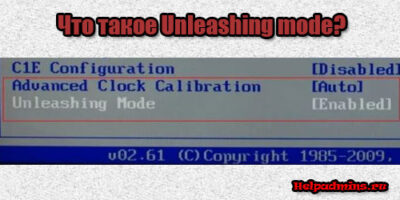
Unleashing mode что это?
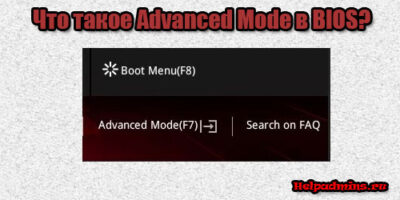
Advanced Mode в биосе что это?
Ошибка BIOS id Check Error при обновлении на плате Gigabyte
С данной ошибкой можно столкнуться в процессе обновления прошивки BIOS на материнских платах Gigabyte. Появляется она после выбора файла обновления в стандартной утилите Q-Flash. В данной статье мы рассмотрим возможные варианты устранения этой ошибки, а также способы ее обхода для удачного обновления BIOS.
Из-за чего может появляться ошибка?
BIOS id Check Error говорит о том, что проверка идентификатора BIOS не пройдена. Другими словами – этот BIOS, который Вы пытаетесь прошить, несовместим с материнской платой.
Итак, первое, что Вам стоит знать для успешного обновления BIOS через утилиту Q-Flash – флешка, на которую вы сбрасываете файл обновления, должна быть отформатирована в системе Fat32.
Далее проверяем все пункты, описанные ниже.
Соответствие BIOS вашей материнской плате
Как бы банально это не звучало, но достаточно часто пользователи неправильно определяют модель своей материнской платы и как следствие, скачивают неподходящий BIOS.
Поэтому внимательно сверьте модель своей мат.платы с той, для которой вы скачиваете BIOS. Соответствие должно быть полным! Вплоть до последней цифры и буквы!
Промежуточное обновление
Бывает так, что если между той версией BIOS, которая у Вас установлена, и той, которую вы пытаетесь установить, выходили промежуточные обновления, сперва следует установить их.
Разнообразие версий BIOS
К примеру, на Вашей плате стоит BIOS версии 1a, установить Вы пытаетесь версию 3c, а между ними были еще 1b, 2a, 2c и 3b, то при возникновении ошибки BIOS id Check Error перед установкой версии 3c попробуйте поставить 1b или 2a, а после успешной установки уже версию 3c.
Использование утилиты @bios
На сайте Gigabyte в разделе поддержки есть ссылка на скачивание утилиты @BIOS. Она позволяет легко и быстро обновить BIOS прямо из-под Windows.
Поэтому при возникновении проблем с обновлением BIOS утилитой Q-Flash можно попробовать @BIOS.
Прошивка программатором
Если ничего из вышеперечисленного не помогло и обновить BIOS все равно не получилось, то остается лишь один вариант – прошивка программатором. Но для этого потребуется снятие флешки BIOS с мат. платы, а также специальный программатор. Доверить это лучше сервисному центру.
Прошивка на программаторе
Лучшая благодарность автору — репост к себе на страничку:
Источник
Как обновить BIOS Gigabyte через Q-Flash и Q-Flash Plus
Актуальная версия BIOS позволяет материнской плате полноценно выполнять свои функции в ногу с нововведениями. Как правило, производители материнских плат рекомендуют обновление биос, Gigabyte же наоборот, просит не обновлять микрокод, если он работает без ошибок и справляется с запросами пользователя.
В статье я расскажу, как установить обновление BIOS загрузкой с флешки через Q-Flash и Q-Flash Plus. Отмечу, что прошить может любой уверенный пользователь, главное соблюдать пошаговую инструкцию.
- Как обновить BIOS Gigabyte через Q-Flash
- Как пользоваться Q-Flash Plus Gigabyte
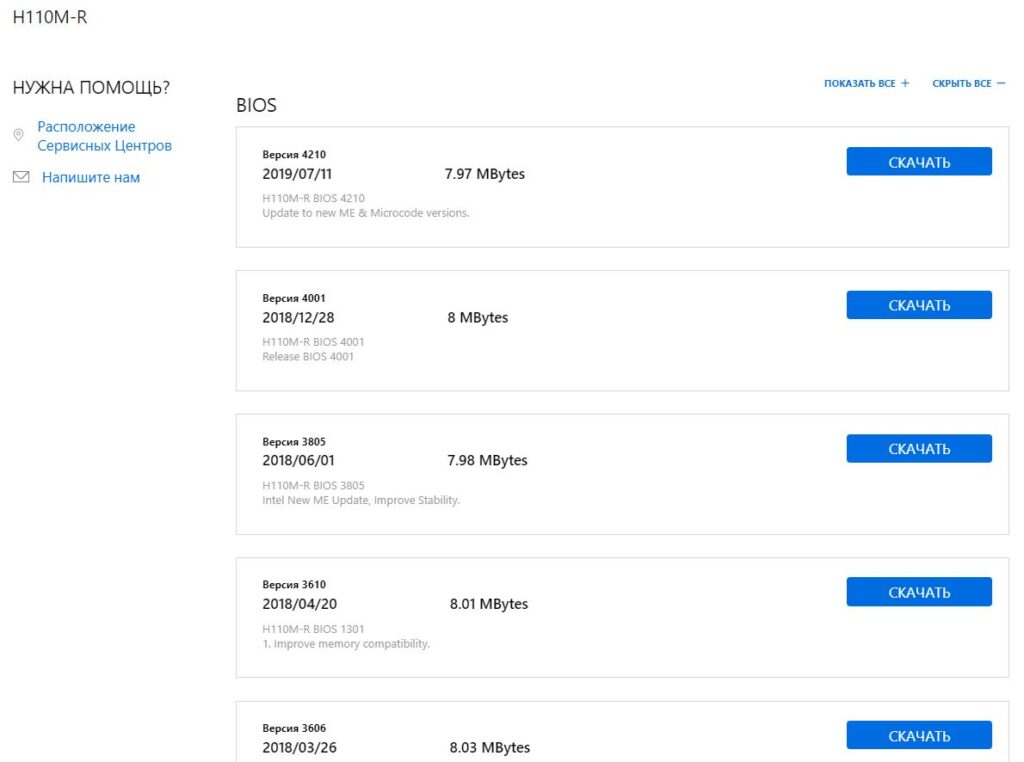
Как обновить BIOS Gigabyte через Q-Flash
Шаг 1. Для начала необходимо войти в биос, чтобы посмотреть версию вашей микропрограммы, запоминаем. Далее лучше выйти и выключить компьютер с помощью выключателя на блоке питании.
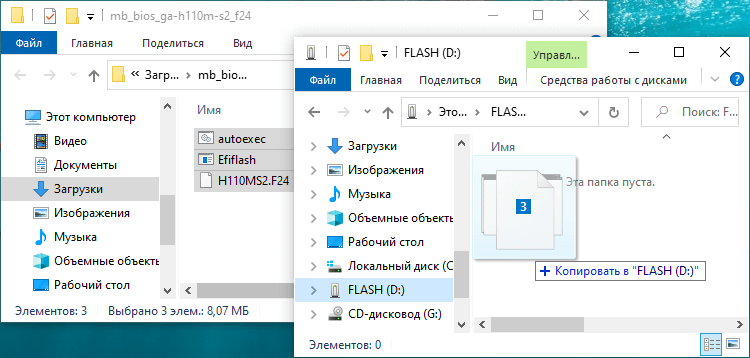
Шаг 2. Откройте левую боковую крышку и выпишите модель материнской платы в плоть до ревизии, например GA-H110M-S2.

Шаг 3. Откройте сайт производителя gigabyte.ru . Щелкните на значок поиска, укажите выписанную модель вашей материнки, нажмите Enter .

Шаг 4. Из представленного списка необходимо найти точную запрашиваемую модель, остальные похожие модели нас не интересуют. Кликните на ссылку Driver .

Шаг 5. В списке загрузок разверните категорию BIOS, выберите любую версию прошивки, рекомендую скачать последнюю (не скачивайте beta-версии). Напротив каждой версии биос в описании вы можете прочитать какие присутствуют изменения (дополнения).

Шаг 6. Распакуйте скачанный архив.

Скопируйте файлы на отформатированную флешку, на самом деле достаточно перенести только один файл с названием материнской платы и версией биос, в нашем примере это «GA-H110M-S2.F24». USB-носитель оставляем подключенным к ПК, на котором требуется прошить микрокод.
Шаг 7. Перезагрузите компьютер, войдите в BIOS, найдите утилиту Q-Flash.

Если ее там нет, перезагрузите ПК, при запуске нажмите несколько раз на клавиатуре клавишу End или F8 в зависимости от версии вашей микропрограммы, чтобы войти в Q-Flash.

Шаг 8. Здесь есть две опции:
- Uploads BIOS – обновление микрокода с USB-флешки.
- Save BIOS – сохранение существующей версии микрокода на USB-флешку.
Выберите первое – обновление BIOS для платы Gigabyte.
Шаг 9. Микропрограмма автоматически определит вашу новую версию микропрограммы на флешке, щелкните Enter .
Пойдет процесс обновления, ничего не нажимайте, компьютер перезагрузится, затем еще раз с полным выключением, дожидаемся окончания загрузки Windows.
Как пользоваться Q-Flash Plus Gigabyte
Ни так давно Gigabyte внедрил в дорогие материнские платы новую функцию Q-Flash Plus , что значительно упростило обновление BIOS. Это особенно актуально для тех, у кого мать в стоковой прошивке не определяет процессор. Отмечу, что обновить микропрограмму можно без вставленного в материнскую плату процессора и оперативной памяти.
Как пользоваться Q-Flash Plus покажу на примере материнской платы GIGABYTE Z690 AORUS MASTER. Проделываем все шаги с первого по пятый , что описаны в предыдущем подзаголовке.
Шаг 6. Распакуйте архив.
Шаг 7. Перенесите файл BIOS (например, Z690AORUSMASTER.F5) на отформатированный в FAT32 флэш-накопитель.
Шаг 8. Переименуйте ваш файл биос в GIGABYTE.bin. Во всплывающем окне с предупреждением, подтвердите Да . На моем примере, БЫЛО:


Шаг 9. Подключите кабели блока питания к разъему питания 12 В (подключите один, если их два – для процессора) и к основному источнику питания 20+4 pin.
Шаг 10. Отключите все подключенные к компьютеру устройства. Включите блок питание перед подключением USB-накопителя к порту Q-Flash Plus на задней панели.

Шаг 11. Нажмите кнопку Q-Flash Plus, и система автоматически найдет и сопоставит файл BIOS на USB-накопителе. QFLED и кнопка Q-Flash Plus на задней панели будут мигать во время процесса сопоставления и перепрограммирования BIOS. Подождите пока светодиоды перестанут мигать (это займет 6-8 минут), погашенные индикаторы означают, что перепрошивка BIOS завершена.
Не прерывайте процедуру установки, даже если вам покажется, что у вас просто черный экран, – ждите! Прерванная операция приведет ваше железо в «кирпич», чтобы реанимировать его, придется обращаться в сервисный центр для прошивки биос через программатор.
Как вы видите, обновить биос материнской платы gigabyte просто, и это под силу практически каждому пользователю.
Лучшее «Спасибо» — ваш репост
Айтишник
Вячеслав. Специалист по ремонту ноутбуков и компьютеров, настройке сетей и оргтехники, установке программного обеспечения и его наладке. Опыт работы в профессиональной сфере 9 лет.

Как отключить Security Boot Fail на Acer
Ошибка: An operating system wasn’t found. Try disconnecting any drives that don’t contain operating system

Как устранить A:Drive Error Press F1 to Resume
4 комментариев на “ Как обновить BIOS Gigabyte через Q-Flash и Q-Flash Plus ”
Пробовала реанимировать старый компьютер, требовалось обновление BIOS на материнской плате Gigabyte, пробовала подсунуть разные флешки с прошивками в FAT32, но ни в какую не работало. Поменяла файловую систему на просто FAT и всё получилось. Может кому поможет.
Спасибо за дополнение.
GA-81925XE-G пробывал обнавить из БИОС, а там загрузка только с дискеты…..
Да, такое можно встретить на старых материнских платах, но уже гораздо редко. Процесс в целом тот же, только записываете на флоппи-диск.
Источник
Gigabyte gaming 7 z170 — «Invalid Bios Image»
batman2million
Reputable


First off, I’ve been creeping around this forum for years and has helped me resolve countless issues I’ve had. So thank you for everything!
I just built my new rig and I have a lot of little issues that I believe can be fixed via a BIOs updated. I’ll try to keep them short. First things first:
Specs:
i7 6700k stock
Gigabyte gaming 7 z170 (rev 1.0) (Firmware F3)
G.SKILL Ripjaws V Series 16GB (2 x 8GB) 288-Pin DDR4 SDRAM DDR4 3200
SAMSUNG 950 PRO SERIES SSD PCIE M.2 512MB (Primary — Win 10 installed)
GTX 780 Stock
750W PSU — Corsair
Windows 10 Pro
1. My boot time is way too slow. The gigabyte screen flashes twice, then a blinking cursor shows up taking all together a good 25-30 seconds before Win 10 boots up. I have the OS installed in PCIE SSD.
2. Samsung magician is giving me read at 1900 mbs and write at 900mbs for the PCIe SSD. Is that correct? I’d assume it should be faster. And under «OS Optimization» is tell me my OS cannot be optimized.
3. I assumed I can fixed the problems by updating the BIOs. I tried to update it via Q-flash and got «invalid BIOs Image» via USB. I also tried with @BIOs. I did try to do it in increments, from F3-F4, but it wouldn’t work. @BIOs would just keep flashing «writing» «erasing» at 0% and eventually fail.
Got scared and didn’t do it again. I’ve formatted it to FAT32 and put all three files on the root of the drive.
Let me know if there’s any other information you guys might need.
Dr Dev
Reputable

1. My boot time is way too slow. The gigabyte screen flashes twice, then a blinking cursor shows up taking all together a good 25-30 seconds before Win 10 boots up. I have the OS installed in PCIE SSD.
Calvin7
Titan


Create a Bootable DOS USB Drive
http://bootableusb.net/create-bootable-dos-usb-drive/
Try it and see if you can boot into DOS.
Flashing the BIOS with EFIflash:
Download the BIOS File for your motherboard and save it to your desktop so that you can find it easily. Double click on the 7Zip file (it is self extracting) and it will put the 3 download files onto your desktop for you. You only need the EFI Flash Exe file and the BIOS File, the Autoexec file can be discarded. Make a note of the BIOS File name as you will need this information later in the process and if you don’t get this part correctly you will not be able to update the BIOS.
Create the Bootable Pendrive using the Rufus program.
Copy the Efiflash exe and BIOS files onto the USB Pendrive
Reboot the PC and press F12 to go to the BOOT Menu.
Select the USB Pendrive and press enter, this will take you into the DOS environment.
At the C:/ prompt type: Efiflash and press enter. This will start the Efiflash tool.
At the C:/ prompt type: efiflash xxxxxx.xx (replace the x’s with the name of your BIOS File that you noted earlier) IMPORTANT: Make sure that you insert a space between the words efiflash and the BIOS name. Also make sure you enter the full point (.) before the BIOS version number. Press enter.
The BIOS Flashing process is now done and there is no further input required. The first stage you will see that the BIOS is being erased. The 2nd stage the BIOS is written and the 3rd stage the BIOS is verified. DO NOT power down or reset the PC whilst this process is happening. Once the BIOS update has been verified the PC will automatically go into a shutdown/restart/shutdown/restart sequence.
batman2million
Reputable
Create a Bootable DOS USB Drive
http://bootableusb.net/create-bootable-dos-usb-drive/
Try it and see if you can boot into DOS.
Flashing the BIOS with EFIflash:
Download the BIOS File for your motherboard and save it to your desktop so that you can find it easily. Double click on the 7Zip file (it is self extracting) and it will put the 3 download files onto your desktop for you. You only need the EFI Flash Exe file and the BIOS File, the Autoexec file can be discarded. Make a note of the BIOS File name as you will need this information later in the process and if you don’t get this part correctly you will not be able to update the BIOS.
Create the Bootable Pendrive using the Rufus program.
Copy the Efiflash exe and BIOS files onto the USB Pendrive
Reboot the PC and press F12 to go to the BOOT Menu.
Select the USB Pendrive and press enter, this will take you into the DOS environment.
At the C:/ prompt type: Efiflash and press enter. This will start the Efiflash tool.
At the C:/ prompt type: efiflash xxxxxx.xx (replace the x’s with the name of your BIOS File that you noted earlier) IMPORTANT: Make sure that you insert a space between the words efiflash and the BIOS name. Also make sure you enter the full point (.) before the BIOS version number. Press enter.
The BIOS Flashing process is now done and there is no further input required. The first stage you will see that the BIOS is being erased. The 2nd stage the BIOS is written and the 3rd stage the BIOS is verified. DO NOT power down or reset the PC whilst this process is happening. Once the BIOS update has been verified the PC will automatically go into a shutdown/restart/shutdown/restart sequence.
I tired that and it got stuck at «loading bios image» or something like that. I waited for 15 minutes and nothing happened.
Источник
What can be more frustrating than to be slapped with an error code while upgrading the BIOS? I know your pain as I was in your shoes once.
As a lifelong user of Gigabyte motherboards for multiple years on different platforms, I know how to fix the error more elegantly and effortlessly.
In this article, I’m going to help you with only two questions, why this error occurs and how to solve it.
Sounds fair? Let’s get to the first question. Why does Gigabyte BIOS Id check error happen?
The primary reason behind this blunder is installing the wrong BIOS version. Other than that, a corrupted BIOS file that you have downloaded, a bad internet connection, and a non-bootable drive containing media files also can be responsible for BIOS error.
So, which one is causing you all the trouble? Continue reading to find out.
Check out our separate post: What is SVM mode in BIOS
What Causes BIOS ID Error?
The BIOS is the prime source of your operating system. So, any improper implementation of settings would likely fail the BIOS. Connectivity issues or downloading a corrupted update may also cause BIOS errors. I have shortlisted some common reasons behind the id check error in this part. Determine which one is causing you the hassle and follow the measures accordingly.
Here are the possible reasons behind BIOS Id error:
- Corrupted BIOS version: In order to upgrade BIOS, you need to download the latest available version from the internet. If that downloaded variant is corrupted, then there is a possibility that your screen will show a BIOS id error.
- Terrible Internet Connection; Another reason behind the id check error can be an awful internet connection. Imagine downloading an update with several disconnectivity. The fact that it kills your time and some parts of the downloaded file can get corrupted easily. This will undoubtedly lead to a BIOS error.
- Installing Existing Update: Have you ever tried updating the BIOS version before this time? If yes, then there is a possibility that you have already installed the latest version and you are trying to do that again. In that case, your computer might notify this as an Id check error.
- Mismatched BIOS Version: Are you sure that the edition you are downloading does match exactly with your motherboard? Most of the time, downloading the mismatched version of BIOS creates this issue. You can consider this as the main reason behind the BIOS id check error.
- Failed Devices: It is not so common a reason but still possible that failed USB drivers, broken Hard drives can lead you to this horrific problem. If you have recently installed new hardware on your computer and after that, the error appears, then it’s because of the recent hardware changes.
These are the most possible causes behind your computer’s ID check error, and finding the exact one will help you to solve the issue.
Don’t you know how to solve the error? No worries, I’m here to guide you. Just read the following chapters, and you are going to solve the issue effortlessly.
Follow our guide to Fix keyboard not working in BIOS
How to Solve BIOS ID Check Error
There are plenty of fixes available throughout the web. Most of them are temporary solutions. But, in this document, I’ll be explaining the advanced procedures that will permanently disappear the BIOS error.
This might be a little tricky, but as I am here to help, I’ll explain it in an adequate method.
So, without bushing around, let’s make your system workable.
Go through our epic guide: Is SSD Compatible with All Motherboards
Here are the steps to fix the BIOS ID error:
First Method: Reset BIOS to Default
Resetting BIOS to default settings helps the system to get over compatibility issues. BIOS returns to the last saved configuration if you complete the action, and most of the error messages get solved automatically.
You can reset BIOS either by getting into the boot menu or reinstalling the CMOS battery. I’m explaining both so that you can choose whichever seems easy.
You may also like to read: Will motherboard boot without CMOS battery
Reinstall CMOS: You can reinstall CMOS by following these steps:
- Shut down the computer and remove power cables.
- Locate a small, silver-colored battery on your motherboard.
- Remove the battery for 5-10 minutes and put it back on.
- Close the computer casing.
Your BIOS settings will be default if you follow these steps. Or you can do it manually by getting into the boot menu.
Quickly check out our epic guide on how to fix CPU fan not detected in BIOS
Boot menu settings: You can perform the following steps>
- Press F2 / Delete while booting up the pc to enter the boot menu.
- Press F9 to set the BIOS settings to default.
- Go to the last tab and select Save & Exit.
Restart the computer to complete the process.
These are the proper ways to reset BIOS settings to default. Once you complete either one of these processes, check if the BIOS id error has been resolved or not.
If not, apply the next method precisely as I explain.
You may check out the easiest way to gateway BIOS updates
Second Method: Update BIOS Properly
The most probable reason behind the BIOS id error is updating a version that is not particularly made for your motherboard. That happens when you download without being sure about the BIOS model.
In this method, I am going to teach you how you can get proper BIOS information and install it in a more efficient way.
Here’s the method to check BIOS version:
- Type cmd on your windows search box.
- Right click on the result and select Run as administrator from the list.
- Type this command wmic bios get smbiosbiosversion and press Enter.
The command prompt will show the current BIOS version of your motherboard. Download the latest version from the motherboard’s manufacturer website and follow the installation process.
NOTE: Before installing, remember that, while flashing the BIOS, if the power goes away, you will face more trouble than you are in right now. It can even fail your motherboard. So, try to get an alternative power source like UPS and then proceed.
Also, check our exclusive tutorial on BIOS not detecting USB
How to Install the Files
At this point, I can assume you’ve downloaded the exact BIOS file, and you’re ready to move further. Now you only need to install the files.
Here’s how you flash the BIOS properly:
- Insert an empty USB flash drive into your computer.
- Extract the downloaded files onto the flash drive. Note down the name of the update file exactly as it is named.
- Restart the computer after copying. And press F2 to enter the boot menu.
- Change the Primary Boot Device to the attached USB drive.
- Press F10 to save changes and exit to reboot the computer.
- Wait for a moment for the Command Prompt to appear on display.
- Type the name of BIOS files that you took a note of.
- Press Enter to begin the process and press the Y key to confirm the process.
That’s a lot to do, right? Trust me; this is by far the simplest yet workable solution you can find. Don’t hesitate to perform the action. Just do it and see the result.
Pro tip: Don’t install the update if there’s a b on the file name. Like “ U1b.exe,” That b means beta version. They are most likely bugged and problematic to install. Bonus tip: Before extracting the files to the USB, make sure it is formatted as FAT32. The other formats prevent updating efficiently. That problem happened to me.
Check out our separate post on how to Fix motherboard HDMI no signal
Conclusion
The very last thing I would like to add is you must be careful with the downloading process. I have said earlier and I am repeating again, Match the BIOS model and the downloaded version character by character.
Did that already? Well, do it for the last time and proceed to install. In this manner, the solution will work properly.
If you are at this point of the article and read every word I have put there, I can ensure you that you will be able to solve the BIOS id error all by yourself, and you won’t feel a slight complication doing that.
Then again, If you face any difficulties solving the issue, feel free to comment below, and I’ll solve them as soon as possible.
-
#1
Last edited by a moderator: Aug 10, 2022

-
- Oct 7, 2009
-
- 47,549
-
- 3,394
-
- 143,940
- 8,527
-
#2
Are you sure you have the right motherboard? You should be seeing that error only when you use the wrong BIOS version for your motherboard(meaning the BIOS is meant for another board). Can you double check your board’s make and model using CPU-Z?
-
#4
- Advertising
- Cookies Policies
- Privacy
- Term & Conditions
- Topics
-
#1
Last edited by a moderator: Aug 10, 2022
-
- Oct 7, 2009
-
- 47,549
-
- 3,394
-
- 143,940
- 8,527
-
#2
Are you sure you have the right motherboard? You should be seeing that error only when you use the wrong BIOS version for your motherboard(meaning the BIOS is meant for another board). Can you double check your board’s make and model using CPU-Z?
-
#4
- Advertising
- Cookies Policies
- Privacy
- Term & Conditions
- Topics
Под DOS
Создайте загрузочную флешку с помощью программы Rufus
Загрузите файл BIOS тот что выслал вам для вашей материнской платы и сохраните его на рабочем столе в архиве три файла: autoexec.bat, Efiflash.exe, 970ADS3P.F2j
нужен файл EFI Flash Exe и файл BIOS 970ADS3P.F2j, файл Autoexec удалить.
Запишите имена файлов на бумагу Efiflash.exe, 970ADS3P.F2j, эта информация пригодится в DOS.
Скопируйте файлы Efiflash exe и 970ADS3P.F2j на USB корень флешки.
Перезагрузите компьютер и нажмите F12, чтобы перейти в меню BOOT.
Выберите загрузку с USB и нажмите Enter, это перенесет вас в среду DOS.
В командной строке перейди в корень флешки и введите Efiflash и нажмите Enter. Это запустит инструмент Efiflash.
В приглашении выберете Efiflash и 970ADS3P.F2j , который вы записали на бумаге.
Убедитесь, что нажали пробел между словами efiflash и 970ADS3P.F2j Также убедитесь, что вы вводите точку .F2j Перед номером версии BIOS. Нажми Enter.
На первом этапе вы увидите:
1) Что BIOS стирается
2) BIOS Записывается
3) BIOS проверяется
НЕ выключайте и не перезагружайте ПК во время этого процесса компьютер сам автоматически перейдет в последовательность выключения / перезагрузки / выключения / перезагрузки. Не трогай ни чего это нормально.
После завершения можете войти в BIOS и внести любые изменения.