Модераторы: Trinity admin`s, Free-lance moderator`s
-
Kostom
- Junior member
- Сообщения: 13
- Зарегистрирован: 21 мар 2016, 10:38
BMC Fail при загрузке сервера
Здравствуйте
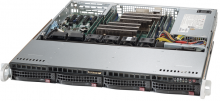
Подскажите пожалуйста. Имеется сервер ТРИНИТИ. Около года, при загрузке сервера, наблюдаю следующее:
IPMI card is first powered
System waits for its initialization (сервер на этом этапе, задумывается минут на 5)
После наблюдаю следующее:
BMC Fail
Press F1 to Resume
После нажатия F1 загружаюсь в ОС. Недавно была установлена ОС Windows Server 2012 R2. В биосе сервера, в разделе IPMI Configuration, отображается следующее:
IPMI firmware Revision 0.02
Status of BMC Not Working
P.S. Сервер в данный момент не используется… Сетевые кабели к адаптерам не подключены…
-
Kostom
- Junior member
- Сообщения: 13
- Зарегистрирован: 21 мар 2016, 10:38
Re: BMC Fail при загрузке сервера
Сообщение
Kostom » 21 мар 2016, 11:35
А подскажите пожалуйста…
Если «всё оставить как есть», сильно ли это повлияет на работу системы в целом?
Я так понимаю, BMC нужен только для удаленного доступа? Правильно?
P.S. Не совсем по теме, раньше на ОС Windows Server 2003, можно было проверить параметры сервера через SUPER DOCTOR. В Windows Server 2012 R2 данная программа не устанавливается, можно найти аналог, или обновленную версию?
Заранее спасибо
-
Kostom
- Junior member
- Сообщения: 13
- Зарегистрирован: 21 мар 2016, 10:38
Re: BMC Fail при загрузке сервера
Сообщение
Kostom » 21 мар 2016, 15:25
Хотя, я ошибался. BMC это далеко не только для удаленного доступа…
Без него не получится смотреть информацию о сервере (температура, энергия и т.д.)
Подсказали, что если BMC Not Working. То это уже намек на то, что материнская плата не исправна. Посоветовали, не делать этот сервер основным…
-
Kostom
- Junior member
- Сообщения: 13
- Зарегистрирован: 21 мар 2016, 10:38
Re: BMC Fail при загрузке сервера
Сообщение
Kostom » 22 мар 2016, 10:49
Уважаемая тех-поддержка, что посоветуете?
Если ОС на данном сервере успешно работает (Windows Server 2012 R2), только одно нарекание, в диспетчере устройств, в ветке системные устройства/Устройства совместимые с Microsoft Generic IPMI (восклицательный знак). Запуск устройства невозможен, указано несуществующее устройство…
Неужели из-за этого лучше не пользоваться сервером? IPMI не влияет же на работу системы в целом…
-
insector
- Сотрудник Тринити

- Сообщения: 9
- Зарегистрирован: 05 дек 2013, 12:27
- Откуда: Екатеринбург
Re: BMC Fail при загрузке сервера
Сообщение
insector » 22 мар 2016, 11:04
Стандартный алгоритм решения проблем с сервером: 1. обновить firmware, 2. если не помогло — обратиться в техподдерку. Соответственно этого пути и предлагаю придерживаться. По поводу SUPER DOCTOR: выкачал только что http://www.supermicro.com/solutions/SMS_SD5.cfm. В файле ReleaseNote.txt написано, что поддерживается Windows 2012 Server R2. По поводу обращения в техподдержку: предлагаю обратиться не через форум, а официально, через менеджера, который с вами работает по этому серверу. И да, если есть какие-то проблемы с сервером, лучше решать их сразу, а не ждать, когда они неожиданно начнут расти как снежный ком.
-
Kostom
- Junior member
- Сообщения: 13
- Зарегистрирован: 21 мар 2016, 10:38
Re: BMC Fail при загрузке сервера
Сообщение
Kostom » 22 мар 2016, 11:28
insector писал(а):Стандартный алгоритм решения проблем с сервером: 1. обновить firmware, 2. если не помогло — обратиться в техподдерку. Соответственно этого пути и предлагаю придерживаться. По поводу SUPER DOCTOR: выкачал только что http://www.supermicro.com/solutions/SMS_SD5.cfm. В файле ReleaseNote.txt написано, что поддерживается Windows 2012 Server R2. По поводу обращения в техподдержку: предлагаю обратиться не через форум, а официально, через менеджера, который с вами работает по этому серверу. И да, если есть какие-то проблемы с сервером, лучше решать их сразу, а не ждать, когда они неожиданно начнут расти как снежный ком.
Я уже обратился «официально» в техподдержку. По поводу прошивки (обновить firmware) мне сказали, что это невозможно без специального программатора.
-
Kostom
- Junior member
- Сообщения: 13
- Зарегистрирован: 21 мар 2016, 10:38
Re: BMC Fail при загрузке сервера
Сообщение
Kostom » 22 мар 2016, 11:41
Я каждый раз когда перезагружал сервер, у меня питание было подключено к серверу.
Сейчас я выключил сервер. Отключил питание (отключил провод от ИБП), после чего запустил сервер.
В биосе теперь STATUS of BMC Working. Надпись BMC fail больше не появилась во время загрузки сервера…
Получается помогла перезагрузка сервера с полным выключением питания?
-

Tert
- Advanced member
- Сообщения: 4233
- Зарегистрирован: 19 янв 2003, 08:09
- Откуда: Москва
- Контактная информация:
Re: BMC Fail при загрузке сервера
Сообщение
Tert » 23 мар 2016, 14:45
Kostom
IPMI начинает работать, как только вы подключаете блоки питания сервера к сети. И работает постоянно, даже если сам сервер выключен.
Отключив и включив питание от сервера, вы перезагрузили IPMI.
Вернуться в «Серверы — Решение проблем»
Перейти
- Серверы
- ↳ Серверы — Конфигурирование
- ↳ Конфигурации сервера для 1С
- ↳ Серверы — Решение проблем
- ↳ Серверы — ПО, Unix подобные системы
- ↳ Серверы — ПО, Windows система, приложения.
- ↳ Серверы — ПО, Базы Данных и их использование
- ↳ Серверы — FAQ
- Дисковые массивы, RAID, SCSI, SAS, SATA, FC
- ↳ Массивы — RAID технологии.
- ↳ Массивы — Технические вопросы, решение проблем.
- ↳ Массивы — FAQ
- Майнинг, плоттинг, фарминг (Добыча криптовалют)
- ↳ Proof Of Work
- ↳ Proof Of Space
- Кластеры — вычислительные и отказоустойчивые ( SMP, vSMP, NUMA, GRID , NAS, SAN)
- ↳ Кластеры, Аппаратная часть
- ↳ Deep Learning и AI
- ↳ Кластеры, Программное обеспечение
- ↳ Кластеры, параллельные файловые системы
- Медиа технологии, и цифровое ТВ, IPTV, DVB
- ↳ Станции видеомонтажа, графические системы, рендеринг.
- ↳ Видеонаблюдение
- ↳ Компоненты Digital TV решений
- ↳ Студийные системы, производство ТВ, Кино и рекламы
- Инфраструктурное ПО и его лицензирование
- ↳ Виртуализация
- ↳ Облачные технологии
- ↳ Резервное копирования / Защита / Сохранение данных
- Сетевые решения
- ↳ Сети — Вопросы конфигурирования сети
- ↳ Сети — Технические вопросы, решение проблем
- Общие вопросы
- ↳ Обсуждение общих вопросов
- ↳ Приколы нашего IT городка
- ↳ Регистрация на форуме
The browser version you are using is not recommended for this site.
Please consider upgrading to the latest version of your browser by clicking one of the following links.
- Safari
- Chrome
- Edge
- Firefox
Article ID: 000034800
Content Type: Error Messages
Last Reviewed: 07/09/2021
«Error! BMC Interface Error…Microcontroller not found in system» Message while Attempting to Update the BIOS/Firmware
Environment
Intel server boards
Troubleshooting guide towards dealing with this error message
When running the BIOS/Firmware update, the following message causes a pause and prompts for user intervention:
«Loading IPMI driver…
Error! BMC Interface…Microcontroller not found in system.
An error occurred. Would you like to save the errors to a file? [Y, N, ESC]»
Proceed as follows:
- Clear the CMOS.
- Clear the event log and load the BIOS default settings as follows:
- Reboot the server into the BIOS.
- Once there, press <F9> to restore BIOS default settings.
- Reset any customized BIOS settings.
- Enable the Clear System Event Log option, which is located in the Server Management tab of the BIOS Setup utility.
- Finally, press <F10> to save the new settings and reboot the system.
- Attempt to run the BIOS/firmware update once more.
Related articles
Contact Support
Related Products
This article applies to 1 products
Intel® Server System R2312GZ4GC4
- Summary
- Description
- Resolution
1
Need more help?
Contact support
Give Feedback
Did you find this information useful?
YES
NO
Characters remaining: 500
We appreciate all feedback, but cannot reply or give product support. Please do not enter contact information. If you require a response, contact support.
Thank you
Disclaimer
All postings and use of the content on this site are subject to Intel.com Terms of Use.
Hello all,
Well, I have worn the letters off of my keyboard, Google searches just default to terms in this post heading when I try to search anything, and I have simply exhausted all my energy in trying to remedy my issue(s), server issues that is ?. I have been chasing this for a little over three weeks, have read everything I can get my hands on, tried every suggestion I could find in posts everywhere, all to no avail.
The long intro is to show that I have tried everything I can think of to resolve the situation before posting here. I am posting in this section as I see quite a few folks have the same TAM boxes and MB’s. Also, I have tried now three separate MB’s and IPMI cards, with the same non-functional end result. I have dug deep into the BIOS settings, I have read manuals from front to back on these devices, nothing. (Worse, my vacation is over Monday! ?
So, here are the issues… (remember, three different MB’s and three different IPMI cards!)
One… NO fans; none of the fans spin at all, period. (they do “jump” at power on)
Two… (In BIOS): Status Of BMC = Not Working
POST msg: BMC Interface = No Interface Found
From IPMICFG Utility: BMC Interface Not In Idle Or Error State
(IPMI card(s) is lit up!!!)
Hardware:
n Dual 900W (yea, the loud ones) PS; jumped and tested all outputs of ATX connector, four & eight pin CPU connectors. All stable outputs respective to their required voltages.
n H8DME-2 (rev 2.01A) AMI BIOS (rev 3.5) Dual AMD quad cores 32Gb RAM (at some point, hopefully, will be running unRAID)
n IPMI card: SuperMicro SIM1U+ (has the dedicated LAN option) I have no idea what Firmware as I cannot get in the thing(s) (remember, tried three of them!)
Attempts to troubleshoot:
FANS: measured PS outputs as indicated, put one fan in a time (checking for bad fan), measured output at fan headers (3-pin) = zero output — No joy at all
H8DME-2 MB BIOS: Updated to most recent, went through every single line item using manual(s) as a reference/suggestions – No fans ~ No BMC (IPMI) – Nothing helped
BMC/IPMI: Cannot access board(s) – BIOS does not recognize any of them “Staus Of BMC = Not Found”
I have tried using the “IPMICFG.EXE” DOS utility and it returns: “BMC Interface Not In Idle State Or Error State” (I have tried -r, -fde arguments, neither of which will work)
Tried to “Flash” the IPMI card BIOS, no joy with that either; it simply errors out
Cold booted I don’t know how many times…
Cold booted without IPMI card, still no fans
Replaced IPMI card and cold booted: States it is installing the IPMI software and it will reboot when finished, which it does, but then hangs in POST! Can reset but still no IPMI after POST (BMC Interface: None Found)
Shorted JP5 “Reset” pins to see if that would restart/reset the KIRA processor on the IPMI card – No joy with that either!
“Heartbeat” LED: plug in power supplies, wait ~ one minute, get “heartbeat” and solid “status” LED’s.
Power up/boot: “heartbeat” goes dark, “status” stays lit (same on all three cards)
LAN connections: Understand there is Dedicated|Shared|Failover – have tried every variation; with USB connected/not connected, LAN on both LAN 1 and Dedicated IPMI LAN, Just LAN1, Just Dedicated IPMI LAN…
There is probably more I have tried that I can’t think of at the moment, but this is getting long. ANY feedback will be appreciated. Plus, hopefully, this post may prove beneficial to someone else that may have the same issue(s) in the future. Given that all of this issue is repeatable, I suspect the BIOS(s) of the MB and IPMI card. It has been my experience that when something fails at exactly the same place each time, it is usually software related. Lots of vague posts/documentation indicating these BIOS’s are finicky, but nothing offering exact direction on how to get them to work; anyone good at Voodoo?
Thanks in advance for putting up with my rambling and any assistance that may come of this!
BTW, I have a NON-IPMI SuperMicro unRAID system that is just fat, dumb, and happily working away with 20 Tb of storage! Works like a champ! So, I know this is totally un-unRAID related, but short of SM support, I figured this community would be my best and last resource! TIA everyone!
Problem
Troubleshooting BMC issues on IBM System x and BladeCenter servers
Resolving The Problem
- To begin troubleshooting the Baseboard Management Controller (BMC), check the following top issues. If your issue is listed, select the link, otherwise proceed to step 2.

BMC error log overview BMC error log access BMC flash update BMC Intelligent Platform Management Interface (IPMI) data loss BMC log shows voltage or temperature errors BMC log shows Non Maskable Interrupt (NMI) BMC network does not work when AC power first applied BMC busy and not responding to initial requests from MM Error «Dr Watson has created an error log for the following program, SMBridge.exe» Errors running the command line interface through the serial port Ethernet connections to the BMC fail - Check the operator information panel on the front of the server. If the information LED is lit, it indicates that information about a suboptimal condition in the server is available in the BMC log or in the system-error log. Proceed to step 3.

Note: If the system-error LED is lit, refer to your system’s Hardware Maintenance Manual (HMM) for light path diagnostics.
- Access the BMC log.
- Check the system-error log and the BMC log for messages indicating the cause of the error. Take the action indicated before replacing a CRU or FRU. When troubleshooting an error, make sure to clear the BMC log so that you can more easily find current errors.
- If these steps have not solved your problem, refer to your system’s Hardware Maintenance Manual (HMM),
or refer to «Need more help?»
|
Error log overview |
|---|
Newer IBM eServer xSeries systems (e.g. xSeries 236, 306, 346, 366) have a BMC log which is the default «service processor» if the optional RSA2 is not installed. The BMC log and the system-error log contain messages that were generated during POST and all system status messages from the service processor. The BMC log contains a large number of information, error, and warning messages. The POST error log contains the three most recent error codes and messages that were generated during POST.
Notes:
- The BMC log is limited in size and is designed so that when the log is full, new entries will not overwrite existing entries; therefore, you must periodically clear the BMC log from the Configuration/Setup Utility program (the menu choices are described in the User’s Guide).
- When troubleshooting an error, make sure to clear the BMC log so that you can find current errors more easily.
- Entries written to the BMC log early in the POST procedure will show an incorrect date as the default timestamp; however, the date and time will correct itself as POST continues.
- Each BMC log entry appears on its own page; to display all the data for an entry, use the up arrow and down arrow or the Page Up and Page Down keys. To move from one entry to the next, move the cursor to the Get Next Entry or Get Previous Entry line; then, press Enter.
- The log indicates an Assertion Event when an event has occurred. It indicates a Deassertion Event when the event is no longer occurring.
- Some of the error codes and messages in the BMC log are abbreviated.
- Viewing the BMC log through the web interface of the optional Remote Supervisor Adapter II SlimLine allows all messages to be translated.
Example BMC log entry:

|
Accessing the BMC log |
|---|
You can view the contents of the POST error log, the BMC log, and the system-error log from the Configuration/Setup Utility program. You can also view the contents of the BMC log from the diagnostic programs. The BMC log contains the same information whether it is viewed from the Configuration/Setup Utility program or from the diagnostic programs.
Note: When troubleshooting PCI-X slots, note that the error logs report the PCI-X buses numerically. The numerical assignments vary depending on the configuration. You can check the assignments by running the Configuration/Setup Utility program.
|
Viewing error logs from the Configuration/Setup Utility program |
|---|
To view the error logs from the Configuration/Setup Utility:
- Turn on the server.
- When the prompt «Press F1 for Configuration/Setup» appears, press F1. If you have set both a power-on password and an administrator password, you must type the administrator password to view the error logs.
- Use one of the following procedures:
- To view the POST error log, select Error Logs, and then select POST Error Log.
- To view the BMC log, select Advanced Settings, select Baseboard Management Controller (BMC) settings, and then select BMC System Event Log.
- To view the system-error log, select Event/Error Logs, and then select System Event/Error Log
Note: This option is only available if an optional Remote Supervisor Adapter II SlimLine is installed.
|
Viewing the BMC log from the diagnostic programs |
|---|
To view the BMC log from diagnostics:
- If the server is running, turn off the server and all attached devices.
- Turn on all attached devices; then, turn on the server.
- When the prompt «F2 for Diagnostics» appears, press F2.
Note: If you have set both a power-on password and an administrator password, you must type the administrator password to run the diagnostic programs.
- From the top of the screen, select Hardware Info.
- From the list, select BMC Log.
|
Need more help? |
|---|
Please select one of the the following options for further assistance:
Document Location
Worldwide
Operating System
BladeCenter:Operating system independent / None
System x:Operating system independent / None
[{«Type»:»HW»,»Business Unit»:{«code»:»BU016″,»label»:»Multiple Vendor Support»},»Product»:{«code»:»HW19V»,»label»:»BladeCenter->BladeCenter HS20″},»Platform»:[{«code»:»PF025″,»label»:»Platform Independent»}],»Line of Business»:{«code»:»»,»label»:»»}},{«Type»:»HW»,»Business Unit»:{«code»:»BU054″,»label»:»Systems w/TPS»},»Product»:{«code»:»HW20D»,»label»:»BladeCenter JS20 Blade»},»Platform»:[{«code»:»PF025″,»label»:»Platform Independent»}],»Line of Business»:{«code»:»»,»label»:»»}},{«Type»:»HW»,»Business Unit»:{«code»:»BU016″,»label»:»Multiple Vendor Support»},»Product»:{«code»:»HW20G»,»label»:»BladeCenter->BladeCenter HS40″},»Platform»:[{«code»:»PF025″,»label»:»Platform Independent»}],»Line of Business»:{«code»:»»,»label»:»»}},{«Type»:»HW»,»Business Unit»:{«code»:»BU016″,»label»:»Multiple Vendor Support»},»Product»:{«code»:»HW20M»,»label»:»BladeCenter->BladeCenter T Chassis»},»Platform»:[{«code»:»PF025″,»label»:»Platform Independent»}],»Line of Business»:{«code»:»»,»label»:»»}},{«Type»:»HW»,»Business Unit»:{«code»:»BU016″,»label»:»Multiple Vendor Support»},»Product»:{«code»:»HW21G»,»label»:»BladeCenter->BladeCenter LS20″},»Platform»:[{«code»:»PF025″,»label»:»Platform Independent»}],»Line of Business»:{«code»:»»,»label»:»»}},{«Type»:»HW»,»Business Unit»:{«code»:»BU054″,»label»:»Systems w/TPS»},»Product»:{«code»:»HW21X»,»label»:»BladeCenter JS21 Blade»},»Platform»:[{«code»:»PF025″,»label»:»Platform Independent»}],»Line of Business»:{«code»:»»,»label»:»»}},{«Type»:»HW»,»Business Unit»:{«code»:»BU054″,»label»:»Systems w/TPS»},»Product»:{«code»:»HW21Y»,»label»:»BladeCenter H Chassis»},»Platform»:[{«code»:»PF025″,»label»:»Platform Independent»}],»Line of Business»:{«code»:»»,»label»:»»}},{«Type»:»HW»,»Business Unit»:{«code»:»BU016″,»label»:»Multiple Vendor Support»},»Product»:{«code»:»HW22E»,»label»:»BladeCenter->BladeCenter HS21″},»Platform»:[{«code»:»PF025″,»label»:»Platform Independent»}],»Line of Business»:{«code»:»»,»label»:»»}},{«Type»:»HW»,»Business Unit»:{«code»:»BU016″,»label»:»Multiple Vendor Support»},»Product»:{«code»:»HW22F»,»label»:»BladeCenter->BladeCenter LS21″},»Platform»:[{«code»:»PF025″,»label»:»Platform Independent»}],»Line of Business»:{«code»:»»,»label»:»»}},{«Type»:»HW»,»Business Unit»:{«code»:»BU016″,»label»:»Multiple Vendor Support»},»Product»:{«code»:»HW22G»,»label»:»BladeCenter->BladeCenter LS41″},»Platform»:[{«code»:»PF025″,»label»:»Platform Independent»}],»Line of Business»:{«code»:»»,»label»:»»}},{«Type»:»HW»,»Business Unit»:{«code»:»BU054″,»label»:»Systems w/TPS»},»Product»:{«code»:»HW22H»,»label»:»BladeCenter QS20 Blade»},»Platform»:[{«code»:»PF025″,»label»:»Platform Independent»}],»Line of Business»:{«code»:»»,»label»:»»}},{«Type»:»HW»,»Business Unit»:{«code»:»BU016″,»label»:»Multiple Vendor Support»},»Product»:{«code»:»HW22I»,»label»:»BladeCenter->BladeCenter HS21 XM»},»Platform»:[{«code»:»PF025″,»label»:»Platform Independent»}],»Line of Business»:{«code»:»»,»label»:»»}},{«Type»:»HW»,»Business Unit»:{«code»:»BU016″,»label»:»Multiple Vendor Support»},»Product»:{«code»:»HW22Q»,»label»:»BladeCenter->BladeCenter HT Chassis»},»Platform»:[{«code»:»PF025″,»label»:»Platform Independent»}],»Line of Business»:{«code»:»»,»label»:»»}},{«Type»:»HW»,»Business Unit»:{«code»:»BU016″,»label»:»Multiple Vendor Support»},»Product»:{«code»:»HW312″,»label»:»System x->System x3800″},»Platform»:[{«code»:»PF025″,»label»:»Platform Independent»}],»Line of Business»:{«code»:»»,»label»:»»}},{«Type»:»HW»,»Business Unit»:{«code»:»BU016″,»label»:»Multiple Vendor Support»},»Product»:{«code»:»HW313″,»label»:»System x->System x3650 T»},»Platform»:[{«code»:»PF025″,»label»:»Platform Independent»}],»Line of Business»:{«code»:»»,»label»:»»}},{«Type»:»HW»,»Business Unit»:{«code»:»BU016″,»label»:»Multiple Vendor Support»},»Product»:{«code»:»HW314″,»label»:»System x->System x3850″},»Platform»:[{«code»:»PF025″,»label»:»Platform Independent»}],»Line of Business»:{«code»:»»,»label»:»»}},{«Type»:»HW»,»Business Unit»:{«code»:»BU016″,»label»:»Multiple Vendor Support»},»Product»:{«code»:»HW315″,»label»:»System x->System x3950″},»Platform»:[{«code»:»PF025″,»label»:»Platform Independent»}],»Line of Business»:{«code»:»»,»label»:»»}},{«Type»:»HW»,»Business Unit»:{«code»:»BU054″,»label»:»Systems w/TPS»},»Product»:{«code»:»HW316″,»label»:»System x->System x3950 E»},»Platform»:[{«code»:»PF025″,»label»:»Platform Independent»}],»Line of Business»:{«code»:»»,»label»:»»}},{«Type»:»HW»,»Business Unit»:{«code»:»BU016″,»label»:»Multiple Vendor Support»},»Product»:{«code»:»HW317″,»label»:»System x->System x3500″},»Platform»:[{«code»:»PF025″,»label»:»Platform Independent»}],»Line of Business»:{«code»:»»,»label»:»»}},{«Type»:»HW»,»Business Unit»:{«code»:»BU016″,»label»:»Multiple Vendor Support»},»Product»:{«code»:»HW318″,»label»:»System x->System x3550″},»Platform»:[{«code»:»PF025″,»label»:»Platform Independent»}],»Line of Business»:{«code»:»»,»label»:»»}},{«Type»:»HW»,»Business Unit»:{«code»:»BU016″,»label»:»Multiple Vendor Support»},»Product»:{«code»:»HW319″,»label»:»System x->System x3650″},»Platform»:[{«code»:»PF025″,»label»:»Platform Independent»}],»Line of Business»:{«code»:»»,»label»:»»}},{«Type»:»HW»,»Business Unit»:{«code»:»BU016″,»label»:»Multiple Vendor Support»},»Product»:{«code»:»HW321″,»label»:»System x->System x3400″},»Platform»:[{«code»:»PF025″,»label»:»Platform Independent»}],»Line of Business»:{«code»:»»,»label»:»»}},{«Type»:»HW»,»Business Unit»:{«code»:»BU016″,»label»:»Multiple Vendor Support»},»Product»:{«code»:»HW322″,»label»:»System x->System x3455″},»Platform»:[{«code»:»PF025″,»label»:»Platform Independent»}],»Line of Business»:{«code»:»»,»label»:»»}},{«Type»:»HW»,»Business Unit»:{«code»:»BU016″,»label»:»Multiple Vendor Support»},»Product»:{«code»:»HW323″,»label»:»System x->System x3655″},»Platform»:[{«code»:»PF025″,»label»:»Platform Independent»}],»Line of Business»:{«code»:»»,»label»:»»}},{«Type»:»HW»,»Business Unit»:{«code»:»BU016″,»label»:»Multiple Vendor Support»},»Product»:{«code»:»HW324″,»label»:»System x->System x3755″},»Platform»:[{«code»:»PF025″,»label»:»Platform Independent»}],»Line of Business»:{«code»:»»,»label»:»»}},{«Type»:»HW»,»Business Unit»:{«code»:»BU016″,»label»:»Multiple Vendor Support»},»Product»:{«code»:»HW328″,»label»:»System x->System x3105″},»Platform»:[{«code»:»PF025″,»label»:»Platform Independent»}],»Line of Business»:{«code»:»LOB26″,»label»:»Storage»}},{«Type»:»HW»,»Business Unit»:{«code»:»BU016″,»label»:»Multiple Vendor Support»},»Product»:{«code»:»HW329″,»label»:»System x->System x3200″},»Platform»:[{«code»:»PF025″,»label»:»Platform Independent»}],»Line of Business»:{«code»:»»,»label»:»»}},{«Type»:»HW»,»Business Unit»:{«code»:»BU016″,»label»:»Multiple Vendor Support»},»Product»:{«code»:»HW331″,»label»:»System x->System x3250″},»Platform»:[{«code»:»PF025″,»label»:»Platform Independent»}],»Line of Business»:{«code»:»»,»label»:»»}},{«Type»:»HW»,»Business Unit»:{«code»:»BU016″,»label»:»Multiple Vendor Support»},»Product»:{«code»:»HWXA1″,»label»:»System x->System x3650 NAS»},»Platform»:[{«code»:»PF025″,»label»:»Platform Independent»}],»Line of Business»:{«code»:»»,»label»:»»}},{«Type»:»HW»,»Business Unit»:{«code»:»BU016″,»label»:»Multiple Vendor Support»},»Product»:{«code»:»QU00NMK»,»label»:»BladeCenter->BladeCenter E Chassis->8677″},»Platform»:[{«code»:»PF025″,»label»:»Platform Independent»}],»Line of Business»:{«code»:»»,»label»:»»}},{«Type»:»HW»,»Business Unit»:{«code»:»BU016″,»label»:»Multiple Vendor Support»},»Product»:{«code»:»QU00XPE»,»label»:»BladeCenter->BladeCenter E Chassis->1881″},»Platform»:[{«code»:»PF025″,»label»:»Platform Independent»}],»Line of Business»:{«code»:»»,»label»:»»}}]
Содержание
- Перезапуск IBM BMC без перезапуска самого сервера
- Troubleshooting BMC issues
- Troubleshooting
- Problem
- Resolving The Problem
- Supermicro — перезагрузка IPMI (BMC) с помощью ipmitool
- Перезагружаем IPMI из операционной системы проблемного сервера
- Перезагружаем IPMI удалённо по сети
- Ссылки
- Похожие материалы
- Плата управления сервером Supermicro CSE-PTJBOD-CB3 (firmware)
- Сервер Supermicro SYS-6018R-MT (firmware)
- Материнская плата Supermicro X10DRi-T — прошивка REDFISH_X10_366
- How to fix: BMC can’t force ME to recovery mode when updating BIOS
- Patrick
- Panagiotis
- oneplane
- acquacow
- Bmc error cannot reset bmc
- Что такое bmc intel management port
- Как настроить intel bmc порт
- Настройка intel remote management module 3
Перезапуск IBM BMC без перезапуска самого сервера
У меня есть несколько серверов с IBM BMC (Baseboard Management Controller). Я хотел бы включить и выключить BMC без перезагрузки сервера. Это возможно? Как?
Примечание: на одном из них веб-интерфейс не работает; поэтому мне нужно либо сделать это, физически перезапустив BMC (не уверен, как это сделать — даже кнопка питания на сервере не должна перерабатывать BMC, я считаю), либо через интерфейс UDP или SNMP (снова не знаю как это сделать тоже)
Самый простой способ, если вы можете войти на сервер, запустить от имени пользователя root:
Если вы не можете подключиться к BMC через web, ssh, IPMI, telnet или другой настроенный вами механизм подключения, то единственный способ точно сбросить BMC — это выключить компьютер, а затем отключить питание. Многие BMC (или iLO, или eLOM, или что-то еще) не сбрасываются, когда компьютер перезагружается или выключается.
Я не знаю IBM, но на серверах HP вы часто можете подключиться к их iLO, если веб-интерфейс не работает, и наоборот. Если вы не сделаете ни того, ни другого, я думаю, что это будет полное выключение системы.
Предполагая, что вы присвоили IP BMC, вы можете подключиться и запустить этот инструмент из IBM. Имеет параметры питания и сброса. Проблема в том, что я не знаю, включают ли эти команды фактический BMC — трагический. Но это может дать вам отправную точку.
Для тех, у кого похожая проблема, вот команда ipmiutil для выдачи холодного сброса на BMC без перезагрузки сервера:
Лично я использую ipmiutil over, ipmitool когда это возможно, поскольку он может работать без установленных драйверов IPMI. У меня было несколько случаев, когда модули Linux IPMI были заблокированы из-за проблемы с BMC. Это препятствовало запуску ipmitool, но я все еще мог использовать ipmiutil в «режиме без драйверов», к которому он автоматически возвращается. Единственным недостатком является то, что, в отличие от ipmitool, ipmiutil, скорее всего, еще не установлен. Он должен быть доступен для установки с использованием репозиториев yum / apt-get, включенных в большинство дистрибутивов.
Не уверен, только перезагрузка BMC.
Но если вы хотите перезагрузить Remote Managemenet, то вручную и физически отключите питание переменного тока. Отключите оба резервных источника питания переменного тока. Вся система будет отключена.
Источник
Troubleshooting BMC issues
Troubleshooting
Problem
Troubleshooting BMC issues on IBM System x and BladeCenter servers
Resolving The Problem
- To begin troubleshooting the Baseboard Management Controller (BMC), check the following top issues. If your issue is listed, select the link, otherwise proceed to step 2.
| BMC error log overview | |
| BMC error log access | |
| BMC flash update | |
| BMC Intelligent Platform Management Interface (IPMI) data loss | |
| BMC log shows voltage or temperature errors | |
| BMC log shows Non Maskable Interrupt (NMI) | |
| BMC network does not work when AC power first applied | |
| BMC busy and not responding to initial requests from MM | |
| Error «Dr Watson has created an error log for the following program, SMBridge.exe» | |
| Errors running the command line interface through the serial port | |
| Ethernet connections to the BMC fail |
Check the operator information panel on the front of the server. If the information LED is lit, it indicates that information about a suboptimal condition in the server is available in the BMC log or in the system-error log. Proceed to step 3.

Note: If the system-error LED is lit, refer to your system’s Hardware Maintenance Manual (HMM) for light path diagnostics.
Access the BMC log.
| Viewing error logs from the Configuration/Setup Utility program | |
| Viewing the BMC log from the diagnostic programs |
Check the system-error log and the BMC log for messages indicating the cause of the error. Take the action indicated before replacing a CRU or FRU. When troubleshooting an error, make sure to clear the BMC log so that you can more easily find current errors.
If these steps have not solved your problem, refer to your system’s Hardware Maintenance Manual (HMM),
or refer to «Need more help?»
Newer IBM eServer xSeries systems (e.g. xSeries 236, 306, 346, 366) have a BMC log which is the default «service processor» if the optional RSA2 is not installed. The BMC log and the system-error log contain messages that were generated during POST and all system status messages from the service processor. The BMC log contains a large number of information, error, and warning messages. The POST error log contains the three most recent error codes and messages that were generated during POST.
- The BMC log is limited in size and is designed so that when the log is full, new entries will not overwrite existing entries; therefore, you must periodically clear the BMC log from the Configuration/Setup Utility program (the menu choices are described in the User’s Guide).
- When troubleshooting an error, make sure to clear the BMC log so that you can find current errors more easily.
- Entries written to the BMC log early in the POST procedure will show an incorrect date as the default timestamp; however, the date and time will correct itself as POST continues.
- Each BMC log entry appears on its own page; to display all the data for an entry, use the up arrow and down arrow or the Page Up and Page Down keys. To move from one entry to the next, move the cursor to the Get Next Entry or Get Previous Entry line; then, press Enter.
- The log indicates an Assertion Event when an event has occurred. It indicates a Deassertion Event when the event is no longer occurring.
- Some of the error codes and messages in the BMC log are abbreviated.
- Viewing the BMC log through the web interface of the optional Remote Supervisor Adapter II SlimLine allows all messages to be translated.
Example BMC log entry:
You can view the contents of the POST error log, the BMC log, and the system-error log from the Configuration/Setup Utility program. You can also view the contents of the BMC log from the diagnostic programs. The BMC log contains the same information whether it is viewed from the Configuration/Setup Utility program or from the diagnostic programs.
Note: When troubleshooting PCI-X slots, note that the error logs report the PCI-X buses numerically. The numerical assignments vary depending on the configuration. You can check the assignments by running the Configuration/Setup Utility program.
To view the error logs from the Configuration/Setup Utility:
- Turn on the server.
When the prompt «Press F1 for Configuration/Setup» appears, press F1. If you have set both a power-on password and an administrator password, you must type the administrator password to view the error logs.
Use one of the following procedures:
- To view the POST error log, select Error Logs, and then select POST Error Log.
To view the BMC log, select Advanced Settings, select Baseboard Management Controller (BMC) settings, and then select BMC System Event Log.
Note: This option is only available if an optional Remote Supervisor Adapter II SlimLine is installed.
To view the BMC log from diagnostics:
- If the server is running, turn off the server and all attached devices.
Turn on all attached devices; then, turn on the server.
When the prompt «F2 for Diagnostics» appears, press F2.
Note: If you have set both a power-on password and an administrator password, you must type the administrator password to run the diagnostic programs.
From the top of the screen, select Hardware Info.
Источник
Supermicro — перезагрузка IPMI (BMC) с помощью ipmitool


Иногда интерфейс IPMI сервера Supermicro может зависнуть. При этом операционная система на сервере может не поддерживать утилиту IPMICFG. ОС может быть не установлена. Перезагружаем IPMI с помощью ipmitool.
Перезагружаем IPMI из операционной системы проблемного сервера
Команда для холодной перезагрузки IPMI (cold):
Команда для тёплой перезагрузки IPMI (warm):
Перезагружаем IPMI удалённо по сети
Команда для холодной перезагрузки IPMI (cold):
Команда для тёплой перезагрузки IPMI (warm):
Ссылки
Похожие материалы
Плата управления сервером Supermicro CSE-PTJBOD-CB3 (firmware)

Сервер Supermicro SYS-6018R-MT (firmware)
Supermicro SYS-6018R-MT — недорогой одноюнитовый девайс с одним блоком питания.
Мониторинг сервера можно настроить через IPMI, шаблоны для заббикса есть, правда допиливать всё равно пришлось, позже выложу статью с шаблонами, если кому-то понадобятся. Минус всё тот же — мониторить винты нельзя. На борту имеется BMC (redfish) для удалённого управления. Есть некоторое количество сенсоров.
Выкладываю прошивки для сервера:
Материнская плата Supermicro X10DRi-T — прошивка REDFISH_X10_366
На базе материнской платы Supermicro X10DRi-T собирают много разных серверов. Мой выглядел так:
Т.е. взяли корпус CSE-846BE16-R920B, напихали туда всего понемногу и получили требуемое устройство.
Источник
How to fix: BMC can’t force ME to recovery mode when updating BIOS

Patrick
Administrator
Patrick submitted a new resource:
I recently ran into an issue where I purchased a Supermicro license key for remote BIOS upgrade only to find that the system rebooted to «System initializing» and post code 19. Normally the remote BIOS update key allows you to update BIOS remotely without issue, even when you have some strange POST code failure. Instead, the remote flash would fail and I saw this message:
View attachment 5265
Here was the fix:
- Power off system completely
- Unplug system so BMC turns off.
Well-Known Member
If this doesn’t work for you, try to update bios with SUM* and the «—force_update» parameter:
Panagiotis
New Member
If this doesn’t work for you, try to update bios with SUM* and the «—force_update» parameter:
Member
Thanks for this info!
I just had a X10DRU-i+ here that didn’t POST after flashing the latest BIOS (2 similar systems were upgraded last week without any issues..)
Some additional findings: In case SUM will give you this error
oneplane
Active Member
Member

acquacow
Well-Known Member
So I’m dealing with this on an X10SRH-CF right now.
It arrived with bios 9/9/2014 Rev 1.0a and I updated to 6.5.2021 Rev 3.4
It now spends a «LONG time at DXE—BIOS SMM Initialization 79»
When posting and in the BIOS it reports:
Operational Firmware Version: N/A
ME Firmware Type: N/A
Recovery Firmware Version N/A
ME Firmware Features: N/A
ME Firmware Status #1: 0x00003401
ME Firmware Status #2: 0x00080000
Current state: Initializing
Error Code: Image Failure
I have been able to downgrade/upgrade the bios, but no matter which way I go or which flags I feed to AFUDOS, I can’t seem to get the ME firmware to write.
I’ve tried popping the battery, but when you reset the bios, it defaults to last-state or power-on and it immediately turns on when I feed it power, so I can’t do Patrick’s sequence in the first post. Doesn’t matter which position I have JPME2 in (there is no JPME1). The flash updaters say that it can’t enter/unlock the ME Manufacturer mode.
Источник
Bmc error cannot reset bmc

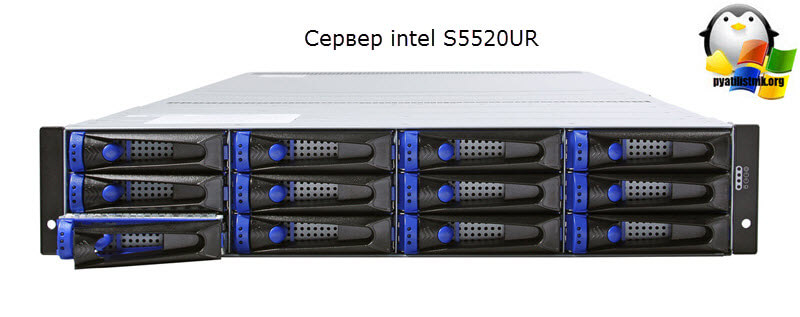
Всем привет, продолжаем изучать серверное оборудование и его функциональные возможности. Не так давно я вам рассказывал про порты управления сервером, которые нужны, чтобы вы могли удаленно устанавливать операционную систему или включать сервер, если вдруг он завис на синем экране или вообще выключен. Но в обзорной статье я не рассказывал про оборудование компании Intel, так как сам больше предпочитаю IBM или HP, но дареному коню в зубы не смотрят, сегодня расскажу, как настроить bmc порт у intel S5520UR. BMC это порт управления на основе IPMI.
Что такое bmc intel management port
Итак bmc intel management port > это порт управления на основе IPMI технологии, некий аналог ilo hp, и с менее разнообразным функционалом. Выглядит BMC порт у Intel подобным образом. Очень часто он выделяется зеленым цветом, но не везде, так, что если вдруг у вас он обезличенный, то это нормально, тоже.

Вот как выглядит сервер intel S5520UR. Если вы приглядитесь повнимательнее, то у него нет кнопок включения или перезагрузки и все управление, как раз осуществляется за счет bmc порта.
Как настроить intel bmc порт
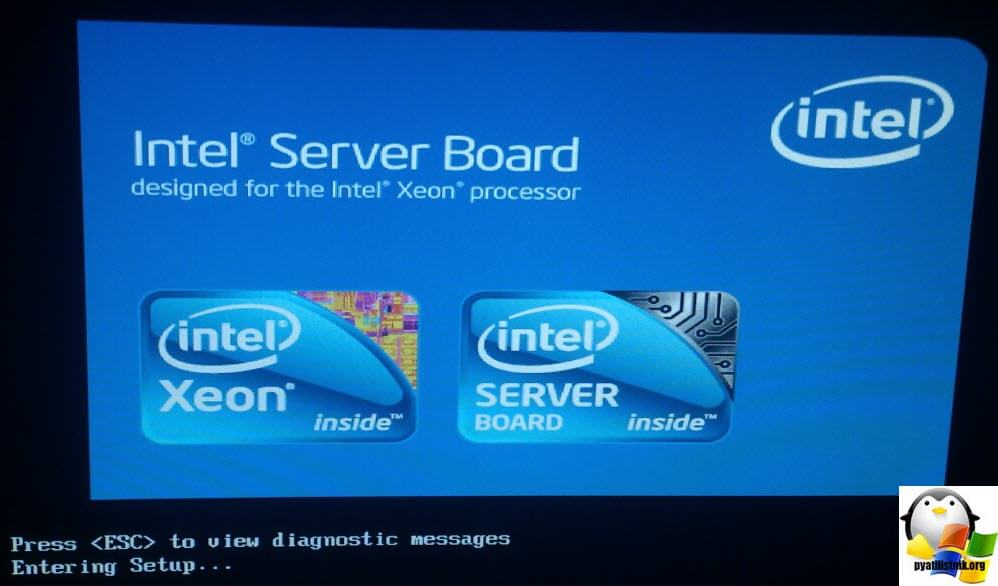
При включении intel S5520UR запускает автозапуск, и вы видите знакомое всем приветственное окно с логотипом компании, для попадания в биос нажмите клавишу F2.
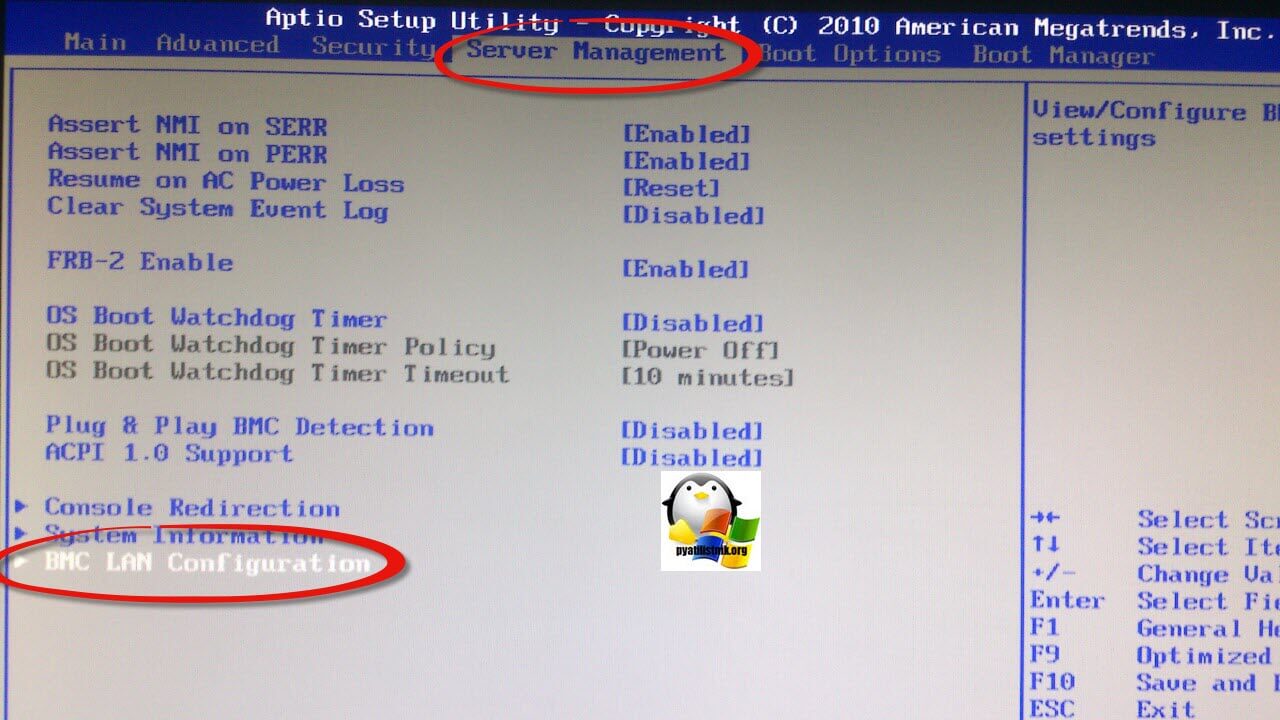
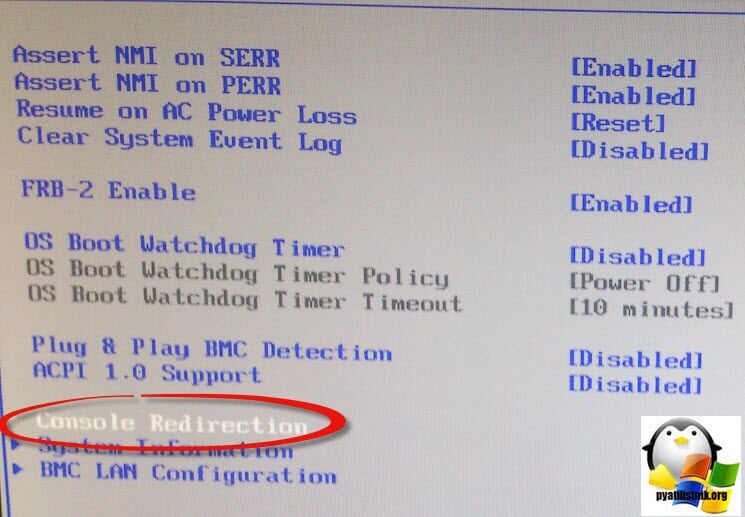
Переходим в BIOS в пункт меню Server Management > BMC LAN Configuration, именно он отвечает за последующую настройку.
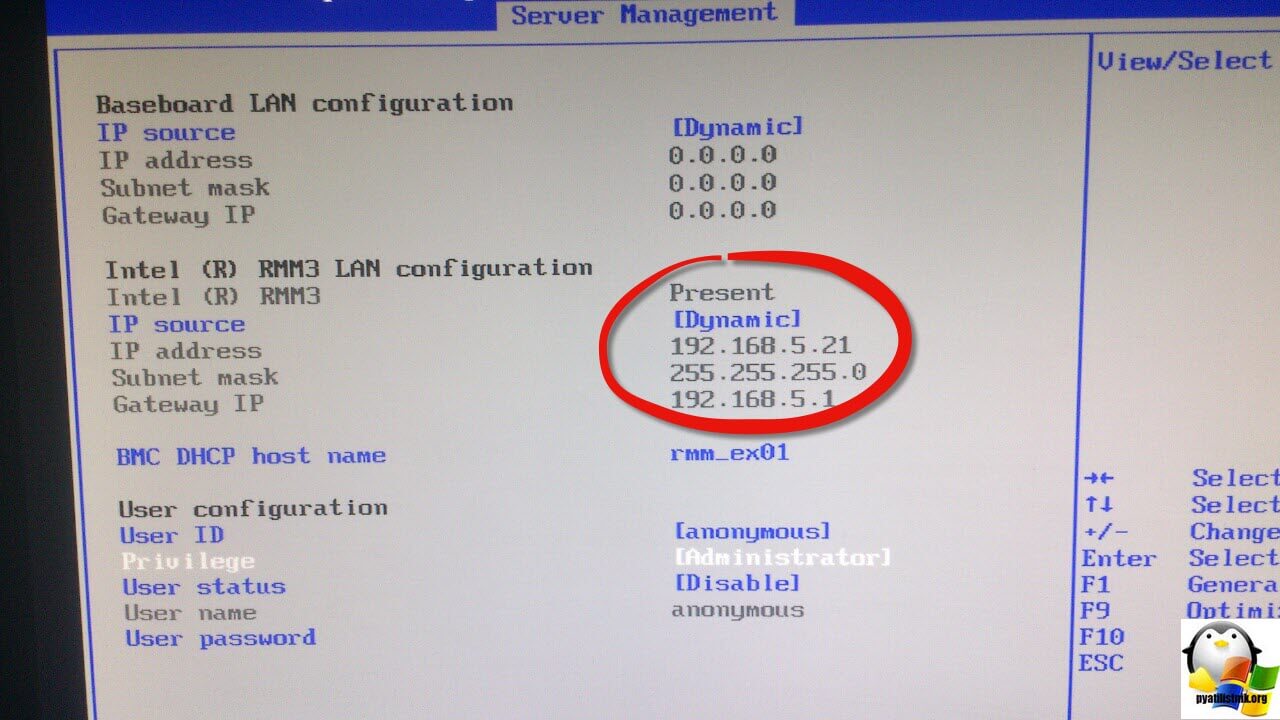
Попав в Server Management вы в поле IP address увидите полученный от DHCP сервера сетевой адрес, в моем случае это 192.168.5.21. По этому ip адресу вы будите заходить в браузере веб-интерфейс. Чуть ниже вы увидите имя вашего сервера (host name), у меня это rmm_ex01. Очень важный вопрос, это вопрос о безопасности. Убедитесь, что у вас учетная запись anonymous в состоянии Disable (выключена), так как зная ее стандартный пароль можно взломать и очень сильно навредить серверу и службам, работающим на нем.
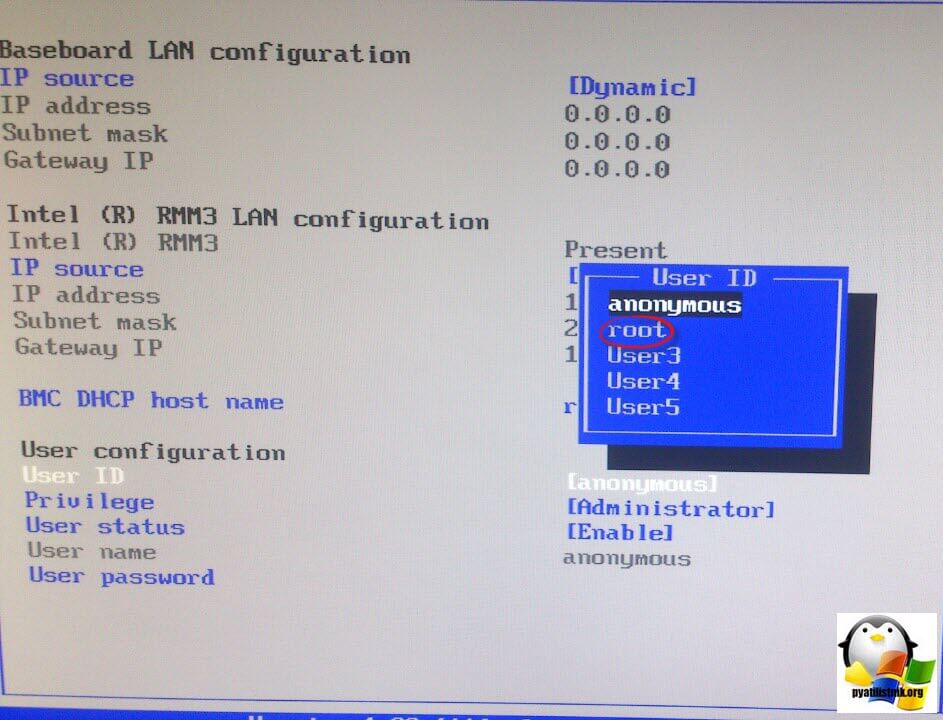
У данной прошивки BMC есть возможность предоставить доступ для управления сервером, через порт управления для 5 пользователей, и два из них системные. Так как мы выключили с вами учетную запись anonymous, то настроим пароль для root,
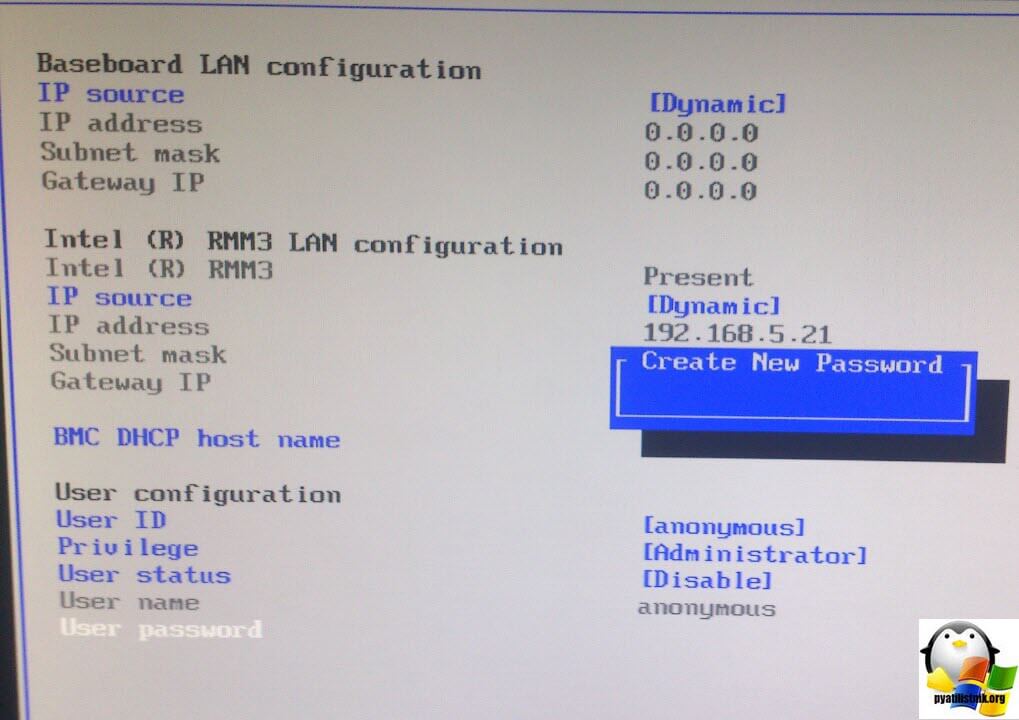
Щелкаем по User password и задаем два раза, один и тот же пароль.
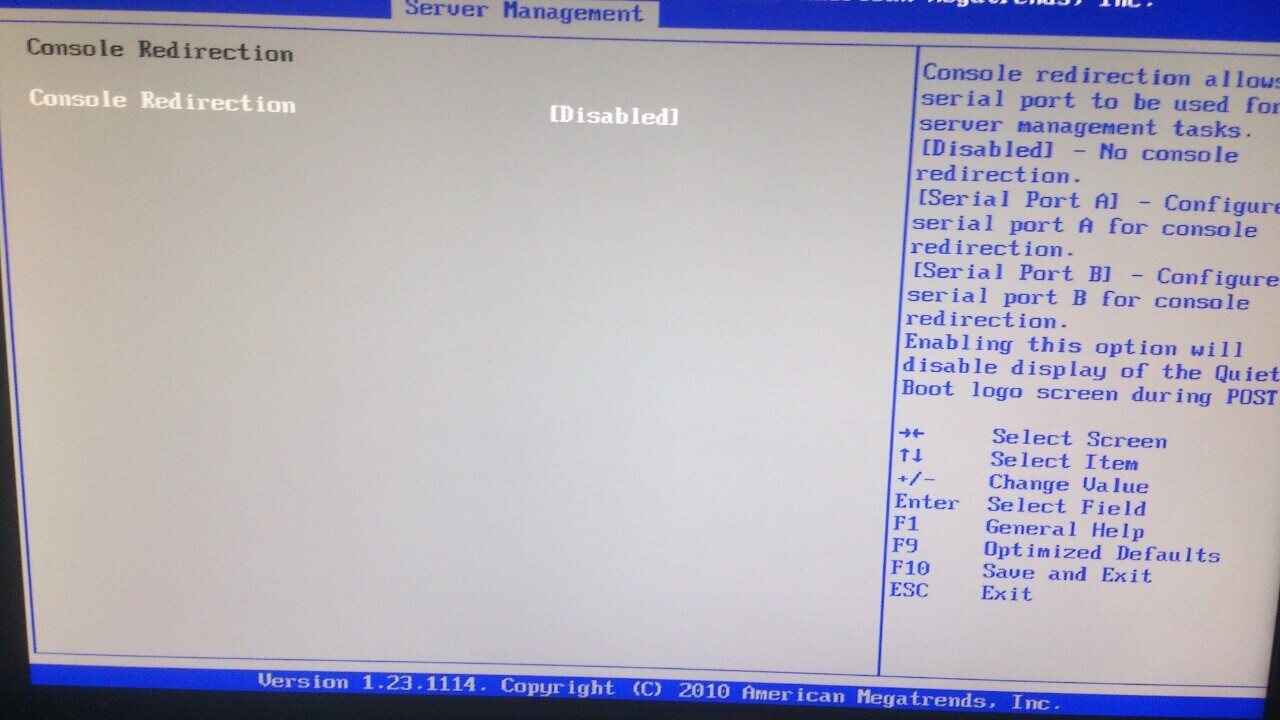
Еще сразу хочу вам посоветовать включить Java консоль управления, называется она у Intel BMC порта Console Redirection, переходим в этот пункт BIOS.
И ставим у Console Redirection состояние Enable.
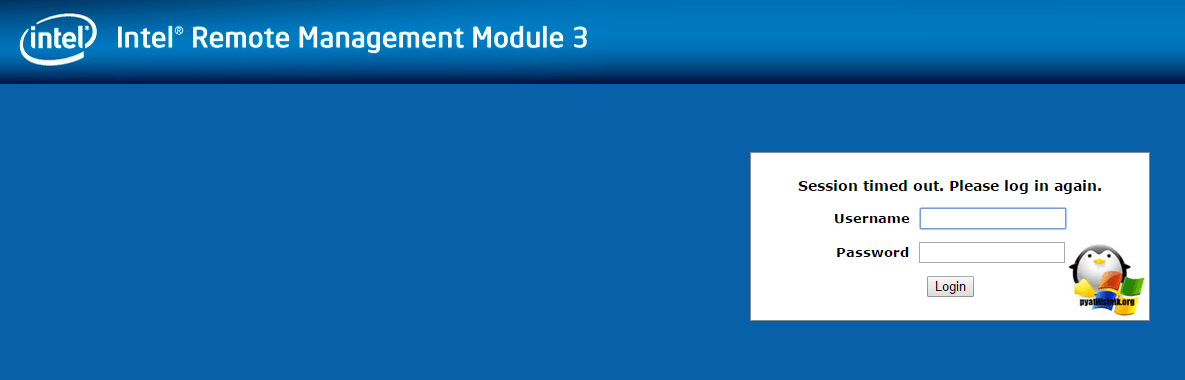
Открываем браузер и пробуем залогиниться. Далее мы более детально разберем основные настройки BMC порта, вы сами увидите его удобства.
Настройка intel remote management module 3
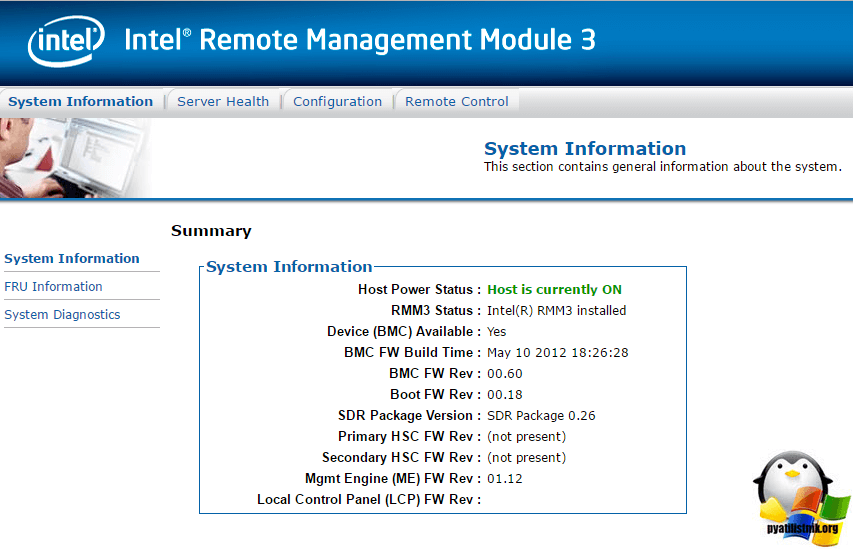
И так у меня есть сервер intel S5520UR, давайте теперь пробежимся по основным настройкам remote management module. Самым первым, что вы увидите это вкладка System Information, тут очень много полезной информации:
- Host Power Status > статус включен сервер или нет
- RMM3 Status > установлен или нет
- BMC > есть или нет
- BMC FW Build Time > Время прошивки
- BMC FW Rev > версия прошивки
- Boot FW Rev > версия загрузчика
- SDR Packege Version
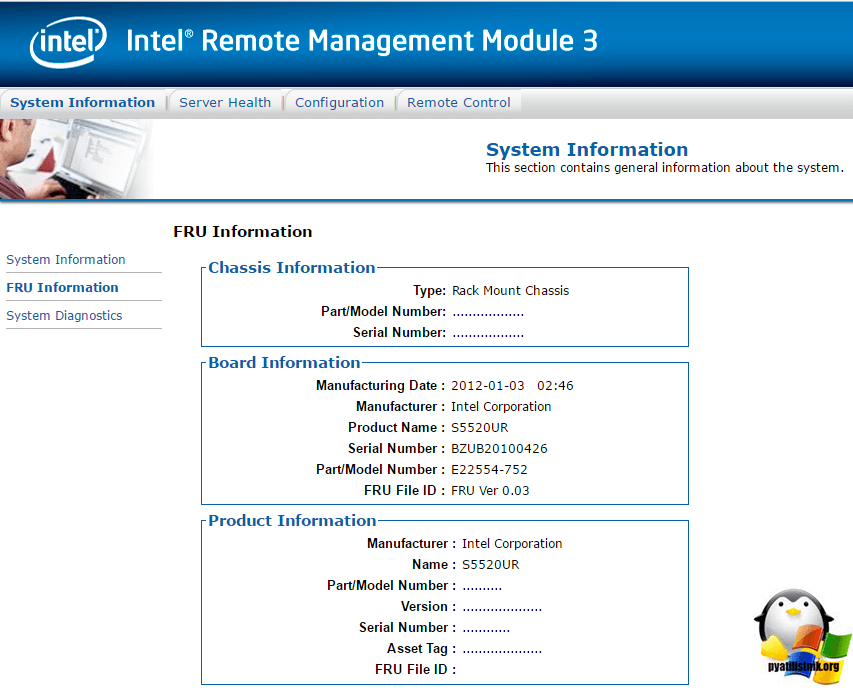
Переходим на вкладку FRU Information, я вам уже рассказывал про fru номера у IBM, если кто не знает эти номера очень часто спрашивают представители технической поддержки вендора. Так же вы тут обнаружите все серийные номера.
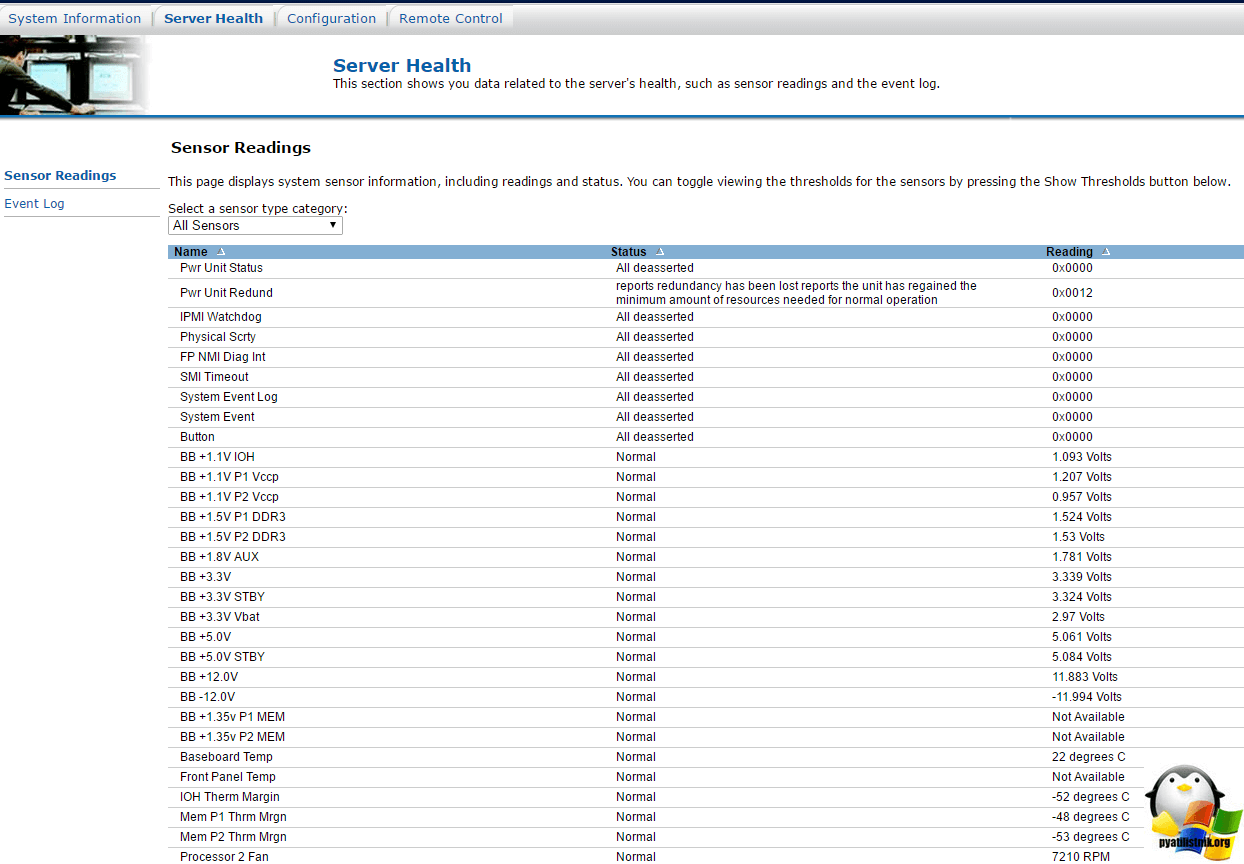
Далее переходим на вкладку Server Health, в ней вы увидите датчики проверки всевозможных компонентов сервера intel s5520ur, их кстати можно по SNMP мониторить.
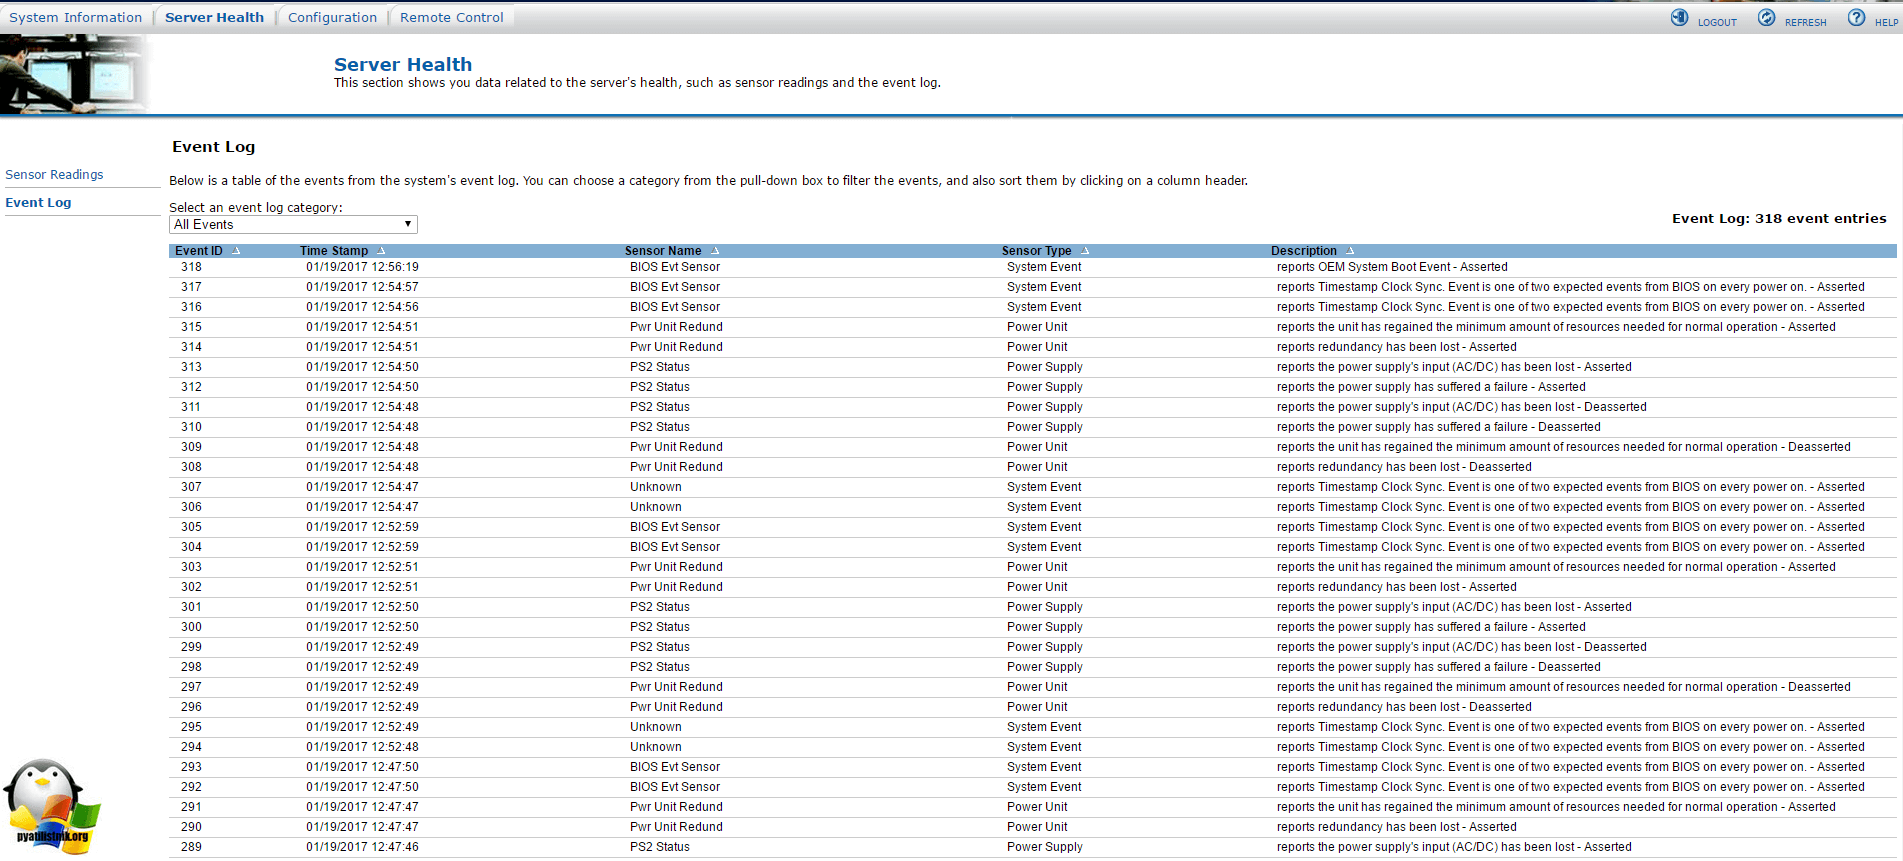
Чуть ниже пункт Event Log, в котором записываются все события, происходящие с сервером.
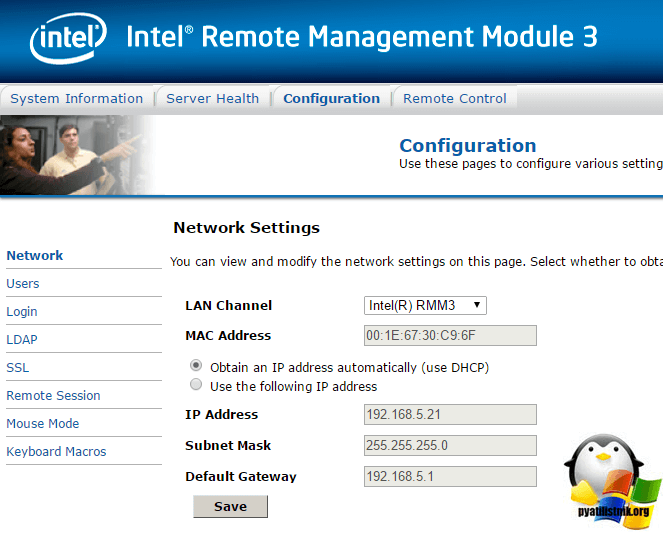
Переходим в пункт Configuration, первым пунктом тут будет Network. В нем можно изменить ip адрес.
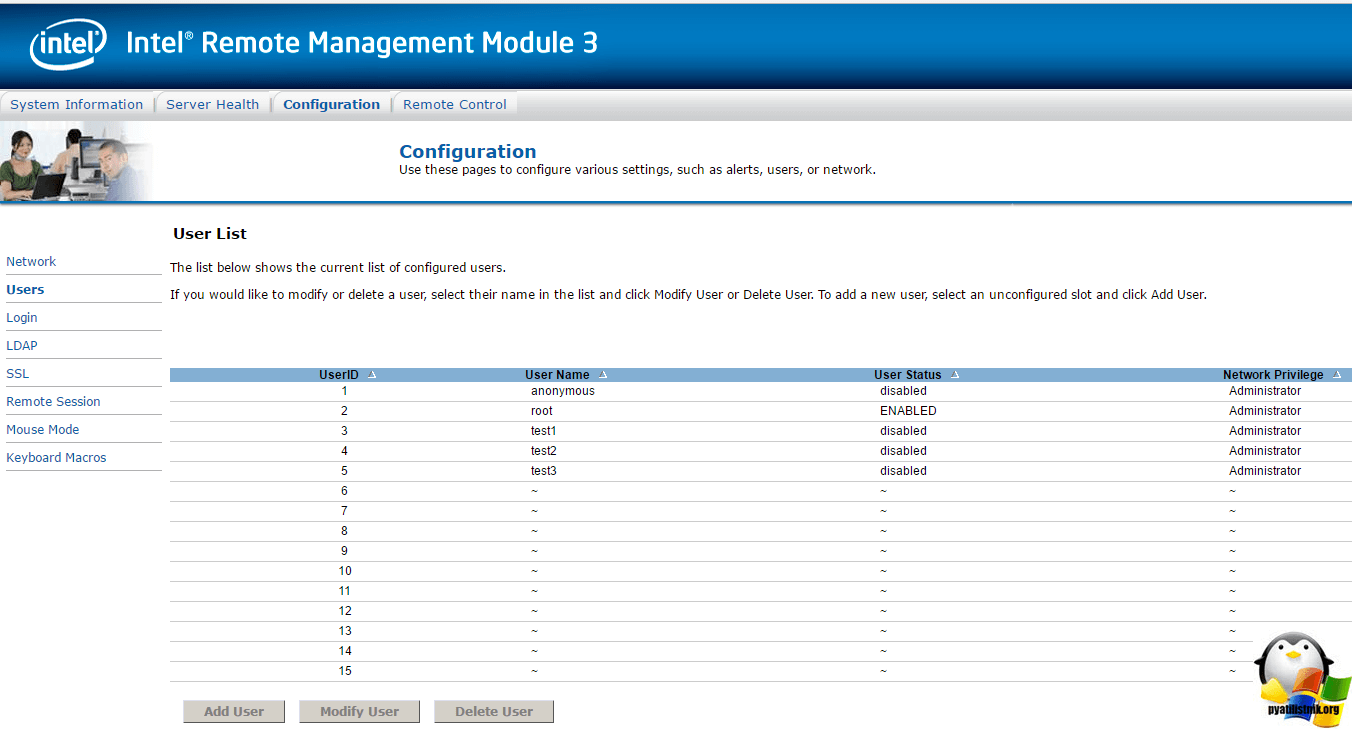
В пункте Users вы увидите, уже не 5 слотов для пользователей, а 15 и сможете тут их администрировать, выдавая нужные права и задавая пароли.
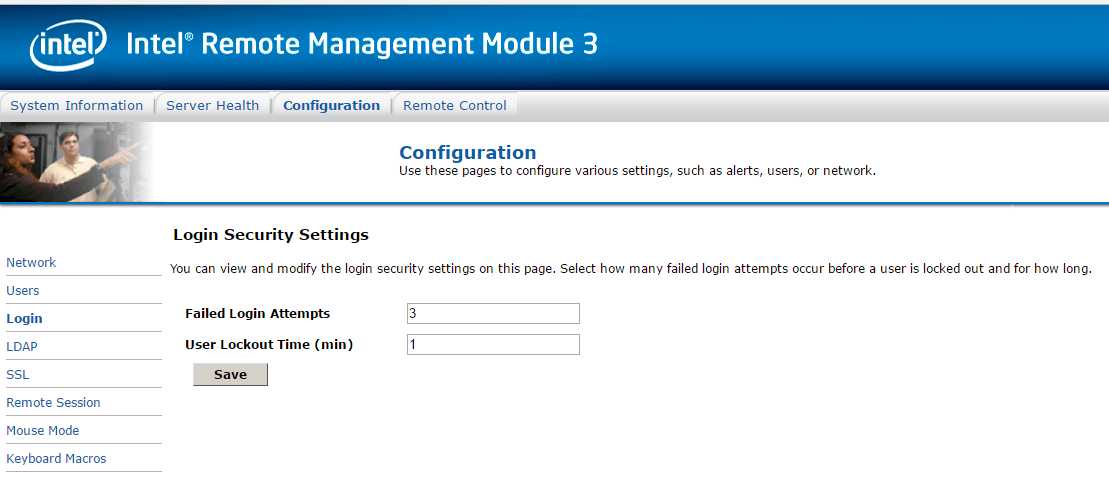
В пункте Login вы сможете задать некоторые политики безопасности для сервера s5520ur, а именно:
- Failed Login Attempts > Количество не удачных попыток аутентификации.
- User Lockout Time > время блокировки пользователя
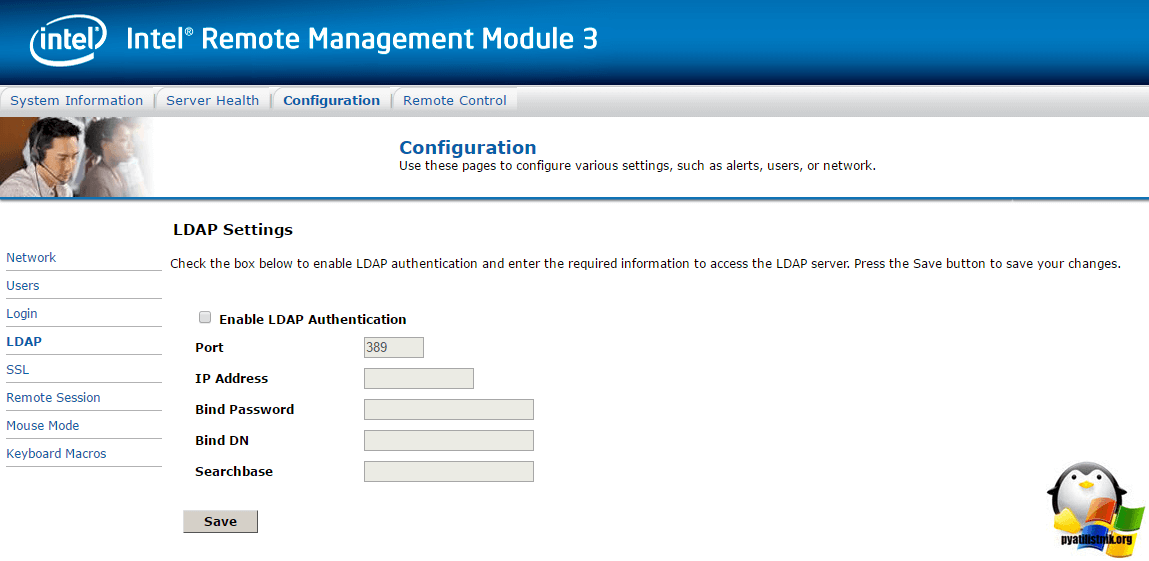
Далее самое удобное это LDAP, это возможность настроить аутентификацию сервера через контроллер домена Active Directory. Все, что от вас потребуется заполнить поля.
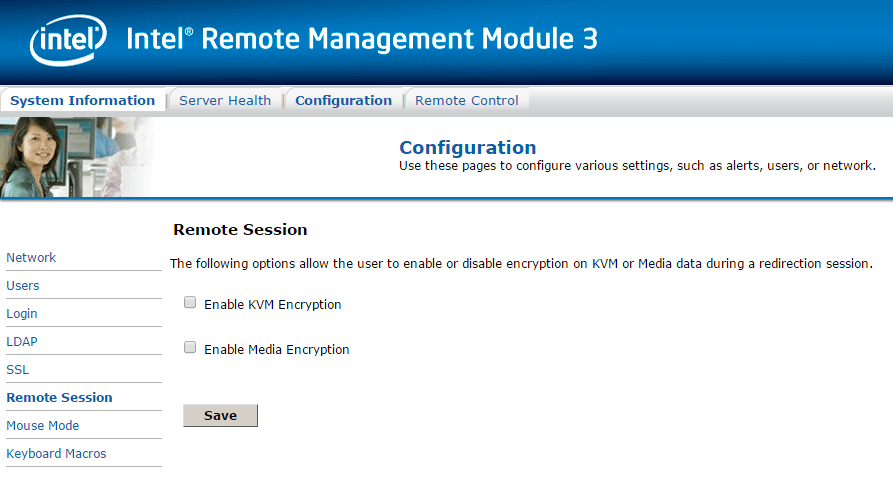
Remote Session позволяет шифровать трафике при удаленном подключении, еще больше будет безопасности, но и ресурсов будет тратиться побольше.
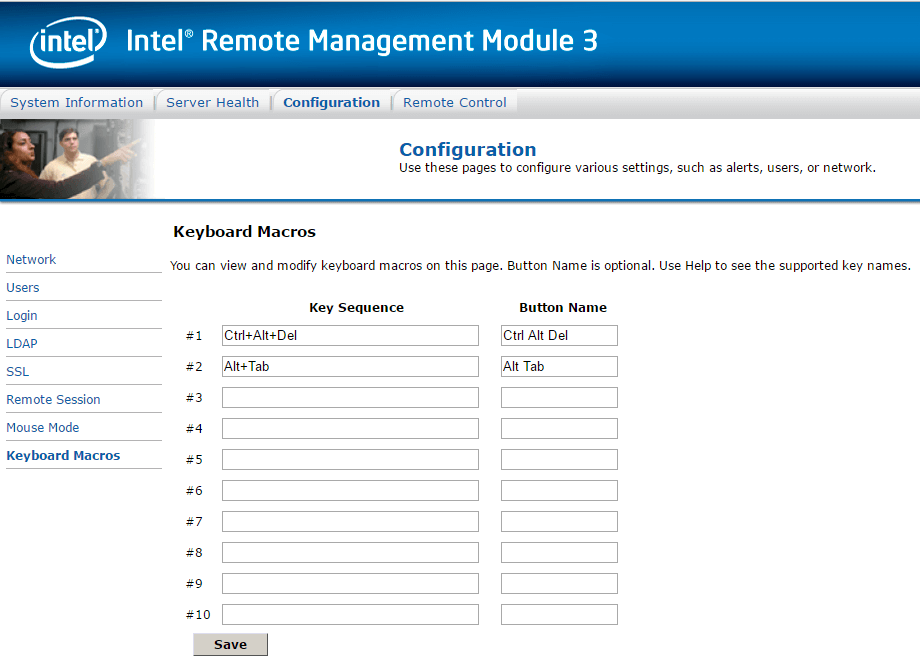
Очень полезный пункт это Keyboard Macros, нужно это для того, чтобы вы заранее задали комбинации клавиш, для KVM консоли.
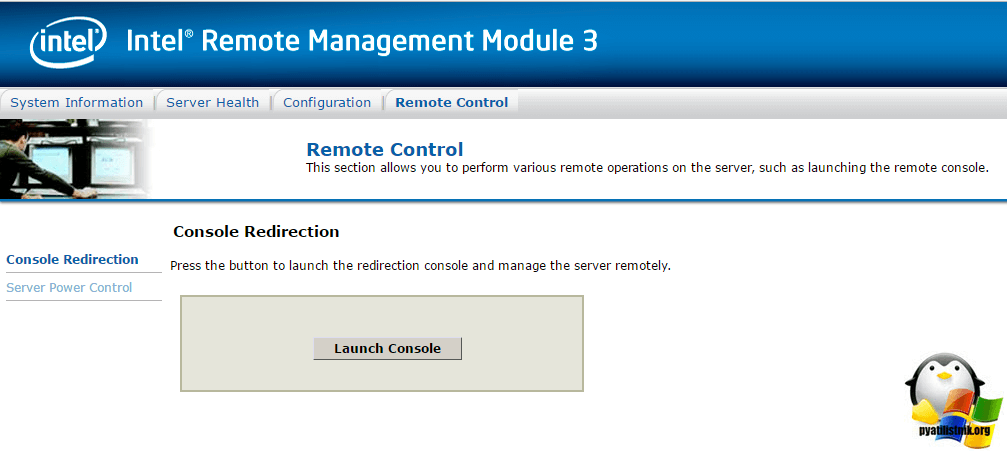
И переходим к последним пунктам Remote Control, тут в параметре Console Redirection вы сможете запускать Java KVM окно и видеть все, что происходит на экране сервера, будто вы работаете за ним физически.
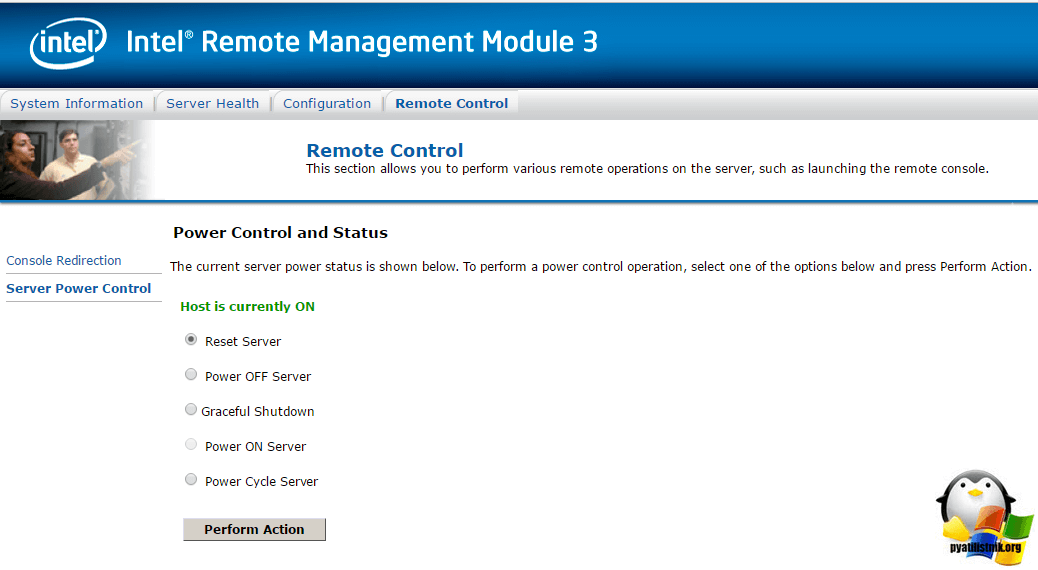
Ну и естественно удаленное управление включением и выключением сервера, BMC у intel S5520UR умеет все это делать, через пункт Server Power Control.
Как видите настроить BMC порт у серверов Intel очень просто, а дальнейшее управление через remote management module 3, вызовет только положительные эмоции, функционала конечно меньше чем у других вендоров, но администрировать пойдет.
Источник
Обновлено 30.01.2017
Всем привет, продолжаем изучать серверное оборудование и его функциональные возможности. Не так давно я вам рассказывал про порты управления сервером, которые нужны, чтобы вы могли удаленно устанавливать операционную систему или включать сервер, если вдруг он завис на синем экране или вообще выключен. Но в обзорной статье я не рассказывал про оборудование компании Intel, так как сам больше предпочитаю IBM или HP, но дареному коню в зубы не смотрят, сегодня расскажу, как настроить bmc порт у intel S5520UR. BMC это порт управления на основе IPMI.
Что такое bmc intel management port
Итак bmc intel management port > это порт управления на основе IPMI технологии, некий аналог ilo hp, и с менее разнообразным функционалом. Выглядит BMC порт у Intel подобным образом. Очень часто он выделяется зеленым цветом, но не везде, так, что если вдруг у вас он обезличенный, то это нормально, тоже.
Вот как выглядит сервер intel S5520UR. Если вы приглядитесь повнимательнее, то у него нет кнопок включения или перезагрузки и все управление, как раз осуществляется за счет bmc порта.
Как настроить intel bmc порт
При включении intel S5520UR запускает автозапуск, и вы видите знакомое всем приветственное окно с логотипом компании, для попадания в биос нажмите клавишу F2.
Переходим в BIOS в пункт меню Server Management > BMC LAN Configuration, именно он отвечает за последующую настройку.
Попав в Server Management вы в поле IP address увидите полученный от DHCP сервера сетевой адрес, в моем случае это 192.168.5.21. По этому ip адресу вы будите заходить в браузере веб-интерфейс. Чуть ниже вы увидите имя вашего сервера (host name), у меня это rmm_ex01. Очень важный вопрос, это вопрос о безопасности. Убедитесь, что у вас учетная запись anonymous в состоянии Disable (выключена), так как зная ее стандартный пароль можно взломать и очень сильно навредить серверу и службам, работающим на нем.
У данной прошивки BMC есть возможность предоставить доступ для управления сервером, через порт управления для 5 пользователей, и два из них системные. Так как мы выключили с вами учетную запись anonymous, то настроим пароль для root,
Щелкаем по User password и задаем два раза, один и тот же пароль.
Еще сразу хочу вам посоветовать включить Java консоль управления, называется она у Intel BMC порта Console Redirection, переходим в этот пункт BIOS.
И ставим у Console Redirection состояние Enable.
Открываем браузер и пробуем залогиниться. Далее мы более детально разберем основные настройки BMC порта, вы сами увидите его удобства.
Настройка intel remote management module 3
И так у меня есть сервер intel S5520UR, давайте теперь пробежимся по основным настройкам remote management module. Самым первым, что вы увидите это вкладка System Information, тут очень много полезной информации:
- Host Power Status > статус включен сервер или нет
- RMM3 Status > установлен или нет
- BMC > есть или нет
- BMC FW Build Time > Время прошивки
- BMC FW Rev > версия прошивки
- Boot FW Rev > версия загрузчика
- SDR Packege Version
Переходим на вкладку FRU Information, я вам уже рассказывал про fru номера у IBM, если кто не знает эти номера очень часто спрашивают представители технической поддержки вендора. Так же вы тут обнаружите все серийные номера.
Далее переходим на вкладку Server Health, в ней вы увидите датчики проверки всевозможных компонентов сервера intel s5520ur, их кстати можно по SNMP мониторить.
Чуть ниже пункт Event Log, в котором записываются все события, происходящие с сервером.
Переходим в пункт Configuration, первым пунктом тут будет Network. В нем можно изменить ip адрес.
В пункте Users вы увидите, уже не 5 слотов для пользователей, а 15 и сможете тут их администрировать, выдавая нужные права и задавая пароли.
В пункте Login вы сможете задать некоторые политики безопасности для сервера s5520ur, а именно:
- Failed Login Attempts > Количество не удачных попыток аутентификации.
- User Lockout Time > время блокировки пользователя
Далее самое удобное это LDAP, это возможность настроить аутентификацию сервера через контроллер домена Active Directory. Все, что от вас потребуется заполнить поля.
Remote Session позволяет шифровать трафике при удаленном подключении, еще больше будет безопасности, но и ресурсов будет тратиться побольше.
Очень полезный пункт это Keyboard Macros, нужно это для того, чтобы вы заранее задали комбинации клавиш, для KVM консоли.
И переходим к последним пунктам Remote Control, тут в параметре Console Redirection вы сможете запускать Java KVM окно и видеть все, что происходит на экране сервера, будто вы работаете за ним физически.
Ну и естественно удаленное управление включением и выключением сервера, BMC у intel S5520UR умеет все это делать, через пункт Server Power Control.
Как видите настроить BMC порт у серверов Intel очень просто, а дальнейшее управление через remote management module 3, вызовет только положительные эмоции, функционала конечно меньше чем у других вендоров, но администрировать пойдет.