
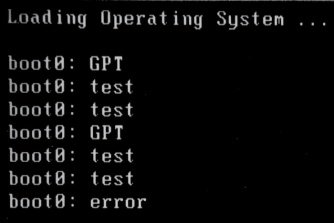
После успешной установки хакинтоша может возникнуть ошибка при загрузке с жесткого диска, вот такая:
Loading Operating System …
boot0: GPT
boot0: test
boot0: test
boot0: GPT
boot0: test
boot0: test
boot0: error
В чем заключается проблема:
Т.к. объем жестких дисков с каждым годом увеличивается, производители вынуждены менять стандартный размер блока диска с 512 байт до 4096 байт. Эти жесткие диски известны как «Advanced Format» или 4K. Сначала размер увеличивали на дисках больше 1 ТБ, однако в скором времени изменения затронут все выпускаемые диски. Из-за этого загрузчик Chimera не может загрузиться как положено.
Прим.: Chimera не грузится, а вот разработчики Clover-загрузчика уже давно исправили эту проблему и загрузка происходит автоматически, без изменений.
Решение №1: Использовать флешку с UniBeast
Решение очень простое, но потребует наличие флешки с установщиком Mac OS.
Прим.: я советую всегда хранить флешку с установщиком Mac OS, в случае, если потребуется распаковать бэкап или выполнить доп. настройку, например, при апгрейде оборудования
Как исправить:
1. Загрузиться в установку Mac OS с флешки с UniBeast
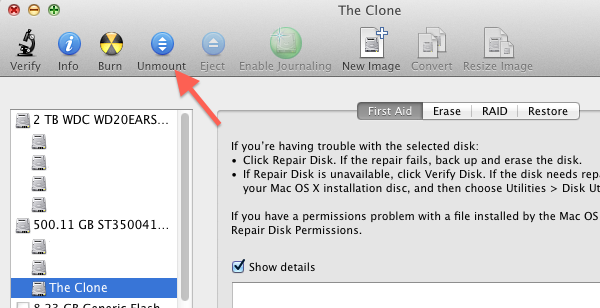
2. Не запуская установку, запустить из меню сверху Дисковую Утилиту (Disk Utility), в ней размонтировать жесткий диск, на который установлена Mac OS X.
3. Запустить Терминал и выполнить следующую комманду:
|
dd if=/usr/standalone/i386/boot1h of=/dev/disk0s2 |
4. Теперь можно выйти из терминала и перезагрузить компьютер
ВАЖНОЕ ЗАМЕЧАНИЕ: Пример кода выше работает в том случае, если ваш жесткий диск подключен к SATA порту 0. Если у вас используется другой порт, то вы можете узнать его из Дисковой Утилиты.
Решение №2: Использовать SATA > USB Адаптер
Это решение сработает, если у вас есть под рукой другой работающий Mac.
Как починить:
1. Установить жесткий диск в запасной Mac, установить систему на этот жесткий диск.
2. После установки, выключить запасной Mac, вытащить жесткий, и подключить его с помощью USB-адаптера к новому Mac
3. Загрузить новый Mac
4. Запустить MultiBeast, произвести установку загрузчика
5. Теперь можно установить жесткий диск как обычно, без адаптеров
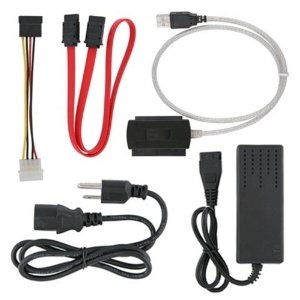 Приобрести переходник-адаптер SATA-USB можно в большинстве компьютерных магазинов или заказать на Aliexpress или подобных сайтах.
Данный переходник может пригодится, например, сделать из внутреннего DVD-привода внешний.

-
#1

The Issue:
Upon successful installation, boot from hard drive results in this:
Loading Operating System …
boot0: GPT
boot0: test
boot0: test
boot0: GPT
boot0: test
boot0: test
boot0: error
The Actual Problem:
With disk drives getting larger and larger manufacturers have had to change the default block size from 512 bytes to 4,096 bytes. These new drives are known as «Advanced Format» or 4K drives. Initially this was only seen on drives larger than 1 TB but will soon be on all drives. As part of this change there is an issue with OS X writing the boot helper code to these drives when booted from the drive. Because of this they require a workaround to boot on their own.
Solution 1: Use UniBeast
Pros: Easy- OS X Only
Cons: Requires use of the Terminal and UniBeast drive.
How To Do it:
1. Install using UniBeast
2. Boot new installation using UniBeast created USB.
3. Run MultiBeast and install as normal
4. Reboot system back into OS X installer.
5. Run Disk Utility and unmount the drive you installed OS X on. Right click on the volume and select Unmount.
6. Launch Terminal and execute the following command:
Code:
dd if=/usr/standalone/i386/boot1h of=/dev/disk0s2
7. Exit Terminal
8. Reboot Normally
NOTE: The above instructions are based on OS X being installed to a hard drive connected to SATA port 0. If you are using a different port you will need to get the drive device name from Disk Utility by selecting the volume and clicking Info.
Solution 2: Use a SATA > USB Adapter
Pros: Easy- OS X Only
Cons: Need an additional functional Mac or Hack.
How To Do it:
1. Install using UniBeast using System 1.
2. After installation, shut down, unplug the SATA drive from System 1, and plug into System 2 via USB
3. Boot System 2
4. Run MultiBeast, targeting System 1’s drive
5. Unplug the System 1 drive, plug back into System 1, and boot without any issues.

SATA/PATA/IDE Drive to USB 2.0 Adapter Converter Cable
with AC Power Adapter for 2.5 / 3.5 Inch Hard Drive / Optical Drive
http://www.amazon.com/gp/product/B001OORMVQ/ref=as_li_ss_tl?ie=UTF8
[amazon-uk]http://www.amazon.co.uk/gp/product/B001OORMVQ/ref=as_li_ss_tl?ie=UTF8[/amazon-uk]
An extremely useful extra for any custom build. Hook a hard drive up to another working system via USB. Also use to convert a internal optical drive into an external USB optical drive.
-

boot0.jpg
18.6 KB
· Views: 129,509
-

ref=dp_image_0.jpeg
15.8 KB
· Views: 128,504

Last edited by a moderator: Apr 29, 2016
-
#3
Article: boot0 Error: The Official Guide
please video
-
#4
what do you mean with unmount the disk
-
#5
After the unmount, the /Volumes doesn’t exist anymore. The dd command won’t work. I got an error saying no such file or dir.
If I don’t unmount the volume, dd gives me a resource busy error. Please help.
-
#6
Article: boot0 Error: The Official Guide
After the unmount, the /Volumes doesn’t exist anymore. The dd command won’t work. I got an error saying no such file or dir.
If I don’t unmount the volume, dd gives me a resource busy error. Please help.
Hmm, me too. Tried several times, Unhappy face.
-
#7
Article: boot0 Error: The Official Guide
Hmm, me too. Tried several times, Unhappy face.
just try the other method, boot into a working system then run multibeast set the target drive to your «boot0 error» drive that is connected via usb, after installation connect back to your system… works like magic.
-
#8
Article: boot0 Error: The Official Guide
just try the other method, boot into a working system then run multibeast set the target drive to your «boot0 error» drive that is connected via usb, after installation connect back to your system… works like magic.
You know somewhere it says read everything before posting….Im going to start doing that, I saw a load of data connectors on the second method and just freaked out, with an old external caddy..job done. Also the major thing for me was resetting the power patch thingy. Thank you stevesod…I like you.
-
#9
One thing to try first if you can is boot the system with unibeast then use multibeast to install/reinstall the boot loader to the target drive. I had this error happen on a couple of lion installs after cloning a backup version of 10.7.4 back to my regular launch drive after making changes that didn’t work out. Installed boot loader, rebooted like normal.
-
#10
Just a note about Mountain Lion, I’m not able to get this to work on a GA-Z77X with a Seagate Barracuda 1 TB. I get the awful Mac Multilingual restart screen. Gonna just buy a smaller drive and startup from that instead.

Getting Mac OS X to boot from your Hackintosh’s hard disk without any help can be a difficult process. Most of the time, using Multibeast to install UserDSDT or Easybeast will do the trick. However, you may get a boot0 error, instead of the normal Hackintosh bootscreen, after running Multibeast on your Hackintosh. This error might be caused by the sector format of your Hackintosh’s hard drive. If so, there’s a fix available, but it isn’t easy.
UPDATE (December 6, 2015): This issue no longer occurs when your Hackintosh uses Clover Bootloader (now the default in the Unibeast method of installing OS X).
Overview
Sometimes, a boot0 error just means that your Hackintosh’s bootloader wasn’t installed properly. In which case, boot into your Hackintosh with iBoot or Unibeast, and re-run UserDSDT/Easybeast with Multibeast again.
However, a boot0 error might also happen when your Hackintosh’s hard drive reads and writes files in 4096 byte sectors. Most hard drives read and write files in 512 byte sectors, and Chimera bootloader (the bootloader installed by UserDSDT and Easybeast) can’t be installed normally on a hard disk with 4096 byte sectors. To fix this problem, you have to unmount (turn off) the hard disk that Mac OS X is installed on, and then manually reinstall Chimera on that unmounted disk.
NOTE: Though this guide fixes the boot0 error for Chimera bootloader, it will also work for Chameleon bootloader, which is essentially the same thing.
What you need
You can’t fix this problem straight from your normal installation of Mac OS X, because it requires you to unmount your main hard disk, and it’s impossible for OS X to unmount itself. Instead, here’s what you’ll need:
- Anything with the Mac OS X Installer: To unmount the hard disk, you need to boot into something that will give you access to a different copy of Mac OS X, such as the Mac OS X Installer. This could be a Unibeast USB drive, Kakewalk USB drive, myHack USB drive, Snow Leopard installation DVD, xMove partition, or even a cloned copy of your hard disk.
- Standalone installer for Chimera bootloader: In this guide, you’ll be writing «boot1h», which is located inside the Chimera installer, onto your hard disk. This is the manual way to install Chimera. Registration on tonymacx86.com is required to download Chimera.
- A separate USB drive: You’ll need an extra USB drive to store the boot1h file on.
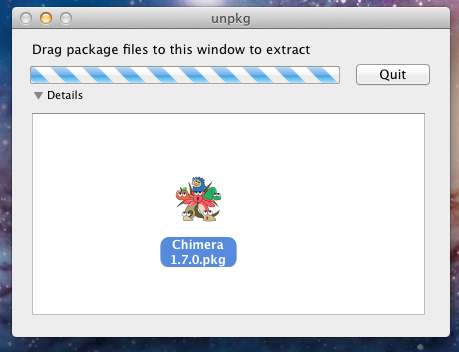
- unpkg: This app extracts the contents of .pkg installer files. You’ll need to use it to access the boot1h file inside Chimera.
Make sure that you’ve already installed Chimera bootloader on your Hackintosh (Chimera is included with UserDSDT and Easybeast). Obviously, it won’t work properly yet, but we’ll be fixing it. For now, you can boot into your Hackintosh with iBoot, your Unibeast USB drive, etc.
Procedure
Start unpkg, and drag the Chimera file that you downloaded onto the unpkg window. Unpkg will create a folder named «Chimera» on your desktop.
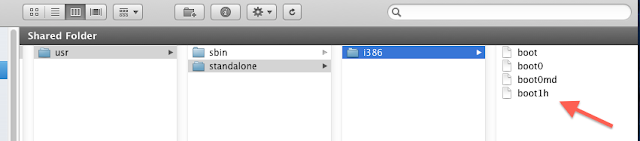
In the «Chimera» folder, go to usr->standalone->i386 and copy the boot1h file into a USB drive. Remember the name of the USB drive (you will need it later).
Restart your computer, and boot from your Unibeast USB drive, your retail Mac OS X Snow Leopard DVD, or your xMove partition. Don’t worry; you won’t have to reinstall Mac OS X.
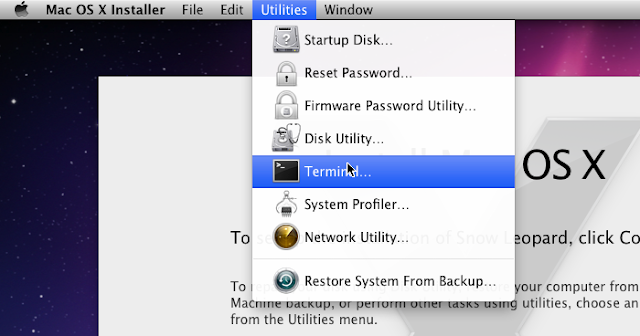
Once the Mac OS X Installer starts, open Disk Utility by opening the «Utilities» menu in the menu bar.

In Disk Utility, select the hard disk partition where Mac OS X is installed from the sidebar, and unmount it.
Once that’s done, close Disk Utility and open Terminal from the Utilities window.
In terminal, type:
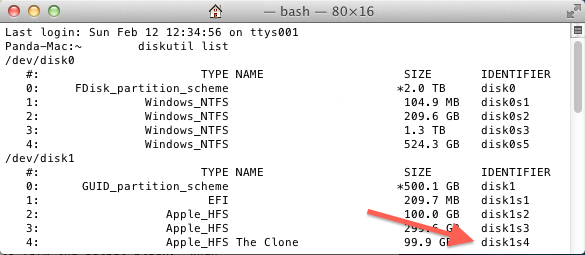
diskutil list
This will output a list of all of your hard disks. Find the name of the hard disk that Mac OS X is installed on (the one you just unmounted), and remember the hard disk’s identifier. You’ll probably want to write this down so that you can remember it later.
If you haven’t already, plug in the USB drive with the boot1h file inside. Then, in terminal, type:
cd /Volumes/»USB Drive»
Don’t forget to include the space between cd and /Volumes/»USB Drive».
Replace «USB Drive» with the name of your USB drive (include the quotation marks), which you should have remembered before. This command changes the folder that Terminal is working on (cd stands for «change directory). Now, everything you type in Terminal will apply to the files in your USB drive, including the boot1h file.
Once you’ve made Terminal focus on your USB drive, type:
dd if=boot1h of=/dev/identifier
Replace «identifier» (don’t include the quotation marks) with the identifier for your hard disk that you unmounted. This command reads the boot1h file, and then writes it to your hard disk.
Reboot, and the Chimera bootscreen will be able to load!
I’ve been slaving away at a hackintosh build for a week now, and no matter what I try, I cannot get past this simple error
Boot0:GPT
Boot0:test
Boot0:test
Boot0:GPT
Boot0:test
Boot0:test
Boot0:error
I tried following several different guides, to no avail. the first I tried to follow was this one
http://www.tonymacx86.com/25-boot0-error-official-guide.html
I only have access to one mac, so I tried the first method. However, whenever I start up terminal, everything has a prefix like this
bash-3.2#
I’m not experienced with terminal, so I’m not sure if this is what normally appears or how to get it to what I need.
I tried a different guide suggested by another redditor and still had the issue that I couldn’t find a volume because I couldn’t use the cd command
Any help would be appreciated. thanks!
EDIT: specs are as follows i5 3570k
Gigabyte B75M-HD3
8 GB 1600 Mhz RAM
no discrete video card
I am attempting a unibeast installation, I tried myhack and I got even worse results.
UPDATE: I’m not even sure how this worked, but I moved the mouse to a different USB port, and suddenly, the whole thing worked. I now have a fully functioning hackintosh.
When ever one tries to install a multiboot OSX Window box, you are most likely to run into the boot0:error, or a b0 error. what this means is that the partition that you intend to boot into did not have the active flag set. Most of these errors arise after you have installed 2 systems and it wouldn’t boot into either or both. This can be easily fixed by the following steps
1. Boot with mac OSX boot disc
2. Goto Utilities and enter Terminal
3. in the terminal type
diskutil list
Make a note of which disk has the partitions(rdisk0, rdisk1, etc)
4. type
fdisk -e /dev/rdisk0
you might see the MBR error, don’t worry about it.
5. type
p
and you should see all your partitions. At this point you would want to figure out which partitions you want to boot into first. If you have 2 partitions then flag the one you want to be primary last.
For example, you have 2 partitions, 1 and 2.Partition 2 holds windows 7 and 1 holds OSX Snow Leopard. You want to boot into OSX boot loader to choose which parition to boot, in this case you want to flag the windows partition active first, then flag the OSX partition active,
6. so you would type
f 2
write
y
f 1
write
y
exit
This would fix your problem, eject your CD and reboot.
На чтение 4 мин. Просмотров 179 Опубликовано 15.12.2019
Некоторые из вас, после установки загрузчика на жёсткий диск, могут увидеть не очень приятное сообщение на своём мониторе:
Это означает то, что ваш загрузчик не может прочитать загрузочную запись на вашем жёстком диске. Но не стоит расстраиваться и паниковать! Решение совсем простое,и не требует больших усилий. Для этого нам понадобится:
- Загрузочная флешка с OS X (Так как будем загружаться с неё, и работать в терминале);
- Файл boot1h2 для изменения загрузочного сектора;
- Флешка (любого размера, на которую будем закидывать файл boot1h2).
После того, как скачали файл boot1h2, копируем его в корень нашей флешки. Загружаемся с флешки, переходим в Утилиты-Терминал.
В терминале прописываем команду “Diskutil list” , чтобы просмотреть все диски и разделы, которые есть в системе. Должно получиться что-то вроде такого:

Далее, смотрим на каком диске установлена OS X, и на каком разделе у вас установлен загрузчик.
На моём примере у меня загрузчик на disk0 и разделе EFI, и имеет идентификатор disk0s1
Далее нужно отмонтировать тот диск, куда будет прописываться загрузочный сектор. Для этого в терминале набираем команду:
diskutil unmount идентификатор диска
Например: diskutil unmount disk0s1
Далее вам выдаст сообщение – disk0s1 unmount , то есть отмонтирован.
Затем, необходимо в терминале прописать последнюю команду, которая и перезапишет сам загрузочный сектор!
Содержание
- dd if=/Volumes/имя флешки/boot1h2 of=/dev/ваш идентификатор
- Решение №1: Использовать флешку с UniBeast
- Smexhy
- Smexhy
dd if=/Volumes/имя флешки/boot1h2 of=/dev/ваш идентификатор
Где “имя флешки“-соответственно имя вашей флешки,на которой в корне лежит файл boot1h2, а “ваш идентификатор” – соответственно идентификатор раздела,на который установлен загрузчик
Например: У меня имя флешки “Kingston“, а идентификатор disk0s1 ,соответственно команда будет такого вида:
dd if=/Volumes/Kingston/boot1h2 of=/dev/disk0s1
После ввода команды,нажимаем Enter, терминал запросит пароль – вводим пароль, и снова Enter.
Если всё сделано правильно – увидим запись, вроде такой:
2+0 records out
1024 bytes transferred in 0.001129 secs (982245 bytes/sec)
Выходим с терминала, перезагружаемся. Ошибка boot0: error должна исчезнуть!
После успешной установки хакинтоша может возникнуть ошибка при загрузке с жесткого диска, вот такая:
Loading Operating System …
boot0: GPT
boot0: test
boot0: test
boot0: GPT
boot0: test
boot0: test
boot0: error
В чем заключается проблема:
Т.к. объем жестких дисков с каждым годом увеличивается, производители вынуждены менять стандартный размер блока диска с 512 байт до 4096 байт. Эти жесткие диски известны как «Advanced Format» или 4K. Сначала размер увеличивали на дисках больше 1 ТБ, однако в скором времени изменения затронут все выпускаемые диски. Из-за этого загрузчик Chimera не может загрузиться как положено.
Прим.: Chimera не грузится, а вот разработчики Clover-загрузчика уже давно исправили эту проблему и загрузка происходит автоматически, без изменений.
Решение №1: Использовать флешку с UniBeast
Решение очень простое, но потребует наличие флешки с установщиком Mac OS.
Прим.: я советую всегда хранить флешку с установщиком Mac OS, в случае, если потребуется распаковать бэкап или выполнить доп. настройку, например, при апгрейде оборудования
Как исправить:
1. Загрузиться в установку Mac OS с флешки с UniBeast
2. Не запуская установку, запустить из меню сверху Дисковую Утилиту (Disk Utility), в ней размонтировать жесткий диск, на который установлена Mac OS X.
3. Запустить Терминал и выполнить следующую комманду:

Smexhy
Hi guys, I am trying to boot my OS X without the USB installation of the macOS, but unsuccessfully. It looks like there is no bootloader or something, even when I checked it and reinstalled clover in OS X to the latest version. What is the solution for this error? I checked online like billion guides, but either I didn’t understand what did they mean or I already tried.
I would be very grateful for any tips.
Smexhy
Fixed by this method from one forum:
It means you’re booting in legacy mode on hard disk with 4096 byte sectors instead of 512 byte ones and the boot1h file doesn’t get imaged correctly because of it.
You should find a copy of boot1h in /usr/standalone/i386 on the hard drive partition you already installed Clover to.
1. Copy boot1h to your USB OS X Installer in its root directory.
2. Reboot and boot up your USB OS X Installer.
3. Under menu go to Utilities -> Terminal
diskutil list
to figure out your needed hard drive partition’s device node where you installed OS X to. In this example I’ll use /dev/disk0s3.
diskutil unmount /dev/disk0s3
dd if=/boot1h of=/dev/rdisk0s3 bs=4096
6. Reboot and try booting from the hard drive.
 Добро пожаловать, Гость. Пожалуйста, войдите или зарегистрируйтесь.
После установки Mac OS X 10.4.6 на ноут Asus W3V…
- Сообщения: 13
- Зарегистрирован: 20 апр 2010
- Возраст: 39

Ошибка boot0:error
Всем привет!
Ребята, вот с какой проблемой столкнулся.
У меня есть ноутбук Asus W3V. Вот и захотелось поставить на него Mac OS X.
Порылся в нете и нашел конкретную версию на сайте
http://wiki.osx86project.org/
Это версия 10.4.6
Установка прошла успешно, но после первой перезагрузки вылетает вот такая ошибка:
boot0:testing
boot0:testing
boot0:testing
boot0:error
Подскажите, что это и как с этим бороться.
Спасибо.
-
- 1 Ответы
- 1850 Просмотры
-
Последнее сообщение fmmshut
28 июн 2010, 17:17
-
- 16 Ответы
- 1905 Просмотры
-
Последнее сообщение Icebolt
29 окт 2009, 14:04
-
- 2 Ответы
- 380 Просмотры
-
Последнее сообщение BABON
4 фев 2019, 14:44
-
- 4 Ответы
- 1107 Просмотры
-
Последнее сообщение Alex Dee
25 янв 2005, 21:11
-
- 6 Ответы
- 2446 Просмотры
-
Последнее сообщение Xaos™
11 июл 2011, 0:44
На чтение 4 мин. Опубликовано 15.12.2019
Некоторые из вас, после установки загрузчика на жёсткий диск, могут увидеть не очень приятное сообщение на своём мониторе:
Это означает то, что ваш загрузчик не может прочитать загрузочную запись на вашем жёстком диске. Но не стоит расстраиваться и паниковать! Решение совсем простое,и не требует больших усилий. Для этого нам понадобится:
- Загрузочная флешка с OS X (Так как будем загружаться с неё, и работать в терминале);
- Файл boot1h2 для изменения загрузочного сектора;
- Флешка (любого размера, на которую будем закидывать файл boot1h2).
После того, как скачали файл boot1h2, копируем его в корень нашей флешки. Загружаемся с флешки, переходим в Утилиты-Терминал.
В терминале прописываем команду “Diskutil list” , чтобы просмотреть все диски и разделы, которые есть в системе. Должно получиться что-то вроде такого:
Далее, смотрим на каком диске установлена OS X, и на каком разделе у вас установлен загрузчик.
На моём примере у меня загрузчик на disk0 и разделе EFI, и имеет идентификатор disk0s1
Далее нужно отмонтировать тот диск, куда будет прописываться загрузочный сектор. Для этого в терминале набираем команду:
diskutil unmount идентификатор диска
Например: diskutil unmount disk0s1
Далее вам выдаст сообщение – disk0s1 unmount , то есть отмонтирован.
Затем, необходимо в терминале прописать последнюю команду, которая и перезапишет сам загрузочный сектор!
Содержание
- dd if=/Volumes/имя флешки/boot1h2 of=/dev/ваш идентификатор
- Решение №1: Использовать флешку с UniBeast
- Smexhy
- Smexhy
dd if=/Volumes/имя флешки/boot1h2 of=/dev/ваш идентификатор
Где “имя флешки“-соответственно имя вашей флешки,на которой в корне лежит файл boot1h2, а “ваш идентификатор” – соответственно идентификатор раздела,на который установлен загрузчик
Например: У меня имя флешки “Kingston“, а идентификатор disk0s1 ,соответственно команда будет такого вида:
dd if=/Volumes/Kingston/boot1h2 of=/dev/disk0s1
После ввода команды,нажимаем Enter, терминал запросит пароль – вводим пароль, и снова Enter.
Если всё сделано правильно – увидим запись, вроде такой:
2+0 records out
1024 bytes transferred in 0.001129 secs (982245 bytes/sec)
Выходим с терминала, перезагружаемся. Ошибка boot0: error должна исчезнуть!
После успешной установки хакинтоша может возникнуть ошибка при загрузке с жесткого диска, вот такая:
Loading Operating System …
boot0: GPT
boot0: test
boot0: test
boot0: GPT
boot0: test
boot0: test
boot0: error
В чем заключается проблема:
Т.к. объем жестких дисков с каждым годом увеличивается, производители вынуждены менять стандартный размер блока диска с 512 байт до 4096 байт. Эти жесткие диски известны как «Advanced Format» или 4K. Сначала размер увеличивали на дисках больше 1 ТБ, однако в скором времени изменения затронут все выпускаемые диски. Из-за этого загрузчик Chimera не может загрузиться как положено.
Прим.: Chimera не грузится, а вот разработчики Clover-загрузчика уже давно исправили эту проблему и загрузка происходит автоматически, без изменений.
Решение №1: Использовать флешку с UniBeast
Решение очень простое, но потребует наличие флешки с установщиком Mac OS.
Прим.: я советую всегда хранить флешку с установщиком Mac OS, в случае, если потребуется распаковать бэкап или выполнить доп. настройку, например, при апгрейде оборудования
Как исправить:
1. Загрузиться в установку Mac OS с флешки с UniBeast
2. Не запуская установку, запустить из меню сверху Дисковую Утилиту (Disk Utility), в ней размонтировать жесткий диск, на который установлена Mac OS X.
3. Запустить Терминал и выполнить следующую комманду:
Smexhy
Hi guys, I am trying to boot my OS X without the USB installation of the macOS, but unsuccessfully. It looks like there is no bootloader or something, even when I checked it and reinstalled clover in OS X to the latest version. What is the solution for this error? I checked online like billion guides, but either I didn’t understand what did they mean or I already tried.
I would be very grateful for any tips.
Smexhy
Fixed by this method from one forum:
It means you’re booting in legacy mode on hard disk with 4096 byte sectors instead of 512 byte ones and the boot1h file doesn’t get imaged correctly because of it.
You should find a copy of boot1h in /usr/standalone/i386 on the hard drive partition you already installed Clover to.
1. Copy boot1h to your USB OS X Installer in its root directory.
2. Reboot and boot up your USB OS X Installer.
3. Under menu go to Utilities -> Terminal
diskutil list
to figure out your needed hard drive partition’s device node where you installed OS X to. In this example I’ll use /dev/disk0s3.
diskutil unmount /dev/disk0s3
dd if=/boot1h of=/dev/rdisk0s3 bs=4096
6. Reboot and try booting from the hard drive.