-
#1
Hi,
have a question for the experts
I wanted to update my Mi12 to the new stable.
I went into fastboot as usual and wanted to boot into TWRP via ADB.
I loaded the current one (twrp-3.6.2_12-v6.3_A12-cupid-skkk.img)from the Xiaomi.eu site and then renamed it to TWRP.
Then I did the steps as seen in the CMD.

After that, nothing worked. (Sweat). Have the error googled but found nothing.
Why does not work, where is the error, but has otherwise always worked?
Then I searched for an old version and found this. twrp-3.6.2_12-v3.9_A12-cupid-unofficialtwrp
With that it booted back into TWRP and I was able to install the stable rom.

With the version it has then booted back into TWRP and I could install the stable Rom.
Thank God now everything worked again, but why does the current TWRP not work?
Has anyone ever had this?
Regards
jo253

-
#2
The problem was that you used TWRP, which is intended for installation, not for booting.
Command to install (REC)TWRP:
Code:
fastboot flash recovery_ab twrp.imgBOOT / REC TWRP for some devices
For some devices there are different TWRPs available
1.) BOOT-TWRP -> fastboot boot twrp — boot TWRP only
2.) REC-TWRP -> fastboot flash recovery_ab twrp.img — install TWRP permanent
3.) BOOT-REC-TWRP -> you can use both fastboot commands -> see 1.) & 2.)
-
#3
Ok, that means I have to install it and not boot from it.
Then I will give that a try.
Thanks for the info
-
#4
have found the error, I loaded the TWRP from the site Xiaomi.eu and there is nothing about boot and REC.

On the other side of skkk that there is boot TWRP and REC TWRP.
No idea what then that is for a TWRP on the linked page of Katerpanne.
-
#5
Unfortunately, I made the same mistake and created the image
twrp-3.7.0_12-v6.5_A12-diting-skkk.img
via fastboot boot twrp-3.7.0_12-v6.5_A12-diting-skkk.img
installed.
Now my Xiaomi 12T Pro (Installed xiaomi.eu_multi_DITING_V13.0.7.0.SLFCNXM_v13-12-fastboot.zip) is running in FASTBOOT loop.
Currently there are no images available for download at https://dl.akr-developers.com/?dir=skkk/TWRP/A12/.
When I ditting the files for my smartphone
[BOOT]3.6.2_12-RedmiK50Ultra_v6.3_A12-diting-skkk_0868fc7f.zip
[BOOT]3.6.2_12-RedmiK50Ultra_v6.2_A12-diting-skkk_062ba6dc.zip
get and unzip the ZIPs, what command I need to run to finally boot in TWRP, then into the system to recover my data?
Unfortunately the command works
fastboot flash recovery_ab twrp-3.7.0_12-v6.5_A12-diting-skkk.img
as shown in the picture, does not work.
Please help me!
Many thanks
Tenker
EDIT:
Now I have also tried the two TWRP via
fastboot.exe flash recovery twrp-3.6.2_A12-diting-skkk.img
oder
fastboot.exe flash recovery twrp-3.7.0_12-v6.5_A12-diting-skkk.img
fastboot.exe reboot recovery
to install them.
It also worked, but I can not get out of the FASTBOOT.
-

Image4.jpg
76.2 KB
· Views: 191
-

Image5.jpg
132.6 KB
· Views: 189
Last edited: Nov 27, 2022
-
#6
I’ve made the same mistake as well, on a Poco F4 GT/K50 Gaming (ingres). I tried to install the twrp-3.7.0_12-v6.5_A12-ingres-skkk.img with these commands «fastboot flash recovery twrp.img» and «fastboot boot twrp.img» but now I’m stuck in a bootloop at Fastboot. Could need some help as well.
EDIT:
Thanks Tenker, you helped me quite a bit with that.
fastboot.exe flash recovery twrp.img
fastboot.exe reboot recovery
did the job for me, after that I connected the phone to my pc, put the twrp.img on the phone and installed it via advanced > install recovery ramdisk, and after that I flashed xiaomi.eu_multi_INGRES_V13.0.11.0.SLJCNXM_v13-12.zip again to get rid of the bootloop, now everything is working again.
Thank you
Last edited: Nov 27, 2022
-
#7
@Azumatz
Were you after the command
fastboot.exe reboot recovery
in TWRP?
Unfortunately TWRP does not start for me.
Did you not lose any data?
-
#8
Yes, after I performed «fastboot.exe reboot recovery» the recovery booted up for me. I didn’t lost any data because I didnt wiped the phone. I just flashed the rom again. To be fair I had the xiaomi.eu 13.0.11 rom installed before.
-
#9
Can you please help me further?
I have executed the commands (according to my image 5).
But then was further only FASTBOOT to see!
So once again
fastboot.exe reboot recovery
and wait?
-
#10
Reboot the phone, it’ll automaticly boot in FASTBOOT, after that connect it to a PC and perform the «fastboot.exe flash recovery twrp-3.7.0_12-v6.5_A12-diting-skkk.img» command. After that is done you perform «fastboot.exe reboot recovery». You should end up being in TWRP.
-
#11
made but I continue to see only FASTBOOT on the screen of my smartphone
-

Image7.jpg
106.8 KB
· Views: 175
Last edited: Nov 27, 2022
-
#12
made but I continue to see only FASTBOOT on the screen of my smartphone
I have the same problem on 12s Ultra. Did you find a solution?
-
#13
Yes, the solution I posted before was almost complete.
I used one of the fastboot versions (in my case xiaomi.eu_multi_ingres_v13.0.10.0.sljcnxm_v13-12-fastboot.zip, use the one that applys to your phone it must have fastboot at the end) of the xiaomi.eu Rom to fix the bootloop. I rebooted the phone, it automaticly booted into Fastboot mode, then I connected it via USB to my computer and started the windows_fastboot_update_rom.bat (dont use the first install one, the first install one wipes your phone)
After its done, your phone will reboot, but it’ll load indefinetly on the home screen, to fix that, you’ll go back into Fastboot mode. Perform «fastboot.exe flash recovery twrp.img» and after that «fastboot.exe reboot recovery» once thats done you should end up being in twrp, from there you need to change the language from chinese to english, and after that you put the twrp.img on the phone and install it via advanced > install recovery ramdisk. Once that’s done you can install the latest xiaomi.eu version.
-
#14
Yes, the solution I posted before was almost complete.
I used one of the fastboot versions (in my case xiaomi.eu_multi_ingres_v13.0.10.0.sljcnxm_v13-12-fastboot.zip, use the one that applys to your phone it must have fastboot at the end) of the xiaomi.eu Rom to fix the bootloop. I rebooted the phone, it automaticly booted into Fastboot mode, then I connected it via USB to my computer and started the windows_fastboot_update_rom.bat (dont use the first install one, the first install one wipes your phone)
After its done, your phone will reboot, but it’ll load indefinetly on the home screen, to fix that, you’ll go back into Fastboot mode. Perform «fastboot.exe flash recovery twrp.img» and after that «fastboot.exe reboot recovery» once thats done you should end up being in twrp, from there you need to change the language from chinese to english, and after that you put the twrp.img on the phone and install it via advanced > install recovery ramdisk. Once that’s done you can install the latest xiaomi.eu version.
Thanks. I flashed the fastboot version for 12sU (13.0.8) and it worked. It already included TWRP so I was able to use the updater app to update to the lastest version.

-
#15
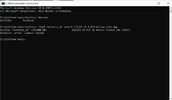
Hi,
have a question for the experts
I wanted to update my Mi12 to the new stable.
I went into fastboot as usual and wanted to boot into TWRP via ADB.
I loaded the current one (twrp-3.6.2_12-v6.3_A12-cupid-skkk.img)from the Xiaomi.eu site and then renamed it to TWRP.
Then I did the steps as seen in the CMD.
View attachment 44619
After that, nothing worked. (Sweat). Have the error googled but found nothing.
Why does not work, where is the error, but has otherwise always worked?
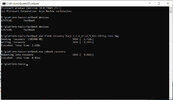
Then I searched for an old version and found this. twrp-3.6.2_12-v3.9_A12-cupid-unofficialtwrp
With that it booted back into TWRP and I was able to install the stable rom.
View attachment 44620
With the version it has then booted back into TWRP and I could install the stable Rom.
Thank God now everything worked again, but why does the current TWRP not work?
Has anyone ever had this?
Regards
jo253
Dude, this error has happened to me too. Then after restarting the phone in fastboot mode and trying several times it worked
-
#16
Situation of my MI 12 pro before:
TWRP — twrp-3.6.2_12-v6.3_A13-zeus-skkk.img
xiaomi.eu_multi_XM12Pro_V13.2.7.0.TLBCNXM_v13-13-fastboot.zip
Android 13 MIUI 13
MIUI 14 was available, so I thought it’s good when I upgrade to TWRP — twrp-3.7.0_12-v6.5_A13-zeus-skkk.img.
I installed TWRP with «fastboot flash recovery twrp-3.7.0_12-v6.5_A13-zeus-skkk.img».
Then I typed «fastboot boot twrp-3.7.0_12-v6.5_A13-zeus-skkk.img».
But after this, the error message above appears and it’s still in fastboot.
Restarting the phone (often) doesn’t helps, always the fastboot came. Tried also to install the «old» TWRP version again but same error.
Can’t be a mistake using «fastboot flash recovery twrp…» instead of «fastboot flash recovery_ab twrp…». I’ve read the recovery_ab is just for permanent installation.
Last try was install with the new TWRP and recovery_ab but again no luck.
What to do now? …. my new phone (soft)broken?
So I installed the new rom xiaomi.eu_multi_XM12Pro_V14.0.4.0.TLBCNXM_v14-13-fastboot.zip with the windows_fastboot_update_rom.bat.
Luckily no error during installation, booting into device was fine
Next thing I checked was TWRP…is it possible to boot into? And yes, it is — it has the version 3.7.0_12-v6.5_A13.
Seems during installation of the rom, something was fixed that I can boot into TWRP without problems. Now I’m just afraid to install an newer version of TWRP though at moment it is not necessary.
Now I have Android 13 MIUI 14
Will keep an eye at my phone
-
#17
Hy! Hm pfpfpfp
0. 12t Pro_codaneme: diting (xiaomi.eu_multi_DITING_V14.0.22.12.26.DEV_v14-13-fastboot)
1. Fastboot mod -> USB -> PC -> windows_fastboot_first_install_with_data_format
2. Rom start…
3. Reboot fastboot
4. Fastboot mod -> USB -> PC ->
— fastboot devices (ok)
— fastboot flash recovery_ab twrp.img (ok)
— fastboot reboot recovery (PC ok, Phone Fastboot mode, nothing happens.)
5. Phone -> power button…. (Phone Fastboot mode, nothing happens.) BOOTLOOP ???
6. Fastboot mod -> USB -> PC -> windows_fastboot_update_rom (xiaomi.eu_multi_DITING_V14.0.22.12.26.DEV_v14-13-fastboot)
7. Code starts. Code is running.
8. TWRP started! WTF ?? Hee ??
Can someone tell me why TWRP started like this?
thx.
-
#18
stuck in the same situation :
using 12s ultra and flashed twrp-3.7.0_12-v6.6_A13-thor-skkk.img with fastboot flash recovery_ab twrp.img successful but when typing fastboot.exe reboot recovery doesn’t start twrp. How to get into recovery now ? Tried fastboot boot twrp.img but I get FAILED (remote: Failed to load/authenticate boot image: Bad Buffer Size)
-
#20
tried this but fastboot reboot recovery doesn’t do anything
-
#21
Enter these commands.
Code:
fastboot erase misc
fastboot set_active a
fastboot reboot recovery
-
#22
fastboot set_active a
usage: fastboot [ <option> ] <command>
commands:
update <filename> reflash device from update.zip
…..
This command doesn’t works
my device is 12s ultra
-
#23
Updated latest fastboot and it works. Many thanks
-
#24
Enter these commands.
Code:
fastboot erase misc
fastboot set_active a
fastboot reboot recovery
fastboot flash recovery_ab recovery.img
fastboot reboot recovery
Hi, i wrote this two commands, but i get «unknown reboot recovery target» error. I tried to fastboot erase misc and fastboot set_active a commands. but got same error after «fastboot reboot recovery». I stucked in fastboot secreen.
Please help me, thanks

-
#25
fastboot flash recovery_ab recovery.img
fastboot reboot recoveryHi, i wrote this two commands, but i get «unknown reboot recovery target» error. I tried to fastboot erase misc and fastboot set_active a commands. but got same error after «fastboot reboot recovery». I stucked in fastboot secreen.
Please help me, thanks
A special invitation, just for you, to update your fastboot tool: https://xiaomi.eu/community/threads/installing-a-custom-recovery.67841/
Booting failed remote failed to load authenticate boot image load error
В теме нет куратора. Если в теме есть пользователь, желающий стать Куратором и соответствующий Требованиям для кандидатов, он может подать заявку, создав новую тему в разделе Хочу стать Куратором (предварительно изучив Правила и рекомендации для Кураторов).
До назначения куратора, по вопросам наполнения шапки, обращайтесь к модераторам раздела через кнопку  под сообщениями, на которые необходимо добавить ссылки.
Сообщение отредактировал snekt — 28.08.22, 08:31
11.0.9.0 xiaomi.eu
 -> sourceforge.net | androidfilehost.com — ОТОЗВАНА
11.0.7.0 xiaomi.eu
-> sourceforge.net | androidfilehost.com
Сообщение отредактировал Dogsly — 02.03.20, 12:03
Сообщение отредактировал Camerado — 13.03.20, 08:04
Optimization: Increased system stability
Optimization: Reduced system lag

Телефон подключен по юзб и в режиме фатбута.
Сообщение отредактировал draiv88 — 17.03.20, 02:58
Источник
Booting failed remote failed to load authenticate boot image load error
Пожелания по наполнению шапки направляйте сразу в виде кода в QMS, чтобы я не ломал голову)
В теме нет куратора. По вопросам наполнения шапки, обращайтесь к модераторам раздела через кнопку под сообщениями, на которые необходимо добавить ссылки.
Сообщение отредактировал destroyer71 — 14.07.21, 20:21
Сообщение отредактировал snekt — 03.01.20, 23:07
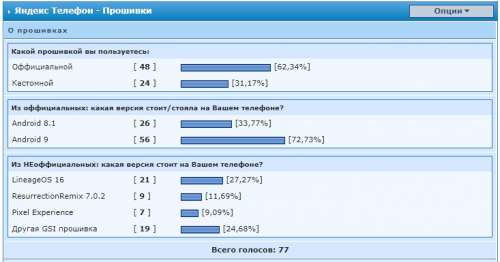
LineageOS 16 — это бесплатный, основанный сообществом дистрибутив прошивки Android 9.0 (Pie), который предназначен для повышения производительности и надежности Android-устройства.
LineageOS основан на проекте Android Open Source с дополнительными изменениями от многих разработчиков из сообщества Android, которые могут быть использованы без какой-либо необходимости в каком-либо приложении от Google. Вам необходимо будет устанавливать пакет приложений Google (GAPPS). LineageOS по-прежнему включает в себя различный закрытый аппаратно-зависимый код, который также медленно становится открытым в любом случае.
Все исходные коды для LineageOS доступны в репозитории LineageOS Github. Если вы хотите внести свой вклад в LineageOS, посетите наш Gerrit Code Review.
Для установки необходима разблокировка загрузчика!
Устанавливать можно поверх 8.1 и 9.0.
- 20191010
- исправлена неработа динамика, при перезагрузке с подключенными наушниками
- обноления LineageOS
- 20190923
- обноления LineageOS, включая обновления безопастности
- включена поддержка «фиксации» TTL в ядре
- 20190814
- добавлена поддержка профилей производительности
- 20190813
- первый публичный выпуск
- Экран
- Тачскрин (тач DJN должен работать нормально, необходимо тестирование от владельцев)
- RIL (Звонки, SMS, USSD, Мобильный интернет, LTE+, две симкарты)
- Запись телефонных разговоров с линии
- VoLTE (при установке поверх 9бета)
- NFC (включая бесконтактную оплату)
- Wi-Fi
- Bluetooth
- Сканер отпечатков пальца
- Камера (фото, видео)
- Звук
- Сенсоры (включая магнитный датчик для чехла)
- Автояркость
- GPS (Глонасс и т.д.)
- SD-крта (и adopted storage)
- SDcardFS, exFAT
- Selinux
- FM-радио (пока не понятно полностью ли оно реализовано в железе)
- скорее всего VoLTE при модеме из 8.1
- пока так и не понятно, как все-таки должна работать вторая задняя камера.
- перезагрузиться в fastboot (adb reboot-bootloader)
- разлочить (fastboot oem yandex_unlock)
- перезагрузить бутлоадер (выбираем кнопками громкости restart bootloader)
- запустить TWRP (fastboot boot twrp-3.3.1-0-20190804-Amber.img)
- если TWRP спросит пароль, нажать Cancel
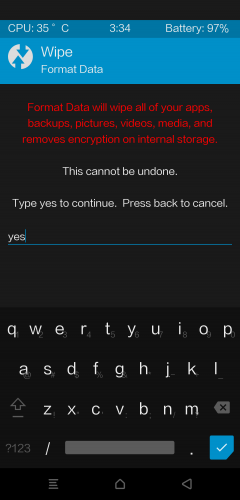
- сделать wipe data (в TWRP Wipe -> swipe to Factory Reset)
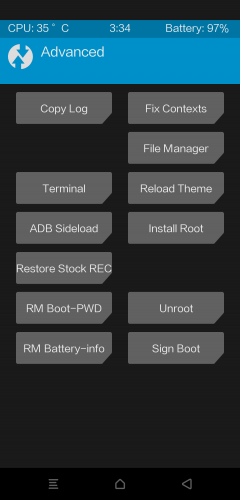
- запустить sideload в TWRP (Advanced -> ADB Sideload)
- запустить sideload на ПК (примерно через 3 сек после запуска в twrp) (adb sideload lineage-16.0-2019XXXX-UNOFFICIAL-Amber.zip)
Если необходимо установить Gapps (если не надо, то можно сразу перезагружаться в систему):
- пререзагрузиться в fastboot (в TWRP Reboot->Bootloader или adb reboot-bootloader)
- запустить TWRP (fastboot boot twrp-3.3.1-0-20190804-Amber.img)
- запустить sideload в TWRP (Advanced -> ADB Sideload)
- запустить sideload на ПК (примерно через 3 сек после запуска в twrp) (adb sideload open_gapps-arm64-9.0-nano-2019XXXX.zip)
- пререзагрузиться в систему (в TWRP Reboot->System или adb reboot)
дополнения к инструкции приветствуются
Сообщение отредактировал vm03 — 26.10.19, 10:56
Как прошить Ота официальной 9-ки через fastboot , при распаковке архива получается много img файлов?
Сообщение отредактировал ramazanov — 25.08.19, 09:16
Поставил Lineage OS, magisk, Viper FX, в целом всё работает,но не хотят нормально работать gapps pico (не синхронизируются контакты) и не работает мобильный интернет от слова совсем, хотя звонки работают нормально и под «шторкой» пишет что мобильный интернет подключен .
Интернет заработал, всё нормально. Осталось разобраться с гаппс, но это не проблема прошивки :rolleyes:
Сообщение отредактировал Drudl — 25.08.19, 10:35
Источник
Error when booting in TWRP «Failed to load/authenticate boot image: Bad Buffer Size»
jo253
Members


gogocar62
Members
The problem was that you used TWRP, which is intended for installation, not for booting.
Command to install (REC)TWRP:
jo253
Members
jo253
Members
Tenker
Members
Unfortunately, I made the same mistake and created the image
twrp-3.7.0_12-v6.5_A12-diting-skkk.img
via fastboot boot twrp-3.7.0_12-v6.5_A12-diting-skkk.img
installed.
Now my Xiaomi 12T Pro (Installed xiaomi.eu_multi_DITING_V13.0.7.0.SLFCNXM_v13-12-fastboot.zip) is running in FASTBOOT loop.
Currently there are no images available for download at https://dl.akr-developers.com/?dir=skkk/TWRP/A12/.
When I ditting the files for my smartphone
[BOOT]3.6.2_12-RedmiK50Ultra_v6.3_A12-diting-skkk_0868fc7f.zip
[BOOT]3.6.2_12-RedmiK50Ultra_v6.2_A12-diting-skkk_062ba6dc.zip
get and unzip the ZIPs, what command I need to run to finally boot in TWRP, then into the system to recover my data?
Unfortunately the command works
fastboot flash recovery_ab twrp-3.7.0_12-v6.5_A12-diting-skkk.img
Recovery for Xiaomi devices — Browse /diting at SourceForge.net
as shown in the picture, does not work.
Many thanks
Tenker
EDIT:
Now I have also tried the two TWRP via
fastboot.exe flash recovery twrp-3.6.2_A12-diting-skkk.img
oder
fastboot.exe flash recovery twrp-3.7.0_12-v6.5_A12-diting-skkk.img
fastboot.exe reboot recovery
to install them.
It also worked, but I can not get out of the FASTBOOT.
Attachments

Azumatz
Members
I’ve made the same mistake as well, on a Poco F4 GT/K50 Gaming (ingres). I tried to install the twrp-3.7.0_12-v6.5_A12-ingres-skkk.img with these commands «fastboot flash recovery twrp.img» and «fastboot boot twrp.img» but now I’m stuck in a bootloop at Fastboot. Could need some help as well.
EDIT:
Thanks Tenker, you helped me quite a bit with that.
fastboot.exe flash recovery twrp.img
fastboot.exe reboot recovery
did the job for me, after that I connected the phone to my pc, put the twrp.img on the phone and installed it via advanced > install recovery ramdisk, and after that I flashed xiaomi.eu_multi_INGRES_V13.0.11.0.SLJCNXM_v13-12.zip again to get rid of the bootloop, now everything is working again.
Thank you
Tenker
Members
Were you after the command
fastboot.exe reboot recovery
in TWRP?
Unfortunately TWRP does not start for me.
Did you not lose any data?
Azumatz
Members
Tenker
Members
Can you please help me further?
I have executed the commands (according to my image 5).
But then was further only FASTBOOT to see!
So once again
fastboot.exe reboot recovery
and wait?
Azumatz
Members
Tenker
Members
Attachments
Flipp
Members
Azumatz
Members
Yes, the solution I posted before was almost complete.
I used one of the fastboot versions (in my case xiaomi.eu_multi_ingres_v13.0.10.0.sljcnxm_v13-12-fastboot.zip, use the one that applys to your phone it must have fastboot at the end) of the xiaomi.eu Rom to fix the bootloop. I rebooted the phone, it automaticly booted into Fastboot mode, then I connected it via USB to my computer and started the windows_fastboot_update_rom.bat (dont use the first install one, the first install one wipes your phone)
After its done, your phone will reboot, but it’ll load indefinetly on the home screen, to fix that, you’ll go back into Fastboot mode. Perform «fastboot.exe flash recovery twrp.img» and after that «fastboot.exe reboot recovery» once thats done you should end up being in twrp, from there you need to change the language from chinese to english, and after that you put the twrp.img on the phone and install it via advanced > install recovery ramdisk. Once that’s done you can install the latest xiaomi.eu version.
Flipp
Members
Yes, the solution I posted before was almost complete.
I used one of the fastboot versions (in my case xiaomi.eu_multi_ingres_v13.0.10.0.sljcnxm_v13-12-fastboot.zip, use the one that applys to your phone it must have fastboot at the end) of the xiaomi.eu Rom to fix the bootloop. I rebooted the phone, it automaticly booted into Fastboot mode, then I connected it via USB to my computer and started the windows_fastboot_update_rom.bat (dont use the first install one, the first install one wipes your phone)
After its done, your phone will reboot, but it’ll load indefinetly on the home screen, to fix that, you’ll go back into Fastboot mode. Perform «fastboot.exe flash recovery twrp.img» and after that «fastboot.exe reboot recovery» once thats done you should end up being in twrp, from there you need to change the language from chinese to english, and after that you put the twrp.img on the phone and install it via advanced > install recovery ramdisk. Once that’s done you can install the latest xiaomi.eu version.

Abbashady
Members
heyne
Members
Situation of my MI 12 pro before:
TWRP — twrp-3.6.2_12-v6.3_A13-zeus-skkk.img
xiaomi.eu_multi_XM12Pro_V13.2.7.0.TLBCNXM_v13-13-fastboot.zip
Android 13 MIUI 13
MIUI 14 was available, so I thought it’s good when I upgrade to TWRP — twrp-3.7.0_12-v6.5_A13-zeus-skkk.img.
I installed TWRP with «fastboot flash recovery twrp-3.7.0_12-v6.5_A13-zeus-skkk.img».
Then I typed «fastboot boot twrp-3.7.0_12-v6.5_A13-zeus-skkk.img».
But after this, the error message above appears and it’s still in fastboot.
Restarting the phone (often) doesn’t helps, always the fastboot came. Tried also to install the «old» TWRP version again but same error.
Can’t be a mistake using «fastboot flash recovery twrp. » instead of «fastboot flash recovery_ab twrp. «. I’ve read the recovery_ab is just for permanent installation.
Last try was install with the new TWRP and recovery_ab but again no luck.
What to do now? . my new phone (soft)broken?
So I installed the new rom xiaomi.eu_multi_XM12Pro_V14.0.4.0.TLBCNXM_v14-13-fastboot.zip with the windows_fastboot_update_rom.bat.
Luckily no error during installation, booting into device was fine
Next thing I checked was TWRP. is it possible to boot into? And yes, it is — it has the version 3.7.0_12-v6.5_A13.
Seems during installation of the rom, something was fixed that I can boot into TWRP without problems. Now I’m just afraid to install an newer version of TWRP though at moment it is not necessary.
Now I have Android 13 MIUI 14
Will keep an eye at my phone
Источник
Booting failed remote failed to load authenticate boot image load error
- Если желаете остаться на офиц. прошивке, то можно загрузиться в систему и пользоваться ей, но TWRP «слетит» при первой же загрузке системы. Для загрузки в TWRP придется повторить пункт 6.
Чтобы TWRP не слетал, из TWRP прошейте архив Disable_Dm-Verity_ForceEncrypt_v1.4.zip, ниже. - Для установки локализованной/кастомной прошивки идем дальше.
- Можно не прошивать рекавери, а только разово подгрузить его, для этого используйте fastboot boot twrp.img без команды fastboot flash recovery twrp.img после выхода из TWRP восстановится стандартное рекавери.
- Можно стереть рекавери fastboot erase recovery
- FAQ по TWRP recovery
Для истории  xiaomi-mi-8-se-twrp3.2.1-7to-recovery-8.6.26.img ( 26.79 МБ )
Сообщение отредактировал D_Godunov — 02.04.19, 23:42
Архив прошивок Mi 8 SE sirius
Recovery — для установки из Recovery он же «три точки», TWRP;
Fastboot — для установки в режиме Fastboot (заяц) из MiFlash, EDL.
прекратите писать чушь и вводить в заблуждение остальных. отвечать мне не надо я не намерен с вами препираться.
Сообщение отредактировал D_Godunov — 22.06.19, 04:20
 Dogsly,
здесь тоже, но успешно, как я понял http://www.miui.com/fo…15875536&pid=228338452
а у того скорее всего проблема в «зашифрованной дате». надо было формат дата или прошить no-verity-opt-encrypt-6.0.zip
Сообщение отредактировал D_Godunov — 27.06.18, 13:07
1. Там есть две ссылки с разными размерами, кто знает что к чему там?
2. Присутствует ли в miui10 английский язык?
Сообщение отредактировал kraftz0r — 28.06.18, 11:16
Все крайне просто.
1. Скачал на ПК по ссылке предоставленной в шапке темы .zip архив прошивки China Developer 8.6.21 Recovery.
2. Залил прошивку в память телефона. На смартфоне была установлена MIUI 9 China Stable V9.5.8.0.OEBCNFA.
3. Прошил тело на MIUI 10 через три точки с с заблокированным загрузчиком.
p.s. При восстановлении данных с ми-аккаунта, наблюдались проблемы с Google Services. Play Market крашил постоянно. После перезагрузки тела и обновления всех приложений, сервисы обновились и все стало в порядке.
Google Play на Xiaomi Mi 8/SE с китайской прошивкой
Способ установки Google Play Store и исправление синхронизации контактов google (Google Contacts Sync).
Скачайте Google Installer затем распакуйте и установите на телефоне Google-Installer for Mi8.zip ( 159.7 КБ )
Разрешите установку из неизвестных источников.
Весь процесс установки популярно в картинках показан здесь http://en.miui.com/thread-2824236-1-1.html
После установки необходимо предоставить все разрешения. Зеленая иконка Security App › Manage › Permissions › Google Contacts Sync › разрешить все, т.е. зеленые галочки ✓ на всех пунктах.
Удачи :4PDA:
Сообщение отредактировал D_Godunov — 26.07.18, 19:20
TWRP для Mi 8 SE Sirius от LR.Team Китайский и английский языки. Версии Magisk между 16.6 и 18.2 не работают на Mi8SE.
❗ Внимание! Перед скачиванием TWRP читать обязательно: Пояснение о версиях TWRP (0928, 1102 и 1227), что куда шить.
- TWRP-3.3.1-1001 для MIUI 11 recovery-TWRP-3.3.1-1001-XIAOMI8SE-CN-wzsx150.img ( 64 МБ )
ТОЛЬКО для прошивок начиная с Dev 8.12.27 и выше, а также для Stable V10.3.1.0.PEBCNXM и выше
- TWRP-3.3.0-0423 для Android 9TWRP-3.3.0-0423-XIAOMI8SE-CN-wzsx150.zip ( 23.75 МБ )
TWRP-3.2.3-0331 Встроенный Magisk 19.0 для Android 9
TWRP-3.2.3-0331-XIAOMI8SE-CN-wzsx150.zip ( 23.74 МБ ) - TWRP-3.2.3-1227 ТОЛЬКО для прошивок начиная с Dev 8.12.27 и выше на Android 9 PieTWRP-3.2.3-1227-XIAOMI8SE-CN-wzsx150.zip ( 23.46 МБ )
Для прошивок до Dev 8.12.27 и ниже, а также для Stable V10.2.3.0.PEBCNXM и ниже
- TWRP-3.2.3-1217 Встроенный Magisk 16.6. для Android 8/9
TWRP-3.2.3-1217-XIAOMI8SE-CN-wzsx150.zip ( 23.46 МБ ) TWRP-3.2.3-1102 Встроенный Magisk 16.6. для Android 8/9TWRP-3.2.3-1102-XIAOMI8SE-CN-wzsx150.zip ( 23.41 МБ )
TWRP-3.2.3-0928-XIAOMI8SE-CN-wzsx150.zip ( 23.24 МБ )Встроен Magisk 16.4. для Android 8 Oreo
TWRP-3.2.3-0810-XIAOMI8SE-CN-wzsx150.zip ( 22.84 МБ ) То же самое, что и выше, но добавлен русский язык и шрифт от ув. DriffeX автора MiRoom.
Источник: http://portal.mi-room.ru/files/twrp-recovery/
TWRP-3.2.3-MIUI_8.12.27+ ТОЛЬКО для прошивок начиная с Dev 8.12.27 и выше на Android 9 Pie repack TurboPonyTWRP-3.2.3-MIUI_8.12.27+.img ( 27.37 МБ )
TWRP-3.2.3-1102_DX Встроенный Magisk 16.6. для Android 8/9 TWRP-3.2.3-1102_DX.img ( 25.18 МБ )


2019.04.23
1. Update to the latest 3.3.0 version, adjust the optimization
2019.03.31
1. Update the built-in root to magisk-v19.0, update of other built-in functions.
2. If the built-in root does not go into the system, Try it again, or completely remove the old magisk and root system.
3. Other optimizations
2018.12.27 update content:
1. Update the new version of the rom can not go to the twrp problem
2018.12.17 update content:
1. Update to fix some oil can not get twrp problem, repeatedly restart into the fastboot mode
2018.11.02 update:
1. Update support official Android 9 rom
2. Update and optimize some functions
3. Increase automatic The option to restart after the upgrade is completed. In the twrp setting, the default is automatic restart. Uncheck the box to not restart. It is convenient to perform some operations after the automatic upgrade to prevent the twrp from being overwritten, etc.
2018.9.28 update:
1. Add support to remove dm checksum and cancel forced encryption. The removal of the dm check function is mainly to prevent the card screen caused by the dm check and to prevent the official rec from covering the twrp.
Cancel the forced encryption function is used to permanently decrypt the data, you need to format the data, otherwise you can not enter the system, do not understand the machine is not recommended. Please be careful! !
2. Update the built-in magisk to 16.6, which is said to be the latest version of the card screen. The updated version will cause the card screen. At the same time fix the bug that the built-in magisk can’t brush the module.
2018.8.10 update:
1. Update to 3.2.3
2. Support new version official rom
3. Added signature boot and restore official rec and other functions
4. Built-in magisk 16.3, it is said that the high version will be card screen
5. Update the decryption data mechanism, theoretically decrypt the data more stable Some
important notes:
1. This rec supports data partition automatic decryption , encrypted data can be used normally under rec . The official system defaults to encrypting data partitions.
2. This rec support to brush into the official original full card brush package.
3. The bootloader must be unlocked to be able to brush into a third-party rec.
4. Built-in root system / remove root function, through the root system, you can also remove dm check, prevent card screen, and can make the system root privileges.
5. Set the screen password to the machine friend, enter twrp need to enter the lock screen password, otherwise you can not temporarily decrypt the data.
The root system is strongly recommended, otherwise twrp may be overwritten by the official rec.
Modify the optimization project:
* Delete redundant languages, keep English, add Chinese language, default Chinese.
* Modify the default configuration, for example, the default time zone is the East eight zone, the default screen brightness, the default vibration, the default 24 hours, the default return button is on the right, the default Chinese and so on.
* Modify the default configuration file path to reduce the possibility of conflicts with other people’s compiled versions.
* Adjust and optimize the Chinese text and description, and re-edit all the items one by one, which is more accurate, understandable and humanized. Also added display mtp enable off display, file operation result display, operation page title display, permission description when modifying permissions, etc. UI text display.
* Modify the unlocking interface and adjust the height of the sliding unlocking bar, which can effectively prevent misoperation (the original unlocking bar and the operating unlocking bar are of the same height. When the unlocking is completed, the sliding may be repeated, and the corresponding action is directly operated).
* Open more partition backup and restore, such as modern baseband partition, bootloader, persist, cust and other partitions, easy to back up the underlying files before the brush machine, brush the machine can restore the underlying file.
* Add the .bin and .mbn format image files to be flushed so that you do not need to use the zip flash package to flash the underlying files. The original version only supports the brushing of .img format image files. (Be sure to pay attention to the selected partition. )
* Solve the problem of interface jam when using the simulation operation (the simulation operation is mainly for testing the theme, and no actual operation).
* Added manual installation root function in Advanced Options > Root System. Add a display root system option on this basis for manual operation.
* Added the ability to cancel forced encryption, in Advanced Options > Unenforce Encryption. You can remove the official system to force encryption and cancel the check.
* Change the built-in root method, add magisk as the default root method.
* Fix some interface buttons and key operations.
* The adb/usb debug mode is enabled by default, which is convenient for operating the phone through the computer command line in rec mode.
* By default, MTP is enabled. In the rec state, the mobile phone can also be connected to a computer to facilitate file copying.
* Modify the logo interface, modify the header of the main interface page, and add the display phone model and team name, author name.
* Fix some logical relationships and modify some interface displays.
* Increase the removal of root function
* Increase the clear power-on password function
* Increase the clear battery information function
Important instructions:
1. The rec support data partition automatic decryption , encrypted data without formatting can also be used under rec normal. The official system defaults to encrypting data partitions.
2. This rec supports brushing into the official original full card brush package.
3. The bootloader must be unlocked in order to flush third-party rec.
4. Built-in root system / remove the root function, through the root system, you can also remove the dm check to prevent the card screen, while allowing the system root privileges.
The root system is strongly recommended, otherwise twrp may be covered by the official rec.
Сообщение отредактировал D_Godunov — 08.10.19, 09:23
Источник
I got a new Pixel 2 and wanted to load an TWRP backup from my previous Pixel 2 (with stock ROM) onto it, instead of setting it up freshly. So I
- booted the new device
- clicked through the settings
- entered developer mode and oem unlock
- rebooted
- unlocked the bootloader
- booted into TWRP (using
fastboot boot) - copied my old
/sdcardcontents to the device usingadb - used TWRP to restore the old backup (partitions
boot,systemanddata.
At that point I hoped I was done, and could just boot into my system. But unfortunately, it always just boots into the bootloader.
What did I do wrong?
And what do I do now?
- I tried to do a factory reset by using
fastboot flashing lock, and it claimed it would reset the phone, but it doesn’t. - I tried to enter recovery from the bootloader, but it just boots into the bootloader.
-
I tried to flash an official image from https://developers.google.com/android/images#walleye using
./flash-all.shbut it fails to update the bootloader:Sending 'bootloader_a' (38692 KB) OKAY [0.155s] Writing 'bootloader_a' (bootloader) Updating: partition:0 @00002000 sz=0000B000 FAILED (remote: 'Command Flash Error') fastboot: error: Command failedand then fails do do more:
-------------------------------------------- Bootloader Version...: mw8998-002.0059.00 Baseband Version.....: g8998-00008-1902121845 Serial Number........: … -------------------------------------------- extracting android-info.txt (0 MB) to RAM... Checking 'product' OKAY [0.000s] Checking 'version-bootloader' FAILED Device version-bootloader is 'mw8998-002.0059.00'. Update requires 'mw8998-002.0076.00'. fastboot: error: requirements not met! -
I tried to boot twrp again, but that does not work:
$ fastboot boot twrp-3.3.0-0-walleye.img
downloading 'boot.img'...
OKAY [  0.115s]
booting...
FAILED (remote: Failed to load/authenticate boot image: Load Error)
What else should I try?
![]()
Posts: 6
Threads: 1
Joined: Sep 2020
Reputation:
0
While partitioning my Redmi Note 5 Pro using this excellent tutorial for reference, the phone was restarted accidentally, and the system partition got deleted from the device, i.e. the partition table doesn’t contain the system partition.
Now the phone is stuck on fastboot, and I am not even able to flash recovery or system image to the phone using fastboot.
Following are the terminal commands I tried and the results if that helps:
Code:
fastboot flash boot OrangefoxRecovery.img
This command executes successfully, but after restarting the phone using fastboot boot OrangefoxRecovery.img or using the [power + volume up] button, the devices goes to the fastboot mode.
Code:
fastboot boot twrp-3.4.0-0-whyred.img

Sending 'boot.img' (42452 KB)                      OKAY [  1.065s]

Booting                                            FAILED (remote: 'Failed to load/authenticate boot image: 00000050')

fastboot: error: Command failed
Code:
fastboot getvar all

(bootloader) crc:1

(bootloader) anti:4

(bootloader) token:VQEBIAEQ9Tig3evCCIbvIZd+UDKaiAMGd2h5cmVkAgQi+ltp

(bootloader) hw-revision:10000

(bootloader) unlocked:yes

(bootloader) off-mode-charge:0

(bootloader) charger-screen-enabled:0

(bootloader) battery-soc-ok:yes

(bootloader) battery-voltage:4064

(bootloader) version-baseband:

(bootloader) version-bootloader:

(bootloader) erase-block-size: 0x200

(bootloader) logical-block-size: 0x200

(bootloader) variant:SDM EMMC

(bootloader) partition-type:vendor:raw

(bootloader) partition-size:vendor: 0x8AC00000

(bootloader) partition-type:cache:f2fs

(bootloader) partition-size:cache: 0x11E00000

(bootloader) partition-type:recovery:raw

(bootloader) partition-size:recovery: 0x4000000

(bootloader) partition-type:boot:raw

(bootloader) partition-size:boot: 0x4000000

(bootloader) partition-type:rawdump:raw

(bootloader) partition-size:rawdump: 0x8000000

(bootloader) partition-type:modem:raw

(bootloader) partition-size:modem: 0xC000000

(bootloader) partition-type:logdump:raw

(bootloader) partition-size:logdump: 0x4000000

(bootloader) partition-type:persistbak:raw

(bootloader) partition-size:persistbak: 0x2000000

(bootloader) partition-type:persist:raw

(bootloader) partition-size:persist: 0x2000000

(bootloader) partition-type:splash:raw

(bootloader) partition-size:splash: 0x4000000

(bootloader) partition-type:bk2:raw

(bootloader) partition-size:bk2: 0x2000000

(bootloader) partition-type:mdtp:raw

(bootloader) partition-size:mdtp: 0x2000000

(bootloader) partition-type:bk1:raw

(bootloader) partition-size:bk1: 0x1800000

(bootloader) partition-type:dsp:raw

(bootloader) partition-size:dsp: 0x1000000

(bootloader) partition-type:modemst2:raw

(bootloader) partition-size:modemst2: 0x800000

(bootloader) partition-type:modemst1:raw

(bootloader) partition-size:modemst1: 0x800000

(bootloader) partition-type:fsg:raw

(bootloader) partition-size:fsg: 0x800000

(bootloader) partition-type:logfs:raw

(bootloader) partition-size:logfs: 0x800000

(bootloader) partition-type:devinfo:raw

(bootloader) partition-size:devinfo: 0x800000

(bootloader) partition-type:misc:raw

(bootloader) partition-size:misc: 0x400000

(bootloader) partition-type:xblbak:raw

(bootloader) partition-size:xblbak: 0x380000

(bootloader) partition-type:xbl:raw

(bootloader) partition-size:xbl: 0x380000

(bootloader) partition-type:sti:raw

(bootloader) partition-size:sti: 0x200000

(bootloader) partition-type:bluetooth:raw

(bootloader) partition-size:bluetooth: 0x100000

(bootloader) partition-type:keymasterbak:raw

(bootloader) partition-size:keymasterbak: 0x100000

(bootloader) partition-type:keymaster:raw

(bootloader) partition-size:keymaster: 0x100000

(bootloader) partition-type:mdtpsecappbak:raw

(bootloader) partition-size:mdtpsecappbak: 0x400000

(bootloader) partition-type:mdtpsecapp:raw

(bootloader) partition-size:mdtpsecapp: 0x400000

(bootloader) partition-type:tzbak:raw

(bootloader) partition-size:tzbak: 0x400000

(bootloader) partition-type:tz:raw

(bootloader) partition-size:tz: 0x400000

(bootloader) partition-type:devcfg:raw

(bootloader) partition-size:devcfg: 0x100000

(bootloader) partition-type:devcfgbak:raw

(bootloader) partition-size:devcfgbak: 0x100000

(bootloader) partition-type:toolsfv:raw

(bootloader) partition-size:toolsfv: 0x100000

(bootloader) partition-type:ddr:raw

(bootloader) partition-size:ddr: 0x100000

(bootloader) partition-type:dip:raw

(bootloader) partition-size:dip: 0x100000

(bootloader) partition-type:ablbak:raw

(bootloader) partition-size:ablbak: 0x100000

(bootloader) partition-type:abl:raw

(bootloader) partition-size:abl: 0x100000

(bootloader) partition-type:cmnlib64bak:raw

(bootloader) partition-size:cmnlib64bak: 0x100000

(bootloader) partition-type:cmnlib64:raw

(bootloader) partition-size:cmnlib64: 0x100000

(bootloader) partition-type:cmnlibbak:raw

(bootloader) partition-size:cmnlibbak: 0x100000

(bootloader) partition-type:cmnlib:raw

(bootloader) partition-size:cmnlib: 0x100000

(bootloader) partition-type:pmicbak:raw

(bootloader) partition-size:pmicbak: 0x80000

(bootloader) partition-type:pmic:raw

(bootloader) partition-size:pmic: 0x80000

(bootloader) partition-type:hypbak:raw

(bootloader) partition-size:hypbak: 0x80000

(bootloader) partition-type:hyp:raw

(bootloader) partition-size:hyp: 0x80000

(bootloader) partition-type:rpmbak:raw

(bootloader) partition-size:rpmbak: 0x80000

(bootloader) partition-type:rpm:raw

(bootloader) partition-size:rpm: 0x80000

(bootloader) partition-type:frp:raw

(bootloader) partition-size:frp: 0x80000

(bootloader) partition-type:keystore:raw

(bootloader) partition-size:keystore: 0x80000

(bootloader) partition-type:msadp:raw

(bootloader) partition-size:msadp: 0x40000

(bootloader) partition-type:apdp:raw

(bootloader) partition-size:apdp: 0x40000

(bootloader) partition-type:storsecbak:raw

(bootloader) partition-size:storsecbak: 0x20000

(bootloader) partition-type:storsec:raw

(bootloader) partition-size:storsec: 0x20000

(bootloader) partition-type:vbmetabak:raw

(bootloader) partition-size:vbmetabak: 0x10000

(bootloader) partition-type:vbmeta:raw

(bootloader) partition-size:vbmeta: 0x10000

(bootloader) partition-type:sec:raw

(bootloader) partition-size:sec: 0x5000

(bootloader) partition-type:ssd:raw

(bootloader) partition-size:ssd: 0x8000

(bootloader) partition-type:limits:raw

(bootloader) partition-size:limits: 0x8000

(bootloader) partition-type:fsc:raw

(bootloader) partition-size:fsc: 0x2000

(bootloader) partition-type:dpo:raw

(bootloader) partition-size:dpo: 0x2000

(bootloader) partition-type:switch:raw

(bootloader) partition-size:switch: 0x2000

(bootloader) secure:yes

(bootloader) serialno:44420506

(bootloader) product:whyred

(bootloader) max-download-size:536870912

(bootloader) kernel:uefi

all:

Finished. Total time: 0.012s
Partitions that are missing:
system
vendor
cust
userdata
ADB doesn’t work in the fastboot mode:
Code:
adb devices
// doesn't return any device id
![]()
X3non
Recognized Contributor
![]()
![]()
![]()
![]()
![]()
Posts: 22,062
Threads: 571
Joined: Jul 2014
Reputation:
332
(22-09-2020, 01:02 PM)[email protected] Wrote: …
Now the phone is stuck on fastboot, and I am not even able to flash recovery or system image to the phone using fastboot.
…
does both the orangefox and twrp3.4 recovery work on this your device? i.e have you ever confirmed them to boot up on this device?
have you tried the command @ https://www.hovatek.com/forum/thread-21410.html ? ; see if that’ll get you back into recovery mode (twrp)
have you tried flashing full stock firmware using miflash?
![]()
Posts: 6
Threads: 1
Joined: Sep 2020
Reputation:
0
(23-09-2020, 09:45 AM)X3non Wrote:
(22-09-2020, 01:02 PM)[email protected] Wrote: …
Now the phone is stuck on fastboot, and I am not even able to flash recovery or system image to the phone using fastboot.
…does both the orangefox and twrp3.4 recovery work on this your device? i.e have you ever confirmed them to boot up on this device?
have you tried the command @ https://www.hovatek.com/forum/thread-21410.html ? ; see if that’ll get you back into recovery mode (twrp)
have you tried flashing full stock firmware using miflash?Hi, yes, I tried flasing stock rom using miflash tool. However, I got an error «system partion not found» while flashing the stock rom.
Also, I am not able get into the recovery mode.The link you mentioned didn’t work for me, and the device is not recognised with the «adb devices» command.
![]()
X3non
Recognized Contributor
![]()
![]()
![]()
![]()
![]()
Posts: 22,062
Threads: 571
Joined: Jul 2014
Reputation:
332
(23-09-2020, 12:48 PM)[email protected] Wrote: …
did you try the command below using the both twrp recoveries you have?
Code:
fastboot boot twrp.img
you mentioned that you have previously used the orangefox twrp on this very device before. you ran the command below. this command is meant to flash the twrp to boot partition meaning that you don’t need to reboot to recovery. simple reboot the phone as normal i.e «fastboot reboot» then check if it boots the twrp that has been flashed into boot partition
Code:
fastboot flash boot orangefoxtwrp.img
lastlly, try flashing back stock boot into boot partition then flash stock recovery into recovery and confirm if you can boot into recovery mode using key combo
![]()
Posts: 6
Threads: 1
Joined: Sep 2020
Reputation:
0
(25-09-2020, 06:44 PM)X3non Wrote:
(23-09-2020, 12:48 PM)[email protected] Wrote: …
did you try the command below using the both twrp recoveries you have?
Code:
fastboot boot twrp.imgyou mentioned that you have previously used the orangefox twrp on this very device before. you ran the command below. this command is meant to flash the twrp to boot partition meaning that you don’t need to reboot to recovery. simple reboot the phone as normal i.e «fastboot reboot» then check if it boots the twrp that has been flashed into boot partition
Code:
fastboot flash boot orangefoxtwrp.imglastlly, try flashing back stock boot into boot partition then flash stock recovery into recovery and confirm if you can boot into recovery mode using key combo
Hi,
Any recovery (twrp or Orangefox) flash command results in following error:
Code:
fastboot boot twrp-3.4.0-0-whyred.img

Sending 'boot.img' (42452 KB)                      OKAY [  1.065s]

Booting                                            FAILED (remote: 'Failed to load/authenticate boot image: 00000050')

fastboot: error: Command failed
Also, after
Code:
fastboot flash boot StockRecovery.imgthe device boots into fastboot mode only when using hardware buttons to reboot into recovery (Power + Volume Up).
![]()
X3non
Recognized Contributor
![]()
![]()
![]()
![]()
![]()
Posts: 22,062
Threads: 571
Joined: Jul 2014
Reputation:
332
(26-09-2020, 02:42 AM)[email protected] Wrote: …
seeing as there’s no means to boot back into twrp then you must flash the device in edl mode
see the link @ https://forum.xda-developers.com/redmi-n…o-t3779267 for how to get your device into edl mode
download the firehose programmer file @ [ Login / Register to download free]
within your stock firmware folder, replace the existing firehose programmer file with the file you download from the link above
then you can flash the device using miflash (edl) @ https://www.hovatek.com/forum/thread-27300.html
![]()
Posts: 6
Threads: 1
Joined: Sep 2020
Reputation:
0
(26-09-2020, 06:06 PM)X3non Wrote:
(26-09-2020, 02:42 AM)[email protected] Wrote: …
seeing as there’s no means to boot back into twrp then you must flash the device in edl mode
see the link @ https://forum.xda-developers.com/redmi-n…o-t3779267 for how to get your device into edl mode
download the firehose programmer file @ [ Login / Register to download free]
within your stock firmware folder, replace the existing firehose programmer file with the file you download from the link above
then you can flash the device using miflash (edl) @ https://www.hovatek.com/forum/thread-27300.html
You are a savior X3non..! It wouldn’t have been possible w/o your help..! my phone is back to life now..! Thank you so much…! really appreciate your help..! 
![]()
Posts: 1
Threads: 0
Joined: Mar 2021
Reputation:
0
I am facing exact same problem is there any solution of it
![]()
X3non
Recognized Contributor
![]()
![]()
![]()
![]()
![]()
Posts: 22,062
Threads: 571
Joined: Jul 2014
Reputation:
332
(08-03-2021, 07:44 PM)mrinmoy biswas Wrote: I am facing exact same problem is there any solution of it
if you are using the same device as the OP then the solution is two posts above your post @ https://www.hovatek.com/forum/thread-366…#pid202117
if you still have any other problems then create a new thread for your device issue by clicking «ask question» at the top
In this guide, we will show you the steps to unbrick your Poco F3 device via Fastboot Commands. When it comes to offering the absolute valuer for money, devices from Xiaomi are right there at the top. Be it its Redmi series, its Mi lineup, or the popular Poco devices, all of them have managed to encapsulate quite a lot of audience base.
However, it is the Poco lineup that seems to have caught the attention of the masses. Starting from its F1 all the way up to the latest F3, they are the closest to giving a tough competition to the likes of Nord. Not only do these devices manage to checkmark all the prerequisites for everyday usage, but they are quite active in custom development as well.
In this regard, the new addition to this family, the F3, has already welcomed a plethora of mods. Be it for flashing custom ROMs or installing custom recoveries, there’s a lot to try out. But carrying out these tweaks have their downsides as well. If you flash an incorrect binary or flash the correct one to the incorrect partition, then you are inviting trouble.
There’s every chance of the device getting end up in a bootloop or softbrick state. Fortunately, there’s a handy way out from this. You could easily unbrick your Poco F3 device by flashing the stock firmware via Fastboot Commands. And this guide shall help you with just that. So without any further ado, let’s get started.

The below instructions are listed under separate sections for ease of understanding. Make sure to follow in the exact same sequence as mentioned. Droidwin and its members wouldn’t be held responsible in case of a thermonuclear war, your alarm doesn’t wake you up, or if anything happens to your device and data by performing the below steps.
- Download Patched Firehose File (prog_emmc_firehose.mbn) for 600+ Android Devices
- Unbrick Redmi Note 7 | Note 8 | Note 9 Series: The Fix?
- Fix Mi Account Authorization | Unbrick Xiaomi | EDL Mode
- How to Bypass Xiaomi Account Verification via Mi Unlock Tool
STEP 1: Install Android SDK
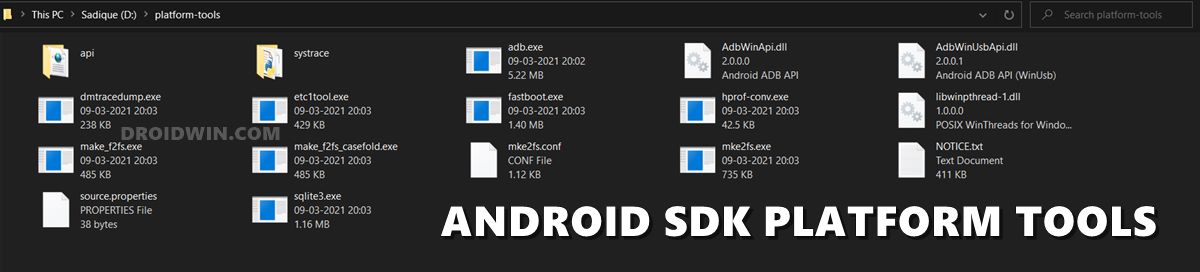
First and foremost, you will have to install the Android SDK Platform Tools on your PC. This is the official ADB and Fastboot binary provided by Google and is the only recommended one. So download it and then extract it to any convenient location on your PC. Doing so will give you the platform-tools folder, which will be used throughout this guide.
STEP 2: Download Poco F3 Fastboot ROM
Next up, download the Fastboot ROM for your device. As for this guide, I am using the following ROM file: Poco F3 Global (alioth) V12.5.2.0.RKHMIXM Fastboot ROM. You are free to try any version of your choice, but it is recommended to try the newer builds only and more importantly, of your region.

Here is how to understand the Xiaomi Fastboot firmware version:
- V12.5.2.0 – Firmware version
- R – Android version (R-> Android 11).
- KH – Smartphone model code (KH = Poco F3)
- MI – Firmware build type (IN for India | MI for Global | EU for Europe)
- XM – Firmware version code
Furthermore, the downloaded firmware file might be in .gz format. So right-click on it, select Rename and change its extension to TGZ. Then reply Yes in the confirmation dialog box. Once that is done, you may extract this TGZ file via WinRAR/7ZIP, etc and proceed ahead to the next step to unbrick Poco F3 via Fastboot Commands.
STEP 3: Move Poco F3 Fastboot ROM Files to ADB Folder
- Head over to the folder where you have extracted the firmware.
- Then go to the Images folder present inside this extracted firmware and you should find the following files:

- Select all these files via Ctrl+A shortcut keys and copy them to the platform-tools folder. This is the same folder that you have got after installing the Android SDK.
- Once done, proceed to the next step to unbrick your Poco F3 device via Fastboot Commands.

STEP 4: Boot Bootloop/Soft Bricked Poco F3 to Fastboot Mode
- First off, boot your device to the Fastboot Mode. For that, power it off.
- If you cannot do so (due to your device being stuck in a bootloop) then the only option left is to let the entire battery drain out.
- Once your device has turned off, press and hold the Volume Down and Power buttons for a few seconds. Then connect it to the charger at the very instance so that it gets some power to boot up to Fastboot Mode.
- This will boot your device to Fastboot Mode. You should see the famous Mi Bunny Logo with the Fastboot text underneath it.

Fastboot Mode in Xiaomi

STEP 5: Unbrick Poco F3 via Fastboot Commands
- Let’s now start off with the fastboot commands and flash each of these partition files to your device.
- For that, head over to the platform-tools folder where you have extracted the Fastboot ROM.
- Go to its address bar, type in CMD, and hit Enter. This will launch the Command Prompt window.

- Now execute the below commands in this CMD window. Don’t copy-paste them all at once, rather execute one command at a time:
fastboot erase boot_ab
fastboot flash xbl_ab xbl.elf
fastboot flash xbl_config_ab xbl_config.elf
fastboot flash abl_ab abl.elf
fastboot flash tz_ab tz.mbn
fastboot flash hyp_ab hyp.mbn
fastboot flash devcfg_ab devcfg.mbn
fastboot flash storsec storsec.mbn
fastboot flash bluetooth_ab BTFM.bin
fastboot flash cmnlib_ab cmnlib.mbn
fastboot flash cmnlib64_ab cmnlib64.mbn
fastboot flash modem_ab NON-HLOS.bin
fastboot flash dsp_ab dspso.bin
fastboot flash keymaster_ab km41.mbn
fastboot flash logo logo.img
fastboot flash featenabler_ab featenabler.mbn
fastboot flash aop_ab aop.mbn
fastboot flash qupfw_ab qupv3fw.elf
fastboot flash uefisecapp_ab uefi_sec.mbn
fastboot flash multiimgoem_ab multi_image.mbn
fastboot flash super super.img
fastboot flash misc misc.img
fastboot flash vbmeta_ab vbmeta.img
fastboot flash dtbo_ab dtbo.img
fastboot flash vbmeta_system_ab vbmeta_system.img
fastboot erase metadata
fastboot flash userdata userdata.img
fastboot flash cust cust.img
fastboot erase imagefv_ab
fastboot flash imagefv_ab imagefv.elf
fastboot flash rescue rescue.img
fastboot flash spunvm spunvm.bin
fastboot flash vendor_boot_ab vendor_boot.img
fastboot flash logfs logfs_ufs_8mb.bin
fastboot flash boot_ab boot.img
fastboot set_active a
fastboot reboot
- Once you have successfully executed all the above commands, your device will reboot to the OS. And your active slot will be set to A (due to the second last command that we executed).

With this, we conclude the guide on how to unbrick Poco F3 via Fastboot Commands. The best part about this tutorial is the fact that it doesn’t require any Poco F3 Patched Firehose File (prog_emmc_firehose.mbn) or the prog_firehose_ddr_unbrick.elf file.
Furthermore, we didn’t need to make use of the Mi Flash Tool either. With that said, if you have any queries concerning the aforementioned steps, do let us know in the comments section below. We will get back to you with a solution at the earliest.
About Chief Editor

Sadique Hassan
administrator
A technical geek by birth, he always has a keen interest in the Android platform right since the birth of the HTC Dream. The open-source environment always seems to intrigue him with the plethora of options available at his fingertips. “MBA by profession, blogger by choice!”
|
|
|
Message#1
|
|
|
Ebony merchant
Topics Curator Reputation: |
Xiaomi Mi 8 SE — MIUI Firmware Important information!
Drivers and Utilities ADB and Fastboot install one of your choice
Official firmware Official download pages:H www.miui.com | Instructions China Stable Recovery— for installation from Recovery it is also «three points», TWRP; Android 9 Pie
China Developer Recovery— for installation from Recovery it is also «three points», TWRP; Android 9 Pie
Localized firmware based on official All localized / custom firmware should be installed only on the UNLOCKED bootloader from TWRP Recovery
Recovery / Root / Kernel
Recovery download
Root
Kernel
miscellanea
For filling caps, please contact D_Godunov atQMS Post has been editedD_Godunov — 18.05.19, 10:59 Reason for editing: Dev 9.5.16. V10.3.1.0.PEBCNXM. EdXposed (Xposed for Android 9) in Other. |


|
Message#2
|
|
|
Ebony merchant
Topics Curator Reputation: |
TWRP Recovery for Mi 8 SE and firmware Installation Requirements
I recommend installing TWRP recovery from wzsx150 LR.Team,fast. Before downloading, carefully read the explanation about the versions of TWRP. Installation:
Possible problems AT: When you connect the cable, the phone restarts. About the first screen of TWRP When you first start TWRP will ask about the right to modify the system. This moment must be considered carefully.
Notes
Stock recovery Stock recovery from sirius_images_V9.5.6.0.OEBCNFA DownloadDisable_Dm-Verity_ForceEncrypt_v1.4.zip Universal Recovery Flash Driver Post has been editedD_Godunov — 02.04.19, 23:42 Reason for editing: Edit ——————— Winner of the Walk of Fame 2018-2019! |

 recovery.img(64 MB)
|
Message#3
|
|
|
Ebony merchant
Topics Curator Reputation: |
Archive firmware Mi 8 SE sirius Official download pages:H www.miui.com | Instructions China Stable Recovery— for installation from Recovery it is also «three points», TWRP; Android 9 Pie
Android 8.1 Oreo
China Developer Recovery— for installation from Recovery it is also «three points», TWRP; Android 9 Pie
Android 8.1 Oreo
mr.proper.vovo @ 06/27/18 10:56 Again, check out the official mi forum. mr.proper.vovo @ 06/27/18 10:49 If you are going through a fastboot, they will be erased, but there are two more methods of firmware study together If you want to get a new one, you can update it with the ROM version using MIUI full ROM pack. If you upgrade from MIUI to ROMI based on Android N, please follow it Fastboot update. Recovery update might cause upgrade failure. Method 2: Recovery Updatehttp://en.miui.com/a-233.html If you want to get a new one, you can update it with the ROM version using MIUI full ROM pack. This method is not applicable to any bootloader. How to Upgrade to MIUI 10?http://en.miui.com/thread-2954622-1-1.html 1. Please don’t forget to back up your data before upgrading to MIUI 10. Stop writing nonsense and mislead the rest. I do not need to answer. I do not intend to bicker with you. mr.proper.vovo @ 06/27/18 08:45 In the update menu of the device I applied for the beta test MIUI 10. I’m waiting for an answer. The miui10 beta tester set has long been discontinued. You have applied for beta testing in general. for Russia the set was held herehttps://c.mi.com/thread-1180862-1-0.html Post has been editedD_Godunov — 25.03.19, 03:45 Reason for editing: Updated firmware archive ——————— Winner of the Walk of Fame 2018-2019! |

|
Message#4
|
|
|
Experienced
Group: Friendswww.savagemessiahzine.com Reputation: |
|
|
Message#7
|
|
|
Local
Group: Friendswww.savagemessiahzine.com Reputation: |
People how can you roll back to the firmware and twrp to return the back please tell me? ——————— lun |
|
Message#8
|
|
|
Ebony merchant
Topics Curator Reputation: |
lun34822 @ 06/27/18 12:59 How can I roll back to the firmware if the loader is open, then from fastboot otherwise in the update through three points. lun34822 @ 06/27/18 12:59 and twrp back of in the sense of native recovery? I wrote above as the file with my native recovery added instructions below. ——————— Winner of the Walk of Fame 2018-2019! |
|
Message#9
|
|
|
Questions? In Guadeloupe!
Group: Honorary Gameday Reputation: |
M Topic added toCatalogand moved to subsectionXiaomi ——————— We checked — the fetal unreliable, do not trust them! (c) «Electronics» |
 28.06.18, 11:05 28.06.18, 11:05 |
|
|
Novice
Group: Active users Reputation: |
D_Godunov @ 06/27/18, 14:55 Official download pages: H China Open Beta MIUI 10 | 1. There are two links with different sizes, who knows what’s there? 2. Does miui10 have English? Post has been editedkraftz0r — 28.06.18, 11:16 |
| 28.06.18, 11:23 |
|
|
Ebony merchant
Topics Curator Reputation: |
——————— Winner of the Walk of Fame 2018-2019! |
| 28.06.18, 16:50 |
|
|
Novice
Group: Active users Reputation: |
Share instructions with forum users Everything is extremely simple. p.s. When recovering data from the e-account, there were problems with Google Services. Play Market crashed constantly. After rebooting the body and updating all applications, the services were updated and everything was fine. |
| 29.06.18, 16:11 |
|
|
Local
Group: Friendswww.savagemessiahzine.com Reputation: |
and how to install on it the Play Market? |
| 29.06.18, 16:22 |
|
|
Experienced
Group: Friendswww.savagemessiahzine.com Reputation: |
|
| 30.06.18, 14:02 |
|
|
Ebony merchant
Topics Curator Reputation: |
Google Play on Xiaomi Mi 8 / SE with Chinese firmware Allow installation from unknown sources. Post has been editedD_Godunov — 26.07.18, 19:20 Reason for editing: After installation, you must provide all permissions. ——————— Winner of the Walk of Fame 2018-2019! |
| 30.06.18, 15:49 |
|
|
Ebony merchant
Topics Curator Reputation: |
TWRP for Mi 8 SE SiriusfromLR.TeamChinese and English. Magisk versions between 16.6 and 18.2 do not work on Mi8SE. TWRP from LR.Team ONLYfor firmware starting from Dev 8.12.27 and above, as well as for Stable V10.3.1.0.PEBCNXM and above
For firmwarebeforeDev 8.12.27 and below, as well as for Stable V10.2.3.0.PEBCNXM and below
Built-in Magisk 16.4. forAndroid 8 Oreo
TWRP from DriffeX The same as above, but the Russian language and the font from u.Driffexby MiRoom. TWRP-3.2.3-MIUI_8.12.27 + ONLYfor firmware starting from Dev 8.12.27 and higheron Android 9 Pie repack TurboPony TWRP-3.2.3-1102_DXBuilt-in Magisk 16.6. forAndroid 8/9 Screenshots TWRP-3.2.3-0928 Screenshots TWRP-3.2.3-0810 autotranslate with whale>ang 2019.04.23 2018.8.10 update: important notes: Modify the optimization project: Important instructions: a sourcehttp://www.miui.com/thread-15964692-1-1.html ✓ Universal Flash Recovery for WindowsW Post has been editedD_Godunov — 01.05.19, 19:21 Reason for editing: Edit. New version 0423 ——————— Winner of the Walk of Fame 2018-2019! |
| 01.07.18, 11:11 |
|
|
All good
Group: Friendswww.savagemessiahzine.com Reputation: |
Received today, immediately unlocked, put it Post has been editedS7asha — 01.07.18, 11:12 ——————— |
| 01.07.18, 11:18 |
|
|
Visitor
Group: Active users Reputation: |
S7asha @ 07/01/18 13:11 Now shake xiaomi.eu I did not start it. I tried two versions 8.6.18 and 8.6.21, on both bootloops. While I asked the Chinese. Post has been editedxxl2k — 01.07.18, 11:23 |
| 01.07.18, 12:57 |
|
|
All good
Group: Friendswww.savagemessiahzine.com Reputation: |
Post has been editedS7asha — 01.07.18, 12:59 ——————— |
| 03.07.18, 10:33 |
|
|
Novice
Group: Active users Reputation: |
I flew Update firmware out of the box 9.5.8 like, installing through the air without problems, afterwards he already allowed the play market and many other applications to download. |
| 03.07.18, 12:59 |
|
|
Local
Group: Friendswww.savagemessiahzine.com Reputation: |
Turist_ua @ 07/03/18 13:53 those. The Chinese version began to support Google Play without additional manipulations with the root, etc.? That’s howHerethe person advised, everything was established without any unnecessary manipulations, but there is one BUT, Google blocked my payment account free of charge ((( |
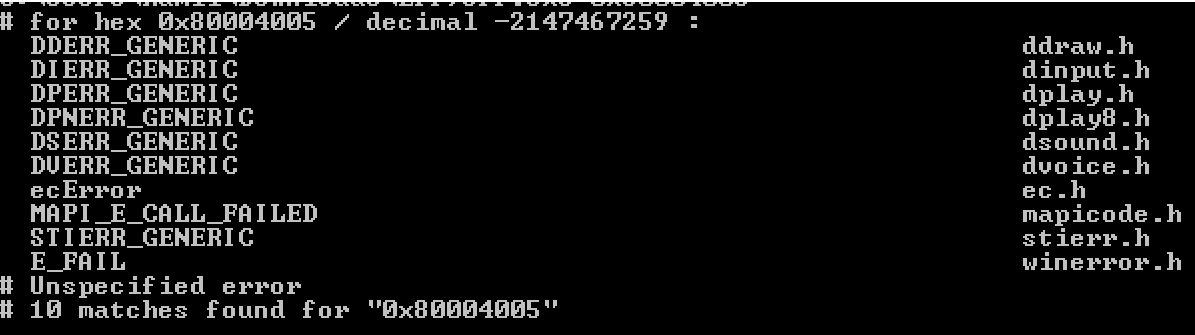
Как исправить ошибку 0x80004005 windows

Ошибка 0x80004005 переводится как неуказанная ошибка и обычно наблюдается, когда пользователь не может получить доступ к общим папкам, дискам, виртуальным машинам, а также при невозможности установки обновлений Windows. Устранение этой проблемы зависит от того, где и как возникает сообщение об ошибке, и поскольку в этой ошибке не указано конкретно, какова фактическая проблема, даже в Microsoft справочнике она определяется как «Неопределенная ошибка».
С помощью этого руководства вы сможете решить проблему. Я собрал рабочие решения для различных сценариев и поместил их в этот пост. См. Ниже содержание, а затем используйте решение, применимое к вашему сценарию.
Ошибка 0x80004005 на VirtualBox
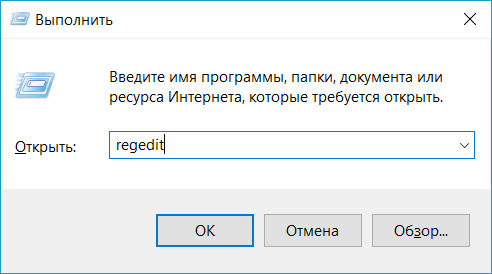
Обычно это раздел реестра, который вызывает проблемы.
- Удерживайте клавишу Windows и нажмите R. Введите regedit и нажмите OK.
- Перейдите к следующему пути реестра:
- Если этот ключ существует, удалите его и повторите попытку. Если удаление ключа не помогает, попробуйте отключить антивирус.
Если ошибка все ещё возникает, тогда:
- Удалите антивирус, проверьте его и затем переустановите.
Замените антивирус другим, например, AVG или Essentials безопасности.
Ошибка 0x80004005 при доступе к общей папке или диску
Мы будем использовать regedit для создания значения LocalAccountTokenFilterPolicy.
- Удерживайте клавишу Windows и нажмите R
- Введите regedit и нажмите OK.
- Перейдите к следующему пути в regedit
HKLMSOFTWAREMicrosoftWindowsCurrentVersionPoliciesSystem
Для 64-разрядной системы создайте QWORD (64-разрядный), с названием LocalAccountTokenFilterPolicy.
Если проблема повторяется после выполнения всех вышеперечисленных действий; тогда
Удерживая клавишу Windows и нажмите R и введите hdwwiz.cpl, чтобы открыть Диспетчер устройств. Выберите «Сетевые адаптеры», затем выберите «Вид» в меню и выберите «Просмотр скрытых устройств». Разверните сетевые адаптеры, и если вы увидите Microsoft 6to4 Adapters, затем удалите их все, щелкнув правой кнопкой мыши и выбрав «Удалить устройство».
После этого перезагрузите компьютер и проверьте.
Ошибка 0x80004005 при установке Windows 7 или Windows Server 2008 R2 с пакетом обновления 1
Скачать и запустить CheckSUR из здесь . После того, как средство готовности к обновлению системы завершит проверку компонентов в системе, запустите сканирование SFC.
E_FAIL (0x80004005) При настройке VirtualBox на Ubuntu
Если вы пытаетесь выделить виртуальную машину более 3 ГБ ОЗУ, убедитесь, что хост — это 64-разрядная система, и разрешено использование истинного аппаратного обеспечения (VT-x)
Не удалось открыть сеанс для виртуальной машины
В некоторых сеансах на виртуальной машине (VirtualBox) вы можете увидеть следующую ошибку.
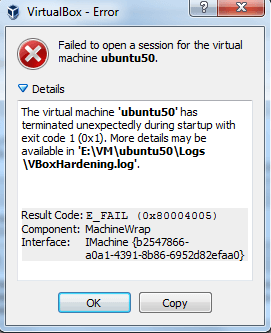
Чтобы устранить проблему, откройте Центр управления сетями и выберите «Изменить настройки адаптера». Щелкните правой кнопкой мыши свой адаптер только для хостинга Virtualbox и выберите «Свойства». Включите «VirtualBird NDIS6 Bridget Networking Driver», если он отключен, и снова проверьте. Теперь VirtualBox должен работать нормально. Если нет, включите Virtual Network NDIS6 Bridget Networking Driver для каждого сетевого адаптера (Ethernet, WiFi …) и всегда снимите флажок NDIS6 и протестируйте.
Удаление Microsoft 6to4
Чтобы решить эту проблему, вы должны удалить Microsoft 6to4-устройства из своего диспетчера задач. Имейте в виду, что вы можете не видеть эти устройства, потому что они скрыты по умолчанию. Таким образом, вы увидите их только после включения опции Показать скрытые устройства.
Ниже приведены шаги для удаления этих устройств.
- Удерживайте клавишу Windows и нажмите R
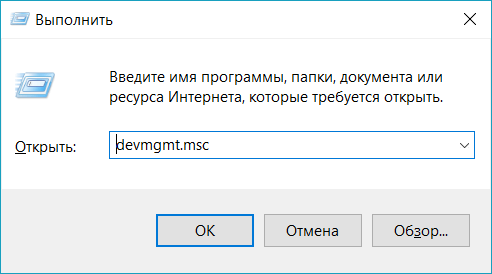
- Введите devmgmt.msc и нажмите Enter.
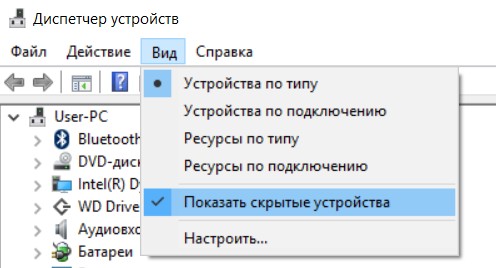
- Дважды щелкните Сетевые адаптеры
- Щелкните правой кнопкой мыши устройство Microsoft 6to4 и выберите «Удалить» . Повторите этот шаг для всех устройств Microsoft 6to4, которые вы видите в списке
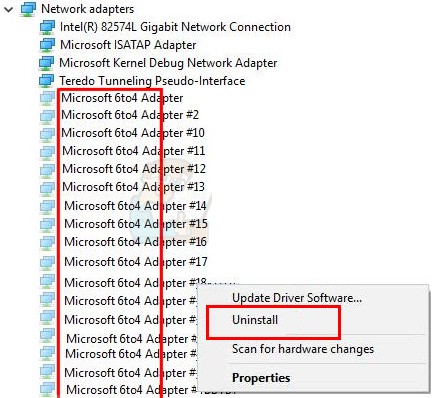
Как только вы закончите, перезагрузите компьютер. Ваша проблема должна быть решена после повторного входа в Windows.
Ошибка 0x80004005 При извлечении файлов
Если вы получаете эту ошибку при попытке извлечь или открыть ZIP-файлы или файлы .rar, у вас есть несколько потенциальных исправлений.
Способ 1. Попробуйте использовать другую утилиту для извлечения
Во-первых, убедитесь, что файл не защищен паролем, а утилита разахиватора не оборудована для обработки файлов, защищенных паролем. Вы можете сделать это, загрузив еще одну утилиту, например 7Zip, и посмотрите, требуется ли вам указать пароль при попытке открыть или извлечь один и тот же архив .zip или .rar.
Способ 2. Отключите защиту антивирусом в реальном времени
Другая возможная причина — чрезмерный защитный пакет сторонних разработчиков. При определенных условиях несколько сторонних антивирусных пакетов будут блокировать извлечение zipped-файлов. Если вы используете внешний сторонний антивирус вместо стандартного набора безопасности (Защитник Windows), вы можете попытаться временно отключить защиту в реальном времени или защиту вашего стороннего AV-адаптера и выяснить, устранена ли проблема.
В случае, если вы больше не сталкиваетесь с ошибкой 0x80004005, подумайте об удалении вашего текущего пакета сторонних поставщиков и перейдите в другой пакет безопасности. Если вы хотите избежать других конфликтов, подобных этому, подумайте над встроенным решением безопасности.
Метод 3: Повторная регистрация jscript.dll и vbscript.dll
Если первые два возможных решения вам не удались, попробуем другой подход. Некоторым пользователям удалось зафиксировать их, перерегистрировав несколько DLL (библиотеки динамических ссылок) в расширенной командной строке. Чтобы быть более точным, этот метод попытается устранить проблему, перерегистрировав jscript.dll (библиотеку, используемую при запуске JScript) и vbscript.dll (модуль, содержащий функции API для VBScript). Вот краткое руководство о том, как это сделать:
- Нажмите клавишу Windows + R, чтобы открыть окно «Выполнить». Затем введите «cmd» и Ctrl + Shift + Enter и нажмите « Да» в приглашении UAC (Контроль учетных записей пользователей), чтобы открыть повышенную командную строку.
- В командной строке с повышенными правами введите следующую команду и нажмите Enter:
- В том же приглашении с повышенным командованием введите следующую команду и нажмите Enter:
- Перезагрузите компьютер и убедитесь, что вы можете открывать или извлекать файлы .zip или .rar без получения ошибки 0x80004005 .
Исправляем ошибку System componentmodel win32exception кодом 0x80004005 в Windows
Любой пользователь желает, чтобы его компьютер был быстрым и стабильным в работе, но часто возникают разного рода проблемы, о которых информируют появляющиеся на экране ошибки. В этой статье мы разберем ошибку под кодом 0x80004005 и предложим актуальные методы её исправления.
Чаще всего пользователь вместе с ошибкой видит сообщение — system componentmodel win32exception.
- попытке изменения параметров и свойств файлов;
- попытке подключиться к интернету с объединенных в общую сеть компьютеров;
- попытке записать образ диска;
- попытке обновить операционную систему.

Были случаи, когда при запуске игры или программы, например, таких как XCOM 2 и Outlook, антивирусные системы блокировали их функциональность, что вызывало сбой с окном ошибки на экране. В данном случае вам следует сменить защитную программу или настроить её должным образом.
Иногда и перезапуск компьютера устраняет данный сбой, но бывают более сложные решения данной ошибки. Ниже представлены разнообразные методы устранения ошибки 0x80004005.
Способы исправления ошибки
Метод №1
Если сбой произошел во время загрузки обновлений для вашей операционной системы, то для восстановления корректной работы проделайте следующий алгоритм действий:
- Зайдите в меню «пуск» и в поле поиска наберите «устранение неполадок»;
- Выберите найденный результат в списке;
- Нажмите на «просмотр всех категорий» в левой верхней части появившегося окна;
- В отобразившемся списке щелкните на «центр обновления Windows», в новом появившемся окне «дополнительно» (убедитесь, что установлена галочка рядом с пунктом «автоматически применять исправления»;
- Нажмите далее, чтобы запустить проверку, в процессе которой все найденные неполадки будут устранены.
Метод №2
Часто ошибка возникает при наличии поврежденного файла обновления. Для решения следует удалить содержимое папки, куда загружаются обновления операционной системы. Для этого:
- Зайдите в «мой компьютер», который располагается на рабочем столе и в меню «пуск», проследуйте по пути: C:WindowsSoftwareDistributionDownload ( «С» — системный диск, буква может отличаться);
- Выделите все файлы в конечной папке (Download) и нажмите на кнопку «delete».

Метод №3
Ошибка крайне часто связана со сбоем в работе виртуальной машины (программа virtualbox). В таком случае проделайте следующее:
- Нажмите сочетание клавиш: Windows+R;
- В отобразившемся окне напечатайте команду «regedit» и нажмите OK;
- Появится новое окно, в котором проследуйте по данному пути: HKEY_LOCAL_MACHINESOFTWAREMicrosoftWindows NTCurrentVersionAppCompatFlagsLayers;
- Удалите расположенный там ключ, имеющий пометку virtualbox.
Дополнительные способы решения сбоя в работе virtualbox:
- Полное удаление и установка более ранней версии программы;
- В некоторых версиях BIOS есть функция Intel Virtualization Technology, требуется найти её и включить (Enabled).
Метод №4
Если при попытке RDP соединения появляется ошибка, делайте следующее:
- Зайдите в «пуск»;
- В строчке поиска наберите «Центр обновления Windows» и щелкните мышкой по первому найденному результату;
- Появится окно, в котором кликните на ссылку «Установленные обновления»;
- Подождите, пока отобразится список всех обновлений. Найдите в данном списке следующие обновления KB2592687 и KB2574819 и удалите их.
Метод №5
Частой причиной возникновения ошибки 0x80004005 служат поврежденные DLL файлы и сбой в работе реестра. Для решения делайте следующее:
- Перейдите в меню «пуск», наберите в строчку поиска: %Temp%;
- Щелкните по найденной папке;
- В отобразившемся окне выделите все содержимое и нажмите кнопку «delete»;
- После перезагрузки компьютера ошибка должна исчезнуть.

Метод №6
Проверьте ваш системный диск на присутствие в его работе ошибок. Для этого перейдите в «Мой Компьютер» , далее нажмите по диску, на котором у вас установлен Windows, правой кнопкой мыши и кликните по «свойства». В открывшемся окошке перейдите во вкладку «Сервис» и выберите «Выполнить проверку». Появится новое окошко, в нем установите все галочки и нажмите «запуск». Проверка может занять продолжительное время – дождитесь её завершения. Если будут обнаружены сбои в работе диска, в том числе те, которые вызывают ошибку 0x80004005 – они будут исправлены.
Метод №7
Если ошибка появляется с пометкой «DllregisterServer», то вам следует сделать следующее:
- Перейдите в «пуск» и в строчке поиска напечатайте: «Учетные записи пользователей»;
- Выберите первый найденный результат в списке;
- Отобразится новое окно, в котором найдите пункт «Изменение параметров контроля учетных записей», кликните по нему;
- В открывшемся окне увидите ползунок, передвиньте его в самый низ, установив тем самый параметр «Никогда не уведомлять».

Метод №8
При ошибке с пометкой «system componentmodel win32exception» и «dllregisterserver» вам поможет изменение типа своей учетной записи на «администратор». Для этого: перейдите в меню «пуск», в поисковую строку наберите «Учетные записи пользователей» и нажмите на найденный результат.
В окне, которое отобразится на экране, кликните по пункту «Изменение типа своей учетной записи», в котором поставьте галочку в пункте «администратор».
Метод №9
Если ваш случай является из ряда вон выходящим, и все способы и методы не помогли, то в таком случае единственным способом избавления от ошибки будет полная переустановка операционной системы. Хоть данный выход является радикальным, но он обеспечивает стопроцентное избавление от любой ошибки.
Xiaomi Mi 0x80004005 Failed remote device is locked Cannot flash images
Для просмотра онлайн кликните на видео ⤵
FAILED (remote: device is locked. Cannot flash images) Unknown Command — ADB Fastboot TWRP LG Подробнее
Xiaomi Mi Flash Error ( Solved ) Подробнее
Cara mengatasi 0x80004005 (Failed remote device is locked Cannot flash image) Подробнее
How to unlock Bootloader using cmd Подробнее
[FIX] Flash Xiaomi Redmi 3 (Device is locked) Подробнее
how to flash redmi note 3 using miflash Fix error Подробнее
How to check bootloader lock/unlock status using ADB Подробнее
Mi A1 One Click Bootloader Unlock/lock Подробнее
Mi Flashtool Error Solution || Mi Flashing Fix All Type Problem 10000% ✓ Working Method Подробнее
Solved! Xiaomi Redmi 2 Prime unspecified error 0x80004005 missmatching image and device error Подробнее
Fastboot Flash any Xiaomi Phone with Lock Bootloader Подробнее
[GUIDE][MI A2 / MI 6X] How To Unbrick Xiaomi Devices with Locked bootloader Подробнее
Tutorial Fix MI flash Unspecified Error 0x80004005 and Flashing Xiaomi Подробнее
[FIX] *FAILED (remote: Failed to load/authenticate boot image: Load Error) on MI 8 SE Подробнее
Cara Flash Xiaomi Redmi 4A (Rolex) Locked Bootloader Подробнее
redmi mi 3S firmware update / lock removed in edl mode 10000% with download link Подробнее
[Unbrick] Xiaomi Redmi 4 Prime Hardbrick, Locked Bootloader, No EDL Mode, Only Fastboot Mode Подробнее
How To Fix Mi Xiaomi Redmi Flashing Tool Error Solution/How To Flash Mi Redmi 2 Prime No Error 2017 Подробнее
Исправить код ошибки 0x80004005: неопределенная ошибка
Ошибка 0x80004005, кажется, является распространенной проблемой для пользователей Windows. Возможно, вы пытались получить доступ к общим папкам, запустить виртуальные машины или обновить Windows, но вы потерпели неудачу и получили сообщение об ошибке. При устранении неполадок эта ошибка может показаться «неопределенной», что делает пользователя еще более запутанным.
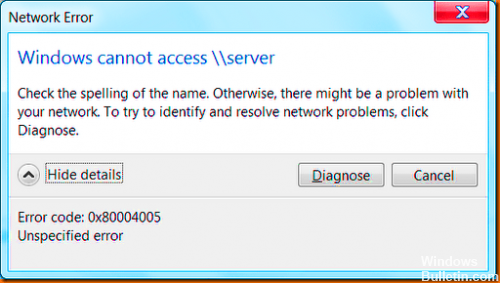
Причин может быть несколько, но наиболее распространенной является отсутствующий файл DLL, который вызывает неопределенную ошибку 0x80004005.
Эта проблема также может возникнуть, если файл, требующий активации продукта Windows (WPA), поврежден или отсутствует. Это происходит, когда выполняется одно или оба из следующих условий:
Сторонняя программа резервного копирования или антивирусная программа мешает установке Windows XP.
Файл, который требует WPA, изменяется вручную.
Как исправить код ошибки 0x80004005 в Windows?
Ищите поврежденный файл .dll.

Файл .DLL вызывает эту ошибку в большинстве случаев, так почему бы не научиться исправлять ее в первую очередь. Ваша операционная система выдает всплывающее окно с предупреждениями, если у вас есть поврежден или отсутствует файл DLL это библиотека динамических ссылок, и она отвечает за несколько операций в Windows.
Так что, если вы получите ошибку, вы можете не очень хорошо управлять своим устройством. Но не волнуйтесь, я предложу решение, которое решит проблему с DLL.
Вы можете решить проблему с DLL, и это автоматически решит проблему с кодом ошибки. Поэтому вы должны запустить средство проверки системных файлов, которое ищет поврежденные файлы и заменяет их правильным файлом.
Апрельское обновление 2020:
Теперь мы рекомендуем использовать этот инструмент для вашей ошибки. Кроме того, этот инструмент исправляет распространенные компьютерные ошибки, защищает вас от потери файлов, вредоносных программ, сбоев оборудования и оптимизирует ваш компьютер для максимальной производительности. Вы можете быстро исправить проблемы с вашим ПК и предотвратить появление других программ с этим программным обеспечением:
- Шаг 1: Скачать PC Repair & Optimizer Tool (Windows 10, 8, 7, XP, Vista — Microsoft Gold Certified).
- Шаг 2: Нажмите «Начать сканирование”, Чтобы найти проблемы реестра Windows, которые могут вызывать проблемы с ПК.
- Шаг 3: Нажмите «Починить все», Чтобы исправить все проблемы.

Откройте командную строку, нажав кнопку «Пуск» и нажав кнопку «Командная строка», или нажав win и R, чтобы открыть окно «Выполнить».
Введите cmd и нажмите Enter, чтобы получить приглашение.
Просто вставьте следующий текст в черную область sfc / scannow k и нажмите Enter.
Оставьте его на несколько минут, пока продолжается анализ, затем вы можете перезагрузить устройство и проверить, отображается ли ошибка по-прежнему.
Использовать средство устранения неполадок Windows
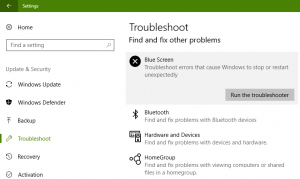
Многие пользователи сообщают, что они получают код ошибки 0x80004005 при сбое установки Центра обновления Windows. Вы можете использовать средство устранения неполадок Windows для восстановления обновления.
Выполните эти шаги:
Шаг 1: Полностью нажмите Windows + S, чтобы открыть область поиска, введите устранение неполадок и нажмите Enter.
Шаг 2. Нажмите на Показать все
Шаг 3. Нажмите на систему и безопасность
Шаг 4. Щелкните правой кнопкой мыши Центр обновления Windows и выберите Запуск от имени администратора.
Нажмите «Дополнительно», выберите «Применить ремонт автоматически» в следующем окне, затем нажмите «Далее».
Нажмите кнопку «Закрыть», чтобы завершить устранение неполадок, или нажмите «Просмотр подробной информации», чтобы просмотреть дополнительную информацию о результатах.
Отключите функцию блокировки для антивирусной программы.
Наиболее распространенной причиной этой ошибки является антивирусное программное обеспечение с ложным положительным отчетом. Если на вашем компьютере установлено антивирусное программное обеспечение, сначала попытайтесь решить эту проблему, отключив программное обеспечение. После выключения программного обеспечения проверьте, правильно ли работает Outlook.
Если это так, обязательно сообщите об этом разработчику программного обеспечения. Конечно, большим недостатком является то, что компьютер может быть недостаточно защищен, но разработчик должен решить эту проблему за несколько дней.
Если вы обнаружите другие способы устранения неполадок для исправления ошибки 0x80004005 в Windows 10, пожалуйста, не стесняйтесь обращаться к нам в разделе комментариев ниже.

CCNA, веб-разработчик, ПК для устранения неполадок
Я компьютерный энтузиаст и практикующий ИТ-специалист. У меня за плечами многолетний опыт работы в области компьютерного программирования, устранения неисправностей и ремонта оборудования. Я специализируюсь на веб-разработке и дизайне баз данных. У меня также есть сертификат CCNA для проектирования сетей и устранения неполадок.
Как исправить «Windows не может получить доступ к компьютеру» код ошибки 0x80004005
Windows позиционируется как корпоративная операционная система с различными функциями для поддержки рабочих групп и совместного использования файлов и физических ресурсов.Несмотря на этот акцент, однако, эта флагманская операционная система, похоже, выходит из своего пути, чтобы генерировать зашифрованные и враждебные пользователю сообщения об ошибках для общих проблем.
Эти сообщения об ошибках всегда делают решение проблем более сложным, чем это должно быть. Кроме того, они, как правило, добавляют слой путаницы и разочарования для интеллектуальных, но не погруженных в компьютер пользователей-людей, которые, вероятно, могли бы решить проблему, если бы знали что — то о ее причине.
Одним из наиболее вопиющих правонарушителей является код ошибки Windows 0x80004005. Эта ошибка обычно появляется во время неудачной попытки использовать общий ресурс по сети, такой как общий сетевой жесткий диск. Обычный синтаксис для этой ошибки обычно что-то вроде “Windows не может получить доступ Computer1, проверьте орфографию. код ошибки 0x80004005 неопределенная ошибка.”
Конечно, это супер-полезное сообщение, появляющееся на чьем-то экране, в основном ничего им не говорит. В результате, это может быть очень трудно устранить эту ошибку.
Но ты не волнуйся. Существует несколько методов, которые могут быть использованы для решения этой проблемы. В этой статье я объясню, как диагностировать и устранять основные проблемы, которые может представлять этот код ошибки.
ИСПРАВИТЬ ОШИБКУ » WINDOWS НЕ МОЖЕТ ПОЛУЧИТЬ ДОСТУП К КОМПЬЮТЕРУ
Есть несколько «быстрых исправлений», которые стоит попытаться решить эту ошибку. Эти решения часто являются эффективными для решения этой проблемы.
Хотя это не полный список всех возможных решений, есть хороший шанс, что одно из этих исправлений будет работать для вас.
БЫСТРОЕ ИСПРАВЛЕНИЕ 1: ОТКЛЮЧИТЬ IPV6
Одним из исправлений является отключение протокола IPv6 вашего компьютера. Вам все равно не нужен IPv6 прямо сейчас, если вы не используете сеть IPv6.
Просто выполните следующие четыре действия, чтобы попробовать это исправление:
- Щелкните правой кнопкой мыши кнопку Пуск Windows и выберите пункт Сетевые подключения.
- Нажмите кнопку «Изменить параметры адаптера».
- Щелкните правой кнопкой мыши сетевой адаптер и выберите пункт Свойства.
- Найдите Протокол Интернета версии 6 (TCP / IPv6) в центральной области и снимите флажок.
Большинство сетевых конфигураций все еще используют IPv4 и будут использоваться в обозримом будущем, поэтому вам не понадобится IPv6 на некоторое время, если вы не находитесь в корпоративной сети, которая уже использует IPv6. (В этом случае, это быстрое решение не будет работать для вас в любом случае.)
Нажмите кнопку » OK » и перезагрузите компьютер. Если это не поможет устранить ошибку, перейдите к следующему предложенному решению.
БЫСТРОЕ ИСПРАВЛЕНИЕ 2: ПРОВЕРЬТЕ NETBIOS
Следующий шаг — убедиться, что Служба NetBIOS работает. NetBIOS позволяет сетевым компьютерам совместно использовать ресурсы. Если это не работает или не включено, это может быть причиной ошибки.
Выполните следующие действия, чтобы проверить, включена ли служба NetBIOS:
- В том же окне, что и выше, выделите IPv4 и нажмите кнопку Свойства внизу.
- Нажмите кнопку Дополнительно и выберите вкладку WINS.
- Убедитесь, что параметр NetBIOS установлен по умолчанию.
Если NetBIOS работает так, как это должно быть, а затем перейти к следующему возможному решению.
БЫСТРОЕ ИСПРАВЛЕНИЕ 3: ПРОВЕРЬТЕ ПАРАМЕТРЫ ОБЩЕГО ДОСТУПА
Если настройки NetBIOS не были проблемой, давайте посмотрим на расширенные настройки общего доступа.
- Перейдите на панель управления, Сеть и Интернет, Центр управления сетями и общим доступом и дополнительные параметры общего доступа.
- Щелкните частную сеть и убедитесь, что сетевое обнаружение включено, а флажок автоматическая установка включен. Убедитесь,что включен также общий доступ к файлам и принтерам.
- Щелкните все сети и убедитесь, что включен параметр Отключить общий доступ к сети, защищенный паролем.
Если вы внесли изменения в любой из этих параметров, повторно протестируйте свою долю, чтобы увидеть, исправлена ли она ошибка.
БЫСТРОЕ ИСПРАВЛЕНИЕ 4: ПРОВЕРЬТЕ РАЗРЕШЕНИЯ
Если это не исправило его, мы должны далее проверить ваши разрешения.
- Щелкните правой кнопкой мыши на папке или диске, который вы хотите поделиться.
- Выберите общий доступ, а затем расширенный общий доступ.
- Выберите вкладку общий доступ, а затем расширенный общий доступ.
- Необходимо установить флажок рядом с пунктом общий доступ к этой папке. Проверьте его, если это не так. Затем нажмите кнопку разрешения.
- Выделите группу Все, которая должна находиться в верхней панели, и разрешите полный контроль. Если группа » Все «отсутствует, нажмите кнопку Добавить и введите» все » в нижней области, а затем выберите ее.
Если это решение не работает для вас, пришло время перейти к быстрому исправлению номер пять.
БЫСТРОЕ ИСПРАВЛЕНИЕ 5: ПОВТОРНО ЗАГРУЗИТЕ WINDOWS 10 UPDATE
Если вы получаете это сообщение об ошибке при попытке обновить Windows 10, проблема может быть вызвана поврежденным файлом установки.
Чтобы исправить это, попробуйте повторно загрузить установщик Windows 10 и начать все сначала. Как бы это ни было неприятно, стоит попробовать, если это является источником проблемы.
БЫСТРОЕ ИСПРАВЛЕНИЕ 6: ВКЛЮЧИТЕ ПОДДЕРЖКУ ОБЩЕГО ДОСТУПА К ФАЙЛАМ SMB 1.0/CIFS
Предложенный TechJunkie reader TFI, несколько пользователей сообщили, что это делает трюк.
- В поле поиска введите «панель управления “и выберите”Программы и компоненты».
- В левой области задач нажмите кнопку «Включить или выключить Компоненты Windows».
- В появившемся диалоговом окне прокрутите вниз и найдите “SMB 1.0 / CIFS File Sharing Support».
- Убедитесь, что рядом с этой опцией установлен флажок.
- нажимать OK.”
ПОСЛЕДНЯЯ МЫСЛЬ
Это может быть неприятно и трудно устранить неполадки Windows 10 ошибок, и сообщения об ошибках редко предоставляют какую-либо полезную информацию.
Надеюсь, что один из этих вариантов поможет вам получить ваш Windows 10 машина снова работает должным образом. Есть ли другие предложения по решению этой проблемы? Поделитесь ими с нами в разделе комментариев ниже!
Это не единственное непрозрачное сообщение об ошибке Windows,и TechJunkie имеет много учебных статей по исправлению некоторых из других, которые появляются.