
#601
![]()
OFFLINE
Micha
- Город:Саратов
- Коптер:MAVICи
Отправлено 21 Январь 2019 — 05:17
«Новая волна», что ли… Ответил вроде… Во все темы не пишите одно и то же… Дело не в экране а в экспозиции… Эта тема про подвес…
Сообщение отредактировал Micha: 21 Январь 2019 — 05:19
-
0
#602
![]()
OFFLINE
VDN
VDN
-

- Пользователи
-
- 38 сообщений
Начинающий летчик
- Город:Санкт-Петербург
- Коптер:S900+f550+Mavic+самоделка
Отправлено 21 Январь 2019 — 05:17
Alexey77,
попробуйте сократить выдержку съемки
-
0
#603
![]()
OFFLINE
embutido
embutido
- Город:Москва
-
Коптер:вы ничего не докажите

Отправлено 21 Январь 2019 — 05:55
Alexey77, правое колесико под указательным пальцем)
С такими познаниями предлагаю сразу разобраться с airdata, чтобы дрон проще искать было 
-
1
#604
![]()
OFFLINE
Alexey77
Alexey77
-
- Пользователи
-
- 8 сообщений
Начинающий летчик
- Город:Москва
- Коптер:Mavic pro platinum
Отправлено 22 Январь 2019 — 03:12
Спасибо разобрался!
-
0
#605
![]()
OFFLINE
Aleksejlvlv
Aleksejlvlv
-
- Пользователи
-
- 1 сообщений
Начинающий летчик
- Город:RIGA, Latvia
- Коптер:Mavic Pro
Отправлено 07 Февраль 2019 — 06:56
Добрый день.
Мавик Про .
Перестал возвращаться домой. При включении возврата домой делает так,
набирает высоту возврата домой установленную в парраметрах ( сейчас это 50 метров) и потом вместо возвращения, оставаясь там где он есть начинает снова подниматься, до упора 500 метров. После чего стоит на месте и просто сигналит о том что достигнута максимальная высота полета.
Подскажите пожалуйста в чем может быть проблема или как её исправить.
-
0
#606
![]()
OFFLINE
SergKap
Отправлено 07 Февраль 2019 — 09:57
возможно, вы прицепили к дрону снизу какую-нибудь хрень с али, на что реагируют датчики, чувствуя близость препятствия.
ели нет — выложите лог для постановки диагноза
-
1
#607
![]()
OFFLINE
Квадр
Квадр
-
- Пользователи
-
- 14 сообщений
Начинающий летчик

- Город:Ногинск
- Коптер:Mavic
Отправлено 28 Февраль 2019 — 06:38
Что может быть? После замены шлейфа управления подвесом, при включении камера впадает в припадок а начинает без остановки колбасится по всем осям, мотор имеет ощутимый нагрев, никаких ошибок на экране не возникает, иногда все нормально проходит все калибровки и на управление реагирует адекватно, происходит именно при включении.
-
0
#608
![]()
OFFLINE
Machete
Machete
-
- Пользователи
-
- 25 сообщений
Начинающий летчик
- Город:самара
- Коптер:mavic pro platinum
Отправлено 28 Февраль 2019 — 10:16
после калибровки через ассистент пишет ошибку: calculation error check the screen size на 85%
не у кого не было подобного??
-
0
#609
![]()
OFFLINE
VeterMir
VeterMir
- Город:Вологда
- Коптер:DJI Mavic Pro
Отправлено 01 Март 2019 — 04:48
Подвес часто теряет горизонт. Тожсамое наблюдаю на своём гимболе жиюне китайском, на холоде (сегодня летал в -6) надеялся, что здесь всё будет лучше. А вот и нет.
Это нормально на холоде? Или у джиай всё продумано и это ошибка заводская?
-
0
#610
![]()
OFFLINE
Vanech
Vanech
- Город:С-Петербург
- Коптер:DJI Phantom 4 Pro, Mavic Pro
Отправлено 01 Март 2019 — 11:01
VeterMir,Увы, перекошенный горизонт очень частая проблема и не только у Мавика.
-
0
#611
![]()
OFFLINE
DozorSPb
DozorSPb
- Город:Санкт-Петербург
- Коптер:Mavic Pro / Spark / Diatone M530 / Walkera Runner
Отправлено 06 Апрель 2019 — 07:47
Увы, перекошенный горизонт очень частая проблема и не только у Мавика.
Да, есть такое дело… Особенно если ветер
Для себя нашел такое решение:
— резко опустить и поднять камеру (с помощью 5D джойстика — там эта функция по умолчанию есть)
— правым джойстиком двинуть влево / вправо
Оба эти действия выравнивают горизонт
Сообщение отредактировал DozorSPb: 06 Апрель 2019 — 07:47
-
1
#612
![]()
OFFLINE
axell
axell
-
- Пользователи
-
- 2 сообщений
Начинающий летчик

- Город:Кострома
- Коптер:Mavic Pro
Отправлено 07 Апрель 2019 — 06:51
Здравствуйте уважаемые участники!
Я владею мавиком с 2018 года, покупал новый. Проблем с ним не было не падал не стукался. На днях достал, полетал и обнаружил на видеофото артефакт. Никто не может понять что и от куда. Подскажите, знающие люди.
p.s. предлагают только менять камеру.


-
0
#613
![]()
OFFLINE
axell
axell
-
- Пользователи
-
- 2 сообщений
Начинающий летчик
- Город:Кострома
- Коптер:Mavic Pro
Отправлено 21 Апрель 2019 — 09:45
Форум по ходу мертвый…. заменил камеру, всем спасибо.
-
0
#614
![]()
OFFLINE
dispetcherz
dispetcherz
-
- Пользователи
-
- 18 сообщений
Начинающий летчик
- Город:Киев
- Коптер:Мавик
Отправлено 04 Май 2019 — 12:53
Привет всем! Летаю 2 года, прошивка дрона и пульта 01.03.700, DJI GO 4.1.3 После недавней замены подвеса на новый перестали работать некоторые интелект режимы: Follow me (Mobile GPS signal weak, хотя колич спутников 15-17), Cinemat Mode (тут пишет конфликт). При этом остальные режимы Activ Track, Point of Interest, Tripod работают нормально. Все необходимые настройки после замены были сделаны, калибровка компаса и передних-нижних датчиков, перепрошивка дрона с 2-я батареями, переустановка джиги. Может у кого есть идеи куда копать?
-
0
#615
![]()
OFFLINE
Kyrts
Kyrts
-
- Пользователи
-
- 1 сообщений
Начинающий летчик
- Город:Одесса
- Коптер:Mavic Pro Plattinum
Отправлено 14 Май 2019 — 03:03
Всем доброго времени суток.
Подскажите куда копать? Дрон не падал, тряски не испытывал, но в последнее время после включения не видит карту и подвес не реагирует на колесико подъема и С1 (вверх-вниз).
Менял карты, не помогло, сбивал до заводских, ставил через ассистента прошивку заново…..даже карты форматировал, калибровал подвес и сенсоры, жмакал рессет на самом дроне.
А происходит вот что, после включения и сопряжения пишет «NO SD CARD», после этого жду от одной до 3х минут подвес дергается и о чудо! Карта появляется.
При это картинка при включении есть, и постоянно пытается сфокусироваться до тех пор, пока подвес самопроизвольно не дернется.
После всех процедур и ожиданий снимаю без проблем, собственно продублирую вопрос: КУДА КОПАТЬ?
-
0
#616
![]()
OFFLINE
berkut13
berkut13
-
- Пользователи
-
- 12 сообщений
Начинающий летчик
- Город:Moscow
Отправлено 15 Май 2019 — 01:06
После замены подвеса и шлейфа — на высоте при движении вперед наблюдается дрожание камеры. Конечно откалибровал подвес перед взлетом. Что я упустил?
Сообщение отредактировал berkut13: 15 Май 2019 — 01:07
-
0
#617
![]()
OFFLINE
megavox
megavox
-
- Пользователи
-
- 2 сообщений
Начинающий летчик
- Город:Moscow
- Коптер:Mavic Pro
Отправлено 17 Июнь 2019 — 11:31
Привет всем.
Давно летаю на всяких вертолетах), мавик с год летает. Вопросов не было, вот и не регился тут, просто почитывал разные сведения как что у кого.
Был тут в путешествии, летал больше обычного. Возникла проблемка с подвесом. В один момент даже расстроился что усе, дальше без дрона. А снимать еще много всего было (Исландия). Подвес начал ругаться, что мотор оверлоад. В холостую крутил как-то странно его. Как будто что-задевает. Крашей не было, все всегда плавно и аккуратно. Еще несколько раз покрутив все в холостую на откл питании, оно заработало. Грешу не то, что раз была посадка на землю, где было пыльно. Возможно пыль попала между подвижными частями. Калибровку после подвес прошел- все норм. Сейчас все работает.
Но осадок остался.
Далее было пару раз так: в полете вкл запись видео. Камера начинает танцы, подвес вращает как попало. Где лечу не понимаю. Видимо в полете начинается калибровка. Через минуту примерно все приходит в норму. Дальше все ок. Так было пару раз.
Было при вкл записи видео, такая же ерунда. Запись видео обрывалась. Калибровка. В тот момент я сделал вираж, видимо камера не успела за квадриком и начались танцы с подвесом. Делал еще несколько раз калибровку — все отрабатывает. При запуске ни на что не ругается. Даже отдельно попробовал запись видео и крутые виражи — все норм.
что было — интересно… может таки глюк шлейфа?
-
0
#618
![]()
OFFLINE
apm
apm
- Город:Красноярск
- Коптер:Mavic
Отправлено 18 Июнь 2019 — 05:26
Было при вкл записи видео, такая же ерунда. Запись видео обрывалась.
Скорее всего пыль. Взлетаете в руки ? Подобное было описано в ранних обсуждениях М1.
-
0
#619
![]()
OFFLINE
megavox
megavox
-
- Пользователи
-
- 2 сообщений
Начинающий летчик
- Город:Moscow
- Коптер:Mavic Pro
Отправлено 18 Июнь 2019 — 02:01
Скорее всего пыль. Взлетаете в руки ? Подобное было описано в ранних обсуждениях М1.
по ситуации — если поверхность не очень — с руки — там обычно с дороги — асфальт — трафик не очень) поэтому можно было.
-
0
#620
![]()
OFFLINE
embutido
embutido
- Город:Москва
-
Коптер:вы ничего не докажите
Отправлено 20 Июнь 2019 — 12:00
DozorSPb
, а я плюнул на горизонт, снимаю, как есть, а потом на обработке выравниваю в пару кликов. И маневров с дроном меньше и нервы крепче
-
0

Let us calibrate. Let us eradicate. Let Us Drone.
In a perfect world, we would be able to fly our drones whenever and wherever we felt like it; never getting any errors or malfunctions. But this world isn’s perfect, and we have annoying things like jobs that dictate when we can fly, and the FAA to say where we can fly. When Saturday finally does come around and our location is in the green, we get VPS errors *sigh*. All is not bad though, it’s still Saturday, and I’m going to tell you how to get rid of those vision system errors on your Phantom 4 Pro.
In this post, we will talk about common reasons for vision system errors on the Phantom 4 Pro (applicable to the other Phantom 4’s) and how to calibrate the vision system to eradicate those errors.
What is the Vision System
DJI has worked very hard to make their drones user-friendly. The remote control helicopters I would fly as a teenager were incredibly difficult to maneuver compared to any of DJI’s drone lineup. Why is this? The incorporation of GPS and a Vision Positioning System (VPS) to keep the aircraft extremely steady are certainly two of the reasons.
The Vision System on the Phantom 4 Pro is comprised of two ultrasonic sensors (located on the bottom) and three stereo vision sensors (located on the back, front and bottom).
Ultrasonic sensors emit high-frequency sound waves that bounce off surfaces back to the drone to provide distances of objects.
Stereo vision sensors are cameras that feed images to the drones processor, which is then able to identify the depth of objects by using software that assigns colors to corresponding distances.
This is a basic description of the VPS, and although not part of the VPS, I should note that the Phantom 4 Pro (and P4 Pro V2.0) have infrared sensors on the sides as well. What isn’t widely known is that those infrared sensors only work when the drone is in beginner or Tripod mode. Sure, it’s still nice to have them, but don’t expect the infrared sensors to save your butt if you’re rolling towards a wall at 20 MPH.
If you have the original Phantom 4 or Phantom 4 Advanced, you will not have sensors on the back or sides of your drone.
Common reasons for Vision System errors
Ever receive one of the following messages while flying your Phantom 4 Pro?
- “Downward Vision Sensor Calibration Error. Precision Landing May Fail”. Well, that’s not good.
- “Vision Sensor Communication Error (10c00)”
- “Vision System Error”
- “Forward Vision Sensor Calibration Error. Precision Landing and Obstacle Avoidance May Fail”
- “Restart Aircraft. Contact DJI Support if the Problem Persists.”
- “Vision System Error (f00400)”
- “Recalibrate Vision System using DJI Assistant 2”
- “Recalibrate the Vision System. Use DJI Assistant on Mac or PC.”
It may be difficult to ascertain why you are getting errors with the VPS, but I have compiled a list of some common instances where people have gotten errors.
Problem: You may get an error or the drones VPS might just not operate correctly when flying over water. This is clearly stated in the manual: “The performance of your Vision System and Infrared Sensing System are affected by the surface being flown over”, and under the types of surfaces listed we see “Flying over water or transparent surfaces”.
Solution: A lot of people have recommended turning off the VPS when flying over water. I usually don’t (unless I am flying low), but it is worth a shot if you are getting errors or notice erratic behavior while flying over water. To disable vision positioning, go to settings>visual navigation settings>advanced settings>enable vision positioning.

Problem: You receive a vision system error after a firmware update.
Solution: Try calibrating the VPS. If that doesn’t work, try refreshing the firmware. You can refresh the firmware with DJI Assistant 2 or within the DJI GO 4 App.
Problem: You receive a vision system error with your brand new drone.
Solution: Calibrate the VPS. We all know how much of bumpy ride packages go through in the mail, and your P4 Pro doesn’t love all that jarring action.
Problem: VPS error after a crash.
Solution: Well, we can’t be too surprised if we get a VPS error, along with a few other errors if you crash the drone. Not only should you calibrate the VPS after a crash, but it would also be wise to calibrate the IMU and compass. Do a thorough inspection of the drone to make sure everything is structurally sound as well!

Problem: VPS error after a DJI GO 4 App update.
Solution: Forceclose the app and see if the error is still present upon reopening it. If it’s still there, delete the app and download it again. If none of this works, consider rolling back the app to the previous version. I can’t speak much to this as I have never tried it, but here are YouTube tutorials on how to undertake such a task: click here for Apple, and here for Android.
Problem: VPS error after installing the HDMI output module.
Solution: After installing the HDMI module it is very important to refresh the firmware, even your AC and RC are currently on the latest firmware update.
Problem: VPS error after the drone came into contact with moisture. A guy reported that after landing in the snow he got a VPS error, but the drone wouldn’t calibrate with DJI Assistant 2. Turns out moisture had fogged up one of the downward stereo vision sensors.
Solution: After letting it dry out for a couple of days he was able to calibrate the VPS with no problem.
Problem: You may have a bad VPS module.
Solution: If you’ve tried everything and are still getting vision system errors, there is a chance that the VPS module is bad. DJI offers a 6-month limited warranty for the VPS on the Phantom 4 Pro. In my article Is My DJI Drone or Gimbal Under Warranty? Check Here I explain how to go about initiating a return.
How to calibrate the Vision System on the P4 Pro
Calibrating the vision system is a relatively simple process, and it takes about five minutes. You will need DJI Assistant 2 for the calibration.
- Make sure that you are on the latest firmware update.
- If you haven’t already, download DJI Assistant 2 from DJI’s website here.
- Set the resolution of your computer screen to 1600×900.
- Ensure that you have at least a 50% charge in your battery.
- Connect your Phantom 4 Pro to a computer with a USB cable.
- Power on the drone.
- Launch DJI Assistant 2.
- Click on Phantom 4 Pro.
- Click on “Calibration” which you should see on the lefthand menu.
- Follow the tutorial that will walk you through the steps of calibrating. Note: when I was calibrating the downward sensors, the gimbal make a funny sound, like it was screaming at me. After researching this, others have heard the same sound and claimed that it was “normal”.
- After you have tilted your drone in every which way, DJI assistant 2 will begin the calibration, which takes about a minute.
- Upon completion of the calibration process, DJI Assistant 2 will ask you to restart the drone.
- Ta-da! You did it, and hopefully, all VPS errors will be gone when you open DJI GO 4.
If you’d prefer, here is a YouTube tutorial video that walks you through each step.
It’s very important to set the screen resolution
In order for the calibration to work, your computers screen resolution should be set to 1600 x 900. I have an older 27″ iMac which has a default screen resolution of 2560 x 1440, and I could not calibrate the VPS. I kept getting a “Frame Alignment Error”, and when I clicked on “calibrate” I was met with a white screen. I kept thinking “where are those darn dots that I see in the tutorial video”. Well, after conducting some research I learned that the resolution needs to be set to 1600 x 900. When I changed the screen resolution under the display settings, the calibration worked flawlessly.

If you have an Apple computer, go to settings>displays>scaled>click 1600 x 900. If you have a PC, the steps may be a bit different, but there should still be a “displays” section under settings where you can adjust the resolution.
Trevor’s take
I’ll admit it, I can be lazy. I flew for months with a message on the DJI GO 4 App that read “Recalibrate the Vision System. Use DJI Assistant on Mac or PC.” When I went to calibrate the VPS on my iMac, I ran into the issue I mentioned above where the screen resolution was too large. I didn’t know that the screen resolution size was the culprit at the time, and I was too lazy to figure out why because, after all, my drone seemed to be flying just fine. When I realized how simple the remedy was, I frowned at myself for dragging my feet.
If you’re reading this and currently have a VPS error message displaying on your app, I hope that this post provided some value for ya. What’s your experience with the vision positioning system? Have you experienced other errors or problems that weren’t mentioned above? Comment below!
Содержание
- Camera sensor error
- #1 OFFLINE StalArt
- Прикрепленные изображения
- #2 OFFLINE olegnsk
- #3 OFFLINE StalArt
- #4 OFFLINE olegnsk
- Подвес — настройка, проблемы, ошибки, камера (Phantom4)
- #81 OFFLINE Fduch
- #82 OFFLINE RimmerGo
- #83 OFFLINE ЮХа
- Прикрепленные файлы
- DJI Phantom 4/ Pro Error Codes and How to Fix Them!
- Common DJI Phantom 4/ 4 Pro Error Codes.
- Error 1: DJI Phantom 4 Error Code 50 (IMU Error).
- Solutions.
- Error 2: DJI Phantom 4 Battery Error.
- Solutions.
- Error 3: DJI Phantom 4 ESC Status Error.
- Solutions.
- Error 4: DJI Phantom 4 Compass Error (COMPASS-ERR).
- Solutions.
- Error 5: DJI Phantom 4 GPS Error.
- Solutions.
- Error 6: DJI Phantom 4 Camera Sensor Error.
- Solution.
- Не работают сенсоры
- #41 OFFLINE SergKap
- #42 OFFLINE indeec
- #43 OFFLINE BMWkLw
- #44 OFFLINE Kirows
- #45 OFFLINE mehanism
- Прикрепленные изображения
- #46 OFFLINE RomanSimfer
- #47 OFFLINE mehanism
- #48 OFFLINE RomanSimfer
- Прикрепленные изображения
Camera sensor error
#1 OFFLINE StalArt


- Город: Минск
- Коптер: Dji mavic pro
Было падение Mavic с небольшой высоты. Повредился шлейф подвеса камеры и пластина крепления камеры. После замены шлейфа и пластины, подвес заработал стабильно, но камера не работает — выдает ошибку Camera sensor error.
Есть какие-нибудь советы? Может-быть плохо «пристегнулся» шлейф? Или еще что? Или все плохо? 🙁
Прикрепленные изображения
#2 OFFLINE olegnsk
Опытный летчик АС

- Город: Москва, исторически Новосибирск и Камчатка
- Коптер: младшенький Mavic и ещё небольшая эскадрилья
StalArt , За видео там отвечает отдельный многожильный пучёк проводов (а не шлейф) . Его и разъёмы смотреть надо.
#3 OFFLINE StalArt
- Город: Минск
- Коптер: Dji mavic pro
olegnsk , о, как. спасибо. он выглядит очень надежным. тоже мог повредиться? сам провод или разъемы смотреть в первую очередь?
#4 OFFLINE olegnsk
Опытный летчик АС
- Город: Москва, исторически Новосибирск и Камчатка
- Коптер: младшенький Mavic и ещё небольшая эскадрилья
StalArt , И то и другое, но лучше отнести (отправить) специалисту.
Источник
Подвес — настройка, проблемы, ошибки, камера (Phantom4)
#81 OFFLINE Fduch
Летчик со стажем
- Город: Санкт-Петербург
- Коптер: Phantom 4
RimmerGo , по моему тоже все ОК — лучше не будет, это все же не профессиональная техника с сумасшедшей светосилой и скорострельностью. Но перфекционизм понимаю :-))))
Съемке горнолыжных спусков это повредить не должно (ИМХО), поскольку там самое выразительное — «наезды-отъезды», а если речь про отслеживание летящего лыжника быстрым поворотом коптера, то фон будет размыт, а движущийся объект — резкий, что очень добавит художественной выразительности. Но потренироваться так снимать придется немало: даже фото «с проводкой» снять непросто, а уж видео.
В общем мое ИМХО: для видео качество ОК, если нет намерения вырезать стопкадры из кусков во время поворотов. В каком-то учебном видео на ютубе даже учат специально одевать фильтр чтобы снижать освещенность и заставлять камеру делать бОльшую выдержку — для смаза во время движения, чтоб более «киношной» картинка была.
#82 OFFLINE RimmerGo
- Город: Екатеринбург
- Коптер: Phantom 4
#83 OFFLINE ЮХа
Опытный летчик АС
- Город: Кострома
Честно: «смаз во время движения» снимая с коптера получить очень сложно. Думаю, что невозможно. Хотя, в если только в постредактировании. Но не при 30 к/сек.
Хороший кадр смаза . Но не с коптера. Кадр не мой. Взят с костромского форума.
Прикрепленные файлы
- Снимок экрана 2016-07-13 в 22.35.43.png1,76МБ 3 Количество загрузок:
 Снимок экрана 2016-07-13 в 22.35.43.png1,76МБ 3 Количество загрузок:
Сообщение отредактировал ЮХа: 13 Июль 2016 — 10:36
Источник
DJI Phantom 4/ Pro Error Codes and How to Fix Them!

It’s normal to get error codes and messages when using Phantom 4 and it’s better to get some knowledge about those things and how to fix those issues. I went through many DJI forums and collected several error codes and how to fix them.

Hope this article would help with solving your Phantom 4 Error codes. Below, There is the list of error codes I was able to collect from DJI forums.
Common DJI Phantom 4/ 4 Pro Error Codes.
- Error 1: DJI Phantom 4 Error Code 50 (IMU Error).
- Error 2: DJI Phantom 4 Battery Error.
- Error 3: DJI Phantom 4 ESC Status Error.
- Error 4: DJI Phantom 4 Compass Error (COMPASS-ERR).
- Error 5: DJI Phantom 4 GPS Error.
- Error 6: DJI Phantom 4 Camera Sensor Error.
Error 1: DJI Phantom 4 Error Code 50 (IMU Error).
Phantom 4 Error Code 50 is an IMU calibration error and many Phantom 4 users get this error because of performing the calibration process near metal structures while calibrating the IMU. Also outdated Phantom 4 firmware, and glitched firmware also could cause the issue.
Solutions.
- Update Phantom 4 firmware. Outdated firmware and firmware glitches can mess up the IMU calibration process. Therefore make sure to keep the firmware updated when you perform any calibration. Read How to Update DJI Phantom 4 firmware if you need to.
- Perform the IMU calibration process in a proper environment. When calibrating IMU you need to pay attention to the surroundings. For example, you should perform the process on a flat surface and should keep metal and electronics away from the aircraft. Also, you should perform the steps properly. Read the How to Calibrate IMU article for a detailed explanation of IMU calibration.
- Factory Reset Phantom 4. Download and install DJI Assistant 2 application to the PC. Connect Phantom 4 aircraft to the PC. Open the DJI Assistant 2 application and log in to your DJI account and choose Phantom 4. Then go to the “Firmware Updates” tab and click on “Factory Reset”.
- Change Location and try again.
Error 2: DJI Phantom 4 Battery Error.
Usually, DJI Phantom 4 battery error pops because of an imbalance in battery cells, faulty power management board, and battery firmware glitches.
Solutions.
- Refresh battery firmware. Update Phantom 4 firmware while keeping the glitched battery inside. Read How to Update DJI Phantom 4 firmware.
- Drain the battery to zero and recharge it fully.
- Change the battery.
- Change power management board. If the error still exists, the power management board might be glitched or damaged. So you would have to change the power management board. Advisable to contact DJI Support.
Error 3: DJI Phantom 4 ESC Status Error.
Usually, ESC status error can be caused by outdated firmware and faulty electronic speed controller (ESC).
Solutions.
- Update Phantom 4 firmware.
- Replace ESC.
Error 4: DJI Phantom 4 Compass Error (COMPASS-ERR).
In most cases, Phantom 4 Compass Error pops up because of placing and flying the aircraft near a magnetic field. Once the aircraft is placed near a magnetic field, it assumes the artificial magnetic field as the earth’s natural magnetic field. Then it pops “Compass Error” when the Phantom 4 checks its orientation against its GPS position and finds a discrepancy.
Solutions.
- Avoid Electromagnetic interference. Fly the Phantom 4 away from powerlines, communication towers, huge buildings, etc.
- Calibrate the compass in an open wide area. Move away from the place where you currently receive Compass Error to an open area. Then perform a proper compass calibration on Phantom 4. Read how to calibrate the compass.
- Contact DJI. If you still get the error, it’s better to contact DJI for repair.
Error 5: DJI Phantom 4 GPS Error.
DJI Phantom 4 GPS Error is usually caused by firmware issues, DJI GO 4 app issues, miscalibrated compass, and GPS module glitches.
Solutions.
- Update DJI GO 4 app to the latest version. Visit DJI Downloads Center and download and install the latest DJI GO 4 app.
- Update or refresh Phantom 4 firmware. Read How to Update DJI Phantom 4 firmware.
- Calibrate Phantom 4 compass.
- Replace the GPS module. If you still facing the issue, the GPS module might be glitched or damaged. So you need to replace this. Better to contact DJI to replace or fix the issue.
Error 6: DJI Phantom 4 Camera Sensor Error.
In most cases, DJI Phantom 4 does not show any camera view and pops camera sensor error, chances are the ribbon cable to the camera is damaged.
Solution.
- Replace the Camera ribbon cable. Buy Phantom 4/ 4 Pro Ribbon cable for about 40$ and replace the current ribbon cable. Here is a demonstation video from the youtube.
Источник
Не работают сенсоры
#41 OFFLINE SergKap
Опытный летчик АС
- Город: РФ
полёты в сумерках ?
#42 OFFLINE indeec
- Город: Брянск
- Коптер: dji mavic pro, inspire 1 pro
Здравствуйте, попытался откалибровать сенсоры через ассистент, всё делает как надо, но в конце калибрации возникакт screen error, ввожу диагональ монитора, всё без толку. Всё что можно с анголоязычных форумов попробовал, разрешения всякие ставил, всё равно в конце ошибка.
Уже всё решил, достал из кладовки старый ноут с 14″ экраном и соотношением сторон 16:9 и всё откалибровалось.
#43 OFFLINE BMWkLw
- Город: velikie luki
- Коптер: mavic pro
#44 OFFLINE Kirows
- Город: Khabarovsk
- Коптер: Mavic Pro, Phantom 4
Кто знает а для чего у мавик про нижние сенсоры? Контроль высоты или препятствий? Я имею ввиду камеры
#45 OFFLINE mehanism
- Город: Севастополь
- Коптер: Phantom 4 Pro Plus V2.0
Восстанавливаю найденный в поле Mavic Pro. Судя по датам записей на флешке, пролежал он в траве ровно 11 месяцев. Судя по состоянию, не упал, а сел.
Аккум добрые люди разблокировали. Очистил аппарат от грязи, разобрал весь. На удивление оказался довольно герметичен. Особых повреждений не нашёл. Промыл всё и все разъёмы спиртом и очистителем контактов. Собрал. С первого запуска (пока на столе) всё заработало, за исключением передних сенсоров — ошибка по обоим вывалилась сразу. При просмотре в DJI Assistant выдал «несоответствие прошивки некоторым модулям» — обновил, по сенсорам ничего не изменилось.
Разобрал снова, снял сенсоры, осмотрел ещё раз шлейфы и разъёмы — криминала не нашёл.
Вопрос к опытным товарищам — куда копать ? Два сенсора или шлейфа сдохли одновременно ? Или однозначно плата подвеса ?
Прикрепленные изображения

#46 OFFLINE RomanSimfer
Летчик со стажем

- Город: Симферополь
- Коптер: MINI2
Сенсоры снимал, плюс 1 минута к полёту. Смотреть надо куда едешь летишь! Пишет — «ошибка сенсоров» ну и что, всё летает.
Таких ошибок как у Вас с отключенными сенсорами не выдаёт.
Я про передние сенсоры если что.
Может стоит прошить другой.
Сообщение отредактировал RomanSimfer: 04 Июнь 2022 — 10:55
#47 OFFLINE mehanism
- Город: Севастополь
- Коптер: Phantom 4 Pro Plus V2.0
Смотреть надо куда едешь летишь!
Таких ошибок как у Вас с отключенными сенсорами не выдаёт.
#48 OFFLINE RomanSimfer
Летчик со стажем
- Город: Симферополь
- Коптер: MINI2
В планах использовать его как «разведчик погоды» в стрёмных местах
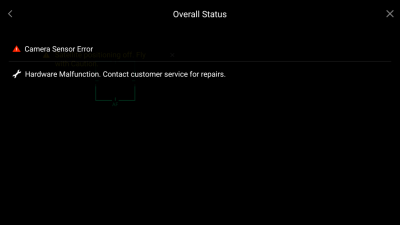
Мы сейчас делаем маленький Детектор глушилок, с маленьким дисплеем, только на диапазон навигации.
Можно поднимать дроном и как «разведчик глушилок» использовать
С земли, в пересечённой местности, не всегда покажет, с высоты — без проблем.
Взлетел, скажем на 100 метров, покрутился, сел и посмотрел на дисплей, в памяти сигналы останутся.
Прикрепленные изображения
Сообщение отредактировал RomanSimfer: 06 Июнь 2022 — 08:52
Источник
Knowing how to calibrate the Mavic 2 Pro and Zoom vision sensors is very important.
If your are receiving the Mavic 2 Vision system error, or if your quadcopter is flying erratically, not hovering correctly, then you need to calibrate the Mavic 2 Vision Positioning System.
Also, if the Mavic 2 vision system is not working correctly, then it may not detect and avoid obstacles.
Below are the instructions on how to calibrate the Mavic 2 Pro and Zoom vision system including videos. You will also find tips to fix the Mavic 2 vision sensor and system errors.
If you are flying your Mavic 2 and the Vision Sensor Calibration error or Vision System Error occurs, you need to fly the quadcopter in straight away and re-calibrate the Mavic 2 VPS using the below instructions.
If the Mavic 2 calibration doesn’t fix the flying difficulties, then check to see if there is a Mavic 2 update available and use the excellent tips below to fix the Mavic 2 vision system error.
The full Mavic 2 calibration is done with the DJI Assistant 2 software. However, if you have no computer with you, then you can perform a quick vision sensor calibration using the DJI Go 4 app.
If you have the original Mavic Pro, then you visit our Mavic Pro vision calibration article as there are differences in the Mavic Pro and Mavic 2 vision system calibration.
Below are the instructions to calibrate the Mavic 2 Pro and Zoom vision system to fix errors while flying, hovering or obstacle sense and avoid issues.
- Download the DJI Assistant app (Apply and Windows versions available).
- Remove the Mavic 2 propellers.
- Power on the Mavic 2 quadcopter.
- Connect the quadcopter to a computer using a USB cable.
- Launch the DJI Assistant 2 application on your computer.
- Select Mavic 2.
- Click Calibration on the left side in the DJI Assistant 2 software.
- Watch the tutorial a couple of times, which show you how to calibrate the Mavic 2.
- Click Next and Calibration Now.
- Face the Mavic 2 front sensors at the computer screen.
- Adjust the Mavic 2 position so that the green rectangle is covered by the red rectangle.
- Keep the Mavic 2 in its current position and slowly move the drone along with the blue background.
- When the Mavic 2 forward vision sensors are calibrated a prompt will pop up, stating Forward Camera Calibration Complete with a green check mark.
- Click Start Downward Camera Calibration to continue.
- Keep the Mavic 2 with its downward vision sensor in its current position facing the computer and slowly move the drone along with the blue background.
- When the Mavic 2 downward vision sensors are calibrated a prompt will pop up stating Downward Camera Calibration Complete.
- Click Start Rear Camera Calibration to continue.
- Keep the Mavic 2 with its backward vision sensor in its current position facing the computer and slowly move the drone along with the blue background.
- When the Mavic 2 backward vision sensors are calibrated a prompt will pop up stating Rear Camera Calibration Complete.
- Next, fold the back legs under the Mavic 2 before starting to calibrate the side vision sensors.
- You won’t be able to fold the back leg fully on the side which has the USB cable on. That is OK.
- First, hold the Mavic 2 with the right side, which contains the USB cable to face the computer and move the quadcopter along with the blue background.
- When this side sensor is calibrated a pop up box will state Right Camera Calibration Complete.
- Then turn the Mavic 2 to the left side and calibrate by following the blue boxes on screen.
- After both sides of the Mavic 2 are calibrated, the DJI Assistant performs calculations. If calibration is successful, you will see a green check mark with Calibration Complete message.
- Then restart your Mavic 2 drone to complete the calibration.
Below is an excellent Mavic 2 calibration tutorial video.
Calibrate Mavic 2 Vision Sensor Using DJI Go 4
It is possible to do a quick calibration of the Mavic 2 vision sensors using the DJI Go 4 app. This could be a quick fix if you receive the DJI Mavic Vision Sensor Calibration error or Vision System Error.
Other reasons to calibrate the Mavic 2 VPS is if you feel the Mavic 2 isn’t hovering as stable as it normally does or if you feel the Mavic 2 is slow detecting obstacles or just not flying as it should.
If you don’t have a laptop with the DJI Assistant 2 app to do a full Mavic vision sensor calibration, then you can do a quick Mavic vision sensor calibration using the DJI Go 4 app.
To do the quick Mavic vision calibration, tap on the Aircraft Status in the DJI Go 4 app. Then click on Vision Sensors and start the quick calibration.
What To Do If Mavic 2 Vision Sensor Calibration Fails
- Insure that you have the latest Mavic 2 firmware before calibrating the vision sensors.
- Only calibrate the Vision Sensors when the light is good and never calibrate near or over reflective surfaces.
- Remove the propellers before starting the calibration.
- It is best to have batteries full or as close to full on your laptop and Mavic 2 just in case the vision sensor calibration takes longer.
- Give yourself plenty of space and have no interruptions while you calibrate the Mavic 2 vision sensors.
- Calibration of the Mavic 2 vision sensors require more or less only wrist movement to pivot, tilt and rotate the drone to follow the blue squares on the screen.
- Insure you fingers aren’t covering or close to the vision sensors while calibrating the Mavic 2.
- Leave the Mavic 2 on during the full process until you see the “Calibration Complete” message.
- Don’t forget to restart the Mavic 2 after calibration.
- If you are using a laptop and the DJI Assistant 2 is not properly recognizing the Mavic 2 sensors, then try it on a normal desktop computer with external display.
Fix Mavic 2 Vision System Error
The Mavic 2 vision system error does not have to be coming from the vision sensors. It could be caused by the infrared sensors, which are part of the whole Mavic 2 Vision Positioning System. So the process of calibrating the vision sensors would not correct the system error if the problem is with the infrared sensors.
If you’re quadcopter is only new and you are receiving the Mavic 2 vision system error, it is important to troubleshoot the problem as quickly as possible.
With all new DJI products, there is always the option to return the quadcopter but this return period is not very long. However, don’t send it straight back without checking the Mavic 2 and following the below steps as it could be something very simple causing the Mavic 2 vision system error.
Here are some instructions on what to try when you receive the DJI Mavic Vision system errors.
- If the Mavic is only new, check that there is no tape or packaging covering the vision sensors on the forward, rear, downward and both sides.
- Switch off the Mavic 2, take the battery out and leave it off for about 3 minutes.
- If the light is insufficient, then the Mavic 2 vision sensors won’t work properly. See below.
- The Mavic 2 vision system won’t work correctly or not at all over polished or reflective surfaces giving cause to the vision sensor See below.
- Ensure the vision sensors are clean. Use a soft cloth to remove any dust or debris from the sensors.
- Check other parts of your Mavic 2. If the quadcopter isn’t flying correctly because of bent or broken propellers or other parts, then incorrect information will be sent back to the flight controller, which could lead to the to the system error.
- Check to see if there is new Mavic 2 firmware available.
- Calibrate the Mavic 2 vision sensors using DJI Assistant 2 software as described above.
- Try the DJI Go 4 Mavic quick calibration described above.
- Check that you are getting a strong GPS signal in P-Mode.
- Calibrate the Mavic 2. If the IMU / compass is not calibrated, the flight control system will not receiving correct information and this may effect the vision system error.
As well as vision sensor issues, you may be having issues where the Mavic disconnects from the Remote Control or DJI Go 4 app.
If you are experiencing these Mavic 2 disconnect issues, then read our article on fixing Mavic Pro and Mavic 2 disconnects. The article covers all the many reasons which can cause the drone disconnecting from the remote or DJI Go 4 app. Looks at cables, ports, SD cards, smartphone cache, app settings and more.
Performance Of The Mavic 2 Vision System
The Mavic Vision System is affected by its surroundings with the infrared sensor under the Mavic been affected greatly by the surfaces it is being flown over.
Here are some notes on instances and surroundings which can adversely affect your Mavic Vision system;
- Flying over monochrome surfaces such as pure black, white, pure red, pure green.
- Flying over reflective surfaces.
- Flying over transparent surfaces.
- Flying over moving objects or surfaces.
- Flying over surfaces that strongly reflect infrared waves away such as mirrors.
- Flying at high speeds of over 31 mph forward and 27 mph backward to allow the Mavic 2 sufficient time to brake.
- Flying over small and fine objects such as power lines or tree branches.
- Flying when the lighting changes frequently and drastically.
- Flying over extremely dark surfaces. (< 10 lux) or very bright (> lux 40,000).
- Flying over surfaces without a clear pattern or texture.
- Flying over surfaces with identical repeating patterns.
Note: If you require components for your quadcopter, then view this large selection of Mavic 2 parts, upgrades and accessories.
DJI Mavic Care Refresh
The Mavic Care Refresh provides two replacement units for a small additional charge in one year and covers a wide variety of accidents, giving you greater peace of mind. Click on the below link to read the FAQ and pricing.
DJI Mavic 2 Care Refresh
Mavic 2 Obstacle Sensing Vision System Information
The new Mavic 2 Pro and Zoom can sense objects in 6 directions. Known as Omnidirectional Obstacle Sensing, this includes left, right, up, down, forward and backward obstacle sensing.
Obstacle sensing for left and right directions is only available in ActiveTrack or Tripod Mode.
Now, while all 6 sides of the Mavic 2 are covered for obstacle sensing, Omnidirectional Obstacle Sensing does not fully cover the full 360 degree circumference arc of the quadcopter.
Please see the DJI Mavic 2 user manual for diagrams showing the obstacle sensing coverage around the quadcopter.
How the Mavic 2 Obstacle Sensing Works
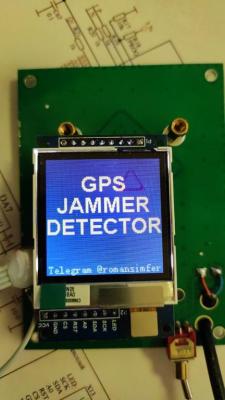
The Mavic 2 Pro and Mavic 2 Zoom are equipped with Forward, Backward, Downward and Lateral Vision Systems including Upward and Downward Infrared Sensing Systems. These all provide omnidirectional obstacle detection, providing lighting conditions are adequate.
The main components of the Forward, Backward and Downward Vision Systems are 6 camera sensors located on the nose, rear end and underside of the Mavic 2 quadcopter.
The lateral Vision System are 2 cameras with one camera on each side of the Mavic 2 quadcopter.

The main components of the Upward and Downward Infrared Sensing Systems are 2 x 3D infrared modules located on the top and underside of the Mavic 2 quadcopter.
The Downward Vision System and Infrared Sensing System helps the Mavic 2 maintain its current position and hover in place very precisely. The Vision and Infrared Sensing system allow the Mavic 2 to fly indoors or in other areas where a GPS signal is unavailable.
Mavic 2 Bottom Auxiliary Light
The Auxiliary light located on the underside of the Mavic 2 improves visibility for the Downward Vision System in bad light conditions.
Obstacle Sensing is fascinating technology and you can read further in this article entitled “Top Collision Avoidance Drones And Obstacle Detection Explained“.
Here is a shorter version from DJI on how to calibrate the Mavic 2 VPS.
A time may come when you receive an “Abnormal” status notification in your DJI Go 4 app. You click it and you receive another message saying “Recalibrate the Vision System. Use DJI Assistant on Mac or PC.“
It is really important that you don’t ignore this message. Even though you can fly your drone in this state, it is not safe to do so. You may hurt someone due to your drone misbehaving or you could just crash your drone, and all that because your drone is lacking of one of its main features, vision sensors.
So, in order to continue practicing safe flight, you must know how to recalibrate vision sensors on a DJI drone. In this article, I am going to show you a step by step guide on how to do this, along with a video preview, so you don’t make any mistakes.
1. Install DJI Assistant
First, go to the DJI Assistant download page and get one that suits your drone, but be careful not to get the wrong version.
Click “Download exe” if you wish to directly install the application to your computer. Then open the .exe file and install the Assistant. After you installed it, start the Assistant.
2. Connect the drone to the PC
It’s a good idea to remove propellers from a drone. You will see me skipping that part in the video (I forgot), but you should do it just in case. The safer, the better!
Then make sure your drone battery is charged (it doesn’t need to be a full charge, 50% will be enough), and turn it on.
After turning on the drone and connect it to the PC via cable (in my case it was a USB-C cable that arrived with the Mavic Air). DJI Assistant interface will change and your drone icon will appear on the screen. Click it, and you will be taken to another window with options that are available for your drone.
On the left-hand side menu, choose “Calibration”. You will be greeted with few animations that will show you wrong and right techniques for calibrating the drone. Watch them carefully.
3. Calibrate your drone
After you “Next-ed” all of the animations, click “Calibrate Now.”
You will have to align the drone with the screen as I did in the video, and just like you saw in tutorial animations before the calibration, then follow the pattern.
You must do this for each set of sensors you have. Mavic Air has Front, Bottom and Back sensors, so I had to calibrate all of them.
4. Finishing the calibration process
If you completed each task you were asked to do, then you will see that window from the beginning, and it will say “Calculating…”. This means it collected all the necessary data and it’s now adjusting your sensors.
This step will last just a few seconds. After it’s done and you will get a “Calibration Success!” message and now you can exit the DJI Assistant and unplug and turn off your drone.
5. The Video Tutorial
6. The List of Steps
- Visit the DJI website and download and install the software.
- Run DJI Assistant.
- Make sure your drone battery is at least 50% charged.
- Remove the propellers from your drone.
- Turn on your drone.
- Connect the drone to the desktop/laptop via USB cable.
- DJI Assistant will automatically recognize that your drone is connected.
- Select the box with your drone on it.
- In the new window, on the left-hand side, click on “Calibration”.
- Carefully inspect DOs and DON’Ts that the Assistant will show you.
- After you “next-ed” all steps click on “Start Calibration”.
- Carefully place the drone in front of the screen at the right distance from the screen. Start with the drone almost touching the middle of your screen, and then move it away from the screen until the corners of the blue square become blue.
- Track the squares without moving your drone around. Keep it in place and just tilt rotate it.
- Next, you will need to take a step back and repeat the process.
- After you do both Close and Far calibration of one set of sensors, you will be asked to calibrate the next set (if you have it).
- When all vision sensors are calibrated, DJI Assistant will then calculate the data it collected, and it will upload the new settings to your drone.
- After it’s done and you will get a “Calibration Success!” message and now you can exit the DJI Assistant and unplug and turn off your drone.
7. Congratulations!
You have completed the calibration.
If you have any questions, post them in the comment section below.

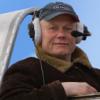
Ошибка Код 10001:
Неисправность камеры. Требуется ремонт, обратитесь в службу поддержки DJI за помощью.
При появлении этой ошибки — перезагрузите квадрокоптер. Если после перезагрузки ошибка осталась, быстрей всего проблема в аппаратной части дрона и необходима замена камеры или шлейфа камеры. Смотрите пошаговую видео инструкцию — как заменить камеру в mavic mini.
Ошибка Код 10016:
Камера не откалибрована. Качество изображения может быть хуже, обратитесь в службу поддержки DJI.
Произведите калибровку камеры согласно инструкции приложения dji, если ошибка не пропала — необходим ремонт или замена подвеса камеры. Инструкцию по замене можно найти в разделе «ремонт квадрокоптеров»
Ошибка Код 10022:
Нет SD карты. Вставьте SD карту
Проверьте SD карту, при необходимости, продуйте слот SD карты в самом квадрокоптере.
Ошибка Код 10023:
Неисправность SD карты. Замените карту.
Проверьте SD карту на другом устройстве и полностью отформатируйте, либо поменяйте SD карту.
Ошибка Код 30007 / 30008:
Нет сигнала GPS. Невозможно парить. Летайте с осторожность.
Ошибка может быть вызвана из-за находящегося по близости аэропорта или вы можете находиться в зоне взлета самолетов, в этом случае лучше вообще не взлетать. Если по близости нет объектов вызывающих помехи GPS, а ошибка по прежнему появляется, тогда необходим ремонт или замена GPS модуля. Смотрите пошаговую инструкцию как заменить gps модуль.
Ошибка Код 30047:
Барометру не удалось подготовиться к работе. Перезагрузите летательный аппарат.
Перезагрузите квадрокоптер
Ошибка Код 30049:
Ошибка модуля GPS. Перезапустите летательный аппарат.
Пере запускаем квадрокоптер, если ошибка снова появляется — замена gps модуля.
Ошибка Код 30050:
Требуется калибровка IMU. Откалибруйте IMU.
В настройках приложения dji найдите калибровку IMU и откалибруйте устройство. Если откалибровать IMU не удается, ошибка по прежнему появляется, тогда необходима замена GPS модуля, потому как IMU это часть модуля GPS.
Ошибка Код 30055:
IMU не откалиброван. Откалибруйте IMU.
Повторям все действия согласно рекомендациям к ошибке 30050.
Ошибка Код 30060:
Ошибка компаса. Убедитесь, что рядом с летательным аппаратом нет металлических или магнитных предметов, и откалибруйте его перед использованием.
Откалибруйте квадрокоптер и поменяйте место взлета, подальше от металлических конструкций или сооружений создающих магнитное поле.
Ошибка Код 30064:
Невозможно взлететь.
Убедитесь, что вы находитесь в зоне где разрешены полеты, для этого перейдите в раздел «рекомендуемые зоны» в самом приложении dji. Если вы находитесь в разрешенной зоне полета, а ошибка по прежнему осталась, попробуйте перезагрузить квадрокоптер и обновить прошивку. Если после обновления прошивки, ошибка опять появляется, стоит обратить внимание на ESC модуль который отвечает за управление всеми четырьмя моторами.
Ошибка Код 30074:
Ошибка аккумуляторной батареи. Посадите летательный аппарат и замените батарею.
Лучше всего немедленно посадить квадрокоптер и заменить батарею. При сильно изношенной батареи, ошибка может снова появляться.
Ошибка Код 30168:
Мощности летательного аппарата недостаточно. Летайте с осторожностью.
Причин возникновения этой ошибки может быть несколько:
- Чаще всего, ошибка появляться во время сильного ветра, попробуйте перевести квадрокоптер в спортивный режим.
- Может не хватать остаточного заряда батареи при попытке сопротивления дрона с сильным ветром.
- Изношенный аккумулятор. Попробуйте заменить аккумулятор и проверить, будет ли появляться ошибка снова.
- Неисправная работа ESC модуля.
Ошибка Код 30210:
Ошибка программного обеспечения. Перезапустите летательный аппарат.
Чаще всего, шибка решается банальной перезагрузкой дрона, в противном случае — обновите прошивку.
Ошибка Код 30226:
Ошибка при запуске. Перезагрузите летательный аппарат и приложение DJI Fly.
Действуйте согласно инструкции приложения DJI Fly.
Ошибка Код 30238:
Полёт на большой высоте, время торможения увеличено, время полета сокращено. Летайте с осторожностью.
Превышена допустимая дальность полета квадрокоптера, лучше вернуться обратно к пульту управления.
Ошибка Код 30239:
Низкий сигнал GPS. Летательный аппарат не может автоматически зависать и взлет ограничен. Переместитесь в окружающую среду с достаточным освещением. Разблокировка ограничений на взлет не рекомендуется.
При возникновении этой ошибки, рекомендуется поменять локацию для полета. Для поиска новой местности воспользуйтесь разделом «рекомендуемые зоны» в самом приложении DJI Fly.
Ошибка Код 40002:
Застревание подвеса. Проверьте, снята ли защитная крышка подвеса, и убедитесь, что подвес вращается свободно
Снимите защитную крышку камеры. Если ошибка появляется снова, убедитесь, что все четыре фиксатора подвеса камеры зафиксированы на корпусе квадрокоптера. Если же один из фиксаторов подвеса выпал, установите его обратно в специальное место на корпусе, как это сделать — смотрите эту видео инструкцию.
Ошибка Код 40011:
Ошибка калибровки подвеса. Перезагрузите летательный аппарат.
Пере запустите квадрокоптер и откалибруйте подвес камеры в приложении DJI Fly.
Ошибка Код 40012:
Не удается подключиться к подвесу. Требуется ремонт. Обратитесь в службу поддержки DJI за помощью
В данном случае, вероятней всего, проблема в аппаратной части подвеса. Ошибка может быть вызвана поломкой самого подвеса камеры, либо надрывом шлейфа соединяющего подвес камеры и основную плату. Для решения этой поломки необходимо разобрать квадрокоптер и проверить целостность шлейфа, а также подвес камеры на наличие повреждений. Смотрите пошаговую инструкцию — как разобрать Mavic Mini.
Ошибка Код 40021:
Ошибка данных IMU подвеса. Обратитесь в службу поддержки DJI за помощью.
Модуль IMU является частью модуля GPS, при возникновении это ошибки, быстрей всего, придется заменить модуль GPS — как заменить модуль IMU/GPS.
Ошибка Код 180016 / 180030 / 180031:
Ошибка нижнего сенсора. Ошибка сенсора. Обратитесь в службу поддержки DJI за помощью.
Для начала просто перезагрузите квадрокоптер. Если ошибка вновь появилась, высока вероятность, что сенсоры на основной плате квадрокоптера вышли из строя и нуждаются в замене.
К сожалению, вызванные ошибки не всегда являются программными. При выявлении неисправности дрона в аппаратной составляющей, пользуйтесь нашими видео инструкциями по ремонту в разделе «ремонт дронов»
Если у вас остались вопросы касательно ошибок и ремонта квадрокоптера Mavic Mini, задавайте их в комментариях. Также, если у вас есть свой опыт в ремонте и решения проблем, пожалуйста, делитесь своим опытом в комментариях ниже.
