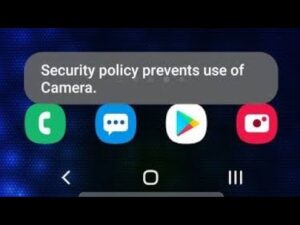
Допустим, вы хотите открыть камеру телефона Samsung Galaxy и здесь вы замечаете ошибку, сообщающую вам, что политика безопасности запрещает использование камеры на вашем устройстве. Что вы должны сделать? Что ж, многие люди уже некоторое время испытывают эти ошибки на своих телефонах Samsung. Особенно те, кто использует Samsung S10, S20, S21 и даже на Samsung A-серии, такие как A50, A51, A10, A11, A12, A20, A21, A22, A31, A32, A52 и на F41 и на M-серия, а также M10, M12, M30, M20 и другие.
Что ж, в этом посте мы покажем вам, как вы можете легко исправить политику безопасности, запрещающую использование камеры на вашем телефоне Samsung.
Содержание
- 1 Исправление политики безопасности, запрещающей использование камеры на телефонах Samsung.
- 2 Как перевести Samsung в безопасный режим
- 3 Восстановите заводские настройки телефона Samsung
В такой ситуации может случиться так, что эта проблема вызвана определенными приложениями на вашем устройстве. Итак, первое, что нужно сделать, это поискать такие приложения, зайдя на Настройки -> «Биометрия и безопасность»->«Прочие настройки безопасности»->«Приложения для администрирования устройства. Здесь вы увидите, какие приложения вызывают проблему.
Если вы по-прежнему не можете использовать камеру, я рекомендую вам перевести телефон в безопасный режим и попробовать еще раз, чтобы увидеть, можете ли вы использовать камеру. Если камера работает нормально после установки устройства в безопасный режим, то вполне вероятно, что проблема связана со сторонним приложением.
Как перевести Samsung в безопасный режим
Шаг 1: Нажмите и удерживайте мощностью кнопка пока не увидите значок отключения питания.
Шаг 2: Теперь нажмите и удерживайте на выключения значок, пока не появится безопасный режим.
Шаг 3: Наконец нажмите на что собой представляет Безопасный режим значок и ваш Samsung перейдет в безопасный режим.
Теперь вы должны увидеть a Индикатор безопасного режима в нижней левой части экрана.
Восстановите заводские настройки телефона Samsung
Сброс настроек телефона Samsung — еще один работающий метод. Многие сочли это решение эффективным. Прежде чем продолжить, убедитесь, что вы сделали резервную копию телефона Samsung, а затем выполните полный сброс настроек.
Чтобы восстановить заводские настройки устройства, нажмите и удерживайте Увеличить громкость и Кнопки питания одновременно, пока устройство не завибрирует и не появится режим восстановления Android. Подождите около 30 секунд, пока появится опция, а затем выберите вытирать данные/фабрика сброс.
OR
-
от Настройки, найдите и выберите Сброс данных.
-
Далее нажмите Сброс данных еще раз, а затем просмотрите информацию.
-
Когда будете готовы, проведите пальцем и коснитесь Сброс.
- Введите PIN-код устройства и нажмите «Далее».
- После этого тынаш телефон перезагрузится; когда он снова включится, он запустится с экрана начальной настройки.
Это все. Вы не увидите Политика безопасности запрещает использование камеры на вашем телефоне Samsung снова.
Содержание
- Как разрешить доступ к камере на самсунге?
- Как разрешить доступ к веб камере?
- Как разрешить приложению доступ к камере?
- Как разрешить приложению доступ к камере Windows 7?
- Как сделать доступ к камере на айфоне?
- Как на ноутбуке разрешить доступ к камере?
- Как разрешить доступ к камере в Тик Ток?
- Как настроить разрешения для приложений?
- Как запросить доступ к камере?
- Как разрешить классическим приложениям доступ к камере?
- Как настроить веб камеру на компьютере Windows 7?
- Как настроить веб камеру на ноутбуке Windows 7?
- Как разрешить доступ к камере в Teams?
- Как разрешить сафари доступ к камере на айфоне?
- Как разрешить доступ к камере на айфоне в Инстаграм?
- Как разрешить доступ к фотографиям в айфоне?
- camera has been disabled because of security policies как исправить
- Camera has been disabled because of security policies как исправить
- Исправить ошибку камеры на Android [Easy Step]
- 1. Перезагрузите ваше устройство Android
- 2. Удалить кэш приложения
- 3. Сбросить настройки приложения
- 4. Загрузите телефон в безопасном режиме
- 5. Выполните Сброс настроек
- Данные Bcakup перед выполнением сброса
- Опция 1 Reset из меню настроек
- Опция 2 Reset с жесткими клавишами
- Ошибка камеры: «Не удалось подключиться к камере» на Android-устройстве
- 1. Доступные способы
- 2. Способы среднего уровня сложности
- 3. Методы устранения ошибки для продвинутых пользователей
- Camera won’t work
Как разрешить доступ к камере на самсунге?
Выберите Настройки сайтов. Нажмите Микрофон или Камера. Включите или выключите микрофон или камеру. Разрешить.
Как разрешить доступ к веб камере?
Как настроить доступ к камере и микрофону для веб-сайта
- Откройте Chrome .
- В правом верхнем углу экрана нажмите на значок «Ещё» Настройки.
- В разделе «Конфиденциальность и безопасность» нажмите Настройки сайтов.
- Выберите Камера или Микрофон. Включите или отключите параметр Запрашивать разрешение на доступ.
Как разрешить приложению доступ к камере?
Включение разрешений приложения для камеры в Windows 10
- Выберите Пуск > Параметры > Конфиденциальность > Камера. …
- Затем разрешите приложениям доступ к камере. …
- Если приложениям разрешен доступ к камере, можно изменить эти параметры для каждого приложения.
Как разрешить приложению доступ к камере Windows 7?
Перейдите в настройки (клавиша Windows + I)> Конфиденциальность> Камера> ‘Разрешить приложениям использовать оборудование моей камеры’> ВКЛ. Затем вы можете выбрать, какие приложения могут получить доступ к веб-камере.
Как сделать доступ к камере на айфоне?
Просмотр и изменение доступа к камере, микрофону и другим аппаратным функциям
- Откройте «Настройки» > «Конфиденциальность».
- Коснитесь аппаратной функции, такой как камера, Bluetooth, локальная сеть или микрофон.
Как на ноутбуке разрешить доступ к камере?
Пройти путь: Пуск – Параметры – вкладка «Конфиденциальность»; Перейти в раздел «Камера»; «Разрешить приложениям доступ к камере».
Как разрешить доступ к камере в Тик Ток?
Как разрешить камеру в ТИК ТОК
- Очистите кеш и различный веб-мусор с вашего телефона. Возможно вы перенасытили его память и из-за этого он выдает подобные ошибки.
- Попробуйте перезагрузить смартфон.
- Попробуйте полностью удалить приложение, а после – переустановите его.
- Попробуйте перепрошить ваш смартфон.
Как настроить разрешения для приложений?
- Откройте настройки устройства Android.
- Нажмите Приложения и уведомления.
- Выберите Дополнительно Разрешения приложений.
- Выберите разрешение, например Календарь, Местоположение или Телефон.
- Укажите, каким приложениям вы хотите предоставить выбранное разрешение.
Как запросить доступ к камере?
Как настроить доступ к камере и микрофону для сайта
- Откройте приложение Chrome. на устройстве Android.
- Справа от адресной строки нажмите на значок «Ещё» Настройки.
- Выберите Настройки сайтов.
- Нажмите Микрофон или Камера.
- Включите или выключите микрофон или камеру.
Как разрешить классическим приложениям доступ к камере?
Перейдите в раздел пуск > Параметры > Конфиденциальность > камерой. Укажите необходимое значение для параметра Разрешить приложениям доступ к камере. В разделе Выберите приложения, которые могут получать доступ к камеревключите или отключите отдельные параметры для приложений.
Как настроить веб камеру на компьютере Windows 7?
Щелкните «Пуск» и переместитесь в «Панель управления». Откройте «Система и безопасность». Далее в разделе «Система» отыщите пункт «Диспетчер устройств» и щелкните по нему. Перейдите в раздел «Устройства обработки изображений» или «Звуковые, видео и игровые устройства» (зависит от типа камеры).
Как настроить веб камеру на ноутбуке Windows 7?
Требуется просто на ноутбуке включить Скайп и кликнуть «Инструменты». Далее войти в «Настройки», где войти в «Настройки видео». Должна будет появиться видеокартинка с камеры. Потом нажать на клавишу, находящуюся под изображением «Настройки веб-камеры».
Как разрешить доступ к камере в Teams?
Введите «teams.microsoft.com» в поле Поиск. Откройте группу «Microsoft.com» и прокрутите список вниз, чтобы найти teams.microsoft.com и выбрать ее. Здесь установите для камеры и микрофона разрешение доступа к этим устройствам.
Как разрешить сафари доступ к камере на айфоне?
Разблокировка камеры и микрофона в Safari
- На верхней панели нажмите кнопку «Safari» (главное меню программы);
- Выберите пункт меню «Настройки для этого веб-сайта»;
- В открывшемся окне настроек разрешите доступ к камере и микрофону:
Как разрешить доступ к камере на айфоне в Инстаграм?
Как активировать камеру Instagram из настроек
Надо выбрать «Разрешить доступ к камере». Вы увидите, что вы видите в настройках Instagram внутри iPhone. Вы должны переместить значок камеры, чтобы быть активным и, таким образом, разрешить доступ.
Как разрешить доступ к фотографиям в айфоне?
В разделе «Конфиденциальность» выберите пункт «Фотографии». Шаг 3. Поставьте флажок на пункте «Разрешить изменения» и вернитесь на главный экран настроек для сохранения изменений. После применения этих настроек у вас вновь появится возможность изменять параметры предоставления доступа приложениям к «Фото».
Источник
camera has been disabled because of security policies как исправить
Camera has been disabled because of security policies как исправить
Новые темы необходимо создавать только в корневом разделе! В дальнейшем они будут обработаны модераторами.
Обсуждение Doogee S40  doogee s40
Обсуждение »
Appearance
Color : Mineral Black, Fire Orange
Dimension: 158.20*79.40*14.10mm
Weight: 238g
Basic parameters
Certification Standards: IP68 / IP69K / MIL-STD-810G
Operating System: Android™ 9.0 Pie
Processor: MT6739 4X Cortex-A53 up to 1.5GHz
Technology: 16nm
GPU: IMG GE8100
Battery: 4650mAh Built-in Polymer Battery 5V/2A
Memory
RAM: 2GB
ROM: 16GB
External Storage: Micro SD Card (T-Flash Card) up to 32GB
Camera
Rear Cameras: 8.0MP+5.0MP f/2.2 80° Wide-angle LED Flash
Front Camera: 5.0MP f/2.2 80° Wide-angle
Display
Size: 5.5″
Resolution: 480*960 FWVGA
Pixel Density: 195ppi
Panel Technology: Multi-touch/Corning® Gorilla® Glass 4
Type: IPS
Network Type
SIM Card: Dual SIM Cards Standby Nano-SIM + Nano-SIM/ Nano-SIM+ TF Card
Frequency: GSM:2/3/5/8 WCDMA:1/8 FDD:B1/3/7/8/20
Wi-Fi: Support
Bluetooth: Support
OTA: Support
Media
Video Playback Format: Support AVI, MP4, WMV, RMVB, MKV, MOV, ASF, RM, FLV and Other Video Formats up to 720p/30fps.
Video Produce Format: Support up to [email protected] Video Shooting
Audio Playback Format: Support MP3/ M4A/AAC / MKA/AMR / ALAC/ FLAC /APE / WAV
GPS and Sensors
Fingerprint: Rear Fingerprint 0.1s Unlocking 360° Identification
Face Unlocking: Support
NFC: Support
GPS: Support
G-sensor: Support
Proximity Sensor: Support
Ambient Light Sensor : Support
Compass: Support
Geomagnetism: Support
Gyroscope: Support
GLONASS: Support
SOS: Support
Исправить ошибку камеры на Android [Easy Step]
Освободи Себя Ошибка камеры может быть связана с приложением или указывать на проблему с оборудованием. Я наметил некоторые из наиболее эффективных решений и обходных путей для ссылки.
1. Перезагрузите ваше устройство Android
Если вы впервые сталкиваетесь с ошибкой камеры, попробуйте сначала перезагрузить телефон, так как это может быть следствием незначительного сбоя в работе камеры.
Шаг 1 Длительное нажатие мощность Кнопка в течение приблизительно 3 секунд.
Шаг 2 Нажать на Перезагрузить/Перезагружать.
После перезагрузки откройте камеру, чтобы узнать, возникает ли проблема по-прежнему, и если она все еще существует, попробуйте выполнить принудительную перезагрузку:
Нажмите и удерживайте Объемы вниз и горизонтальное распределение мощностью ключи одновременно на 10 секунд или более.
Это перезагрузит телефон как обычный процесс, но память телефона будет обновлена и все приложения и службы будут перезагружены.
Если после этого ошибка камеры продолжится, попробуйте следующее решение.
2. Удалить кэш приложения
Важно, чтобы вы попытались выполнить эту процедуру, поскольку ошибку камеры можно устранить, просто удалив кэш приложения. Дело в том, что вы на самом деле не просто удаляете кеш, но и заменяете его новым, очень эффективным. Вот как вы это делаете:
Шаг 1 Войдите в Параметры > Приложения.
Шаг 2 Нажать на камера и нажмите Очистить кэш и Очистить данные.
Шаг 3 Перезагрузите устройство и откройте камеру, чтобы увидеть, проявляется ли ошибка камеры или нет.
3. Сбросить настройки приложения
Иногда некоторые из этих приложений по умолчанию могут глючить, отключаться или исчезать по любой причине, например, камера. Чтобы увидеть, если приложение камеры на вашем телефоне Android говорит Ошибка камеры из-за приложения по умолчанию мы рекомендуем сбросить настройки приложения. Вот как это делается:
Шаг 1 Перейдите в Параметры.
Шаг 2 Откройте Приложения/Менеджер приложений.
Шаг 3 Найдите Все приложения и нажмите на значок меню в верхнем правом углу.
Шаг 4 Нажмите на Сбросить настройки приложения.
4. Загрузите телефон в безопасном режиме
Иногда сторонние приложения могут привести к конфликту с другими приложениями и, таким образом, вызвать ошибки, такие как эта ошибка камеры. Попробуйте загрузить телефон в безопасном режиме и использовать приложение камеры в безопасном режиме. Вот как включить безопасный режим на вашем телефоне Android:
Шаг 1 Держа мощностью кнопку, пока не появится меню выключения.
Шаг 2 Нажмите и удерживайте Выключить вариант на несколько секунд.
Шаг 3 Подтвердите, чтобы Перезагрузитесь в безопасный режим.
Когда телефон перезагрузится, запустите приложение камеры и попробуйте сделать образцы фотографий или записать видео. Если в безопасном режиме ошибка не возникает, это означает, что виновато стороннее приложение. Подумайте, какой из ваших загруженных приложений является триггером, а затем удалите подозрительные приложения по отдельности.
5. Выполните Сброс настроек
Это ваше последнее средство. Если ни одно из приведенных выше предложений не помогло, вам следует подумать о том, чтобы стереть телефон и вернуть его настройки по умолчанию. Однако обязательно сделайте резервную копию ваших важных файлов и данных, так как они будут удалены во время процесса.
Данные Bcakup перед выполнением сброса
FoneLab Data Android Резервное копирование и восстановление позволит вам сделать резервную копию ваших данных наиболее без проблем и без потерь. Это отличный инструмент управления данными, который имеет гладкий интерфейс. Вы можете вручную выбрать тип данных, которые вы хотите сделать резервную копию, или в один клик сделать резервную копию всех данных.
Резервное копирование и восстановление данных Android на ваш компьютер легко.
Шаг 1 Скачайте программу на компьютер и запустите ее.
Шаг 2 Выберите Резервное копирование и восстановление данных Android.
Шаг 3 Подключите телефон к компьютеру с помощью USB-кабеля.
Шаг 4 Выберите резервное копирование одним щелчком или выборочное резервное копирование.
Шаг 5 Выберите тип файла, который вы хотите сделать резервную копию, затем нажмите Start, (Вы можете зашифровать свои резервные файлы, отметив галочкой Зашифрованное резервное копирование.
Шаг 6 Выберите выходную папку для хранения ваших файлов.
Затем подождите несколько минут до завершения процедуры резервного копирования.
После резервного копирования выполните следующие действия для сброса настроек телефона Android:
Опция 1 Reset из меню настроек
Шаг 1 Войдите в Параметры > Персонал.
Шаг 2 Нажать на Резервирование и сброс.
Шаг 3 Нажать на Сброс данных.
Шаг 4 Выберите Сброс данныхи ударил Сброс устройства.
Опция 2 Reset с жесткими клавишами
Альтернативой для выполнения полного сброса на телефонах Android является использование комбинации кнопок.
Шаг 1 Выключите телефон Android.
Шаг 2 Одновременно нажмите и удерживайте объем Up и горизонтальное распределение мощностью клавиш, пока не появится логотип Android, затем отпустите кнопки.
Шаг 3 Перейдите в Factoryt/сброс к заводским настройкам с помощью кнопок регулировки громкости и подтвердите нажатием мощность ключ.
После сброса телефон перезагрузится.
Не стесняйтесь присылать нам свои вопросы, предложения и проблемы, с которыми вы столкнулись при использовании утилиты FoneLab.
Резервное копирование и восстановление данных Android на ваш компьютер легко.
Ошибка камеры: «Не удалось подключиться к камере» на Android-устройстве
Всё начинается с того, что при попытке задействовать камеру Android-устройства вы сначала видите пустой экран со значком камеры в центре, а потом получаете сообщение «Не удалось подключиться к камере». Иногда удается задействовать камеру после перезагрузки устройства, но, как правило, частота возникновения ошибки увеличивается, и вскоре воспользоваться фото-модулем для того, чтобы сделать пару-тройку фотографий, становится просто невозможно. Многие пользователи жалуются также, что аналогичное сообщение об ошибке они получают при попытке произвести съемку видео с минимальным разрешением (240p). Можно ли как-то исправить ситуацию? Давайте попробуем вместе разобраться в происходящем и найти доступные пути самостоятельного решения проблемы.
1. Доступные способы
A) Перезагрузка
Пользователи сообщают, камера начинает работать после перезагрузки Android-устройства. Иногда приходится перезагрузить гаджет несколько раз, чтобы добиться требуемого результата. В любом случае, есть смысл попробовать этот элементарный способ — выключить и снова включить свой смартфон или планшет.
B) Перезагрузка в безопасном режиме
Каждое Android-устройство имеет функцию загрузки в «Безопасном режиме» функцию, то есть, вы перезагружаете телефон и включаете его, активируя только основные приложения и ограниченное количество доступных функций. Безопасный режим отлично подходит для поиска неисправностей, так как загруженные приложения будут отключены, и вы будете в состоянии определить, действительно ли существует конфликт между различным софтом сторонних разработчиков и системным программным обеспечением, имеющим отношение к использованию камеры.
C) Удалить конфликтующие сторонние приложения
Попробуйте удалить сторонние приложения, имеющие отношение к камере. Это приложения, которые в процессе своей работы могут делать снимки. Например: Snapchat, Whatsapp и т.д. Наверняка на вашем смартфоне или планшете найдутся программы, с помощью которых вы можете делать фотографии непосредственно из приложения и делиться ими. Удаляйте такие программы последовательно, одну за другой, проверяя после каждого удаления, не исчезла ли ошибка. Если вам удалось подключиться к камере, вы нашли конфликтующее с системным программным обеспечение стороннее приложение. И еще: не забывайте переключаться между видео, панорамной съемкой и другими режимами во время проверки — проблема может проявиться в любом из них, а нам важно восстановить полный функционал камеры.
D) Попробуйте воспользоваться сторонним приложением для камеры
Если системное приложение является единственной программой, имеющей доступ к камере на вашем Android-устройстве, и вы получили сообщение «Не удалось подключиться к камере», стоит попробовать поработать с ней с помощью стороннего приложения. В магазине Google Play представлено много подходящих для этой цели программ. Воспользуйтесь функцией поиска и найдите приложения в категории «Камера». Остановите свой выбор на одном из популярных приложений — таком как: Candy Camera, Open Camera, Camera 360, Camera MX или Camera for Android. Скачайте и установите приложение, запустите его.
2. Способы среднего уровня сложности
Это стандартные шаги, которые можно сделать в случае, когда приложение показывает сообщение об ошибке «Не удалось подключиться к камере». Попробуйте использовать их все — должно помочь. И не забывайте останавливать работу приложения и перезапускать его перед каждой новой попыткой подключения камеры. Приведенные здесь способы исправления ошибки «Не удалось подключиться к камере» не несут в себе опасности потери сохраненных фотографий и видео.
3. Методы устранения ошибки для продвинутых пользователей
Внимание: данные методы исправления ошибки «Не удалось подключиться к камере» при использовании влекут за собой потерю данных, сохраненных на Android-устройстве. Чтобы не лишиться контактов, фотогалереи, игр, музыки и прочего контента, необходимо выполнить резервное копирование. Сохраните фотографии, информацию об учетной записи и резервную копию приложений в вашем аккаунте Google. Всё это будет повторно установлено после добавления той же учетной записи Google на устройство.
А) Очистка кэша
Это действие позволяет очистить систему устройства от временных данных — устаревших и только загромождающих память. Эта опция активируется в режиме Recovery, который становится доступен после перезагрузки телефона с помощью загрузчика.
После того, как очистка кэша успешно завершится, перезагрузите ваш телефон и попробуйте запустить приложение камеры еще раз. Обратите внимание, что в вашем Android-устройстве может быть иная комбинация кнопок для доступа к режиму технического обслуживания и восстановления.
B) Сброс к заводским настройкам
Сброс настроек считается самым кардинальным способом решения проблем, так как влечет за собой полную потерю данных. Но если никакие другие методы не помогают, то использовать его вы будете просто вынуждены. Впрочем, данные сохранить поможет резервное копирование, а повторная настройка аппарата лишь закрепит навыки работы с Android-устройствами. Приведем два способа, используя которые можно выполнить сброс телефона или планшета до заводских настроек.
Camera won’t work
So the HP 8 G2 tablet I only brought about a week ago won’t load the camera.
I get the message «camera has been disabled because of security policies».
I’m using the default app (Google camera) and have not changed any security setting from when it was first turned on.
What can I do to get the camera working?
Welcome to the HP forums.
I understand you’re experiencing issues with the camera on your HP 8 G2 tablet.
Have you encrypted your device? Certain exchange servers used by companies will disable the use of cameras on devices for security. If this is not the case I would suggest trying an alternate camera app in an attempt to isolate the issue. To the best of my knowledge the Google Camera app is not pre-installed on the tablet and instead has a simple «Camera» app, not to be confused with the actual Google application.
You can download the Google Camera app here: Google Camera.
If the Google Camera app presents the same issue or if you already attempted multiple apps, and have not encrypted your device please try the following:
Clear all cache on the tablet: Settings > Storage > Cached Data. You should have the option to erase all the cached data here.
Hard reset: While the tablet is on, press and hold the power button for 8+ seconds to force shut down. Turn the tablet back on and see if that helps.
Factory reset: Make sure you backup any important files or information first. Settings > Backup & reset > Factory data reset.
If this fails to resolve the issue please call our technical support team. Please visit our contact page. After selecting your region click the Contact Support tab near the top and fill out your product info. Once you’ve entered the product there is a form to fill out at the bottom of the page. When you’ve submitted the form it will provide you with a case number and phone number to call.
Great-Deku-Tree
I work on behalf of HP
If you found this post helpful, you can let others know by clicking the “ Accept as Solution ” button. You can also show your appreciation, with a kudos, by clicking the “ thumbs up » button!
This Is the Reply from the Samsung Forum on the s4 Security Policy Update
We are currently upgrading Security Enhancements for Android which will check apps for malicious code and security risks. However some customers appear to be experiencing a connection issue with the upgrade server which we are investigating.
Please be assured that there is nothing to be concerned about and we are working on resolving the issue.
I Also have the same problem.
A factory reset really sounds like a bad solution.
As does «dont show notifications»
My operator is Tele2 Sweden, the phone is a Samsung S4
Never seen this problem before. :what:
Sent From a Galaxy S4 Away!
Its a server issue and they are trying to fix it.
I reckon the new update which comes out today or tomorrow is just going to fix it as they are just updating the whole OS to 4.3
So i guess just ignore it for now
should I just wait to reinstall fb??
Had the problem for two day’s now.
I got this message a week ago, S4 on android 4,2,2
Tried anything suggested on forums around the web but it reappeared on reboot or when walking into a wifi area. Very annoing, and all in all not very professional of Samsung. Dissappointing to say the least.
Solution: Installed «Startup Manager (Free)» from google marked, and disabled the security policy update from ever starting up. You will find it in the list. After this it havent reappeared, many days ago Seems to do the trick.
I also disabled other crap from startup, making the phone quicker.
Mine too. Its annooying!
Anyone got the answer what to do.
Not sure if this will work for everyone else but up until today I had the same issue. I went to Settings > Applications > All > Security Update and hit clear data. Instantly the update prompt came back and when I hit confirm this time it worked.
Hope it works for some others!
Not sure if this will work for everyone else but up until today I had the same issue. I went to Settings > Applications > All > Security Update and hit clear data. Instantly the update prompt came back and when I hit confirm this time it worked.
Hope it works for some others!
I also have been suffering this issue for about 2 weeks and so have a few friends of mine so it is far from being an isolated case!
Источник
Привет! Проблема та же! Помогла перезагрузка. До этого Полезла в безопасность, включала и отключала адм приложения, не помогало. Использую устройство ZTE AXON 7 mini. Версия андроид 7.1.1 (с нуля шел на 5-том андроиде). До этого камеру не трогала, лишь галерею чистила)
Работаю в Связном, сталкивалась с проблемой такой у клиента на ZTE blade v8 mini, сброс, очистка сертификата и прочего не помогли, предложила установить камеру через Play Market, просто другое приложение камеры — всё сработало. Даже лучше снимает) а с его проблемой помогла потом только перепрошивка
Оксана, спасибо за подробную информацию!
Осътлично, спасибо, нашел, помогло!
Николай, рады что смогли вам помочь!
Some users (prominently Samsung and ZTE users) report that the “Camera has been disabled because of security policies” prompt appears whenever they enter the Camera app. If you have the same or similar problem, check the steps we provided below to fix it as soon as possible.
Table of contents:
- Restart your phone
- Check the Sensors Toggle
- Check Security policies
- Reset the Camera app
- Reset your device to factory settings
The camera not working because of security policies on Android
Primarily you’ll want to restart your Android. If that doesn’t help, check the Sensors Tile in the Quick Access menu and Security Policies.
If that fails and the Camera is still not working, reset the app or try with the factory settings reset.
1. Restart your phone
The first thing you should do is restart your device. If the issue persists, try and boot your device into safe mode, which we already explained. If the camera is working without issues, uninstall all third-party apps that you’ve installed recently.
On the other hand, if you still see the “Camera has been disabled because of security policies” prompt, make sure to continue with the next step.
2. Check the Sensors toggle
There are some hidden toggles that usually don’t appear in the Quick Access menu before you enable them in the Developer options. One of them is the Sensors toggle which allows users to disable all sensors with a single tap. Some users reported that the problem was gone when they toggled this tile off.
You can find it in the Quick Access menu and it looks like a pulse reading. If you don’t see it, in all tiles (including the ones not added), then you can immediately skip to the next step.
3. Check Security policies
Some users suggest checking security policies. You should disable Security policies for everything in System settings. You can re-enable Find My Device later. If you are not sure how to do it, follow these steps:
- Open Settings.
- Tap Security or Biometrics and security.
- Open Device admin apps (Other security settings > Device admin apps).
- Disable all apps with device admin access and check for improvements.
In addition, we recommend removing all your fingerprints and faces from face recognition and adding them again. For some, the issues started the moment they added a new fingerprint. Navigate to Settings > Security > Fingerprints and erase all fingerprints. Add them again, open the Camera app, and check for improvements.
4. Reset the Camera app
If the previous step failed, try to reset the camera by uninstalling its updates. Maybe the current version of the app doesn’t work as intended or the cached local data got corrupted. Uninstalling updates will restore all in-app settings so you’ll need to set up the Camera app once you update it again.
Here’s how to uninstall Camera updates on your Android:
- Open Settings.
- Tap Apps.
- Select Camera.
- Tap on the 3-dots menu and select Uninstall updates.
- On Samsung devices, open Camera Settings, swipe down, and tap Reset settings.
5. Reset your device to factory settings
Finally, if you still get the “Camera has been disabled because of security policies” prompt whenever you open the Camera, we can only recommend the factory reset. We are well aware that this is an unwelcome scenario for many users, but based on reports on the Samsung Official Support forum, this is the definitive solution for Samsung devices.
This leads us to believe that’s the case for other Android handsets, not just Samsungs. If you were wondering how to reset your device to factory settings, follow the instructions we provided below:
- Back up your data from the internal storage (photos can be saved to Google Photos, and other media can be saved to an external storage or a PC).
- Navigate to Settings > General management > Reset.
- Select Factory data reset.

- Follow the instructions to reset your device to factory values.
- Once your Android restarts, follow the instructions to restore it.

And, on that note, we can conclude this article. Thank you for reading and make sure to share your thoughts or alternative solutions in the comments section below. You can also reach us on Twitter or Facebook.
Many users nowadays come across the problem of getting an error named ‘Security Policy prevents use of Camera,’ which leads to trouble using the camera. This is an annoying problem because it prevents you from using the camera app. This notice comes whenever you open the camera app. It just sucks because, you know, what’s a phone without a camera!!?
Hence, to address this issue, we at toolspond today are gonna provide you with a complete and comprehensive guide about this error. Also, we will enlighten you on the fixes that might come in handy if you are experiencing this error.
Contents
- 1 Security Policy prevents use of camera – the cause
- 2 Getting the error? – Here’s how to fix Fix Security Policy Prevents Use of Camera
- 2.1 Restart Your phone
- 2.2 Enable Safe Mode
- 2.3 Configure the sensors properly
- 2.3.1 Developer Options should be enabled.
- 3 FAQs on Security Policy Prevents Use of Camera
- 3.1 Why is my phone’s camera turned off?
- 3.2 Why can’t I use my Samsung phone’s camera?
- 3.3 What is the procedure for disabling security policy?
- 3.4 Will resetting the phone resolve the security policy preventing use of the camera?
- 4 Trending Now
The security policy prevents use of camera notifications restricting users from using the camera app and can display on your Samsung smartphone for various reasons.
- The camera app or the phone’s settings have been configured incorrectly. This is one of the primary causes of the current problem. On a Samsung or any Android device, the security notification is more likely to appear if the camera or phone settings are incorrect.
- Incompatibility with a third-party application. Several third-party programs are incredibly beneficial. However, some of these may cause issues with your phone’s camera. The camera will not launch in this scenario, and you will receive the security policy notice.
- The phone’s sensors have been turned off. When you activate the camera app, if the phone’s sensors are disabled, you’ll get a security policy notification because the camera sensor is disabled.
Getting the error? – Here’s how to fix Fix Security Policy Prevents Use of Camera

Although this error generally occurs in the android phones, particularly the SAMSUNG android phones have been infamous for giving this security policy prevents use of camera error. While the potential causes have been explained already, it’s a matter of fact that there could be some added reasons also.
This problem has been reported by a large number of Samsung users. And we understand how aggravating it is when you just want to capture a moment with your camera, and all you see is this mistake.
The Samsung Galaxy series – S21, S20, and S10 – are known to be affected by this problem. Samsung’s A-series includes the A51, A50, A12, A11, A10, A21, A21, A22, A31, A32, A52, and F41, as well as the M-series, which includes the M10, M12, M30, M20, and more.
However, below we are going to discuss the fixes you might use whenever you encounter the error quoting ‘security policy prevents use of camera’.
Restart Your phone
Let’s start from the easy first, try restarting your phone. In most cases, the problem is simply a glitch that may be quickly resolved by restarting the smartphone. Restarting your Samsung mobile will likely resolve the problem.
In most cases, a faulty dictionary on the SD card where the photographs and videos are stored is the root of the problem. It is, therefore, preferable to restart the smartphone after removing the SD card and SIM card. This shall remove the security policy prevents use of camera error.
Enable Safe Mode
Safe mode is a particular feature of the Windows operating system that most users are already aware of. Safe mode is a diagnostic mode that only allows necessary system programs and services to function when the computer boots up. All you have to do is to follow the following steps:
To begin, press and hold power off button on your Android phone’s left or right side. Then, on your screen, press and hold power off button. After that, you’ll notice a safe mode button, which you should click. Your phone will display a “Safe mode” label that will appear in the bottom-left corner of the screen. You’ll also notice that downloaded app icons are greyed out, suggesting that they’re disabled. This means that the outsourced apps have been disabled for the time being, allowing only the standard firmware. Opening the camera in the safe mode can effectively remove the security policy prevents use of camera error.
Now, open the camera application. If everything is working fine and there are no messages on the screen, it means that there are some malicious apps that are interrupting the standard working of the phone. Hence, restart the android phone in regular mode. To repair this, you’ll need to adjust the device’s settings or uninstall harmful third-party programs. This shall remove the security policy prevents use of camera error.
Configure the sensors properly
Phone sensors play a determining role in the smooth functioning of the phone. The sensors on the phone are crucial. You will be confronted with a security policy prevents use of camera errors on your android mobile if you have turned them off or if they are not correctly configured.
Developer Options should be enabled.
To begin, go to the Settings app and tap “About phone,” then tap the “Build number” entry seven times, and a message stating that you are a developer will appear. If prompted, enter your PIN to gain access to a new settings menu named “Developer options.”
Now, from the Settings app, go to “System,” then “Advanced,” and finally “Developer options.” Select “Quick settings developer tiles” after scrolling down a little bit. When you swipe down from the top of any page and enable the toggle next to “Sensors Off,” you’ll see a new toggle in your Quick Settings.

Your compass, proximity sensor, accelerometer, gyroscope, and any other sensors will be turned off if you hit this “Sensors Off” button. Because Bluetooth, Wi-Fi, and GPS have their toggles, they are unaffected. It’s worth noting that while your sensors are switched off, any functionality that relies on them will be broken. Make double sure that the sensors off option are unchecked.
This shall effectively eliminate the security policy prevents use of camera errors.

FAQs on Security Policy Prevents Use of Camera
Why is my phone’s camera turned off?
Check the camera app’s permissions.
If the issue “camera not working on Android” occurs, review the apps to which you previously provided Permission and revoke the access. To see apps on your Android device that have Camera Permissions – APPS & NOTIFICATIONS > APP PERMISSIONS > SETTINGS > APP PERMISSIONS > CAMERA should be selected.
Why can’t I use my Samsung phone’s camera?
The phone should be restarted. If restarting the camera app doesn’t work, go to Settings > Applications > Application management > Camera app and clear the cache and data. Then press Force Stop and pick Clear Data and Clear Cache from the Storage menu.
What is the procedure for disabling security policy?
Open Settings to check what could be controlling your phone. To learn more about biometrics and security, go to Biometrics and Security. Select Other security settings from the drop-down menu.
Select Device admin applications from the drop-down menu. A list of apps that may be controlling your phone may be found here. By sliding the switch to the left, you can try to disable the ones that are now active.
Will resetting the phone resolve the security policy preventing use of the camera?
Yes, if all the other options fail, you can factory reset the phone and can get rid of this, security policy prevents the use of camera error.
Trending Now
-

Resolve Error Code E4301 Using These 4 Exciting Methods
●October 20, 2022
-
15 Incredible Ways to Fix Paramount Plus Keeps Pausing Error
by Amal Santosh●October 20, 2022
-
5 Strategies to Fix Adobe Short Media Token Validation Error Invalid Signature
by Amal Santosh●October 11, 2022
-
Fix the Apple TV 4K Turns off by Itself with 7 Wonderful Ways
by Amal Santosh●October 11, 2022


Learn The 12 Working Solutions To Fix Error Message “Security Policy Prevents Use Of Camera” On Android While Opening The Camera App!
You are going to a picnic, or attending someone’s marriage/birthday/anniversary, or going somewhere else, and to capture those beautiful moments you take out your phone to click some photos or make some videos. But as you open the camera on your phone you get a pop-up error message “Security policy prevents the use of Camera”. Due to this error, you can’t take pictures.
This error generally comes on Samsung phones such as Samsung Galaxy S21/S20/S9/S10/A10/A11/A20/A01/A50/A51/Note 20 Ultra and other Samsung phones and tablet. If you are facing the same error on your phone then this tutorial is for you. Here, you will get some effective solutions on how to fix security policy prevents use of camera on Android.
- Solution 1: Restart Your Android Phone Without SIM & SD Card
- Solution 2: Boot Your Android Into Safe Mode
- Solution 3: Update Your Android OS
- Solution 4: Enable Or Disable Phone’s Sensors
- Solution 5: Clear Cache And Data Of Camera App
- Solution 6: Disable And Then Enable Camera App
- Solution 7: Clear Cache And Data Of Device Security
- Solution 8: Reset Camera App Settings To Default
- Solution 9: Disable Camera App In the Secure Wi-Fi Feature
- Solution 10: Reset Setting Of Your Android Device
- Solution 11: Check Phone Admin Apps
- Solution 12: Factory Reset Your Android Phone
- Related Frequently Asked Question [FAQs]
Before you know the causes for this issue and solutions to fix it. Let’s look at a real user’s practical example.
Practical Example: A Samsung Galaxy S4 Active Users Wants To Know Solutions To Fix This Issue
“Security Policy restricts use of camera”
I went to use the camera today on my S4 Active and got the message “Security Policy restricts use of camera”. I don’t know what happened to cause this. I have Snoopwall and it’s not disabled there. I am not sure where else to look to unrestrict it. Anyone seen this before? I couldn’t find much out there on the web for this trouble and the S4A.
Source: Android Central Forums
Like the above example there are many users who are getting this error and due to this they are unable to take pictures or make videos using their phone’s camera.
Most of the users want to know why “Security policy prevents use of camera” error message pop-up on Android. If you also want to know this then here are the reason for this.
Also Read: How To Fix Front Camera Not Working On Android
Why Does Your Phone Say Security Policy Prevents Use Of Camera?
You may see the security policy prevents use of camera on your Android phone due to different reasons. Some of the common reasons are listed below.
- If you have disabled your phone’s camera sensors then you can see this error because phone’s camera is also a sensor.
- When the camera app or camera related app cache and data get corrupted.
- If the phone’s settings and the camera settings are not configured properly.
- If a third-party app such as Microsoft Authenticator app on the device is interfering with the camera’s operation.
Now, you must be eager to know how do you fix security policy prevents use of camera on Android.
Note: below mentioned all the solutions will work for all Android phone models such as Samsung, Sony, LG, OnePlus, Realme, Vivo, Asus, Oppo, Xiaomi, Huwaei, and all other phone models.
Solution 1: Restart Your Android Phone Without SIM & SD Card
You should start with the simple method to fix security policy prevents use of camera on Android and restarting the phone without SIM and SD memory card is one of them.
Below follow the steps to restart your Android phone without SD/SIM card.
Step 1: Firstly, switched off your phone and remove the SIM/SD card from your device.
Step 2: After that, keep the phone on charging and charge it fully.
Step 3: Once it gets fully charged, switch on your phone (without SIM and SD card) and see the problem is solved or not.
Step 4: If not then power off the phone again and insert the SIM card (not SD card) and switch on the device to fix the error.
Also Read: How To Fix Instagram Camera Not Working On Android
Solution 2: Boot Your Android Into Safe Mode
Safe mode disabled all the third-party apps except the pre-installed (default) apps. And when your device enter to safe mode then you can try to run the default camera app and check the issue is occurring or not.
If it is not occurring that it indicates that there are some third party apps on your phone that contains bugs and causing this error. And to fix this, you need to uninstall the app one by one.
Now, follow the below steps to boot your Android device into safe mode.
Step 1: Press and hold the Power key until you see the Power menu on the screen.
Step 2: Now, tap and hold the Power Off option until the Safe Mode popups.

Step 3: Next, to enter your device in safe mode you need to hit on OK button.
Now, check the camera is working fine or not. If it working fine without any error then you should start uninstalling the app one by one.
Also Read: How To Repair “Camera Failed” Error On Samsung
Solution 3: Update Your Android OS
If your phone’s camera is not compatible with the current Android OS then you should look for update.
Here are the steps to install latest version of OS on Android.
Step 1: On your Android phone open the Settings app and then tap on System.
Step 2: After this, hit on About Phone and choose Software Update.
Step 3: Next, tap on Check for Updates and if the update is available then download and install the latest update.

Now, restart your device and then check security policy restricts use of camera issue is resolved or not.
Also Read: [Android] Phone Not Ringing For Incoming Calls
Solution 4: Enable or Disable Phone’s “Sensors Off” Feature
As we have told earlier that if your phone’s sensor is not configured correctly means if the sensors are disabled in the phone’s developer options then you will get the security policy pop-up. So, to fix this you need to enable phone’s sensors.
Now, follow the below steps to do the same.
Step 1: Go to Quick Settings menu by swiping down your phone’s screen and see the Sensors Off option is available there.

Step 2: If it is there, then enabling or disabling Sensors will help to fix the error. On some phone models, users need to rearrange the button order for Control Center or Quick Settings menu to enable viewing of Sensors Off.
Step 3: If you can’t see the sensors option in the Quick Settings menu then you need to enable the developer options on your Android device and then run the phone’s Settings app. To enable go to Settings > About phone/About device > click on the “Build number” seven times.

Step 3: After this, choose Developer options and launch Quick Settings Developer Tiles.
Step 4: Now, enable the Sensors Off option and restart your device.

Step 5: After restarting, see enabling or disabling Sensors Off fix the issue.
Also Read: What To Do If Samsung Internet Keeps Stopping
Solution 5: Clear Cache And Data Of Camera App
Another way to get rid of security policy restricts use of camera is by clearing the cache and data of camera app.
Here are the steps to do the same.
Step 1: Tap on Settings icon from your device home’s screen.
Step 2: Then tap on Apps/Application Manager/Apps & notifications.
Step 3: After this, choose Camera app from the list of all apps.
Step 4: Now, hit on Force Stop button to force stop the camera app and then confirm to stop the camera app.
Step 5: Next, tap on Storage and then Clear Cache and Clear Data button.

Now, open the Camera app again to check if it is working fine or not. If not then follow the next solution.
Also Read: How To Fix Microsoft Teams Keeps Stopping On Android
Solution 6: Disable And Then Enable Camera App
If clearing the cache and data of Camera app didn’t fix the problem then you can disable the Camera app and then enable it.
Below, follow the steps to do the same.
Step 1: Navigate to Settings > Apps.
Step 2: Among all app’s list choose Camera app and hit on it.
Step 3: Now, hit on Disable button to disable the Camera app.
Step 4: Next restart your phone, and then enable the camera app.
After this, check whether the issue is solved or still occurring.
Solution 7: Clear Cache And Data Of Device Security
You can also try to clear the cache and data of device security and see if the problem is solved or not.
Step 1: Head to Settings > 3 vertical lines.
Step 2: Select Show System and then scroll down and look for Device Security and open it.

Step 3: Now, go to its storage.
Step 4: Hit on Clear Cache and then Clear Data buttons.
That’s It!
Also Read: [7 Quick Tips] Fix Android 11 Bluetooth Issues
Solution 8: Reset Camera App Settings To Default
If there is a configuration issue with the camera settings then resetting it to default will help you to fix the problem.
Here are the simple steps to reset camera settings to default.
Step 1: Run the Camera app on your Android device and go to its Settings.
Step 2: Then, scroll down to the bottom of the menu and hit on Reset Settings.

Step 3: Next, confirm the process and open the camera again to see it is working fine or not.
Also Read: How To Fix Phone Camera Making Buzzing Noise
Solution 9: Disable Camera App In the Secure Wi-Fi Feature
You can also turn off camera app in the secure Wi-Fi feature to fix the Security policy error while using the camera.
Below, follow the steps to disable this feature.
Step 1: Go to Settings > Connections.
Step 2: Choose Wi-Fi connections and hit on Advanced.

Step 3: Next, open Secure Wi-Fi and choose Apps.

Step 4: Uncheck the Camera or other camera-related apps and then restart your Android device.

Also Read: What To Do When Samsung Touch Screen Not Working After Update
Solution 10: Reset Setting Of Your Android Device
If there is misconfiguration of your device settings then this can also lead to this pop-up error message on camera. Therefore, to fix this you need to reset the settings on your phone.
Below follow the steps to reset Android device’s settings.
Step 1: Go to Settings > Back-Up & Reset/General Management > Reset > Reset Settings.

Step 2: Then hit on Reset.

Also Read: Fix Wi-Fi Calling Not Working On Samsung Galaxy S20 (Plus)/S20 Ultra
Solution 11: Deactivate or Uninstall The Third-Party Conflicting Apps
Some users have reported that the device Admin applications cause this error. So, to fix this, you need to look for “device admin apps”.
Here follow the steps to do so.
Step 1: Go to Settings > Biometrics & security > Other security settings.

Step 3: Choose Device admin apps.

Step 4: Now check the following applications that are causing the problem and then “turn it off”. It is because most of the users reported the camera security issue related to the following apps:
- Camera Guide
- Microsoft Authenticator app
- Nikon Snapbridge app

Step 5: If that does not fix the issue, then deactivate these apps one by one by selecting the Deactivated option, and see whether the issue is solved or not.
Step 6: If that doesn’t fix the problem, then try uninstalling these apps one by one and see if that solves the problem.
Also Read: Learn To Fix Samsung Cloud Backup Failed – Can’t Backup Data
Solution 12: Factory Reset Your Android Phone
If you have tried all the above-mentioned solutions but still the issue is not fixed then lastly you need to factory reset your phone.
Note: Before you follow the steps to factory reset your device to default, backup all important data as this will erase everything from your phone.
Now, follow the below steps to factory reset your smartphone.
Step 1: Go to Settings > Backup & Reset.
Step 2: Select Factory Data Reset and then hit on Reset Device.
Step 3: Then tap on Erase Everything button.
Note: If you forgot to back up some precious data and they got deleted after a factory reset and you wish to recover them then you are suggested to try Android Data Recovery software.
You May Also Like:
- Recover Deleted Data From Samsung Galaxy S22/S22+/S22 Ultra
- Samsung S10 Screen Rotation Not Working [Quick Fixes]
- Tips To Extend/Improve Samsung Galaxy Battery Life
- How To Recover Deleted Data from Samsung Galaxy A50/A51
Related Frequently Asked Questions [FAQs]
Question 1 – What Is The Need Of Security Policies?
Answer 1 – The main need of security policies is to set rules for the user’s expected behavior and to keep the user’s information safe and sanction the results if any users violate the rules.
Question 2 – How Can I Remove Android Policy?
Answer 2 – Firstly, you should not remove the Android device policy as protects your data. But if you want to know how to do this then follow the below steps.
Step 1: Go to your phone’s home screen and open your apps list.
Step 2: After this, find “Device policy” and tap and hold it.
Step 3: Now, you will get the action menu.
Step 4: Choose “Uninstall”.
That’s All!
Question 3 – How Can I Change Security Policy?
Answer 3 – You can easily change the security policy by updating it.
Here follow the steps to update it.
Step 1: Open Settings app.
Step 2: Then hit on Lock screen and security.
Step 3: Now, tap on Other security settings.
Step 4: Next, tap on Security policy updates.
Step 5: Lastly, tap on Update now and the security policy will be updated.
Wrap Up
I know it is a very sad moment for you when you face Security policy issue on your phone and due to this you can’t take images or make videos of what you want.
But I hope the above-mentioned solutions will help you to fix Security policy prevents use of camera on Android. And now without facing this error you can click pictures anything when you want.

Max Field is a founder of recoverandroid-data.com. He is an Android lover and loves to write tips, tricks, fixes for errors, data recovery solutions and more related to Android.