Содержание
- Как восстановить и исправить ошибку Winsock в Windows
- Microsoft Winsock Fix
- Сброс сетевого стека TCP / IP вручную
- Сброс Winsock с помощью netsh
- How to Repair a Winsock Error
- Contents
- What Is A Winsock Error?
- What Causes The Winsock Error?
- Automated Tools
- Verifying Your Internet Protocols
- Rebuild the Winsock
- Deleting the Corrupt Registry Keys
- Reinstall the Internet Protocol Drivers
- System File Checker
Как восстановить и исправить ошибку Winsock в Windows
Winsock — это спецификация, которая используется в Windows для определения того, как сетевые приложения взаимодействуют с сетевыми службами, такими как TCP / IP.
Это в основном определяет, как две сетевые программы будут общаться друг с другом. Например, чтобы клиент FTP работал правильно, он использует Winsock.
Однако, Winsock может испортиться на машине Windows во время удаления шпионского или рекламного ПО. Вы можете начать получать странные ошибки, связанные с ошибками Winsock или сокетов, и основные команды, такие как IPCONFIG, не будут работать правильно.
Вы также можете получить такие ошибки, как Страница не может быть отображена при попытке просматривать интернет.
Программы для Windows, мобильные приложения, игры — ВСЁ БЕСПЛАТНО, в нашем закрытом телеграмм канале — Подписывайтесь:)
Чтобы исправить ошибку Winsock, вы должны сбросить весь стек протоколов TCP / IP на вашем компьютере с Windows. Существует несколько способов решения проблемы: использование командной строки, загрузка стороннего приложения и т. Д.
Microsoft Winsock Fix
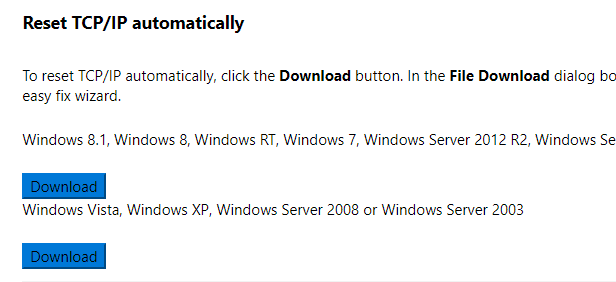
Самый простой и безопасный способ сбросить ваш стек TCP / IP — это загрузить бесплатную утилиту от Microsoft.
Просто скачайте правильный файл для ваших версий Windows и пройдите мастер!
Сброс сетевого стека TCP / IP вручную
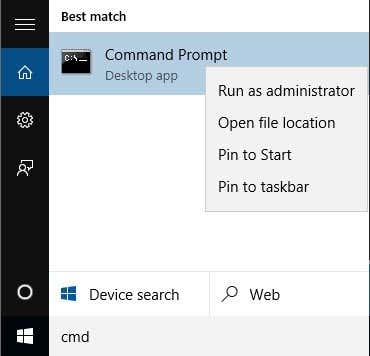
Первое, что нужно попробовать, если вышеприведенная программа не работает, это вручную сбросить сетевой стек TCP / IP. Откройте командную строку администратора, нажав кнопку Пуск и введя CMD, а затем щелкните правой кнопкой мыши командную строку и выберите Запустить от имени администратора,
Теперь введите следующую команду:
Это перезапишет два раздела реестра, которые необходимы для правильной работы TCP / IP. Это будет работать на Windows XP, Vista, 7, 8 и 10. Если это не работает, читайте ниже!
Сброс Winsock с помощью netsh
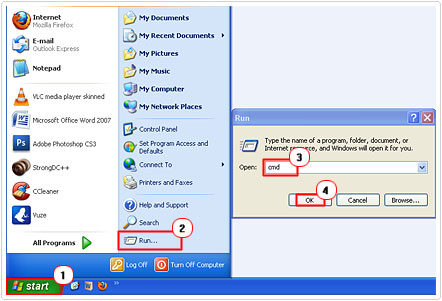
Если сброс TCP / IP не работает, попробуйте сбросить стек TCP / IP с помощью команды сброса. Сначала откройте командную строку, выбрав «Пуск», «Выполнить» и набрав CMD.
Перед вводом команды сброса следует проверить, какие LSP (многоуровневые поставщики услуг) будут затронуты. Вы можете сделать это, набрав:
Команда сброса ниже удалит все LSP Winsock. Теперь введите следующую команду ниже:
Каталог Winsock будет сброшен к конфигурации по умолчанию. Если ваш LSP поврежден и вызывает проблемы с сетевым подключением, эта команда должна исправить это. Обратите внимание, что если вы запустите эту команду, вам, возможно, придется переустановить несколько программ, на которых ранее были установлены LSP.
Вы также можете ознакомиться со статьей базы знаний Майкрософт ниже, в которой подробно описываются дополнительные шаги, которые можно предпринять для устранения повреждения Winsock2 в Windows XP и Windows Vista:
Надеемся, что один из методов, описанных выше, решил вашу проблему с сетью! Если нет, то вам, возможно, придется переустановить Windows, поскольку она может быть повреждена без возможности восстановления.
Программы для Windows, мобильные приложения, игры — ВСЁ БЕСПЛАТНО, в нашем закрытом телеграмм канале — Подписывайтесь:)
Источник
How to Repair a Winsock Error
Contents
Are you currently bogged down with the Winsock error? If so, you’ve come to the right place, as I intend to explain all.
Winsock is short for Windows Socket and is an application programming interface or API that is used by developers to create applications that communicate with other computer systems through the TCP/IP protocol. Both Windows 95 and Windows NT come with a DLL file called winsock.dll, it’s this file that does the mediation between the application and the internet protocol.
The winsock.dll file is available in a variety of versions, on one side you have the Microsoft version, and on the other, you have a number of shareware and freeware versions, the Winsock API does not have an official standard, so each version may differ somewhat from the other.
What Is A Winsock Error?
A Winsock error typically occurs within the Winsock itself, which is used as the interface between windows applications and internet connectivity. Winsock’s primarily responsibility is to govern how windows applications interface with other applications over the internet.
All Windows based computers come with at least one physical port (the Ethernet port), however, there are also ports that you can’t see, called virtual ports, and it’s these ports that are used when your computer makes multiple connections to the internet from various sources. Every computer has exactly 65535 ports. At least 60% of these ports are used by applications that require access to the internet, while some ports (0 – 1024) are reserved solely for the operating system. If any application on your computer attempts to access the internet through one of these ports, it will be denied and/or result in an error. However, this very rarely happens, since the vast majority of developers are aware of which ports are accessible and which are reserved for the OS, and for those individuals that aren’t totally up to speed on which ports they can use, and which ports are reserved, they can always checkout any public index list online.
Winsock’s responsibility in all of this is to open and close these ports that applications on your computer are using to get online. If the Winsock file gets corrupted or if a resource that Winsock requires gets corrupted, then applications on your system that require internet connectivity as part of their functionality, will cease to function as they should. The Winsock error is always the result of this particular scenario, which makes it pretty easy for you to determine what the problem is. However, when it comes to fixing it, it can be rather difficult, especially if you no idea of where to start.
What Causes The Winsock Error?
The vast majority of internet connection issues are the result of corrupt Winsock settings. Because of the various programs on your computer that use Winsock, it can be rather difficult to identify which program is the root cause of the problem. The Winsock is also a primary target for malware, as hackers attempt to access your computer through the net.
The most common culprits of the Winsock error are:
- The registry keys of the Winsock component are corrupt.
- The drivers for the TCP/IP protocol on your system are corrupt or missing.
- The drivers for your NIC (Network Interface Card) are corrupt or missing.
- An application is trying to receive or transmit data through a reserved system port.
Of the main culprits highlighted above, a corrupt registry key is the most common; however, a corrupt registry key typically results in other areas of the registry being corrupt to. The manual approach to rectifying this issue is fairly comprehensive, however, I’ve taken the time to jot down the entire procedure; continue reading for more information.
However, the recommended approach to addressing this issue is to use automated software.
The majority of Winsock errors are typically the result of registry corruption. Just one simple mistake is capable of causing all kinds of heartache which in some cases, only automated tools are capable of fixing. The good thing is that, despite the difficulties in fixing the problem manually, if you use the right tool, you can fix the problem in a matter of minutes. The first tool I’ll like to recommend is Advanced System Repair Pro, and that’s because of its proficiency in repairing corrupt registries. You can find out more about this program here:
The two other tools that I think you should try are WinSock XP Fix and WinSockFix, both of which are capable of fixing errors related to the Winsock and have the testimonials to prove it.
 The solution(s) below are for ADVANCED level computer users. If you are a beginner to intermediate computer user, I highly recommend you use the automated tool(s) above!
Verifying Your Internet Protocols
The first thing you’re going to want to do is ensure that you have all the appropriate internet protocols present on your computer.
1. First, log into your computer with a user profile that has administrative rights.
2. Then click on Start -> Run [ Windows Vista/7 : Press  + R], type msinfo32, and click on OK.

3. This will load the System Information applet, on the left pane, click on the + symbol next to Components -> Network -> Protocol.
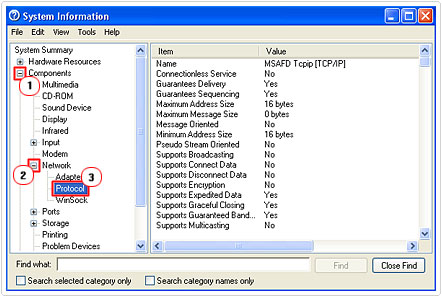
Within the Protocol, on the right pane, as you scroll down, you should have at least 10 sections labelled with the following names:
- MSAFD Tcpip [TCP/IP]
- RSVP UDP Service Provider
- MSAFD NetBIOS
If on your computer its showing less than ten sections with names that differ from those listed above, then it means you have missing data that Winsock requires in order to function properly. To rectify this problem, you’re going to have to rebuild the Winsock component.
Rebuild the Winsock
One thing you should be aware of when rebuilding or resetting the Winsock, is that if you’re running Windows XP with Service Pack 2, then it will restore all Winsock settings including your third-party LSPs back to their factory defaults. LSPs are settings created by applications that use the Winsock, this means, you will have to reinstall some applications on your computer after completing this procedure.
1. First start by logging into your system with administrative rights.
2. Then click on Start -> Run, type cmd and click on OK. [ Windows Vista/7 : Start -> Type cmd (into the Search programs and files box) and Press CTRL + Shift + Enter, then click on Continue]
3. Once Command Prompt loads up, type “netsh winsock reset” and hit Enter.
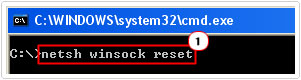
After you’ve run this command, you must reboot your computer in order for the changes to take effect.
Deleting the Corrupt Registry Keys
The next step is to remove the corrupt registry keys created by Winsock, so that new ones can be made in their stead.
WARNING: Editing or deleting the wrong registry entry can damage your operating system beyond repair.
1. First, log into your computer with administrative rights.
2. Then click on Start -> Run [ Windows Vista/7 : Press + R], type regedit and click on OK.
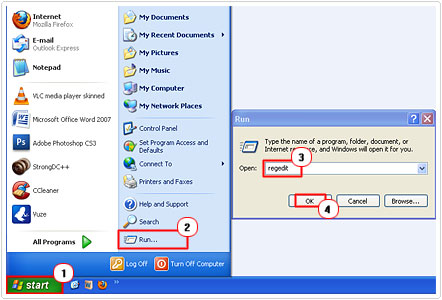
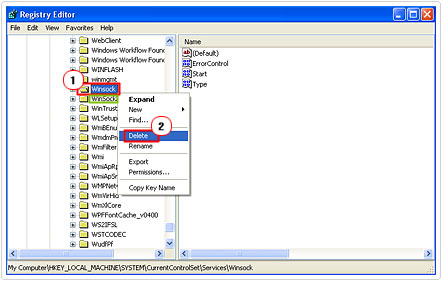
3. Once the Registry Editor loads up, navigate to the following path:
HKEY_LOCAL_MACHINESystemCurrentControlSetServices
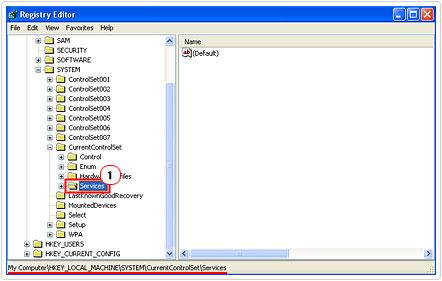
4. Once there, click on the + symbol next to Services to reveal all its sub keys.
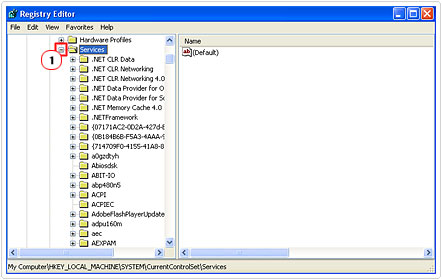
5. Then scroll down to you find the registry sub keys Winsock and Winsock2 and right click on each one and select Delete.
Once you’ve removed both sub keys, restart your system.
Reinstall the Internet Protocol Drivers
Once you’ve removed the sub keys from your registry, you’ll want to reinstall the Internet Protocol drivers, so that connections to the internet are possible through third party applications.
1. To complete this procedure, you must first log into your computer with administrative rights.
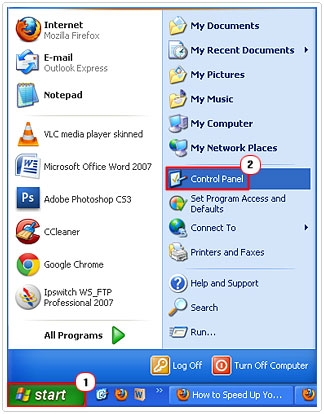
2. Then click on Start -> Control Panel.
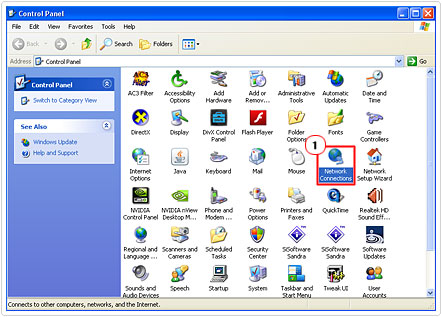
3. Once Control Panel loads up, double click on Network Connections.
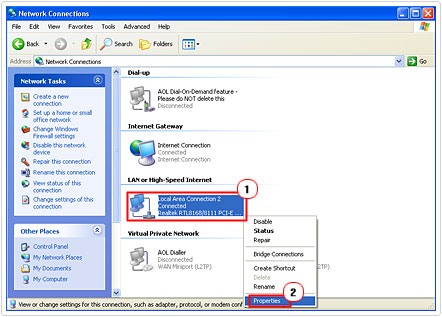
4. From Network Connections, under LAN or High-Speed Internet, right click on Local Area Connection and select Properties.
5. This will bring up the Local Area Connection Properties applet, from here, click on Install.
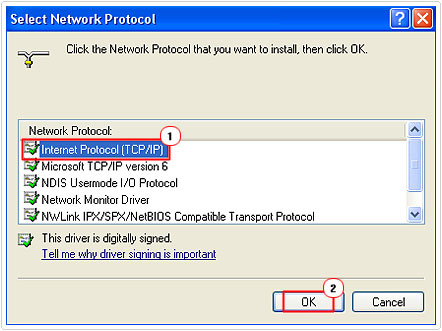
6. For the Network Component Type, select Protocol and click on Add.
7. On the Select Network Protocol applet, click on Have Disk.
8. Then type “C:Windowsinf” and click on OK.
9. Lastly, select Internet Protocol (TCP/IP) from the list and click on OK.
The steps above should be sufficient in rectifying any issues you have with the Winsock, however, in the event that it’s not, you should consider running system file checker.
System File Checker
The system file checker is a Windows utility tool that will scan your system for any missing or corrupt system files and replace them. In order for you to run this tool, you must have your operating system on CD.
1. First, begin by logging into your computer with administrative rights.
2. Then click on Start -> Run, type cmd and click on OK. [ Windows Vista/7 : Start -> Type cmd (into the Search programs and files box) and Press CTRL + Shift + Enter, then click on Continue]
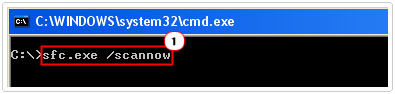
3. Once Command Prompt loads up, type “sfc /scannow” and press Enter.
Note: Make sure you have your OS CD in your CD/DVD Rom drive before you hit Enter.
If after following all the steps below, you’re still getting a Winsock error, then you should consider running a repair installation. For more information on how to do this manually, you can check out my post on how to speed up your system.
However, the manual option requires a certain level of expertise and also for you to have your Windows CD, which can be a problem, as most systems come with their operating system pre-installed. However, as an alternative, you can use a Windows repair tool called Reimage, which can automatically reinstall your operating system on the fly, without the requirement of a Windows CD and at no risk to your personal files.
For more information on this product, visit the following link:
Are you looking for a way to repair all the errors on your computer?

If the answer is Yes, then I highly recommend you check out Advanced System Repair Pro.
Which is the leading registry cleaner program online that is able to cure your system from a number of different ailments such as Windows Installer Errors, Runtime Errors, Malicious Software, Spyware, System Freezing, Active Malware, Blue Screen of Death Errors, Rundll Errors, Slow Erratic Computer Performance, ActiveX Errors and much more. Click here to check it out NOW!
Источник
Настройка сетевого ядра MyChat Server, port, ipv4/ipv6, bindings, external IP

TCP порт и версия IP
По умолчанию MyChat Server использует 2004 TCP порт для подключения клиентов.
Если порт занят другим сетевым программным обеспечением или оборудованием, либо вы хотите изменить его по соображениям безопасности, то выберите любой другой номер в диапазоне от 1024 до 65535. Нужен перезапуск сервера.
Вы можете изменить версию протокола, IPv4 или IPv6, в зависимости от того, какая версия используется в вашей сети.
Какие интерфейсы «слушать» или биндинг адреса
Можно указать, какие локальные IP адреса будет «слушать» MyChat Server.
• «слушать всё» (по умолчанию). Сервер принимает входящие подключения на все доступные сетевые интерфейсы. Если на вашем компьютере установлено несколько сетевых карт для работы с разными подсетями, то сервер будет принимать подключения на любую из них.
• определённый IP адрес. Сервер обрабатывает подключения только на один конкретный сетевой интерфейс, игнорируя пользователей из остальных подсетей. Используйте этот вариант аккуратно, чётко понимая, зачем вы это делаете.

IP адрес или Host сервера для «внешних» клиентов
Если к вашему серверу подключаются пользователи через интернет, то нужно прописать в этом поле ваш реальный внешний IP адрес или DNS имя, чтобы правильно работал сервис MyChat Guest, встроенный FTP сервер, голосовые и видео звонки, интеграция с Telegram и чат поддержки на сайт.
Источник
Как восстановить и исправить ошибку Winsock в Windows
Winsock — это спецификация, которая используется в Windows для определения того, как сетевые приложения взаимодействуют с сетевыми службами, такими как TCP / IP.
Это в основном определяет, как две сетевые программы будут общаться друг с другом. Например, чтобы клиент FTP работал правильно, он использует Winsock.
Однако, Winsock может испортиться на машине Windows во время удаления шпионского или рекламного ПО. Вы можете начать получать странные ошибки, связанные с ошибками Winsock или сокетов, и основные команды, такие как IPCONFIG, не будут работать правильно.
Вы также можете получить такие ошибки, как Страница не может быть отображена при попытке просматривать интернет.
Программы для Windows, мобильные приложения, игры — ВСЁ БЕСПЛАТНО, в нашем закрытом телеграмм канале — Подписывайтесь:)
Чтобы исправить ошибку Winsock, вы должны сбросить весь стек протоколов TCP / IP на вашем компьютере с Windows. Существует несколько способов решения проблемы: использование командной строки, загрузка стороннего приложения и т. Д.
Microsoft Winsock Fix
Самый простой и безопасный способ сбросить ваш стек TCP / IP — это загрузить бесплатную утилиту от Microsoft.
Просто скачайте правильный файл для ваших версий Windows и пройдите мастер!
Сброс сетевого стека TCP / IP вручную
Первое, что нужно попробовать, если вышеприведенная программа не работает, это вручную сбросить сетевой стек TCP / IP. Откройте командную строку администратора, нажав кнопку Пуск и введя CMD, а затем щелкните правой кнопкой мыши командную строку и выберите Запустить от имени администратора,
Теперь введите следующую команду:
Это перезапишет два раздела реестра, которые необходимы для правильной работы TCP / IP. Это будет работать на Windows XP, Vista, 7, 8 и 10. Если это не работает, читайте ниже!
Сброс Winsock с помощью netsh
Если сброс TCP / IP не работает, попробуйте сбросить стек TCP / IP с помощью команды сброса. Сначала откройте командную строку, выбрав «Пуск», «Выполнить» и набрав CMD.
Перед вводом команды сброса следует проверить, какие LSP (многоуровневые поставщики услуг) будут затронуты. Вы можете сделать это, набрав:
Команда сброса ниже удалит все LSP Winsock. Теперь введите следующую команду ниже:
Каталог Winsock будет сброшен к конфигурации по умолчанию. Если ваш LSP поврежден и вызывает проблемы с сетевым подключением, эта команда должна исправить это. Обратите внимание, что если вы запустите эту команду, вам, возможно, придется переустановить несколько программ, на которых ранее были установлены LSP.
Вы также можете ознакомиться со статьей базы знаний Майкрософт ниже, в которой подробно описываются дополнительные шаги, которые можно предпринять для устранения повреждения Winsock2 в Windows XP и Windows Vista:
Надеемся, что один из методов, описанных выше, решил вашу проблему с сетью! Если нет, то вам, возможно, придется переустановить Windows, поскольку она может быть повреждена без возможности восстановления.
Программы для Windows, мобильные приложения, игры — ВСЁ БЕСПЛАТНО, в нашем закрытом телеграмм канале — Подписывайтесь:)
Источник
How to Repair a Winsock Error
Contents
Are you currently bogged down with the Winsock error? If so, you’ve come to the right place, as I intend to explain all.
Winsock is short for Windows Socket and is an application programming interface or API that is used by developers to create applications that communicate with other computer systems through the TCP/IP protocol. Both Windows 95 and Windows NT come with a DLL file called winsock.dll, it’s this file that does the mediation between the application and the internet protocol.
The winsock.dll file is available in a variety of versions, on one side you have the Microsoft version, and on the other, you have a number of shareware and freeware versions, the Winsock API does not have an official standard, so each version may differ somewhat from the other.
What Is A Winsock Error?
A Winsock error typically occurs within the Winsock itself, which is used as the interface between windows applications and internet connectivity. Winsock’s primarily responsibility is to govern how windows applications interface with other applications over the internet.
All Windows based computers come with at least one physical port (the Ethernet port), however, there are also ports that you can’t see, called virtual ports, and it’s these ports that are used when your computer makes multiple connections to the internet from various sources. Every computer has exactly 65535 ports. At least 60% of these ports are used by applications that require access to the internet, while some ports (0 – 1024) are reserved solely for the operating system. If any application on your computer attempts to access the internet through one of these ports, it will be denied and/or result in an error. However, this very rarely happens, since the vast majority of developers are aware of which ports are accessible and which are reserved for the OS, and for those individuals that aren’t totally up to speed on which ports they can use, and which ports are reserved, they can always checkout any public index list online.
Winsock’s responsibility in all of this is to open and close these ports that applications on your computer are using to get online. If the Winsock file gets corrupted or if a resource that Winsock requires gets corrupted, then applications on your system that require internet connectivity as part of their functionality, will cease to function as they should. The Winsock error is always the result of this particular scenario, which makes it pretty easy for you to determine what the problem is. However, when it comes to fixing it, it can be rather difficult, especially if you no idea of where to start.
What Causes The Winsock Error?
The vast majority of internet connection issues are the result of corrupt Winsock settings. Because of the various programs on your computer that use Winsock, it can be rather difficult to identify which program is the root cause of the problem. The Winsock is also a primary target for malware, as hackers attempt to access your computer through the net.
The most common culprits of the Winsock error are:
- The registry keys of the Winsock component are corrupt.
- The drivers for the TCP/IP protocol on your system are corrupt or missing.
- The drivers for your NIC (Network Interface Card) are corrupt or missing.
- An application is trying to receive or transmit data through a reserved system port.
Of the main culprits highlighted above, a corrupt registry key is the most common; however, a corrupt registry key typically results in other areas of the registry being corrupt to. The manual approach to rectifying this issue is fairly comprehensive, however, I’ve taken the time to jot down the entire procedure; continue reading for more information.
However, the recommended approach to addressing this issue is to use automated software.
Automated Tools
The majority of Winsock errors are typically the result of registry corruption. Just one simple mistake is capable of causing all kinds of heartache which in some cases, only automated tools are capable of fixing. The good thing is that, despite the difficulties in fixing the problem manually, if you use the right tool, you can fix the problem in a matter of minutes. The first tool I’ll like to recommend is Advanced System Repair Pro, and that’s because of its proficiency in repairing corrupt registries. You can find out more about this program here:
The two other tools that I think you should try are WinSock XP Fix and WinSockFix, both of which are capable of fixing errors related to the Winsock and have the testimonials to prove it.
The solution(s) below are for ADVANCED level computer users. If you are a beginner to intermediate computer user, I highly recommend you use the automated tool(s) above!Verifying Your Internet Protocols
The first thing you’re going to want to do is ensure that you have all the appropriate internet protocols present on your computer.
1. First, log into your computer with a user profile that has administrative rights.
2. Then click on Start -> Run [ Windows Vista/7 : Press + R], type msinfo32, and click on OK.
3. This will load the System Information applet, on the left pane, click on the + symbol next to Components -> Network -> Protocol.
Within the Protocol, on the right pane, as you scroll down, you should have at least 10 sections labelled with the following names:
- MSAFD Tcpip [TCP/IP]
- RSVP UDP Service Provider
- MSAFD NetBIOS
If on your computer its showing less than ten sections with names that differ from those listed above, then it means you have missing data that Winsock requires in order to function properly. To rectify this problem, you’re going to have to rebuild the Winsock component.
Rebuild the Winsock
One thing you should be aware of when rebuilding or resetting the Winsock, is that if you’re running Windows XP with Service Pack 2, then it will restore all Winsock settings including your third-party LSPs back to their factory defaults. LSPs are settings created by applications that use the Winsock, this means, you will have to reinstall some applications on your computer after completing this procedure.
1. First start by logging into your system with administrative rights.
2. Then click on Start -> Run, type cmd and click on OK. [ Windows Vista/7 : Start -> Type cmd (into the Search programs and files box) and Press CTRL + Shift + Enter, then click on Continue]
3. Once Command Prompt loads up, type “netsh winsock reset” and hit Enter.
After you’ve run this command, you must reboot your computer in order for the changes to take effect.
Deleting the Corrupt Registry Keys
The next step is to remove the corrupt registry keys created by Winsock, so that new ones can be made in their stead.
WARNING: Editing or deleting the wrong registry entry can damage your operating system beyond repair.
1. First, log into your computer with administrative rights.
2. Then click on Start -> Run [ Windows Vista/7 : Press + R], type regedit and click on OK.
3. Once the Registry Editor loads up, navigate to the following path:
HKEY_LOCAL_MACHINESystemCurrentControlSetServices
4. Once there, click on the + symbol next to Services to reveal all its sub keys.
5. Then scroll down to you find the registry sub keys Winsock and Winsock2 and right click on each one and select Delete.
Once you’ve removed both sub keys, restart your system.
Reinstall the Internet Protocol Drivers
Once you’ve removed the sub keys from your registry, you’ll want to reinstall the Internet Protocol drivers, so that connections to the internet are possible through third party applications.
1. To complete this procedure, you must first log into your computer with administrative rights.
2. Then click on Start -> Control Panel.
3. Once Control Panel loads up, double click on Network Connections.
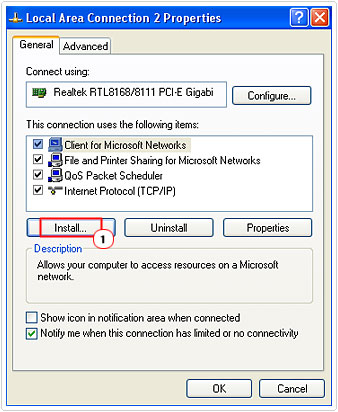
4. From Network Connections, under LAN or High-Speed Internet, right click on Local Area Connection and select Properties.
5. This will bring up the Local Area Connection Properties applet, from here, click on Install.
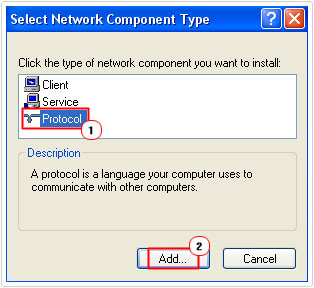
6. For the Network Component Type, select Protocol and click on Add.
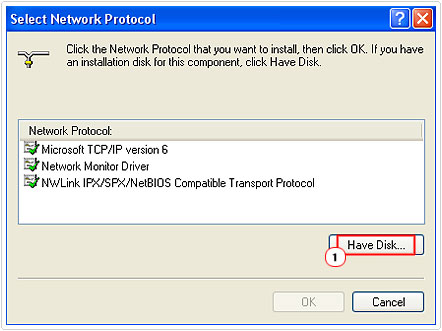
7. On the Select Network Protocol applet, click on Have Disk.
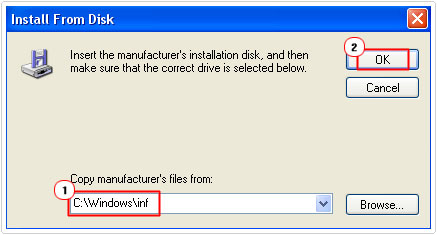
8. Then type “C:Windowsinf” and click on OK.
9. Lastly, select Internet Protocol (TCP/IP) from the list and click on OK.
The steps above should be sufficient in rectifying any issues you have with the Winsock, however, in the event that it’s not, you should consider running system file checker.
System File Checker
The system file checker is a Windows utility tool that will scan your system for any missing or corrupt system files and replace them. In order for you to run this tool, you must have your operating system on CD.
1. First, begin by logging into your computer with administrative rights.
2. Then click on Start -> Run, type cmd and click on OK. [ Windows Vista/7 : Start -> Type cmd (into the Search programs and files box) and Press CTRL + Shift + Enter, then click on Continue]
3. Once Command Prompt loads up, type “sfc /scannow” and press Enter.
Note: Make sure you have your OS CD in your CD/DVD Rom drive before you hit Enter.
If after following all the steps below, you’re still getting a Winsock error, then you should consider running a repair installation. For more information on how to do this manually, you can check out my post on how to speed up your system.
However, the manual option requires a certain level of expertise and also for you to have your Windows CD, which can be a problem, as most systems come with their operating system pre-installed. However, as an alternative, you can use a Windows repair tool called Reimage, which can automatically reinstall your operating system on the fly, without the requirement of a Windows CD and at no risk to your personal files.
For more information on this product, visit the following link:
Are you looking for a way to repair all the errors on your computer?
If the answer is Yes, then I highly recommend you check out Advanced System Repair Pro.
Which is the leading registry cleaner program online that is able to cure your system from a number of different ailments such as Windows Installer Errors, Runtime Errors, Malicious Software, Spyware, System Freezing, Active Malware, Blue Screen of Death Errors, Rundll Errors, Slow Erratic Computer Performance, ActiveX Errors and much more. Click here to check it out NOW!
Источник
Winsock — это спецификация, которая используется в Windows для определения того, как сетевые приложения взаимодействуют с сетевыми службами, такими как TCP / IP.
Это в основном определяет, как две сетевые программы будут общаться друг с другом. Например, чтобы клиент FTP работал правильно, он использует Winsock.
Однако, Winsock может испортиться на машине Windows во время удаления шпионского или рекламного ПО. Вы можете начать получать странные ошибки, связанные с ошибками Winsock или сокетов, и основные команды, такие как IPCONFIG, не будут работать правильно.
Вы также можете получить такие ошибки, как Страница не может быть отображена при попытке просматривать интернет.
Чтобы исправить ошибку Winsock, вы должны сбросить весь стек протоколов TCP / IP на вашем компьютере с Windows. Существует несколько способов решения проблемы: использование командной строки, загрузка стороннего приложения и т. Д.
Microsoft Winsock Fix
Самый простой и безопасный способ сбросить ваш стек TCP / IP — это загрузить бесплатную утилиту от Microsoft.
https://support.microsoft.com/en-us/help/299357/how-to-reset-tcp-ip-by-using-the-netshell-utility
Просто скачайте правильный файл для ваших версий Windows и пройдите мастер!
Сброс сетевого стека TCP / IP вручную
Первое, что нужно попробовать, если вышеприведенная программа не работает, это вручную сбросить сетевой стек TCP / IP. Откройте командную строку администратора, нажав кнопку Пуск и введя CMD, а затем щелкните правой кнопкой мыши командную строку и выберите Запустить от имени администратора,
Теперь введите следующую команду:
netsh int ip reset resetlog.txt
Это перезапишет два раздела реестра, которые необходимы для правильной работы TCP / IP. Это будет работать на Windows XP, Vista, 7, 8 и 10. Если это не работает, читайте ниже!
Сброс Winsock с помощью netsh
Если сброс TCP / IP не работает, попробуйте сбросить стек TCP / IP с помощью команды сброса. Сначала откройте командную строку, выбрав «Пуск», «Выполнить» и набрав CMD.
Перед вводом команды сброса следует проверить, какие LSP (многоуровневые поставщики услуг) будут затронуты. Вы можете сделать это, набрав:
netsh winsock show catalog
Команда сброса ниже удалит все LSP Winsock. Теперь введите следующую команду ниже:
netsh winsock reset catalog
Каталог Winsock будет сброшен к конфигурации по умолчанию. Если ваш LSP поврежден и вызывает проблемы с сетевым подключением, эта команда должна исправить это. Обратите внимание, что если вы запустите эту команду, вам, возможно, придется переустановить несколько программ, на которых ранее были установлены LSP.
Вы также можете ознакомиться со статьей базы знаний Майкрософт ниже, в которой подробно описываются дополнительные шаги, которые можно предпринять для устранения повреждения Winsock2 в Windows XP и Windows Vista:
Восстановление от Winsock2 повреждения в Windows
Надеемся, что один из методов, описанных выше, решил вашу проблему с сетью! Если нет, то вам, возможно, придется переустановить Windows, поскольку она может быть повреждена без возможности восстановления.
Attention Before you read this post, I highly recommend you check out my resources page for access to the tools and services I use to not only maintain my system but also fix all my computer errors, by clicking here!
Are you currently bogged down with the Winsock error? If so, you’ve come to the right place, as I intend to explain all.
Winsock is short for Windows Socket and is an application programming interface or API that is used by developers to create applications that communicate with other computer systems through the TCP/IP protocol. Both Windows 95 and Windows NT come with a DLL file called winsock.dll, it’s this file that does the mediation between the application and the internet protocol.
The winsock.dll file is available in a variety of versions, on one side you have the Microsoft version, and on the other, you have a number of shareware and freeware versions, the Winsock API does not have an official standard, so each version may differ somewhat from the other.
What Is A Winsock Error?
A Winsock error typically occurs within the Winsock itself, which is used as the interface between windows applications and internet connectivity. Winsock’s primarily responsibility is to govern how windows applications interface with other applications over the internet.
All Windows based computers come with at least one physical port (the Ethernet port), however, there are also ports that you can’t see, called virtual ports, and it’s these ports that are used when your computer makes multiple connections to the internet from various sources. Every computer has exactly 65535 ports. At least 60% of these ports are used by applications that require access to the internet, while some ports (0 – 1024) are reserved solely for the operating system. If any application on your computer attempts to access the internet through one of these ports, it will be denied and/or result in an error. However, this very rarely happens, since the vast majority of developers are aware of which ports are accessible and which are reserved for the OS, and for those individuals that aren’t totally up to speed on which ports they can use, and which ports are reserved, they can always checkout any public index list online.
Winsock’s responsibility in all of this is to open and close these ports that applications on your computer are using to get online. If the Winsock file gets corrupted or if a resource that Winsock requires gets corrupted, then applications on your system that require internet connectivity as part of their functionality, will cease to function as they should. The Winsock error is always the result of this particular scenario, which makes it pretty easy for you to determine what the problem is. However, when it comes to fixing it, it can be rather difficult, especially if you no idea of where to start.
What Causes The Winsock Error?
The vast majority of internet connection issues are the result of corrupt Winsock settings. Because of the various programs on your computer that use Winsock, it can be rather difficult to identify which program is the root cause of the problem. The Winsock is also a primary target for malware, as hackers attempt to access your computer through the net.
The most common culprits of the Winsock error are:
- The registry keys of the Winsock component are corrupt.
- The drivers for the TCP/IP protocol on your system are corrupt or missing.
- The drivers for your NIC (Network Interface Card) are corrupt or missing.
- An application is trying to receive or transmit data through a reserved system port.
Of the main culprits highlighted above, a corrupt registry key is the most common; however, a corrupt registry key typically results in other areas of the registry being corrupt to. The manual approach to rectifying this issue is fairly comprehensive, however, I’ve taken the time to jot down the entire procedure; continue reading for more information.
However, the recommended approach to addressing this issue is to use automated software.
The majority of Winsock errors are typically the result of registry corruption. Just one simple mistake is capable of causing all kinds of heartache which in some cases, only automated tools are capable of fixing. The good thing is that, despite the difficulties in fixing the problem manually, if you use the right tool, you can fix the problem in a matter of minutes. The first tool I’ll like to recommend is Advanced System Repair Pro, and that’s because of its proficiency in repairing corrupt registries. You can find out more about this program here:
CLICK HERE TO CHECK OUT ADVANCED SYSTEM REPAIR PRO
The two other tools that I think you should try are WinSock XP Fix and WinSockFix, both of which are capable of fixing errors related to the Winsock and have the testimonials to prove it.
 The solution(s) below are for ADVANCED level computer users. If you are a beginner to intermediate computer user, I highly recommend you use the automated tool(s) above!
Verifying Your Internet Protocols
The first thing you’re going to want to do is ensure that you have all the appropriate internet protocols present on your computer.
1. First, log into your computer with a user profile that has administrative rights.
2. Then click on Start -> Run [Windows Vista/7: Press  + R], type msinfo32, and click on OK.

3. This will load the System Information applet, on the left pane, click on the + symbol next to Components -> Network -> Protocol.

Within the Protocol, on the right pane, as you scroll down, you should have at least 10 sections labelled with the following names:
- MSAFD Tcpip [TCP/IP]
- RSVP UDP Service Provider
- MSAFD NetBIOS
If on your computer its showing less than ten sections with names that differ from those listed above, then it means you have missing data that Winsock requires in order to function properly. To rectify this problem, you’re going to have to rebuild the Winsock component.
Rebuild the Winsock
One thing you should be aware of when rebuilding or resetting the Winsock, is that if you’re running Windows XP with Service Pack 2, then it will restore all Winsock settings including your third-party LSPs back to their factory defaults. LSPs are settings created by applications that use the Winsock, this means, you will have to reinstall some applications on your computer after completing this procedure.
1. First start by logging into your system with administrative rights.
2. Then click on Start -> Run, type cmd and click on OK. [Windows Vista/7: Start -> Type cmd (into the Search programs and files box) and Press CTRL + Shift + Enter, then click on Continue]

3. Once Command Prompt loads up, type “netsh winsock reset” and hit Enter.

After you’ve run this command, you must reboot your computer in order for the changes to take effect.
Deleting the Corrupt Registry Keys
The next step is to remove the corrupt registry keys created by Winsock, so that new ones can be made in their stead.
WARNING: Editing or deleting the wrong registry entry can damage your operating system beyond repair.
1. First, log into your computer with administrative rights.
2. Then click on Start -> Run [Windows Vista/7: Press + R], type regedit and click on OK.

3. Once the Registry Editor loads up, navigate to the following path:
HKEY_LOCAL_MACHINESystemCurrentControlSetServices

4. Once there, click on the + symbol next to Services to reveal all its sub keys.

5. Then scroll down to you find the registry sub keys Winsock and Winsock2 and right click on each one and select Delete.

Once you’ve removed both sub keys, restart your system.
Reinstall the Internet Protocol Drivers
Once you’ve removed the sub keys from your registry, you’ll want to reinstall the Internet Protocol drivers, so that connections to the internet are possible through third party applications.
1. To complete this procedure, you must first log into your computer with administrative rights.
2. Then click on Start -> Control Panel.

3. Once Control Panel loads up, double click on Network Connections.

4. From Network Connections, under LAN or High-Speed Internet, right click on Local Area Connection and select Properties.

5. This will bring up the Local Area Connection Properties applet, from here, click on Install.

6. For the Network Component Type, select Protocol and click on Add.

7. On the Select Network Protocol applet, click on Have Disk.

8. Then type “C:Windowsinf” and click on OK.

9. Lastly, select Internet Protocol (TCP/IP) from the list and click on OK.
")
The steps above should be sufficient in rectifying any issues you have with the Winsock, however, in the event that it’s not, you should consider running system file checker.
System File Checker
The system file checker is a Windows utility tool that will scan your system for any missing or corrupt system files and replace them. In order for you to run this tool, you must have your operating system on CD.
1. First, begin by logging into your computer with administrative rights.
2. Then click on Start -> Run, type cmd and click on OK. [Windows Vista/7: Start -> Type cmd (into the Search programs and files box) and Press CTRL + Shift + Enter, then click on Continue]
3. Once Command Prompt loads up, type “sfc /scannow” and press Enter.

Note: Make sure you have your OS CD in your CD/DVD Rom drive before you hit Enter.
If after following all the steps below, you’re still getting a Winsock error, then you should consider running a repair installation. For more information on how to do this manually, you can check out my post on how to speed up your system.
However, the manual option requires a certain level of expertise and also for you to have your Windows CD, which can be a problem, as most systems come with their operating system pre-installed. However, as an alternative, you can use a Windows repair tool called Reimage, which can automatically reinstall your operating system on the fly, without the requirement of a Windows CD and at no risk to your personal files.
For more information on this product, visit the following link:
CLICK HERE TO CHECK OUT REIMAGE
Are you looking for a way to repair all the errors on your computer?

If the answer is Yes, then I highly recommend you check out Advanced System Repair Pro.
Which is the leading registry cleaner program online that is able to cure your system from a number of different ailments such as Windows Installer Errors, Runtime Errors, Malicious Software, Spyware, System Freezing, Active Malware, Blue Screen of Death Errors, Rundll Errors, Slow Erratic Computer Performance, ActiveX Errors and much more. Click here to check it out NOW!
1. Полное удаление истории конференций
Новая консольная команда сервера — remove confs. Полностью удаляет все сообщения во всех существующих и закрытых конференциях. На сервере и на всех клиентских приложениях под все платформы. Если устройство пользователя было офлайн, то удаление истории произойдёт сразу же, как только снова подключится к серверу. Будьте внимательны, восстановить историю удалённых сообщений невозможно
2. Проверка доступности сервера из интернет
Администраторы серверов MyChat часто сталкиваются с одними и теми же проблемами при настройке роутеров для работы программы через интернет.
Чтобы облегчить им задачу и узнать, всё ли настроено правильно, мы сделали инструмент для проверки связи:
3. Улучшения MyChat для Android
Новый инструмент проверки подключения к серверу, теперь учитывается подключение ко всем портам, которые использует мобильное приложение.
Также добавили сканер QR-кодов для быстрого подключения на экране логина без ввода логина, пароля и адреса сервера.
4. Разные полезности
В Integration API добавили функции MCIAPI_CS_AddUserToCommonContacts для добавления пользователя в общий список контактов и MCIAPI_CS_GetDepartmentIDByTextPath для получения ID подразделения по полному пути из общего дерева списка контактов.
Также теперь можно указать тип сообщения при отправке сообщений в приваты и конференции.
Переделали дизайн уведомлений о прочтении оповещений и добавили сокращённое содержимое текста отправленного оповещения (до 100 первых символов): «Умный» поиск в диалогах, можно использовать русские и английские буквы, программа сама подбирает подходящие по написанию названия.
5. Все изменения общим списком
[+] новое;
[*] исправлена ошибка и/или изменено к лучшему;
[-] исправлена ошибка;
MyChat Client
[+] «умный» поиск в диалогах, можно использовать русские и английские буквы, программа сама подбирает подходящие по написанию названия;
[+] (Android) добавлена проверка доступности TURN-сервера перед звонком;
[+] (Android) добавлен сканер QR-кодов для быстрого подключения на экране логина
[+] (Android) новый инструмент проверки подключения к серверу, теперь учитывается подключение ко всем портам, которые использует мобильное приложение
[*] возможность удаления сообщений в привате с роботом Elisa (UIN 0);
[*] переделан дизайн уведомлений о прочтении оповещений + добавили туда сокращённое содержимое текста отправленного оповещения;
[*] полный контроль корректности IPv4, IPv6 и FQDN-адресов в менеджере серверов для подключения;
[*] возможность вводить вручную IPv6 адреса в любом формате для подключения в менеджере серверов;
[*] переделана проверка связи с TURN-сервером перед началом звонка, теперь в список доступных для проверки адресов автоматически добавляется первым локальный адрес MyChat Server, на который соединяется клиент;
[*] если MyChat Client запущен в RDP сессии с сервера, система автоматического обновления отключается, потому что клиент нужно обновлять на сервере, один для всех пользователей RDP;
[*] если в конференции не было ни одного сообщения, то в диалогах конференций (Ctrl+2) пишется «Нет сообщений» и не рисуется штамп времени;
[*] MyChat Client пишет в протокол, если он работает под управлением виртуальной машины, например: «Run under VMWare Workstation». Определяются разные версии VMWare, Virtual PC, VirtualBox и Wine;
[*] (Android) изменено окно добавления или изменения адреса сервера;
[*] если HTTPS-сертификат некорректный или устаревший, писалось сообщение «Server Certificate Invalid or not present» и программа «падала» с ошибкой;
[*] замена шрифтов на Arial для Windows XP/2003 из-за невозможности рендеринга современных шрифтов на устаревших ОС;
[*] заменили версию инсталлятора, для совместимости с Windows XP;
[-] клик по пункту главного меню «Инструменты», «Файлы», «Мои файлы на сервере» работал некорректно. Исправлено;
[-] (Android) не работали фильтры по MAC для Android клиентов. Исправлено;
[-] если приватные диалоги (Ctrl+1) были пусты, то при новом входящем приватном сообщении диалог не появлялся, нужно было перезапустить программу или переподключиться к серверу. Исправлено;
[-] клик по ссылке на «Мои файлы на сервере» в чате работал некорректно;
[-] исправлена ошибка в плагине VNCServer, теперь он корректно работает;
[-] (macOS)(Linux)(Web) не отображались сообщения, индексы которых пересекались с индексами удаленных сообщений в других конференциях. Исправлено;
[-] проблема скачивания файлов в чате на устаревших OS (Windows XP, Server 2003/2008, Windows 7);
[-] клик по исполняемому файлу в тексте чате (exe, msi, bat etc.) приводил к зависанию MyChat Client;
MyChat Server
[+] (Admin) добавлена функция проверки доступности портов служб сервера (web, core, turn, ftp) из интернета;
[+] (Integration API) функция MCIAPI_CS_AddUserToCommonContacts для добавления пользователя в общий список контактов;
[+] (Integration API) функция MCIAPI_CS_GetDepartmentIDByTextPath для получения ID подразделения по полному пути из общего дерева списка контактов;
[+] (Admin) консольная команда «remove confs» полного удаления всей истории конференций для онлайн и офлайн пользователей;
[*] более быстрый запуск встроенного сервера NodeJS для системы обновлений MyChat;
[*] (Integration API) возможность указать тип сообщения при отправке сообщений в приваты и конференции;
[*] заменили версию инсталлятора, для совместимости с Windows XP;
[-] (Admin) в просмотре онлайн-пользователей, если используется https, не показывалось, что используется шифрование для всех web-сервисов MyChat: admin, kanban, web, forum;
[-] (Admin) в просмотре онлайн-пользователей для web-сервисов указывался IP 127.0.0.1. Исправлено;
[-] ошибка ID: F0A9FE4D, обновление MyChat с версий 3.x, корректный перенос файлов из Program Files в AllUsers;
[-] ошибка ID: E52473AE, «Не удается найти указанный файл.» при обновлении с версий ниже 5.20;
[-] ошибка ID: 52A2F726, «A field with the name ‘reflink’ already exists — Native error: 30351.» при обновлении с версии ниже 5.22;
[-] ошибка ID: 031959FB, «no such table: cuids.» при обновлении сервера с версий ниже 7.2;
[-] ошибка ID: 5C0EF561, «Table ‘allowip’ does not exist. — Native error: 30396.» при обновлении сервера со старых версий;
[-] ошибка ID: 97159F15, «List index out of bounds (-1).» при импорте пользователей из домена с custom фильтром LDAP-запроса;
[-] ошибка ID: 7A85EE31, при выключении сервера, сохранение статистики;
[-] ошибка ID: 91B608E9, проблема запуска сервера, «Сannot create file «C:ProgramDataMyChat Serverdbmcserv.lock». The file exists.»
[-](Admin) в настройках шаблона клиента, при выборе пункта «Способ обновления», не добавлялись поля логина, пароля и домена. Исправлено;
[-] ошибка ID: C9ED6301, «Процесс не может получить доступ к файлу, так как этот файл занят другим процессом», иногда случалась при запросе клиентом миниатюры изображения;
[-] неправильно отрабатывали фильтры IP для веб-сервисов. Исправлено;
[-] команда полного удаления приватов (remove privates) работала неправильно, она уходила всем онлайн-пользователям, но не офлайн. Поправлено;
[-] перезапуск сервера из админки работал некорректно, исправлено;
[-] после изменения настроек перезапуск встроенного WEB-сервера NodeJS не работал, показывалось сообщение «Cannot bind 1979 TCP port, WINSOCK ERROR».
6. Как обновиться на последнюю версию?И коммерческая, и бесплатная версии обновляются одинаково. Сначала обновляется сервер, затем — клиенты. В основном, в автоматическом режиме. Подробнее о продукте смотрите здесь
Как я и обещал в предыдущей статье, сегодня мы рассмотрим, как Winsock-приложение может принимать входящие соединения. Архитектура «клиент-сервер» ныне у всех на устах, поэтому, дабы не отставать от моды, мы займемся организацией простейшего сервера, принимающего входящие соединения.
Приложения-клиенты, обращающиеся к нашему серверу, мы напишем в следующем выпуске. Самые нетерпеливые могут сделать это сами.
Сделаем небольшое теоретическое отступление.
Для того, что бы сервер мог принимать входящие соединения от клиентов, клиенты должны знать адрес сервера. Кроме адреса, клиент должен знать порт, на котором сервер ожидает появления запроса на соединение. То есть, полный адрес сервера состоит из его IP адреса (имени) и порта. Приложение-клиент, должно знать адрес сервера и порт перед установкой соединения.
Например, 216.127.88.3: 80, это адрес и порт HTTP сервера, так как HTTP сервис находиться именно на этом порте. По аналогии FTP сервис находится на 21 порту, SOCKS на 1080 и так далее.
Что же нам нужно сделать для того, что бы наше приложение-сервер, работало в режиме приёма входящих соединений? Вот список необходимых нам действий:
1) Создаём сокет
2) Привязываем сокет к определенному IP-адресу и порту.
3) Устанавливаем сокет в «слушающий» режим.
4) Ждём запроса на соединение.
5) Обрабатываем входящий запрос (если он поступил в п. 4) и производим все необходимые нам действия (регистрацию, обмен данными и т.п.)
6) Goto пункт 4.
Как видите, список необходимых действий не сложный. Однако с некоторыми пунктами у нас возникнут проблемы из-за нехватки знаний материала. Например, пункты 2-4. В этой статье мы исправим ситуацию!
Давайте рассмотрим практическую реализацию каждого пункта средствами Winsock. Итак:
Каким образом, и при каких обстоятельствах сокет привязывается к определенному IP-адресу/порту? Когда сокет создаётся, он изначально не имеет привязки к определенному адресу и порту. Привязка происходит в случае выполнения функции connect (автоматически), либо по требованию программиста (функция bind), до начала операций ввода/вывода
Рассмотрим функцию bind.
int bind(SOCKET s, // (in) сокет
const struct sockaddr FAR *name, // (in) структура, содержащая нужный адрес и порт
int namelen // (in) длинна параметра name
);
Параметр name заполняется следующим образом:
sockaddr_in name;
ZeroMemory (&name, sizeof (name));
name.sin_family = AF_INET;
name.sin_addr.S_un.S_addr = htonl (INADDR_ANY);
name.sin_port = htons (0);
В данном случае, система сама вбирает IP адрес и номер порта, которые закрепятся за сокетом. Для того, что бы предоставить системе право выбора IP и порта адреса мы должны указать INADDR_ANY в качестве IP-адреса, и 0 для порта. Можно также, задать IP-адрес самостоятельно, а выбор свободного порта предоставить системе (можно наоборот), или задать самим и адрес и порт.
Для приложений, которым не все равно, какой из локальных адресов/портов система присвоит данному сокету, используем такой вариант:
sockaddr_in name;
ZeroMemory (&name, sizeof (name));
name.sin_family = AF_INET;
name.sin_addr.S_un.S_addr = inet_addr («193.108.128.229»);
name.sin_port = htons (5678);
В этом случае, сокет привязывается к интерфейсу 193.108.128.229, порт 5678. Следует принимать во внимание, что на машине, на которой выполняется программа, должен присутствовать адрес 193.108.128.229. Также, значение порта не должно превышать 0xffff (65535) и запрашиваемый порт должен быть не занят другим приложением.
Такая форма заполнения (с явным указанием IP адреса) нужна, например, если машина имеет более чем один сетевой интерфейс (multihomed). Тогда, мы указываем нужный нам сетевой адаптер. На моей машине одна сетевая карта имеет внутренний IP-адрес, а вторая реальный интернет адрес. Если я хочу создать сервер видимый извне, то мне нужно привязать сокет ко второй сетевой карте.
sockaddr_in name;
ZeroMemory (&name, sizeof (name));
name.sin_family = AF_INET;
name.sin_addr.S_un.S_addr = inet_addr («193.108.128.229»);
name.sin_port = htons (0);
В данном случае, мы явно указываем IP адрес, но позволяем системе самой выбрать свободный порт.
Пример вызова:
sockaddr_in name;
ZeroMemory (&name, sizeof (name));
name.sin_family = AF_INET;
name.sin_addr.S_un.S_addr = inet_addr («193.108.128.229»);
name.sin_port = htons (5678);
if (SOCKET_ERROR == bind (test_sock, (sockaddr* ) &name, sizeof (name) ) )
{
return E_FAIL;
}
A если нет ошибки, функция возвращает ноль, в противном случае — SOCKET_ERROR.
В случае, если при вызове bind IP-адрес/порт не были указанны явно, система, как мы знаем, выбирает адрес/порт самостоятельно. Для того, что бы узнать, какой адрес или порт был выбран для конкретного сокета в результате вызова bind, мы можем использовать функцию getsockname.
int getsockname(SOCKET s, // (in) сокет
struct sockaddr FAR *name, // (out) структура, в которую система поместит данные
int FAR *namelen // (in, out) длинна данных
);
Пример:
sockaddr_in name;
int n_l = sizeof (name);
ZeroMemory (&name, sizeof (name));
If (SOCKET_ERROR == getsockname (test_sock, (sockaddr* ) &name, &n_l))
{
// Error
}
Если функция выполнилась успешно, то структура name должна содержать информацию о типе адреса, IP-адрес и порт данного сокета.
Если у вас возникнет необходимость вывести содержимое структуры name (тип sockaddr_in) на экран, нам пригодятся следующие функции: inet_ntoa конвертирует интернет-адрес в строку формата «xxx.xxx.xxx.xxx»
char FAR * inet_ntoa(struct in_addr in // адрес в сетевом формате
);
Пример использования:
printf («Server IP: %s», inet_ntoa ((in_addr) name.sin_addr));
2. ntohs конвертирует 16-битное значение из TCP/IP формата в нужный для данной машины формат 16-битного числа (для процессоров семейства Intel — little-endian)
u_short ntohs(u_short netshort
);
Пример использования:
printf («Server port: %d», ntohs (name.sin_port));
Таким образом, с помощью функций getsockname, inet_ntoa, ntohs мы можем узнать все необходимые нам данные относительно привязки сокета.
Для того, что бы сокет мог в дальнейшем принимать входящие соединения, мы должны использовать функцию, которая переводит сокет в «слушающий режим».
int listen(SOCKET s, // Сокет
int backlog // Количество входящих соединений для данного сокета
);
Пример использования:
if (FAILED (listen (s, SOMAXCONN) ) ) // Максимально возможное кол-во
{
// входящих соединений
return E_FAIL;
}
или
if (FAILED (listen (s, 10) ) ) // Максимум 10 входящих соединений
{
return E_FAIL;
}
SOMAXCONN максимально возможное количество соединений для данной системы.
Если функция выполнилась успешно, он возвращает нулевое значение, в противном случае SOCKET_ERROR.
После того, как сокет был помешен в слушающее состояние, он может принимать входящие соединения. Для приёма входящих соединений используется функция accept.
SOCKET accept(SOCKET s, // сокет
struct sockaddr FAR *addr, // Адрес присоединившейся машины
int FAR *addrlen // Длинна адреса
);
При вызове accept, сокет блокируется вплоть до появления сигнала о входящем соединении (по аналогии к функциям из предыдущей статьи). Функция возвращает новый сокет, который будет использоваться для связи с присоединившейся машиной (система создаёт его сама, при успешном соединении). Более подробные данные о присоединившейся машине accept возвращает в параметре addr (тип адреса, IP-адрес, порт).
Пример вызова:
SOCKET new_sock;
Sockaddr_in new_ca;
int new_len = sizeof (new_ca);
ZeroMemory (&new_ca, sizeof (new_ca));
if (FAILED (new_sock = accept (s, (sockaddr* ) &new_ca, &new_len) ) )
{
// Error
}
//Теперь new_sock можно использовать для передачи данных.
Если функция выполнилась успешно, он возвращает новый сокет для установленного соединения, в противном случае INVALID_SOCKET.
Теперь мы можем приступить к написанию простейшего приложения-сервера. Давайте еще раз опишем протокол работы клиентской и серверной части.
Сервер:
1) Создаём сокет
2) Привязываем сокет к определенному IP-адресу и порту.
3) Устанавливаем сокет в «слушающий» режим.
4) Ждём запроса на соединение.
5) Обрабатываем входящий запрос (если он поступил в п. 4), а именно принимаем от клиента одно сообщение и выводим его на экран.
6) Закрываем соединение с данным клиентом
7) Если максимальный лимит входящих соединений для данной программы не достигнут (устанавливается при вызове listen), то идём в пункт 4 (и ждём следующего соединения), иначе завершаем работу.
Как вы видите из схемы, сервер принимает соединения до тех пор, пока не будет достигнут лимит, установленный при вызове listen, или вы не закрыли приложение-сервер. При открытии очередного соединения, сервер получает сообщение от клиента, выводит его на экран и закрывает соединение.
Клиент:
1) Создаём сокет
2) Выполняем соединение с сервером
3) Посылаем сообщение
4) Закрываем соединение с сервером
5) Завершаем работу.
Принцип работы клиента еще более прост. Я думаю, вы без труда сможете реализовать простейшее приложение-клиент, работающее с данным сервером, просмотрев исходный код сервера. Скачать пример можно отсюда ws4.zip
Конечно, данную программу можно назвать громким словом «сервер» с большой натяжкой. Она даже не отвечает на запрос клиента . Я думаю, это досадное упущение вы сможете исправить сами!
Так же вы можете самостоятельно поэкспериментировать с проблемой блокировки сокета на функции accept. Я предлагаю вам решить ее с помощью функции select (которую мы рассматривали в предыдущей статье) самостоятельно.
Если появятся проблемы пишите на форумы, обсудим их вместе!
Не ленитесь экспериментировать самостоятельно!
В следующем выпуске читайте:
- Решаем проблему блокировки accept
- Разрабатываем собственную ICQ
Искренне Ваш Андрей Онофрейчук aka Pepper (Another Day LTD, www.anotherd.com ).
Вопросы, комментарии pepper@anotherd.com