Содержание
- Cannot complete the device driver installation wizard как исправить
- Не устанавливается драйвер. При установке драйвера пишет cannot complete the device driver installation wizard
- Device driver installation wizard error
Cannot complete the device driver installation wizard как исправить
Купил в «Евросети» кабель их производства для моделей 6610/7210, разъемы подходят. На диске к кабелю программа «iPhoneNk72» и USB Driver PL-2303. Установил. Скачал Nokia_PC_Suite_682_rel_22_0_rus_web, установил. В папке Program Files появились три папки: Nokia, PC Connectivity Solution, DIFX. Внутри последней находится Driver Package Installer, версия 2.0.1.0 При его запуске выдает «Cannot Complete the Device Driver Installation Wizard». Когда запускаю Нокиа ПК Сьюит, то телефон не определяется, сам телефон никак не реагирует на подключение к ниму шнура, только батарея начинает через USBшник подзаряжаться. Че делать, я уже так упарился, второй день делаю, без толку.
Самая последняя версия РС Suite не замечает телефоны низкой ценовой категории,попробуй установи програмное обеспечение с диска и не обновляй PC suite!
Иногда бывает, что DKU-5 не распознаёт его, а только CA-42. С чем это связано, честно говоря не знаю. Но версию с PC Suite тоже не исключаю.
![]()
The official citrix installer, CitrixWorkspaceApp.exe (2006) , on reinstall detect a previous install and attempts to remove it, that fails.
I went back and tried an install with CitrixWorkspaceApp.exe (2002) and in the multiple components that install this one fails «Citrix Screen Casting for Windows»
this is the error from CtxInstall-WinDockerInstaller-20200615-100547.log
The ReceiverCleanUputilty does its job and the main program attemps another install.
Не устанавливается драйвер. При установке драйвера пишет cannot complete the device driver installation wizard
Snappy Driver Installer (SDI) — портативная программа по установке и обновлению драйверов, не требующая подключения к интернету. Является лидером среди программ этого класса по точности подбора драйверов и скорости работы. При ранжировании драйверов отдает приоритет более подходящим драйверам (невзирая на наличие более новых версий), чтобы минимизировать риски для рядовых пользователей. Специалисты могут оценить большой объем информации, выдаваемый о драйверах и возможность выбрать альтернативный драйвер.
Внимание! Если ваше устройство начало зависать/перезагружатся/выдавать ошибки google play сервисов и сторонних приложений — у вас умерла eMMC микросхема памяти.
К сожалению, с этим столкнулись большинство пользователей после окончания гарантии. Перепрошивка или программное восстановление не устранит проблему. Не тратьте свое время. Необходима физическая замена памяти или материнки.
Видео удачной замены памяти: часть 1 (замена), часть 2 (прошивка)
Внимание: Не переключайте планшет в среду ART. Переключение пока не работает, а планшет после этой операции висит на логотипе (ждали до 2 часов). Обычное выключение/ включение приводит к возврату к среде dalvik.
Получение root для модели 3730 (только под Андроид 4.3)
Если у Вас китайская модель 3736, то данный способ Вам не подходит!
Внимание: все операции проводятся на свой страх и риск
Процесс сводится к переходу в режим загрузчика (droidboot) и прошивке системного образа (с предустановленным рутом) через утилиту fastboot
- Выключить планшет, зажать кнопки включения и громкость вниз, затем подключить планшет к компьютеру.
- Подключить планшет к компьютеру, затем запустить команду: adb reboot-bootloader
fastboot flash system rooted_factory_v7jb4.3_system.img.gz
Кто-то пробовал шится?
Если кому нужно, я могу расписать все по подробным шагам, так сказать для таких чайников как я 🙂
Тема пополняется 🙂 Это гуд 🙂
На xda на v7 получили бутлуп после следования инструкциям по получению рута, планшет был из Китая.
Тема пополняется 🙂 Это гуд 🙂
На xda на v7 получили бутлуп после следования инструкциям по получению рута, планшет был из Китая.
Ok. Добавлю тогда, что инструкция только для модели 3730.
У китайской модели номер 3736
Кто-то пробовал шится?
Если кому нужно, я могу расписать все по подробным шагам, так сказать для таких чайников как я 🙂
По поводу прошивок — скоро автор рута сделает деоксированную прошивку. Получение ROOT-прав для модели 3730
Если у Вас китайская модель 3736, то данный способ Вам не подходит!
Внимание. Все операции проводятся на свой страх и риск. 1.1 Подключаем планшет к компьютеру (в выключенном состоянии).
1.2. Заходим в Диспетчер устройств Windows (Пуск->Панель Управления->Система->Диспетчер Устройств)
1.3. Смотрим есть ли у Вас такой пункт:

(Если есть переходим к части 2).
1.4. Если такового у Вас нет, то должен быть такой:

(Это не страшно, у Вас просто не установлены драйвера)
1.5. Итак, давайте же их установим. Качаем Пакет драйверов отсюда.
1.6. Распаковываем их, к примеру, в Корневой каталог диска C. У меня получилось так: C:dell_adb_driver . (Вы можете распаковать в любое удобное для вас место)
1.7. Заходим в диспетчер устройств (см. пункт 1.2).
1.8. Ищем там:
1.9. Щелкаем по нему правой кнопкой мыши (ПКМ), и выбираем пункт Обновить Драйверы :

1.10. Из предложенных пунктов выбираем второй, Выполнить поиск драйверов на этом компьютере :


1.13. Заходим в диспетчер устройств (см. пункт 1.2), и убеждаемся в установке пакета драйверов. Ищем строку оповещающую о том, что драйвера установились нормально. (см. пункт 1.3.)
Поздравляю, Вы установили драйвер, необходимый для прошивки устройства!

2.5. Вызываем консоль Windows (win+r) . Внимание. На протяжении всего последующего процесса консоль не закрывать.
Напомню, планшет находится в выключенном состоянии, и подключенным к компьютеру
2.6. С помощью консоли переходим в папку с утилитами adb и fastboot. Так как я распаковал их в Корневой каталог диска С. Выполним в консоли команду:
2.7. Далее Вам необходимо попасть в так называемый Режим Загрузчика(bootloader). Для этого выполняем в консоли следующую команду:

2.9. Далее непосредственно процесс прошивки. Выполняем в консоли следующую команду: fastboot flash system rooted_factory_v7jb4.3_system.img.gz

2.10. После успешной прошивки Вы увидете в консоли следующее:

2.11. Для того чтобы завершить процесс и перезагрузить аппарат, Вам необходимо ввести в консоли следующую команду:

Поздравляю, Вы счастливый обладатель ROOT-доступа, на планшете Dell Venue 7 3730
UPD: После прошивки не устанавливаем OTA (обновление по воздуху), иначе рут слетит!
Просьба добавить в шапку!
По поводу прошивок — скоро автор рута сделает деоксированную прошивку.
Это есть отлично! Если что сообщите, буду благодарен! :clap:
В точности следовал инструкции.Шился на «чистом» нетбуке с установленной Win 8.1 x32 ( под чистым понимаю то,что никакие андроид-устройства туда до этого не подключались).Процесс прошел без замечаний.Далее после перезагрузки снова прилетело OTA обновление и рут слетел.
Что-то я делаю не так.
UPD -после прошивки не смог обновится бинарник SU.
Шился «поверх» установленных пользовательских программ-может надо было селать сброс к заводским настройкам? Хотя вряд ли это поможет.
Было такое 1 раз (думал только у меня такое), перепрошился по новой, и все как по маслу. После 2-ой перепрошивки OTA обновление уже было установлено!
Если кто не верит:


Было такое 1 раз (думал только у меня такое), перепрошился по новой, и все как по маслу. После 2-ой перепрошивки OTA обновление уже было установлено!
Не вопрос,сейчас пройдусь еще раз.
Прошел еще раз описанный процесс.Без замечаний,без ошибок.После перегрузки планшета-естественно-опять «обновление андроид»,потом выход в экран блокировки.Далее-опять-это обновление прилетело.Но ДО его постановки-рут есть,SU работает.
Вот наверняка все слетит,когда обновление применится >-)
UPD -после прошивки не смог обновится бинарник SU.
Шился «поверх» установленных пользовательских программ-может надо было селать сброс к заводским настройкам? Хотя вряд ли это поможет.
Что-то делаете не так. У меня все как по маслу!
Давайте, 😉 если не поможет — пишите, помогу чем смогу!
Вот наверняка все слетит,когда обновление применится >-)
У гражданина Mityj1972, он вроде как прошился без замечаний, и рут не слетал.
Все то же самое :
Прошел еще раз описанный процесс.Без замечаний,без ошибок.После перегрузки планшета-естественно-опять «обновление андроид»,потом выход в экран блокировки.Далее-опять-это обновление прилетело.Но ДО его постановки-рут есть,SU работает.
После накатки обновления рут слетает.
Вопрос-надо ли проводить какие-то отдельные действия с загрузчиком до начала прошивки?
Нет, я никаких действий не делал! Единственное что я перед 1-ой прошивкой сбросил все к заводским настройкам.
Смотрите какова была ситуация у меня: Значит, я прошился 1-ый раз, запустил планшет и прилетело обновление. Я его установил, рут права слетели. Затем я перепрошился 2-ой раз и все заработало (обновления не прелетали)!
А как вы узнаете что у вас нет рут прав? М.Б. они есть :rolleyes: ?
И еще 1. У вас перед самой первой прошивкой OTA обновления были установлены?
«обновление андроид»,потом выход в экран блокировки.Далее-опять-это обновление прилетело.
Тут не понял фразы.
Я бы видео снял, как я это все делал 😀 , так вот не на что снимать :beee:
Смотрите какова была ситуация у меня: Значит, я прошился 1-ый раз, запустил планшет и прилетело обновление. Я его установил, рут права слетели. Затем я перепрошился 2-ой раз и все заработало (обновления не прелетали)!
А как вы узнаете что у вас нет рут прав? М.Б. они есть :rolleyes: ?
Вооот. уже проясняется. Кое-что.Возможно,что в шапку пойдет добавление.
Нет,у меня рута нет.То есть те проги,которые хотят рут-не работают. Говорят что нет,значит нет
Далее-оказывается -вы сбросились к дефолтным настройкам пеерд тем как шиться.Возможно,это важно.Я пока не сбросился.
Перед самой первой попыткой рута естественно уже было прилетевшее ОТА.
Последовательность такая получается:
-1.сбросить настройки к заводским из меню настроек
-2.прошиться.
-3.запустить планшет,принять обновление
-4.прошить еще раз.
Я правильно понял,что вот эти 4 пункта Вы делали и все ОК??
Ребят, всё логично. Рутованный раздел у нас одной версии. После его прошивки система считает, что у нас старая версия, поэтому прилетает обновление. Это обновление сносит рут, так как не знает о нем (то есть о нем не знает скрипт обновления, который обновляет системный раздел).
Нам по-хорошему нужно кастомное рековери, чтобы без проблем рутовать устройство.
И мне не понятно, откуда взялся системный раздел уже с рутом. Если предположить, что кто-то как-то внедрил рут в устройство, а потом снял слепок системы и отдал его на всеобщее обозрение, тогда почему не выложил инструкцию по первоначальному внедрению.
P.s. сейчас на планшете у меня версия 3730_jb4.3_v1.25_140226-NoModem
P.p.s. ну как у меня, вообще-то планшет дочке двухлетней куплен, так что рут я не получал.
-1.сбросить настройки к заводским из меню настроек
-2.прошиться.
-3.запустить планшет,принять обновление
-4.прошить еще раз.
Я правильно понял,что вот эти 4 пункта Вы делали и все ОК??
Да, можете попробовать сделать так. Думал сброс не важен. попробуйте, если это важно — сообщите, я поправлю инструкцию!
![]()
I downloaded the latest chipset drivers, but cannot seem to get them to install. When I attempt to open the setup program, nothing happens. However, an instance of the AMD Software installer is running in the background if I check Task Manager, but at 0%. If I re-click the setup program, I get a message that the application is already running. But no installation program ever actually opens. I am at a loss.
New comments cannot be posted and votes cannot be cast
![]()
R7 1800X | 980Ti | 32GB Ripjaws V 3200MHz | Windows 10 / Debian
You need to delete the contents of the C:AMD folder. The installer in the latest Chipset Driver will hang and not proceed otherwise.
Wow thank you! That worked!! 🙂
Fixed the problem for me as well. Thanks.
Does /u/AMD_Robert know about this bug?
R7 1700@stock | Killer SLI/ac | F4-3000C16D-32GTZR | GTX 1070Ti
That worked for me as well, i have been trying to get it to install since the last release.
DDU would do it more efficiently.
btw. the chipset driver versioning is as shit-show for themselves. Do not think that a newer chipset driver version is better/needed for your system!
R7 1800X | 980Ti | 32GB Ripjaws V 3200MHz | Windows 10 / Debian
Stability also comes to mind, where installing a new/newer driver has halted or completely stopped intermittent crashes and janky OS or hardware behavior, especially in the case of overclocking or stressing hardware.
Источник
Device driver installation wizard error
При установке HWK_Support_Suite_Setup_v02.02.000 выдает ошибку (the current language is not supported by the Device Driver Installation Wizard.
Contact the vendor that provides you this package) при этом бокс не подключен,также когда выходит сообщение об установке драйвера USB не устанавливается,
А указать на драйвер в ручную пробовали ( Program Files > SarasSoft > UFS >UFS_USB_Driver
PS. подключить бокс в устойствах определяется?? установить драйвера..
Да пробывал,пишет что не удалось установить,не пойму почему,что я не так делаю
в устройствах как определяется. обновить драйвер указать на онный..
пишет что устройство не опознано
————————————————
Добавлено позже:
в устройствах определаяется как неизвестное
прверить на другой системе если тоже к продавцу обмен по гарантии..
Здравствуйте всем! такая поблема приобрел программатор HWKuFs Micro,кроме кабелей ничего не было,не могу установить ПО,все время выдает ошибку,порылся в инете нашел инструкция ПО,делал все по инструкции ничего не получается,я конечно понимаю в инете по поводу этого очень много инфы,но какая из них подходит не понятно,все пишут по разному.
На данном форуме около сотни тем на данный вопрос, могли бы предварительно почитать, испробовать все рекомендации.
При установке HWK_Support_Suite_Setup_v02.02.000 выдает ошибку (the current language is not supported by the Device Driver Installation Wizard.
Contact the vendor that provides you this package)
Это не ошибка а предупреждение что язык установочного пакета не соответствует языку операционной системы и на работоспособность не влияет.
ну и конечно при всем при этом обновление не происходит.Прошу помочь в данном вопросе,что делаю не так,если есть ссылки по данному вопросу дайте пожалуйста,хотя какие ьыли в инете все просмотрел,может есть видео по установке? Прошу прощения если что не так написал.Спасибо заранее.
Прикладывайте скриншоты, логи, дословное цитирование ошибок, ясновидящих здесь нет поэтому чем либо вам помочь не зная что у вас не получается не представляется возможным.
Например в windows 7 драйвер UFS автоматически не устанавливается, надо устанавливать принудительно. И подобных нюансов очень много, поэтому описывайте ваши действия подробно.
Инструкция по установке:
1. Установить HWK Support Suite Setup
2. Установить драйвер UFS
3. Обновить UFS
4. Установить HWK Suite Setup
Источник
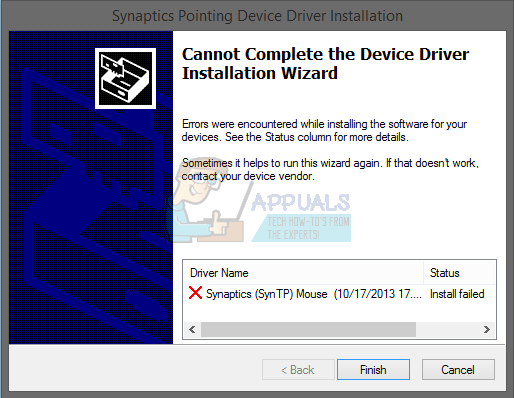
If you cannot install Synaptics, ASUS, etc, Touchpad drivers, and you see Cannot complete the device driver installation wizard error message, then this post shows how to resolve the issue.
Without the driver installed, you’ll be missing out on advanced gestures. For example, when you try to install the Synaptics Pointing Device driver, you may get the following error message.
Cannot complete the device driver installation wizard.
This happens with laptops of many models, in particular, Asus Zenbook. The Asus Smart Gesture driver is prone to this issue. Users have noticed that the installation of this touchpad driver fails.
If you notice that your touchpad drivers aren’t installing, this should be your course of action:
- Update the touchpad driver online.
- Update the touchpad using the generic Windows driver.
- Uninstall the touchpad driver.
- Delete this registry key.
- Disable Driver Signature Enforcement.
Read this post to the end and then decide the order you want to try the suggestions. Before you begin, make sure that Touchpad is enabled.
1] Update the touchpad driver online
The primary suspect in cases when your touchpad isn’t clicking or responding to touch is the driver. Do this by searching for and opening Device Manager in the Start menu.
Here, expand Mice and other pointing devices and right-click on your touchpad driver. Go to Properties from the context menu. Switch to the Driver tab of the Properties window and hit the Update Driver button.

Click on Search automatically for updated driver software and allow Windows to discover updated driver files. Note that you need internet connectivity for this.
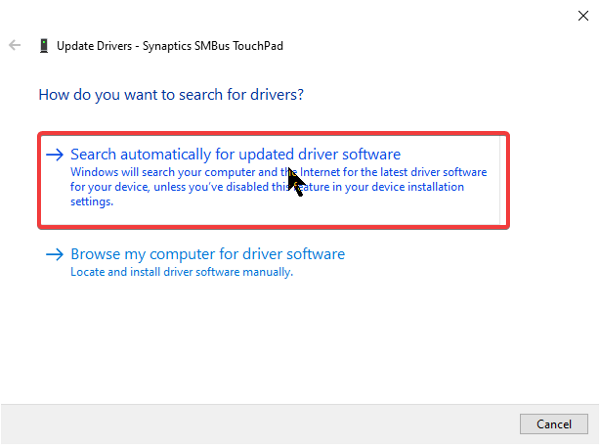
If the Windows system doesn’t find updated drivers, you can check on the device manufacturer’s website.
Read: Where to download drivers for Windows 10?
2] Update the touchpad using the generic Windows driver
This solution is similar to the first one, in the sense that we’re also going to update the device to fix the touchpad issue. However, instead of searching for the touchpad driver online, you can update it using the generic Windows driver.
First open Device Manager, either by searching from the Start menu or running the devmgmt.msc command in the Run dialog box. Find your touchpad under Mice and other pointing devices and right-click on it.
Select the Update driver option from the context menu, and when asked, go with the option that says Let me pick from a list of device drivers on my computer.
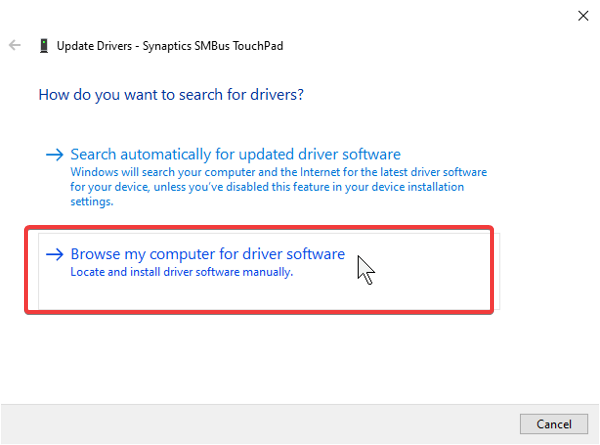
Choose HID-compliant mouse from the directory and hit the Next button. Finally, complete the installation using the on-screen instruction.
3] Uninstall the touchpad driver
If updating your touchpad driver doesn’t fix the issue, you can try uninstalling it. Contrary to how it sounds, you’re not really getting rid of the driver. The driver may be buggy and causing the issue.
When you uninstall the device, the Windows system will attempt to re-install it when next you boot the computer. Here’s how to uninstall the touchpad driver.
Press the Windows key + R to open the Run dialog box. Enter devmgmt.msc and press OK to go to Device Manager. Here, expand Mice and other pointing devices.
Right-click on your touchpad and select the Uninstall device option. Confirm the uninstallation and follow the Windows instructions to finalize the process.

Finally, restart your computer, and Windows will re-install the touchpad driver.
4] Delete this registry key

The Windows registry is an incredibly sensitive area on your system to modify, especially without proper guidance. So, I recommend that you back up your registry before proceeding with this solution.
Search for regedit in the Start menu. Right-click on Registry Editor and go to the Run as administrator option. In the Registry Editor, navigate to the following directory:
HKEY_LOCAL_MACHINESOFTWAREMicrosoftWindowsCurrentVersionPoliciesSystem
Find the EnableInstallerDetection key. Right-click on this entry and Delete it.
After deleting the Detect Application Installations folder, go ahead to install the touchpad driver again. It should work this time around. If not, continue to the next solution.
5] Disable Driver Signature Enforcement
Windows 10 computers with the 64-bit architecture come with the Driver Signature Enforcement feature. This restricts the computers to only load Microsoft-signed drivers.
Your touchpad driver may not install if this feature is enabled and identifies your driver software as not signed by Microsoft. If the previous fixes have all failed, then try this.
Press the Windows key and search for cmd. Right-click on Command Prompt from the results and select Run as Administrator.
In the Command Prompt window, type in the following command and press ENTER:
bcdedit/set testsigning on
The above command disabled the Driver Signature Enforcement feature. Exit Command Prompt and reboot your computer. Now, you should be able to install the touchpad driver.
Read: Unable to connect to Synaptics Pointing Device Driver.
Unable to install Asus Smart Gesture driver
If you can’t install the Smart Gesture driver in your Asus notebook, a solution is to remove the Asus Smart Gesture driver manually and re-install the driver.
- Start by searching the Start menu for Asus Smart Gesture.
- Right-click on Asus Smart Gesture and select Open file location.
- Delete everything in the directory it takes you to. After that, restart your machine.
- With the Asus Smart Gesture driver files now removed, visit the Asus website and download the touchpad driver from there.
- Extract the folders from Disable3fun.exe and run the SetupTPdriver.msi file to install the driver successfully.
- After installing the new touchpad driver, you should now go to Device Manager.
- Right-click on your touchpad under Mice and other pointing devices and update the driver.
After trying every solution on this page, your touchpad driver installation will be successful.
If you still can’t install the touchpad driver, a trick is to go with the Synaptics Touchpad driver instead. The installation of this touchpad driver rarely fails, and it can work across most computer models.
Windows 10/11 won’t install drivers is a common issue and many users are bothered by it. MiniTool Software collects some methods that are proved to be effective and shows them in this article. You can select a suitable method to help you solve the issue.
Windows 10/11 Won’t Install Drivers on PC
The device drivers are very important parts of a computer. When you want to use a device on your PC, you need to make sure the device driver is properly installed and you’d better keep it up-to-date. However, some users report that Windows 10/11 won’t install drivers on their computers. For example, they receive the error message saying cannot complete the device driver installation wizard during the installation process.
This problem will affect your normal use of the computer device. So, you need to take active measures to solve the issue.
Well then, what should you do when you are unable to install drivers on Windows 10/11? You can use the Windows built-in troubleshooter to find and fix errors. You can also run a DISM and SFC scan to fix the issue. Besides, you can update the device driver or clean boot your device to have a try. If all of the fixes don’t work for you, you will need to reset your computer.
In this article, we will show you how to use these methods to solve the issue.
How to Fix: Windows 10/11 Won’t Install Drivers
- Fix 1: Run the Hardware and Device Troubleshooter
- Fix 2: Update the Device Driver
- Fix 3: Run DISM and SFC
- Fix 4: Clean Boot Your Computer
- Fix 5: Reset Your PC
Fix 1: Run the Hardware and Device Troubleshooter
Windows has a built-in tool that can help you solve the device driver issue. It is a hardware and device troubleshooter. This tool is available on both Windows 11 and Windows 10. You can open it via Control Panel. Yes, Control Panel is still available on Windows 11.
Way 1: Run the Hardware and Device Troubleshooter via Control Panel
- Click the search icon from the taskbar and search for control panel.
- Select Control Panel from the search result to open it.
- Expand View by and select Large icons.
- Click Troubleshooting to continue.
- Click View all from the left panel.
- Click Hardware and Devices.
- Click Advanced.
- Click Run as Administrator.
- Click Next to run this tool.
This tool can automatically find and fix found errors on the devices. You should wait until the whole process ends.
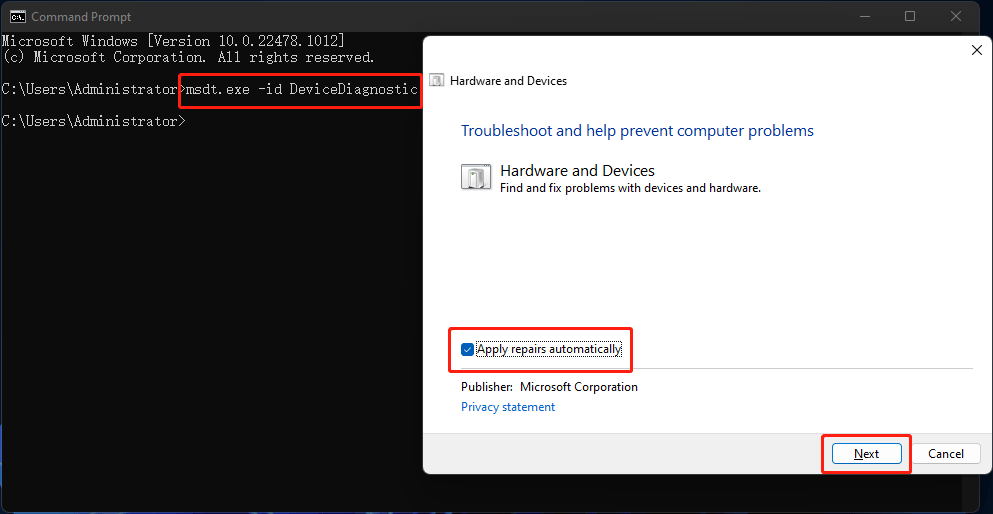
Way 2: Run the Hardware and Device Troubleshooter via Command Prompt
If you can’t find the hardware and devices troubleshooter via Control Panel, you can use Command Prompt instead. Here is a guide:
- Click the search icon from the taskbar and type cmd.
- Select Command Prompt from the search result to open it.
- Type exe -id DeviceDiagnostic into Command Prompt and press Enter.
- The Hardware and Devices troubleshooter will open. You can click Advanced to make sure Apply repairs automatically is selected.
- Click Next to run this tool. This tool will begin to detect problems. You should wait until the process ends. If necessary, you need to follow the on-screen guide to complete the fix. For example, you may need to restart your computer to finish installing drivers and updates.
After running this tool, you can go to check if your needed device drivers are installed successfully.
Fix 2: Update the Device Driver
If you can’t install the device driver on your computer, you can update it to have a try. This can also fix the missing, broken, or outdated device driver. It is easy to do this:
- Right-click on Start and select Device Manager.
- Find the target device and right-click it.
- Select Update driver.
- On the pop-up page, click Search automatically for drivers to search for the best available driver and install it on your computer.
Fix 3: Run DISM and SFC
At times, the issues of Windows 10/11 won’t install drivers are caused by missing or corrupted system files. You can run DISM (inbox Deployment Image Servicing and Management) and SFC (System File Checker) in Command Prompt to repair the system files.
Here is what you can do:
1. Click the search icon from the taskbar and search for cmd.
2. Right-click Command Prompt from the search result and select Run as administrator.
3. Type the following commands one by one and press Enter after each.
- DISM /Online /Cleanup-Image /ScanHealth
- DISM /Online /Cleanup-Image /CheckHealth
- DISM /Online /Cleanup-Image /RestoreHealth
4. After running DISM completely, you need to type sfc /scannow and press Enter to run SFC on your device. This tool can scan your Windows OS and then restore your missing & corrupted system files. You should wait until the process is 100% completed.
Fix 4: Clean Boot Your Computer
Software conflicts can also cause driver installation issues like Windows 10/11 won’t install drivers. It is impossible to uninstall all software from your computer. But this doesn’t mean that you can’t solve this issue. You can clean boot your computer and then find out if it is a software conflict issue. If yes, you can take further steps to find the culprit.
How to Clean Boot Your Windows 10/11 Computer?
1. Click the search icon from the taskbar.
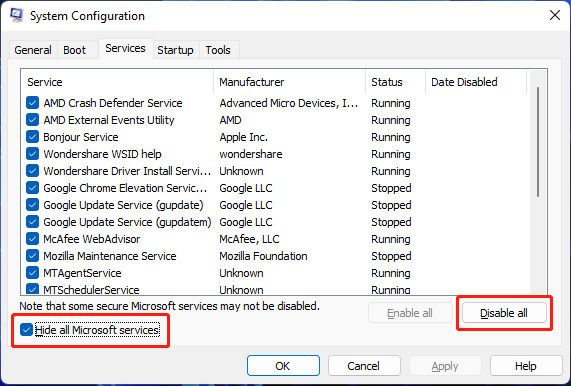
2. Type msconfig into the search box.
3. Click System Configuration from the search result to open it.
4. On the System Configuration interface, you need to check the option of Hide all Microsoft services. This can make sure that all the Microsoft services are still running after you clean boot your Windows 10/11 computer.
5. Click the Disable all button to continue.
6. Switch to the Startup section.
7. Click the Open Task Manager link.
8. On Task Manager, you can select the startup program that may interface with your system and then click the Disable Then, repeat this step to disable all the suspected programs.
9. Close Task Manager.
10. Close System Configuration.
11. Restart your computer.
12. Check if you can install your needed device driver. If you can, it means that third-party software prevents you from installing device drivers. To find out which is the cause, you can repeat step 1 to step 5 but enable half of the listed services. The recently installed software should be considered. You can try this way until you find the culprit.
If Windows 10/11 still won’t install drivers, the next fix may help you.
Fix 5: Reset Your PC
If you can’t use the above methods to solve the device driver installation issue, you may need to reset your PC. To protect your files on the computer, you’d better back up your device before resetting your PC. In this part, we will show you a full guide on how to reset your PC.
Step 1: Back up Your Computer
You can use MiniTool ShadowMaker, a professional Windows backup software, to back up your files, folders, partitions, disks, and systems. This software supports automatic backup, differential and incremental backup. With it, you can also schedule a backup based on your requirements.
This software has a trial edition. You can use it for free within 30 days. If you want to try it, you can click the following button to download and install it on your device. It works on all versions of Windows, including Windows 11, Windows 10, Windows 8.1/8, and Windows 7.
Free Download
After the installation, you can open this software, switch to the Backup section, and select the disk or partition, files or folders to backup.

After backing up your computer, you can feel free to reset your PC.
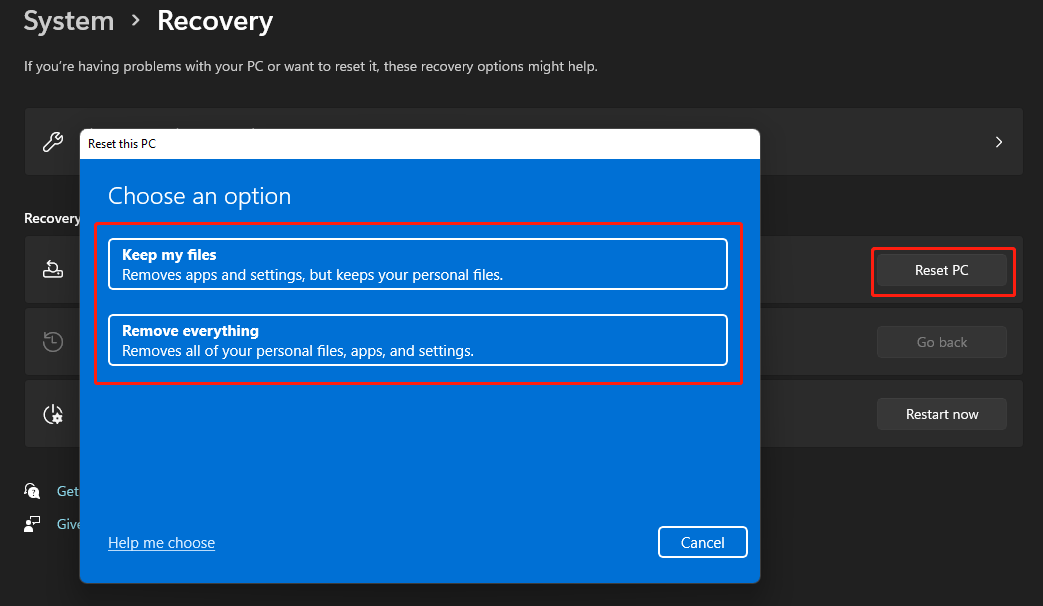
Step 2: Reset Your Computer
- Click the Start button from the taskbar.
- Go to Settings > System > Recovery.
- Under the Recovery options section, you need to click the Reset PC button to continue.
- On the pop-up page, click Keep my files or Remove everything based on your situation to continue.
- On the next page, click Cloud download or Local reinstall based on your requirements to continue.
- Follow the on-screen instructions to reset your PC.
Step 3: Recover Your Lost Files if There Is No Available Backup
When you use your Windows computer, some of your files may get deleted or lost by mistake. For example, your files are removed accidentally after you reset your computer and you want to get them back. In this situation, you can use professional data recovery software to get them back.
MiniTool Power Data Recovery is a reliable and free file recovery tool. It can be used to recover pictures, documents, videos, movies, music files, and more from all kinds of data storage devices like hard drives, SSDs, memory cards, SD cards, USB flash drives, etc.
Tip: No matter which data recovery software you are using, it can only recover deleted and lost files that are not overwritten by new data.
This software also has a trial edition. You can use it to scan the drive you want to recover data from. Then, you can see if it can find your needed files. If yes and you want to recover them, you can use a full edition to do this.
Free Download
After downloading and installing this software on your PC, you can follow this guide to rescue your files:
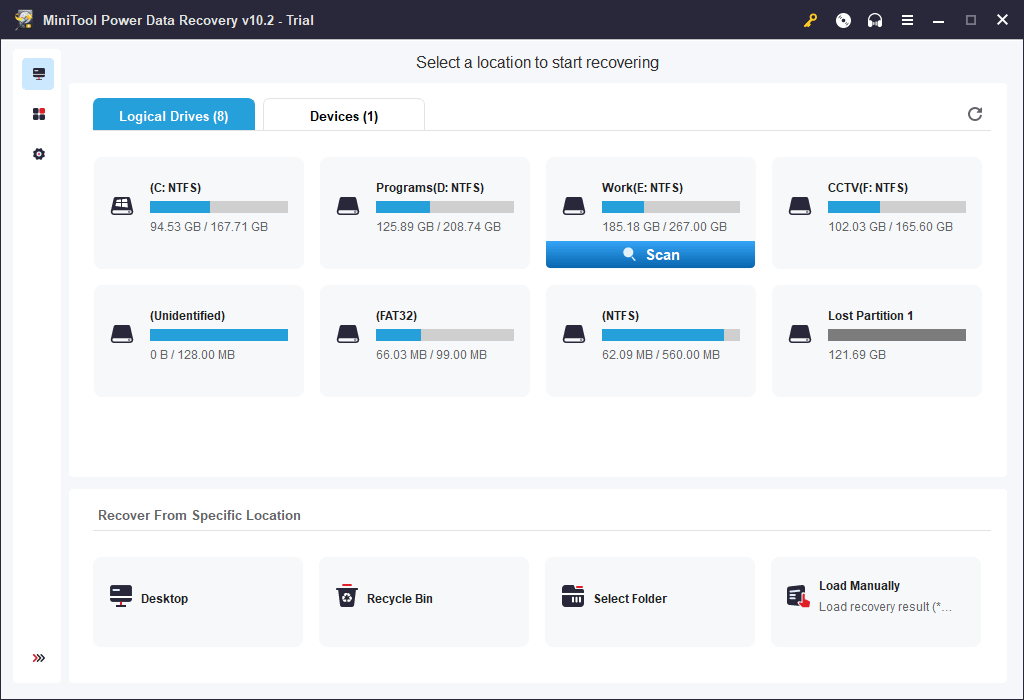
- Open the software to enter its main interface.
- This software shows you all the available partitions under Logical Drives. You can hover over the target partition and click the Scan button to start scanning it. If you want to directly scan the whole disk, you need to switch to the Devices section and select the target drive to scan.
- When the scanning process ends, you can see the scan results. You can check if your needed files are there. To recover them, you need to upgrade this software to a full edition. Then, you can select all your needed files and click the Save button to select a suitable location to save them. When selecting the destination folder, you should not select the original location. Otherwise, the deleted files might be overwritten and become unrecoverable.
Although there is a chance to recover your lost data, you’d better form a good habit of regularly backing up files in case the lost files are overwritten.
Unable to Install Drivers on Windows 10/11
If you can’t install drivers on your Windows 10/11 computer, you can just try the methods mentioned in this article to help you out. You should find a suitable method here. Should you have any other related issues, you can let us know in the comments. You can also contact us via [email protected].
Явно в системе чтото конфликтует.
Я недавно столкнулся с такой же проблемой (что собственно у меня не удивительно при таком количестве разных версий драйверов ![]() ).
).
Попробую рассказать в двух словах как обойти эту проблему.
1. Если при подключении устройства, система находит для него (старые) драйвера и устанавливает их. Нужно удалить эти (старые) драйвера.
2. Для этого нужно запустить «Диспетчер устройств»
3. Подключить аппарат (именно в том режиме для которого вы устанавливаете драйвера). Например для режима прошивки нужно подключать выключенный аппарат
4. Дождаться появления подключенного устройства в списке
5. Кликнуть по этому устройству правой кнопкой мыши, и в появившемся меню выбрать пункт «Удалить»
6. В появившемся диалоговом окне поставить галочку «Удалить программы драйверов для этого устройства» и нажать «ОК»
7. После удаления устройства из списка отключить аппарат от компьютера
8. Повторять пункты с 3 по 7 до тех пор пока система не перестанет определять наличие драйверов для подключаемого устройства
9. Когда все (старые) драйвера будут удалены, устанавливаем необходимые драйвера в соответствии с инструкцией
в диспетчере устройств мелькнуло что-то MT6589 Preloader и исчезло
Это абсолютно нормальное поведение.
Устройство появляется в списке всего на пару секунд, вот за это время нужно успеть кликнуть по нему правой кнопкой мыши и перейти в «Свойства». А уже из окна «Свойств» Обновлять или Удалять драйвера.

Отредактировал 23 ноября, 2014 psihipofigist
Убрал фото под spoiler
Are you using a notebook and you can not install Synaptics Touchpad driver, because your Synaptics Touchpad hardware component is not recognized by your touchpad driver? If yes, you should read this article, because there are potential solutions which will help you to solve the problem. The touchpad is hardware component which simulates your mouse. You can not use your notebook without a functional touchpad. Actually, you can, but you will need an external wired or wireless mouse. So, what is the symptom of this problem? When you run touchpad driver you see an error Cannot Complete the Device Driver Installation Wizard.
This issue occurs because of different issues including incompatibility driver, hardware or system issues. Also, this issue occurs on the different operating system from Windows XP to Windows 10 and different notebooks models.
We created ten methods which will help you to solve the issue with the touchpad. So, let’s start.
Method 1: Enable Touchpad on your notebook
If the touchpad is not enabled, the driver will not be able to detect touchpad device. Based on that, you will need to enable Touchpad on your notebook, by following solution 1 (see the bottom of this article for link to Solution 1). After that, you will need to run touchpad driver. If you did not find the proper touchpad driver for your notebook, please read method 2.
Method 2: Install chipset driver and Intel I/O Acceleration driver
In the third method we will continue with driver installation, but not touchpad driver. Few users solved their problem by installing or reinstalling chipset driver and Intel I/O Acceleration driver. By using tips from method 2, please download and install drivers from official vendor’s website. If you can not find Intel I/O Acceleration driver on notebook vendor’s website, please open Intel website and download the latest driver. After you finish driver installation, do not forget to restart your Windows machine.
Method 3: Disable Driver Signature Enforcement
In this method, you will need to temporarily disable Driver Signature Enforcement (DSE). We will show you how to do it on Windows 10. The same procedure is compatible with Windows 8 and Windows 8.1.
- Left click on Start menu and type cmd to find Command Prompt
- Right click on Command Prompt and click Run as Administrator
- Click yes to confirm running Command Prompt as Administrator
- Type bcdedit /set testsigning on and press Enter to disable Driver Signature Enforcement

- Close Command Prompt
- Restart your Windows machine
- Install Synaptics Touchpad driver

Method 4: Perform changes in Registry database
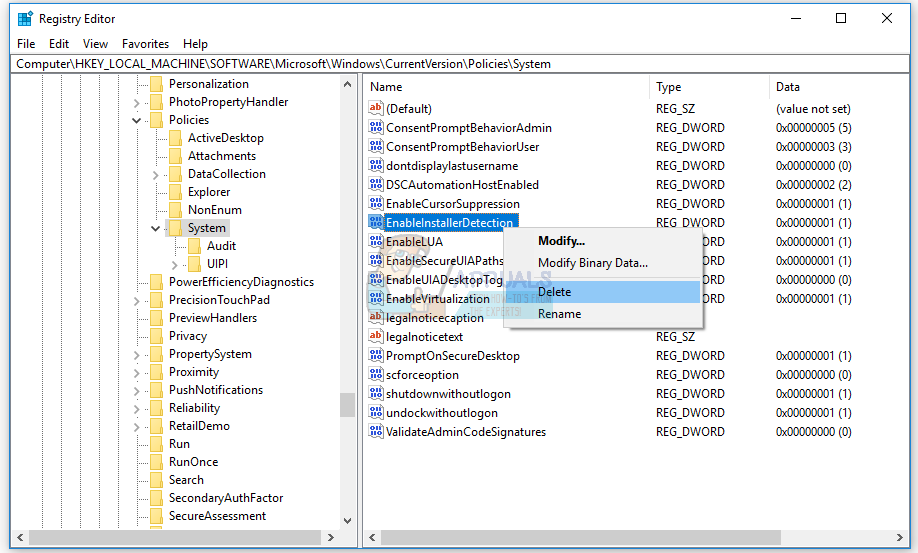
In this method, you will need to do some changes using Registry Editor. Before you do any registry configuration, we are recommending you to the backup registry database. Why do you need to do registry backup? In the case of some misconfiguration, you can revert registry database to the previous state when everything worked without any problems. For this method, you will need to use a user account with Administrator privilege, because Standard user account is not allowed to do any system changes.
- Navigate on the following location HKEY_LOCAL_MACHINESOFTWAREMicrosoftWindowsCurrentVersionPoliciesSystem
- Navigate on EnableInstallerDetection entry
- Right click on EnableInstallerDetection and choose Delete

- Click Yes to confirm deleting EnableInstallerDetection entry
- Close Registry Editor
- Restart your Windows machine
- Install Synaptics Touchpad driver

Jasmin Kahriman
Jasmin is a certified Senior Systems Engineer with over 15 years in IT Infrastructure. Jasmin holds multiple IT certifications which include CNIP, MTA, MCP, MCSA, MCT, Server+, and Network+.