Where to Start Troubleshooting
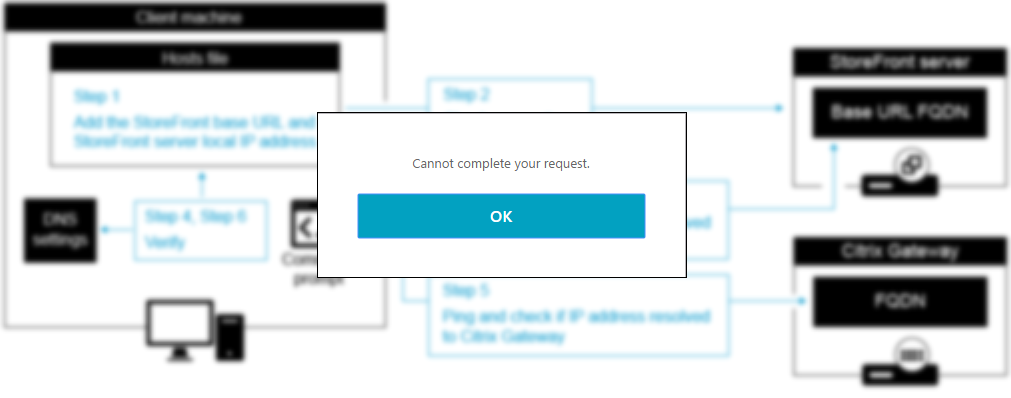
In order to identify what steps need to be followed when troubleshooting the error, you will have to identify where the issue is occurring by performing the following 3 tests:

-
Do you get the error when connecting directly to the StoreFront server? If yes, start troubleshooting from step 1.
Perform this test by adding the StoreFront base URL and the StoreFront server local IP address to the Hosts file of the internal machine you will be testing with. For more information about editing the Hosts file refer to the following article – How to use a Hosts file to test a site that uses host headers on an Intranet.
-
Do you get the error connecting through a load balancer? If yes, start troubleshooting from step 13.
From the testing machine open the command prompt and ping the StoreFront base URL FQDN. The FQDN should resolve to the IP address of your load balancer. If it does not then verify your DNS settings or the Hosts file on the local machine.
-
Do you get the error only when connecting through your NetScaler Gateway? If yes, start troubleshooting from step 19.
From the testing machine open the command prompt and ping the NetScaler Gateway FQDN. The FQDN should resolve to the IP address of your NetScaler Gateway. If it does not then verify your DNS settings or the Hosts file on the local machine.
Troubleshooting Steps
Troubleshooting the Storefront Server Connection
-
On the StoreFront server open the StoreFront MMC > Server Group > Base URL and confirm that the StoreFront base URL has a full FQDN and not a Host name or IP address. To change the base URL refer to Citrix Documentation – Configure server groups
-
Open the Command Prompt on the StoreFront server and ping the StoreFront base URL. The base URL should resolve to the StoreFront server local IP address. Add an entry to the Hosts file on the StoreFront server to make sure that the base URL resolves to itself.
Note: StoreFront 3.x has the loopback feature, for configuration guidance refer to Citrix Blog –
What’s New in StoreFront 3.0.
-
Open the IIS console on the StoreFront server click the server > Server Certificates > double-click the certificate that you are using for StoreFront.
Make sure that the certificate on the StoreFront server is not expired.
Make sure the “Certificate Issued To” name matches the StoreFront base URL.The certificate should also contain a private key. If using a SAN certificate, make sure the StoreFront Base URL is listed under the subject alternative names. Wildcard certificates are also supported.
View the Certification Path tab on the certificate and confirm that all the Intermediate and Root certificates are properly installed in order to complete an SSL Handshake. For more information regarding certificates see article – Server Certificates.
-
Open the IIS console on the StoreFront server and go to Sites > Default Web Site > Bindings. Make sure there is a binding for HTTPS over port 443 with a certificate that matches the StoreFront Base URL assigned to it. Leave the host name field empty. For more information regarding adding a binding refer to article – SSL Bindings
-
On the IIS console go to Application Pools and confirm that Citrix Delivery Services Authentication app pool is configured to use .NET CLR Version 4.0. If the app pool is not using .NET 4.0, refer to Microsoft article – Specify a .NET Framework Version for an Application Pool (IIS 7) and restart the Citrix Credential Wallet Service.
-
Open the StoreFront MMC > Authentication and make sure user name and password is enabled. To enable it click Add/Remove Methods > check the User Name and Password box > click OK.
-
On the StoreFront MMC, click Receiver For Web > Choose Authentication Methods and make sure that User Name and Password is also enabled. To enable it, check the User Name and Password box and click OK.
-
On the StoreFront server open the Services console and confirm the following:
- Verify if the Citrix Default Domain Services Windows Service is running. By default, the startup type will be set to Automatic (Delayed Start). Confirm the service is running after the StoreFront server reboots.
- Verify if the Citrix Credential Wallet Service is running. By default, the startup type will be set to Automatic (Delayed Start). Confirm the service is running after the StoreFront server reboots.
-
Telnet from the StoreFront server to the domain controller over ports 88 and 389 to confirm they are open. For more information refer to article CTX139039 – Communication Ports for StoreFront 2.0.
-
In Active Directory confirm the User Logon Name matches the User Logon Name (pre-Windows 2000). For more information refer to article – User Name Formats.
-
Verify if antivirus firewall is installed on the StoreFront server. Disable the antivirus firewall and test the connection. Exclude the StoreFront ports within the antivirus firewall. For more information refer to the following links:
- CTX101810 – Communication Ports Used by Citrix Technologies
- On-Access scan appears to cause IIS application pools to recycle?
- Performance issues with specific applications after installing VirusScan Enterprise 8.8 Patch 4
-
Confirm that you are not using a proxy when testing the connection to StoreFront. If you are receiving the error when the proxy is in place refer to the proxy configuration.
Troubleshooting the Load Balancer
-
If you are load balancing StoreFront, then Open the command prompt from the testing machine and ping StoreFront base URL FQDN to confirm if it is resolving to the load balancing IP address. Open a browser on the testing machine and go to the StoreFront base URL to confirm the correct certificate is bound to the load balancing VIP.
-
Confirm that the certificate bound to the load balancer is properly linked to the root and intermediate on NetScaler. For more information refer to article CTX128539 – How to Link an Intermediate Certificate to the Server Certificate on NetScaler/NetScaler Gateway.
-
On the NetScaler load balancing VIP confirm that the Persistence is set to SOURCEIP and the Method is set to LEASTCONNECTION. For more information see refer to Citrix Documentation – About Persistence
-
View the Services bound to the load balancing VIP and go to Settings > Header to confirm X-Forwarded-For is specified. To add it, edit the load balancer Service settings > Settings > Check Client IP > Add X-Forwarded-For to the Header textbox.
-
Confirm TLS 1.0 is enabled under the SSL Parameters on the load balancing VIP and load balancing services. StoreFront 3.0.1 and prior versions do not support TLS 1.1 and TLS 1.2.
-
On NetScaler go to under System > Settings > Configure Basic Features > Integrating caching and confirm that it is disabled.
Troubleshooting NetScaler Gateway
-
Open the StoreFront MMC > NetScaler Gateway > Select the Gateway you configured > Change General Settings > NetScaler Gateway URL and confirm external users are using the same URL for external access on the browser and Citrix Receiver.
-
On the StoreFront server open the Command Prompt > Ping NetScaler Gateway FQDN and confirm it resolves to the correct gateway IP address.
-
On the StoreFront server open a browser and navigate to the NetScaler Gateway URL to confirm there are no certificate errors. For more information refer to article CTX128539 – How to Link an Intermediate Certificate to the Server Certificate on NetScaler/NetScaler Gateway.
-
Open the StoreFront MMC and go to NetScaler Gateway > select the gateway you are configuring > Change General Settings > Subnet IP address and remove it. The subnet IP address is only needed if you are using a NetScaler 9.x firmware or under certain use cases concerning GSLB as mentioned here. Specifying the VIP of a NetScaler Gateway (not SNIP) may be required if the StoreFront implementation supports multiple NetScaler Gateways with the same URL (such as the same URL being used internally and externally, but resolving to different NetScaler Gateways) along with unique callback URLs. That being said, only certain use cases and the use of NetScaler 9.x firmware necessitate populating the Subnet IP address field which should otherwise be left blank.
-
On the same Change General Settings window from step 22, confirm the Logon Type is set to Domain if using LDAP authentication on the NetScaler Gateway. For more information to Citrix Documentation – Configure NetScaler Gateway connection settings.
-
On the same Change General Settings window from step 22, confirm the Callback URL FQDN listed resolves to the NetScaler Gateway VIP by using the ping command on the Command Prompt from the StoreFront server. Once you verify it resolves to the correct gateway IP address, open a browser on the StoreFront server and navigate to it and confirm there are no certificate errors.
-
On the NetScaler Gateway VIP go to Authentication > LDAP Policy > Edit Server and confirm the following settings:
For more information refer to – User authentication.
- Server Logon Name Attribute: sAMAccountName
- Group Attribute: MemberOf
- Sub Attribute Name: CN
- Security Type: PlainText
- Keep SSO Name attribute: blank (sometimes having some attributes set as SSO name attribute cause SSO failure if not a multi domain environment)
-
Go to the Session Policy bound to the NetScaler Gateway VIP > Edit Profile > Client Experience > Single Sign-on to Web Applications and confirm that it is checked. Then go to the Published Applications tab > Single Sign-on Domain and confirm the correct domain is specified.
Note: For domain users in a multi-domain environment, add the SSO Name Attribute field as UserPrincipalName under LDAP Policy configuration and uncheck the Single Sign-on Domain for the authentication on the session profile.
-
Check the NetScaler Gateway VIP > SSL Parameters > TLSv1 and confirm that it is enabled. StoreFront 3.0.1 or prior does not support TLS 1.1 and TLS 1.2. Make sure the Callback VIP has TLS 1.0 enabled.
-
On the NetScaler Gateway VIP verify the “No Rewrite Clientless” policy on the NetScaler Gateway VIP is configured to use the expression TRUE.
-
On the NetScaler go to Security > Application Firewall and confirm the feature is disabled. If it is enabled bypass the policies during testing. If successful re-enable the Application Firewall in learning mode,so it can Learn and Allow the necessary StoreFront traffic. For more information refer to article CTX117003 – How to Configure Learning Parameters on the Application Firewall.
Other Scenarios
-
If you only get the error when accessing the server for first time after an idle time or running an antivirus scan then disable the File Change Notification feature on the IIS server where StoreFront is running.
For .NET 4.0 and Lower
Find app bitness from appPool advance settings.
64 bit: To enable this hotfix, you must add the following DWORD value of 1 at the following registry key:
HKLMSoftwareMicrosoftASP.NETFCNMode
32 bit: If you are running a 32-bit process on an x64-based system, add the following DWORD value of 1 at the following registry key:
HKLMSOFTWAREWow6432NodeMicrosoftASP.NETFCNMode
For .NET 4.5 and Higher
Note: Starting with the Microsoft .NET Framework 4.5 and later versions, FCNMode can be configured by using the httpRuntime settings as follows:
<httpRuntime fcnMode=”Disabled”/>
-
Is there an error in the Event Viewer for “An unexpected error occurred storing the credentials” (Event ID
or “An error occurred during authentication” (Event ID 3)?If so, run the following PowerShell command:
cd ‘C:Program FilesCitrixReceiver StoreFrontScripts’
$certlist = @(Get-DSCertificate)[0] | where { $_.Subject -Match “Credential Wallet Replication Identity” }
foreach ( $cert in $certlist ) { Add-DSCertificateKeyReadAccess $cert “NT ServiceCitrixCredentialWallet” }
And then restart the Citrix Credential Wallet Service.
-
If any timeout settings have been modified manually through the web.config file located under C:inetpubwwwrootCitrixAuthenticationweb.config then make sure the SessionState timeout field is set to the default value of 5.
For example – <sessionState mode=”InProc” cookieName=”Citrix_AuthSvc” timeout=”5″ />
-
If using Microsoft NLB as a load balancer; it has been reported that using Microsoft “NLB” type load balancing with unicast mode might trigger this issue. Switching to multicast mode helps resolve this issue.
 or “An error occurred during authentication” (Event ID 3)?
-
When a single FQDN configuration is used then refer to the following Citrix Documentation to verify if any step is skipped or misconfigured – Create a single Fully Qualified Domain Name (FQDN) to access a store internally and externally. You can potentially get the cannot complete request error.
-
If you were configuring Optimal Gateway for launching applications, make sure the configuration on the web.config file has a proper closing HTML tag. For more information regarding Optimal Gateway configuration then refer to Citrix Documentation – Configure optimal NetScaler Gateway routing for a store.
-
If you experience the error after publishing a new application or customizing an application’s icon, check the event viewer on the StoreFront server and look for the following errors:
Event 1 = There was an error during a resources List request. System.Net.WebException, System, Version=4.0.0.0, Culture=neutral, PublicKeyToken=b77a5c561934e089
The remote server returned an error: (500) Internal Server Error.
Event 7 = Unhandled exception thrown for route “DazzleResources/List” System.ArgumentException, mscorlib, Version=4.0.0.0, Culture=neutral, PublicKeyToken=b77a5c561934e089 Offset and length were out of bounds for the array or count is greater than the number of elements from index to the end of the source collection.
The workaround is to go to Studio > Delivery Groups > Applications > view the properties of the application recently added > Delivery > Application Icon > Change and choose from any of the Citrix default icons.
-
If you received this error during implementation of ADFS, Azure and FAS then consider the following – SAML authentication does not use a password and only uses the user name. Also, SAML authentication only informs users when authentication succeeds. If SAML authentication fails, users are not notified. Since a failure response is not sent, SAML has to be either the last policy in the cascade or the only policy.
So when you configure SAML authentication along with LDAP authentication on NetScaler, use the following guidelines – if SAML is the primary authentication type, then disable authentication in the LDAP policy and configure it for group extraction. Now, bind the LDAP policy as the secondary authentication type.
-
If this error occurs after an upgrade, then go to IIS > Default Site > StorenameWeb > Default Files > delete default.html and recreate default.html file manually.
-
Disable self-recycling for the following application pools:
Citrix delivery services authentication
Citrix delivery services resources
Citrix receiver for web
-
Verify if all the required network is reachable from NetScaler Gateway. Routing table should also look complete.
-
Examine the logs on NetScaler Gateway to verify if it is blocking any cookies, in case expression for cookie header is used in the session policy.
-
If the issue occurs specially after an HA failover of NetScaler Gateway, then verify the time on both the nodes. The time on nodes should be in sync. Examine the ntpd process and sync the time if the nodes are not in sync.
After Upgrade of your ADC Applaince you get “cannot complete your request”? If you updated to Citrix ADC version 13.0-64.35 in the course of CVE-2020-8245, CVE-2020-8246 or CVE-2020-8247 (https://support.citrix.com/article/CTX281474), it is possible that despite a successful firmware update and correct configuration, the login is not forwarded to the storefront.
One of the versions that fixes CVE-2020-8245, CVE-2020-8246 or CVE-2020-824 is Citrix ADC and Citrix Gateway 13.0-64.35 or later. However, it is important to know that Citrix has made some adjustments with this version, which can also be found in the ReleaseNodes. The main reason is to further harden the application and to better protect the systems.
https://docs.citrix.com/en-us/citrix-adc/downloads/release-notes-13-0-64-35.html
Support to disable the weak Basic, Digest, and NTLM authentication globally
The SSO configuration is now made more secure by dishonoring the following weak authentication methods globally.– Basic authentication
– Digest Access Authentication
– NTLM without setting Negotiate NTLM2 Key or Negotiate SignFor more information, see https://docs.citrix.com/en-us/citrix-adc/13/aaa-tm/enable-sso-for-auth-pol.html.
[ NSAUTH-7747 ]
After the update it is possible that suddenly the login sent from the Citrix ADC Gateway to the Citrix Storefront does not work anymore. Single Signon therefore no longer works. The Citrix Storefront only returns : “Cannot Complete your Request”.
How to fix the Problem on Citrix ADC 13.0-64.35 (installed with 13.x)?
If you have installed your appliance with version 13.x, you can easily fix the problem. You have to create the following policies. you can do that with the following commands:
add VPN TrafficAction traf_act_SSO HTTP -SSO ON
add VPN TrafficPolicy traf_pol_SSO true traf_act_SSO

bind VPN vServer *YOUR Gateway vServer* -policy traf_pol_SSO -priority 100 -gotoPriorityExpression END -type REQUEST
How to fix the Problem on Citrix ADC 13.0-64.35 (upgraded from 12.x)?
But if you did not install your appliance with ersion 13.x, but upgraded from 11.x or 12.x, you have to take a slightly different approach here. First check the policy type on your gateway. You cannot mix Classic with Advanced Policies.
This is a good example of such an upgrade path. Fortunately the flash files are available.

You can easily find out by typing the following command.
show VPN TrafficPolicyIf you see in the output that Classic Policies are in use, you cannot apply the Workarround as above.

In this case the following command will help you to solve the problem.
add VPN TrafficAction traf_act_SSO HTTP -SSO ON
add VPN TrafficPolicy traf_pol_SSO ns_true traf_act_SSO

bind VPN vServer *YOUR Gateway vServer* -policy traf_pol_SSO -priority 100
Now the login should work normally again and the SSO should work again.The error “Cannot complete your Request” should no longer occur. You can follow me on twitter or check out my other blog posts.
Where to Start Troubleshooting
In order to identify what steps need to be followed when troubleshooting the error, you will have to identify where the issue is occurring by performing the following 3 tests:
-
Do you get the error when connecting directly to the StoreFront server? If yes, start troubleshooting from step 1.
Perform this test by adding the StoreFront base URL and the StoreFront server local IP address to the Hosts file of the internal machine you will be testing with. For more information about editing the Hosts file refer to the following article – How to use a Hosts file to test a site that uses host headers on an Intranet.
-
Do you get the error connecting through a load balancer? If yes, start troubleshooting from step 13.
From the testing machine open the command prompt and ping the StoreFront base URL FQDN. The FQDN should resolve to the IP address of your load balancer. If it does not then verify your DNS settings or the Hosts file on the local machine.
-
Do you get the error only when connecting through your NetScaler Gateway? If yes, start troubleshooting from step 19.
From the testing machine open the command prompt and ping the NetScaler Gateway FQDN. The FQDN should resolve to the IP address of your NetScaler Gateway. If it does not then verify your DNS settings or the Hosts file on the local machine.
Troubleshooting Steps
Troubleshooting the Storefront Server Connection
-
On the StoreFront server open the StoreFront MMC > Server Group > Base URL and confirm that the StoreFront base URL has a full FQDN and not a Host name or IP address. To change the base URL refer to Citrix Documentation – Configure server groups
-
Open the Command Prompt on the StoreFront server and ping the StoreFront base URL. The base URL should resolve to the StoreFront server local IP address. Add an entry to the Hosts file on the StoreFront server to make sure that the base URL resolves to itself.
Note: StoreFront 3.x has the loopback feature, for configuration guidance refer to Citrix Blog –
What’s New in StoreFront 3.0.
-
Open the IIS console on the StoreFront server click the server > Server Certificates > double-click the certificate that you are using for StoreFront.
Make sure that the certificate on the StoreFront server is not expired.
Make sure the “Certificate Issued To” name matches the StoreFront base URL.The certificate should also contain a private key. If using a SAN certificate, make sure the StoreFront Base URL is listed under the subject alternative names. Wildcard certificates are also supported.
View the Certification Path tab on the certificate and confirm that all the Intermediate and Root certificates are properly installed in order to complete an SSL Handshake. For more information regarding certificates see article – Server Certificates.
-
Open the IIS console on the StoreFront server and go to Sites > Default Web Site > Bindings. Make sure there is a binding for HTTPS over port 443 with a certificate that matches the StoreFront Base URL assigned to it. Leave the host name field empty. For more information regarding adding a binding refer to article – SSL Bindings
-
On the IIS console go to Application Pools and confirm that Citrix Delivery Services Authentication app pool is configured to use .NET CLR Version 4.0. If the app pool is not using .NET 4.0, refer to Microsoft article – Specify a .NET Framework Version for an Application Pool (IIS 7) and restart the Citrix Credential Wallet Service.
-
Open the StoreFront MMC > Authentication and make sure user name and password is enabled. To enable it click Add/Remove Methods > check the User Name and Password box > click OK.
-
On the StoreFront MMC, click Receiver For Web > Choose Authentication Methods and make sure that User Name and Password is also enabled. To enable it, check the User Name and Password box and click OK.
-
On the StoreFront server open the Services console and confirm the following:
- Verify if the Citrix Default Domain Services Windows Service is running. By default, the startup type will be set to Automatic (Delayed Start). Confirm the service is running after the StoreFront server reboots.
- Verify if the Citrix Credential Wallet Service is running. By default, the startup type will be set to Automatic (Delayed Start). Confirm the service is running after the StoreFront server reboots.
-
Telnet from the StoreFront server to the domain controller over ports 88 and 389 to confirm they are open. For more information refer to article CTX139039 – Communication Ports for StoreFront 2.0.
-
In Active Directory confirm the User Logon Name matches the User Logon Name (pre-Windows 2000). For more information refer to article – User Name Formats.
-
Verify if antivirus firewall is installed on the StoreFront server. Disable the antivirus firewall and test the connection. Exclude the StoreFront ports within the antivirus firewall. For more information refer to the following links:
- CTX101810 – Communication Ports Used by Citrix Technologies
- On-Access scan appears to cause IIS application pools to recycle?
- Performance issues with specific applications after installing VirusScan Enterprise 8.8 Patch 4
-
Confirm that you are not using a proxy when testing the connection to StoreFront. If you are receiving the error when the proxy is in place refer to the proxy configuration.
Troubleshooting the Load Balancer
-
If you are load balancing StoreFront, then Open the command prompt from the testing machine and ping StoreFront base URL FQDN to confirm if it is resolving to the load balancing IP address. Open a browser on the testing machine and go to the StoreFront base URL to confirm the correct certificate is bound to the load balancing VIP.
-
Confirm that the certificate bound to the load balancer is properly linked to the root and intermediate on NetScaler. For more information refer to article CTX128539 – How to Link an Intermediate Certificate to the Server Certificate on NetScaler/NetScaler Gateway.
-
On the NetScaler load balancing VIP confirm that the Persistence is set to SOURCEIP and the Method is set to LEASTCONNECTION. For more information see refer to Citrix Documentation – About Persistence
-
View the Services bound to the load balancing VIP and go to Settings > Header to confirm X-Forwarded-For is specified. To add it, edit the load balancer Service settings > Settings > Check Client IP > Add X-Forwarded-For to the Header textbox.
-
Confirm TLS 1.0 is enabled under the SSL Parameters on the load balancing VIP and load balancing services. StoreFront 3.0.1 and prior versions do not support TLS 1.1 and TLS 1.2.
-
On NetScaler go to under System > Settings > Configure Basic Features > Integrating caching and confirm that it is disabled.
Troubleshooting NetScaler Gateway
-
Open the StoreFront MMC > NetScaler Gateway > Select the Gateway you configured > Change General Settings > NetScaler Gateway URL and confirm external users are using the same URL for external access on the browser and Citrix Receiver.
-
On the StoreFront server open the Command Prompt > Ping NetScaler Gateway FQDN and confirm it resolves to the correct gateway IP address.
-
On the StoreFront server open a browser and navigate to the NetScaler Gateway URL to confirm there are no certificate errors. For more information refer to article CTX128539 – How to Link an Intermediate Certificate to the Server Certificate on NetScaler/NetScaler Gateway.
-
Open the StoreFront MMC and go to NetScaler Gateway > select the gateway you are configuring > Change General Settings > Subnet IP address and remove it. The subnet IP address is only needed if you are using a NetScaler 9.x firmware or under certain use cases concerning GSLB as mentioned here. Specifying the VIP of a NetScaler Gateway (not SNIP) may be required if the StoreFront implementation supports multiple NetScaler Gateways with the same URL (such as the same URL being used internally and externally, but resolving to different NetScaler Gateways) along with unique callback URLs. That being said, only certain use cases and the use of NetScaler 9.x firmware necessitate populating the Subnet IP address field which should otherwise be left blank.
-
On the same Change General Settings window from step 22, confirm the Logon Type is set to Domain if using LDAP authentication on the NetScaler Gateway. For more information to Citrix Documentation – Configure NetScaler Gateway connection settings.
-
On the same Change General Settings window from step 22, confirm the Callback URL FQDN listed resolves to the NetScaler Gateway VIP by using the ping command on the Command Prompt from the StoreFront server. Once you verify it resolves to the correct gateway IP address, open a browser on the StoreFront server and navigate to it and confirm there are no certificate errors.
-
On the NetScaler Gateway VIP go to Authentication > LDAP Policy > Edit Server and confirm the following settings:
For more information refer to – User authentication.
- Server Logon Name Attribute: sAMAccountName
- Group Attribute: MemberOf
- Sub Attribute Name: CN
- Security Type: PlainText
- Keep SSO Name attribute: blank (sometimes having some attributes set as SSO name attribute cause SSO failure if not a multi domain environment)
-
Go to the Session Policy bound to the NetScaler Gateway VIP > Edit Profile > Client Experience > Single Sign-on to Web Applications and confirm that it is checked. Then go to the Published Applications tab > Single Sign-on Domain and confirm the correct domain is specified.
Note: For domain users in a multi-domain environment, add the SSO Name Attribute field as UserPrincipalName under LDAP Policy configuration and uncheck the Single Sign-on Domain for the authentication on the session profile.
-
Check the NetScaler Gateway VIP > SSL Parameters > TLSv1 and confirm that it is enabled. StoreFront 3.0.1 or prior does not support TLS 1.1 and TLS 1.2. Make sure the Callback VIP has TLS 1.0 enabled.
-
On the NetScaler Gateway VIP verify the “No Rewrite Clientless” policy on the NetScaler Gateway VIP is configured to use the expression TRUE.
-
On the NetScaler go to Security > Application Firewall and confirm the feature is disabled. If it is enabled bypass the policies during testing. If successful re-enable the Application Firewall in learning mode,so it can Learn and Allow the necessary StoreFront traffic. For more information refer to article CTX117003 – How to Configure Learning Parameters on the Application Firewall.
Other Scenarios
-
If you only get the error when accessing the server for first time after an idle time or running an antivirus scan then disable the File Change Notification feature on the IIS server where StoreFront is running.
For .NET 4.0 and Lower
Find app bitness from appPool advance settings.
64 bit: To enable this hotfix, you must add the following DWORD value of 1 at the following registry key:
HKLMSoftwareMicrosoftASP.NETFCNMode
32 bit: If you are running a 32-bit process on an x64-based system, add the following DWORD value of 1 at the following registry key:
HKLMSOFTWAREWow6432NodeMicrosoftASP.NETFCNMode
For .NET 4.5 and Higher
Note: Starting with the Microsoft .NET Framework 4.5 and later versions, FCNMode can be configured by using the httpRuntime settings as follows:
<httpRuntime fcnMode=”Disabled”/>
-
Is there an error in the Event Viewer for “An unexpected error occurred storing the credentials” (Event ID
or “An error occurred during authentication” (Event ID 3)?
If so, run the following PowerShell command:
cd ‘C:Program FilesCitrixReceiver StoreFrontScripts’
$certlist = @(Get-DSCertificate)[0] | where { $_.Subject -Match “Credential Wallet Replication Identity” }
foreach ( $cert in $certlist ) { Add-DSCertificateKeyReadAccess $cert “NT ServiceCitrixCredentialWallet” }
And then restart the Citrix Credential Wallet Service.
-
If any timeout settings have been modified manually through the web.config file located under C:inetpubwwwrootCitrixAuthenticationweb.config then make sure the SessionState timeout field is set to the default value of 5.
For example – <sessionState mode=”InProc” cookieName=”Citrix_AuthSvc” timeout=”5″ />
-
If using Microsoft NLB as a load balancer; it has been reported that using Microsoft “NLB” type load balancing with unicast mode might trigger this issue. Switching to multicast mode helps resolve this issue.
-
When a single FQDN configuration is used then refer to the following Citrix Documentation to verify if any step is skipped or misconfigured – Create a single Fully Qualified Domain Name (FQDN) to access a store internally and externally. You can potentially get the cannot complete request error.
-
If you were configuring Optimal Gateway for launching applications, make sure the configuration on the web.config file has a proper closing HTML tag. For more information regarding Optimal Gateway configuration then refer to Citrix Documentation – Configure optimal NetScaler Gateway routing for a store.
-
If you experience the error after publishing a new application or customizing an application’s icon, check the event viewer on the StoreFront server and look for the following errors:
Event 1 = There was an error during a resources List request. System.Net.WebException, System, Version=4.0.0.0, Culture=neutral, PublicKeyToken=b77a5c561934e089
The remote server returned an error: (500) Internal Server Error.
Event 7 = Unhandled exception thrown for route “DazzleResources/List” System.ArgumentException, mscorlib, Version=4.0.0.0, Culture=neutral, PublicKeyToken=b77a5c561934e089 Offset and length were out of bounds for the array or count is greater than the number of elements from index to the end of the source collection.
The workaround is to go to Studio > Delivery Groups > Applications > view the properties of the application recently added > Delivery > Application Icon > Change and choose from any of the Citrix default icons.
-
If you received this error during implementation of ADFS, Azure and FAS then consider the following – SAML authentication does not use a password and only uses the user name. Also, SAML authentication only informs users when authentication succeeds. If SAML authentication fails, users are not notified. Since a failure response is not sent, SAML has to be either the last policy in the cascade or the only policy.
So when you configure SAML authentication along with LDAP authentication on NetScaler, use the following guidelines – if SAML is the primary authentication type, then disable authentication in the LDAP policy and configure it for group extraction. Now, bind the LDAP policy as the secondary authentication type.
-
If this error occurs after an upgrade, then go to IIS > Default Site > StorenameWeb > Default Files > delete default.html and recreate default.html file manually.
-
Disable self-recycling for the following application pools:
Citrix delivery services authentication
Citrix delivery services resources
Citrix receiver for web
-
Verify if all the required network is reachable from NetScaler Gateway. Routing table should also look complete.
-
Examine the logs on NetScaler Gateway to verify if it is blocking any cookies, in case expression for cookie header is used in the session policy.
-
If the issue occurs specially after an HA failover of NetScaler Gateway, then verify the time on both the nodes. The time on nodes should be in sync. Examine the ntpd process and sync the time if the nodes are not in sync.
After Upgrade of your ADC Applaince you get “cannot complete your request”? If you updated to Citrix ADC version 13.0-64.35 in the course of CVE-2020-8245, CVE-2020-8246 or CVE-2020-8247 (https://support.citrix.com/article/CTX281474), it is possible that despite a successful firmware update and correct configuration, the login is not forwarded to the storefront.
One of the versions that fixes CVE-2020-8245, CVE-2020-8246 or CVE-2020-824 is Citrix ADC and Citrix Gateway 13.0-64.35 or later. However, it is important to know that Citrix has made some adjustments with this version, which can also be found in the ReleaseNodes. The main reason is to further harden the application and to better protect the systems.
https://docs.citrix.com/en-us/citrix-adc/downloads/release-notes-13-0-64-35.html
Support to disable the weak Basic, Digest, and NTLM authentication globally
The SSO configuration is now made more secure by dishonoring the following weak authentication methods globally.– Basic authentication
– Digest Access Authentication
– NTLM without setting Negotiate NTLM2 Key or Negotiate SignFor more information, see https://docs.citrix.com/en-us/citrix-adc/13/aaa-tm/enable-sso-for-auth-pol.html.
[ NSAUTH-7747 ]
After the update it is possible that suddenly the login sent from the Citrix ADC Gateway to the Citrix Storefront does not work anymore. Single Signon therefore no longer works. The Citrix Storefront only returns : “Cannot Complete your Request”.
How to fix the Problem on Citrix ADC 13.0-64.35 (installed with 13.x)?
If you have installed your appliance with version 13.x, you can easily fix the problem. You have to create the following policies. you can do that with the following commands:
add VPN TrafficAction traf_act_SSO HTTP -SSO ON
add VPN TrafficPolicy traf_pol_SSO true traf_act_SSO

bind VPN vServer *YOUR Gateway vServer* -policy traf_pol_SSO -priority 100 -gotoPriorityExpression END -type REQUEST
How to fix the Problem on Citrix ADC 13.0-64.35 (upgraded from 12.x)?
But if you did not install your appliance with ersion 13.x, but upgraded from 11.x or 12.x, you have to take a slightly different approach here. First check the policy type on your gateway. You cannot mix Classic with Advanced Policies.
This is a good example of such an upgrade path. Fortunately the flash files are available.
You can easily find out by typing the following command.
show VPN TrafficPolicyIf you see in the output that Classic Policies are in use, you cannot apply the Workarround as above.
In this case the following command will help you to solve the problem.
add VPN TrafficAction traf_act_SSO HTTP -SSO ON
add VPN TrafficPolicy traf_pol_SSO ns_true traf_act_SSO

bind VPN vServer *YOUR Gateway vServer* -policy traf_pol_SSO -priority 100
Now the login should work normally again and the SSO should work again.The error “Cannot complete your Request” should no longer occur. You can follow me on twitter or check out my other blog posts.
How to Transfer Canva Projects Betw…
Please enable JavaScript
The “Cannot complete your request” error in Citrix VAD is probably one of the most generic Citrix VAD error messages. This error can be attributed to at least ~25 different root causes! This is a great example which proves that the error message by itself is not definitive of the actual issue. You should always seek to capture as much unique information from your Citrix VAD environment as possible so that you can truly isolate the underlying root cause.

The following CTX articles describe different reasons why you may receive the “cannot complete your request” error.
- https://support.citrix.com/article/CTX207162 (this is the master CTX article you should consult for this error message, contains most of the other CTX articles)
- https://support.citrix.com/article/CTX235843 (Citrix ADC DNS misconfiguration)
- https://support.citrix.com/article/CTX235858 (X-Forwarded-For disabled in Citrix ADC)
- https://support.citrix.com/article/CTX282271 (Storefront misconfiguration)
- https://support.citrix.com/article/CTX235968 (Storefront misconfiguration)
- https://support.citrix.com/article/CTX238964 (Storefront misconfiguration and IIS bindings)
- https://support.citrix.com/article/CTX262124 (Storefront or Citrix load balancing or Citrix Gateway misconfiguration)
- https://support.citrix.com/article/CTX235918 (Web proxy misconfiguration)
- https://support.citrix.com/article/CTX235915 (Stopped Storefront services)
- https://support.citrix.com/article/CTX235900 (Storefront misconfiguration)
- https://support.citrix.com/article/CTX235888 (Authentication misconfiguration in Citrix Gateway)
- https://support.citrix.com/article/CTX216704 (SAML authentication misconfiguration)
- https://support.citrix.com/article/CTX235909 (Authentication misconfiguration in Storefront)
- https://support.citrix.com/article/CTX235882 (DNS misconfiguration)
- https://support.citrix.com/article/CTX261738 (load balancing misconfiguration)
- https://support.citrix.com/article/CTX235899 (Citrix Gateway customized theme)
- https://support.citrix.com/article/CTX244520 (Citrix Gateway custom portal theme)
- https://support.citrix.com/article/CTX235906 (Expired TLS certificate)
- https://support.citrix.com/article/CTX235908 (TLS certificate misconfiguration)
- https://support.citrix.com/article/CTX235844 (TLS certificate misconfiguration)
- https://support.citrix.com/article/CTX282546 (SAML misconfiguration)
- https://support.citrix.com/article/CTX235849 (Persistence misconfiguration in ADC)
- https://support.citrix.com/article/CTX235970 (Customized app icon in Storefront)
Consult the following Citrix flow diagram as reference when troubleshooting the “cannot complete your request” error.

You can find more detailed guidance and step-by-step procedures for analyzing and troubleshooting Citrix Virtual Apps and Desktops organized by category in my Citrix Virtual Apps and Desktops Troubleshooting e-book.
Error cannot resolve the SSL Host name (SSL error 40) in Citrix Virtual Apps and DesktopsHow to resolve cannot start app/desktop or unable to launch your application errors in Citrix VAD
Skip to content
Suddenly in my Citrix Virtual Apps environment, my users where unable to connect to a desktop or app session externally using the Citrix Gateway funcionallity in Citrix ADC (former NetScaler). During the sign-in process the user got the following error message: “Cannot Complete your Request”. Yay – thanks for that!
So the troubleshooting begun. The first hit on Google was the following troubleshooting chart from Citrix:

I was pointed towards the StoreFront setup everywhere I looked, but none of the troubleshooting steps helped me out. Instead, I started to go thought Carl Stalhood’s outstanding blog to search for a solution. And as always – Carl had the answer!
It turned out that ADC, in version 13.0 build 64 and newer, no longer sends the user’s credentials to StoreFront making SSO impossible. The ADC disables SSO globally which now needs to be enabled on a per traffic basis due to security reasons. Read more about the change here.
To solve the issue, you have to create a Traffic Policy in ADC to enable SSO. Find out how on Carl’s blog post here.
We use own and third-party cookies to improve your experience and to collect anonymous information for analytics. By clicking on «Accept», you accept the use of these cookies.
You can read more about our cookies here, or click on «Settings» to choose what cookies you want to allow.
SettingsRejectAccept
This is a section of my latest eBook, but I figured that it could be more useful as a blog-section which people could reference if needed and also makes it easier for me to update when new stuff appers to give a simple resolution for known errors.
Cannot complete your request
After logging into the NetScaler Gateway and the enduser is redirected to the StoreFront page you get the error message “Cannot Complete your request”

You can also notice that you get an error in event viewer of the storefront server under Application and Services Logs -> Citrix Delivery Services. Where you get an error message of “None of the AG Call back service responded”

This is often the case if Storefront cannot talk back with the callback URL which is listed under Manage NetScaler Gateways à Edit NetScaler Gateway à Authentication Settings à Callback URL. Make sure that this URL is accessible from the Storefront server. If this is not possible because of network segmentation. You can deploy a dummy NetScaler Gateway VIP in the internal network.
If you notice that you have an error in Event viewer stating that “Citrix AGBasic Login request has failed”. That might be that there are different domains specified on the NetScaler session policy and under Storefront. If you have specified a domain name in Storefront under Manage Authentication à Pass-through from NetScaler Gateway à Configure trusted domains, this needs to be the same domain name in the session policy as well.
If you note that you have an error in Event viewer stating that Failed to run discovery this is most likely the case if you have not configured the use of a proper SSL certificate under the IIS administration console of the Storefront server.
Your logon has expired
If you are prompted for another authentication after logging into the NetScaler Gateway portal, when redirected to the Storefront portal, and then this error message appears.

You can also notice an error in event viewer of the storefront server under Application and Services Logs -> Citrix Delivery Services. That states, “A request was sent to service that was detected as passing through a gateway, but none of these matched the request.

This is typically the case if the NetScaler Gateway URL is configured wrongly. Since this URL needs to be the same as what the end-users are using, in case Storefront will not trust the incoming request and therefore ignore authentication attempts.

Unknown Client error 1110
This is a generic error which might occur in many different scenarios, but some key things to check to find the root cause of the issue.

· STA available on the NetScaler and marked as up? (This can be checked under NetScaler Gateway à Virtual Server à Published Applications à STA Server.
Cannot Start Desktop “COMPUTERNAME”
If you try launching an application or desktop and you get the error message cannot start Desktop/Application name after authenticating and getting the resources up

This might just be that the resource that we are trying to launch in currently unavailable or that something for instance is wrong with the VDA agents on that resource we are trying to launch.
We can also go into event viewer of Storefront to take a closer look at what kind of error is actually happening. Event viewer à Application and Services Logs -> Citrix Delivery Services. If we get an error message here stating “All the configured Secure Ticket authorities failed to respond”
![]()
This might be that we have an STA server that is down, in which Storefront tries to communicate with or that we have configured the wrong STA server under NetScaler Gateway appliances in Storefront. This can be checked under à Manage NetScaler Gateways à Edit NetScaler Gateway à Secure Ticket Authority.
Error: Login exceeds maximum allowed users
When logging in you get an error message stating that login exceeds maximum allowed users. This is typically the case if we did not place the virtual server in ICA-only mode. By default, the global AAA settings of NetScaler Gateway is set to allow maximum 5 users logging in using VPN at the same time. If we go and change the settings of the Virtual server to ICA-only mode, this error will go away.
Http/1.1 Internal Server Error 43531
After authenticating to the NetScaler Gateway portal you get a blank page with an error message stating Http/1.1 Internal Server Error 43531. This is typically the case if the Gateway cannot communicate with the Storefront web site. Which might just be a wrong URL in the session policy for instance.
Or this can also be that a client is not being applied a session policy, if we for instance have session policies in place based upon different criteria’s. If someone outside those criteria would get those error messages. The easiest way to get them access is to bind a session policy with the highest priority number with an expression of ns_true.
403 – Forbidden: Access is denied
After authenticating to the NetScaler Gateway portal, you get a default IIS error message stating “Access is denied”. This is typically the case if the session policy does not point directly to the receiver for web site on Storefront. After changing, the session policy to point to the direct URL this error message will go away.
In case of authentication failure attempt, a user will be given a generic error message of:

There are many ways to troubleshoot authentication failures, the simplest one is using the authentication dashboard in the NetScaler UI.

Which basically list the syslog events directly into the UI. Another way is using CLI. Log into the NetScaler appliance using an SSH client, type Shell and then type cat /tmp/aaad.debug
This will in real-time list out all AAA attempts happening against the NetScaler. Now by default the NetScaler does not list out detailed information whenever a user has an expired password or if their account is disabled. However, there is a feature which we can enabled which can give more detailed information back to the end user. This feature is called Enhanced Authentication Feedback
Which enabled under NetScaler Gateway à Global Settings à Change Authentication AAA settings.
NOTE: This setting is disabled by default, because it might reveal to much information to malicious hackers which try to do a brute force attack, to get information on which users are enabled and not.
It is also important that the aaad.debug command lists out different error codes when there is a failed authentication attempt.
For instance, if a user with a disabled account tries to authenticate.
Send reject with code Rejecting with error code 4011
Citrix has made a list which describes all these error codes and the meaning of them.
4001 Invalid credentials. Catch-all error from previous versions.
4002 Login not permitted. Catch-all error from previous versions.
4003 Server timeout
4004 System error
4005 Socket error talking to authentication server
4006 Bad (format) user passed to nsaaad
4007 Bad (format) password passed to nsaaad
4008 Password mismatch (when entering new password)
4009 User not found
4010 Restricted login hours
4011 Account disabled
4012 Password expired
4013 No dial-in permission (RADIUS specific)
4014 Error changing password
4015 Account locked
Now if a user tries to authenticate but is not bound to an authentication policy, for instance if we have multiple authentication policy for different groups, network segments and someone which fall outside of those policies try to authenticate they are presented with this error message.
The simplest way to fix this is to either define ns_true authentication policy which handles all other authentication attempts.
Now if an end-user tries to authenticate to start a Citrix Receiver session and is presented with this error message
This is typically the case if there is a session policy bound to the user which has a default authorization policy of DENY, this might be intended but if not, we should change it to ALLOW.
This is a section of my latest eBook, but I figured that it could be more useful as a blog-section which people could reference if needed and also makes it easier for me to update when new stuff appers to give a simple resolution for known errors.
Cannot complete your request
After logging into the NetScaler Gateway and the enduser is redirected to the StoreFront page you get the error message “Cannot Complete your request”
You can also notice that you get an error in event viewer of the storefront server under Application and Services Logs -> Citrix Delivery Services. Where you get an error message of “None of the AG Call back service responded”
This is often the case if Storefront cannot talk back with the callback URL which is listed under Manage NetScaler Gateways à Edit NetScaler Gateway à Authentication Settings à Callback URL. Make sure that this URL is accessible from the Storefront server. If this is not possible because of network segmentation. You can deploy a dummy NetScaler Gateway VIP in the internal network.
If you notice that you have an error in Event viewer stating that “Citrix AGBasic Login request has failed”. That might be that there are different domains specified on the NetScaler session policy and under Storefront. If you have specified a domain name in Storefront under Manage Authentication à Pass-through from NetScaler Gateway à Configure trusted domains, this needs to be the same domain name in the session policy as well.
If you note that you have an error in Event viewer stating that Failed to run discovery this is most likely the case if you have not configured the use of a proper SSL certificate under the IIS administration console of the Storefront server.
Your logon has expired
If you are prompted for another authentication after logging into the NetScaler Gateway portal, when redirected to the Storefront portal, and then this error message appears.
You can also notice an error in event viewer of the storefront server under Application and Services Logs -> Citrix Delivery Services. That states, “A request was sent to service that was detected as passing through a gateway, but none of these matched the request.
This is typically the case if the NetScaler Gateway URL is configured wrongly. Since this URL needs to be the same as what the end-users are using, in case Storefront will not trust the incoming request and therefore ignore authentication attempts.
Unknown Client error 1110
This is a generic error which might occur in many different scenarios, but some key things to check to find the root cause of the issue.
· STA available on the NetScaler and marked as up? (This can be checked under NetScaler Gateway à Virtual Server à Published Applications à STA Server.
Cannot Start Desktop “COMPUTERNAME”
If you try launching an application or desktop and you get the error message cannot start Desktop/Application name after authenticating and getting the resources up
This might just be that the resource that we are trying to launch in currently unavailable or that something for instance is wrong with the VDA agents on that resource we are trying to launch.
We can also go into event viewer of Storefront to take a closer look at what kind of error is actually happening. Event viewer à Application and Services Logs -> Citrix Delivery Services. If we get an error message here stating “All the configured Secure Ticket authorities failed to respond”
![]()
This might be that we have an STA server that is down, in which Storefront tries to communicate with or that we have configured the wrong STA server under NetScaler Gateway appliances in Storefront. This can be checked under à Manage NetScaler Gateways à Edit NetScaler Gateway à Secure Ticket Authority.
Error: Login exceeds maximum allowed users
When logging in you get an error message stating that login exceeds maximum allowed users. This is typically the case if we did not place the virtual server in ICA-only mode. By default, the global AAA settings of NetScaler Gateway is set to allow maximum 5 users logging in using VPN at the same time. If we go and change the settings of the Virtual server to ICA-only mode, this error will go away.
Http/1.1 Internal Server Error 43531
After authenticating to the NetScaler Gateway portal you get a blank page with an error message stating Http/1.1 Internal Server Error 43531. This is typically the case if the Gateway cannot communicate with the Storefront web site. Which might just be a wrong URL in the session policy for instance.
Or this can also be that a client is not being applied a session policy, if we for instance have session policies in place based upon different criteria’s. If someone outside those criteria would get those error messages. The easiest way to get them access is to bind a session policy with the highest priority number with an expression of ns_true.
403 – Forbidden: Access is denied
After authenticating to the NetScaler Gateway portal, you get a default IIS error message stating “Access is denied”. This is typically the case if the session policy does not point directly to the receiver for web site on Storefront. After changing, the session policy to point to the direct URL this error message will go away.
In case of authentication failure attempt, a user will be given a generic error message of:
There are many ways to troubleshoot authentication failures, the simplest one is using the authentication dashboard in the NetScaler UI.
Which basically list the syslog events directly into the UI. Another way is using CLI. Log into the NetScaler appliance using an SSH client, type Shell and then type cat /tmp/aaad.debug
This will in real-time list out all AAA attempts happening against the NetScaler. Now by default the NetScaler does not list out detailed information whenever a user has an expired password or if their account is disabled. However, there is a feature which we can enabled which can give more detailed information back to the end user. This feature is called Enhanced Authentication Feedback
Which enabled under NetScaler Gateway à Global Settings à Change Authentication AAA settings.
NOTE: This setting is disabled by default, because it might reveal to much information to malicious hackers which try to do a brute force attack, to get information on which users are enabled and not.
It is also important that the aaad.debug command lists out different error codes when there is a failed authentication attempt.
For instance, if a user with a disabled account tries to authenticate.
Send reject with code Rejecting with error code 4011
Citrix has made a list which describes all these error codes and the meaning of them.
4001 Invalid credentials. Catch-all error from previous versions.
4002 Login not permitted. Catch-all error from previous versions.
4003 Server timeout
4004 System error
4005 Socket error talking to authentication server
4006 Bad (format) user passed to nsaaad
4007 Bad (format) password passed to nsaaad
4008 Password mismatch (when entering new password)
4009 User not found
4010 Restricted login hours
4011 Account disabled
4012 Password expired
4013 No dial-in permission (RADIUS specific)
4014 Error changing password
4015 Account locked
Now if a user tries to authenticate but is not bound to an authentication policy, for instance if we have multiple authentication policy for different groups, network segments and someone which fall outside of those policies try to authenticate they are presented with this error message.
The simplest way to fix this is to either define ns_true authentication policy which handles all other authentication attempts.
Now if an end-user tries to authenticate to start a Citrix Receiver session and is presented with this error message
This is typically the case if there is a session policy bound to the user which has a default authorization policy of DENY, this might be intended but if not, we should change it to ALLOW.