Во многих статьях в интернете, документации к инструментам для разработки на Java и в книгах зачастую упоминается JAVA_HOME. Что же такое JAVA_HOME?
JAVA_HOME это переменная окружения, указывающая на директорию с установленным JDK (Java Development Kit, комплект разработчика Java). JAVA_HOME это соглашение, используемое во многих программах из экосистемы Java.
Какие программы используют JAVA_HOME
- Intellij IDEA, Eclipse, NetBeans
- Apache Maven, Apache Ant, Gradle
- Apache Tomcat
- Jenkins
Некоторые игры, написанные на Java (например, Minecraft), тоже могут требовать установленной переменной JAVA_HOME.
Ошибки, связанные с JAVA_HOME
Если переменная окружения JAVA_HOME не определена, некоторые программы могут выдавать следующие ошибки:
- Переменная среды java_home не определена
- Cannot determine a valid Java Home
- JAVA_HOME is set to an invalid directory
- JAVA_HOME is not defined correctly
- JAVA_HOME environment variable is not set
- JAVA_HOME command not found
- JAVA_HOME not found in your environment
- JAVA_HOME does not point to the JDK
При появлении таких ошибок просто установите переменную JAVA_HOME
Как установить переменную окружения JAVA_HOME в Windows
Сперва вам нужно установить JDK или JRE.
- Установите JDK, если вы занимаетесь разработкой программ на Java
- Установите JRE, если вам нужно только запустить прикладную программу на Java
После установки JDK либо JRE запишите путь установки, он понадобится.
Теперь щёлкните правой кнопкой на «Мой компьютер» → «Свойства» → «Дополнительные параметры системы» → «Переменные среды…». В разделе «Системные переменные» нажмите кнопку «Создать…» и укажите следующие данные:
| Имя переменной | JAVA_HOME |
| Значение переменной | Путь к директории JDK / JRE, например: C:Javajdk-11.0.6 |
Сохраните изменения, кликнув «OK». Теперь выберите в списке переменную окружения Path и нажмите «Изменить…». В конце списка добавьте строчку со значением «%JAVA_HOME%bin«
Для проверки откройте консоль (Win+R, cmd) и укажите последовательно укажите две команды:
echo %JAVA_HOME%
java --version
Если вы правильно установили JDK/JRE и правильно установили переменные окружения, вы увидите вывод наподобие этого:
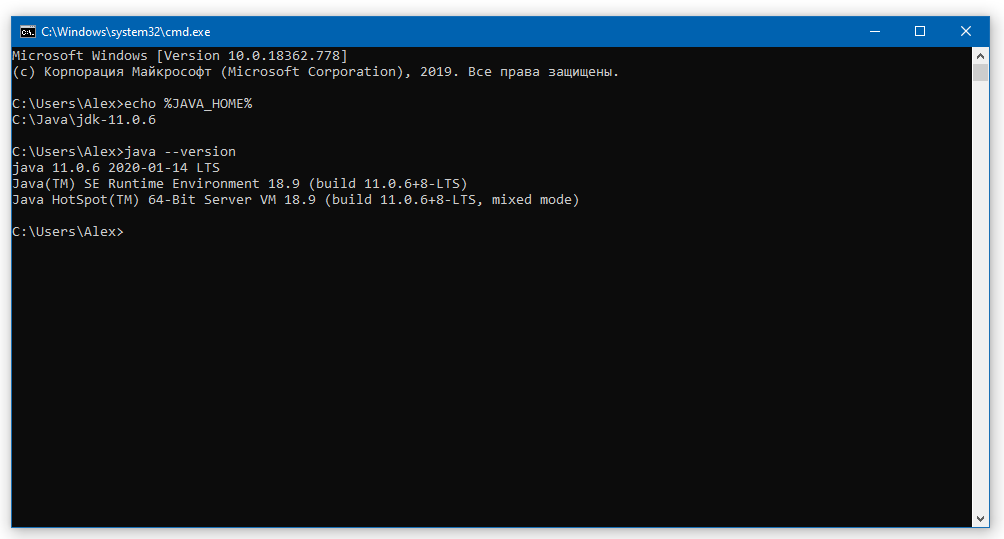
Это будет служить результатом того, что переменная JAVA_HOME установлена правильно и Java работает из командной строки.
Резюме
В данной статье мы рассказали вам, что являет собой переменная окружения JAVA_HOME, где она используется и как её корректно указать.
- HowTo
- Java Howtos
- Cannot Determine a Valid Java Home

This tutorial demonstrates the cannot determine a valid java home error in Java.
Cannot Determine a Valid Java Home
The error cannot determine a valid java home occurs when the Java Home path is not correctly set. We must follow the steps to correctly set our Java Home to solve this issue.
Even after that, the same error occurs. Follow the steps below to solve this issue.
First, define a new variable JAVA_HOME and assign it the path of the Java installation directory.
JAVA_HOME = C:Program FilesJavajdk-17.0.2
Now update the Path variable and add the bin directory.
Now add this to your Path variable; this can be done from environment variables.
Now you can check if it’s working or not; insert the following command in CMD or shell.
The output for this will be:
java version "17.0.2" 2022-01-18 LTS
Java(TM) SE Runtime Environment (build 17.0.2+8-LTS-86)
Java HotSpot(TM) 64-Bit Server VM (build 17.0.2+8-LTS-86, mixed mode, sharing)

Sheeraz is a Doctorate fellow in Computer Science at Northwestern Polytechnical University, Xian, China. He has 7 years of Software Development experience in AI, Web, Database, and Desktop technologies. He writes tutorials in Java, PHP, Python, GoLang, R, etc., to help beginners learn the field of Computer Science.
LinkedIn
Facebook
Related Article — Java Home
Related Article — Java Error

I think my path is not set correctly for some reason.
«Path» under System Variables looks following:
C:Program FilesCommon FilesOracleJavajavapath;C:ProgramDataOracleJavajavapath;C:Program FilesCommon FilesMicrosoft SharedWindows Live;C:Windowssystem32;C:Windows;C:WindowsSystem32Wbem;C:WindowsSystem32WindowsPowerShellv1.0;C:Program FilesWindows LiveShared;C:Program FilesQuickTimeQTSystem
Under User Variable Path or Java_home is not there?
Is there a way to start the path over again?
![]()
catch23
17k41 gold badges141 silver badges212 bronze badges
asked Jan 26, 2019 at 13:47
![]()
2
You have to do a few things:
- define a new variable
JAVA_HOMEand assign to it exactly JDK installation location, likeC:javajdk_1.8.0 - update your
Pathvariable with:
%JAVA_HOME%bin
- important point set it first to
Path.
Finally, yourPathwill look:
%JAVA_HOME%bin;C:Program FilesCommon FilesOracleJavajavapath;C:Program FilesCommon FilesMicrosoft SharedWindows
- open console and type:
java -version
The output should be something like:
java version "1.8.0_192"
Java(TM) SE Runtime Environment (build 1.8.0_192-b12)
Java HotSpot(TM) 64-Bit Server VM (build 25.192-b12, mixed mode)
BTW your Path has some duplication. Just remove an unneeded part.
answered Jan 26, 2019 at 13:56
![]()
catch23catch23
17k41 gold badges141 silver badges212 bronze badges
9 hours ago, Allurapre said:
Also of note is that once I hit the launcher for WO or WU it takes at least 2 full minutes to load the character select screen.
I don’t know the answer to the Java issue, «Cannot determine a valid Java Home»
It’s possible that you changed a system variable elsewhere without realizing it, but others here are better on java issues than me.
Do see these threads in case any help:
- «Cannot determine a valid Java Home» (Oracle)
- «Cannot determine a valid Java Home» (Wurm)
It may simply mean you needed to reboot after changing the JAVA location through updating, in order for windows to update the new JAVA HOME location
However, i just recently responded to your WU tech issue on delays for loading character screen, which may or may not be relevant here, so check back on that thread also (I know you were waiting for several days without any responses)
__________________________
If you could check the file size of keybindings.txt in both WO and WU, it would help rule this out as the cause of the lag in loading up the character screen (regardless of having reinstalled steam and/or wurm multiuple times). The locations for those files are:
- steamsteamappscommonWurm UnlimitedWurmLauncherPlayerFilesconfigs
- Wurmconfigs
(check both DEFAULT and EDITED subfolders, depending on your windows settings it may not say «.txt» at the end)
I have run into issues in other games tech forums where people reported windows was keeping backups of old settings despite a reinstall, and reapplying those settings, so we need to check even though you said you reinstalled both WO & WU. Its possible this could also explain the JAVA HOME isswue, I do not know.
if the filesize for keybindings.txt in either location is more than 2-7 kilobytes, report back with the filesize here.
Next time it asks to to redownload, try also installing Wurm Online to a folder such as C:GamesWurm or D:Wurm and NOT something like: Users, Desktop, Program Files, Downloads
REBOOT FIRST AS PER ORACLE THREAD to make sure Java variables were updated.
Edited August 6, 2018 by Brash_Endeavors
In this post, we will solve the «Java Runtime Environment not found error». This java error is one of the common errors faced by developers or end-users. Whenever you try to install any software which requires java like eclipse or Minecraft. Also, if you are new to java development, JDK or Java Development Kit is necessary for you.
Following this tutorial will help you to resolve all Java runtime errors. Additionally, you will learn to install, remove and set java variables in Windows10 and Ubuntu.
These are the very common errors you will find related to Java.
- java runtime environment not found
- java runtime environment not found windows 10
- eclipse java runtime environment not found
- eclipse java runtime environment not found path
- java SE runtime environment not found
- java runtime environment not found at bin javaw.exe
- unable to load java runtime environment
- cannot determine a valid java home
- java runtime environment not found mac
Let’s understand some basic concepts of Java runtime first. Check out this post, if you are getting a java command not found error.
Table of Contents
- 1 What is a runtime environment?
- 2 JRE vs JDK
- 3 Java download
- 4 How to install Java runtime environment step by step
- 5 Video tutorial-JRE error solved for Windows
- 6 How to uninstall java from Windows 10
- 7 How to install java runtime environment in Ubuntu 20.04
- 8 Video Tutorial — JRE error solved for Ubuntu
- 9 Frequently Asked Questions (FAQs)
- 10 Ending notes
What is a runtime environment?
Runtime basically means everything you require to run a program. Which includes environment variables, directory structure, common libraries etc. This can also be a virtual machine like
- JRE (Java Runtime Environment)
- CLR (Common Language Runtime) for .net framework
The target would be JRE or CLR for your program, need to decide by you. As soon as you execute any program, it’s in run time.
JRE vs JDK
| JRE | JDK |
|---|---|
| Stands for Java Runtime Environment | Stands for Java development kit |
| To run Java programs, you need JRE | Helps to build Java programs and applets |
| Platform dependent contains libraries and supporting tool | Platform dependent contains tools development and debugging |
| JRE does not contain a development kit. | JDK includes JRE also to execute the program |
What are the causes of the «Java Runtime environment not found» error
- Java is not installed in your system
- Java installation not completed (due to errors)
- Environment variables of Java are not set
- Java conflict due to more than one Java Runtime installation
Because JRE is platform-dependent, I have covered java installation, variable setup and un-installation for Windows and Ubuntu both.
Choose Windows 10 or Ubuntu 20.04 from the post and follow step by step to get java issues resolved.
Java download
Before installation, first, we need to download java —
Step1
Visit oracle.com and download JDK 15 or the latest available for your system. I am downloading it for Windows 10 (64-bit). The latest available versions of java are listed in the screenshot.

How to install Java runtime environment step by step
Let’s solve 1st reason for «Java runtime environment not found», Because java is not installed.
Step2
First, check for any pre-installed java version —
Open the command prompt with «Run as administrator» and run java command.
C:Usersadmin> java --version

How to install java runtime environment in Windows 10
Step3
Once Download completes. Browse to the «jdk-15.0.1_windows-x64_bin.exe» file and double-click on it, to run the installer. Click Next.

Step4
I recommend keeping «C:Program filesjavajdk-15.0.1 (64-bit)» as the default installation folder. Select Next.
You may select different installation folders also. For example, if you are installing a second instance of java software. Click on change and browse for the target folder.

Step5
Let installation complete, it may take a few minutes.

Step6
Click close. Now you are done with java installation on windows 10.

How to set the environment variable for java in windows10
Set the Environment variable for java in windows 10 by these steps —
Step7
Type «environment» in the search window. Click «open» on «Edit the system environment variables«

Step8
Click on Environment variables.

Step9
Select «Path» > Then click Edit.

Step10
Select New > Give path of java installation directory > For example, «C:Program filesjavajdk-15.0.1bin» in my case. If you have selected a different folder for java installation in step4. You can enter your path to the bin folder.
Click OK.

Step11
Set «classpath» for java. Click «New» in the environment variable window. It allows to set up the new environment variables.

Step12
In «Variable name», enter «classpath«. Also in «variable value» provide path to your java installation till «lib» folder. In my case it is «C:program filesjavajdk-15.0lib > Select OK

Close all open environment variables windows by selecting OK.
How to check what version of java I have?
Installation and java variables have been set up. Now, Let’s validate the java installation and version.
Step13
Open the command prompt with «run as administrator» rights in windows 10.

Step14
Run the «java» command to check your Java and JRE (Java Runtime Environment) version.
java --version

Check java SDK version with javac command

Video tutorial-JRE error solved for Windows
«Java Runtime Environment not found» error fixed for windows 10
How to uninstall java from Windows 10
In case, you are not happy with your old java or JRE version and want to install a new. For that, you need to remove the old Java version.
Cleanup of Java from Windows 10 is pretty easy. Follow these steps to remove java from your system.
Step15
Search add or remove programs and click open

Step16
Select the java program and click Uninstall.

Java software will go from the window. You can clean up java variables also, set up in step10 and 11 earlier.
There are two ways to download and install java or JDK in Ubuntu 20.04
A.) Using the apt command
B.) Download the Oracle JDK package and install it manually
Let’s see both options one by one-
A.) How to install java or JRE in Ubuntu 20.04 using the apt command
To install Java in Ubuntu using the repository, Follow these commands
Step17
Update package index using apt command
$ sudo apt update

Step18
Check if you have any old java versions installed in the system. In my case, java is not installed.
$ sudo java -version
output
Command ‘java’ not found, but can be installed with:
sudo apt install openjdk-11-jre-headless # version 11.0.9.1+1-0ubuntu1~20.04, or
sudo apt install default-jre # version 2:1.11-72
———————-output-truncated————————————
Step19
Run the «apt» command to install java or JRE. I will install default-jre version 2:1.11-72 in my Ubuntu system from the list.
$ sudo apt install default-jre

Select «Y» and press Enter. Let installation complete. it will take a few minutes.
Step20
Check the java version
$ sudo java -version
output

How to Remove java from Ubuntu 20.04
Step21
Run apt command to remove JRE package installed. Press Y and then enter.
$ sudo apt autoremove "JRE package name"

B.) How to install the latest java or JDK in Ubuntu 20.04 from oracle (manually)
Step22
Java JRE download steps —
Visit oracle.com and download JDK 15 or the latest available .deb and transfer to your system. I am downloading Debian package jdk-15.0.1_linux-x64_bin.deb.

Alternatively, you can download java using wget command.
$ sudo wget "download link"
Reference output

Step23
Rename the .deb file using mv command, if required. Then install the Debian package using the dpkg command.
Learn more ways to install .deb package.
$ sudo dpkg -i ".deb-file-path"
output

Default installation directory path of java would be «/usr/lib/jvm/jdk-15.0.1/«. So, make a note of it, as it will be required to set up a Java_HOME variable.
How to set the «JAVA_HOME» variable in Ubuntu 20.04
Set the JAVA_HOME variable for all users in Ubuntu by editing the environment file.
Step24
Edit /system/environment file
$ sudo vi /etc/environment
Add path «/usr/lib/jvm/jdk-15.0.1/bin» to the last of the environment file. Then, save and exit.

Run source command to execute changes made in the environment file.
$ sudo source /etc/environment
Step25
Check your java version
$ sudo java -version

Remove java runtime environment package using dpkg command
Step26
Run the dpkg command with the —purge option to completely clean java from Ubuntu 20.04
$ sudo dpkg --purge "package-name"
For example,
$ sudo dpkg --purge jdk-15.0.1

Video Tutorial — JRE error solved for Ubuntu
Video on «How to fix java runtime environment error in Ubuntu 20.04»
Frequently Asked Questions (FAQs)
Where is the java runtime environment on Windows 10?
The default installation folder for java runtime is «C:Program filesjavajdk-15.0.1bin» in the case of windows 10.
What does Java Runtime Environment do?
Java Runtime Environment (JRE) helps to run java programs like the eclipse.
What is the java runtime environment used for?
Java runtime environment helps to run java programs like Tomcat, eclipse and Jenkins.
What is the java runtime environment?
Java runtime environment JRE is a software that runs on the operating system. Which provides class libraries and resources to run java programs.
How to set the java runtime environment in windows 10?
Type «environment» in the search window. Click «open» on «Edit the system environment variables«
Click on Environment variables.
Select «Path» > Then click Edit.
Select New > Give path of java installation directory > For example, «C:Program filesjavajdk-15.0.1bin«
Click OK
Ending notes
I hope after reading this article, you will be able to solve the «Java Runtime Environment not found error». Because majorly reasons for java related errors are, either Java is not installed or the java variable is not set.
if you still have issues, please comment and let me know, I will try to help you.
I think my path is not set correctly for some reason.
«Path» under System Variables looks following:
C:Program FilesCommon FilesOracleJavajavapath;C:ProgramDataOracleJavajavapath;C:Program FilesCommon FilesMicrosoft SharedWindows Live;C:Windowssystem32;C:Windows;C:WindowsSystem32Wbem;C:WindowsSystem32WindowsPowerShellv1.0;C:Program FilesWindows LiveShared;C:Program FilesQuickTimeQTSystem
Under User Variable Path or Java_home is not there?
Is there a way to start the path over again?
Если ваша система частенько выдает сообщения об ошибках запуска Java Virtual Machine «виртуальной машины Java», вам не нужно беспокоиться, эти ошибки очень легко устранить.
Функции JVM (Java Virtual Machine)
Виртуальная машина java отвечает за выделение памяти и сбор мусора, наряду с интерпретацией байт-кода в машинный код.
Среда выполнения Java (JRE) является обязательным для установки на вашем компьютере для некоторых приложений, чтобы работать должным образом. Основным компонентом JRE является виртуальная машина Java (JVM), которая помогает запускать Java-приложения. Java-файл, при компиляции, производит ‘.класс’ файл, а не исполняемый файл. Этот класс файл содержит байт-код java, который в jvm интерпретируется в машиночитаемые инструкции. Jvm — независит от платформы, поскольку он обеспечивает машинный интерфейс, который не зависит от базовой операционной системы и аппаратной архитектуры.
Могут быть случаи, когда вы можете получить сообщения об ошибках при запуске jvm, в таких ситуациях, как загрузка в компьютер, игра в игры, такие как minecraft, или открытие определенных Java-приложений. В этой статье я собрал несколько решений, которые могут помочь вам исправить ошибки запуска виртуальной машины Java для Windows.

Сообщение об ошибке #1: не удалось создать виртуальную машину java.
Это сообщение об ошибке обычно возникает при попытке запуска Java-игр, таких как minecraft.
➦Откройте панель управления.
➦Зайти в систему.
➦Перейти к расширенным свойствам системы.
➦Нажмите кнопку ‘переменные среды’.
➦В системных переменных, нажмите кнопку ‘новый’.
➦Поставьте новое имя переменной: _JAVA_OPTIONS
➦Вбейте новое значение переменной: -Xmx512M
➦Нажмите кнопку ‘ОК’.
-Xmx/S-это параметр конфигурации, который управляет количеством памяти которое использует java.
- Xmx — это максимальный размер памяти, которая может быть выделена.
- Xms — это минимальный размер памяти, которая может быть выделена.
Сообщение об ошибке #2: ошибка при открытии раздела реестра.
Эта ошибка может возникнуть при работе с Java в командной строке.
➦Открываем папку WINDOWSsystem32.
➦Удаляем исполняемый файл java файлов, в том числе java.exe, javaw.exe и javaws.exe.
➦Далее переустанавливаем среду JRE.
 Сообщение об ошибке #3: Виртуальная машина java лаунчер не может найти основной класс: программа завершает работу
➦Нажмите кнопку «Пуск» в главном меню.
➦В окне поиска введите «mrt» и нажмите клавишу Enter. Будет запущена утилита Windows под названием ‘Средство удаления вредоносных программ Microsoft Windows ‘.
➦Нажмите кнопку «Далее» и выберите «полное сканирование».
➦Перезагрузите компьютер после завершения сканирования.
➦Нажмите кнопку «Пуск» и запустить программу настройки системы, набрав команду «msconfig» в поле поиска.
➦ Перейдите на вкладку «запуска» и снимите галочку рядом с ‘WJView.exe’ и ‘javaw.exe’.
➦Перезагрузитесь при запросе.
Сообщение об ошибке #4: не удалось открыть jarфайл.
Эта ошибка может возникнуть при попытке открыть приложение.
➦Нажмите кнопку ‘Пуск’ и перейдите к ‘программам по умолчанию’.
➦Выберите «сопоставление типа файла или протокола программе’.
➦Нажмите на расширения (.jar) для просмотра программы, которая открывает его по умолчанию.
➦Нажмите кнопку «изменить программу» и выбрите программу по умолчанию «виртуальная машина java лаунчер».
➦Нажмите кнопку «закрыть» и проверьте, устранена ли проблема.
➦Если нет, попробуйте удалить и переустановить Java.
➦Если проблема не устранена, обратитесь в техническую поддержку приложения, которое дает вам ошибку.
Если вы столкнулись с еще какими-либо ошибками Java Virtual Machine напишите о них в комментариях, постараюсь помочь.
I had to do an «emergency deploy» of JRE 8u144 32bit on our Windows 7 64bit installations. I used powershell with psexec to let every single PC install Java with the following switches: jre-8u144-windows-i586.exe INSTALL_SILENT=1 AUTO_UPDATE=0 REBOOT=0 SPONSORS=0 REMOVEOUTOFDATEJRES=1
Somehow quite some of the installations don’t work. JRE seems to be installed correctly, but when a JavaWs application is started I get the error «Cannot determine a valid Java Home». What does that mean and how can I fix it without reinstalling JRE everywhere (which probably would break working installations on other PCs, as JRE deletes a working 8u144 installation when rolled out again)?
Any help would really be appreciated as this issue is driving me nuts.
- 48596 Просмотров
- Метки: нет (добавить)
1. Re: «Cannot determine a val >

Did you reboot those windows machines after you installed the JRE? Most possibly, the JAVA_HOME environment variable was set, but until the system is rebooted, the previous value would be still set in memory and applications trying to run java will not find the new JRE at its new location since they will be looking in the old location.
- Мне нравится Показать отметки «Мне нравится» (0) (0)
- Действия
2. Re: «Cannot determine a val >

I tried that already, but to no avail. Even on working systems I can’t find a JAVE_HOME user or system variable , where should it be? The only variable I can find is a PATH variable that’s named ‘C:ProgramDataOracleJavajavapath’ — but this one can even be found on non-working systems.
I installed java and set the path environment and when I run echo $JAVA_HOME in the terminal I get the following output:
/usr/lib/jvm/java-7-oracle/jre/bin/java
I Also installed apache-maven and changed environment file and now it looks like this:
JAVA_HOME="/usr/lib/jvm/java-7-oracle/jre/bin/java"
M2_HOME=/usr/local/apache-maven/apache-maven-3.0.5
M2=$M2_HOME/bin
MAVEN_OPTS="-Xms256m -Xmx512m"
PATH=$M2:$PATH
But when I execute mvn --version I get a warning:
Error: JAVA_HOME is not defined correctly.
  We cannot execute /usr/lib/jvm/java-7-oracle/jre/bin/java/bin/java
Can not find out why it repeats in the end /bin/java/bin/java
![]()
Philip Mutua
5,62811 gold badges37 silver badges77 bronze badges
asked Dec 5, 2014 at 15:40
![]()
user3127896user3127896
6,11314 gold badges39 silver badges62 bronze badges
2
Assuming you use bash shell and installed Java with the Oracle installer, you could add the following to your .bash_profile
export JAVA_HOME=$(/usr/libexec/java_home)
export PATH=$JAVA_HOME/jre/bin:$PATH
This would pick the correct JAVA_HOME as defined by the Oracle installer and will set it first in your $PATH making sure it is found.
Also, you don’t need to change it later when updating Java.
EDIT
As per the comments:
Making it persistent after a reboot
Just add those lines in the shell configuration file. (Assuming it’s bash)
Ex: .bashrc, .bash_profile or .profile (for ubuntu)
Using a custom Java installation
Set JAVA_HOME to the root folder of the custom Java installation path without the $().
Ex: JAVA_HOME=/opt/java/openjdk
answered Feb 24, 2015 at 1:48
![]()
5
JAVA_HOME should be /usr/lib/jvm/java-7-oracle/jre/.
answered Dec 5, 2014 at 15:42
![]()
talextalex
17.7k3 gold badges28 silver badges62 bronze badges
1
We open a terminal and look for the location of java:
manuel@zonademanel:~ → whereis java
java: /usr/bin/java /etc/java /usr/bin/X11/java /usr/share/java
/usr/share/man/man1/java.1.gz
What we are looking for is /usr/bin/java continue on the command line to find the absolute path , as this is only a symbolic link.
manuel@zonademanel:~ → ls -lah /usr/bin/java
lrwxrwxrwx 1 root root 22 may 19 2015 /usr/bin/java ->
/etc/alternatives/java
manuel@zonademanel:~ → ls -lah /etc/alternatives/java
lrwxrwxrwx 1 root root 39 dic 7 11:52 /etc/alternatives/java ->
/usr/lib/jvm/java-8-oracle/jre/bin/java
I modified my /etc/environment file with the following values
PATH=»/usr/local/sbin:/usr/local/bin:/usr/sbin:/usr/bin:/sbin:/bin:/usr/games:/usr/local/games:/usr/lib/jvm/java-8-oracle/jre/bin»
JAVA_HOME=»/usr/lib/jvm/java-8-oracle/jre«
If I do not want to relogin I can reload the changes with:
source /etc/environment
And run mvn -version correctly
manuel@zonademanel:~ → mvn -version
Apache Maven 3.0.5
Maven home: /usr/share/maven
Java version: 1.8.0_77, vendor: Oracle Corporation
Java home: /usr/lib/jvm/java-8-oracle/jre
Default locale: es_MX, platform encoding: UTF-8
OS name: «linux», version: «3.16.0-70-generic», arch: «amd64», family: «unix»
![]()
borjab
10.8k6 gold badges69 silver badges95 bronze badges
answered Apr 14, 2016 at 16:15
![]()
0
$JAVA_HOME should be the directory where java was installed, not one of its parts:
export JAVA_HOME=/usr/lib/jvm/java-7-oracle
answered Dec 5, 2014 at 15:42
![]()
MureinikMureinik
290k52 gold badges300 silver badges337 bronze badges
You might get this error due to couple of reasons. To fix this quickly please follow below steps,
First find the java location. To get a list of your installed Java platforms, run the following command from the terminal:
$ sudo update-alternatives --config java
Now set JAVA_HOME and PATH,
$ export JAVA_HOME=<java_home>

$ export PATH=$JAVA_HOME/jre/bin:$PATH
Create the symlink
$ sudo ln -s <java_home>/jre <java_symlink_path>
When we take your case as a example :
$ sudo ln -s /usr/lib/jvm/java-7-oracle/jre /usr/lib/jvm/java-7-oracle/jre/bin/java
Above command will create the symlink location where the system is trying to find in your issue.
Finally do the
$ mvn --version
answered May 27, 2016 at 9:28
![]()
tk_tk_
15.8k8 gold badges80 silver badges89 bronze badges
1
You should set as it is export JAVA_HOME=/usr/java/jdk1.8.0_31 and run with sudo it will execute as shown below.
Example
sudo mvn -v
OUTPUT
Apache Maven 3.6.0
Maven home: /usr/share/maven
Java version: 11.0.10, vendor: Ubuntu, runtime: /usr/lib/jvm/java-11-openjdk-amd64
Default locale: en_US, platform encoding: UTF-8
OS name: "linux", version: "5.4.0-70-generic", arch: "amd64", family: "unix"
![]()
Philip Mutua
5,62811 gold badges37 silver badges77 bronze badges
answered Mar 17, 2015 at 13:07
![]()
2
Firstly, in a development mode, you should use JDK instead of the JRE.
Secondly, the JAVA_HOME is where you install Java and where all the others frameworks will search for what they need (JRE,javac,…)
So if you set
JAVA_HOME=/usr/lib/jvm/java-7-oracle/jre/bin/java
when you run a «mvn» command, Maven will try to access to the java by adding /bin/java, thinking that the JAVA_HOME is in the root directory of Java installation.
But setting
JAVA_HOME=/usr/lib/jvm/java-7-oracle/
Maven will access add bin/java then it will work just fine.
answered Sep 18, 2015 at 19:37
![]()
Jad B.Jad B.
1,39614 silver badges14 bronze badges
This solution work for me…
just type
export PATH=$JAVA_HOME/jre/bin:$PATH in the terminal
then run mvn -version
it will show the same error but with a log like this
which: no javac in (/jre/bin:/sbin:/bin:/usr/sbin:/usr/bin:/opt/puppetlabs/bin)
Warning: JAVA_HOME environment variable is not set.
Apache Maven 3.2.5 (12a6b3acb947671f09b81f49094c53f426d8cea1; 2014-12-14T22:59:23+05:30)
Maven home: /opt/apache-maven-3.2.5
Java version: 1.8.0_171, vendor: Oracle Corporation
Java home: /usr/lib/jvm/java-1.8.0-openjdk-1.8.0.171-8.b10.el7_5.x86_64/jre
Default locale: en_US, platform encoding: UTF-8
OS name: "linux", version: "3.10.0-693.el7.x86_64", arch: "amd64", family: "unix"
now copy the Java home path i.e. /usr/lib/jvm/java-1.8.0-openjdk-1.8.0.171-8.b10.el7_5.x86_64/jre in my case.
now type,
export JAVA_HOME=/usr/lib/jvm/java-1.8.0-openjdk-1.8.0.171-8.b10.el7_5.x86_64/jre
and the error gets resolve.
NOTE: paste your own path which is shown by your machine in mvn log at export JAVA_HOME.
answered Jul 8, 2018 at 5:34
![]()
You must take the whole directory where java is installed, in my case:
export JAVA_HOME=/usr/java/jdk1.8.0_31
![]()
Rizier123
58.3k16 gold badges96 silver badges153 bronze badges
answered Feb 24, 2015 at 0:18
![]()
ascoderascoder
5753 silver badges14 bronze badges
It happens because of the reason mentioned below :
If you see the mvn script: The code fails here —
Steps for debugging and fixing:
Step 1: Open the mvn script /Users/Username/apache-maven-3.0.5/bin/mvn
(Open with the less command like: less /Users/Username/apache-maven-3.0.5/bin/mvn)
Step 2: Find out the below code in the script:
  if [ -z "$JAVACMD" ] ; then
  if [ -n "$JAVA_HOME"  ] ; then
    if [ -x "$JAVA_HOME/jre/sh/java" ] ; then
      # IBM's JDK on AIX uses strange locations for the executables
      JAVACMD="$JAVA_HOME/jre/sh/java"
    else
      JAVACMD="$JAVA_HOME/bin/java"
    fi
  else
    JAVACMD="`which java`"
  fi
fi

if [ ! -x "$JAVACMD" ] ; then
  echo "Error: JAVA_HOME is not defined correctly."
  echo "  We cannot execute $JAVACMD"
  exit 1
fi
Step3: It is happening because JAVACMD variable was not set. So it displays the error.
Note: To Fix it
export JAVACMD=/Library/Java/JavaVirtualMachines/jdk1.8.0_131.jdk/Contents/Home/jre/bin/java

export JAVA_HOME=/Library/Java/JavaVirtualMachines/jdk1.8.0_131.jdk/Contents/Home/
Key: If you want it to be permanent
open emacs .profile
post the commands
and press Ctrl-x Ctrl-c ( save-buffers-kill-terminal ).
answered Jun 15, 2017 at 9:48
![]()
Shubham VermaShubham Verma
9671 gold badge10 silver badges13 bronze badges
If you are using mac-OS , export JAVA_HOME=/usr/libexec/java_home need to be changed to export JAVA_HOME=$(/usr/libexec/java_home) .
Steps to do this :
 $ vim .bash_profile

 export JAVA_HOME=$(/usr/libexec/java_home)

 $ source .bash_profile
where /usr/libexec/java_home is the path of your jvm
answered Jul 26, 2017 at 4:36
![]()
ishanbakshiishanbakshi
1,8852 gold badges19 silver badges37 bronze badges
Use these two commands (for Java 8):
sudo update-java-alternatives --set java-8-oracle
java -XshowSettings 2>&1 | grep -e 'java.home' | awk '{print "JAVA_HOME="$3}' | sed "s//jre//g" >> /etc/environment
answered Mar 25, 2018 at 18:11
![]()
XdgXdg
1,6752 gold badges25 silver badges42 bronze badges
In my case, the problem was in vscode.
I use windows and installed Ubuntu on my computer, so vscode terminal uses the Ubuntu. I just go to settings.json and change to cmd.exe again
answered Aug 29, 2019 at 19:42
![]()
I had this same issue but with open jdk and none of the answers here helped. The trouble was that the mvn script was appending /bin/java at the end of JAVA home while trying to run java commands.
The solution for me was to manually edit the /usr/local/apache-maven/apache-maven-3.3.9/bin/mvn script (your own script might be installed differently; just run which mvn) and change
   if [ -z "$JAVACMD" ] ; then
  if [ -n "$JAVA_HOME"  ] ; then
    if [ -x "$JAVA_HOME/jre/sh/java" ] ; then
      # IBM's JDK on AIX uses strange locations for the executables
      JAVACMD="$JAVA_HOME/jre/sh/java"
    else
      JAVACMD="$JAVA_HOME/bin/java"
    fi
  else
    JAVACMD="`which java`"
  fi
 fi
To
if [ -n "$JAVA_HOME"  ] ; then
    if [ -x "$JAVA_HOME/jre/sh/java" ] ; then
      # IBM's JDK on AIX uses strange locations for the executables
      JAVACMD="$JAVA_HOME/jre/sh/java"
    else
      JAVACMD="$JAVA_HOME"
    fi
  else
    JAVACMD="`which java`"
  fi
fi
answered Oct 22, 2020 at 20:07
![]()
larisoftlarisoft
1912 silver badges5 bronze badges
add in .bash_profile
export JAVA_HOME=/usr/lib/jvm/java-8-openjdk-amd64
export PATH=$JAVA_HOME/jre/bin:$PATH
and then
source .bash_profile
answered Feb 18, 2022 at 11:58
![]()
Flavio TroiaFlavio Troia
2,3161 gold badge25 silver badges26 bronze badges
I had similar issue and it was not getting resolved even after editing and sourcing the .bash_profile, .bashrc file. I got it resolved by editing the maven.sh file directly.
export JAVA_HOME=/usr/lib/jvm/java-11-openjdk-11.0.16.0.8-1.amzn2.0.1.x86_64
export M2_HOME=/opt/maven
export M2=/opt/maven/bin
export PATH=$PATH:$HOME/bin:$JAVA_HOME:$M2HOME:$M2
and then sourcing the file
source /etc/profile.d/maven.sh
For those who didnt get they issue resolved with other answers, give this a try as well.
answered Jan 3 at 10:35
![]()
eccentricCodereccentricCoder
8561 gold badge12 silver badges35 bronze badges