Содержание
- VB-Audio’s Forums
- Unable to set Input to WDM or MME
- Unable to set Input to WDM or MME
- Cannot open input device 1 undefined external error
- Re: Midi — undefined external error
- Re: Midi — undefined external error
- Re: Midi — undefined external error
- Re: Midi — undefined external error
- Stereo Tool
- Windows 10 1803 — Virtual Audio Cable input error
- Cannot open input device 1 undefined external error
- MicroSIP troubleshooting
- Registration
- Calls
- Video Calls
- Other help pages
- Report bugs
VB-Audio’s Forums
VB-Audio’s Information and Discussions
Unable to set Input to WDM or MME
Unable to set Input to WDM or MME
Post by revose » Thu Oct 17, 2019 5:31 pm
Hey guys,
i have used Voicemeeter (Banana) and VirtualCable A and B for quite some time now and it always worked very well!
Now tuesday i had to setup my Win10 new.
I installed Voicemeeter and Cable A and B and it worked as expected with A and B being WDM input for Teamspeak sound and Media (Spotify and Browser) sound.
I also have my NT1 with a Focusrite Scarlett 2i2 3rd as Mic input and as main Output (all WDM).
This setup worked before the new installation of Windows and for one day after the new installation.
Yesterday i booted my PC and noticed no Sound on Cable A (Spotify). I switched from WDM to KS and i had sound. I switch back to WDM and sound was gone again and in settings it says for Input 1: «Failed to Open Input Device: pAudioClient: Initialize return error -2147024891 (0x80070005)». I also have this error for Cable B and Mic input. So all WDM inputs.
For MME Inputs i get the error «Failed to Open Input Device: Function waveInOpen failed. Undefined external error.»
My output works fine with WDM although just with Buffering set to 1024 (there are distorsion sounds below 1024. :S). Never had this before.
I tried resetting settings and uninstall, reboot, install, reboot of VM and Cables. Nothing fixed my problem. I also checked the audio devices for naming and settings.
Also no new software was installed and no settings were changed from the day it worked to the day it didnt.
I have found similar problems in the forum* but there was never a solution to it.
Help would be greatly appriciated
I would have added a screenshot of the settings but apparently 1mb is to large..
Источник
Cannot open input device 1 undefined external error

Re: Midi — undefined external error
Post by zuill » Tue Jan 03, 2017 10:32 pm
How is the keyboard hooked up? USB only, or MIDI to USB? If the second, and you don’t need the keyboard to play the sounds, try only hooking the cable’s Out to the keyboard’s in, and not the other plug.
P.S.: Looks like you already said USB keyboard. Then either get the latest updates for the drivers, or try using direct sound instead.
Re: Midi — undefined external error
Post by Pontus » Tue Jan 03, 2017 11:21 pm
Thanks zuill. The thing is that my computer is brand new and everything worked perfectly until I turned the MIDI
Keyboard off. Somerthing bad suddenly happenend in my system. I Will look For some update to my keyboard but I doubt that is the problem.
Re: Midi — undefined external error
Post by Pontus » Tue Jan 03, 2017 11:26 pm
Re: Midi — undefined external error
Post by jwward » Thu Jun 15, 2017 7:29 pm
Probably unrelated, but who knows? Is the laptop plugged in?
I’d been getting an «undefined external error» and all kinds of weird behavior attempting SpeedyEntry on my laptop, using an E-Mu USB-to-MIDI cord. (Incorrect notes, lagging notes, error messages.) Strange because a few days earlier it had worked fine. Today, after much frustration, I went upstairs and grabbed the power cord for the laptop. Suddenly the MIDI input worked perfectly.
My only guess is that the cord was underpowered without the laptop plugged in. Or maybe the gods were playing tricks on me. Anyway, it’s one more thing to try.
Источник
Feedback, questions, settings and more.
All times are UTC+01:00
Windows 10 1803 — Virtual Audio Cable input error
| Post new topic Reply to topic | Page 1 of 1 | [ 8 posts ] |
| Print view | Previous topic | Next topic |
| Author | Message | ||||||||||||||||||||||||||||||||||||
|---|---|---|---|---|---|---|---|---|---|---|---|---|---|---|---|---|---|---|---|---|---|---|---|---|---|---|---|---|---|---|---|---|---|---|---|---|---|
| bob0r | |||||||||||||||||||||||||||||||||||||
| Joined: Tue Sep 03, 2013 1:52 am Posts: 17 |
|

| Author | Message |
|---|---|
|
Post subject: Windows 10 1803 — Virtual Audio Cable input error PostPosted: Tue May 01, 2018 9:10 pm |
|
|
|
Just updated to Windows 10 1803 and now Virtual Audio Cable 1 input gives this error: I tried reinstalling Virtual Audio Cable, but that’s not working. |
| Top |
Profile Reply with quote |
|
bob0r |
Post subject: Re: Windows 10 1803 — Virtual Audio Cable input error PostPosted: Tue May 01, 2018 10:02 pm |
|
|
Looks like Windows broke it. Only outputs seems to work. Winamp to Line 1 and ST to Line 2. RIP audio processor. Hope restoring old Windows version will work. Edit: Edit 2: |
| Top | |
|
arche |
Post subject: Re: Windows 10 1803 — Virtual Audio Cable input error PostPosted: Wed May 02, 2018 4:05 pm |
|
|
This problem happened here too but I found the solution: go to the «microphone privacy settings» -> hit «Allow access to the microphone on this device» and switch «Allow apps to access your microphone» to ON position. Hope it will work on your systems. |
| Top | |
|
bob0r |
Post subject: Re: Windows 10 1803 — Virtual Audio Cable input error PostPosted: Thu May 03, 2018 3:08 am |
|
|
Quote: This problem happened here too but I found the solution: go to the «microphone privacy settings» -> hit «Allow access to the microphone on this device» and switch «Allow apps to access your microphone» to ON position. Hope it will work on your systems. WOW Thanks! It’s working now. |
| Top | |
|
Discepto |
Post subject: Re: Windows 10 1803 — Virtual Audio Cable input error PostPosted: Thu Jul 12, 2018 12:05 pm |
|
|
Quote: This problem happened here too but I found the solution: go to the «microphone privacy settings» -> hit «Allow access to the microphone on this device» and switch «Allow apps to access your microphone» to ON position. Hope it will work on your systems. I made an account just so that I could post confirm that this worked for me as well. Thank you so much! |
| Top | |
|
squage |
Post subject: Re: Windows 10 1803 — Virtual Audio Cable input error PostPosted: Mon Aug 20, 2018 12:31 am |
|
|
I also just registered to say THANK YOU for explaining this one! Went to Settings and followed those instructions and — hey presto — fixed! It seems that, since Windows 1803, they’d modified the Microphone Permission so it no longer just applies to the Windows 10 Modern Apps, but Win32/x64 programs also. Without, it appears, telling anyone. Sigh. Thanks again |
| Top | |
|
NIGHTF44L |
Post subject: Re: Windows 10 1803 — Virtual Audio Cable input error PostPosted: Tue Oct 05, 2021 3:51 pm |
|
|
Quote: This problem happened here too but I found the solution: go to the «microphone privacy settings» -> hit «Allow access to the microphone on this device» and switch «Allow apps to access your microphone» to ON position. I’ve been looking for a solution since many hours with this under Windows server 2019, I was desperate |
| Top | |
Подключить две гарнитуры к компьютеру для ночного просмотра фильма вдвоем: миссия выполнима!
Время позднее, и «приглушить звук» рекомендовано не только административным кодексом, но и внутренними моральными ограничениями, происходящими из советского культурного прошлого, и спящим в соседней комнате чудесным ребенком.
А это значит, что смотреть видео придется в наушниках. Одному — не проблема, а как быть, если зрителей двое (а то и трое)?
Просто необходимо подключить две гарнитуры
В наше время, когда от проводов избавились даже зарядные устройства, сидеть в двух парах проводных наушников, подключенных к гнезду аудиокарты через «механический» разветвитель, как-то совсем неправильно.

Тем более, что за годы прослушивания любимой музыки в хозяйстве накопилось аж 3 (три!) пары беспроводных наушников — гарнитур:

- Sony MW600 — отличный дизайн ИМХО и отличный звук и, что не менее важно – время работы от одной зарядки, хоть и устаревшая модель, но все равно мне нравится.
- Sony SBH 52 – крупновата, конечно, но с отдельным динамиком для разговоров без, собственно, наушников (удобно крепится на воротник рубашки). Встроенный динамик, кстати, удивительно хорош для своих размеров и вполне сносно воспроизводит музыку.
- LG BTS-1 – аудиофильская, для ценителей lossless музыки (о ней я уже писал здесь).
Несколько дней я вбивал в поиск «две гарнитуры windows, как подключить две гарнитуры к компьютеру, как подключить две bluetooth гарнитуры, …». Все впустую.
Ссылки вели на Википедию с протоколами Bluetooth, да на советы от Микрософт как эти самые гарнитуры подключать. Умные люди на форумах тоже были не в курсе , как заставить работать на прием две BT-гарнитуры одновременно и сыпали теориями и догадками.
От безысходности всерьез планировались эксперименты с дополнительным блютуз-USB донглом: одна гарнитура работает со встроенным BT, вторая — с донглом… Но как распараллелить аудиопоток от VLC player на два физических устройства?
Кто ищет — тот найдет. Решить проблему совместного беспроводного просмотра видео помогла замечательная программа Virtual Audio Cable (разработчику огромный такой респект за его труды).
Настройка virtual audio cable на ноутбуке
1. Сопрягаем обе гарнитуры с ноутбуком.

По-умолчанию на ноутбуке с Windows 7-8 при просмотре видео звук появляется только «в одном месте» из четырех:
- на встроенных в ноутбук динамиках, или
- в гнезде для наушников звуковой карты, при подключении наушников, или
- на первой BT-гарнитуре, либо
- на второй BT-гарнитуре.
2. Качаем отсюда и устанавливаем программу Virtual Audio Cable.

3. Включаем какой-нибудь фильмец…

Звук пошел во встроенные динамики (или активную в данный момент bluetooth гарнитуру).
4. Запускаем приложение «vcctlpan» и инициализируем наш виртуальный звуковой «тройник» нажатием Set в двух местах.

5. В настройках компьютера «Панель управления -> Оборудование и звук -> Звук» меняем устройство, воспроизводящее звуки в системе по умолчанию, на «Line1 Virtual Audio Cable».
Все, компьютер теряет «голос», т.к. звуки с соответствующей микросхемы направляются на виртуальный «аудио-тройник».

6. Теперь задача «воткнуть» в «аудио-тройник» виртуальные «провода» от уже существующих в системе устройств для воспроизведения звука (звуковые карты, блютус-гарнитуры и HDMA интерфейсы и т.п.)
Запускаем приложение «audiorepeater»

и создаем «провод» выбором на его «концах»:
Жмем «Start».

Все работает, о чем свидетельствует прыгающая светодиодная линейка, показывая количество «звука», подготовленного для передачи в соответствующую гарнитуру из буфера!
7. Аналогично добавляем еще один «провод» к устройству повторным (!) запуском приложения «audiorepeater», кликая по его ярлыку и выбирая вторую гарнитуру в выпадающем списке Wave out.

8. Все, it’s showtime!

Раз пошла такая пьянка, то почему бы не задействовать все имеющиеся устройства, способные воспроизводить звук, и посмотреть, что из этого получится?! Выглядит это вот так:

По едва уловимой задержке и эху от разных гарнитур понятно, что виртуальный драйвер работает в режиме временного разделения: несколько десятков миллисекунд звука одной гарнитуре, затем та же порция из буфера — другой. Ну да ладно, лишнее можно отключить – любопытство удовлетворено.
В общем, Virtual Audio Cable работает почти безупречно: претензия лишь к легкой рассинхронизации между видео и звуком, вызванной использованием буфера.
Это можно заметить, например, по этому клевому клипу.
Если устройство по умолчанию для воспроизведения звука в системе не виртуальный аудио кабель, а родные динамики, то губы Джона Ньюмена двигаются точно в такт словам.
UPD: Наш читатель Антон в комментариях настоятельно рекомендует поэкспериментировать с настройкой «Total buffer» — подобрав значение, можно снизить рассинхронизацию между видео и звуком до очень комфортных значений.
PS: Кстати, новая версия программы для снятия скриншотов Snagit 12.3.2. выше всяких похвал. Еще раз рекомендую.
PPS: Если моя статья вам пригодилась, поддержите автора кликами по сами знаете чему 😉
Жмите кнопки, чтобы поблагодарить автора, улучшить карму и украсить ленту соц.сети.
Другие статьи похожей тематики

Настройка Virtual Audio Cable
Всем привет. В этой статье я расскажу как на компьютере вывести звук одновременно на 2 и более устройств, например на наушники и колонки.
Внимание! В статье приведено лишь краткое описание того, как создать распределение звука. Настройки/конфигурации будут разобраны в скором времени в отдельной статье. #upd от 09.06.15
Внимание! Новая статья уже в процессе написания. #upd от 09.07.15
Внимание! Ссылка на новую статью в конце этой. #upd от 09.07.15
Настоящая статья написана исключительно на основании личного опыта автора и соавторов. Все приведенные советы Вы выполняете на свой страх и риск. За последствия Ваших действий автор и Администрация сайта ответственности не несут.
Что нам понадобится:
- Программа Virtual Audio Cable
- Устройства, на которые нужно выводить звук
Программу можно скачать здесь — http://vk.cc/19R0Bs (Здесь и можно почитать более подробное описание и назначение данной программы)
Устанавливаем. После этого программа должна была создать один Виртуальный аудио-кабель —

Если он не создался или Вам нужно больше 1 такого кабеля, то идем в меню Пуск и запускаем Control Panel(Запускать нужно от имени Администратора) —

Здесь —

Данная программа имеет большое кол-во настроек, поэтому при желании Вы можете настроить все на свой вкус.
После создания нужного кол-ва кабелей мы переходим непосредственно к «выводу» звука.Это можно делать вручную и автоматически(при запуске системы,но об этом немного позже).
Заходим в меню и уже запускаем Audio Repeater (MME). Теперь необходимо выбрать устройство ввода и вывода, а также установить параметры(рекомендую поставить такие же как на скриншоте ниже). В зависимости от того, какой источник нужно вывести, мы ставим его в Wave In, у меня в Windows основным устройством воспроизведения стоит Line 1, поэтому я его и ставлю в Wave In. В Wave Out мы ставим устройство вывода звука, в моем случае это наушники, но это только одно устройство. Для вывода на снова запускаем Audio Repeater (MME) ,не закрывая первую копию, ставим все тоже самое кроме Wave Out где мы указываем другое устройство вывода.
Получилось вот так
Автоматизация процесса
Я рассмотрю пример для моего случая: 1 кабель и 2 устройства.
Создаем .bat файл с таким содержанием:
@chcp 1251
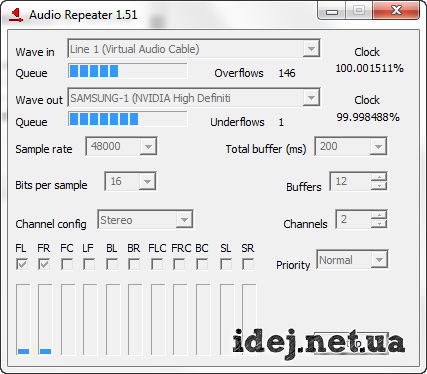
start /min "audiorepeater" "%programfiles%Virtual Audio Cableaudiorepeater.exe" /Input: "Line 1 (Virtual Audio Cable)" /Output: "SAMSUNG-1 (NVIDIA High Definiti" /SamplingRate:48000 /BufferMs:200 /Autostart
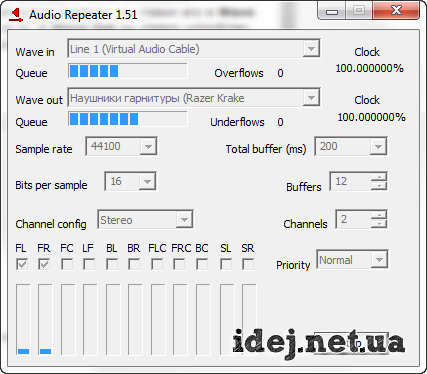
start /min "audiorepeater" "%programfiles%Virtual Audio Cableaudiorepeater.exe" /Input: "Line 1 (Virtual Audio Cable)" /Output: "Наушники гарнитуры (Razer Krake" /SamplingRate:48000 /BufferMs:200 /Autostart
Пример строчки:
start /min "audiorepeater" "место, куда Вы установили программу" /Input: "Тут мы вписываем ввод звука(микрофон или виртуальный кабель)" /Output: "Устройство вывода звука" /SamplingRate:48000 /BufferMs:200 /Autostart
Доступные команды
-
- /Input:
- /Output:
- /SamplingRate:
- /BitsPerSample:
- /Channels:
- /ChanCfg:
- /BufferMs:
- /Buffers:
- /Priority:
- /WindowName:
- /AutoStart
- /CloseInstance:
В /Input и /Output названия должны быть точно такие же, которые высвечиваются в Audio Repeater (MME) ,даже если они там написаны неполностью!
Сохраняем. Теперь копируем bat файл в папку Автозагрузка — C:Usersимя пользователяAppDataRoamingMicrosoftWindowsStart MenuProgramsStartup. Теперь при каждом запуске Windows будут загружаться репитеры. Для их остановки нужно создать bat файл с таким содержанием:
taskkill /im "audiorepeater.exe"
Кол-во строк будет зависеть от кол-ва запущенных репитеров.
Примеры использования VAC:
Вариант А (Взят из форума по играм)
Суть в том, что я(стример и игрок) должен слышать звуки из игры и голоса тиммейтов в тимспике+ они должны слышать меня в тимспике. Так же есть комментаторы, которые будут комментировать стрим. Они(комментаторы) не слышат меня, но все что они говорят слышно на стрим. Я(стример и игрок) не должен слышать их, так же как они меня.
Получается что на стриме видно всю мою игру, а слышно комментаторов + звуки из игры.

Если Вам помогла данная статья или у Вас возникли трудности, то напишите об этом в комментариях.
Hey guys,
i have used Voicemeeter (Banana) and VirtualCable A and B for quite some time now and it always worked very well!
Now tuesday i had to setup my Win10 new.
I installed Voicemeeter and Cable A and B and it worked as expected with A and B being WDM input for Teamspeak sound and Media (Spotify and Browser) sound.
I also have my NT1 with a Focusrite Scarlett 2i2 3rd as Mic input and as main Output (all WDM).
This setup worked before the new installation of Windows and for one day after the new installation.
Yesterday i booted my PC and noticed no Sound on Cable A (Spotify). I switched from WDM to KS and i had sound. I switch back to WDM and sound was gone again and in settings it says for Input 1: «Failed to Open Input Device: pAudioClient: Initialize return error -2147024891 (0x80070005)». I also have this error for Cable B and Mic input. So all WDM inputs.
For MME Inputs i get the error «Failed to Open Input Device: Function waveInOpen failed. Undefined external error.»
My output works fine with WDM although just with Buffering set to 1024 (there are distorsion sounds below 1024… :S). Never had this before.
I tried resetting settings and uninstall, reboot, install, reboot of VM and Cables. Nothing fixed my problem. I also checked the audio devices for naming and settings.
Also no new software was installed and no settings were changed from the day it worked to the day it didnt.
I have found similar problems in the forum* but there was never a solution to it.
Help would be greatly appriciated
I would have added a screenshot of the settings but apparently 1mb is to large..
Best regards
revose
Hi all;
I’m attempting to install a PCIe e-mu 1010 card (for the 1616m dock) under VMWare Player 3 on a Windows 7 64bit host. The Virtual environment is Windows XP Home Edition.
I’m receiving the Sound Device Cannot be Opened, Undefined External Error, Failed to connect virtual device sound, when I start VMware Player. The card is found under the Device Manager (PCI Slot 34), and is given the default Creative AudioPCI (ES1371,ES1373) (WDM) driver. When I try to upgrade to the 1010 / 1616m driver, Setup is unable to detect the device.
In the Virtual Machine Settings, the Sound Card, set to Auto Detect, initially tries to use the default host sound card. When I specify a host sound card (one option for selection) Speakers (2- E-mu E-dsp Audio P, there is no change.
I can remove the sound card and revert to the machine speaker. This doesn’t really prove anything, although it’s been a long time since I’ve heard that beep.
Unfortunately, the native sound card on the Win 7 machine is part of the motherboard and can’t be removed. I can deactivate it on Win 7. It doesn’t appear to be recognized at all by VMWare. My goal is to use the 1010/1616m card/dock.
Thanks in advance for any suggestions. Finally, my vmx file reads as follows:
.encoding = «windows-1252»
config.version = «8»
virtualHW.version = «7»
scsi0.present = «TRUE»
memsize = «512»
scsi0:0.present = «TRUE»
scsi0:0.fileName = «Windows XP Home Edition.vmdk»
ide1:0.present = «TRUE»
ide1:0.fileName = «auto detect»
ide1:0.deviceType = «cdrom-raw»
floppy0.fileType = «device»
floppy0.fileName = «»
floppy0.clientDevice = «FALSE»
ethernet0.present = «TRUE»
ethernet0.connectionType = «nat»
ethernet0.wakeOnPcktRcv = «FALSE»
ethernet0.addressType = «generated»
usb.present = «TRUE»
ehci.present = «TRUE»
mks.enable3d = «TRUE»
serial0.present = «TRUE»
serial0.fileType = «thinprint»
pciBridge0.present = «TRUE»
pciBridge4.present = «TRUE»
pciBridge4.virtualDev = «pcieRootPort»
pciBridge4.functions = «8»
pciBridge5.present = «TRUE»
pciBridge5.virtualDev = «pcieRootPort»
pciBridge5.functions = «8»
pciBridge6.present = «TRUE»
pciBridge6.virtualDev = «pcieRootPort»
pciBridge6.functions = «8»
pciBridge7.present = «TRUE»
pciBridge7.virtualDev = «pcieRootPort»
pciBridge7.functions = «8»
vmci0.present = «TRUE»
buslogic.noDriver = «FALSE»
roamingVM.exitBehavior = «go»
displayName = «Windows XP Home Edition»
guestOS = «winxphome»
nvram = «Windows XP Home Edition.nvram»
virtualHW.productCompatibility = «hosted»
printers.enabled = «TRUE»
gui.exitOnCLIHLT = «FALSE»
extendedConfigFile = «Windows XP Home Edition.vmxf»
ethernet0.generatedAddress = «00:0c:29:4e:d5:66»
tools.syncTime = «FALSE»
uuid.location = «56 4d 1e 82 9a 96 c7 4e-04 13 c5 89 a7 4e d5 66»
uuid.bios = «56 4d 1e 82 9a 96 c7 4e-04 13 c5 89 a7 4e d5 66»
cleanShutdown = «TRUE»
replay.supported = «FALSE»
unity.wasCapable = «FALSE»
replay.filename = «»
scsi0:0.redo = «»
pciBridge0.pciSlotNumber = «17»
pciBridge4.pciSlotNumber = «21»
pciBridge5.pciSlotNumber = «22»
pciBridge6.pciSlotNumber = «23»
pciBridge7.pciSlotNumber = «24»
scsi0.pciSlotNumber = «16»
usb.pciSlotNumber = «32»
ethernet0.pciSlotNumber = «33»
ehci.pciSlotNumber = «35»
vmci0.pciSlotNumber = «36»
vmotion.checkpointFBSize = «134217728»
usb:0.present = «TRUE»
usb:1.present = «TRUE»
ethernet0.generatedAddressOffset = «0»
vmci0.id = «-1488005786»
usb:1.deviceType = «hub»
usb:0.deviceType = «mouse»
floppy0.autodetect = «TRUE»
ide1:0.autodetect = «TRUE»
floppy0.startConnected = «FALSE»
checkpoint.vmState = «»
debugStub.winOffsets.version = «7»
debugStub.winOffsets.value = «0x88,0x84,0x18,0x190,0x174,16,416,0x22c,0x228,0x1f0,0x224,0x20,0x18,0x18,0x20,0x24,4,0x11c,0x8,0x0,0x14,0x100000,0x1b0,0xc,0xc,0x18,0x13c,0x1f4»
sound.present = «TRUE»
ide1:0.startConnected = «TRUE»
sound.pciSlotNumber = «34»
sound.fileName = «-1»
sound.autodetect = «TRUE»