I have a windows 8.1 Pro laptop with a 500GB HD and a 500GB portable USB HD.
I boot up my laptop with a linux live CD so that I can use dd or cat.
Testing cat:
cat /dev/sda > /dev/sdc
cat: write error: No space left on device
Testing dd:
dd if=/dev/sda of=/dev/sdc bs=4096
dd: error writing L/dev/sdcL: No space left on device
1+0 records in
0+0 records out
0 bytes (0 B) copied. 0.0kB/s
When running fdisk -l I can see that my laptop HD has been assigned to /dev/sda and my external HD to /dev/sdc
However fdisk shows some unexpected info for the /dev/sdc section:
fdisk -l
Disk /dev/sdc: 10MiB, 10485768 bytes, 20400 sectors
Units: sectors of 1 * 512 = 512 bytes
...
Device    Boot  Start   End       Blocks    Id  System
/dev/sdc1 * 2048    718847    358400    7   HPFS/NTFS/exFAT
/dev/sdc2   718848  81922047  40601600  7   HPFS/NTFS/exFAT
The /dev/sdc external hd shows its only 10MiB in size.
What can I do to correct this issue?
I have tried using fdisk /dev/sdc to delete all partitions on the device, but after doing this cat and dd still return the same error message.
Another thing thats confusing is arn’t cat and dd supposed to clone the source(laptop) hd and copy it to the target(external)? so the fact that my external HD having a different partition setup/config shouldnt matter right? Because the source disk is overwriting whatever is there with itself… Why should its setup make any difference? On a bare metal level the HD is 500GB, I thought that was the purpose of dd to clone the Entire Disk byte for byte. If it takes into consideration the setup of the external HD clearly its not cloning byte for byte as its giving authority to the external disk.
Update
lsblk returns
NAME   MAJ:MIN RM   SIZE   RO TYPE
sda     0:0     0  465.9G  0  disk
>^sda1  0:1     0  350M    0  part
>^sda2  0:2     0  38.7G   0  part
sdc     8:32    0  465.8G  0  disk
loop0   7:0     0  275.1M  0  loop /livemnt/squashfs
gdisk -l /dev/sdc returns
....
Partition table scan:
MBR: MBR only
BSD: not present
APM: not present
GPT: not present

**********************************
Found invalid GTP and valid MBR; converting MBR to GPT format in memory.
**********************************
...
Connecting and dissconnecting the external HD makes the /dev/sdc drive appear and dissappear.
fdisk -l is reporting that the disk /dev/sdc is only 10MiB.
How can it report this when we have no partitions?
Ошибка no space left on device в Linux может возникать при использовании различных программ или сервисов. В графических программах данная ошибка может выводится во всплывающем сообщении, а для сервисов она обычно появляется в логах. Во всех случаях она означает одно. На разделе диска, куда программа собирается писать свои данные закончилось свободное место.
Избежать такой проблемы можно ещё на этапе планирования установки системы. Выделяйте под каталог /home отдельный раздел диска, тогда если вы займете всю память своими файлами, это не помешает работе системы. Также выделяйте больше 20 гигабайт под корневой раздел чтобы всем программам точно хватило места. Но что делать если такая проблема уже случилась? Давайте рассмотрим как освободить место на диске с Linux.
Первым дело надо понять на каком разделе у вас закончилась память. Для этого можно воспользоваться утилитой df. Она поставляется вместе с системой, поэтому никаких проблем с её запуском быть не должно:
df -h
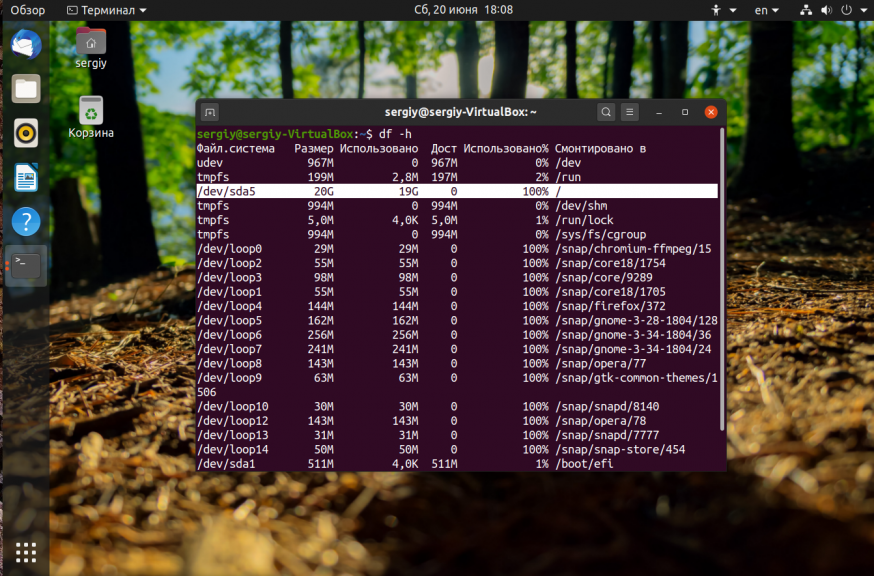
На точки монтирования, начинающиеся со слова snap внимания можно не обращать. Команда отображает общее количество места на диске, занятое и доступное место, а также процент занятого места. В данном случае 100% занято для корневого раздела — /dev/sda5. Конечно, надо разобраться какая программа или файл заняла всё место и устранить эту проблему, но сначала надо вернуть систему в рабочее состояние. Для этого надо освободить немного места. Рассмотрим что можно сделать чтобы экстренно освободить немного памяти.
1. Отключить зарезервированное место для root
Обычно, у всех файловых систем семейства Ext, которые принято использовать чаще всего как для корневого, так и для домашнего раздела используется резервирование 5% памяти для пользователя root на случай если на диске закончится место. Вы можете эту память освободить и использовать. Для этого выполните:
sudo tune2fs -m 0 /dev/sda5
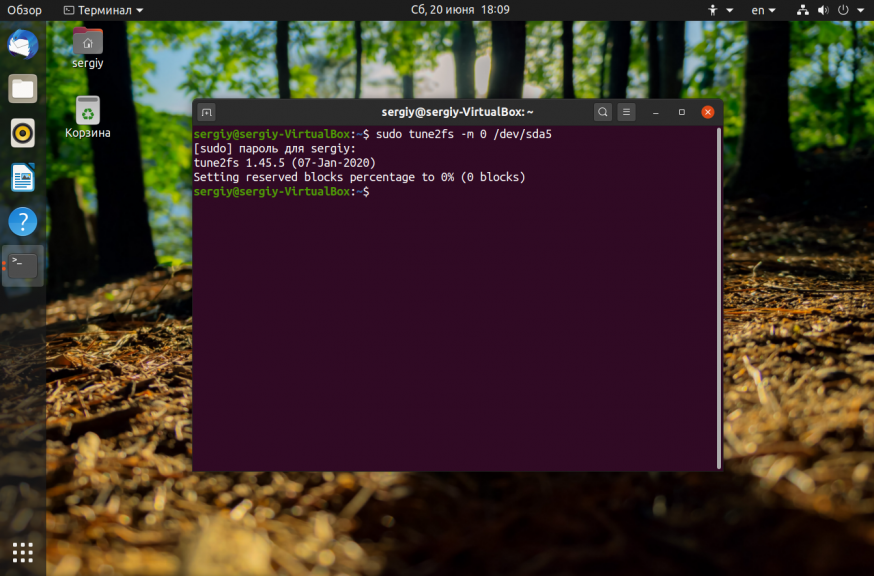
Здесь опция -m указывает процент зарезервированного места, а /dev/sda5 — это ваш диск, который надо настроить. После этого места должно стать больше.
2. Очистить кэш пакетного менеджера
Обычно, пакетный менеджер, будь то apt или yum хранит кэш пакетов, репозиториев и другие временные файлы на диске. Они некоторые из них ненужны, а некоторые нужны, но их можно скачать при необходимости. Если вам срочно надо дисковое пространство этот кэш можно почистить. Для очистки кэша apt выполните:
sudo apt clean
sudo apt autoclean
Для очистки кэша yum используйте команды:
yum clean all
3. Очистить кэш файловой системы
Вы могли удалить некоторые большие файлы, но память после этого так и не освободилась. Эта проблема актуальна для серверов, которые работают долгое время без перезагрузки. Чтобы полностью освободить память надо перезагрузить сервер. Просто перезагрузите его и места на диске станет больше.
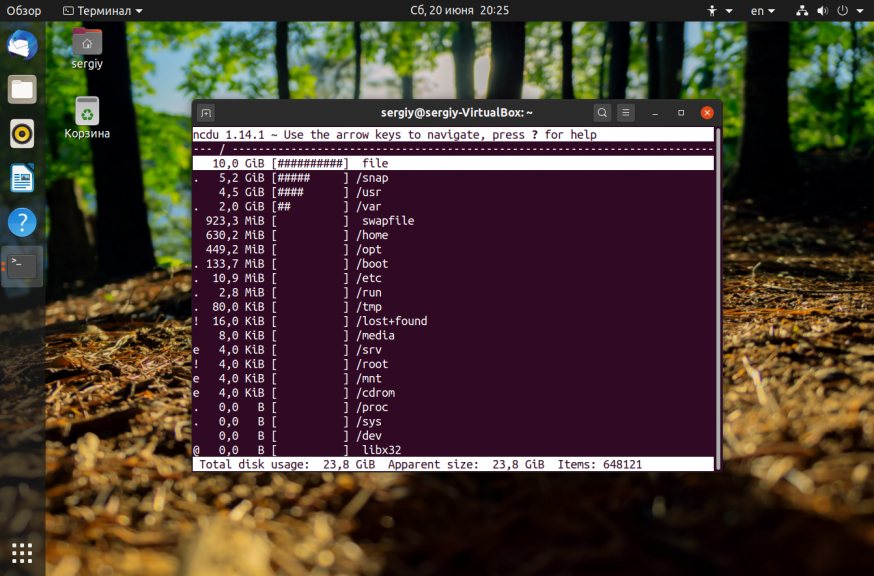
4. Найти большие файлы
После выполнения всех перечисленных выше рекомендаций, у вас уже должно быть достаточно свободного места для установки специальных утилит очистки системы. Для начала вы можете попытаться найти самые большие файлы и если они не нужны — удалить их. Возможно какая-либо программа создала огромный лог файл, который занял всю память. Чтобы узнать что занимает место на диске Linux можно использовать утилиту ncdu:
sudo apt install ncdu
Она сканирует все файлы и отображает их по размеру:
Более подробно про поиск больших файлов читайте в отдельной статье.
5. Найти дубликаты файлов
С помощью утилиты BleachBit вы можете найти и удалить дубликаты файлов. Это тоже поможет сэкономить пространство на диске.
6. Удалите старые ядра
Ядро Linux довольно часто обновляется старые ядра остаются в каталоге /boot и занимают место. Если вы выделили под этот каталог отдельный раздел, то скоро это может стать проблемой и вы получите ошибку при обновлении, поскольку программа просто не сможет записать в этот каталог новое ядро. Решение простое — удалить старые версии ядер, которые больше не нужны.
Выводы
Теперь вы знаете почему возникает ошибка No space left on device, как её предотвратить и как исправить если с вами это уже произошло. Освободить место на диске с Linux не так уж сложно, но надо понять в чём была причина того, что всё место занято и исправить её, ведь на следующий раз не всё эти методы смогут помочь.

Статья распространяется под лицензией Creative Commons ShareAlike 4.0 при копировании материала ссылка на источник обязательна .
Об авторе
![]()
Основатель и администратор сайта losst.ru, увлекаюсь открытым программным обеспечением и операционной системой Linux. В качестве основной ОС сейчас использую Ubuntu. Кроме Linux, интересуюсь всем, что связано с информационными технологиями и современной наукой.
10 More Discussions You Might Find Interesting
1. Solaris
Sol11 — Error at prompt (no space left on device)
user1@:/$
-ksh: line 3: write to 1 failed
user11@:/$
-ksh: line 3: write to 1 failed
user1@:/$
-ksh: line 3: write to 1 failed
user1@:/$
-ksh: line 3: write to 1 failed
user1@:/$
-ksh: line 3: write to 1 failed But theres plenty of space :-
user1@:/$ df -kh
Filesystem … (9 Replies)
Discussion started by: psychocandy
2. Solaris
Write to 1 failed [No space left on device] Error
Running a installation on Solaris 11 and getting error write to 1 failed
If anyone can advise ?
ORIGINAL_PATH=»${PATH}»
# prepend /usr/xpg4/bin to PATH as needed
temporaryPath=`expr «${PATH}:» : ‘(/usr/xpg4/bin:)’`
if
then
PATH=»/usr/xpg4/bin:${PATH}»
seem to have… (6 Replies)
Discussion started by: Mpumi
3. Linux
No space left on device while there is plenty of space available
Hello all
posting here after scanning the net and tried most of the things offered
still no solution that worked
when I do :
$ df -h
Filesystem Size Used Avail Use% Mounted on
footmpfs 7.9G 60K 7.9G 1% /dev
tmpfs 7.9G 0 7.9G 0% /dev/shm
/dev/da1 … (3 Replies)
Discussion started by: umen
4. UNIX for Advanced & Expert Users
Sed: couldn’t write 1378 items to stdout: No space left on device
Hi ,
In file first line start with «»,when trying to remove using sed i am getting the below error .Please advise
sed -e ‘s///g’ -e ‘s/$]//g’ segment1.txt >>segment_m1
sed: couldn’t write 1378 items to stdout: No space left on device
Thanks,
Mohan (1 Reply)
Discussion started by: mohan705
5. Shell Programming and Scripting
Write to 1 failed [No space left on device]
I am getting error in a shell script having a simple date command.
Error is » write to 1 failed «.
We saw that /tmp folder was 100% full. When we cleared some space in /tmp folder then script worked fine. Why does date command(or any other command) require space in /tmp folder? Which settings… (6 Replies)
Discussion started by: mahish20
6. HP-UX
Received error as Not enough space left on device
Hi Forum,
We have observed one problem in one of our HP-UX machines which runs a software which connects the radio frequency scan devices and the scanned information is stored in the database through the same software.
This software has thrown an error like «Not enough space left on the… (4 Replies)
Discussion started by: Nishant.Jvk
7. Solaris
visudo: write error: No space left on device
Hi All,
This is Sandeep Gupta,
I am facing a problem with sudo command.
Whenever i am executing the command «visudo» i am getting the error «visudo: write error: No space left on device».
but i have checked on my Solaris Box everything is ok, i have enough free space on my box, and also… (13 Replies)
Discussion started by: Sandeepgupta
8. Solaris
No space left on device but free space and inodes are available…
hi guys, me again 
i recently opened a thread about physical to zone migration.
My zone is mounted over a «bigger» LUN (500GB) and step is now to move the old files, from the physical server, to my zone.
We are talking about 22mio of files.
i used rsync to do that and every time at… (8 Replies)
Discussion started by: beta17
9. UNIX for Advanced & Expert Users
no space left on device
I have a SCO UNIX on my Server. When I last tried to shutdown my system, I got an error message
�no space left on device�.
Now when I try to boot the system again, I
just can’t and I get the same error message. Please help! (2 Replies)
Discussion started by: anjane
10. UNIX for Dummies Questions & Answers
no space left on device
This seems like it would be a common question, but I didn’t find much that helped in a search…
I have a script scheduled in my crontab that outputs to /dev/null
ie: /dir/scripts/script1 > /dev/null
I have recently started getting the error:
cp /dir1/dir2/file.xls: No space left on… (1 Reply)
Discussion started by: kristy
A few hours ago my root partition filled up, I moved files away from it and df reports:
# df -h
Filesystem            Size  Used Avail Use% Mounted on
/dev/hda1             183G  174G     0 100% /
So there should be 9GB free, but avail reports 0 and Use is still at 100%.
I tested as root, e.g.
# echo test >a ; cat a
test
it works as expected; however as a normal user, I still get the error:
$ echo test >a ; cat a
bash: echo: write error: No space left on device
The root home directory where I conducted the positive test and my home directory are on the same partition.The fstab entry is:
/dev/hda1 / ext3 noatime,defaults,errors=remount-ro 0 1
![]()
Benoit
3,5291 gold badge18 silver badges17 bronze badges
asked Oct 9, 2009 at 18:46
![]()
Most filing systems reserve a certain percentage for root, so you can still log in as root and solve out of diskspace issues. Usually this is 5%. 9GB is roughly 5% of 183GB, so this would make sense. You can see how much is reserved using tune2fs:
# tune2fs -l /dev/sda1 | grep -i reserved
Reserved block count:     936488
Reserved GDT blocks:      1019
Reserved blocks uid:      0 (user root)
Reserved blocks gid:      0 (group root)
You can modify it using
# tune2fs -m 3 /dev/sda1
tune2fs 1.41.9 (22-Aug-2009)
Setting reserved blocks percentage to 3% (561893 blocks)
On modern large drives 5% is probably a little excessive, and you probably want to set it lower. You don’t want to set it to zero.
answered Oct 9, 2009 at 19:01
![]()
David PashleyDavid Pashley
23.3k2 gold badges44 silver badges71 bronze badges
2
im with bob, try df -i, if you have a bunch of ill output crontabs for instance, your /var/spool/clientmqueue/ directory can get filled up
answered Oct 9, 2009 at 19:44
![]()
CDATACDATA
712 bronze badges
Take a look at INODES too. In a «vanilla» installation, if you have to many small files they can consume inodes, but not space. You’ll see that you have available space, but since your inodes are full, you’ll not be able to use this space.
answered Oct 9, 2009 at 19:04
![]()
Bob RiversBob Rivers
5165 silver badges13 bronze badges
1
«By default, every filesystem in Unix has some space reserved for the superuser (root). This means that no regular Unix user can fill your filesystem up to 100%, and so it’s always going to have enough free space to continue normal function.»
From: http://www.unixtutorial.org/commands/tune2fs/
answered Oct 9, 2009 at 18:57
![]()
Another thing to check is to see if there are any open files on that filesystem (especially logs). Deleting files won’t clear the space on the disk until the file is actually closed.
answered Oct 13, 2009 at 0:59
![]()
I’d bet $1 that Clyde has the answer. A process has a file open on that device. In linux, the file isn’t actually removed until the process holding it open lets go of it.
I’d start with: lsof | grep hda1
answered Oct 13, 2009 at 4:16
![]()
GreeblesnortGreeblesnort
1,7598 silver badges10 bronze badges
Most of the time, Linux is pretty specific with its error messages. “This didn’t work – try installing this package.” However, there’s one in particular that really doesn’t help me very much: “No space left on device.” What causes that? I thought I had 2 TB of storage, how can it be full? Where do I start looking? Today, we’ll be walking you through all of that in our guide on how to fix the “No space left on device” error on Linux.
Before you go any further, it’s a good idea to check that there really is space left on the disk. While the tools in your desktop environment are good, it can be faster to use the direct ones from the command line.
If you’d like to use the tools in your desktop environment, they’ll give you easy-to-read representations of the information you can find with these tools. I’m using Fedora with GNOME, and the GNOME Disk Usage Analyzer tool shows me the following.

Begin with du. Point it to the base directory on the drive that’s having the problem. Let’s assume it’s the partition with /.
![]()
It’ll take some time to go through everything. Now, try with df.
Add / and the filesystems mounted under it. For example, if you have /home on a separate drive, add that in with the reading for /. The total should come out close to what you had with du. If not, that might point toward a deleted file being used by a process.
Of course, the main concern here is whether or not the results of these commands come in under the size of the drive. If it did, there’s obviously something wrong.
No Space on Device Possible Causes
There are a couple of main causes here. If you saw a discrepancy between du and df, you can jump down to the first option here. Otherwise, start at the second one.
Deleted File Reserved by Process
Occasionally, a file will be deleted, but a process is still using it. Linux won’t release the storage associated with the file while the process is still running, but you can find the process and restart it.
Try to locate the process.
sudo lsof / | grep deleted
The problematic process should be listed. Just restart it.
sudo systemctl restart service_name
If it’s not immediately evident, do a full daemon reload.
sudo systemctl daemon-reload
Not Enough Inodes
There is a set of metadata on filesystems called “inodes.” Inodes track information about files. A lot of filesystems have a fixed amount of inodes, so it’s very possible to fill the max allocation of inodes without filling the filesystem itself. You can use df to check.
Compare the inodes used with the total inodes. If there’s no more available, unfortunately, you can’t get more. Delete some useless or out-of-date files to clear up inodes.
Bad Blocks
The last common problem is bad filesystem blocks. Filesystems can become corrupt over time, and hard drives die. Your operating system will most likely see those blocks as usable unless they’re otherwise marked. The best way to find and mark those blocks is by using fsck with the -cc flag. Remember that you can’t use fsck from the same filesystem that you’re testing, so you’ll probably need to use a live CD.
sudo fsck -vcck /dev/sda2
Obviously, replace the drive location with the drive that you want to check. You can find that by using the df command from earlier. Also, keep in mind that this will probably take a long time, so be prepared to grab a coffee.
Hopefully, one of these solutions solved your problem. This issue isn’t exactly easy to diagnose in every instance. With any luck, though, you can get it cleared up and have your system working again normally.
If you’re looking for more Linux pointers, see our guide on how to set up Bluetooth in Linux. Or, for something a little different, see how to install Mac’s Safari browser in Linux. Enjoy!

John Perkins
John is a young technical professional with a passion for educating users on the best ways to use their technology. He holds technical certifications covering topics ranging from computer hardware to cybersecurity to Linux system administration.
Subscribe to our newsletter!
Our latest tutorials delivered straight to your inbox
etci get this message/cron.daily/openmediavault-cron-apt:
:
cat: write error: No space left on device
etc/cron.daily/openmediavault-cron-apt:
cat: write error: No space left on device
cat: write error: No space left on device
cat: write error: No space left on device
cat: write error: No space left on device
cat: write error: No space left on device
cat: write error: No space left on device
cati: write error: No space left on device
cat: write error: No space left on device
cat: write error: No space left on device
cat: write error: No space left on device
cat: write error: No space left on device
cat: write error: No space left on device
etc/cron.daily/openmediavault-cron-apt:
cat: write error: No space left on device
cat: write error: No space left on device
cat: write error: No space left on device
cat: write error: No space left on device
cat: write error: No space left on device
cat: write error: No space left on device
cat: write error: No space left on device
cat: write error: No space left on device
cat: write error: No space left on device
cat: write error: No space left on device
cat: write error: No space left on device
Wiping a disk is done by writing new data over every single bit.
Tip: References to «disks» in this article also apply to loopback devices.
Common use cases
Wipe all data left on the device
The most common usecase for completely and irrevocably wiping a device is when the device is going to be given away or sold. There may be (unencrypted) data left on the device and you want to protect against simple forensic investigation that is mere child’s play with for example File recovery software.
If you want to quickly wipe everything from the disk, /dev/zero or simple patterns allow maximum performance while adequate randomness can be advantageous in some cases that should be covered up in #Data remanence.
Every overwritten bit means to provide a level of data erasure not allowing recovery with normal system functions (like standard ATA/SCSI commands) and hardware interfaces. Any file recovery software mentioned above then would need to be specialized on proprietary storage-hardware features.
In case of a HDD, data recreation will not be possible without at least undocumented drive commands or tinkering with the device’s controller or firmware to make them read out for example reallocated sectors (bad blocks that S.M.A.R.T. retired from use).
There are different wiping issues with different physical storage technologies. Most notably, all Flash memory based devices and older magnetic storage (old HDDs, floppy disks, tape).
Preparations for block device encryption
To prepare a drive for block device encryption inside the wiped area afterwards, it is recommended to use #Random data generated by a cryptographically strong random number generator (referred to as RNG in this article from now on).
See also Wikipedia:Random number generation.
Warning: If block device encryption is mapped on a partition that contains non-random or unencrypted data, the encryption is weakened and becomes comparable to filesystem-level encryption: disclosure of usage patterns on the encrypted drive becomes possible. Therefore, do not fill space with zeros, simple patterns (like badblocks) or other non-random data before setting up block device encryption if you are serious about it.
Data remanence
See also Wikipedia:Data remanence. The representation of data may remain even after attempts have been made to remove or erase the data.
Operating system, programs and filesystem
The operating system, executed programs or journaling file systems may copy your unencrypted data throughout the block device. When writing to plain disks, this should only be relevant in conjunction with one of the above.
If the data can be exactly located on the disk and was never copied anywhere else, wiping with random data can be thoroughgoing and impressively quick as long there is enough entropy in the pool.
A good example is cryptsetup using /dev/urandom for wiping the LUKS keyslots.
Hardware-specific issues
Flash memory
Write amplification and other characteristics make Flash memory, including SSDs, a stubborn target for reliable wiping.
As there is a lot of transparent abstraction in between data as seen by a device’s controller chip and the operating system, sight data is never overwritten in place and wiping particular blocks or files is not reliable.
Other «features» like transparent compression (all SandForce SSDs) can compress your zeros or repetitive patterns, so if wiping is fast beyond belief this might be the cause.
Disassembling Flash memory devices, unsoldering the chips and analyzing data content without the controller in between is feasible without difficulty using simple hardware. Data recovery companies do it for cheap money.
For more information see:
- Solid state drive/Memory cell clearing
- Reliably Erasing Data From Flash-Based Solid State Drives.
- #Select a target
Marked Bad Sectors
If a hard drive marks a sector as bad, it cordons it off, and the section becomes impossible to write to via software. Thus a full overwrite would not reach it. However because of block sizes, these sections would only amount to a few theoretically recoverable KiB.
Residual magnetism
A single, full overwrite with zeros or random data does not lead to any recoverable data on a modern high-density storage device. Note that repeating the operation should not be necessary nowadays. [1] Indications otherwise refer to single residual bits; reconstruction of byte patterns is generally not feasible.[2] See also [3], [4] and [5].
Select a target
Use fdisk to locate all read/write devices the user has read access to.
Check the output for lines that start with devices such as /dev/sd"X".
This is an example for a HDD formatted to boot a linux system:
# fdisk -l
Disk /dev/sda: 250.1 GB, 250059350016 bytes, 488397168 sectors
Units = sectors of 1 * 512 = 512 bytes
Sector size (logical/physical): 512 bytes / 512 bytes
I/O size (minimum/optimal): 512 bytes / 512 bytes
Disk identifier: 0x00ff784a

   Device Boot      Start         End      Blocks   Id  System
/dev/sda1   *        2048      206847      102400   83  Linux
/dev/sda2          206848   488397167   244095160   83  Linux
Or another example with the Arch Linux image written to a 4GB USB thumb drive:
# fdisk -l
Disk /dev/sdb: 4075 MB, 4075290624 bytes, 7959552 sectors
Units = sectors of 1 * 512 = 512 bytes
Sector size (logical/physical): 512 bytes / 512 bytes
I/O size (minimum/optimal): 512 bytes / 512 bytes
Disk identifier: 0x526e236e

   Device Boot      Start         End      Blocks   Id  System
/dev/sdb1   *           0      802815      401408   17  Hidden HPFS/NTFS
If you are worried about unintentional damage of important data on the primary computer, consider using an isolated environment such as a virtual environment (VirtualBox, VMWare, QEMU, etc…) with direct connected disk drives to it or a single computer only with a storage disk(s) that need to be wiped booted from a Live Media (USB, CD, PXE, etc…) or use a script to prevent wiping mounted partitions by typo.
Select a data source
To wipe sensitive data, one can use any data pattern matching the needs.
Zeros
Overwriting with /dev/zero or simple patterns is considered secure in most situations. With today’s HDDs, it is deemed appropriate and fast for disk wiping.
However, a drive that is abnormally fast in writing patterns or zeroing could be doing transparent compression. It is obviously presumable not all blocks get wiped this way. Some #Flash memory devices do «feature» that.
To setup block device encryption afterwards, one should wipe the area with random data (see next section) to avoid weakening the encryption.
Warning: Subject to compression and to be used carefully with flash memory and SSDs, to be avoided for block encryption preparation as stated above.
Random data
True random data source using /dev/random is impractical for wiping large capacities as it will take too long to wait for the entropy generation. /dev/urandom can be used as a reasonable source of pseudorandom data. For differences between random and pseudorandom data as source, please see Random number generation.
Another alternative for pseudorandom data generation is to use an encrypted datastream. For example, if one wants to prepare a device for block encryption and will use AES for the encrypted partition, it is appropriate to wipe it with a similar cipher prior to creating the filesystem to make the empty space not distinguishable from the used space.
Select a block size
See also Wikipedia:Dd (Unix)#Block size, blocksize io-limits.
If you have an Advanced Format hard drive it is recommended that you specify a block size larger than the default 512 bytes. To speed up the overwriting process choose a block size matching your drive’s physical geometry by appending the block size option to the dd command (i.e. bs=4096 for 4 KiB).
fdisk prints physical and logical sector size for every disk. Alternatively sysfs does expose information:
/sys/block/sdX/size
/sys/block/sdX/queue/physical_block_size
/sys/block/sdX/queue/logical_block_size
/sys/block/sdX/sdXY/alignment_offset
/sys/block/sdX/sdXY/start
/sys/block/sdX/sdXY/size
Warning: These methods show the block size the drive reports to the kernel. However, many Advanced Format drives incorrectly understate the physical block size as 512.
Tip: The script genwipe.shAUR helps to calculate parameters to wipe a device/partition with dd, e.g.genwipe.sh /dev/sd"XY".
Calculate blocks to wipe manually
Block storage devices are divided in sectors, and the size of a single sector can be used to calculate the size of the entire device in bytes. To do so, multiply the number of sectors by the drive sector size.
As an example we use the parameters with the dd command to wipe a partition:
# dd if=data_source of=/dev/sdX bs=sector_size count=sector_number seek=partitions_start_sector status=progress
Here, to illustrate with a practical example, we will show the output of the fdisk command on the partition /dev/sdX:
# fdisk -l /dev/sdX
Disk /dev/sdX: 1.8 TiB, 2000398934016 bytes, 3907029168 sectors
Disk model: ST3500413AS
Units: sectors of 1 * 512 = 512 bytes
Sector size (logical/physical): 512 bytes / 4096 bytes
...
Device     Boot      Start        End         Sectors     Size  Id Type
/dev/sdX1            2048         3839711231  3839709184  1,8T  83 Linux
/dev/sdX2            3839711232   3907029167  67317936    32,1G  5 Extended
- The first line of the fdisk output shows the disk size in bytes and in logical sectors.
- The size in bytes of the storage device or of the partition can also be obtained with the command
blockdev --getsize64 /dev/sdXY. - The Units line of the fdisk output shows the size of single logical sector; the logical sector size can also be derived from the number of bytes divided by the number of logical sectors, here use:
echo $((2000398934016 / 3907029168)). - To know the physical sector size in bytes (that will make it work faster), we can use the next line.
- To get the disk size in physical sectors, one can divide the disk size in bytes by the size of a single physical sector, here
echo $((2000398934016 / 4096)),
Note:
- In the examples below we will use the logical sector size.
- You can even wipe unallocated disk space with a
ddcommand by calculating the difference between the end of one and start of the next partition.
To wipe partition /dev/sdX1, the example parameters with logical sectors would be used like follows.
- By using the starting address of the partition on the device using the
seek=parameter:
# dd if=data_source of=/dev/sdX bs=${BytesInSector} count=${End - Start} seek=${Start} status=progress
with Start=2048, End=3839711231 and BytesInSector=512.
- Or by using the partitions size in logical sectors:
# dd if=data_source of=/dev/sdX1 bs=${BytesInSector} count=${LogicalSectors} status=progress
with LogicalSectors=3839709184.
Or, to wipe the whole disk by using physical sectors:
# dd if=data_source of=/dev/sdX bs=${PhysicalSectorSizeBytes} count=${AllDiskPhysicalSectors} seek=0 status=progress
with AllDiskPhysicalSectors=488378646 and PhysicalSectorSizeBytes=4096.
Note: The count= option is not necessary when wiping all the physical area e.g. sdXY or sdX from the start to the end but it shows an error about out of free space when it tries to write outside the limits.
Overwrite the target
You can choose from several utilities to overwrite a drive. If you only want to wipe a single file, Securely wipe disk/Tips and tricks#Wipe a single file has considerations in addition to the utilities mentioned below.
By redirecting output
The redirected output can be used to create files, rewrite free space on the partition, and to wipe the whole device or a single partition on it. The examples here use /dev/zero to zero the device, but /dev/urandom may be substituted if a random wipe is desired.
The following examples show how to rewrite the partition or a block device by redirecting stdout from other utilities:
# cat /dev/zero > /dev/sd"XY"
cat: write error: No space left on device
# xz -z0 /dev/zero -c > /dev/sd"XY"
xz: (stdout): Write error: No space left on device
# dd if=/dev/zero > /dev/sd"XY"
dd: writing to ‘standard output’: No space left on device
20481+0 records in
20480+0 records out
10485760 bytes (10 MB, 10 MiB) copied, 2.29914 s, 4.6 MB/s
The file copy command cp can also be used to rewrite the device, because it ignores the type of the destination:
# cp /dev/zero /dev/sd"XY"
 cp: error writing ‘/dev/sd"XY"’: No space left on device
 cp: failed to extend ‘/dev/sd"XY"’: No space left on device
To display progress status and metrics you can use pv:
# pv --progress --timer --eta --rate --bytes --stop-at-size -s "$(blockdev --getsize64 /dev/sd"XY" )" /dev/zero > /dev/sd"XY"
dd
See also dd and Securely wipe disk/Tips and tricks#Wipe a single file.
Warning: There is no confirmation regarding the sanity of this command so double-check that the correct drive or partition has been targeted. Make certain that the of=... option points to the target drive and not to a system disk.
Zero-fill the disk by writing a zero byte to every addressable location on the disk using the /dev/zero stream.
# dd if=/dev/zero of=/dev/sdX bs=4096 status=progress
Or the /dev/urandom stream:
# dd if=/dev/urandom of=/dev/sdX bs=4096 status=progress
The process is finished when dd reports No space left on device and returns control back:
dd: writing to ‘/dev/sdX’: No space left on device
7959553+0 records in
7959552+0 records out
4075290624 bytes (4.1 GB, 3.8 GiB) copied, 1247.7 s, 3.3 MB/s
To speed up wiping a large drive, see also:
- Securely wipe disk/Tips and tricks#dd — advanced example which uses OpenSSL,
- Securely wipe disk/Tips and tricks#Using a template file which wipes with non-random preset data (e.g. overwrite a whole disk with a single file) but is very fast
- Dm-crypt/Drive preparation#dm-crypt specific methods which uses dm-crypt.
wipe
A program specialized on wiping files. It is available as part of the wipe package. To make a quick wipe of a destination, you can use something like:
$ wipe -r /path/to/wipe
See also wipe(1). The tool was last updated in 2009. Its SourceForge page suggests that it is currently unmaintained.
shred
shred (from the coreutils package) is a Unix command that can be used to securely delete individual files or full devices so that they can be recovered only with great difficulty with specialised hardware, if at all. By default shred uses three passes, writing pseudo-random data to the device during each pass. This can be reduced or increased.
The following command invokes shred with its default settings and displays the progress.
# shred -v /dev/sdX
Shred can also be used on a single partition, e.g. to wipe the first partition use shred -v /dev/sdX1.
Alternatively, shred can be instructed to do only one pass, with entropy from e.g. /dev/urandom, and a final overwrite with zeros.
# shred --verbose --random-source=/dev/urandom -n1 --zero /dev/sdX
badblocks
The tool badblocks from e2fsprogs is able to perform destructive read-write test, effectively wiping the device. By default, it performs four passes and can take very long.
# badblocks -wsv /dev/device
hdparm
hdparm supports ATA Secure Erase, which is functionally equivalent to zero-filling a disk. It is however handled by the hard drive firmware itself, and includes «hidden data areas». As such, it can be seen as a modern-day «low-level format» command. SSD drives reportedly achieve factory performance after issuing this command, but may not be sufficiently wiped (see #Flash memory).
Some drives support Enhanced Secure Erase, which uses distinct patterns defined by the manufacturer. If the output of hdparm -I for the device indicates a manifold time advantage for the Enhanced erasure, the device probably has a hardware encryption feature and the wipe will be performed to the encryption keys only.
For detailed instructions on using ATA Secure Erase, see Solid state drive/Memory cell clearing and the Linux ATA wiki.
blkdiscard
See Solid state drive/Memory cell clearing#Common method with blkdiscard
See also
- Wipe free space in Linux