С появлением CentOS 7 изменился синтаксис многих команд этой операционной системы. Я уже писал ранее как сменить консоль в CentOS, теперь это две разные инструкции для CentOS 6 и CentOS 7. В этой статье я расскажу как изменить имя хоста в CentOS 7 & RHEL 7.
Чтобы изменить имя хоста навсегда в CentOS 7 воспользуйтесь следующей командой:
# hostnamectl set-hostname New_HostName
где New_HostName — это новое имя хоста.
В некоторых случаях, если вы используете виртуальный сервер, вам также потребуется отключить изменение hostname при загрузке с помощью команды:
# scarletctl disable set-hostname
Перезапуск сервиса systemd-hostnamed
Чтобы все изменения вступили в силу желательно перезапустить службу (сервис) systemd-hostnamed:
# systemctl restart systemd-hostnamed
Как проверить имя хоста в CentOS 7
Чтобы увидеть имя хоста сервера в CentOS 7 воспользуйтесь командой hostnamectl:
Вы увидите примерно следующее:
# hostnamectl status
   Static hostname: sitename.tld
         Icon name: computer-vm
           Chassis: vm
        Machine ID: ce4cc7f6d67d0056a8a68503a37d39ee
           Boot ID: 58599810ff8e4d6b882f4181b616ff46
    Virtualization: vmware
  Operating System: CentOS Linux 7 (Core)
       CPE OS Name: cpe:/o:centos:centos:7
            Kernel: Linux 3.10.0-327.10.1.el7.x86_64
      Architecture: x86-64
Благодарности
При написании статьи были использованы следующие источники:
- https://habrahabr.ru/post/280093/
- http://www.cyberciti.biz/faq/rhel-redhat-centos-7-change-hostname-command/
Обычно имя хоста задается во время установки операционной системы или динамически назначается виртуальной машине при ее создании.
Существует ряд причин, по которым вам может потребоваться изменить имя хоста. Чаще всего это когда имя хоста устанавливается автоматически при создании экземпляра.
Прежде чем вы приступите
Прежде чем продолжить это руководство, убедитесь, что вы вошли в систему как пользователь с привилегиями sudo .
Общие сведения об именах хостов
Имя хоста — это метка, которая идентифицирует устройство в сети. У вас не должно быть двух или более машин с одинаковым именем хоста в одной сети.
Есть три класса hostname : static , pretty и transient .
static— Традиционное имя хоста. Он хранится в/etc/hostnameфайле и может быть установлен пользователем.pretty— Имя хоста UTF8 в свободной форме, используемое для представления пользователю. Например,Baksdev's desktop.transient— Динамическое имя хоста, поддерживаемое ядром. Серверы DHCP или mDNS могут изменять временное имя хоста во время выполнения. По умолчанию это то же самое, что иstaticимя хоста.
Рекомендуется использовать полностью квалифицированное имя домена ( FQDN ) для обоих static и transient имена , такие как host.example.com .
Отображение текущего имени хоста
Чтобы просмотреть текущее имя хоста, выполните следующую команду:
hostnamectl
В этом примере текущее имя хоста установлено на centos8.localdomain .
Изменение имени хоста
Метод 1: с помощью hostnamectl команды
В CentOS 8 и всех других дистрибутивах Linux, использующих systemd, вы можете изменить имя хоста системы и соответствующие настройки с помощью hostnamectl команды. Синтаксис следующий:
sudo hostnamectl set-hostname host.example.comsudo hostnamectl set-hostname "Your Pretty HostName" --prettysudo hostnamectl set-hostname host.example.com --staticsudo hostnamectl set-hostname host.example.com --transientКопироватьКопироватьКопировать
Например, чтобы изменить статическое имя хоста системы на host.baks.dev , вы должны использовать следующую команду:
sudo hostnamectl set-hostname host.baks.dev
Чтобы установить красивое имя хоста Baksdev's desktop , введите:
sudo hostnamectl set-hostname "Baksdev's desktop" --pretty
В hostnamectl не производит вывода. В случае успеха возвращается 0, в противном случае — ненулевой код ошибки.
Чтобы убедиться, что имя хоста было успешно изменено, используйте hostnamectl команду.
Способ 2: с помощью nmtui команды
nmtui это основанный на curses инструмент для взаимодействия с NetworkManager. Его также можно использовать для установки или изменения имени хоста.
Запустите инструмент, набрав его имя в терминале:
sudo nmtui
Используйте клавиши со стрелками для навигации по параметрам, выберите Set system hostname и нажмите Enter :
Введите новое имя хоста:
Нажмите, Enter чтобы подтвердить новое имя хоста:
Наконец, перезапустите systemd-hostnamed службу, чтобы изменения вступили в силу:
sudo systemctl restart systemd-hostnamed
Метод 3: с помощью nmcli команды
nmcli — это инструмент командной строки для управления NetworkManager, который также может использоваться для изменения имени хоста системы.
Чтобы просмотреть текущее имя хоста, введите:
sudo nmcli g hostname
Чтобы изменить имя хоста, host.baks.dev используйте следующую команду:
sudo nmcli g hostname host.baks.dev
Чтобы изменения вступили в силу, перезапустите systemd-hostnamed службу:
sudo systemctl restart systemd-hostnamedЗаключение
Чтобы установить или изменить имя хоста в системе CentOS, используйте hostnamectl set-hostname команду, за которой следует новое имя хоста.
| Введение | |
| Узнать имя своего хоста | |
| Изменить имя хоста | |
| С помощью hostnamectl | |
| pretty hostname | |
| hosts | |
| alias | |
| На хостинге | |
| Похожие статьи |
Введение
Имя хоста — это уникальная метка, которая идентифицирует машину в сети.
Должна существовать таблица соответствия между hostname и
IP адресом
это нужно для для маршрутизации пакетов.
Хост может иметь несколько имён, но предпочтительным является вариант, когда имя одно.
Существует три класса hostname : static , pretty и transient .
-
static — традиционное имя хоста, которое может быть установлено пользователем и хранится в
/etc/hostname - pretty — имя хоста UTF8 в свободной форме, используемое для представления пользователю. Например HeiHei’ host.
- transient — динамическое имя хоста, поддерживаемое ядром, которое может быть изменено сервером DHCP или mDNS во время выполнения. По умолчанию это то же самое, что и static имя хоста.
Рекомендуется использовать полное доменное имя ( FQDN ) как для static и для transient имен, таких как host.example.com .
Так как CentOS 7 поддреживает только Fully Qualified Domain Names (FQDNs),
советую тщательно проверить hostname, который вы планируете использовать.
Допустимые значения:
- Строчные буквы от a до z
- Цифры от 0 до 9
- Точки и дефисы
- Hostnames может быть от 2 до 63 символов
- Hostnames должен начинаться и заканчиваться цифрой или буквой
Узнать имя своего хоста
Существует несоколько способов узнать имя своего хоста.
Часто для этого достаточно просто посмотреть в терминал
Пример моего терминала
[andrei@localhost Downloads]$
andrei — это имя пользователя
localhost — это имя хоста
Downloads — имя текущей директории
Посмотреть порядок можно выполнив
echo $PS1
[u@h W]$
u — пользователь
h — хост
W — Working Directory — Рабочая диретория
Другие способы
hostname
localhost.localdomain
hostname -f
localhost
uname -n
localhost.localdomain
hostnamectl
Static hostname: localhost.localdomain
Icon name: computer-vm
Chassis: vm
Machine ID: 35e254eda578c54084b96e06d5f285cf
Boot ID: afb44fef8d764f30bb89550849b02fde
Virtualization: kvm
Operating System: CentOS Linux 7 (Core)
CPE OS Name: cpe:/o:centos:centos:7
Kernel: Linux 3.10.0-1160.36.2.el7.x86_64
Изменить имя хоста
С помощью команды hostname
hostname dns-server
hostname
dns-server
Если заново открыть терминал изменения будут видны в командной строке.
[andrei@dns-server~]$
Это имя хоста сохранится только до перезагрузки системы
Если выполнить hostnamectl видно, что
помянелось только динамическое имя хоста
hostnamectl
Static hostname: localhost.localdomain
Transient hostname: dns-server
Icon name: computer-vm
Chassis: vm
Machine ID: cff8a80b9c356243b5238452511a8ade
Boot ID: 64d9ddab85ec4c219ac46c6a2940e628
Virtualization: kvm
Operating System: CentOS Linux 7 (Core)
CPE OS Name: cpe:/o:centos:centos:7
Kernel: Linux 3.10.0-1160.42.2.el7.x86_64
Architecture: x86-64
Если изучить файл
hostname
, также можно увдиеть отсутствие изменений.
cat /etc/hostname
localhost.localdomain
С помощью hostnamectl
hostnamectl set-hostname dns-server.andrei.com
hostname
dns-server.andrei.com
Это постоянное изменение. Т.е. новое имя хоста имеет класс persistent.
cat /etc/hostname
dns-server.andrei.com
pretty name
Чтобы задать pretty name нужно воспользоваться кавычками
hostnamectl set-hostname «andrei’s.host.com»
hostnamectl
Static hostname: andreis.host.com
Pretty hostname: andrei’s.host.com
Icon name: computer-vm
Chassis: vm
Machine ID: cff8a80b9c356243b5238452511a8ade
Boot ID: 64d9ddab85ec4c219ac46c6a2940e628
Virtualization: kvm
Operating System: CentOS Linux 7 (Core)
CPE OS Name: cpe:/o:centos:centos:7
Kernel: Linux 3.10.0-1160.42.2.el7.x86_64
Architecture: x86-64
Появилось pretty hostname а static hostname такое же
, но без запрещенных символов
В /etc/hostname отображается только static hostname
cat /etc/hostname
andreis.host.com
pretty hostname можно увидеть в файле
/etc/machine-info
cat /etc/machine-info
PRETTY_HOSTNAME=»andrei’s.host.com»
hosts
Изучить информацию об именах других хостов можно в файле
hosts
В моём примере в сети есть два хоста:
dns-server.andrei.com
с IP адресом
192.168.56.149
host113.andrei.com с IP адресом
192.168.56.113
Зайдём на него с помощью
ssh
и посмотрим, есть ли у него записи об именах других хостов в сети.
Для наглядности я теперь буду показываеть приглашение терминала чтобы было видно имя хоста.
[andrei@dns-server~]$ ssh andrei@192.168.56.113
Выполним ping по IP
[andrei@host113 ~]$ ping 192.168.56.149
PING 192.168.56.149 (192.168.56.149) 56(84) bytes of data.
64 bytes from 192.168.56.149: icmp_seq=1 ttl=64 time=0.650 ms
64 bytes from 192.168.56.149: icmp_seq=2 ttl=64 time=0.731 ms
^C
— 192.168.56.149 ping statistics —
2 packets transmitted, 2 received, 0% packet loss, time 1000ms
rtt min/avg/max/mdev = 0.650/0.690/0.731/0.048 ms
По IP пингуется успешно
И ping по hostname
[andrei@host113 ~]$ ping dns-server.andrei.com
ping: dns-server.andrei.com: Name or service not known
host113 не знает как разрешить имя
dns-server.andrei.com
Это неудивительно — ведь в файле
hosts
нет про него никаких записей. Проверим содержимое:
[andrei@host113 ~]$ cat /etc/hosts
127.0.0.1 localhost localhost.localdomain localhost4 localhost4.localdomain4
::1 localhost localhost.localdomain localhost6 localhost6.localdomain6
Добавим запись о dns-server.andrei.com
sudo vi !$
127.0.0.1 localhost localhost.localdomain localhost4 localhost4.localdomain4
::1 localhost localhost.localdomain localhost6 localhost6.localdomain6
192.168.56.149 dns-server.andrei.com
Повторим ping
[andrei@host113 ~]$ ping dns-server.andrei.com
PING dns-server.andrei.com (192.168.56.149) 56(84) bytes of data.
64 bytes from dns-server.andrei.com (192.168.56.149): icmp_seq=1 ttl=64 time=0.698 ms
64 bytes from dns-server.andrei.com (192.168.56.149): icmp_seq=2 ttl=64 time=0.735 ms
64 bytes from dns-server.andrei.com (192.168.56.149): icmp_seq=3 ttl=64 time=0.739 ms
^C
— dns-server.andrei.com ping statistics —
3 packets transmitted, 3 received, 0% packet loss, time 2001ms
rtt min/avg/max/mdev = 0.698/0.724/0.739/0.018 ms
Теперь всё работает
alias
Чтобы не писать длинные имена хостов можно придумать alias
Формат следующий
IP FQDN ALIAS
FQDN — Fully Qualified Domain Name — полностью определённое имя домена.
192.168.56.149 dns-server.andrei.com vbdns
[andrei@host113 ~]$ ping vbdns
PING dns-server.andrei.com (192.168.56.149) 56(84) bytes of data.
64 bytes from dns-server.andrei.com (192.168.56.149): icmp_seq=1 ttl=64 time=0.619 ms
64 bytes from dns-server.andrei.com (192.168.56.149): icmp_seq=2 ttl=64 time=0.674 ms
^C
— dns-server.andrei.com ping statistics —
2 packets transmitted, 2 received, 0% packet loss, time 1000ms
rtt min/avg/max/mdev = 0.619/0.646/0.674/0.037 ms
Обратите внимание на dns-server.andrei.com
Хоть пинг и был по алиасу, ответ идёт как от static fqdn
Если поменять порядок так, что vbdns идёт первым а FQDN dns-server.andrei.com вторым, но
dns-server.andrei.com будет считаться алиасом
192.168.56.149 vbdns dns-server.andrei.com
В таком случае ответ будет идти от vbdns
[andrei@host113 ~]$ ping vbdns
Или
[andrei@host113 ~]$ ping dns-server.andrei.com
PING vbdns (192.168.56.149) 56(84) bytes of data.
64 bytes from vbdns (192.168.56.149): icmp_seq=1 ttl=64 time=0.721 ms
64 bytes from vbdns (192.168.56.149): icmp_seq=2 ttl=64 time=1.01 ms
^C
— vbdns ping statistics —
2 packets transmitted, 2 received, 0% packet loss, time 1004ms
rtt min/avg/max/mdev = 0.721/0.866/1.012/0.148 ms
Это может стать важным при работе с сертификатами
На хостинге
Как добавить соответствие IP адреса и домена сайта
| Настройка сети в CentOS | |
| Создать новый интерфейс | |
| CentOS | |
| Компьютерные сети | |
| ip | |
| hostname | |
| DNS | |
| route: Маршруты/Роутер | |
| Firewall | |
| iptables | |
| netstat | |
| iftop: Мониторинг сети | |
| nethogs: Мониторинг сети | |
| tc: Контроль за трафиком | |
| iperf: Измерение скорости сети | |
| uuidgen: uuid для сетевого интерфейса | |
| SCP: обмен файлами; | |
| SSH: удалённый доступ | |
| Сокеты в C |
 Обновлено: 19.10.2017
Опубликовано: 24.08.2016
Тематические термины: Linux, CentOS, Ubuntu.
Есть несколько способов задать сетевое имя компьютеру с Linux. Рассмотрим примеры на CentOS и Ubuntu без необходимости перезагружать систему.
Файл hostname
Команда hostnamectl
Узнать текущее имя компьютера можно командой:
hostname
Способ 1. Файл hostname
Открываем файл с именем компьютера следующей командой
vi /etc/hostname
и пишем имя компьютера, например:
hostname
Чтобы все сервисы начали использовать новое имя, вводим следующую команду
hostname `cat /etc/hostname`
Перезапускаем сетевую службу.
CentOS / Red Hat / Fedora:
systemctl restart network
или
service network restart
Ubuntu / Debian:
systemctl restart networking
или
service networking restart
Способ 2. Команда hostnamectl
В новых системах на основе systemd (CentOS 7, Ubuntu 15.04 и выше) можно выполнить одну единственную команду:
hostnamectl set-hostname hostname
* перезагрузка не потребуется — новое имя начнет использоваться сразу.
Если, по каким-либо причинам, новое имя не начнет использоваться, вводим:
systemctl restart systemd-hostnamed
Подробнее, статус можно посмотреть командой:
hostnamectl status
Также, можно задать дополнительное для описания имя (прелестное):
hostnamectl set-hostname «Description Name» —pretty
![]()
Была ли полезна вам эта инструкция?
Да Нет
Introduction
The hostname of a machine is a label that differentiates one system from another on a single network.
During the installation of Centos 8, either the admin defines a hostname or one is automatically created. The assigned system name is not always easy to remember. Later, if you add more machines to the network, you may want to organize hostnames.
In this tutorial, learn how to change the hostname on Centos 8 / RHEL.

Prerequisites
- CentOS 8 / RHEL system
- A user with Sudo or root permissions
- Access to a terminal or command line
- Any built-in text editor
Understanding the Types of Hostnames
There are three classes of hostnames:
- The traditional hostname, located at /etc/hostname. The guide focuses on this type.
- A human-readable hostname that allows special characters (e.g., pnap’s server). The system only uses it as a presentation to the user. It is located in the /etc/machine-info directory.
- A changeable hostname that the Linux kernel maintains. By default, it is the same as static, but DHCP and mDNS can change it, or you can change it manually.
The static hostname is defined by default as localhost, while the other two need to be specified separately.
How to Display Current Hostname
To check a machine’s hostname, open the terminal and enter:
hostname
Our virtual machine has the default hostname, localhost.localdomain.
Check out our article on the hostname command to learn more about this command and how to use it.
Another way to check the static hostname and get more details about the machine is to use the hostnamectl command:
hostnamectl
Change Hostname on CentOS 8 / RHEL without Restarting the System
In some circumstances, rebooting a machine is not an option. There are multiple methods to change the hostname on CentOS 8 or RHEL without having to restart the machine.
Select the option you prefer and then log out and log back in to make sure the changes have taken effect.
Note: It does not matter if you are creating virtual machines or booting physical servers, always assign hostnames in a logical manner. The maximum number of characters you can use is 64.
Use hostnamectl to Change Hostname
The hostnamectl tool allows you to set all classes of hostnames. The command works on other Linux distributions as well, not only CentOS / RHEL.
Set Static Hostname with hostnamectl
The syntax to set a static hostname with hostnamectl is:
sudo hostnamectl set-hostname host.domainFor example, we will change the hostname to vm1.phoenixnap.com:
sudo hostnamectl set-hostname vm1.phoenixnap.comThe terminal returns a new line. Use one of the two methods we mentioned to verify if the hostname was changed:

Set Pretty Hostname with hostnamectl
To modify the pretty hostname, append --pretty to the command:
sudo hostnamectl set-hostname "New Pretty Hostname" --prettyFor example:
sudo hostnamectl set-hostname "PNAP's Test VM" --prettyEnter hostnamectl to verify the changes:

Set Transient Hostname with hostnamectl
Following the pattern from the previous example, set a transient hostname by adding --transient to the command.
For example:
sudo hostnamectl set-hostname testvm1.phoenixnap.comCheck the changes with hostnamectl:

Use nmtui to Change Hostname
Launch the NetworkManager TUI with the nmtui command to change the hostname. This is not the primary function of the tool, but it allows users to set a new hostname.
1. In a terminal window, enter:
nmtuiThe tool opens in the same window.
2. Select Set system hostname using the keyboard arrows.
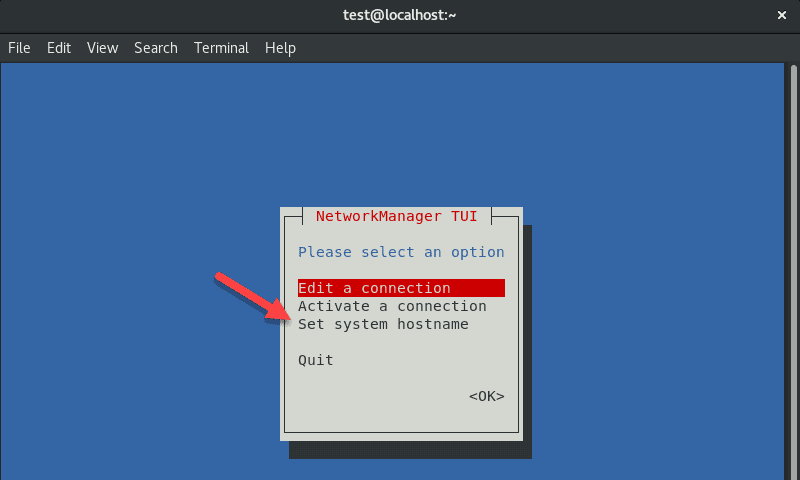
3. Enter the desired hostname and select <OK>.
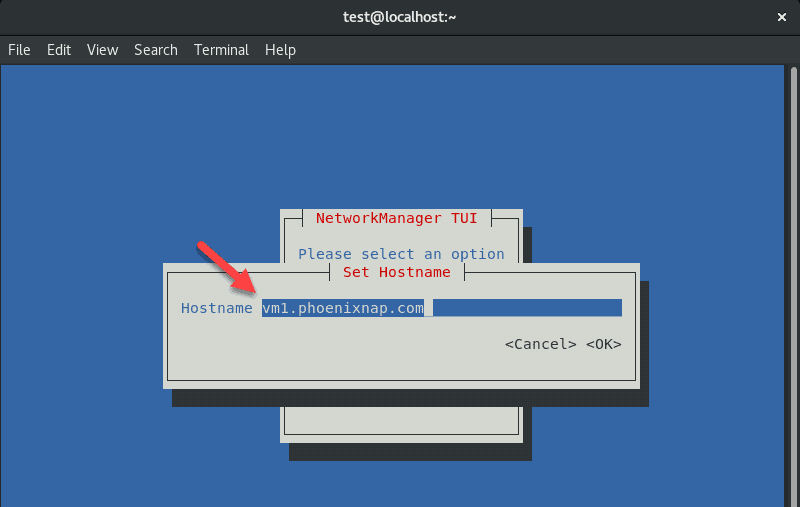
4. Enter your password if prompted, and confirm the changes.
5. Quit the tool.
6. You may need to restart the system-hostnamed to apply the changes:
sudo systemctl restart system-hostnamedYou have successfully changed the hostname on your CentOS 8 or RHEL machine.
Use nmcli to Change Hostname
The nmcli tool is also used to control the NetworkManager, but without the GUI.
The command to change the hostname with nmcli is:
sudo nmcli g hostname newhostname.domainFor example:
sudo nmcli g hostname vm.phoenixnap.comRestart sytemd-hostanmed to apply the changes:
sudo systemctl restart system-hostnamedCheck the hostname using one of the methods we mentioned previously. In this case, we will use nmcli to check the hostname:
sudo nmcli g hostnameSet Hostname by Editing /etc/hostname File (Restart Required)
If you are accustomed to editing system files, change the hostname by making the following changes:
1. Open the /etc/hostname file using your preferred text editor. In this example, we will use nano:
sudo nano /etc/hostname2. Change the current hostname to the desired hostname.
3. Save the changes and exit the editor.
4. Restart the system to apply the changes.

Conclusion
This tutorial explained different options to change the hostname on CentOS 8 /RHEL. Select the system name you prefer, and quickly modify the hostname on your CentOS 8 system.
Как изменить имя хоста в CentOS 7/8 и Fedora 30/29/28?
Во время установки CentOS или Fedora вам предлагается указать имя хоста для сервера.
Это нормально, но изменение его после установки иногда неизбежно.
Имя хоста однозначно идентифицирует компьютер в сети.
Имя хоста сервера может содержать буквы (a-z, A-Z), цифры (0-9), дефис (-), точку (.), но должно заканчиваться буквой или цифрой.
Рекомендуется использовать описательное имя при назначении имен хостов для простой идентификации сервера / службы.
Прежде чем устанавливать имя хоста, сначала проверьте существующее имя хоста.
$ hostname -s
cent-01

$ hostname -f
cent-01

$ hostnamectl
   Static hostname: cent-01
         Icon name: computer-vm
           Chassis: vm
        Machine ID: 596e865e6c594db98c4fd47fdb858138
           Boot ID: 47d2f07eb2ea44b799ae6b0c0ba8600e
    Virtualization: kvm
  Operating System: CentOS Linux 7 (Core)
       CPE OS Name: cpe:/o:centos:centos:7
            Kernel: Linux 3.10.0-957.5.1.el7.x86_64
      Architecture: x86-64
Где:
- -s, –short – используется для вывода короткого имени хоста
- -f, –fqdn, –long – используется для вывода полного имени хоста (FQDN)
Изменить имя хоста с помощью hostnamectl
Чтобы установить постоянное имя хоста с помощью команды hostnamectl, используйте команду.
sudo hostnamectl set-hostname <name> --staticСмотрите пример ниже:
sudo hostnamectl set-hostname backend-sms-app.mydomain.com --staticПодтвердите свое новое имя хоста.
$ hostnamectl
   Static hostname: backend-sms-app.mydomain.com
Transient hostname: cent-01
         Icon name: computer-vm
           Chassis: vm
        Machine ID: 596e865e6c594db98c4fd47fdb858138
           Boot ID: 47d2f07eb2ea44b799ae6b0c0ba8600e
    Virtualization: kvm
  Operating System: CentOS Linux 7 (Core)
       CPE OS Name: cpe:/o:centos:centos:7
            Kernel: Linux 3.10.0-957.5.1.el7.x86_64
      Architecture: x86-64
Этот параметр автоматически обновит файл /etc/hostname.
$ cat /etc/hostname
backend-sms-app.mydomain.com
Существует три класса имен хостов, которые можно установить с помощью команды hostnamectl.
- Transient hostname – это динамическое имя хоста, управляемое ядром, которое может быть изменено сервером DHCP или mDNS во время выполнения. Используйте флаг –transient, чтобы установить временное имя хоста.
- Pretty hostname – как следует из названия, это удобное имя хоста UTF8, используемое для представления пользователя машины. Используйте флаг –pretty, чтобы установить его.
- Static hostname – хранится в /etc/hostname для использования во время выполнения.
Назначьте Pretty hostname.
sudo hostnamectl set-hostname "Computingforgeeks PC" --prettyУстановить Transient hostname – обычно совпадает со статическим именем хоста.
sudo hostnamectl set-hostname backend-sms-app.mydomain.com --transientПодтвердите свои настройки.
$ hostnamectl
   Static hostname: backend-sms-app.mydomain.com
   Pretty hostname: Computingforgeeks PC
         Icon name: computer-vm
           Chassis: vm
        Machine ID: 596e865e6c594db98c4fd47fdb858138
           Boot ID: 47d2f07eb2ea44b799ae6b0c0ba8600e
    Virtualization: kvm
  Operating System: CentOS Linux 7 (Core)
       CPE OS Name: cpe:/o:centos:centos:7
            Kernel: Linux 3.10.0-957.5.1.el7.x86_64
      Architecture: x86-64
Чтобы сопоставить новое имя хоста с IP-адресом, отредактируйте файл /etc/hosts и замените старое имя хоста новым.
$ sudo vim /etc/hosts
192.168.121.17 backend-sms-app.mydomain.com backend-sms-app
Там у вас есть это.
$ ping -c 2 backend-sms-app
PING backend-sms-app.mydomain.com (192.168.121.17) 56(84) bytes of data.
64 bytes from backend-sms-app.mydomain.com (192.168.121.17): icmp_seq=1 ttl=64 time=0.019 ms
64 bytes from backend-sms-app.mydomain.com (192.168.121.17): icmp_seq=2 ttl=64 time=0.040 ms

--- backend-sms-app.mydomain.com ping statistics ---
2 packets transmitted, 2 received, 0% packet loss, time 1000ms
rtt min/avg/max/mdev = 0.019/0.029/0.040/0.011 ms
A hostname is a human-readable string that helps people refer to a computer by a familiar name, rather than by a number or unwieldy descriptors like, «the third one from the bottom of the second-to-last rack.» Often, a hostname is set during the installation process, but there are times when it needs to be changed. On Linux, there are many ways to set a hostname, and this article aims to cover them all.
Before exploring the tools related to hostnames, though, you must understand the different contexts in which the term is used. There are potentially two designators of a system’s hostname: the computer’s administrator (a laptop’s owner, or a server’s root user) and the network (depending on protocols and settings). This factor can lead to confusion, because you might look at your computer’s hostname and see one value, only to find that the same computer is referred to as something different over the network.
There’s a historical reason for this situation. Long ago, before DNS, hosts on a network had to be defined locally in the file /etc/hosts. If there were 31 hosts on a network and a new one was added, then 32 hosts had to update their /etc/hosts file to reflect the correct IP address and corresponding hostname for each of their neighbors. This process didn’t scale well for bigger networked systems such as the World Wide Web (the Internet), and so DNS was invented, and the concept of hostnames largely was abstracted away from local computers to instead be managed by the network.
Today, the important hostname is the one the network uses. The hostname value in /etc/hosts is often set to localhost by default.
With this context in mind, here are all the different ways to manipulate a hostname on Linux.
[ Free download: Advanced Linux commands cheat sheet. ]
Change all three names with hostnamectl
The hostnamectl command from systemd can manipulate three varieties of hostnames:
- Transient: Received from network configuration.
- Static: Provided by the kernel.
- Pretty: Provided by the user.
A transient hostname can change as needed to avoid name collisions. For instance, if you name your computer penguin but there’s already another host with that name on the network, your network hostname becomes penguin-1.
Static and pretty hostnames are a little like local variables: They’re used for activities occurring on the local machine, mostly as a convenience for the user, along with applications that need to know whether they’re running locally or remotely (for example, over a forwarded X session).
When invoked without any arguments, hostnamectl returns the static and pretty names, plus some system information:
$ hostnamectl
   Static hostname: penguin
   Pretty hostname: Penguin VM
         Icon name: computer-vm
           Chassis: vm
        Machine ID: 418d9ce8ead44bbfb6970c0d356b89bf
           Boot ID: fb3a310237ef41f88b1c62c26f19065a
    Virtualization: kvm
  Operating System: Fedora 30 (Workstation Edition)
       CPE OS Name: cpe:/o:fedoraproject:fedora:30
            Kernel: Linux 5.0.9-301.fc30.x86_64
      Architecture: x86-64
$ sudo hostnamectl set-hostname --pretty "Web dev test environment"
$ sudo hostnamectl set-hostname --static webdev-test-env
$ hostnamectl
   Static hostname: webdev-test-env
   Pretty hostname: Web dev test environment
   [...]
Change the static and pretty names in the GUI with GNOME Settings
If you want to set the static and pretty names in a desktop application, use GNOME Settings. To launch GNOME Settings, go to the Activities menu in the upper left corner of your GNOME desktop. Type Settings into the search field, or click the Show Applications icon on the left dock and find Settings in the application icons as shown below:

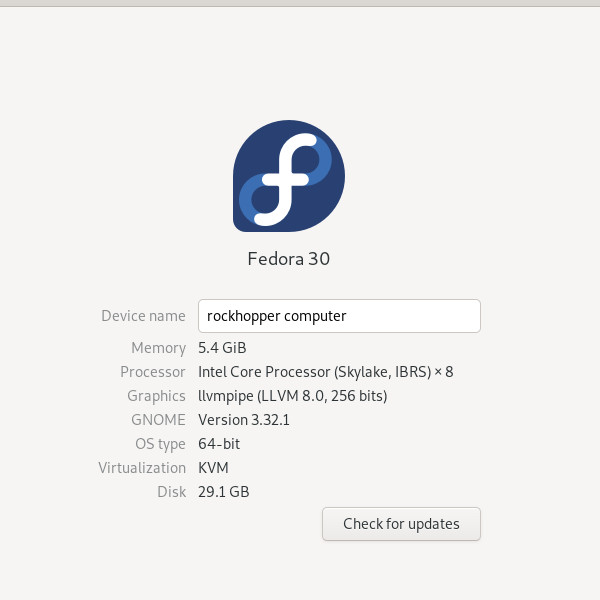
$ hostnamectl
   Static hostname: rockhopper-computer
   Pretty hostname: rockhopper computer
   [...]
Change the static name with cockpit
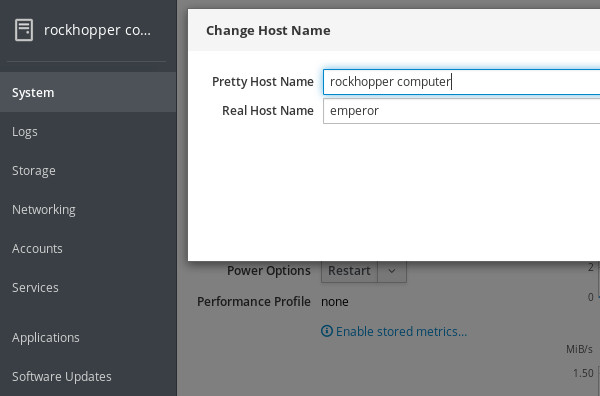
Fedora, CentOS, and RHEL systems feature a web console application called Cockpit for monitoring and configuring local and remote machines. Using Cockpit, you can change the static hostname for your own machine, or any machine you administer (as long as it has Cockpit enabled).
First, install and enable Cockpit:
$ sudo dnf install cockpit
[...]
$ sudo systemctl enable --now cockpit
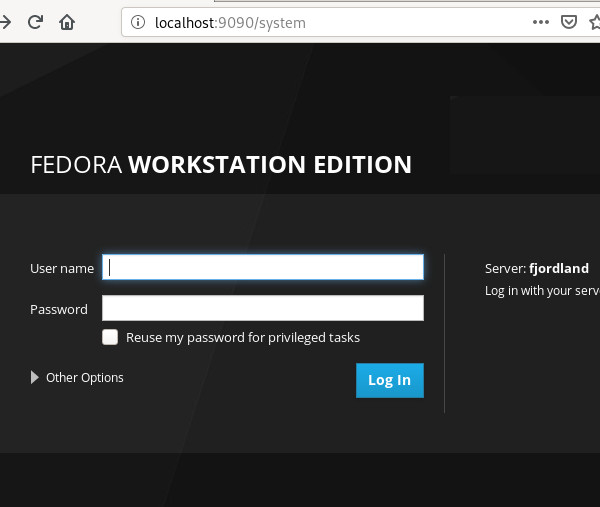
In the web console, click the System tab in the left column. Click the entry for Host name and edit the Pretty Host Name and (static) Real Host Name:
$ sudo echo "galapagos" > /etc/hostname
$ hostnamectl
   Static hostname: snares
   Pretty hostname: rockhopper web console computer
   [...]
Change the static name in the hostname file
You can also set the static hostname manually by editing /etc/hostname. This file contains exactly one line by default. If you have not changed the hostname yet, then that line probably reads localhost.localdomain. If you have used hostnamectl to change the hostname already, then this file reflects that change.
Editing this file manually is not necessarily recommended, because it doesn’t update all the other hostname values the way hostnamectl does. For example:
$ sudo echo "galapagos" > /etc/hostname
$ hostnamectl
   Static hostname: galapagos
   Pretty hostname: rockhopper computer
   Transient hostname: rockhopper-computer
   [...]
Change the static name with nmcli
Another way to change a static hostname is through the command line interface for Network Manager, nmcli:
$ sudo nmcli general hostname emperor
$ hostnamectl
   Static hostname: emperor
   Pretty hostname: rockhopper computer
   Transient hostname: rockhopper-computer
   [...]
Change the transient name with sysctl
The sysctl command allows you to configure kernel parameters while Linux is running (that is, instead of at boot time). Your computer’s transient hostname is a kernel parameter, so you can modify it with this command:
$ sudo sysctl kernel.hostname=humboldt
$ hostnamectl
   Static hostname: emperor
   Pretty hostname: rockhopper computer
   Transient hostname: humboldt
   [...]
Change the transient name with hostname
The hostname command from the util-linux package is a simple tool to query and set the transient hostname.
To query your current hostname:
$ hostname
humboldt
$ sudo hostname fjordland
$ hostnamectl
   Static hostname: emperor
   Pretty hostname: rockhopper computer
Transient hostname: fjordland
Be careful with /etc/hosts
The /etc/hosts file is mostly historic, although it is used by some applications and protocols, and can be a useful method for creating shortcuts to hosts you use often. You can use it to set a hostname, but usually, you’re just creating an alias to localhost at IP address 127.0.0.1 (your computer’s network loopback address).
For example, if you change /etc/hosts from the default entries like this:
$ cat /etc/hosts
127.0.0.1   magellanic magellanic.localdomain magellanic magellanic.localdomain4
::1         magellanic magellanic.localdomain magellanic magellanic.localdomain6
$ ping -c 1 localhost
PING localhost(magellanic (::1)) 56 data bytes
64 bytes from magellanic (::1): icmp_seq=1 ttl=64 time=0.182 ms
[...]
$ ping -c 1 magellanic
PING magellanic(magellanic (::1)) 56 data bytes
64 bytes from magellanic (::1): icmp_seq=1 ttl=64 time=0.181 ms
[...]
$ hostnamectl
   Static hostname: emperor
   Pretty hostname: rockhopper computer
   Transient hostname: fjordland
Follow the conformity convention
As you can tell from the iterations within this article, a computer’s hostname can get confusing should you use too many methods to set it, or if you change it frequently. While nothing enforces uniformity across hostname types, it’s a convention to keep everything the same on each computer.
Choose a memorable name and use it for your pretty name. Let the static and transient names be derived from that. Just as importantly, in a large network, choose meaningful names. For instance, all upper management computers may be named after a D&D monster, while all computers in the IT department may be named after a famous starship, and so on. Using a naming schema helps avoid name collisions and provides context to an otherwise dizzying list of network hosts.