
-
- Поделиться
Доброго времени суток, уважаемые форумчане!
Я столкнулся с проблемой, когда после поиска значений и переноса их в нижнюю часть программы, не вводятся значения.
Объясняю всю процедуру:
Пересмотрел кучу видео, чтобы знать как правильно и что делать.
Зашел в игру, запустил СЕ, в программе выбрал нужную мне игру, затем ввел значения и нажал на «first scan» программа выдала мне несколько значений, затем перешел снова в игру, изменил нужное мне значение (забегая вперед, пробовал и увеличивать и уменьшать) перешел в программу СЕ ввел новое значение и нажал на кнопку «next scan» программа снова нашла несколько значений, я выделил их все (как было в видеоуроках) и перенес в нижнюю часть программы с помощью красной стрелочки между двумя частями программы
Затем я выделил все значения (так же пробовал и каждое значение по отдельности) и нажав на числовое значение высветилось окно для ввода нового значения, я ввел новое значение (пробовал разные числовые значения) нажал на кнопку «ОК» и ничего не произошло, значения какие были такие и остались.
Прошу, помогите, что я делаю не так? немного позже, если потребуется скину скрины со всеми действиями.
Я буду Вам крайне признателе
P.S. пробовал в разных играх итог один.
Изменено 26 августа, 2020 пользователем OtetsViktor
Ссылка на комментарий
Поделиться на другие сайты

-
- Поделиться
Может быть ты название им меняешь, вместо значения? нужно нажимать на значение если хочешь изменить его.
Ссылка на комментарий
Поделиться на другие сайты
-
- Поделиться
2 часа назад, OtetsViktor сказал:
Затем я выделил все значения (так же пробовал и каждое значение по отдельности) и нажав на числовое значение высветилось окно для ввода нового значения, я ввел новое значение (пробовал разные числовые значения) нажал на кнопку «ОК» и ничего не произошло, значения какие были такие и остались.
это обычно так если меняешь экранное значение или какое то зависимое от реального , но не реальное . игра постоянно читает реальное значение и переносит его в экранное . когда ты меняешь через чит енжин экранное значение , то игра сразу меняет его обратно на реальное . поэтому кажеться , что не чего не меняеться .
реальное значение может быть другой тип , а не который ты выбрал поэтомцу из которых ты нашел не одно не подходит . иногда бывает реальное значение тот же тип , но не равно экранному . бывает реальное значение шифровано . даже бывает , что реальное значение находиться вобще не в памяти , а только в регистре тогда его поиском не найти .
попробуй потренироваться на программе tutorial которая входит в чит енжин . там реальные значения их найти легко . быстро разберешься .
Ссылка на комментарий
Поделиться на другие сайты
- Автор
-
- Поделиться
46 минут назад, Alex2411 сказал:
это обычно так если меняешь экранное значение или какое то зависимое от реального , но не реальное . игра постоянно читает реальное значение и переносит его в экранное . когда ты меняешь через чит енжин экранное значение , то игра сразу меняет его обратно на реальное . поэтому кажеться , что не чего не меняеться .
реальное значение может быть другой тип , а не который ты выбрал поэтомцу из которых ты нашел не одно не подходит . иногда бывает реальное значение тот же тип , но не равно экранному . бывает реальное значение шифровано . даже бывает , что реальное значение находиться вобще не в памяти , а только в регистре тогда его поиском не найти .попробуй потренироваться на программе tutorial которая входит в чит енжин . там реальные значения их найти легко . быстро разберешься .
Спасибо большое за информацию! Обязательно попробую.
Но у меня есть вопрос, на видео, показано, как разные люди вводят значение и оно меняется, в той же самой игре, просто есть очень много видео, где показано, что и в самой игре значение меняется и это значение изменяется, к примеру, игровая валюта, она изменилась и ее можно использовать. Чтобы было более понятно, эта игра GTA 5 online.
Ссылка на комментарий
Поделиться на другие сайты
-
- Поделиться
31 минуту назад, OtetsViktor сказал:
online
если игра онлайн то реальные значения скорее всего храняться на той стороне поэтому их обычным способом изменять не получиться .. ну типа как я сейчас читаю твое сообщение и могу через чит енжин в браузере изменить весь текст , н о твое реальное сообщение находиться на этом форуме , а не у меня на компе поэтому меняться оно не будет .
Ссылка на комментарий
Поделиться на другие сайты

-
- Поделиться
1 час назад, OtetsViktor сказал:
Но у меня есть вопрос, на видео, показано, как разные люди вводят значение и оно меняется, в той же самой игре, просто есть очень много видео, где показано, что и в самой игре значение меняется и это значение изменяется, к примеру, игровая валюта, она изменилась и ее можно использовать. Чтобы было более понятно, эта игра GTA 5 online.
Ну, если люди в видео меняют значение в GTA 5 Online, то наверняка они меняют экранное значение. Это тоже самое, что раньше были детские видео уроки по взлому какого-нибудь «золота» в игре Вконтакте. Ты взламывал экранное значение, но при обновлении той же страницы, всё становилось обратно на свои места.
Изменено 26 августа, 2020 пользователем Elyn1tex
Ссылка на комментарий
Поделиться на другие сайты
- Автор
-
- Поделиться
10 часов назад, Elyn1tex сказал:
Ну, если люди в видео меняют значение в GTA 5 Online, то наверняка они меняют экранное значение. Это тоже самое, что раньше были детские видео уроки по взлому какого-нибудь «золота» в игре Вконтакте. Ты взламывал экранное значение, но при обновлении той же страницы, всё становилось обратно на свои места.
Спойлер
Вот одно из видео, как это происходит. На видел, все меняется, а когда это пытаюсь сделать я, то ничего не выходит.
И вот ещё один из способов, который так не получается у меня. Может вы посмотрите видео и скажите, реально ли такое?
Спойлер
10 часов назад, Alex2411 сказал:
если игра онлайн то реальные значения скорее всего храняться на той стороне поэтому их обычным способом изменять не получиться .. ну типа как я сейчас читаю твое сообщение и могу через чит енжин в браузере изменить весь текст , н о твое реальное сообщение находиться на этом форуме , а не у меня на компе поэтому меняться оно не будет .
А есть ли способ все же поменять значение на сервере? Я отправил примеры видео на Ютубе, где это все работает.
Изменено 27 августа, 2020 пользователем Xipho
Видео у нас принято убирать под спойлер.
Ссылка на комментарий
Поделиться на другие сайты

-
- Поделиться
14 часов назад, OtetsViktor сказал:
более понятно, эта игра GTA 5 online.
я продавал машину в гараже и ставил значение 190000 немного и получалось все а если миллион поставить то пишет не удалась транзакция вроде того
Ссылка на комментарий
Поделиться на другие сайты
- Автор
-
- Поделиться
37 минут назад, ЛАГАРИУМ сказал:
я продавал машину в гараже и ставил значение 190000 немного и получалось все а если миллион поставить то пишет не удалась транзакция вроде того
Ну, а у меня вообще не вводятся значеня, не меняются, я пробовал даже меньше значение делать, в общем, значения не меняются
Ссылка на комментарий
Поделиться на другие сайты
-
- Поделиться
1 час назад, OtetsViktor сказал:
Ну, а у меня вообще не вводятся значеня,
вот уменя получилось попробуй ище
Спойлер
Ссылка на комментарий
Поделиться на другие сайты
- Автор
-
- Поделиться
19 минут назад, ЛАГАРИУМ сказал:
вот уменя получилось попробуй ище
Показать контент
Вот и я смотрю, у всех получается, у меня нет.
Значит, я что-то не то делаю.
А может быть дело, что Cheat Engine у меня 7.1?
Можешь скинуть ссылку на твой СЕ?
Я тогда вечером попробую и отпишусь сюда)))
Ссылка на комментарий
Поделиться на другие сайты
-
- Поделиться
Ссылка на комментарий
Поделиться на другие сайты
- Автор
-
- Поделиться
7 часов назад, ЛАГАРИУМ сказал:
вот уменя получилось попробуй ище
Показать контент
Я пробовал сегодня несколько раз, все тчетно, записал видео, посмотрите пожалуйста, может я что-то делаю не так?
версия Windows 10 64бит
Спойлер
Ссылка на комментарий
Поделиться на другие сайты
-
- Поделиться
23 минуты назад, OtetsViktor сказал:
Я пробовал сегодня несколько
Показать контент
попробуй заморозить адреса утебя почему-то не меняются значение не знаю почему
Изменено 27 августа, 2020 пользователем ЛАГАРИУМ
Ссылка на комментарий
Поделиться на другие сайты
- Автор
-
- Поделиться
24 минуты назад, ЛАГАРИУМ сказал:
попробуй заморозить адреса утебя почему-то не меняются значение не знаю почему
пробовал, ничего не получается, так же не меняется значение, я даже пробовал заморозить саму игру с помощью Process Hacker
может это как-то связано с Windows 10 ?
Ссылка на комментарий
Поделиться на другие сайты
-
- Поделиться
36 минут назад, OtetsViktor сказал:
может это как-то связано с Windows 10 ?
может винда виновата Windows 10 ето зло
Ссылка на комментарий
Поделиться на другие сайты
- Автор
-
- Поделиться
8 часов назад, ЛАГАРИУМ сказал:
может винда виновата Windows 10 ето зло
Какие будут предложения?? Как обойти эту систему? Может это какая-то защита от изменения данных?? Как мне ее пофиксить? Подскажите, пожалуйста.
Ссылка на комментарий
Поделиться на другие сайты
-
- Поделиться
28 минут назад, OtetsViktor сказал:
Какие будут предложения??
скачай чит и накррути денех и немучайся
Ссылка на комментарий
Поделиться на другие сайты
![]()
-
- Поделиться
9 часов назад, ЛАГАРИУМ сказал:
Windows 10 ето зло
Ага… и это зло, скоро захватит весь мир.

Ссылка на комментарий
Поделиться на другие сайты
-
- Поделиться
2 минуты назад, LIRW сказал:
Ага… и это зло, скоро захватит весь мир.
винда 7 для меня лучше
Ссылка на комментарий
Поделиться на другие сайты
- Автор
-
- Поделиться
1 час назад, ЛАГАРИУМ сказал:
скачай чит и накррути денех и немучайся
Но за чит можно получить бан, а через CE получить бан очень маловероятно
Ссылка на комментарий
Поделиться на другие сайты
-
- Поделиться
2 минуты назад, OtetsViktor сказал:
Но за чит можно получить бан,
за все можна улететь на бананове острова
Ссылка на комментарий
Поделиться на другие сайты
- Автор
-
- Поделиться
1 час назад, ЛАГАРИУМ сказал:
винда 7 для меня лучше
у меня стояла на ноутбуке windows 10 home, я переустановил на win7, и тут началось веселье, половина драйверов перестала работать, а при попытке установить официальные драйвера, выдавало ошибки. ну я намучался и снов поменял на win10 pro и все заработало как прежде..
мне бы решить проблему с CE так как не только в ГТА не меняет, а в других играх тоже не меняет, хотя туториал проходил, там все работало
Ссылка на комментарий
Поделиться на другие сайты
- Автор
-
- Поделиться
В 26.08.2020 в 20:09, Alex2411 сказал:
попробуй потренироваться на программе tutorial которая входит в чит енжин . там реальные значения их найти легко . быстро разберешься .
Я потренировался на tutorial там все получалось нормально, а в играх так же не работает. я дополнительно видео ранее выложил с моими попытками
Ссылка на комментарий
Поделиться на другие сайты
-
- Поделиться
13 минут назад, OtetsViktor сказал:
мне бы решить проблему с CE
если и в других играх CE тоже наработает то може реально винда виновата ?
Ссылка на комментарий
Поделиться на другие сайты
Содержание
- Учимся работать с Cheat Engine
- Изменение значений в игре
- Включение SpeedHack
- Вопросы и ответы

Если вы хотите поиграть в компьютерные игры не совсем честно, но не знаете как это сделать, тогда данная статья именно для вас. Сегодня мы расскажем вам, как можно взломать различные игры с помощью специализированного софта. Делать это мы будем с помощью Cheat Engine.
Скачать последнюю версию Cheat Engine
Сразу же хотим обратить внимание на тот факт, что в некоторых случаях при использовании указанной программы вы можете получить бан. Поэтому лучше всего сперва проверить работоспособность взлома на каком-то новом аккаунте, который будет не жалко в случае чего потерять.
Рассматриваемая нами программа для взлома весьма функциональна. С помощью нее можно выполнять множество различных задач. Но для большинства из них потребуется определенный багаж знаний, например опыт работы с HEX (Хекс). Мы не будем нагружать вас различными терминами и поучениями, поэтому просто расскажем вам об общих приемах и способах применения Cheat Engine.
Изменение значений в игре
Данная функция является самой популярной из всего арсенала Cheat Engine. Она позволяет изменить нужным образом практически любое значение в игре. Это может быть здоровье, броня, количество боеприпасов, денег, координаты персонажа и многое другое. Вы должны понимать, что использование данной функции далеко не всегда завершается успешно. Причиной неудачи может быть как ваша ошибка, так и надежная защита игры (если рассматривать онлайн-проекты). Тем не менее попытаться взломать показатели вы все же можете. Вот что нужно сделать:
- Загружаем с официального сайта Cheat Engine, после чего устанавливаем ее на компьютер либо ноутбук, а после этого запускаем.
- Вы увидите на рабочем столе следующую картину.
- Теперь следует запустить клиент с игрой либо открыть таковую в браузере (если речь идет о веб-приложениях).
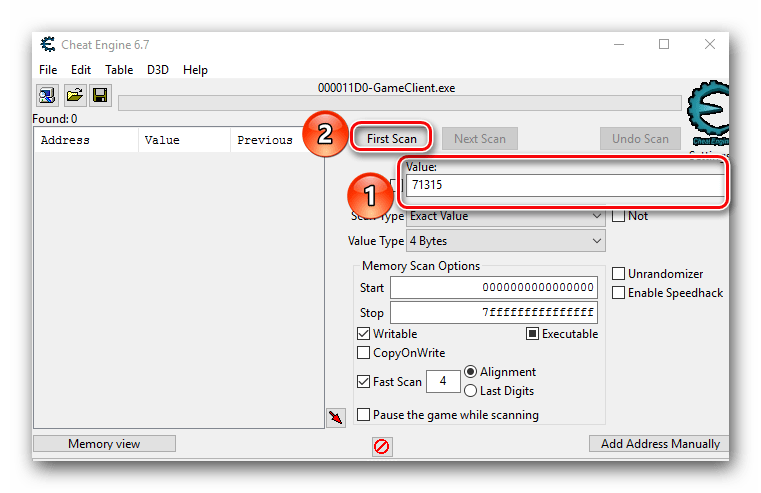
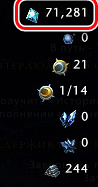
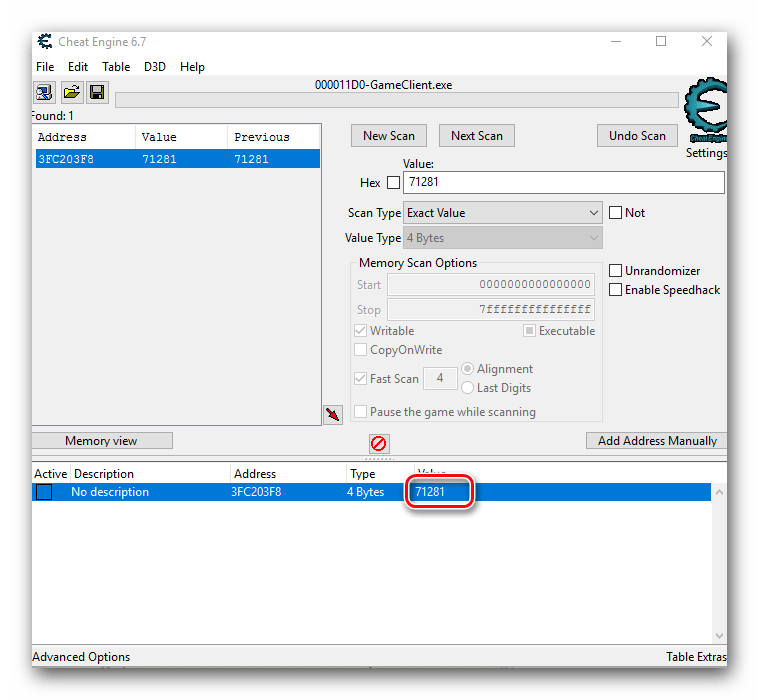
- После того, как игра будет запущена, необходимо определиться с тем, показатель чего именно вы хотите изменить. К примеру, это какая-то валюта. Смотрим в инвентарь и запоминаем ее текущее значение. В приведенном ниже примере данное значение равняется 71 315.
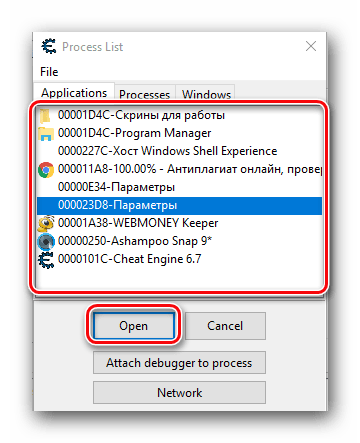
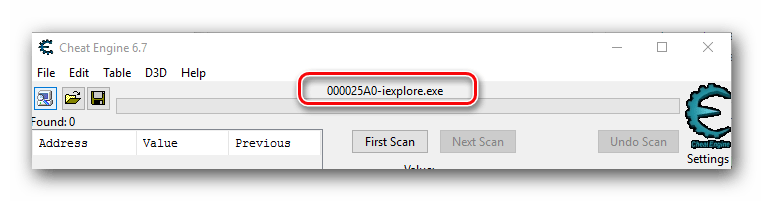
- Теперь снова возвращаемся к запущенной Cheat Engine. Необходимо в главном окне найти кнопку с изображением компьютера. До первого нажатия эта кнопка будет с мигающей обводкой. Нажимаем на нее один раз левой кнопкой мыши.
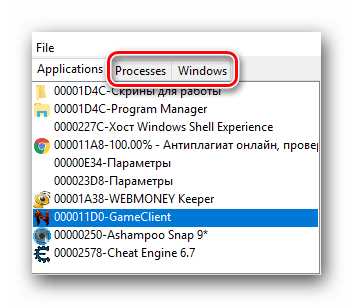
- В результате на экране появится окно меньших размеров со списком запущенных приложений. Из подобного списка вам нужно выделить ту строчку левой кнопки мыши, которая отвечает за игру. Ориентироваться можно по иконке слева от названия, а если таковая отсутствует, то по самому имени приложения. Как правило, имя содержит название приложения либо слово «GameClient». Выбрав нужную позицию, следует нажать на кнопку «Open», которая располагается немного ниже.
- Кроме того, выбрать нужную игру можно также из списка процессов или открытых окон. Для этого нужно просто перейти в одну из вкладок с соответствующим названием вверху.
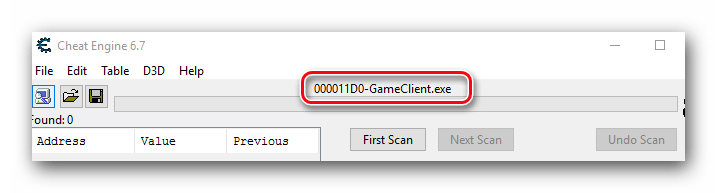
- Когда игра будет выбрана из списка, программе потребуется буквально пару секунд, чтобы провести так называемую инъекцию библиотек. Если ей это удастся, то в самом верху главного окна Cheat Engine будет отображено название приложения, которое вы выбрали ранее.
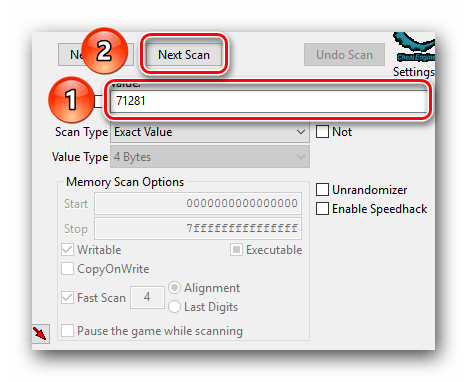
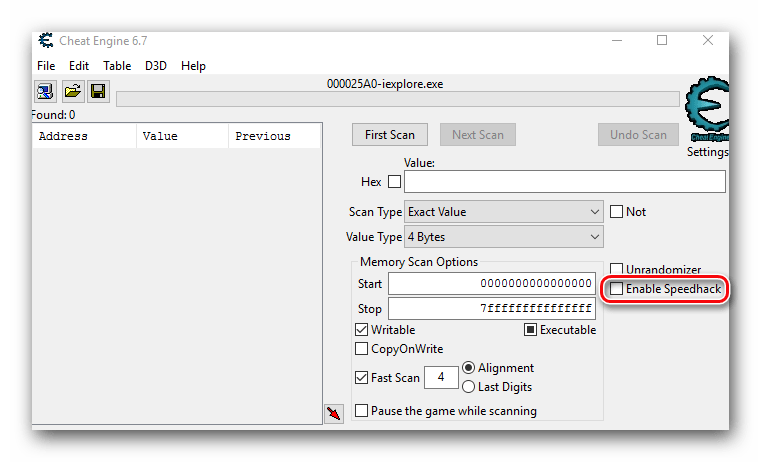
- Теперь можно приступить непосредственно к поиску нужного значения и его дальнейшему редактированию. Для этого в поле с названием «Value» вводим значение, которое мы ранее запомнили и которое хотим изменить. В нашем случае это 71 315.
- Далее нажимаем кнопку «First Scan», которая находится выше поля ввода.
- Чтобы результаты поиска получились более точными, можно установить опцию паузы в игре во время сканирования. Делать это не обязательно, но в некоторых случаях помогает сузить перечень вариантов. Чтобы включить данную функцию, достаточно поставить отметку в чекбокс напротив соответствующей строки. Ее мы отметили на изображении ниже.
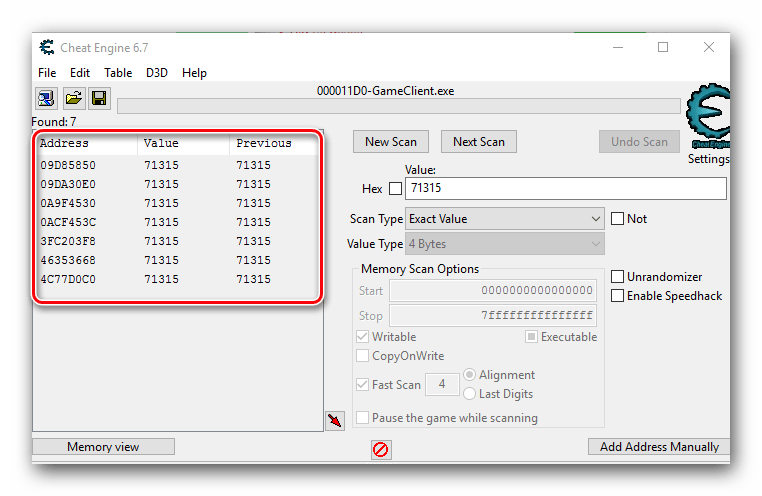
- Нажав на кнопку «First Scan», вы увидите спустя короткий промежуток времени все найденные результаты в левой части программы в виде своеобразного списка.
- За искомое значение отвечает лишь один адрес. Поэтому необходимо отсеять лишние. Для этого нужно вернуться в игру и изменить числовое значение валюты, жизней или того, что вы хотите изменить. Если это какая-то валюта, то достаточно просто что-либо купить или продать. Не важно, в какую сторону изменится значение. В примере после манипуляций у нас получилось число 71 281.
- Возвращаемся снова к Cheat Engine. В строке «Value», куда ранее мы вписывали значение 71 315, теперь указываем новое число — 71 281. Проделав это, жмем кнопку «Next Scan». Она находится немного выше строчки ввода.
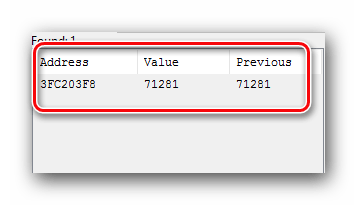
- При самых хороших раскладах вы увидите в списке значений лишь одну нужную строчку. Если же таких будет несколько, то необходимо повторить предыдущий пункт еще раз. Имеется в виду смена значения в игре, ввод нового числа в поле «Value» и повторный поиск через «Next Scan». В нашем случае все получилось с первого раза.
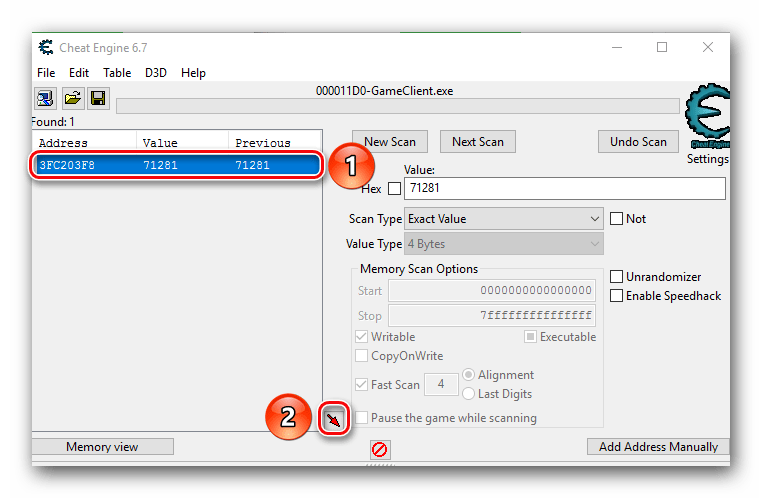
- Выделяем найденный адрес одиночным нажатием левой кнопкой мыши. После этого нажимаем на кнопку с красной стрелкой. Ее мы отметили на скриншоте ниже.
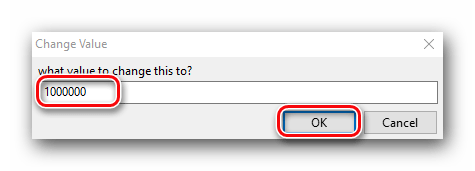
- Выбранный адрес переместится в нижнюю часть окна программы, где можно производить дальнейшие правки. Для изменения значения кликаем два раза левой кнопкой мышки на той части строки, где находятся цифры.
- Появится маленькое окошко с единственным полем для ввода. В нем пишем то значение, которое вы хотите получить. К примеру вы хотите 1 000 000 денег. Именно данное число и пишем. Подтверждаем действия нажатием кнопки «OK» в этом же окне.
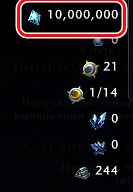
- Возвращаемся обратно к игре. Если все сделано верно, то изменения тут же вступят в силу. Вы увидите примерно следующую картину.
- В некоторых случаях необходимо еще раз изменить числовое значение в игре (купить, продать и так далее) для того, чтобы новый параметр вступил в силу.


Вот собственно и вся методология поиска и изменения нужного параметра. Мы советуем при сканировании и отсеве параметров не менять настройки программы по умолчанию. Для этого необходимы более глубокие знания. А без них вы попросту не сможете добиться желаемого результата.
Важно помнить, что при работе с онлайн-играми далеко не всегда получится проделать описанные выше манипуляции. Виной всему защита, которую нынче стараются установить практически везде, даже в браузерные проекты. Если у вас что-либо не получается, то это не значит, что всему виной ваши ошибки. Возможно, это установленная защита не дает подключиться Cheat Engine к игре, вследствие чего на экране могут возникнуть различные ошибки. Кроме того, часто встречаются ситуации, когда поменять значения выходит лишь на уровне клиента. Это значит что отображаться будет введенное вами значение, но сервер по факту увидит лишь настоящие цифры. Это также заслуга системы защиты.
Включение SpeedHack
SpeedHack — это изменение скорости движения, стрельбы, полета и прочих параметров в игре. С помощью Cheat Engine сделать это абсолютно несложно.
- Заходим в ту игру, в которой нужно изменить скорость.
- Далее снова возвращаемся к ранее запущенному Cheat Engine. Жмем на кнопку в виде компьютера с лупой в левом верхнем углу. О ней мы упоминали в предыдущем разделе.
- Выбираем из появившегося списка свою игру. Чтобы она появилась в данном перечне, ее необходимо предварительно запустить. Выбрав приложение, жмем кнопку «Open».
- Если защита позволит программе подключиться к игре, то вы не увидите на экране никакого сообщения. В верхней части окна лишь отобразится название подключенного приложения.
- С правой стороны окна Cheat Engine вы найдете строчку «Enable Speedhack». Ставим отметку в чекбоксе рядом с данной строчкой.
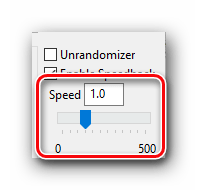
- Если попытка включения завершится успехом, вы увидите ниже появившуюся строчку для ввода и ползунок. Изменить скорость можно как в большую сторону, так и вовсе опустить ее до нуля. Для этого нужно ввести в строчку нужное значение скорости либо выставить его с помощью ползунка путем перетягивания последнего.
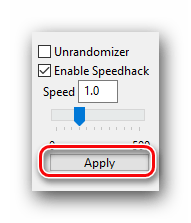
- Для того чтобы изменения вступили в силу, нужно нажать кнопку «Apply» после того, как выбрали нужную скорость.
- После этого ваша скорость в игре изменится. В некоторых случаях увеличивается скорость не только ваша, но и всего происходящего в игровом мире. Кроме того, иногда сервер не успевает обрабатывать подобные запросы, в результате чего возникают некие рывки и подергивания. Это связано с защитой игры и обойти это, к сожалению, никак нельзя.
- Если вам необходимо отключить Speedhack, то достаточно просто закрыть Cheat Engine или снять галочку напротив строки в окне программы.

Вот таким нехитрым образом можно в игре быстро бегать, стрелять и проводить прочие действия.
На этом данная статья подходит к концу. Мы рассказали вам об основных и самых востребованных функциях CheatEngine. Но это не значит, что программа больше ни на что не способна. На самом деле, ее возможности очень велики (составление трейнеров, работа с хексом, подмена пакетов и так далее). Но для этого потребуются куда большие знания, а пояснять подобные манипуляции понятным всем языком не так-то просто. Надеемся, у вас получится достигнуть поставленных целей. А если вам нужна будет консультация или совет — милости просим в комментарии к этой статье.
Если вам интересна тема взлома игр и использования читов, рекомендуем ознакомиться со списком софта, который в этом поможет.
Подробнее: Программы-аналоги ArtMoney
Еще статьи по данной теме:
Помогла ли Вам статья?
Доброго времени суток, уважаемые форумчане!
Я столкнулся с проблемой, когда после поиска значений и переноса их в нижнюю часть программы, не вводятся значения.
Объясняю всю процедуру:
Пересмотрел кучу видео, чтобы знать как правильно и что делать.
Зашел в игру, запустил СЕ, в программе выбрал нужную мне игру, затем ввел значения и нажал на «first scan» программа выдала мне несколько значений, затем перешел снова в игру, изменил нужное мне значение (забегая вперед, пробовал и увеличивать и уменьшать) перешел в программу СЕ ввел новое значение и нажал на кнопку «next scan» программа снова нашла несколько значений, я выделил их все (как было в видеоуроках) и перенес в нижнюю часть программы с помощью красной стрелочки между двумя частями программы
Затем я выделил все значения (так же пробовал и каждое значение по отдельности) и нажав на числовое значение высветилось окно для ввода нового значения, я ввел новое значение (пробовал разные числовые значения) нажал на кнопку «ОК» и ничего не произошло, значения какие были такие и остались.
Прошу, помогите, что я делаю не так? немного позже, если потребуется скину скрины со всеми действиями.
Я буду Вам крайне признателе
P.S. пробовал в разных играх итог один.
Cheat Engine– полезнейшая программа в арсенале любого геймера. Изменить внутренние параметры игры и «создать» себе нужное количество игрового золота, боеприпасов или любых других ресурсов в несколько кликов мышки, вот предназначение этой программы. К сожалению, у многих игроков при первом использовании возникают вопросы, как ею правильно пользоваться, поэтому мы написали для вас подробною инструкцию, как пользоваться Cheat Engine.
Инструкция будет показана на примере старой доброй игры Age of Empires III, где мы «наколдуем» себе пару миллионов игровых монет. Итак, для начала скачайте последнюю версию cheat engine и запустите сначала ее, а затем игру.
Делай раз
Запустим какую-нибудь миссию в игре и увидим, что золота у нас не так что бы уж очень много – 200.
Запомним это значение и откроем через alt+tab окно с нашей программой. Здесь вам нужно будет выбрать игровой процесс (1), в строку поиска ввести искомое значение (2) и нажать кнопку “Поиск” (3).
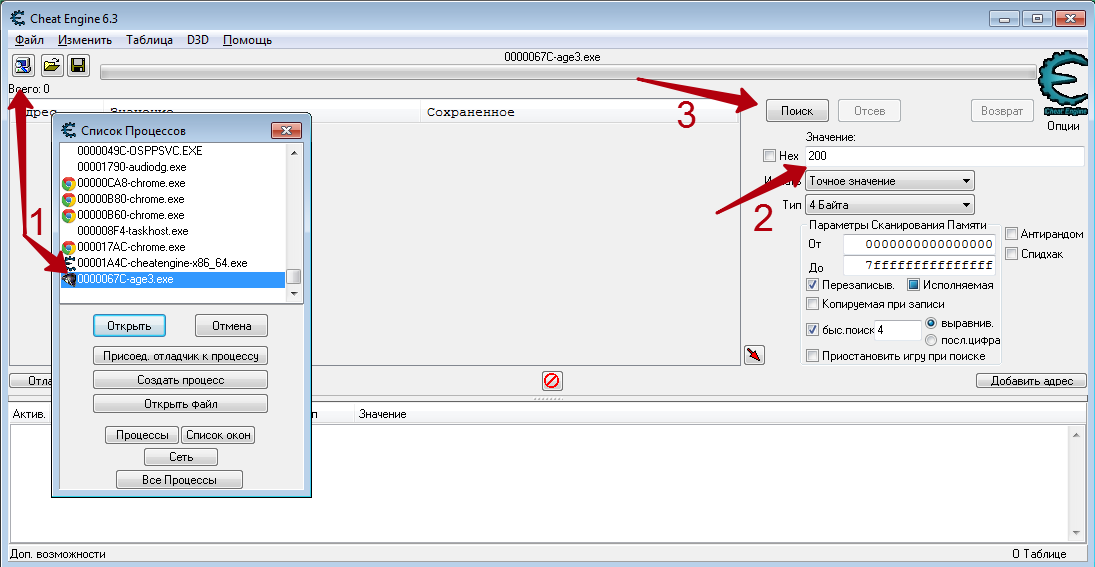
В этот момент Cheat Engine просканирует память игры на предмет наличия этого значения. Скорее всего, в результате вы получите огромное количество результатов и понять какой именно отвечает за наше золото будет непросто.
Делай два
Поэтому возвращаемся к игре и отправим поселенцев заработать немного денег, что бы изменить их количество.
Переключаемся опять к cheat engine, вводим в строку поиска новое значение (4) и запускаем повторное сканирование кнопкой “Отсев” (5), что бы программа искала изменение значений только среди результатов первого сканирования.
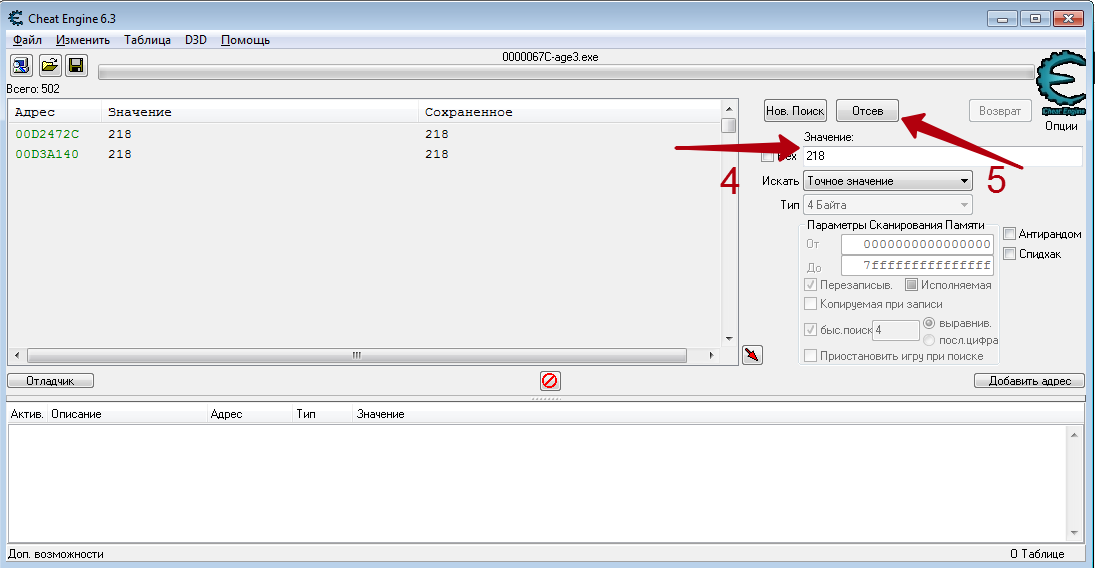
Как видите, результатов осталось всего два. Выберете их мышкой, щелкните правой клавишей и нажмите “Добавить выбранные адреса в таблицу”.
Делай три
Теперь в таблице выберете эти два значения, нажмите на них правой кнопкой мыши и проследуйте по пути “Изменить ” – “Значение”.
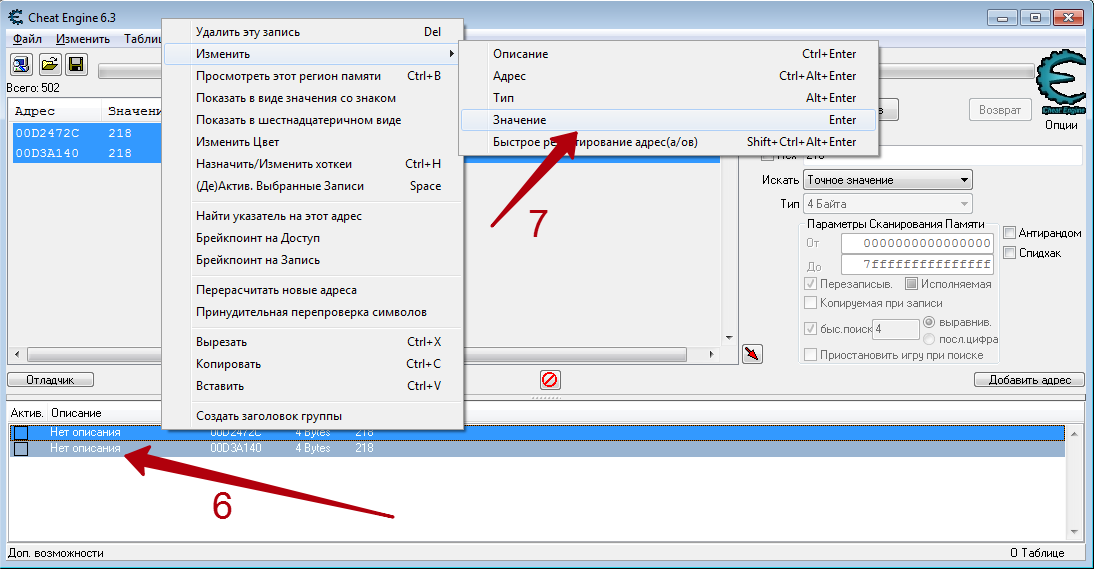
И устанавливайте нужное вам. Например, 10000. Теперь возвращайтесь в игру, и вуаля – теперь количество золота у вас равно десяти тысячам. Таким же образом вы можете изменять любые другие значения в любых играх. Удачи в экспериментах!
Твитнуть
Поделиться
Плюсануть
Поделиться
![]()
Download Article
![]()
Download Article
This wikiHow teaches you how to use Cheat Engine to exploit some computer games. Cheat Engine is a memory scanning tool. It allows you to access data stored in your computer’s memory and make changes to that data. This allows you to change information in a game, such as health, ammo, score, lives, and the number of things you have in your inventory.
Things You Should Know
- You can download Cheat Engine for Windows or macOS from https://cheatengine.org/downloads.php.
- You can use Cheat Engine to change the number of items in your inventory by modifying their aspect numbers.
- Not all games work with Cheat Engine, but you’ll have the best luck with single-player Steam games.
-

1
-
2
Click Download Cheat Engine. It’s a large link in the middle of the page.
- This button will also have the current version of Cheat Engine listed on it (e.g., Download Cheat Engine 6.7).
- If you’re attempting to use Cheat Engine on a Mac, click the Download Cheat Engine 6.2 For Mac link instead.
Advertisement
-
3
Install Cheat Engine. Doing so will vary depending on your computer’s operating system:
- Windows — Double-click the Cheat Engine setup file, click Yes when prompted, click Next, check the «I agree» box and click Next, click Next three more times, uncheck the «I agree to install McAfee WebAdvisor» box and click Next, and click Install. Once setup completes, click Next if prompted, then click Finish.
- Mac — Double-click the Cheat Engine DMG file, verify the installation if prompted, click and drag the Cheat Engine logo onto the «Applications» folder, and follow any on-screen instructions.
-
4
Open Cheat Engine. Once you’ve finished installing Cheat Engine, open Start
(Windows) or Launchpad (Mac), then click the Cheat Engine option.
- You may have to click Yes or Open before Cheat Engine will open.


Advertisement
-
1
Start a game. Open the game that you want to use with Cheat Engine.
- Remember, this cannot be an online multiplayer or server-based game.
-
2
Click the «Processes» icon. In the Cheat Engine window, click the computer-shaped icon in the top-left corner. This will open a pop-up window with your computer’s current programs in it.
-
3
Select your game’s process. Scroll through the list of processes until you find your game, then click the game’s name. If you’re attempting to use Cheat Engine for a browser game, you’ll select your browser’s name instead.
- If your game doesn’t appear in the «Processes» list, you cannot edit it in Cheat Engine.
- You may first have to click the Processes tab at the top of the window.
-
4
Click OK. It’s at the bottom of the window. This will open the game in Cheat Engine.


Advertisement
-
1
Determine a game aspect to change. In order for you to be able to change a game aspect, the aspect must have a number attached to it (e.g., amount of ammo, health, or items).
- The number must be on-screen. For example, if you want to change the number of a certain item in your inventory, you would first have to open your inventory to the page on which the item’s number is available.
-
2
Minimize the game window and click over to Cheat Engine. You’ll need to pull up the Cheat Engine window while the game is minimized.
- Don’t pause the game when you do this.
-
3
Click New Scan. It’s at the top of Cheat Engine next to the panel on the left. Any time you want to scan for a new value, you need to click New Scan.
-
4
Select a scan type. There are five scan types you can do when you start a new scan. The two main ones you’ll be using are «Exact Value» and «Unknown initial value». Use the drop-down menu next to «Scan Type» to select the type of scan you want to do. The scan types are as follows:
- Exact value: Use this scan type if you know the exact number you want to change. For example, if you know the exact number of lives, or ammo you have, you can select this option.
- Unknown initial value: In video games, sometimes a value isn’t represented with a number. For example, your health may be represented by a health meter instead of a number. In which case, you don’t have an exact number for how much health you have. There is a number that represents your health, you just don’t see it on-screen. In this case, you can select Unknown initial value.
- Bigger than…:’ Select this option if you don’t know the exact number you’re look for, but you know the smallest possible value.
- Smaller than…: Select this option if you don’t know the exact value, but you know the largest possible value.
- Value between…: This option allows you to enter a range of values to look for.
-
5
Select a data type: The data type represents how a value is stored in the memory. It can be hard to know what data type to select, so this can take a little guesswork. Use the drop-down menu next to «Data type» to select a data type. If you can’t find the value you are looking for using one data type, click New Scan and try again using a different data type. Some of the more common data types you will be using are as follows:
- Bytes: 2 Bytes and 4 Bytes are the data types you’ll be using most often. Most Windows applications use 4 Bytes, so start with that. You can also find these values using 2 Bytes. 1 Bytes and 8 Bytes can work as well, but you may run into problems.
- Float: Floating point data types are values that have a decimal point in the value (though you may not see the decimal point on-screen in the game). Some times games store values as floating points to prevent simple memory scans. If you’re not able to find the value you are looking for by scanning bytes, try scanning for floating points.
- Double: Doubles are similar to floating points, but they can contain twice the amount of digits. If you are unable to find a value by scanning for bytes or floats, try scanning for it as a double.
- All: This option scans all values of all data types. This is a good option if you don’t know what you are searching for, but it will also return more search results that you will need to narrow down.
-
6
Enter the value you want to change and click First scan. For example, if you have 20 bullets left in your ammo, you would type 20 into the «Value» text box. This will scan for all values that have the number «20» in it. This will likely produce a long list of values in the list of addresses, you’ll need need to narrow it down a bit.
-
7
Return to your game and change the value. How you do this will depend on the game itself; for example, if you’re trying to give yourself more health, you might purposefully damage your own health in order to lower the number. If you want more ammo, you might fire a couple of shots to lower your ammo count.
-
8
Return to Cheat Engine and scan for the updated number value. Minimize the game again and click back over to Cheat Engine. Type the new number into the «Value» section, then click Next Scan. This will scan all the values in your first scan and narrow down the addresses to the ones that changed to the value you entered in the «Value» bar.
- Unknown initial value: If you selected «Unknown initial value» for your first scan, select Increased value or Decreased value under «Scan type» depending on if the value (or meter) increased or decreased. This will scan for all values that increased or decreased instead of scanning for an exact number.
-
9
Repeat the search process until you have 4 or fewer values. You’ll keep changing the number and then searching for the updated number until you have no more than 4 values listed on the left side of Cheat Engine.
- You should eventually see the previous number you searched for listed in the «Previous» column of each value’s number, while the current value of the item will be in the «Value» column.
-
10
Add the values to the address list. You can either double-click a value to add it to the address list at the bottom, or you can click an address to select it and click the red, diagonal arrow in the bottom-right corner of the list of values. Doing so will place the values in the list of addresses at the bottom of the window.
- To select multiple addresses, you can hold «Shift» and click the top address and the bottom address.
-
11
Change the number to a value you want. Use the following steps to change the value number:
- Double-click the number below «Value» in the list at the bottom of Cheat Engine.
- Enter a new number in the «Value» field.
- Click Ok.
-
12
Check to see if the value updated in your game. When you re-open the game, the value you edited should reflect the number you just entered. The next part teaches you how to stop a value from changing by replacing it with non-operational code.
- You may need to change the value one more time before it will update.


Advertisement
-
1
Scan for a value you want to stop. This part teaches you how to use the Code Finder to find what writes to the address you want to change and then replace it with non-operational code. This will prevent the value from changing in-game. Use the steps in the previous part to find a value you want to change. Add it to the list at the bottom of the screen.
-
2
Right-click the address and click Find out what access this address. This opens the Cheat Engine Debugger. This displays instructions that write to the address you are accessing.
-
3
Click Yes. This confirms that you want to attach the debugger to the Cheat Engine process. This opens the Code debugger. The list will be blank when the window first opens.
-
4
Return to the game and change the value again. Once again, return to your game and do something to change the value you want to stop. This will cause the code instruction that accesses the address you selected to appear in the debugger window.
-
5
Return to Cheat Engine and click the instruction in the list. There may be more than one address. If that is the case, select the one that doesn’t write to the same base address. Look for the instruction that has a different value between the «[‘ and «]» brackets than the rest.
-
6
Click Replace. This replaces the code with non-operational (NOP) code. [1]
- If there is more than one item in the list, go ahead and select all of them.
-
7
Click Stop. This puts the non-operational code into effect. This will prevent the value from changing in the game.
- To restore the original code, select the item in the list and clck Show disassembler. Right-click where it says «NOP» and click Restore with original code. If you don’t see this option, click Replace with code that does nothing, click Yes. Then right-click NOP again and select Restore with orignal code.


Advertisement
-
1
Scan for a value you want to change. Sometimes values can change address either when you restart the game, or in the middle of the game. You can use pointers to find what writes to an address. Once you find the base level static address that doesn’t change, you can change that value.
-
2
Right-click the address and click Find out what writes to this address. This opens the debugger window.
- If there is multiple addresses, open a debugger window for as many addresses as Cheat Engine will allow.
-
3
Return to the game and change the value again. Once again, return to your game and do something to change the value you want to change (i.e. fire your weapon, get hit). This will cause the instruction that writes to that address to appear in the debugger window.
- If nothing changes in the debugger window, it is not the correct address. Try a different one.
-
4
Return to Cheat Engine and click the instruction in the list. It’s in the debugger window. There may be more than one address. If that is the case, look for the instruction that has a different set of characters between the «[‘ and «]» brackets than the rest. If there isn’t a single address that has different characters, check to see if the pointer is the same for all of them.
- If the characters have a + and a number at the end (i.e. [ESI+14]). That is an offset number. Write it down. You’ll need it later.
-
5
Click More information. This displays instructions that happen when the value changes in the Extra Info screen. This also lists the pointer that writes to the address.
- You can also find the address by checking the characters in the bracket, and then checking what number comes after those characters listed at the bottom. For example, if the address has «[rdx]» next to it, look for RDX=xxxxxxxx at the bottom.
-
6
Click the checkbox next to «Hex» and do a new scan for the pointer address. The address of the pointer is listed in the text that says «The value of the pointer needed to find this address is probably xxxxxxxxx». Use the following steps to search for the address at the end of this sentence.
- Click New Scan.
- Click the checkbox that says «Hex» next to the «Value» field.
- Enter the pointer address in the Value field and click First scan.
-
7
Double-click the pointer address. This adds the address to the list at the bottom of Cheat Engine.
- If the address is listed in green in the scan results. This means it is a static address and probably the pointer you are looking for. In some cases, the pointer you find may also be a pointer. This is called a multilevel pointer. In this case, you’ll need to repeat these steps for each pointer you find in order to find out what the root static pointer address is.
-
8
Double-click the number below «Address». This opens the «Change address» dialogue box.
-
9
Copy the address in the field and click Cancel. To copy the address, simply highlight the entire text in the field at the top of the «Change address» box. Right-click it and click Copy. Then click Cancel to close the field.
-
10
Click Add address manually. It’s the button on the left above the address list at the bottom of Cheat Engine. This opens a box that looks similar to the «Change address» box, except this one allows you to add an address.
-
11
Click the checkbox next to «Pointers». This expands the box and adds a new text field where you can enter a pointer.
-
12
Paste the pointer address in the field below «Pointers» and click Ok. This adds a new address for the pointer that controls the value that you want to change. The address for the pointer you just created will read something like «P—>xxxxxxxx». This indicates that this is a pointer pointing to a specific address.
- If there is an offset number, enter it in the space above the field where you paste the address.
- If there is more than one pointer, click Add offset. This will add more offset number boxes above the area where you paste the address. Enter the correct offset number in each box.
-
13
Click the «Active» boxe next to the pointer address you just added. It’s the box below «Active» in the list address list at the bottom of the screen. This activates pointer.
-
14
Change the value of the address you just added. The value number for the pointer address you just created should be the same as the address of the value you searched for. If the pointer writes to a different location, the original address you scanned for will no longer be valid. However, you can still change the value of the pointer address you just created. That will work no matter where it writes the value location to. Click the number below «value» for the address you just added. Enter a new numeric value and click Ok.


Advertisement
-
1
Scan for a value you want to stop. This part teaches you how to use Code Injections to change how the code writes a value. For example, if you lose health every time you get hit, you can change the code so that it increases your health when you get hit.
-
2
Right-click the address and click Find out what access this address. This opens the Cheat Engine Debugger.
-
3
Click Yes. This confirms that you want to attach the debugger to the Cheat Engine process. This opens the Code debugger. The list will be blank when the window first opens.
-
4
Return to the game and change the value again. Once again, return to your game and do something to change the value you want to stop. This will cause the code that accesses the address you selected to appear in the debugger window.
-
5
Return to the game and change the value again. Once again, return to your game and do something to change the value you want to stop. This will cause the instruction that writes to that address to appear in the debugger window.
-
6
Return to Cheat Engine and click the instruction in the list. There may be more than one address. If that is the case, look for an instruction that has the word «sub» in the instruction to subtract from the value, or the word «add» or «inc» to increase the value.
-
7
Click Show disassembler. This opens the code in the disassembler.
-
8
Select the code that subtracts or increases the value. It is usually the first instruction at the top of the code. It will have wlll most likely have the word «Sub» or «Add» at the start of the code to subtract from the value or add to it.
-
9
Click Tools followed by Auto Assemble. This opens the auto assembler.
-
10
Click Template followed by Full Injection. This displays a pop-up window that confirms the address you want to inject code into.
-
11
Ensure the address is correct and click Ok. Ensure the address in the field is the same address you selected in the Memory Viewer disassembler window. Then click Ok. This opens a new template.
-
12
Replace the code with it’s opposite. Scroll down to where it says «Code». The line below it is the code that changes the value. If the line starts with «sub», change «sub» to «add». If the line starts with «add», change it to «sub». You can also change the value at the end of the line to change how much you want it to change the value by.
-
13
Click Execute followed by Yes twice. The «Execute» button is at the bottom of the Code Injection window. You will be asked if you are sure you want to inject the code. Click Yes to confirm. Then you can click Yes or No to open the new code in the disassembler. If the code injection was successful, values in your game will do the opposite of what they are supposed to do. You can gain ammo by firing your weapon instead of losing ammo. You can gain health when you get hit instead of losing health.


Advertisement
-
1
Scan for a value you want to stop. In some games, multiple objects share the same code. Injecting code into one object will affect all the others too. So you might freeze your own health bar, only to realize that the health of all enemies is also frozen. In this case, you need to find out how to distinguish between different objects and inject a script that only affects the object you want.
- In order to inject scripts for different objects, you need to know some assembly code. However, it’s not too hard to create a basic script.
-
2
Right-click the address and click Find out what writes to this address. Once you’ve determined the address of the values you want to change or stop, find out what writes to those addresses, open up the debugger and find out what writes to that address.
-
3
Select the instruction and click Show disassembler. It’s the instruction that is highlighted when you open the debugger. This displays the instructions in the code disassembler.
-
4
Right-click the top instruction and click Find out what addresses this instruction accesses. This opens a window that displays a list of all the addresses the instruction accesses when it writes to a new address.
-
5
Allow all the objects in the game to change their value. This will show a list of all addresses that the instruction accesses. For example, if you are trying to stop your health bar from changing, you can return to your game and get hit. This will display the instruction that accesses that address in the list of accessed addresses window. If you hit an enemy that also shares that instruction, it will also show in the list of accessed addresses window.
-
6
Select all addresses in the list of accessed addresses window. Once you have an address for all objects that share the same address in the list of accessed addresses, simply click and drag to highlight all of them.
- Alternatively, you can right-click each individual address and click Show register states.[2]
- Alternatively, you can right-click each individual address and click Show register states.[2]
-
7
Disect the data of structure of all the listed addresses. Use the following steps to disect the data structure for the list of addresses:
- Right-click the selected addresses.
- Click Open disect data with selected addresses.
- Click Ok.
- Enter a name for the data structure and click Ok.
- Click Yes.
- Enter a starting size of the struct or leave it as is, and click Ok.
-
8
Find a value that is the same for the player(s), but different for other objects. Whether you are looking at the data structure or the register for each object, you need to find a value that is the same for all allies, but different for the enemies. For example, if Team 1 has two player characters, and Team 2 has two computer-controlled characters, the Team 1 characters may be represented with a value of 1, and Team 2 might have a value of 2.
- If can’t find a value that is the same for allies, but different for enemies, you can make one. Simply right-click one of the values (such as a pointer), and click Add Element. Select «4 Bytes» as the data type and give it an offset number value that is not taken. Offset numbers are listed to the left in the data dissection structure table.
-
9
Note the register for the value. Whether you are looking at the register view or data dissection view, the register value is on the left. In the register view, it will be the actual register the instruction writes to (i.e. RSI, RDX, EDX, etc). If you are looking at a data structure, the register will be an offset number or letter listed to the left.
-
10
Open a new code injection template for the instruction. Return to the Memory Viewer window and open a new code injection template for the instruction that writes to the different addresses. Use the following steps to do so:
- Click the instruction in the Memory Viewer window.
- Click Tools in the menu bar at the top.
- Click Auto Assembler.
- Click Template in the menu bar at the top.
- Click Code Injection.
-
11
Create a new label for the object you want to affect. Labels are listed at the top of the code injection template. Add a new label for the object you want to affect below the existing labels. To add a label, simply type label followed by the name of the label in parenthesis. For example, «label (player)» or «label (enemy)».
-
12
Create a new section for the label you just created. To create a new section for the label, type the name of the label followed by a colon (:) anywhere before or after the original code.
-
13
Add code to the label that changes the value of the object you want to effect. This requires a bit of knowledge of assembly code. You’ll need to add a line of code that changes the value for the object you want to change in the way you want to change it. Then you’ll need to add a line that jumps to the exit, original code, return code.
-
14
Create a comparison code below «newmem». The line that says «newmem:» in the code injection template indicates that the instruction is calling a new memory address. Normally, it will go right into the original code that has a label of (code:) or (originalcode:). Use the «cmp» command to create a line of code that compares the value of the different objects at the registry or registry plus offset number. For example, if RDX with an offset of 14 determines the player team from the computer team, and the player team has a value of 1, you would type cmp [rbx+14],1 to check if an object is a player or not.
-
15
Add a line of code that jumps to section for the object you want to change. Use the «je» command to jump to the section for your comparison command. For example, if your label is called «player», add the line je player to jump to the player section if the value comparison corresponds to the player.
-
16
Add code that jumps to the original code. After you create a line of code that jumps to the section for the object you want to change, you need to add a line of code that jumps to the original code if value doesn’t corrispond to the player or ally. Use the «jmp» command to create a line of code that jumps to the orignal code after the line of code that jumps to the original code (or another set of code you create that does something different).
- One way to keep things simple is not to add any new labels. Just create a comparison code at the end of «newmen:» to differenciate between allies and foes. Then add a line of code that jumps to the exit if it’s an ally. If it’s an enemy, have it jump to the original code. This will make it so that if the player or an ally is attacked (or fires weapons uses consumables, etc), nothing will change, but if an enemy is attacked, the code will execute as normal.
-
17
Click Execute. This executes the code you entered. If all goes well, you will have injected new code that differentiates between allies and foes. The following is an example of a simple script you can use to differentiate between allies and foes:
 alloc(newmem,2048,"Tutorial-x86_64.exe"+2EB6D)
label(returnhere)
label(originalcode)
label(exit)
label(player) //New label for the player.

newmem: //This calls a new memory address.
cmp [rbx+14],1 //This differenciates between ally team members and enemy team
je player //This jumps to the player section if object is on the player's team.
jmp originalcode //This jumps to the original code if object is an enemy team.

player: //This creates a new section for the Player's team
jmp exit //This jumps to the exit and does nothing for the player's team.

originalcode: //This is the original code section
movss [rbx+08],xmm0 //This executes original insturctions (for the enemy team)

exit: //This section ends this script.
jmp returnhere

"Tutorial-x86_64.exe"+2EB6D:
jmp newmem
returnhere:


Advertisement
-
1
Learn how Cheat Engine works. Cheat Engine can access pieces of data stored in your computer’s random access memory (RAM). When you run a piece of software, such as a game, information is transferred from a static storage location such a a hard drive, to your RAM. From there, the information can be read and written. Cheat Engine allows you to scan information stored in your RAM and change the information.
-
2
Understand the terminology. Cheat Engine deals with a lot of high-level computer code. To make things easier to understand, it helps to understand some of the terminology involved. The following are some terms used in Cheat Engine:
- Value: A value is anything in a computer program that has a numeric value attached to it. It games, it can be your health percentage, the number of ammo you have, or the quantity of an object you have. Cheat Engine allows you to scan for variables and make changes to them.
- Address: An address is the location the information is stored within the RAM. Sometimes, the location of a value can change.
- Data Type: A data type is how a value is stored. I can be in bytes (i.e. 2 Bytes, 4 Bytes, or 8 Bytes), it can also be a floating point, or a double.
- Pointer: A pointer is an address that contains a value that was written to by another address. These addresses can change every time you load a game, or sometime in the middle of a game.
-
3
Understand that Cheat Engine won’t work with many games. Any game which has some form of cheat protection or online multiplayer functionality won’t work with Cheat Engine, and attempting to use Cheat Engine will typically result in your account or profile being banned from online play.
- If you are somehow able to use Cheat Engine to obtain resources which are usually purchased with real money, you may be prosecuted for theft.
- Cheat Engine is a high-profile piece of software, so most games have some form of protection against it.
-
4
Know which games may work with Cheat Engine. Older singleplayer games and some Steam singleplayer games should work with Cheat Engine, though the games in question must have some on-screen value that you can view and change.
- Many online flash games which don’t have a community link (e.g., no multiplayer and no high score) are also compatible with Cheat Engine.


Advertisement
Add New Question
-
Question
Is there a speedhack function on Cheat Engine?

Yes, on the right side there’s a tickbox that reads ‘Enable Speedhack’. It allows you to easily speed up or slow down any singleplayer game.
-
Question
How do I do it with money on Gta 5 single player?
Try changing 4 bytes to string or double.
-
Question
I did this in Clash of Kings, and it changes the value in the game, but when I go to buy something, it goes back to what it was before it changed. What do I do?
It’s a multiplayer game, therefore it won’t let you change those values with cheat engine.
See more answers
Ask a Question
200 characters left
Include your email address to get a message when this question is answered.
Submit
Advertisement
-
Start with the interactive tutorial that comes with Cheat Engine. Try using these skills to get through all 9 steps.
-
Cheat Engine is useful for changing minor aspects of a game, though attempting to alter larger features may cause the game to break.
-
To use Cheat Engine effectively, it’s best if you have some knowledge of assembly code.
Thanks for submitting a tip for review!
Advertisement
-
If you use Cheat Engine on a VAC or other anti-cheat protected server, you will get banned.
-
On Roblox you can’t hack with the usual Cheat Engine, if you do you will get kicked off the game you’re trying to hack.
Advertisement
References
About This Article
Article SummaryX
1. Open Cheat Engine.
2. Start the game.
3. Determine the aspect number you want to change.
4. Minimize the game.
5. Click Processes and select the game’s process.
6. Find the aspect number and click First Scan.
7. Repeat until you have 4 or fewer values.
8. Add all remaining values to the address list.
9. Enter the value you want to use and click OK.
Did this summary help you?
Thanks to all authors for creating a page that has been read 1,412,856 times.
Is this article up to date?
![]()
Download Article
![]()
Download Article
This wikiHow teaches you how to use Cheat Engine to exploit some computer games. Cheat Engine is a memory scanning tool. It allows you to access data stored in your computer’s memory and make changes to that data. This allows you to change information in a game, such as health, ammo, score, lives, and the number of things you have in your inventory.
Things You Should Know
- You can download Cheat Engine for Windows or macOS from https://cheatengine.org/downloads.php.
- You can use Cheat Engine to change the number of items in your inventory by modifying their aspect numbers.
- Not all games work with Cheat Engine, but you’ll have the best luck with single-player Steam games.
-
1
-
2
Click Download Cheat Engine. It’s a large link in the middle of the page.
- This button will also have the current version of Cheat Engine listed on it (e.g., Download Cheat Engine 6.7).
- If you’re attempting to use Cheat Engine on a Mac, click the Download Cheat Engine 6.2 For Mac link instead.
Advertisement
-
3
Install Cheat Engine. Doing so will vary depending on your computer’s operating system:
- Windows — Double-click the Cheat Engine setup file, click Yes when prompted, click Next, check the «I agree» box and click Next, click Next three more times, uncheck the «I agree to install McAfee WebAdvisor» box and click Next, and click Install. Once setup completes, click Next if prompted, then click Finish.
- Mac — Double-click the Cheat Engine DMG file, verify the installation if prompted, click and drag the Cheat Engine logo onto the «Applications» folder, and follow any on-screen instructions.
-
4
Open Cheat Engine. Once you’ve finished installing Cheat Engine, open Start
(Windows) or Launchpad (Mac), then click the Cheat Engine option.
- You may have to click Yes or Open before Cheat Engine will open.
Advertisement
-
1
Start a game. Open the game that you want to use with Cheat Engine.
- Remember, this cannot be an online multiplayer or server-based game.
-
2
Click the «Processes» icon. In the Cheat Engine window, click the computer-shaped icon in the top-left corner. This will open a pop-up window with your computer’s current programs in it.
-
3
Select your game’s process. Scroll through the list of processes until you find your game, then click the game’s name. If you’re attempting to use Cheat Engine for a browser game, you’ll select your browser’s name instead.
- If your game doesn’t appear in the «Processes» list, you cannot edit it in Cheat Engine.
- You may first have to click the Processes tab at the top of the window.
-
4
Click OK. It’s at the bottom of the window. This will open the game in Cheat Engine.
Advertisement
-
1
Determine a game aspect to change. In order for you to be able to change a game aspect, the aspect must have a number attached to it (e.g., amount of ammo, health, or items).
- The number must be on-screen. For example, if you want to change the number of a certain item in your inventory, you would first have to open your inventory to the page on which the item’s number is available.
-
2
Minimize the game window and click over to Cheat Engine. You’ll need to pull up the Cheat Engine window while the game is minimized.
- Don’t pause the game when you do this.
-
3
Click New Scan. It’s at the top of Cheat Engine next to the panel on the left. Any time you want to scan for a new value, you need to click New Scan.
-
4
Select a scan type. There are five scan types you can do when you start a new scan. The two main ones you’ll be using are «Exact Value» and «Unknown initial value». Use the drop-down menu next to «Scan Type» to select the type of scan you want to do. The scan types are as follows:
- Exact value: Use this scan type if you know the exact number you want to change. For example, if you know the exact number of lives, or ammo you have, you can select this option.
- Unknown initial value: In video games, sometimes a value isn’t represented with a number. For example, your health may be represented by a health meter instead of a number. In which case, you don’t have an exact number for how much health you have. There is a number that represents your health, you just don’t see it on-screen. In this case, you can select Unknown initial value.
- Bigger than…:’ Select this option if you don’t know the exact number you’re look for, but you know the smallest possible value.
- Smaller than…: Select this option if you don’t know the exact value, but you know the largest possible value.
- Value between…: This option allows you to enter a range of values to look for.
-
5
Select a data type: The data type represents how a value is stored in the memory. It can be hard to know what data type to select, so this can take a little guesswork. Use the drop-down menu next to «Data type» to select a data type. If you can’t find the value you are looking for using one data type, click New Scan and try again using a different data type. Some of the more common data types you will be using are as follows:
- Bytes: 2 Bytes and 4 Bytes are the data types you’ll be using most often. Most Windows applications use 4 Bytes, so start with that. You can also find these values using 2 Bytes. 1 Bytes and 8 Bytes can work as well, but you may run into problems.
- Float: Floating point data types are values that have a decimal point in the value (though you may not see the decimal point on-screen in the game). Some times games store values as floating points to prevent simple memory scans. If you’re not able to find the value you are looking for by scanning bytes, try scanning for floating points.
- Double: Doubles are similar to floating points, but they can contain twice the amount of digits. If you are unable to find a value by scanning for bytes or floats, try scanning for it as a double.
- All: This option scans all values of all data types. This is a good option if you don’t know what you are searching for, but it will also return more search results that you will need to narrow down.
-
6
Enter the value you want to change and click First scan. For example, if you have 20 bullets left in your ammo, you would type 20 into the «Value» text box. This will scan for all values that have the number «20» in it. This will likely produce a long list of values in the list of addresses, you’ll need need to narrow it down a bit.
-
7
Return to your game and change the value. How you do this will depend on the game itself; for example, if you’re trying to give yourself more health, you might purposefully damage your own health in order to lower the number. If you want more ammo, you might fire a couple of shots to lower your ammo count.
-
8
Return to Cheat Engine and scan for the updated number value. Minimize the game again and click back over to Cheat Engine. Type the new number into the «Value» section, then click Next Scan. This will scan all the values in your first scan and narrow down the addresses to the ones that changed to the value you entered in the «Value» bar.
- Unknown initial value: If you selected «Unknown initial value» for your first scan, select Increased value or Decreased value under «Scan type» depending on if the value (or meter) increased or decreased. This will scan for all values that increased or decreased instead of scanning for an exact number.
-
9
Repeat the search process until you have 4 or fewer values. You’ll keep changing the number and then searching for the updated number until you have no more than 4 values listed on the left side of Cheat Engine.
- You should eventually see the previous number you searched for listed in the «Previous» column of each value’s number, while the current value of the item will be in the «Value» column.
-
10
Add the values to the address list. You can either double-click a value to add it to the address list at the bottom, or you can click an address to select it and click the red, diagonal arrow in the bottom-right corner of the list of values. Doing so will place the values in the list of addresses at the bottom of the window.
- To select multiple addresses, you can hold «Shift» and click the top address and the bottom address.
-
11
Change the number to a value you want. Use the following steps to change the value number:
- Double-click the number below «Value» in the list at the bottom of Cheat Engine.
- Enter a new number in the «Value» field.
- Click Ok.
-
12
Check to see if the value updated in your game. When you re-open the game, the value you edited should reflect the number you just entered. The next part teaches you how to stop a value from changing by replacing it with non-operational code.
- You may need to change the value one more time before it will update.
Advertisement
-
1
Scan for a value you want to stop. This part teaches you how to use the Code Finder to find what writes to the address you want to change and then replace it with non-operational code. This will prevent the value from changing in-game. Use the steps in the previous part to find a value you want to change. Add it to the list at the bottom of the screen.
-
2
Right-click the address and click Find out what access this address. This opens the Cheat Engine Debugger. This displays instructions that write to the address you are accessing.
-
3
Click Yes. This confirms that you want to attach the debugger to the Cheat Engine process. This opens the Code debugger. The list will be blank when the window first opens.
-
4
Return to the game and change the value again. Once again, return to your game and do something to change the value you want to stop. This will cause the code instruction that accesses the address you selected to appear in the debugger window.
-
5
Return to Cheat Engine and click the instruction in the list. There may be more than one address. If that is the case, select the one that doesn’t write to the same base address. Look for the instruction that has a different value between the «[‘ and «]» brackets than the rest.
-
6
Click Replace. This replaces the code with non-operational (NOP) code. [1]
- If there is more than one item in the list, go ahead and select all of them.
-
7
Click Stop. This puts the non-operational code into effect. This will prevent the value from changing in the game.
- To restore the original code, select the item in the list and clck Show disassembler. Right-click where it says «NOP» and click Restore with original code. If you don’t see this option, click Replace with code that does nothing, click Yes. Then right-click NOP again and select Restore with orignal code.
Advertisement
-
1
Scan for a value you want to change. Sometimes values can change address either when you restart the game, or in the middle of the game. You can use pointers to find what writes to an address. Once you find the base level static address that doesn’t change, you can change that value.
-
2
Right-click the address and click Find out what writes to this address. This opens the debugger window.
- If there is multiple addresses, open a debugger window for as many addresses as Cheat Engine will allow.
-
3
Return to the game and change the value again. Once again, return to your game and do something to change the value you want to change (i.e. fire your weapon, get hit). This will cause the instruction that writes to that address to appear in the debugger window.
- If nothing changes in the debugger window, it is not the correct address. Try a different one.
-
4
Return to Cheat Engine and click the instruction in the list. It’s in the debugger window. There may be more than one address. If that is the case, look for the instruction that has a different set of characters between the «[‘ and «]» brackets than the rest. If there isn’t a single address that has different characters, check to see if the pointer is the same for all of them.
- If the characters have a + and a number at the end (i.e. [ESI+14]). That is an offset number. Write it down. You’ll need it later.
-
5
Click More information. This displays instructions that happen when the value changes in the Extra Info screen. This also lists the pointer that writes to the address.
- You can also find the address by checking the characters in the bracket, and then checking what number comes after those characters listed at the bottom. For example, if the address has «[rdx]» next to it, look for RDX=xxxxxxxx at the bottom.
-
6
Click the checkbox next to «Hex» and do a new scan for the pointer address. The address of the pointer is listed in the text that says «The value of the pointer needed to find this address is probably xxxxxxxxx». Use the following steps to search for the address at the end of this sentence.
- Click New Scan.
- Click the checkbox that says «Hex» next to the «Value» field.
- Enter the pointer address in the Value field and click First scan.
-
7
Double-click the pointer address. This adds the address to the list at the bottom of Cheat Engine.
- If the address is listed in green in the scan results. This means it is a static address and probably the pointer you are looking for. In some cases, the pointer you find may also be a pointer. This is called a multilevel pointer. In this case, you’ll need to repeat these steps for each pointer you find in order to find out what the root static pointer address is.
-
8
Double-click the number below «Address». This opens the «Change address» dialogue box.
-
9
Copy the address in the field and click Cancel. To copy the address, simply highlight the entire text in the field at the top of the «Change address» box. Right-click it and click Copy. Then click Cancel to close the field.
-
10
Click Add address manually. It’s the button on the left above the address list at the bottom of Cheat Engine. This opens a box that looks similar to the «Change address» box, except this one allows you to add an address.
-
11
Click the checkbox next to «Pointers». This expands the box and adds a new text field where you can enter a pointer.
-
12
Paste the pointer address in the field below «Pointers» and click Ok. This adds a new address for the pointer that controls the value that you want to change. The address for the pointer you just created will read something like «P—>xxxxxxxx». This indicates that this is a pointer pointing to a specific address.
- If there is an offset number, enter it in the space above the field where you paste the address.
- If there is more than one pointer, click Add offset. This will add more offset number boxes above the area where you paste the address. Enter the correct offset number in each box.
-
13
Click the «Active» boxe next to the pointer address you just added. It’s the box below «Active» in the list address list at the bottom of the screen. This activates pointer.
-
14
Change the value of the address you just added. The value number for the pointer address you just created should be the same as the address of the value you searched for. If the pointer writes to a different location, the original address you scanned for will no longer be valid. However, you can still change the value of the pointer address you just created. That will work no matter where it writes the value location to. Click the number below «value» for the address you just added. Enter a new numeric value and click Ok.
Advertisement
-
1
Scan for a value you want to stop. This part teaches you how to use Code Injections to change how the code writes a value. For example, if you lose health every time you get hit, you can change the code so that it increases your health when you get hit.
-
2
Right-click the address and click Find out what access this address. This opens the Cheat Engine Debugger.
-
3
Click Yes. This confirms that you want to attach the debugger to the Cheat Engine process. This opens the Code debugger. The list will be blank when the window first opens.
-
4
Return to the game and change the value again. Once again, return to your game and do something to change the value you want to stop. This will cause the code that accesses the address you selected to appear in the debugger window.
-
5
Return to the game and change the value again. Once again, return to your game and do something to change the value you want to stop. This will cause the instruction that writes to that address to appear in the debugger window.
-
6
Return to Cheat Engine and click the instruction in the list. There may be more than one address. If that is the case, look for an instruction that has the word «sub» in the instruction to subtract from the value, or the word «add» or «inc» to increase the value.
-
7
Click Show disassembler. This opens the code in the disassembler.
-
8
Select the code that subtracts or increases the value. It is usually the first instruction at the top of the code. It will have wlll most likely have the word «Sub» or «Add» at the start of the code to subtract from the value or add to it.
-
9
Click Tools followed by Auto Assemble. This opens the auto assembler.
-
10
Click Template followed by Full Injection. This displays a pop-up window that confirms the address you want to inject code into.
-
11
Ensure the address is correct and click Ok. Ensure the address in the field is the same address you selected in the Memory Viewer disassembler window. Then click Ok. This opens a new template.
-
12
Replace the code with it’s opposite. Scroll down to where it says «Code». The line below it is the code that changes the value. If the line starts with «sub», change «sub» to «add». If the line starts with «add», change it to «sub». You can also change the value at the end of the line to change how much you want it to change the value by.
-
13
Click Execute followed by Yes twice. The «Execute» button is at the bottom of the Code Injection window. You will be asked if you are sure you want to inject the code. Click Yes to confirm. Then you can click Yes or No to open the new code in the disassembler. If the code injection was successful, values in your game will do the opposite of what they are supposed to do. You can gain ammo by firing your weapon instead of losing ammo. You can gain health when you get hit instead of losing health.
Advertisement
-
1
Scan for a value you want to stop. In some games, multiple objects share the same code. Injecting code into one object will affect all the others too. So you might freeze your own health bar, only to realize that the health of all enemies is also frozen. In this case, you need to find out how to distinguish between different objects and inject a script that only affects the object you want.
- In order to inject scripts for different objects, you need to know some assembly code. However, it’s not too hard to create a basic script.
-
2
Right-click the address and click Find out what writes to this address. Once you’ve determined the address of the values you want to change or stop, find out what writes to those addresses, open up the debugger and find out what writes to that address.
-
3
Select the instruction and click Show disassembler. It’s the instruction that is highlighted when you open the debugger. This displays the instructions in the code disassembler.
-
4
Right-click the top instruction and click Find out what addresses this instruction accesses. This opens a window that displays a list of all the addresses the instruction accesses when it writes to a new address.
-
5
Allow all the objects in the game to change their value. This will show a list of all addresses that the instruction accesses. For example, if you are trying to stop your health bar from changing, you can return to your game and get hit. This will display the instruction that accesses that address in the list of accessed addresses window. If you hit an enemy that also shares that instruction, it will also show in the list of accessed addresses window.
-
6
Select all addresses in the list of accessed addresses window. Once you have an address for all objects that share the same address in the list of accessed addresses, simply click and drag to highlight all of them.
- Alternatively, you can right-click each individual address and click Show register states.[2]
- Alternatively, you can right-click each individual address and click Show register states.[2]
-
7
Disect the data of structure of all the listed addresses. Use the following steps to disect the data structure for the list of addresses:
- Right-click the selected addresses.
- Click Open disect data with selected addresses.
- Click Ok.
- Enter a name for the data structure and click Ok.
- Click Yes.
- Enter a starting size of the struct or leave it as is, and click Ok.
-
8
Find a value that is the same for the player(s), but different for other objects. Whether you are looking at the data structure or the register for each object, you need to find a value that is the same for all allies, but different for the enemies. For example, if Team 1 has two player characters, and Team 2 has two computer-controlled characters, the Team 1 characters may be represented with a value of 1, and Team 2 might have a value of 2.
- If can’t find a value that is the same for allies, but different for enemies, you can make one. Simply right-click one of the values (such as a pointer), and click Add Element. Select «4 Bytes» as the data type and give it an offset number value that is not taken. Offset numbers are listed to the left in the data dissection structure table.
-
9
Note the register for the value. Whether you are looking at the register view or data dissection view, the register value is on the left. In the register view, it will be the actual register the instruction writes to (i.e. RSI, RDX, EDX, etc). If you are looking at a data structure, the register will be an offset number or letter listed to the left.
-
10
Open a new code injection template for the instruction. Return to the Memory Viewer window and open a new code injection template for the instruction that writes to the different addresses. Use the following steps to do so:
- Click the instruction in the Memory Viewer window.
- Click Tools in the menu bar at the top.
- Click Auto Assembler.
- Click Template in the menu bar at the top.
- Click Code Injection.
-
11
Create a new label for the object you want to affect. Labels are listed at the top of the code injection template. Add a new label for the object you want to affect below the existing labels. To add a label, simply type label followed by the name of the label in parenthesis. For example, «label (player)» or «label (enemy)».
-
12
Create a new section for the label you just created. To create a new section for the label, type the name of the label followed by a colon (:) anywhere before or after the original code.
-
13
Add code to the label that changes the value of the object you want to effect. This requires a bit of knowledge of assembly code. You’ll need to add a line of code that changes the value for the object you want to change in the way you want to change it. Then you’ll need to add a line that jumps to the exit, original code, return code.
-
14
Create a comparison code below «newmem». The line that says «newmem:» in the code injection template indicates that the instruction is calling a new memory address. Normally, it will go right into the original code that has a label of (code:) or (originalcode:). Use the «cmp» command to create a line of code that compares the value of the different objects at the registry or registry plus offset number. For example, if RDX with an offset of 14 determines the player team from the computer team, and the player team has a value of 1, you would type cmp [rbx+14],1 to check if an object is a player or not.
-
15
Add a line of code that jumps to section for the object you want to change. Use the «je» command to jump to the section for your comparison command. For example, if your label is called «player», add the line je player to jump to the player section if the value comparison corresponds to the player.
-
16
Add code that jumps to the original code. After you create a line of code that jumps to the section for the object you want to change, you need to add a line of code that jumps to the original code if value doesn’t corrispond to the player or ally. Use the «jmp» command to create a line of code that jumps to the orignal code after the line of code that jumps to the original code (or another set of code you create that does something different).
- One way to keep things simple is not to add any new labels. Just create a comparison code at the end of «newmen:» to differenciate between allies and foes. Then add a line of code that jumps to the exit if it’s an ally. If it’s an enemy, have it jump to the original code. This will make it so that if the player or an ally is attacked (or fires weapons uses consumables, etc), nothing will change, but if an enemy is attacked, the code will execute as normal.
-
17
Click Execute. This executes the code you entered. If all goes well, you will have injected new code that differentiates between allies and foes. The following is an example of a simple script you can use to differentiate between allies and foes:
 alloc(newmem,2048,"Tutorial-x86_64.exe"+2EB6D)
label(returnhere)
label(originalcode)
label(exit)
label(player) //New label for the player.

newmem: //This calls a new memory address.
cmp [rbx+14],1 //This differenciates between ally team members and enemy team
je player //This jumps to the player section if object is on the player's team.
jmp originalcode //This jumps to the original code if object is an enemy team.

player: //This creates a new section for the Player's team
jmp exit //This jumps to the exit and does nothing for the player's team.

originalcode: //This is the original code section
movss [rbx+08],xmm0 //This executes original insturctions (for the enemy team)

exit: //This section ends this script.
jmp returnhere

"Tutorial-x86_64.exe"+2EB6D:
jmp newmem
returnhere:
Advertisement
-
1
Learn how Cheat Engine works. Cheat Engine can access pieces of data stored in your computer’s random access memory (RAM). When you run a piece of software, such as a game, information is transferred from a static storage location such a a hard drive, to your RAM. From there, the information can be read and written. Cheat Engine allows you to scan information stored in your RAM and change the information.
-
2
Understand the terminology. Cheat Engine deals with a lot of high-level computer code. To make things easier to understand, it helps to understand some of the terminology involved. The following are some terms used in Cheat Engine:
- Value: A value is anything in a computer program that has a numeric value attached to it. It games, it can be your health percentage, the number of ammo you have, or the quantity of an object you have. Cheat Engine allows you to scan for variables and make changes to them.
- Address: An address is the location the information is stored within the RAM. Sometimes, the location of a value can change.
- Data Type: A data type is how a value is stored. I can be in bytes (i.e. 2 Bytes, 4 Bytes, or 8 Bytes), it can also be a floating point, or a double.
- Pointer: A pointer is an address that contains a value that was written to by another address. These addresses can change every time you load a game, or sometime in the middle of a game.
-
3
Understand that Cheat Engine won’t work with many games. Any game which has some form of cheat protection or online multiplayer functionality won’t work with Cheat Engine, and attempting to use Cheat Engine will typically result in your account or profile being banned from online play.
- If you are somehow able to use Cheat Engine to obtain resources which are usually purchased with real money, you may be prosecuted for theft.
- Cheat Engine is a high-profile piece of software, so most games have some form of protection against it.
-
4
Know which games may work with Cheat Engine. Older singleplayer games and some Steam singleplayer games should work with Cheat Engine, though the games in question must have some on-screen value that you can view and change.
- Many online flash games which don’t have a community link (e.g., no multiplayer and no high score) are also compatible with Cheat Engine.
Advertisement
Add New Question
-
Question
Is there a speedhack function on Cheat Engine?
Yes, on the right side there’s a tickbox that reads ‘Enable Speedhack’. It allows you to easily speed up or slow down any singleplayer game.
-
Question
How do I do it with money on Gta 5 single player?
Try changing 4 bytes to string or double.
-
Question
I did this in Clash of Kings, and it changes the value in the game, but when I go to buy something, it goes back to what it was before it changed. What do I do?
It’s a multiplayer game, therefore it won’t let you change those values with cheat engine.
See more answers
Ask a Question
200 characters left
Include your email address to get a message when this question is answered.
Submit
Advertisement
-
Start with the interactive tutorial that comes with Cheat Engine. Try using these skills to get through all 9 steps.
-
Cheat Engine is useful for changing minor aspects of a game, though attempting to alter larger features may cause the game to break.
-
To use Cheat Engine effectively, it’s best if you have some knowledge of assembly code.
Thanks for submitting a tip for review!
Advertisement
-
If you use Cheat Engine on a VAC or other anti-cheat protected server, you will get banned.
-
On Roblox you can’t hack with the usual Cheat Engine, if you do you will get kicked off the game you’re trying to hack.
Advertisement
References
About This Article
Article SummaryX
1. Open Cheat Engine.
2. Start the game.
3. Determine the aspect number you want to change.
4. Minimize the game.
5. Click Processes and select the game’s process.
6. Find the aspect number and click First Scan.
7. Repeat until you have 4 or fewer values.
8. Add all remaining values to the address list.
9. Enter the value you want to use and click OK.
Did this summary help you?
Thanks to all authors for creating a page that has been read 1,412,856 times.
Is this article up to date?
-
1
Запомните, как работает Cheat Engine. Cheat Engine может получить доступ к данным, которые находятся в оперативной памяти компьютера — некоторые из этих данных относятся к игровым значениям. Например, если здоровье игрового персонажа выражено числом (к примеру, 100), число «100» является значением. С помощью Cheat Engine такие значения можно находить в оперативной памяти компьютера, а затем менять их.
- Если изменить значение, можно, например, получить больше предметов, улучшить здоровье персонажа и так далее.
-
2
Имейте в виду, что Cheat Engine работает не со всеми играми. Если игра защищена от использования чит-кодов или является многопользовательской сетевой игрой, она не будет работать с Cheat Engine — если вы попытаетесь использовать Cheat Engine, ваш аккаунт или профиль для сетевой игры будет заблокирован.
- Если с помощью Cheat Engine вы умудритесь получить предметы, которые в игре продаются за настоящие деньги, вас могут привлечь к ответственности за кражу.
- Cheat Engine — это качественное программное обеспечение, поэтому у большинства игр есть какая-то защита от него.
-
3
Запомните, какие игры могут работать с Cheat Engine. Старые однопользовательские игры и некоторые однопользовательские игры Steam должны работать с Cheat Engine, но в таких играх на экране должно отображаться какое-то значение, которое можно найти и изменить.
- Многие сетевые флеш-игры, в которых нет многопользовательского режима и рекордов, также совместимы с Cheat Engine.
Реклама


-
1
-
2
Нажмите Download Cheat Engine (Скачать Cheat Engine). Эта кнопка находится посередине страницы.
- На этой кнопке также будет указана текущая версия Cheat Engine, например, «Download Cheat Engine 6.7» (Скачать Cheat Engine 6.7).
- Чтобы скачать Cheat Engine для macOS, нажмите «Download Cheat Engine 6.2 For Mac» (Скачать Cheat Engine 6.2 для Mac).
-
3
Откажитесь от установки дополнительного программного обеспечения. Нажмите «Decline» (Отклонить) в окне, а затем снова нажмите «Отклонить», когда появится запрос. Начнется загрузка установочного файла Cheat Engine на компьютер.
- Пропустите этот шаг на компьютере Mac — как только вы щелкните по кнопке для загрузки, запустится процесс скачивания DMG-файла.
-
4
Установите Cheat Engine. Процесс зависит от операционной системы компьютера:
- Windows — дважды щелкните по установочному файлу Cheat Engine, нажмите «Да» в окне с запросом, щелкните по «Next» (Далее), установите флажок у «I agree» (Согласиться) и нажмите «Next» (Далее), трижды щелкните по «Next» (Далее), снимите флажок у «I agree to install McAfee WebAdvisor» (Согласиться на установку McAfee WebAdvisor), нажмите «Next» (Далее) и щелкните по «Install» (Установить). Когда процесс установки завершится, нажмите «Next» (Далее) и щелкните по «Finish» (Готово).
- Mac — дважды щелкните по скачанному DMG-файлу, разрешите устанавливать программы сторонних разработчиков, перетащите значок Cheat Engine в папку «Программы» и следуйте инструкциям на экране.
-
5
Запустите Cheat Engine. Откройте меню «Пуск»
(Windows) или Launchpad (Mac), а затем нажмите «Cheat Engine».
- Возможно, сначала вам придется нажать «Да» или «Открыть».
Реклама


-
1
Запустите игру. Запустите игру, которую хотите использовать с Cheat Engine.
- Помните, что это не должна быть многопользовательская сетевая или серверная игра.
-
2
Выберите элемент игры, значение которого нужно изменить. Чтобы изменить значение, элемент должен быть выражен числом (например, уровень здоровья персонажа выражен числом).
- Число должно отображаться на экране. Например, чтобы изменить количество конкретного предмета в инвентаре, сначала откройте инвентарь, чтобы отобразить текущее количество этого предмета.
-
3
Сверните окно с игрой. Теперь откройте окно Cheat Engine.
- Игру не останавливайте.
-
4
Нажмите на значок «Processes» (Процессы) в окне Cheat Engine. Он выглядит как компьютер и находится в верхнем левом углу. Откроется всплывающее окно со списком программ, которые запущены на компьютере.
-
5
Выберите процесс игры. Прокрутите список процессов, найдите в нем запущенную игру и щелкните по ее имени. Чтобы использовать Cheat Engine для игры, которая запущена в браузере, нажмите на имя браузера.
- Если нужной игры в списке «Процессы» нет, использовать Cheat Engine с этой игрой нельзя.
- Возможно, сначала вам придется нажать на вкладку «Процессы» в верхней части окна.
-
6
Щелкните по OK. Эта опция находится внизу окна. Игра откроется в Cheat Engine.
-
7
Найдите число, которое нужно изменить. Введите число, которым выражен нужный игровой элемент, в текстовое поле «Value» (Значение) в верхней части окна Cheat Engine, а затем нажмите «First Scan» (Первое сканирование).
- Например, если нужный игровой элемент выражен числом «20», введите 20 в текстовом поле «Значение».
-
8
Сделайте так, чтобы число изменилось. Ваши действия будут зависеть от игры; например, если вы хотите изменить уровень здоровья персонажа, как-нибудь навредите себе, чтобы уровень здоровья снизился.
- То есть нужно сделать так, чтобы число, отображаемое на экране, изменилось (уменьшилось или увеличилось).
-
9
Сверните окно с игрой, а затем найдите новое число. Введите новое число в поле «Value» (Значение) и нажмите «Next Scan» (Следующее сканирование). Так вы уменьшите количество значений, которые отображаются на левой панели окна Cheat Engine.
-
10
Повторяйте процесс поиска, пока на левой панели не останется 4 или менее значений. То есть делайте так, чтобы число, отображаемое на экране (в окне с игрой), менялось, а затем ищите новое число в программе Cheat Engine.
- В конце концов, предыдущее искомое число отобразится в столбце «Previous» (Предыдущее), а текущее число — в столбце «Value» (Значение).
-
11
Выберите значения. Нажмите на верхнее значение, удерживайте ⇧ Shift и щелкните по нижнему значению. Все значения будут выделены.
-
12
Добавьте значения в список адресов. Нажмите на красную диагональную стрелку в правом нижнем углу списка значений. При этом значения переместятся в список адресов в нижней части окна.
-
13
Выберите все значения. Щелкните по одному значению в нижней части окна, а затем нажмите Ctrl+A (Windows) или ⌘ Command+A (Mac).
-
14
Нажмите ↵ Enter. Появится всплывающее окно с текстовым полем.
- Возможно, вам придется дважды щелкнуть по значению, чтобы открыть это поле.
-
15
Введите нужное число. Введите число, которое будет присвоено выбранному игровому элементу, во всплывающем окне.
- Например, чтобы получить 1000 предметов, введите 1000.
-
16
Щелкните по OK. Эта опция находится внизу окна. Все текущие значения будут обновлены.
-
17
Проверьте, изменилось ли число в игре. Когда вы откроете игру, вместо числа, которое вы хотели изменить, должно отображаться введенное вами число.
- Возможно, вам придется изменить число еще раз, прежде чем оно отобразится в игре.
Реклама


Советы
- Cheat Engine предназначен для изменения незначительных элементов игры — если изменить значение более крупного элемента, игра может поломаться.
Реклама
Предупреждения
- Если вы используете Cheat Engine на VAC или другом защищенном от мошенничества сервере, ваш аккаунт будет заблокирован.
- Roblox нельзя взломать с помощью Cheat Engine — если вы сделаете это, ваш аккаунт будет заблокирован.
Реклама
Об этой статье
Эту страницу просматривали 95 838 раз.
Была ли эта статья полезной?
Иногда схватка с чрезмерно сложным боссом портит впечатление от игры, когда тот упорно не дает продвигаться дальше по сюжету. Подобные проблемы, вызванные отсутствием баланса, легко решить с помощью Cheat Engine – программы для изменения внутриигровых параметров. Это отличное решение, которым пользуются тысячи геймеров.
Как работает программа Cheat Engine
Здоровье, броня, деньги, урон от оружия и другие параметры сохранены в единой базе данных в виде HEX-кодов. Проще говоря, это цифры в оперативной памяти – текущие параметры, которые изменяемы. Конечно, искать подходящую строчку самостоятельно будет очень сложно, ведь в игре используются сотни и тысячи параметров, в том числе и скрытых, которые представляют собой комбинацию цифр.
Cheat Engine представляет собой высокопроизводительный HEX-редактор, работающий в стандартном режиме и Speed Hack. Пользоваться программой сможет даже новичок, по-крайней мере, изменить количество денег или увеличить здоровье главного героя в 10 или 100 раз – базовые операции не представляют собой ничего сложного.
Как пользоваться популярной программой Cheat Engine
Рассмотрим, как работает программа на примере игры Heroes 3. Допустим, что изначальное количество золота составляет 20000 – почему бы не сделать себе миллион золотых. Сверните игру и запустите Cheat Engine, затем выполните манипуляции, описанные ниже.
Нажимаем кнопку с изображением компьютера.
Откроется окно, в котором представлен список запущенных процессов – в нашем случае нужен h3wog.exe. Название «экзешника» можно посмотреть в папке с игрой.

Нажимаем кнопку Открыть. В строке Значение указывается текущее количество золота. Нажимаем кнопку Поиск. В открывшейся таблице, находящейся слева, отобразятся найденные значения, соответствующие введенному запросу.
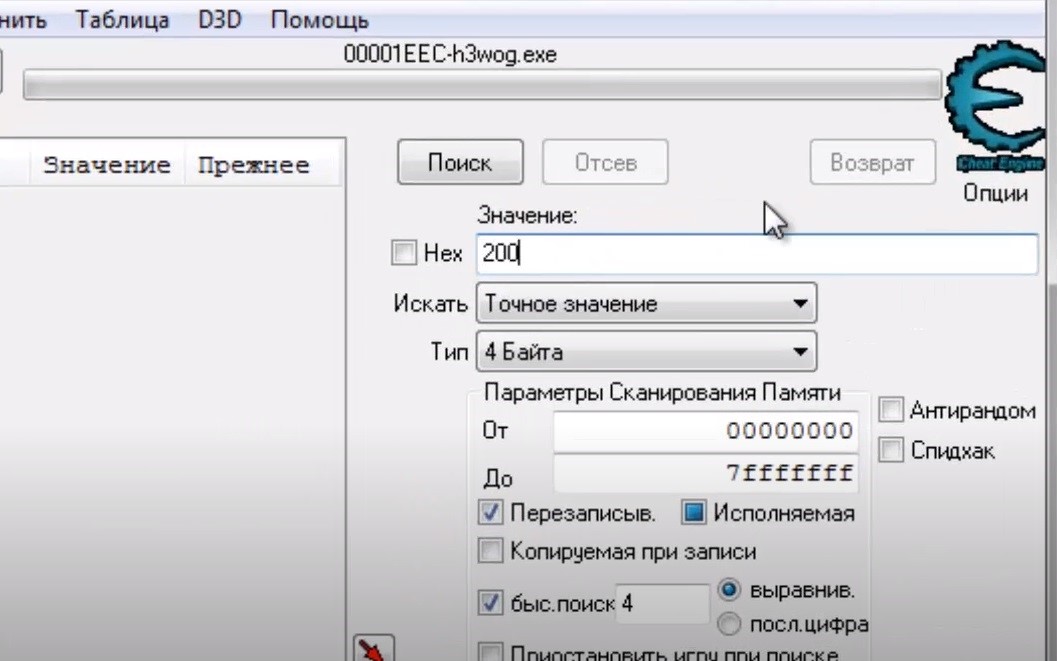
Найдите нужную строку из доступных, используя метод сортировки. Потратьте золото в игре – пусть текущее количество денег в казне изменится. Эту комбинацию цифр введите в Cheat Engine в поле значение – выполните эту манипуляцию и нажмите кнопку Отсев (ни в коем случае не Новый поиск, иначе придется начинать заново!).
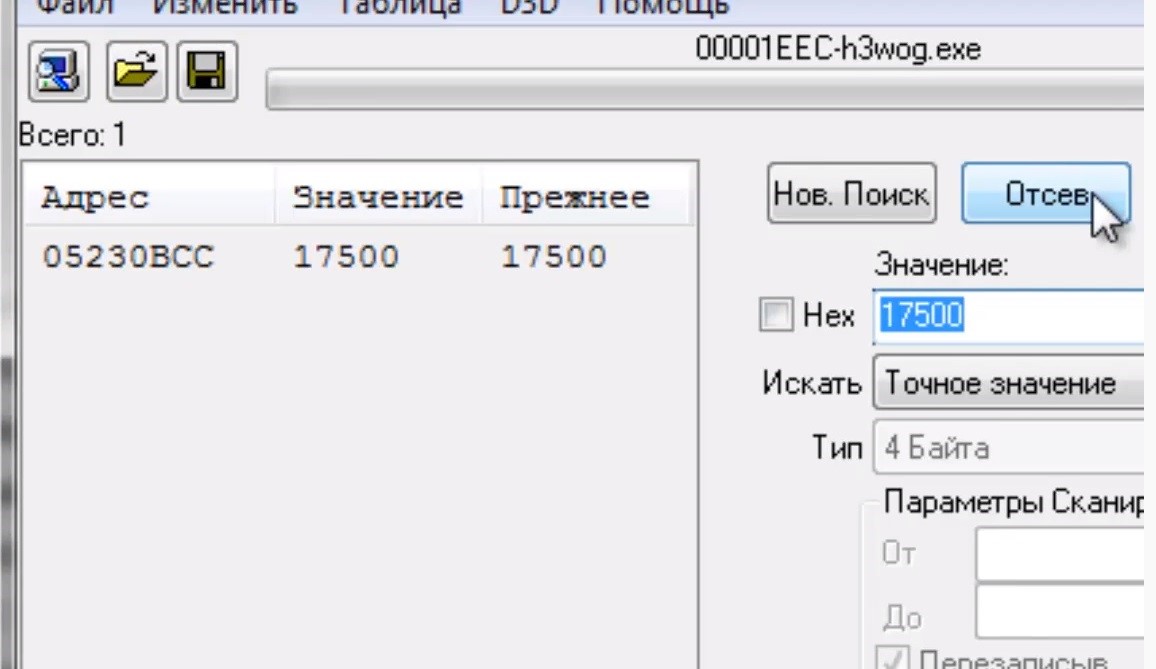
Продолжайте поиск, пока не останется одна строка с закодированным количеством денег. Кликните по оставшейся строке левой кнопкой мыши, а затем правой и в контекстном меню выберите пункт Изменить значение у выбранных адресов памяти. Введите число, соответствующее сумме золота, которое желаете получить, например, 1 миллион.
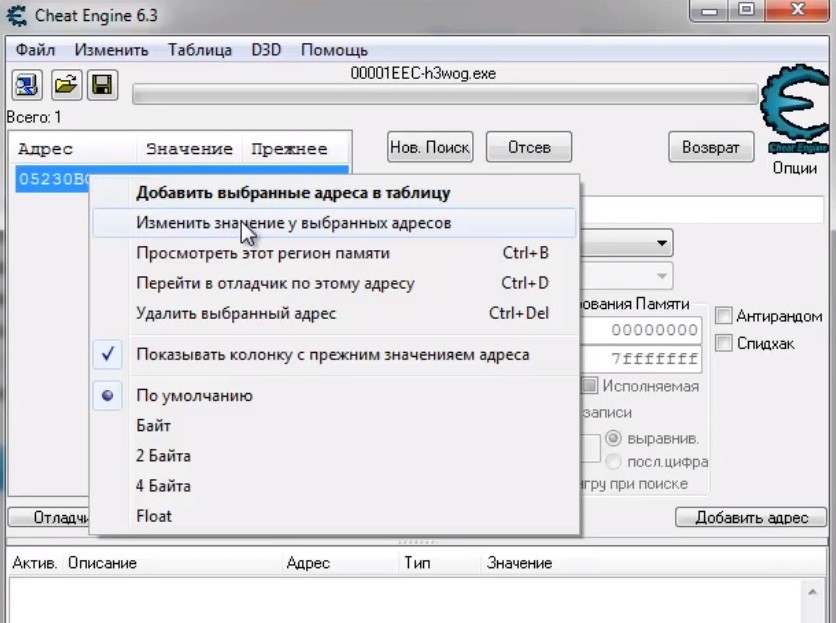
По возвращении в игру и проверьте: если никаких изменений не произошло, то в этом случае выполните произвольное внутриигровое действие, например, переместите героя на одну клетку или запустите экран города.
Вы не собираетесь ничего менять и хотите запустить Speed Hack для получения преимущества в игре? В таком случае выполните манипуляции, описанные выше, до того момента, когда задается значение параметра в соответствующем поле. Искать HEX-код не нужно, выберите exe-файл с игрой и справа от поля Значение отметьте галочкой поле Спидхак. После этого в игре произойдет ускорение, которое затронет только игрового персонажа или и окружение.
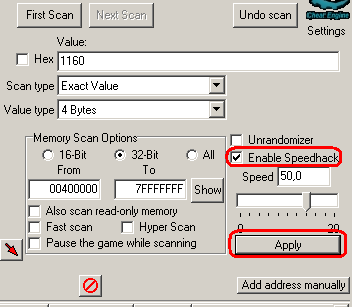
Cheat Engine используется для взлома одиночных игр. Кроме того, это работающий способ получения преимуществ в онлайн-играх, однако в последнем случае пользователь рискует быть забаненым системой античитов на сервере. Изменять параметры онлайн-игр с помощью Cheat Engine рекомендуется на отдельном аккаунте – в противном случае появляется риск лишиться учетной записи.
Преимущества программы Cheat Engine
Использование программы не требует специальных знаний. Пользователям не нужно иметь представление о HEX-кодах и других специфических аспектах игр. Для решения проблемы воспользуйтесь нашей инструкцией, применимой в любой игре – алгоритм поиска нужных полей остается неизменным.
Программа поддерживает русский язык. Требования Cheat Engine к аппаратной конфигурации ПК лояльные – программа работает даже на слабых компьютерах. В продуманной навигации с легкостью разберется даже новичок. Изменения дополнительных параметров не требуется, делайте это только в том случае, если вы – продвинутый пользователь. Подобная необходимость возникает при сложном поиске, когда требуется изменить параметры конкретного противника и не затрагивать остальное игровое окружение.
Программа Cheat Engine легка в освоении и не вызывает сложностей у новичков. Геймеры пользуются этой программой каждый день и получают в любимых играх максимум удовольствия. Загрузите Cheat Engine на нашем портале и забудьте о возможных сложностях в видеоиграх. Программа работает в Windows XP и новее. Cheat Engine – это универсальный инструмент.