On occasion some of our users get this error when connecting to the MAB VPN (Check Point SSL Network Extender Service):
Check Point Deployment Shell internal error
I have seen this article and it says the ics.jar file is corrupt on the Security Gateway.
https://supportcenter.checkpoint.com/supportcenter/portal?eventSubmit_doGoviewsolutiondetails=&solut…
As this only affects a few users, I am reluctant at the moment to follow the solution on the Gateway in case it causes any further issues.
An update or replacement of the Endpoint Security on Demand (ESOD) files on the gateway is necessary.
In the past, if we delete the users profiles off the laptop, get them to logon to the domain again it creates a new user profile and then they can logon to the VPN without this issue.
To me, there seems to be some file(s) that are located on the users profile that could also be causing an issue here.
Has anyone else seen this or know of any files that get placed on the user profile for the MAB VPN (Check Point SSL Network Extender Service)?
Mgmt = R80.40 Latest JFA Take 48 (19 May 2020)
Security GW = R80.30 JFA Take 50 (3 October 2019)
Thanks
|
Endpoint Security on Demand (ESOD) fails to start scan with error «Check Point Deployment Shell Internal Error» |
Technical Level
|
| Solution ID | sk168882 |
Technical Level  |
|
| Product | Mobile Access / SSL VPN |
| Version | All |
| OS | Windows 10 |
| Platform / Model | All |
| Date Created |
2020-09-06 00:00:00.0 |
| Last Modified | 2020-12-24 06:31:27.0 |
Symptoms
- Endpoint Security on Demand (ESOD) fails to start the scan with error «Check Point Deployment Shell Internal Error».
- User uses the procedure described in sk164713, but it did not help.
- User tries to delete
%TEMP%/CSHELL/folder, but it fails to delete because file is open.
Cause
CSHELL Files/Folder used for ESOD cannot be deleted if the file is open in a Java application. Java process hangs in Windows OS, while running ESOD.
Solution
|
Note: To view this solution you need to Sign In |
Are you in need of uninstalling Check Point Deployment Shell to fix some problems? Are you looking for an effective solution to completely uninstall it and thoroughly delete all of its files out of your PC? No worry! This page provides detailed instructions on how to completely uninstall Check Point Deployment Shell.
Possible problems when you uninstall Check Point Deployment Shell
* Check Point Deployment Shell is not listed in Programs and Features.
* You do not have sufficient access to uninstall Check Point Deployment Shell.
* A file required for this uninstallation to complete could not be run.
* An error has occurred. Not all of the files were successfully uninstalled.
* Another process that is using the file stops Check Point Deployment Shell being uninstalled.
* Files and folders of Check Point Deployment Shell can be found in the hard disk after the uninstallation.
Check Point Deployment Shell cannot be uninstalled due to many other problems. An incomplete uninstallation of Check Point Deployment Shell may also cause many problems. So, it’s really important to completely uninstall Check Point Deployment Shell and remove all of its files.
How to Uninstall Check Point Deployment Shell Completley?
Method 1: Uninstall Check Point Deployment Shell via Programs and Features.
When a new piece of program is installed on your system, that program is added to the list in Programs and Features. When you want to uninstall the program, you can go to the Programs and Features to uninstall it. So when you want to uninstall Check Point Deployment Shell, the first solution is to uninstall it via Programs and Features.
Steps:
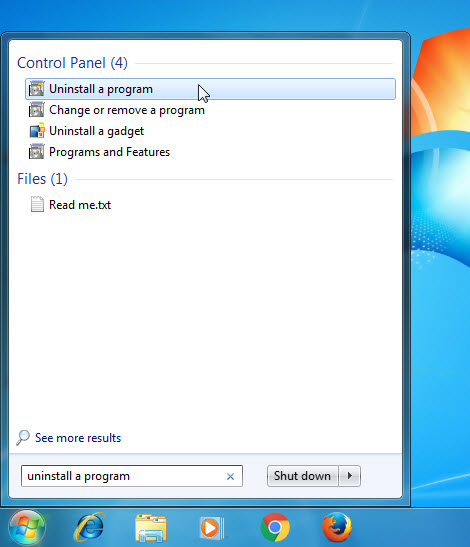
a. Open Programs and Features.
Windows Vista and Windows 7
Click Start, type uninstall a program in the Search programs and files box and then click the result.
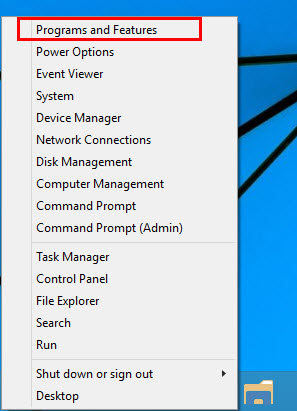
Windows 8, Windows 8.1 and Windows 10
Open WinX menu by holding Windows and X keys together, and then click Programs and Features.
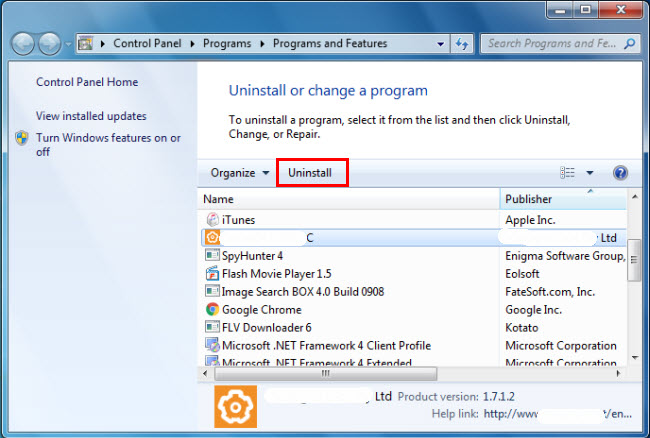
b. Look for Check Point Deployment Shell in the list, click on it and then click Uninstall to initiate the uninstallation.
Method 2: Uninstall Check Point Deployment Shell with its uninstaller.exe.
Most of computer programs have an executable file named uninst000.exe or uninstall.exe or something along these lines. You can find this files in the installation folder of Check Point Deployment Shell.
Steps:
a. Go to the installation folder of Check Point Deployment Shell.
b. Find uninstall.exe or unins000.exe.
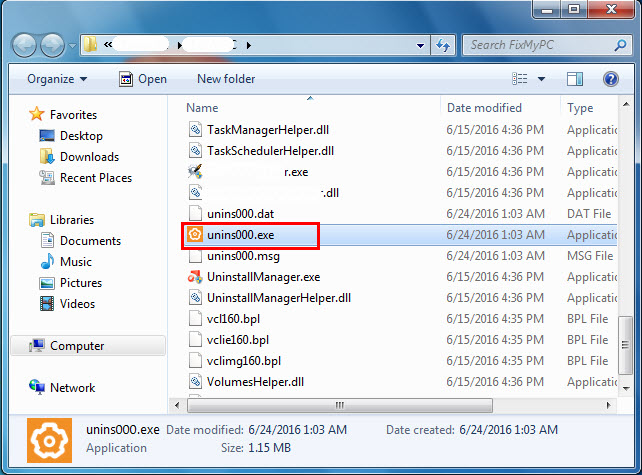
c. Double click on its uninstaller and follow the wizard to uninstall Check Point Deployment Shell.
Method 3: Uninstall Check Point Deployment Shell via System Restore.
System Restore is a utility which comes with Windows operating systems and helps computer users restore the system to a previous state and remove programs interfering with the operation of the computer. If you have created a system restore point prior to installing a program, then you can use System Restore to restore your system and completely eradicate the unwanted programs like Check Point Deployment Shell. You should backup your personal files and data before doing a System Restore.
Steps:
a. Close all files and programs that are open.
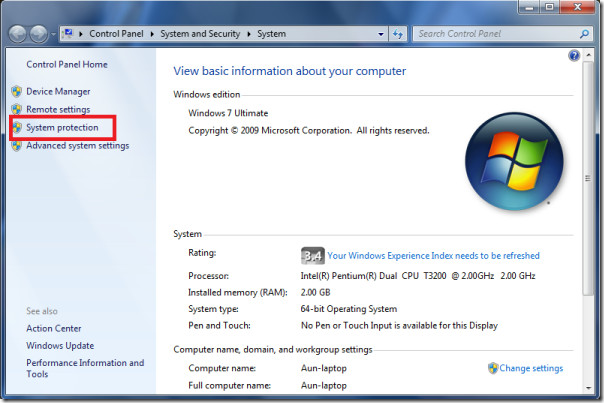
b. On the desktop, right click Computer and select Properties. The system window will display.
c. On the left side of the System window, click System protection. The System Properties window will display.
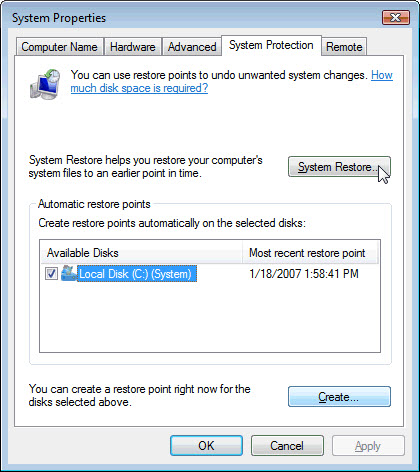
d. Click System Restore and the System Restore window will display.
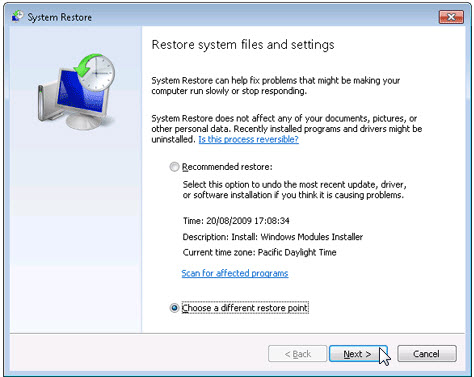
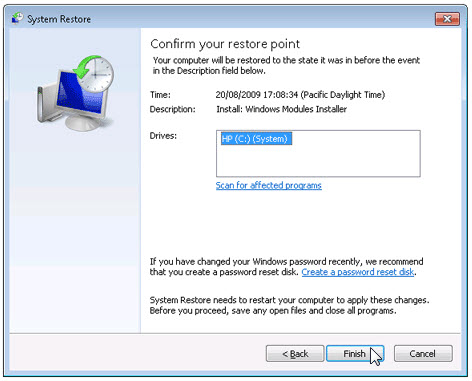
e. Select Choose a different restore point and click Next.
f. Select a date and time from the list and then click Next. You should know that all programs and drivers installed after the selected date and time may not work properly and may need to be re-installed.
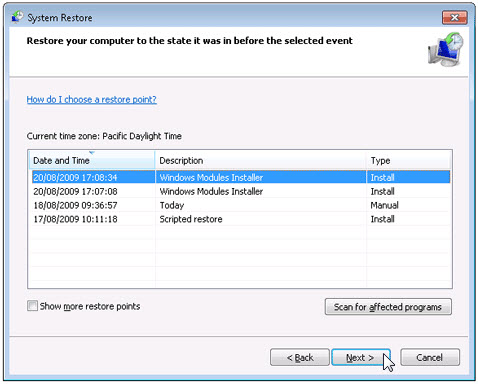
g. Click Finish when the «Confirm your restore point» window appears.
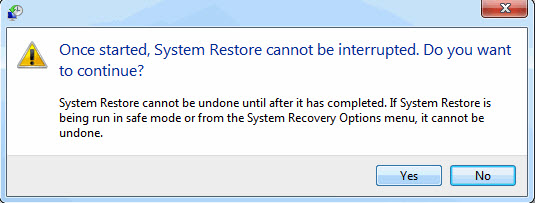
h. Click Yes to confirm again.
Method 4: Uninstall Check Point Deployment Shell with Antivirus.
Nowadays, computer malware appear like common computer applications but they are much more difficult to remove from the computer. Such malware get into the computer with the help of Trojans and spyware. Other computer malware like adware programs or potentially unwanted programs are also very difficult to remove. They usually get installed on your system by bundling with freeware software like video recording, games or PDF convertors. They can easily bypass the detection of the antivirus programs on your system. If you cannot remove Check Point Deployment Shell like other programs, then it’s worth checking whether it’s a malware or not. Click and download this malware detect tool for a free scan.
Method 5: Reinstall Check Point Deployment Shell to Uninstall.
When the file required to uninstall Check Point Deployment Shell is corrupted or missing, it will not be able to uninstall the program. In such circumstance, reinstalling Check Point Deployment Shell may do the trick. Run the installer either in the original disk or the download file to reinstall the program again. Sometimes, the installer may allow you to repair or uninstall the program as well.
Method 6: Use the Uninstall Command Displayed in the Registry.
When a program is installed on the computer, Windows will save its settings and information in the registry, including the uninstall command to uninstall the program. You can try this method to uninstall Check Point Deployment Shell. Please carefully edit the registry, because any mistake there may make your system crash.
Steps:
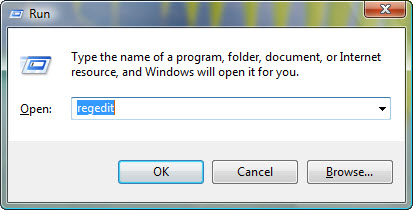
a. Hold Windows and R keys to open the Run command, type in regedit in the box and click OK.
b. Navigate the following registry key and find the one of Check Point Deployment Shell:
HKEY_LOCAL_MACHINESOFTWAREMicrosoftWindowsCurrentVersionUninstall
c. Double click on the UninstallString value, and copy its Value Data.
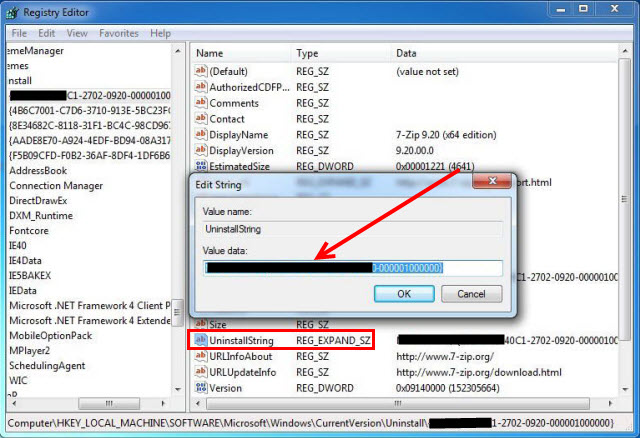
d. Hold Windows and R keys to open the Run command, paste the Value Data in the box and click OK.
e. Follow the wizard to uninstall Check Point Deployment Shell.
Method 7: Uninstall Check Point Deployment Shell with Third-party Uninstaller.
The manual uninstallation of Check Point Deployment Shell requires computer know-how and patience to accomplish. And no one can promise the manual uninstallation will completely uninstall Check Point Deployment Shell and remove all of its files. And an incomplete uninstallation will many useless and invalid items in the registry and affect your computer performance in a bad way. Too many useless files also occupy the free space of your hard disk and slow down your PC speed. So, it’s recommended that you uninstall Check Point Deployment Shell with a trusted third-party uninstaller which can scan your system, identify all files of Check Point Deployment Shell and completely remove them. Download this powerful third-party uninstaller below.
chrootVPN
Checkpoint R80+ VPN client chroot wrapper
VPN client chroot’ed Debian setup/wrapper
for Debian/Ubuntu/RedHat/CentOS/Fedora/Arch/SUSE/Gentoo/Slackware/Void/Deepin/KaOS/Pisi/Kwort/Clear/NuTyx Linux based hosts
Checkpoint R80.10 and up
https://github.com/ruyrybeyro/chrootvpn
Rui Ribeiro 2022-2023
Tiago Teles @ttmx — Contributions for Arch Linux
💥Nominated for best tool of the year 2022 at Checkpoint user forums💥
voting URL http://surveymonkey.com/r/3FF28GL
Description
This script downloads the Mobile Access Portal Agent (CShell) and the SSL Network Extender (SNX) CheckPoint installation scripts from the firewall/VPN we intend to connect to, and installs them in a chrooted environment.
Being SNX still a 32-bits binary together with the multiples issues of satisfying cshell_install.sh requirements, a chroot is used in order to not to corrupt (so much) the Linux user desktop, and yet still tricking snx / cshell_install.sh into «believing» all the requirements are satisfied; e.g. both SNX and CShell behave on odd ways ; furthermore, Fedora and others already deprecated 32-bit packages necessary for SNX ; the chroot setup is built to counter some of those behaviours and provide a more secure setup.
Whilst the script supports several Linux distributions as the host OS, it still uses Debian 11 for the chroot «light container».
CShell CheckPoint Java agent needs Java (already in the chroot) and X11 desktop rights. The binary SNX VPN client needs a 32-bits environment. The SNX binary, the CShell agent/daemon (and Java) install and run under chrooted Debian. The Linux host runs Firefox (or another browser).
resolv.conf, VPN IP address, routes and X11 «rights» «bleed» from the chroot directories and kernel shared with the host to the host Linux OS.
The Mobile Access Portal Agent, unlike the ordinary cshell_install.sh official setup, runs with its own non-privileged user which is different than the logged in user. In addition, instead of adding the localhost self-signed Agent certificate to a user personal profile as the official setup does, this script install a server-wide global Firefox policy file instead when possible. Notably when Firefox is a snap, or the distribution already has a default Firefox policy file, a new policy won’t be installed.
As long the version of the Debian/RedHat/SUSE/Arch distribution is not at the EOL stage, chances are very high the script will run successfully. Void, Gentoo, Slackware, Deepin,NuTyx,Pisi/Kwort and KaOS variants are not so thoroughly tested. Have a look near the end of this document, for the more than 110 recent versions/distributions successfully tested.
INSTRUCTIONS
For the stable release, download rpm or deb file from the last release.
-
First time installing, run it as:
vpn.sh -i --vpn=FQDN_DNS_name_of_VPN -
accept localhost certificate in brower if not Firefox or if Firefox is a snap
https://localhost:14186/id
-
visit web VPN page aka Mobile Access Portal for logging in
-
To launch it any time after installation or a reboot
-
the script tries to launch itself upon user xorg login via XDG. To have an automatic launch, if vpn.sh was installed via rpm or deb, add to /etc/sudoers
your_user ALL=(ALL:ALL) NOPASSWD: /usr/bin/vpn.sh -
Whilst it is recommended having Firefox already installed, for deploying via this script a Firefox policy for automagically accepting the self-signed Mobile Access Portal Agent X.509 certificate, if it is not present a already a policy, you can install a Firefox policy any time doing:
-
If /opt/etc/vpn.conf is present the above script settings will be ignored. vpn.conf is created upon first installation. Thus, for reinstalling, you can run:
-
For delivering the script to other users, you can fill up VPN and VPNIP variables at the beginning of the script. They can then install it as:
USAGE
vpn.sh [-l][-f FILE][-c DIR|—chroot=DIR][—proxy=proxy_string][—vpn=FQDN] -i|—install
vpn.sh [-f FILE][-o FILE|—output=FILE][-c|—chroot=DIR] start|stop|restart|status
vpn.sh [-f FILE][-c DIR|—chroot=DIR] [uninstall|rmchroot]
vpn.sh [-f FILE][-o FILE|—output=FILE] disconnect|split|selfupdate|fixdns
vpn.sh -h|—help
vpn.sh -v|—version
| Option | Function | |
|---|---|---|
| —install | -i | install mode — creates chroot |
| —chroot | -c | changes default chroot /opt/chroot directory |
| —help | -h | shows this help |
| —version | -v | script version |
| —file | -f | alternate conf file. Default /opt/etc/vpn.conf |
| —vpn | selects VPN DNS full name at install time | |
| —proxy | proxy to use in apt inside chroot ‘http://user:pass@IP’ | |
| —output | -o | redirects ALL output for FILE |
| —silent | -s | special case of output, no arguments |
| -l | gets snx/cshell_install.sh from cwd directory, if present | |
| —portalurl | custom prefix path other than / and sslvpn |
| Command | Function |
|---|---|
| start | starts CShell daemon |
| stop | stops CShell daemon |
| restart | restarts CShell daemon |
| status | checks if CShell daemon is running |
| disconnect | disconnects VPN/SNX session from the command line |
| split | splits tunnel VPN — use only after session is up |
| uninstall | deletes chroot and host file(s) |
| rmchroot | deletes chroot |
| selfupdate | self-updates this script if new version available |
| fixdns | tries to fix resolv.conf |
| policy | tries to install a Firefox policy |
For debugging/maintenance:
vpn.sh -d|—debug
vpn.sh sudoers
vpn.sh [-c DIR|—chroot=DIR] shell|upgrade
vpn.sh shell
| Options | Function | |
|---|---|---|
| —debug | -d | bash debug mode on |
| shell | bash shell inside chroot | |
| upgrade | OS upgrade inside chroot | |
| sudoers | installs in /etc/sudoers sudo permission for the user | |
| log | shows CShell Jetty logs | |
| taillog | follows/tail CShell Jetty logs |
This script can be downloaded running:
- git clone https://github.com/ruyrybeyro/chrootvpn/blob/main/vpn.sh
- wget https://raw.githubusercontent.com/ruyrybeyro/chrootvpn/main/vpn.sh
- curl https://raw.githubusercontent.com/ruyrybeyro/chrootvpn/main/vpn.sh -O
KNOWN FEATURES
-
The Web page of Mobile access portal has to open in a browser and allow login with or without this script/SNX/CShell installed;
-
The user installing/running the script has to got sudo rights (for root);
-
For the CShell daemon to start automatically upon the user XDG login, the user must be able to sudo /usr/bin/vpn.sh or /usr/local/bin/vpn.sh without a password;
-
The CShell daemon writes over X11; if VPN is not working when called/installed from a ssh session, or after logging in, start/restart the script using a X11 graphical terminal;
-
The script/chroot is not designed to allow automatic remote deploying of new versions of both CShell (or SNX?)-apparently this functionality is not supported for Linux clients. If the status command of this script shows CShell or SNX new versions remotely, uninstall, and install the chroot setup again;
-
For (re)installing newer versions of SNX/CShell delete the chroot with vpn.sh uninstall and vpn -i again; after the configurations are saved in /opt/etc/vpn.conf, vpn -i is enough;
-
The CShell daemon runs with a separate non-privileged user, and not using the logged in user;
-
if using Firefox, is advised to have it installed before running this script;
-
if Firefox is reinstalled, better uninstall and (re)install vpn.sh, for the certificate policy file to be (re)deployed, or run:
-
if TZ is not set before the script or edited, default time is TZ=’Europe/Lisbon’;
-
if having issues connecting to VPN after first installation/OS upgrade, reboot;
-
if having DNS issues in Debian/Ubuntu/Parrot right at the start of the install, reboot and (re)start installation;
-
If after login, the web Mobile Portal is asking to install software, most of the time, either the CShell daemon is not up, or the Firefox policy was not installed or Firefox is a snap. do vpn.sh start and visit https://localhost:14186/id
-
Linux rolling releases distributions must be fully up to date before installing any new packages. Bad things can happen and will happen running this script if packages are outdated;
-
At least Arch after kernel(?) updates seem to occasionally need a reboot for the VPN to work;
-
If having the error «Check Point Deployment Shell internal error» run vpn.sh uninstall and install again with vpn.sh -i
-
When installing in Clear Linux, if Error: cannot aquire lock file persists, kill swupd
-
CShell runs an https server at localhost:14186, so in a minimalist distribution such as Alpine, you shan’t forget to setup the lo interface.
SCREENS
The following screens show actions to be performed after running the script.
- Accepting localhost certificate in Firefox at https://localhost:14186/id IF a policy not applied or Firefox is installed as a snap. This is done only once in the browser after each chroot (re)installation.
If the certificate is not accepted manually or via a policy installed by vpn.sh, Mobile Portal will complain about lack of installed software, whether CShell and SNX are running or not.


- Logging in into Mobile Portal VPN. If using a double factor auth PIN, write the regular password followed by the PIN.

Select «Continue sign in» and «Continue» if logged in in other device/software.

First time logging in, select Settings:

And: «automatically» and «Network mode». This only needs to be done ONCE, the first time you login into the Mobile Portal.

Then press Connect to connect to the firewall.

The negotiation of a connection takes a (little) while.

First and each time after reinstalling the chroot/script, «Trust server» has to be selected.

The signature must be accepted too. It will happen several times if there is a cluster solution.

Finally, the connection is established. The user will be disconnected then upon timeout, closing the tab/browser, or pressing Disconnect.

Split tunneling
For creating temporarily a split tunnel on the client side, only after the VPN is up:
If the VPN is giving «wrong routes», deleting the default VPN gateway might not be enough, so there is a need to fill in routes in the SPLIT variable, by default at /opt/etc/vpn.conf, or if before installing for the first time, at the beginning of the vpn.sh script.
The SPLIT variable accepts the following directives:
| Command | Function |
|---|---|
| flush | cleans all routes given the VPN interface |
| +ROUTE | for adding a route via VPN |
| -ROUTE | for deleting a route via VPN |
Example: split VPN with Internet access, and private addresses via VPN
-
dropping all VPN routes
-
adding a route to 10.0.0.0/8 via the VPN
-
adding a route to 192.168.0.0/16 via the VPN
-
adding a route to 172.16.0.0/12 via the VPN
SPLIT="flush +10.0.0.0/8 +192.168.0.0/16 +172.16.0.0/12"
Example: Deleting default gateway given by the VPN, and adding a new route:
-
dropping the VPN default gateway
-
adding a route to 10.0.0.0/8 via the VPN
SPLIT="-0.0.0.0/1 +10.0.0.0/8"
Beware of NDAs and policies around manipulating VPN routes.
Relevant CheckPoint Linux support pages
SSL Network Extender https://supportcenter.checkpoint.com/supportcenter/portal?eventSubmit_doGoviewsolutiondetails=&solutionid=sk65210#Linux%20Supported%20Platforms
How to install SSL Network Extender (SNX) client on Linux machines https://supportcenter.checkpoint.com/supportcenter/portal?eventSubmit_doGoviewsolutiondetails=&solutionid=sk114267
Mobile Access Portal Agent Prerequisites for Linux https://supportcenter.checkpoint.com/supportcenter/portal?eventSubmit_doGoviewsolutiondetails=&solutionid=sk119772
Mobile Access Portal and Java Compatibility https://supportcenter.checkpoint.com/supportcenter/portal?eventSubmit_doGoviewsolutiondetails=&solutionid=sk113410
Mobile Access Portal Agent for Mozilla Firefox asks to re-install even after it was properly installed https://supportcenter.checkpoint.com/supportcenter/portal?eventSubmit_doGoviewsolutiondetails=&solutionid=sk122576&partition=Advanced&product=Mobile
Unable to connect with SSL Network Extender on Linux machine https://supportcenter.checkpoint.com/supportcenter/portal?eventSubmit_doGoviewsolutiondetails=&solutionid=sk114521
Check Point Remote Access Solutions — Gateway-Based Access https://supportcenter.checkpoint.com/supportcenter/portal?eventSubmit_doGoviewsolutiondetails=&solutionid=sk67820
Remote Access FAQ covering IPSec and HTTPS portal based VPN solutions (needs a CheckPoint login) https://supportcenter.checkpoint.com/supportcenter/portal?action=portlets.SearchResultMainAction&eventSubmit_doGoviewsolutiondetails=&solutionid=sk166032
see also Unix SE post: VPN SSL Network Extender in Firefox https://unix.stackexchange.com/questions/450131/vpn-ssl-network-extender-in-firefox
COMPATIBILITY
Tested with:
| chroot’ed | ver | release | arch |
|---|---|---|---|
| Debian | 11 | Bullseye | i386 |
| Debian | 12 | Bookworm | i386 |
with the following x86_64 hosts:
| Alpine | version |
|---|---|
| Alpine (1) | 3.16.2 |
| Arch based | version |
|---|---|
| AaricKDE | |
| AmOs | |
| Arch | |
| ArchBang | 2022.07.02 |
| Archcraft | 2022.06.08 |
| ArchEx | 220206 |
| ArchLabs | |
| ArchMan | 2022.07.02 |
| ArchMan | 2022.08.20 |
| Arco | 22.06.07 |
| Big | 2022-07-15 |
| Bluestar | 6.0.5 |
| cachyOS | |
| EndeavourOS | 2022.06.32 |
| EndeavourOS | 22.7 Artemis neo |
| EndeavourOS | 22.9 |
| EndeavourOS | 22.12 |
| FreedomOS | |
| Garuda | 220614 |
| Garuda | 220717 |
| Garuda | 221017 |
| Mabox | 22.06 |
| Mabox | 22.08 |
| Mabox | 22.12 |
| Manjaro | 21.2.6.1 |
| Manjaro | 22.0 |
| Peux OS | 22.06 |
| RebornOS | |
| SalientOS | 21.06 |
| Xero | 2022.09 |
| Clear | version |
|---|---|
| Clear OS | 36010 Desktop |
| Debian based | version |
|---|---|
| antiX | 21 Grup Yorum |
| antiX | 22 Grup Yorum |
| Armbian | 22.08 Jammy |
| B2D/OB2D | 2023 1.0.1 |
| Backbox | 8 |
| Bodhi | 6.0.0 |
| Bodhi | 7.0.0 |
| BOSS | 9 (urja) |
| BunsenLabs | 10.5 (Lithium) |
| BunsenLabs | 11 (Beryllium) |
| Condres OS | 1.0 |
| Crowz | 4.0 |
| cutefishOS | |
| DragonOS | 22.04 R27 |
| Debian | 10 Buster |
| Debian | 11 Bullseye |
| Debian | 12 Bookworm |
| Debian Edu | 11.3 |
| Deepin | 20.6 |
| Deepin | 20.8 |
| Deepin | 23 |
| Devuan | 4.0 Chimaera |
| Devuan | 5.0 Daedalus |
| Diamond LinuxTT | Gen5+ |
| Drauger OS | 7.6 Strigoi |
| Elementary OS | 6.1 Jolnir |
| Elive | 3.8.30 |
| Emmabuntüs DE4 | 1.01 |
| Emmabuntüs DE4 | 1.02 |
| Enso OS | 0.4 |
| Escuelas | 7.6 |
| Exe | 20220306 Chimaera |
| EXERGOS RED | 22 |
| ExTix Deepin | 20.6 |
| ExTix Deepin | 22.6 |
| Feren OS | 2022.04 |
| Freespire | 82 |
| Gnuinos | 4.0 Chimaera |
| Greenie | 20.04 |
| HamoniKR | 5.0 Hanla |
| Kaisen | 2.1 |
| Kaisen | 2.2 |
| Kali | 2022.2 |
| Kali | 2022.3 |
| Kanotix64 | Silverfire |
| KDE neon | 5.25 |
| Kubuntu | 20.04 LTS |
| Kubuntu | 22.04 LTS |
| Kubuntu | 22.10 |
| LinuxFx | 11 |
| Lite | 6.0 Fluorite |
| Lliurex | 21 |
| Loc-OS | 22 |
| Lubuntu | 20.04 LTS |
| Lubuntu | 22.04 LTS |
| Lubuntu | 22.10 |
| Makulu | 2022-06.10 Shift |
| MAX | 11.5 |
| Mint | 20.2 Uma |
| Mint | 21 Vanessa |
| Mint | 21.2 Vanessa |
| MX | 21.1 Wildflower |
| MX | 21.2 |
| Neptune | 7 («Faye») |
| Neptune | 7.5 |
| Netrunner | 21.01 (“XOXO”) |
| Nitrux | 2.4.1 |
| Nova | Desktop 8.0 |
| PakOS | 2021-05 |
| Pardus | 21.2 Yazılım Merkezi |
| Pardus | 21.4 |
| Parrot | 5.0.1 Electro Ara |
| Pearl | 11 MATE Studio |
| Peppermint OS | 2022-05-22 |
| Pop!_OS | 22.04 LTS |
| Primtux | 7 |
| PureOS | 10.0 (Byzantium) |
| Q4OS | 4.10 Gemini |
| Q4OS | 4.8 Gemini |
| Refracta | 11.0 Chimaera |
| Robo | 12.07 |
| Robo | 12.08 |
| Robo | 12.09 |
| Rhino Remix | |
| Runtu | 20.04.1 |
| Runtu | 22.04 |
| Septor | 2022 |
| Shark | |
| SolydXK10 | |
| Sparky | 7 (Orion-Belt) 2022.7 |
| Spiral | 11 |
| SysLinuxOS | 11 filadelfia |
| Trisquel | 10.0.1 Nabia |
| Ubuntu | 18.04 Bionic Beaver LTS |
| Ubuntu | 20.04 Focal Fossa LTS |
| Ubuntu | 22.04 Jammy Jellyfish LTS |
| Ubuntu | 22.10 Kinetic Kudu |
| Ubuntu | 23.04 Lunar Lobster |
| Ubuntu Budgie | 22.04 |
| Ubuntu Budgie | 22.10 |
| Ubuntu Kylin | 22.04.1 |
| Ubuntu Mate | 20.04.4 LTS |
| Ubuntu Mate | 22.04 LTS |
| Ubuntu Mate | 22.10 |
| Ubuntu Studio | 22.10 |
| Ubuntu Unity | 22.04.1 LTS |
| Ubuntu Unity | 22.10 |
| Uruk | 3 (Nannar) |
| WattOS | R12 |
| Voyager | 22.04 LTS |
| Voyager | 22.10 |
| Xubuntu | 20.04 LTS |
| Xubuntu | 22.04 Jammy Jellyfish LTS |
| Xubuntu | 22.10 |
| Zentyal Server | 7.0 |
| Zevenet CE | 5.12.2 |
| Zorin OS | 16.1 |
| Zorin OS | 16.2 |
| Gentoo based | version |
|---|---|
| Gentoo | 2.8 |
| Redcore | 2102 |
| Redcore | 2201 Hardened (Rastaban) |
| Calculate | 22.0.1 |
| Calculate | 23 |
| Mandriva based | version |
|---|---|
| ALT k | 10.0 |
| ALT k | 10.1 |
| OpenMandriva Lx | 4.3 |
| OpenMandriva Lx | 5.0 |
| OpenMandriva | 23.01 ROME |
| NuTyx | version |
|---|---|
| NuTyx | 22.10 |
| Pisi | version |
|---|---|
| Pisi | 2.3.1 (Nar) |
| KaOS | version |
|---|---|
| KaOS | 2022.10 |
| Kwort | version |
|---|---|
| Kwort | 4.4 |
| RedHat based | version |
|---|---|
| Alma | 8.6 Tiger |
| Alma | 8.7 |
| Alma | 9.0 Emerald Puma |
| Alma | 9.1 |
| BlueOnyx | 9.0 |
| BlueOnyx | 9.1 |
| CentOS | 8 |
| CentOS | 9 stream |
| EulixOS | 1.0.1 |
| EulixOS | 1.1 |
| Euro | 8.6 Kyiv |
| Euro | 8.7 Brussels |
| Euro | 9.0 |
| Euro | 9.1 |
| Fedora | 23 |
| Fedora | 36 |
| Fedora | 37 |
| Fedora | 38 |
| Mageia | 8 mga8 |
| Mageia | 9 |
| Miracle | 8.4 (Peony) |
| Miracle | 9.0 |
| Navy | Enterprise 8.6 r1 |
| Nobara | 36 |
| Nobara | 37 |
| NST | 36 |
| openEuler | 22.03 LTS |
| openEuler | 22.09 |
| Oracle | 8.6 |
| Oracle | 8.7 |
| Oracle | 9.0 |
| Oracle | 9.1 |
| PCLinuxOS | 2022.07.10 (2) |
| RHEL | 8 |
| RHEL | 8.7 |
| RHEL | 9.0 Plow |
| RHEL | 9.1 |
| risiOS | 36 |
| Rocky | 8.6 Green Obsidian |
| Rocky | 8.7 |
| Rocky | 9.0 |
| Rocky | 9.1 |
| ROSA | 12.2 Fresh Desktop |
| Springale | 8 |
| Springale | 9.0 (Parma) |
| Slackware based | version |
|---|---|
| Absolute | |
| Slackware | 15.0 |
| Slackware | 15.1-current |
| Salix OS | 15.0 |
| Slackel | 7.3 Openbox (2) |
| Zenwalk | 221106 |
| SUSE based | version |
|---|---|
| SLES | 15-SP4 |
| openSUSE | 15.3 Leap |
| openSUSE | 15.4 Leap |
| Gecko | 153.x STATIC Cinnamon |
| Gecko | 154.x STATIC Cinnamon |
| Kamarada | 15.3 |
| Regata OS | 22 Discovery |
| Void based | version |
|---|---|
| AgarimOS | |
| Void | 2021-09-30 |
| Void | 2022-10-01 |
(1) — implementation for advanced users/VMs
(2) — no /etc/resolv.conf from VPN