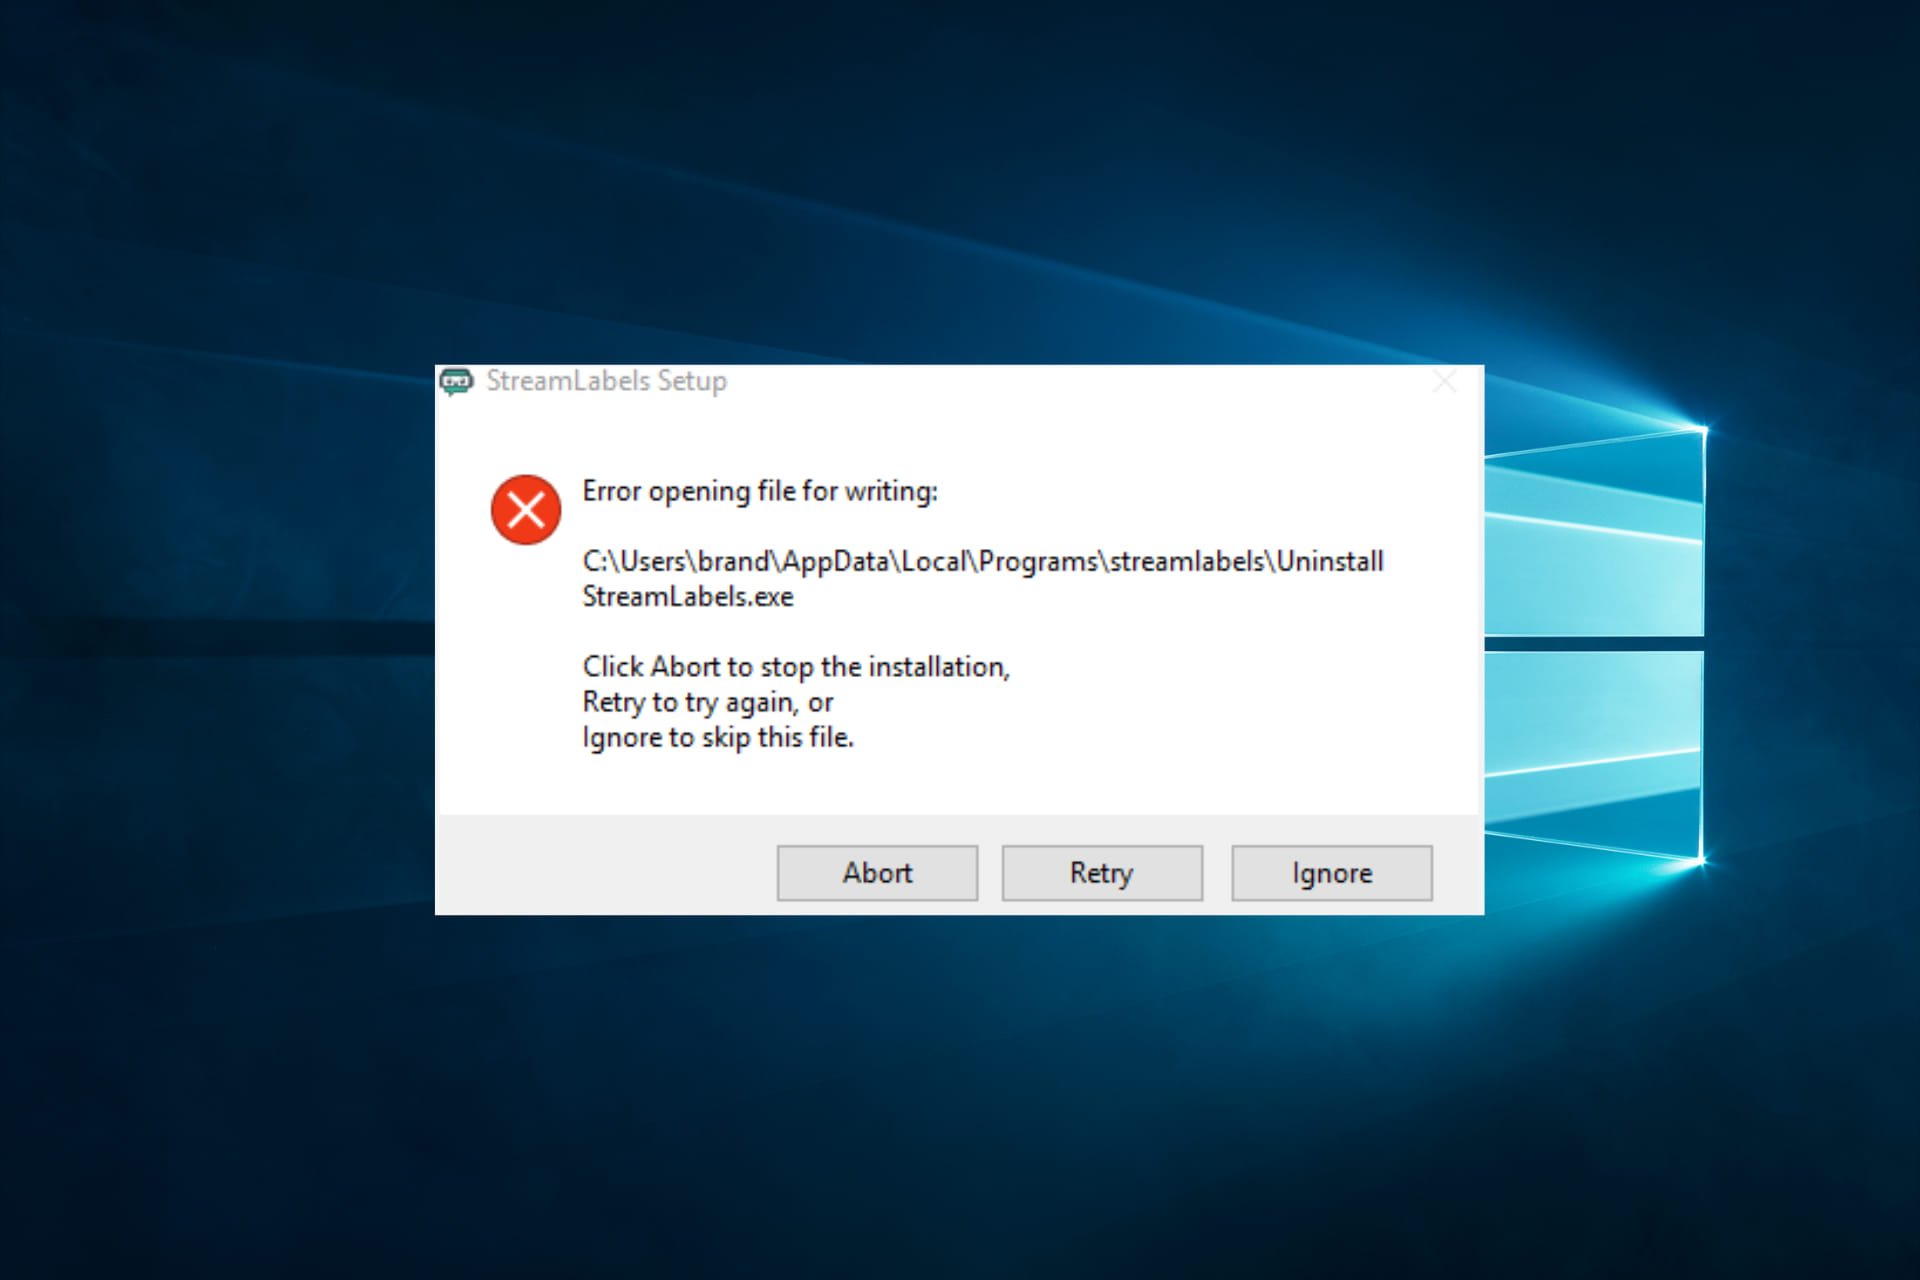
Исправить ошибку открыть файл для записи
Если вы столкнулись с сообщением об ошибке «Ошибка при открытии файла для записи» при запуске установочного файла для установки какой-либо программы на ваш компьютер, читайте дальше, поскольку этот пост даст вам несколько советов о том, как вы можете это исправить. Вы можете столкнуться с этой ошибкой при запуске установочного файла для установки такой программы, как GlassWire, Notepad ++, VLC, Steam, OBS, Mod Organizer, WinpCap, NSIS, FileZilla, BSPlayer, Kodi, Wireshark, rtcore64, qt5core.dll, MSI Afterburner, GWCtlSrv. .exe, npf.sys, vcredist_86 и многие другие. И поэтому, когда эта ошибка появляется во время запуска установочного файла, обратитесь к приведенным ниже инструкциям, которые могут помочь решить проблему.
Шаг 1: Во-первых, вы должны убедиться, что никакая другая установка не выполняется, так как несколько установок, скорее всего, могут вызвать появление этой ошибки. Вы можете перезагрузить компьютер и попробовать снова запустить установочный файл.
Шаг 2: Если ошибка по-прежнему возникает даже после перезагрузки компьютера, нажмите «Повторить», чтобы повторить попытку, а если ничего не произошло, нажмите «Прервать», чтобы прервать установку. После этого перейдите в папку, в которую вы поместили установочный файл, и удалите его.
Шаг 3: Убедитесь, что на вашем компьютере достаточно места на диске. Вы можете использовать функцию Windows 10 Storage Sense, которая может очистить все временные файлы с вашего компьютера и помочь вам сэкономить место для хранения. Чтобы использовать Storage Sense, выполните следующие действия.
- Откройте «Настройки»> «Система»> «Хранилище» в меню WinX.
- Оттуда вы увидите список всех локальных и подключенных запоминающих устройств, а также сведения о свободном пространстве.
- Теперь убедитесь, что функция Storage Sense включена, затем найдите ссылку «Free Up Space» и нажмите ее, чтобы открыть.
- После этого появится экран, который является встроенной программой в Windows 10, и просканирует ваш компьютер на наличие следующих нежелательных файлов, чтобы вы могли освободить место на диске:
- Файлы журнала обновления Windows
- Система создала файлы отчетов об ошибках Windows
- Эскизы
- Temporary Internet Files
- Предыдущие установочные файлы Windows
- Файлы оптимизации доставки
- DirectX Shader Cache
Примечание: Когда вы закончите освобождать место на диске, попробуйте снова запустить установочный файл.
Шаг 4: Если освобождение места не помогло, вы можете просто удалить установочный файл и загрузить другой с официальной домашней страницы программы. Оттуда загрузите установочный файл и поместите его в другое место. После этого запустите установочный файл еще раз.
Шаг 5: Убедитесь, что вы загрузили правильный установочный файл в соответствии с вашей операционной системой, то есть x64 или x86.
Шаг 6: Еще раз перезагрузите компьютер и убедитесь, что вы вошли в систему как администратор. После этого щелкните правой кнопкой мыши установочный файл и выберите «Запуск от имени администратора».
Если это по-прежнему не помогло, вы можете стать владельцем папки, в которой вы сохранили установочный файл. Как? Следуйте приведенным ниже инструкциям, но перед тем, как это сделать, сначала необходимо создать точку восстановления системы, после чего продолжить.
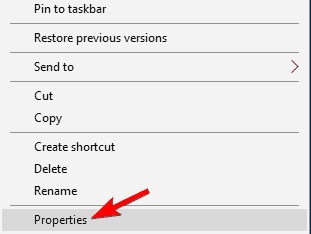
- Сначала найдите нужную папку и щелкните ее правой кнопкой мыши, затем выберите «Свойства».
- Затем нажмите кнопку «Изменить» в окне «Свойства» и нажмите «ОК», чтобы подтвердить, что вы получили запрос на повышение прав контроля учетных записей.
- После этого выберите пользователя / группу в окнах разрешений или нажмите кнопку «Добавить», чтобы добавить другого пользователя или группу. Было бы лучше, если бы вы добавили «Все», чтобы дать разрешение.
- Затем установите флажок «Полный доступ» в столбце «Разрешить», чтобы назначить разрешения на полный доступ.
- Теперь измените разрешение на Полный доступ для «Все».
- Нажмите кнопку ОК, чтобы сохранить внесенные изменения, а затем выйдите.
Расширенный ремонт системы Pro
Автоматизированное решение для ремонта ПК в один клик
![]()
С Advanced System Repair Pro вы можете легко
Замените поврежденные файлы
Восстановить производительность
Удалить вредоносные программы
СКАЧАТЬ
Advanced System Repair Pro совместим со всеми версиями Microsoft Windows, включая Windows 11.
Поделиться этой статьей:
Вас также может заинтересовать
Начиналась как внутренняя сеть и постепенно расширялась с 1960 года, когда Интернет захватил весь мир. В начале это было средство изменения информации, но в современную эпоху вы можете запускать приложения и виртуальные машины через Интернет, вы можете транслировать видео и аудио, и вы можете общаться в режиме реального времени с кем-то на другой стороне Земли. .
С учетом того, что Интернет растет так быстро за такой небольшой промежуток времени, вполне логично и мудро сделать шаг назад и внимательно посмотреть на то, что он предлагает сейчас, что в нем хорошего и что есть худшего.

Хорошие стороны интернета
Информация
Преимуществ у интернета много, в первую очередь это информация. Интернет создавался как служба обмена информацией, и даже сегодня в нем можно найти массу разнообразной информации на самые разные темы, которые вас интересуют. Такой сайт, как Википедия, является полностью бесплатной онлайн-энциклопедией, и у многих новостных компаний есть свои собственные интернет-сайты, на которых вы можете найти бесплатную информацию и новости.
С другой стороны, есть также веб-сайты, такие как udemy, edx, Coursera и многие другие, которые предложат вам образование, некоторые бесплатно, некоторые за деньги, но вы можете получить представление и часть качественного университетского образования всего за небольшую часть. цена.
Интернет-магазин
Такие сайты, как Amazon, использовали Интернет и зарекомендовали себя как сегодняшние многомиллиардные компании. В современном мире нет ни одной вещи, которую нельзя купить онлайн. Многие сайты сегодня переходят от крупного онлайн-рынка, где можно найти все, к небольшим специализированным нишам. Также у каждого крупного бренда в мире сегодня есть свой интернет-магазин.
Другие магазины предложат вам музыку, фильмы, игры и т. д. Такие сервисы, как steam, xbox pass, sony pass и т. д., позволят вам покупать онлайн игры, другую музыку, фильмы и многое другое.
Потоковые сервисы
Дни, когда вам приходилось покупать фильмы, чтобы смотреть их дома, прошли, благодаря Интернету у нас есть множество потоковых сервисов для фильмов и телешоу, а также для музыки. Если вы не хотите тратить деньги на фактическую покупку вещей, хорошей идеей будет настроить план потоковой передачи, когда вы этого захотите.
Электронная почта и обмен сообщениями
Общение — это великая вещь, и с самого начала человечества люди разговаривали и делились друг с другом, Интернет сделал возможным отправлять почту в электронном виде и мгновенно, а современное общение в чате повсюду. Мы можем не только разговаривать с нашими друзьями и семьей, которые могут быть на другом конце света, мы также можем общаться в режиме реального времени с торговым представителем, с технической службой или посещать онлайн-занятия с группой людей.
Услуги облачного хранилища
Сохранение ваших изображений в эпоху цифровых медиа на жестком диске может быть рискованным, но благодаря современным технологиям вы можете сохранить большую часть своих ценных файлов на облачных серверах для безопасного хранения. От картинок до документов и даже других файлов, которые вам нужны и которые вы хотите сохранить. Есть некоторые из них, которые предложат вам бесплатную сумму, а также некоторые базовые бесплатные планы.
Плохие стороны интернета
Вредоносное ПО, вирусы и фишинг
Мы не могли бы говорить о плохой стороне Интернета, если бы не упомянули его величайшую угрозу. Плохие сайты, зараженное программное обеспечение, фишинговые письма и многие другие вредоносные угрозы. Проблема в том, что такого рода уловки и атаки становятся все более и более изощренными, и их все труднее обнаружить и избежать.
Порнография
Порнография — это плохо, а иметь ее в свободном доступе для детей — еще хуже. К сожалению, единственный способ отрегулировать это на уровне отдельных компьютеров, включив родительский контроль на каждом из них. Существует множество исследований, в которых подробно рассматривается, почему это плохо, но, к сожалению, в настоящее время нет эффективных способов изолировать этот контент.
Нет конфиденциальности
Когда мы говорим, что конфиденциальности нет, мы не имеем в виду использование социальных сетей и отсутствие настроек конфиденциальности, хотя это также соответствует этому пункту, мы говорим о сборе данных о ваших привычках и вещах, которые вы делаете. Хорошо известно, что сегодня многие веб-сайты используют ту или иную форму рекомендательной системы ИИ, чтобы лучше адаптировать ваш опыт работы в Интернете в соответствии с вашими потребностями. Большинство этих систем искусственного интеллекта обучаются путем сбора ваших данных и анализа ваших привычек.
Если у вас есть две учетные записи Google, существует высокая вероятность того, что по одному и тому же запросу вы получите разные результаты, в зависимости от ваших привычек просмотра. То же самое касается и других услуг.
Темные интернет-магазины
На темных и глубоких сайтах, похожих на WEB, есть несколько замечательных вещей с правдивыми новостями и информацией. Даже некоторые законные библиотеки, где можно найти и скачать редкие книги. К сожалению, как и в случае с темным и глубоким Интернетом, в Интернете также есть свои темные стороны: от тревожного контента до магазинов, которые продают украденные вещи, до прямой кражи ваших денег, выдавая себя за законные магазины, но только для того, чтобы украсть ваши деньги.
Сайты знакомств
Мы все пытаемся найти кого-то, кто идеально подходит нам, но использование сайта онлайн-знакомств имеет много доказанных негативных последствий для психологии. Это также обесценивает взаимодействие между людьми и может снизить самооценку.
Плохие привычки
Поскольку Интернет стал широко доступен и популярен на различных устройствах, таких как планшеты и мобильные телефоны, все больше и больше людей тратят на него нездоровое количество времени. Пользоваться преимуществами Интернета — это здорово, но находите время и для других людей.
Узнать больше
PuzzleGamesDaily — это расширение для браузера, разработанное Mindspark. Это расширение отслеживает действия пользователей, такие как посещения веб-сайтов, переходы по ссылкам и другие задачи, связанные с Интернетом, которые впоследствии используются для отображения целевой рекламы.
После установки он изменил домашнюю страницу по умолчанию, поисковую систему и страницу новой вкладки на MyWay.com, и во время просмотра Интернета с активным расширением вы увидите дополнительные всплывающие окна, внедренные (нежелательные) объявления и рекламные ссылки во время просмотра. сессий.
Из Условий использования: Настоящим вы признаете и соглашаетесь с тем, что при использовании продукта MS вы можете столкнуться с Контентом, который может быть оскорбительным, непристойным или нежелательным в вашем сообществе […] Продукты MS подвержены различным проблемам безопасности, и их следует рассматривать как ненадежный. Принимая настоящее Соглашение, вы признаете и соглашаетесь с тем, что Продукты MS и любая информация, которую вы загружаете или предлагаете поделиться с помощью Продукта MS, могут подвергаться несанкционированному доступу, перехвату, искажению, повреждению или неправильному использованию и должны рассматриваться как ненадежный. Вы принимаете на себя всю ответственность за такие риски безопасности и любой ущерб, возникший в результате этого.
Это расширение было отмечено как угонщик браузера несколькими антивирусными сканерами и помечено для дополнительного удаления. Он не считается вредоносным, но многие пользователи хотят удалить его по указанным выше причинам.
О браузере угонщиков
Взлом браузера рассматривается как постоянная опасность Интернета, нацеленная на интернет-браузеры. Это тип вредоносной программы, которая направляет запросы веб-браузера на некоторые другие подозрительные интернет-сайты. Вредоносное ПО-угонщик браузера создается по разным причинам. Часто это заставляет пользователей переходить на определенные сайты, которые стремятся увеличить доход от своей рекламной кампании. Многие люди считают эти веб-сайты законными и безвредными, но это не так. Почти все угонщики браузера представляют собой существующую угрозу вашей безопасности в Интернете, и очень важно отнести их к категории рисков для конфиденциальности. Злоумышленники также могут позволить другим вредоносным программам без вашего ведома еще больше повредить ваш компьютер.
Основные признаки того, что ваш интернет-браузер был угнан
Есть много признаков того, что ваш веб-браузер взломан: домашняя страница браузера изменена; закладка и новая вкладка также изменены; изменяются основные настройки веб-браузера, и нежелательные или небезопасные сайты помещаются в список надежных сайтов; вы получаете панели инструментов браузера, которых раньше не видели; вы наблюдаете, как в вашем браузере или на экране появляется множество рекламных объявлений; у вашего браузера нестабильность или частые ошибки; Невозможность перехода к определенным сайтам, особенно к веб-страницам антивирусного ПО, а также к другим программам компьютерной безопасности.
Итак, как именно угонщик браузера заражает компьютер?
Угонщики браузеров атакуют компьютеры с помощью вредоносных вложений электронной почты, загружаемых зараженных документов или путем проверки зараженных сайтов. Они могут быть включены в панели инструментов, BHO, надстройки, плагины или расширения браузера. Угонщики браузера проникают на ваш компьютер в дополнение к загрузке бесплатных приложений, которые вы невольно устанавливаете вместе с оригиналом. Примером печально известного угонщика браузера являются Babylon, Anyprotect, Conduit, SweetPage, DefaultTab, RocketTab и Delta Search, но названия регулярно меняются. Угонщики браузеров могут записывать нажатия клавиш пользователя для сбора потенциально важной информации, что может привести к проблемам с конфиденциальностью, вызвать нестабильность в системах, значительно нарушить работу пользователя и, в конечном итоге, замедлить работу компьютера до такой степени, что он станет непригодным для использования.
Удаление
Некоторые угонщики можно легко удалить, удалив бесплатное программное обеспечение, с которым они были включены, или удалив любое расширение, которое вы недавно добавили на свой компьютер. Тем не менее, некоторые угонщики гораздо труднее обнаружить или избавиться от них, поскольку они могут быть связаны с определенными важными компьютерными файлами, которые позволяют ему работать как необходимый процесс операционной системы. Неопытным пользователям ПК никогда не следует пытаться выполнить удаление вручную, поскольку для внесения исправлений в системный реестр и файл HOSTS требуются подробные компьютерные знания. Приложение для защиты от вредоносных программ очень эффективно в отношении обнаружения и удаления угонщиков браузера, которые обычное антивирусное программное обеспечение упускает из виду. SafeBytes Anti-Malware — один из лучших инструментов для устранения вредоносных программ, угонщиков браузера. Он помогает вам устранить все ранее существовавшие вредоносные программы в вашей системе и обеспечивает мониторинг в режиме реального времени и защиту от новых угроз.[/section][/vc_column_text][/vc_column][/vc_row][vc_row][vc_column][vc_column_text ][section header=»Как устранить вредоносное ПО, блокирующее веб-сайты или препятствующее загрузке»]Вредоносное ПО может нанести компьютеру, сети и данным несколько различных видов ущерба. Некоторые вредоносные программы находятся между вашим компьютером и сетевым подключением и блокируют некоторые или все веб-сайты, которые вы хотели бы посетить. Это также может помешать вам добавить что-либо на свой компьютер, особенно приложения для защиты от вредоносных программ. Если вы читаете эту статью, возможно, вы заражены вредоносным ПО, которое не позволяет вам загрузить на компьютер программу компьютерной безопасности, такую как Safebytes Antimalware. Обратитесь к приведенным ниже инструкциям, чтобы удалить вредоносное ПО альтернативными способами.
Установите антивирус в безопасном режиме
В ОС Windows есть специальный режим, известный как «Безопасный режим», в котором загружается минимум необходимых программ и служб. Если вредоносное ПО настроено на автоматическую загрузку при загрузке ПК, переключение в этот режим может помешать ему это сделать. Чтобы войти в безопасный режим или безопасный режим с загрузкой сетевых драйверов, нажмите F8 во время загрузки ПК или запустите MSCONFIG и найдите параметры «Безопасная загрузка» на вкладке «Загрузка». После перезапуска в безопасном режиме с загрузкой сетевых драйверов вы можете загрузить, установить и обновить программу защиты от вредоносных программ оттуда. После установки запустите сканер вредоносных программ, чтобы удалить большинство стандартных заражений.
Переключиться на другой веб-браузер
Некоторые вредоносные программы могут быть нацелены на уязвимости конкретного веб-браузера, которые блокируют процесс загрузки. Если вы не можете загрузить программу безопасности с помощью Internet Explorer, это означает, что вирус может использовать уязвимости IE. Здесь вам нужно переключиться на другой веб-браузер, например Chrome или Firefox, чтобы загрузить программное обеспечение Safebytes Anti-malware. Создайте портативный антивирус для уничтожения вирусов Другой вариант — хранить и запускать антивирусную программу полностью с флэш-накопителя. Чтобы запустить защиту от вредоносных программ с помощью флэш-накопителя, выполните следующие простые действия:
1) На чистом компьютере установите Safebytes Anti-Malware.
2) Установите фломастер на тот же компьютер.
3) Дважды щелкните значок «Настройка» пакета антивирусного программного обеспечения, чтобы запустить мастер установки.
4) Выберите флэш-накопитель в качестве места, когда мастер спросит вас, где именно вы хотите установить приложение. Следуйте инструкциям на экране для завершения процесса установки.
5) Теперь перенесите флешку на зараженный ПК.
6) Дважды щелкните EXE-файл программы защиты от вредоносных программ на USB-накопителе.
7) Просто нажмите «Сканировать сейчас», чтобы запустить полную проверку зараженного компьютера на вирусы.
Взгляните на лучшую программу защиты от вредоносных программ
Если вы хотите установить на свой компьютер программное обеспечение для защиты от вредоносных программ, тем не менее, на рынке есть множество инструментов, которые следует учитывать, вы не можете слепо доверять никому, независимо от того, бесплатная это программа или платная. Некоторые из них отличные, некоторые достойные, а некоторые сами уничтожат ваш компьютер! При поиске антивирусной программы приобретите ту, которая предлагает надежную, эффективную и полную защиту от всех известных вирусов и вредоносных программ. При рассмотрении надежных программ, Safebytes Anti-Malware, безусловно, является наиболее рекомендуемой. SafeBytes — это мощное антивирусное приложение, работающее в режиме реального времени, которое предназначено для того, чтобы помочь обычному конечному пользователю компьютера защитить свой компьютер от вредоносных угроз. Используя передовую технологию, это программное обеспечение может помочь вам устранить несколько типов вредоносных программ, включая компьютерные вирусы, трояны, ПНП, червей, программы-вымогатели, рекламное ПО и программы-угонщики браузера.
Антивирус вредоносных программ SafeBytes выводит защиту ПК на совершенно новый уровень благодаря своим расширенным функциям. Вот некоторые из хороших:
Активная защита: SafeBytes обеспечивает активный мониторинг в реальном времени и защиту от всех известных вирусов и вредоносных программ. Они чрезвычайно эффективны при проверке и удалении множества угроз, поскольку постоянно улучшаются с помощью последних обновлений и предупреждений.
Лучшая защита от вредоносных программ: Используя признанный критиками движок вредоносных программ, SafeBytes предлагает многоуровневую защиту, предназначенную для обнаружения и устранения угроз, которые спрятаны глубоко в операционной системе вашего компьютера.
Быстрое многопоточное сканирование: Механизм поиска вирусов SafeBytes является одним из самых быстрых и эффективных в отрасли. Его целевое сканирование значительно увеличивает скорость обнаружения вирусов, встроенных в различные компьютерные файлы.
Фильтрация веб-сайтов: Safebytes присваивает всем сайтам уникальный рейтинг безопасности, который помогает вам понять, безопасен ли веб-сайт, который вы собираетесь посетить, для просмотра или известен ли он как фишинговый.
Легкий инструмент: SafeBytes обеспечивает полную защиту от онлайн-угроз при небольшой нагрузке на ЦП благодаря усовершенствованному механизму и алгоритмам обнаружения.
24/7 онлайн-поддержка: Служба поддержки доступна 24 x 7 x 365 дней по электронной почте и в чате, чтобы ответить на ваши вопросы. Подводя итог, SafeBytes Anti-Malware отлично подходит для защиты вашего компьютера от всех видов вредоносных программ. Нет никаких сомнений в том, что ваша компьютерная система будет защищена в режиме реального времени, как только вы воспользуетесь этим инструментом. Вы получите наилучшую всестороннюю защиту за деньги, которые вы потратите на подписку SafeBytes Anti-Malware, в этом нет никаких сомнений.
Технические детали и удаление вручную (для опытных пользователей)
Если вы хотите удалить PuzzleGamesDaily вручную, а не с помощью автоматизированного программного инструмента, вы можете воспользоваться следующими мерами: Перейдите в панель управления Windows, нажмите «Установка и удаление программ» и выберите программу-нарушитель для удаления. В случае подозрительных версий плагинов браузера вы можете удалить их через менеджер расширений вашего веб-браузера. Вы даже можете сбросить настройки веб-браузера, а также очистить кеш браузера и файлы cookie. Чтобы убедиться в полном удалении, найдите следующие записи реестра на своем компьютере и удалите их или сбросьте значения соответствующим образом. Однако это может быть трудной задачей, и только компьютерные профессионалы могут ее безопасно выполнить. Кроме того, некоторые вредоносные программы способны копировать или предотвращать удаление. Желательно, чтобы вы выполняли процесс удаления в безопасном режиме.
файлы:
%Documents and Settings%%UserName%Application Data%random% %AllUsersProfile%Application Data.dll
Реестр:
HKCUSoftwareMicrosoftWindowsCurrentVersionRunKB8456137 = %LocalAppData%KB8456137KB8456137.exe HKEY_CLASSES_ROOTCLSID28949824-6737-0594-0930-223283753445InProcServer32 (по умолчанию) = .dll
Узнать больше
Релиз Steam Deck почти близок, и появляются новые новости. Последняя официально подтвержденная техническая деталь заключается в том, что пользователь будет иметь доступ к BIOS устройства и будет официально поддерживаться двойная загрузка.
 Это, конечно, означает, что вы сможете иметь на своем устройстве и Proton, и Windows, что позволит вам играть во все, что вы пожелаете, если аппаратное обеспечение достаточно мощное. Valve также сказала, что вы можете запускать ОС с SD-карты! Это, конечно, сэкономит место, доступное для самих игр, особенно для моделей начального уровня, в которых доступно менее одной. Вся эта информация действительно толкает Deck на территорию карманного ПК, а не просто еще одной консоли, и я должен признать, что это объявление вызвало у меня улыбку.
Узнать больше
Что такое файл SYNTP.SYS? это системный файл, созданный драйверами сенсорной панели Synaptics, которые отвечают за все жесты и отслеживают прикосновения пользователей к сенсорной панели. Однако что происходит, когда этот драйвер выходит из строя? Что ж, либо у вас частично перестанет работать тачпад, либо он вообще перестанет работать. И в таких случаях вы столкнетесь с ошибкой синего экрана SYNTP.SYS вместе с любым из следующих кодов ошибок:
- IRQL_NOT_LESS_EQUAL
- KMODE_EXCEPTION_NOT_HANDLED
- INVALID_PROCESS_ATTACH_ATTEMPT
Чтобы решить проблему, используйте инструкции, приведенные ниже в качестве ссылки.
Вариант 1. Запустите средство диагностики памяти для проверки утечек памяти.
- Нажмите клавиши Win + R, чтобы открыть Run и введите ехе и нажмите Enter, чтобы открыть средство диагностики памяти Windows.
- После этого он даст два варианта, таких как:
- Перезапустите сейчас и проверьте наличие проблем (рекомендуется)
- Проверьте проблемы при следующем запуске компьютера
- После перезагрузки компьютера выполните базовое сканирование, или вы также можете воспользоваться опциями «Advanced», такими как «Test mix» или «Pass count». Просто нажмите клавишу F10, чтобы начать тестирование.
Примечание: После того, как вы выберете эту опцию, ваш компьютер перезагрузится и проверит наличие проблем с памятью. Если он обнаружит какие-либо проблемы, он автоматически их исправит, а если проблем не обнаружено, то, скорее всего, это не проблема, связанная с памятью, поэтому вам следует попробовать другие варианты, указанные ниже.
Вариант 2. Попробуйте переустановить драйвер Synaptics.
Возможно, вы захотите переустановить драйвер Synaptics, чтобы устранить ошибку синего экрана SYNTP.SYS.
- Нажмите клавиши Win + R, чтобы открыть диалоговое окно «Выполнить».
- После этого введите «appwiz.cpl» в поле и нажмите Enter, чтобы открыть раздел «Программы и компоненты» на панели управления.
- Затем вам нужно найти «Драйвер устройства Synatics Point» и щелкнуть его правой кнопкой мыши, а затем нажать «Удалить», чтобы удалить его с вашего компьютера.
- Перезагрузите компьютер и проверьте наличие обновлений в разделе «Центр обновления Windows».
- После этого он найдет последний доступный и стабильный драйвер Synaptics и затем установит его.
- Затем нажмите «Проверить или обновить» в разделе обновлений Windows, и он автоматически найдет последнюю доступную версию драйвера Synaptic и установит его для вас.
- Теперь перезагрузите компьютер и изменения вступят в силу.
Вариант 3. Попробуйте запустить сканирование с помощью средства проверки системных файлов.
Вы также можете попробовать запустить проверку системных файлов или проверку SFC, чтобы проверить ваш компьютер на наличие поврежденных файлов, которые могут быть причиной ошибки 0x80000003. Как только он найдет любые поврежденные системные файлы, он автоматически исправит их. Чтобы запустить проверку системных файлов, вот что вам нужно сделать:
- Нажмите Win + R, чтобы запустить Run.
- Введите CMD в поле и нажмите Enter.
- После открытия командной строки введите ПФС / SCANNOW
Команда запустит сканирование системы, которое займет несколько секунд, прежде чем завершится. Как только это будет сделано, вы можете получить следующие результаты:
- Защита ресурсов Windows не обнаружила нарушений целостности.
- Защита ресурсов Windows обнаружила поврежденные файлы и успешно восстановила их.
- Windows Resource Protection обнаружила поврежденные файлы, но не смогла исправить некоторые из них.
- Перезагрузите компьютер после завершения сканирования.
Вариант 4. Выполните восстановление системы
Выполнение восстановления системы может помочь вам исправить ошибку синего экрана SYNTP.SYS. Вы можете сделать эту опцию либо загрузкой в безопасном режиме, либо восстановлением системы. Если вы уже находитесь в разделе «Дополнительные параметры запуска», просто выберите «Восстановление системы» и перейдите к следующим шагам. И если вы только что загрузили свой компьютер в безопасном режиме, следуйте инструкциям ниже.
- Нажмите клавиши Win + R, чтобы открыть диалоговое окно «Выполнить».
- После этого введите «sysdm.cpl» в поле и нажмите «Ввод».
- Затем перейдите на вкладку «Защита системы» и нажмите кнопку «Восстановление системы». Откроется новое окно, в котором вы должны выбрать предпочитаемую точку восстановления системы.
- После этого следуйте инструкциям на экране, чтобы завершить процесс, а затем перезагрузите компьютер и проверьте, устранена ли проблема.
Вариант 5 — Попробуйте запустить утилиту CHKDSK
Запуск утилиты CHKDSK также может помочь устранить ошибки SYNTP.SYS. Если на вашем жестком диске есть проблемы с целостностью, обновление действительно завершится сбоем, так как система будет считать, что она неработоспособна, и именно здесь появляется утилита CHKDSK. Утилита CHKDSK исправляет ошибки жесткого диска, которые могут вызывать проблему.
- Откройте командную строку с правами администратора.
- После открытия командной строки выполните следующую команду и нажмите Enter:
CHKDSK / F / R
- Дождитесь завершения процесса и перезагрузите компьютер.
Вариант 6. Используйте средство устранения неполадок синего экрана
Средство устранения неполадок синего экрана — это встроенный инструмент в Windows 10, который помогает пользователям исправлять ошибки BSOD, такие как ошибка синего экрана SYNTP.SYS. Его можно найти на странице средств устранения неполадок настроек. Чтобы использовать его, выполните следующие действия:
- Нажмите клавиши Win + I, чтобы открыть панель «Настройки».
- Затем перейдите в Обновление и безопасность> Устранение неполадок.
- Оттуда найдите опцию «Синий экран» с правой стороны, а затем нажмите кнопку «Запустить средство устранения неполадок», чтобы запустить средство устранения неполадок «Синий экран», а затем перейдите к следующим параметрам на экране. Обратите внимание, что вам может потребоваться загрузить ваш компьютер в безопасном режиме.
Узнать больше
 Глава Windows and Devices Панос Панай объявил о новой функции фокус-сессий, которая будет в Windows 11, в своем аккаунте Twitter сегодня. Сам он называет это переломным моментом, особенно с интеграцией Spotify.
Так что же такое фокус-сессия?
Из видеоклипа, представленного в Твиттере, мы видим, что пользователи фокус-сессии смогут выбрать конкретную задачу из ранее созданного списка задач, выбрать песни, которые будут воспроизводиться в фоновом режиме, пока задача активна, и установить таймер для ее выполнения. выбранное задание с перерывами. Возможно, лучшим сравнением и объяснением будет настольная задача календаря Google с музыкой, в общем, вот и все. Аккуратный и хороший органайзер внутри вашей операционной системы Windows 11. Я думаю, что это в целом хорошая идея и наверняка она найдет свою аудиторию.
Узнать больше
В случае, если вы не знаете, Microsoft Office использует отдельный механизм, нежели операционная система Windows, для определенных целей, таких как Обновления и Активация, что приводит к зависимостям содержимого этого механизма от различных служб и процессов. Таким образом, в таких случаях вы можете столкнуться с ошибками, такими как код ошибки 0x80070426. Когда вы получите эту ошибку, вы увидите следующее сообщение об ошибке на вашем экране:
«Произошла неожиданная ошибка. Ваш запрос не может быть обработан в настоящее время. Пожалуйста, повторите попытку позже. (0x80070426) »
Этот вид ошибки вызван различными вспомогательными процессами и службами, которые не работают или не запускаются должным образом. Если вы в настоящее время столкнулись с этой проблемой, не беспокойтесь, этот пост поможет вам исправить ее. Вы можете попробовать два возможных исправления: вы можете либо проверить соответствующие службы, либо вручную запустить сценарий активации. Для получения более подробной информации обратитесь к приведенным ниже параметрам.
Вариант 1. Попробуйте проверить ответственные службы
- В Начальном поиске введите «services.msc» в поле и нажмите «Ввод» или нажмите «ОК», чтобы открыть диспетчер служб Windows.
- Если появляется запрос контроля учетных записей или контроля учетных записей, просто нажмите «Да», чтобы перейти к окну служебной программы Windows Services Manager.
- После этого найдите запись службы «Служба лицензирования программного обеспечения» в указанном списке служб внутри окна.
- Затем щелкните его правой кнопкой мыши и выберите «Свойства», а затем убедитесь, что для параметра «Тип запуска» установлено значение «Автоматически».
- После этого нажмите кнопку «Пуск», чтобы запустить службу, а затем закройте диспетчер служб.
- Затем нажмите клавиши Win + R, чтобы открыть служебную программу «Выполнить», затем введите «cmd» в поле и нажмите «Ввод», чтобы открыть командную строку с повышенными привилегиями.
- После этого набирайте и вводите каждую команду одну за другой.
- чистый старт slsvc
- sc qc slsvc
- sc queryex slsvc
- sc qprivs slsvc
- sc qsidtype slsvc
- sc sdshow slsvc
- Теперь проверьте, исправлена ли проблема или нет.
Вариант 2. Попробуйте вручную запустить сценарий активации.
- В поле «Начать поиск» введите «cmd» и щелкните правой кнопкой мыши командную строку в заданных результатах поиска, а затем выберите параметр «Запуск от имени администратора», чтобы открыть командную строку с правами администратора.
- Затем перейдите в следующее место в служебной программе командной строки командной строки, если вы используете Office 16.
- x86: C: / Программные файлы (x86) / Microsoft Office / Office16
- x64: C: / Program Files / Microsoft Office / Office16.
- С другой стороны, если вы используете более старую версию, перейдите в следующую папку.
- x86: C: / Программные файлы (x86) / Microsoft Office / OfficeXX
- x64: C: / Программные файлы / Microsoft Office / OfficeXX
- Как только вы окажетесь в этом месте, введите следующую команду, чтобы запустить сценарий активации, а затем нажмите Enter.
cscript ospp.vbs / act
- Команда, которую вы только что ввели, активирует вашу копию Microsoft Office.
Узнать больше
OneXPlayer — прямой конкурент грядущей колоде Steam от Valve. Это устройство явно вдохновлено предложением Valve, и оно проявляется во всем, от внешнего вида до назначения, и предназначено для геймеров ПК в качестве портативного устройства.
 Оборудование под капотом
 Оборудование под капотом
Это устройство оснащено 7-дюймовым дисплеем с разрешением 1080p, процессором Intel Core i11-7G1195 7-го поколения, потрясающими 16 ГБ ОЗУ, 512 ГБ SSD-накопителем с возможностью покупки модели на 1 ТБ или 2 ТБ. Выбранный графический процессор — Intel iris Xe Graphics, который, по нашему мнению, является узким местом во всей системе, и для более требовательных игр мы считаем, что переключение на 720p было бы лучшим вариантом. Все здесь питается от литий-ионного аккумулятора емкостью 10455 мАч.
Входы OneXPlayer и прочее
Наладонник оснащен двойными бамперами и двойными линейными триггерами. Консоль поставляется с двумя динамиками по обе стороны от нее. Внутри консоли находится алюминиевый радиатор с медными тепловыми трубками и вентилятор для охлаждения внутреннего оборудования. Снаружи у нас есть два порта USB-C и один порт USB-A для подключения и, конечно же, разъем для наушников для наушников. Консоль поставляется с Wi-Fi 6 и Bluetooth 5.0 для беспроводной связи.
Цена
Базовая модель начального уровня обойдется вам в колоссальные 1.259 долларов, модель на 1 ТБ — в 1.399 долларов, а модель на 2 ТБ — в 1,599 долларов. С такой ценой я не уверен, что она сможет победить Valve. Конечно, он содержит полностью лицензированную Windows 11, которая наверняка предложит больше возможностей, чем ОС Stem на базе Linux, но даже с этим преимуществом я не думаю, что это оправдывает такую большую разницу в цене.
Заключение
Конечно, такого рода консоли или карманные компьютеры все равно найдут свою клиентскую базу, многим пользователям они наверняка понравятся, так как поставляются с готовой Windows из коробки. Конечно, вы можете разместить Windows и в колоде Steam, но вам нужно знать, как это сделать, где все готово, и вы можете запускать рядом со Steam другие лаунчеры без проблем, таких как Origin, Uplay, Gog и т. д. Как это будет принято сообществом time расскажет, но приятно видеть, что есть разнообразие и конкуренция в области портативных ПК.
Узнать больше
Код ошибки 10, код диспетчера устройств возникает, когда не удается включить Bluetooth или Wi-Fi. Внутри диспетчера устройств рядом с устройством будет желтый восклицательный знак, и если вы войдете в свойства устройства, состояние будет: Это устройство не может быть запущено.
 Ниже приведены проверенные решения, которые решат проблему и предоставят вам работающее устройство.
Перезагрузите компьютер, проверьте переключатель
Это простое решение обычно может работать в большинстве случаев. Прежде всего, проверьте, не выключен ли случайно аппаратный переключатель Wi-Fi или Bluetooth (на ноутбуках есть небольшой переключатель, который может включать или выключать устройство), а затем, если вы этого не сделаете, есть переключатель или вы убедились, что он включен, перезагрузите систему.
Запустите средство устранения неполадок сетевого адаптера
Если предыдущие простые решения не оказались эффективными, запустите средство устранения неполадок сетевого адаптера.
- Нажмите ОКНА+Я открыть настройки
- Перейдите в Система> Устранение неполадок> Другие средства устранения неполадок
- Внутри Найти Сетевой адаптер
- Нажмите на Run чтобы запустить средство устранения неполадок
Отключите, а затем снова включите адаптер
Если предыдущее решение не устранило проблему, попробуйте отключить адаптер, а затем снова включить его.
Обновить сетевой адаптер
Перейдите на веб-сайт Intel и загрузите последний пакет драйверов. После завершения загрузки установите последнюю версию драйвера.
Включите службу автонастройки WLAN.
- Нажмите Windows Key + R для вызова диалогового окна «Выполнить».
- В диалоговом окне «Выполнить» введите услуги.MSC и нажмите Enter, чтобы открыть службы.
- В окне «Службы» прокрутите и найдите службу WLAN AutoConfig.
- Дважды щелкните запись, чтобы изменить ее свойства.
- В окне свойств щелкните раскрывающийся список Тип запуска и Автоматически.
- Затем убедитесь, что Состояние службы запускается и работает.
- Нажмите Применить > OK для сохранения изменений.
- Выйдите из консоли служб.
- Перезагрузите компьютер.
Узнать больше
Многие пользователи жалуются на нехватку места для хранения каждый раз, когда выпускается обновление компонентов Windows, а также на невозможность загрузки обновлений, медленное обновление и многие другие жалобы. Основная проблема заключается в том, что многим пользователям не хватает места на своих ПК. И теперь, чтобы убедиться, что ни одно из обновлений не зависнет из-за нехватки места для хранения, Microsoft представила функцию зарезервированного хранилища, которая предустановлена с v1903 или с теми, где v1903 был установлен начисто. Это руководство покажет вам, как включить или отключить зарезервированное хранилище на вашем компьютере с Windows 10. Как вы знаете, процессу Центра обновления Windows должно быть достаточно места, чтобы он мог загрузить, извлечь и применить обновление на компьютере. Обычно размер зарезервированного хранилища составляет около 7 ГБ, что дает достаточно места для обновления, временных файлов, системных кешей, приложений и многого другого. И, по словам Microsoft, размер зарезервированного места для хранения время от времени будет меняться и будет зависеть от того, как вы используете свой компьютер.
объяснение
Функция зарезервированного дискового пространства включена по умолчанию на устройствах, которые поставляются с предустановленным обновлением за май 2019 г. или после выполнения чистой установки ОС Windows 10. Чтобы проверить, есть ли на вашем компьютере эта функция, вам нужно перейти в «Настройки»> «Система»> «Хранилище», затем щелкнуть ссылку «Показать другие категории» и затем выбрать «Система и зарезервировано». Однако, если вы не можете найти зарезервированное хранилище в списке, возможно, это связано с тем, что на вашем компьютере ограничено пространство на жестком диске или это не новая или новая установка. С другой стороны, если у вас есть эта функция, но она вам не нужна и вы хотите вместо нее отключить, то читайте дальше, поскольку этот пост также покажет вам, как это делается.
Решения
Имейте в виду, что когда вы отключаете функцию «Зарезервированное хранилище», скорее всего, вы не сможете включить ее снова, поэтому вам нужно убедиться, что это действительно то, что вы хотите сделать, прежде чем отключить ее навсегда. Так что если вы действительно хотите отключить зарезервированное хранилище, вы можете сделать это с помощью редактора реестра. Прежде чем продолжить, сначала необходимо создать точку восстановления системы, а затем выполнить следующие шаги.
- Нажмите клавиши Win + R, чтобы запустить утилиту «Выполнить», введите в поле «Regedit» и затем нажмите «Ввод», чтобы открыть редактор реестра.
- Далее перейдите к этому пути реестра: ComputerHKEY_LOCAL_MACHINESOFTWAREMicrosoftWindowsCurrentVersionReserveManager
- Оттуда дважды щелкните DWORD с именем «ShippedWithReserved» и установите его значение «1».
- Как только вы закончите, перезагрузите компьютер и посмотрите, не исчезла ли функция зарезервированного хранилища.
С другой стороны, если вы хотите уменьшить зарезервированное пространство для хранения, есть два способа сделать это. Во-первых, вы можете перейти в «Настройки»> «Приложения»> «Приложения и функции»> «Управление дополнительными функциями» и оттуда удалить те дополнительные функции, которые вы не используете. Во-вторых, вам нужно перейти в «Настройки»> «Время и язык»> «Язык», а затем удалить языки и их надстройки, которые вы не используете.
Примечание: Функция зарезервированного хранилища также используется системными процессами и приложениями для создания временных файлов, и как только зарезервированное хранилище заполняется, Windows 10 автоматически удаляет их. Это бесспорно полезная функция, поэтому отключать ее не рекомендуется, но если у вас мало места для хранения и у вас нет большого выбора, вы можете отключить ее на свой страх и риск.
Узнать больше
Call of Duty — веселая и хорошая игра, отличный таймкиллер с отрядом друзей, однако иногда игра вылетает, и веселье прерывается. В этом руководстве мы рассмотрим и решим эту неприятную проблему.
-
Сканировать файлы игры
внутри панели запуска выберите параметры, а под ними выберите сканирование и восстановление файлов игры. Этот процесс может занять 5-30 минут, так как размер игры составляет 60 ГБ. Это просмотрит все ваши игровые файлы и убедитесь, что все они действительны и что ни один из них не поврежден, что может привести к сбоям. Когда все будет готово, вы получите уведомление о том, что в игру можно играть. Попробуйте еще раз и посмотрите, продолжаются ли ваши сбои.
-
Обновить драйверы
Обновление драйверов имеет решающее значение для бесперебойной работы игры, возможно, важны драйверы графического процессора. Перейдите на веб-сайт производителя графического процессора и получите последние версии драйверов.
-
Нижние графические настройки
Интенсивные графические требования могут перегрузить графический процессор и вызвать сбои, попробуйте уменьшить детали в игре и посмотрите, решит ли это проблему.
-
Отключить оверлеи
Если вы используете такую программу, как Discord, у которой есть оверлей, вы можете отключить его, так как это может вызывать графическую ошибку.
Узнать больше
![]()
Авторское право © 2022, ErrorTools, Все права защищены
Товарные знаки: логотипы Microsoft Windows являются зарегистрированными товарными знаками Microsoft. Отказ от ответственности: ErrorTools.com не аффилирован с Microsoft и не претендует на прямую аффилированность.
Информация на этой странице предоставлена исключительно в информационных целях.
![]()
Ремонт вашего ПК одним щелчком мыши
Имейте в виду, что наше программное обеспечение необходимо установить на ПК с ОС Windows. Откройте этот веб-сайт на настольном ПК и загрузите программное обеспечение для простого и быстрого устранения ваших проблем.
You are here: Home / Windows / 10 Fixes For Error Opening File For Writing On Windows 11/10
This article has been updated to stay relevant for Windows 11 and 10 users.
Errors that appear during installation are surely the worst kind. The error opening file for writing has been reported by many users for a long time, and it appears while trying to install certain applications.
This error mainly appears for writing MSI Afterburner, Steam, vcredist_x86.exe, VLC, and some other commonly used applications.
Here we have discussed how to solve this error, so keep reading!
Why You Cannot Open File For Writing?
Contents
- 1 Why You Cannot Open File For Writing?
- 2 How To Fix Error Opening File For Writing
- 2.1 Solution 1: Close All Background Installation Processes
- 2.2 Solution 2: Delete Junk files
- 2.3 Solution 3: Run The Compatibility Troubleshooter
- 2.4 Solution 4: Run The Installer With Administrative Rights
- 2.5 Solution 5: Change Security Permissions
- 2.6 Solution 6: Change Advanced Security Permissions
- 2.7 Solution 7: Create New User As Administrator
- 2.8 Solution 8: Disable Your Antivirus
- 2.9 Solution 9: Disable The User Account Control Feature
- 2.10 Solution 10: Delete The Installer And Download It Again
- 3 Wrapping Up
As per reports, this error is most common when setup files lack the required permissions as the setup file can’t open the file to write.
But, there can be other causes for this error, such as:
- If the installation file is not compatible with your system, then it can cause such an error.
- The antivirus is known to stop files from writing that it considers a threat to the computer, including installation files. Thus, the antivirus can be responsible for the error while opening the file.
- The installation file itself can be corrupted causing this error.
- If the installation process of the file is already running in the background and you try to start the installation again, then this error can get triggered.
- Problems in registry or excess of junk files in the computer can also cause this error.
This error can be fixed with the following solutions. So, perform all of them and see which one solves it for you.
Solution 1: Close All Background Installation Processes
If one installation is already in process in the background and you are trying to start another installation, then this error can get triggered.
To ensure there are no installation processes in the background, follow the steps given below:
- Press Ctrl + Shift + Esc keys on your keyboard to open the Task Manager.
- Select the Processes tab, and check if any installation process is running.
If yes, then right-click on it and click on the End task option.
Try installing the file again. This solution should fix the problem if it was caused by another installation in the background.
Solution 2: Delete Junk files
If your computer has excess junk files, then it can cause this type of installation errors.
Fortunately, there are some in-built junk file cleaners in your Windows like the Storage sense and the Disk cleanup tool, which can be used to delete the junk files present in your computer.
After the junk files are removed, try to install the application again and check if the error persists.
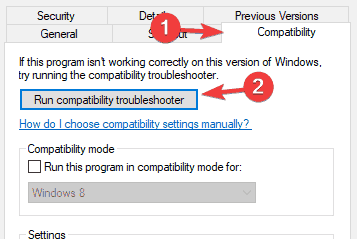
Solution 3: Run The Compatibility Troubleshooter
If the installer file is incompatible with your Windows, then the installer can’t open the file to write and thus trigger this error.
Fortunately, there is an in-built compatibility troubleshooter in Windows that you can use to check the file’s compatibility.
To run the compatibility troubleshooter, follow the steps given below:
- Locate the installer file of the application that is causing this error for you and right-click on it.
- Click on the Properties option from the pop-up menu.
- Select the Compatibility tab and then click on the Run compatibility troubleshooter option.
- Select the Try recommended settings option and follow the instructions given by the wizard to run the compatibility troubleshooter.
Try to install the file again and check if the installer is facing the same error.
Solution 4: Run The Installer With Administrative Rights
This error mostly happens if the installer doesn’t have the required permissions to install the file. Running the installer as an administrator can fix the problem.
Here is how you can do it:
- First, locate the installer in your computer and right-click on it.
- Select the Run as administrator option.
- The application will now install while having administrator rights.
If the error doesn’t arise again, then you will have to open this program each time in administrator mode to work around this problem or you can give this application permanent administrative rights.
To set the application to run as administrator whenever you open it, follow the steps given below:
- Locate the application on your computer and right-click on it.
- Click on the Properties options from the pop-up menu.
- Select the Compatibility tab and then select the Run this program as an administrator box.
- Finally, click on Apply and then OK to save the changes.
Solution 5: Change Security Permissions
If running the installer as an administrator didn’t work, the check if you are signed in as a regular user account.
Regular users are not allowed to install applications if denied by the administrator. So, they can face this error when they try to install the application.
You can try changing the security permissions to allow the installer to function. To change the security permissions, follow the steps given below:
- Right-click on the application and select Properties.
- Next, select the Security tab and then click on the Edit option.
- Click on your account username in the Group or user names section.
- In the Permissions for Users section, locate the Write option and then check the box in the Allow section.
- Finally, click on Apply and OK to save the changes.
By changing the security permissions, you should now be able to install the program without triggering the error during the installation.
Solution 6: Change Advanced Security Permissions
If changing the security permissions didn’t fix this error, then try changing the Advanced security permissions.
To change the Advanced security permissions, follow the steps given below:
- Follow Solution 5 and open the Security tab.
- Next, click on the Advanced option.
- Click on the Add option and click on the Select a principal option.
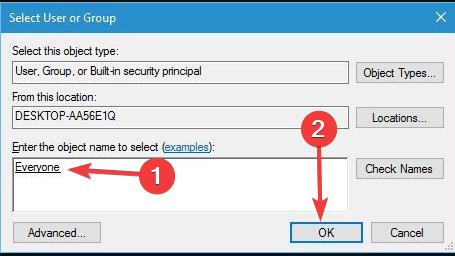
- Type Everyone in the Enter the object name to select (examples) section and then click on the Check Names option. Click OK to save the changes.
- In the Basic permissions section, check the Full control box and click on OK to save the changes.
- Now, from the Permission entries list, locate the Everyone element and select it.
Now, you should be able to install the application without triggering the error opening file for writing during the installation.
Solution 7: Create New User As Administrator
If you don’t want to change the security permissions, then try creating a new user account as an administrator and then install this application there.
To create a new user account as an administrator, follow the steps given below:
- Right-click on the Windows start button and then click on the Settings option from the pop-up menu.
- Locate the Accounts option and open it.
- Now, select the Family & other users option (only Family for Windows 11).
- Then scroll down and click on the Add someone else to this PC (or only Add Someone for Window 11) option.
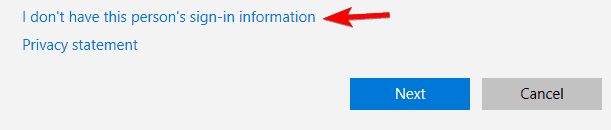
- Click on the I don’t have this person’s sign-in information option.
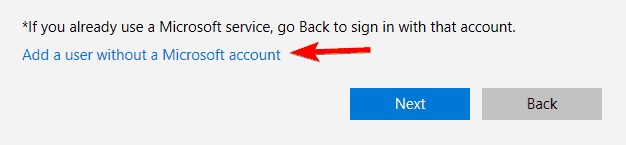
- Next, click on the Add a user without a Microsoft account option. You will have to use another Microsoft account in Windows 11.
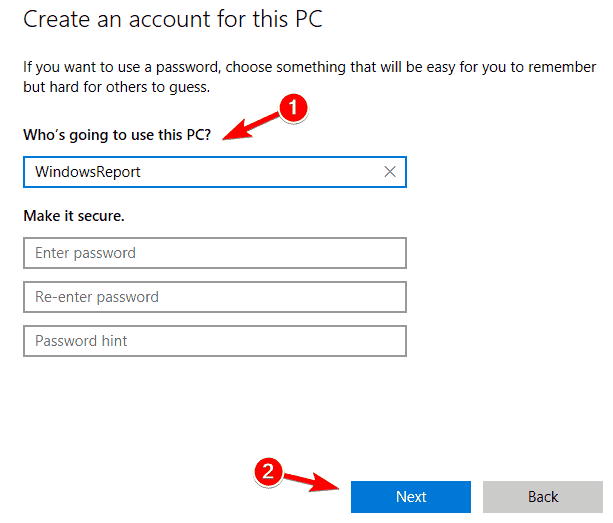
- Now, enter the name and the password of the user account and then click on Next.
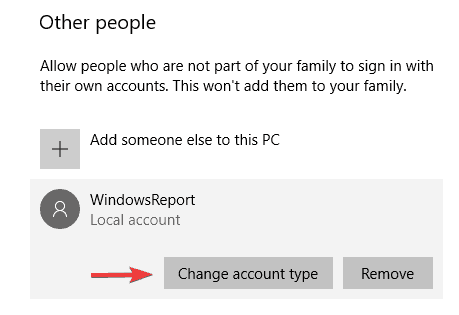
This should create your new user account and you will be able to see it in the Other users section. - Select the user account you just created and click on the Change account type option.
- Now, click on the Account type menu and select the Administrator option from the drop-down list.
Click Ok to save the changes. - Now, sign out of your current account and log in to your new user account.
Once you have switched to the new user, try installing the program and check if the setup still cannot open file for writing.
Solution 8: Disable Your Antivirus
Antiviruses are known instigators when it comes to stopping other files from opening or stopping installers.
Though the antivirus will only target those that it considers threatening to your PC, but sometimes what they consider and what the reality is can differ.
If your Antivirus is stopping the installation of the program, then disabling the antivirus should fix the problem.
To disable Windows Defender, follow the steps given below:
- Type Windows Security in the Windows search bar and select the top option.
- Select the Virus and Threat protection option and then click on the Manage settings option under the Virus and threat protection settings.
- Disable the Real-time Protection toggle to disable Windows Defender.
Once the antivirus is disabled, try installing the program and check if the problem arises again.
If the problem still arises, then follow the above steps again to turn on Real-time protection, as the error is most likely not caused by the antivirus.
Solution 9: Disable The User Account Control Feature
Whenever there is a system related change that requires administrator privileges, the User Account Control notifies you about the change.
This feature was included as a way to protect the user, but it is also reported by many users as the cause of this error.
Disabling User Account Control can fix this error. Here is how you can disable it:
- Type Change User Account Control settings in the Windows search bar and select the top option.
- You will notice a slider on the left side of your screen. Drag that slider down until it says Never notify.
- Finally, click on OK to save the changes.
Solution 10: Delete The Installer And Download It Again
If none of the above solutions worked for you, then the installer file itself may be corrupt. In this scenario, locate the installer file and delete it completely from your computer.
Now, download the installer of the program again from the official website and then try to install the program.
Wrapping Up
So, now you know what to do if you face the error opening file for writing during the installation of any program.
The above solutions should help you fix this issue so read and execute them carefully. And as always, feel free to share your thoughts on this article in the comment section below.
A reinstallation often works
by Milan Stanojevic
Milan has been enthusiastic about technology ever since his childhood days, and this led him to take interest in all PC-related technologies. He’s a PC enthusiast and he… read more
Updated on February 9, 2023
Reviewed by
Alex Serban

After moving away from the corporate work-style, Alex has found rewards in a lifestyle of constant analysis, team coordination and pestering his colleagues. Holding an MCSA Windows Server… read more
- Installing new software on Windows 10 is relatively simple; however, users may face the Error opening file for writing error message.
- This problem can affect applications like MSI Afterburner, Kodi, Steam, VLC, Wireshark, CCleaner, BSPlayer, and Hotspot Shield.
XINSTALL BY CLICKING THE DOWNLOAD FILE
This software will repair common computer errors, protect you from file loss, malware, hardware failure and optimize your PC for maximum performance. Fix PC issues and remove viruses now in 3 easy steps:
- Download Restoro PC Repair Tool that comes with Patented Technologies (patent available here).
- Click Start Scan to find Windows issues that could be causing PC problems.
- Click Repair All to fix issues affecting your computer’s security and performance
- Restoro has been downloaded by 0 readers this month.
Installing new software on Windows 10 is relatively simple; however, users reported the Error opening file for writing error while installing specific applications.
It seems that this problem can affect almost any application, thus preventing you from installing it.
Since this issue prevents you from installing additional software, it might seem severe, but you can quickly fix it by following one of the recommended solutions.
What does the Error opening file for writing mean?
The error opening file for writing typically means that a program tries to save a file but cannot do so due to some issues. For example, the following elements often cause it:
- Permission issues – The user doesn’t have the necessary permissions to write to the file or the file’s directory.
- Another program is using the file – Another program is currently accessing or using the file, making it inaccessible for writing.
- The file is locked or corrupted – The file may be locked or corrupted, making it impossible to write to it.
- Disk space issues – The disk may be full or the file may be too large to save in the available space.
- Incorrect file path – The program may be trying to write to an incorrect file path or a file that doesn’t exist.
- Outdated or conflicting software – The software may be outdated or have conflicting versions, causing it to fail when trying to save a file.
Error opening file for writing can be a big problem since you won’t be able to run specific files on your PC. Speaking of this error, users reported the following issues:
- Error opening file for writing MSI Afterburner, Kodi, Steam, VLC, Wireshark, CCleaner, BSPlayer, Hotspot Shield – This problem can affect many applications. If you’re having this issue, you might be able to fix the issue simply by reinstalling the affected applications.
- Error opening file for writing qt5core.dll, vcredist_x86.exe, npf.sys, msvcr110.dll – Many users reported this error caused by specific files on your PC. You might have to reinstall the components in charge of these files to fix the issue and check if that solves the problem.
If you are faced with the error, read on to see some of the best fixes.
How can I fix the Error opening file for writing?
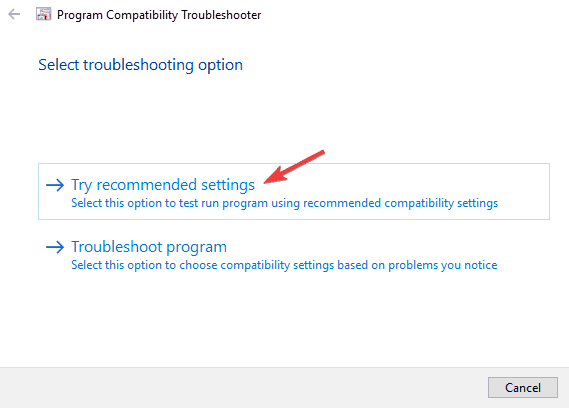
1. Run the Compatibility troubleshooter
- Right-click the setup file of the problematic application and choose Properties from the menu.

- Navigate to the Compatibility tab, and click Run compatibility troubleshooter.

- Select Try the recommended settings.

- Follow the instructions, and your problem should be fixed.
In addition to using a Compatibility troubleshooter, you can just set the program to run in compatibility mode to fix this problem.
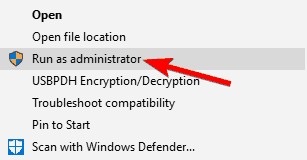
2. Run the program as an administrator
- Right-click the setup file and select Run as administrator from the menu.

If running the application as an administrator fixes the problem, you’ll have to repeat this workaround every time you want to start this application.
If you want a more permanent solution, you can set the application to always run with administrative privileges. To do that, follow these steps:
- Right-click the application giving you this problem and choose Properties from the menu.
- Now navigate to the Compatibility tab and check Run this program as an administrator.

- Click on Apply and OK to save changes.
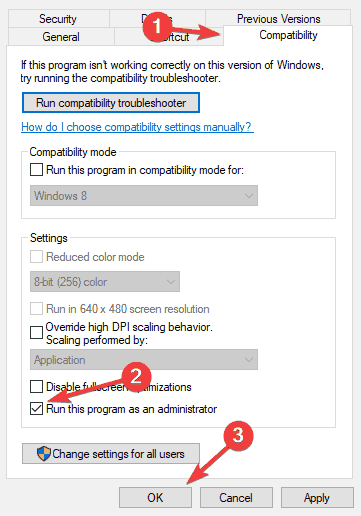
After doing that, the application will always run with administrative privileges, and you won’t experience this issue anymore.
Sometimes, you’ll get the Error opening file for writing messages if your user account lacks certain privileges. The simplest solution for this problem is to install the problematic application as an administrator.
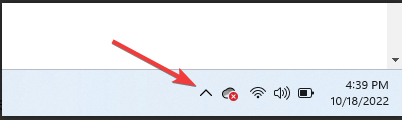
3. Check and disable your antivirus
- Click on the hidden access arrow in the Taskbar.

- Click on your antivirus icon, hover over Avast shields Control and select Disable for 10 minutes (This step varies for different antivirus software).

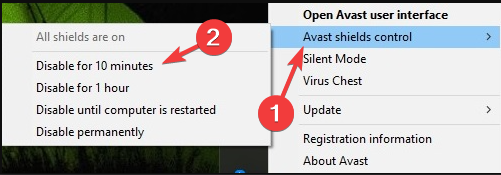
According to some users, your antivirus can cause the Error opening file for writing messages to appear.
Even though your antivirus is crucial to protecting your safety online, sometimes the antivirus can interfere with your files and cause this error to appear.
To fix the problem, users suggest changing their antivirus settings and checking if that solves the issue. In addition, you can start by disabling certain features and see if that helps.
If you don’t know which feature to disable, you can permanently disable your antivirus and check if that solves the issue.
If that doesn’t help, you might have to remove your antivirus and check if that solves the issue. Since your old antivirus was causing this issue, it might be a good idea to switch to new antivirus software.
There are many great antivirus tools available, and if you need to resolve this writing error file quickly, it’s probably the best idea to find one that doesn’t cause any errors.
4. Reinstall the problematic application
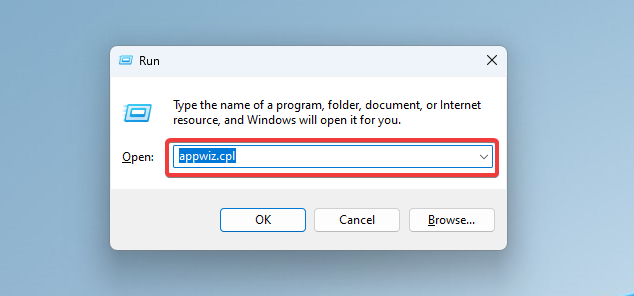
- Press Windows + R, type appwiz.cpl, and hit Enter.

- Click on the program to be uninstalled from the programs list, then select Uninstall.

- Download a new application version, double-click to run it, and follow the wizard until it is fully installed.
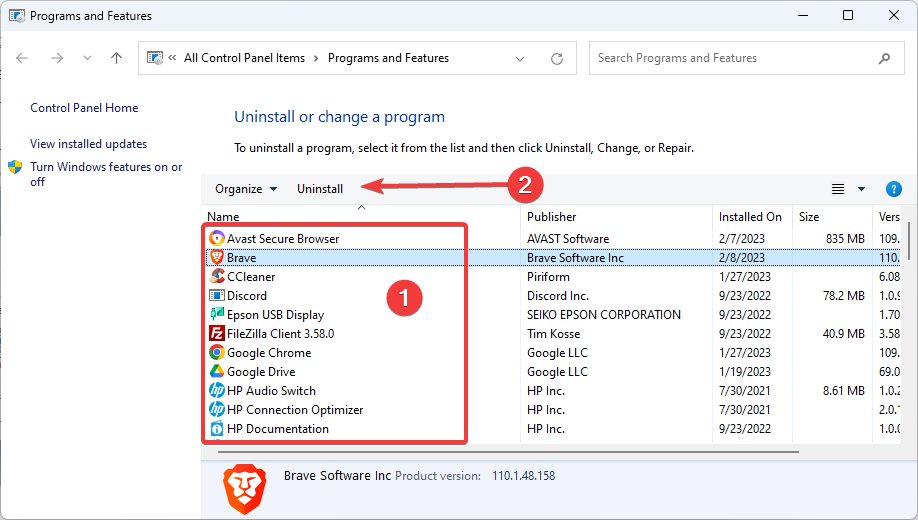
According to users, sometimes this error can occur if you’re trying to run a specific application.
If this happens, it means that your installation is probably corrupted, and to fix the problem; you need to reinstall the application.
5. Create a new administrator account
- Open the Settings app by pressing Windows + I.
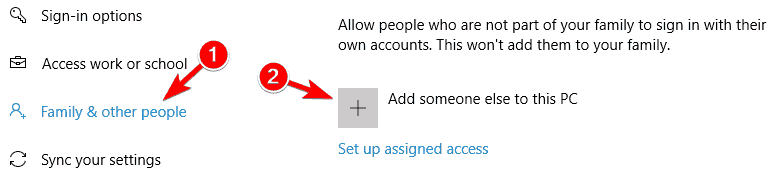
- Navigate to the Family & other users tab and click the Add someone else to this PC button.

- Select I don’t have this person’s sign-in information.

- Now click on Add a user without a Microsoft account.

- Add a username and password for this account and click Next.

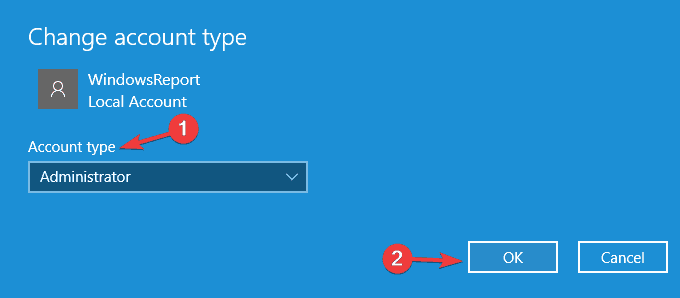
- You should see the newly created account available in the Other users section. Please select it and click on the Change account type button.

- From the Account type menu, select Administrator and click OK.

- Lastly, switch to the newly created administrator account and try installing the application again.
If the Error opening file for writing message persists, you might have to create a new administrator account and install the application on that account.
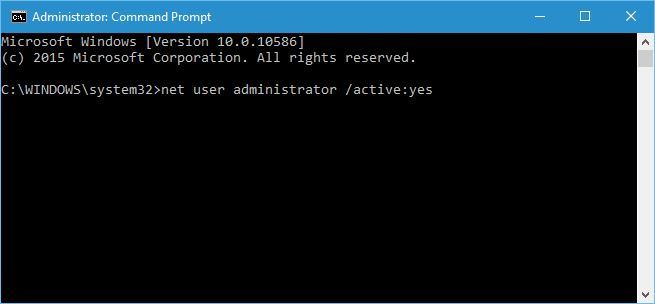
Alternatively, you can enable the hidden administrator account using the Command Prompt. To do that, follow these steps:
- Press Windows Key + X shortcut and select Command Prompt (Admin) from the menu.

- When Command Prompt starts, type the code below and press Enter to run it. This will enable a new administrator account that you can switch to install the problematic software.
net user administrator /active:yes

If you wish to disable this administrator account, switch back to your old account, open Command Prompt as administrator, and enter the script below:net user administrator /active:no
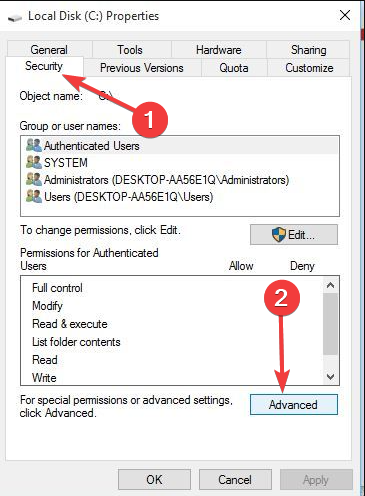
6. Change the security permissions
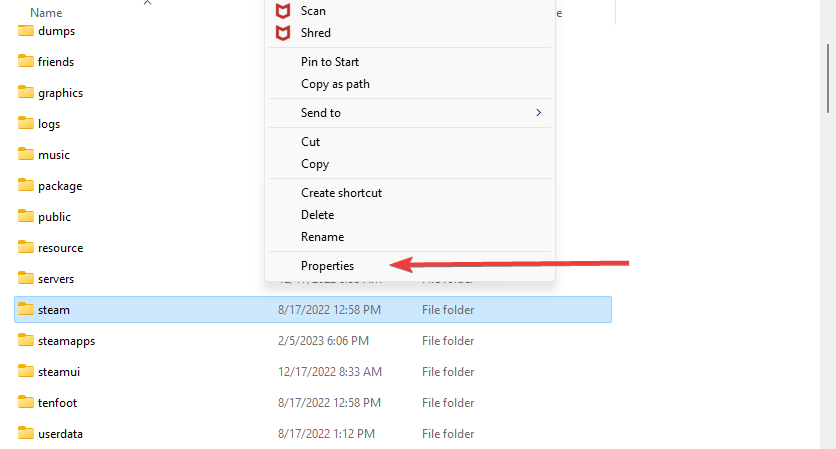
- Locate the folder in which you’re trying to install the problematic application. For example, it could be the path below:
C:Program Files (x86)Steam - Once you’ve located the directory, right-click it and choose Properties.

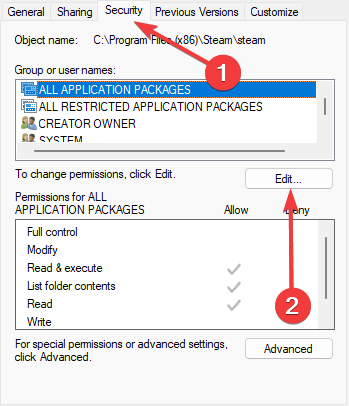
- Navigate to the Security tab and click the Edit button.

- Select Users from the Group or user names and check the write property under the Permissions for Users section.

- Finally, click OK and Apply.

After you’ve changed security permissions, you should be able to install applications to that specific folder.
By default, regular users aren’t allowed to install applications, and if you try to do that, you’ll probably encounter this error message.
Suppose you can’t install a particular application as a regular user. In that case, we strongly advise you to create an administrator account or try to install the application as an administrator to avoid this issue.
If you don’t want to use an administrator account, you might want to change security permissions.
7. Disable User Account Control
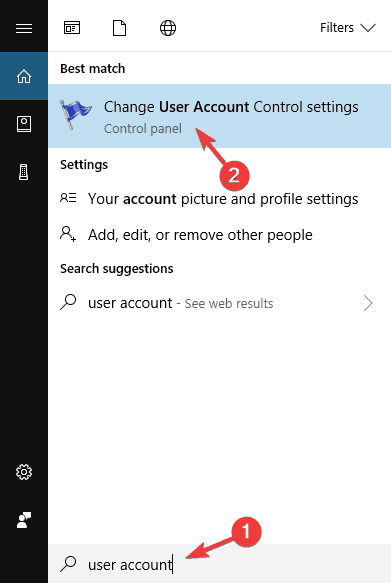
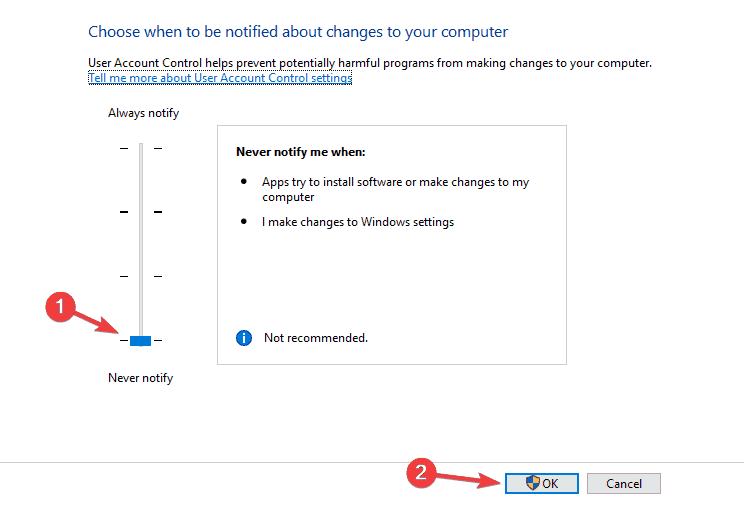
- Press Windows Key + S and enter User Account. Next, select Change User Account control settings.

- Move the slider down until it says Never notify.

- Lastly, click OK to save the changes.
After you’ve disabled User Account Control, the Error opening file for writing error message shouldn’t appear.
In addition to turning off User Account Control, users reported that turning off Windows Defender fixes this problem.
Suppose you have any third-party antivirus software installed. In that case, Windows Defender should be turned off by default, but if you don’t use any third-party antivirus software, try disabling Windows Defender.
User Account Control will notify you whenever a system-related change requires administrator privileges.
This feature is designed to protect you, but it can sometimes interfere with other software and cause the Error opening file for writing error message.
- Nvbackend Exe Error: How to Fix It in 5 Steps
- System Thread Exception not Handled Ntfs.sys: 6 Easy Fixes
- Invalid Kernel Handle Error: Use These 9 Methods to Fix it
- Runtime Error R6025: Fix it With These 4 Easy Solutions
- Error #268D3: What Is It and How to Remove the Popup
8. Change advanced security permissions
- Locate the folder in which you’re trying to install the problematic application. For example, it could be the path below:
C:Program Files (x86)Steam - Next, right-click the folder and choose Properties.
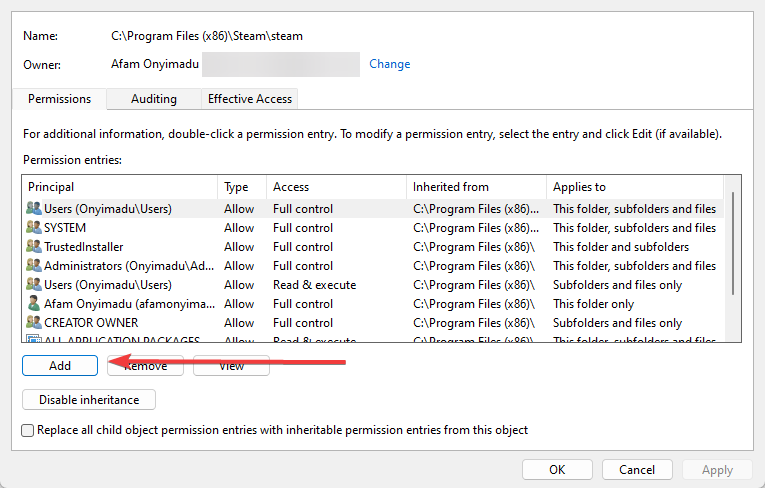
- Navigate to the Security tab and click the Advanced button.

- Now, click the Add button.

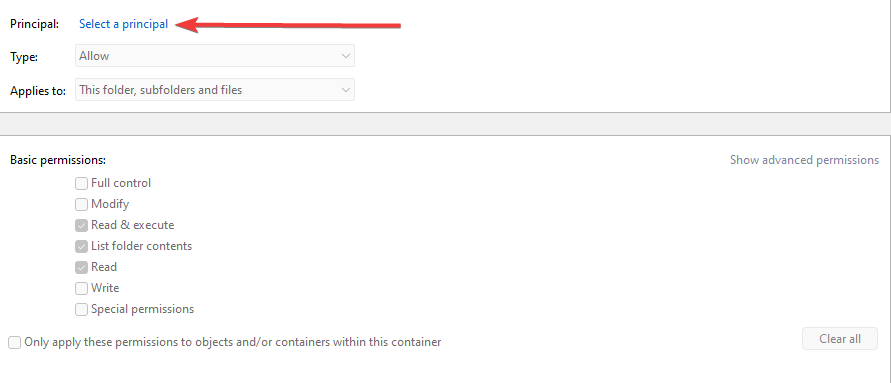
- Click on Select a principal.

- In the Enter the object name to select section, type Everyone and click Check Names and OK.

- In the Basic permissions section, select Full control and click OK.

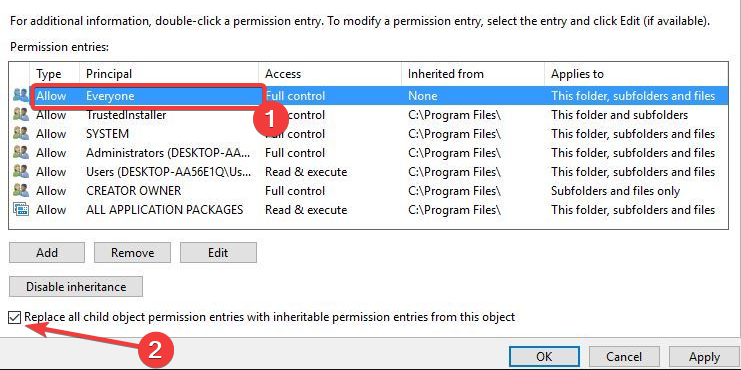
- From the Permissions open file for writing entries list, select Everyone and check the Replace all child object permission entries at the bottom.

- Finally, click Apply and OK to save changes.

After changing the security permissions, you’ll be able to install the application to that folder without any issues.
Changing security permissions isn’t always the best option, and we strongly advise that you try installing the problematic application by running its setup file as an administrator or by using an administrator account.
If both options aren’t working, you might want to try changing advanced security permissions.
9. Use registry cleaner software to clean up your registry
Sometimes, the Error opening file for writing message appears due to problems in the registry. The simplest solution is to download and run any registry cleaner to fix this.
We covered the best registry cleaners for Windows 10, so make sure that you check it out to find a proper registry cleaner for you.
Error opening file for writing error message will prevent you from installing specific software; however, this problem can be easily fixed by switching to the administrator account or by using any other solution from this article.
Lastly, let us know which solutions have proved most effective for you in the comments.
![]()
Newsletter
A reinstallation often works
by Milan Stanojevic
Milan has been enthusiastic about technology ever since his childhood days, and this led him to take interest in all PC-related technologies. He’s a PC enthusiast and he… read more
Updated on February 9, 2023
Reviewed by
Alex Serban
After moving away from the corporate work-style, Alex has found rewards in a lifestyle of constant analysis, team coordination and pestering his colleagues. Holding an MCSA Windows Server… read more
- Installing new software on Windows 10 is relatively simple; however, users may face the Error opening file for writing error message.
- This problem can affect applications like MSI Afterburner, Kodi, Steam, VLC, Wireshark, CCleaner, BSPlayer, and Hotspot Shield.
XINSTALL BY CLICKING THE DOWNLOAD FILE
This software will repair common computer errors, protect you from file loss, malware, hardware failure and optimize your PC for maximum performance. Fix PC issues and remove viruses now in 3 easy steps:
- Download Restoro PC Repair Tool that comes with Patented Technologies (patent available here).
- Click Start Scan to find Windows issues that could be causing PC problems.
- Click Repair All to fix issues affecting your computer’s security and performance
- Restoro has been downloaded by 0 readers this month.
Installing new software on Windows 10 is relatively simple; however, users reported the Error opening file for writing error while installing specific applications.
It seems that this problem can affect almost any application, thus preventing you from installing it.
Since this issue prevents you from installing additional software, it might seem severe, but you can quickly fix it by following one of the recommended solutions.
What does the Error opening file for writing mean?
The error opening file for writing typically means that a program tries to save a file but cannot do so due to some issues. For example, the following elements often cause it:
- Permission issues – The user doesn’t have the necessary permissions to write to the file or the file’s directory.
- Another program is using the file – Another program is currently accessing or using the file, making it inaccessible for writing.
- The file is locked or corrupted – The file may be locked or corrupted, making it impossible to write to it.
- Disk space issues – The disk may be full or the file may be too large to save in the available space.
- Incorrect file path – The program may be trying to write to an incorrect file path or a file that doesn’t exist.
- Outdated or conflicting software – The software may be outdated or have conflicting versions, causing it to fail when trying to save a file.
Error opening file for writing can be a big problem since you won’t be able to run specific files on your PC. Speaking of this error, users reported the following issues:
- Error opening file for writing MSI Afterburner, Kodi, Steam, VLC, Wireshark, CCleaner, BSPlayer, Hotspot Shield – This problem can affect many applications. If you’re having this issue, you might be able to fix the issue simply by reinstalling the affected applications.
- Error opening file for writing qt5core.dll, vcredist_x86.exe, npf.sys, msvcr110.dll – Many users reported this error caused by specific files on your PC. You might have to reinstall the components in charge of these files to fix the issue and check if that solves the problem.
If you are faced with the error, read on to see some of the best fixes.
How can I fix the Error opening file for writing?
1. Run the Compatibility troubleshooter
- Right-click the setup file of the problematic application and choose Properties from the menu.
- Navigate to the Compatibility tab, and click Run compatibility troubleshooter.
- Select Try the recommended settings.
- Follow the instructions, and your problem should be fixed.
In addition to using a Compatibility troubleshooter, you can just set the program to run in compatibility mode to fix this problem.
2. Run the program as an administrator
- Right-click the setup file and select Run as administrator from the menu.
If running the application as an administrator fixes the problem, you’ll have to repeat this workaround every time you want to start this application.
If you want a more permanent solution, you can set the application to always run with administrative privileges. To do that, follow these steps:
- Right-click the application giving you this problem and choose Properties from the menu.
- Now navigate to the Compatibility tab and check Run this program as an administrator.
- Click on Apply and OK to save changes.
After doing that, the application will always run with administrative privileges, and you won’t experience this issue anymore.
Sometimes, you’ll get the Error opening file for writing messages if your user account lacks certain privileges. The simplest solution for this problem is to install the problematic application as an administrator.
3. Check and disable your antivirus
- Click on the hidden access arrow in the Taskbar.
- Click on your antivirus icon, hover over Avast shields Control and select Disable for 10 minutes (This step varies for different antivirus software).
According to some users, your antivirus can cause the Error opening file for writing messages to appear.
Even though your antivirus is crucial to protecting your safety online, sometimes the antivirus can interfere with your files and cause this error to appear.
To fix the problem, users suggest changing their antivirus settings and checking if that solves the issue. In addition, you can start by disabling certain features and see if that helps.
If you don’t know which feature to disable, you can permanently disable your antivirus and check if that solves the issue.
If that doesn’t help, you might have to remove your antivirus and check if that solves the issue. Since your old antivirus was causing this issue, it might be a good idea to switch to new antivirus software.
There are many great antivirus tools available, and if you need to resolve this writing error file quickly, it’s probably the best idea to find one that doesn’t cause any errors.
4. Reinstall the problematic application
- Press Windows + R, type appwiz.cpl, and hit Enter.
- Click on the program to be uninstalled from the programs list, then select Uninstall.
- Download a new application version, double-click to run it, and follow the wizard until it is fully installed.
According to users, sometimes this error can occur if you’re trying to run a specific application.
If this happens, it means that your installation is probably corrupted, and to fix the problem; you need to reinstall the application.
5. Create a new administrator account
- Open the Settings app by pressing Windows + I.
- Navigate to the Family & other users tab and click the Add someone else to this PC button.
- Select I don’t have this person’s sign-in information.
- Now click on Add a user without a Microsoft account.
- Add a username and password for this account and click Next.
- You should see the newly created account available in the Other users section. Please select it and click on the Change account type button.
- From the Account type menu, select Administrator and click OK.
- Lastly, switch to the newly created administrator account and try installing the application again.
If the Error opening file for writing message persists, you might have to create a new administrator account and install the application on that account.
Alternatively, you can enable the hidden administrator account using the Command Prompt. To do that, follow these steps:
- Press Windows Key + X shortcut and select Command Prompt (Admin) from the menu.
- When Command Prompt starts, type the code below and press Enter to run it. This will enable a new administrator account that you can switch to install the problematic software.
net user administrator /active:yes
If you wish to disable this administrator account, switch back to your old account, open Command Prompt as administrator, and enter the script below:net user administrator /active:no
6. Change the security permissions
- Locate the folder in which you’re trying to install the problematic application. For example, it could be the path below:
C:Program Files (x86)Steam - Once you’ve located the directory, right-click it and choose Properties.
- Navigate to the Security tab and click the Edit button.
- Select Users from the Group or user names and check the write property under the Permissions for Users section.
- Finally, click OK and Apply.
After you’ve changed security permissions, you should be able to install applications to that specific folder.
By default, regular users aren’t allowed to install applications, and if you try to do that, you’ll probably encounter this error message.
Suppose you can’t install a particular application as a regular user. In that case, we strongly advise you to create an administrator account or try to install the application as an administrator to avoid this issue.
If you don’t want to use an administrator account, you might want to change security permissions.
7. Disable User Account Control
- Press Windows Key + S and enter User Account. Next, select Change User Account control settings.
- Move the slider down until it says Never notify.
- Lastly, click OK to save the changes.
After you’ve disabled User Account Control, the Error opening file for writing error message shouldn’t appear.
In addition to turning off User Account Control, users reported that turning off Windows Defender fixes this problem.
Suppose you have any third-party antivirus software installed. In that case, Windows Defender should be turned off by default, but if you don’t use any third-party antivirus software, try disabling Windows Defender.
User Account Control will notify you whenever a system-related change requires administrator privileges.
This feature is designed to protect you, but it can sometimes interfere with other software and cause the Error opening file for writing error message.
- Nvbackend Exe Error: How to Fix It in 5 Steps
- System Thread Exception not Handled Ntfs.sys: 6 Easy Fixes
- Invalid Kernel Handle Error: Use These 9 Methods to Fix it
- Runtime Error R6025: Fix it With These 4 Easy Solutions
- Error #268D3: What Is It and How to Remove the Popup
8. Change advanced security permissions
- Locate the folder in which you’re trying to install the problematic application. For example, it could be the path below:
C:Program Files (x86)Steam - Next, right-click the folder and choose Properties.
- Navigate to the Security tab and click the Advanced button.
- Now, click the Add button.
- Click on Select a principal.
- In the Enter the object name to select section, type Everyone and click Check Names and OK.
- In the Basic permissions section, select Full control and click OK.
- From the Permissions open file for writing entries list, select Everyone and check the Replace all child object permission entries at the bottom.
- Finally, click Apply and OK to save changes.
After changing the security permissions, you’ll be able to install the application to that folder without any issues.
Changing security permissions isn’t always the best option, and we strongly advise that you try installing the problematic application by running its setup file as an administrator or by using an administrator account.
If both options aren’t working, you might want to try changing advanced security permissions.
9. Use registry cleaner software to clean up your registry
Sometimes, the Error opening file for writing message appears due to problems in the registry. The simplest solution is to download and run any registry cleaner to fix this.
We covered the best registry cleaners for Windows 10, so make sure that you check it out to find a proper registry cleaner for you.
Error opening file for writing error message will prevent you from installing specific software; however, this problem can be easily fixed by switching to the administrator account or by using any other solution from this article.
Lastly, let us know which solutions have proved most effective for you in the comments.
![]()
Newsletter
-
Partition Wizard
-
Partition Magic
- How to Fix “Error Opening File for Writing” Windows 10/8/7
By Irene | Follow |
Last Updated October 29, 2019
When installing third-party software on a Windows PC, you may encounter the “error opening file for writing” error message and you will fail to install the program. What causes the error opening file for writing? How to fix? This post from MiniTool will show you effective solutions.
The error opening file for writing is not an error for a specific program. It could occur when you install programs like Steam, VLC, Wireshark, CCleaner, BSPlayer, etc. on a Windows operating system. It can basically affect any third-party Windows application and prevent it from installing.
In this case, you won’t be able to run certain applications on your PC, which cause great inconvenience. Well, how to fix error opening file for writing Windows 10/8/7? This article will show you some effective methods with detailed steps.
Fix 1. Run Compatibility Troubleshooter
The error opening file for writing error could be caused by compatibility issues. When you try to install a third-party program which is not compatible with the version of your Windows operating system, you may encounter installation failure along with the error opening file for writing error message.
In this case, you can run Windows compatibility troubleshooter to check and repair compatibility issues. If you don’t know how to run the compatibility troubleshooter, check out the following steps.
Step 1. Find the .exe file for the installer of the affected program.
Step 2. Locate the installer and right-click on it.
Step 3. Click on Properties from the context menu.
Step 4. Navigate to the Compatibility tab.
Step 5. Find and click on Run compatibility troubleshooter.
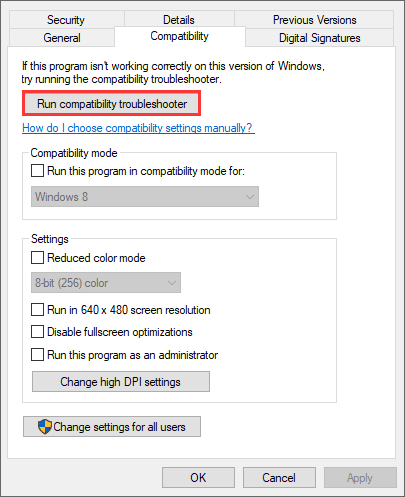
Step 5. Click on Try recommended settings.
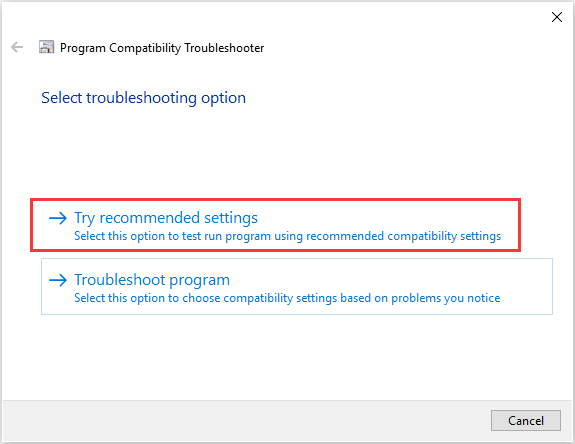
Then just follow the onscreen instructions to fix compatibility issues with the compatibility troubleshooter. Once the compatibility troubleshooter is done its job, try installing the application again and check whether the error opening file for writing problem get fixed.
Fix 2. Run the Installer with Administrative Privileges
You can run the installer for the third-party application with administrative privileges. This may help you resolve the error opening file for writing.
Step 1. Find the .exe file for the installer of the program.
Step 2. Right-click on the installer and choose Run as administrator from the context menu.
Step 3. Follow the on-screen instructions to complete the installation and check if the error message «error opening file for writing» gets fixed.
Fix 3. Change Security Permissions
Step 1. Find the installation folder for the third-party program with error opening file for writing.
Step 2. Right click on the folder and click on Properties.
Step 3. Switch to the Security tab.
Step 4. Click on Edit….
Step 5. Under the Group or user names section, click on Users.
Step 6.Check the box for Allow next to Write under Permissions for users.
Step 7. Click on Apply and then on OK.
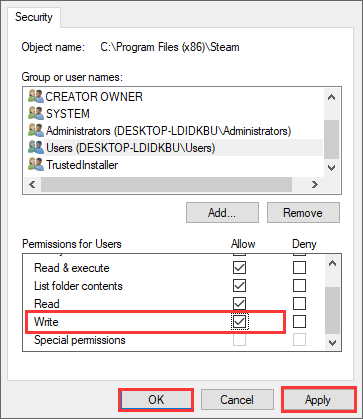
Step 8. Restart your computer and try again.
After restarting your PC, if you still encounter the error opening files for writing message, you may try the next method.
Fix 4. Disable User Account Control
The User Account Control feature can cause third-party installation errors such as error opening file for writing. In you encounter this error, you can try disabling the User Account Control.
Step 1. Type Change User Account Control settings in the Windows 10 Cortana search box and click the best match to open it.
Step 2. Move the slider to Never notify.
Step 3. Click on OK to confirm the action.
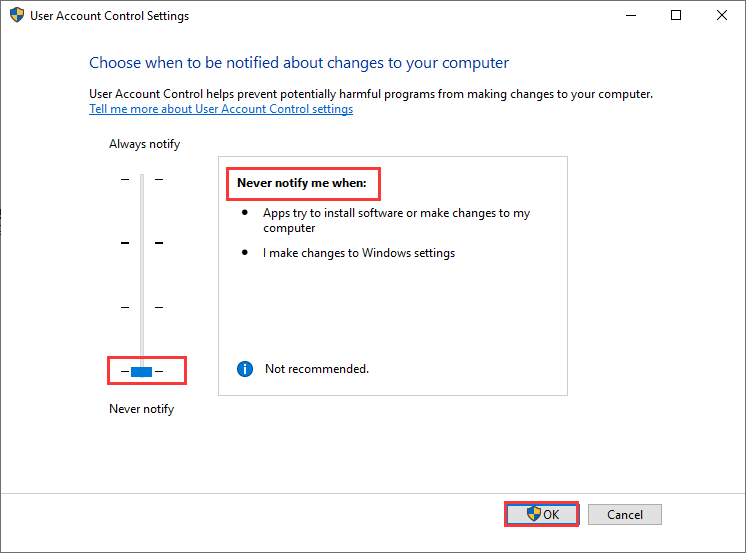
Step 4. Restart your computer. Then try installing the problematic application again.
Conclusion
Have you fixed the “error opening file for writing” installation error? Which method works for you? If you have better solutions, please don’t hesitate to share it with us. We are glad to have you share with us.
When installing a third-party application on a Windows computer, there are a lot of things that can go wrong. One of the most common problems faced by Windows users while trying to install third-party programs is an issue where the installation fails because Windows, for some reason, fails to open a file it needs to write in order to install the program in question. When this issue occurs, the user is informed that the installation was unsuccessful and Windows spits out the following error message:

“Error opening file for writing“
This specific problem is not bound to any specific version of the Windows Operating System – every single version of the Windows Operating System that is currently supported by Microsoft is prone to this problem. In addition, this issue is also not bound to any specific program or set of programs designed for Windows – it can basically affect any third-party Windows application and prevent it from being successfully installed. Not being able to install an application you want or need on your computer is most definitely a significant problem, but, thankfully, it is not an unfixable one. The following are some of the most effective solutions that any Windows user affected by this problem can use to try and resolve it and successfully install the affected application:
Solution 1: Run the installer for the program with administrative privileges
If you’re having trouble installing any third-party application designed for the Windows Operating System, the most commonly recommended course of action is to perform the installation as an administrator and see if doing so gets the job done. To run the installer for the third-party Windows application you are trying to install as an administrator, you need to:
- Navigate to where the .EXE file for the installer of the program is stored.
- Locate the installer and right-click on it.
- Click on Run as administrator in the resulting context menu.

- Go through the installation wizard by following the onscreen instructions and see if the “Error opening file for writing” error message rears its ugly head while the installation is being performed with administrative privileges.

Solution 2: Run the compatibility troubleshooter
If you are trying to install a third-party program that is not entirely compatible with the version and iteration of the Windows Operating System that your computer is running on, the installation might fail and you might end up being seeing the “Error opening file for writing” error message. Thankfully, though, Windows has the compatibility troubleshooter to check for and try to repair compatibility problems with files. To run the compatibility troubleshooter, you need to:
- Navigate to where the .EXE file for the installer of the affected program is stored.
- Locate the installer and right-click on it.
- Click on Properties in the resulting context menu.

- Navigate to the Compatibility tab.
- Click on Run compatibility troubleshooter.

- Click on Try recommended settings.

- Follow the onscreen instructions and bear with the compatibility troubleshooter all the way to the very end.
- Once the compatibility troubleshooter is done working its magic, try installing the affected application to see whether the problem has been resolved.


Solution 3: Change the security permissions for the installation location
You might be seeing the “Error opening file for writing” error message while trying to install a specific application because the security permissions for the installation location you have chosen for it do not allow files located in it to be written by your user account. If that is the case, you should be able to resolve the problem by fixing the security permissions for the directory you are trying to install the affected application to. To apply this solution, you need to:
- Navigate to the installation location for the affected third-party program.
- Right-click on the folder you are trying to install the affected third-party program to, and click on Properties.
- Navigate to the Security tab.
- Click on Edit….

- Click on Users under the Group or user names section to select it.
- Check the checkbox for Allow next to Write under Permissions for users.

- Click on Apply and then on OK.
- Restart your computer.


When the computer boots up, try running the installer and see if the “Error opening file for writing” error message still persists.
Solution 4: Change advanced security permissions for the installation location
If simply changing the regular security permissions for the installation location isn’t enough to get the job done, you take another step forward and change the advanced security permissions for the installation location. To change the advanced security permissions for the installation location, you need to:
- Navigate to the installation location for the affected third-party program.
- Right-click on the folder you are trying to install the affected third-party program to, and click on Properties.
- Navigate to the Security tab.
- Click on Advanced.

- Click on Change permissions and then click on Add.
- Click on Select a principal.

- In the Enter an object name to select: field, type Everyone, click on Check Names and then click on OK.

- Under Basic permissions:, check the checkbox beside Full control and click on OK.

- In the list located directly under the Permission entries: section, click on the Everyone listing to select it and enable the Replace all child object permission entries with inheritable permission entries from this object option.

- Click on Apply and then on OK.
- Restart your computer.


Wait for the computer to boot up and then try installing the third-party application your were previously having trouble installing to see if the problem has been resolved.
Solution 5: Disable User Account Control
The User Account Control feature, although a security feature built in to the Windows Operating System to protect users, can sometimes cause more harm than it does good, and causing the installations of certain third-party programs to fail with the “Error opening file for writing” error message is an example of such an instance. Thankfully, though, User Access Control can be disabled. To disable User Account Control, you need to:
- Open the Start Menu.
- Search for “user accounts“.
- Click on the search result titled User Accounts.

- Click on Change User Account Control settings.

- Move the slider all the way down to Never notify.

- Click on OK and, if required to do so, confirm the action.
- Restart your computer.
- When the computer boots up, try installing the affected application to see if the installation now goes through successfully.


Solution 6: Create a new user account and try installation the affected application on it
If absolutely none of the solutions listed and described above have managed to work for you, the problem might just lie with your user account itself. And if that’s the case, you should be able to successfully install the affected third-party program on a different, brand new user account on your computer. To create a new administrator account on your computer, you need to:
- Open the Start Menu.
- Click on Settings.
- Click on Accounts.
- Click on Family & other users in the left pane.
- In the right pane of the window, under the Other users section, click on Add someone else to this PC.

- Click on I don’t have this person’s sign-in information.
- Click on Add a user without a Microsoft account.
- Type in a user name and a password for the new user account and click on Next.
- The new user account you created should now show up under Other users. Click on it to select it and click on Change account type.

- Open the dropdown menu and click on Administrator to select it, and then click on OK.

- Switch to your newly created user account and try installation the affected third-party application on it.


If the program is successfully installed on the new user account, your old user account itself was the problem. That being the case, you should simply move all of your data and files from your old user account to the new one and delete the old user account.

Kevin Arrows
Kevin is a dynamic and self-motivated information technology professional, with a Thorough knowledge of all facets pertaining to network infrastructure design, implementation and administration. Superior record of delivering simultaneous large-scale mission critical projects on time and under budget.