Появление сообщения об ошибке 401 Unauthorized Error («отказ в доступе») при открытии страницы сайта означает неверную авторизацию или аутентификацию пользователя на стороне сервера при обращении к определенному url-адресу. Чаще всего она возникает при ошибочном вводе имени и/или пароля посетителем ресурса при входе в свой аккаунт. Другой причиной являются неправильные настройки, допущенные при администрировании web-ресурса. Данная ошибка отображается в браузере в виде отдельной страницы с соответствующим описанием. Некоторые разработчики интернет-ресурсов, в особенности крупных порталов, вводят собственную дополнительную кодировку данного сбоя:
- 401 Unauthorized;
- Authorization Required;
- HTTP Error 401 – Ошибка авторизации.
Попробуем разобраться с наиболее распространенными причинами возникновения данной ошибки кода HTTP-соединения и обсудим способы их решения.
Причины появления ошибки сервера 401 и способы ее устранения на стороне пользователя
При доступе к некоторым сайтам (или отдельным страницам этих сайтов), посетитель должен пройти определенные этапы получения прав:
- Идентификация – получение вашей учетной записи («identity») по username/login или email.
- Аутентификация («authentic») – проверка того, что вы знаете пароль от этой учетной записи.
- Авторизация – проверка вашей роли (статуса) в системе и решение о предоставлении доступа к запрошенной странице или ресурсу на определенных условиях.
Большинство пользователей сохраняют свои данные по умолчанию в истории браузеров, что позволяет быстро идентифицироваться на наиболее часто посещаемых страницах и синхронизировать настройки между устройствами. Данный способ удобен для серфинга в интернете, но может привести к проблемам с безопасностью доступа к конфиденциальной информации. При наличии большого количества авторизованных регистрационных данных к различным сайтам используйте надежный мастер-пароль, который закрывает доступ к сохраненной в браузере информации.
Наиболее распространенной причиной появления ошибки с кодом 401 для рядового пользователя является ввод неверных данных при посещении определенного ресурса. В этом и других случаях нужно попробовать сделать следующее:
- Проверьте в адресной строке правильность написания URL. Особенно это касается перехода на подстраницы сайта, требующие авторизации. Введите правильный адрес. Если переход на страницу осуществлялся после входа в аккаунт, разлогинитесь, вернитесь на главную страницу и произведите повторный вход с правильными учетными данными.
- При осуществлении входа с сохраненными данными пользователя и появлении ошибки сервера 401 проверьте их корректность в соответствующих настройках данного браузера. Возможно, авторизационные данные были вами изменены в другом браузере. Также можно очистить кэш, удалить cookies и повторить попытку входа. При удалении истории браузера или очистке кэша потребуется ручное введение логина и пароля для получения доступа. Если вы не помните пароль, пройдите процедуру восстановления, следуя инструкциям.
- Если вы считаете, что вводите правильные регистрационные данные, но не можете получить доступ к сайту, обратитесь к администратору ресурса. В этом случае лучше всего сделать скриншот проблемной страницы.
- Иногда блокировка происходит на стороне провайдера, что тоже приводит к отказу в доступе и появлению сообщения с кодировкой 401. Для проверки можно попробовать авторизоваться на том же ресурсе с альтернативного ip-адреса (например, используя VPN). При подтверждении блокировки трафика свяжитесь с провайдером и следуйте его инструкциям.
Некоторые крупные интернет-ресурсы с большим количеством подписчиков используют дополнительные настройки для обеспечения безопасности доступа. К примеру, ваш аккаунт может быть заблокирован при многократных попытках неудачной авторизации. Слишком частые попытки законнектиться могут быть восприняты как действия бота. В этом случае вы увидите соответствующее сообщение, но можете быть просто переадресованы на страницу с кодом 401. Свяжитесь с администратором сайта и решите проблему.
Иногда простая перезагрузка проблемной страницы, выход из текущей сессии или использование другого веб-браузера полностью решают проблему с 401 ошибкой авторизации.
Устранение ошибки 401 администратором веб-ресурса
Для владельцев сайтов, столкнувшихся с появлением ошибки отказа доступа 401, решить ее порою намного сложнее, чем обычному посетителю ресурса. Есть несколько рекомендаций, которые помогут в этом:
- Обращение в службу поддержки хостинга сайта. Как и в случае возникновения проблем с провайдером, лучше всего подробно описать последовательность действий, приведших к появлению ошибки 401, приложить скриншот.
- При отсутствии проблем на стороне хостинг-провайдера можно внести следующие изменения в настройки сайта с помощью строки Disallow:/адрес проблемной страницы. Запретить индексацию страницам с ошибкой в «rоbоts.txt», после чего добавить в файл «.htассеss» строку такого типа:
Redirect 301 /oldpage.html http://site.com/newpage.html.
Где в поле /oldpage.html прописывается адрес проблемной страницы, а в http://site.com/newpage.html адрес страницы авторизации.
Таким образом вы перенаправите пользователей со всех страниц, которые выдают ошибку 401, на страницу начальной авторизации.
- Если после выполнения предыдущих рекомендаций пользователи при попытках авторизации все равно видят ошибку 401, то найдите на сервере файл «php.ini» и увеличьте время жизни сессии, изменив значения следующих параметров: «session.gc_maxlifetime» и «session.cookie_lifetime» на 1440 и 0 соответственно.
- Разработчики веб-ресурсов могут использовать более сложные методы авторизации и аутентификации доступа для создания дополнительной защиты по протоколу HTTP. Если устранить сбой простыми методами администрирования не удается, следует обратиться к специалистам, создававшим сайт, для внесения соответствующих изменений в код.
Хотя ошибка 401 и является проблемой на стороне клиента, ошибка пользователя на стороне сервера может привести к ложному требованию входа в систему. К примеру, сетевой администратор разрешит аутентификацию входа в систему всем пользователям, даже если это не требуется. В таком случае сообщение о несанкционированном доступе будет отображаться для всех, кто посещает сайт. Баг устраняется внесением соответствующих изменений в настройки.
Дополнительная информация об ошибке с кодом 401
Веб-серверы под управлением Microsoft IIS могут предоставить дополнительные данные об ошибке 401 Unauthorized в виде второго ряда цифр:
- 401, 1 – войти не удалось;
- 401, 2 – ошибка входа в систему из-за конфигурации сервера;
- 401, 3 – несанкционированный доступ из-за ACL на ресурс;
- 401, 501 – доступ запрещен: слишком много запросов с одного и того же клиентского IP; ограничение динамического IP-адреса – достигнут предел одновременных запросов и т.д.
Более подробную информацию об ошибке сервера 401 при использовании обычной проверки подлинности для подключения к веб-узлу, который размещен в службе MS IIS, смотрите здесь.
Следующие сообщения также являются ошибками на стороне клиента и относятся к 401 ошибке:
- 400 Bad Request;
- 403 Forbidden;
- 404 Not Found;
- 408 Request Timeout.
Как видим, появление ошибки авторизации 401 Unauthorized не является критичным для рядового посетителя сайта и чаще всего устраняется самыми простыми способами. В более сложной ситуации оказываются администраторы и владельцы интернет-ресурсов, но и они в 100% случаев разберутся с данным багом путем изменения настроек или корректировки html-кода с привлечением разработчика сайта.
Trying to access a WordPress site and being met with an error page is at best inconvenient, whether that site is yours or someone else’s. As with many HTTP response codes, part of what makes a 401 error so frustrating is the lack of information it offers for diagnosing and resolving the issue.
The 401 error can happen with any browser, so it’s a pretty common issue people face. In most cases, this problem is relatively simple and straightforward to fix.
In this post, we’ll explain what 401 error messages are and why they happen. Then, we’ll walk you through five methods you can use to fix them.
Let’s get started!
What is the 401 Error Code?
The Internet Engineering Task Force (IETF) defines the error 401 Unauthorized as:
The 401 (Unauthorized) status code indicates that the request has not been applied because it lacks valid authentication credentials for the target resource. The server generating a 401 response MUST send a WWW-Authenticate header field containing at least one challenge applicable to the target resource.
An Introduction to the 401 Error Code
HTTP 400 status codes are encountered when there is a problem making a request. A 401 error, in particular, happens when your browser denies you access to the page you’re trying to visit.
As a result, instead of loading the web page, the browser will load an error message. 401 errors can happen within any browser so the message appearing may differ.
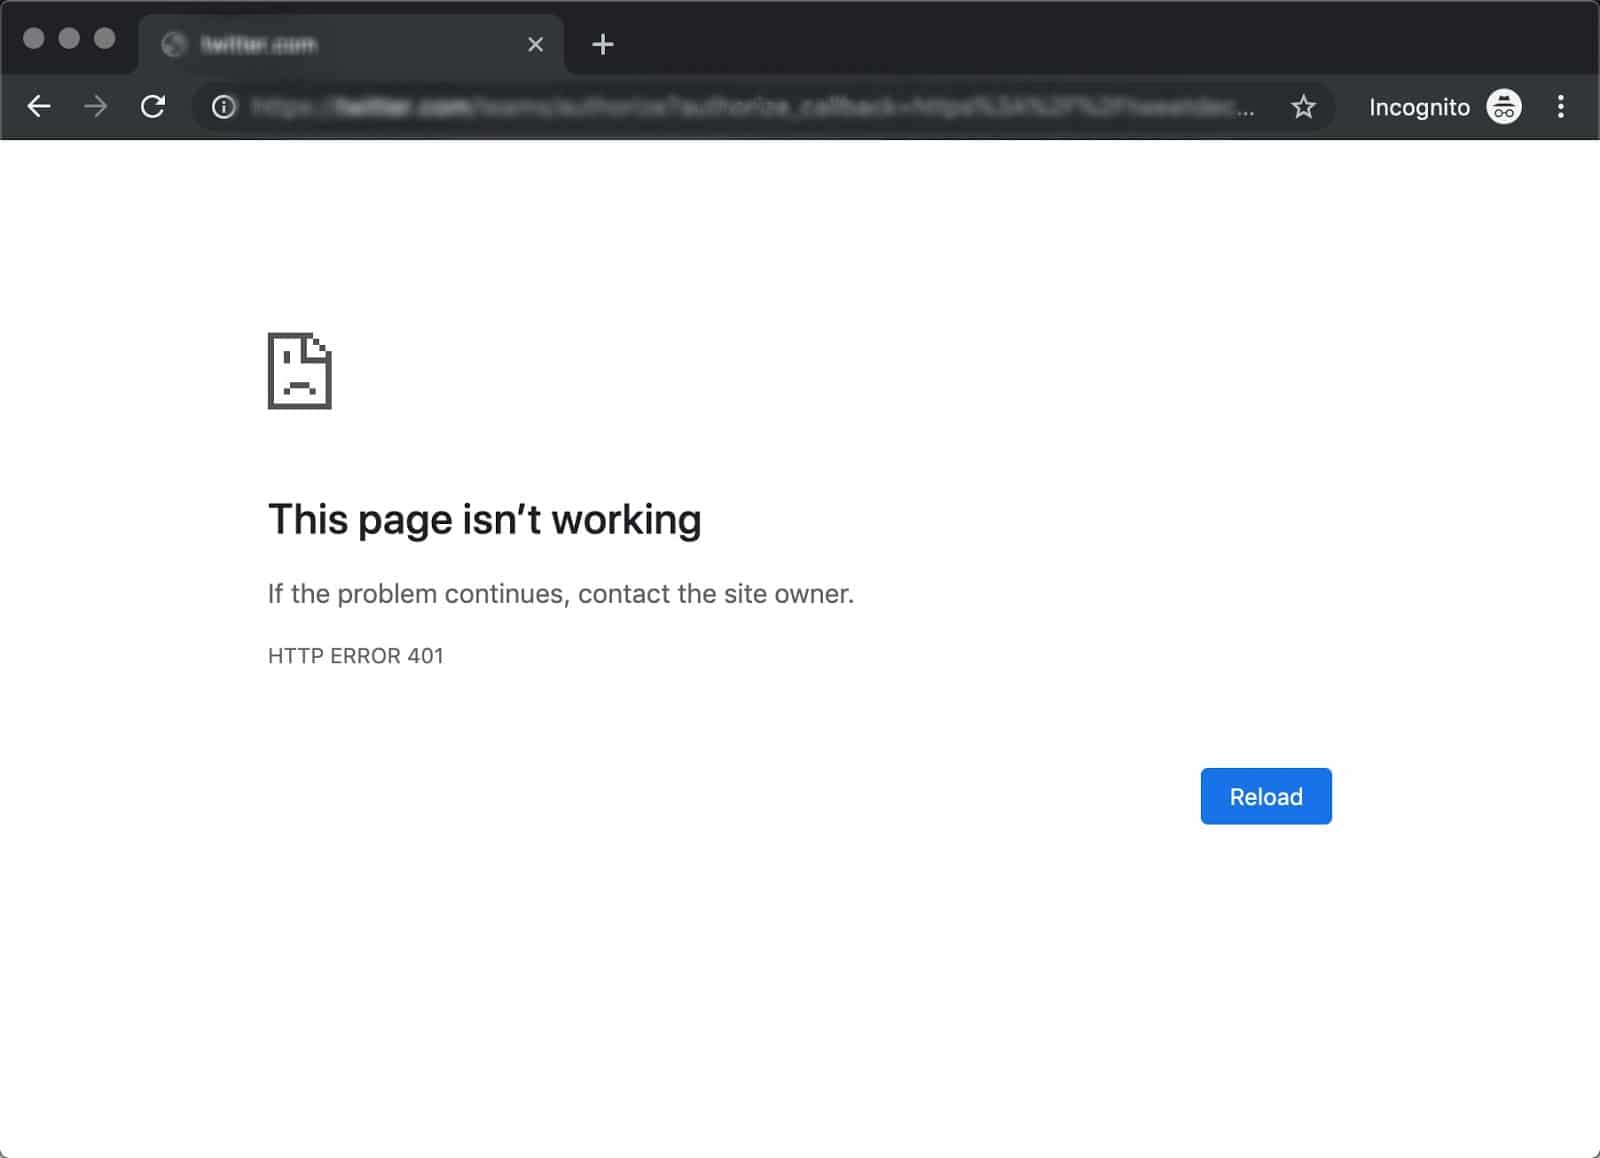
For example, in Chrome or Edge, you’ll likely see a paper icon along with a simple message telling you that the page in question isn’t working. It will include the phrase “HTTP Error 401” at the bottom, and instruct you to contact the site’s owner if the problem persists:
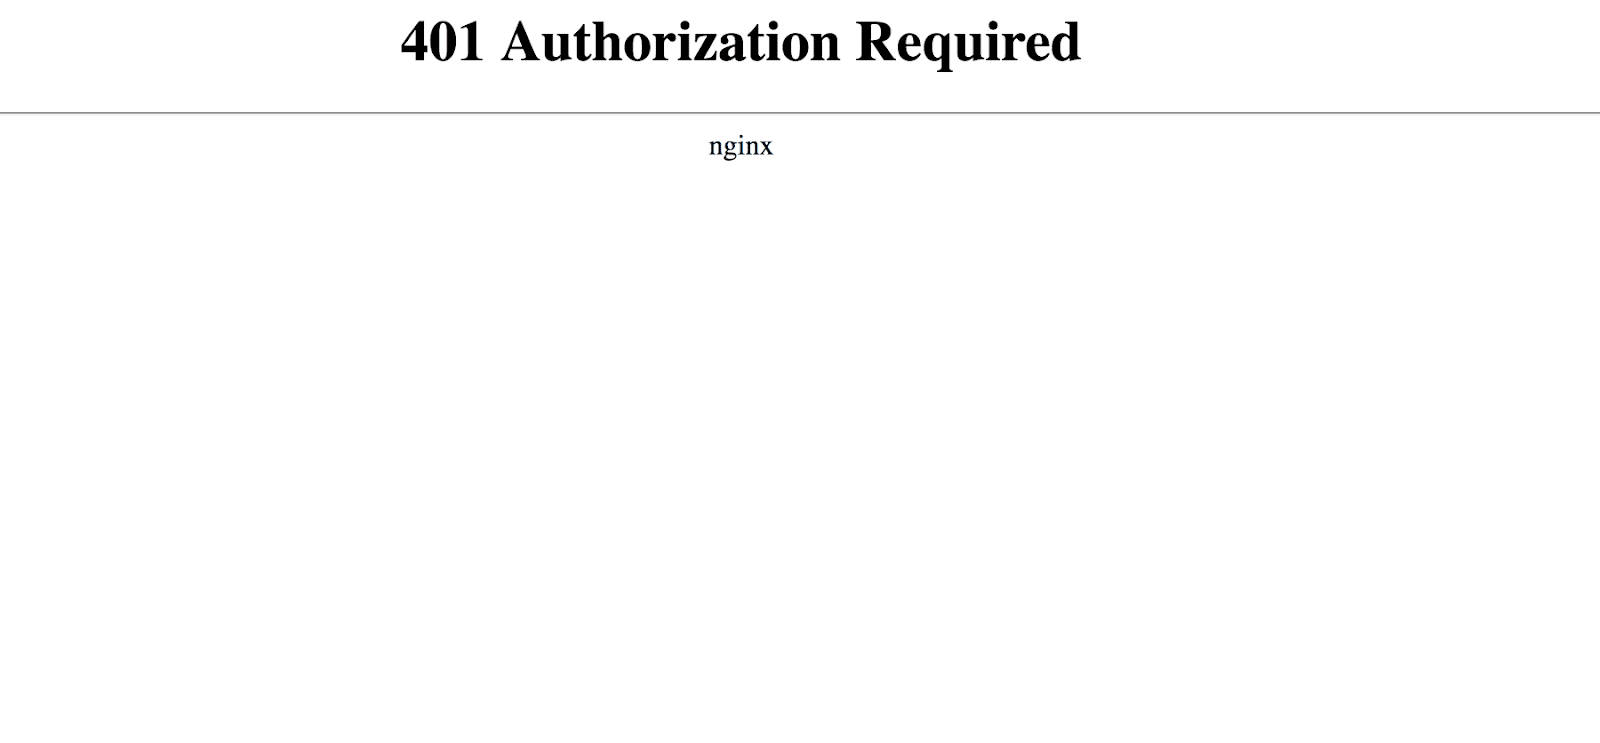
At other times and in other browsers, you might get a slightly less friendly warning that’s just a blank page with a “401 Authorization Required” message:
Other variations include:
- “HTTP 401 Error – Unauthorized”
- “401 Unauthorized”
- “Access Denied”
These errors occur on websites that require a login in order to access them. In most cases, it means that something is either wrong with the credentials or with the browser’s ability to read them as valid.
This is similar to HTTP 403 Forbidden Error, in that access isn’t permitted to the user. However, unlike with the 403 error, the 401 error message indicates that the authentication process failed.
The code is sent via the WWW-Authenticate header, which is responsible for identifying the authentication method used for granting access to a web page or resource.
The HTTP 401 error is all too common 🤦♀️ — and this guide will give you everything you need to fix it the next time you see that message showing up ✅Click to Tweet
What Causes a 401 Error?
If you encounter an error code in the 400s, you know you’re dealing with a client-side (or browser-side) issue. While the problem may be happening within your browser, however, it doesn’t necessarily always mean that’s the culprit, which we’ll explain in more detail later.
401 errors occur on restricted resources, such as password-protected pages of your WordPress site. So it’s safe to assume that the cause of the problem has something to do with the authentication credentials.
Outdated Browser Cache and Cookies
One of the most common reasons you might experience a 401 error is that your browser’s cache and cookies are out of date, preventing the authorization from successfully going through. If your browser isn’t using the valid authentication credentials (or any at all), the server will reject the request.
Plugin Incompatibility
At other times, this error is caused by a plugin incompatibility or error. For example, a firewall or security plugin can mistake your login attempt as malicious activity, and return a 401 error to protect the page.
Incorrect URL or Outdated Link
It’s also possible that the source of the problem can be attributed to a minor mistake. Common culprits in this category include an incorrectly-typed URL or an outdated link.
How to Fix the 401 Error (5 Methods)
Now that we’ve gone through a bit of background on the 401 error, it’s time to discuss how you can resolve it.
Let’s take a look at five methods you can use:
1. Look for Errors in the URL
We’ll start off with the easiest potential fix: making sure you used the correct URL. This may sound simple, but 401 errors can sometimes appear if the URL wasn’t correctly entered in.
Another possibility is that the link you used to visit the page in question points to the wrong URL. For example, it might be outdated, or leading to a page that no longer exists (and no redirects are in place).
Therefore, it’s worth double-checking the URL you used. If you typed it in yourself, verify that you spelled everything correctly. If you clicked on a link, confirm that it’s pointing to the page you’re trying to access (or try to visit that page directly through the website).
2. Clear Your Browser’s Cache
Your browser’s cache is designed to improve your online experience, by reducing page loading times. Unfortunately, sometimes it can also cause unwanted interruptions.
As we mentioned earlier, one of the common causes of the 401 error is outdated or incorrect cache data or cookies. Therefore, if you don’t notice any issues with the page’s URL, the next step is to clear your browser’s cache.
This will clean out any invalid information that’s locally stored in your browser, which could be interrupting the authentication process. Similarly, your browser’s cookies might contain authentication data that simply needs to be refreshed.
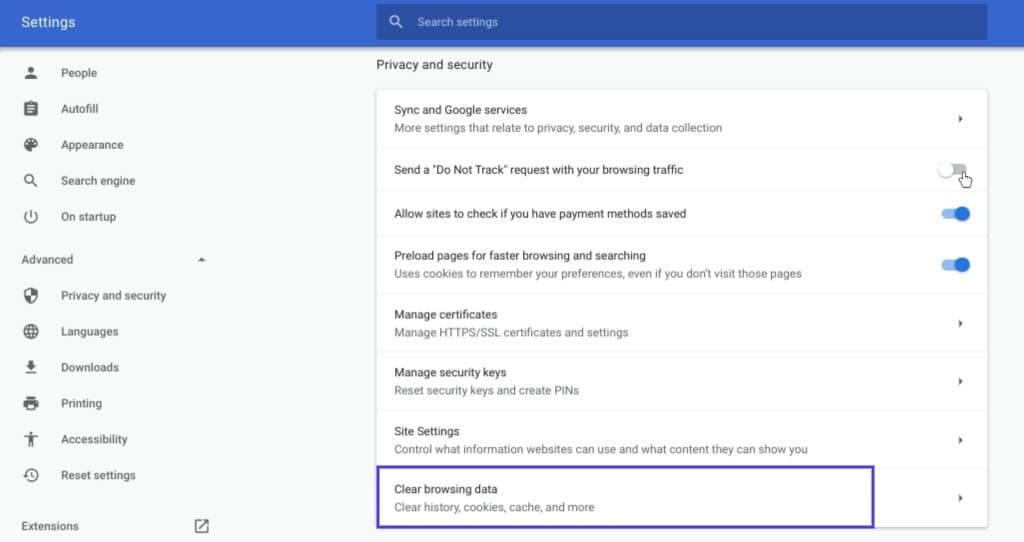
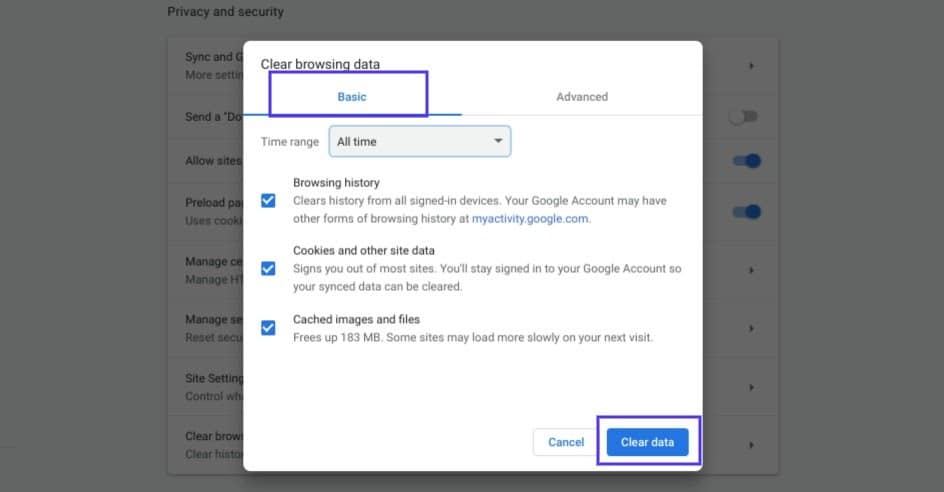
If you’re a Google Chrome user, you can do this by clicking on the menu icon in the top-right corner of the browser, and then going to Settings. Under the Privacy and security section, click on Clear browsing data:
A new window will open. Under the Basic tab, make sure all three boxes are selected, and then select Clear data:
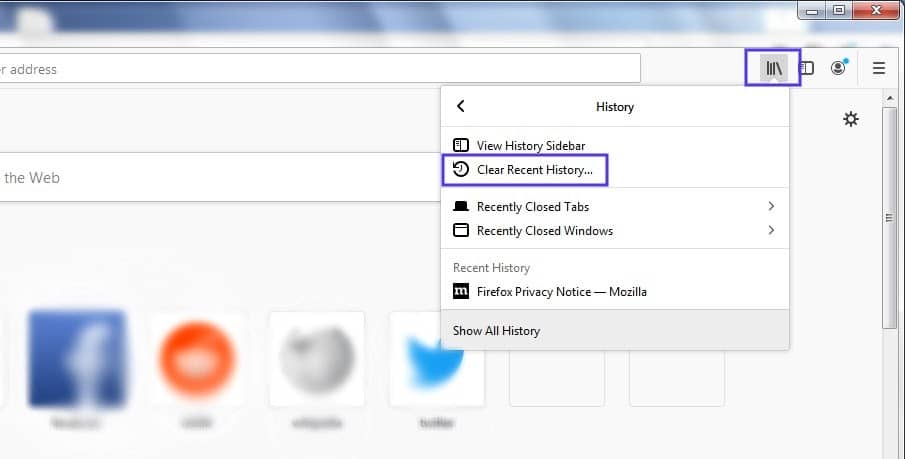
This process will look a little different in other browsers. For example, in Mozilla Firefox, you would click on the library icon in the top-right corner of the browser, followed by History > Clear Recent History:
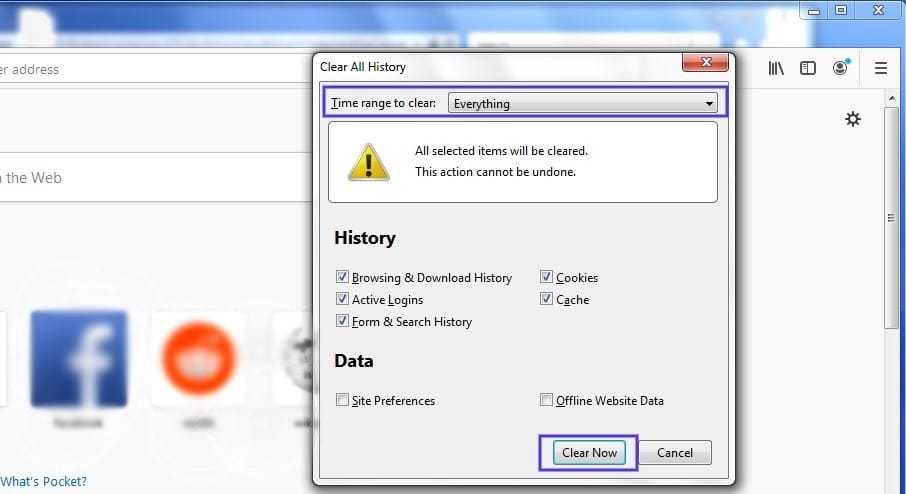
In the panel that opens next, select Everything in the drop-down menu at the top, make sure “Cache” is selected, and then click on the Clear Now button:
If you’re using a different browser, please refer to this guide for clearing the cache
3. Flush Your DNS
Another method you can try to resolve the 401 error is flushing your Domain Name Server (DNS). While this is a rarer issue, it can be a possible cause, so it’s worth giving it a try if the first two solutions don’t work.
To do this in Windows, click on the Start button and type cmd into the search bar. Hit Enter, and the Command Prompt will open. Copy and paste the command ipconfig/flushdns, and then hit Enter again:
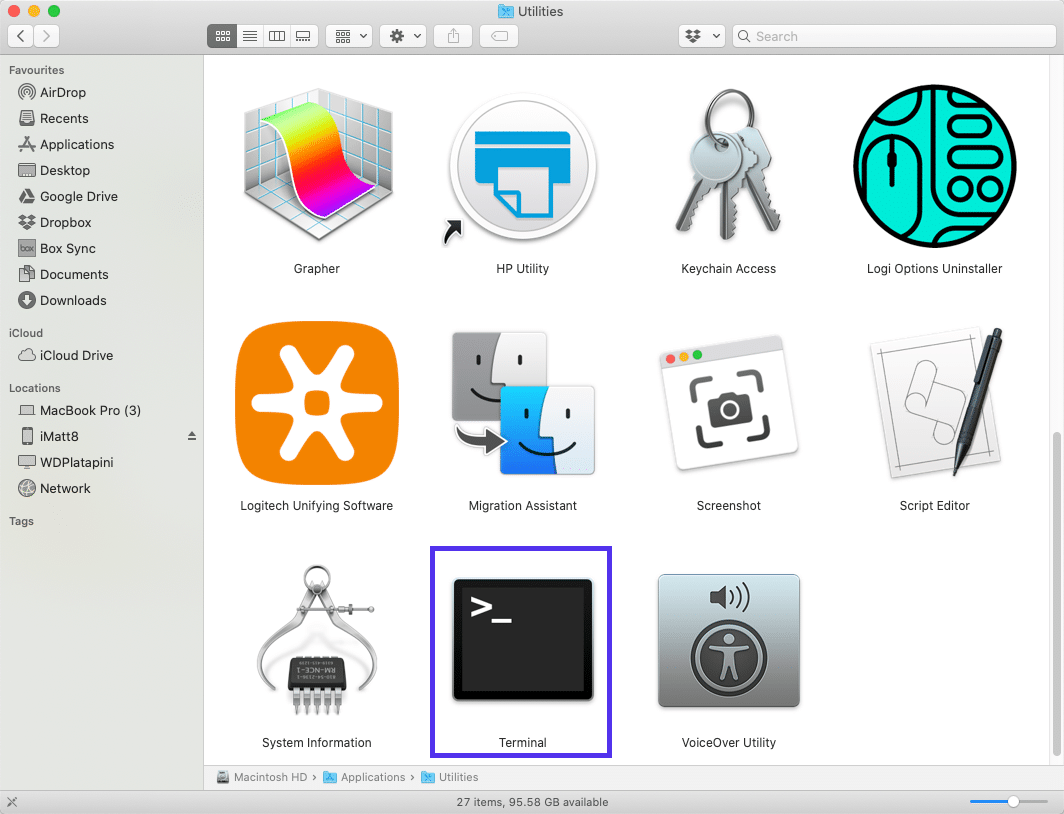
On a Mac, you can do this by going to Finder > Applications > Utilities > Terminal:
Input the command line sudo killall -HUP mDNSResponder and press Enter. Then, you can try refreshing the page you were trying to visit, to see if the 401 error has been resolved.
4. Deactivate Your WordPress Plugins
The problem causing your 401 error might not be due to your browser. If you’re having trouble accessing your WordPress site, it’s also possible that one or more plugins are to blame.
Some plugins, especially security-focused plugins, are configured to show a 401 error when they suspect suspicious login activity that might indicate an attack. Others might just be suffering from compatibility issues. Therefore, it’s a good idea to deactivate all of your WordPress plugins and see if that resolves the issue.
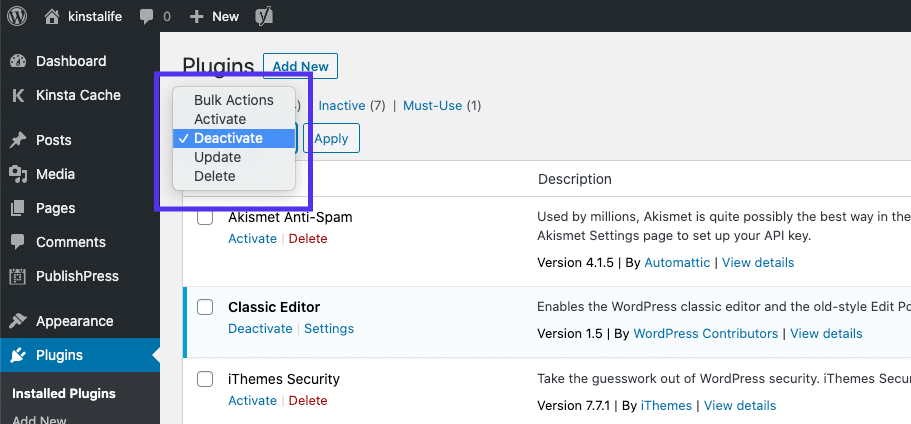
You can deactivate your plugins all at the same time in your dashboard, by going to Plugins > Installed Plugins. Check the box at the top to select all of them. Then under the Bulk Actions drop-down menu, select Deactivate and click on the Apply button:
After that, try reloading the page that returned the 401 error to see if this has resolved the issue. If it has, you can manually activate each plugin one at a time, in order to determine which one is causing the problem.
Then you can remove that plugin, replace it with a new one, or contact its developer for assistance.
5. Check the WWW-Authenticate Header Response
At this point, if the issue hasn’t been fixed, it may be caused by a server-side problem. This means our last fix will be a bit more involved.
As we saw earlier, the 401 response is sent through the WWW-Authenticate header, which appears as “WWW-Authenticate: <type> realm=<realm>”. It includes ‘challenges’, or strings of data that indicate what type of authentication is required in order for access to be granted.
In a nutshell, you’ll want to check and see if the header response was sent, and more specifically, what authentication scheme was used. At the very least, this can help narrow down the cause of the problem, and bring you one step closer to a solution.
To do this, go to the web page that’s displaying the 401 error, and access the developer console in Chrome. You can right-click on the page and select Inspect, or use Ctrl+Shift+J.
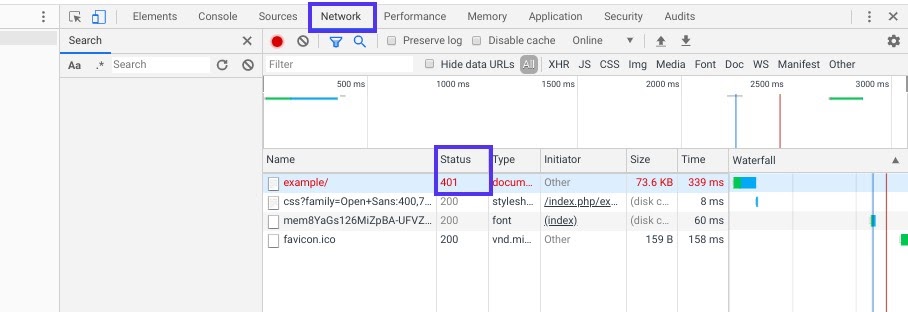
Next, click on the Network tab and reload the page. This will generate a list of resources. Select the Status header to sort the table and locate the 401 status code:
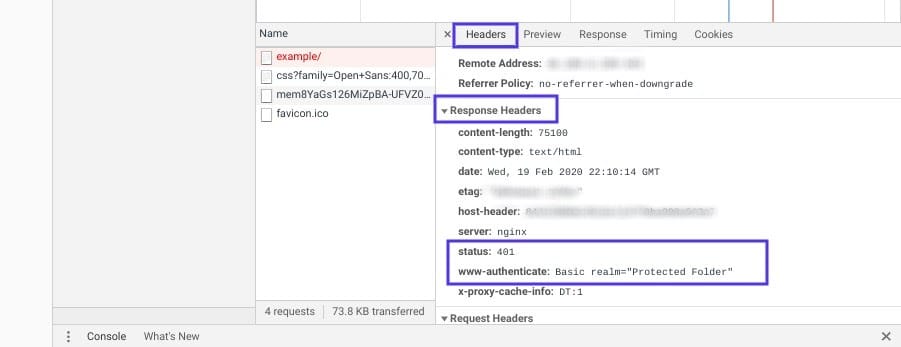
Select that entry, and then click on the Headers tab. Under Response Headers, locate the WWW-Authenticate header:
The information that is present in the response header, particularly the authentication schemes, can give you more information about what’s happening and point you towards a solution. It can help you understand what type of authentication the server is expecting.
For example, in the above example, we can see that the authentication scheme is “Basic”. This means the authentication request should only require an ID and password. For more detailed information and instructions on how to use this information, we recommend referring to the HTTP Authentication Scheme Registry.
HTTP 401 errors, begone! 🧙♂️ 5 ways to stop those pesky messages (no magic required) ✨Click to Tweet
Summary
When your browser and server have trouble communicating or authenticating requests, you’re sometimes forced to deal with errors such as the 401 error. While this problem is irritating, the message is usually temporary and fixable.
Here are five methods you can use to fix the 401 error:
- Look for errors in the URL.
- Clear your browser’s cache.
- Flush your DNS.
- Deactivate your WordPress plugins.
- Check the WWW-Authenticate header response.
Get all your applications, databases and WordPress sites online and under one roof. Our feature-packed, high-performance cloud platform includes:
- Easy setup and management in the MyKinsta dashboard
- 24/7 expert support
- The best Google Cloud Platform hardware and network, powered by Kubernetes for maximum scalability
- An enterprise-level Cloudflare integration for speed and security
- Global audience reach with up to 35 data centers and 275 PoPs worldwide
Test it yourself with $20 off your first month of Application Hosting or Database Hosting. Explore our plans or talk to sales to find your best fit.
Это перевод с сайта www.bluefrontier.co.uk.
Что означают ошибки с кодами 4XX
Ошибки с кодами 4XX — это ошибки, которые возникают, когда веб-страница не существует или когда доступ к ней ограничен. Обычно это случается из-за неправильно набранного URL-адреса. Если страница недоступна, то она не может обмениваться данными с веб-сервером, в результате чего выводится ошибка 4XX и пользователь не может получить доступ к странице или сайту.
Сначала разберём популярные типы ошибок с кодом 4XX, а потом поговорим о том, как их исправить.
400 Bad Request или «Некорректный запрос»
400 Bad Request возникает при отправке неправильного или поврежденного запроса на веб-сервер. В результате сервер, принимающий запрос, не может его понять.
Как и сообщение об ошибке типа «404 Не найдено», страницы 400 можно нужным образом настраивать.
401 Unauthorized или «Авторизация не пройдена»
HTTP-ошибка 401 говорит о том, что запрос отправлен клиентом, аутентификация которого невозможна. Причина может быть в том, что:
- клиент не предоставил корректные учётные данные вместе со своим запросом;
- клиенту по какой-либо причине запрещён доступ к веб-ресурсу;
- сервер отклонил учетные данные клиента.
403 Forbidden или «Доступ запрещен»
Это сообщение об ошибке отображается при попытке обратиться к странице или веб-ресурсу, доступ к которому строго запрещён. Как правило, в таком случае пользователю будут предоставлены базовые указания для решения этой проблемы.
404 Not Found или «Страница не найдена»
Страница с ошибкой 404 будет показана пользователю при переходе по «битым» ссылкам. В результате он не сможет получить доступ к соответствующей странице. Ошибка «Cтраница не найдена» обычно вызвана некорректным URL-адресом или тем, что данная страница уже перестала быть общедоступной.
Также ошибка 404 может возникнуть, если на страница или ресур «переехали» на другой URL, но перенаправление со старого URL-адреса на новый не настроено.
Эта ошибка указывает на то, что сервер доступен, но конкретная страница, на которую вы пытаетесь попасть, недоступна.
Как выглядят ошибки с кодами 4XX
Ошибки 4XX легко выявить — они появляются в окне браузера и обычно объясняют, что именно произошло. На рисунке ниже показаны примеры сообщений, которые могут быть выведены пользователю:
Как исправить ошибку с кодом 4XX
- Проверьте URL-адрес, не ошиблись ли вы, когда печатали его? Если адрес сайта набран неправильно, то, скорее всего, вы увидите ошибку «404 — Not Found».
- Очистите файлы cookie и кэш браузера. Возможно, ваш браузер пытается использовать недействительные или просроченные файлы cookie. Возможно, ваш браузер сохранил в кэше поврежденную версию страницы, которую вы пытаетесь открыть, поэтому возвращается ошибка 400 Bad Request.
Как очистить cookie и кэш браузера
Обычно это делается в настройках браузера. Они всегда находятся в верхнем правом углу экрана.
В Google Chrome: Настройки → Безопасность и конфиденциальность → Очистить историю.
В Яндекс.Браузере: Настройки → Системные → Очистить историю.
В Mozilla Firefox: Настройки → Приватность и защита → Куки и данные сайтов → Удалить данные.
- Обратите внимание на то, что причина ошибки может быть в сервере, принимающем запрос. Некоторые серверы не настроены на отправку более информативных сообщений и присылают просто ошибку. Например, вы загружаете на сайт слишком большой файл. Вместо указания на то, что размер файла превышает максимально допустимый, сервер отправляет HTTP-ошибку с кодом 400.
- Обновите страницу, это то же самое, что выключить и снова включить какое-нибудь устройство. Это действие не всегда помогает, но попробовать стоит. Просто нажмите клавишу F5, и ваш браузер перезагрузит страницу. Если вы всё равно получаете ошибку, то можно, придерживаясь того же подхода, попробовать перезагрузить компьютер.
- Попробуйте воспользоваться поиском по сайту. Не всегда легко заметить, что URL-адрес набран неправильно, особенно, если в нём вместо понятных слов используются цифры и символы. Если вы наберёте в браузере «site.com:ключевое слово», то в поисковой выдаче должны появиться страницы сайта, содержащие этот запрос. Это эффективный способ поиска страниц, у которых могут быть новые URL-адреса.
- Для проверки зайдите на другие сайты. Если вы постоянно видите HTTP-ошибки, причиной может быть ваш компьютер или сетевое оборудование. Попробуйте зайти на другие сайты и посмотреть, не появляется ли на них HTTP-ошибка с кодом 4XX.
- Если вы пытаетесь где-то авторизоваться, чтобы получить доступ к определённым данным, проверьте, что используете правильный URL-адрес. URL-адреса могут обновляться или изменяться, поэтому если вы когда-то добавили страницу в закладки, то сейчас она может быть уже неактуальной. Также важно убедиться, что вы используете правильные данные для входа в систему, поскольку неправильные могут привести к появлению сообщения об ошибке с кодом 401.
- Если ничего из вышеперечисленного не помогает, свяжитесь с администраторами сайта.
Ошибки 4XX: негативное влияние на SEO
Когда внутренняя ссылка на страницу сайта или внешняя ссылка, ведущая на ваш сайт с другого ресурса меняется, удаляется или не работает, такую ссылку называют «битой». Она не позволит увидеть пользователю соответствующий контент. Вместо этого появится сообщение об ошибке с кодом 4XX.
Чаще всего это сообщение выглядит примерно так: «400: Bad Request», «400: некорректный запрос» или «HTTP-ошибка с кодом 400».
Полезно: Полный гайд по кодам ответа сервера 1**, 2**, 3**, 4**,5**
Внутренние ссылки
С точки зрения SEO важно исправлять битые внутренние ссылки, поскольку они мешают поисковым системам правильно индексировать ваш сайт. Более того, с позиции бизнеса, из‑за битых ссылок ваш сайт будет выглядеть непрофессионально, а это уже может дать повод полагать, что на таком же уровне организован и весь бизнес. Когда появляется страница с ошибкой, особенно стандартная, ваш посетитель и потенциальный клиент просто уйдёт к конкуренту.
К счастью, у Google есть Search Console — инструмент, который позволяет легко отслеживать битые ссылки и составлять графики с данными по ним.
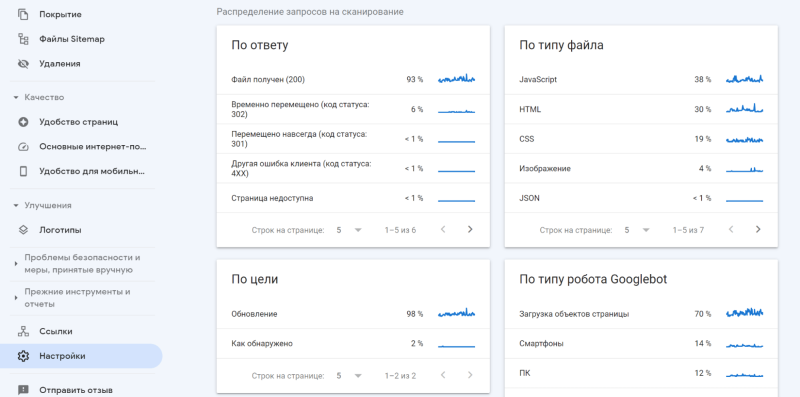
Для этого зайдите в Google Search Console и перейдите в «Настройки» → «Статистика сканирования». Обратите внимание на поле «По ответу» — в нём указано количество страниц с ошибками:
Кликнув на ошибки, вы увидите какие именно страницы сайта отдают эти ошибки.
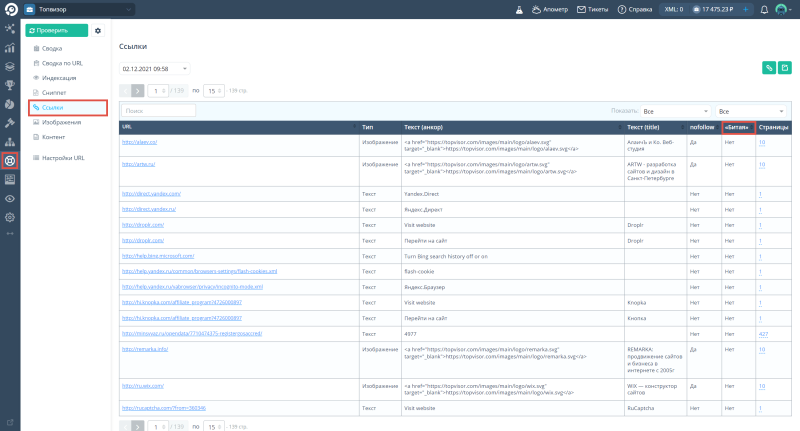
Кроме того, инструмент обнаружения битых ссылок на сайте есть у Топвизора. Перейдите в Аудит → Ссылки. Инструмент покажет ошибки:
В некоторых случаях, например, для Wordpress, Drupal и Joomla, есть встроенное расширение, которое вы можете использовать для автоматической проверки на наличие битых ссылок.
Внешние ссылки
Внешние ссылки или, как их ещё называют, «входящие ссылки», могут стать «битыми» из‑за изменения URL‑адреса или местоположения контента, а также из‑за допущенной ошибки в самом URL‑адресе.
В результате такие ссылки негативно влияют на ранжирование вашего сайта в поисковых системах и на впечатления посетителей от использования сайта.
Как «лечить» битые ссылки
Вот несколько возможных вариантов.
Исправьте сами ссылки или настройте редирект
Сначала необходимо обнаружить битую ссылку. Как и в случае с внутренними ссылками, проверьте ошибки сканирования в Google Search Console, найдите все ссылки с ошибками и их источник.
После обнаружения источника, свяжитесь с вебмастером ресурса и попросите исправить ссылку. Если по каким‑то причинам вы не можете связаться с ним, настройте редирект (301‑й код состояния HTTP) на исходную статью. Google с радостью перенесёт всю ссылочную ценность с вашей битой ссылки на текущую.
Инструкция по настройке 301‑го редиректа от Google
Чем больше входящих ссылок связано со страницей, тем выше её позиции в ранжировании, поэтому нужно тщательно продумывать удаление или изменение имён файлов страниц.
Поддерживайте распределение ссылочного веса
«Ссылочный вес» служит своеобразной валютой в поисковике Google и используется в алгоритмах поисковых систем для определения рейтинга сайта или страницы. Страницы связаны между собой ссылками, и их ценность передаётся от одной страницы к другой. Если ссылка не работает, то передача ссылочного веса прекращается, и он теряется. Это может сильно повлиять на ранжирование сайта и ухудшить впечатления пользователей от сайта, снижая его посещаемость.
Создавая пользовательскую страницу для сообщения об ошибке с кодом 404, вы можете перенаправить пользователя либо на главную страницу сайта, либо на предыдущую страницу, чтобы вернуть его на шаг назад. Несмотря на то, что пользователю отображается страница с сообщением об ошибке, он может легко вернуться на предыдущую посещенную страницу сайта без необходимости заново начинать весь процесс.
Перенаправляя посетителей на предыдущие страницы, сайт сохраняет ссылочный вес, который в противном случае был бы потерян.
Создавайте нестандартные страницы с ошибкой 404
Страница с ошибкой 404 служит для информирования посетителя сайта о том, что страница не может быть найдена, например из‑за нерабочей ссылки или даже просто опечатки.
Мы предлагаем создавать нестандартные страницы с ошибкой на вашем сайте. У такой страницы есть несколько преимуществ.
Во‑первых, нестандартная страница с сообщением об ошибке гораздо проще в понимании. У посетителя сайта будет складываться впечатление, что сайтом всё еще кто‑то занимается, в отличие от стандартной страницы об ошибке, которая свидетельствует о том, что сайт, возможно, давно не обновляли.
Но ещё важнее то, что пользовательская страница с ошибкой 404 может помочь пользователю найти именно то, что он искал. А это позволит не упустить трафик, если у вас окажется много битых ссылок. У Google есть несколько хороших советов по созданию полезной страницы с ошибкой 404.
Не игнорируйте ошибки с кодами 4XX, потому что они сильно влияют на впечатления посетителей сайта. Если вы вдруг ещё не знали, алгоритмы Google ориентированы на обеспечение максимально положительного пользовательского опыта.
Хотя битые ссылки — только один из многочисленных факторов, которые учитывает поисковой робот Google, они могут привести к потере ценного трафика, поскольку пользователи разочаровываются, когда переходят по нерабочим ссылкам на несуществующие страницы. В конечном счёте битые ссылки негативно отразятся на поведенческих факторах сайта и, как следствие, на его эффективности с точки зрения SEO.
Ошибка сервера 401 Unauthorized возвращается в ответ на запрос пользователя в том случае, если он
пытается получить доступ с авторизацией, которая не может быть подтверждена сервером.
О чем свидетельствует «ошибка 401»
Она говорит о том, что пользователь передал неверный запрос, в котором некорректны данные в заголовке
www.authenticate. Сервер не может распознать такой запрос. Чаще всего это происходит потому, что
пользователь ввел неправильный пароль и логин, или, например, сменил пароль, но пытается ввести старый.
Также иногда это может свидетельствовать о некорректной работе сервера, на котором происходит
авторизация.
Что делать пользователю, когда в браузере появляется код ошибки 401
Самый очевидный путь для преодоления ошибки Unauthorized — это заполнить предложенные поля для логина и
пароля заново. Если вы не можете вспомнить пароль, воспользуйтесь опцией его восстановления. Если же вы
уверены, что все введенные данные корректны, но сервер все равно возвращает в ответ на запрос ошибку
401, обратитесь к администратору ресурса. Возможна ситуация, при которой ваша учетная запись по тем или
иным причинам была заблокирована или деактивирована, но выдача соответствующего сообщения на сайте не
настроена. В этом случае по умолчанию сервер также возвратит вам ошибку 401.
Также может быть, что ваши права по авторизации на определенном ресурсе ограничил ваш провайдер услуг
интернет. Для проверки этого предположения попробуйте воспользоваться любым сервисом VPN. Если ошибка в
таком случае не возникает, обратитесь к провайдеру за разъяснением.
Владельцы сайтов, чьи пользователи массово получают ошибку 401 Unauthorized, должны обращаться в службу
технической поддержки хостинг-провайдера. В таком случае желательно отправить скриншот с ошибкой.
Причины возникновения ошибки «ERROR 401 UNAUTHORIZED»
Наиболее распространенными причинами возникновения ошибки 401 являются все-таки неправильные запросы от
браузера пользователя. Такие запросы не содержат информации, необходимой для авторизации пользователя,
либо такая информация некорректна. Чаще всего это ошибка в вводе пароля и/или логина, объясняющаяся
действием человеческого фактора. Реже проблема может возникать на стороне обрабатывающего запрос
сервера.
Вас также может заинтересовать

