«403 Forbidden» — наиболее распространенная ошибка при работе с NGINX. В этой статье мы расскажем о причинах возникновения 403 forbidden NGINX, а также о том, как найти ее причину и исправить основную проблему.
- Об ошибке
- Поиск файла конфигурации NGINX
- Некорректный индексный файл
- Автоиндекс
- Права доступа к файлам
- Идентификация пользователя NGINX
- Установите права собственности на файл
- Установите права доступа
«403 Forbidden» — это универсальная ошибка NGINX, которая указывает на то, что вы запросили что-то, а NGINX (по ряду причин) не может это предоставить. «403» является кодом состояния HTTP, который означает, что веб-сервер получил и понял ваш запрос, но не может предпринять никаких дальнейших действий.
По умолчанию файлы конфигурации NGINX находятся в папке /etc/nginx. Если вы просмотрите этот каталог, то найдете несколько конфигурационных файлов для различных модулей сервера.
Главный файл конфигурации — /etc/nginx/nginx.conf. Он содержит основные директивы для NGINX и является аналогом файла httpd.conf для Apache.
Чтобы отредактировать этот файл, используйте команду:
CentOS 7: sudo nano /etc/nginx/conf.d/test.example.com.conf
Ubuntu 16.04: sudo nano /etc/nginx/sites-available/test.example.com.conf
Одна из наиболее распространенных причин ошибки 403 forbidden NGINX — некорректная настройка индексного файла.
nginx.conf указывает, какие индексные файлы должны загружаться, и в каком порядке. Например, приведенная ниже строка указывает NGINX искать index.html, затем index.htm, затем index.php:
index index.html index.htm index.php;
Если ни один из этих трех файлов не будет найден в каталоге, NGINX вернет ошибку «403 Forbidden».
Примечание. Имена файлов чувствительны к регистру. Если nginx.conf указывает index.html, а файл называется Index.html, это приведет к ошибке «403 Forbidden».
Если вы хотите использовать имя индексного файла, которое ваш веб-сервер NGINX не распознает, отредактируйте nginx.conf и добавьте имя файла в строку конфигурации индекса.
Например, чтобы добавить index.py в список распознаваемых индексных файлов, отредактируйте эту строку следующим образом:
index index.html index.htm index.php index.py;
Сохраните изменения, а затем перезапустите NGINX командой:
Альтернативным решением является разрешение индекса директории. Индекс директории означает, что если индексный файл не найден, сервер отобразит все содержимое директории.
По соображениям безопасности индекс директории в NGINX по умолчанию отключен.
При «403 forbidden NGINX», если вы хотите показать индекс директории в ситуациях, когда NGINX не может найти (идентифицировать) файл, отредактируйте nginx.conf, как описано выше, и добавьте в него две следующие директивы:
Autoindex on;
Autoindex_exact_size off;
Эти директивы должны быть добавлены в блок location. Можно либо добавить их в существующий блок location/, либо добавить новый. Окончательный результат должен выглядеть так:
location / {
  [pre-existing configurations, if applicable]
  autoindex on;
  autoindex_exact_size off;
  }
Также можно активировать индексирование директории в определенной папке, если не хотите, чтобы она была доступна для всего сайта:
location /myfiles {
  autoindex on;
  autoindex_exact_size off;
  }
Сохраните изменения в файле, затем перезапустите NGINX командой:
Некорректные права доступа к файлам являются еще одной причиной ошибки «403 Forbidden NGINX». Для использования с NGINX рекомендуется стандартная настройка: для каталогов — 755 и для файлов — 644. Пользователь NGINX также должен быть владельцем файлов.
Для начала нужно определить, от имени какого пользователя запущен NGINX. Для этого используйте команду:
В этом примере рабочий процесс NGINX работает от имени пользователя nginx.
Перейдите на уровень выше корневой директории документа сайта. Например, если корневая директория вашего сайта /usr/share/nginx/example.com, перейдите в /usr/share/nginx с помощью команды:
Измените права собственности на все файлы в директориях нижних уровней на пользователя nginx с помощью команды:
sudo chown -R nginx:nginx *
403 forbidden NGINX — как исправить: установите права доступа для каждой директории на 755 с помощью команды:
sudo chmod 755 [имя директории]
Например, чтобы установить права доступа для директории example.com, используется команда:
sudo chmod 755 example.com
Затем перейдите в корневой каталог веб-документа:
sudo chmod 755 example.com
Измените права доступа для всех файлов в этой директории с помощью команды:
При работе с серверами и веб-ресурсами мы сталкиваемся с ошибками, которые вызываем при обслуживании и настройке. Когда вы сталкиваетесь с такими ошибками, вам необходимо как можно быстрее диагностировать и устранить проблему, чтобы избежать простоев и потери данных.
В этой краткой статье рассматривается типичная ошибка при работе с серверами (403 Forbidden), ее причины и способы ее устранения.
Ошибка Nginx 403 Forbidden – это код состояния, сгенерированный и отображаемый пользователю, когда клиент пытается получить доступ к части веб-сервера с недостаточными разрешениями. Например, NGINX защищает список каталогов и приведет к ошибке 403.
Причины ошибки Nginx 403 на стороне сервера
Прежде чем мы начнем, стоит отметить, что ошибка может исходить от клиента, а не от самого сервера. Сначала мы рассмотрим ошибки на стороне сервера, а затем ошибки на стороне клиента.
Причина 1: неправильный индексный файл
Самая первая и частая причина ошибки NGINX 403 Forbidden – это неправильная конфигурация индексного файла.
Файл конфигурации Nginx указывает, какие индексные файлы загружать и в каком порядке их загружать. Однако, если указанные индексные файлы отсутствуют в каталоге, Nginx вернет ошибку 403 Forbidden.
Например, конфигурация ниже определяет индексные файлы и способ их загрузки.
location / {
index index.html index.htm index.html inde.php;
}
Один из способов решения этой проблемы – добавить индексный файл, указанный в файле конфигурации, или добавить доступный индексный файл в файл конфигурации.
Другой способ решить эту проблему – разрешить Nginx отображать каталоги, если индексный файл недоступен. Включите этот модуль, добавив следующую запись в файл конфигурации.
location / {
autoindex on;
autoindex_exact_size on;
}
Примечание
Мы не рекомендуем этот метод на общедоступных серверах.
Для получения дополнительной информации о том, как обслуживать статический контент, рассмотрите ресурс документации Nginx, представленный ниже:
https://docs.nginx.com/nginx/admin-guide/web-server/serving-static-content/
Причина 2: неправильно настроенные разрешения
ошибка Nginx 403Forbidden также может возникать из-за неверно установленных разрешений для файлов и каталогов. Чтобы Nginx мог успешно передать клиенту определенный файл и ресурс, Nginx должен иметь разрешения RWX – чтение, запись и выполнение – на всем пути.
Чтобы устранить эту ошибку, измените разрешение каталогов на 755 и разрешение файла на 644. Убедитесь, что пользователь, запускающий процесс Nginx, владеет файлами. Например, установите пользователя на www-data:
sudo chown -R www-data:www-data *
Наконец, установите права доступа к каталогу и файлу как:
sudo chmod 755 {dir}
sudo chmod 644 {files}
Причина ошибки на стороне клиента 403
Как уже упоминалось, в других случаях ошибка 403 может быть вызвана пользователем, а не на стороне сервера. Чтобы решить такие проблемы на стороне клиента, выполните следующие операции.
- Убедитесь, что вы получаете доступ к правильному веб-адресу
- Очистить кеш браузера
- Убедитесь, что брандмауэр или прокси-сервер разрешает вам доступ к веб-ресурсу.
Заключение
В этой краткой статье обсуждаются причины ошибки NGIX 403 Forbidden и различные способы ее устранения. Прежде чем пытаться использовать какие-либо методы устранения неполадок, рекомендуется просмотреть журналы сервера.
Если вы нашли ошибку, пожалуйста, выделите фрагмент текста и нажмите Ctrl+Enter.
Ошибка 403 forbidden nginx означает что вы запросили ресурс у сервера, который он не может отправить, потому что у вас недостаточно прав для его просмотра. Фактически, это даже не ошибка, это сообщение HTTP 4xx, которое всего лишь сообщает, что у вас нет доступа к определенному контенту.
Достаточно часто такие сообщения показывается пользователям, потому что они были заблокированы на сайте или попытались получить доступ к файлу, который доступен только локально. В этой статье мы попытаемся разобраться со случаями, когда появление 403 forbidden nginx 1.4 6 Ubuntu не желательно и представляет из себя ошибку, которую веб-мастер или системный администратор должен решить. Но сначала рассмотрим основные причины почему вы можете видеть это сообщение.
Итак, ошибка 403 forbidden nginx 1.4 6 Ubuntu может возникать в таких случаях:
- Пользователь заблокирован на сервере с помощью директивы deny в конфигурации nginx;
- Доступ к данному ресурсу разрешен только с определенного IP адреса;
- Пользователь пытается получить доступ к папке, отображение содержимого которой запрещено;
- Nginx не может прочитать содержимое запрашиваемого файла в файловой системе;
- Файл index не найден в каталоге.
Это основные причины, которые встречаются наиболее часто. Как видите, две последние из них представляют из себя проблему. Рассмотрим как ее решить.
Неверно выставлены права
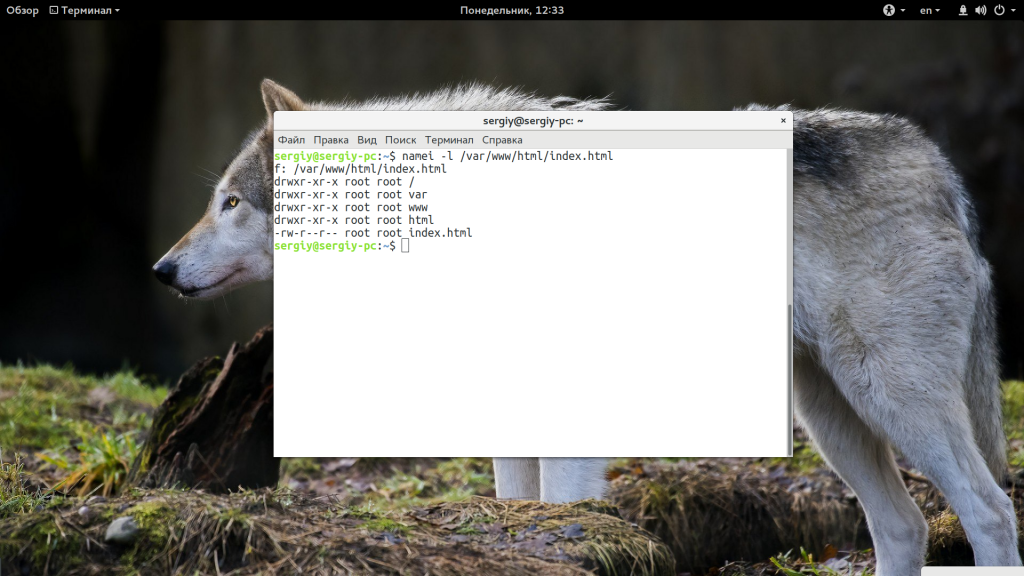
Если права на файл, который пытается получить пользователь выставлены неправильно, то будет выдана такая ошибка. Необходимо, чтобы у Nginx были права не только на чтение этого файла, но и на чтение все родительских каталогов. Это можно проверить командой:
namei -l /var/www/public_html/index.html

Для всех элементов пути должен быть установлен флаг «r», чаще всего лучше подходят права 644, то есть, владелец может все, а группа и остальные только читать. Если права не соответствуют, то вы нашли проблему и осталось только исправить права с помощью chmod. Например:
chmod 644 /var/www/public_html/index.html
Вот так должно быть:
Также обратите внимание на владельца файлов и папок. Если nginx должен иметь возможность выполнять туда запись, то, возможно есть смысл сделать владельцем пользователя nginx или позже получите другую ошибку. Также, если с правами все хорошо, но ошибка не решена попробуйте отключить SELinux, возможно, эта служба мешает Nginx получить доступ к файлам.
Если вы используете PHP и получаете такую ошибку, то еще нужно проверить может ли Nginx получить доступ к сокету обработчика PHP. Желательно, чтобы php-fpm запускался с той же группой, что и nginx, потому что права, по умолчанию, для доступа к сокету 660 (для группы и для владельца). Поэтому проверьте поля listen.owner и listen.group в файле /etc/php5/fpm/php-fpm.conf.

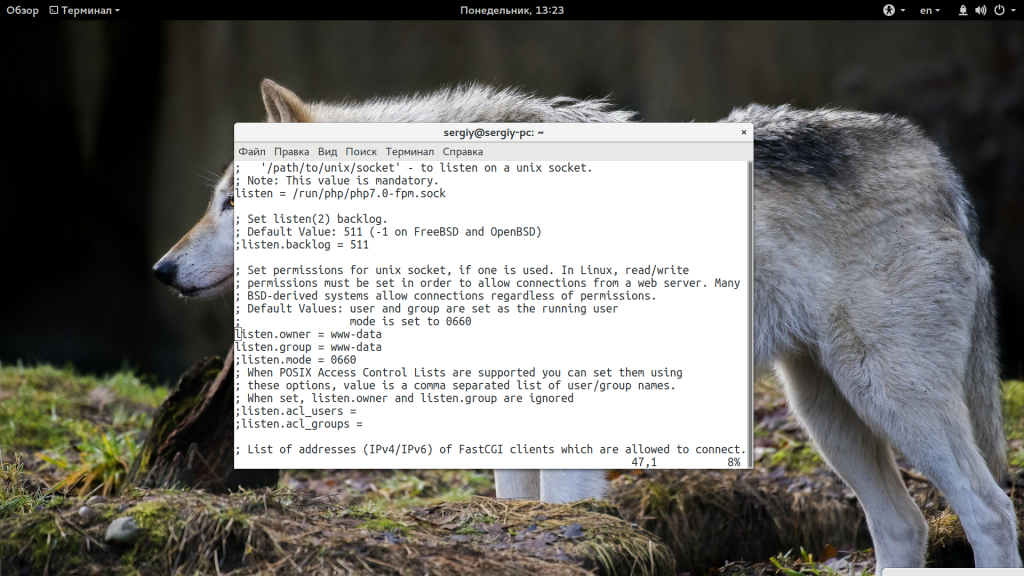
Также можно попытаться использовать сетевой сокет и подключаться к порту, а не файлу.
Неверно настроен index
Файл index открывается по умолчанию при запросе папки на сервере, в которой он находится. Если такого файла в папке нет или он настроен неправильно в конфигурационном файле nginx, то программа попытается отобразить содержимое папки, а это по умолчанию запрещено, поэтому вы получите 403 Foribden.
Чтобы решить проблему убедитесь, что файл index.html, index.php или как он у вас называется, находится в нужно папке, в той, которую вы запрашиваете. Проверьте конфигурационный файл и убедитесь, что в нем указана директива Index с правильным именем и расширением файла:
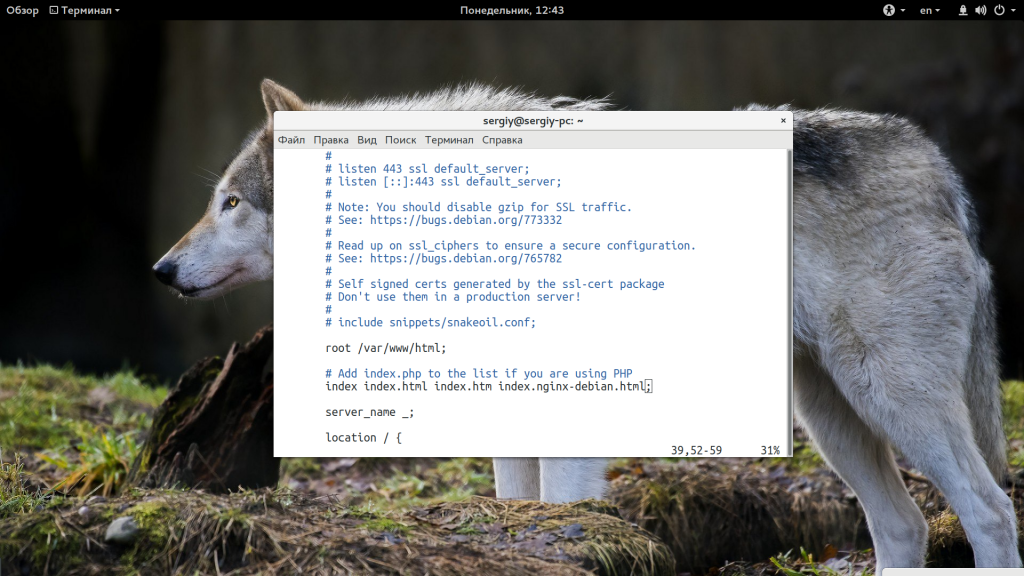
Если в директиве указаны только файлы html, а вы используете php, то уже понятно почему программа не может найти то, что нужно. Просто добавьте имя файла в директиву:
index index.html index.htm index.php;
Точно так же, если вы использовали python скрипт, то нужно добавить его расширение.
Выводы
В этой статье мы рассмотрели почему возникает ошибка 403 forbidden nginx 1.4 6 Ubuntu и пути ее решения. Это наиболее частые причины, с которыми сталкиваются пользователи и попробовав все это, скорее всего, вы решите свою проблему. Если у вас остались вопросы, спрашивайте в комментариях!

Статья распространяется под лицензией Creative Commons ShareAlike 4.0 при копировании материала ссылка на источник обязательна .
Об авторе
![]()
Основатель и администратор сайта losst.ru, увлекаюсь открытым программным обеспечением и операционной системой Linux. В качестве основной ОС сейчас использую Ubuntu. Кроме Linux, интересуюсь всем, что связано с информационными технологиями и современной наукой.
Are you stuck with Nginx 403 forbidden error? We can help you in fixing it.
This error occurs mainly due to incorrect set up of index file and wrong file permissions.
At Bobcares, we often receive requests to fix this error as part of our Server Management Services.
Today, let’s discuss how our Support Engineers fix this error easily for our customers.
Why does Nginx 403 forbidden error occur?
Before discussing how to fix the error, let’s have a look at the error.
Usually, it is quite common to find the 403 forbidden error when dealing with Nginx.
And, this error occurs when Nginx cannot deliver the requested process.
Also, the location of the Nginx configuration files is by default /etc/nginx.
The major causes of this error are incorrect settings in the index file and wrong file permissions.
How we fix the forbidden error?
Now, let’s check the major causes in detail and discuss their respective fixes by our Support Engineers.
Wrong file permissions
One major cause of Nginx 403 error is the incorrect file permissions.
By default, the standard permission for the directory is 755 and that of the file is 644.
And, any error with these permissions will result in 403 forbidden.
Also, it is necessary that the Nginx user must be the owner of the files.
We change the ownership of all the files to the Nginx user with the command,
sudo chown -R nginx:nginx *Also, we change the permissions of each directory to 755 using the command,
sudo chmod 755 [directory name]Similarly, we go to the directory and change the permissions of all the files using the following command.
sudo chmod 644 *Incorrect setting up of index file
The Nginx configuration file will specify the index files to load and the order in which they should load.
And, incorrect set up of the index file will cause this error. For instance, we will give it as follows,

The above line shows that the index.html will load first and then the index.php file.
If these files are not found in the directory, it will result in a 403 forbidden error.
Similarly, if we want to load another index file, we will add it along with the list of recognized index files.
[Need more assistance to fix this error?- We’re available 24/7.]
Conclusion
In short, Nginx 403 forbidden error occurs due to incorrect set up of index file and wrong file permissions. In today’s writeup, we discussed how our Support Engineers fix this error for our customers.
PREVENT YOUR SERVER FROM CRASHING!
Never again lose customers to poor server speed! Let us help you.
Our server experts will monitor & maintain your server 24/7 so that it remains lightning fast and secure.
GET STARTED
var google_conversion_label = «owonCMyG5nEQ0aD71QM»;
Many times you will face a 403 Forbidden error using Nginx web server, and also most times, it is not related to Nginx itself. 403 Forbidden error means you don’t have permission to access that part of the web. This error can be caused by many reasons, and here we will discuss these reasons one by one. In order to debug or fix 403 Forbidden Nginx errors, all you have to do is check the correct error logs and take the proper action to resolve it.
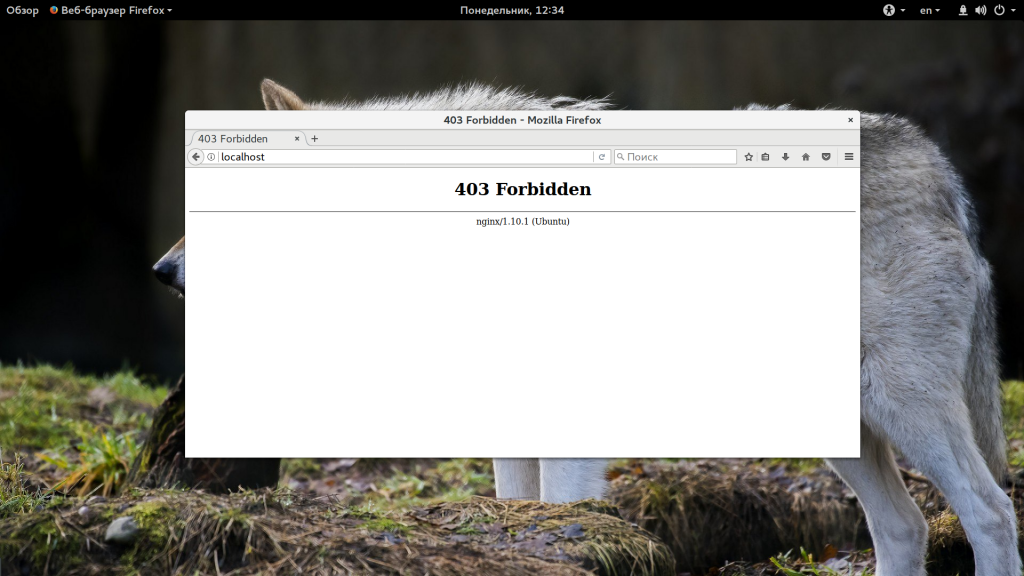
403 Forbidden errors are Nginx’s way of telling “You have requested for a resource but we cannot give it to you.” The error should like similar to the image below.

403 Forbidden is technically not an error but an HTTP status code. 403 response headers are intentionally returned in many cases such as –
- User is blocked from requesting that page/resource or the site as a whole.
- User tries to access a directory but autoindex is set to off.
- User tries to access a file that can be only accessed internally.
- An issue with the internet resources on the users’ computer.
- Inputting an incorrect website address;
- A change of resources on the website;
- The users’ IP was blocked because of a website policy violation or banned because of other reasons.
- The browser has timed-out.
When it comes to the reasons on the website administrators’ side, the reasons why an Nginx 403 Forbidden error is issued are different:
- The index page has been corrupted or renamed with a different name.
- The index page is located in a directory for which the auto index parameter is off.
- The files that need to be loaded have incorrect file permissions.
- The file is in an incorrect format.
- You experience an error when trying to update the DNS cache by changing the host.
- Incorrect .httacess configuration or in another configuration file from the server.
The main Nginx configuration file is /etc/nginx/nginx.conf
Nginx error log Location: /var/log/nginx/error.log
Troubleshooting Steps
- The first step of this is to check for the process ID of the main Nginx process, you can run the following command and except output somewhat similar to the one indicated below:
ps x | grep nginx

24152 ? S 0:00 nginx: master process /usr/sbin/nginx
The first column of each row is the process ID, as we can see, the main/master process ID is24152in this case, however, this will change in every system. - Incorrect Index File
The NGINX configuration file specifies which index files to load, and in which order. For example, this line tells NGINX to look for index.html, then index.htm, then index.php:index index.html index.htm index.php;If none of those three files is found in the directory, NGINX returns a “403 Forbidden” error. Similarly, for a Python setup, index.py should be defined as a directory index.
Save and exit the file after adding index.py in directory index., then restart NGINX with the command:sudo nginx -s reload - Permissions are not set correctly
In order to serve a file, Nginx needs to have read permissions for the file as well as execute permissions for every hierarchical parent directory of the file to chdir to it.
For example, to access the file located at –/usr/share/basezap/logo.jpg
Nginx needs to have read permissions for the file as well as execute permissions for /, /usr, /usr/share and /usr/share/basezap. If you use the standard 755 for directories and 644 for files (umask: 022), you should not run into this problem. - Directory restrictions by IP and 403 Forbidden error
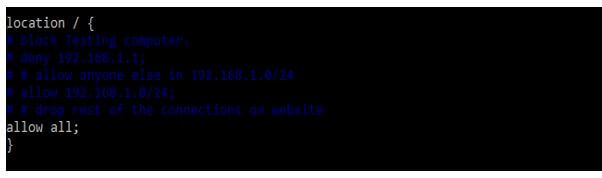
Check your nginx.conf file, or your sites nginx .conf file in case you have an allow/deny rule that may be blocking your network, for example:location / {
# block Testing computer.
deny 192.168.1.1;
# allow anyone else in 192.168.1.0/24
allow 192.168.1.0/24;
# drop rest of the connections on website
deny all;
} - Autoindex is off
If you don’t have an index file, but also have autoindex off set at Nginx config, you will have to turn it on using this method:location / {
autoindex on;
autoindex_exact_size off;
}autoindex on: Turn auto indexing on
autoindex_exact_size off: Show file sizes rounded in kb/mb/gb
HTTP 403 forbidden errors can happen for a variety of reasons, however, they all mean the same thing – that you are being denied access to the resource you requested. Whenever you are receiving a 403 forbidden Nginx error, try debugging the error with the suggestions mentioned above. If you aren’t sure and unable to fix the issue then you can reach us out at technical[at]basezap.com address with the issue.
Contents
- 1 403 Forbidden Error Nginx — How to Solve
- 1.1 Fixing 403 Forbidden Nginx Errors
- 1.1.1 About the Error
- 1.2 Fixing Nginx HTTP errors
- 1.2.1 Incorrect Directory Settings
- 1.2.2 Incorrect Permissions
- 1.2.2.1 Set File Ownership
- 1.2.2.2 Set Permissions
- 1.1 Fixing 403 Forbidden Nginx Errors
403 Forbidden Error Nginx — How to Solve
Fixing 403 Forbidden Nginx Errors
The «403 Forbidden» browser error is the most common error encountered when working with NGINX.
Learn more about what causes this NGINX error, how to locate the source of the error, and how to correct the underlying problem.
About the Error
«403 Forbidden» is an all-purpose NGINX error which indicates that you have asked for something that NGINX — for a variety of potential reasons — cannot deliver. «403» is actually an HTTP status code that means that the web server has received and understood your request, but that it cannot take any further action.
Fixing Nginx HTTP errors
Once you have the correct error log file, it’s time to watch for errors. In our experience, the best way to do this is by running a continuous stream of the error log in your shell screen using the tail utility.
tail -n0 -f /var/log/nginx/error.log
Once you’ve ran this command, tail will continuously output any newly appended content to the error.log as it comes in until you hit Control + C. We are running with zero lines, so this way we do not have any confusion when accessing the site that any output is new. If you are in a live environment you will want to grep out your ip address, so you only get your traffic.
tail -n0 -f /var/log/nginx/error.log | grep '192.168.2.2'
Now, you will need to replicate the issue that you are getting. The error should be printed out right away after you replicate the issue. For example, if you have a 403 Forbidden error, then you should refresh the page that is causing the problem so that a new error log entry can be appended. Once that is done, you’ll see a new line in the error log which should hopefully lead you to the right path to fixing the issue. We’re going to cover a few of the most common issues below.
Incorrect Directory Settings
The error below can be caused by two different reasons: incorrect directory index or disallowed directory listing.
2019/06/31 15:03:43 [error] 29231#0: *2098806 directory index of «/usr/share/nginx/static/» is forbidden, client: 1.1.1.1, server: domain.com, request: «GET / HTTP/1.1», host: «domain.com»
If you are trying to list all the files in a folder, you will get that error if the directory does not have directory listing enabled.
You can enable directory listing by adding the following line to your Nginx configuration, you can read more about this option here: http://nginx.org/en/docs/http/ngx_http_autoindex_module.html
autoindex on;
The other possibility for that error to come up is if your index setting is incorrect, so for example, you have a index.php file in that folder, however, your index setting is setup to index.htm and index.html. This means that only these files are checked if no specific file is provided. If you alter it to something like the following, your index.php file should work:
index index.htm index.html index.php;
Incorrect Permissions
The error below is generally caused by incorrect Unix permissions, you will need to make sure you have the correct permissions for the entire path.
2019/07/01 00:31:57 [error] 29231#0: *2115270 open() «/usr/share/nginx/static/forbidden» failed (13: Permission denied), client: 1.1.1.1, server: domain.com, request: «GET /forbidden HTTP/1.1», host: «domain.com»
As you see, the file that we are trying to access is /usr/share/nginx/static/forbidden. In order for Nginx to access it with no problems at all, Nginx must have read permissions for that specific file as well as execute for all the folders above it. This means that /, /usr, /usr/share, /usr/share/nginx and /usr/share/nginx/static must be executable by Nginx and the file /usr/share/nginx/static/forbidden must be readable by Nginx in this case.
Set File Ownership
Go to the directory above the website’s document root. For example, if your website’s document root is /usr/share/nginx/example.com go to /usr/share/nginx with the command:
cd /usr/share/nginx
Change the ownership of all the files from this point down to the nginx user with the command:
chown -R nginx:nginx *
Set Permissions
Set the permissions of each directory at this location to 755 with the command:
chmod 2755 [directory name]
For example, to set the permissions of the briansnelsons.com directory, the command is:
chmod 2755 briansnelson.com
Then go to the web document root directory:
cd example.com
Change the permissions of all the files in this directory with the command:
chmod 644 *
The 403 Forbidden error is the most common error encountered while working on Nginx web server. But most of the time, it is not related to Nginx itself. 403 Forbidden error means that you don’t have permission to access certain directory or a web page. This error can be caused due to many reason. And in this article we will identify the source of the error and then we will learn how to Fix it.
+
About 403 Error
Let’s understand “403 Forbidden” error in details.
“403 Forbidden” is an error which indicates that you have requested for something that NGINX cannot deliver. This error is actually an HTTP status code which simply means that the web server has received and understood the request which is made, but cannot process further.
1. Wrong Directory or File permissions
Incorrect file permissions are one of the most common cause of this “403 Forbidden” error. In case of NGINX, the standard permission settings for directories and and file are 755 and 644 respectively. Moreover, the NGINX user also needs to be the owner of the directory and files.
Identify the NGINX User
To begin, we first need to identify the NGINX user. To check the user, run:
ps -ef | grep nginx
Output:
userwv+  6016 26683  0 19:28 ttyS0    00:00:00 grep --color=auto nginx
root     26734     1  0 Mar20 ?        00:00:00 nginx: master process /usr/sbin;
www-data 26739 26734  0 Mar20 ?        00:01:53 nginx: worker process
In our case, we can identify the NGINX worker processe in the third row of the first column.
We can see that the NGINX worker process is running as the user www-data.
Set File Ownership
Since we already know that the standard permission for the directory in case of Nginx is 755 and that of the file is 644. We need to set the file ownership.
For example, if the root folder of your website is /var/www/html/example.com/public_html/, run:
+
sudo chown -R www-data:www-data /var/www/html/example.com/public_html/
Set Directory Permissions
Now we need to set 755 permissions on each directory in this location.
sudo chmod 755 [directory name]
In our case, we need to set permission on example.com directory. To achieve that, run:
sudo chmod 755 example.com
Now, navigate to the root directory of the website by running:
cd example.com
Now change the file permission to 644 by running:
sudo chmod 644 *
2. Incorrect Index File
The “403 Forbidden” error can appear if the index file is not set properly.
+
Navigate to the NGINX configuration file and check whether you have updated correct index file or not. To do that, open our NGINX configuration file for example.com, by running:
sudo vim /etc/nginx/sites-available/example.com
For example, if you’re running a WordPress based website, inside the server block your index should be:
index index.php;
If you’re running an HTML based website, your default file must contain .html extension. e.g.,
index index.html;
Chances are there that you might have forgotten to add this line inside the server block. If you have included this line of code, you must check whether you have spelled it correctly or not.
Moreover, you also must keep in mind that these file names are case-sensitive. If the default file name is index.html but the file is named mentioned in NGINX configuration is Index.html, this will throw “403 Forbidden” error.
If you are running some web application that NGINX is not able to recognize, you can edit configuration file and add the file extension.
For example, if you’re running a python based application, you can add index.py to the list of recognized index files:
index index.py;
In case you’re running a web application that uses multiple programming languages, you can add:
index index.php index.html index.py;
Now, update the changes in the configuration file and restart NGINX by running:
sudo nginx -s reload
or
sudo service nginx restart
Autoindex
It is an alternative solution which is useful if you don’t have any index file or no index file is found by NGINX.
The the server will scan and list all of the contents of your website’s root directory by autoindex method. But for security reasons, the directory index is turned off in NGINX by default.
You can turn on this feature by just adjusting a few lines of code. You just need to turn on and turn of the autoindex and autoindex_exact_size respectively.
autoindex on;
autoindex_exact_size off;
Now you can add these configurations to the location block. The final result will look like:
location / {
   [pre-existing configurations, if applicable]
   autoindex on;
   autoindex_exact_size off;
   }
To activate the directory indexing for some other directories, you can add the forward slash (/) and then the name of the directory. For example:
location /some_directory {
   autoindex on;
   autoindex_exact_size off;
   }
Now, save the changes and reload the NGINX.
sudo nginx -s reload
3. Directory restrictions by IP
Inside your nginx.conf file, check if you have applied allow/deny rule that may be blocking your network. For example:
location / {
 # block Oxygen's Computer.
   deny    192.168.1.1;
 # allow anyone else in 192.168.1.0/24
   allow   192.168.1.0/24;
 # drop rest of the connections
   deny    all;
 }
4. No index files
This could be a silliest mistake if you don’t have any file name as ‘index (index.php, index.html, index.py)’ inside the root directory of your website. This could also be a reason that your website is throwing a 403 Forbidden Error.
Additional Resources
- HTTP Status Codes on W3C
You might also want to check some other fixes:
- Error Establishing a Database Connection in WordPress Fix
- Fix 502 Bad Gateway Nginx Error in Ubuntu
- Fix: 504 Gateway Timeout Nginx Error
- PHP5-FPM 502 Bad Gateway Error (connect() to unix:/var/run/php5-fpm.sock failed (2: No such file or directory)
- Your PHP installation appears to be missing the MySQL extension which is required by WordPress
I hope you these 4 ways will help you to Fix 403 Forbidden Error.
Which of these ways helped you get rid of this error? Let us know in the comment section below.
Introduction to Nginx Forbidden
We are facing the Nginx forbidden error many times in our application; we are facing this error while using the nginx server. Also, most time, this is not related to the nginx server. Nginx forbidden error contains error code 403, which means we have no permission to access specified web parts. So this error will cause many reasons in our application; investigating the error cause is very important.

What is Nginx Forbidden 403?
For debugging and fixing the error of 403 nginx forbidden, we need to check the correct error logs and take proper action. The nginx forbidden 403 error is the nginx server’s way of telling the user that we are requesting for resource, but we cannot give it to us. Nginx forbidden 403 is technically not an error, but it contains the status code of http. Response code of 403 headers is intentionally returned in multiple cases, like the user is blocked from requesting the page, resource, or whole site of the application.
How to Fix Nginx 403 Forbidden Error?
When dealing with web resources and servers, we encounter errors that cause at the time of performing configurations and maintenance. At the time of meeting this error, we need to fix the same as soon as possible.
Nginx 403 forbidden error is nothing but will generate the status code and display it on the user’s screen when a client tries to access part of the web server with insufficient permission.
The figure below shows the error message that will occur on the user’s screen when this error occurs.

Below is the cause of the nginx 403 forbidden error and how we can fix the same user-specified action. To improve the issue of nginx forbidden 403, first, we need to install the nginx server in our system.
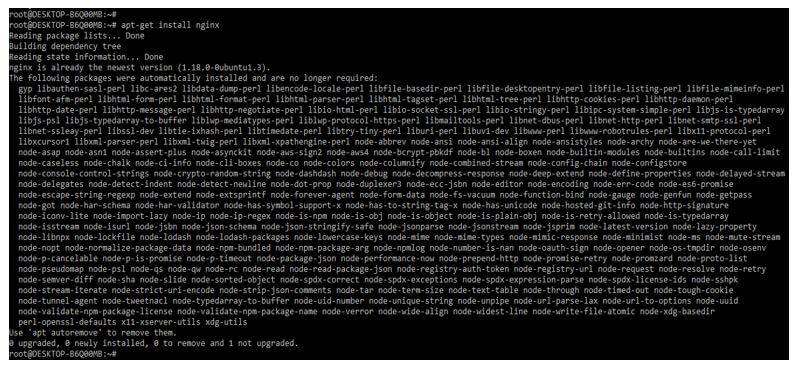
Below we are installing the nginx server on the ubuntu system. We are installing the nginx server by using the apt-get command as follows.
Code:
apt-get install nginxOutput:
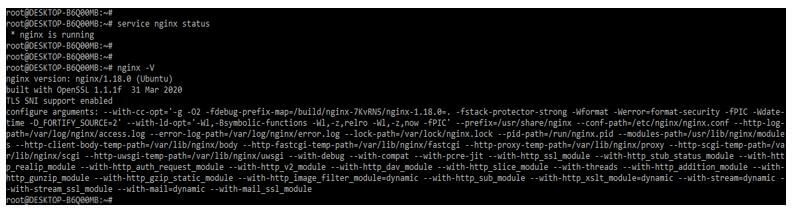
After installing the nginx server, we check the nginx installed version by using the following command. We can check the nginx version and the running status of the nginx server.
Code:
nginx –VOutput:
The common cause of this error is an incorrect configuration file of the index section. The nginx will specify which index file we need to load and the order in which we are loading; it determines that the index file is not in the directory. So we need to define the below index file and load it; we need to define the index files into the location directive as follows.
Code:
location / {
 index index.html index.htm index.html inde.php;
}
Output:

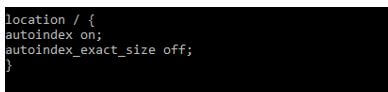
The index page was located in the directory from which the auto index parameter was off. Therefore, we can on the auto index parameter of the index by using the following way as follows.
Code:
location / {
  autoindex on;
  autoindex_exact_size off;
}
Output:
After changing the configuration, we need to reboot the nginx server to take the effect of the changed port. Before restarting the nginx server, we execute the nginx –t command to check whether the nginx configuration file contains any error or not.
Code:
nginx –t
service nginx restart
Output:

Nginx 403 Forbidden HTTP
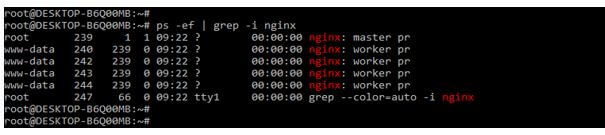
It http contains the different causes of these errors. First, we check the process ID of our nginx server to check the server state it is running or not; we can use the following command to find the process ID.
Code:
ps –ef | grep –i nginxOutput:
The error of nginx 403 forbidden also occurs due to directory restrictions by using IP. We need to check; we need to check the config file in case we have to allow or deny the rule of blocking the network. We must comment that line into the configuration file if we deny any IP. Or we can let all the network traffic of our website by allowing all rules as follows. We need to define this rule in the location directive of the nginx configuration file.
Code:
location / {
  # deny 192.168.1.1;
  # allow 192.168.1.0/24;
  allow all;
}
Output:
Http 403 forbidden error will occur by using multiple reasons, but all the errors are the same, like we have no access to the data directory or file we are accessing. So when we encounter an nginx forbidden error, we need to try debugging the mistake using the suggested suggestions.
Incorrect Setting Nginx Forbidden
The nginx 403 forbidden will also result in setting incorrect permission of folders and files. Nginx will successfully serve specific resources and files to the client; nginx will contain the read, write and execute permissions on the entire path. To resolve this error, we need to change the permission of the data directory to 755 and file permission to 644. In addition, we need to ensure that the user who was running owns the nginx files.
Code:
chown -R www-data:www-data *
chmod 755 /var/lib/nginx/
Output:

This error may occur from the server side as well as the client side.
To resolve the client-side issue, we need to perform the following client-side operations as follows:
- First, we must ensure that we are accessing the correct location on the web.
- We need to clear the browser cache when this type of issue occurs.
- We must ensure that a proxy or firewall will allow us to access the web resources.
If suppose we are unsure how to fix the issue of nginx forbidden, then we can investigate the same by using the error log.
Conclusion
The nginx forbidden 403 error is the nginx server’s way of telling the user that we are requesting for resource, but we cannot give it to us. Nginx forbidden error contains error code 403, which means we have no permission to access specified web parts.
Recommended Articles
This is a guide to Nginx Forbidden. Here we discuss the introduction and how to fix the nginx 403 forbidden error with an incorrect setting. You may also have a look at the following articles to learn more –
- Nginx Add_header
- Nginx Location Directive
- Nginx WAF
- Nginx FastCGI
- Private Cloud
- Public Cloud
-
- Cloud Servers
- Cloud Networks
- Cloud Load Balancers
- DNS
-
- Object Storage
- Cloud Block Storage
- Cloud File Sharing
-
- Identity Authentication
- Cloud Image Service
- Key Management
-
- Certified Kubernetes
-
- Orchestration
-
- Big Data Services
-
- Solutions
-
- OpenStack Consulting
- OpenStack Upgrades
-
- Kubernetes Enablement
- Managed Zuul
-
- Resources
-
- Blog
- Ebooks & White Papers
- Tutorials
-
- Success Stories
- FAQs
- Videos
-
- VEXXHOST
-
- Company
- Data Center Locations
- Brand Guide
-
- Newsroom
- Events
- Careers
-
HTTP errors are pesky and typically hard to resolve without the right tools. However, with proper investigation and tools, you can easily identify the source of a problem and fix it just as fast. In order to debug or fix 403 Forbidden Nginx errors, all you have to do is check the correct error logs and take the proper action to resolve it. We’ll go over how to check the error logs and the possible scenarios that typically cause these errors.
Finding Error Logs
If you know exactly where the error logs of your Nginx server are, you can skip onto the next section. If you’re not sure where to find the error logs of your Nginx server, then be sure to continue this section.
The path for error logs can change a lot depending on how Nginx was installed on the server and the Linux distribution. If you do not know where your error logs are and you have a hard time going through Nginx configuration, we can use a very small and useful Linux tool with the name of lsof which gives us all the open files associated to a specific process. This will help us find the error log for your web server.
The first step of this is to check for the process ID of the main Nginx process, you can run the following command and except output somewhat similar to the one indicated below:
$ ps x | grep nginx
29229 ?        S      0:00 nginx: master process /usr/sbin/nginx
The first column of each row is the process ID, as we can see, the main/master process ID is 29229 in this case, however this will change in every system. Once you have the process ID, you will be able to use the lsof too to get all open files associated to this process by running the following. We’ve trimmed the output to the part you should be looking for, as there might be a lot more data when you run that command:
$ lsof -p 29229
COMMAND   PID USER   FD   TYPE             DEVICE SIZE/OFF     NODE NAME
nginx   29229 root  cwd    DIR              202,1     4096        2 /
nginx   29229 root  rtd    DIR              202,1     4096        2 /
nginx   29229 root  txt    REG              202,1   843656     1182 /usr/sbin/nginx
...
nginx   29229 root    2w   REG              202,1        0   262748 /var/log/nginx/error.log
...
As you can see from the above output, we can see that one of the files that are open by this Nginx installation is /var/log/nginx/error.log which (by the file name) does look like an error log. We’ve now identified the path of our Nginx error log and we can move onto finding the reason behind our pesky HTTP error.
Fixing Nginx HTTP errors
Once you have the correct error log file, it’s time to watch for errors. In our experience, the best way to do this is by running a continuous stream of the error log in your shell screen using the tail utility.
$ tail -f /var/log/nginx/error.log
Once you’ve ran this command, tail will continuously output any newly appended content to the error.log as it comes in until you hit Control + C. We recommend that you clear the entire shell screen to make it easy to identify newly appended content. You can do this in Windows (PuTTY) by right clicking the PuTTY menu bar and clicking on “Clear Scrollback” or on Mac OS X by clicking Command + K.
Now, you will need to replicate the issue that you are getting. The error should be printed out right away after you replicate the issue. For example, if you have a 403 Forbidden error, then you should refresh the page that is causing the problem so that a new error log entry can be appended. Once that is done, you’ll see a new line in the error log which should hopefully lead you to the right path to fixing the issue. We’re going to cover a few of the most common issues below.
Incorrect Directory Settings
The error below can be caused by two different reasons: incorrect directory index or disallowed directory listing.
2013/08/31 15:03:43 [error] 29231#0: *2098806 directory index of "/usr/share/nginx/static/" is forbidden, client: 1.1.1.1, server: domain.com, request: "GET / HTTP/1.1", host: "domain.com"
If you are trying to list all the files in a folder, you will get that error if the directory does not have directory listing enabled. You can enable directory listing by adding the following line to your Nginx configuration, you can read more about this option here: http://nginx.org/en/docs/http/ngx_http_autoindex_module.html
autoindex on;
The other possibility for that error to come up is if your index setting is incorrect, so for example, you have a index.php file in that folder, however, your index setting is setup to index.htm and index.html. This means that only these files are checked if no specific file is provided. If you alter it to something like the following, your index.php file should work:
index index.htm index.html index.php;
Incorrect Permissions
The error below is generally caused by incorrect Unix permissions, you will need to make sure you have the correct permissions for the entire path.
2013/09/01 00:31:57 [error] 29231#0: *2115270 open() "/usr/share/nginx/static/forbidden" failed (13: Permission denied), client: 1.1.1.1, server: domain.com, request: "GET /forbidden HTTP/1.1", host: "domain.com"
As you see, the file that we are trying to access is /usr/share/nginx/static/forbidden. In order for Nginx to access it with no problems at all, Nginx must have read permissions for that specific file as well as execute for all the folders above it. This means that /, /usr, /usr/share, /usr/share/nginx and /usr/share/nginx/static must be executable by Nginx and the file /usr/share/nginx/static/forbidden must be readable by Nginx in this case.
Conclusion
We’ve gone through quite a few tools such as tail and lsof. These are just one of the tools which are offered by Linux which allow system administrators to resolve and debug issues much faster and easier. The most important factor in resolving system issues is being able to identify the issue properly, resolution is usually the easiest part once the problem is identified. The larger the toolset of the system administrator, the faster they can identify and fix those problems.
Would you like to know about Zuul, a CI/CD project gating tool? Download our white paper and get reading!