Время прочтения
8 мин
Просмотры 12K
В этой статье мы с вами разберемся, что такое CORS, CORS-ошибки и из-за чего мы можем с ними сталкиваться. Я также продемонстрирую возможные решения и объясню, что такое предварительные (preflight) запросы, CORS-заголовки и в чем заключается их важность при обмене данными между сторонами. Эта статья рассчитана на тех, у кого уже есть базовые познания в области веб-разработки и некоторый опыт с протоколом HTTP. Я старался писать статью так, чтобы она была понятна и новичкам, будучи наполненной знаниями, но при этом стараясь избегать слишком большого количества технических нюансов, не связанных с темой CORS. Если вы заметите какие-либо ошибки или у вас будут предложения, не стесняйтесь писать мне. В некоторых местах я нарочно делал упрощения, говоря “служба”, подразумевая “сервер”, и наоборот.
Что такое CORS?
Cross-Origin Resource Sharing (CORS или “совместное использование ресурсов различными источниками”) — это контролируемый и применяемый в принудительном порядке клиентом (браузером) механизм обеспечения безопасности на основе HTTP. Он позволяет службе (API) указывать любой источник (origin), помимо себя, из которого клиент может запрашивать ресурсы. Он был разработан в соответствии с same-origin policy (SOP или “политика одинакового источника”), которая ограничивает взаимодействие сайта (HTML-документа или JS-скрипта), загруженного из одного источника, с ресурсом из другого источника. CORS используется для явного разрешения определенных cross-origin запросов и отклонения всех остальных.
В основном CORS реализуют веб-браузеры, но как вариант его также можно использовать в API-клиентах. Он присутствует во всех популярных браузерах, таких как Google Chrome, Firefox, Opera и Safari. Этот стандарт был принят в качестве рекомендации W3C в январе 2014 года. Исходя из этого, можно смело предполагать, что он реализован во всех доступных в настоящее время браузерах, которые не были перечислены выше.
Как это работает?
Все начинается на стороне клиента, еще до отправки основного запроса. Клиент отправляет в службу с ресурсами предварительный (preflight) CORS-запрос с определенными параметрами в заголовках HTTP (CORS-заголовках, если быть точнее). Служба отвечает, используя те же заголовки с другими или такими же значениями. На основе ответа на предварительный CORS-запрос клиент решает, может ли он отправить основной запрос к службе. Браузер (клиент) выдаст ошибку, если ответ не соответствует требованиям предварительной проверки CORS.
Предварительные CORS-запросы отправляются независимо от используемых для отправки запросов из браузера библиотек или фреймворков. Поэтому вам не нужно соответствовать требованиям CORS, когда вы работе с API из вашего серверного приложения.
CORS не будет препятствовать пользователям запрашивать или загружать ресурсы. Вы прежнему можете успешно запросить ресурс с помощью таких приложений, как curl, Insomnia или Postman. CORS будет препятствовать доступу браузера к ресурсу только в том случае, если политика CORS не разрешает этого.
Что такое предварительная проверка CORS?
Когда браузер отправляет запрос на сервер, он сначала отправляет Options HTTP-запрос. Это и есть предварительным CORS-запрос. Затем сервер отвечает списком разрешенных методов и заголовков. Если браузеру разрешено сделать фактический запрос, то тогда он незамедлительно отправит его. Если нет, он покажет пользователю ошибку и не выполнит основной запрос.

CORS-заголовки
CORS-заголовки — это обычные заголовки HTTP, которые используются для контроля политики CORS. Они используются, когда браузер отправляет предварительный CORS-запрос на сервер, на который сервер отвечает следующими заголовками:
-
Access-Control-Allow-Originуказывает, какой источник может получать ресурсы. Вы можете указать один или несколько источников через запятую, например:https://foo.io,http://bar.io. -
Access-Control-Allow-Methodsуказывает, какие HTTP-методы разрешены. Вы можете указать один или несколько HTTP-методов через запятую, например:GET,PUT,POST. -
Access-Control-Allow-Headersуказывает, какие заголовки запросов разрешены. Вы можете указать один или несколько заголовков через запятую, например:Authorization,X-My-Token. -
Access-Control-Allow-Credentialsуказывает, разрешена ли отправка файлов cookie. По умолчанию:false. -
Access-Control-Max-Ageуказывает в секундах, как долго должен кэшироваться результат запроса. По умолчанию: 0.
Если вы решите использовать Access-Control-Allow-Credentials=true, то вам нужно знать, что вы не сможете использовать символы * в заголовках Access-Control-Allow-*. Необходимо будет явно перечислить все разрешенные источники, методы и заголовки.
Полный список CORS-заголовков вы можете найти здесь.

Почему запрос может быть заблокирован политикой CORS?
Если вы веб-разработчик, вы, вероятно, уже слышали или даже сталкивались с CORS-ошибками, имея за плечами часы, потраченные на поиски их причин и решений. Наиболее распространенная проблема заключается в том, что браузер блокирует запрос из-за политики CORS. Браузер выдаст ошибку и отобразит в консоли следующее сообщение:
Access to XMLHttpRequest at 'http://localhost:8080/' from origin
'http://localhost:3000' has been blocked by CORS policy:
Response to preflight request doesn't pass access control
check: No 'Access-Control-Allow-Origin' header is present
on the requested resource.
Приведенная выше CORS-ошибка уведомляет пользователя о том, что браузер не может получить доступ к ресурсу (https://localhost:8080) из источника (https://localhost:3000), поскольку сервер его не одобрил. Это произошло из-за того, что сервер не ответил заголовком Access-Control-Allow-Origin с этим источником или символом * в ответе на предварительный CORS-запрос.
Запрос может быть заблокирован политикой CORS не только из-за невалидного источника, но и из-за неразрешенных заголовка HTTP, HTTP-метода или заголовка Cookie.
Как исправить CORS-ошибку?
Фундаментальная идея “исправления CORS” заключается в том, чтобы отвечать на OPTIONS запросы, отправленные от клиента, корректными заголовками. Есть много способов начать отвечать корректными CORS. Вы можете использовать прокси-сервер или какое-нибудь middleware на своем сервере.

Помните, что заголовки Access-Control-* кэшируются в браузере в соответствии со значением, установленным в заголовке Access-Control-Max-Age. Поэтому перед тестированием изменений вам обязательно нужно чистить кэш. Вы также можете отключить кэширование в своем браузере.
1. Настройка вашего сервера
По умолчанию, если вы являетесь владельцем сервера, вам необходимо настроить на своем сервере CORS-ответы, и это единственный способ правильно решить проблему. Вы можете добиться этого несколькими способами из нескольких слоев вашего приложения. Самый распространенный способ — использовать обратный прокси-сервер (reverse-proxy), API-шлюз или любой другой сервис маршрутизации, который позволяет добавлять заголовки к ответам. Для этого можно использовать множество сервисов, и вот некоторые из них: HAProxy, Linkerd, Istio, Kong, nginx, Apache, Traefik. Если ваша инфраструктура содержит только приложение без каких-либо дополнительных слоев, то вы можете добавить поддержку CORS в код самого приложения.

Вот несколько популярных примеров активации CORS:
-
Apache: отредактируйте файл .htaccess
-
Nginx: отредактируйте файл конфигурации,
-
Traefik: используйте middleware,
-
Spring Boot: используйте аннотацию @EnableCORS,
-
ExpressJS: используйте app.use(cors()),
-
NextJS: используйте реквест-хелперы.
Здесь вы можете найти больше примеров активации CORS для разных фреймворков и языков: enable-cors.org.
Если вы не можете активировать CORS в службе, но все же хотите сделать возможными запросы к ней, то вам нужно использовать одно из следующих решений, описанных ниже.
2. Установка расширения для браузера
Использование расширения для браузера может быть быстрым и простым способом решения проблем с CORS в вашей среде разработки. Самым большим преимуществом использования расширения для браузера является то, что вам не нужно менять свой код или конфигурацию. С другой стороны, вам необходимо установить расширение в каждый браузер, который вы используете для тестирования своего веб-приложения.

Расширения для браузера изменяют входящий предварительный запрос, добавляя необходимые заголовки, чтобы обмануть браузер. Это очень удобное решение для локальной работы с производственным API, которое принимает запросы только из рабочего домена.
Вы можете найти расширения в Google Web Store или в библиотеке дополнений Mozilla. В некоторых случаях дефолтной конфигурации расширения может быть недостаточно; убедитесь, что установленное расширение корректно настроено. Вам также следует быть в курсе, что если держать подобное расширение включенным постоянно, то это может вызвать проблемы с некоторыми сайтами. Их рекомендуется использовать только в целях разработки.
3. Отключение CORS-проверок в браузере
Вы можете полностью отключить CORS-проверки в своем браузере. Чтобы отключить CORS-проверки в Google Chrome, нужно закрыть браузер и запустить его с флагами --disable-web-security и --user-data-dir. После запуска Google Chrome не будет отправлять предварительные CORS-запросы и не будет проверять CORS-заголовки.
# Windows
chrome.exe --user-data-dir="C://chrome-dev-disabled-security" --disable-web-security --disable-site-isolation-trials

# macOS
open /Applications/Google Chrome.app --args --user-data-dir="/var/tmp/chrome-dev-disabled-security" --disable-web-security --disable-site-isolation-trials

# Linux
google-chrome --user-data-dir="~/chrome-dev-disabled-security" --disable-web-security --disable-site-isolation-trials
Все команды, приведенные выше, запускают Google Chrome в изолированной безопасной среде. Они не затронут ваш основной профиль Chrome.

Список всех доступных флагов для Google Chrome можно найти здесь.
4. Настройка прокси-сервера
Если вы ищете решение, которое не требует от вас изменения настроек браузера, вам следует обратить внимание на прокси-сервера. Эта опция поможет вам избавиться от CORS-ошибок, ничего не меняя в самом браузере. Идея подхода заключается в том, чтобы отправлять все запросы на ваш сервер, который затем перенаправит запрос реальной службе, которую вы хотите использовать. Вы можете создать прокси-сервер самостоятельно с помощью языка и платформы по вашему предпочтению. Вам потребуется настроить CORS и реализовать функционал передачи полученных запросов в другую службу.

Прокси-сервер — хорошее решение, если у вас нет доступа к службе, которую вы собираетесь использовать. Существует множество готовых к использованию решений с открытым исходным кодом для создания прокси-серверов, но вам обязательно нужно следить за тем, чтобы они не пытались перехватить ваши запросы с заголовками авторизации и передать их какой-либо сторонней службе. Такие нарушения безопасности могут привести к катастрофическим последствиям как для вас, так и для потенциальных пользователей службы.
Ниже приведен список CORS сервисов с открытым исходным кодом, которые вы можете найти на просторах интернета:
-
https://github.com/Freeboard/thingproxy
-
https://github.com/bulletmark/corsproxy
-
https://github.com/Rob—W/cors-anywhere
Перед использованием любого из этих сервисов обязательно проверьте код самой последний версии версии.
Как протестировать CORS?
Использование браузера для проверки конфигурации CORS может оказаться на удивление утомительной задачей. В качестве альтернативы вы можете использовать такие инструменты, как CORS Tester, test-cors.org или, если вас не страшит командная строка, вы можете использовать curl для проверки конфигурации CORS.
curl -v -X OPTIONS https://simplelocalize.io/api/v1/translations
Остерегайтесь ложных CORS-ошибок
В некоторых случаях, когда сервис находится за дополнительным слоем защиты ограничителя частоты запросов, балансировщика нагрузки или сервера авторизации, вы можете получить ложную CORS-ошибку. Заблокированные или отклоненные сервером запросы должны отвечать статус кодами ошибки. Например:
-
401 unauthorized,
-
403 forbidden,
-
429 too many requests,
-
500 internal server error,
-
любые, кроме 2XX или 3XX.
Вы можете видеть, что запрос заблокирован из-за неудачного предварительного запроса, но на самом деле служба просто отклоняет его. Вы всегда должны проверять статус код и текст ответа, чтобы избежать излишней отладки. Браузер должным образом уведомляет вас о сбое в предварительном CORS-запросе, но причина сбоя может быть не связана с конфигурацией CORS.
Заключение
В этой статье я постарался объяснить, что такое CORS и каковы наиболее распространенные проблемы с ним. Я предложил четыре способа избавиться от проблемы с CORS и объяснил преимущества и недостатки каждого из них. Я также объяснил, как правильно настроить CORS-ответы и как их протестировать. Более того, я показал самые распространенные проблемы, с которыми вы можете столкнуться при распознавании ложных CORS-ошибок. Я постарался изложить все максимально простым языком и избежать мудреных технических подробностей. Cпасибо за внимание!
Полезные ссылки
-
https://developer.mozilla.org/en-US/docs/Web/HTTP/CORS/Errors
-
https://developer.mozilla.org/en-US/docs/Web/Security/Same-origin_policy
-
https://enable-cors.org/
-
https://stackoverflow.com/a/42024918/1133169
Материал подготовлен в преддверии старта онлайн-курса «JavaScript Developer. Professional». Недавно прошел открытый урок на тему «CSS-in-JS. Удобный способ управлять стилями», на котором рассмотрели Styled components, Linaria, Astroturf и другие инструменты упрощения работы со стилями. Посмотреть запись можно по ссылке.
Всем привет!
Меня зовут Радик, я frontend developer компании Creative. И сегодня я хочу поднять тему, которая касается и фронта и бэка, и окружает нас с вами каждый день. Речь пойдёт об ошибках CORS и как их можно обойти.
Уверен, что многим разрабам знакома ситуация, когда ты работаешь над приложением, оно запущено локально, и тебе нужно сделать из него запросы к различным удалённым ресурсам. В этот момент «что-то идёт не так», и ты видишь на своём экране миллион ошибок в консоли браузера. Почему они появляются? Давайте разбираться вместе. В этой статье расскажу о средствах защиты браузера и о том, что он может от вас скрывать в процессе кроссдоменных запросов. Фича: об ошибках будем говорить в картинках 
SOP – Same Origin Policy
Рассмотрим кейс. Мы заходим на какой-то незнакомый сайт, созданный потенциальным злоумышленником. Внешне пока не видим ничего подозрительного, но пока мы находимся на этом сайте, злобный скрипт уже готовит запрос к серверу банка, в котором мы залогинены, и пытается получить наши данные:
Как же браузер пытается нас от этого защитить? Он использует Политику одинакового источника: Same Origin Policy (SOP).
В тех случаях, когда запрос отправляется на ресурс, у которого отличается домен / порт / протокол, – браузер по умолчанию понимает, что он кроссдоменный и применяет политику безопасности:
CORS – Cross Origin Resource Sharing
Что же делать в том случае, когда нам необходимо разрешить для браузера взаимодействие между различными ресурсами?
Браузер должен отправить в запросе заголовок:
**origin: htttps://good-website.com**
Сервер проверит, откуда к нему пришёл запрос, и (если этот домен разрешён) в ответе вернёт заголовок:
**access-control-allow-origin: htttps://good-website.com**
ACAH – Access-Control-Allow-Headers
Браузер может запретить доступ к некоторым заголовкам ответа из кода, ничего не сообщив при этом разработчику.
Так получается, потому что по умолчанию при кроссдоменных запросах браузер разрешает чтение только следующих заголовков ответа:
-
Cache-Control
- Content-Language
- Content-Length
- Content-Type
- Expires
- Last-Modified
- Pragma
Поэтому в network вкладке браузера мы видим абсолютно все интересующие нас заголовки, а из кода JS они будут нам недоступны.
Для того чтобы браузер разрешил доступ к этим заголовкам, в ответе должен быть указан заголовок Access-Control-Allow-Headers.
В нём нужно перечислить заголовки, доступ к которым разрешён браузером:
Специальное значение * позволяет разрешить для использования любые заголовки, но только в том случае, если в изначальном запросе нет cookie или данных аутентификации. В противном случае оно будет рассматриваться как буквальное имя заголовка «*».
Proxy как одно из возможных решений проблемы при локальной разработке
Рассмотрим ещё один кейс. Нам нужно сделать кроссдоменный запрос из приложения, которое развёрнуто локально. Но такой запрос в нужный нам момент не обрабатывается должным образом на сервере. Картинка для понимания.
Как быть? Можно запустить локальный proxy сервер, который будет пересылать данные между нашим приложением и сервером, добавляя необходимые заголовки:
Можно сделать простой proxy сервер на Node.js для решения проблемы с кроссдоменными запросами:
- Для этого переходим в директорию, в которой вы хотите создать прокси сервер
- Инициализируем Node.js проект командой npm init
- Устанавливаем необходимые пакеты командой npm install cors express http-proxy-middleware
- Создаём файл index.js со следующим содержимым:
-
Запускаем proxy сервер командой node index.js
- Теперь мы можем использовать адрес и порт, указанный в proxy сервере в приложении во время разработки.
На этом всё. Мы рассмотрели причины возникновения ошибки CORS и одно из возможных решений при локальной разработке на фронте. Надеюсь, мой материал будет вам полезен. Буду рад продолжить обсуждение темы в комментариях. Всем хорошего дня и поменьше ошибок CORS!
Cross-Origin Resource Sharing (
CORS) is a mechanism or a protocol that allows devices on one domain to access resources residing on other domains.
Generally, for security reasons, browsers forbid requests that come in from cross-domain sources. However, there could be cases where you want to overcome this and access cross-domain resources, and CORS makes this possible.
There is another concept known as
Same-Origin Policy (
SOP) which enables resource sharing on similar domains. In this guide, we will discuss the
SOP and how it helps to secure websites. We will also discuss how CORS extends the flexibility and adds pace to the SOP.
Same-Origin Policy (SOP)
The Same-Origin Policy was developed as a security mechanism for browsers to protect resources from malicious attacks. SOP allows resource sharing (data exchange) between two objects with the same origins.
This means that the origin of two websites should be the same if they want to share resources. For two websites to have the same origins, the websites should have the same domain, port number, and protocol type. If any one of these three properties is found different, then the sources are considered different origins.
While SOP is considered a restrictive system, it is highly secured, eliminating potential attacks on websites through cross-domain resources.
SOP offers security to websites but can also be a huddle to interact with third-party websites. Many dynamic websites regularly share a cross-domain resource with trusted websites and subdomains.
With SOP in place, access to cross-origin websites is restricted, and controlled access to resources is possible using Cross-Origin Resource Sharing (CORS).
Cross-Origin Resource Sharing (CORS)
CORS was introduced to provide easy and quick access to subdomains and trusted third parties. CORS enables controlled resource sharing between cross-domain origins as discussed earlier.
The browser and cross-origin website you are trying to access collectively exchange HTTP headers that define trusted web origins and associated properties for access control, as defined by CORS specifications.
CORS offers controlled access to cross-domain websites and hence is well secured. CORS is widely implemented to tackle limitations introduced by SOP. However, if poorly executed, CORS can cause severe security risks. Improper configuration of CORS may present some challenges and errors.
Let us learn more about CORS errors and best practices to avoid them.
Understanding and Fixing CORS Error
CORS is implemented on the server-side; it cannot be reconfigured on the client-side. The CORS behavior, commonly termed as CORS error, is a mechanism to restrict users from accessing shared resources.
This is not an error but a security measure to secure users or the website which you are accessing from a potential security breach.
This breach may occur due to incomplete or improper HTTP headers on the client-side implementation (eg. missing authorization data such as API key).
Best Practices to Avoid CORS Errors
Let’s discuss some of the best practices for avoiding CORS errors by using a Custom Field Extension in Contentstack.
Proxy the API Request While Using External Calls in an Extension
CORS proxy can be a helpful solution to make cross-origin requests. The proxy layer sits between your request and its destination without knowing the request’s origin.
Thus, though the request comes from an unknown source, the CORS proxy makes it seem that it is a request from an allowed location.
To learn how to do this, here is the list of
CORS-Proxy which you can use for your website.
Free Proxies can be great for testing, but relying on a free third-party tool is not advisable for something you will use on the production site. In such cases, a more stable solution is to call the API from a server and make the data available on the client-side.
Use a Serverless Function
A more commonly used solution to resolve CORS error is to use a serverless function. It is an alternate way to proxy your requests, but instead of relying on a free third-party service, you can build your micro-infrastructure to call a web service and feed data to an API endpoint.
Popular serverless functions include AWS Lambda, Azure Functions, and Google Cloud functions. These services allow you to get just enough server space to run a function or two, as you do not need much space to run a function that calls a web service to return some data.
To understand this better, let’s consider a use case:
A user wants to create an extension in Contentstack which will fetch the maps data from the
Google Maps API to get data related to longitude and latitude within your entry.
The user has to follow the steps below:
- Create a custom extension in Contentstack using the UI extension SDK. This extension will make an API call to the Google Maps API to fetch the data in your entry.
The request will fail due to the cross-origin policy set at Google’s server, which will not let you fetch the data, resulting in a CORS error at your client-side. - To solve this problem, you can create an API Gateway URL in AWS with CORS enabled to serve the responses from the Google Maps API with our AWS Lambda function. For example:
 exports.handler = async (event) => {
try{

    return {
      statusCode: 200,
      headers: {
        'Content-Type': 'application/json',
        'Access-Control-Allow-Headers':
          'Content-Type,X-Amz-Date,Authorization,X-Api-Key,X-Amz-Security-Token',
        'Access-Control-Allow-Methods': 'OPTIONS,POST',
        'Access-Control-Allow-Credentials': true,
        'Access-Control-Allow-Origin': '*',
        'X-Requested-With': '*',
      },
      body: JSON stringified object,
    };
  } catch (error) {
    console.log(error);
    return {
      statusCode: 500,
      headers: {
        'Content-Type': 'application/json',
        'Access-Control-Allow-Headers':
          'Content-Type,X-Amz-Date,Authorization,X-Api-Key,X-Amz-Security-Token',
        'Access-Control-Allow-Methods': 'OPTIONS,POST',
        'Access-Control-Allow-Credentials': true,
        'Access-Control-Allow-Origin': '*',
        'X-Requested-With': '*',
      },
      body: JSON.stringify({
        name: error.name,
        code: error.code,
        message: error.message,
      }),
    };
  }
};
- The extension that we have created will make an appropriate call i.e., GET, POST, and so on, to our API Gateway URL & trigger our lambda function.
- The AWS Lambda will then return the maps API response to our client-side. This will fetch the maps data from Google Maps within your entry in Contentstack.
Note: For external hosting of the extension source code, the ‘allow-same-origin’ option will be enabled. Here, the origin refers to the domain where you’ve hosted the extensions. Also, ensure that the response header has the exact origin URL passed in the request header.
For Contentstack-hosted extensions, the iframe’s origin will be null as we don’t enable the ‘allow-same-origin’ flag.
CORS Issue in Frontend Frameworks
The CORS configuration can sometimes be tricky to achieve, and hence developers serve both the backend and frontend under the same domain in production.
To minimize this effort and provide flexibility to work with CORS, React, Nuxt, Express, etc. allow users to replicate the setup in development. This setup is done at the server end, so whenever a cross-origin request is made to the server, we can use a middleware like http-proxy-middleware to proxy requests.
Furthermore, we can also redirect and change the path of the request by using options like pathRewrite.
Consider the following situation: you’re trying to fetch some data from an API on your website using fetch() but end up with an error.
You open up the console and see either “No Access-Control-Allow-Origin header is present on the requested resource,” or “The Access-Control-Allow-Origin header has a value <some_url> that is not equal to the supplied origin” written in red text, indicating that your request was blocked by CORS policy.

Seem familiar? With over 10,000 questions posted under the cors tag on StackOverflow, it is one of the most common issues that plague frontend developers and backend developers alike. So, what exactly is the CORS policy and why do we face this error often?
What is Cross-Origin Resource Sharing (CORS)?
Interestingly, this is not an error as we portray it, but rather the expected behavior. Our web browsers enforce the same-origin policy, which restricts resource sharing across different origins. Cross-origin resource sharing, or CORS, is the mechanism through which we can overcome this barrier. To understand CORS, let us first understand the same-origin policy and its need.
The same-origin policy
In simple terms, the same-origin policy is the web version of “don’t talk to strangers” incorporated by the browser.
All modern web browsers available today follow the same-origin policy that restricts how XMLHttpRequest and fetch requests from one origin interact with a resource from another origin. What’s an origin, exactly?
It’s the combination of a scheme, domain, and port. The scheme could be HTTP, HTTPS, FTP, or anything else. Similarly, the port can also be any valid port number. Same-origin requests are essentially those requests whose scheme, domain, and port match. Let’s look at the following example.
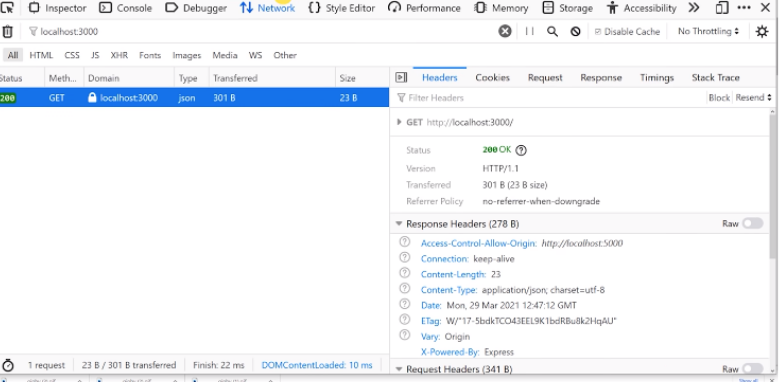
Assuming our origin is http://localhost:3000, the requests can be categorized into same-origin or cross-origin requests as follows:
| Origin | Request Type | Reason |
|---|---|---|
| http://localhost:3000/about | Same-origin | The path “/about” is not considered as a part of the origin |
| http://localhost:3000/shop/product.html | Same-origin | The path “/shop/product.html” is not considered as a part of the origin |
| http://localhost:5000 | Cross-origin | Different port (5000 instead of 3000) |
| https://localhost:3000 | Cross-origin | Different scheme (HTTPS instead of HTTP) |
| https://blog.logrocket.com | Cross-origin | Different scheme, domain, and port |
This is the reason why your frontend running on http://localhost:3000 cannot make API calls to your server running http://localhost:5000 or any other port when you develop single-page applications (SPAs).
Also, requests from origin https://mywebsite.com to origin https://api.mywebsite.com are still considered cross-site requests even though the second origin is a subdomain.
Due to the same-origin policy, the browser will automatically prevent responses from cross-origin requests from being shared with the client. This is great for security reasons! But not all websites are malicious and there are multiple scenarios in which you might need to fetch data from different origins, especially in the modern age of microservice architecture where different applications are hosted on different origins.
This is a great segue for us to deep dive into CORS and learn how to use it in order to allow cross-origin requests.
Allowing cross-site requests with CORS
We’ve established that the browser doesn’t allow resource sharing between different origins, yet there are countless examples where we are able to do so. How? This is where CORS comes into the picture.
CORS is an HTTP header-based protocol that enables resource sharing between different origins. Alongside the HTTP headers, CORS also relies on the browser’s preflight-flight request using the OPTIONS method for non-simple requests. More on simple and preflight requests later in this article.
Because HTTP headers are the crux of the CORS mechanism, let’s look at these headers and what each of them signifies.
Access-Control-Allow-Origin
The Access-Control-Allow-Origin response header is perhaps the most important HTTP header set by the CORS mechanism. The value of this header consists of origins that are allowed to access the resources. If this header is not present in the response headers, it means that CORS has not been set up on the server.
If this header is present, its value is checked against the Origin header of request headers. If the values match, the request will be completed successfully and resources will be shared. Upon mismatch, the browser will respond with a CORS error.
To allow all origins to access the resources in the case of a public API, the Access-Control-Allow-Origin header can be set to * on the server. In order to restrict only particular origins to access the resources, the header can be set to the complete domain of the client origin such as https://mywebsite.com.
Access-Control-Allow-Methods
The Access-Control-Allow-Methods response header is used to specify the allowed HTTP method or a list of HTTP methods such as GET, POST, and PUT that the server can respond to.
This header is present in the response to pre-flighted requests. If the HTTP method of your request is not present in this list of allowed methods, it will result in a CORS error. This is highly useful when you want to restrict users from modifying the data through POST, PUT, PATCH, or DELETE requests.
Access-Control-Allow-Headers
The Access-Control-Allow-Headers response header indicates the list of allowed HTTP headers that your request can have. To support custom headers such as x-auth-token, you can set up CORS on your server accordingly.
Requests that consist of other headers apart from the allowed headers will result in a CORS error. Similar to the Access-Control-Allow-Methods header, this header is used in response to pre-flighted requests.
Access-Control-Max-Age
Pre-flighted requests require the browser to first make a request to the server using the OPTIONS HTTP method. Only after this can the main request be made if it is deemed safe. However, making the OPTIONS call for each pre-flighted request can be expensive.
To prevent this, the server can respond with the Access-Control-Max-Age header, allowing the browser to cache the result of pre-flighted requests for a certain amount of time. The value of this header is the amount of time in terms of delta seconds.
More great articles from LogRocket:
- Don’t miss a moment with The Replay, a curated newsletter from LogRocket
- Learn how LogRocket’s Galileo cuts through the noise to proactively resolve issues in your app
- Use React’s useEffect to optimize your application’s performance
- Switch between multiple versions of Node
- Discover how to animate your React app with AnimXYZ
- Explore Tauri, a new framework for building binaries
- Compare NestJS vs. Express.js
Overall, here’s the syntax of how CORS response headers look like:
Access-Control-Allow-Origin: <allowed_origin> | *
Access-Control-Allow-Methods: <method> | [<method>]
Access-Control-Allow-Headers: <header> | [<header>]
Access-Control-Max-Age: <delta-seconds>
Simple requests vs. pre-flighted requests
Requests that do not trigger a CORS preflight fall under the category of simple requests. However, the request has to satisfy some conditions only after it is deemed as a simple request. These conditions are:
- The HTTP method of the request should be one of these:
GET,POST, orHEAD - The request headers should only consist of CORS safe-listed headers such as
Accept,Accept-Language,Content-Language, andContent-Typeapart from the headers automatically set by the user agent - The
Content-Typeheader should have only either of these three values:application/x-www-form-urlencoded,multipart/form-data, ortext/plain - No event listeners are registered on the object returned by the
XMLHttpRequest.uploadproperty if usingXMLHttpRequest - No
ReadableStreamobject should be used in the request
On failing to satisfy either of these conditions, the request is considered to be a pre-flighted request. For such requests, the browser has to first send a request using the OPTIONS method to the different origin.
This is used to check if the actual request is safe to send to the server. The approval or rejection of the actual request depends on the response headers to the pre-flighted request. If there is a mismatch between these response headers and the main request’s headers, the request is not made.
Enabling CORS
Let’s consider our initial situation where we faced the CORS error. There are multiple ways we could resolve this issue depending on whether we have access to the server on which the resources are hosted. We can narrow it down to two situations:
- You have access to the backend or know the backend developer
- You can manage only the frontend and cannot access the backend server
If you have access to the backend:
Because CORS is just an HTTP header-based mechanism, you can configure the server to respond with appropriate headers in order to enable resource sharing across different origins. Have a look at the CORS headers we discussed above and set the headers accordingly.
For Node.js + Express.js developers, you can install the cors middleware from npm. Here is a snippet that uses the Express web framework, along with the CORS middleware:
const express = require('express');
const cors = require('cors');
const app = express();

app.use(cors());

app.get('/', (req, res) => {
  res.send('API running with CORS enabled');
});

app.listen(5000, console.log('Server running on port 5000'));
If you don’t pass an object consisting of CORS configuration, the default configuration will be used, which is equivalent to:
{
  "origin": "*",
  "methods": "GET,HEAD,PUT,PATCH,POST,DELETE",
  "preflightContinue": false,
  "optionsSuccessStatus": 204
}
Here is how you could configure CORS on your server which will only allow GET requests from https://yourwebsite.com with headers Content-Type and Authorization with a 10 minutes preflight cache time:
app.use(cors({
  origin: 'https://yourwebsite.com',
  methods: ['GET'],
  allowedHeaders: ['Content-Type', 'Authorization'],
  maxAge: 600
}));
While this code is specific to Express.js and Node.js, the concept remains the same. Using the programming language and framework of your choice, you can manually set the CORS headers with your responses or create a custom middleware for the same.
If you only have access to the frontend:
Quite often, we may not have access to the backend server. For example, a public API. Due to this, we cannot add headers to the response we receive. However, we could use a proxy server that will add the CORS headers to the proxied request.
The cors-anywhere project is a Node.js reverse proxy that can allow us to do the same. The proxy server is available on https://cors-anywhere.herokuapp.com/, but you can build your own proxy server by cloning the repository and deploying it on a free platform like Heroku or any other desired platform.
In this method, instead of directly making the request to the server like this:
fetch('https://jsonplaceholder.typicode.com/posts');
Simply append the proxy server’s URL to the start of the API’s URL, like so:
fetch('https://cors-anywhere.herokuapp.com/https://jsonplaceholder.typicode.com/posts');
Conclusion
As we learn to appreciate the same-origin policy for its security against cross-site forgery attacks, CORS does seem to make a lot of sense. While the occurrences of the red CORS error messages in the console aren’t going to magically disappear, you are now equipped with the knowledge to tackle these messages irrespective of whether you work on the frontend or the backend.
Cut through the noise of traditional error reporting with LogRocket

LogRocket is a digital experience analytics solution that shields you from the hundreds of false-positive errors alerts to just a few truly important items. LogRocket tells you the most impactful bugs and UX issues actually impacting users in your applications.
Then, use session replay with deep technical telemetry to see exactly what the user saw and what caused the problem, as if you were looking over their shoulder.
LogRocket automatically aggregates client side errors, JS exceptions, frontend performance metrics, and user interactions. Then LogRocket uses machine learning to tell you which problems are affecting the most users and provides the context you need to fix it.
Focus on the bugs that matter — try LogRocket today.
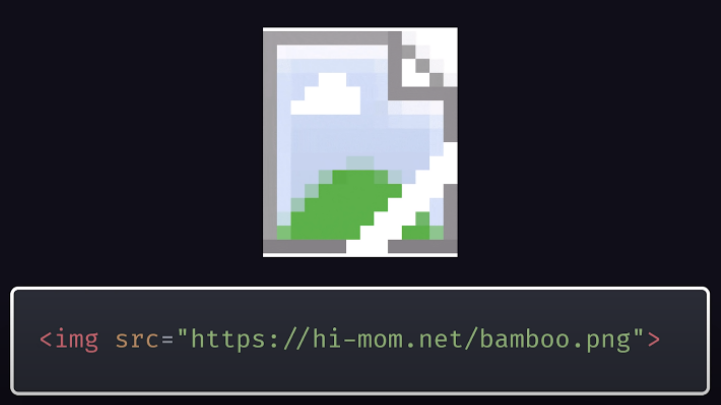
CORS is an abbreviation for Cross-Origin Response Sharing. It is what allows the website on one URL to request data from a different URL, and it frustrates both the frontend and backend devs alike. You might’ve added an image URL only to end up with something like this.
Or, your API fails and shows a CORS error in the console.
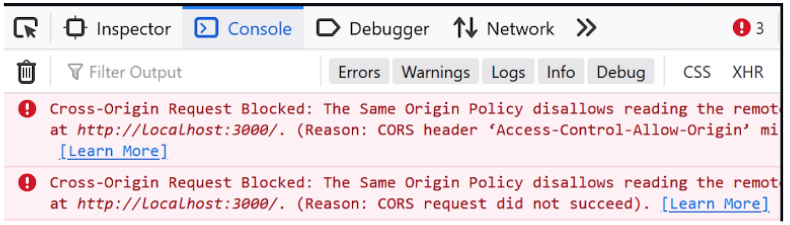
This happens because the same-origin policy is part of the browser’s security model which allows websites to request data from APIs of the same URL but blocks those of different URLs. Browsers do this by adding an ORIGIN key in the request.

However, let’s say if the server was on bar.com then the browser will prevent showing this to the client because it had a cross-origin response.
Why is CORS blocked?
It is to prevent cross-site request forgery. Let’s say you log in to facebook.com and your browser stores the authentication token so that in the future you get logged in automatically. And for every request to the origin facebook.com, these auth-token headers will be present. Now imagine a scenario where you click on a pop-up opening badSite.com. They also have the ability to make requests to facebook.com. In this case, the browser will add related cookies and your token will be shared with badSite.com, and your account has been successfully hacked with a cross-site request forgery attack. To prevent this the CORS error was introduced.
How do we solve these issues?
The first method is the quickest, but it is not the right way. It is mostly used during development when you need to start implementing the API quickly and can wait a bit for the final production build. As you might have guessed, we are going to tell the browser to stop caring about these errors. This can be done by installing a chrome extension.
Once installed, click on it and make sure it says on. Once done just refresh your app.
Why is this fix a deceiving one?
As you can see, whatever this extension did was to stop YOUR browser from checking the CORS error. But when you deliver it to your client this won’t work.
Solving CORS error the right way
Now, If you are in control of the server then lucky for you because you actually have some power to solve this. But if not, then you are out of luck.
For example, if you want to solve this on the express.js then all you have to do is use a certain middleware that will handle the origin key.
1 2 3 4 5 6 7 8 9 10 11 12const express = require('express'); const app = express(); const cors = require('cors'); app.use(cors({ origin: 'https://foo.com' })); app.get('/', (req, res) => { res.send('CORS solved') })
But, for any non-standard HTTP request like PUT, PATCH, DELETE, you’ll have to preflight them. The term preflight is used because it’s like a security check before you board a plane to make sure the passengers (or request) are safe to deploy on the airplane (or server) or not. The neat thing is that the browser automatically knows when to preflight and the server responds accordingly whether these non-standard requests are allowed or not.
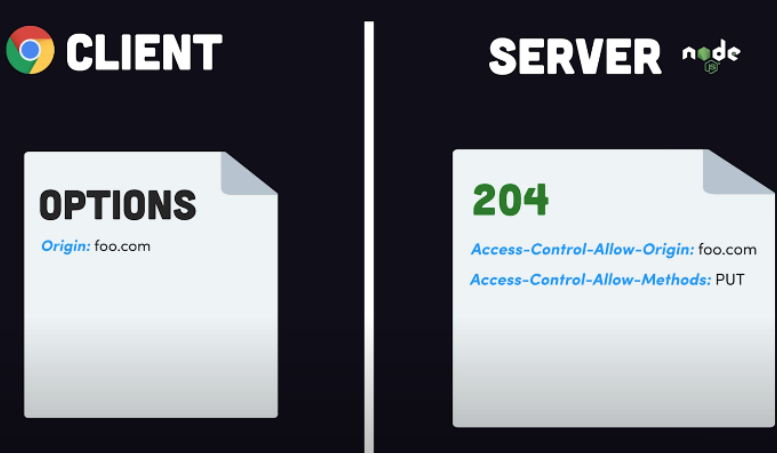
And at this point, these requests can happen properly. This sounds inefficient, because your service will have to deal with this at every request but the server has an option to respond with a header called Access-Control-Max-Age:86400 which will keep these details saved for the specified time.
Still facing a CORS error?
Open a network tab in your console.
In the response header look for the Access-Control-Allow-Origin header. If it does not exist then add it as a middleware in the way we discussed above. If it does exist then make sure there is no URL mismatch with the website.
And if all is fine then check whether it is a non-standard HTTP request and you need to allow them.
How to allow from multiple origin domains:
Let’s say in your express app you only want to allow requests from www.example1.com www.example2.com and www.example3.com.
You will do it in the following way with the help of middleware.
1 2 3 4 5 6 7 8app.use((req, res, next) => { const allowedOrigins = ['www.example1.com', 'www.example2.com', 'www.example3.com']; const origin = req.headers.origin; if (allowedOrigins.includes(origin)) { res.setHeader('Access-Control-Allow-Origin', origin); } return next(); });
Now, let’s look at the Access-Control header family with a bit of detail. You can do various things and put several restrictions with their help.
For example you can allow only certain types of requests in the following way.
res.header('Access-Control-Allow-Methods', 'GET, POST');
This will allow only GET and POST requests.
If you want to fix the headers that can be sent by client then you can do that in the following way.
res.header('Access-Control-Allow-Headers', 'Content-Type, Authorization');
If you want the browser to expose things like cookies/authorization headers, or the TLS client certificates then you can do that in the following way.
res.header('Access-Control-Allow-Credentials', true);
These are some of the popular Access-Control header family members.
Goodbye.
Click to show preference!
Click to show preference!
D0A3FC91-EEC2-4529-BF7D-3B777D79E185 Chat on Discord
Cross-Origin Resource Sharing (CORS) is a mechanism that browsers and webviews — like the ones powering Capacitor and Cordova — use to restrict HTTP and HTTPS requests made from scripts to resources in a different origin for security reasons, mainly to protect your user’s data and prevent attacks that would compromise your app.
In order to know if an external origin supports CORS, the server has to send some special headers for the browser to allow the requests.
An origin is the combination of the protocol, domain, and port from which your Ionic app or the external resource is served. For example, apps running in Capacitor have capacitor://localhost (iOS) or http://localhost (Android) as their origin.
When the origin where your app is served (e.g. http://localhost:8100 with ionic serve) and the origin of the resource being requested (e.g. https://api.example.com) don’t match, the browser’s Same Origin Policy takes effect and CORS is required for the request to be made.
CORS errors are common in web apps when a cross-origin request is made but the server doesn’t return the required headers in the response (is not CORS-enabled):
note
XMLHttpRequest cannot load https://api.example.com. No ‘Access-Control-Allow-Origin’ header is present on the requested resource. Origin ‘http://localhost:8100’ is therefore not allowed access.
Request with preflight
By default, when a web app tries to make a cross-origin request the browser sends a preflight request before the actual request. This preflight request is needed in order to know if the external resource supports CORS and if the actual request can be sent safely, since it may impact user data.
A preflight request is sent by the browser if:
- The method is:
- PUT
- DELETE
- CONNECT
- OPTIONS
- TRACE
- PATCH
- Or if it has a header other than:
- Accept
- Accept-Language
- Content-Language
- Content-Type
- DPR
- Downlink
- Save-Data
- Viewport-Width
- Width
- Or if it has a
Content-Typeheader other than:- application/x-www-form-urlencoded
- multipart/form-data
- text/plain
- Or if a
ReadableStreamor event listeners inXMLHttpRequestUploadare used.
If any of the conditions above are met, a preflight request with the OPTIONS method is sent to the resource URL.
Let’s suppose we are making a POST request to a fictional JSON API at https://api.example.com with a Content-Type of application/json. The preflight request would be like this (some default headers omitted for clarity):
OPTIONS / HTTP/1.1
Host: api.example.com
Origin: http://localhost:8100
Access-Control-Request-Method: POST
Access-Control-Request-Headers: Content-Type
If the server is CORS enabled, it will parse the Access-Control-Request-* headers and understand that a POST request is trying to be made from http://localhost:8100 with a custom Content-Type.
The server will then respond to this preflight with which origins, methods, and headers are allowed by using the Access-Control-Allow-* headers:
HTTP/1.1 200 OK
Access-Control-Allow-Origin: http://localhost:8100
Access-Control-Allow-Methods: GET, POST, OPTIONS
Access-Control-Allow-Headers: Content-Type
If the returned origin and method don’t match the ones from the actual request, or any of the headers used are not allowed, the request will be blocked by the browser and an error will be shown in the console. Otherwise, the request will be made after the preflight.
In our example, since the API expects JSON, all POST requests will have a Content-Type: application/json header and always be preflighted.
Simple requests
Some requests are always considered safe to send and don’t need a preflight if they meet all of the following conditions:
- The method is:
- GET
- HEAD
- POST
- Have only these headers:
- Accept
- Accept-Language
- Content-Language
- Content-Type
- DPR
- Downlink
- Save-Data
- Viewport-Width
- Width
- The
Content-Typeheader is:- application/x-www-form-urlencoded
- multipart/form-data
- text/plain
- No
ReadableStreamor event listeners inXMLHttpRequestUploadare used.
In our example API, GET requests don’t need to be preflighted because no JSON data is being sent, and so the app doesn’t need to use the Content-Type: application/json header. They will always be simple requests.
| Header | Value | Description |
|---|---|---|
| Access-Control-Allow-Origin | origin or * |
Specifies the origin to be allowed, like http://localhost:8100 or * to allow all origins. |
| Access-Control-Allow-Methods | methods |
Which methods are allowed when accessing the resource: GET, HEAD, POST, PUT, DELETE, CONNECT, OPTIONS, TRACE, PATCH. |
| Access-Control-Allow-Headers | headers |
Used in response to a preflight request to indicate which headers can be used when making the actual request, aside from the simple headers, which are always allowed. |
| Access-Control-Allow-Credentials | true or false |
Whether or not the request can be made with credentials. |
| Access-Control-Expose-Headers | headers |
Specifies the headers that the browser is allowed to access. |
| Access-Control-Max-Age | seconds |
Indicates how long the results of a preflight request can be cached. |
The browser automatically sends the appropriate headers for CORS in every request to the server, including the preflight requests. Please note that the headers below are for reference only, and should not be set in your app code (the browser will ignore them).
All Requests
| Header | Value | Description |
|---|---|---|
| Origin | origin |
Indicates the origin of the request. |
Preflight Requests
| Header | Value | Description |
|---|---|---|
| Access-Control-Request-Method | method |
Used to let the server know what method will be used when the actual request is made. |
| Access-Control-Request-Headers | headers |
Used to let the server know what non-simple headers will be used when the actual request is made. |
A. Enabling CORS in a server you control
The correct and easiest solution is to enable CORS by returning the right response headers from the web server or backend and responding to preflight requests, as it allows to keep using XMLHttpRequest, fetch, or abstractions like HttpClient in Angular.
Ionic apps may be run from different origins, but only one origin can be specified in the Access-Control-Allow-Origin header. Therefore we recommend checking the value of the Origin header from the request and reflecting it in the Access-Control-Allow-Origin header in the response.
Please note that all of the Access-Control-Allow-* headers have to be sent from the server, and don’t belong in your app code.
Here are some of the origins your Ionic app may be served from:
Capacitor
| Platform | Origin |
|---|---|
| iOS | capacitor://localhost |
| Android | http://localhost |
Replace localhost with your own hostname if you have changed the default in the Capacitor config.
Ionic WebView 3.x plugin on Cordova
| Platform | Origin |
|---|---|
| iOS | ionic://localhost |
| Android | http://localhost |
Replace localhost with your own hostname if you have changed the default in the plugin config.
Ionic WebView 2.x plugin on Cordova
| Platform | Origin |
|---|---|
| iOS | http://localhost:8080 |
| Android | http://localhost:8080 |
Replace port 8080 with your own if you have changed the default in the plugin config.
Local development in the browser
| Command | Origin |
|---|---|
ionic serve |
http://localhost:8100 or http://YOUR_MACHINE_IP:8100 |
npm run start or ng serve |
http://localhost:4200 for Ionic Angular apps. |
Port numbers can be higher if you are serving multiple apps at the same time.
Allowing any origin with Access-Control-Allow-Origin: * is guaranteed to work in all scenarios but may have security implications — like some CSRF attacks — depending on how the server controls access to resources and use sessions and cookies.
For more information on how to enable CORS in different web and app servers, please check enable-cors.org
CORS can be easily enabled in Express/Connect apps with the cors middleware:
const express = require('express');
const cors = require('cors');
const app = express();

const allowedOrigins = [
  'capacitor://localhost',
  'ionic://localhost',
  'http://localhost',
  'http://localhost:8080',
  'http://localhost:8100',
];

// Reflect the origin if it's in the allowed list or not defined (cURL, Postman, etc.)
const corsOptions = {
  origin: (origin, callback) => {
    if (allowedOrigins.includes(origin) || !origin) {
      callback(null, true);
    } else {
      callback(new Error('Origin not allowed by CORS'));
    }
  },
};

// Enable preflight requests for all routes
app.options('*', cors(corsOptions));

app.get('/', cors(corsOptions), (req, res, next) => {
  res.json({ message: 'This route is CORS-enabled for an allowed origin.' });
});

app.listen(3000, () => {
  console.log('CORS-enabled web server listening on port 3000');
});
B. Working around CORS in a server you can’t control
Don’t leak your keys!
If you are trying to connect to a 3rd-party API, first check in its documentation that is safe to use it directly from the app (client-side) and that it won’t leak any secret/private keys or credentials, as it’s easy to see them in clear text in Javascript code. Many APIs don’t support CORS on purpose, in order to force developers to use them in the server and protect important information or keys.
1. Native-only apps (iOS/Android)
Use the HTTP plugin from Ionic Native to make the requests natively from outside the webview. Please note that this plugin doesn’t work in the browser, so the development and testing of the app must always be done in a device or simulator going forward.
Usage in Ionic Angular 4
import { Component } from '@angular/core';
import { HTTP } from '@awesome-cordova-plugins/http/ngx';

@Component({
  selector: 'app-home',
  templateUrl: './home.page.html',
  styleUrls: ['./home.page.scss'],
})
export class HomePage {
  constructor(private http: HTTP) {}

  async getData() {
    try {
      const url = 'https://api.example.com';
      const params = {};
      const headers = {};

      const response = await this.http.get(url, params, headers);

      console.log(response.status);
      console.log(JSON.parse(response.data)); // JSON data returned by server
      console.log(response.headers);
    } catch (error) {
      console.error(error.status);
      console.error(error.error); // Error message as string
      console.error(error.headers);
    }
  }
}
2. Native + PWAs
Send the requests through an HTTP/HTTPS proxy that bypasses them to the external resources and adds the necessary CORS headers to the responses. This proxy must be trusted or under your control, as it will be intercepting most traffic made by the app.
Also, keep in mind that the browser or webview will not receive the original HTTPS certificates but the one being sent from the proxy if it’s provided. URLs may need to be rewritten in your code in order to use the proxy.
Check cors-anywhere for a Node.js CORS proxy that can be deployed in your own server. Using free hosted CORS proxies in production is not recommended.
C. Disabling CORS or browser web security
Please be aware that CORS exists for a reason (security of user data and to prevent attacks against your app). It’s not possible or advisable to try to disable CORS.
Older webviews like UIWebView on iOS don’t enforce CORS but are deprecated and are very likely to disappear soon. Modern webviews like iOS WKWebView or Android WebView (both used by Capacitor) do enforce CORS and provide huge security and performance improvements.
If you are developing a PWA or testing in the browser, using the --disable-web-security flag in Google Chrome or an extension to disable CORS is a really bad idea. You will be exposed to all kind of attacks, you can’t ask your users to take the risk, and your app won’t work once in production.
Sources
- CORS Errors in Ionic Apps
- MDN

![]()
Your request is hitting an error due to CORS. Not all is lost! Most CORS errors are quick & easy to debug and fix, once you understand the basics. Let’s sort it out.
You know you’re hitting a CORS error when you see error messages like:
Access to fetch at ‘https://example.com’ from origin ‘http://localhost:8000’ has been blocked by CORS policy.
No ‘Access-Control-Allow-Origin’ header is present on the requested resource
Cross-Origin Request Blocked: The Same Origin Policy disallows reading the remote resource at https://example.com/
Response to preflight request doesn’t pass access control check
The value of the ‘Access-Control-Allow-Origin’ header in the response must not be the wildcard ‘*’ when the request’s credentials mode is ‘include’
Method PUT is not allowed by Access-Control-Allow-Methods in preflight response.
Request header field custom is not allowed by Access-Control-Allow-Headers in preflight response.
In each of these cases, you’ve asked JavaScript running in your page to send a request to a different origin, and at some stage the browser is refusing to do what you want.
What is CORS?
When you include JavaScript in a web page, you’re running code on your user’s computer, inside their browsing session.
That’s a lot of power, and browsers are designed to protect users from the risks of this. CORS is one of these protections, aiming to protect the user and the services they use from two main attacks:
- CORS stops you from using the user’s existing login session (their cookies and other cached authentication details) when communicating with other servers. JavaScript on your web page shouldn’t be able to send requests to the Facebook API using their existing Facebook session. Without CORS, any web page could talk to other servers as you.
- CORS stops you from talking to servers that might only be accessible from their machine, but which aren’t accessible publicly. Your web page should not be able to send requests to
my-intranet-server.local, which might be an internal company server or your home router, and it should not be able to talk to servers that are listening only for localhost requests. Servers like these are often unauthenticated and very trusting, because they aren’t connected to the public internet. Without CORS, any web page you visit could access them.
This only applies to cross origin requests, e.g. requests from https://example.com to https://google.com. The protocol, domain, and port all count as part of a URL’s origin, but the path does not, so https://example.com/abc and https://example.com/def have the same origin, but http://localhost:123 and http://localhost:456 do not.
CORS protects against the above attacks by requiring the target server to opt into receiving dangerous requests from the source server, and to opt in to allowing pages from other origins to read responses. The Facebook API and your local network servers can accept requests from web pages running on other origins if they want to, but only if they agree.
Why doesn’t my CORS work?
Your CORS request is failing because you’re sending a request that the target server hasn’t agreed to allow.
There’s two classes of CORS request:
-
‘Simple’ cross-origin requests. There are basic requests that use no unsafe headers, don’t stream requests or responses, and only use HEAD, GET or POST methods (with limited safe content types). Any request that’s possible here would also be possible by e.g. loading an image or posting a form to the cross-origin request (and we can’t stop those, for huge backwards compatibility reasons).
You can always send simple requests, but you might not be allowed to read the response.
-
‘Preflighted’ cross-origin requests. These are more complex requests, that aren’t easy to send in other ways. A ‘preflight’ request will be sent to ask the server for permission before sending any of these requests, and if it’s rejected, you won’t be able to send the request at all.
If the preflight request is successful, the real request is sent, and the final response to that still has to follow the same rules as a ‘simple’ response for you to be allowed to read it.
When a request is preflighted, before sending the real request the browser sends an OPTIONS request with headers explaining the real request that it wants to send. It expects a response including headers that explicitly allow the real request.
There’s three ways that this might hit an error:
- You’re sending a simple request, which is sent immediately, but the headers on the response don’t allow you to read it.
- You’re sending a preflighted request, and the headers on the preflight response don’t allow you to send the real request.
- You’re sending a preflighted request, the preflight went OK and the request was sent, but the headers on the final response for the real request don’t allow you to read it.
The browser error message should show you which is happening for you. You can know if your request is being preflighted by looking for an OPTIONS request that’s sent immediately before it.
The rules for the final (after preflight, if applicable) response are:
- The response must include a
Access-Control-Allow-Originheader, whose value either matches the page’s origin or is*. The page’s origin is sent in the request in anOriginheader. - If the request included credentials (e.g.
fetch(url, { credentials: 'include' })) then the response headers must includeAccess-Control-Allow-Credentials: true, and theAccess-Control-Allow-Originheader must match exactly (i.e.*is not allowed).
If the response doesn’t follow those rules, then the server hasn’t opted in to your request, and you won’t be allowed to read the response.
If you’re in cases 1 or 3, you must be breaking one of these rules.
The rules for the preflight request are:
- The preflight response must include a
Access-Control-Allow-Originheader, whose value either matches the page’s origin or is*. The page’s origin is sent in the preflight request in anOriginheader. - If the page wants to send custom headers, then it will include
Access-Control-Request-Headerslisting the headers in the preflight OPTIONS request, and the server must include aAccess-Control-Allow-Headersheader that includes all those headers in the response.*can also be used here, but it won’t match anAuthorizationheader — that must always be listed explicitly. - If the page wants to use a non-simple HTTP method, it will include
Access-Control-Request-Methodin the preflight OPTIONS request, and the server must include aAccess-Control-Allow-Methodsheader that includes that method in the response. - If the page wants to send credentials (e.g.
fetch(url, { credentials: 'include' })) the response must include aAccess-Control-Allow-Credentials: trueheader, and theAccess-Control-Allow-Originheader must match exactly (i.e.*is not allowed).
If your preflight OPTIONS response doesn’t follow these rules, then you won’t be allowed to send the real request at all.
If you’re in case 2, you must be breaking one of these rules.
It’s also possible that you’re in case 2, but you actually don’t want to read the response — you just want to send it. To do that, you’ll need to simplify your request such that it’s a simple request. You can use { mode: 'no-cors' } on your fetch options to enforce this (but note that this doesn’t change the rules, it just enforces that it’s a simple request where you can’t read the result).
How can I fix my CORS error?
To know exactly why your request is failing, you need to inspect the traffic itself, find where you’re breaking the rules above, and then either:
- Change the request to make it a simple request
- Change the server’s response to follow the rules above
- If all else fails, proxy the request through your own server on your own origin, so it’s not a cross-origin request (proxying avoids the attacks above, because it doesn’t let you use the cookies or authentication details from the user’s browser, and it requires the target server to be accessible from your source server)
To inspect the traffic, you can use your browser built-in tools, but it’s usually easier to use a dedicated HTTP debugger like HTTP Toolkit. Dedicated tools make it much easier to see the data, rather than (for example) Chrome’s very cramped and fiddly network tab, and you can also breakpoint responses and edit the headers to test how the browser will handle changes without actually changing your server. Also, some Chrome versions don’t show all CORS requests.
Hopefully, once you examine your CORS requests & responses, it’s clear where you’re breaking the rules above.
If not, try walking through Will It CORS. This is a self-explaining implementation of the CORS rules: you can input step by step what you’re trying to do, and it’ll tell you what will happen and why, and how you can change it.
There’s also a few common mistakes that you should watch out for:
- Trying to request content from another origin that isn’t explicitly available cross-origin. If its not your server, and it doesn’t actively want CORS requests, you’re not going to work around most issues: you need to proxy the request, ask the owner to allow it, or do something entirely different.
- Always returning
*forAccess-Control-Allow-Origin, and then trying to send credentials. - Adding CORS headers for preflight OPTIONS requests, but forgetting to also include CORS headers on the final request too.
- Unnecessarily sending custom request headers. This will trigger a preflight request. You can often get by just using the CORS-safe request headers instead, or moving request data into the body of your request.
- Incorrectnyl caching CORS response headers independent of their origin, by not using
Vary: Origin. If you do this then responses for requests from one origin may be cached and returned for later requests from a different origin. That mismatched data can quickly break things. - Trying to access response headers without including an
Access-Control-Expose-Headersheader. In this case, all headers except the CORS-safe response headers will be unexpectedly undefined, even though they were sent by the server. - Sending cross-origin mixed-content requests (a request from
https://...tohttp://...). These will always be blocked, regardless of the details, as insecure content like this is never allowed on HTTPS origins. There’s not much you can do about this, other than changing to use HTTPS on both servers.
That covers the core of CORS, how it can go wrong, and how to fix it. Have more questions? Comment below, or get in touch on Twitter.
Originally posted on the HTTP Toolkit blog
CORS errors
Совместное использование ресурсов между источниками ( CORS ) — это стандарт, который позволяет серверу ослабить политику одного источника . Это используется для явного разрешения одних запросов из разных источников при отклонении других. Например, если сайт предлагает встраиваемую услугу, может потребоваться ослабить определенные ограничения. Настроить такую конфигурацию CORS не обязательно просто и могут возникнуть некоторые проблемы. На этих страницах мы рассмотрим некоторые распространенные сообщения об ошибках CORS и способы их устранения.
Если конфигурация CORS настроена неправильно, в консоли браузера будет отображаться сообщение об ошибке типа "Cross-Origin Request Blocked: The Same Origin Policy disallows reading the remote resource at $somesite" что указывает на то, что запрос был заблокирован из-за нарушения безопасности CORS. правила. Однако это не обязательно может быть ошибкой настройки. Возможно, что запрос на самом деле намеренно запрещен веб-приложением пользователя и удаленной внешней службой. Однако, если конечная точка должна быть доступна, для успешного выполнения потребуется некоторая отладка.
Выявление проблемы
Чтобы понять суть проблемы с конфигурацией CORS,необходимо выяснить,в каком запросе ошибка и почему.Эти шаги могут помочь вам в этом:
- Перейдите на нужный веб-сайт или веб-приложение и откройте Инструменты разработчика .
- Теперь попробуйте воспроизвести неудачную транзакцию и проверьте консоль , если вы видите сообщение об ошибке нарушения CORS. Вероятно, это будет выглядеть так:
Текст сообщения об ошибке будет похож на следующий:
Cross-Origin Request Blocked: The Same Origin Policy disallows
reading the remote resource at https://some-url-here. (Reason:
additional information here).
Примечание. По соображениям безопасности подробности о том, что пошло не так с запросом CORS , недоступны для кода JavaScript . Код знает только то, что произошла ошибка. Единственный способ определить, что именно пошло не так, — это посмотреть подробности в консоли браузера.
сообщения об ошибках CORS
See also
- Glossary: CORS
- CORS introduction
- Настройки CORS на стороне сервера
- CORS включенное изображение
- атрибуты настроек CORS
- https://www.test-cors.org — страница для тестирования запросов CORS.
HTTP
-
CORS
Cross-Origin Resource Sharing (CORS)-это механизм,основанный на HTTP-заголовках,который позволяет серверу указывать любое происхождение (домен,схема,порт),отличное от его происхождения.
-
Заголовки ответа HTTP
В этом разделе перечислены заголовки HTTP-ответов,которые серверы возвращают для запросов контроля доступа,определенных спецификацией Cross-Origin Resource Sharing.
-
Errors: CORSAllowOriginNotMatchingOrigin
Происхождение,делающее запрос,не соответствует разрешенному заголовком Access-Control-Allow-Origin.
-
Errors: CORSDidNotSucceed
HTTP-запрос,использующий CORS,завершился неудачей из-за сбоя соединения на уровне сетевого протокола.