Introduction
This document describes a troubleshooting scenario which applies to applications that do not work through the Cisco AnyConnect VPN Client.
Prerequisites
Requirements
There are no specific requirements for this document.
Components Used
The information in this document is based on a Cisco Adaptive Security Appliance (ASA) that runs Version 8.x.
The information in this document was created from the devices in a specific lab environment. All of the devices used in this document started with a cleared (default) configuration. If your network is live, make sure that you understand the potential impact of any command.
Troubleshooting Process
This typical troubleshooting scenario applies to applications that do not work through the Cisco AnyConnect VPN Client for end-users with Microsoft Windows-based computers. These sections address and provide solutions to the problems:
- Installation and Virtual Adapter Issues
- Disconnection or Inability to Establish Initial Connection
- Problems with Passing Traffic
- AnyConnect Crash Issues
- Fragmentation / Passing Traffic Issues
Installation and Virtual Adapter Issues
Complete these steps:
- Obtain the device log file:
- Windows XP / Windows 2000:
Windowssetupapi.log
- Windows Vista:
Note: Hidden folders must be made visible in order to see these files.
WindowsInfsetupapi.app.log

    WindowsInfsetupapi.dev.log
If you see errors in the setupapi log file, you can turn up verbosity to 0x2000FFFF.
- Windows XP / Windows 2000:
- Obtain the MSI installer log file:
If this is an initial web deploy install, this log is located in the per-user temp directory.
- Windows XP / Windows 2000:
Documents and Settings<username>Local SettingsTemp
- Windows Vista:
Users<username>AppDataLocalTemp
If this is an automatic upgrade, this log is in the temp directory of the system:
WindowsTemp
The filename is in this format: anyconnect-win-x.x.xxxx-k9-install-yyyyyyyyyyyyyy.log. Obtain the most recent file for the version of the client you want to install. The x.xxxx changes based on the version, such as 2.0.0343, and yyyyyyyyyyyyyy is the date and time of the install.
- Windows XP / Windows 2000:
- Obtain the PC system information file:
- From a Command Prompt/DOS box, type this:
- Windows XP / Windows 2000:
winmsd /nfo c:msinfo.nfo
- Windows Vista:
msinfo32 /nfo c:msinfo.nfo
Note: After you type into this prompt, wait. It can take between two to five minutes for the file to complete.
- Windows XP / Windows 2000:
- Obtain a systeminfo file dump from a Command Prompt:
Windows XP and Windows Vista:
systeminfo c:sysinfo.txt
- From a Command Prompt/DOS box, type this:
Refer to AnyConnect: Corrupt Driver Database Issue in order to debug the driver issue.
Disconnection or Inability to Establish Initial Connection
If you experience connection problems with the AnyConnect client, such as disconnections or the inability to establish an initial connection, obtain these files:
- The configuration file from the ASA in order to determine if anything in the configuration causes the connection failure:
From the console of the ASA, type
write net x.x.x.x:ASA-Config.txtwherex.x.x.xis the IP address of a TFTP server on the network.OR
From the console of the ASA, type
show running-config. Let the configuration complete on the screen, then cut-and-paste to a text editor and save. - The ASA event logs:
- In order to enable logging on the ASA for auth, WebVPN, Secure Sockets Layer (SSL), and SSL VPN Client (SVC) events, issue these CLI commands:
config terminal
logging enable
logging timestamp
logging class auth console debugging
logging class webvpn console debugging
logging class ssl console debugging
logging class svc console debugging - Originate an AnyConnect session and ensure that the failure can be reproduced. Capture the logging output from the console to a text editor and save.
- In order to disable logging, issue
no logging enable.
- In order to enable logging on the ASA for auth, WebVPN, Secure Sockets Layer (SSL), and SSL VPN Client (SVC) events, issue these CLI commands:
- The Cisco AnyConnect VPN Client log from the Windows Event Viewer of the client PC:
- Choose Start > Run.
- Enter:
eventvwr.msc /s
- Right-click the Cisco AnyConnect VPN Client log, and select Save Log File as AnyConnect.evt.
Note: Always save it as the .evt file format.
If the user cannot connect with the AnyConnect VPN Client, the issue might be related to an established Remote Desktop Protocol (RDP) session or Fast User Switching enabled on the client PC. The user can see the AnyConnect profile settings mandate a single local user, but multiple local users are currently logged into your computer. A VPN connection will not be established error message error on the client PC. In order to resolve this issue, disconnect any established RDP sessions and disable Fast User Switching. This behavior is controlled by the Windows Logon Enforcement attribute in the client profile, however currently there is no setting that actually allows a user to establish a VPN connection while multiple users are logged on simultaneously on the same machine. Enhancement request CSCsx15061  was filed to address this feature.
Note: Make sure that port 443 is not blocked so the AnyConnect client can connect to the ASA.
When a user cannot connect the AnyConnect VPN Client to the ASA, the issue might be caused by an incompatibility between the AnyConnect client version and the ASA software image version. In this case, the user receives this error message: The installer was not able to start the Cisco VPN client, clientless access is not available.
In order to resolve this issue, upgrade the AnyConnect client version to be compatible with the ASA software image.
When you log in the first time to the AnyConnect, the login script does not run. If you disconnect and log in again, then the login script runs fine. This is the expected behavior.
When you connect the AnyConnect VPN Client to the ASA, you might receive this error: User not authorized for AnyConnect Client access, contact your administrator.
This error is seen when the AnyConnect image is missing from the ASA. Once the image is loaded to the ASA, AnyConnect can connect without any issues to the ASA.
This error can be resolved by disabling Datagram Transport Layer Security (DTLS). Go to Configuration > Remote Access VPN > Network (Client) Access > AnyConnect Connection Profiles and uncheck the Enable DTLS check box. This disables DTLS.
The dartbundle files show this error message when the user gets disconnected: TUNNELPROTOCOLDPDMGR_ERROR_NO_DPD_RESPONSE:The secure gateway failed to respond to Dead Peer Detection packets. This error means that the DTLS channel was torn due to Dead Peer Detection (DPD) failure. This error is resolved if you tweak the DPD keepalives and issue these commands:
webvpn
   svc keepalive 30
   svc dpd-interval client 80
   svc dpd-interval gateway 80
The svc keepalive and svc dpd-interval commands are replaced by the anyconnect keepalive and anyconnect dpd-interval commands respectively in ASA Version 8.4(1) and later as shown here:
webvpn
anyconnect ssl keepalive 15
anyconnect dpd-interval client 5
anyconnect dpd-interval gateway 5
Problems with Passing Traffic
When problems are detected with passing traffic to the private network with an AnyConnect session through the ASA, complete these data-gathering steps:
- Obtain the output of the show vpn-sessiondb detail svc filter name <username> ASA command from the console. If the output shows
Filter Name: XXXXX, then gather the output for show access-list XXXXX. Verify that the access-list XXXXX does not block the intended traffic flow. - Export the AnyConnect statistics from AnyConnect VPN Client > Statistics > Details > Export (AnyConnect-ExportedStats.txt).
- Check the ASA configuration file for nat statements. If Network Address Translation (NAT) is enabled, these must exempt data that returns to the client as a result of NAT. For example, to NAT exempt (nat 0) the IP addresses from the AnyConnect pool, use this on the CLI:
access-list in_nat0_out extended permit ip any 10.136.246.0 255.255.255.0
ip local pool IPPool1 10.136.246.1-10.136.246.254 mask 255.252.0.0
nat (inside) 0 access-list in_nat0_out - Determine if the tunneled default gateway needs to be enabled for the setup. The traditional default gateway is the gateway of last resort for non-decrypted traffic.
Example:
!--- Route outside 0 0 is an incorrect statement.

route outside 0 0 10.145.50.1
route inside 0 0 10.0.4.2 tunneled
For example, if the VPN Client needs to access a resource which is not in the routing table of the VPN Gateway, the packet is routed through the standard default gateway. The VPN gateway does not need the complete internal routing table in order to resolve this. The tunneled keyword can be used in this instance.
- Verify if the AnyConnect traffic is dropped by the inspection policy of the ASA. You could exempt the specific application that is used by AnyConnct client if you implement the Modular Policy Framework of Cisco ASA. For example, you could exempt the skinny protocol with these commands.
ASA(config)# policy-map global_policy
ASA(config-pmap)#  class inspection_default
ASA(config-pmap-c)# no inspect skinny
AnyConnect Crash Issues
Complete these data-gathering steps:
- Ensure that the Microsoft Utility Dr Watson is enabled. In order to do this, choose Start > Run, and run Drwtsn32.exe. Configure this and click OK:
Number of Instructions      : 25
Number of Errors To Save    : 25
Crash Dump Type             :  Mini
Dump Symbol Table           : Checked
Dump All Thread Contexts    : Checked
Append To Existing Log File : Checked
Visual Notification         : Checked
Create Crash Dump File      : Checked
When the crash occurs, gather the .log and .dmp files from C:Documents and SettingsAll UsersApplication DataMicrosoftDr Watson. If these files appear to be in use, then use ntbackup.exe.
- Obtain the Cisco AnyConnect VPN Client log from the Windows Event Viewer of the client PC:
- Choose Start > Run.
- Enter:
eventvwr.msc /s
- Right-click the Cisco AnyConnect VPN Client log, and select Save Log File As AnyConnect.evt.
Note: Always save it as the .evt file format.
Fragmentation / Passing Traffic Issues
Some applications, such as Microsoft Outlook, do not work. However, the tunnel is able to pass other traffic such as small pings.
This can provide clues as to a fragmentation issue in the network. Consumer routers are particularly poor at packet fragmentation and reassembly.
Try a scaling set of pings in order to determine if it fails at a certain size. For example, ping -l 500, ping -l 1000, ping -l 1500, ping -l 2000.
It is recommended that you configure a special group for users that experience fragmentation, and set the SVC Maximum Transition Unit (MTU) for this group to 1200. This allows you to remediate users who experience this issue, but not impact the broader user base.
Problem
TCP connections hang once connected with AnyConnect.
Solution
In order to verify if your user has a fragmentation issue, adjust the MTU for AnyConnect clients on the ASA.
 ASA(config)#group-policy <name> attributes
                          webvpn
                              svc mtu 1200
Uninstall Automatically
Problem
The AnyConnect VPN Client uninstalls itself once the connection terminates. The client logs show that keep installed is set to disabled.
Solution
AnyConnect uninstalls itself despite that the keep installed option is selected on the Adaptive Security Device Manager (ASDM). In order to resolve this issue, configure the svc keep-installer installed command under group-policy.
Issue Populating the Cluster FQDN
Problem: AnyConnect client is pre-populated with the hostname instead of the cluster Fully Qualified Domain Name (FQDN).
When you have a load-balancing cluster set up for SSL VPN and the client attempts to connect to the cluster, the request is redirected to the node ASA and the client logs in successfully. After some time, when the client tries to connect to the cluster again, the cluster FQDN is not seen in the Connect to entries. Instead, the node ASA entry to which the client has been redirected is seen.
Solution
This occurs because the AnyConnect client retains the host name to which it last connected. This behavior is observed and a bug has been filed. For complete details about the bug, refer to Cisco bug ID CSCsz39019. The suggested workaround is to upgrade the Cisco AnyConnect to Version 2.5.
Backup Server List Configuration
A backup server list is configured in case the main server selected by the user is not reachable. This is defined in the Backup Server pane in the AnyConnect profile. Complete these steps:
- Download the AnyConnect Profile Editor (registered customers only) . The file name is AnyConnectProfileEditor2_4_1.jar.
- Create an XML file with the AnyConnect Profile Editor.
- Go to the server list tab.
- Click Add.
- Type the main server on the Hostname field.
- Add the backup server below the backup server list on the Host address field. Then, click Add.
- Once you have the XML file, you need to assign it to the connection you use on the ASA.
- In ASDM, choose Configuration > Remote Access VPN > Network (Client) Access > AnyConnect Connection Profiles.
- Select your profile and click Edit.
- Click Manage from the Default Group Policy section.
- Select your group-policy and click Edit.
- Select Advanced and then click SSL VPN Client.
- Click New. Then, you need to type a name for the Profile and assign the XML file.
- Connect the client to the session in order to download the XML file.
AnyConnect: Corrupt Driver Database Issue
This entry in the SetupAPI.log file suggests that the catalog system is corrupt:
W239 driver signing class list "C:WINDOWSINFcertclas.inf" was missing or invalid. Error 0xfffffde5: Unknown Error., assuming all device classes are subject to driver signing policy.
You can also receive this error message: Error(3/17): Unable to start VA, setup shared queue, or VA gave up shared queue.
You can receive this log on the client: "The VPN client driver has encountered an error".
Repair
This issue is due to Cisco bug ID CSCsm54689. In order to resolve this issue, make sure that Routing and Remote Access Service is disabled before you start AnyConnect. If this does not resolve the issue, complete these steps:
- Open a command prompt as an Administrator on the PC (elevated prompt on Vista).
- Run
net stop CryptSvc. - Run:
esentutl /p%systemroot%System32catroot2
{F750E6C3-38EE-11D1-85E5-00C04FC295EE}catdb - When prompted, choose OK in order to attempt the repair.
- Exit the command prompt.
- Reboot.
Failed Repair
If the repair fails, complete these steps:
- Open a command prompt as an Administrator on the PC (elevated prompt on Vista).
- Run
net stop CryptSvc. - Rename the %WINDIR%system32catroot2 to catroot2_old directory.
- Exit the command prompt.
- Reboot.
Analyze the Database
You can analyze the database at any time in order to determine if it is valid.
- Open a command prompt as an Admimistrator on the PC.
- Run:
esentutl /g%systemroot%System32catroot2
{F750E6C3-38EE-11D1-85E5-00C04FC295EE}catdb
Refer to System Catalog Database Integrity for more information.
Error Messages
Error: Unable to Update the Session Management Database
While the SSL VPN is connected through a web browser, the Unable to Update the Session Management Database. error message appears, and the ASA logs show %ASA-3-211001: Memory allocation Error. The adaptive security appliance failed to allocate RAM system memory.
Solution 1
This issue is due to Cisco bug ID CSCsm51093. In order to resolve this issue, reload the ASA or upgrade the ASA software to the interim release mentioned in the bug. Refer to Cisco bug ID CSCsm51093 for more information.
Solution 2
This issue can also be resolved if you disable threat-detection on ASA if threat-detection is used.
Error: «Module c:Program FilesCiscoCisco AnyConnect VPN Clientvpnapi.dll failed to register»
When you use the AnyConnect client on laptops or PCs, an error occurs during the install:
"Module C:Program FilesCiscoCisco AnyConnect VPN Clientvpnapi.dll failed
to register..."
When this error is encountered, the installer cannot move forward and the client is removed.
Solution
These are the possible workarounds to resolve this error:
- The latest AnyConnect client is no longer officially supported with Microsoft Windows 2000. It is a registry problem with the 2000 computer.
- Remove the VMware applications. Once AnyConnect is installed, VMware applications can be added back to the PC.
- Add the ASA to their trusted sites.
- Copy these files from the ProgramFilesCiscoCiscoAnyconnect folder to a new folder and run the regsvr32 vpnapi.dll command prompt:
- vpnapi.dll
- vpncommon.dll
- vpncommoncrypt.dll
- Reimage the operating system on the laptop/PC.
The log message related to this error on the AnyConnect client looks similar to this:
DEBUG: Error 2911:  Could not remove the folderC:Program FilesCiscoCisco AnyConnect
VPN Client.
The installer has encountered an unexpected error installing this package. This may
indicate a problem with this package. The error code is 2911. The arguments are:
C:Program FilesCiscoCisco AnyConnect VPN Client, ,
DEBUG: Error 2911:  Could not remove the folder C:Program FilesCiscoCisco AnyConnect
VPN Client.
The installer has encountered an unexpected error installing this package. This may
indicate a problem with this package. The error code is 2911. The arguments are:
C:Program FilesCiscoCisco AnyConnect VPN Client, ,
Info 1721. There is a problem with this Windows Installer package. A program required for
this install to complete could not be run. Contact your support personnel or package
vendor. Action: InstallHelper.exe, location: C:Program FilesCiscoCisco AnyConnect VPN
ClientInstallHelper.exe, command: -acl "C:Documents and SettingsAll UsersApplication
DataCiscoCisco AnyConnect VPN Client\" -r
Error: «An error was received from the secure gateway in response to the VPN negotiation request. Please contact your network administrator»
When clients try to connect to the VPN with the Cisco AnyConnect VPN Client, this error is received.
This message was received from the secure gateway:
«Illegal address class» or «Host or network is 0» or «Other error»
Solution
The issue occurs because of the ASA local IP pool depletion. As the VPN pool resource is exhausted, the IP pool range must be enlarged.
Cisco bug ID is CSCsl82188 is filed for this issue. This error usually occurs when the local pool for address assignment is exhausted, or if a 32-bit subnet mask is used for the address pool. The workaround is to expand the address pool and use a 24-bit subnet mask for the pool.
Error: Session could not be established. Session limit of 2 reached.
When you try to connect more than two clients with the AnyConnect VPN Client, you receive the Login Failed error message on the Client and a warning message in the ASA logs that states Session could not be established. Session limit of 2 reached. I have the AnyConnect essential license on the ASA, which runs Version 8.0.4.
Solution 1
This error occurs because the AnyConnect essential license is not supported by ASA version 8.0.4. You need to upgrade the ASA to version 8.2.2. This resolves the error.
Note: Regardless of the license used, if the session limit is reached, the user will receive the login failed error message.
Solution 2
This error can also occur if the vpn-sessiondb max-anyconnect-premium-or-essentials-limit session-limit command is used to set the limit of VPN sessions permitted to be established. If the session-limit is set as two, then the user cannot establish more than two sessions even though the license installed supports more sessions. Set the session-limit to the number of VPN sessions required in order to avoid this error message.
Error: Anyconnect not enabled on VPN server while trying to connect anyconnect to ASA
You receive the Anyconnect not enabled on VPN server error message when you try to connect AnyConnect to the ASA.
Solution
This error is resolved if you enable AnyConnect on the outside interface of the ASA with ASDM. For more information on how to enable AnyConnect on the outside interface, refer to Configure Clientless SSL VPN (WebVPN) on the ASA.
Error:- %ASA-6-722036: Group client-group User xxxx IP x.x.x.x Transmitting large packet 1220 (threshold 1206)
The %ASA-6-722036: Group < client-group > User < xxxx > IP < x.x.x.x> Transmitting large packet 1220 (threshold 1206) error message appears in the logs of the ASA. What does this log mean and how is this resolved?
Solution
This log message states that a large packet was sent to the client. The source of the packet is not aware of the MTU of the client. This can also be due to compression of non-compressible data. The workaround is to turn off the SVC compression with the svc compression none command. This resolves the issue.
Error: The secure gateway has rejected the agent’s vpn connect or reconnect request.
When you connect to the AnyConnect Client, this error is received: "The secure gateway has rejected the agent's vpn connect or reconnect request. A new connection requires re-authentication and must be started manually. Please contact your network administrator if this problem persists. The following message was received from the secure gateway: no assigned address".
This error is also received when you connect to the AnyConnect Client: "The secure gateway has rejected the connection attempt. A new connection attempt to the same or another secure gateway is needed, which requires re-authentication. The following message was received from the secure gateway:Host or network is 0".
This error is also received when you connect to the AnyConnect Client: "The secure gateway has rejected the agent's vpn connect or reconnect request. A new connection requires a re-authentication and must be started manually. Please contact the network administrator if the problem persists. The following message was received from the secure gateway: No License".
Solution
The router was missing pool configuration after reload. You need to add the concerned configuration back to the router.
Router#show run | in pool

ip local pool SSLPOOL 192.168.30.2 192.168.30.254
   svc address-pool SSLPOO
The "The secure gateway has rejected the agent's vpn connect or reconnect request. A new connection requires a re-authentication and must be started manually. Please contact the network administrator if the problem persists. The following message was received from the secure gateway: No License" error occurs when the AnyConnect mobility license is missing. Once the license is installed, the issue is resolved.
Error: «Unable to update the session management database»
When you try to authenticate in WebPortal, this error message is received: "Unable to update the session management database".
Solution
This problem is related to memory allocation on the ASA. This issue is mostly encountered when the ASA Version is 8.2.1. Originally, this requires a 512MB RAM for its complete functionality.
As a permanent workaround, upgrade the memory to 512MB.
As a temporary workaround, try to free the memory with these steps:
- Disable the threat-detection.
- Disable SVC compression.
- Reload the ASA.
Error: «The VPN client driver has encountered an error»
This is an error message obtained on the client machine when you try to connect to AnyConnect.
Solution
In order to resolve this error, complete this procedure in order to manually set the AnyConnect VPN agent to Interactive:
- Right-click My Computer > Manage > Services and Applications > Services > and select the Cisco AnyConnect VPN Agent.
- Right-click Properties, then log on, and select Allow service to interact with the desktop.
This sets the registry Type value DWORD to 110 (default is 010) for the HKEY_LOCAL_MACHINESYSTEMCurrentControlSetServicesvpnagent.
Note: If this is to be used, then the preference would be to use the .MST transform in this instance. This is because if you set this manually with these methods, it requires that this be set after every install/upgrade process. This is why there is a need to identify the application that causes this problem.
When Routing and Remote Access Service (RRAS) is enabled on the Windows PC, AnyConnect fails with the
The VPN client driver has encountered an error.error message. In order to resolve this issue, make sure that Routing and RRAS is disabled before starting AnyConnect. Refer to Cisco bug ID CSCsm54689 for more information.
Error: «Unable to process response from xxx.xxx.xxx.xxx»
AnyConnect clients fail to connect to a Cisco ASA. The error in the AnyConnect window is "Unable to process response from xxx.xxx.xxx.xxx".
Solution
In order to resolve this error, try these workarounds:
- Remove WebVPN from the ASA and reenable it.<
- Change the port number to 444 from the existing 443 and reenable it on 443.
For more information on how to enable WebVPN and change the port for WebVPN, refer to this Solution.
Error: «Login Denied , unauthorized connection mechanism , contact your administrator»
AnyConnect clients fail to connect to a Cisco ASA. The error in the AnyConnect window is "Login Denied , unauthorized connection mechanism , contact your administrator".
Solution
This error message occurs mostly because of configuration issues that are improper or an incomplete configuration. Check the configuration and make sure it is as required to resolve the issue.
<
Error: «Anyconnect package unavailable or corrupted. Contact your system administrator»
This error occurs when you try to launch the AnyConnect software from a Macintosh client in order to connect to an ASA.
Solution
In order to resolve this, complete these steps:
- Upload the Macintosh AnyConnect package to the flash of the ASA.
- Modify the WebVPN configuration in order to specify the AnyConnect package that is used.
webvpn
 svc image disk0:/anyconnect-macosx-i386-2.3.2016-k9.pkg 2
 svc image disk0:/anyconnect-macosx-powerpc-2.3.2016-k9.pkg 3
The svc image command is replaced by the anyconnect image command in ASA Version 8.4(1) and later as shown here:
hostname(config)#webvpn
hostname(config-webvpn)#anyconnect image disk0:/
anyconnect-win-3.0.0527-k9.pkg 1hostname(config-webvpn)#anyconnect image disk0:/
anyconnect-macosx-i386-3.0.0414-k9.pkg 2
Error: «The AnyConnect package on the secure gateway could not be located»
This error is caused on the user’s Linux machine when it tries to connect to the ASA by launching AnyConnect. Here is the complete error:
"The AnyConnect package on the secure gateway could not be located. You may
be experiencing network connectivity issues. Please try connecting again."
Solution
In order to resolve this error message, verify whether the Operating System (OS) that is used on the client machine is supported by the AnyConnect client.
If the OS is supported, then verify if the AnyConnect package is specified in the WebVPN configuration or not. See the Anyconnect package unavailable or corrupted section of this document for more information.
Error: «Secure VPN via remote desktop is not supported»
Users are unable to perform a remote desktop access. The Secure VPN via remote desktop is not supported error message appears.
Solution
This issue is due to these Cisco bug IDs: CSCsu22088 and CSCso42825. If you upgrade the AnyConnect VPN Client, it can resolve the issue. Refer to these bugs for more information.
Error: «The server certificate received or its chain does not comply with FIPS. A VPN connection will not be established»
When you attempt to VPN to the ASA 5505, the The server certificate received or its chain does not comply with FIPS. A VPN connection will not be established error message appears.
Solution
In order to resolve this error, you must disable the Federal Information Processing Standards (FIPS) in the AnyConnect Local Policy file. This file can usually be found at C:ProgramDataCiscoCisco AnyConnect VPN ClientAnyConnectLocalPolicy.xml. If this file is not found in this path, then locate the file at a different directory with a path such as C:Documents and SettingsAll UsersApplication DataCisco AnyConnectVPNClientAnyConnectLocalPolicy.xml. Once you locate the xml file, make changes to this file as shown here:
Change the phrase:
<FipsMode>true</FipsMode>
To:
<FipsMode>false</FipsMode>
Then, restart the computer. Users must have administrative permissions in order to modify this file.
Error: «Certificate Validation Failure»
Users are unable to launch AnyConnect and receive the Certificate Validation Failure error.
Solution
Certificate authentication works differently with AnyConnect compared to the IPSec client. In order for certificate authentication to work, you must import the client certificate to your browser and change the connection profile in order to use certificate authentication. You also need to enable this command on your ASA in order to allow SSL client-certificates to be used on the outside interface:
ssl certificate-authentication interface outside port 443
Error: «VPN Agent Service has encountered a problem and needs to close. We are sorry for the inconvenience»
When AnyConnect Version 2.4.0202 is installed on a Windows XP PC, it stops at updating localization files and an error message shows that the vpnagent.exe fails.
Solution
This behavior is logged in Cisco bug ID CSCsq49102. The suggested workaround is to disable the Citrix client.
Error: «This installation package could not be opened. Verify that the package exists»
When AnyConnect is downloaded, this error message is received:
"Contact your system administrator. The installer failed with the following error: This installation package could not be opened. Verify that the package exists and that you can access it, or contact the application vendor to verify that this is a valid Windows Installer package."
Solution
Complete these steps in order to fix this issue:
- Remove any anti-virus software.
- Disable the Windows firewall.
- If neither Step 1 or 2 helps, then format the machine and then install.
- If the problem still persists, open a TAC Case.
Error: «Error applying transforms. Verify that the specified transform paths are valid.»
This error message is recieved during the auto-download of AnyConnect from the ASA:
"Contact your system administrator. The installer failed with the following error:
Error applying transforms. Verify that the specified transform paths are valid."
This is the error message received when connecting with AnyConnect for MacOS:
"The AnyConnect package on the secure gateway could not be located. You may be
experiencing network connectivity issues. Please try connecting again."
Solution
Complete one of these workarounds in order to resolve this issue:
- The root cause of this error might be due to a corrupted MST translation file (for example, imported). Perform these steps to fix this:
- Remove the MST translation table.
- Configure the AnyConnect image for MacOS in the ASA.
- From the ASDM, follow the Network (Client) Access > AnyConnect Custom > Installs path and delete the AnyConnect package file. Make sure the package remains in Network (Client) Access > Advanced > SSL VPN > Client Setting.
If neither of these workarounds resolve the issue, contact Cisco Technical Support.
Error: «The VPN client driver has encountered an error»
This error is received:
The VPN client driver has encountered an error when connecting through Cisco
AnyConnect Client.
Solution
This issue can be resolved when you uninstall the AnyConnect Client, and then remove the anti-virus software. After this, reinstall the AnyConnect Client. If this resolution does not work, then reformat the PC in order to fix this issue.
Error: «A VPN reconnect resulted in different configuration setting. The VPN network setting is being re-initialized. Applications utilizing the private network may need to be restored.»
This error is received when you try to launch AnyConnect:
"A VPN reconnect resulted in different configuration setting. The VPN network
setting is being re-initialized. Applications utilizing the private network may
need to be restarted."
Solution
In order to resolve this error, use this:
group-policy <Name> attributes
			webvpn
				svc mtu 1200
The svc mtu command is replaced by the anyconnect mtu command in ASA Version 8.4(1) and later as shown here:
hostname(config)#group-policy <Name> attributes
hostname(config-group-policy)#webvpnhostname(config-group-webvpn)#anyconnect mtu 500
AnyConnect Error While Logging In
Problem
The AnyConnect receives this error when it connects to the Client:
The VPN connection is not allowed via a local proxy. This can be changed
through AnyConnect profile settings.
Solution
The issue can be resolved if you make these changes to the AnyConnect profile:
Add this line to the AnyConnect profile:
<ProxySettings>IgnoreProxy</ProxySettings><
AllowLocalProxyConnections>
false</AllowLocalProxyConnections>
IE Proxy Setting is Not Restored after AnyConnect Disconnect on Windows 7
Problem
In Windows 7, if the IE proxy setting is configured for Automatically detect settings and AnyConnect pushes down a new proxy setting, the IE proxy setting is not restored back to Automatically detect settings after the user ends the AnyConnect session. This causes LAN issues for users who need their proxy setting configured for Automatically detect settings.
Solution
This behavior is logged in Cisco bug ID CSCtj51376. The suggested workaround is to upgrade to AnyConnect 3.0.
Error: AnyConnect Essentials can not be enabled until all these sessions are closed.
This error message is received on Cisco ASDM when you attempt to enable the AnyConnect Essentials license:
There are currently 2 clientless SSL VPN sessions in progress. AnyConnect
Essentials can not be enabled until all these sessions are closed.
Solution
This is the normal behavior of the ASA. AnyConnect Essentials is a separately licensed SSL VPN client. It is entirely configured on the ASA and provides the full AnyConnect capability, with these exceptions:
- No Cisco Secure Desktop (CSD) (including HostScan/Vault/Cache Cleaner)
- No clientless SSL VPN
- Optional Windows Mobile Support
This license cannot be used at the same time as the shared SSL VPN premium license. When you need to use one license, you need to disable the other.
Error: Connection tab on Internet option of Internet Explorer hides after getting connected to the AnyConnect client.
The connection tab on the Internet option of Internet Explorer hides after you are connected to the AnyConnect client.
Solution
This is due to the msie-proxy lockdown feature. If you enable this feature, it hides the Connections tab in Microsoft Internet Explorer for the duration of an AnyConnect VPN session. If you disable the feature, it leaves the display of the Connections tab unchanged.
Error: Few users getting Login Failed Error message when others are able to connect successfully through AnyConnect VPN
A few users receive the Login Failed Error message when others can connect successfully through the AnyConnect VPN.
Solution
This issue can be resolved if you make sure the do not require pre-authentication checkbox is checked for the users.
Error: The certificate you are viewing does not match with the name of the site you are trying to view.
During the AnyConnect profile update, an error is shown that says the certificate is invalid. This occurs with Windows only and at the profile update phase. The error message is shown here:
The certificate you are viewing does not match with the name of the site
you are trying to view.
Solution
This can be resolved if you modify the server list of the AnyConnect profile in order to use the FQDN of the certificate.
This is a sample of the XML profile:
<ServerList><HostEntry>
<HostName>vpn1.ccsd.net</HostName>
</HostEntry>
</ServerList>
Note: If there is an existing entry for the Public IP address of the server such as <HostAddress>, then remove it and retain only the FQDN of the server (for example, <HostName> but not <Host Address>).
Cannot Launch AnyConnect From the CSD Vault From a Windows 7 Machine
When the AnyConnect is launched from the CSD vault, it does not work. This is attempted on Windows 7 machines.
Solution
Currently, this is not possible because it is not supported.
AnyConnect Profile Does Not Get Replicated to the Standby After Failover
The AnyConnect 3.0 VPN client with ASA Version 8.4.1 software works fine. However, after failover, there is no replication for the AnyConnect profile related configuration.
Solution
This problem has been observed and logged under Cisco bug ID CSCtn71662. The temporary workaround is to manually copy the files to the standby unit.
AnyConnect Client Crashes if Internet Explorer Goes Offline
When this occurs, the AnyConnect event log contains entries similar to these:
Description : Function:
CAdapterNetworkStateIfc::SetConnectedStateToConnected
File: .AdapterNetworkStateIfc.cpp
Line: 147
Invoked Function: InternetSetOption
Return Code: 12010 (0x00002EEA)
Description: The length is incorrect for the option typeDescription : Function: CTransportWinHttp::InitTransport
File: .CTransportWinHttp.cpp
Line: 252
Invoked Function: CConnectedStateIfc::SetConnectedStateToConnected
Return Code: -25362420 (0xFE7D000C)
Description: CADAPTERNETWORKSTATEIFC_ERROR_SET_OPTION
Solution
This behavior is observed and logged under Cisco bug ID CSCtx28970. In order to resolve this, quit the AnyConnect application and relaunch. The connection entries reappear after relaunch.
Error Message: TLSPROTOCOL_ERROR_INSUFFICIENT_BUFFER
The AnyConnect client fails to connect and the Unable to establish a connection error message is received. In the AnyConnect event log, the TLSPROTOCOL_ERROR_INSUFFICIENT_BUFFER error is found.
Solution
This occurs when the headend is configured for split-tunneling with a very large split-tunnel list (approximately 180-200 entries) and one or more other client attributes are configured in the group-policy, such as dns-server.
In order to resolve this issue, complete these steps:
- Reduce the number of entries in the split-tunnel list.
- Use this configuration in order to disable DTLS:
group-policy groupName attributes
  webvpn
    svc dtls none
For more information, refer to Cisco bug ID CSCtc41770.
Error Message: «Connection attempt has failed due to invalid host entry»
The Connection attempt has failed due to invalid host entry error message is received while AnyConnect is authenticated with the use of a certificate.
Solution
In order to resolve this issue, try either of these possible solutions:
- Upgrade the AnyConnect to Version 3.0.
- Disable Cisco Secure Desktop on your computer.
For more information, refer to Cisco bug ID CSCti73316.
Error: «Ensure your server certificates can pass strict mode if you configure always-on VPN»
When you enable the Always-On feature on AnyConnect, the Ensure your server certificates can pass strict mode if you configure always-on VPN error message is received.
Solution
This error message implies that if you want to use the Always-On feature, you need a valid sever certificate configured on the headend. Without a valid server certificate, this feature does not work. Strict Cert Mode is an option that you set in the AnyConnect local policy file in order to ensure the connections use a valid certificate. If you enable this option in the policy file and connect with a bogus certificate, the connection fails.
Error: «An internal error occurred in the Microsoft Windows HTTP Services»
This Diagnostic AnyConnect Reporting Tool (DART) shows one failed attempt:
******************************************
Date : 03/25/2014
Time : 09:52:21
Type : Error
Source : acvpnuiDescription : Function: CTransportWinHttp::SendRequest
File: .CTransportWinHttp.cpp
Line: 1170
Invoked Function: HttpSendRequest
Return Code: 12004 (0x00002EE4)
Description: An internal error occurred in the Microsoft
Windows HTTP Services
*****************************************
Date : 03/25/2014
Time : 09:52:21
Type : Error
Source : acvpnuiDescription : Function: ConnectIfc::connect
File: .ConnectIfc.cpp
Line: 472
Invoked Function: ConnectIfc::sendRequest
Return Code: -30015443 (0xFE36002D)
Description: CTRANSPORT_ERROR_CONN_UNKNOWN
******************************************
Date : 03/25/2014
Time : 09:52:21
Type : Error
Source : acvpnuiDescription : Function: ConnectIfc::TranslateStatusCode
File: .ConnectIfc.cpp
Line: 2999
Invoked Function: ConnectIfc::TranslateStatusCode
Return Code: -30015443 (0xFE36002D)
Description: CTRANSPORT_ERROR_CONN_UNKNOWN
Connection attempt failed. Please try again.******************************************
Also, refer to the event viewer logs on the Windows machine.
Solution
This could be caused due to a corrupted Winsock connection. Reset the connection from the command promt with this command and restart your windows machine:
netsh winsock reset
Refer to the How to determine and to recover from Winsock2 corruption in Windows Server 2003, in Windows XP, and in Windows Vista knowledge base article for more information.
Error: «The SSL transport received a Secure Channel Failure. May be a result of a unsupported crypto configuration on the Secure Gateway.»
This Diagnostic AnyConnect Reporting Tool (DART) shows one failed attempt:
******************************************
Date : 10/27/2014
Time : 16:29:09
Type : Error
Source : acvpnuiDescription : Function: CTransportWinHttp::handleRequestError
File: .CTransportWinHttp.cpp
Line: 854
The SSL transport received a Secure Channel Failure. May be a result of a unsupported crypto configuration on the Secure Gateway.******************************************
Date : 10/27/2014
Time : 16:29:09
Type : Error
Source : acvpnuiDescription : Function: CTransportWinHttp::SendRequest
File: .CTransportWinHttp.cpp
Line: 1199
Invoked Function: CTransportWinHttp::handleRequestError
Return Code: -30015418 (0xFE360046)
Description: CTRANSPORT_ERROR_SECURE_CHANNEL_FAILURE******************************************
Date : 10/27/2014
Time : 16:29:09
Type : Error
Source : acvpnuiDescription : Function: ConnectIfc::TranslateStatusCode
File: .ConnectIfc.cpp
Line: 3026
Invoked Function: ConnectIfc::TranslateStatusCode
Return Code: -30015418 (0xFE360046)
Description: CTRANSPORT_ERROR_SECURE_CHANNEL_FAILURE
Connection attempt failed. Please try again.
******************************************
Solution
Windows 8.1 does not support RC4 according to the following KB update:
http://support2.microsoft.com/kb/2868725
Either configure DES/3DES ciphers for SSL VPN on the ASA using the command «ssl encryption 3des-sha1 aes128-sha1 aes256-sha1 des-sha1» OR edit the Windows Registry file on the client machine as mentioned below:
https://technet.microsoft.com/en-us/library/dn303404.aspx
Related Information
- Cisco ASA 5500 Series Adaptive Security Appliances
- AnyConnect VPN Client FAQ
- Cisco Secure Desktop (CSD) FAQ
- Cisco AnyConnect VPN Client
- Technical Support & Documentation — Cisco Systems
Some Windows users are reportedly getting the ‘Connection attempt failed‘ error when running the Cisco AnyConnect application in the hopes of establishing a virtual private network (VPN). This issue is reported to occur with Windows 8.1 and Windows 10.

As it turns out, this particular issue can occur due to several different common scenarios. Here’s a list of potential culprits that might be triggering this error code:
- Missing Hotfix for TLS Protocol Renegotiation – As it turns out, there are a couple of updates with the potential of causing issues with Cisco AnyConnect. Several affected users have managed to fix the issue by installing every pending update in order to resolve the inconsistency with the TLS protocol renegotiation and fallback behavior.
- Incompatibility with Windows 10 – According to a lot of Windows 10 users, you can expect to see this problem occurring due to an incompatibility affecting the SSL/TLS API that inhibits the Cisco AnyConnect tool from communicating with an outside server. In this case, you should be able to resolve the issue by forcing the vpnui.exe file to open in compatibility mode with Windows 8.
- Error caused by Windows Update KB 3034682 – If you find yourself in a scenario where the issue suddenly started to occur after WU installed update KB 3034682, chances are the update contains a problematic security rule that is interfering with Cisco AnyConnect. In this case, you can resolve the issue by uninstalling and hiding the problematic update with a specialized utility.
- Hyper-V Conflict on Windows 10 – It’s a well-known fact that Hyper-V is known to conflict with a lot of VPN facilitators such as Cisco AnyConnect and this scenario is no exception. If you find yourself in this scenario, you should be able to resolve the issue by disabling Hyper-V prior to launching the application.
- Connection Sharing is Enabled – As it turns out, you can also expect to see this error code popping up due to a network sharing functionality that interferes with Cisco AnyConnect. If this scenario is applicable, you should be able to fix the problem by disabling the network connection sharing from the Network Connections tab.
- Internet Explorer is configured to Work Offline – Since Cisco AnyConnect and IE share some common functionality, you can expect to see this error in those situations where IE’s offline mode is enabled by default. In this case, you can fix the issue by making some changes via the Registry Editor.
Now that you know every potential scenario that might be responsible for the apparition of the ‘Connection attempt failed‘ error, here’s a list of verified methods that other users have successfully deployed in order to bypass the error message:
1. Install every Pending Windows Update
As it turns out, one of the most common instances that might trigger this problem is a security update (3023607) that ends up affecting the default behavior regarding the TLS protocol renegotiation and fallback behavior.
According to some affected users, the issue was finally resolved after they run the Microsoft Update utility and installed every security and cumulative update including March cumulative security update for Internet Explorer (MS15-018) and Vulnerability in SChannel could allow security feature bypass: March 10, 2015 (MS15-031).
If you’re not certain that you have every available Windows update installed on your computer, follow the instructions below:
- Press Windows key + R to open up a Run dialog box. Next, type ”ms-settings:windowsupdate’ and press Enter to open up the Windows Update tab of the Settings app.

Opening Windows Update - Inside the Windows update screen, go ahead and click on Check for updates. Next, follow the on-screen prompts to install every Windows update that is currently scheduled to be installed.

Installing every pending Windows Update Note: Install every type of update including cumulative and security updates, not just important ones.
- You should keep in mind that if you have a lot of pending updates, you will be prompted to restart before every update is installed. If this happens, restart your PC as instructed, but make sure to return to this screen at the next startup and finish the installation of the rest of the updates.
- After every pending update is installed, reboot your computer once again and see if the Cisco AnyConnect error is now fixed.


2. Run Cisco AnyConnect in Compatibility Mode (Windows 10 only)
If installing every pending update didn’t do the trick for you or you’re encountering the issue on Windows 10, chances are you’re dealing with an incompatibility issue. This most commonly occurs due to a Critical Windows 10 Update (3023607) that changes some details in regards to the SSL/TLS API in a way that breaks the Cisco AnyConnect app.
If you face this issue on Windows 10, the easiest way to fix it is to force the main executable (the one you use to launch Cisco AnyConnect) to run in Compatibility Mode with Windows 8.
In case you find yourself in this particular scenario, follow the instructions below to force the vpnui.exe executable to run in compatibility mode with Windows 8:
- Open File Explorer and navigate to the location where you installed the Cisco AnyCOnnect Mobility Client folder. Unless you installed the utility in a custom location, you’ll find it in:
C:Program Files (x86)CiscoCisco AnyConnect Secure Mobility Client
- Once you’re inside the correct location, right-click on vpnui.exe and click on the Properties entry from the context menu that just appeared.
- Once you’re inside the Properties screen, click on Compatibility, then go to Compatibility mode and check the box where it says ‘Run this program in compatibility mode for:’.
- After checking the box, it will unlock a list of other versions of Windows, select the list and click on Windows 8.

Running Cisco AnyConnect’s executable in Compatibility Mode with Windows 8 - Finally, click on Apply and launch the game to see if the graphics error still occurs.
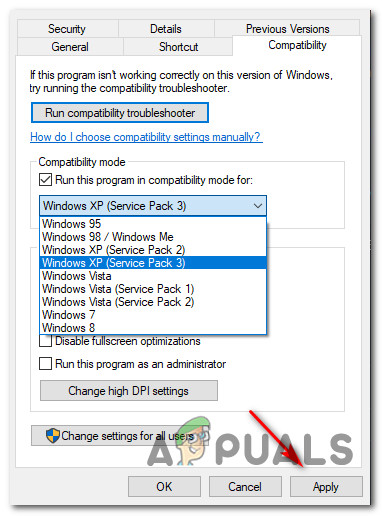
If you already tried forcing the vpnui.exe executable to run in compatibility mode with Windows 8 and you’re still seeing the same Connection attempt failed error, move down to the next potential fix below.
3. Uninstalling & hide the KB 3034682 update
If the first 2 methods did not work for you or were not applicable, the last resort would be to simply uninstall the problematic update that is causing the update on Windows 10 (3034682).
However, keep in mind that unless you take some steps to hide the problematic update, it will eventually find your way onto your computer and cause the same issue all over again after several system restarts.
But you can prevent this from occurring by using the Microsoft Show or Hide troubleshooter to hide the problematic update after you uninstall the KB 3034682 update.
If you’re looking for specific instructions on how to do this, follow the instructions below:
- Press Windows key + R to open up a Run dialog box. Next, type “ms-settings:windowsupdate” inside the text box and press Enter to open up the Windows Update screen of the Settings app.
- Inside the Windows Update screen, click on View Update history from the left-hand section of the screen.
- Next, from the list of recently installed updates loads up, click on Uninstall updates (at the top of the screen).
- Scroll down through the list of installed updates and locate the KB3034682 update inside the list of installed updates.
- After you manage to locate the correct update, right-click on it and choose Uninstall from the context menu. Then, click Yes at the confirmation prompt to start the process.
- Once the update has been uninstalled, visit the download page of the Microsoft Show or Hide troubleshooter package and download the troubleshooter.
- Once the download is complete, open the .diagcab file and immediately click on the Advanced button. Next, check the box associated with Apply Repairs Automatically.
- Hit Next to advance to the next menu and wait for the utility to finish the scan for updates before finally clicking on Hide Updates.
- Once the operation is complete, check the box associated with the update that you want to hide, then click on Next to advance to hide the selected update from Windows Update.
- Finally, wait until the procedure is complete, then restart your computer and see if the issue has been resolved once the next startup sequence is complete.

If the same issue is still occurring even after you went through the trouble of uninstalling and hiding the problematic update, move down to the next potential fix below.
4. Disabling Hyper-V (Windows 10)
As it turns out, it turns out that you can also expect to encounter this error due to a conflict between Cisco AnyConnect and the main Hyper-V service that’s enabled by default on Windows 10.
Several affected users that were also encountering this problem have reported that they finally managed to fix the ‘Connection attempt failed’ error by temporarily disabling Hyper-V and all associated services before rebooting the computer and using Cisco AnyConnect.
If you suspect this scenario might be applicable to your current situation, follow the instructions below to disable Hyper-V from the Windows Features menu:
- Start by pressing Windows key + R to open up a Run dialog box. Inside the text box, type ‘appwiz.cpl’ and press Enter to open up the Programs and Features menu. If you are prompted by the UAC (User Account Control), click Yes to grant admin access.

Opening to Programs and Features screen - Next, from the Programs and Features menu, use the menu on the left to click on Turn Windows features on or off. At the User Account Control prompt, click Yes to grant admin access.

Turning Windows Features On and Off - Once you’re inside the Windows Features screen, scroll down through the list of Windows Features and uncheck the box associated with Hyper-V. Next, click on Ok to save the changes.

Disabling Hyper V - Once the Hyper-V functionality is disabled, restart your computer and see if the problem is fixed once the next startup is complete.


5. Disable Network Connection sharing
If none of the methods above have worked for you, and you are currently sharing a network connection via the Microsoft Hosted Network Virtual Adapter, you might be able to resolve the ‘Connection attempt failed‘ error by disabling the shared network connection.
If this scenario is applicable to your particular scenario, several affected users have managed to fix this issue by accessing the Network Connections tab and modifying the default Sharing configuration so that network connection sharing is not allowed.
If you’re looking for specific step-by-step instructions on how to do this, follow the instructions below:
- Start by press Windows key + R to open up a Run dialog box. Inside the ‘ncpa.cpl’ inside the text box and press Enter to open up the Network Connections tab. If you’re prompted by the UAC (User Account Control), click Yes to grant admin access.

Opening the Network Connections screen - Inside the Network Connections tab, look through the list of network adapters and identify the one created specifically for hosting hotspot networks. Traditionally, it should be named Microsoft Hosted Network Virtual Adapter.
- Once you identify the correct network adapter, right-click on it and choose Properties from the context menu that just appeared.

Accessing the Properties screen of the Hosted Network Virtual Adapter Note: When you see the UAC (User Account Control), click Yes to grant admin access.
- Inside the Properties screen of the Microsoft Hosted Network Virtual Adapter, access the Sharing tab from the menu at the top, then uncheck the box associated with Allow other network users to connect through this computer’s Internet connection.

Disabling internet connection sharing - Finally, click Ok to save the changes, then restart your computer.
- Attempt to start the hotspot network once again and see if the issue is now resolved.


In case the same kind of problem is still occurring, move down to the next potential fix below.
6. Disable IE’S Ability to Work Offline via Registry Editor
If none of the methods above have proven to be effective in your case, it’s also possible to face this problem to the fact that Internet Explorer is configured to ‘work in offline mode’. IE’s Offline mode is notoriously known to conflict with a lot of VPN facilitators such as the Cisco AnyConnect software.
This would not be a problem if Microsoft didn’t remove the option to change this default behavior and made it so that the option now defaults to online.
Since there’s no longer an option to make this modification from the GUI menu, you’ll have to resort to a Registry modification.
Follow the instructions below to disable Internet Explorer’s ability to work in Offline Mode via Registry Editor:
- Press Windows key + R to open up a Run dialog box. Next, type ‘regedit’ and press Ctrl + Shift + Enter to open up an elevated Registry Editor prompt. When you are prompted by the UAC (User Account Control), click Yes to grant admin access.
Opening the Registry Editor - Inside the Registry Editor, use the left-hand side menu to navigate to the following location:
HKEY_CURRENT_USERSoftwareMicrosoftWindowsCurrentVersionInternet Settings
Note: You can either navigate to this location manually or you can paste the location directly into the navigation bar and press Enter to get there instantly.
- Once you get to the correct location, move down to the right-hand side section and locate the GlobalUserOffline DWORD key.

Modifying the value of GlobalUserOffline - When you see it, double-click on it and set the Base to Hexadecimal and the value to 0, and click Ok to save the changes.
- Restart your computer and see if the problem is fixed once the next startup is complete.


Kevin Arrows
Kevin is a dynamic and self-motivated information technology professional, with a Thorough knowledge of all facets pertaining to network infrastructure design, implementation and administration. Superior record of delivering simultaneous large-scale mission critical projects on time and under budget.
by Vlad Constantinescu
Vlad might have a degree in Animal Husbandry and Livestock Management, but he’s currently rocking anything software related, ranging from testing programs to writing in-depth reviews about them…. read more
Published on September 14, 2020
- If you’re using Cisco AnyConnect, you may have encountered the infamous VPN client failed to establish a connection error, preventing employees from remotely connecting to their workplace.
- Although this issue fixes itself more often than not, sometimes you might need to step into action to solve it. Discover 6 easy workarounds.
- Visit the Security VPN section to see how to enhance your online security with a VPN.
- Check out our Cisco Troubleshooting Hub to fix more Cisco VPN errors.

If you’re using Cisco AnyConnect, you may have encountered the infamous VPN client failed to establish a connection error. More often than not, this issue solves itself, but sometimes it may take a bit of elbow grease to put the wheels in motion.
Although a VPN client, Cisco AnyConnect isn’t your regular privacy-protection security tool. In fact, this service was developed to help remote workers access the enterprise network and share company resources in a safe, secure manner.
How to fix Cisco AnyConnect’s connection error?
1. Restart your PC
Restarting not only your PC, but also the app itself, your router, and possibly your modem too can have quite the effect in this situation. It’s well-known that your PC builds upon on cached data, but so does your router.
Thus, giving them a chance to refresh their internal configuration, discard old, outdated data, and acquire new one might work wonders. There’s a good reason why restarting is the first suggestion of most customer support agents.
Furthermore, you could try uninstalling the AnyConnect VPN client and perform a fresh install. It’s not exactly uncommon for updates to render perfectly functional features unusable.
2. Flush your DNS
-
- Press the Win key on your keyboard
- Type CMD
- Right-click the Command Prompt icon
- Select Run as administrator

- Type the following commands, in this precise order, one by one:
ipconfig /flushdns

ipconfig /registerdns

ipconfig /release

ipconfig /renew

netsh winsock reset

exit
- Restart your computer
- Launch Cisco AnyConnect
- Check if the connection problem still persists
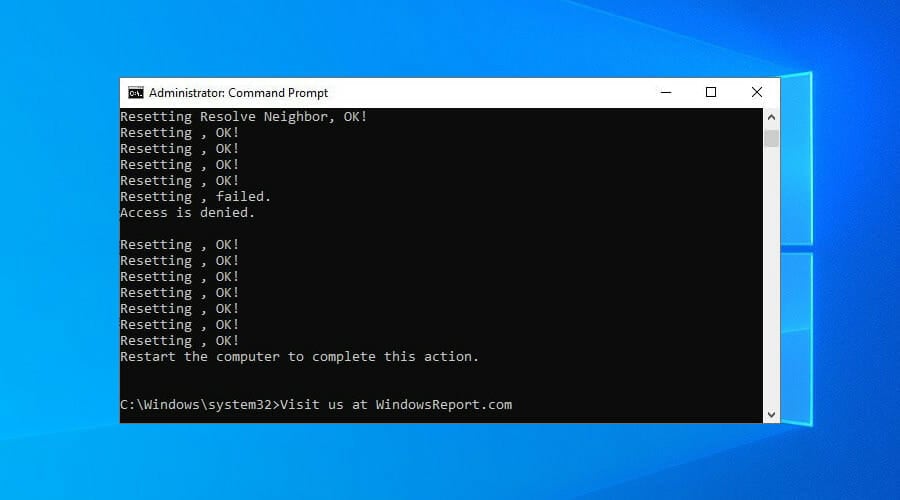
If restarting your PC and router didn’t do the trick, manually forcing your PC to discard old cached DNS and acquire a new set of DNS servers might just be enough to put things back in order.
3. Disable Wi-Fi hotspot
If you have a Wi-Fi hotspot up and running on your PC, it would be wise to turn it off and checking if the problem still persists.
Reportedly, this issue occurs more frequently for Windows 7 PC users, but it might’ve slipped on later versions of this operating system, as well.
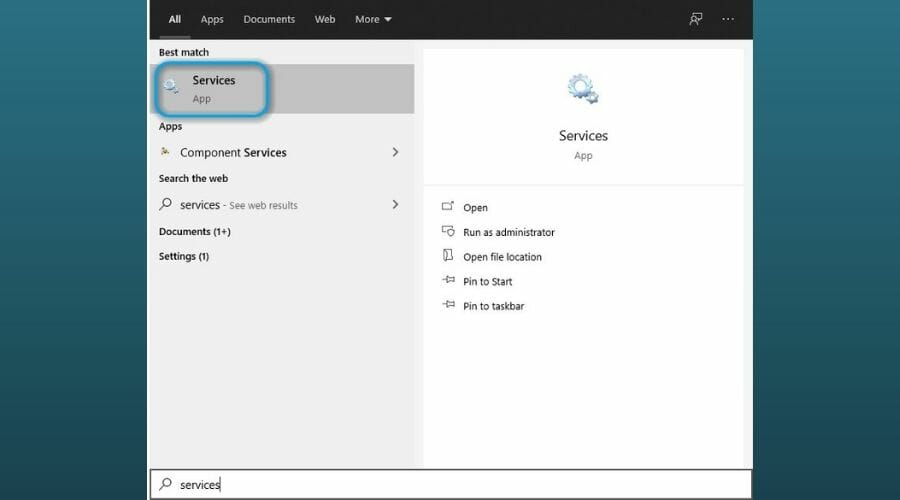
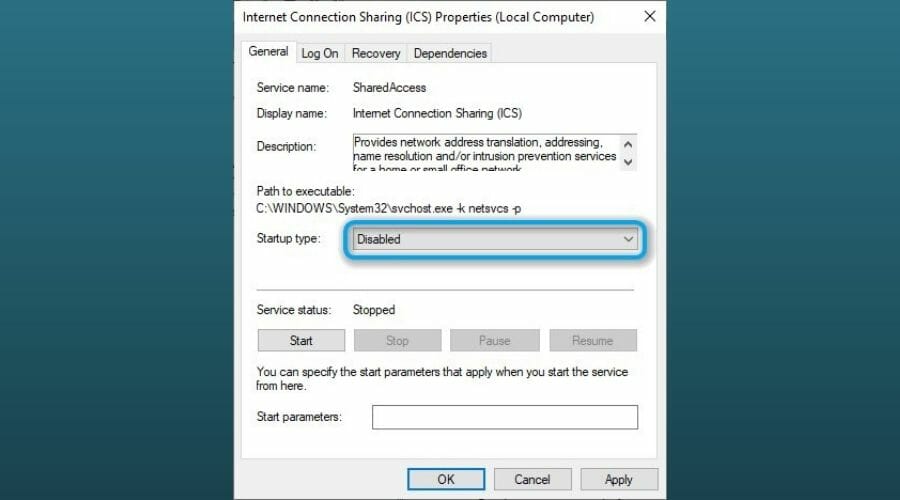
4. Disable ICS
- Hit the Win key
- Type Services
- Select the Services app from the results
- Scroll down to Internet Connection Sharing (ICS)
- Right-click it and select Properties
- Click the Startup type combo menu
- Select Disabled from the menu
- Click Apply and OK
- Restart your PC
- Check if the issue still persists
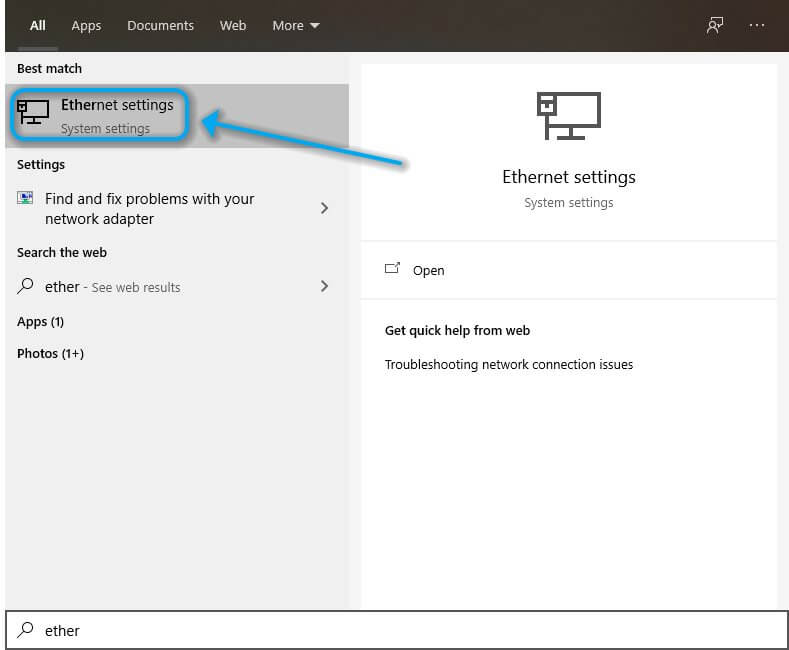
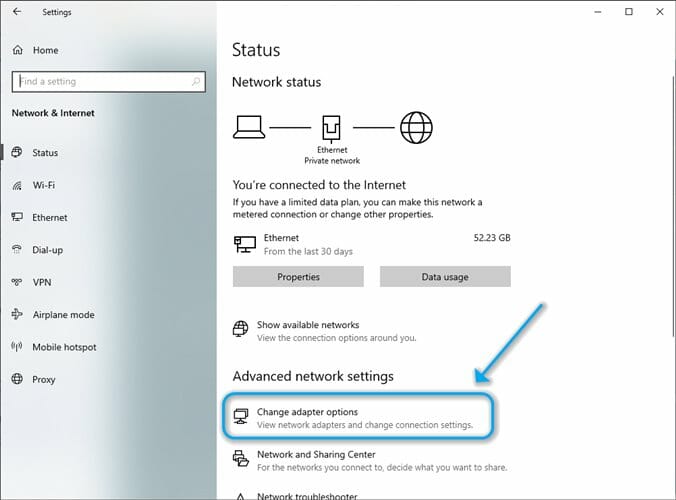
5. Change adapter settings
- Press the Win key on your keyboard
- Type Ethernet settings

- Access the Ethernet settings section
- Click the Change adapter options button

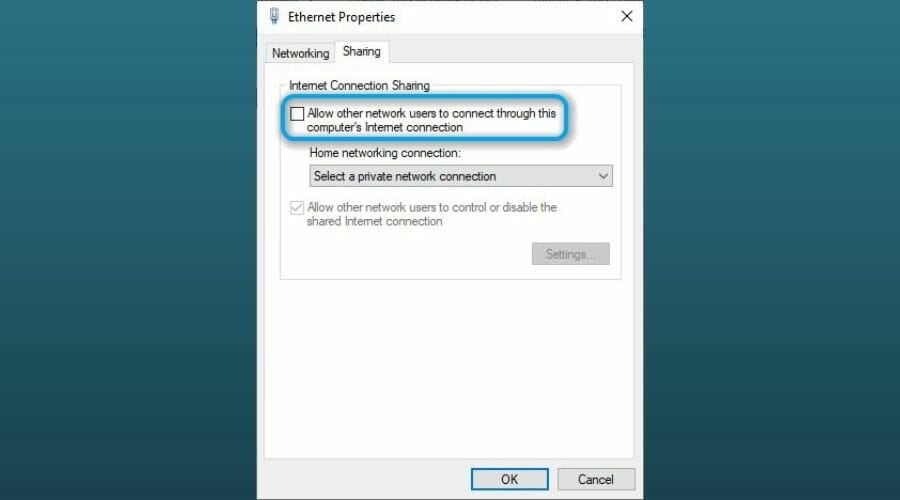
- Right-click your active connection and select Properties
- Go to the Sharing tab
- Make sure the sharing option is not checked (uncheck it if necessary)
- Restart your PC
- Check if the VPN client failed to establish a connection error still persists
6. Check your firewall/antivirus settings
- Press the Win key
- Type Firewall
- Select the Firewall & Network protection option
- Click the Allow an app through firewall button

- Press the Change settings button
- Look for Cisco AnyConnect in the list
- If you can’t find it, use the Allow another app button
- Make sure the Private and Public boxes are both checked
- Click OK
- Check your antivirus for any signs of blocking Cisco AnyConnect
- Add Cisco AnyConnect to your antivirus’ exception list
- Restart your computer
- Check if the VPN connection error is still there

Some users reported that certain antivirus software solutions block some programs by default. Therefore, it’s not enough to leave the program (Cisco AnyConnect) as it is.
What you’ll need to do is open the antivirus program and add the VPN to a trusted list.
Final thoughts on fixing VPNs failing to establish connections
All things considered, if you’re having a difficult time getting your VPN to establish a connection, you might want to try troubleshooting the issue manually.
More often than not, the situation fixes itself. However, sometimes you might need to step into action and perform certain steps such as restarting your PC, clearing your cache, flushing your DNS, or even disabling Windows services temporarily.
Your connection is not secure — websites you visit can find out your details:

- Your IP Address:
loading

Companies can sell this information, alongside your location and internet provider name, and profit from it by serving targeted ads or monitoring your data usage.
We recommend Private Internet Access, a VPN with a no-log policy, open source code, ad blocking and much more; now 79% off.
![]()
Newsletter
by Vlad Constantinescu
Vlad might have a degree in Animal Husbandry and Livestock Management, but he’s currently rocking anything software related, ranging from testing programs to writing in-depth reviews about them…. read more
Published on September 14, 2020
- If you’re using Cisco AnyConnect, you may have encountered the infamous VPN client failed to establish a connection error, preventing employees from remotely connecting to their workplace.
- Although this issue fixes itself more often than not, sometimes you might need to step into action to solve it. Discover 6 easy workarounds.
- Visit the Security VPN section to see how to enhance your online security with a VPN.
- Check out our Cisco Troubleshooting Hub to fix more Cisco VPN errors.
If you’re using Cisco AnyConnect, you may have encountered the infamous VPN client failed to establish a connection error. More often than not, this issue solves itself, but sometimes it may take a bit of elbow grease to put the wheels in motion.
Although a VPN client, Cisco AnyConnect isn’t your regular privacy-protection security tool. In fact, this service was developed to help remote workers access the enterprise network and share company resources in a safe, secure manner.
How to fix Cisco AnyConnect’s connection error?
1. Restart your PC
Restarting not only your PC, but also the app itself, your router, and possibly your modem too can have quite the effect in this situation. It’s well-known that your PC builds upon on cached data, but so does your router.
Thus, giving them a chance to refresh their internal configuration, discard old, outdated data, and acquire new one might work wonders. There’s a good reason why restarting is the first suggestion of most customer support agents.
Furthermore, you could try uninstalling the AnyConnect VPN client and perform a fresh install. It’s not exactly uncommon for updates to render perfectly functional features unusable.
2. Flush your DNS
-
- Press the Win key on your keyboard
- Type CMD
- Right-click the Command Prompt icon
- Select Run as administrator
- Type the following commands, in this precise order, one by one:
ipconfig /flushdns

ipconfig /registerdns

ipconfig /release

ipconfig /renew

netsh winsock reset

exit
- Restart your computer
- Launch Cisco AnyConnect
- Check if the connection problem still persists
If restarting your PC and router didn’t do the trick, manually forcing your PC to discard old cached DNS and acquire a new set of DNS servers might just be enough to put things back in order.
3. Disable Wi-Fi hotspot
If you have a Wi-Fi hotspot up and running on your PC, it would be wise to turn it off and checking if the problem still persists.
Reportedly, this issue occurs more frequently for Windows 7 PC users, but it might’ve slipped on later versions of this operating system, as well.
4. Disable ICS
- Hit the Win key
- Type Services
- Select the Services app from the results
- Scroll down to Internet Connection Sharing (ICS)
- Right-click it and select Properties
- Click the Startup type combo menu
- Select Disabled from the menu
- Click Apply and OK
- Restart your PC
- Check if the issue still persists
5. Change adapter settings
- Press the Win key on your keyboard
- Type Ethernet settings
- Access the Ethernet settings section
- Click the Change adapter options button
- Right-click your active connection and select Properties
- Go to the Sharing tab
- Make sure the sharing option is not checked (uncheck it if necessary)
- Restart your PC
- Check if the VPN client failed to establish a connection error still persists
6. Check your firewall/antivirus settings
- Press the Win key
- Type Firewall
- Select the Firewall & Network protection option
- Click the Allow an app through firewall button
- Press the Change settings button
- Look for Cisco AnyConnect in the list
- If you can’t find it, use the Allow another app button
- Make sure the Private and Public boxes are both checked
- Click OK
- Check your antivirus for any signs of blocking Cisco AnyConnect
- Add Cisco AnyConnect to your antivirus’ exception list
- Restart your computer
- Check if the VPN connection error is still there
Some users reported that certain antivirus software solutions block some programs by default. Therefore, it’s not enough to leave the program (Cisco AnyConnect) as it is.
What you’ll need to do is open the antivirus program and add the VPN to a trusted list.
Final thoughts on fixing VPNs failing to establish connections
All things considered, if you’re having a difficult time getting your VPN to establish a connection, you might want to try troubleshooting the issue manually.
More often than not, the situation fixes itself. However, sometimes you might need to step into action and perform certain steps such as restarting your PC, clearing your cache, flushing your DNS, or even disabling Windows services temporarily.
Your connection is not secure — websites you visit can find out your details:
-
- Your IP Address:
loading
Companies can sell this information, alongside your location and internet provider name, and profit from it by serving targeted ads or monitoring your data usage.
We recommend Private Internet Access, a VPN with a no-log policy, open source code, ad blocking and much more; now 79% off.
![]()
Newsletter
Что делать, если Cisco AnyConnect блокирует интернет : Windows
Многие коллеги жалуются, что администраторы сервера удаленного доступа осилили настройку, после которой ломается таблица маршрутизации и Интернет перестает работать. Т.е. работает только сам VPN.
Можете не пытаться править таблицу рутинга в большинстве случаев, поскольку эта гадость блокирует сам интерфейс. Можете попробовать до каких-либо приседаний просто попинговать свой обычный локальный адрес после установки соединения. Увидите, что он блокируется. В интернете много вариантов патчей для разблокировки, но этот как раз тот случай, когда можно налететь на серьезный разговор с безопасниками или просто подцепить вирус. Тем более, что AnyConnect еще тот троян.
Первый правильный и подходящий под все требования вариант — потребовать от работодателя ноутбук для этого AnyConnect, поскольку именно работодатель обеспечивает условия для вашего полноценного труда. Надо понимать, что при получении ноутбука безопасники, скорее всего, заблокируют вообще все другие подключения, с любых других устройств. Мне, например, такой вариант категорически не подходит, поскольку перспектива таскать повсюду еще один ноут для того, чтобы в какой-то момент подключиться. Так себе удовольствие, особенно в свете любви работодателей к тупым и тяжелым машинкам.
Второй вариант — это запуск виртуальной машины с Windows, где и будет запускаться VPN. Обратите внимание, что всякие VirtualBox палятся на раз безопасниками, особенно, если вы еще забудете поменять MAC-адрес на сетевом интерфейсе внутри виртуалки. Я с самого начала поставил в QEMU MAC-адрес от реальной Intel-карты, процессор выставил везде core2duo, чтобы его могли без проблем эмулировать все мои устройства, и теперь могу подключаться, перекидывая файл виртуалки куда угодно. Впрочем, это если у вас ушибленные безопасники, которые категорически против использования виртуалок.
После запуска VPN внутри виртуалки, он может сканировать что угодно и блокировать что угодно, это все останется внутри виртуалки, а снаружи вы сможете вполне нормально пользоваться Интернетом.
Как исправить ошибку агента клиента VPN для Cisco AnyConnect

Cisco AnyConnect — это программное обеспечение VPN, которое включает расширенную защиту для блокировки вредоносных программ на конечных точках. Однако некоторые пользователи говорят, что не могут установить или запустить Cisco AnyConnect. Когда они пытаются установить или запустить AnyConnect, появляется сообщение об ошибке, в котором говорится, что агент клиента VPN не смог создать хранилище межпроцессного взаимодействия . Пользователи исправили это сообщение об ошибке с разрешениями ниже.
Как пользователи могут исправить ошибку агента клиента VPN?
1. Отключите общий доступ к Интернету
- Отключение общего доступа к интернет-подключению является одним из наиболее распространенных исправлений для ошибки агента клиента VPN. Для этого нажмите сочетание клавиш Windows + R, которое открывает аксессуар «Запуск».
- Введите ‘control.exe / имя Microsoft.NetworkAndSharingCenter’ в поле Открыть.
- Нажмите кнопку ОК , чтобы открыть апплет Панели управления Центром управления сетями и общим доступом.
- Нажмите Изменить настройки адаптера в левой части апплета панели управления.
- Щелкните правой кнопкой мыши сетевое соединение с общим состоянием, чтобы выбрать « Свойства» .
- Затем выберите вкладку «Общий доступ», показанную на снимке ниже.
- Снимите флажок Разрешить другим пользователям подключаться к Интернету через этот компьютер .
- Нажмите кнопку ОК .
- Повторите вышеуказанные шаги для всех сетевых подключений с включенным общим доступом.
- Перезагрузите Windows после отключения общего доступа к соединению.
2. Отключите службу ICS
- Или попробуйте отключить службу ICS. Откройте аксессуар «Выполнить» в Windows.
- Введите «services.msc» в поле «Открыть» и выберите опцию « ОК» .
- Щелкните правой кнопкой мыши службу общего доступа к Интернету, указанную в окне «Службы», и выберите « Остановить» .
- Дважды щелкните Internet Connection Sharing, чтобы открыть окно его свойств.
- Щелкните раскрывающееся меню «Тип запуска», чтобы выбрать параметр « Отключено» .
- Не забудьте нажать кнопку Применить .
- Затем нажмите OK, чтобы выйти из окна.
- После этого перезапустите Windows после выключения службы ICS.
Это два подтвержденных решения, которые исправили ошибку агента клиента VPN для пользователей Cisco AnyConnect. После исправления ошибки пользователи могут установить или запустить Cisco AnyConnect.
Ошибка Cisco AnyConnect Попытка подключения не удалась
Некоторые пользователи Windows 10, которые регулярно используют инструмент Cisco AnyConnect, сталкивались с ошибкой, которая называется «Сбой попытки подключения». Обычно это происходит, когда вы пытаетесь запустить виртуальную частную сеть (VPN), но не беспокойтесь, потому что есть способы решить эту проблему. Это также может быть связано с проблемой сети или ПК, и вас просят проверить подключение к Интернету и повторить попытку.

Ошибка Cisco AnyConnect Попытка подключения не удалась
Надеюсь, однажды будет выпущено настоящее исправление, которое решит проблему раз и навсегда. Но пока мы предлагаем пока следовать нашему примеру.
- Откройте Cisco AnyConnect в режиме совместимости
- Отключить Microsoft Hyper V в Windows 10
- Отключить общий доступ к подключению к Интернету
Давайте обсудим это более подробно.
1]Откройте Cisco AnyConnect в режиме совместимости
Для этого вы должны сначала создать первичный исполняемый файл. Не все знают, как это сделать, поэтому, если вы подпадаете под эту категорию, вам нужно открыть проводник и перейти в следующее место:
C: Program Files (x86) Cisco Cisco AnyConnect Secure Mobility Client
После доступа к папке щелкните правой кнопкой мыши vpnui.exe и выберите «Свойства».
Оттуда перейдите в Совместимость> Режим совместимости. Наконец, установите флажок «Запустить эту программу в режиме совместимости для.
Выберите из списка Windows 8 или Windows 7, затем нажмите «Применить»> «ОК».
Перезагрузите компьютер, затем попытайтесь запустить Cisco AnyConnect еще раз, чтобы увидеть, появляется ли по-прежнему ошибка попытки подключения.
2]Отключить Microsoft Hyper V в Windows 10

Еще один способ решить проблему сбоя попытки подключения — отключить Hyper V в Windows 10. Есть три простых шага, которые можно предпринять, чтобы отключить Hyper V.
Как вы увидите из статьи, есть несколько способов отключить Hyper V, поэтому используйте тот, который лучше всего подходит для вас.
3]Отключить общий доступ к подключению к Интернету

Если вышеперечисленные параметры не работают, следующим шагом будет отключить общий доступ к подключению к Интернету из Windows 10. Это довольно просто, и вы узнаете все, что вам нужно знать, прочитав каждое слово.
ЧИТАЙТЕ: Инструмент моделирования сети Cisco Packet Tracer и его бесплатные альтернативы.
.
Содержание
- 1 По какой причине AnyConnect не смогла установить соединение с указанным сообщением об ошибке безопасного шлюза?
- 1.1 Решение 1. Отключение антивируса
- 1.2 Решение 2. Остановите службу подключения к Интернету
- 1.3 Решение 3. Отключите общий доступ к подключению к Интернету (ICS)
- 1.4 Решение 4. Выберите опцию Подключиться к текущей сети в AnyConnect VPN.
- 1.5 Решение 5. Попробуйте альтернативное соединение
Сообщение об ошибке ‘AnyConnect не смог установить соединение с указанным безопасным шлюзом’Появляется, когда пользователи пытаются подключиться к VPN с помощью клиента AnyConnect. Эта проблема возникает из-за того, что VPN-клиент AnyConnect не может успешно выполнить процесс соединения с удаленным сервером, и на его пути существуют некоторые блокировки. Сегодня мы рассмотрим упомянутое сообщение об ошибке, включая причины сообщения об ошибке и различные решения, которые вы можете реализовать, чтобы избавиться от ошибки.
 AnyConnect не смог установить соединение с указанным безопасным шлюзом
По какой причине AnyConnect не смогла установить соединение с указанным сообщением об ошибке безопасного шлюза?
Это может быть связано со многими причинами. Иногда это блокировка антивирусом или брандмауэром, а иногда это может быть вызвано плохим подключением к Интернету. Следующее будет основными причинами; упомянуть вкратце —
- Проблема с антивирусом или брандмауэром: Антивирусное программное обеспечение может иногда вмешиваться в процесс подключения VPN-клиента AnyConnect и не разрешать ему подключаться к внешним сетям или серверам по соображениям безопасности. Много раз это заблокирует много входящих и исходящих соединений. Таким образом, вы не сможете подключиться к своему любимому VPN с помощью Anyconnect.
- Неправильная конфигурация клиента: Если вы неправильно настроили свой клиент Anyconnect и сохраненные в нем конфигурации VPN неверны, тогда вы столкнетесь с проблемами при установлении успешных соединений.
- Интернет ограничения: Время от времени ваш провайдер может заблокировать IP-адреса некоторых стран, и вы не можете сознательно пытаться подключиться к VPN той же страны, которая была заблокирована вашим провайдером. Тогда вы столкнетесь с проблемами.
Чтобы обойти сообщение об ошибке, вы можете следовать решениям, приведенным ниже.
Решение 1. Отключение антивируса
Обо всем по порядку. Поскольку в большинстве случаев проблема вызвана антивирусной блокировкой, которая является распространенным сценарием. Поэтому, в таком случае, вы должны попытаться отключить любой сторонний антивирус, который вы установили в своей системе, а затем попытаться подключиться к VPN с помощью AnyConnect. Надеюсь, это изолирует проблему.
 Отключить антивирус
Решение 2. Остановите службу подключения к Интернету
Иногда служба ICS работает, что вызывает проблемы для клиента AnyConnect, чтобы соединиться с VPN. Вам придется отключить его, чтобы решить проблему. Вот как отключить службу:
- Нажмите Windows + R и введите services.msc
- Когда откроется окно с сервисами, выполните поиск Общий доступ к интернету оказание услуг. Щелкните правой кнопкой мыши и выберите Стоп.
 Остановка службы ICS
 - Затем выйдите из Сервисы окна, закрыв его.
 Остановка службы ICS
Решение 3. Отключите общий доступ к подключению к Интернету (ICS)
Было несколько случаев, когда ICS был включен в Windows, тогда пользователи сталкивались с этой проблемой. Чтобы отключить ICS, следуйте инструкциям ниже:
- Откройте панель управления
- Идти к Сеть и Интернет-обмен а затем нажмите Смените настройки адаптера.
 Центр коммуникаций и передачи данных
 - После этого вам нужно будет щелкнуть правой кнопкой мыши на подключение к общей сети, а затем нажмите на свойства.
- В окне свойств нажмите на разделение
- Оказавшись там, вы должны снять флажок с надписью «Разрешить другим пользователям сети подключаться к Интернету через этот компьютер».
- После этого нажмите ОК.
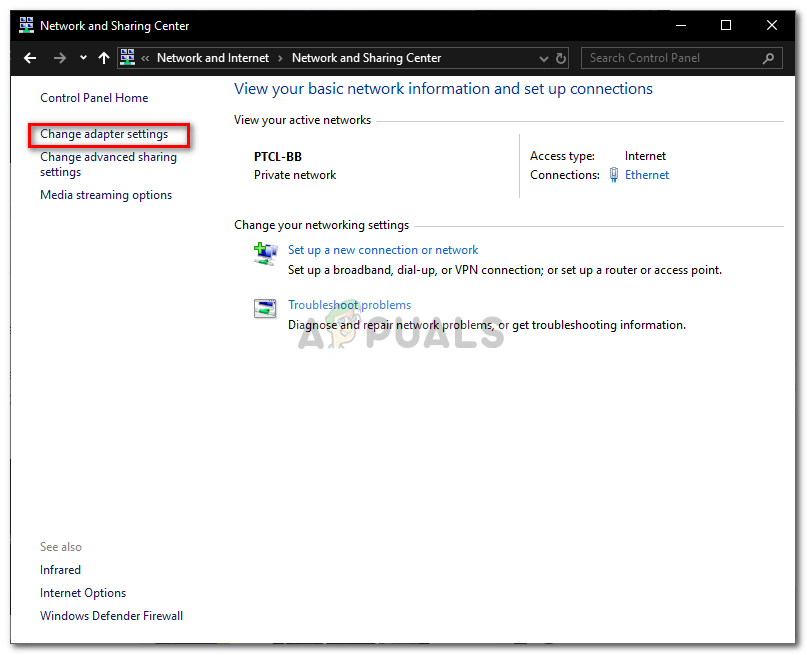 Центр коммуникаций и передачи данных
Если ваша проблема была вызвана включением ICS, то это должно быть исправлено.
Решение 4. Выберите опцию Подключиться к текущей сети в AnyConnect VPN.
Иногда VPN-клиент Any Connect колеблется между разными сетями, поэтому вам нужно выбрать вариант подключения только к текущей сети. Это может решить проблему для вас. Вот как это сделать:
- Открой Клиент AnyConnect, и где вы видите сеть написано, щелкните правой кнопкой мыши на нем.
- Нажмите на «Подключаться только к текущей сети».
 Клиент Cisco AnyConnect
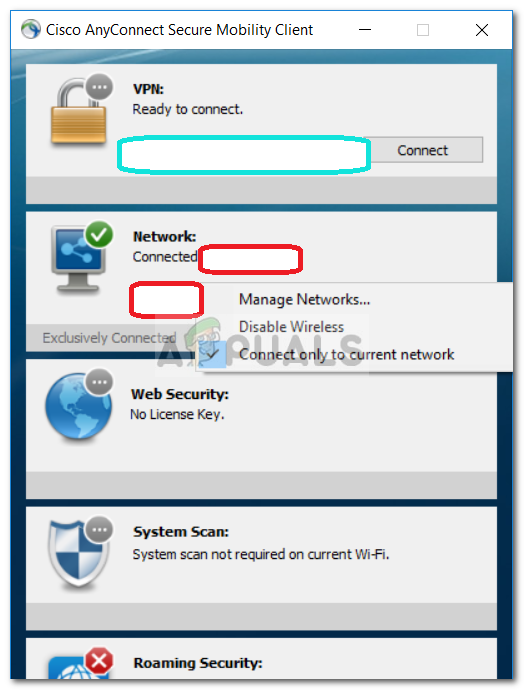 Клиент Cisco AnyConnect
Решение 5. Попробуйте альтернативное соединение
Время от времени используемое вами интернет-соединение может иметь некоторые ограничения или работать неправильно, что является причиной проблемы. В таком случае вам придется использовать альтернативное соединение, например, WiFi или мобильную точку доступа, чтобы узнать, сможете ли вы подключиться к VPN.
Обновлено 2023 января: перестаньте получать сообщения об ошибках и замедлите работу вашей системы с помощью нашего инструмента оптимизации. Получить сейчас в эту ссылку
- Скачайте и установите инструмент для ремонта здесь.
- Пусть он просканирует ваш компьютер.
- Затем инструмент почини свой компьютер.
Сообщение об ошибке «AnyConnect не смог установить соединение с указанным безопасным шлюзом» появляется, когда пользователи пытаются подключиться к VPN с помощью клиента AnyConnect. Эта проблема возникает из-за того, что клиент AnyConnect VPN CISCO не может подключиться к удаленному серверу и блокировки происходят. Сегодня мы обсудим приведенное выше сообщение об ошибке, в том числе причины появления сообщения об ошибке и различные решения, которые вы можете применить для его устранения.

Как исправить AnyConnect не смог подключиться к указанной ошибке Secure Gateway:
Проверьте, работает ли ICS (Internet Connection Sharing).
- Нажмите кнопку Пуск, затем Панель управления.
- В категории «Сеть и Интернет» выберите «Центр управления сетями и общим доступом».
- На левой панели выберите «Изменить настройки адаптера».
- Щелкните правой кнопкой мыши подключение к общей сети (сначала попробуйте использовать проводное подключение / адаптер Ethernet, затем проверьте другие адаптеры) и выберите «Свойства».
- Выберите вкладку «Общий доступ».
- Снимите флажок, чтобы разрешить другим пользователям сети подключаться через соединение на этом компьютере.
- Нажмите кнопку ОК.
Также убедитесь, что служба ICS не работает.
Обновление за январь 2023 года:
Теперь вы можете предотвратить проблемы с ПК с помощью этого инструмента, например, защитить вас от потери файлов и вредоносных программ. Кроме того, это отличный способ оптимизировать ваш компьютер для достижения максимальной производительности. Программа с легкостью исправляет типичные ошибки, которые могут возникнуть в системах Windows — нет необходимости часами искать и устранять неполадки, если у вас под рукой есть идеальное решение:
- Шаг 1: Скачать PC Repair & Optimizer Tool (Windows 10, 8, 7, XP, Vista — Microsoft Gold Certified).
- Шаг 2: Нажмите «Начать сканирование”, Чтобы найти проблемы реестра Windows, которые могут вызывать проблемы с ПК.
- Шаг 3: Нажмите «Починить все», Чтобы исправить все проблемы.

- Нажмите кнопку «Пуск» и выберите «Выполнить».
- Введите: services.msc и нажмите клавишу ВВОД на клавиатуре.
- Выполните поиск общего доступа к подключению к Интернету (ICS), затем остановите службу.
- Измените тип загрузки на Отключено и перезагрузите компьютер.
Обновить настройки реестра

Другой, как вы говорите, меняет реестр, но это очень медленный процесс. Под Windows 8 Pro откройте regedit с командой execute и:
1) Перейдите в [HKEY_LOCAL_MACHINE SYSTEM CurrentControlSet Services vpnva].
2) Измените значение в поле DisplayName на «Cisco AnyConnect VPN Virtual Miniport Adapter для Windows x64».
3) Попробуйте установить соединение.
Проверьте проблему в среде чистой загрузки.

Если ваша проблема не возникает, когда компьютер находится в чистой загрузочной среде, вы можете определить, какое загрузочное приложение или служба вызывает проблему, путем систематического включения или выключения и перезагрузки компьютера. Если вы активируете один сервис или загрузочный элемент и перезапускаетесь каждый раз, когда сервис или приложение проблематично, самый эффективный способ сделать это — протестировать половину из них за раз и устранить половину из них как возможную причину каждый раз при перезагрузке компьютера , Затем вы можете повторить этот процесс, пока не изолируете проблему.
https://community.cisco.com/t5/vpn-and-anyconnect/anyconnect-vpn-client-version-2-5-0217-not-able-to-establish/td-p/1529524
Совет экспертов: Этот инструмент восстановления сканирует репозитории и заменяет поврежденные или отсутствующие файлы, если ни один из этих методов не сработал. Это хорошо работает в большинстве случаев, когда проблема связана с повреждением системы. Этот инструмент также оптимизирует вашу систему, чтобы максимизировать производительность. Его можно скачать по Щелчок Здесь

CCNA, веб-разработчик, ПК для устранения неполадок
Я компьютерный энтузиаст и практикующий ИТ-специалист. У меня за плечами многолетний опыт работы в области компьютерного программирования, устранения неисправностей и ремонта оборудования. Я специализируюсь на веб-разработке и дизайне баз данных. У меня также есть сертификат CCNA для проектирования сетей и устранения неполадок.
Сообщение Просмотров: 303
The CiscoVPN solution is working rather nicely if we look at the reports. The most prominent issues appear only after the major updates which tend to break the application.
These are not common, but then again, they seemingly render the VPN client completely unusable. At least that was the case with the Fall Creators Update and April Update.
BEST VPN RECOMMENDATIONS — VETTED BY OUR EXPERTS
However, there’s no need to worry. We found some applicable steps and enlisted them below so make sure to check them out.
Why is Cisco VPN not connecting?
Users report that an error message appears while trying to connect to the Cisco VPN Client.
When the VPN client is launched, an error message reads The necessary VPN sub-system is not available. You cannot connect to remote VPN server displays.
These three factors can cause this warning to appear:
- The VPN client service has not yet been launched
- Installation issues with the VPN, possibly caused by corrupted or duplicated files
- A firewall or antivirus software may be interfering with the VPN connection
Additionally, a VPN client is more prone to lose Dead Peer Detection while it is having connectivity problems. If your system’s firmware is outdated, it could affect DPD issues.
How do I get my Cisco AnyConnect to work?
- Repair the installation
- Perform a clean installation
- Allow VPN through firewall
- Tweak the registry
1. Repair the installation
- In the Windows Search bar, type Control and open Control Panel.

- Click Uninstall a program in the bottom left corner.
- Click on the Cisco System VPN client and choose Repair.
- Follow the instructions until the installation is repaired.


Let’s start by repairing the installation. Lots of third-party applications tend to break after a major update is administered. That’s why it is always recommended to reinstall them after the update is installed.
Even better, if you want to avoid one of the numerous update/upgrade errors, uninstalling is a viable choice.
However, if you’ve not uninstalled Cisco VPN prior to an update, instead of reinstallation, you should try out repairing the present installation first.
If you’re not sure how to repair the Cisco VPN, follow the steps we provided above.
2. Perform a clean reinstallation
Time needed: 3 minutes.
-
Navigate to Control Panel and open Uninstall a program.
-
Search and select the Cisco AnyConnect Secure Mobility Client.
-
Uninstall the Cisco AnyConnect Secure Mobility Client.
-
Next, open up File Explorer by typing it in the Windows Search Bar.
-
Go to the following path: C:ProgramDataCisco. The ProgramData folder may be hidden so click View at the top-left > Check Hidden items.

-
Delete the folder named Cisco AnyConnect Secure Mobility Client.
-
Lastly, go to the following path: C:Users<username>AppDataLocalCisco. The AppData folder may be hidden so click View at the top-left > Check Hidden items.

-
Delete the folder named Cisco AnyConnect Secure Mobility Client.
-
Restart your PC.
-
Download the Cisco VPN client.
-
Install the client and try running it


Finally, if none of the previous solutions got Cisco VPN to work, the only remaining solution we can suggest is performing a clean reinstallation.
Ideally, this will require a clean slate install where you’ll clear all remaining associated files from your PC prior to installing Cisco VPN again.
Follow the above steps to perform a clean reinstallation and fix Cisco VPN on Windows 10. If Cisco VPN is not working on windows 11 the steps for fixing the error are the same.
3. Allow VPN to freely communicate through Firewall
- In the Windows Search bar, type Allow an app and open Allow an app through Windows Firewall.
- Click Change settings.
- Make sure that Cisco VPN is on the list, and it’s allowed to communicate through Windows Firewall.
- If that’s not the case, click Allow another app and add it.

- If that’s not the case, click Allow another app and add it.
- Check both Private and Publicrong> network boxes.
- Confirm changes and open the Cisco VPN.
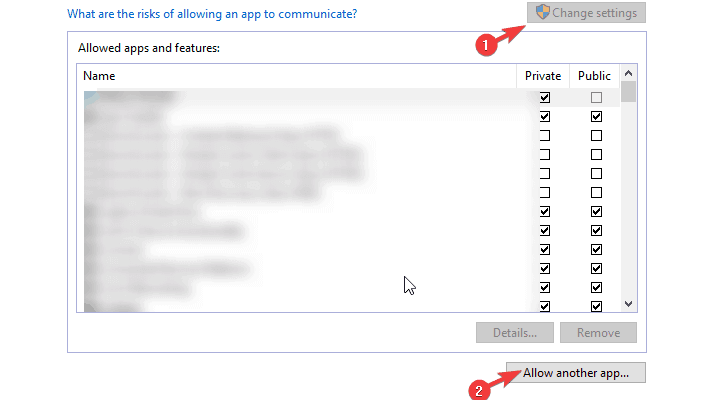
System updates can, quite frequently, change the system settings and preferences to default values. This misdeed, of course, can affect Windows Defender settings as well.
If that’s the case, chances are that lots of third-party apps that require free traffic through the Firewall won’t work. Including the Cisco VPN client.
That’s why we encourage you to check the settings and confirm that the app is indeed allowed in Windows Firewall settings.
4. Tweak the Registry
- Right-click on the Start button and open Device Manager.
- Expand Network adapters.
- Right-click on Virtual Adapter and update it.
- Restart your PC.

Like many other integrating VPN solutions, Cisco VPN comes with the specific associated Virtual Network Adapter. The failure of this device is another common occurrence, and it’s accompanied by error code 442.
The first thing you can do if this error occurs is to check the Virtual Adapter driver in the Device Manager.
Now, if that fails to resolve the issue, you can try a Registry tweak which seems to address it fully. This requires administrative permission, in order to make changes to Registry.
Furthermore, we strongly suggest treading carefully since untaught meddling with the Registry can result in a system failure.
Follow these steps to tweak Registry and repair Cisco VPN:
- Type Regedit in the Windows Search bar and open Registry Editor.
- Copy-paste the following path in the address bar:
HKEY_LOCAL_MACHINE/SYSTEM/Current/Control/SetServices/CVirtA
- Right-click on the DisplayName registry entry and choose Modify.
- Under the Value Data section, make sure that the only body of text which stands is the Cisco Systems VPN Adapter.
- For the 64bit version, the text is the Cisco Systems VPN Adapter for 64-bit Windows.
- Save changes and try running Cisco VPN again.

Why is Cisco AnyConnect not opening?
Common errors include Cisco AnyConnect VPN Login Failed, which can happen for a variety of reasons. The VPN client’s inability to connect to the VPN server is the most frequent cause of this problem. Incorrect VPN settings, firewall configuration, or problems with network connectivity are just a few causes of this.
By navigating to the Windows Administration Tools and making sure that the Cisco AnyConnect VPN Agent is not running, you can determine whether another program interfered with the service.
It might be necessary to disable or even uninstall another VPN application on the desktop if it is already operating and the error message still shows. Verify if you have more than one VPN service installed on your PC, this might be the core problem for Cisco AnyConnect not opening.
If Cisco VPN is still not working on Windows 10 and 11, try contacting the support as they would more likely assist you in the best manner, you can also check our guide on what to do if your Cisco Anyconnect is not working through RDP.
That’s it. If you have any alternative solutions you care to share with us, feel free to do so in the comments section below.
Struggling with cisco anyconnect connection attempt has failed error?
If yes! Then don’t panic. Just stick around to get the most convenient and workable solutions
First of all will talk over the 3W’s.Didn’t get my point?
The three above mention W’s are: What, When and Why
The above error is a connection error. And it is claim by Cisco AnyConnect users. This error bothers its users while attempting to run a Virtual Private Network (VPN).And the issue has been observed by Windows 8.1 and Windows 10 users. There can be several reasons to occur the same but the one of the common culprit is absence of healthy internet connection and PC or network troubles.

As discussed earlier there can be several reasons for displaying the above error message. But we have collected some potential causes for the error.
Why I am facing cisco anyconnect connection attempt has failed error?
Confliction of Hyper-V
Hyper-V is famous for conflicting with VPN implementers like Cisco AnyConnect. Disabling Hyper-V might solve your problem.
When Internet Explorer is organised to Work Offline
It is common to encounter the error when internet explorer offline mode is enabled by default because IE and Cisco AnyConnect have some common functions. You can manage to fix the error by making few modifications thru Registry Files.
Windows Update KB 3034682
If you are encountering the error after Windows Update installed update KB 3034682, then it is quite possible that the update might comprises challenging security rule which is interfering with Cisco AnyConnect.
Enabled Connection Sharing
Network sharing can also raise the issue for you. So disable the Network Connection Sharing from Network Connections tab
Absent Hotfix for TLS Protocol Renegotiation
A number of users claim that few of the updates can create problems with Cisco AnyConnect. Hence a user needs to install every pending update just to avoid the inconsistency with the TLS protocol renegotiation as well as fallback performance.
Unsuitability with Windows 10
Unsuitability really affects SSL/TLS API which hinders the Cisco AnyConnect tool from collaborating with an outside server.
Recommended solutions for cisco anyconnect connection attempt has failed
Fix 1: Disable Network Connection Sharing

The very first thing you can try is disable Internet Connection Sharing. After disabling it you might resolve the issue.
Fix 2: Disable Microsoft Hyper-V
Kindly follow the below mention guidelines to disable Hyper-V from Windows Features menu:
- Press Windows + R key to open Run dialog box > in the appeared box, type “cpl” hit Enter key to pull up Programs and Features menu. Click on Yes to give permission if it was popped up by User Account Control (UAC).
- Under the Programs and Features menu >click on Turn Windows On or off> on the User Account Prompt, tap on Yes to give permission.
- Then, in the Windows Features screen, scroll down through list of Windows Features> uncheck the box related with Hyper-V > Tap on Ok to save changes
- When the Hyper-V is disabled >simply restart your system
Fix 3: Open Cisco AnyConnect via Compatibility Mode
You can try to run the Cisco AnyConnect in a compatibility Mode. Follow the below mention guidelines to do so:
- In the first step open File Explorer and go to the place where the Cisco AnyConnect Mobility Client folder is installed. Without installing the utility in custom location , you will get it in :
C:Program Files (x86)CiscoCisco AnyConnect Secure Mobility Client
- When you are in the right place, right-click on exe> click on Properties entry from context menu that is displayed
- Under the Properties screen , tap on Compatibility > navigate to Compatibility mode> check the box which says “Run this Program in Compatibility mode for”
- When the box is checked, a list of other Versions of Windows will be unblocked >select the list and tap on Windows 8
- Click on Apply and check whether the Cisco anyconnect connection attempt has failed resolved or not
Fix 4: Install the Pending Windows Update
Having a pending Windows Update can also be a possible reason to occur the error.so if you are not sure that every available Windows Update is installed on your work-station , you can follow the below mention guidelines to get out of the dilemma:
- On your keyboard press Windows + R key to open Run dialog box > type in “ms-settings:windowsupdate” and then hit Enter key to open Windows Update tab of Settings app
- Under the Windows Update Screen, click on check for updates. Then follow the on-screen instructions to install each Windows Update that is presently listed to be installed
Note: Install each kind of update comprising security and cumulative updates, not just important ones
- Pay attention if you have a number of pending updates, then you will be pop up to reboot before every update is installed. If this is the situation with you , reboot your system as per the guidelines but ensure to return to the screen at the succeeding startup and complete the installation of the rest of the updates
- Once when every pending update is installed on your PC, restart your system.
Fix 5: Disable Internet Explorer’s Ability to work Offline thru Registry Editor
It might be possible that you are facing the error due to IE be configured to work in offline mode. You can follow the below mention guidelines to disable IE’s ability to work in Offline Mode thru Registry Editor:
- To open Run dialog box , press Windows +R key >type in “regedit”> press ctrl+shift+Enter to open an important Registry Editor Prompt> once you are popped by User Account Control >click on Yes to give permission
- In the Registry Editor, utilize the left side menu and go to the below mention location:
HKEY_CURRENT_USERSoftwareMicrosoftWindowsCurrentVersionInternet Settings
- When you get the right location ,go down to right side section and place the GlobalUserOffline DWORD Key
- Then double-click on it > set the Base to Hexadecimal and the value to 0> click OK just for saving the changes
- Reboot your system and check whether the issue fix or not.
Conclusion
That’s it! Here my job is done and I tried my best to list down the complete information related to Cisco anyconnect connection attempt has failed. In case if your work-station is working slow or if it gets crashed regularly then it is recommended to scan it with an anti-malware tool. With just single scan of PC with a PC repair tool, majority of the errors automatically get fixed.
Kindly ensure to follow the suggestions one by one till you find the suitable one that works for you
If there anything that I missed out on or you have queries then feel free to share with us on Facebook and twitter page. Thanks for Reading.
Cisco AnyConnect — это больше, чем просто виртуальная частная сеть , поскольку она позволяет вашей рабочей силе работать из любого места, на любом устройстве и в любое время. Одной из таких распространенных проблем является ошибка инициализации подсистемы подключения в ошибке Cisco AnyConnect, особенно при использовании операционной системы Windows.
Эта проблема возникает, когда выполняются следующие условия:
- Вы запускаете приложение Cisco AnyConnect Secure Mobility Client для установки VPN-подключений в Windows 8.1, RT 8.1 или Windows Server 2012 R2.
- Вы установили обновление Windows 3023607 на свой компьютер
Microsoft подтвердила, что не удалось инициализировать подсистему подключения в Cisco AnyConnect. Ошибка в продуктах Microsoft, таких как Windows Server 2012 R2 Datacenter, Standard, Essentials и Foundation, Windows 8.1 Enterprise и Pro, Windows 8.1 и Windows RT 8.1.
Ознакомьтесь с некоторыми решениями, которые могут помочь вам обойти эту ошибку и устранить ее на своем компьютере.
Не удалось инициализировать подсистему подключения в ошибке Cisco AnyConnect
- Перейти в Центр обновления Майкрософт
- Запустите средство устранения неполадок совместимости на Cisco AnyConnect
- Отключить общий доступ к подключению к Интернету
- Изменить реестр
1. Зайдите в Центр обновления Майкрософт
Центр обновления Майкрософт поможет вам установить самое последнее накопительное обновление для системы безопасности Internet Explorer, поскольку уязвимость в SChannel делает возможным обход функций безопасности: 10 марта 2015 г. (MS15-031) .
Если вы загружаете и устанавливаете обновления вручную, проверьте ссылки на скачивание в таблице «Подвержены уязвимости» в бюллетене по безопасности Microsoft MS15-018 .
Если это не поможет, попробуйте следующее решение.
2. Запустите средство устранения неполадок совместимости на Cisco AnyConnect
Не удалось инициализировать подсистему подключения в ошибке Cisco AnyConnect обычно связана с последним Центром обновления Windows, поэтому вы можете запустить средство устранения неполадок совместимости, чтобы устранить проблему, выполнив следующие действия:
- Закройте окно Cisco AnyConnect и мини-значок панели задач
- Перейдите в папку клиента Secure Mobility Cisco AnyConnect — вы можете проверить в C: Program Files (x86) Cisco Secure Mobility Client Cisco AnyConnect
- Щелкните правой кнопкой мыши vpnui. исполняемый файл
- Нажмите Запустить средство устранения неполадок совместимости.
- Выберите Попробовать рекомендуемые настройки.
- Выберите, что предлагает мастер (совместимость с Windows
- Нажмите Test Program, чтобы открыть программу
- близко

Примечание. Для vpnagent.exe — локальной службы, которая поддерживает пользовательский интерфейс клиента — вам может потребоваться повторить эти шаги.
- ТАКЖЕ ЧИТАЙТЕ: Как включить клиент Cisco VPN в Windows 10
3. Отключите общий доступ к Интернету
Иногда не удалось инициализировать подсистему подключения в Cisco AnyConnect ошибка может произойти, потому что в вашей локальной сети включен общий доступ к подключению к Интернету (ICS).
Вот как это решить:
- Нажмите на Пуск
- Выберите Настройки

- Нажмите Сеть и Интернет
- В поле поиска введите Local

- Выберите View Local Services
- Щелкните правой кнопкой мыши на Internet Connection Sharing

- Выберите Свойства

- Перейти на вкладку Общие

- Перейти к типу запуска
- Нажмите стрелку раскрывающегося списка и выберите « Отключено».

- Нажмите ОК


4. Отредактируйте реестр
Если у вас не удалось инициализировать подсистему подключения в ошибке Cisco AnyConnect, вы можете исправить ее, внеся небольшое изменение в реестр, выполнив следующие действия:
- Щелкните правой кнопкой мыши Пуск
- Выберите Run

- Тип регедит
- Нажмите Enter
- Перейдите на страницу HKEY_CURRENT_USER Software Microsoft Win
- Создайте новый ключ с именем GlobalOfflineUser
- Дайте ему 1 в качестве значения
- Перезагрузите компьютер и загрузите VPN

Проверьте, можете ли вы подключиться.
Устранило ли какое-либо из этих решений ошибку инициализации подсистемы подключения в Cisco AnyConnect? Дайте нам знать, оставив комментарий в разделе ниже.
СВЯЗАННЫЕ ИСТОРИИ, ЧТОБЫ ПРОВЕРИТЬ:
- Исправлено: SYSTEM_SERVICE_EXCEPTION ошибка в Windows 10
- 10 лучших программных клиентов VPN для Windows 10
- Исправлено: ошибка «Точка входа в процедуру» в Windows 10, 8, 7