Содержание
- Cisco DCNM SAN Client Online Help
- Bias-Free Language
- Book Title
- Configuring Security Features on an External AAA Server
- Results
- Chapter: Configuring Security Features on an External AAA Server
- Configuring Security Features on an External AAA Server
- Information About Switch Management Security
- Security Options
- SNMP Security Options
- Switch AAA Functionalities
- Authentication
- Authorization
- Accounting
- Remote AAA Services
- Server Groups
- AAA Service Configuration Options
- Error-Enabled Status
- AAA Server Monitoring
- Authentication and Authorization Process
- Global AAA Server Monitoring Parameters
- LDAP Authentication and Authorization
- About RADIUS Server Default Configuration
- About the Default RADIUS Server Encryption Type and Preshared Key
- About RADIUS Servers
- Configuring the Test Idle Timer
- Configuring Test User Name
- About Validating a RADIUS Server
- About Vendor-Specific Attributes
- VSA Format
- Specifying SNMPv3 on AAA Servers
- One-Time Password Support
- About TACACS+
- About TACACS+ Server Default Configuration
- About the Default TACACS+ Server Encryption Type and Preshared Key
- About TACACS+ Servers
- Password Aging Notification through TACACS+ Server
- About Validating a TACACS+ Server
- Periodically Validating a TACACS+ Server
- About Users Specifying a TACACS+ Server at Login
- Supported TACACS+ Server Parameters
- About Bypassing a Nonresponsive Server
- AAA Server Distribution
- Starting a Distribution Session on a Switch
- CHAP Authentication
- MSCHAP Authentication
- About Enabling MSCHAP
Cisco DCNM SAN Client Online Help
Bias-Free Language
The documentation set for this product strives to use bias-free language. For the purposes of this documentation set, bias-free is defined as language that does not imply discrimination based on age, disability, gender, racial identity, ethnic identity, sexual orientation, socioeconomic status, and intersectionality. Exceptions may be present in the documentation due to language that is hardcoded in the user interfaces of the product software, language used based on RFP documentation, or language that is used by a referenced third-party product. Learn more about how Cisco is using Inclusive Language.
Book Title
Cisco DCNM SAN Client Online Help
Configuring Security Features on an External AAA Server
View with Adobe Reader on a variety of devices
View in various apps on iPhone, iPad, Android, Sony Reader, or Windows Phone
View on Kindle device or Kindle app on multiple devices
Results
Chapter: Configuring Security Features on an External AAA Server
Configuring Security Features on an External AAA Server
The authentication, authorization, and accounting ( AAA) feature verifies the identity of, grants access to, and tracks the actions of users managing a switch. All Cisco MDS 9000 Family switches use Remote Access Dial-In User Service (RADIUS) or Terminal Access Controller Access Control device Plus (TACACS+) protocols to provide solutions using remote AAA servers.
Based on the user ID and password combination provided, switches perform local authentication or authorization using the local database or remote authentication or authorization using a AAA server. A preshared secret key provides security for communication between the switch and AAA servers. This secret key can be configured for all AAA servers or for only a specific AAA server. This security feature provides a central management capability for AAA servers.
This chapter includes the following topics:
Information About Switch Management Security
Management security in any switch in the Cisco MDS 9000 Family provides security to all management access methods, including the command-line interface (CLI) or Simple Network Management Protocol (SNMP).
This section includes the following topics:
Security Options
You can access the CLI using the console (serial connection), Telnet, or Secure Shell (SSH). You can access DCNM-SAN using TCP/UDP SNMP or HTTP traffic. For each management path (console, Telnet, and SSH), you can configure one or more of the following security control options: local, remote (RADIUS or TACACS+), or none.
- Remote security control
These security features can also be configured for the following scenarios:
See the IP Services Configuration Guide, Cisco DCNM for SAN.
- Fibre Channel Security Protocol (FC-SP) authentication
SNMP Security Options
The SNMP agent supports security features for SNMPv1, SNMPv2c, and SNMPv3. Normal SNMP security features apply to all applications that use SNMP (for example, Cisco MDS 9000 DCNM for SAN).
SNMP security options also apply to DCNM for SAN and Device Manager.
See the Cisco MDS 9000 NX-OS Family System Management Configuration Guide for more information on the SNMP security options.
Refer to the Cisco DCNM Fundamentals Guide for information on DCNM for SAN and Device Manager.
Switch AAA Functionalities
Using the CLI or DCNM for SAN (DCNM-SAN), or an SNMP application, you can configure AAA switch functionalities on any switch in the Cisco MDS 9000 Family.
This section includes the following topics:
Authentication
Authentication is the process of verifying the identity of the person or device accessing the switch. This identity verification is based on the user ID and password combination provided by the entity trying to access the switch. Cisco MDS 9000 Family switches allow you to perform local authentication (using the local lookup database) or remote authentication (using one or more RADIUS or TACACS+ servers).

Note When you log in to a Cisco MDS switch successfully using DCNM-SAN or Device Manager through Telnet or SSH and if that switch is configured for AAA server-based authentication, a temporary SNMP user entry is automatically created with an expiry time of one day. The switch authenticates the SNMPv3 protocol data units (PDUs) with your Telnet or SSH login name as the SNMPv3 user. The management station can temporarily use the Telnet or SSH login name as the SNMPv3 auth and priv passphrase. This temporary SNMP login is only allowed if you have one or more active MDS shell sessions. If you do not have an active session at any given time, your login is deleted and you will not be allowed to perform SNMPv3 operations.
Note DCNM-SAN does not support AAA passwords with trailing white space, for example “passwordA.”
The following authorization roles exist in all Cisco MDS switches:
- Network operator (network-operator)—Has permission to view the configuration only. The operator cannot make any configuration changes.
- Network administrator (network-admin)— Has permission to execute all commands and make configuration changes. The administrator can also create and customize up to 64 additional roles.
- Default-role—Has permission to use the GUI (DCNM-SAN and Device Manager). This access is automatically granted to all users for accessing the GUI.
These roles cannot be changed or deleted. You can create additional roles and configure the following options:
- Configure role-based authorization by assigning user roles locally or using remote AAA servers.
- Configure user profiles on a remote AAA server to contain role information. This role information is automatically downloaded and used when the user is authenticated through the remote AAA server.
Note If a user belongs only to one of the newly created roles and that role is subsequently deleted, then the user immediately defaults to the network-operator role.
Accounting
The accounting feature tracks and maintains a log of every management configuration used to access the switch. This information can be used to generate reports for troubleshooting and auditing purposes. Accounting logs can be stored locally or sent to remote AAA servers.
Remote AAA Services
Remote AAA services provided through RADIUS and TACACS+ protocols have the following advantages over local AAA services:
- User password lists for each switch in the fabric can be managed more easily.
- AAA servers are already deployed widely across enterprises and can be easily adopted.
- The accounting log for all switches in the fabric can be centrally managed.
- User role mapping for each switch in the fabric can be managed more easily.
Server Groups
You can specify remote AAA servers for authentication, authorization, and accounting using server groups. A server group is a set of remote AAA servers implementing the same AAA protocol. The purpose of a server group is to provide for failover servers in case a remote AAA server fails to respond. If the first remote server in the group fails to respond, the next remote server in the group is tried until one of the servers sends a response. If all the AAA servers in the server group fail to respond, then that server group option is considered a failure. If required, you can specify multiple server groups. If the Cisco MDS switch encounters errors from the servers in the first group, it tries the servers in the next server group.
AAA Service Configuration Options
AAA configuration in Cisco MDS 9000 Family switches is service based. You can have separate AAA configurations for the following services:
- Telnet or SSH login (DCNM-SAN and Device Manager login)
- Console login
- iSCSI authentication (see the IP Services Configuration GuideCisco MDS 9000 Family NX-OS IP Services Configuration Guide, Cisco DCNM for SAN).
- FC-SP authentication (see Chapter 31, “Configuring FC-SP and DHCHAP”).
- Accounting
In general, server group, local, and none are the three options that can be specified for any service in an AAA configuration. Each option is tried in the order specified. If all the options fail, local is tried.

Note Even if local is not specified as one of the options, it is tried by default if all AAA servers configured for authentication are unreachable. User has the flexibility to disable this fallback (See section “Configuring Fallback Mechanism for Authentication” section).
When RADIUS times out, local login is attempted depending on the fallback configuration. For this local login to be successful, a local account for the user with the same password should exist, and the RADIUS timeout and retries should take less than 40 seconds. The user is authenticated if the username and password exist in the local authentication configuration.
Table 29-1 provides the related CLI command for each AAA service configuration option.
Table 29-1 AAA Service Configuration Commands
Telnet or SSH login (Cisco DCNM-SAN and Device Manager login)
aaa authentication login default
aaa authentication login console
aaa authentication iscsi default
aaa authentication dhchap default
aaa accounting default
Error-Enabled Status
When you log in, the login is processed by rolling over to local user database if the remote AAA servers do not respond. In this situation, the following message is displayed on your screen if you have enabled the error-enabled feature:
To enable this message display, use the aaa authentication login error-enable command.
To disable this message display, use the no aaa authentication login error-enable command.
To view the current display status, use the show aaa authentication login error-enable command (see Example 29-1).
Example 29-1 Displays AAA Authentication Login Information
AAA Server Monitoring
An unresponsive AAA server introduces a delay in the processing of AAA requests. An MDS switch can periodically monitor an AAA server to check whether it is responding (or alive) to save time in processing AAA requests. The MDS switch marks unresponsive AAA servers as dead and does not send AAA requests to any dead AAA servers. An MDS switch periodically monitors dead AAA servers and brings them to the alive state once they are responding. This monitoring process verifies that an AAA server is in a working state before real AAA requests are sent its way. Whenever an AAA server changes to the dead or alive state, an SNMP trap is generated and the MDS switch warns the administrator that a failure is taking place before it can impact performance.
See Figure 29-1 for AAA server states.
Figure 29-1 AAA Server States
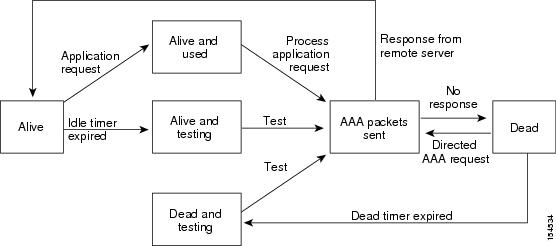
Note The monitoring interval for alive servers and dead servers is different and can be configured by the user. The AAA server monitoring is performed by sending a test authentication request to the AAA server.
The user name and password to be used in the test packet can be configured.
Authentication and Authorization Process
Authentication is the process of verifying the identity of the person managing the switch. This identity verification is based on the user ID and password combination provided by the person managing the switch. The Cisco MDS 9000 Family switches allow you to perform local authentication (using the lookup database) or remote authentication (using one or more RADIUS servers or TACACS+ servers).
Authorization provides access control. It is the process of assembling a set of attributes that describe what the user is authorized to perform. Based on the user ID and password combination, the user is authenticated and authorized to access the network as per the assigned role. You can configure parameters that can prevent unauthorized access by an user, provided the switches use the TACACS+ protocol.
AAA authorization is the process of assembling a set of attributes that describe what the user is authorized to perform. Authorization in the Cisco NX-OS software is provided by attributes that are downloaded from AAA servers. Remote security servers, such as RADIUS and TACACS+, authorize users for specific rights by associating attribute-value (AV) pairs, which define those rights with the appropriate user.
Figure 29-2 shows a flow chart of the authorization and authentication process.
Figure 29-2 Switch Authorization and Authentication Flow
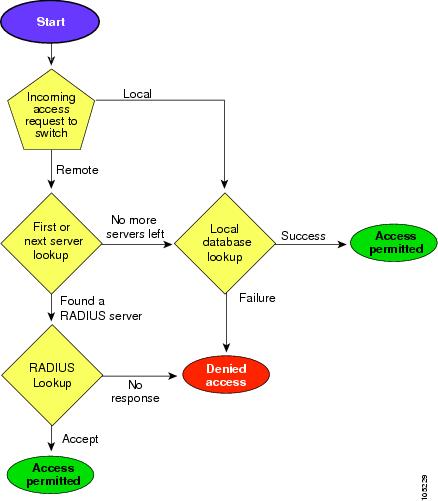
Note No more server groups left = no response from any server in all server groups.
No more servers left = no response from any server within this server group.
Global AAA Server Monitoring Parameters
The global AAA server monitoring parameters function as follows:
- When a new AAA server is configured it is monitored using the global test parameters, if defined.
- When global test parameters are added or modified, all the AAA servers, which do not have any test parameters configured, start getting monitored using the new global test parameters.
- When the server test parameters are removed for a server or when the idle-time is set to zero (default value) the server starts getting monitored using the global test parameters, if defined.
- If global test parameters are removed or global idle-time is set to zero, servers for which the server test parameters are present are not affected. However, monitoring stops for all other servers that were previously being monitored using global parameters.
- If the server monitoring fails with the user-specified server test parameters, the server monitoring does not fall back to global test parameters.
The Lightweight Directory Access Protocol (LDAP) provides centralized validation of users attempting to gain access to a Cisco NX-OS device. LDAP services are maintained in a database on an LDAP daemon running, typically, on a UNIX or Windows NT workstation. You must have access to and must configure an LDAP server before the configured LDAP features on your Cisco NX-OS device are available.
LDAP provides for separate authentication and authorization facilities. LDAP allows for a single access control server (the LDAP daemon) to provide each service-authentication and authorization-independently. Each service can be tied into its own database to take advantage of other services available on that server or on the network, depending on the capabilities of the daemon.
The LDAP client/server protocol uses TCP (TCP port 389) for transport requirements. Cisco NX-OS devices provide centralized authentication using the LDAP protocol.
Note If you are familiar with the Cisco IOS CLI, be aware that the Cisco NX-OS commands for this feature might differ from the Cisco IOS commands that you would use.
LDAP Authentication and Authorization
Clients establish a TCP connection and authentication session with an LDAP server through a simple bind (username and password). As part of the authorization process, the LDAP server searches its database to retrieve the user profile and other information.
You can configure the bind operation to first bind and then search, where authentication is performed first and authorization next, or to first search and then bind. The default method is to first search and then bind.
The advantage of searching first and binding later is that the distinguished name (DN) received in the search result can be used as the user DN during binding rather than forming a DN by prepending the username (cn attribute) with the baseDN. This method is especially helpful when the user DN is different from the username plus the baseDN. For the user bind, the bindDN is constructed as baseDN + append-with-baseDN, where append-with-baseDN has a default value of cn=$userid.
Note As an alternative to the bind method, you can establish LDAP authentication using the compare method, which compares the attribute values of a user entry at the server. For example, the user password attribute can be compared for authentication. The default password attribute type is userPassword.
About RADIUS Server Default Configuration
DCNM-SAN allows you to set up a default configuration that can be used for any RADIUS server that you configure the switch to communicate with. The default configuration includes:
- Encryption type
- Timeout value
- Number of retransmission attempts
- Allowing the user to specify a RADIUS server at login
About the Default RADIUS Server Encryption Type and Preshared Key
You need to configure the RADIUS preshared key to authenticate the switch to the RADIUS server. The length of the key is restricted to 64 characters and can include any printable ASCII characters (white spaces are not allowed). You can configure a global key to be used for all RADIUS server configurations on the switch.
You can override this global key assignment by explicitly using the key option when configuring an individual RADIUS serverin the radius-server host command.
About RADIUS Servers
You can add up to 64 RADIUS servers. RADIUS keys are always stored in encrypted form in persistent storage. The running configuration also displays encrypted keys. When you configure a new RADIUS server, you can use the default configuration or modify any of the parameters to override the default RADIUS configuration.
Configuring the Test Idle Timer
The test idle timer specifies the interval during which a RADIUS server receives no requests before the MDS switch sends out a test packet.
Note The default idle timer value is 0 minutes. When the idle time interval is 0 minutes, periodic RADIUS server monitoring is not performed.
Configuring Test User Name
You can configure a username and password for periodic RADIUS server status testing. You do not need to configure the test username and password to issue test messages to monitor RADIUS servers. You can use the default test username (test) and default password (test).
Note We recommend that the test username not be the same as an existing username in the RADIUS database for security reasons.
About Validating a RADIUS Server
As of Cisco SAN-OS Release 3.0(1), you can periodically validate a RADIUS server. The switch sends a test authentication to the server using the username and password that you configure. If the server does not respond to the test authentication, then the server is considered non responding.
Note For security reasons we recommend that you do not use a username that is configured on your RADIUS server as a test username.
You can configure this option to test the server periodically, or you can run a one-time only test.
About Vendor-Specific Attributes
The Internet Engineering Task Force (IETF) draft standard specifies a method for communicating vendor-specific attributes ( VSAs) between the network access server and the RADIUS server. The IETF uses attribute 26. VSAs allow vendors to support their own extended attributes that are not suitable for general use. The Cisco RADIUS implementation supports one vendor-specific option using the format recommended in the specification. The Cisco vendor ID is 9, and the supported option is vendor type 1, which is named cisco-avpair. The value is a string with the following format:
Where protocol is a Cisco attribute for a particular type of authorization, separator is = (equal sign) for mandatory attributes, and * (asterisk) is for optional attributes.
When you use RADIUS servers to authenticate yourself to a Cisco MDS 9000 Family switch, the RADIUS protocol directs the RADIUS server to return user attributes, such as authorization information, along with authentication results. This authorization information is specified through VSAs.
VSA Format
The following VSA protocol options are supported by the Cisco NX-OS software:
- Shell protocol—Used in Access-Accept packets to provide user profile information.
- Accounting protocol—Used in Accounting-Request packets. If a value contains any white spaces, it should be put within double quotation marks.
The following attributes are supported by the Cisco NX-OS software:
- roles —This attribute lists all the roles to which the user belongs. The value field is a string storing the list of group names delimited by white space. For example, if you belong to roles vsan-admin and storage-admin , the value field would be “ vsan-admin storage-admin” . This subattribute is sent in the VSA portion of the Access-Accept frames from the RADIUS server, and it can only be used with the shell protocol value. These are two examples using the roles attribute:
When an VSA is specified as shell:roles*“network-admin vsan-admin” , this VSA is flagged as an optional attribute, and other Cisco devices ignore this attribute.
- accountinginfo —This attribute stores additional accounting information besides the attributes covered by a standard RADIUS accounting protocol. This attribute is only sent in the VSA portion of the Account-Request frames from the RADIUS client on the switch, and it can only be used with the accounting protocol-related PDUs.
Specifying SNMPv3 on AAA Servers
The vendor/custom attribute cisco-av-pair can be used to specify user’s role mapping using the format:
If the role option in the cisco-av-pair attribute is not set, the default user role is network-operator.
The VSA format optionally specifies your SNMPv3 authentication and privacy protocol attributes also as follows:
The SNMPv3 authentication protocol options are SHA and MD5. The privacy protocol options are AES-128 and DES. If these options are not specified in the cisco-av-pair attribute on the ACS server, MD5 and DES are used by default.
One-Time Password Support
A one-time password (OTP) is a password that is valid for a single login session or transaction. OTPs avoid a number of shortcomings that are associated with usual (static) passwords. The most vital shortcoming that is addressed by OTPs is that, in contrast to static passwords, they are not at risk to replay attacks. If an intruder manages to record an OTP that was already used to log into a service or to conduct an operation, it will not be misused because it is no longer valid.
One-time password applies only to RADIUS and TACACS protocol daemons. In the case of the RADIUS protocol daemon, there is no configuration required from the switch side. In the case of the TACACS protocol, ASCII authentication mode needs to be enabled using the following command.
aaa authentication login ascii-authentication
About TACACS+
TACACS+ is a client/server protocol that uses TCP (TCP port 49) for transport requirements. All switches in the Cisco MDS 9000 Family provide centralized authentication using the TACACS+ protocol. The TACACS+ has the following advantages over RADIUS authentication:
- Provides independent, modular AAA facilities. Authorization can be done without authentication.
- Uses the TCP transport protocol to send data between the AAA client and server, making reliable transfers with a connection-oriented protocol.
- Encrypts the entire protocol payload between the switch and the AAA server to ensure higher data confidentiality. The RADIUS protocol only encrypts passwords.
About TACACS+ Server Default Configuration
DCNM-SAN allows you to set up a default configuration that can be used for any TACACS+ server that you configure the switch to communicate with. The default configuration includes:
- Encryption type
- Preshared key
- Timeout value
- Number of retransmission attempts
- Allowing the user to specify a TACACS+ server at login
About the Default TACACS+ Server Encryption Type and Preshared Key
You need to configure the TACACS+ preshared key to authenticate the switch to the TACACS+ server. The length of the key is restricted to 64 characters and can include any printable ASCII characters (white spaces are not allowed). You can configure a global key to be used for all TACACS+ server configurations on the switch.
You can override this global key assignment by explicitly using the key option when configuring an individual TACACS+ server.
About TACACS+ Servers
By default, the TACACS+ feature is disabled in all switches in the Cisco MDS 9000 Family. DCNM-SAN or Device Manager enables the TACACS+ feature automatically when you configure a TACACS+ server.
If a secret key is not configured for a configured server, a warning message is issued if a global key is not configured. If a server key is not configured, the global key (if configured) is used for that server.
Note Prior to Cisco MDS SAN-OS Release 2.1(2), you can use the dollar sign ($) in the key but the key must be enclosed in double quotes, for example “k$”. The percent sign (%) is not allowed. In Cisco MDS SAN-OS Release 2.1(2) and later, you can use the dollar sign ($) without double quotes and the percent sign (%) in global secret keys.
You can configure global values for the secret key for all TACACS+ servers.
Note If secret keys are configured for individual servers, those keys override the globally configured key.
Password Aging Notification through TACACS+ Server
Password aging notification is initiated when the user authenticates to a Cisco MDS 9000 switch via a TACACS+ account. The user is notified when a password is about to expire or has expired. If the password has expired, user is prompted to change the password.
Note As of Cisco MDS SAN-OS Release 3.2(1), only TACACS+ supports password aging notification. If you try to use RADIUS servers by enabling this feature, RADIUS generates a SYSLOG message and authentication falls back to the local database.
Password aging notification facilitates the following:
- Password change—You can change your password by entering a blank password.
- Password aging notification—Notifies password aging. Notification happens only if the AAA server is configured and MSCHAP and MSCHAPv2 is disabled.
- Password change after expiration—Initiates password change after the old password expires. Initiation happens from the AAA server.
Note Password aging notification fails if you do not disable MSCHAP and MSCHAPv2 authentication.
To enable the password aging option in the AAA server, enter the following command:
To determine whether or not password aging notification is enabled or disabled in the AAA server, enter the following command:
About Validating a TACACS+ Server
As of Cisco SAN-OS Release 3.0(1), you can periodically validate a TACACS+ server. The switch sends a test authentication to the server using the test username and test password that you configure. If the server does not respond to the test authentication, then the server is considered nonresponding.
Note We recommend that you do not configure the test user on your TACACS+ server for security reasons.
You can configure this option to test the server periodically, or you can run a one-time only test.
Periodically Validating a TACACS+ Server
To configure the switch to periodically test a TACACS+ server using DCNM-SAN, see the “Configuring the RADIUS, TACACS+, and LDAP Server” section.
About Users Specifying a TACACS+ Server at Login
By default, an MDS switch forwards an authentication request to the first server in the TACACS+ server group. You can configure the switch to allow the user to specify which TACACS+ server to send the authenticate request. If you enable this feature, the user can log in as username@hostname , where the hostname is the name of a configured TACACS+ server.
Supported TACACS+ Server Parameters
The Cisco NX-OS software currently supports the following parameters for the listed TACACS+ servers:
About Bypassing a Nonresponsive Server
As of Cisco SAN-OS Release 3.0(1), you can bypass a nonresponsive AAA server within a server group. If the switch detects a nonresponsive server, it will bypass that server when authenticating users. Use this feature to minimize login delays caused by a faulty server. Instead of sending a request to a nonresponsive server and waiting for the authentication request to timeout, the switch sends the authentication request to the next server in the server group. If there are no other responding servers in the server group, the switch continues to attempt authentications against the nonresponsive server.
AAA Server Distribution
Configuration for RADIUS and TACACS+ AAA on an MDS switch can be distributed using the Cisco Fabric Services (CFS). The distribution is disabled by default (see the Cisco MDS 9000 Family NX-OS System Management Configuration GuideSystem Management Configuration Guide, Cisco DCNM for SAN).
After enabling the distribution, the first server or global configuration starts an implicit session. All server configuration commands entered thereafter are stored in a temporary database and applied to all switches in the fabric (including the originating one) when you explicitly commit the database. The various server and global parameters are distributed, except the server and global keys. These keys are unique secrets to a switch and should not be shared with other switches.
Note Server group configurations are not distributed.
Note For an MDS switch to participate in AAA server configuration distribution, it must be running Cisco MDS SAN-OS Release 2.0(1b) or later, or Cisco NX-OS Release 4.1(1).
Starting a Distribution Session on a Switch
A distribution session starts the moment you begin a RADIUS or TACACS+ server or global configuration. For example, the following tasks start an implicit session:
- Specifying the global timeout for RADIUS servers.
- Specifying the global timeout for TACACS+ servers.
Note After you issue the first configuration command related to AAA servers, all server and global configurations that are created (including the configuration that caused the distribution session start) are stored in a temporary buffer, not in the running configuration.
CHAP Authentication
Challenge Handshake Authentication Protocol (CHAP) is a challenge-response authentication protocol that uses the industry-standard Message Digest 5 (MD5) hashing scheme to encrypt the response. CHAP is used by various vendors of network access servers and clients. A server running routing and remote access supports CHAP so that remote access clients that require CHAP are authenticated. CHAP is supported as an authentication method in this release.
MSCHAP Authentication
Microsoft Challenge Handshake Authentication Protocol ( MSCHAP) is the Microsoft version of CHAP.
Cisco MDS 9000 Family switches allow user logins to perform remote authentication using different versions of MSCHAP. MSCHAP is used for authentication on a RADIUS or TACACS+ server, while MSCHAPv2 is used for authentication on a RADIUS server.
About Enabling MSCHAP
By default, the switch uses Password Authentication Protocol (PAP) authentication between the switch and the remote server. If you enable MSCHAP, you need to configure your RADIUS server to recognize the MSCHAP vendor-specific attributes. See the “About Vendor-Specific Attributes” section. Table 29-2 shows the RADIUS vendor-specific attributes required for MSCHAP.
Table 29-2 MSCHAP RADIUS Vendor-Specific Attributes
Источник
Помогите настроить доступ к коммутатору Catalyst 3750E.
Нужно сделать следующее:
1. При подключении по консоли я сразу попадаю в привилегированный режим (level 15), без авторизации и без enable.
2. При подключении по сети (SSH) с авторизацией под логином admin я сразу попадаю в привилегированный режим (level 15), без enable.
3. При подключении по сети (SSH) с авторизацией под логином user я сразу попадаю в привилегированный режим (level 5), без enable.
Сейчас я сгенерировал ключи, создал пользователей (с шифрованными паролями), включил SSH, настроил привилегии.
Терминалы настроены так:
username admin privilege 15 password 7 xxx
username user privilege 5 password 7 xxx
...
aaa new-model
aaa authentication login default local
...
line con 0
line vty 0 4
access-class ADMIN_ACCESS in
exec-timeout 60
logging synchronous
line vty 5 15
access-class ADMIN_ACCESS in
exec-timeout 60
logging synchronous
Но что-то не так.
При подключении по консоли запрашивается авторизация. И режим не привилегированный, нужно вводить enable (без пароля).
При подключении по сети (ssh или telnet) запрашивается авторизация. При входе режим не привилегированный, но при вводе enable выдается ошибка:
CORE-SERVICE-C3750E>ena
% Error in authentication.
Ну и если не сложно, чем терминалы 0-4 отличаются от терминалов 5-15?
I have a new Cisco 2811 router. I can telnet to the route successfully. However, when I try to issue the enable command, I get the following:
><><><><><><><><><><><><><><><><><><><><><><><><><><><><><><><><
Username: <user name>
Password:
TestRouter>enable
% Error in authentication.
TestRouter>
><><><><><><><><><><><><><><><><><><><><><><><><><><><><><><><><
I do have crypto commands entered for future Easy VPN setup. It is my main suspicion of what is causing the problem. I have edited my configuration down to the relevant commands below and removed usernames and passwords as needed:
><><><><><><><><><><><><><><><><><><><><><><><><><><><><><><><><
!
aaa new-model
!
aaa authentication login USERLIST local
!
aaa session-id common
!
username <user name> privilege 15 password <user password>
!
crypto ipsec client ezvpn 3G-VPN
connect auto
group 3G-VPN key <key>
mode network-extension
peer 172.16.1.1
username <crypto user name> password <password>
xauth userid mode local
!
interface FastEthernet0/0
ip address 10.1.9.1 255.255.255.0
ip nat inside
ip virtual-reassembly
duplex auto
speed auto
crypto ipsec client ezvpn 3G-VPN inside
!
line con 0
!
line aux 0
!
line vty 0 4
login authentication USERLIST
!
><><><><><><><><><><><><><><><><><><><><><><><><><><><><><><><><
Any suggestions on the cause of ‘% Error in authentication. message’?
Thank you!

Не давно понадобилось настроить Cisco так, что бы при подключении к устройству по протоколу Telnet запрашивались имя пользователя и пароль. И вот тут возникли проблемы.
Если задать:
aaa new-model
aaa authentication login default local
username admin password admin,
а на в настройках Telnet прописать, что login local, то подключение по telnet происходит нормально. запрашивается логин и пароль и отлично заходит в пользовательский режим. Но а дальше не в какую. Если ввести команду enable, то выдает ошибку:
% Error in authentication.
Если прописать:
aaa new-model
aaa authentication login default local
username admin password admin privilege 15.
В настройках telnet — login local. Опять, подключение прошло, запрос логина и пароля и после этого появляется ошибка:
% Login invalid
Подскажите, пожалуйста, как можно настроить авторизацию так, что бы можно при вводе логина и пароля по пасть в прилегированный режим без ввода дополнительного пароля.
__________________
Помощь в написании контрольных, курсовых и дипломных работ, диссертаций здесь
Cisco Nexus 5000 Troubleshooting Guide
Bias-Free Language
The documentation set for this product strives to use bias-free language. For the purposes of this documentation set, bias-free is defined as language that does not imply discrimination based on age, disability, gender, racial identity, ethnic identity, sexual orientation, socioeconomic status, and intersectionality. Exceptions may be present in the documentation due to language that is hardcoded in the user interfaces of the product software, language used based on RFP documentation, or language that is used by a referenced third-party product. Learn more about how Cisco is using Inclusive Language.
Book Title
Cisco Nexus 5000 Troubleshooting Guide
Troubleshooting Security Issues
View with Adobe Reader on a variety of devices
Results
Chapter: Troubleshooting Security Issues
Troubleshooting Security Issues
The Cisco Nexus 5000 NX-OS provides security that protects your network from degradation or failure and from data loss or compromise resulting from intentional attacks or from unintended, damaging mistakes.
This chapter describes how to identify and resolve problems that can occur with security in the Cisco Nexus 5000 Series switch.
This chapter includes the following sections:
Roles
Role assignment fails when user logs in
From the perspective of RBAC, when a user logs in, role assignment fails.
The AV-pair is not configured properly on TACAC+ or the RADIUS server.
To complete the role assignment follow these steps:
Step 1 ![]() Check the TACACS+ (for example, ACS) server configuration.
Check the TACACS+ (for example, ACS) server configuration.
- Use the following menu path to access the settings:
Interface Configuration > TACACS+ (Cisco IOS)
– ![]() Select the User box for Shell (exec)
Select the User box for Shell (exec)
– ![]() Select the Advanced TACACS+ Features
Select the Advanced TACACS+ Features
Display a window for each service that was selected, where you can enter customized TACACS+ attributes in the Advanced Configuration Options.
- Use the following menu path to access the settings and add a string to the Shell attributes:
User Setup > Add/Edit “admin” > TACACS+ Settings
– ![]() Select the Shell and Custom attributes boxes
Select the Shell and Custom attributes boxes
– ![]() Add the following string into the textbox:
Add the following string into the textbox:
Step 2 ![]() Check the RADIUS (for example, ACS) server configuration.
Check the RADIUS (for example, ACS) server configuration.
- Use the following menu paths to access the settings:
Network Configuration > AAA > AAA Servers > svi,20.1.1.2,CiscoSecure ACS
Network Configuration > AAA > AAA Client > 20.1.1.1 20.1.1.1 RADIUS (Cisco IOS/PIX 6.0) > SharedSecret=test1234, Authenticate Using=RADIUS (Cisco IOS/PIX 6.0)
Interface Configuration > RADIUS (Cisco IOS/PIX 6.0)
– ![]() Select User for cisco-av-pair.
Select User for cisco-av-pair.
- Use the following menu path to access the settings and add a string to the RADIUS attributes:
User Setup > Add/Edit > Cisco IOS/PIX 6.x RADIUS Attributes
– ![]() Check the attribute box.
Check the attribute box.
– ![]() Enter the following string:
Enter the following string:
Step 3 ![]() Check the RADIUS (for example, RADIUSD) server configuration for settings in the user account.
Check the RADIUS (for example, RADIUSD) server configuration for settings in the user account.
- Use the following path to access the user account definition:
- Ensure that the user account definition contains:
cisco-avpair= «shell: roles = network-admin»
Step 4 ![]() Log in the user again.
Log in the user again.
Step 5 ![]() Check the role assignment with the show user-account command.
Check the role assignment with the show user-account command.
Rules for Role’s permit/deny action do not work correctly
When a user-defined role is assigned to a user account, the role’s rule policy may not seem to take effect. For example, a rule in the role’s configuration is set to deny all interface configuration commands. However, you still can configure interface commands.
Order of rule configurations for the role is incorrect.
Note ![]() The RBAC parser accesses a rule from highest to lowest rule number.
The RBAC parser accesses a rule from highest to lowest rule number.
After identifying the rule that is not working correctly, check to see if any rules preceding it conflict or override it.
For example, if the rule that is not working correctly has a rule ID of 10, then check all the rules that have a rule ID greater than 10 to see if they might conflict with rule 10. To illustrate this example, we can say that rule 15 is found to be overriding rule 10. To resolve this conflict, you would have to modify rule 15 or change the rule ID of rule 10 so that it has a greater rule ID than rule 15.
Role’s interface or VLAN policy does not appear to work correctly
When a user-defined role is assigned to a user account and the role’s interface or VLAN policy is set to deny access to a certain interface, the user account can still use show commands to display configuration, status, setting, or statistics on the access-denied interface or VLAN.
You are checking the interface or VLAN role policy with CLI commands, such as show interface brief or show vlan.
RBAC does not support filtering when displaying commands. Interface or VLAN role policies only apply to configuration or operational commands.
You are not assigned to the role properly.
- Check the user role assignment with the show user-account command.
- Verify the role definition with the show role name command.
Assigning multiple roles to single user does not seem to work correctly
When a user account is assigned to multiple roles, the user can access commands that are denied by one of the roles that it gets assigned to. This gives the appearance that the command parser does not work with multiple roles.
You might expect that multiple roles on the same user account are parsed sequentially.
The NX-OS design is to parse multiple roles in a union-to-permit function, that each command is examined and compared to all the roles.
If any of the roles permit the command, then the CLI allows the user to continue.
For example, if the role permits the interface eth1/1 command, then the CLI allows the you to enter the interface eth1/1 configuration mode.
Each role applies their policies (that is, interface, VLAN, VSAN, and so on) separately. If a role has an interface policy that denies eth1/1 as in the example, then that role would reject the command, but other roles might have a different interface policy allowing the same interface.
Change to role configuration does not get applied
When a user account is assigned to a role and you are logged into the Nexus 5000 switch, any changes made to the role configuration does not get applied immediately.
While a user account is logged in and has been assigned to role A, the administrator makes some changes to role A with the expectation that the change would immediately affect the user that is logged in. However, the user is not assigned to the role properly.
NX-OS does not activate role configuration changes dynamically. You needs to log in again to have the configuration changes to the new role come into effect.
CLI rejects feature-group removal
The CLI rejects the no role feature-group name command when the administrator tries to delete a feature-group.
A CLI error indicates that the feature group is in use, which means that it is included in one of the role configurations.
To address the error, perform the following steps:
- Use the show role | egrep role:|feature-group command to display which feature group is associated with the role or under which role.
- Detach the association with the no rule command within the role configuration mode, and then delete the feature group.
User cannot login through TACACS+ or RADIUS authentication
With the server group properly configured for the Nexus 5000 switch and the server group is assigned the aaa authentication login default configuration on TACACS+ or RADIUS servers, the Telnet or SSH login fails to authenticate users with the following error:
%TACACS-3-TACACS_ERROR_MESSAGE: All servers failed to respond
AAA group is not configured with the correct VRF to access servers.
Perform the following steps to enable login:
- Check which AAA group is being used for authentication with the show running-config aaa and show aaa authentication commands.
- For TACACS+, check the VRF association with the AAA group with the show tacacs-server groups and show running-config tacacs+ commands.
- For RADIUS, check the VRF association with the AAA group with the show radius-server groups and show running-config radius commands.
- Correct the VRF association, then test the VRF setting with the test aaa group
command.
AAA server is not accessible in network.
If the problem persists after correcting the VRF association and correcting the user-account credentials, then perform the following:
- If the test aaa command returns the error, «error authenticating to server», the route to the server might be missing in the configuration. Use the ping command, if the AAA server is associated with the default VRF. If it is associated with VRF management, use the ping vrf management command.
- If the message «No route to host» appears, then the static route to the server is not configured properly. Reconfigure the IP route in the corresponding VRF context.
- Enter the ping command again. If the command is successful, then use the test aaa group
command.
Unable to decode content of packets with Wireshark
AAA packets were captured from the network, but Wireshark was unable to decode the content of the packets.
AAA packets are encrypted while the host key is enabled.
Perform the following steps to decode the content:
- Use the no tacacs-server command to delete the TACACS server configuration.
- Reconfigure the TACACS server without specifying any key.
- Reconfigure the AAA client for the Nexus 5000 switch on the Network Configuration page in ACS while removing the host key.
- Re-do the wire tapping. The captured packets now should not be encrypted and the data content should be decoded properly by Wireshark.
- After the packet capturing, the administrator should revert to the host key configuration for better security.
Role assignment fails when user logs in
Role assignment fails when the user logs in. (From the perspective of the Nexus 5000 switch AAA.)
Assuming that the ACS or TACACS+ and RADIUS has the Cisco av pair configured correctly, then the problem might be that the internal or local VRF assignment for the user login is not working correctly.
Perform the following steps for role assignment:
- Check which AAA group is being used for authentication with the show running-config aaa and show aaa authentication commands.
- For TACACS+, check the VRF association with the AAA group with the show tacacs-server groups and show running-config tacacs+ commands.
- For RADIUS, check the VRF association with the AAA group with the show radius-server groups and show running-config radius commands.
- If the above commands show that the association is correct, then use the debug tacacs+ all command to enable the trace.
- Log in the user again, and collect the debug trace.
The trace should contain information for further investigation (as shown in the example).
tacacs: process_aaa_tplus_request: Group t1 found. corresponding vrf is management
- Use the no debug tacacs+ all command to turn off debug tracing on TACACS+.
No command accounting logs on ACS server when TACACS+ accounting enabled
When TACACS+ accounting is enabled, the command accounting logs on the ACS server are not found.
The ACS server configuration is wrong or incomplete.
Perform the following steps:
- In the ACS GUI in Network Configuration, go to the AAA Client Setup for any client. Check the checkbox for Log Update/Watchdog Packets from this AAA Client. Click the Submit + Apply button.
- Verify CMD Accounting with the following menu path:
Reports and Activity > TACACS+ Administration
aaa authentication login ascii-authentication works only for TACACS+ and not for RADIUS
From Cisco NX-OS Release 4.2(1)N1(1), the aaa authentication login ascii-authentication command is supported only for TACACS+ and not for RADIUS.
PAP is the default authentication if no other authentication is configured on the switch. Remove the aaa authentication login ascii-authentication configuration so that PAP can be configured as the default authentication for both RADIUS and TACACS+.
Note ![]() If you try to configure ASCII authentication for RADIUS with the aaa authentication login ascii-authentication command, the following syslog message is displayed during log in.
If you try to configure ASCII authentication for RADIUS with the aaa authentication login ascii-authentication command, the following syslog message is displayed during log in.
2016 Jun 14 16:14:15 B21-5596-4 %RADIUS-2-RADIUS_NO_AUTHEN_INFO: ASCII authentication not supported 2016 Jun 14 16:14:16 B21-5596-4 %AUTHPRIV-3-SYSTEM_MSG: pam_aaa:Authentication failed from 64.103.217.161 — dcos_sshd[16804]
Authentication fallback method appears inoperable
The NX-OS supported fallback method for authentication is that if all the AAA remote RADIUS or TACACS+ servers are unreachable, then the log in attempts to authenticate the SSH/Telnet user locally. However, the login to the Nexus 5000 switch might still fail with the local authentication.
The local user database does not contain the user account that the user is using to login with.
Perform the following steps to check the authentication fallback method.
- As a best practice, include the aaa authentication login error-enable command in the configuration. When it is included in the configuration, the login session sees whether the fallback method is operating correctly. If messages, such as “Remote AAA servers unreachable; local authentication done» or “Remote AAA servers unreachable; local authentication failed», are received, then the fallback method is operating correctly.
- If the remote AAA servers are not accessible, check to see if the local user database has the user credential for local authentication. Use the show user-account command to display the credential.
Note ![]() By using the show user-account command, you can determine which user-account was created through REMOTE authentication. A user account that was created with REMOTE authentication cannot be used for a local (fallback) login.
By using the show user-account command, you can determine which user-account was created through REMOTE authentication. A user account that was created with REMOTE authentication cannot be used for a local (fallback) login.
- Create local user accounts with the username password
role command until the remote AAA servers become accessible.
Источник
Время прочтения
4 мин
Просмотры 111K
AAA (Authentication Authorization and Accounting) — система аутентификации авторизации и учета событий, встроенная в операционную систему Cisco IOS, служит для предоставления пользователям безопасного удаленного доступа к сетевому оборудованию Cisco. Она предлагает различные методы идентификации пользователя, авторизации, а также сбора и отправки информации на сервер.
Однако мало того, что ааа по умолчанию выключена; конфигурация этой системы — дело довольно запутанное. Недочеты в конфигурации могут привести либо к нестабильному, небезопасному подключению, либо к отсутствию какого-либо соединения в принципе. В данной статье мы подробно разберем схему настройки аутентификации при помощи aaa.
В общем виде схема аутентификации выглядит так:
Рис. 1. Схема аутентификации (по клику открывается в полном размере)

Рис. 2. Схема аутентификации (продолжение, по клику открывается в полном размере)
Схема разделена на две части не случайно: в первой описывается основной путь прохождения от управляющих линий (vty или con) до методов аутентификации, во второй — сами способы аутентификации.
Но обо всем по порядку.
Отсутствие aaa new-model
В данном случае речь идет о правой части схемы (см. рис. 1).
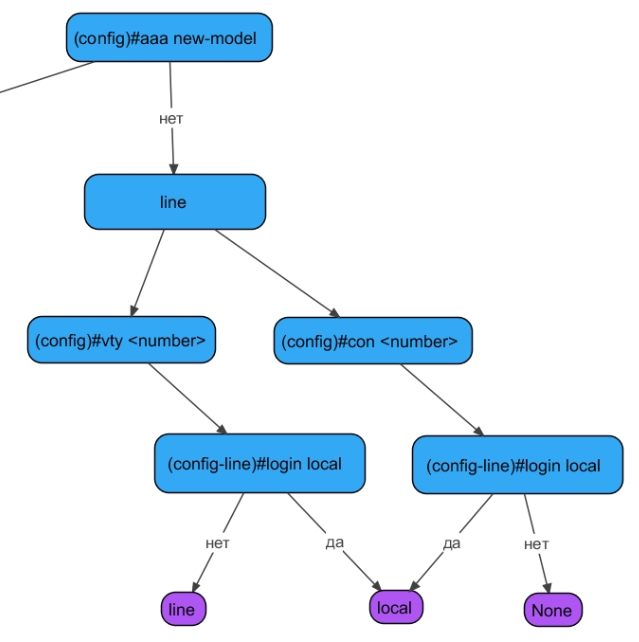
Рис. 3. Схема аутентификации без aaa new-model
Как уже было сказано, по умолчанию сервис aaa new-model выключен. Подключение к устройству может быть выполнено либо физически, путем подключения через консольный порт (line console 0) без ввода каких-либо учетных данных, либо через протокол TELNET (line vty). Причем в последнем случае, даже если задать IP-адрес на Cisco, получить доступ к устройству не получится ввиду отсутствия пароля (способ аутентификации “line”, см. рис. 3). Если пароль на линии vty задан, то устройство потребует от вас только ввести пароль, что существенно снижает безопасность подключения, так как для входа не требуется вводить логин; впрочем, тут все, конечно, зависит также от сложности пароля, который вы настроили.
При выполнении команды “login local” устройство, установив соединение, будет требовать ввести логин и пароль для входа.
Итак: в случае отсутствия aaa new-model максимум, которого вы можете требовать от Cisco IOS, — это использование пароля (способ аутентификации “line”) и использование логина и пароля из локальной базы данных (способ аутентификации “local”).

Рис. 4. Способы аутентификации без aaa new-model
Конфигурация aaa new-model
Преимущество конфигурации aaa в том, что она содержит множество методов аутентификации (в отличие от предыдущего случая). Включение aaa происходит путем добавления команды aaa new-model в режиме глобальной конфигурации. Далее предстоит выбор методов аутентификации. Все методы организуются в списки, которым присваивается либо значение default, либо конкретное имя списка (list-name). Таким образом, на разные типы линий (aux, vty, con…) можно «повесить» разные методы аутентификации, разграничив доступ между пользователями.
Пример настройки aaa new-model и списков аутентификации:
Router(config)#aaa new-model
Router(config)#aaa authentication login {default | list-name} method1 [method2…]
Router(config)#line {vty | aux | con…} line-numbers
Router(config-line)#login authentication {default | list-name}
Методы
Как было сказано ранее, методов аутентификации в aaa довольно много. Попробуем перечислить наиболее распространенные:
• Local — база данных логинов и паролей храниться на самом сетевом устройстве. Требует username {password | secret}.
• Local-case — тот же самый метод, что и local, но чувствительный к регистру при ввде логина.
• Enable — для аутентификации требуется enable{password | secret}.
• Line — для аутентификации требуется пароль line (см. рис. 4 способ аутентификации “line”).
• None — аутентификация не требуется, доступ к устройству предоставляется без ввода логина и пароля.
• Group {tacacs+ | radius} — подключение серверов с установленным Tacacs+ (http://www.cisco.com/en/US/docs/ios/12_2/security/configuration/guide/scftplus.html#wp1000899) или Radius (http://www.cisco.com/en/US/docs/ios/12_2/security/configuration/guide/scfrad.html#wp1000902)для расширения возможностей конфигурации aaa.
• Group {group-name} — позволяет настроить группу серверов с установленным Tacacs+ или Radius или настроить частный сервер группы.
Наиболее интересным методом аутентификации является group: он довольно часто встречается в средних и крупных компаниях.
Ниже представлен пример настройки метода group, который обязательно должен реализовываться в совокупности со списками аутентификации.
Пример добавления группы серверов и частного сервера Radius:
Router(config)#aaa authentication login default group servradius1
Router(config)#aaa group server radius servradius1
Router(config-sg-radius)#server 192.168.1.1
Router(config-sg-radius)#server 192.168.1.2
Router(config-sg-radius)#server 192.168.1.3
Router(config-sg-radius)#server-private 192.168.1.10
На этом примере видно, что настроены три Radius-сервера. Но возникает вопрос: как они будут работать? Первое, что приходит в голову: скорее всего, они будут работать по очереди: при недоступности 192.168.1.1 идет обращение к 192.168.1.2 и т. д. Но это не так. В данном примере допущена ошибка: 192.168.1.1, 192.168.1.2, 192.168.1.3 настроены некорректно, а поэтому в аутентификации использоваться не будут. В данной конфигурации не хватает команды Router(config)#radius-server host для каждого из серверов. Более подробное описание настроек можно найти на ресурсах вендора (например: http://www.cisco.com/en/US/docs/ios/12_2/security/configuration/guide/scfrad.html). Схематично это можно представить следующим образом:

Рис. 5. Настройка аутентификации для метода group
Вот, собственно, и вся информация, которая поможет вам успешно настроить аутентификацию на вашем сетевом устройстве. Следуйте схеме, и если ваши настройки привели к “true”, значит будет счастье, а если к “false” — посмотрите на конфигурацию внимательно: возможно, где-то допущена ошибка или доступ к устройству возможен без ввода логина и пароля (способ аутентификации “none”). Надеюсь, статья оказалась полезной и помогла вам разобраться в нюансах конфигурации aaa.
Мы же, в свою очередь, всегда стараемся автоматизировать такие сложные проверки. Как пример — результат проверки MaxPatrol относительно службы ААА:

Рис. 6. Статус требования

Рис. 7. Результаты требования относительно службы ААА
Автор: Максим Хабрат, исследовательский центр Positive Research