
Добавил(а) microsin
Сначала нужно разъяснить значение некоторых терминов.
enable secret — пароль на вход в режим enable (привилегированный режим), который хранится в маршрутизаторе в зашифрованном виде.
enable password — то же самое, но хранится в незашифрованном виде.
virtual terminal password — пароль виртуального терминала, или пароль Telnet. Если он задан, то любой пользователь, который попытается получить доступ к маршрутизатору по протоколу Telnet, должен будет ввести этот пароль.
Теперь об основных операциях с пользователями и авторизацией.
Команда удаляет учётную запись oldusername:
Команда создаёт новую учётную запись:
username ciadmin privilege 15 secret NEWPASSWORD
Команда меняет пароль для существующей учетной записи, причем уровень privilege сохраняется старым:
username ciadmin secret NEWPASSWORD
Следующая команда меняет пароль режима enable. Вместо enable secret можно указать enable password, что то же самое, но пароль хранится в незашифрованном виде:
enable secret NEWPASSWORDSECRET
Следующие две строчки включают авторизацию по логину и паролю перед вводом пароля enable. Вторая строка включает метод аутентификации local, использующий базу данных aaa.
aaa new-model//разрешает модель контроля доступа aaa
aaa authentication login default local
Следующая команда дает возможность сразу после логина через сеть войти в привилегированный режим, не вводя команду enable (как-то непонятно написано в руководстве — «запускает авторизацию, чтобы определить, разрешено ли пользователю запускать шелл EXEC»).
aaa authorization exec default local
Когда в конфигурации указаны эти три строки (aaa new-model, aaa authentication login default local, aaa authorization exec default local), то для входа в режим enable через сетевое соединение будет предложен только логин и пароль пользователя (нужно ввести логин и пароль пользователя с уровнем привилегий 15), если законнектиться через консольный порт (RS232), то дополнительно нужно ввести еще ключевое слово enable и пароль enable secret. Если же 3 эти строки не указаны, то для входа в привилегированный режим через консоль достаточно ввести только логин и пароль пользователя с уровнем 15.
Здесь меняется пароль на vpn-клиент (группа vpnaccess):
tunnel-group vpnaccess ipsec-attributes
 pre-shared-key *
Команда, которая показывает пароли enable в конфиге в (открытом)закрытом виде:
(no) service password-encryption
Смена пароля пользователя на ASA через Cisco ASDM 5.1: Configuration -> Properties -> Device Administration -> User Accounts, выбираем пользователя, нажимаем кнопку Edit.
Objective
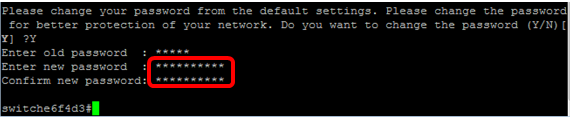
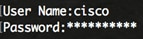
The first time that you log in to your switch through the console, you have to use the default username and password, which is cisco. You are then prompted to enter and configure a new password for the Cisco account. Password complexity is enabled by default. If the password that you choose is not complex enough, you are prompted to create another password.
Since passwords are used to authenticate users accessing the device, simple passwords are potential security hazards. Therefore, password complexity requirements are enforced by default and may be configured as necessary.
This article provides instructions on how to define basic password settings, line password, enable password, service password recovery, password complexity rules on the user accounts, and password aging settings on your switch through the Command Line Interface (CLI).
Note: You have the option to configure the password strength and complexity settings through the web-based utility of the switch as well. click here for instructions.
Applicable Devices | Software Version
- Sx300 Series | 1.4.7.06 (Download latest)
- Sx350 Series | 2.2.8.04 (Download latest)
- SG350X Series | 2.2.8.04 (Download latest)
- Sx500 Series | 1.4.7.06 (Download latest)
- Sx550X Series | 2.2.8.04 (Download latest)
Configure Password Settings through the CLI
From the options below, choose the password settings that you want to configure:
Configure Basic Password Settings
Configure Line Password Settings
Configure Enable Password Settings
Configure Service Password Recovery Settings
Configure Password Complexity Settings
Configure Password Aging Settings
Configure Basic Password Settings
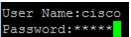
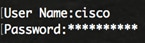
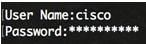
Step 1. Log in to the switch console. The default username and password is cisco.
Note: The available commands or options may vary depending on the exact model of your device. In this example, the SG350X switch is used.
Step 2. You will be prompted to configure new password for better protection of your network. Press Y for Yes or N for No on your keyboard.

Note: In this example, Y is pressed.
Step 3. Enter the old password then press Enter on your keyboard.

Step 4. Enter and confirm the new password accordingly then press Enter on your keyboard.
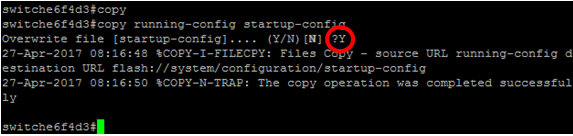
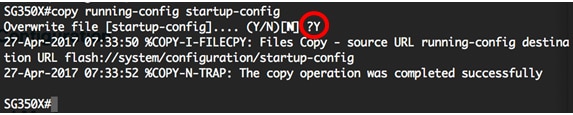
Step 5. Enter Privileged EXEC mode with the enable command. In the Privileged EXEC mode of the switch, save the configured settings to the startup configuration file, by entering the following:
SG350X#copy running-config startup-config

Step 6. (Optional) Press Y for Yes or N for No on your keyboard once the Overwrite file [startup-config]… prompt appears.
You should now have configured the basic password settings on your switch through the CLI.
Configure Line Password Settings
Step 1. Log in to the switch console. The default username and password is cisco. If you have configured a new username or password, enter those credentials instead.
Step 2. In the Privileged EXEC mode of the switch, enter the Global Configuration mode by entering the following:
SG350X#configure terminal
Step 3. To configure a password on a line such as console, Telnet, Secure Shell (SSH), and so on, enter the password Line Configuration mode by entering the following:
SG350X(config)#line [line-name]
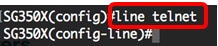
Note: In this example, the line used is Telnet.
Step 4. Enter the password command for the line by entering the following:
SG350X(config-line)#password [password][encrypted]
The options are:
- password — Specifies the password for the line. The length ranges from 0 to 159 characters.
- encrypted — (Optional) Specifies that the password is encrypted and copied from another device configuration.
Note: In this example, the password Cisco123$ is specified for the Telnet line.

Step 5. (Optional) To return the line password to the default password, enter the following:
SG350X(config-line)#no password
Step 6. Enter the end command to go back to the Privileged EXEC mode of the switch.
SG350X(config)#end
Step 7. (Optional) In the Privileged EXEC mode of the switch, save the configured settings to the startup configuration file, by entering the following:
SG350X#copy running-config startup-config

Step 8. (Optional) Press Y for Yes or N for No on your keyboard once the Overwrite file [startup-config]… prompt appears.

You should now have configured the line password settings on your switch through the CLI.
Configure Enable Password Settings
When you configure a new enable password, it is automatically encrypted and saved to the running configuration file. No matter how the password was entered, it will appear in the running configuration file with the keyword encrypted together with the encrypted password.
Follow these steps to configure the enable password settings on your switch through the CLI:
Step 1. Log in to the switch console. The default username and password is cisco. If you have configured a new username or password, enter those credentials instead.
Step 2. In the Privileged EXEC mode of the switch, enter the Global Configuration mode by entering the following:
SG350X#configure terminal
Step 3. To configure a local password on specific user access levels on your switch, enter the following:
SG350X(config)#enable password [level privilege-level] [unencrypted-password | encrypted encrypted-password]
The options are:
- level privilege-level — Specifies the level for which the password applies. The level ranges from 1 to 15. If not specified, the level is set to the default value of 15. The user levels are as follows:
— Read-Only CLI Access (1) — User cannot access the GUI, and can only access CLI commands that do not change the device configuration.
— Read/Limited Write CLI Access (7) — User cannot access the GUI, and can only access some CLI commands that change the device configuration. See the CLI Reference Guide for more information.
— Read/Write Management Access (15) — User can access the GUI, and can configure the device.
SG350X(config)#enable password level 7 Cisco123$
Note: In this example, the password Cisco123$ is set for the level 7 user account.
- unencrypted-password — The password for the username that you are currently using. The length ranges from 0 to 159 characters.
SG350X(config)#enable password level Cisco123$
Note: In this example, the password Cisco123$ is used.
- encrypted encrypted-password — Specifies that the password is encrypted. You can use this command to enter a password that is already encrypted from another configuration file of another device. This will allow you to configure the two switches with the same password.
SG350X(config)#enable password encrypted 6f43205030a2f3a1e243873007370fab
Note: In this example, the encrypted password used is 6f43205030a2f3a1e243873007370fab. This is the encrypted version of Cisco123$.

Note: In the above example, the enable password Cisco123$ is set for the level 7 access.
Step 4. (Optional) To return the user password to the default password, enter the following:
SG350X(config)#no enable password
Step 5. Enter the exit command to go back to the Privileged EXEC mode of the switch.
SG350X(config)#exit
Step 6. (Optional) In the Privileged EXEC mode of the switch, save the configured settings to the startup configuration file, by entering the following:
SG350X#copy running-config startup-config

Step 7. (Optional) Press Y for Yes or N for No on your keyboard once the Overwrite file [startup-config]… prompt appears.

You should now have configured the enable password settings on your switch through the CLI.
Configure Service Password Recovery Settings
The service password recovery mechanism provides you with physical access to the console port of the device with the following conditions:
- If password recovery is enabled, you can access the boot menu and trigger the password recovery in the boot menu. All configuration files and user files are kept.
- If password recovery is disabled, you can access the boot menu and trigger the password recovery in the boot menu. The configuration files and user files are removed.
- If a device is configured to protect its sensitive data with a user-defined passphrase for Secure Sensitive Data, then you cannot trigger the password recovery from the boot menu even if password recovery is enabled.
Service password recovery is enabled by default. Follow these steps to configure the service password recovery settings on your switch through the CLI:
Step 1. Log in to the switch console. The default username and password is cisco. If you have configured a new username or password, enter those credentials instead.
Step 2. In the Privileged EXEC mode of the switch, enter the Global Configuration mode by entering the following:
SG350X#configure terminal
Step 3. (Optional) To enable the password recovery setting on the switch, enter the following:
SG350X#service password-recovery

Step 4. (Optional) To disable the password recovery setting on the switch, enter the following:
SG350X#no service password-recovery

Step 5. (Optional) Press Y for Yes or N for No on your keyboard once prompt below appears.

Note: In this example, Y is pressed.
Step 6. Enter the exit command to go back to the Privileged EXEC mode of the switch.
SG350X(config)#exit
Step 7. (Optional) In the Privileged EXEC mode of the switch, save the configured settings to the startup configuration file, by entering the following:
SG350X#copy running-config startup-config

Step 8. (Optional) Press Y for Yes or N for No on your keyboard once the Overwrite file [startup-config]… prompt appears.
You should now have configured the password recovery settings on your switch through the CLI.
Configure Password Complexity Settings
The password complexity settings of the switch enable complexity rules for passwords. If this feature is enabled, new passwords must conform to the following default settings:
- Have a minimum length of eight characters.
- Contain characters from at least four character classes such as uppercase letters, lowercase letters, numbers, and special characters available on a standard keyboard.
- Are different from the current password.
- Contain no character that is repeated more than three times consecutively.
- Do not repeat or reverse the users name or any variant reached by changing the case of the characters.
- Do not repeat or reverse the manufacturers name or any variant reached by changing the case of the characters.
You can control the above attributes of password complexity with specific commands. If you have previously configured other complexity settings, then those settings are used.
This feature is enabled by default. Follow these steps to configure the password complexity settings on your switch through the CLI:
Step 1. Log in to the switch console. The default username and password is cisco. If you have configured a new username or password, enter those credentials instead.

Step 2. In the Privileged EXEC mode of the switch, enter the Global Configuration mode by entering the following:
SG350X#configure terminal
Step 3. (Optional) To enable the password complexity settings on the switch, enter the following:
SG350X(config)#passwords complexity enable

Step 4. (Optional) To disable the password complexity settings on the switch, enter the following:
SG350X(config)#no passwords complexity enable
Step 5. (Optional) To configure the minimum requirements for a password, enter the following:
SG350X(config)#passwords complexity [min-length number] [min-classes number] [not-current] [no-repeat number] [not-username] [not manufacturer-name]
The options are:
- min-length number — Sets the minimal length of the password. The range is from 0 to 64 characters. The default value is 8.
- min-classes number — Sets the minimal character classes such as uppercase letters, lowercase letters, numbers, and special characters available on a standard keyboard. The range is from 0 to 4 classes. The default value is 3.
- not-current — Specifies that the new password cannot be the same as the current password.
- no-repeat number — Specifies the maximum number of characters in the new password that can be repeated consecutively. Zero specifies that there is no limit on repeated characters. The range is from 0 to 16 characters. The default value is 3.
- not-username — Specifies that the password cannot repeat or reverse the user name or any variant reached by changing the case of the characters.
- not-manufacturer-name — Specifies that the password cannot repeat or reverse the name of the manufacturer or any variant reached by changing the case of the characters.
Note: These commands do not wipe out the other settings. Configuring the passwords complexity settings only work as a toggle.
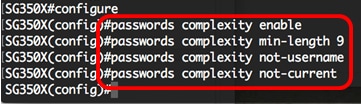
Note: In this example, the password complexity is set to at least 9 characters, cannot repeat or reverse the user name, and cannot be the same as the current password.
Step 6. Enter the exit command to go back to the Privileged EXEC mode of the switch.
SG350X(config)#exit
Step 7. (Optional) In the Privileged EXEC mode of the switch, save the configured settings to the startup configuration file, by entering the following:
SG350X#copy running-config startup-config

Step 8. (Optional) Press Y for Yes or N for No on your keyboard once the Overwrite file [startup-config]… prompt appears.

You should now have configured the password complexity settings on your switch through the CLI.
To show the password configuration settings on the CLI of your switch, skip to Show Passwords Configuration Settings.
Configure Password Aging Settings
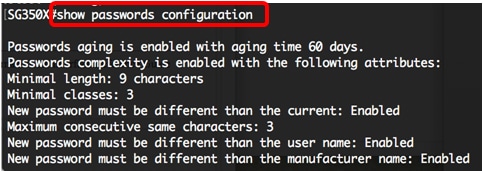
Aging is relevant only to users of the local database with privilege level 15 and to configured enable passwords of privilege level 15. The default configuration is 180 days.
Follow these steps to configure the password aging settings on your switch through the CLI:
Step 1. Log in to the switch console. The default username and password is cisco. If you have configured a new username or password, enter those credentials instead.
Step 2. In the Privileged EXEC mode of the switch, enter the Global Configuration mode by entering the following:
SG350X#configure terminal
Step 3. To specify the password aging setting on the switch, enter the following:
SG350X(config)#passwords aging [days]
- days — Specifies the number of days before a password change is forced. You can use 0 to disable aging. The range is from 0 to 365 days.
Note: In this example, the password aging is set to 60 days.

Step 4. (Optional) To disable password aging on the switch, enter the following:
SG350X(config)#no passwords aging 0
Step 5. (Optional) To return the password aging to the default setting, enter the following:
SG350X(config)#no passwords aging [days]
Step 6. Enter the exit command to go back to the Privileged EXEC mode of the switch.
SG350X(config)#exit
Step 7. (Optional) In the Privileged EXEC mode of the switch, save the configured settings to the startup configuration file, by entering the following:
SG350X#copy running-config startup-config

Step 8. (Optional) Press Y for Yes or N for No on your keyboard once the Overwrite file [startup-config]… prompt appears.

You should now have configured the password aging settings on your switch through the CLI.
To show the password configuration settings on the CLI of your switch, skip to Show Passwords Configuration Settings.
Show Passwords Configuration Settings
Aging is relevant only to users of the local database with privilege level 15 and to configured enable passwords of privilege level 15. The default configuration is 180 days.
Step 1. In the Privileged EXEC mode of the switch, enter the following:
SG350X(config)#show passwords configuration
Revision History
| Revision | Publish Date | Comments |
|---|---|---|
|
1.0 |
13-Dec-2018 |
Initial Release |
Для того, чтобы поменять пароль у пользователя на коммутаторе или маршрутизаторе Cisco — логинимся и выполняем:
>enable
#config t
(config)# enable password MySuperPassword
(config)# username mylogin password UsersPassword
В этом примере мы задаем пароль MySuperPassword для входа в режим конфигурирования (на команду enable) и пароль UsersPassword для пользователя mylogin.
Соответственно, вместо mylogin нужно подставить имя пользователя, для которого хотите менять пароль.
Соответственно и то, что можно менять не оба пароля, а только какой-то один (для enable или для пользователя) или менять пароль для какого угодно пользователя.
Смена пароля пользователя на ASA через Cisco ASDM 5.1: Configuration -> Properties -> Device Administration -> User Accounts, выбираем пользователя, нажимаем кнопку Edit.
enable secret — пароль на вход в режим enable (привилегированный режим), который хранится в маршрутизаторе в зашифрованном виде.
enable password — то же самое, но хранится в незашифрованном виде.
virtual terminal password — пароль виртуального терминала, или пароль Telnet. Если он задан, то любой пользователь, который попытается получить доступ к маршрутизатору по протоколу Telnet, должен будет ввести этот пароль.
Теперь об основных операциях с пользователями и авторизацией.
Команда удаляет учетную запись oldusername:
Команда создает новую учетную запись:
username ciadmin privilege 15 secret NEWPASSWORD
Команда меняет пароль для существующей учетной записи, причем уровень privilege сохраняется старым:
username ciadmin secret NEWPASSWORD
Следующая команда меняет пароль режима enable. Вместо enable secret можно указать enable password, что то же самое, но пароль хранится в незашифрованном виде:
enable secret NEWPASSWORDSECRET
Следующие две строчки включают авторизацию по логину и паролю перед вводом пароля enable. Вторая строка включает метод аутентификации local, использующий базу данных aaa.
aaa new-model//разрешает модель контроля доступа aaa
aaa authentication login default local
Следующая команда дает возможность сразу после логина через сеть войти в привилегированный режим, не вводя команду enable (как-то непонятно написано в руководстве — «запускает авторизацию, чтобы определить, разрешено ли пользователю запускать шелл EXEC»).
aaa authorization exec default local
Когда в конфигурации указаны эти три строки (aaa new-model, aaa authentication login default local, aaa authorization exec default local), то для входа в режим enable через сетевое соединение будет предложен только логин и пароль пользователя (нужно ввести логин и пароль пользователя с уровнем привилегий 15), если законнектиться через консольный порт (RS232), то дополнительно нужно ввести еще ключевое слово enable и пароль enable secret. Если же 3 эти строки не указаны, то для входа в привилегированный режим через консоль достаточно ввести только логин и пароль пользователя с уровнем 15.
Здесь меняется пароль на vpn-клиент (группа vpnaccess):
tunnel-group vpnaccess ipsec-attributes
 pre-shared-key *
Команда, которая показывает пароли enable в конфиге в (открытом)закрытом виде:
(no) service password-encryption
Настройка программы работы через com порт
#Установка программы
apt-get install minicom
#Ищем com порт
dmesg|grep ttyS
#Настройка параметров
minicom -s
Выставляем порт. Выставляем скорость 9600
#Запуск
sudo minicom
Вывод справки
shift-?
Режим администратора
enable
Просмотр файла конфигурации
sh run --
Краткая информация о портах
sh int desc
Подробная информация о порте
sh int gi0/1
Переход в режим конфигурирования
configure t
Сброс параметров интерфейса в стандартные
defaul interface GigabitInterface 0/13
Добавление порта в vlan
interface GigabitEthernet 0/13
switchport mode access
switchport access vlan 10
Определить в trance или в access вторая сторона
interface GigabitEthernet 0/13
switchport nonegotiate
Включить/выключить порт
interface GigabitEthernet 0/13
no shutdown
shutdown
Создание нового vlan
vlan xxx
name имя
decr описание
Перевести порт в режим быстрой инициализации
spanning-tree portfast
Указать время инициализации порта (время обучения)
spanning-tree [vlan stp-list ] forward-time seconds
Смена административного пароля
enable secret <новый пароль>
Смена пароля пользователя
username cisco password <новый пароль для этого пользователя>
Сохрание параметров
(old) copy running-config startup-config
(new) copy system:running-config nvram:startup-config
Перевод порта в trank-овый режим
interfaces Gi 0/xxx
switchport mode trunk
Включаем SSH. Отключаем telnet:
crypto key generate rsa
1024
line vty 0 4
transport input ssh
Назначаем ip адрес интерфейсу
enable
conf t
int vlan 5
ip address x.x.x.x 255.y.y.y
Указать пароль для telnet
en
conf t
line vty 0 4
login
password pass
Включение в vtp домен
sw(config)# vtp domain <domain-name>
Пароль к vtp домену
sw(config)# vtp password <password>
Режим работы vtp
sw(config)# vtp mode <client | server | transparent>
Сброс пароля на коммутаторе Cisco Catalyst 2950
- Подключиться к консоли на коммутаторе с помощью кабеля COM-RJ45
Параметры терминального соединения:
бит в секунду (бод): 9600
бит данных: 8
четность: нет
стоп-бит: 1
контроль передачи: Xon/Xoff
- Отключить кабель питания коммутатора.
- Нажать и удерживать кнопку Mode на коммутаторе, снова подключить кабель питания к коммутатору.
- Чтобы предотвратить автоматическую загрузку коммутатора (произойдет через 15 секунд), нажать break-последовательность (Ctrl+Break в HyperTerminal) (У меня не успевала загрузиться).
- После загрузки и появления строки приглашения набрать команду flash_init.
- Набрать команду load_helper.
- Набрать команду «dir flash:» (ошибка многих статьей указание набирать «dir flash», нужно именно на конце «:»). Появится список файлов, содержащихся во flash-памяти коммутатора, среди них должен быть файл конфигурации — config.text.
- Набрать команду rename flash:config.text flash:config.old для переименования
конфигурационного файла.
- Набрать команду boot.
- В конце процесса загрузки нажать n, чтобы начать процесс установки.
- Набрать enable для входа в привилегированный режим, набрать команду rename
flash:config.old config.text.
- Набрать команды: configure terminal, no enable secret (для сброса пароля,
если он был установлен), enable password cisco (устанавливаем новый пароль cisco).
- Нажать Ctrl+Z, набрать команду write memory для сохранения параметров.
Перезагрузка
#reload
Просмотр информации о vlan-ах на интерфейсе
show interfaces GigabitEthernet 0/21 trunk
Разрешить vlan на интерфейсе
(config-if)#switchport trunk allowed vlan