1 POWER LED
It lights up when printer power is turned
on. (green)
2 ERROR LED
This is lit or flashes when the printer is
in error status. (orange)
Table of Alarm and Error Indications
In addition to normal operating mode, when an abnormal condition is detected
in the printer, an alarm sounds and ERROR LED either lights up or flashes to
indicate the type of error. The LCD indicates the error message.
Item
Printing possible (no error)
Stop or Pause key on operation panel pressed
Head temperature — high temperature abnormality
Head temperature — low temperature abnormality
PF motor temperature abnormality
Fan motor malfunction
Cutter motor temperature abnormality
Head open
Paper end
Paper out (paper position undetectable)
Paper jam
Head low resistance value abnormality
Ribbon end
Communication error (receiving buffer overrun)
Communication error (parity)
Communication error (framing)
Cover open
Auto-cutter abnormality (foreign object etc.)
21
Printer Operation
Normal Operating Mode
1
POWER
ERROR
FEED
2
PAUSE
STOP
MENU
ERROR LED
LCD
OFF
On Line
OFF
Pause
Alarm
Flashing
Head Hot
Error
Flashing
Head Cold
Alarm
Flashing
PFMotor Hot
Error
Flashing
Fan Lock
Alarm
Flashing
Cutter Hot
Error
Flashing
Head Open
Error
Flashing
Paper End
Error
Flashing
Paper Load
Error
Flashing
Paper Jam
Alarm
Flashing
Head Check
Error
Flashing
Ribbon End
Error
Flashing
Serial Over Run
Error
Flashing
Serial Parity
Error
Flashing
Serial Framing
Error
Flashing
Cover Open
Error
Flashing
Cutter Fail
21
Printer Operation
LED Functions
1 POWER LED
It lights up when printer power is turned
on. (green)
2 ERROR LED
This is lit or flashes when the printer is
in error status. (orange)
Table of Alarm and Error Indications
In addition to normal operating mode, when an abnormal condition is detected
in the printer, an alarm sounds and ERROR LED either lights up or flashes to
indicate the type of error. The LCD indicates the error message.
POWER
ERROR
FEED
STOP
MENU
PAUSE
1
2
Normal Operating Mode
Item
ERROR LED
LCD
Printing possible (no error)
OFF
On Line
Stop or Pause key on operation panel pressed
OFF
Pause
Head temperature — high temperature abnormality
Flashing
Alarm
Head Hot
Head temperature — low temperature abnormality
Flashing
Error
Head Cold
PF motor temperature abnormality
Flashing
Alarm
PFMotor Hot
Fan motor malfunction
Flashing
Error
Fan Lock
Cutter motor temperature abnormality
Flashing
Alarm
Cutter Hot
Head open
Flashing
Error
Head Open
Paper end
Flashing
Error
Paper End
Paper out (paper position undetectable)
Flashing
Error
Paper Load
Paper jam
Flashing
Error
Paper Jam
Head low resistance value abnormality
Flashing
Alarm
Head Check
Ribbon end
Flashing
Error
Ribbon End
Communication error (receiving buffer overrun)
Flashing
Error
Serial Over Run
Communication error (parity)
Flashing
Error
Serial Parity
Communication error (framing)
Flashing
Error
Serial Framing
Cover open
Flashing
Error
Cover Open
Auto-cutter abnormality (foreign object etc.)
Flashing
Error
Cutter Fail
Chapter 4 Troubleshooting
4-1. Error Message and Corrective Actions
4-3
CL-S700/CL-S703/CL-S700R
4-1. Error Message and Corrective Actions
When an error occurs, the error condition will be displayed on the operation panel. The ERROR
LED flashes and the LCD shows the error contents.
In case of error, the printer enters off line except for the following errors.
— LCD:
Alarm
Head
Hot
— LCD:
Alarm
PFMotor
Hot
— LCD:
Alarm
Cutter
Hot
Causes/Corrective Actions
ERROR LED
LCD
Head temperature — high temperature abnormality
• Printing stops temporarily.
Wait until the thermal head gets cool.
Flashing Alarm
Head Hot
Head temperature — low temperature abnormality
• Printing is impossible. Start printing after the
thermal head becomes warm.
Flashing Error
Head Cold
PF motor temperature abnormality
• Printing stops temporarily. Wait until the motor
gets cool.
Flashing Alarm
PFMotor Hot
Fan motor malfunction
• Remove obstacle, if any.
• Firmly connect the cable (J12 on “SA, Main
PCB”).
• Replace the “SA, Fan”.
Flashing Error
Fan Lock
Cutter motor temperature abnormality (Option)
• Cutting action stops temporarily.
Wait until the cutter motor gets cool.
Flashing Alarm
Cutter Hot
Head open
• Close the head.
Flashing Error
Head Open
Paper end
• Add media.
Flashing Error
Paper End
Paper out (paper position undetectable)
• Incorrect Adjustable Sensor positioning:
Correct the sensor position to match the sensor
position with the label/tag’s black mark.
• Incorrect Media mode menu:
Match the Media mode menu (e.g. SeeThrough)
and media to be used.
Flashing Error
Paper Load
• Incorrect sensor adjustment against media to be
used:
Enter sensor adjustment mode
While pressing [MENU], [FEED] and [STOP]
Содержание
- Руководство по эксплуатации Citizen CL-S700
- Руководство по эксплуатации для устройства Citizen CL-S700
- Как пользоваться?
- Citizen CL-S700 User Manual 2
- CONTENTS
- INTRODUCTION
- IMPORTANT SAFETY INSTRUCTIONS
- NOTICE
- Citizen CL-E321 не видит этикетку. Диагностика. Ремонт.
Руководство по эксплуатации Citizen CL-S700
Руководство по эксплуатации для устройства Citizen CL-S700
Устройство: Citizen CL-S700
Размер: 1,65 MB
Добавлено: 2014-06-20 20:47:48
Количество страниц: 64
Печатать инструкцию
Как пользоваться?
Наша цель — обеспечить Вам самый быстрый доступ к руководству по эксплуатации устройства Citizen CL-S700 . Пользуясь просмотром онлайн Вы можете быстро просмотреть содержание и перейти на страницу, на которой найдете решение своей проблемы с Citizen CL-S700 .
Для Вашего удобства
Если просмотр руководства Citizen CL-S700 непосредственно на этой странице для Вас неудобен, Вы можете воспользоваться двумя возможными решениями:
- Полноэкранный просмотр -, Чтобы удобно просматривать инструкцию (без скачивания на компьютер) Вы можете использовать режим полноэкранного просмотра. Чтобы запустить просмотр инструкции Citizen CL-S700 на полном экране, используйте кнопку Полный экран .
- Скачивание на компьютер — Вы можете также скачать инструкцию Citizen CL-S700 на свой компьютер и сохранить ее в своем архиве. Если ты все же не хотите занимать место на своем устройстве, Вы всегда можете скачать ее из ManualsBase.
Печатная версия
Многие предпочитают читать документы не на экране, а в печатной версии. Опция распечатки инструкции также предусмотрена и Вы можете воспользоваться ею нажав на ссылку, находящуюся выше — Печатать инструкцию . Вам не обязательно печатать всю инструкцию Citizen CL-S700 а только некоторые страницы. Берегите бумагу.
Резюме
Ниже Вы найдете заявки которые находятся на очередных страницах инструкции для Citizen CL-S700 . Если Вы хотите быстро просмотреть содержимое страниц, которые находятся на очередных страницах инструкции, Вы воспользоваться ими.
Источник
Citizen CL-S700 User Manual 2
Thermal Transfer Barcode & Label Printer
CONTENTS
COMPLIANCE STATEMENT FOR EUROPEAN USERS ——————————
FCC COMPLIANCE STATEMENT FOR AMERICAN USERS ————————
EMI COMPLIANCE STATEMENT FOR CANADIAN USERS————————
ETAT DE CONFORMITE EMI A L’USAGE DES UTILISATEURS CANADIENS ——
Chapter 1 Setup
Chapter 2 Printer Operation
Chapter 3 Printer Adjustments
INTRODUCTION
Thank you for purchasing a Citizen CL-series label printer offering high performance printing at up to 10 inches per second on media up to 4.65 inches wide.
The printer is designed for all day-to-day operations to be accessible from the front of the printer so there is no need to move items near to the printer for access for media loading.
TM printer case>
The main printer’s case lifts directly upwards meaning that no space is needed on either side of the printer. The power switch is located in a recessed panel at the front of the printer so it can be easily accessed without moving the printer.
The Hi-Lift TM metal print head mechanism opens so that it is completely clear of the media path so that the paper and ribbons can be loaded without any part of the printer in the way.
The clear, easy-to-see backlit LCD makes both configuration and operation easy with simple messages about the printer’s status and also the ability for quick configuration when needed.
The printer features an adjustable media sensor which allows the customer to use any type of media. The media (label) rolls can be inside or outside would. Similarly, the ink ribbon can be wound either way: ‘ink in’ or ‘in out’.
The patented ARCP TM function — Active Ribbon Control and Positioning — maintains even ribbon tension from beginning to end of a ribbon. This eliminates ribbon wrinkle and improves print positioning, especially for small labels. Smudging caused by ribbon slippage is also removed.
This printer contains both the Datamax and Zebra emulations. By using the keys on the operation panel, it is easy to simply switch between the two emulations to run your program.
Parallel, Serial and USB interfaces are supplied as standard and optional Ethernet and Wireless LAN boards can be fitted quickly and easily. An auto-cutter and peeler option is also available and can be easily installed.
FOR EUROPEAN USERS
CE marking shows conformity to the following criteria and provisions: Low Voltage Directive (73/23/EEC)/EN60950-1
EMC Directive (89/336/EEC)/EN55022, EN55024, EN61000-3-2 & EN61000-3-3
This product has been tested under EN ISO 7779 and has an acoustic level output no higher than 55db(A).
This device is not intended for use at a video workstation in compliance with Bildscharb V.
FCC COMPLIANCE STATEMENT
FOR AMERICAN USERS
This equipment has been tested and found to comply with the limits for a Class A digital device, pursuant to Part 15 of the FCC Rules. These limits are designed to provide reasonable protection against harmful interference when the equipment is operated in a commercial environment. This equipment generates, uses, and can radiate radio frequency energy and, if not installed and used in accordance with the instruction manual, may cause harmful interference to radio communications. Operation of this equipment in a residential area is likely to cause harmful interference in which case the user will be required to correct the interference at his own expense.
EMI COMPLIANCE STATEMENT
FOR CANADIAN USERS
This Class A digital apparatus complies with Canadian ICES-003.
This equipment generates and uses radio frequency energy and if not installed and used properly, that is, in strict accordance with the manufacturer’s instructions, may cause interference to radio and television reception. This digital apparatus does not exceed the Class A limits for radio noise emissions from digital apparatus set out in the Radio Interference Regulations of the Canadian Department of Communications. This equipment is designed to provide reasonable protection against such interference in a residential installation. However, there is no guarantee that interference will not occur in a particular installation. If this equipment does cause interference to radio or television reception, which can be determined by turning the equipment off and on, the user is encouraged to try to correct the interference by one or more of the following measures:
• Reorient or relocate the receiving antenna.
• Increase the separation between the equipment and receiver.
• Connect the equipment into an outlet on a circuit different from that to which the receiver is connected.
• Consult the dealer or an experienced radio/TV technician for help.
CAUTION: Use shielded cables to connect this device to computers.
Any changes or modifications not expressly approved by the grantee of this device could void the user’s authority to operate the equipment.
ETAT DE CONFORMITE EMI A L’USAGE
DES UTILISATEURS CANADIENS
Cet appareil numérique de la classe A est conforme à la norme NMB-003 du Canada.
Cet équipment produit et utilise l’énergie à radiofréquences et s’iln’est pas installé et utilisé correctment, c’esst à dire en accord strict avec les instructions du fabricant, il risque de provoquer des intérferences avec la réception de la radio et de latélévision.
Le présent appareil numérique n’émet pas de bruite radio électriques dépassant les limites applicables aux appareils numériques de la classe A prescrites dans le Réglement sur le brouillage radioélectrique édicté par le ministère des Communications du Canada.
Cet équipment est conçu pour fournir une protection satisfaisante contre de telles interférences dans une installation résidentielle. Cependant, il n’y a pas de garantie contre les interférences avec les réceptions radio ou télévision, provoquées par la mise en et hors circuit de l’équipment; aussi, il est demandé a l’utilisateur d’essayer de corriger l’interférence par l’une ou plus des mesures suivantes:
• Réorienter l’antenne de réception.
• Installer l’ordinateur autre part, par égard pour le récepteur.
• Brancher l’ordinateur dans une prise de courant différente de façon à ce que l’ordinateur et le récepteur soient branchés sur des circuits différents.
IMPORTANT SAFETY INSTRUCTIONS
• Read all of these instructions and save them for later reference.
• Follow all warnings and instructions marked on the product.
• Unplug this product from the wall outlet before cleaning. Do not use liquid or aerosol cleaners. Use a damp cloth for cleaning.
• Do not use this product near water.
• Do not place this product on an unstable cart, stand or table. The product may fall, causing serious damage to the product.
• Slots and openings on the cabinet and the back or bottom are provided for ventilation.
To ensure reliable operation of the product and to protect it from overheating, do not block or cover these openings. The openings should never be blocked by placing the product on a bed, sofa, rug or other similar surface. This product should never be placed near or over a radiator or heat register. This product should not be placed in a built-in installation unless proper ventilation is provided.
• This product should be operated from the type of power source indicated on the marking label. If you are not sure of the type of power available, consult your dealer or local power company.
• This product is equipped with a three-pronged plug, a plug having a third (grounding) pin. This plug will only fit into a grounding-type power outlet. This is a safety feature. If you are unable to insert the plug into the outlet, contact your electrician to replace your obsolete outlet. Do not defeat the safety purpose of the grounding-type plug.
• Do not allow anything to rest on the power cord. Do not locate this product where the cord will be walked on.
• If an extension cord is used with this product, make sure that the total of the ampere ratings on the products plugged into the extension cord do not exceed the extension cord ampere rating. Also, make sure that the total of all products plugged into the wall outlet does not exceed 15 amperes for 120V outlet and 7.5 amperes for 220V-240V outlet.
• Never push objects of any kind into this product through cabinet slots as they may touch dangerous voltage points or short out parts that could result in a risk of fire or electric shock. Never spill liquid of any kind on the product.
• Except as explained elsewhere in this manual, don’t attempt to service this product yourself. Opening and removing those covers that are marked «Do Not Remove» may expose you to dangerous voltage points or other risks. Refer all servicing on those compartments to service personnel.
• The mains plug on this equipment must be used to disconnect mains power. Please ensure that the socket outlet is installed near the equipment and shall be easily accessible.
• Unplug this product from the wall outlet and refer servicing to qualified service personnel under the following conditions:
A. When the power cord or plug is damaged or frayed. B. If liquid has been spilled into the product.
C. If the product has been exposed to rain or water.
D. If the product does not operate normally when the operating instructions are followed. Adjust only those controls that are covered by the operating instructions since improper adjustment of other controls may result in damage and will often require extensive work by a qualified technician to restore the product to normal operation.
E. If the product has been dropped or the cabinet has been damaged.
F. If the product exhibits a distinct change in performance, indicating a need for service.
NOTICE
• Before use, be sure to read this manual. And keep it handy for reference when needed.
• The contents of this manual may change without prior notice.
• Reproduction, transfer, or transmission of the contents of this manual without prior consent is strictly prohibited.
• We are not liable for any damage resulting from the use of the information contained herein, regardless of errors, omissions, or misprints.
• We are not liable for any problems resulting from the use of optional products and consumable supplies other than the designated products contained herein.
• Do not handle, disassemble or repair the parts other than those specified in this manual.
• We are not liable for any damage caused by user’s erroneous use of the printer and inadequate environment.
• Data residing in the printer is temporary. Therefore, all data will be lost if power is lost. We are not liable for any damage or loss of profits caused by data loss due to failures, repairs, inspections, etc.
• Please contact us if there are any mistakes or ambiguities within this manual.
• If there are missing or incorrectly collated pages in this manual, contact us to obtain a new manual.
CITIZEN is a registered trademark of CITIZEN HOLDINGS CO., Japan.
CITIZEN es una marca registrada de CITIZEN HOLDINGS CO., Japón.
Copyright © 2007 by CITIZEN SYSTEMS JAPAN CO., LTD.
Источник
Citizen CL-E321 не видит этикетку. Диагностика. Ремонт.
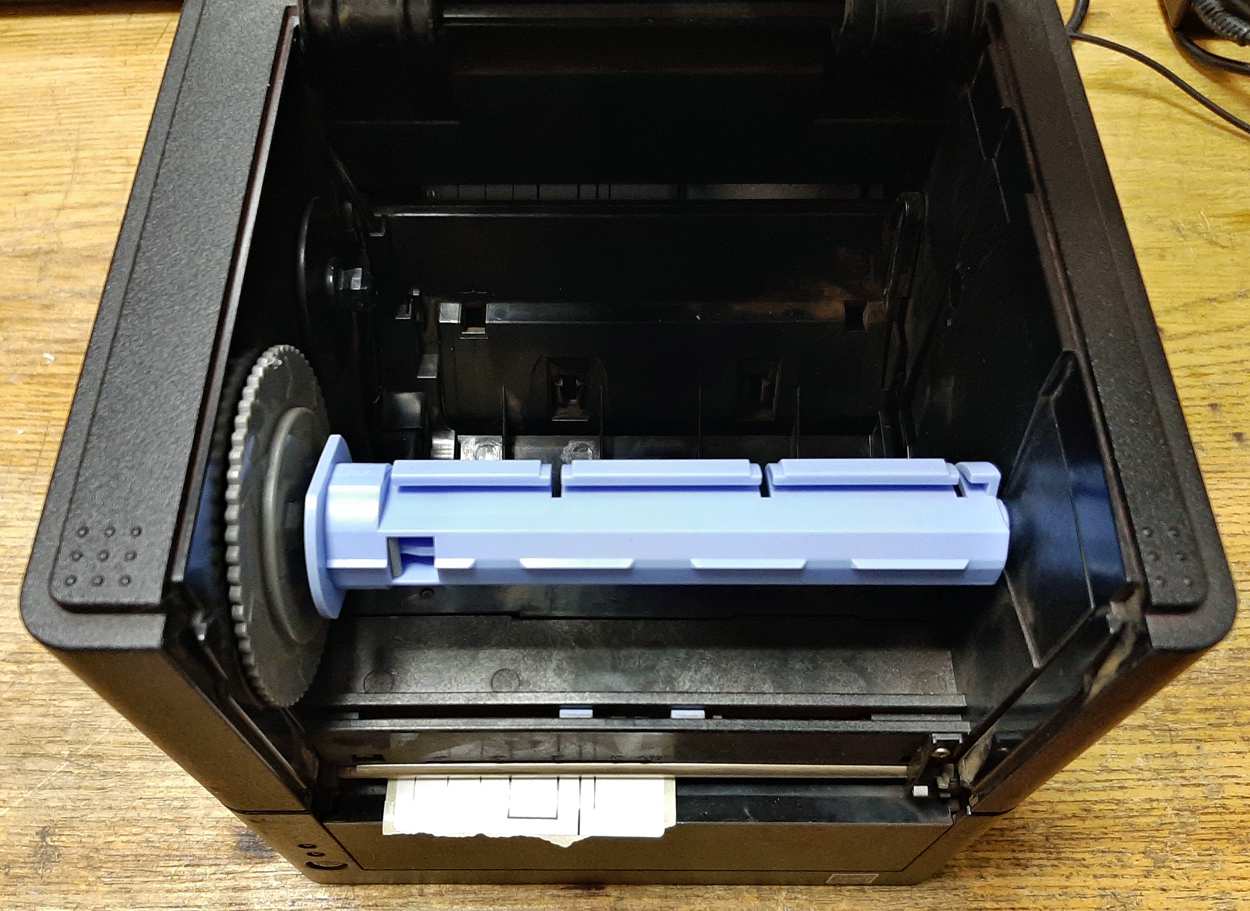
Неисправность со слов заказчика. При нажатии клавиши FEED принтер выдает несколько этикеток (может и не выдавать) начинает моргать красным светодиодом 4 раза и издавать столько же коротких писков.
Первичная диагностика. Довольно характерная неисправность для принтера имеющего управление меню через клавишу FFED. Для устранения проблемы воспользуемся утилитой LabelPrinterUtility, для начала переключим принтер из термотрансферной печати в режим прямой печати и установим датчик этикетки на просвет.
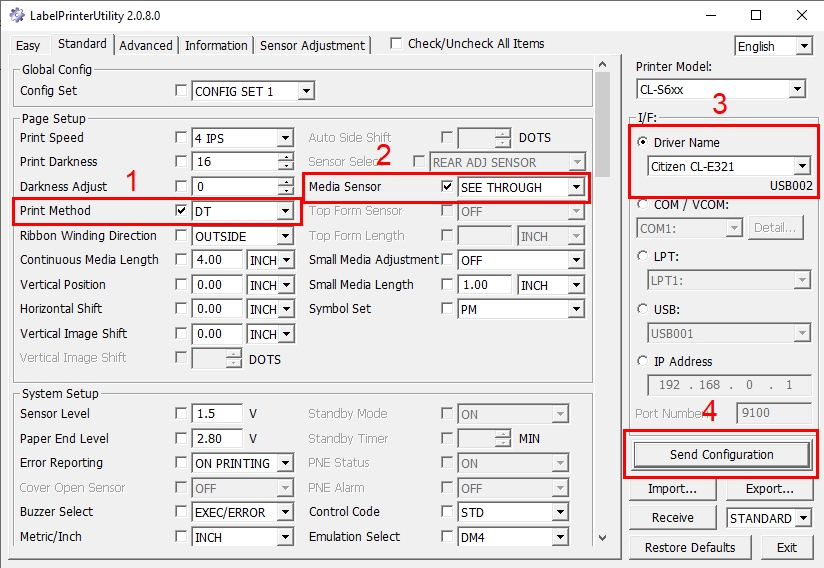
Устанавливаем прямую печать и датчик этикетки на просвет из утилиты LabelPrinterUtility
Данное действие обычно делает принтер работоспособным с большой долей вероятности, но в нашем случае этого не произошло.
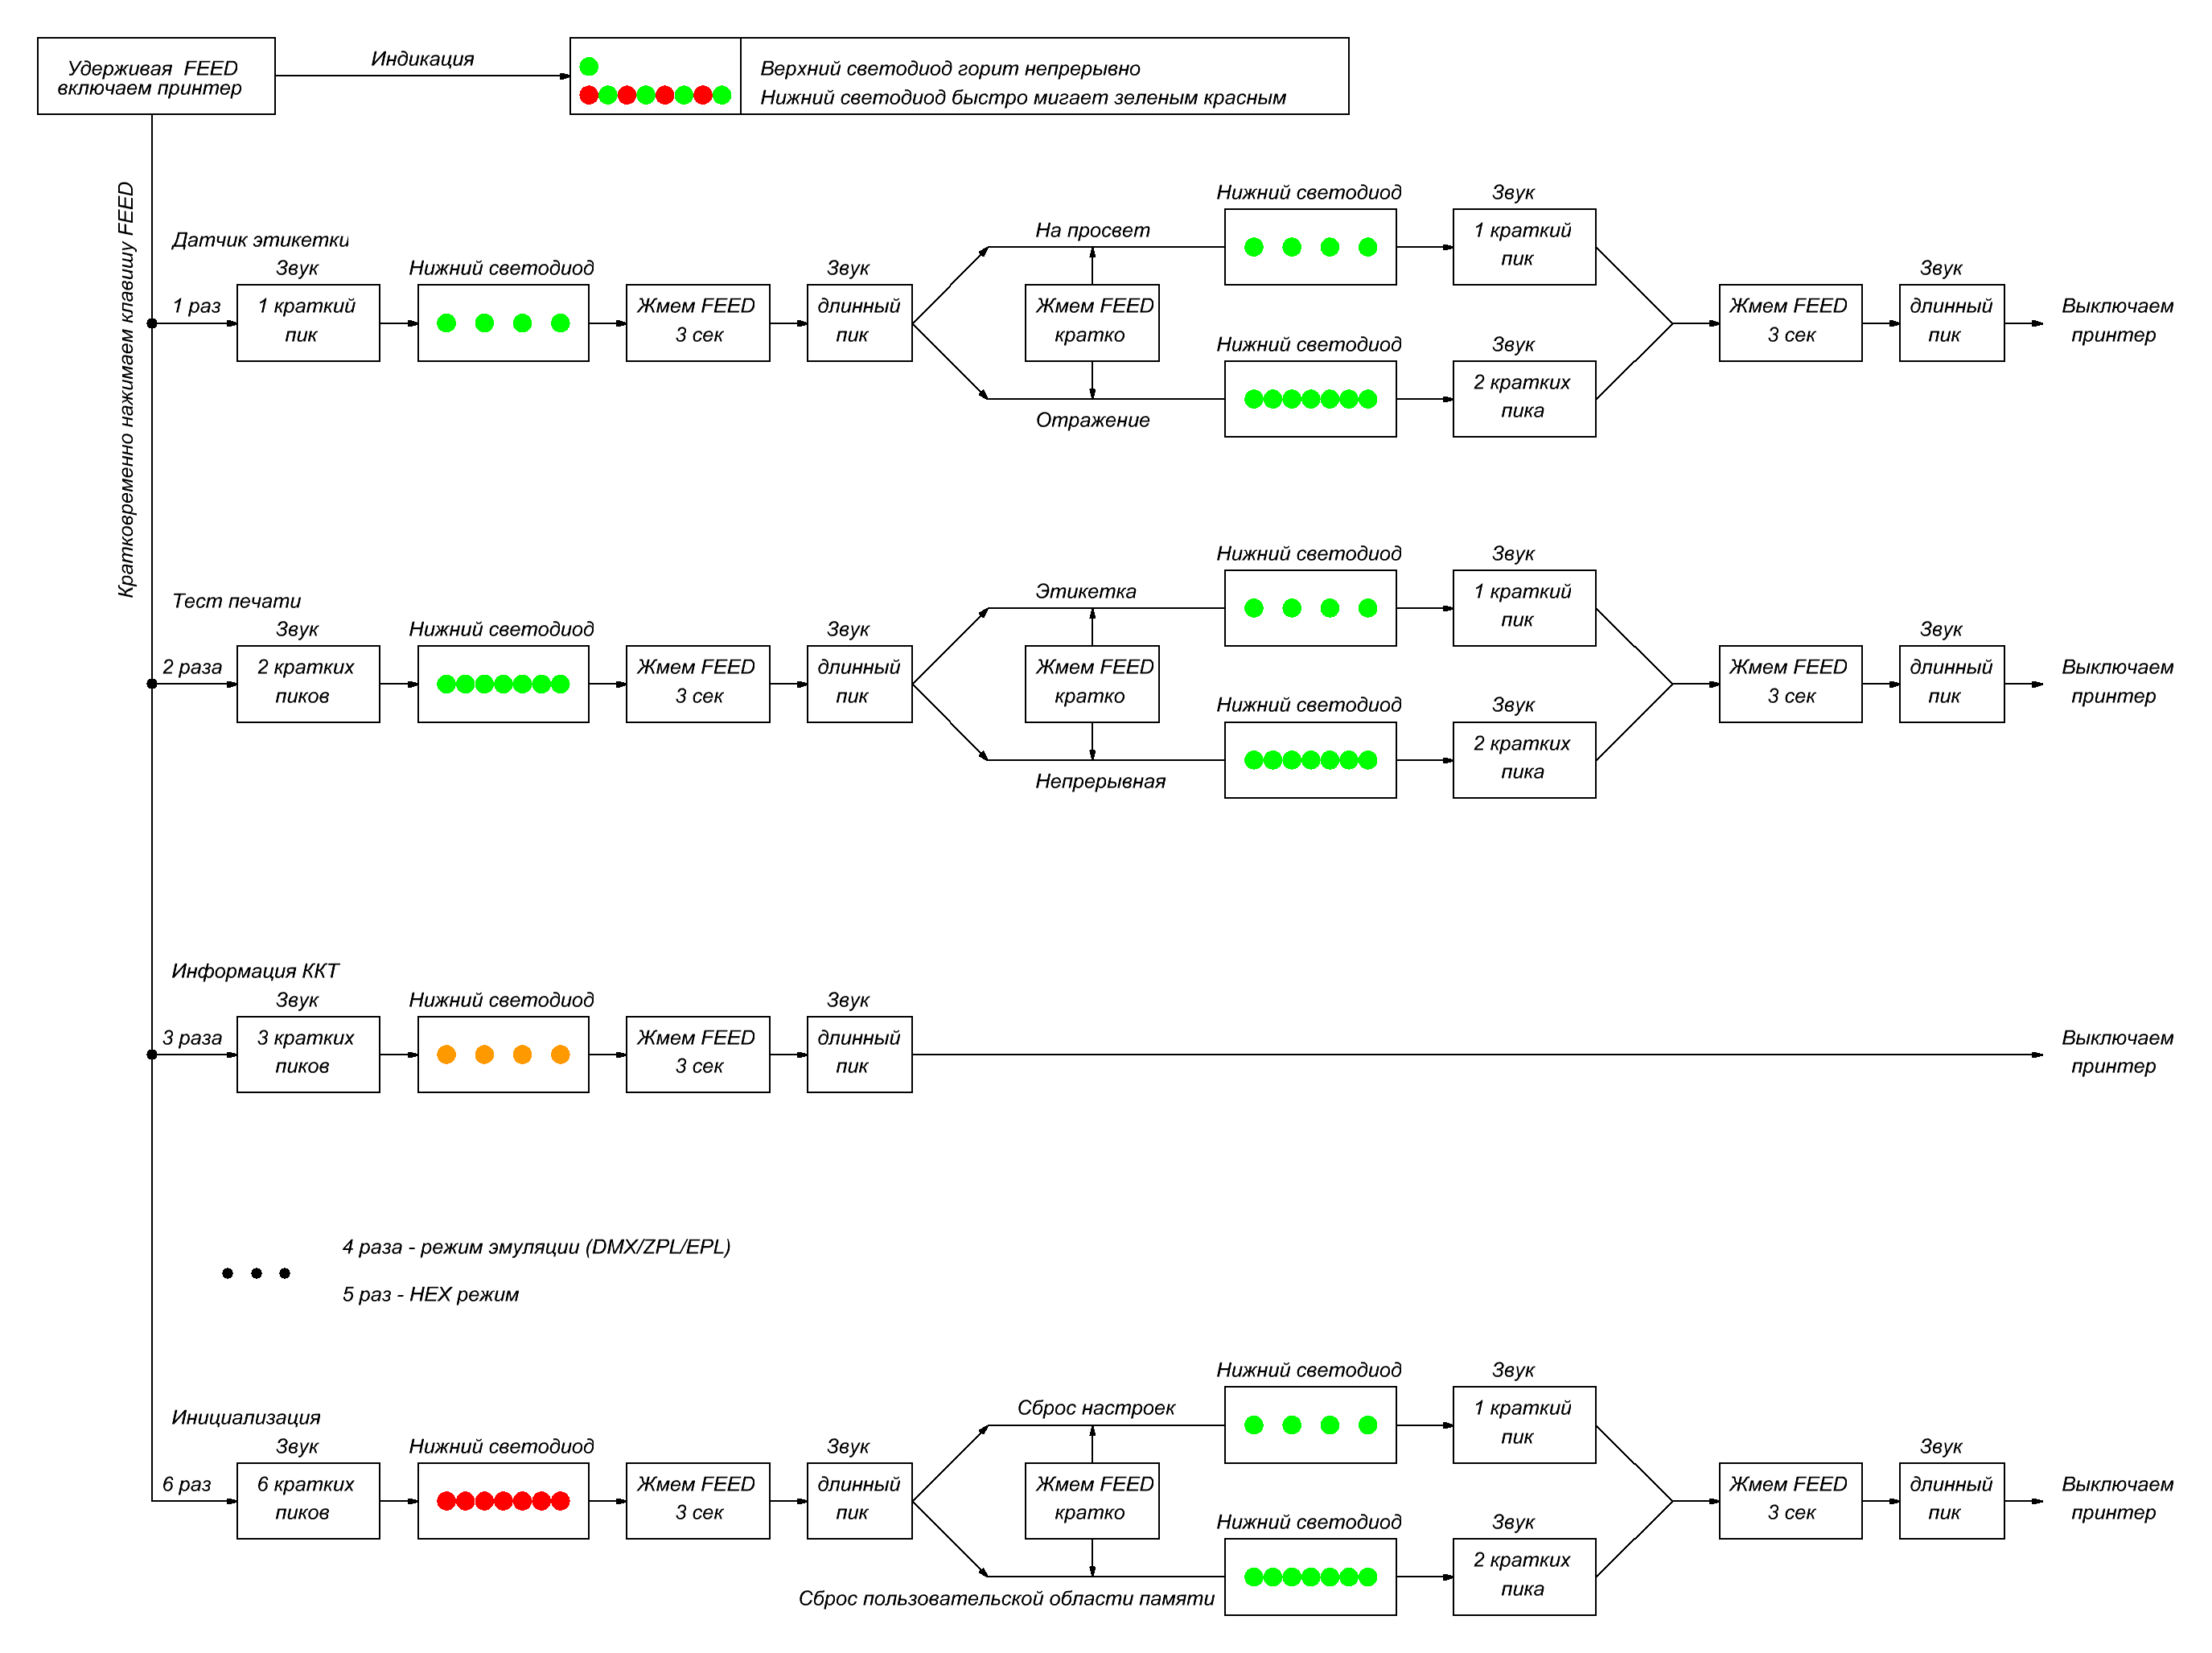
Ремонт. Как такового ремонта не было, была только настройка принтера по весьма мудрено-запутанной методикой настройки. Если совсем кратко — есть два меню:
основное — входим удерживая клавишу FEED при включении
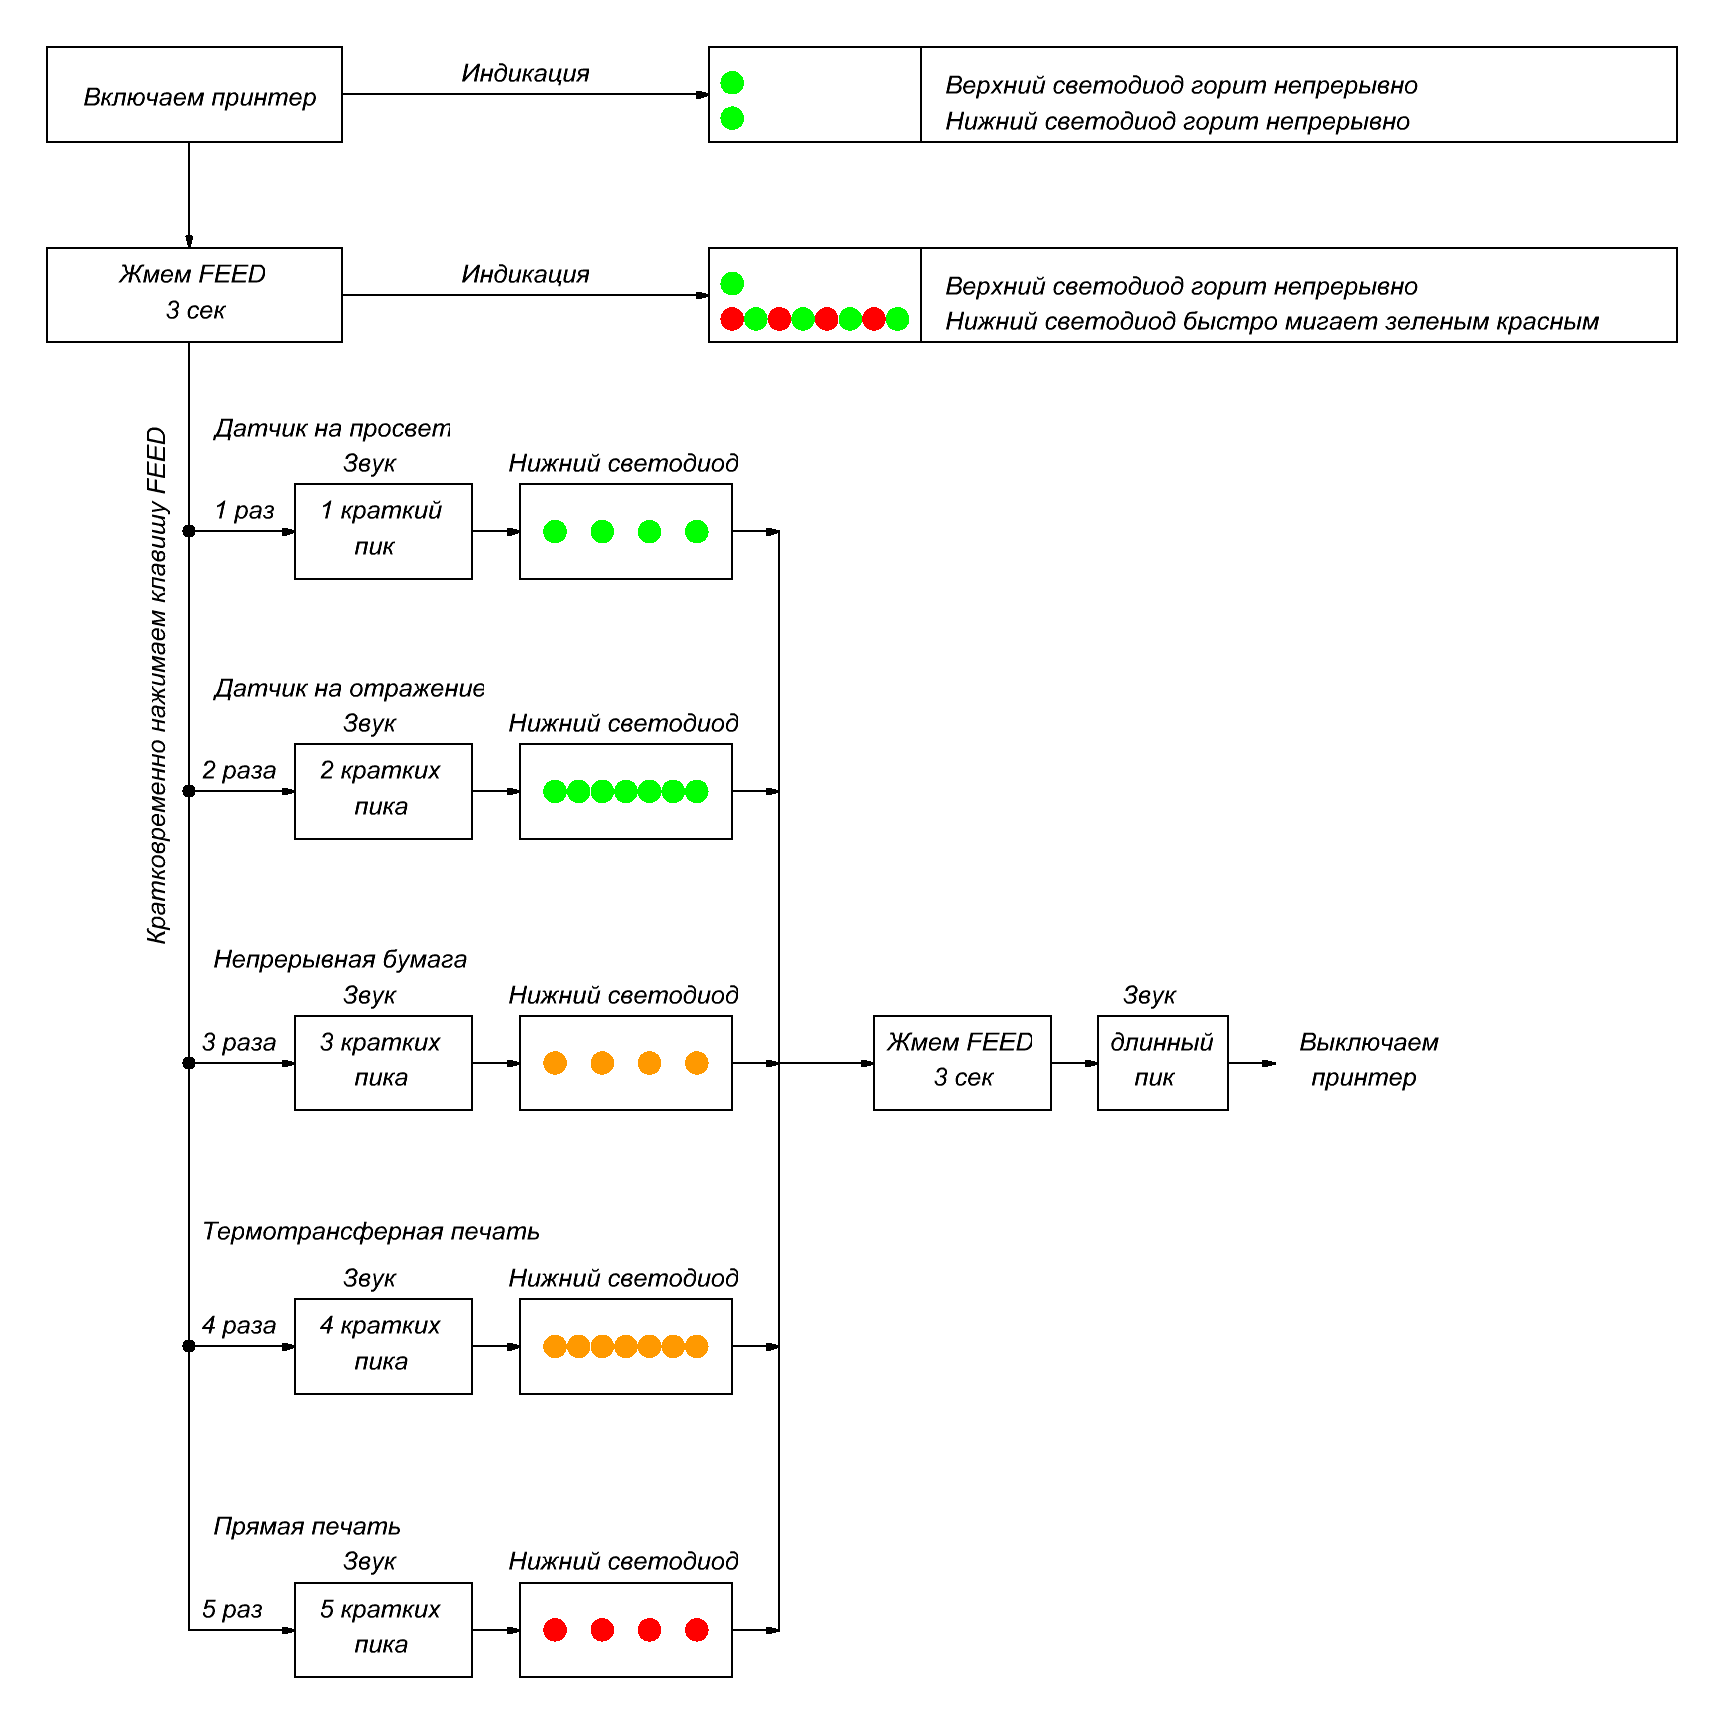
дополнительное — входим из рабочего режима, удерживая клавишу FEED 3 секунды.
Основное меню принтера этикеток CITIZEN CL-E321
Основное меню позволяет :
1 пик — настроить датчик этикетки отражение/просвет
2 пика — распечатать тестовую этикетку
3 пика — распечатать информацию о принтере
6 пиков — инициализировать принтер
Дополнительное меню принтера этикеток CITIZEN CL-E321
Дополнительное меню позволяет:
1 пик — установить датчик этикетки на просвет
2 пика — установить датчик этикетки на отражение
3 пика — установить режим непрерывного носителя
4 пика — установить термотрансферную печать
5 пиков — установить прямую печать
Собственно в основном меню делаем инициализацию настроек принтера этикеток и при необходимости в дополнительном меню выставляем прямую печать. Ремонт, точнее настройка, термопринтера Citizen CL-E321 окончена, можно отдавать заказчику.
Источник
Chapter 4 Troubleshooting
4-1. Error Message and Corrective Actions
4-3 CL-S700/CL-S703/CL-S700R
4-1. Error Message and Corrective Actions
When an error occurs, the error condition will be displayed on the operation panel. The ERROR
LED flashes and the LCD shows the error contents.
In case of error, the printer enters off line except for the following errors.
— LCD: Alarm Head Hot
— LCD: Alarm PFMotor Hot
— LCD: Alarm Cutter Hot
Causes/Corrective Actions ERROR LED LCD
Head temperature — high temperature abnormality
• Printing stops temporarily.
Wait until the thermal head gets cool.
Flashing Alarm
Head Hot
Head temperature — low temperature abnormality
• Printing is impossible. Start printing after the
thermal head becomes warm.
Flashing Error
Head Cold
PF motor temperature abnormality
• Printing stops temporarily. Wait until the motor
gets cool.
Flashing Alarm
PFMotor Hot
Fan motor malfunction
• Remove obstacle, if any.
• Firmly connect the cable (J12 on “SA, Main
PCB”).
• Replace the “SA, Fan”.
Flashing Error
Fan Lock
Cutter motor temperature abnormality (Option)
• Cutting action stops temporarily.
Wait until the cutter motor gets cool.
Flashing Alarm
Cutter Hot
Head open
• Close the head.
Flashing Error
Head Open
Paper end
• Add media.
Flashing Error
Paper End
Paper out (paper position undetectable)
• Incorrect Adjustable Sensor positioning:
Correct the sensor position to match the sensor
position with the label/tag’s black mark.
• Incorrect Media mode menu:
Match the Media mode menu (e.g. SeeThrough)
and media to be used.
(to be continued)
Flashing Error
Paper Load
• Incorrect sensor adjustment against media to be
used:
Enter sensor adjustment mode
While pressing [MENU], [FEED] and [STOP]


